

Page 1
Suction Cup Grab Bar
Barra de Apoyo con Copas
de Succión
Barre D’appui Avec Ventouse
Item # RTL13083, RTL13085
Rev.1.04.29.16
EU Authorized Representative
Drive Medical LTD
Ainley’s Industrial Estate
Elland, West Yorkshire,
United Kingdom HX5 9JP
www.drivemedical.comwww.drivemedical.com
Page 2
grab bar installation instructions
RTL13083
Easily and securely attached without drilling.
Provides security and the convenience of mobility.
Won’t rust or corrode.
Drive Medical Suction Grab Bars are convenient, functional, and offered in a variety of sizes to fit any lifestyle.
They can be attached quickly and are just as easily
removed! The suction pads are specifically designed to
adhere to any smooth, non-porous surface without drilling! Push down on the vacuum toggle lever and the
handles will remain securely in place.
CAUTION
Grab bar is to be used as a balance assist only. Not for
supporting body weight. Always make sure the grab bar
is securely attached before each use and always reattach if loose.
Always test the holding grip on each surface each time
you apply the suction pad to prevent accidents.
RTL13085
1. Check the vacuum suction discs and the surface it
is to be attached to.
2. Clean the surface thoroughly.
3. Press the rubber discs firmly to the surface. The
tilting vacuum levers must be loose at this point
and the whole of each rubber disc must lie on
the surface.
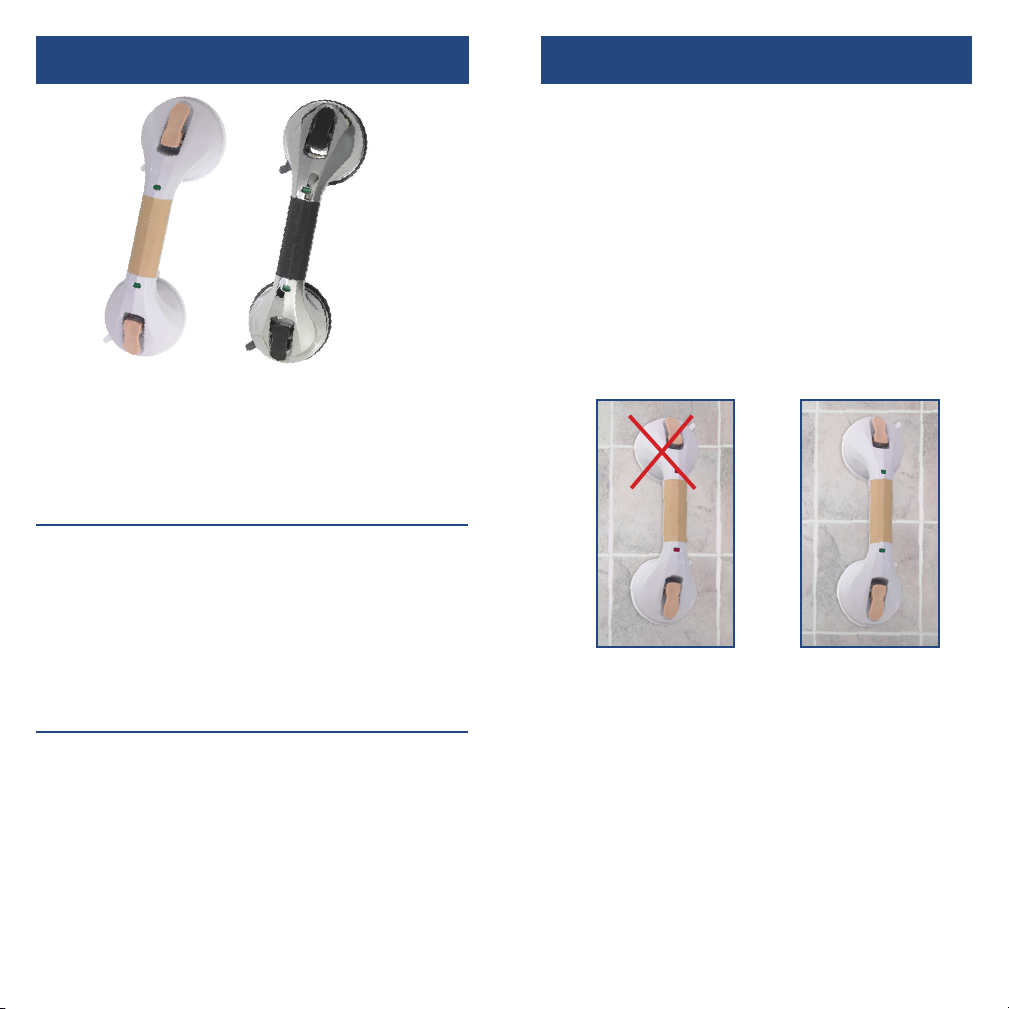
4. Ensure that the rubber discs are completely on the
tile area or other surfaces so that the discs do
not cover any grouting lines or other joints. The
discs should be positioned at least 1/2” away
from all grout lines or joints.
INCORRECT CORRECT
5. First, press down one tilting lever and then press
down the second. The resistance of the suction
pressure generated must be clearly felt. The
greater the resistance felt on the vacuum lever,
the better the suction power of the grab bar. The
indicator on the top of the suction cup will change
from RED to GREEN when a safe and secure hold
is achieved. If you use the bar regularly, then you
will get a feel for the vacuum strength and the
suction power generated.
Rev.1.04.29.16
Page 3
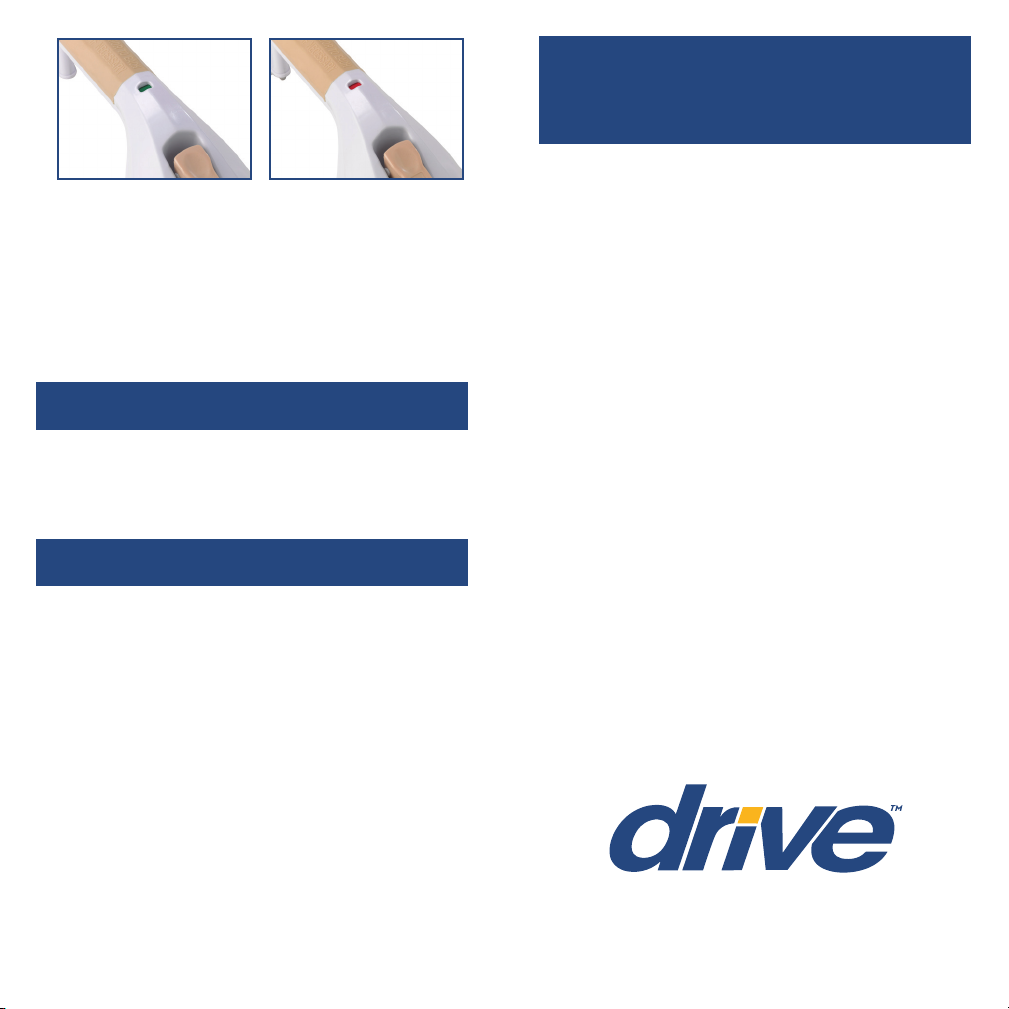
SECURE REAFFIX
6. Before each use, test the firm hold of the suction
device making sure both indicators are GREEN.
If the adhesion seems insufficient, then release
the rail and reattach again. If the required suction
power has not been achieved, the rail should not
be used.
removal instructions
lifetime limited
warranty
Your Drive branded product is warrantied to be
free of defects in materials and workmanship for
the lifetime of the product for the original consumer purchaser.
This device was built to exacting standards and
carefully inspected prior to shipment. This Lifetime
Limited Warranty is an expression of our confidence in the materials and workmanship of our
products and our assurance to the consumer of
years of dependable service.
1. Release both latches.
2. Slide fingertip under rubber seal at each end to
release suction.
maintenance
1. Always keep the rubber suction discs clear of oil
and dust.
2. Clean the rubber discs with standard household
cleaning agents.
3. Never expose the rubber discs to sunlight for
prolonged periods of time otherwise they will
quickly lose their elasticity.
4. Check the rubber discs for possible deterioration.
If the suction cups show damage, then replace
immediately.
Rev.1.04.29.16
This warranty does not cover device failure
due to owner misuse or negligence, or normal
wear and tear. The warranty does not extend to
non-durable components, such as rubber
accessories, casters, and grips, which are subject
to normal wear and need periodic replacement.
If you have a question about your Drive device or
this warranty, please contact an authorized Drive
dealer.
© 2016 Medical Depot, Inc. All rights reserved.
Drive is a trademark of Medical Depot, Inc.
Port Washington N.Y. 11050 USA Made in China
Page 4

barra de sostén
RTL13083 RTL13085
Se adhiere fácil y firmemente sin perforación.
Proporciona seguridad y la conveniencia de movilidad.
No se oxida ni corroe.
Las barras de sostén de Drive Medical son cómodas, funcionales y se ofrecen en una variedad de medidas que se
ajustan a cualquier estilo de vida. ¡Se pueden adherir y
quitar fácil y rápidamente! ¡Las ventosas están específicamente diseñadas para adherirse a cualquier superficie
lisa, no porosa, sin perforación! Empuje sobre la palanca
de vacío y las manijas permanecerán firmemente en
el lugar.
PRECAUCION
La barra de sostén sólo debe usarse como ayuda para
mantener el equilibrio, no para sostener el peso del
cuerpo. Asegúrese siempre que la barra de sostén esté
firmemente adherida antes de cada uso y reajústela
siempre que esté floja.
Para prevenir accidentes, controle siempre la empuñadura de sostén en cada superficie cada vez que usted
aplica la ventosa.
Rev.1.04.29.16
instrucciones de
instalación
1. Controle los discos de succión para producir
vacío y la superficie a la cual serán adheridos.
2. Limpie la superficie minuciosamente.
3. Presione los discos de goma firmemente a la
superficie. Las palancas basculantes para producir
vacío deben estar flojas en este momento y cada
disco de goma debe apoyarse completamente
sobre la superficie.
4. Asegúrese de que los discos de goma estén
completamente apoyados sobre el área del azulejo
u otra superficie de tal forma que los discos no
cubran ninguna línea de lechada u otras uniones.
Los discos deben colocarse a por lo menos ½ pul
gada de todas las uniones.
CORRECT0INCORRECTO
5. Primero presione hacia abajo una palanca basculante y luego la segunda. Debe sentirse claramente la resistencia de la presión negativa
generada. Cuanto mayor es la resistencia sentida
en la palanca para generar vacío, mejor es el poder
de succión de la barra de sostén. El indicador a
la parte superior de la copa de succión cambiará
de ROJO a VERDE cuando se logre una sujeción
segura. Si usa la barra con regularidad tendrá la
sensación de la fuerza y el poder de succión generados.
Page 5

ASEGURAR REAFFIX
6. Antes de cada uso, compruebe la firme sujeción del
dispositivo de succión asegurándose que ambos
indicadores estén en VERDE. Si la adhesión
parece ser insuficiente, afloje el riel y vuelva a
asegurarlo. Si el poder de succión requerido no ha
sido logrado, no se debe usar el riel.
instrucciones para
quitarla
1. Libere ambas trabas
2. Deslice la punta del dedo bajo la banda de
goma en cada extremo para liberar la succión
mantenimiento
1. Mantenga siempre los discos de goma libres
de aceite y polvo.
2. Limpie los discos de goma con productos de
limpieza para el hogar comunes.
3. Nunca exponga los discos de goma a la luz
solar por períodos prolongados de tiempo ya
que perderían rápidamente su elasticidad.
4. Revise los discos de goma por posibles deterioros.
garantía limitada
de por vida
Su producto marca Drive está garantizado de por
vida del producto por el comprador-consumidor
original de no tener defectos en los materiales y
la fabricación.
Este aparato fue construido de acuerdo a
estándares rigurosos y cuidadosamente inspeccionado previo a su envío. Esta Garantía Limitada
de por Vida es una expresión de nuestra confianza
en los materiales y la fabricación de nuestros productos y nuestra seguridad para el consumidor
dada por años de servicios confiables.
Esta garantía no cubre fallas del aparato debidas
a mal uso o negligencia por parte del propietario
o por el uso y desgaste normales. Esta garantía no
se extiende a los componentes no durables, tales
como los accesorios de goma, rueditas y mangos
que están sujetos a desgaste normal y necesitan
reemplazo periódico.
Si usted tiene preguntas acerca de su aparato
Drive o esta garantía, por favor contacte a un
representante autorizado de Drive.
Rev.1.04.29.16
© 2016 Medical Depot, Inc. Todos los derechos reservados.
Drive es marca registrada de medical depot, Inc.
Port Washington NY 11050 USA Hecho en China
Page 6

barre d’appui
RTL13083 RTL13085
S’attachent aisément sans besoin de forer.
Assurent la sécurité et la mobilité.
Ne rouillent pas ni ne se corrodent.
Les barres d’appui à ventouse Drive sont pratiques,
fonctionnelles et sont disponibles dans une variété
de tailles pour satisfaire à tous les styles de vie. Elles
s’attachent rapidement et peuvent s’enlever tout aussi
rapidement! Les ventouses sont spécifiquement conçues
pour adhérer à toutes les surfaces lisses et non poreuses,
sans l’aide d’une foreuse ! Appuyez sur le levier de succion
et les poignées demeureront fermement en place.
AVERTISSEMENT
La barre d’appui ne doit servir que pour aider à maintenir l’équilibre. Elle ne doit jamais servir à soulever le
poids du corps. Avant chaque utilisation, assurez-vous
toujours que la barre d’appui adhère fermement et
rattachez-la si elle est desserrée.
Pour éviter les accidents, toujours tester la succion des
ventouses sur chaque surface avant utilisation.
instructions de
montage
1. Vérifiez les ventouses de succion et la surface où la
barre d’appui sera posée.
2. Nettoyez soigneusement la surface.
3. Appuyez les ventouses en caoutchouc sur la
surface. Les leviers de succion inclinables doivent
être relâchés et chaque ventouse doit reposer
complètement sur la surface.
4. Assurez-vous que les ventouses en caoutchouc
sont bien sur le carrelage ou autre surface afin que
les ventouses ne soient pas sur les jointoiements
des carreaux ou d’autres joints. Les ventouses
doivent être au moins à 1/2 po de tout joint.
CORRIGERINEXACT
5. Appuyez sur le premier levier inclinable, puis sur
le second. Vous devez clairement sentir la pression
négative que vous dégagez en appuyant sur le
levier. Plus la résistance du levier est grande, plus
la force de la ventouse est importante. Le témoin
sur le dessus de la ventouse passera du ROUGE
au VERT lorsque l’adhérence est adéquate. Si vous
utilisez la barre régulièrement, vous vous
habituerez à la force de la ventouse et à sa
puissance d’aspiration.
Rev.1.04.29.16
Page 7

FIXER RÉAPPOSER
6. Avant chaque utilisation, vérifiez que les deux
témoins sont VERTS, indiquant une adhérence
adéquate. Si la ventouse semble relâchée, enlevez
la barre et replacez-la. Si la force d’aspiration de la
ventouse fait défaut, n’utilisez pas la barre.
instructions pour
enlever la barre
1. Relâchez les deux loquets
2. Glissez votre doigt sous la ventouse pour la décoller.
maintenance
1. Gardez toujours les disques en caoutchouc des
ventouses propres et sans résidu graisseux ou
poussière.
2. Nettoyez les disques en caoutchouc des ventouses
avec un produit de nettoyage domestique ordinaire.
3. Ne jamais exposer les disques en caoutchouc des
ventouses au soleil pour une période prolongée
sinon ils perdront de leur élasticité.
4. Vérifiez les disques en caoutchouc des ventouses
pour toute détérioration possible.
garantie à vie,
limitée
Ce produit Drive est garanti exempt de tout défaut
de matériau, de fabrication ou de main d’oeuvrepour
la vie du product pour l’acheteur de consommateur
original.
Cet appareil a été fabriqué selon des normes
de qualité rigoureuses et inspecté avant de qui
ter l’usine. Cette garantie à vie limitée, est un
témoignage de la confiance que nous portons
aux matériaux, à la main d’oeuvre, ainsi qu’ aux
procédés de fabrication requis pour produire
nos appareils afin qu’ils puissent vous assister de manière fiable et sécuritaire pendant de
nombreuses années.
Cette garantie ne peut être invoquée dans les cas
d’usage inapproprié de l’appareil, en cas de négligence ou d’usure normale. Cette garantie ne couvre
pas les pièces qui, de par leur nature, ont une durée
de vie plus courte, tel que les embouts de caoutchouc,
poignées de mousse, roues et pneus, qui doivent être
périodiquement remplacés.
Pour toute question sur cet appareil ou sur sa garantie, veuillez svp, contacter votre détaillant autorisé
de produits Drive.
Rev.1.04.29.16
© 2016 Medical Depot, Inc. Tous droits réservés.
Drive est une marque de commerce de Medical Depot, Inc.
Port Washington, NY 11050 USA Fabriqué en Chine
Page 8

Rev.1.04.29.16
 Loading...