

Page 1

premuim series bath bench
with back and arms
banca para baño de las series premium
con respaldo y descansabrazos
siège de baignoire de la série premium
avec dossier et bras
EU Authorized Representative
Drive Medical LTD
Ainley’s Industrial Estate
Elland, West Yorkshire,
United Kingdom HX5 9JP
www.drivemedical.comwww.drivemedical.com
Page 2
Installation Instructions
NOTE Before assembly, insure that all parts and
quantities match parts list. Inspect all components
for shipping damage. If any parts are determined to
be missing or damaged, contact your dealer/retailer
for replacements.
To adjust legs for proper height or uneven surfaces,
grab the bath bench leg with one hand while
rotating the bottom of the leg (where the suction
cup attaches to the leg) clockwise. The leg has an
adjustment window that indicates the level with a
red marker. Turn to desired height and repeat for
all legs.
WARNING!
DO NOT use this equipment without first
reading and understanding its instruction
sheet. If you are unable to understand these
instructions, contact a healthcare professional, dealer,
or technical person before installing. Otherwise,
injury or damage may occur. Use arms for assistance
only.
PARTSLIST
1. Seat – 1 each
2. Leg – 4 each
3. Arms – 2 each
4. Back – 1 each
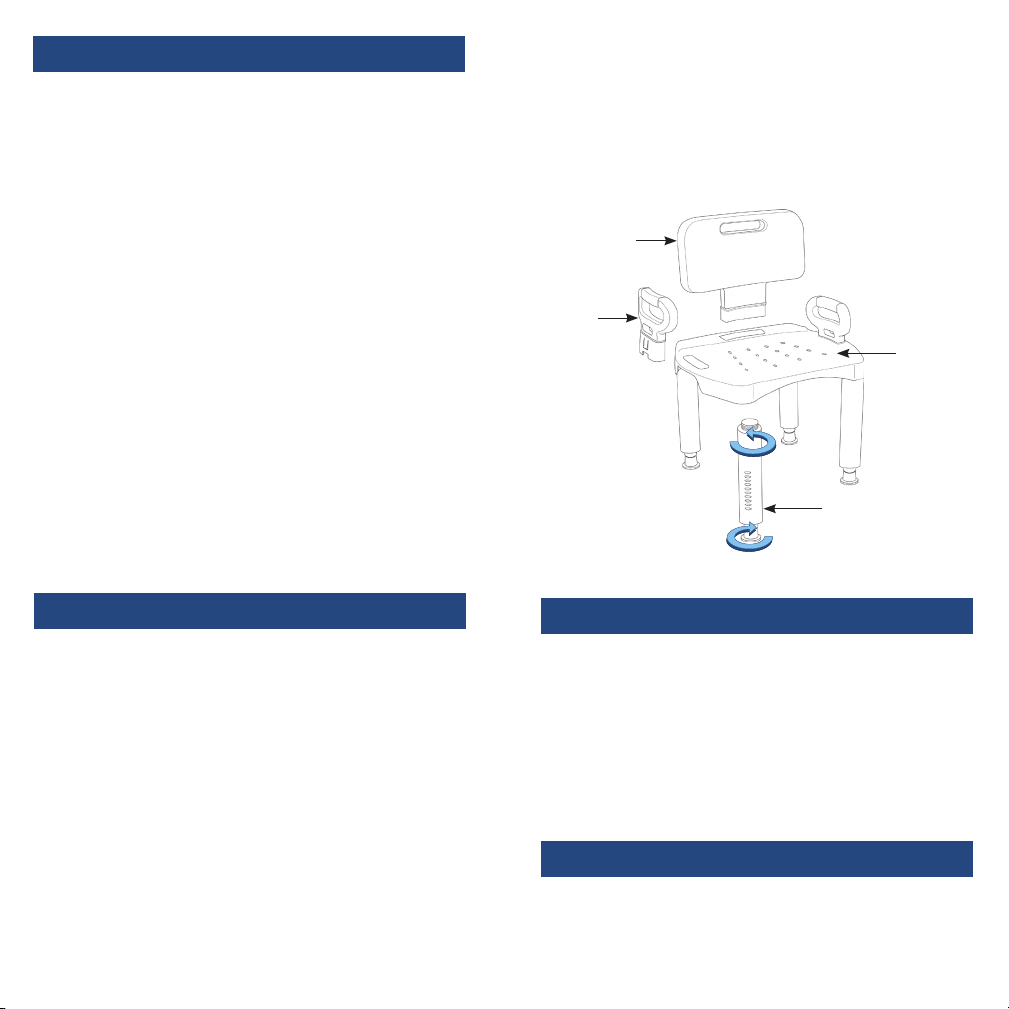
assembly instructions
1. Place seat (1) upside down on a flat surface.
Insert leg (2) into the corner recess of the seat
and rotate counter-clockwise until tight. Repeat
step #1 for all 4 legs.
2. For model with arms (3) place chair upright and
insert arms into holes in side of seat until arm is
fully engaged.
3. For models with a back (4) place back in the slot,
which is in the rear of the seat, and insert back
until engaged.
4
3
1
Turn counter-clockwise
to install leg
Turn rubber tip clockwise
while holding leg tightly
to adjust leg height
2
disassembly instructions
1. The back has a lock tab that, when depressed,
will allow the back to be pulled out of their
slots freely.
2. To remove arms, pinch together the tabs on
the arm which, when assembled, will be under
the seat.
3. Turn the legs clockwise until removed from
bench.
care and maintenace
1. Do not use an abrasive cleaner. Use a non abrasive cleaner with warm water.
2. Periodically inspect all components for damage
or looseness.
Page 3

instrucciones para instalacion
NOTA Antes del armado, asegúrese que
todas las partes y su cantidad concuerden
con la lista de partes.Inspeccione todos los
componentes para descartar daños de envío. Si se
comprueba que alguna parte esta perdida o dañada,
comuníquese con su vendedor/distribuidor para que
sea reemplazada.
ADVERTENCIA!
NO USE este equipamiento sin primero leer y
entender su hoja de instrucciones. Si no puede
entender estas instrucciones, comuníquese con un
profesional de cuidado de salud, distribuidor o
técnico antes de instalarlo. De otra manera, pueden
ocurrir lesiones o daños. Use brazos sólo para
asistencia.
Para ajustar las patas a la altura adecuada o sobre
superficies disparejas, sujete la pata de la banca
para baño con una mano al mismo tiempo que gira
la parte de abajo de la pata (en el lugar en donde se
une la copa de succión a la pata) hacia la derecha.
La pata cuenta con una ventana de ajuste que indica
el nivel con un indicador rojo. Gírela hasta la altura
deseada y repita el mismo procedimiento para las
otras patas.
4
3
1
LISTADEPARTES
1. Asiento – 1 unidad
2. Patas - 4 unidades
3. Brazos - 2 unidades
4. Respaldar – 1 unidad
instrucciones de armado
1. Coloque el asiento (1) hacia arriba sobre una
superficie plana. Introduzca la pata (2) dentro
del hueco de la esquina del asiento y gírela hacia
la izquierda hasta que esté apretada. Repita el
paso #1 para las 4 patas.
2. Para los modelos con brazos (3), coloque pare
la silla e inserte los brazos en los orificios a los
costados del asiento hasta que el brazo esté
completamente trabado.
3. Para los modelos con respaldar (4), coloque el
respaldo en la ranura que está en la parte
posterior del asiento e inserte el respaldo hasta
que esté ompletamente trabado.
Gire hacia la izquierda para
instalar la pata
Gire la punta de hule hacia la derecha
al mismo tiempo que sujeta la pata
firmemente para ajustar su altura.
2
instrucciones para el
desarmado
1. El respaldar tiene una lengüeta para trabar que,
cuando está baja, permitirá que el respaldar sea
quitado de su ranura libremente.
2. Para quitar los brazos, apriete las lengüetas de los
brazos juntas, las cuales al armarlo, estarán
debajo del asiento.
3. Gire las patas hacia la derecha hasta que las
retire de la banca.
cuidado y mantenimiento
1. No use limpiador abrasivo. Use un limpiador no
abrasivo con agua tibia.
2. Periódicamente revise todos los componentes
para verificar que no estén dañados o flojos.
Page 4

directives d’installation
NOTE Avant de procéder à l’assemblage, s’assurer
que toutes les pièces et les quantités requises sont
conformes à la liste de pièces. Inspecter chacune des
composantes et s’assurer qu’elles n’ont pas été
endommagées pendant le transport. Si des pièces
sont manquantes ou endommagées, contacter
votre détaillant autorisé Drive pour obtenir un
remplacement.
ATTENTION!
Ne pas utiliser cet appareil avant d’avoir lu et
compris les directives d’installation. Si vous ne
pouvez comprendre ces directives, adressez-vous à
votre détaillant, à un(e) spécialiste en équipement
médical ou un (e) professionnel de la santé avant de
procéder à l’assemblage. Le non-respect de cette
consigne peut entrainer des blessures ou un bris de
l’appareil. N’utiliser celles-ci uniquement que pour
assister lors
l’utilisation.
LISTEDESPIÈCES
1. Siège- 1 un.
2. Pattes- 4 un.
3. Poignées- 2 un.
4. Dossier- 1 un.
directives d’assemblage
1. Placez le siège (1) à l’envers sur une surface
plane. Insérez un pied (2) dans l’encoche du siège
et tournez dans le sens antihoraire jusqu’à ce qu’il
soit solidement vissé.
2. Pour les modèles munis de poignées ( 3 ),
retourner le banc sur ses pattes et insérer la
bases de la poignée dans les encavures rondes
en poussant fermement jusqu’à ce qu’elles soient
entièrement enfoncées.
3. Pour les modèles munis d’un dossier ( 4 ), insérer
le dossier dans l’encavure rectangulaire vers
l’arrière du banc en poussant fermement jusqu’à
ce qu’il soit entièrement enfoncé.
Pour ajuster les pieds à la hauteur appropriée
ou pour une surface inégale, tenez un pied du
siège d’une main et tournez le bout du pied (où la
ventouse est fixée au pied) dans le sens horaire. La
plage d’ajustement du pied est indiquée par un trait
rouge. Tournez jusqu’à la hauteur désirée et répétez
l’opération sur les quatre pieds.
4
3
1
Tournez dans le sens antihoraire
pour installer le pied
Tournez la ventouse dans le sens
horaire en maintenant fermement le
pied pour ajuster la hauteur.
2
directives de démontage
1. Le dossier est muni d’un cran de vérouillage qui,
lorsqu’il est pressé, permet de retirer le dossier
sans efforts.
2. Les poignées s’enlèvent en appuyant sur les crans
de verrouillage situés sous le siège.
3. Tournez le pied dans le sens horaire pour le
retirer du siège.
entretien
1. Ne pas utiliser de nettoyant abrasif. Utiliser un
nettoyant non-abrasif et de l’eau tiède.
2. Inspecter régulièrement afin de déceler bris et
desserrement.
Page 5

lifetime limited
garantía limitada
warranty
Your Drive brand product is warranted to be free
of defects in materials and workmanship for the
lifetime of the original consumer purchaser.
This device was built to exacting standards
and carefully inspected prior to shipment. This
Lifetime Limited Warranty is an expression of our
confidence in the materials and workmanship of
our products and our assurance to the consumer
of years of dependable service.
This warranty does not cover device failure due to
owner misuse or negligence, or normal wear and
tear. The warranty does not extend to non-durable
components, such as rubber accessories, casters,
and grips, which are subject to normal wear and
need periodic replacement.
If you have a question about your Drive device
or this warranty, please contact an authorized
Drive dealer.
de por vida
Su producto marca Drive está garantizado de por
vida del comprador-consumidor original de no tener
defectos en los materiales y la fabricación.
Este aparato fue construido de acuerdo a estándares
rigurosos y cuidadosamente inspeccionado previo a
su envío. Esta Garantía Limitada de por Vida es una
expresión de nuestra confianza en los materiales
y la fabricación de nuestros productos y nuestra
seguridad para el consumidor dada por años de
servicios confiables.
Esta garantía no cubre fallas del aparato debidas
a mal uso o negligencia por parte del propietario o
por el uso y desgaste normales. Esta garantía no se
extiende a los componentes no durables, tales como
los accesorios de goma, rueditas y mangos que están
sujetos a desgaste normal y necesitan reemplazo
periódico.
Si usted tiene preguntas acerca de su aparato
Drive o esta garantía, por favor contacte a un
representante autorizado de Drive.
© 2006 Medical Depot, Inc. All rights reserved.
Drive is a trademark of Medical Depot, Inc.
Port Washington N.Y. 11050 USA Made in USA
© 2005 Medical Depot, Inc. Todos los derechos reservados.
Drive es marca registrada de medical depot, Inc.
Port Washington NY 11050 USA Hecho en USA
Page 6

garantie à vie,
limitée
Ce produit Drive est garanti d’être exempt de tout
défaut de matériau, de fabrication ou de main
d’oeuvre, auprès du propriétaire original et ce, pour
la durée de la vie de celui-ci.
Cet appareil a été fabriqué selon des normes
de qualité rigoureuses et inspecté avant de
qui ter l’usine. Cette garantie à vie limitée, est
un témoignage de la confiance que nous portons
aux matériaux, à la main d’oeuvre, ainsi qu’ aux
procédés de fabrication requis pour produire
nos appareils afin qu’ils puissent vous assister
de manière fiable et sécuritaire pendant de
nombreuses années.
Cette garantie ne peut être invoquée dans les
cas d’usage inapproprié de l’appareil, en cas de
négligence ou d’usure normale. Cette garantie ne
couvre pas les pièces qui, de par leur nature, ont
une durée de vie plus courte, tel que les embouts de
caoutchouc, poignées de mousse, roues et pneus, qui
doivent être périodiquement remplacés.
Pour toute question sur cet appareil ou sur sa garantie,
veuillez svp, contacter votre détaillant autorisé de
produits Drive.
© 2005 Medical Depot, Inc. Tous droits réservés.
Drive est une marque de commerce de Medical Depot, Inc.
Port Washington, NY 11050 USA Fabriqué en USA
www.drivemedical.com
 Loading...