

Page 1

travel walker
with 5” wheels and glides
andador de viaje
con ruedas de 5” y deslizador
voyagez le promeneur
avec 5" roues et plane
www.drivemedical.com
EU Authorized Representative
Drive Medical LTD
Ainley’s Industrial Estate
Elland, West Yorkshire,
United Kingdom HX5 9JP
www.drivemedical.com
Page 2
walker instructions
custom walker adjustments
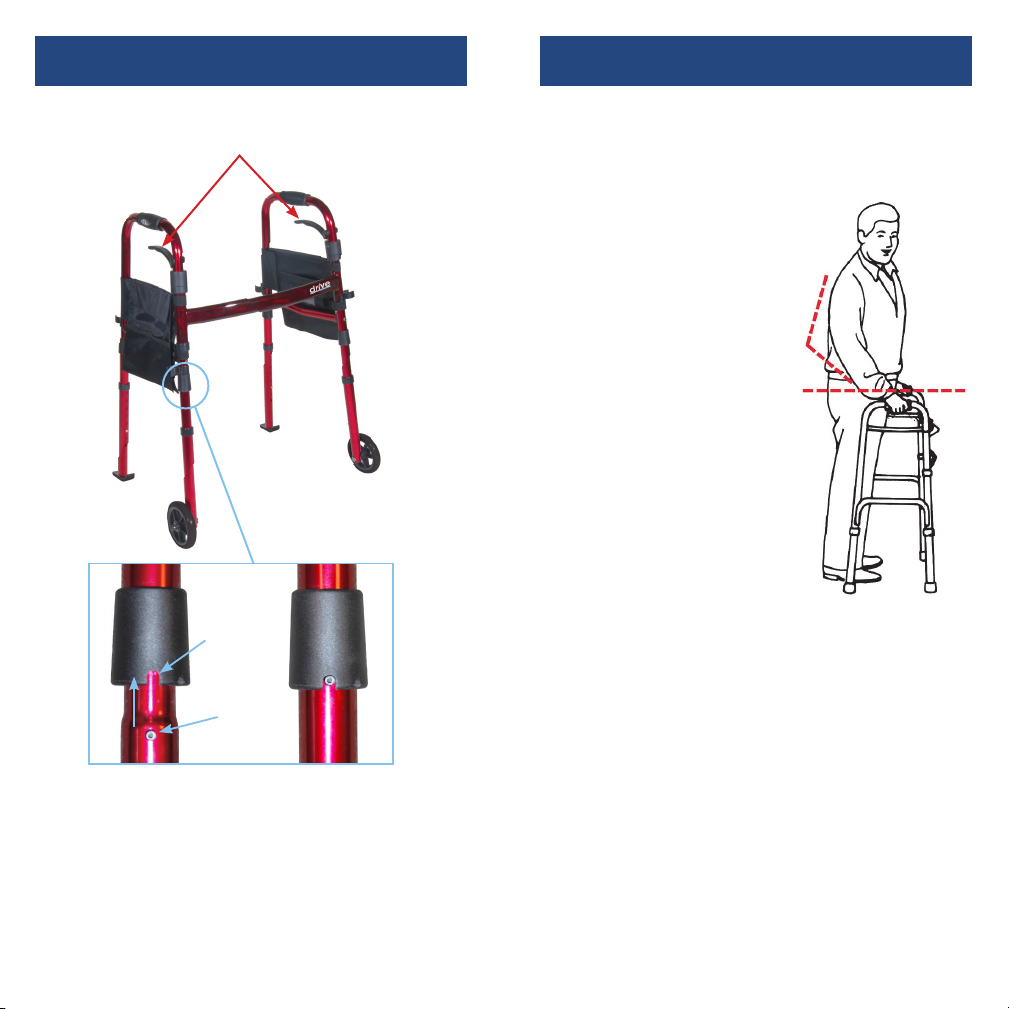
Easy “pull up” trigger release
for opening and closing
LOCK
COLLAR
LEG
PIN
IMPORTANTSAFETYNOTICE
Your walker features flip up legs that can be
attached to the frame of the walker for easy
storage. Be sure that when the legs are turned
down for use as a walker, the leg pin is inserted
into the lock collar as shown above.
With your arm extended down,
handle should be at wrist height.
With your hand placed on
the hand-grip, your elbow
should be flexed 20˚- 30˚.
CAUTION:
Be aware of the following:
- Electrical cords in way
- Liquids on floor
- Throw rugs
- Toys or debris
- Furniture
- Doors and door steps
- Gaps in floor
WARNING
1. Use wheels on front legs only or on all four
legs with appropriate rear wheel brakes.
2. Do not push one side of the walker ahead and
then other side without lifting the walker first.
3. Use Drive accessories only. Use of other
manufacturers’ accessories can result in
improper fit and risk fall and/or injury.
4. Do not use on stairs or escalators.
Page 3
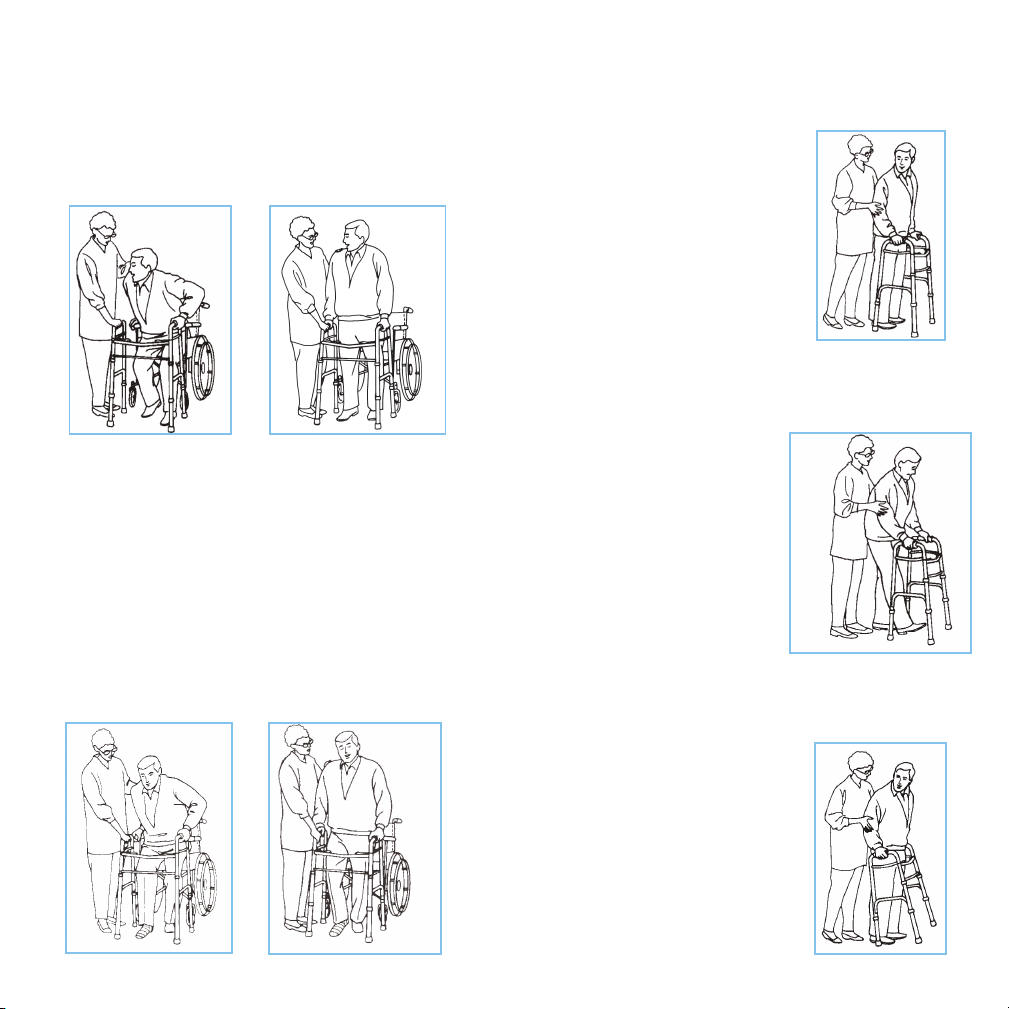
wheelchair to walker transfer
Making certain wheels on the wheelchair are
locked li your body by pushing down on the
armrests and carefully transfer one hand at time
to the walker.
three-point gait
(for walking with walker)
Step 1
Align the middle of your
foot with the back legs
of the walker.
Step 2
wheelchair to walker transfer
(with lower extremity injury to right leg or foot)
Making certain wheels on the wheelchair are
locked, li your body by pushing down on the
armrests and carefully transferring first the le
hand, then the right hand to the walker. (If injury
to le leg or foot transfer the right hand first,
followed by le.)
Li the walker up and
place it comfortably in
front of you, making sure
all four legs end up on
the floor.
Step 2
Carefully, walk forward
one step at a time.
Page 4

instrucciones para el andador
Gatillo que se “levanta hacia arriba”
fácilmente para abrir o cerrar.
COLLAR DE
BLOQUEO
CLAVIJA
DE LA PATA
AVISOIMPORTANTEDESEGURIDAD
Su andador cuenta con patas plegables que
pueden fijarse a la estructura del andador para
fácil almacenamiento. Asegúrese que cuando las
patas estén hacia abajo para usar el andador, la
clavija de la pata esté asegurada dentro del collar
de bloqueo como se muestra arriba.
ajustes personalizados
del andador
Con su brazo extendido hacia abajo,
el mango debe de estar a la altura
de su puño. Con su mano colocada
sobre el mango, su codo debe
estar flexionado entre 20
a 30 grados.
PRECAUCIÓN
Tenga cuidado de lo siguiente:
- Cables eléctricos en su camino
- Líquidos sobre el piso
- Cobertores
- Juguetes o basura
- Muebles
- Puertas y escalones
- Grietas en el suelo
ADVERTENCIA
1. Utilice las ruedas en las patas del frente o
utilícelas en las cuatro patas con los frenos de
las ruedas traseras correspondientes.
2. No empuje un lado del andador hacia
adelante y luego el otro lado sin primero
levantar el andador.
3. Utilice solamente refacciones Drive. El uso de
refacciones de otros fabricantes puede
resultar en un ajuste inadecuado y en el
riesgo de caídas y/o lesiones.
4. No lo utilice sobre escaleras o escaleras
mecánicas.
Page 5

cambiándose de la silla de
ruedas al andador
Asegurándose que el candado de las ruedas de
la silla de ruedas esté activado, levante su cuerpo
al apoyarse de los descansabrazos y con cuidado
transfiera una mano a la vez hacia el andador.
marcha de tres puntos
(para caminar con el andador)
Paso 1
Alinear la parte media
de su pie con las patas
posteriores del andador.
cambiándose de la silla de
ruedas al andador
(con una lesión en la extremidad inferior
de la pierna o pie derecho)
Asegurándose que el candado de las ruedas de
la silla de ruedas esté activado, levante su cuerpo
al apoyarse de los descansabrazos y con cuidado
transfiera primero la mano izquierda y luego la
mano derecha hacia el andador. (Si la lesión está
en la pierna o pie izquierdo, transfiera primero la
mano derecha seguida de la mano izquierda).
Paso 2
Levante el andador
hacia arriba y colóquelo
cómodamente en frente
de Ud., asegurándose
que todas las patas estén
apoyadas sobre el suelo.
Paso 3
Camine cuidadosamente
hacia el frente tomando
un paso a la vez.
Page 6

instructions pour l’ambulateur
ajustement de la marchette
Détente ergonomique « à tiree »
pour l’ouverture et la fermeture.
COLLIER DE
VERROUILLAGE.
GOUPILLE
DES PIEDS
AVISDESÉCURITÉIMPORTANT
Votre ambulateur comporte des pieds repliables
qui peuvent être fixés au cadre de l’ambulateur
pour faciliter l’entreposage. Assurez-vous, avant
l’utilisation, que les goupilles sont insérées dans
les colliers de verrouillage tel qu’illustré ci-dessus.
Avec votre bras prolongé vers le bas,
la poignée devrait être à la hauteur
du poignet. Votre main étant placé
sur la poignée, votre coude devrait
être fléchi 20 degré- 30 degré.
CAUTION
- Cordes Électriques
- Liquides sur le plancher
- Tapis
- Jouets & Débris
- Meubles
- Portes & Arrêts de porte
- Lacunes dans les planchers
AUTRESPRÉCAUTIONS
1. Seulement utiliser les roues sur les pattes
avant ou sur chacune des quatre pattes avec
les freins de roues arrière appropriées.
2. Ne pas pousser en avant un côté et puis
l’autre côté sans soulever la marchette en
premier.
3. L’utilisation des accessoires d’autres fabricants
peut avoir comme conséquence un
ajustement incorrect et peut même amener à
tomber et/ou des blessures.
4. Ne jamais utiliser la marchette sur les escaliers
ou les escalateurs.
Page 7

transfert de la chaise roulante à
la marchette
S’assurer que les quatre roues sont barrées sur la
chaise roulante, soulever votre corps en poussant
vers le bas sur les appuis-bras et soigneusement
transférer une main à la fois sur la marchee.
transfert de la chaise roulante à
la marchette
(avec des blessures d’extrémité inférieures à la
jambe droite ou le pieds droit)
S’assurer que les quatre roues sont barrées sur la
chaise roulante, soulever votre corps en poussant
vers le bas sur les appuis-bras et soigneusement
transférer premièrement la main gauche, après la
main droite sur la marchee. (Si des blessures à
la jambe gauche ou le pieds gauche transférer la
main droite en premier, ensuite la main gauche.)
trois-point-démarche
(pour marcher avec la marchette)
Enligner le milieu de
votre pied avec les paes
arrières de la marchee.
Soulever la marchee et
placer confortablement
en avant de vous, et
s’assurer que les quatre
paes sont sur le
plancher.
Soigneusement marcher
d’avant un pas à la fois.
Page 8

lifetime limited
garantía limitada
warranty
Your Drive brand product is warranted to be free
of defects in materials and workmanship for the
lifetime of the original consumer purchaser.
This device was built to exacting standards and
carefully inspected prior to shipment. This Lifetime
Limited Warranty is an expression of our confidence in the materials and workmanship of our
products and our assurance to the consumer of
years of dependable service.
In the event of a defect covered by this
warranty, we will, at our option, repair or replace
the device.
This warranty does not cover device failure
due to owner misuse or negligence, or normal
wear and tear. The warranty does not extend to
non-durable components, such as rubber
accessories, casters, and grips, which are subject
to normal wear and need periodic replacement.
If you have a question about your Drive device or
this warranty, please contact an authorized Drive
dealer.
de por vida
Su producto marca Drive está garantizado de por
vida del comprador-consumidor original de no tener
defectos en los materiales y la fabricación.
Este aparato fue construido de acuerdo a estándares
rigurosos y cuidadosamente inspeccionado previo a
su envío. Esta Garantía Limitada de por Vida es una
expresión de nuestra confianza en los materiales y la
fabricación de nuestros productos y nuestra seguridad para el consumidor dada por años de servicios
confiables.
En el caso de un defecto cubierto por esta garantía,
repararemos o reemplazaremos el aparato, de acuerdo a nuestra opinión.
Esta garantía no cubre fallas del aparato debidas
a mal uso o negligencia por parte del propietario o
por el uso y desgaste normales. Esta garantía no se
extiende a los componentes no durables, tales como
los accesorios de goma, rueditas y mangos que están
sujetos a desgaste normal y necesitan reemplazo
periódico.
Si usted tiene preguntas acerca de su aparato
Drive o esta garantía, por favor contacte a un
representante autorizado de Drive.
© 2006 Medical Depot, Inc. All rights reserved.
Drive is a trademark of Medical Depot, Inc.
Port Washington N.Y. 11050 USA Made in China
©2006 Medical Depot, Inc. Todos los derechos reservados.
Drive es marca registrada de medical depot, Inc.
Port Washington NY 11050 USA Hecho en China
Page 9

garantie à vie,
limitée
Ce produit Drive est garanti d’être exempt de tout
défaut de matériau, de fabrication ou de main
d’oeuvre, auprès du propriétaire original et ce, pour
la durée de la vie de celui-ci.
Cet appareil a été fabriqué selon des normes
de qualité rigoureuses et inspecté avant de
qui ter l’usine. Cette garantie à vie limitée, est
un témoignage de la confiance que nous portons
aux matériaux, à la main d’oeuvre, ainsi qu’ aux
procédés de fabrication requis pour produire nos appareils afin qu’ils puissent vous assister de manière fiable et sécuritaire pendant de
nombreuses années.
Dans l’éventualité où un bris devait survenir en cours
d’utilisation de l’un de nos produits, nous nous engageons, à notre discrétion, à assurer selon le cas, la
réparation ou le remplacement de l’appareil.
Cette garantie ne peut être invoquée dans les cas
d’usage inapproprié de l’appareil, en cas de négligence ou d’usure normale. Cette garantie ne couvre
pas les pièces qui, de par leur nature, ont une durée
de vie plus courte, tel que les embouts de caoutchouc,
poignées de mousse, roues et pneus, qui doivent être
périodiquement remplacés.
Pour toute question sur cet appareil ou sur sa garantie, veuillez svp, contacter votre détaillant autorisé
de produits Drive.
© 2006 Medical Depot, Inc. Tous droits réservés.
Drive est une marque de commerce de Medical Depot, Inc.
Port Washington, NY 11050 USA Fabriqué en Chine
www.drivemedical.com
Page 10

www.drivemedical.com www.drivemedical.com
 Loading...