

Page 1

rollator
andador
déambulateur
EU Authorized Representative
Drive Medical LTD
Ainley’s Industrial Estate
Elland, West Yorkshire,
United Kingdom HX5 9JP
www.drivemedical.comwww.drivemedical.com
Page 2
Do not aempt to adjust or operate Rollator without
carefully reading all instructions in this manual.
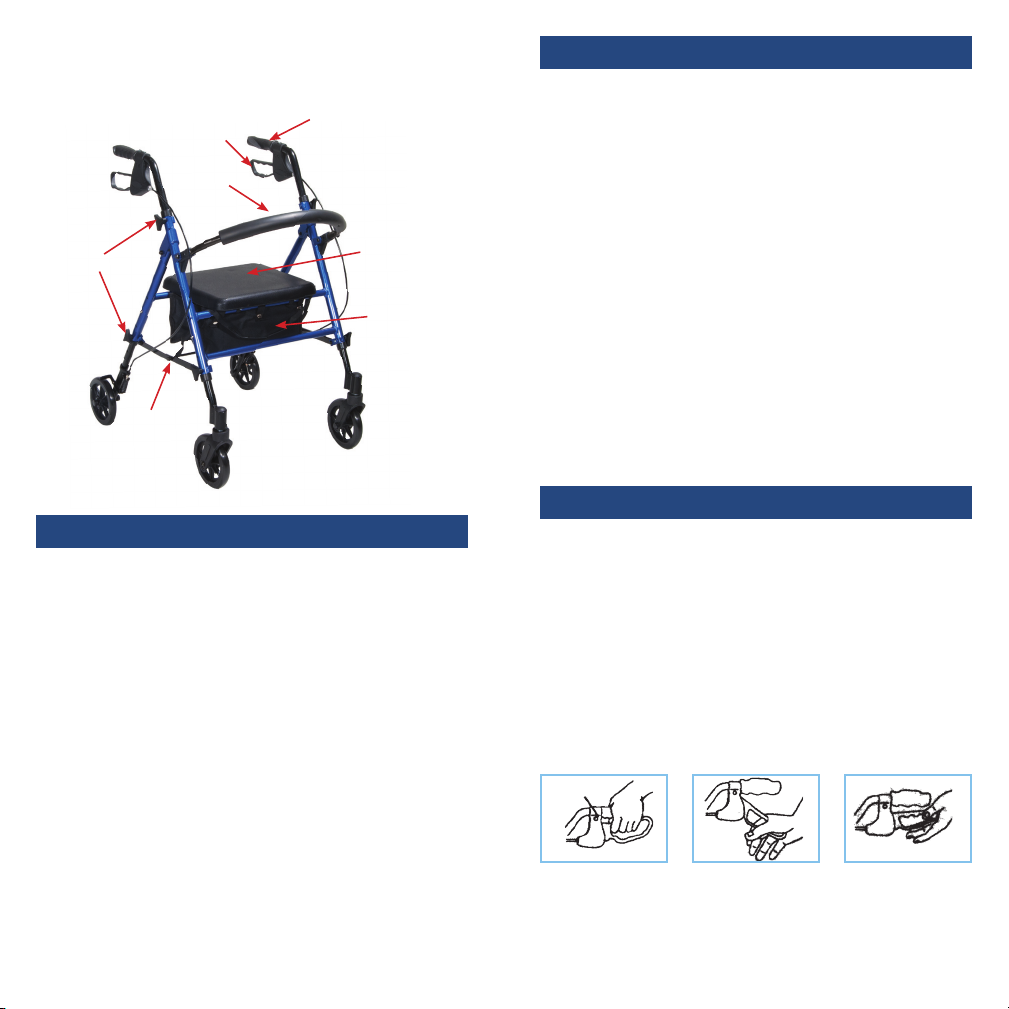
Orthodic
Hand Grips
Wide
Comfortable
Seat
Hanging Bag for
Functionality &
Storage
Height
Adjustable
Folding
Hinge for
Portability
Loop Locks
Safest System
Available
Backrest
assembly instructions
1. Remove all contents from carton.
2. Open frame and place up-side-down on the floor. Aach legs
without brakes to the front of the walker by depressing push
pin and sliding leg into the receptacle. Secure in place using
the tightening knob, threading the knob in from the outside.
Repeat for second leg, making sure both legs are set to the
same height.
3. Aach back legs (with brakes) using the same process,
making sure the wheels are on the outside of the rollator and
are at the same height as the front wheels. Affix brake cable
to the black portion of the leg using the “S” shaped clamp
provided.
4. Insert handle tube into frame and set to desired height.
Secure in placed using tightening knob, threading the knob
in from the outside. Repeat for second handle, making sure
both are set to the same height.
5. Aach padded backrest by depressing the black thumb
buons and sliding into the black bracket. Note that back
rest can be folded up when not in use.
safety precautions
1. Please make sure the Rollator is fully opened, seat is down
and the folding bar under seat is locked in the down position.
2. Be sure that both knobs are fully tightened and are at equal
heights. Test Rollator for stability before applying full weight
to hand grips.
3. Test the loop locks before operating the Rollator. When
wheels are locked (see illustrations for locking and releasing
locks below), lock bar on rear wheels should prevent wheels
from turning. If the wheels turn while brakes are locked,
please take unit back to dealer for adjustment. When locks
are released, the wheels should turn freely.
4. Always lock loop locks before siing and do not use seat
when unit is on an incline or uneven ground.
5. Replace tires when significantly worn or damaged.
6. Do not have anyone push you while you are seated on the
Rollator. This is a walking aid only and is not to be used as a
transportation device.
loop lock operation
Always engage and disengage wheel locks on both sides
simultaneously.
1. To Slow Down or Come to a Temporary Stop — Pull up slowly
on the loop locks with four fingers until unit slows down or
comes to a temporary stop.
2. To Temporarily Lock Wheels in Position — Press down on
both loop locks with palms until you hear a “click” that will
tell you wheels are locked.
3. To Release Wheel Locks — Push up on both loop locks with
palms of hand to original position.
Page 3

height adjustment
The height of the rollator can be adjusted in two ways to
accomodate many different users.
lifetime limited
warranty
handle height adjustment
1. Remove tightening knob from handle.
2. Set handle to desired height.
3. Replace tightening knob into handle, making sure to insert
knob from the outside.
4. Repeat for second handle, making sure both handles are set
to the same height seing.
leg height adjustment
1. Remove tightening knob from leg.
2. Depress push pin and slide leg to desired height.
3. Replace tightening knob into leg, making sure to insert knob
from the outside.
4. Repeat for second, third and fourth legs, making sure all are
set to the same height seing.
Your Drive brand product is warranted to be free
of defects in materials and workmanship for the
lifetime of the original consumer purchaser.
This device was built to exacting standards
and carefully inspected prior to shipment. This
Lifetime Limited Warranty is an expression of our
confidence in the materials and workmanship of
our products and our assurance to the consumer
of years of dependable service.
This warranty does not cover device failure
due to owner misuse or negligence, or normal
wear and tear. The warranty does not extend to
non-durable components, such as rubber
accessories, casters, and grips, which are subject
to normal wear and need periodic replacement.
If you have a question about your Drive device or
this warranty, please contact an authorized Drive
dealer.
© 2006 Medical Depot, Inc. All rights reserved.
Drive is a trademark of Medical Depot, Inc.
Port Washington N.Y. 11050 USA Made in China
Page 4

No intente ajustar u operar el andador rollator sin leer
cuidadosamente todas las instrucciones de este manual.
Empuñaduras
Ortopédicas
Asiento Amplio
y Comfortable
Cesta Colgante
Para Funcionalidad
y Guardado
Altura
Adjustable
Sistema de Seguridad
Con Frenos Curvos
Bisagra Plegable
Para
Transportabilidad
Disponible
Respaldo
instrucciones de armado
1. Saque todas las partes de la caja.
2. Abra el armazón y colóquelo boca abajo sobre el piso. Coloque
las patas sin frenos en la parte del frente de la andadera
caminadora al presionar las clavijas de presión y deslizar la pata
dentro del receptáculo. Asegúrela en su lugar apretando la
perilla, atornille la perilla desde la parte de afuera. Repita el
mismo procedimiento para la segunda pata asegurándose que
estén colocadas a la misma altura.
3. Coloque las patas de atrás (con frenos) usando el mismo
proceso, asegurándose que las ruedas están hacia la parte de
afuera del Rollator y que están a la misma altura que las ruedas
del frente. Sujete el cable del freno a la parte de atrás de la
pata usando la abrazadera en forma de “S” que se adjunta.
4. Introduzca el tubo del mango dentro del armazón y jelo a
la altura deseada. Asegúrela en su lugar apretando la perilla,
atornille la perilla desde la parte de afuera. Repita el mismo
procedimiento para el segundo mango asegurándose que ambos
estén colocados a la misma altura.
5. Fije el respaldo acojinado al presionar los botones negros y
deslizarlo dentro del soporte para el respaldo. Tenga en cuenta
que el respaldo se puede doblar hacia arriba cuando no lo esté
usando.
precauciones de seguridad
1. Por favor asegúrese que el andador Rollator esté completamente
abierto, que el asiento esté bajo y que la barra plegable debajo
del asiento esté trabada en posición baja.
2. Asegúrese que ambas perillas esté completamente ajustadas
y estén a igual altura. Pruebe la estabilidad del andador Rollator
antes de apoyar todo el peso en las empuñaduras.
3. Pruebe los frenos curvos antes de hacer funcionar el andador
Rollator. Cuando las ruedas están trabadas (vea abajo las
ilustraciones para bloquear o desbloquear los frenos), la barra de
freno de las ruedas traseras deberían prevenir que las ruedas
giren. Si las ruedas giran mientras se aplican los frenos, por favor
lleve la unidad de regreso a su representante para su ajuste.
Cuando los frenos son liberados, las ruedas deben girar
libremente.
4. Siempre aplique los frenos curvos antes de sentarse y no use el
asiento cuando la unidad esté en un terreno inclinado o irregular.
5. Reemplace las cubiertas cuando estén significativamente
gastadas o dañadas.
6. No permita que nadie lo empuje mientras usted está sentado
sobre el andador Rollator. Este es sólo una ayuda para caminar y
no debe ser usado como aparato de transporte.
operación del freno curvo
Siempre engrane y desengrane los frenos de las ruedas en ambos
lados simultáneamente.
1. Para Disminuir la Marcha o Hacer una Detención Temporaria —
Jale lentamente de los frenos curvos con cuatro dedos hasta que
la unidad disminuya la marcha o pare momentáneamente.
2. Para Frenar Momentáneamente las Ruedas en Posición —
Presione hacia abajo sobre ambas trabas curvas con las palmas
hasta que oiga un "click" que le indicará que las ruedas están
frenadas.
3. Para Soltar los Frenos de las Ruedas —
Empuje hacia arriba sobre ambos frenos curvos a la posición
original con las palmas de la mano.
Page 5

ajustes de altura
La altura del Rollator se puede ajustar de dos maneras para
acoplarse a los diferentes usuarios.
mango de ajuste de altura
1. Retire la perilla del mango.
2. Fije el mango a la altura deseada.
3. Vuelva a colocar la perilla dentro del mango, asegurándose
de introducir la perilla desde el exterior.
4. Repita el mismo procedimiento para el segundo mango
asegurándose que ambos mangos estén colocados a la
misma altura.
ajuste de altura de pata
1. Retire la perilla de la pata.
2. Presione la clavija a presión y deslice la pata a la altura
deseada.
3. Vuelva a colocar la perilla dentro de la pata, asegurándose
de introducir la perilla desde el exterior.
4. Repita el mismo procedimiento para la segunda, tercera
y cuarta pata asegurándose que todas estén colocadas a la
misma altura.
garantía limitada
de por vida
Su producto marca Drive está garantizado de por
vida del comprador-consumidor original de no tener
defectos en los materiales y la fabricación.
Este aparato fue construido de acuerdo a estándares
rigurosos y cuidadosamente inspeccionado previo a
su envío. Esta Garantía Limitada de por Vida es una
expresión de nuestra confianza en los materiales y la
fabricación de nuestros productos y nuestra seguridad para el consumidor dada por años de servicios
confiables.
Esta garantía no cubre fallas del aparato debidas
a mal uso o negligencia por parte del propietario o
por el uso y desgaste normales. Esta garantía no se
extiende a los componentes no durables, tales como
los accesorios de goma, rueditas y mangos que están
sujetos a desgaste normal y necesitan reemplazo
periódico.
Si usted tiene preguntas acerca de su aparato
Drive o esta garantía, por favor contacte a un
representante autorizado de Drive.
© 2006 Medical Depot, Inc. Todos los derechos reservados.
Drive es marca registrada de medical depot, Inc.
Port Washington NY 11050 USA Hecho en China
Page 6

Ne pas essayer d’ajuster ou utiliser ce déambulateur
sans avoir soigneusement pris connaissance des
instructions contenues dans ce manuel.
Poignées
Anatomiques
Siège Large et
Confortable
Panier de
Rangement
Fonctionnel
Hauteur
Ajustable
Verrouillage à Boucle
Pour un Maximum
de Sécurité Possible
Dossier
Charnière
Assurant la
Portabilité
instructions pour le montage
1. Retirez tout le contenu de la boîte.
2. Ouvrez le cadre et placez-le à l’envers sur le sol. Fixez une pae
dépourvue de frein sur le devant de l’ambulateur en enfonçant le
bouton-poussoir et en glissant la pae dans le réceptacle.
Solidifiez l’ensemble à l’aide du bouton de serrage, avec le
bouton placé à l’extérieur du cadre. Répétez l’opération avec
l’autre pae sans frein, en vous assurant que les paes sont à la
même hauteur.
3. Fixez les paes arrière (pourvues de freins) de la même manière,
en vous assurant que les roues sont à l’extérieur du cadre et à la
même hauteur que les paes d’en avant. Fixez le câble de
freinage à la portion noire de la pae à l’aide de la bride en « S »
fournie.
4. Insérez le tube de la poignée dans le cadre et ajustez-en la
hauteur. Solidifiez l’assemblage à l’aide du bouton de serrage
que vous placerez à l’extérieur du cadre. Répétez l’opération
avec la deuxième poignée, en vous assurant qu’elles sont à la
même hauteur.
5. Fixez le dossier rembourré en enfonçant les boutons-poussoirs
noirs et en le faisant glisser dans le support noir. Notez que le
dossier peut être replié lorsqu’il n’est pas utilisé.
précautions d’emploi
1. Assurez-vous que le déambulateur est complètement déplié,
le siège en position ouverte et l’entretoise pliante sous le siège
solidement verrouillée en position.
2. Assurez-vous que les deux boutons sont bien serrés et à la même
hauteur. Testez d’abord la stabilité du déambulateur avant de
mere votre poids sur les poignées.
3. Testez le verrouillage à boucle avant d’utiliser le déambulateur.
Quand les roues sont verrouillées (voir les schémas pour le
verrouillage et le déverrouillage), la tige de verrouillage sur
les roues arrières devrait empêcher qu’elles ne tournent. Si
elles tournent quand même alors que les freins sont verrouillés,
rapportez votre article à votre revendeur pour qu’elles soient
ajustées. Quand les freins sont relâchés, elles doivent tourner
librement.
4. Toujours verrouiller les freins à boucle avant de vous asseoir. Ne
jamais vous asseoir si le sol est oblique ou caillouteux.
5. Remplacer les pneus si usés ou défectueux.
6. Ne jamais vous laissez pousser par quelqu’un quand vous êtes
assis. Votre déambulateur est une aide à la mobilité et ne doit
pas servir au transport.
fonctionnement du verrouillage à boucle
Toujours verrouiller et déverrouiller les roues des deux côtés
simultanément.
1. Pour ralentir ou s’arrêter –
Relevez légèrement sur la boucle de verrouillage avec vos
quatre doigts jusqu’à ce que le déambulateur ralentisse ou
s’arrête complètement.
2. Pour verrouiller les roues temporairement –
Appuyez sur les deux boucles de verrouillage en même temps
avec la paume de la main jusqu’à ce qu’un « clic » se fasse
entendre vous indiquant que les roues sont verrouillées.
3. Pour relâcher le verrouillage –
Relevez les deux boucles de verrouillage en même temps avec la
paume de la main pour retourner en position originale.
Page 7

ajustement de la hauteur
La hauteur de l’ambulateur peut être ajustée de deux manières
pour répondre aux besoins des différents utilisateurs.
ajustement de la hauteur des poignées
1. Retirez le bouton de serrage de la poignée.
2. Placez la poignée à la hauteur désirée.
3. Replacez le bouton de serrage sur la poignée, avec le bouton
à l’extérieur du cadre.
4. Répéter cee procédure pour la seconde poignée en vous
assurant que les poignées sont à la même hauteur.
ajuste de altura de pata
1. Retirez le bouton de serrage de la pae.
2. Enfoncez le bouton-poussoir et faites glisser la pae jusqu’à
la hauteur désirée.
3. Replacez le bouton de serrage sur la pae, avec le bouton à
l’extérieur du cadre.
4. Répétez cee procédure pour la seconde, troisième et
quatrième pae, en vous assurant qu’elles sont à la même
hauteur.
garantie à vie,
limitée
Ce produit Drive est garanti d’être exempt de tout
défaut de matériau, de fabrication ou de main
d’oeuvre, auprès du propriétaire original et ce, pour
la durée de la vie de celui-ci.
Cet appareil a été fabriqué selon des normes
de qualité rigoureuses et inspecté avant de
qui ter l’usine. Cette garantie à vie limitée, est
un témoignage de la confiance que nous portons
aux matériaux, à la main d’oeuvre, ainsi qu’ aux
procédés de fabrication requis pour produire
nos appareils afin qu’ils puissent vous assister de manière fiable et sécuritaire pendant de
nombreuses années.
Cette garantie ne peut être invoquée dans les cas
d’usage inapproprié de l’appareil, en cas de négligence ou d’usure normale. Cette garantie ne couvre
pas les pièces qui, de par leur nature, ont une durée
de vie plus courte, tel que les embouts de caoutchouc,
poignées de mousse, roues et pneus, qui doivent être
périodiquement remplacés.
Pour toute question sur cet appareil ou sur sa garantie, veuillez svp, contacter votre détaillant autorisé
de produits Drive.
© 2006 Medical Depot, Inc. Tous droits réservés.
Drive est une marque de commerce de Medical Depot, Inc.
Port Washington, NY 11050 USA Fabriqué en Chine
Page 8

www.drivemedical.comwww.drivemedical.com
 Loading...