

Page 1
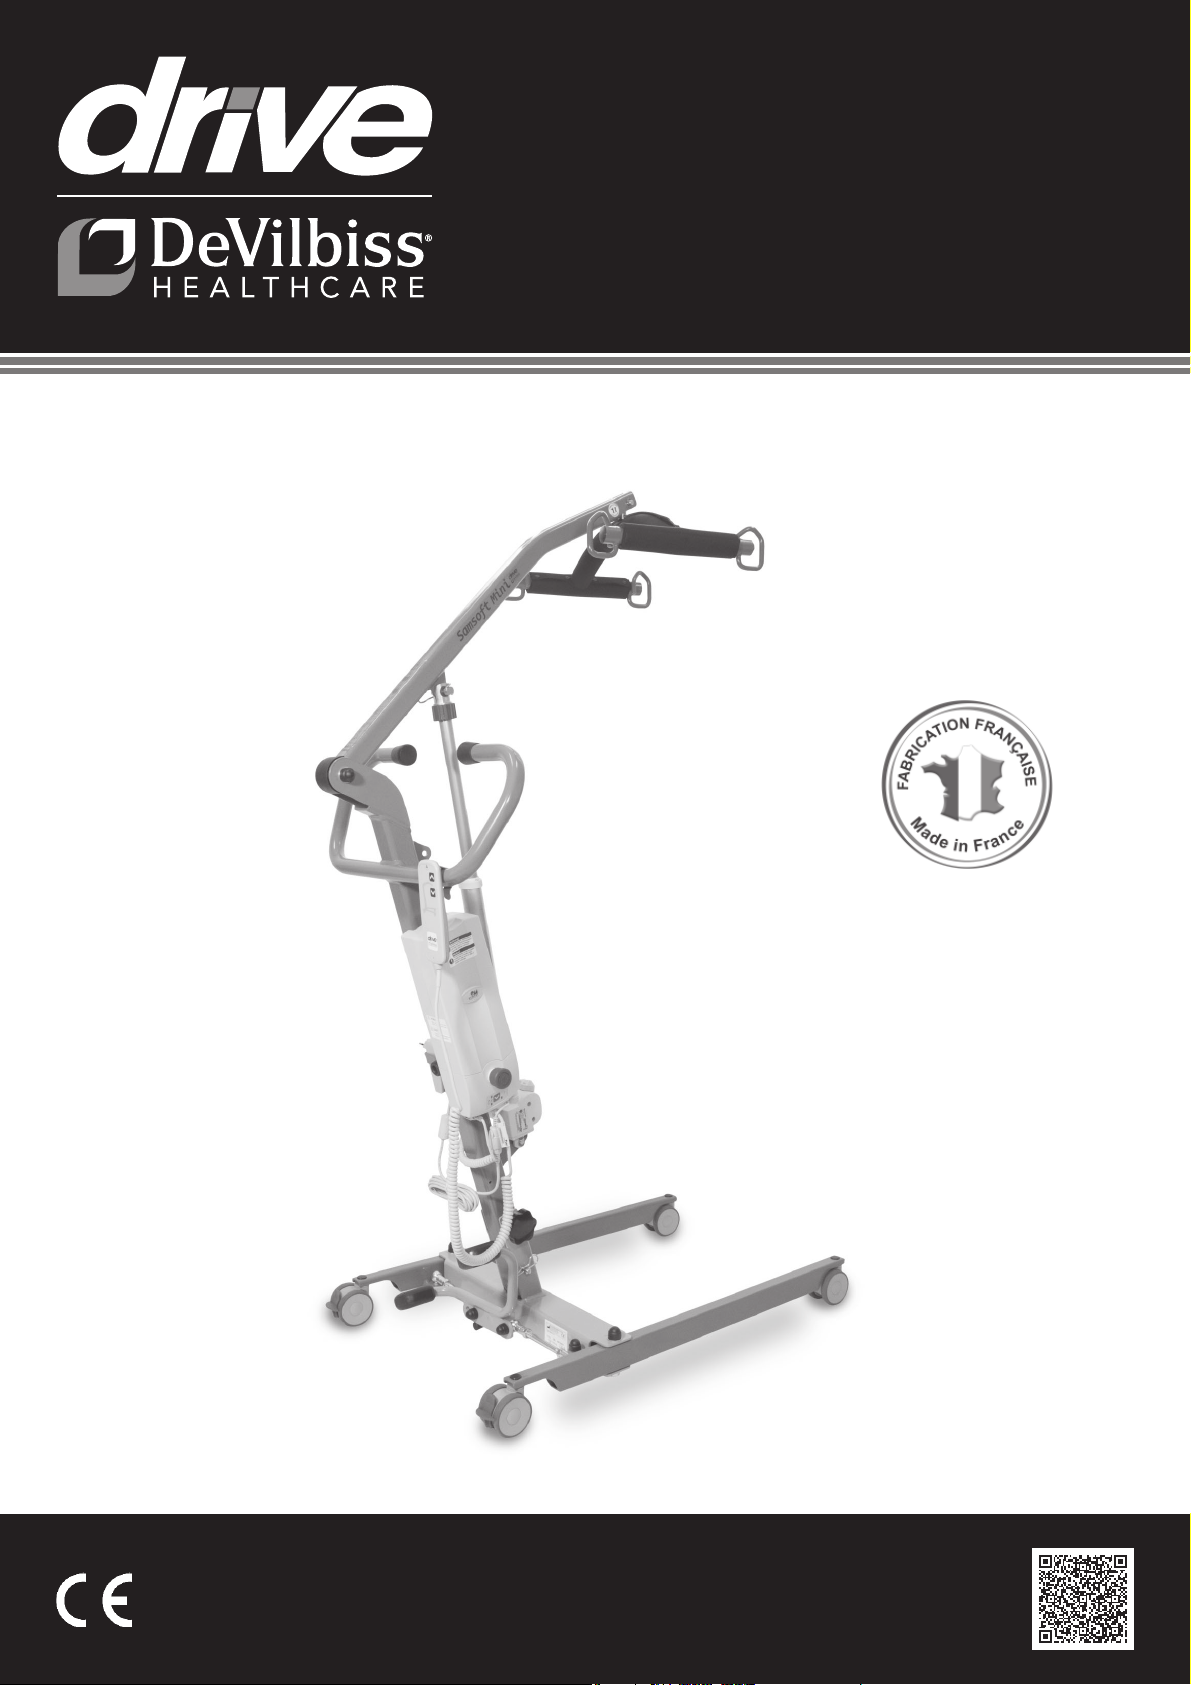
Patient lift
Samsoft Mini
USER MANUAL
More informations :
Page 2
USER AND MAINTENANCE GUIDE FOR
Samsoft Mini
PATIENT LIFT
Samsoft Mini patient lift
CONTENTS
I - WARNINGS...........................................................................................2
II - SYMBOLS AND EXPLANATION......................................................2
III - TECHNICAL SPEFIFICATIONS.....................................................3
3.1 Samsoft Mini.................................................................................3
3.2 Lifting assembly ..............................................................................4
IV - INTENDED USE.................................................................................4
V - ASSEMBLY PRINCIPLE.....................................................................4
5.1 General terminology..........................................................................4
5.2 Unpacking..........................................................................................5
5.3 Assembly............................................................................................5
5.4 Folding.................................................................................................6
VI - USING
6.1 Commissioning..................................................................................7
6.2 Charging..............................................................................................7
6.3 Possible problems............................................................................7
6.4 Battery pack.......................................................................................7
VII - RANSFERRING A PATIENT...........................................................7
7.1 Base spacing......................................................................................7
7.2 Transferring the patient from a bed to an armchair....................7
7.3 Transferring the patient from an armchair to a bed...................7
7.4 Transferring a patient lying on the fl oor.......................................8
7.5 Moving................................................................................................8
VIII - STRAP RANGE FOR
AND STRAP MAINTENANCE............................................................8
8.1 Controls...............................................................................................8
8.2 Cleaning..............................................................................................8
IX -
Samsoft Mini MAINTENANCE.................................................8
9.1 Cleaning..............................................................................................8
9.2 Disinfecting........................................................................................8
9.3 Daily maintenance............................................................................8
9.4 Routine maintenance.......................................................................8
9.5 Preventive maintenance.................................................................9
Samsoft Mini...................................................................6
Samsoft Mini
I - AVERTISSEMENTS
The renter must inform and show the user how to handle
the patient lift stating the precautions and the risks related
to inappropriate use. Pinching areas should be explained
in details.
The renter should ensure the user perfectly understood
the safety instructions
.
When mounting and using the device, it is recommended
to have the hands away from the pinching areas.
When the patient lift is exposed to heat source (sun rays
through a window or radiator) for a long time, ensure there
is no burn risk before using the patient lift.
The device should be used in a su ciently clear place so
that manoeuvres are not disturbed.
Since the slings are
not fi reproof, it is forbidden to use the device near fl ames
and to smoke.
Do not use or store the patient lift in a humid area or near
water splashing (rain, shower, etc.).
In very particular use situations, the patient lift operation
can be disturbed by radio and electromagnetic waves
(proximity of radio-telephone antenna, etc.). In case of
dysfunction, do not use the patient lift. Its operation can
interfere with sensitive electronic devices. In this case, do
not use the patient lift.
Because of the component weight and dimensions, there
are hazards during dismantling and reassembling, so it
is highly recommended being assisted and minding the
pinching areas.
Any serious incident related to this device shall be
reported to the manufacturer and the competent authority
of the Member State in which the user and/or the patient
is located.
II -
SYMBOLS AND EXPLANATIONS
X
SHIPPING, STORAGE AND DISPOSAL...............................9
XI - WARRANTY CONDITIONS AND RESPONSIBILITIES...........10
XII - BEFORE CONTACTING Drive DeVilbiss Healthcare France
CUSTOMER SERVICE....................................................................11
XIII -
SERVICE BOOK.........................................................................12
CAREFULLY READ THIS USING GUIDE BEFORE USER'S
THIS DEVICE.
Only use the slings provided by Drive DeVilbiss
Healthcare France.
Maximum patient weight: 150Kg.
Carefully read the user guide before using this device.
This device should be used by skilled and experienced
sta .
Never use a defective patient lift.
Annual preventive maintenance is compulsory and
should be performed according to § 9.5.
2
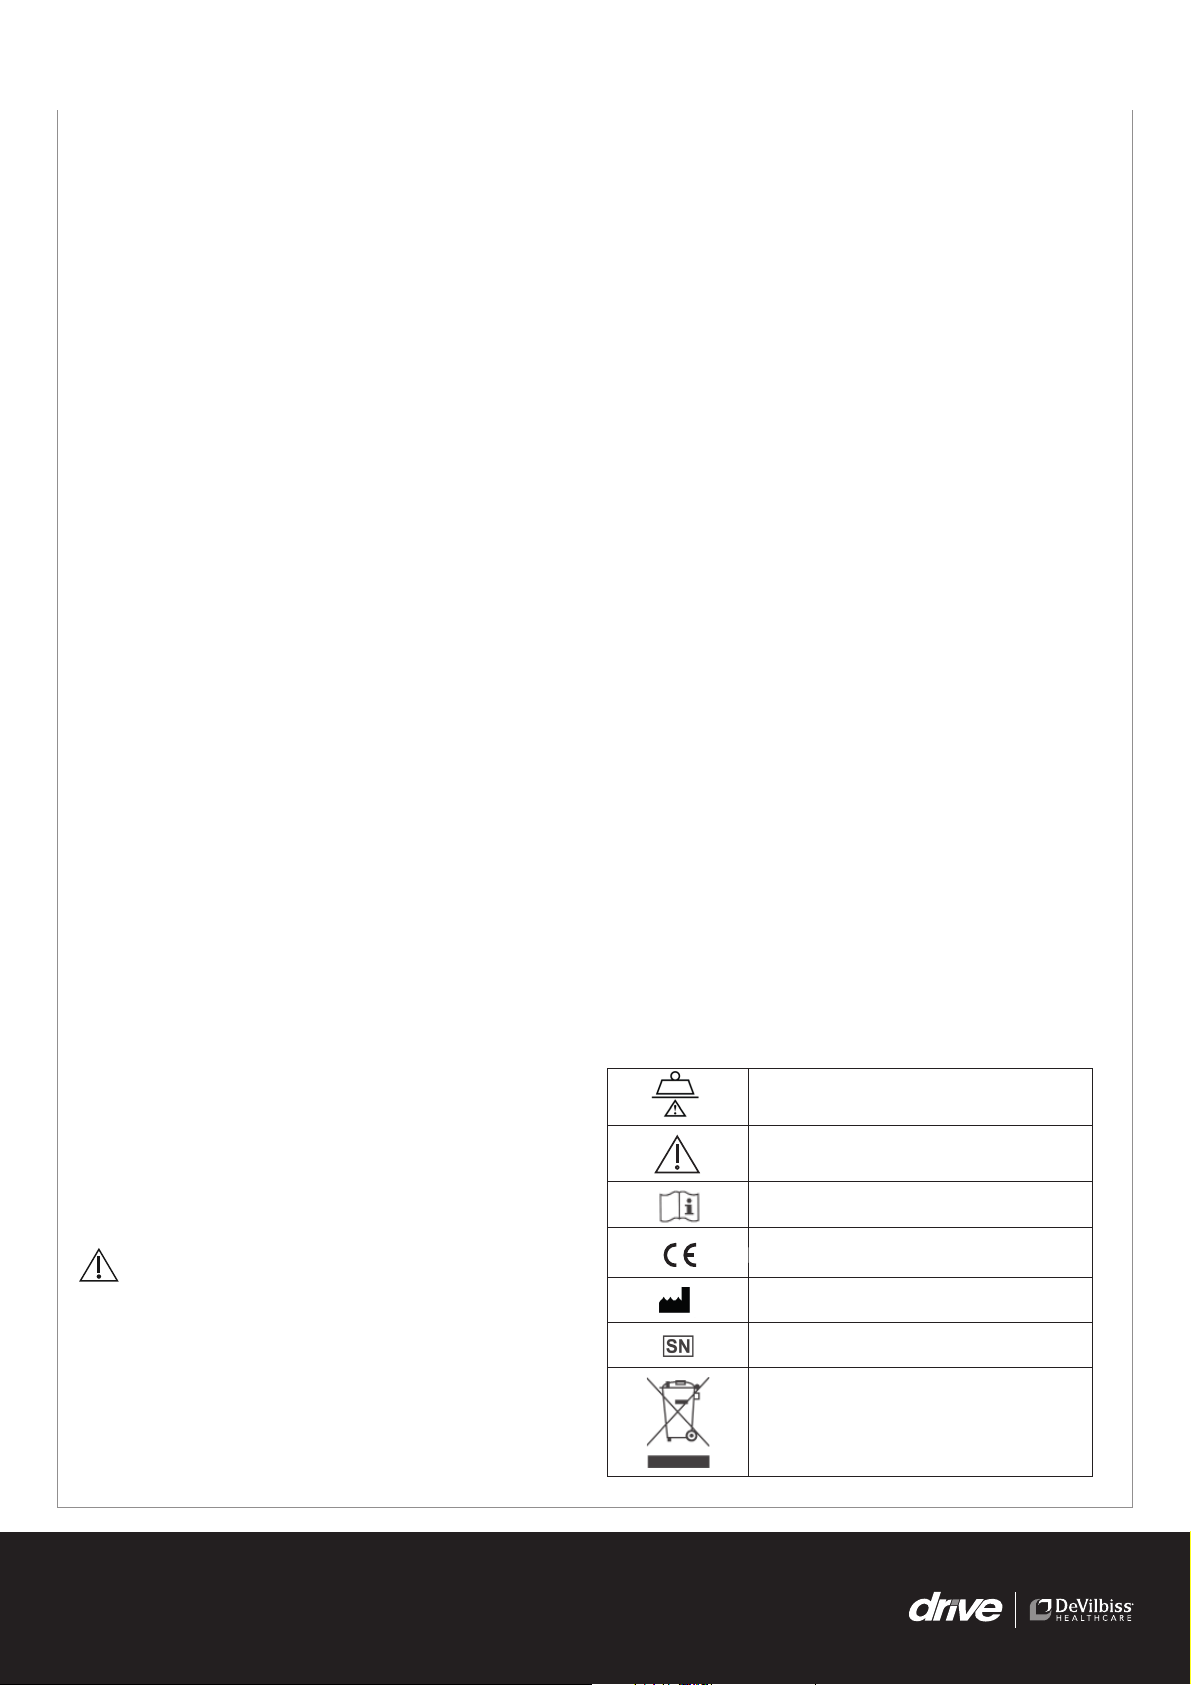
Maximum user weight
Caution: hazard!
Carefully read the user manual
Device compliant to directive 93/42/CEE
Patient lift manufacturer
Serial number
This device is submitted to directive
2002/96/EC relative to waste electric and
electronic equipment (WEEE) and it was
marketed after 13.08.15.
Page 3
USER AND MAINTENANCE GUIDE FOR
Samsoft Mini
PATIENT LIFT
in the up position
engaged in the groove of the axle
either side of the lug and correctly closed
is correctly positioned
.
Check the red emergency lowering ring is
.
Check the elastic ring is correctly
.
Check the spring pin is correctly oriented on
.
Check the beta pin in the lower part of the mast
.
Check the wing knob is correctly screwed in
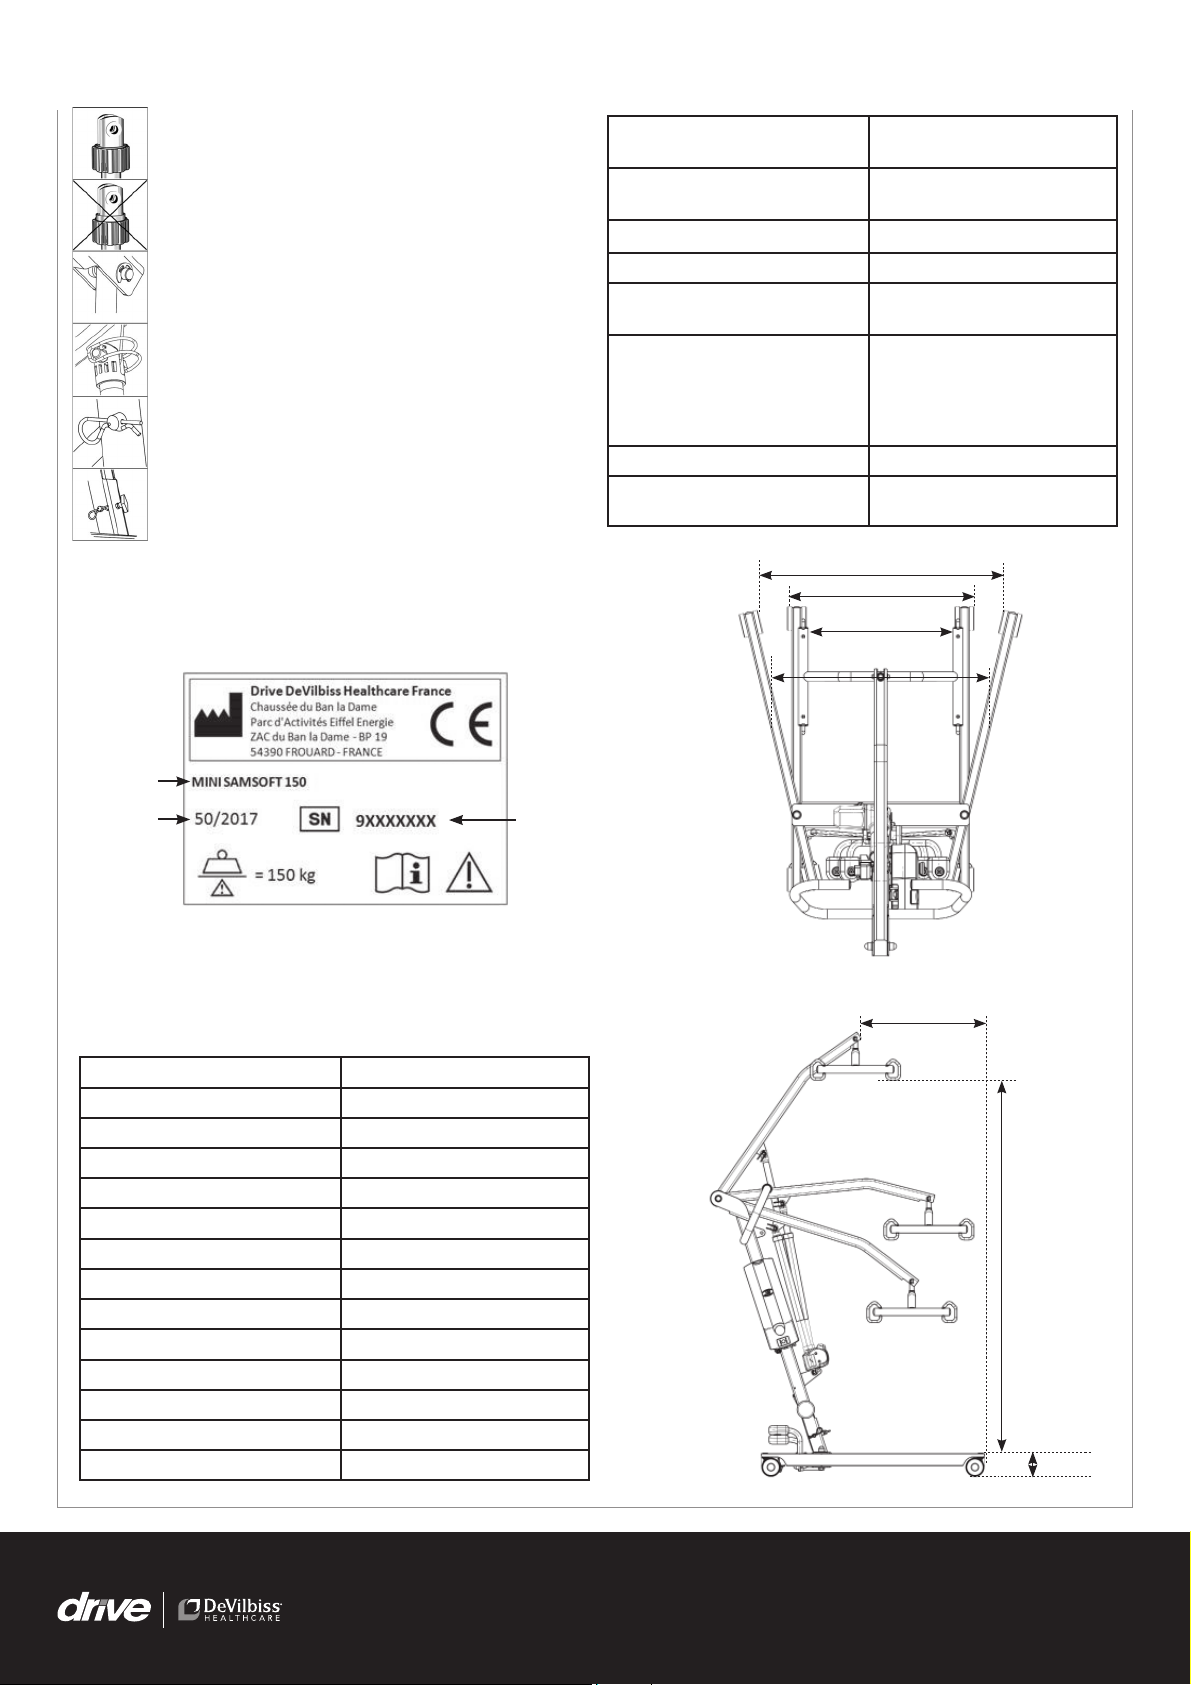
LABEL OF IDENTIFICATION
The label of identifi cation is stuck on the crossbar.
Mechanical cylinder rod
disengagement (red ring)
Battery power supply
External battery charger
Battery charge indicator
Buttons Emergency stop and
Cycle number as for patient
lift autonomy (lifting/lowering)
with an average weight of
100 Kg, with new charged
batteries.
EC marking date
Complies with ISO 10535
.
standard
2 x 4.5Ah, 12V
(included in the battery pack)
LED
emergency lowering
80 cycles
2015
81 cm
58 cm
49 cm
70 cm
Name of
the device
Date of
manufacturing
(week/
year)
III - SPECIFICATIONS
3.1) Samsoft Mini
Dimensions
Dimensions
Lifting capacity
Inner feet spacing
Turning diameter
Base height
Lifting time
Patient lift weight
Lifetime 10 000 cycles at 150 kg
Front wheels
Rear wheels
Structure Steel
Coating
Electric cylinder (lifting)
(folded)
(unfolded)
110 x 58 x 43,5 cm
109 x 58 x 113 cm
150 kg
49 cm min. to 81 cm max.
117 cm
9 cm
44 s (empty)
35 kg
dia. 7,5 x 6 cm without brake
dia. 7,5 x 6 cm with brake
Epoxy RAL 7005 - 7004 - 8000N
24VCC 8000N
Serial
number
Dimensions +/- 1 cm
49 cm
160 cm
(H shaped
crossbar)
155 cm
(I shaped
crossbar)
9 cm
3
Page 4
USER AND MAINTENANCE GUIDE FOR
Samsoft Mini
PATIENT LIFT
Important: the patient lift should be used with slings
(safety members) provided by
France
exclusively
Driven operating force: - with one fi nger: < 5N
- with one hand: < 105 N
- with one foot: < 300 N
Drive DeVilbiss Healthcare
2. Lifting assembly
Autonomous box : (control box + battery pack)
Dimensions L=272 l= 120 h=90 mm
Weight 4,8 Kg
Protection Current limiter
Output voltage 24 V continuous
Output current 8,5 A max.
Output number 1
Battery capacity 4.5 Ah
Battery voltage 2 batteries 12 V
Autonomy around 80 cycles
Charging time 8 h
Emergency stop push-button
mergency lowering button (1) (2)
(photo n°2, page 5)
Charged/discharged battery
indicator
Protection IP 54
IV - UTILISATION PRÉVUE
This transfer device is intended to transfer mobility-impaired
patients; it can be used with a wheelchair, a shower seat, a bed,
or a toilet seat.
Not suitable for children under 12year-old, for patients with
mental disorders, and for patients whose morphology is incompatible with this kind of transfer device
Samsoft Mini should be used indoors exclusively
on a flat and adherent floor; it should be handled by a
competent caregiver trained for using this kind of devices.
V - ASSEMBLY PRINCIPLE
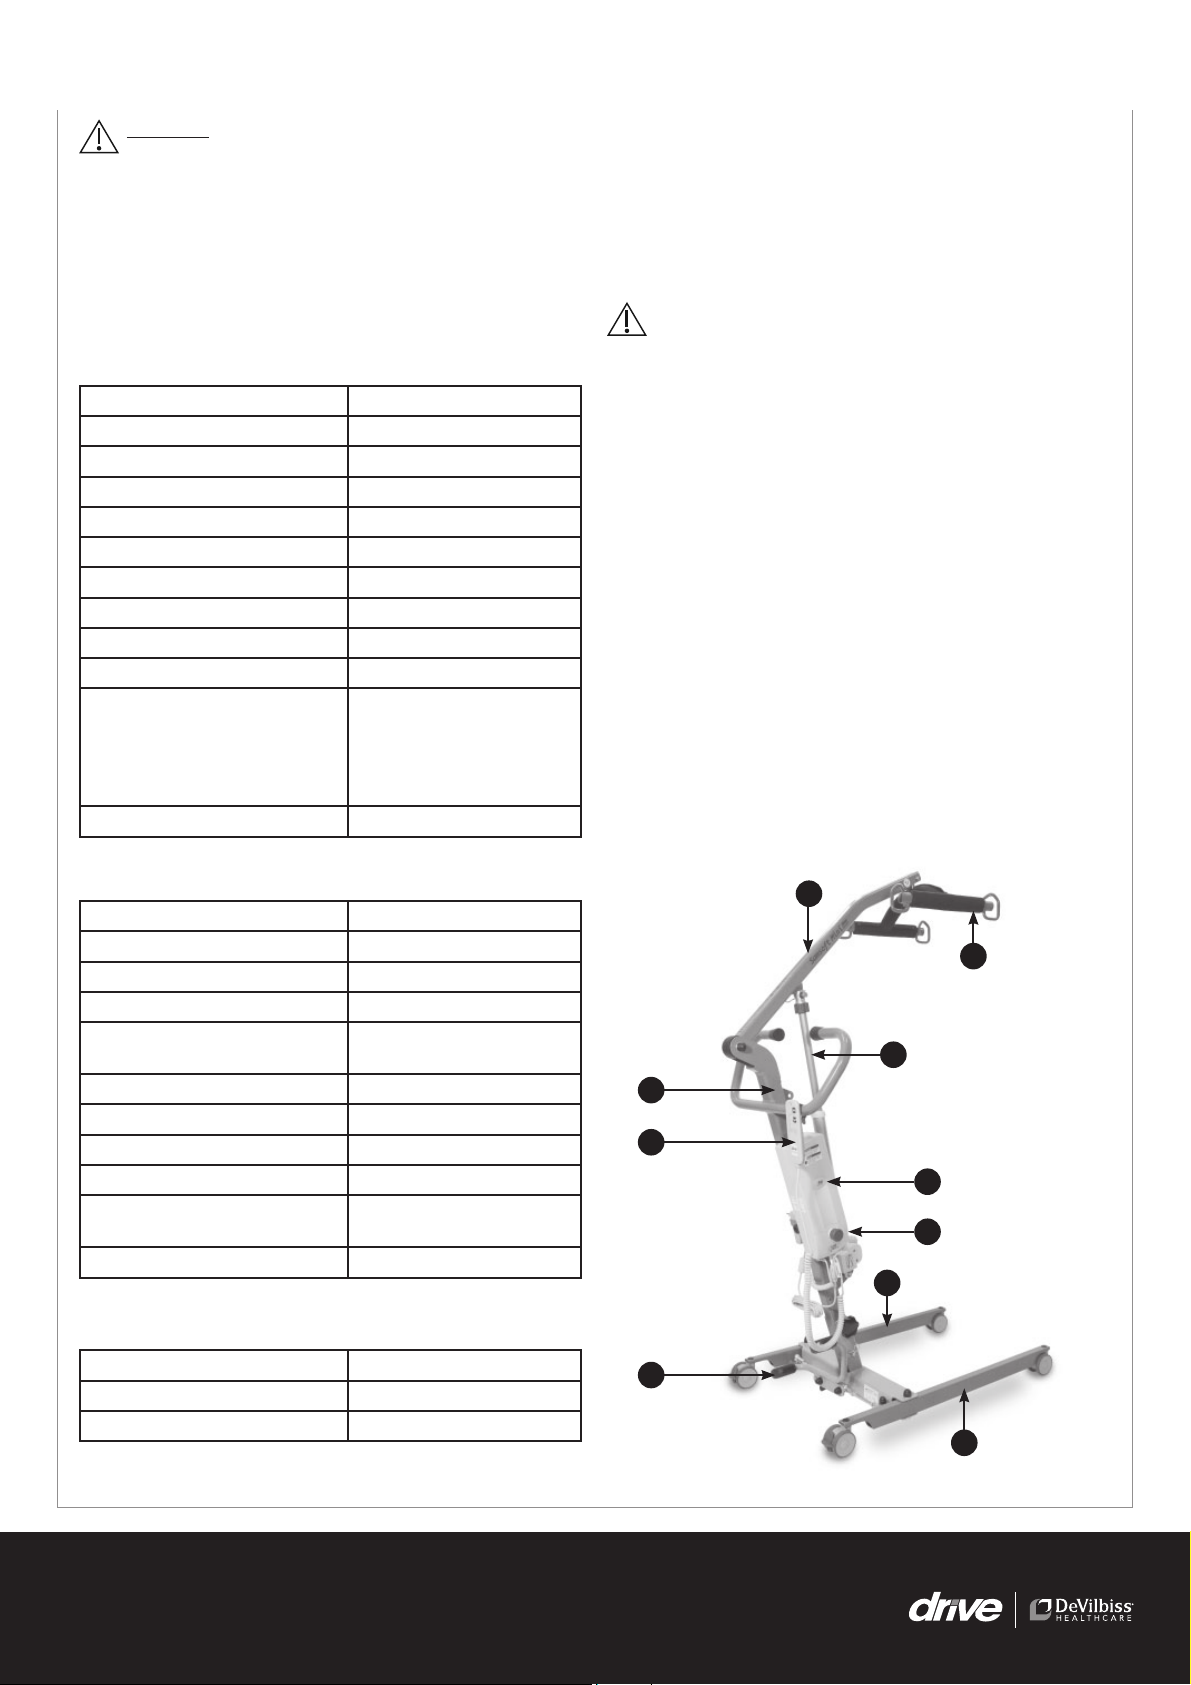
5.1) General terminology
1 - Mast
2 - Base
3 - Cross bar
4 - Boom
5 - Lifting cylinder
6 - Remote control
7 - Controle box
8 - Battery pack
9 - Side rails spacing pedal
10 - Side rails
Actuator or cylinder:
Power supply 24 V DC
Max. center to center distance 895 mm
Max. stroke 300 mm
Max. thrust force 8000 N
Lifting time 38 s (empty)
54 s (with the patient in)
No-load speed 26 mm /s
On-load speed 19 mm /s
Weight 3,5 kg
Protection IPX4
Mechanical decoupling/Safety
nut
Sound level ≤ 60 dB
Chargeur de batterie externe :
Power supply 230V AC 50-60 Hz
Output 24V continuous
Protection IP20
(We reserve the right to change these specifi cations without
notice).
4
3
5
1
6
8
7
2
9
10
4
Page 5

USER AND MAINTENANCE GUIDE FOR
Samsoft Mini
PATIENT LIFT
5.2) Unpacking
Check all the device elements have not been damaged during
transport.
Check the accessories are present: the lifting assembly (box with
battery pack, cylinder, remote control), battery charger, a user
guide, and possibly a strap if it was ordered.
NB: Our device is mounted and tested in our manufacturing site,
but its packaging requires it to be folded.
5.3) Assembly
A- Provided parts:
1 box (including battery pack) (photo # 2), cylinder and
remote control, battery charger,
2 3 - Possibly one strap if it was ordered.
B - Structure installation:
1 - Remove the structure from the box (possibly by cutting the box
angles), lay the structure on a fl at fl oor, and then lock the
brakes and wheels.
2 - In the lower part of the mast, after removing the pin (7)
(photo # 4), remove mast safety shaft (11) (photo #5).
3 - Straighten up the mast, and then position the mast safety shaft
(11) into the second hole (12) and et reposi-tion the pin (7) (photo #°4).
Tighten backlash screw (8) (black wing screw) (photo #°4). Put
the supply box on its support.
Samsoft Mini structure with lifting assembly:
Samsoft Mini user' guide,
If the red indicator is lit up (under the small key), the device
requires special maintenance, please contact Drive DeVilbiss
Healthcare France customer service.
CAUTION: before using the device, make sure all the
shafts, screws, and pins handled during the installation
are perfectly engaged in their respective supports, and they
are correctly locked.
Samsoft Mini is oprerational only if the strap corresponding
to this device is used, and only if the maximum 150 kg permissible
load is respected.
Photo #°1 -
Control box
Samsoft Mini when assembled and folded
1
Battery
pack
4 - Remove the pin which fi xes the head of the jack to the mast
(photo 8) then make revolve the mast and the cross-bar of the
back of the device forwards (photo 7). Bring the head of the
jack on the articulation of the arrow then put back the pin by
watching that its ring of safety is closed well.
Attention on the weight and on the dimensions of the set
and at the risk of possible pinching out.
5 - Check the box is correctly charged:
Green: the batteries are totally charged
Green/yellow: 3/4 charged batteries
Yellow: 1/2 charged batteries.
Yellow/red: the batteries are almost discharged, recharge them.
Red: the batteries are discharged, they should be immediately
charged otherwise their service life could be reduced.
Green
Yellow
Red
2
3
4
5
Photo #°2 - Supply box (including battery pack)
1 - Emergency stop push-button
2 - Emergency lowering button
3 - Cylinder connection plug
4 - Cylinder connection remote control
5 - Battery pack unlocking knob
Photo #°3
5
Page 6

USER AND MAINTENANCE GUIDE FOR
Samsoft Mini
5.4) Folding
PATIENT LIFT
10
7
Photo #°4 - Safety pin
11
Photo #°5 - Mast safety shaft
9
8
The device should be folded to be transported.
(Photo #°1).
The folding allows to store vertically the device and to transport
him in complete safety. To fold up the device, make the operations
described in the paragraph 4 but in the inverse order :
Press on the remote control to lower the arrow up to the low point.
Remove the jack of the arrow then hang on it on the mast.
Make revolve the arrow towards the back of patient-lift.
Fix the cross-bar to the mast.
Remove the pin (7) and the mast safety shaft (11).
Lower the assembly mast/boom/cross-bar onto the side rails.
CAUTION: pinching risk (9 photo #4)
Reposition the mast safety shaft in its 1st position, and put its
pin back.
The device can be vertically transported or stored (photo #9).
12
Photo #°6 - Position of the safety shaft when the mast
is upright
Photo #°7 - Unfolding the boom
Photo #°9
To facilitate the transport of Samsoft Mini, it is possible to
defuse him in two parts by unscrewing completely the button
(10) photo 4 and by removing the axis of safety (11) photo 5.
Warning Unscrew partially backlash screw (8) photo 4
before separating the mast of the rolling base. After reas-
sembly, verify that all the elements of fi xation and the pin
of safety are fi rmly in place. Squeeze strongly the button (10).
Weight of the rolling basis: 14 kg - weight of the mast, the arrow
and the cross-bar: 21 kg and 17 kg without the pack batteries.
VI - USING Samsoft Mini
WARNING
Samsoft Mini should be used indoors exclu-
sively on a fl at and adherent fl oor; it should be handled
by a competent caregiver trained for using this kind of
devices.
Photo #°8 - Pin of the jack
6
Page 7

USER AND MAINTENANCE GUIDE FOR
Samsoft Mini
PATIENT LIFT
6.1) Commissioning
When all the connections are made:
Use the patient lift with the remote control.
Check the battery charge (see colour code in Chapt. III. 3 - B-5).
The patient lift is ready to be used.
6.2) Charging
THE POWER UNIT SHOULD BE CHARGED EVERY NIGHT.
IT SHOULD BE CHARGED IN A WELL-VENTILATED
ROOM. CHECK THE POWER SUPPLY CORD CONDITION
BEFORE PLUGGING IT.
To charge the battery, remove the battery charger from its support
and plug it to the main power.
When charging, the green indicator is blinking.
When the indicator is steady green, charging is fi nished (see
colour code in Chap. IV - B-5).
The patient lift is ready to be used again.
6.4) Battery pack
The 2 batteries included in the box of the battery pack do not require
any special maintenance. Though, they should be regularly
charged to maintain their service life (at least every 3 months).
With a second battery pack (available on request), the device can
work 24/24 hours.
VII - TRANSFERRING A PATIENT
Before positioning and transferring the patient, check that:
The patient’s weight is compatible with the maximum permissible
load of the patient lift (150 kg maximum).
The batteries are charged and the patient lift is fully operational.
The fl oor is fl at and stable.
The patient lift brakes are functional.
Check the strap is compatible with SAMSOFT Mini (Drive
DeVilbiss Healthcare France strap).
Check the strap fasteners and the patient support elements
are in perfect condition.
In the maintenance book included in this manual, check regular
maintenance is performed once a year at least.
If the patient is agitated, an accompanying person should
secure the patient’s movement.
Photo #°10
6.3) Possible problems
If the remote control cannot lower the patient, press the
emergency-lowering button (2)(photo #°2).
If the indicator is steady red when lowering or lifting the patient,
charge the device.
Check the connections if the remote control or the cylinder
does not work.
IN CASE OF PROBLEM WHEN LIFTING OR LOWE-RING A
PATIENT, PRESS THE EMERGENCY STOP BUTTON (1)
(photo # 2), AND THEN RELOAD IT BY PULLING IT.
IN CASE OF POWER SUPPLY PROBLEM, IT IS POSSIBLE TO
MANUALLY LOWER OR LIFT THE BOOM BY PRESSING AND
TURNING THE RED RING LOCATED AT THE END OF THE
CYLINDER ROD (photo #3).
DO NOT FORGET TO REPOSITION IT.
CAUTION: The cylinder should only be used disconti-
nuously, that is to say: 2 minutes operating, and then 18
minutes resting. Do not exceed 2 minutes operating in continuous.
Any duty cycle exceeding the above cycle can damage the lifting
assembly (cylinder/control box). This damage is excluded from
the warranty.
CAUTION: You should move the patient lift base apart
to the maximum before lifting or moving the patient.
Do not engage the wheel brakes. Do not keep on lifting or
lowering the patient if the 4 wheels are not on the fl oor. The
lifting task should be very progressive checking the patient is
well positioned into the strap and there is no tipping risk due
to excessive overhanging.
7.1) Base spacing
Press the spacing pedal to open or close the Samsoft Mini base.
7.2) Transferring the patient from a bed to an
armchair
Position the patient on his/her side.
Place the strap under the patient.
Check the back part of the strap is correctly positioned (from
shoulders to coccyx).
Lay the patient on the back.
Pass each leg support under each thigh.
Position the patient lift at the patient’s level.
Hook each strap buckle inside the crossbar hooks.
The patient can now be transferred from the bed to an armchair.
7.3) Transferring the patient from an armchair to a
bed
Lean the patient forward holding him/her.
Slip the strap behind the patient’s back up to the coccyx.
Pass each leg support under each thigh.
Position the patient lift at the patient’s level.
Hook each strap buckle inside the crossbar hooks.
The patient can now be transferred from an armchair to a bed.
7
Page 8

USER AND MAINTENANCE GUIDE FOR
Samsoft Mini
PATIENT LIFT
Particular points:
When positioning the strap, check there is no fold at the leg
level in order not to hurt the patient.
Do not engage the device brakes when lifting so that the
device can correctly position with regard to the patient.
CAUTION! WHEN LIFTING OR LOWERING A PATIENT, NE-
VER ENGAGE THE WHEEL BRAKES SO THAT THE DEVICE
CAN BE CORRECTLY POSITIONED, IN LINE WITH THE PATIENT.
IN CASE OF POWER SUPPLY PROBLEM, IT IS POSSIBLE TO
MANUALLY LOWER OR LIFT THE BOOM BY PRESSING AND
TURNING THE RED RING LOCATED AT THE END OF THE
CYLINDER ROD.
7.4) Transferring a patient lying on the fl oor
The patient’s weight should not exceed 150 Kg and the
patient lift should be positioned so that the patient’s head
and trunk be located inside the side rails. Lift the patient very
progressively ensuring he/she is well positioned on the straps.
7.5) Moving
Although this operation is strongly not recommended, it is
possible to use the patient lift to move the hung patient on a
very short distance (ex.: from the bed to the shower).
Use the handles to move and guide the patient lift. Another person should secure the patient.
Do not push nor pull the straps or the crossbar
to move the patient lift.
Do not move a patient if agitated.
8.2) Cleaning
(each time it is necessary, and to be performed by a competent
sta )
The polyester straps can be washed at 40°C at the maximum.
For other straps, see the strap instructions.
The straps should be disinfected with detergent solutions (see
below Chap. IX-2).
IX - Samsoft Mini MAINTENANCE
Disconnect the power supply cord and remove the battery
pack before any maintenance operation.
9.1) Cleaning
(every month or when necessary, and to be performed by a
competent sta )
Clean the patient lift with a soft cloth dampened with soapy
solution, then rinse, and carefully dry.
Do not use aggressive detergent; do not soak.
9.2) Disinfecting
(when necessary, and to be performed by a competent sta )
Disinfecting is performed with detergents and disinfecting
solutions sprayed on the external chair areas.
It is a foaming solution that does not require rinsing, but only
drying.
Our internal services use ANIOS solutions.
9.3) Daily maintenance
VIII STRAP RANGE FOR Samsoft
Mini AND MAINTENANCE
Slings of transfer for bar of prehension in 4 points
of attachment. Maxi load 250kg.
Not to exceed the maximum load of raises patient.
Bath net Size M
Bath net Size L
Comfort polyester Size M
Comfort polyester Size L
Comfort polyester Size XL
Bath netted hammock Size M
Bath netted hammock Size XL
Toilet netted hammock Size M
Toilet netted hammock Size XL
8.1) Controls
(before any use, and to be performed by a competent sta )
Before any use, check the condition of the straps. no undone
sewing, the upholstery and the straps should not be fringed, no
tear and no wear sign (transparent upholstery weft).
Charge the battery pack every night.
9.4) Routine maintenance
(every month or when necessary, and to be performed by a
competent sta )
The routine maintenance consists in checking the system
functionality:
With the bed positioned on a fl at fl oor, check its 4 wheels are
touching the fl oor.
When the brakes are engaged, the patient lift should not be
moved (fl at and adhered fl oor).
Operate the patient lift with nobody in, check the arm and the
side rails move steadily with no noise.
Control the handles located on the mast and check t here is
no play between the arm and the mast, and between the mast
and the side rails.
Check the plastic protective housings and casings are not
broken or cracked, and all parts are present.
Check the condition of the connecting cables: power supply
cord, remote control and cylinder; if a cable shows a slight
burn, wear, or impact sign, or if the wires are visible, immediately
stop using the patient lift, and have the cables replaced by
the engineering department.
The slings should be checked at least once a month, or more
regularly in case of intensive use, ensuring the seams are not
8
Page 9

USER AND MAINTENANCE GUIDE FOR
Samsoft Mini
PATIENT LIFT
undone, the upholstery and sling weft is not visible, and there
is no torn part.
Never use a defective sling
The worn or malfunctioning parts should be replaced
with original parts manufactured by Drive DeVilbiss
Healthcare France.
Have some tries with a load before commissioning the patient
lift again.
.
9.5) Preventive maintenance
Every year or when necessary, and to be performed by a
competent sta , according to paragraphs 9.5.1, 9.5.2, and 9.5.3
below.
It is necessary to control the device every year.
The battery pack should be changed about every 18 months
depending on how it is used.
The crossbar suspension axle should be imperatively checked
yearly on each maintenance task.
The yearly maintenance should be performed by skilled technical
sta experienced with electromechanical device maintenance.
The maintenance tasks do not require particular tools; adequate
tools should be used according to the best industry practices.
Mechanical fastening, plays, and adjustments should be realised
according to the best industry practices.
9.5.1) Mechanical control :
Disassembly and systematic lubrication of the crossbar axle.
In case of any wear sign, the axle should IMPERATIVELY be
replaced.
Check the charger.
Check the remote control box and the cylinder.
Check the lifting/lowering speed.
Check the emergency stop and lowering.
Condition of the electric cables (change the cables in case of
doubt).
RReplace the electric cables and/or the components to which
they are connected if there are signs of wear, sheath cut, outlet
damage or plastic and sheath darkening around the coupling
area. Replace the electric cables and/or the components to
which they are connected if there are signs of wear, sheath cut,
outlet damage or plastic and sheath darkening around the coupling
area.
Note : Never disassemble the protective housings of the cylinder,
battery pack, remote control and control box, and battery charger.
9.5.3) Charging test:
Charge the battery pack.
Check the battery pack power and autonomy.
Test the device when fully loaded (150 kg) and control the
power cut threshold (230 kg +/- 10 kg).
Tests.
Battery pack should be changed every 18 ùonths, depending
on use.
9.5.5) Service book:
Every maintenance operation or intervention should be recorded
in the service book attached to these instructions.
X SHIPPING, STORAGE, AND DISPOSAL
1) Check the axle is not distorted.
2) Check the collar is not worn.
Dismantling, cleaning, and lubrication of the front and
rear casters.
Control and lubrication after dismantling the mast and
side rail pivots.
Check the welding. Visual inspection.
Check the alignments. Visual inspection.
Control and lubrication of the cylinder fastenings.
Check the tightening of all the parts.
Dismantling, cleaning, and lubrication of the mast hinge.
Check the fastening, caster play, and brake performance. The
mechanical parts that have cracks, wear signs or geometrical
defects should be replaced with original components delivered
by Drive DeVilbiss Healthcare France.
9.5.2) Electrical inspection :
Check the remote control. Reminder: the remote control does
not enter the warranty fi eld.
The patient lift should be returned or transported in its original
packaging.
Before storing the patient lift, clean it totally and check its
performance. Store the patient lift in a dry place away from dust
and humidity. The batteries should be totally charged every 3
months.
When commissioning, after storing, charge the battery pack,
and check its performance before using it again.
Storage temperature: between 0 and + 50°C Humidity between
10 and 80%
Service temperature: between +10 and + 40°C Humidity
between 30 and 80%
The disposal of defective parts, packaging
and battery pack should be performed by
approved waste treatment centres.
The involved system should not be disposed of with household
waste, but should be sent to an appropriate waste collection
point or to a distributor.
A fi nancial contribution is given for collecting, dismantling, and
recycling the system in question.
By respecting these instructions, you respect the environment
and participate in protecting the natural resources and the
human health.
9
Page 10

USER AND MAINTENANCE GUIDE FOR
XI - WARRANTY CONDITIONS AND
RESPONSIBILITIES
Samsoft Mini s warranted for 5 years as far as the structure,
the cylinder and the control box are concerned, and in case of
normal use according to the instructions given in this guide.
Negligence, handling errors and accidents are excluded from the
warranty. The remote control is guaranteed for 3 months, and the
battery pack is guaranteed for 6 months.
Any modifi cation or addition of accessories without Drive
DeVilbiss healthcare France's written consent will de facto
exclude the product from the warranty and from Drive DeVilbiss
healthcare France liability. In particular, using straps that are
not marketed by Drive DeVilbiss healthcare France for this patient
lift will not entail our liability.
The regular checks and inspections mentioned in the previous
paragraph should be performed by a competent sta and recorded
in the maintenance book. Out of the warranty period, our liability
will not be entailed if you do not respect these controls and
inspections.
Only spare parts and components provided by Drive DeVilbiss
Healthcare France can be used to repair the device.
Samsoft Mini
PATIENT LIFT
In case of unsolved technical problems, please contact the
Customer Service:
Tél. : +33(0)3.83.495.451
Fax : +33(0)3.83.494.391
E-mail : sav@drivedevilbiss.fr
10
Page 11

USER AND MAINTENANCE GUIDE FOR
Samsoft Mini
PATIENT LIFT
XII
BEFORE CONTACTING DRIVE DEVILBISS HEALTHCARE FRANCE CUSTOMER
SERVICE
Calling the Customer Service can often be avoided!
If the patient lift does not perfectly works, please perform the following checks fi rst:
PROBLEM POSSIBLE CAUSE REMEDY
Nothing happens when one of the
remote control keys is pressed.
A cylinder produces abnormal noise.
The remote control cord is not
correctly plugged in its slot.
The remote control cable is cut.
The battery pack is not supplied
The battery pack is discharged.
The cylinder connection plug is not
correctly plugged.
The cylinder power cord is cut
The duty cycle 2min./18min. was
not respected.
Correctly insert the plug.
Replace the remote control.
Release the red push-button
Charge the battery pack.
Correctly insert the plug.
Replace the cylinder.
Send the cylinder for an inspection
to
Drive DeVilbiss Healthcare France
Customer Service.
The pinion or the nut supporting
the lifting tube is damaged.
The cylinder works, but very slowly. The power supply cord is not
correctly connected.
There is no voltage on the mains
outlet.
The batteries do not charge
The red indicator under the small
key is on..
The yellow control box indicator
lights up.
No control box indicator lights up.
The red control box indicator lights
up.
The red emergency lowering ring
turns on the cylinder rod.
. The power supply cord is not
correctly connected.
There is not voltage no the mains
outlet.
The device requires special
maintenance.
The battery pack is half charged.
The battery pack is out of order.
The battery pack is discharged.
The cylinder rod is disengaged.
Send the cylinder for an inspection
to
Drive DeVilbiss Healthcare France
Customer Service
Check the mains outlet connection
Check the wall socket is a mains
socket.
Check the mains outlet connection.
Check the wall socket is a mains
socket.
Contact
France
Plan to charge the battery pack.
Change the battery pack.
Immediately charge the battery
pack.
Push the ring upwards.
drive DeVilbiss Healthcare
Customer Service.
.
11
Page 12

USER AND MAINTENANCE GUIDE FOR
Samsoft Mini
PATIENT LIFT
XIII SERVICE BOOK
DEVICE SERIAL NUMBER :.....................................
COMPAGNY :................................................................
This document should be photocopied and delivered to the technician every time the patient lift is maintained.
In case of incident, the liability can only be determined if all the sheets of this book are completed
DATE
Intervention nature: Check, inspection,
quotation, repairing, etc.
Intervention description Technician’s name and
position
Cachet
Réf. M54068500 - 03/2019 - Rév. 2
Drive DeVilbiss Healthcare France
Chaussée du Ban la Dame - Parc d’activités Ei el Energie
ZAC du Ban la Dame - BP 19 - 54390 FROUARD - FRANCE
Tél. +33(0)3 83 495 495 - Fax +33(0)3 83 495 496
 Loading...