

Page 1

Genesis Rollator
item #:
10444SL
www.drivedevilbiss.co.uk
Page 2
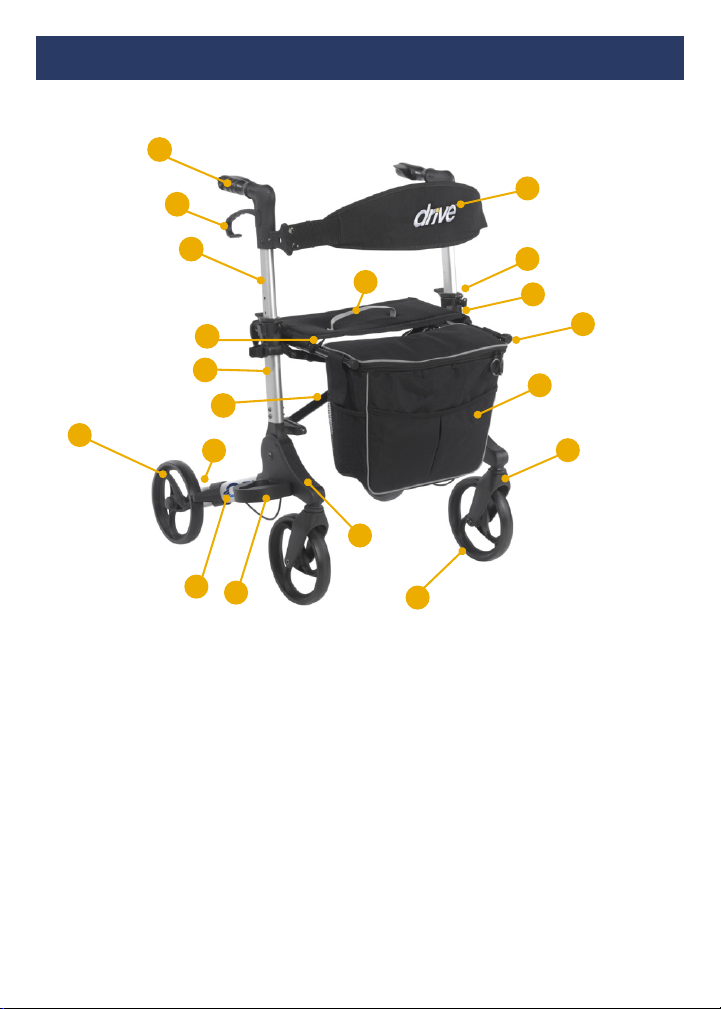
Parts List
1
2
7
WEIGHT CAPACITY: 300lbs / 136kg / 21 stone
1. Handgrip
2. Hand Brake
3. Handle Tube
4. Seat Tube
5. Side Tube
6. Cross Tube
7. Rear Wheel
8. Leg Tube
9. Brake Pad
17
3
16
4
5
6
9
10
8
18
11
14
13
19
15
12
Item # 10444SL
10. Plastic Connecting Base
11. Front Wheel
12. Front Wheel Fork
13. Height Adjust Button
14. Black Pull Tab
15. Bag
16. Seat Handle
17. Backrest
18. Cane Holder
19. Bag Support Rod
Page 3
Introduction
The Walking aid is suitable for a single user with limited mobility. The Genesis Rollator is
ideal for indoor and outdoor use.
Genesis Rollator Includes:
1. Bag
2. Back Rest
3. Can Holder
4. Operating Instructions
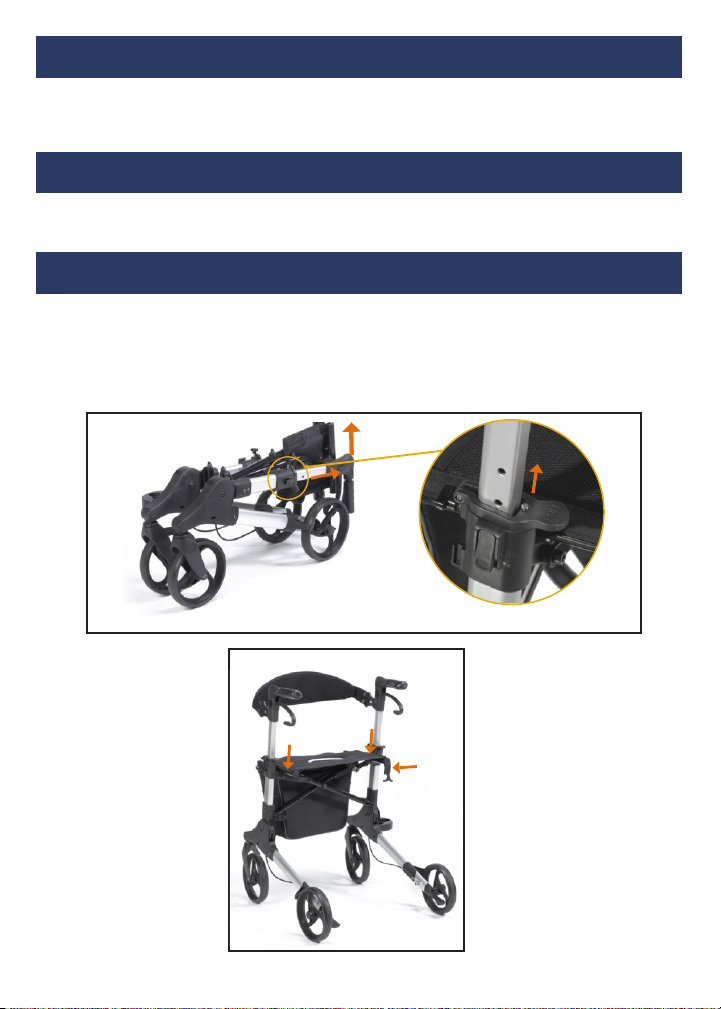
Unfolding The Genesis
Position the Genesis on its wheels. Pull on the black “Pull” tabs to release the locking
mechanism and lift the handles up (Figure 1). Let go of the pull tab, and keep lifting the
handles until they automatically lock into the top position. Then, unlock the black safety
clip that holds the seat tubes together, and press both seat tubes downwards until they
lock into position (Figure 2).
Pull Tabs
Figure 1
Figure 2
Seat Tubes
Safety
Clip
Page 4

Installing The Backrest
Slide the plastic ends of the backrest circled in Figure 3 onto the rails on the handles.
Tighten the screw to lock the backrest in place.
Screw
Figure 3
Height Adjustment
Push the black release buttons and simultaneously move the handgrip upwards or
downwards. Release the button at the desired position and move the handgrip to the
closest setting until it locks into place (Figure 4).
Figure 4
Page 5

Removing / Attaching The Carry Bag
Before attaching the bag, insert the two support rods into the rollator seat frame.
Screw to tighten until rods are secure. The bag can be attached or removed by using
the Velcro straps on both sides of the bag (Figure 5).
Figure 5
Velcro
Strap
Support
Rod
Braking / Locking
Pull both brake levers upwards to apply the brakes while the Genesis is moving
(Figure 6). Always brake slow and steady.
Press both brake levers down to apply the locks while the Genesis is stationary
(Figure 7). Pull up the brake levers and release to release the locks.
The effect of the brakes can be affected by abrasion of the wheels.
Regularly test the brakes.
Figure 6 Figure 7
Page 6

Sitting
Position the Genesis on an even and solid surface. Lock the brakes (parking
position). The Genesis must stand and must not slip. Sit straight up and do not lean
backwards.
DO NOT MOVE ROLLATOR WHILE SEATED.
Folding / Transport / Storage
The Genesis rollator may be folded with our without the bag attached. To fold, pull
the seat handle upwards and lock the seat tubes together with the black safety clip.
Pull up on the black “Pull” tabs and simultaneously lower the handles (Figure 8). Let
go of the pull tabs and continue to lower the handles until they automatically lock
into position. (Figure 9)
Figure 8 Figure 9
Page 7

Using The Universal Cane Holder
The Genesis rollator comes with a cane
holder attachment that can be used with
tri-tip or single tip canes (Figure 11). To
install the cane holder base, rotate so that
the “T” shapes line up. Insert the base and
rotate back. The cane holder and clip can
be used on either side of the rollator. To
move the cane holder base, reverse the
installation steps and reattach to the same
location on the other side of the rollator.
Slide the cane holder clip up off its mount
and move to the same location as the cane
holder base.
Figure 11
Safety Instructions
• Use only as a walking aid!
• Use only on even and solid surfaces.
• Maximum user weight: 300 lbs.
• Regularly check the screws and fasteners on the Genesis and retighten
if necessary.
• Use bag only for transport of objects and do not overload. Maximum load: 11 lbs.
• Do not expose the product to temperatures above 104°F for an extended period
of time, as this can cause the Genesis parts to overheat and burn the user.
• Please make sure the Rollator is fully opened, seat is down and the folding bar
under seat is locked in the down position.
• Be sure that both knobs are fully tightened and are at equal heights. Test Rollator
for stability before applying full weight to hand grips.
• Test the brake lever before operating the Rollator. When wheels are locked, lock
bar on rear wheels should prevent wheels from turning. When locks are released,
the wheels should turn freely.
• Always lock the brake lever before sitting and do not use seat when unit is on an
incline or uneven ground.
• Replace tires when significantly worn or damaged.
• DO NOT MOVE ROLLATOR WHILE SEATED.
•
This is a walking aid only
and is not to be used as a transportation device.
Page 8

Cleaning / Maintenance
Clean regularly by hand with a damp cloth. Do not use aggressive detergents.
Warranty
The frame of your Drive Medical product is warranted to be free of defects in
material and workmanship for 1 year from date of purchase.
The brake handle and housing are covered for a period of 5 years of the original
consumer purchaser.
This device was built to exacting standards and carefully inspected prior to
shipment.
This Warranty is an expression of our confidence in the materials and
workmanship of our products and our assurance to the consumer of years of
dependable service.
This warranty does not cover device failure due to owner misuse or negligence, or
normal wear and tear. The warranty does not extend to non-durable components,
such as rubber accessories, castors, and grips, which are subject to normal wear
and need periodic replacement.
If you have a question about your Drive device or this warranty, please contact an
authorized Drive dealer.
Drive Devilbiss Healthcare Ltd,
1 Heathfield Lane, Birkenshaw
West Yorkshire, GB BD11 2HW
www.drivedevilbiss.co.uk
 Loading...