

Page 1
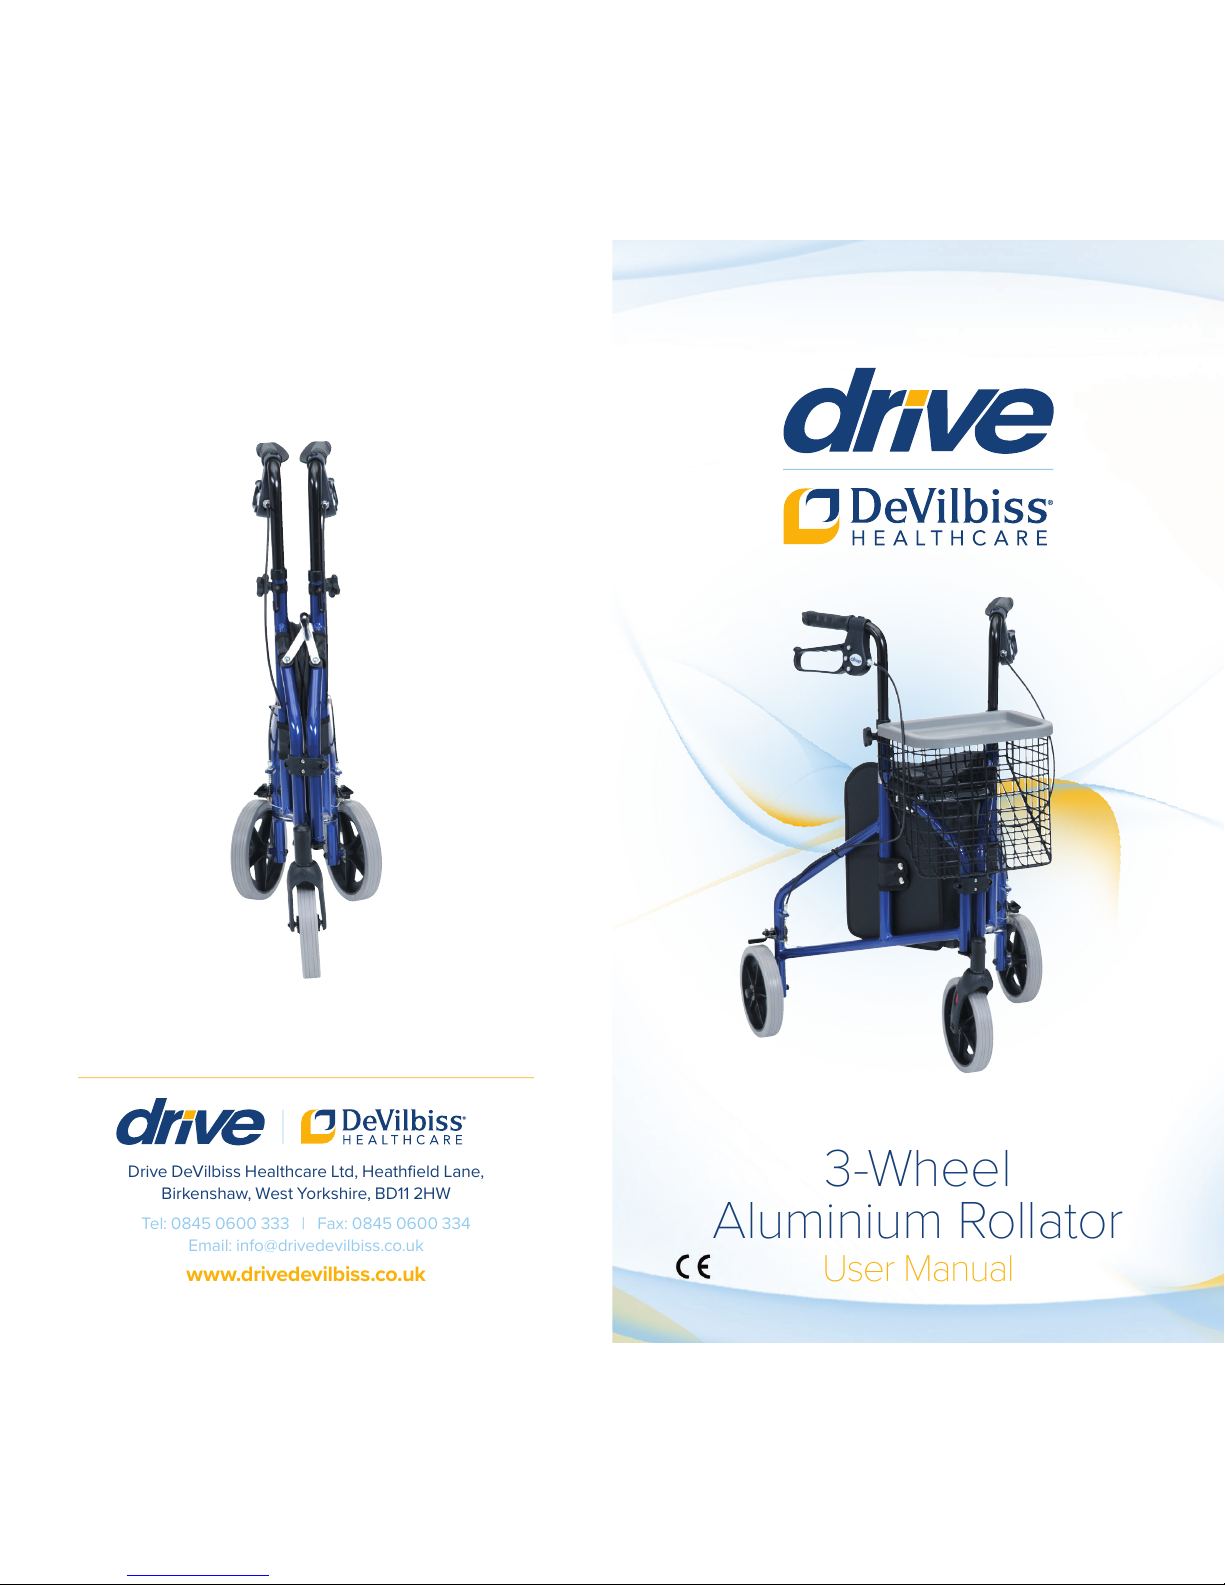
3-Wheel
Aluminium Rollator
User Manual
Drive DeVilbiss Healthcare Ltd, Heathfield Lane,
Birkenshaw, West Yorkshire, BD11 2HW
Tel: 0845 0600 333 | Fax: 0845 0600 334
Email: info@drivedevilbiss.co.uk
www.drivedevilbiss.co.uk
Page 2

contents
1. Contents
2. Introduction
3. Parts Description
4. Personal Safety
5. Transportation &
Assembly
6. Adjustments for
Comfort
7. Brake Operation
8. Care and
Maintenance
9. Specification
10. Warranty
introduction
The Drive DeVilbiss 3-wheel aluminium
triwalker is suitable for everyday indoor and
outdoor use, and is portable whilst offering
stability and security to the user.
All Drive DeVilbiss triwalkers are manufactured
to the highest quality standards and are CE
marked as Medical Devices.
The 3-wheel aluminium triwalker provides a
robust and visually appealing product whilst
being a cost-effective solution to some
mobility problems.
The triwalker comes with 7.5” (19cm) diameter
wheels with solid grey tyres, and features
arthritic friendly loop lock cable brakes.
The triwalker features a shopping bag with
zipped cover which folds with the triwalker
when not in use.
Page 3
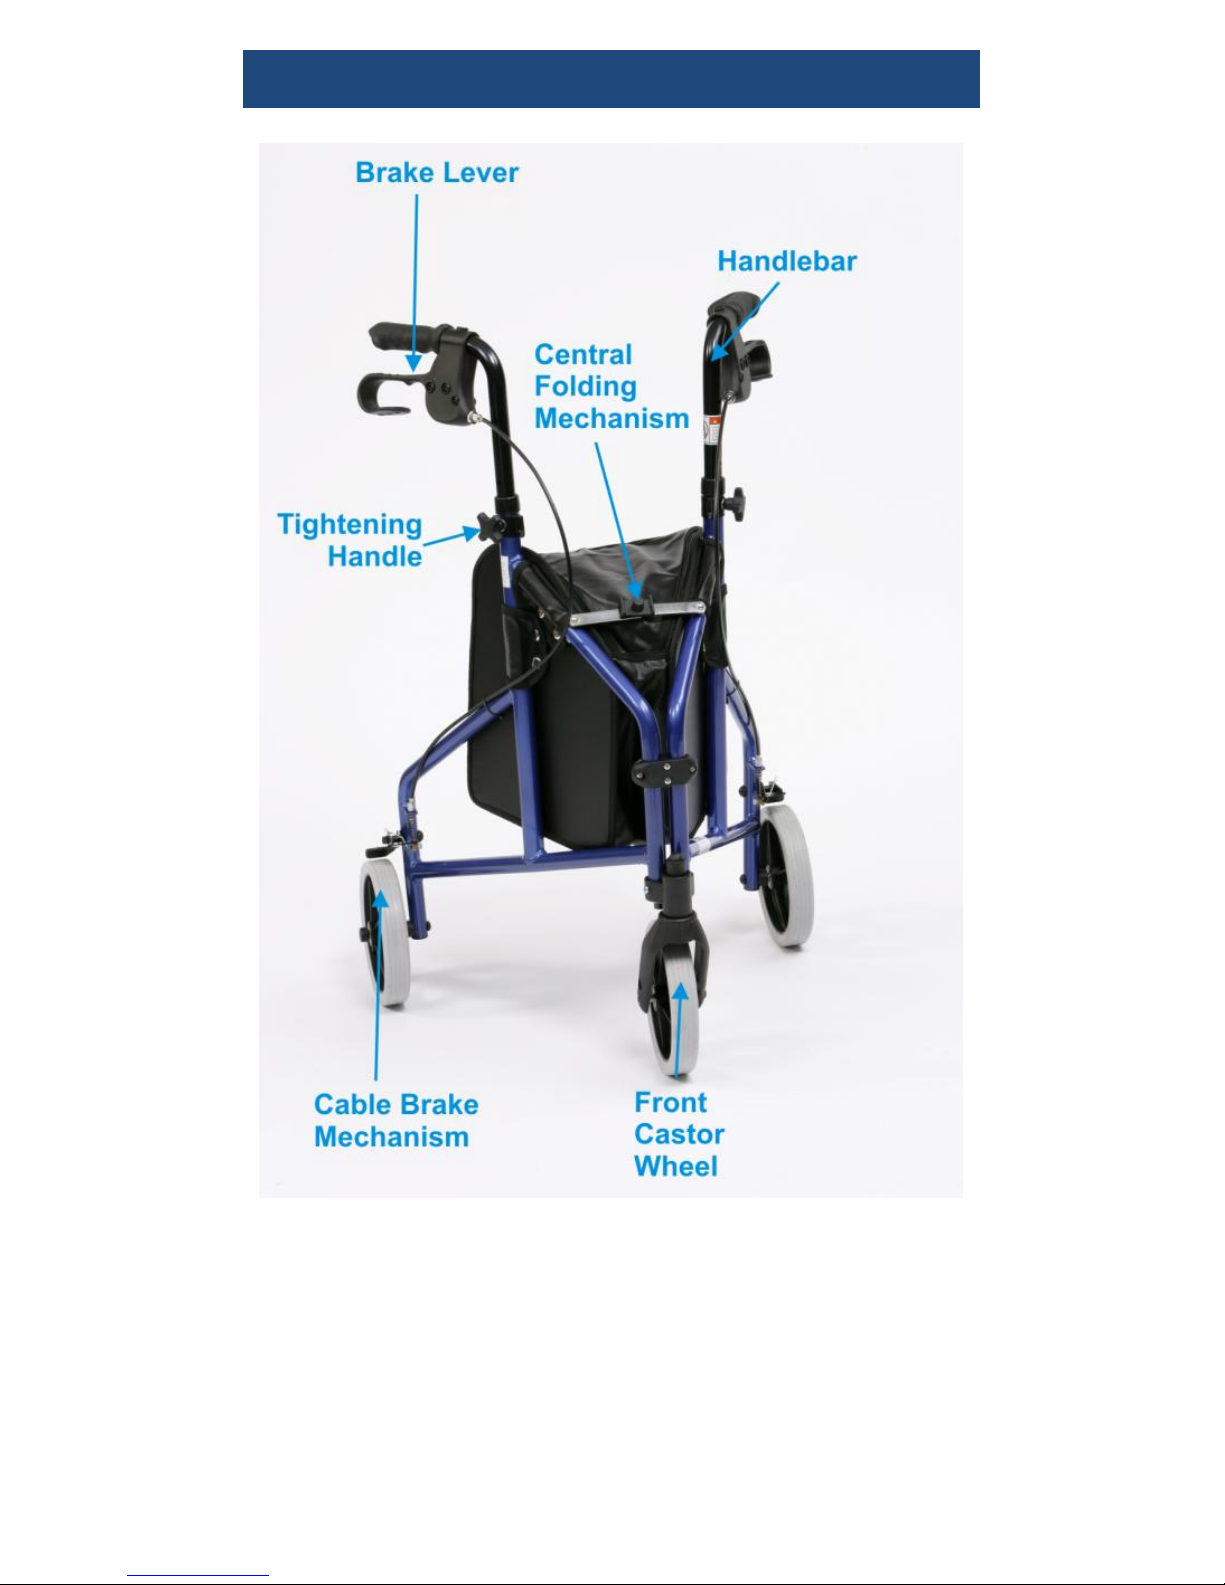
parts description
Page 4

personal safety
For your health and comfort, make sure
that you adopt a comfortable posture and
that you can operate the braking
mechanism with ease. Ensure that the
handles are at equal heights and securely
locked in position.
Ensure the triwalker is always fully folded
out and locked in position before using.
Ensure that all the wheels are stable and
are on the ground. Ensure that the braking
mechanism is adequate and test before
using.
Ensure that the latest health and safety
practice is used for carrying and lifting
items, such as wheeled triwalkers.
Ensure the tightening handles are always
on the outside of the triwalker and there is
no movement in the handle tubing.
Page 5
transportation and assembly
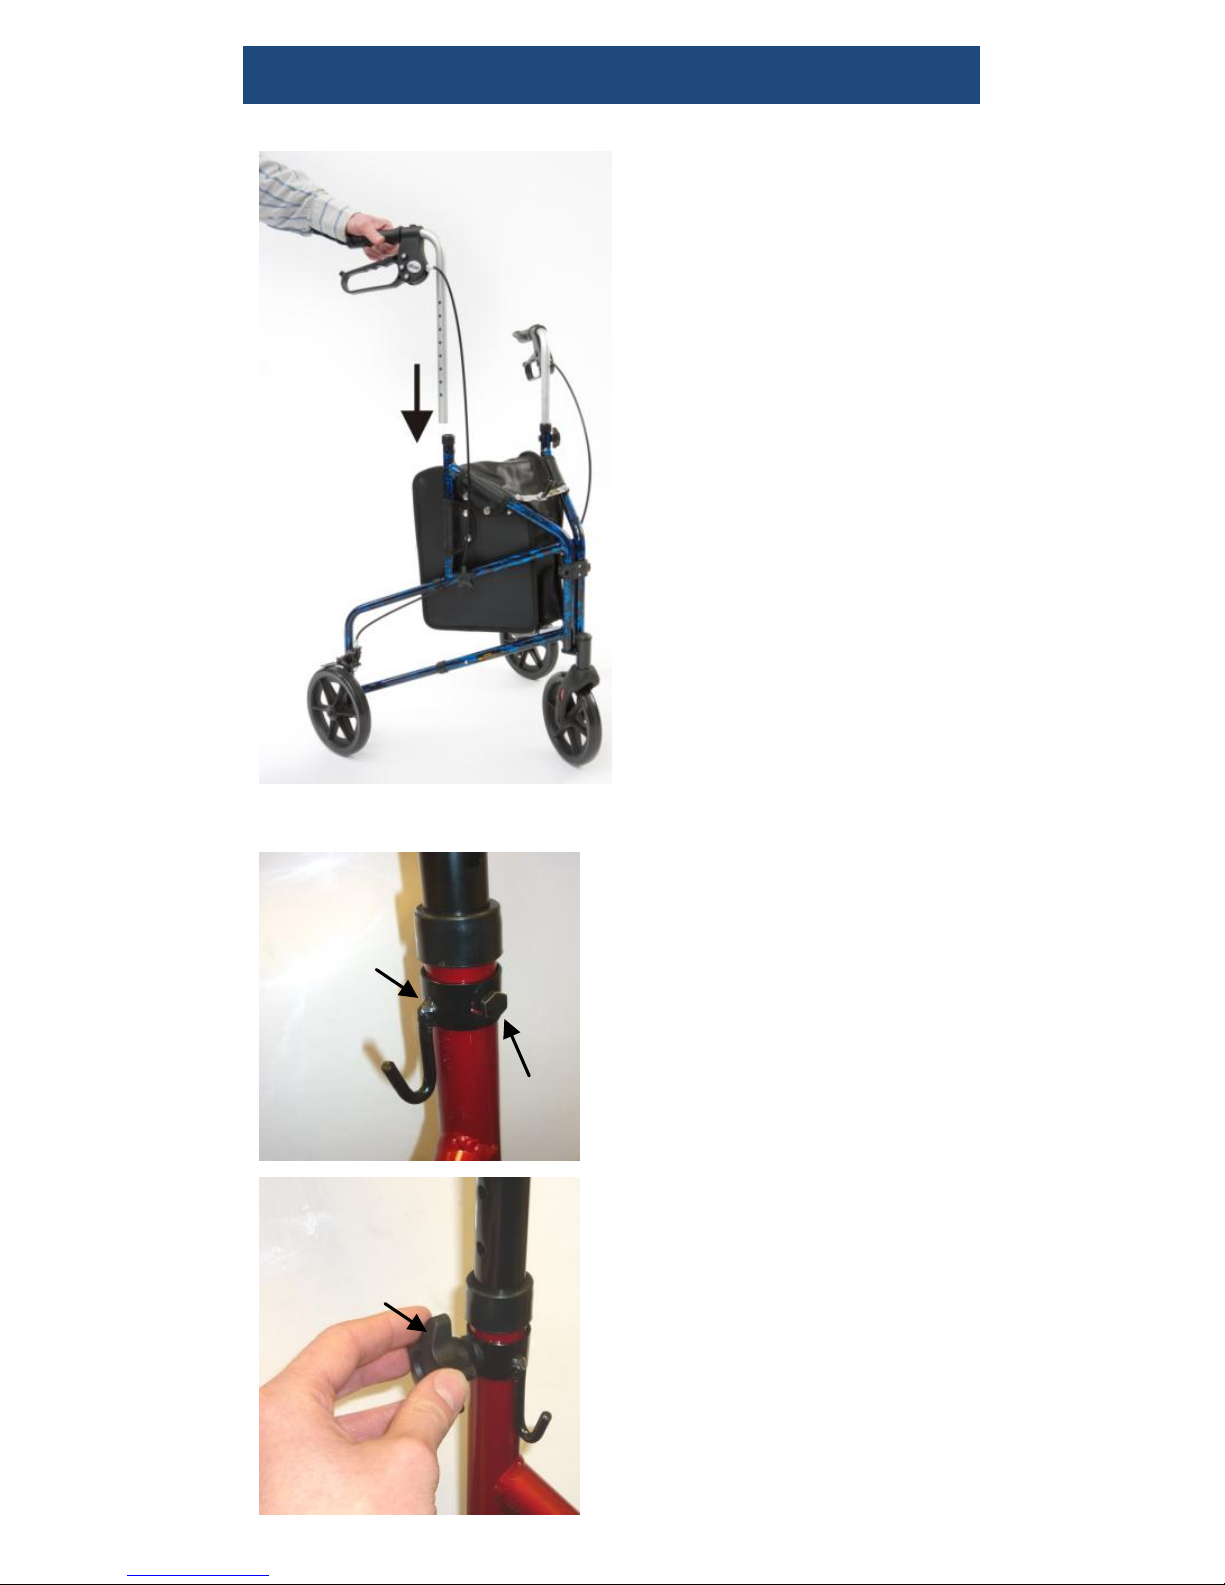
1. Inserting the
Handlebars
Insert the handlebars in
to the frame as shown in
the photograph left.
Repeat for the other
handlebar.
2. Setting the
Handlebar Height
Set the handlebar to the
required height and
insert the screw A from
the tightening handle
through the hook B
bracket and the hole.
(There are two hooks to
attach an optional
basket )
Attach the plastic
washer and tightening
handle C on to the
screw. Rotate the
handle clockwise until it
secures the handle in to
position.
A B C
Page 6
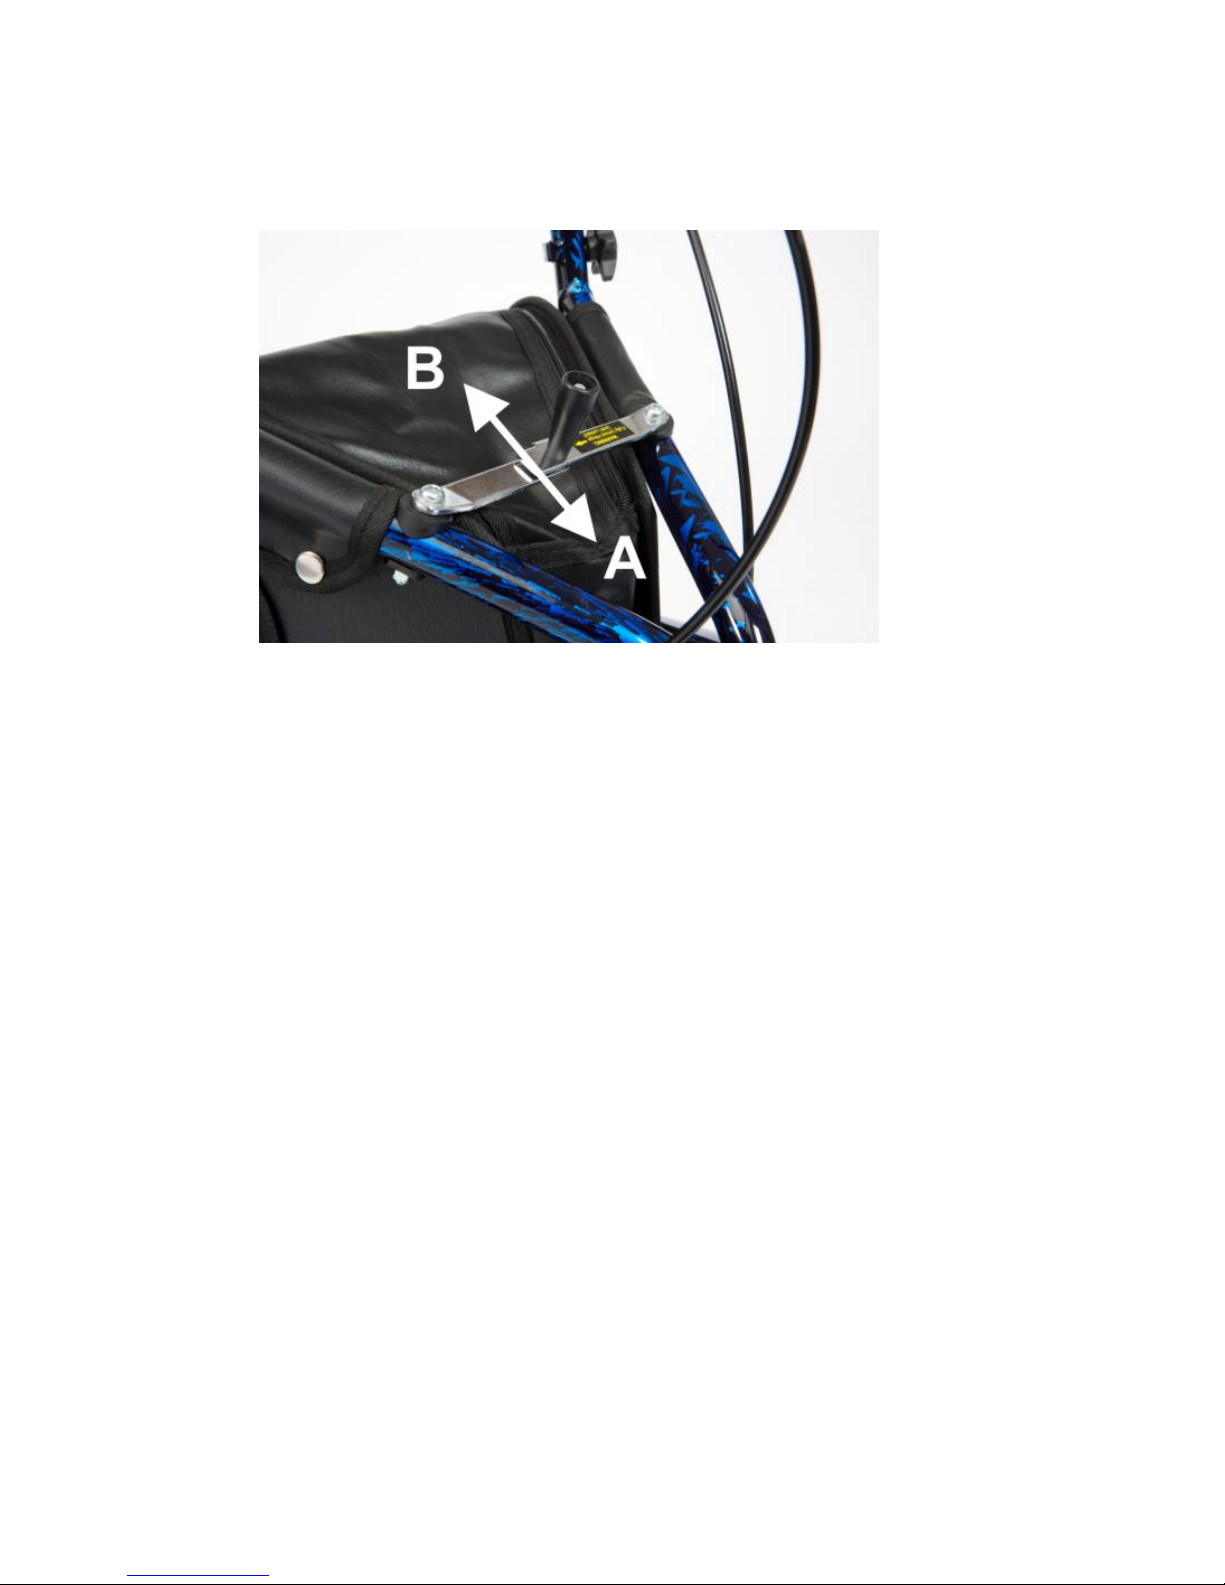
To fully unfold the triwalker before using,
push the folding mechanism down away from
the handles, as shown by direction A in the
photo.
To fold the triwalker for transporting, pull up
on the section in direction B. Leave a gap of at
least 50mm (2 inches) between the rear tyres
to ensure the triwalker remains upright.
NOTE: The brakes on the triwalker are factory
set and should not require adjustment. For
technical assistance on the triwalker brakes,
contact your Drive DeVilbiss dealer.
Page 7
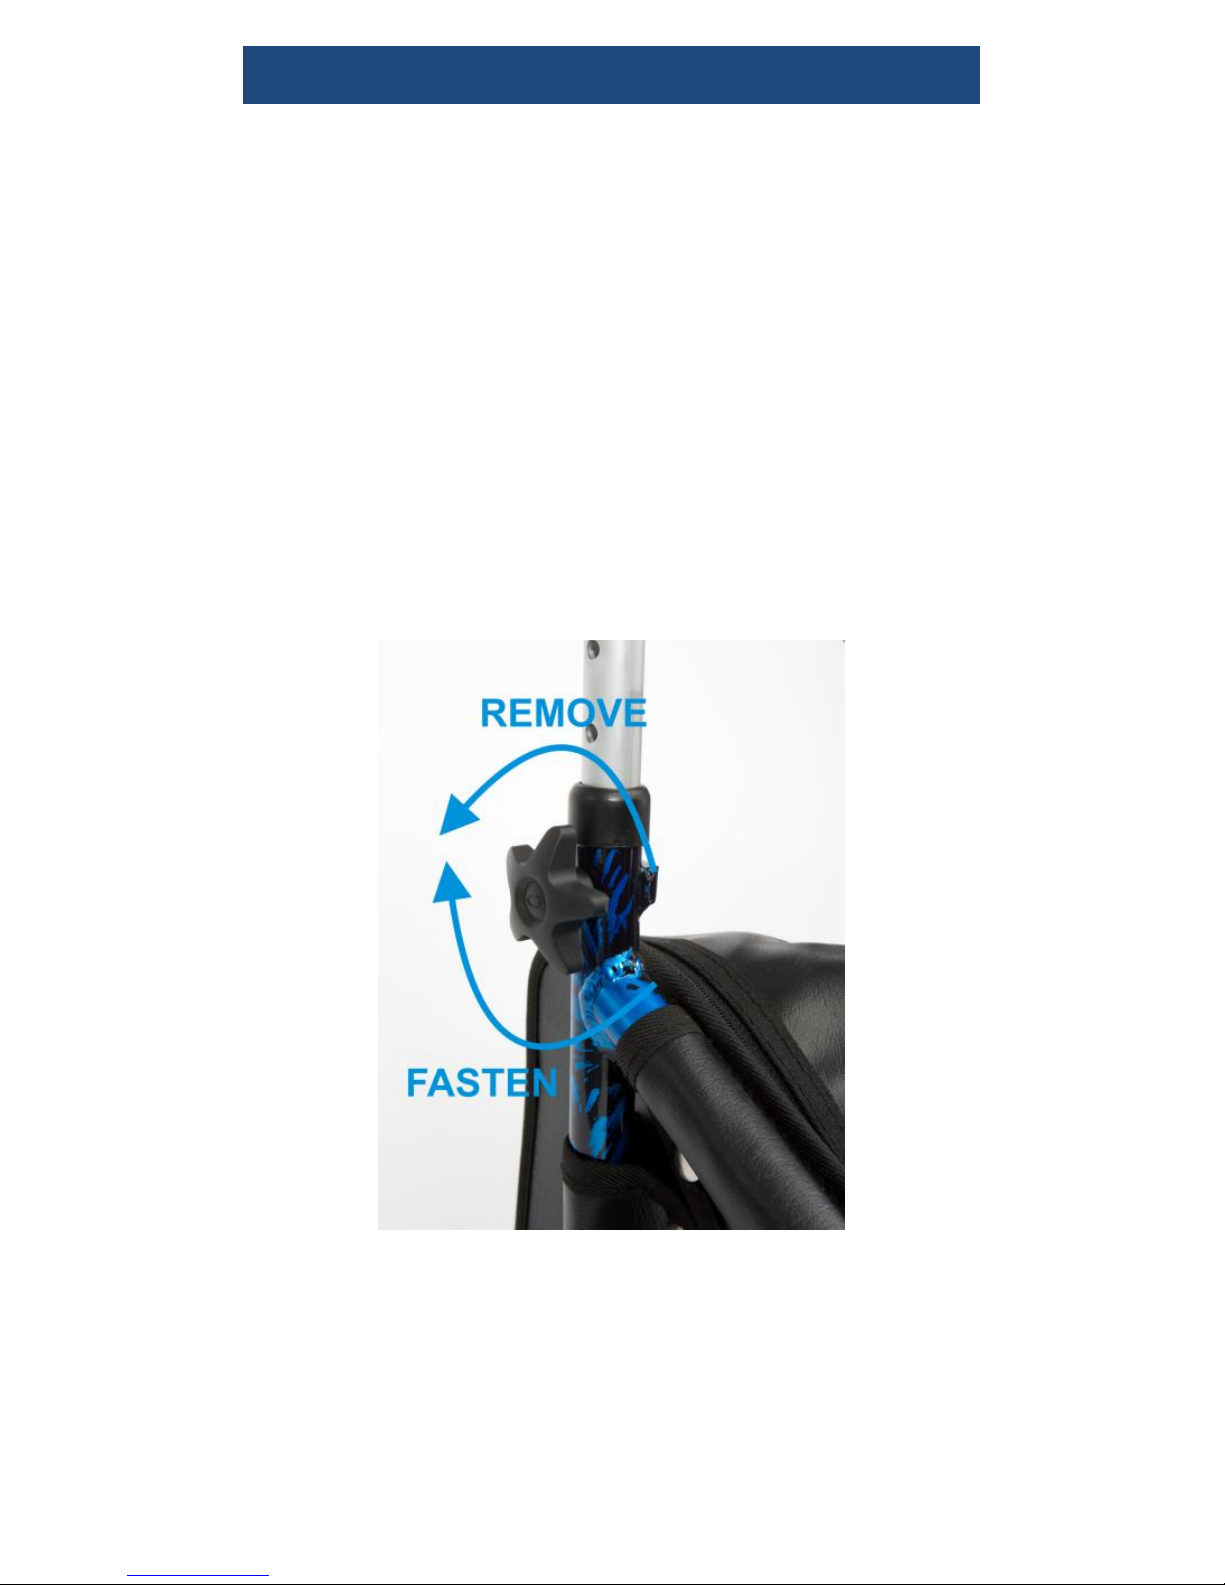
adjustments for comfort
To adjust the handlebar height
Unscrew the tightening handles at either
side of the triwalker anticlockwise, and
remove the screw (as shown in the photo
below). Adjust the height of the triwalker to
suit the user and then reinsert.
Insert the screw and attach the tightening
handles clockwise to secure (as shown in
the photo overleaf). Ensure that the
tightening handles are on the outside of the
triwalker
Page 8
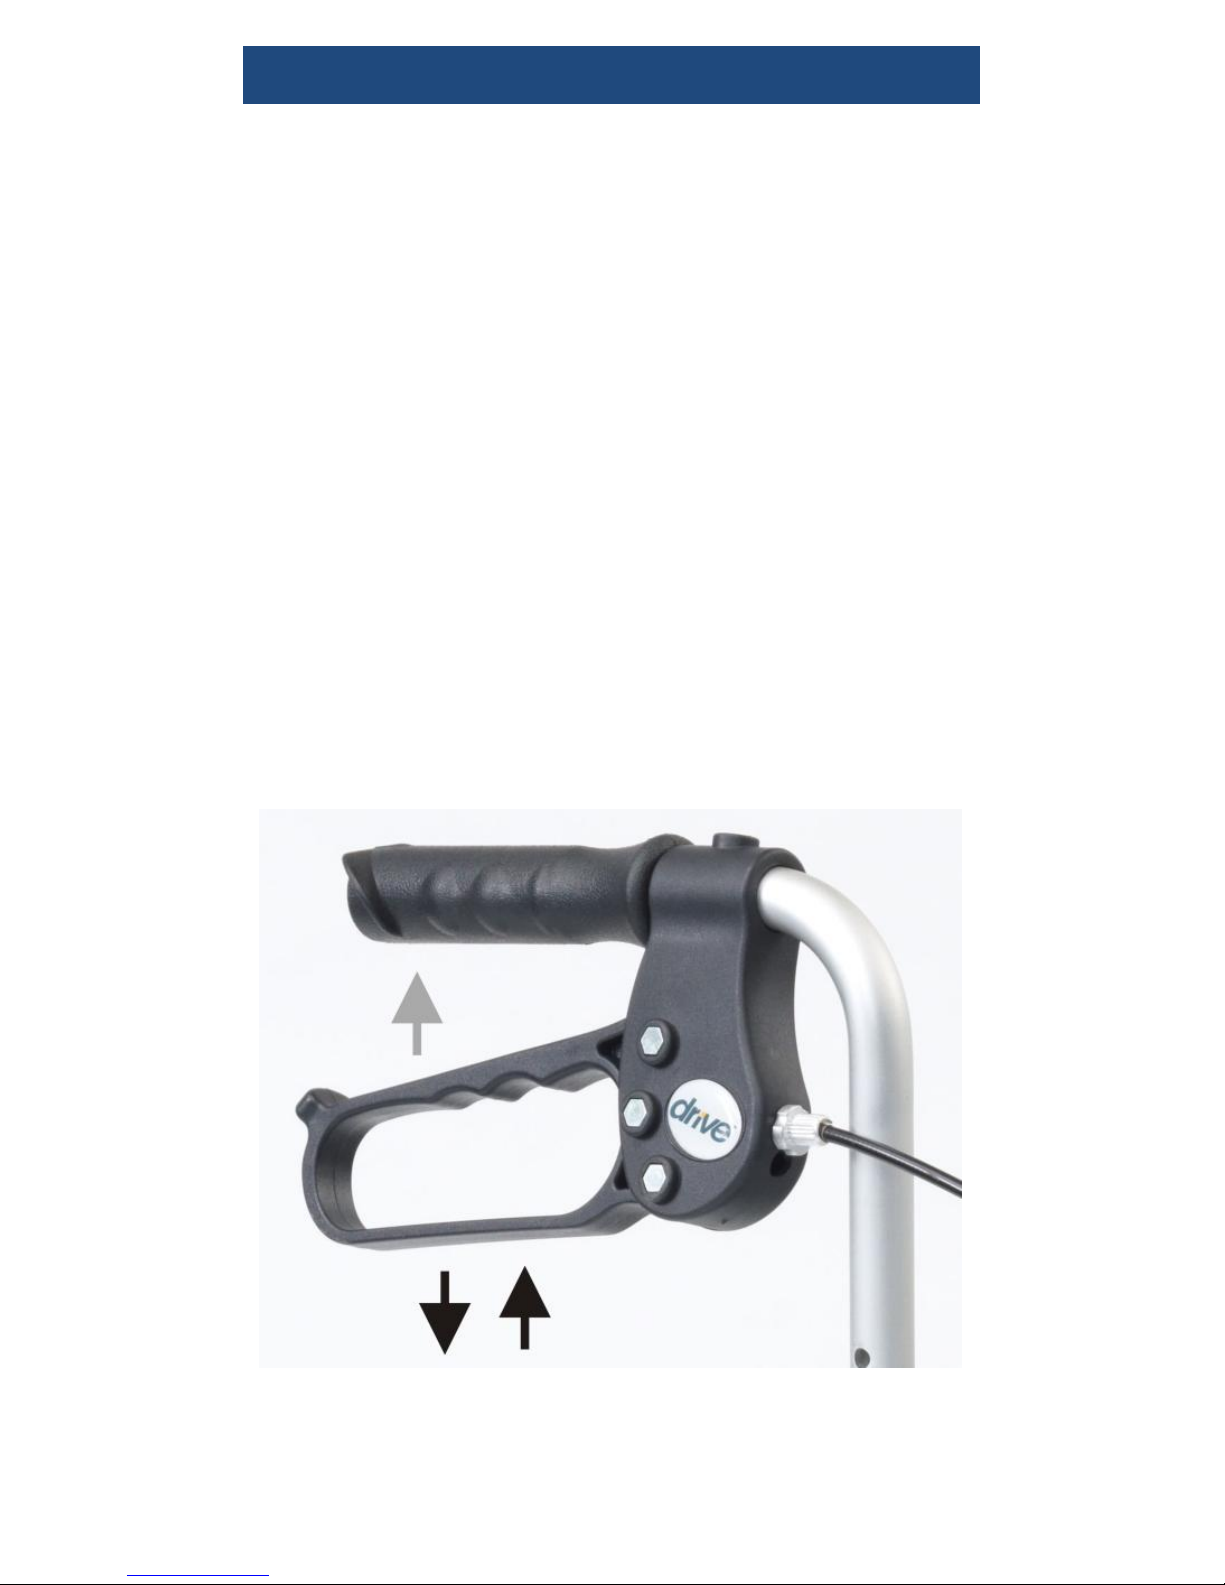
brake operation
To operate the arthritic friendly cable
brakes:
To apply the brakes to slow down whilst moving:
Squeeze both brake levers up to engage
the brakes (in the direction shown the
photo by the grey arrow).
To apply the parking brakes when stationary:
To lock the brakes, push down on the
brake lever until it locks (as shown by the
black downwards arrow in the photo). To
unlock the brakes, pull up on the brake
levers until the lock removes (as shown by
the black upwards arrow)
Page 9

care and maintenance
Ensure the triwalker is used only as an aid
for mobility.
Ensure the triwalker is kept clean. Wipe
down the triwalker with a damp cloth on a
regular basis.
Check the moving parts (e.g. – wheels and
height adjustment) regularly.
Ensure that the hand operated cable
brakes have been adjusted to suit the
wheels and user.
All the fasteners (screws, nuts and bolts)
are to be checked regularly to ensure they
are securely tightened.
Check that the front castor wheel swivels
freely. Withdraw the triwalker from use if it
does not.
Inspect the central locking mechanism
regularly to ensure it is operating correctly
Only use an approved Drive DeVilbiss
dealer for any maintenance and repairs on
your triwalker.
Page 10

specification
The triwalker has a lightweight aluminium
frame with choice of colours, 7.5” (19cm)
diameter wheels with grey tyres and arthritic
friendly cable brakes.
Weights and Dimensions:
Dimensions
(L x W) (cm/in)
56cm (L) x 65cm (W)
22” (L) x 25½”(W)
Dimensions
folded (L x W x
H) (cm/in)
65cm (L) x 23cm (W) x 68cm (H)
25½” (L) x 9” (W) x 27” (H)
Handle Height
(cm / in)
83 - 94cm (H)
32½” – 37”
Weight (kg/lb)
including bag
4.7kg
10.3lb
Max. User
Mass
125kg (20 stone)
Page 11

warranty
Your Drive DeVilbiss branded product is
covered by a one-year warranty from date of
delivery. Drive DeVilbiss will supply
replacements for any parts which have failed
as a result of manufacturing, design or material
defect. Contact the retailer from you purchased
the chair in the event of you needing to make a
claim. Failures as a result of accidental damage,
misuse, modification or wear and tear are not
covered by this warranty.
Contact the stockist from whom you
purchased the chair to apply the warranty.
For full warranty conditions, contact your
Drive DeVilbiss stockist or visit
www.drivedevilbiss.co.uk
!
This does not affect your statutory rights.
 Loading...