

Page 1

lifetime limited
warranty
Your Drive brand product is warranted to be free
of defects in materials and workmanship for the
lifetime of the original consumer purchaser.
This device was built to exacting standards and
carefully inspected prior to shipment. This Lifetime
Limited Warranty is an expression of our confidence in the materials and workmanship of our
products and our assurance to the consumer of
years of dependable service.
In the event of a defect covered by this warranty, we will, at our option, repair or replace the
device.
This warranty does not cover device failure due to
owner misuse or negligence, or normal wear and
tear. The warranty does not extend to non-durable
components, such as rubber accessories, casters,
and grips, which are subject to normal wear and
need periodic replacement.
combination transfer
bench/commode
www.drivemedical.com
If you have a question about your Drive device
or this warranty, please contact an authorized
Drive dealer.
© 2006 Medical Depot, Inc. All rights reserved.
Drive is a trademark of Medical Depot, Inc.
Port Washington N.Y. 11050 USA Made in USA
EU Authorized Representative
Drive Medical LTD
Ainley’s Industrial Estate
Elland, West Yorkshire,
United Kingdom HX5 9JP
www.drivemedical.com
Page 2
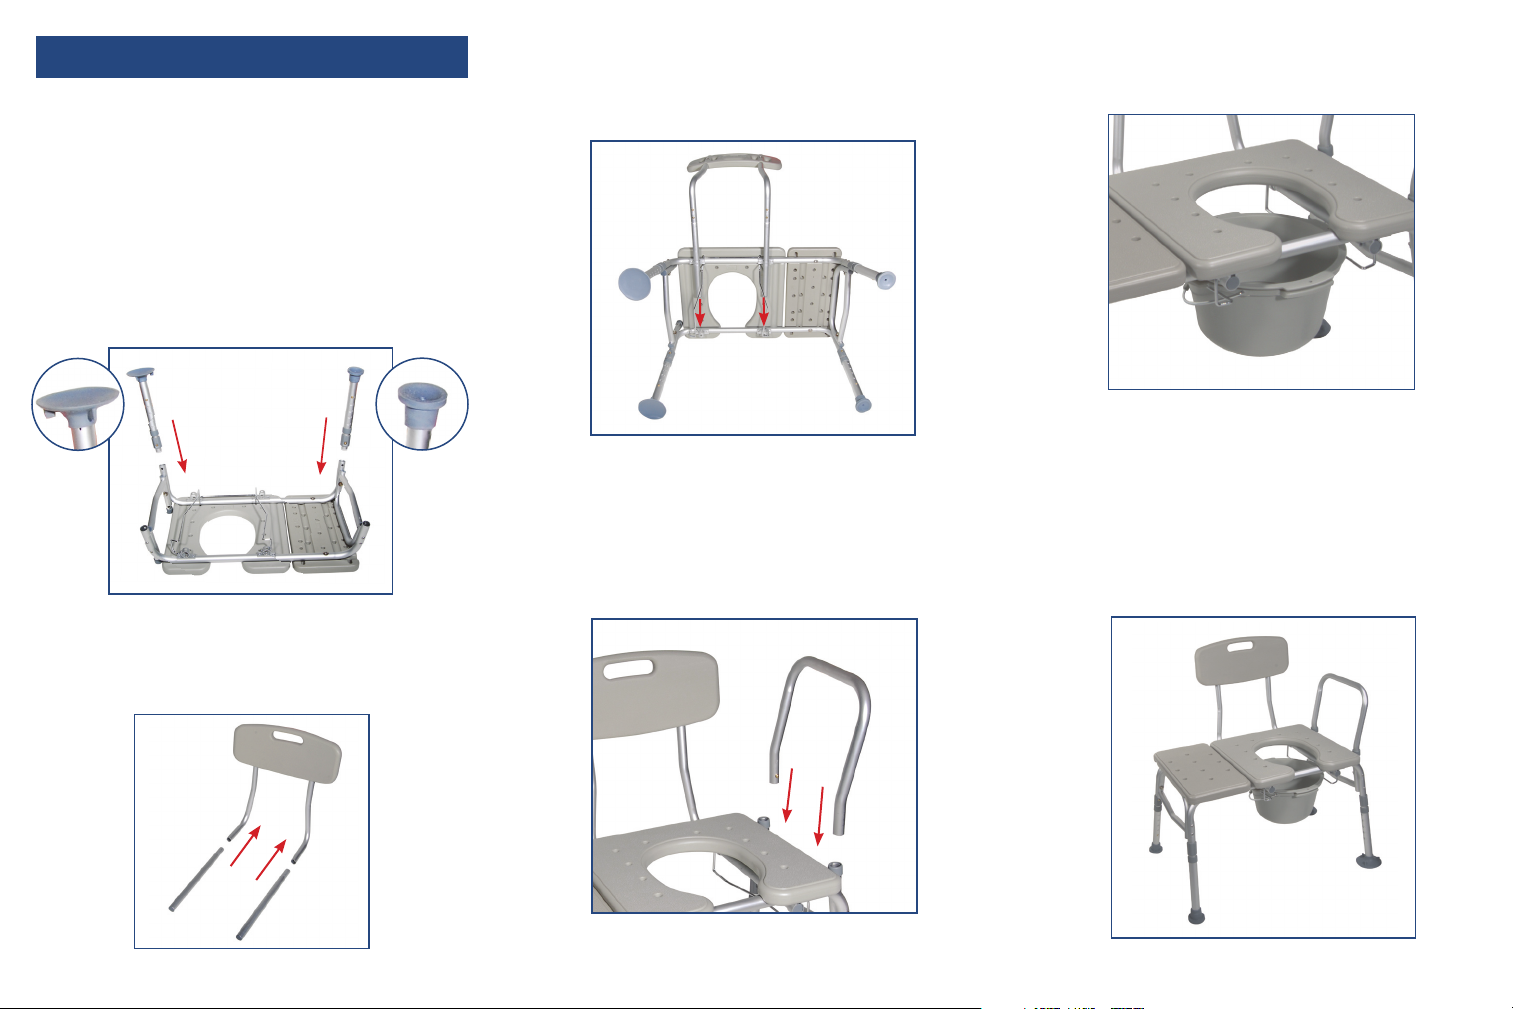
assembly instructions
1. Remove contents from carton.
2. Lay transfer bench upside down on a flat surface.
3. Attach leg with the large suction cup by depressing
the brass push pin and inserting into the receptacle.
Repeat for second leg (Figure 1).
Note: These legs are inserted into the same side that
the arm support will be.
4. Attach leg with small rubber tip by depressing brass
push pin and inserting into the receptacle. Repeat for
second leg (Figure 1).
6. Insert backrest into base by depressing push pins
and sliding supports through both receptacles.
Note: backrest must go through both sets of
receptacles to become secure (Figure 3).
8. Slide commode bucket into hanging metal bars and
affix hooks over back support bars to secure in place
(Figure 5).
figure 5
figure 1
5. To assemble backrest, insert pole into backrest
support by depressing push pin and sliding into
receptacle. Repeat for second pole (Figure 2).
figure 2
figure 3
7. Turn transfer bench right-side-up. Attach armrest
by depressing brass push pins and sliding into the arm
receptacle on the side of the bench. Make sure the
arm arcs outward, not inward (Figure 4).
figure 4
9. Place legs with suction cups into bath tub.
Note: Pull Tab on the suction cup to release from the tub.
Adjust legs to the need of the patient.
The transfer bench/commode is best used when the
bench is level.
 Loading...