

Page 1

maintenance
Drive recommends periodic visual inspection of this
product by the user, to ensure that all parts and
hardware are secure, that components are in good
working order and not worn, torn, frayed, or loose,
and that there are no obstructions or impediments
to normal, safe operation. If any part or mechanism
appears to be unsafe or compromised, do not use the
product. If you experience problems, please contact the
provider that sold you the product, or Drive Technical
Support at (866) 621-4933.
lifetime limited warranty
Your Drive brand product is warranted to be free of
defects in materials and workmanship for the lifetime
of the original consumer purchaser.
This device was built to exacting standards and carefully inspected prior to shipment. This Lifetime Limited
Warranty is an expression of our confidence in the
materials and workmanship of our products and our
assurance to the consumer of years of dependable
service.
This warranty does not cover device failure due to owner misuse or negligence, or normal wear and tear. The
warranty does not extend to non-durable components,
such as rubber accessories, casters, and grips, which are
subject to normal wear and need periodic replacement.
If you have a question about your Drive device or this
warranty, please contact an authorized Drive dealer.
all terrain
knee walker
Item # 990X
© 2018 Medical Depot, Inc. All rights reserved.
Drive is a trademark of Medical Depot, Inc.
Port Washington N.Y. 11050 USA Made in China
REV5.12.14.18
www.drivemedical.com
Page 2

CAUTION! TO REDUCE THE RISK OF ACCIDENT:
- Before using the Knee Walker, you should be trained by
a healthcare professional or dealer.
- Engage the lock and practice bending, reaching and
transfers on and off the Knee Walker. DO NOT use the
Knee Walker by yourself until you have been properly
trained, you have practiced with someone and you feel
confident you can maneuver by yourself.
- The use of the Knee Walker is individual to the person.
You should develop your own methods for use based on
your personal level of function and ability.
- NEVER aempt a maneuver that has not been
practiced.
- Be aware of your surroundings when operating the Knee
Walker. Look for hazards and avoid them.
· This is a medical device, not a toy. Do not allow children
or adults to use this as a toy or for entertainment.
· Always check the fasteners on the tiller, wheels, brakes,
and seat for tightness before use.
Hand Grip
Hand Brake
Handle Height
Lock Tab
Knee Pad
Seat Lock
Knob
Water
Bole
Tiller Lock
Lever
· Be cautious when operating on loose gravel or uneven
surfaces.
· Do not travel over large cracks or fissures.
· Stop and move forward slowly when encountering cracks
or separations in walkway surfaces.
· Do not operate in excess of 3 miles per hour (slow-to-
moderate walking speed).
· Do not turn unless one foot is on the ground.
· Never make a sharp turn at high speed.
· Do not turn at speeds over 1 mph (very slow walking
speed).
· Do not operate on inclines above 15 degrees (slight
incline).
· Do not travel over drops or barriers such as curbs or
parking stops.
Disc Brake
Seat Post
Suspension
operating the knee walker
The Drive Knee Walker is a mobility device that provides
strength and comfort to anyone who may have an injury
below the knee. It allows an even distribution of body
weight by supporting half of the weight on the device and
the other half on the non-injured leg. The device has a
cushioned platform to support both the injured leg and
ankle to make certain that no weight will be placed on the
lower leg.
The device is designed for easy steering and stopping.
Brakes are also featured on this device for controlled
movement and safety.
Page 3
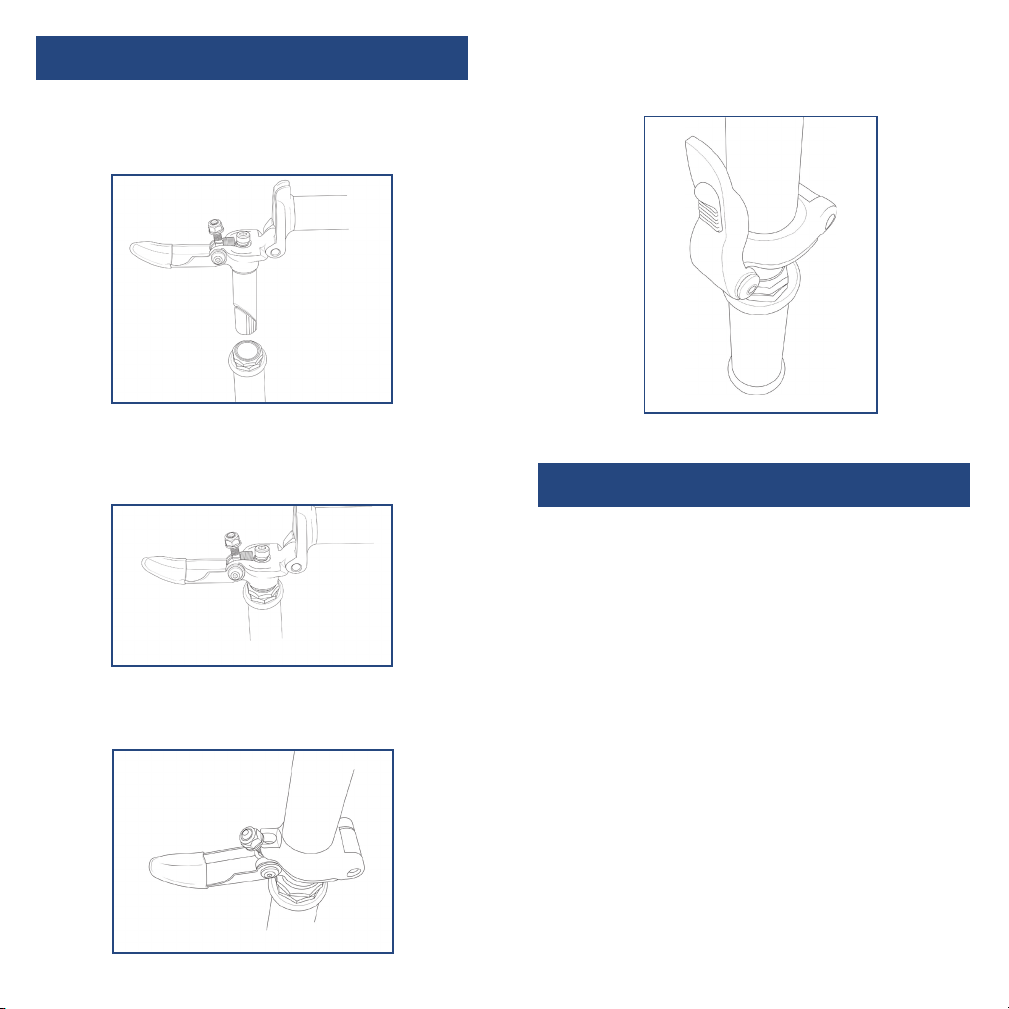
assembly instructions
1. Remove contents from carton.
2. Insert front tiller into front of frame (figure 1).
5. Secure screw and tiller in place by pushing locking
handle against the side of the tiller (figure 4).
figure 1
3. Once tiller is in place and handles are aligned correctly
with the wheels, tighten the screw (figure 2) using the
Allen key (included) by turning clockwise.
figure 2
4. Straighten tiller to the upright position. Slide second
screw into receptacle (figure 3)
figure 3
figure 4
using the hand brake
Do not use the Knee Walker if the brake system is not
working properly.
- The Knee Walker’s brake is similar to a bicycle and also
has a locking feature.
- To use the brake, simply pull the lever with your finger
tips toward the handle bar.
- To lock the brake, pull the brake lever towards the
handlebar and push down spring loaded push buon
located on top of brake (A) figure 5. When done
correctly, push buon with remain down and brake lever
will be locked in place. Repeat for other brake.
- To release brake, simply pull lever towards the handle
bar. Push pin will pop up automatically.
Page 4
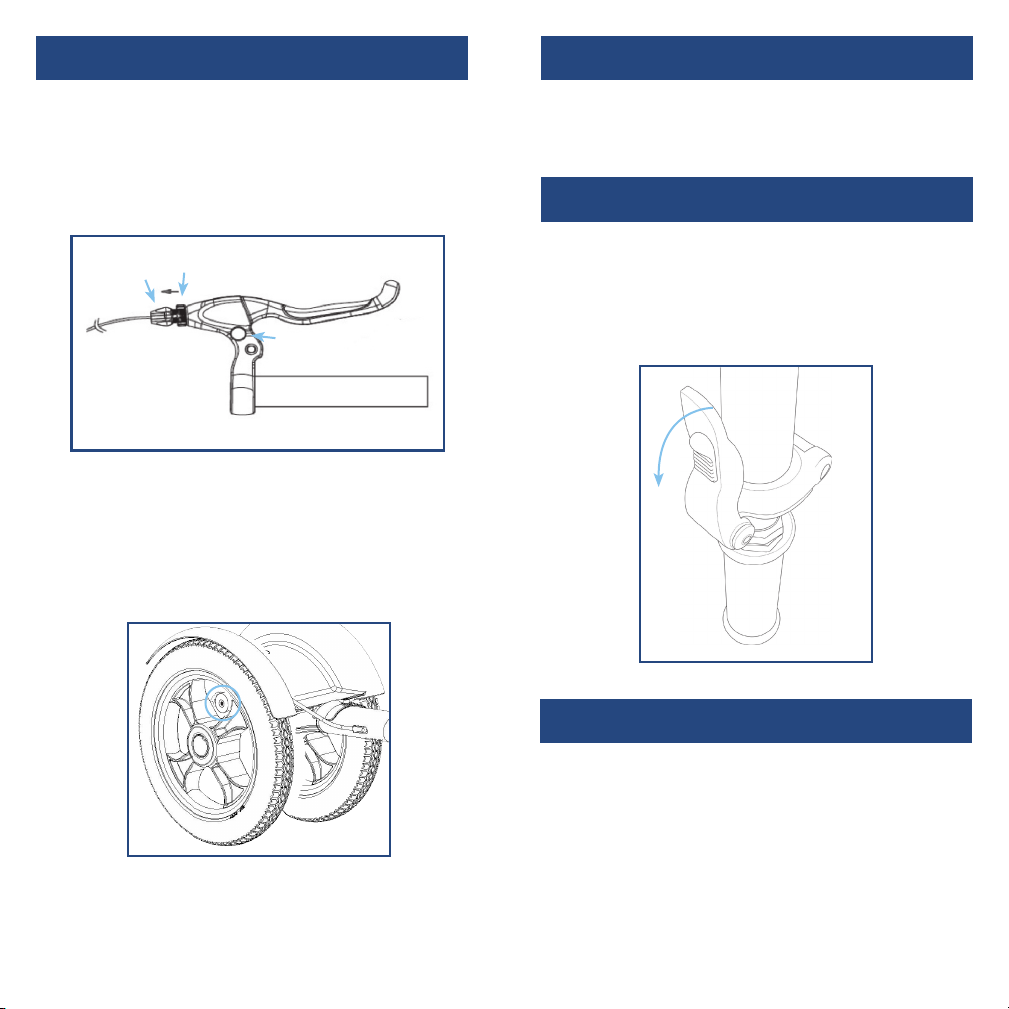
adjusting the hand brake
adjusting seat height
- For minor adjustment the brake adjuster (B) located on
the handbrake can be turned out from the hand
brake counterclockwise to tighten the brake, or
clockwise to loosen the brake. Keep the cable adjuster
nut (C) against the hand brake.
C
B
A
figure 5
- If further adjustment is required, apply the same
method of adjustment at the lower cable adjuster.
- As you adjust the cable adjuster and the adjuster nut
away from each other the brakes will tighten, and as
you adjust them closer the brakes will loosen.
To adjust the seat height, open clamp located under the
seat. Set seat to desired height and close clamp.
to fold tiller
To fold the tiller down, pull the boom lock lever away
from the knee walker until the lock is disengaged. While
holding the lock lever in the down position, fold the tiller
down until it rests on the knee pad.
figure 7
figure 6
- If further adjustment is required, use the Allen key
(included) to adjust double-way regulator, shiing
pads to proper position.
adjusting handle height
To adjust the handle height, release the lock tab on the
collar and adjust the handle to the desired height. Push
the lock tab back to tighten.
 Loading...