

984P
PLASTIC SNAP PLIERS
Instruction Guide for
Size 20 Round, Star, Heart and Flower Plastic Snaps
©2017 Prym Consumer USA Inc.
950 Brisack Rd. • Spartanburg, SC 29303
www.dritz.com
984P Plastic Snap Pliers – Round, Star and Heart Instructions
Fabric Preparation
for Round, Star, and
Use two layers of light to medium-weight fabric, reinforced with interfacing.
Mark position of snaps on topside and underside of garment.
Test a snap on swatch of fabric.
Heart Snaps
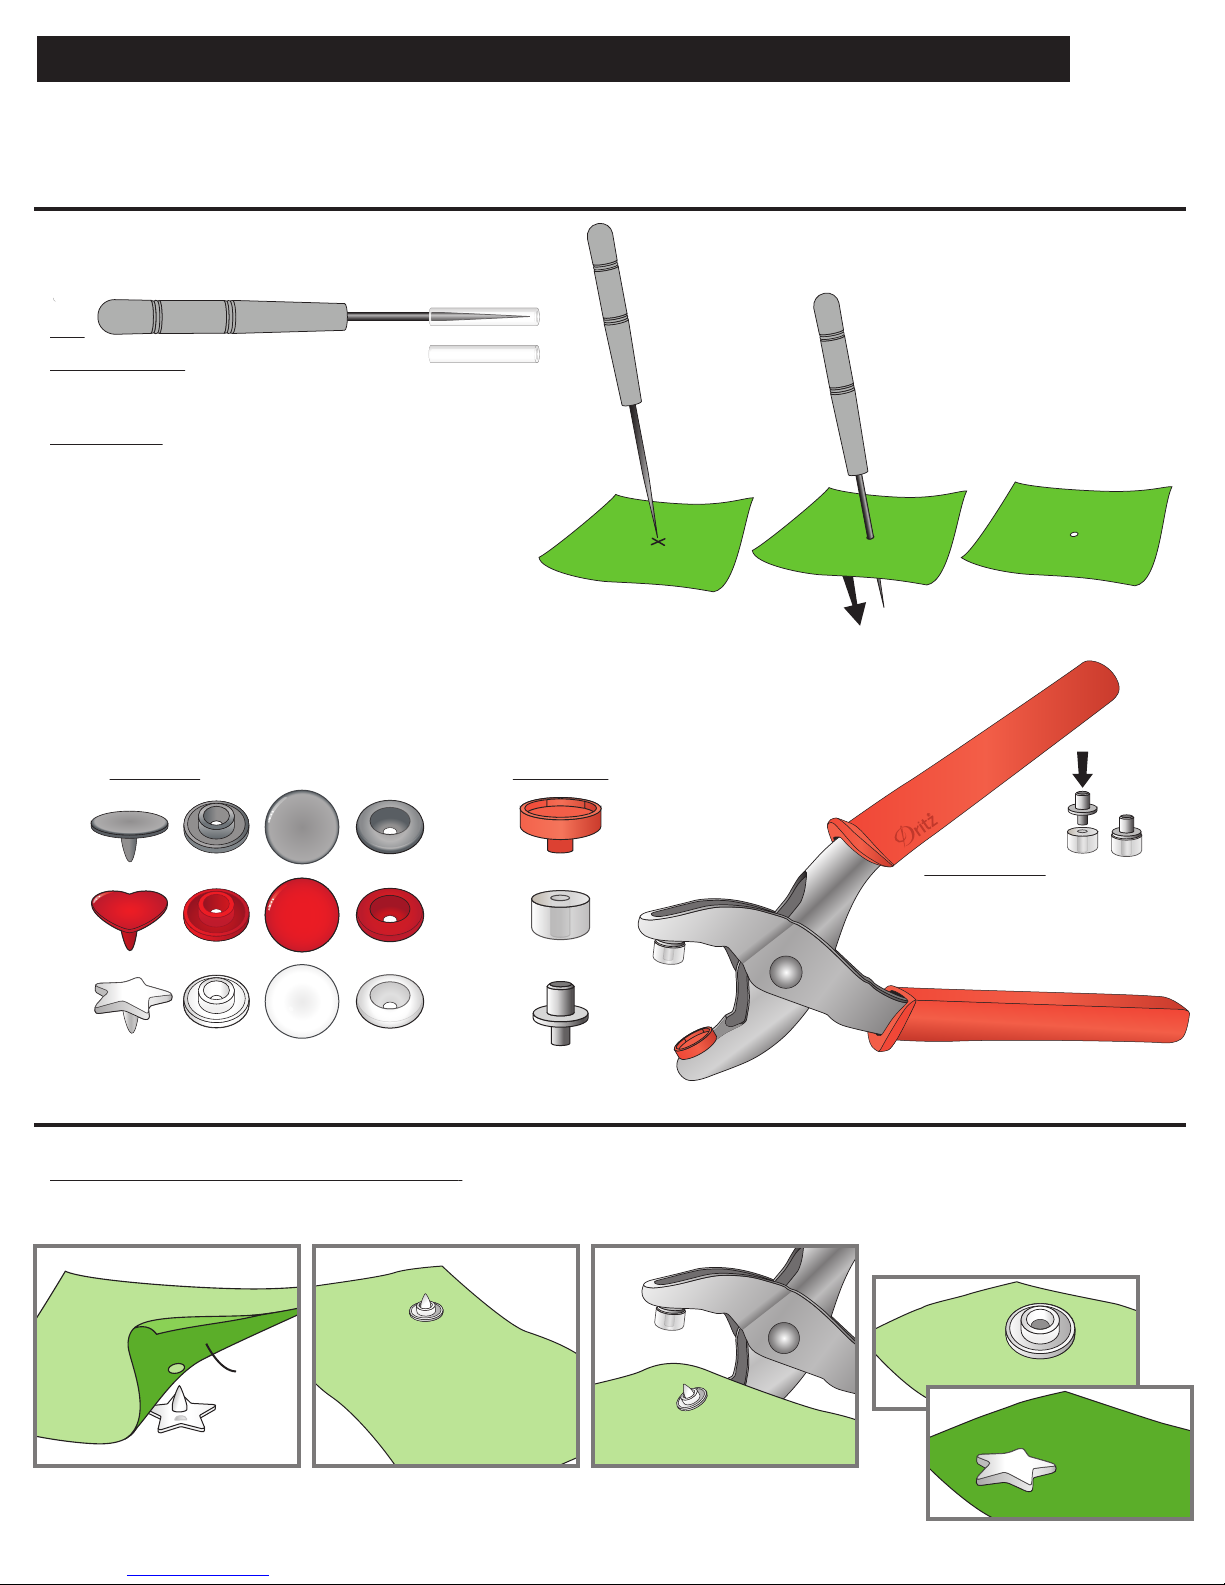
Instructions for Making Holes in Fabric
Awl:
Protective Cover:
Remove protective cover from point of awl. Replace for storage.
Making Holes:
1. Center point of awl over mark.
2. Push awl through fabric to make a small hole.
Instructions for Applying Round, Star and Heart Plastic Snaps
Snap Parts:
Round:
Heart:
Star:
Cap Socket Round
Applying Decorative Cap & Stud (Topside of garment):
1. Insert prong of decorative cap
into hole.
1.
Stud
Cap
2. Place stud over prong. 3. Position decorative cap in coral
2.
Pliers Tools:
Coral Cap Holder
Pressing Head
Metal Die Base
cap holder.
3.
Inserting Tools:
Insert small side of metal die base
into the pressing head. Insert metal
die base in one side of pliers and
coral cap holder in other side.
4. Squeeze pliers rmly to apply snap. Check
for tightness; if necessary, rotate pliers and
squeeze again to completely atten post.
Wrong side
of fabric
Right side
of fabric
Wrong side of fabric
Wrong side of fabric
Wrong side
of fabric
4.
Right side
of fabric

984P Plastic Snap Pliers – Round, Star and Heart Instructions (cont.)
Applying Round Cap & Socket (Underside of garment):
1. Insert prong of round cap into
hole.
2. Place socket over prong. 3. Position round cap in coral cap
holder.
4. Squeeze pliers rmly to apply snap. Check
for tightness; squeeze again, if necessary.
1.
Right side
of fabric
Removing Tools:
Slip hook of gray tool remover
inside ledge of pliers and press
down to release tool.
Repeat for opposite side.
Wrong side
of fabric
2.
Right side of fabric
3.
Right side of fabric
984P Plastic Snap Pliers – Flower Instructions
Fabric Preparation for
Flower Plastic Snaps
Use two layers of light to medium-weight fabric, reinforced with interfacing.
Mark position of snaps on topside and underside of garment.
Test a snap on swatch of fabric.
Right side
of fabric
4.
Wrong side
of fabric
Instructions for Making Holes in Fabric
Awl:
Protective Cover:
Remove protective cover from point of awl. Replace for storage.
Making Holes:
1. Center point of awl over mark.
2. Push awl through fabric to make a small hole.
Instructions for Applying Flower Snaps
Snap Parts:
Cap Socket Round
Stud
Cap
Pliers Tools:
Brown Cap
Holder
Pressing
Head
Metal
Die Base
Inserting Tools:
Insert small side of metal die base
into the pressing head. Insert metal
die base in one side of pliers and
coral cap holder in other side.

984P Plastic Snap Pliers – Flower Instructions (cont.)
Applying Decorative Cap & Stud (Topside of garment):
1. Insert prong of decorative cap
into hole.
1.
Wrong side
of fabric
5. Remove brown cap holder after
applying all decorative snaps.
Metal die base will remain in
tool. Slip hook of gray tool
remover inside ledge of pliers
and press down to release tool
Right side
of fabric
2. Place stud over prong. 3. Position decorative cap in
brown cap holder.
2.
Wrong side of fabric
3.
Wrong side of fabric
Inserting Tool:
Insert coral cap holder into pliers.
4. Squeeze pliers rmly to apply snap. Check
for tightness; if necessary, rotate pliers and
squeeze again to completely atten post.
Wrong side
of fabric
4.
Right side
of fabric
5.
Applying Round Cap & Socket (Underside of garment):
1. Insert prong of round cap into
hole.
1.
Right side
of fabric
Wrong side
of fabric
2. Place socket over prong. 3. Position round cap in coral cap
2.
Right side of fabric
holder.
3.
Right side of fabric
Coral Cap Holder
4. Squeeze pliers rmly to apply snap. Check
for tightness; squeeze again, if necessary.
Right side
of fabric
4.
Wrong side
of fabric
Removing Tools:
Slip hook of gray tool remover
inside ledge of pliers and press
down to release tool.
Repeat for opposite side.

Additional Information
Storing Pliers
Replacement
Inserts
Squeeze pliers together and
hook gray tool remover at
top of pliers.
Replacement inserts have been
provided. When tools are no longer
staying in pliers well, remove worn
insert and replace with new.
WARNING: Small parts. Keep away from
children under 3 years old. NOT A TOY.
 Loading...