

DriSteem STS Series, STS03, LTS Series, LTS03 Service Kit Manual
®
STS
Steam-to-Steam Humidifier,
DI Water
®
LTS
Liquid-to-Steam Humidifier,
DI Water
Service Kit Manual
WARNING
Indicates a hazardous situation that could result in death or
serious injury if instructions are not followed.
Read all warnings and instructions
This page provides important safety instructions; it is intended to supplement — not replace — the humidifier's Installation, Operation, and
Maintenance Manual (IOM). Read the IOM that was provided with the humidifier before performing service or maintenance procedures
on any part of the system. Failure to follow all warnings and instructions could produce the hazardous situations described here and in the
IOM, resulting in property damage, personal injury, or death.
If the IOM is missing, go to www.dristeem.com to download a replacement. mc_071608_0910
Hot surfaces and hot water
Steam humidification systems have extremely hot surfaces, and water in tanks, electrode cylinders, steam pipes, and dispersion assemblies
can be as hot as 212 °F (100 °C). To avoid severe burns, allow the entire humidification system to cool.
Follow the cool-down procedure in the humidifier's IOM before performing service or maintenance procedures on any part of the system.
mc_071608_0911
Electrical shock hazard
If the humidifier starts up at a call for humidity during maintenance, severe bodily injury or death from electrical shock could occur. To
prevent such start-up, follow the procedure below before performing service or maintenance procedures on this humidifier (after the tank
has cooled down and drained):
1. Use the Vapor-logic®3 controller keypad to change the control mode to Standby.
2. Shut off all electrical power to the humidifier using the field-installed fused disconnect, and lock all power disconnect switches in the
OFF position.
3. Close the field-installed manual water supply shut-off valve.
4. Close the manual inlet steam supply (on STS) or inlet hot liquid supply (on LTS) shut-off valve. mc_050808_1541
CAUTION
Indicates a hazardous situation that could result in damage to
or destruction of property if instructions are not followed.
WARNING
mc_051508_1145
Damage from hot discharge water
Discharge water can be as hot as 212 °F (100 °C) and can damage the drain plumbing.
If the humidifier is equipped with a water tempering device such as a DRI-STEEM Drane-kooler™, it needs fresh make-up water in order to function
properly. Make sure the water supply to the Drane-kooler remains open during draining.
If the humidifier is not equipped with a water tempering device, allow the tank to cool before opening the drain valve. mc_111308_1345
Parts in this service kit are for STS03 and/or LTS03 humidifiers (February 2003 to present). Parts are listed on page 2.
CAUTION
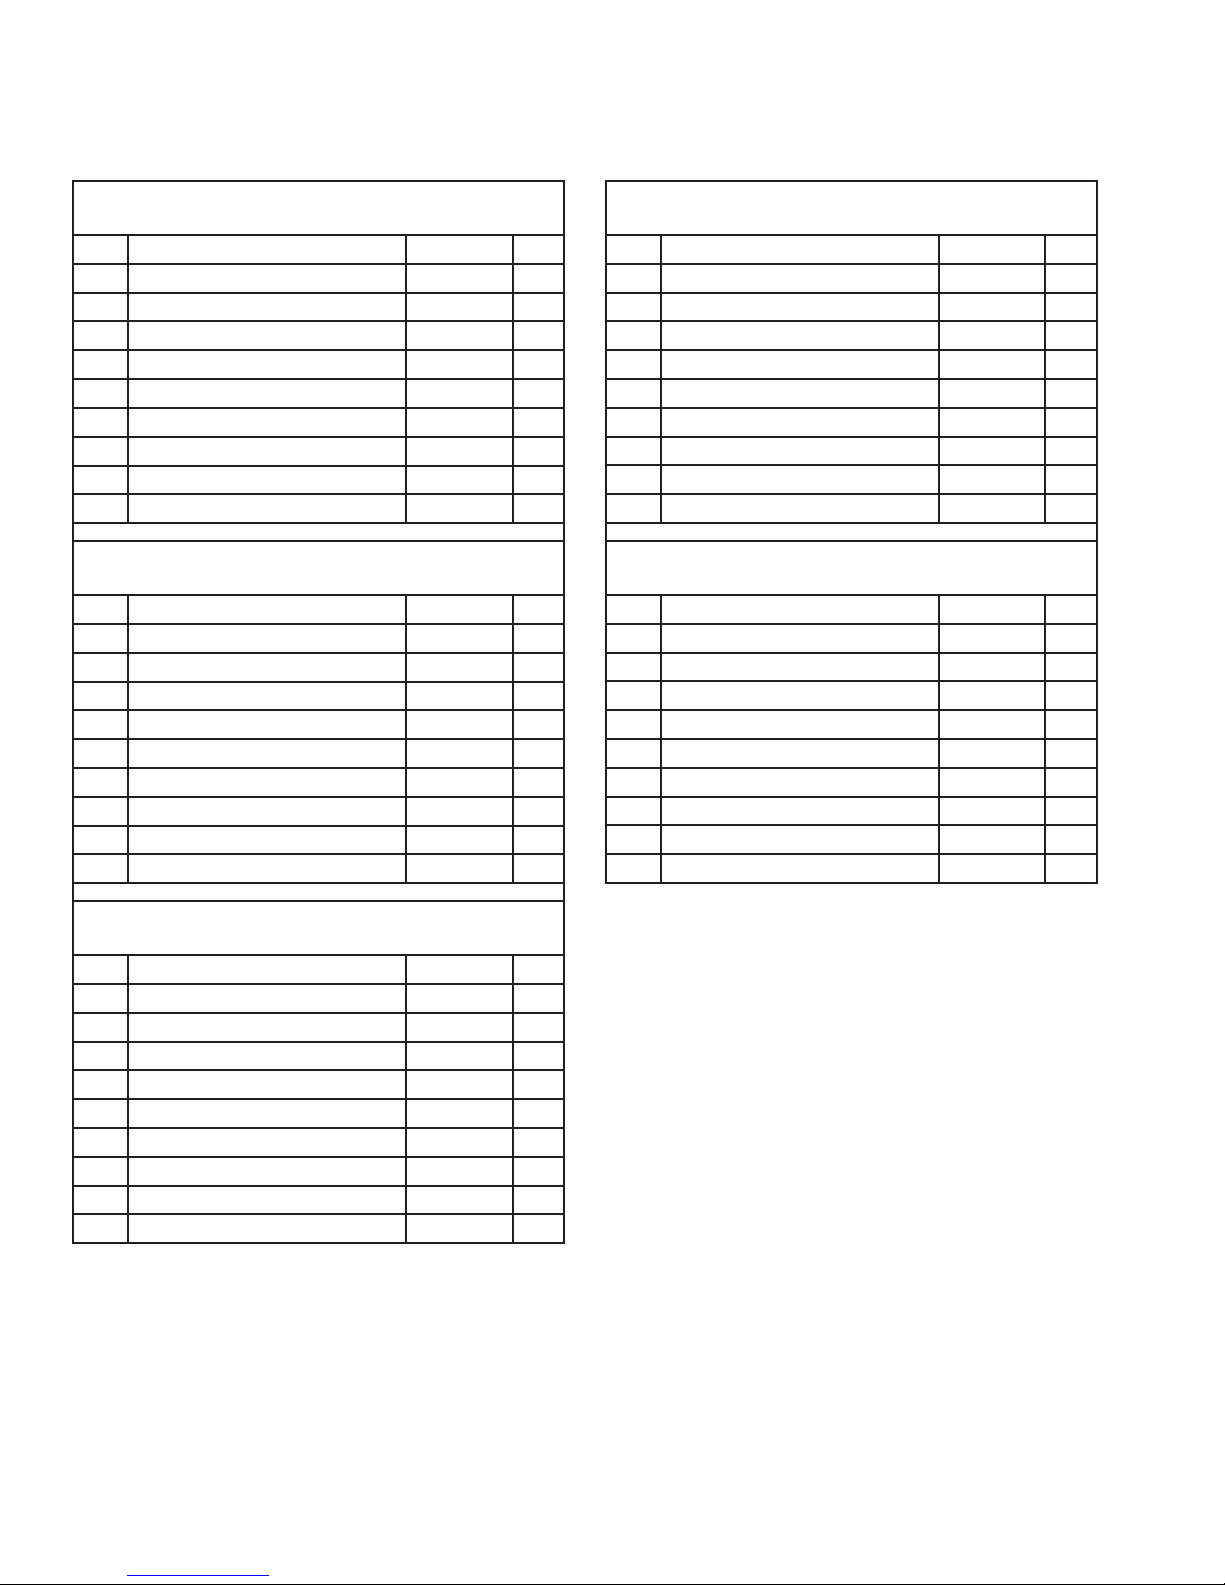
STS/LTS, DI water, service kit parts
STS03 / LTS03, DI water, 25
Service Kit No. 900100-701
No. Part Description Part No. Qty.
1 Silicone, clear (not shown) 320000 1
2 Seat, black EPDM (see Float Valve inset) 505210-003 1
3 Probe plate gasket 308416-001 1
4 Cleanout plate gasket 308015-001 1
5 Cover gasket 160692-001 1
6 Heat exchanger gasket, front 308220 2
7 Washer, flat 10-32 700300-008 8
8 Nut, 10-32, w/Nylon insert 700252-003 8
9 Nut, 14-20, w/Nylon insert 700300-016 16
STS03, DI water, 50
Service Kit No. 900100-702
No. Part Description Part No. Qty.
1 Silicone, clear (not shown) 320000 1
2 Seat, black EPDM (see Float Valve inset) 505210-003 1
3 Probe plate gasket 308416-001 1
4 Cleanout plate gasket 308015-002 1
5 Cover gasket 160692-002 1
6 Heat exchanger gasket, front 308220 2
7 Washer, flat 10-32 700300-008 8
8 Nut, 10-32, w/Nylon insert 700252-003 8
9 Nut, 14-20, w/Nylon insert 700300-016 16
STS03, DI water, 200/400
Service Kit No. 900100-704
No. Part Description Part No. Qty.
1 Silicone, clear (not shown) 320000 1
2 Seat, black EPDM (see Float Valve inset) 505210-003 1
3 Probe plate gasket 308416-001 1
4 Cleanout plate gasket 308015-003 1
5 Cover gasket 160692-004 1
6 Heat exchanger gasket, front 308220 2
7 Washer, flat 10-32 700300-008 8
8 Nut, 10-32, w/Nylon insert 700252-003 8
9 Nut, 14-20, w/Nylon insert 700300-016 16
STS03, DI water, 800 and LTS03, DI water, 400
Service Kit No. 900100-705
No. Part Description Part No. Qty.
1 Silicone, clear (not shown) 320000 1
2 Seat, black EPDM (see Float Valve inset) 505210-003 1
3 Probe plate gasket 308416-001 1
4 Cleanout plate gasket 308015-003 1
5 Cover gasket 160692-004 1
6 Heat exchanger gasket, front 308220 4
7 Washer, flat 10-32 700300-008 16
8 Nut, 10-32, w/Nylon insert 700252-003 16
9 Nut, 14-20, w/Nylon insert 700300-016 32
STS03 / LTS03, DI water, 100
Service Kit No. 900100-703
No. Part Description Part No. Qty.
1 Silicone, clear (not shown) 320000 1
2 Seat, black EPDM (see Float Valve inset) 505210-003 1
3 Probe plate gasket 308416-001 1
4 Cleanout plate gasket 308015-002 1
5 Cover gasket 160692-003 1
6 Heat exchanger gasket, front 308220 2
7 Washer, flat 10-32 700300-008 8
8 Nut, 10-32, w/Nylon insert 700252-003 8
9 Nut, 14-20, w/Nylon insert 700300-016 16
Page 2 • DRI-STEEM STS/LTS, DI Water, Service Kit Manual
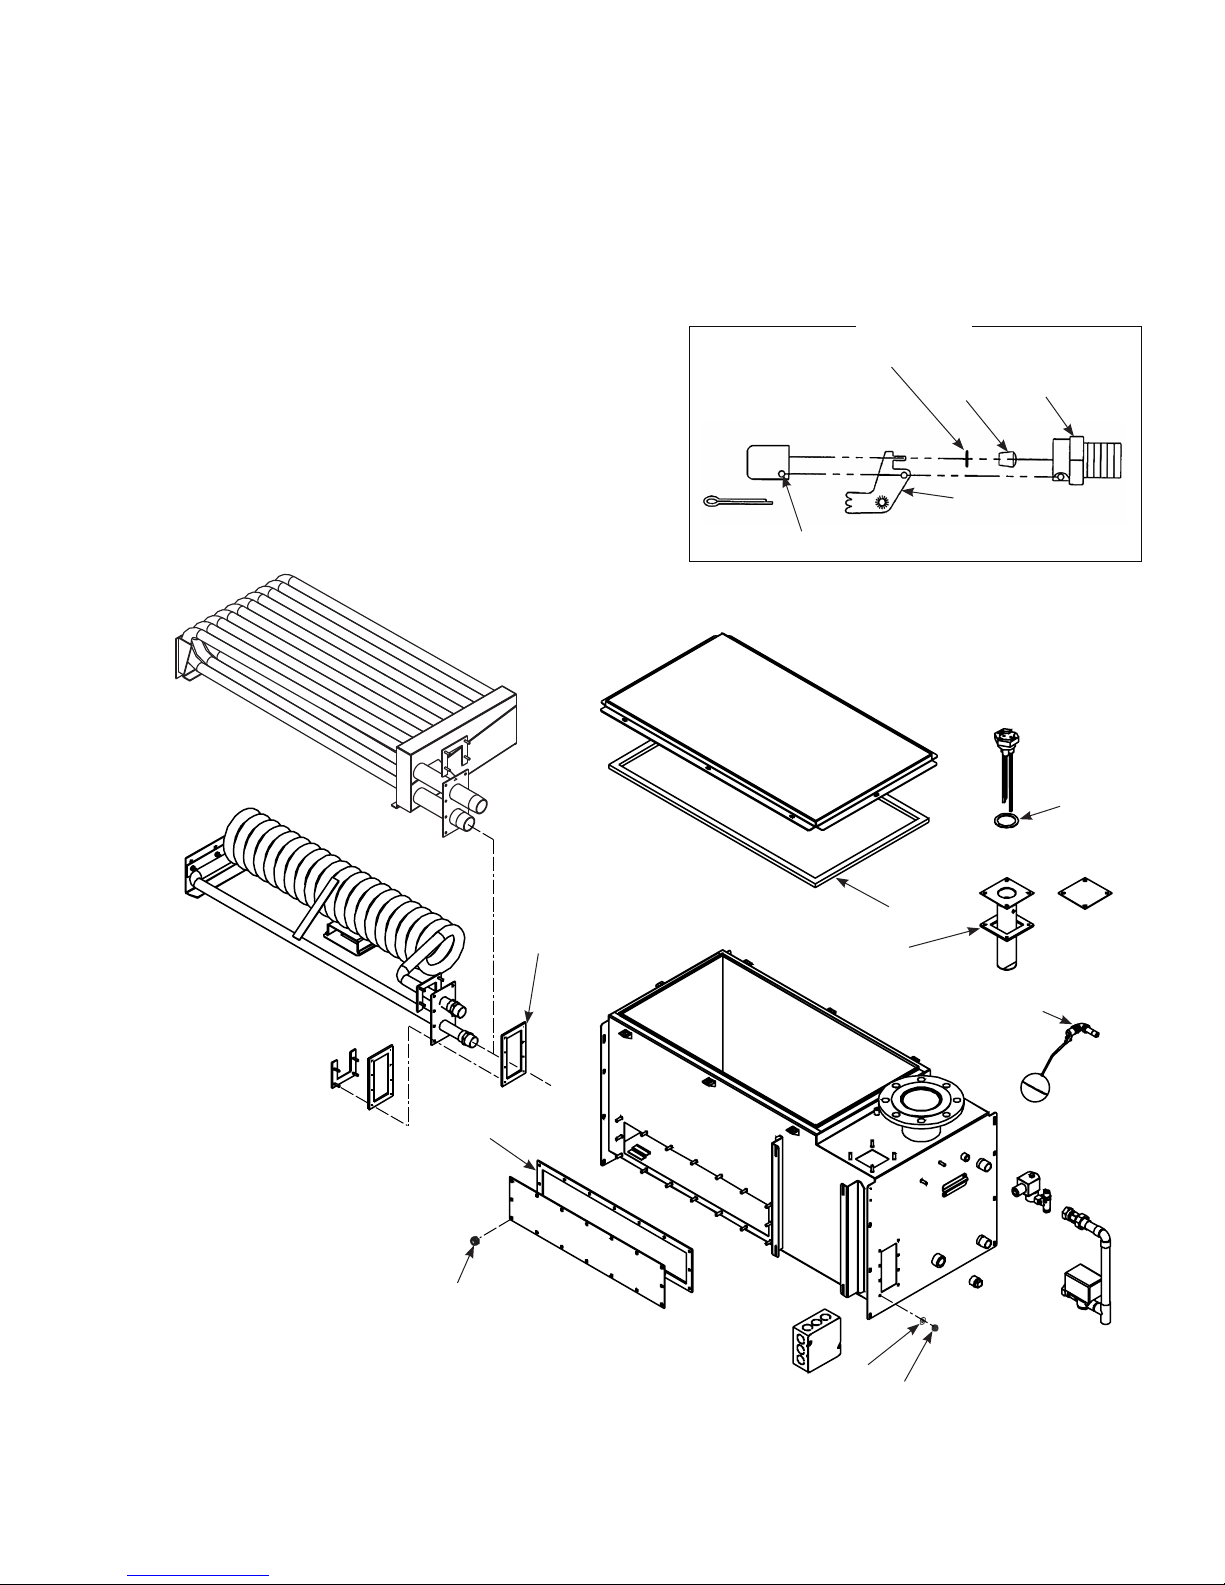
STS/LTS, DI water, service kit parts
This service kit contains the replacement parts called out in the
parts drawing to keep your DRI‑STEEM humidifier operating
at peak performance. This Service Kit Manual provides
important safety and service instructions; it is intended to
supplement — not replace — the humidifier's Installation,
Operation, and Maintenance Manual. Please see Read all
warnings and instructions on page 1.
While performing service and maintenance procedures,
replace existing parts with the new parts provided in the
service kit.
mc_052808_1400
STS heat exchanger
Float Valve
Put back-up washer on
arm first, then seat (2).
Insert cotter pin
2
Arm
Valve
OM-863-1
mc_051908_1410
LTS heat exchanger
Notes:
• Parts for both standard water and DI
water humidifiers are shown.
• Components may by oriented differently
than shown in drawing.
6
(small holes)
4
9
Torque to 25 to 35 in-lbs
(2.8 to 4.0 N-m).
Apply clear
silicone (1)
to both sides
of gasket.
5
3
See Float Valve inset.
7
8
DRI-STEEM STS/LTS, DI Water, Service Kit Manual • Page 3
LTS-OM-18X
OM-946X
mc_052108_1645

STS/LTS, DI water, service instructions
Inspection and maintenance
Cool down humidifier
Before performing any maintenance, allow the tank to cool
down. Insulated and uninsulated tanks will have hot surfaces.
Note: Fresh make‑up water is used to speed up cooling. Do
not close the manual water supply before cooling down
the humidifier; otherwise the tank could stay hot for
several hours.
1. Close the manual shut‑off valve on the inlet steam supply
(STS humidifiers) or the inlet hot liquid supply (LTS
humidifiers).
2. Drain the tank:
Models with a standard drain valve:
a. Manually open the drain valve. The fill valve will open
after enough water has drained out of the tank.
b. Let the fill water run until the tank is cooled; then shut
off the field installed manual supply water shut‑off
valve.
c. Let the tank drain; then manually close the drain valve.
For models with end-of-season drain option (must have
Vapor‑logic3 controller), use the keypad to perform the
cool down procedure. Refer to the Vapor-logic3 Installation
and Operation Manual for more information:
a. Select Manual Drain in the control modes screen.
b Allow approximately half the water to drain out of the
tank.
c. Select Auto in the control modes screen; the fill valve
opens and the humidifier cools down.
d. When the fill valve closes, select Manual Drain in
the control modes screen and allow the tank to drain
completely dry. The humidifier should be cool enough
to work on.
mc_060308_0700
Annually (also recommended when maintenance is performed)
1. All safety devices in the control circuit should be cycled on
and off to verify they are functioning. These include:
• High limit switch
• Airflow proving switch
2. Inspect tank and gaskets for leaks.
3. Verify that the float valve is closing off. If the float valve
will not shut off, there may be particulate on the valve seat,
or the stopper may be worn and need replacing.
As long as mineral‑free water is used in the humidifier, no
cleaning or flushing should be necessary.
Off-season maintenance
1. Perform a complete inspection of the following:
• Heat exchanger
• Float valve
• Humidifier tank and gaskets
2. After inspection, leave the humidifier empty until
humidification is required.
After the humidification season, DRI‑STEEM recommends a
complete inspection and cleaning of the heat exchanger and
water chamber. After cleaning, the unit should remain empty
until humidification is required.
On units with Teflon coated heat exchangers, do not use
a sharp object when cleaning. Cuts or scratches on the heat
exchanger will impair its ability to shed scale during operation
and could cause the Teflon to separate from the metal surface.
mc_060208_0708
mc_060208_0715
Shut down humidifier
Follow the procedure below before performing service or
maintenance procedures, (after the tank has cooled down and
drained):
1. Use the Vapor‑logic3 controller keypad to change the
control mode to Standby.
2. Shut off all electrical power to the humidifier using
the field‑installed fused disconnect, and lock all power
disconnect switches in the OFF position.
3. Close the field‑installed manual water supply shut‑off
valve.
4. Close the manual inlet steam supply (on STS) or inlet hot
liquid supply (on LTS) shut‑off valve.
Page 4 • DRI-STEEM STS/LTS, DI Water, Service Kit Manual
mc_060208_1440

STS/LTS, DI water, service instructions
DI water requirements
• Verify regularly that water processing equipment
is operating correctly. The presence of chlorides in
improperly processed DI water eventually causes pitting
and failure of the heat exchanger tank and its components.
Your DRI‑STEEM warranty does not cover damage caused
by chloride corrosion.
• DI models do not require regular cleaning, although
regular inspections are advised.
• DI models do not require skimming or draining
and flushing to remove precipitated minerals. All
DI humidifiers should be drained at the end of a
humidification season either by manually opening
the drain valve or by programming the humidifier to
automatically drain at end‑of‑season (electric drain valve
and Vapor‑logic3 required).
Note: Although DI models do not require regular tank
cleaning, this service kit contains a new cleanout
plate gasket and nuts. If replacing the gasket, replace
the nuts also, and torque the nuts to 25 to 35 in‑lbs
(2.8 to 4.0 N‑m).
mc_060308_0720
mc_062608_1425
Start-up
Perform the Annual safety checks in the Inspection and
maintenance section on page 4.
If resuming operation after service, do not leave the humidifier
unattended; allow it to cycle through multiple fill cycles to
verify that all serviced parts are functioning properly. See the
humidifier's Installation, Operation, and Maintenance manual
for start‑up details.
mc_052908_1005
DRI-STEEM STS/LTS, DI Water, Service Kit Manual • Page 5

Humidifier De-scaling Solution
Scale buildup on humidifier heat exchangers
acts as an insulator, reducing humidifier
performance while increasing energy
costs. To keep humidifiers operating as
efficiently as possible, remove scale with
DRI-STEEM's Humidifier De-scaling Solution,
available for purchase from your DRI-STEEM
representative or distributor.
The De-scaling Solution cleans without risk
of corroding humidifier tanks or welds. The
De-scaling Solution also cleans surfaces
unreachable by hand scraping.
DRI-STEEM's Humidifier De-scaling Solution
is the only approved cleaner/de-scaler for
use with DRI-STEEM humidifiers. Use of
other cleaners/de-scalers may void your
DRI-STEEM warranty.
mc_021908_1410-heatx
DRI-STEEM Corporation
An ISO 9001: 2000 certified corporation
U.S. Headquarters:
14949 Technology Drive
Eden Prairie, MN 55344
800-328-4447 or 952-949-2415
952-229-3200 (fax)
European office:
Marc Briers
Grote Hellekensstraat 54 b
B-3520 Zonhoven
Belgium
+3211823595 (voice)
+3211817948 (fax)
E-mail: marc.briers@dristeem.com
Continuous product improvement is a
policy of DRI-STEEM Corporation; therefore,
product features and specifications are
subject to change without notice.
DRI-STEEM, LTS, STS, and Vapor-logic
are registered trademarks of DRI-STEEM
Corporation and are filed for trademark
registration in Canada and the European
community.
Drane-kooler is a trademark of DRI-STEEM
Corporation.
© 2013 DRI-STEEM Corporation
Form No. STS/LTS-DI-SKM-1013
Page 6 • DRI-STEEM STS/LTS, DI Water, Service Kit Manual
Part No. 891000-502 Rev D
DRI-STEEM products are warranted according to the terms and conditions of the standard
two-year Limited Warranty effective when the humidifier was purchased. See the literature
that was shipped with the humidifier for warranty information.
mc_081308_1405
 Loading...