

Drinkwell 360 Stainless Steel Pet Fountain User Manual

www.petfountain.com
IMPORTANT SAFETY
INSTRUCTIONS
WARNING: When using electric appliances, basic
precautions should always be followed, including the following:
1) Read all the instructions before using appliance.
2) To reduce the risk of injury, close supervision is necessary when
an appliance is used near children.
3) Only use attachments recommended or sold by the
manufacturer.
4) Do not use outdoors. FOR INDOOR USE ONLY.
5) Do not unplug by pulling on the cord. To unplug, grasp the plug,
not the cord.
6) Do not operate any appliance with a damaged cord or plug, or
after the appliance malfunctions or is dropped or damaged in
any manner. Return appliance to the nearest authorized
service facility for examination, repair, or electrical or mechanical
adjustment.
7) For a portable appliance - To reduce the risk of electrical shock,
do not place or store appliance where it can fall or be pulled into
a tub or sink.
8) Always unplug any appliance when not in use, before putting on
or taking off parts, and before cleaning. Never yank a cord to
remove from the outlet.
SAVE THESE INSTRUCTIONS
INSTRUCTIONS PERTAINING TO;
RISK OF FIRE, ELECTRIC SHOCK OR
HARM TO PERSONS

www.petfountain.com
www.petfountain.com
OPERATING INSTRUCTIONS
U.S. Patents No. 5,799,609 and 5,842,437
DO NOT RUN DRY - FOR INDOOR HOUSEHOLD USE ONLY
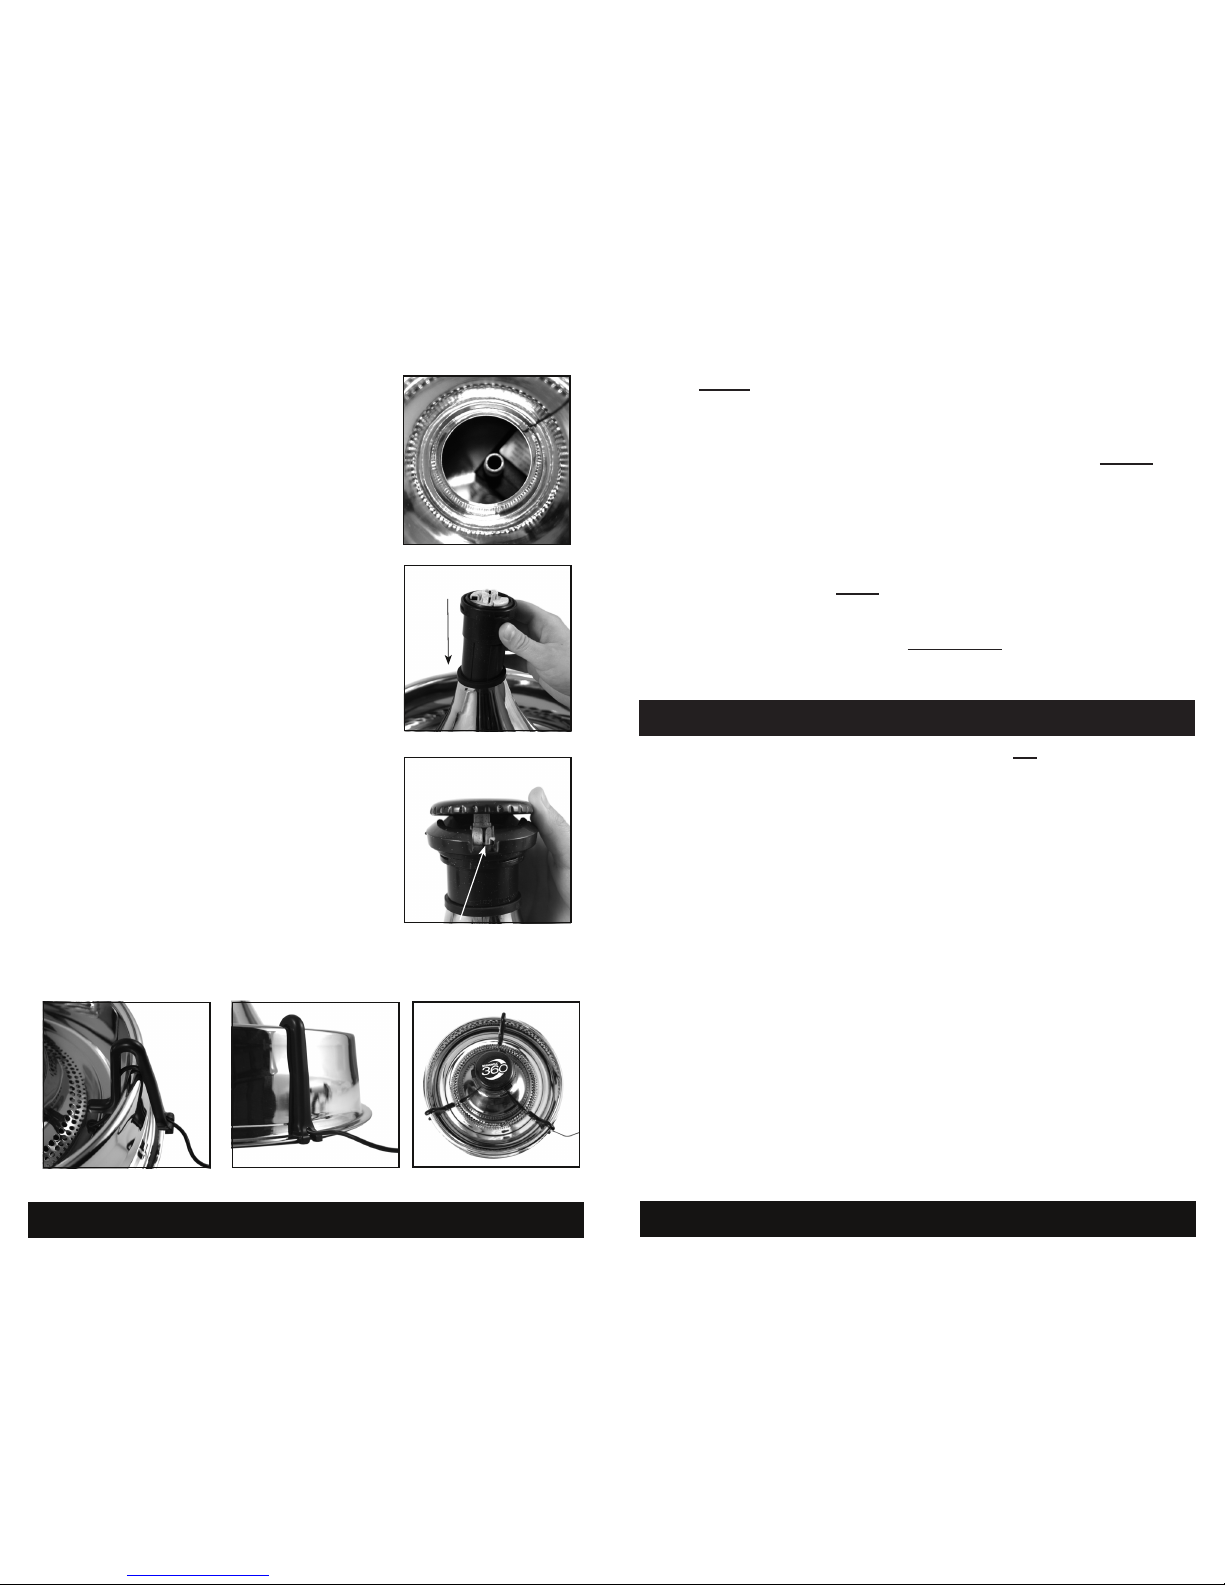
3) Place the pump inside the indention in the bowl. Position the pump so that
the circular opening on the top, is in the upper right hand corner or true
center of the bowl. (See Fig. 3a) Press down on the pump to engage the
suction cups. Place the intake tube into the circular opening on the top of
the pump (See Fig. 3b).
Congratulations on your new Drinkwell® 360 Stainless Steel Pet Fountain! The
fountain will come partially assembled; however, it is a good idea to make sure
none of the fountain pieces have come loose during shipping. Your new fountain
is composed of several plastic & metal parts, a replaceable charcoal lter and a
low voltage submersible pump. (See Fig. 1)
Fig. 1
Flow Control Cap
Cone
Pump &
Low Voltage
Adapter
Filter Housing
Filter
Filter
Housing
Cap
Interchangeable Spout
Rings (5 versions)
Intake Tube
1) As with any electrical device, check the
electrical cord for any tears or damage
before use.
2) Make sure the inline plug is connected.
(See Fig. 2)
Fig. 2
IMPORTANT: Rinse the lter thoroughly under cool
water before placing into the housing! This will remove
any loose charcoal dust, which is harmless to your pet.
A small amount of charcoal dust may shed for the life
of the lter. This is normal and not harmful to your pet.
The lter should be replaced every two weeks for best
performance. Filters may need to be changed more
frequently depending on the number of pets using the
fountain. If you notice a decrease in the ow of the water
that is not corrected by increasing the ow control to max
ow, this may be an indication of a clogged and dirty
lter and/or the need to rinse and clean the lter housing.
Consult the Fountain Disassembly and Cleaning Section
of this manual for details on cleaning and maintaining your
fountain.
Inline plug
Fig. 7
4) Align the cone so that the cord runs through the cord
notch (See Fig. 4) without moving the pump from its
original position (Step 3),Once the cord is aligned,
gently place the cone piece into resting position.
5) Take the partially assembled lter housing and
remove the Flow Control Cap by gently lifting straight
up - DO NOT TWIST TO REMOVE. (See Fig. 5).
Gently lift up and remove the Spout Ring to access
the Filter Housing Cap.
6) Unscrew Filter Housing Cap and insert the lter into
the Filter Housing with the pull-tab facing up. (See
Fig. 6) The lter will slide easily into place. Next,
screw on the Filter Housing Cap.
Fig. 3b
Fig. 4
Fig. 5
Fig. 6
Bowl
Rubber Gasket
Cord Clips
pg. 1
pg. 2
Fig. 3a
www.petfountain.com
www.petfountain.com
7) Look into the cone opening and make sure
the intake tube is sticking straight up from the
motor. (See Fig. 7a) Carefully, insert the Filter
Housing into the cone opening and push
straight down. (See Fig. 7b) By pushing the
Filter Housing all the way down to the rubber
gasket, the housing should easily attach to
the intake tube.
8) Select one of the ve interchangeable spouts
based upon your personal preference or your
pet’s. Place the chosen spout on top of Filter
Housing Lid and gently press down to secure
in place.
9) On the Filter Housing Lid, align the Flow
Control Cap with the raised notches (Fig. 9).
Press down gently and the cap will snap into
place. With the Flow Control Cap, you will be
able to easily adjust the intensity of the water
ow. Turn the cap to the right to increase the
ow of water and turn to the left to decrease.
10) Take one of the plastic cord clips and align
with the electrical cord hanging over the rim
of the bowl. With the two-prong end on the
outside of the bowl (See Fig. 10a), slide the
cord clip all the way down until it clips onto
the bottom of the bowl. (See Fig. 10b)
11) Take the other two plastic cord clips and
attach them to the bowl so that the three clips
together form the three points of a triangle.
(See Fig. 11) This will lock the cone in place.
FOUNTAIN: CLEAN ONCE A WEEK
(For identication of parts in bold refer to parts diagram on page 1)
FOUNTAIN DISASSEMBLY & CLEANING
WARNING: When cleaning your fountain, do not use any abrasive
cleaning solutions, sponges, or pads. These abrasive surfaces can
scratch the stainless steel parts. The Fountain Must Be Cleaned
Regularly To Continue Working Normally!
FILTERS:
1) Filters should be changed approximately every two weeks. Replace
lters more frequently when using the fountain for multiple pets or pets
that produce a lot of saliva.
2) Filters are an added feature of the fountain. Their use is not required for
normal operation.
3) For replacement lters, visit a pet store near you or call 866-322-2530.
Fig. 7a
Raised Notches
12) Place fountain in desired location. To take care of your oors, we suggest
to always use a protective mat or other durable, water resistant surface.
This will help protect your oor from any water that may splash out from
your pet’s use of the fountain.
13) Fill the fountain bowl with water. Make sure the water level is at least to
the MIN Fill Line so the pump does not run dry. This will prime the pump
for use. Do not ll the fountain past the MAX Fill Line.
14) Before plugging the fountain into electricity, make sure the cord and your
hands are completely dry. Plug the fountain in.
15) Add water as needed. Never let the water level fall lower than the MIN
Fill Line (approx. 1” above the bottom of the bowl) or the pump may fail.
To properly pick up the fountain, use both hands and grip underneath
the sidewalls of the bowl and lift. IMPORTANT: Never pick up a full
fountain by the center cone piece!
1) Unplug fountain from electrical source and disconnect the inline plug.
(See Fig. 2)
2) Remove the ow control cap and spout ring.
3) Next, remove the three cord clips by gently pulling the two-prong clip
up and away from the bottom of the bowl. Set the cord clips aside.
Fig. 7b
Fig. 9
Fig. 10a
Fig. 10b
Fig. 11
pg. 3
pg. 4
 Loading...