

Drinkwell D360-CA-17 Operating Manual
D360-CA-17
Drinkwell® 360 Pet Fountain - 3.8 Litres
Drinkwell® 360 fontaine pour animaux
de compagnie
- 3,8litres
Operating Guide
Manuel d’utilisation
Please read this entire guide before beginning
Veuillez lire ce manuel en entier avant de commencer
www.petsafe.net 3 2 www.petsafe.net
ENFR
IMPORTANT SAFETY INFORMATION
Explanation of Attention Words and Symbols used in this guide
This is the safety alert symbol. It is used to alert you to potential
personal injury hazards. Obey all safety messages that follow this
symbol to avoid possible injury or death.
WARNING indicates a hazardous situation which, if not avoided,
could result in death or serious injury.
CAUTION, used without the safety alert symbol, indicates a
hazardous situation which, if not avoided, could result in harm to
yourpet.
NOTICE is used to address safe use practices not related to
personalinjury.
When using electrical appliances, basic safety precautions should
always be followed to reduce the risk of fire, electric shock and/or injury to persons,
including the following:
• To reduce the risk of injury, close supervision is necessary when an appliance is used
by or near children.
• To protect against electric shock, do not place electrical Power Cord or plug in water
or other liquids.
• Do not use outdoors. FOR INDOOR HOUSEHOLD USE ONLY.
• Do not pull on the electrical Power Cord to remove the plug from the electrical outlet.
To unplug, grasp the plug, not the electrical Power Cord.
• Do not operate any appliance if it has a damaged electrical Power Cord or plug, or
if it is malfunctioning or has been damaged. Call Customer Care Centre immediately
for furtherinstructions.
• For a portable appliance - To reduce the risk of electric shock, do not place or store
an appliance where it can fall or be pulled into a bath tub or sink.
• Always unplug any appliance when not in use, before putting on or taking off parts
and before cleaning.
• Do not use an appliance for anything other than its intended use.
• If the plug of this device gets wet, turn off the electricity to that electrical outlet. Do not
attempt to unplug.
• Examine this appliance after installation. Do not plug into electrical outlet if there is
water on the electrical Power Cord orplug.
www.petsafe.net 3
FREN
• Do not allow pets to chew on or swallow any parts. If you are concerned about the
electrical Power Cord, purchase a cord conduit (a hard plastic protector) at any
hardware store.
• The plastic Pet Fountain parts are BPA-FREE. However, some animals have been
known to be sensitive to plastic food and water containers. If your animal shows signs
of an allergic reaction to the plastic, please discontinue use until you have consulted
with your veterinarian.
• The Pet Fountain is intended to run continuously (always plugged into electricity), as
long as the water level is maintained and the Pet Fountain is cleaned regularly. Be sure
to check the Pet Fountain regularly to help prevent damage to the Pump, as the water
may get consumed or evaporate causing the Pump to run dry.
• Do not attempt repairs on the Pump yourself.
• To avoid the possibility of the plug or outlet getting wet, the outlet should always be
above the level of the Pet Fountain.
• If an extension cord is necessary, an extension cord with a proper rating should
beused.
• The electrical use of this appliance is 2 watts.
• Do not use appliance for anything other than intended use. The use of attachments not
recommended or sold by the manufacturer may cause an unsafe condition. Do not
modify the unit.
• Do not install or store appliance where it will be exposed to weather or temperatures
below 4.5° C.
• Read and observe all important notices listed on the appliance and in the packaging.
SAVE THESE INSTRUCTIONS

www.petsafe.net 5 4 www.petsafe.net
ENFR
Thank you for choosing the PetSafe® brand. You and your pet deserve a companionship
that includes memorable moments and a shared understanding together. Our products
promote a lifestyle of protection, teaching and love; essentials that influence memories for
a lifetime. If you have any questions about our products, please visit our
website at www.petsafe.net or contact our Customer Care Centre.
To get the most protection out of your warranty, please register your product within 30
days at www.petsafe.net. By registering and keeping your receipt, you will enjoy the
product’s full warranty and should you ever need to call the Customer Care Centre,
we will be able to help you faster. Most importantly, your valuable information will
never be given or sold to anyone. Complete warranty information is available online
atwww.petsafe.net.
Table of Contents
Components ................................................................5
Features ...................................................................5
Key Definitions .............................................................. 6
Operating Instructions ........................................................ 7
Filters and Pet Fountain Cleaning ............................................... 9
Pump Maintenance ..........................................................11
Pet Fountain Reassembly ..................................................... 12
The Pet Fountain and Your Environment ......................................... 13
General Tips ............................................................... 14
Warranty ................................................................. 14
Compliance ............................................................... 15
Important Recycling Advice ..................................................16
Terms of Use and Limitation of Liability .........................................16
Français ................................................................ 17
www.petsafe.net 5
FREN
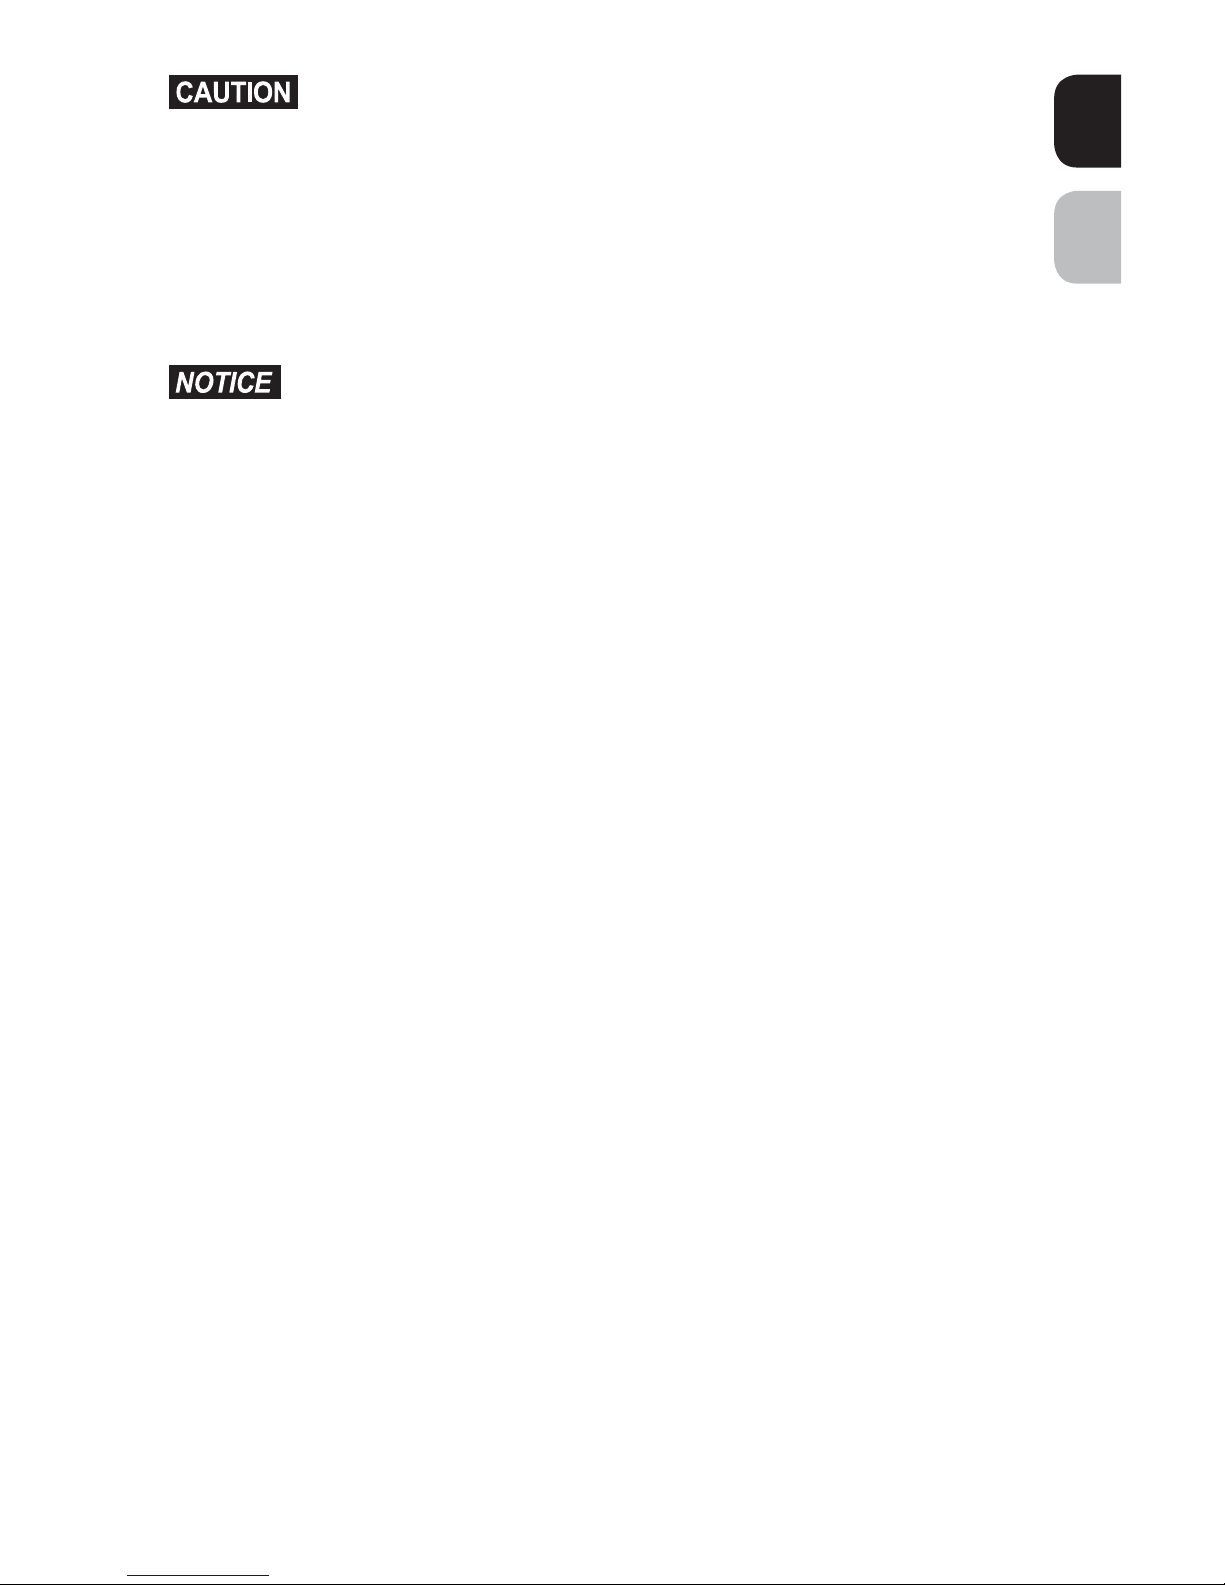
Components
Note: Your Pet Fountain will come partially assembled, however, it is a good idea to
make sure none of the Pet Fountain pieces have come loose in shipping.
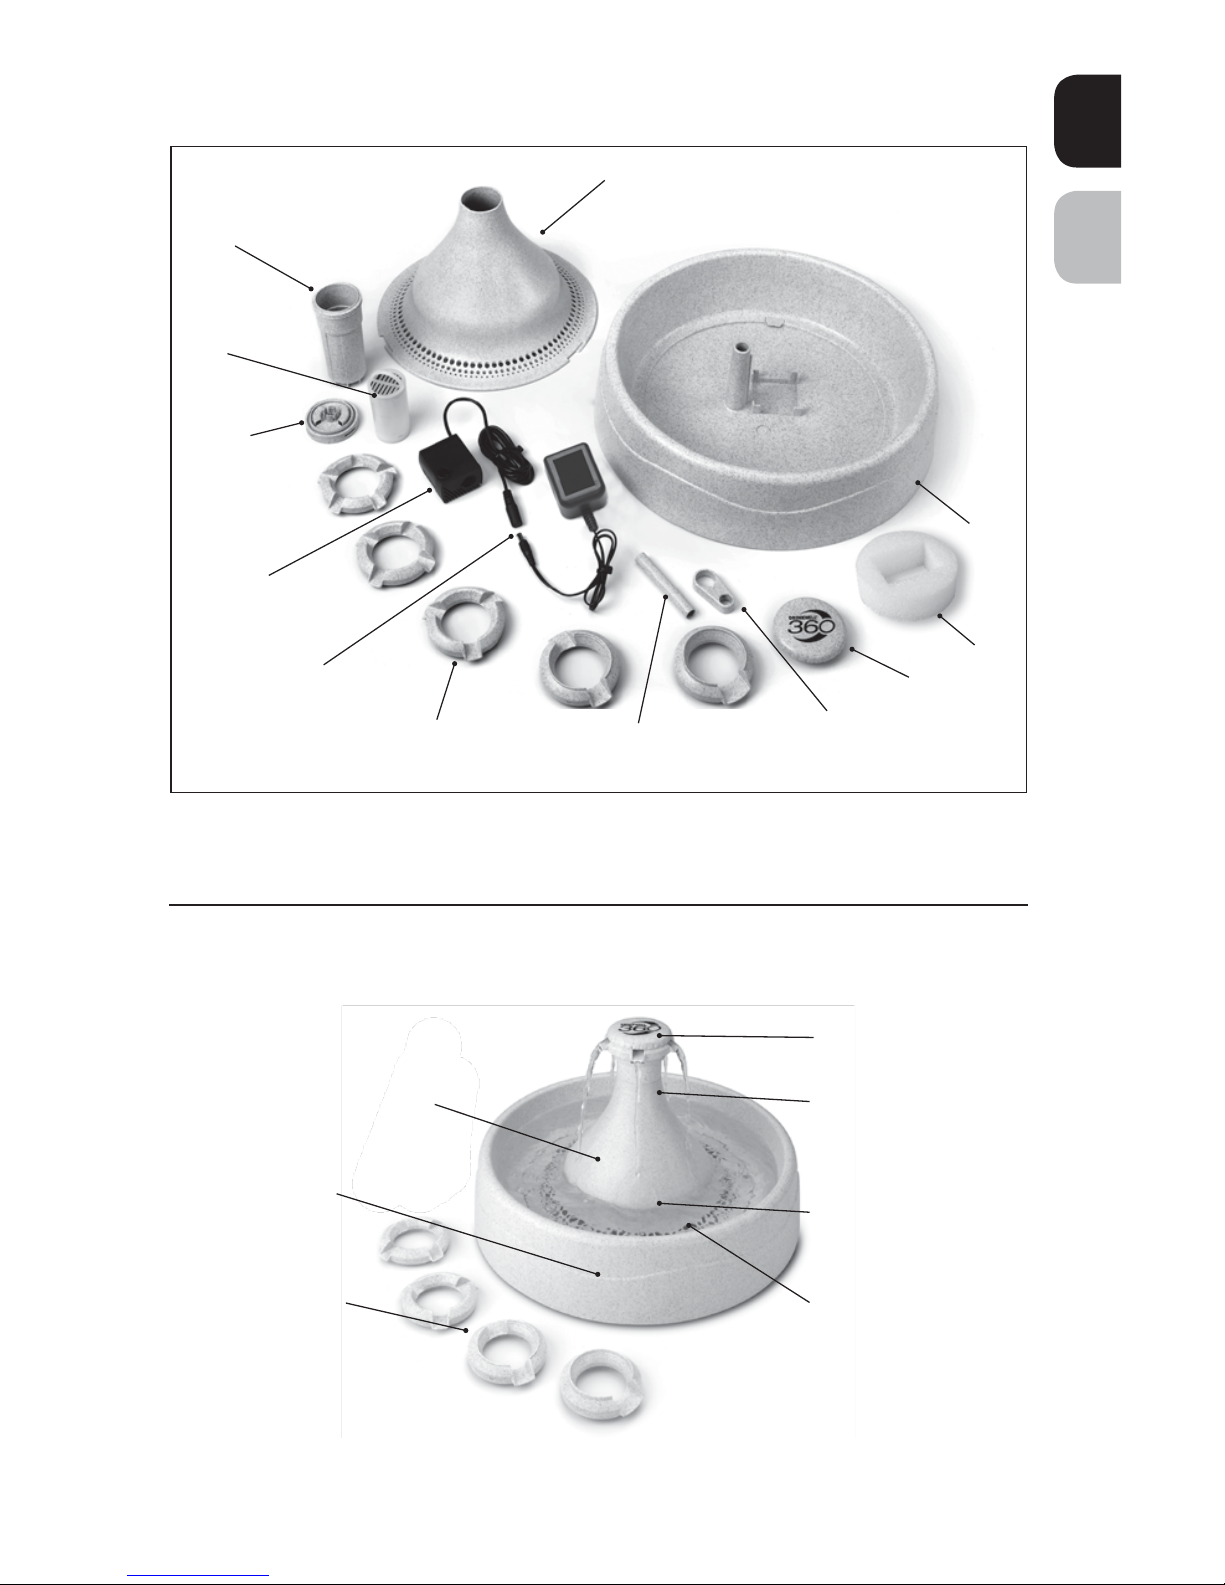
Features
Bowl
Flow Control Cap
Cone
Pump
Filter Housing
Charcoal
Filter
Filter Housing
Cap
Interchangeable Spout Rings
(5 versions)
Intake Tube
Intake Tube Holder
In-Line Plug &
Power Cord/
Adaptor
Foam Filter
Adjustable Flow
Control Cap
Replaceable Charcoal
Filter removes bad
tastes and odours
Submersible pump for
quiet operation
Foam Filter keeps
pump cleaner by
catching hair, debris
and pet food
Cone reduces splash and sound of
falling water
Dishwasher safe
(excluding pump)
3.8 L Water Capacity
Low-Voltage (12V) System
Interchangeable Spout
Rings create up to five
individual streams

www.petsafe.net 7 6 www.petsafe.net
ENFR
Key Definitions
Bowl: The Bowl is the foundation of the Pet Fountain. The circular Bowl piece can be
carried by simply gripping the sidewalls underneath the Bowl. In addition, the bottom of
the Bowl features “cord clips” to hide the Power Cord from view.
Cone: The Cone acts as the housing for the Pet Fountain components and protects
the Pump from curious pets. The Cone acts to reduce the splash and sound of the
falling water. It also houses a majority of the water and holds the Filter Housing and
subsequentparts.
Filter Housing: The Filter Housing slides into the opening at the top of the Cone. It
houses the Filter and locks into the Cone by twisting the entire Filter Housing a quarter turn.
Charcoal Filter: The cylindrical Charcoal Filter features a pull-tab at the top and should
be placed in the Filter Housing with the pull-tab facing upwards for easy placement
andremoval.
Foam Filter: The Foam Filter collects hair, debris and pet food before they reach the
Pump. It is important to use the Foam Filter as it helps maintain proper Pump function.
Filter Housing Cap: The Filter Housing Cap is a screw on cap that attaches to
the Filter Housing to keep the Filter in place. It serves as the base piece to attach the
Interchangeable Spouts & Flow Control Cap.
Spout Rings: The five Interchangeable Spout Rings can be easily changed based
upon your pet’s preference and can provide up to 5 streams of water for multiple
pethouseholds.
Flow Control Cap: The Flow Control Cap is attached to the top of the Pet Fountain and
adjusts the flow of water by simply turning the Flow Control Cap left or right. Turn to the
right to increase the flow of water. Turn to the left to decrease.
Pump: The small submersible aquarium Pump can be dismantled for cleaning.
Important: THE PUMP IS NOT DISHWASHER SAFE! Remove Pump from Pet Fountain
prior to cleaning (See “Pump Maintenance”). The Pump features an In-Line Plug for easy
attachment and removal.
www.petsafe.net 7
FREN
Operating Instructions
Important: DO NOT RUN DRY - FOR INDOOR USE ONLY.
1. As with any electrical device, check the electrical Power
Cord for any tears, or damage before use.
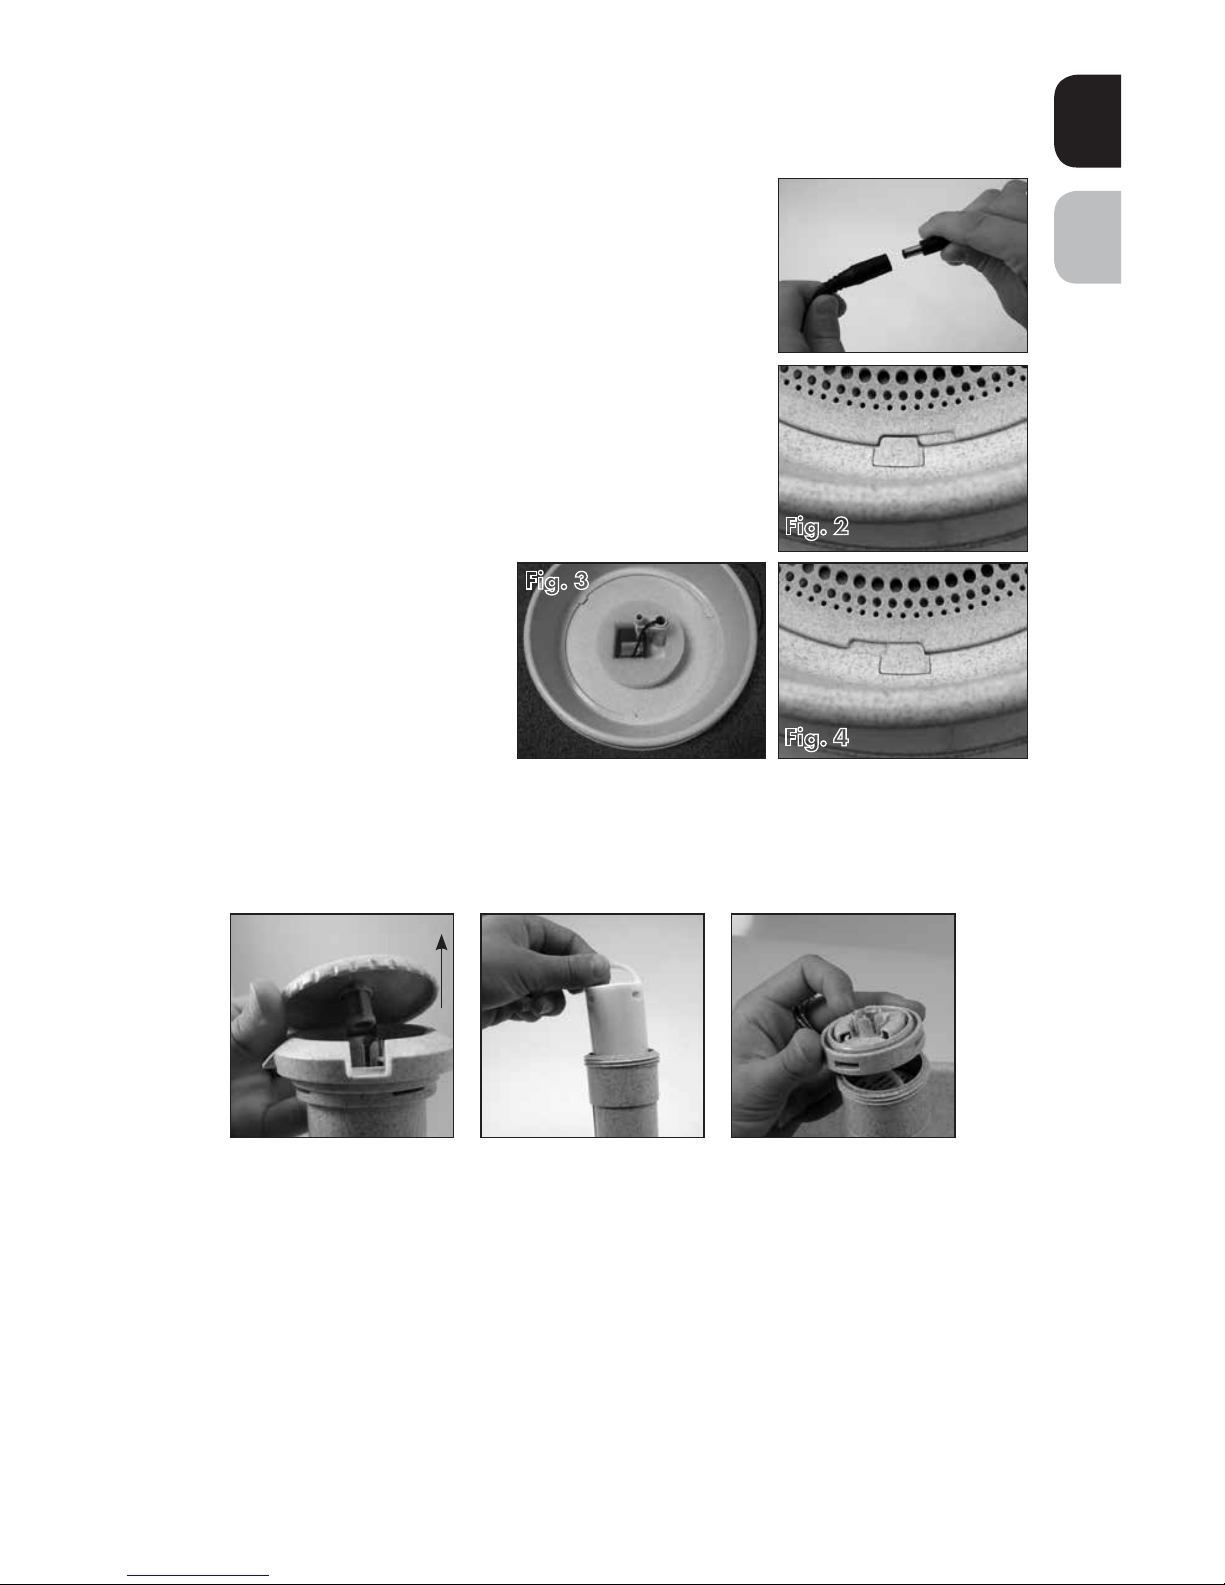
2. Make sure the In-Line Plug is connected (Fig. 1).
3. Remove Cone piece by twisting counter clockwise to
unlock the tabs from the Bowl (Fig.2). Lift up and
setaside.
4. Check to make sure the Intake Tube is properly inserted
(pushed all the way down) into the Pump (Fig. 3).
5. Replace Cone and twist clockwise to lock tabs in
place(Fig. 4).
6. Take the partially assembled
Filter Housing and remove the
Flow Control Cap by gently
lifting straight up - DO NOT
TWIST TO REMOVE (Fig. 5).
Gently lift up and remove the
Spout Ring to access the Filter
Housing Cap.
7. Unscrew Filter Housing Cap and insert the Charcoal Filter into the Filter Housing with
the pull-tab facing up (Fig. 6). The Charcoal Filter will slide easily into place. Next,
screw on the Filter Housing Cap (Fig. 7).
Important: Rinse the Charcoal Filter thoroughly under cold water before placing into
the housing. This will remove any loose charcoal dust, which is harmless to your pet. A
small amount of charcoal dust may be gradually released for the life of the Filter. This is
normal and not harmful to your pet.
Fig. 1
UNLOCKED
Fig. 2Fig. 2
LOCKED
Fig. 4Fig. 4
Fig. 3Fig. 3
Fig. 6 Fig. 7
Fig. 5
www.petsafe.net 9 8 www.petsafe.net
ENFR
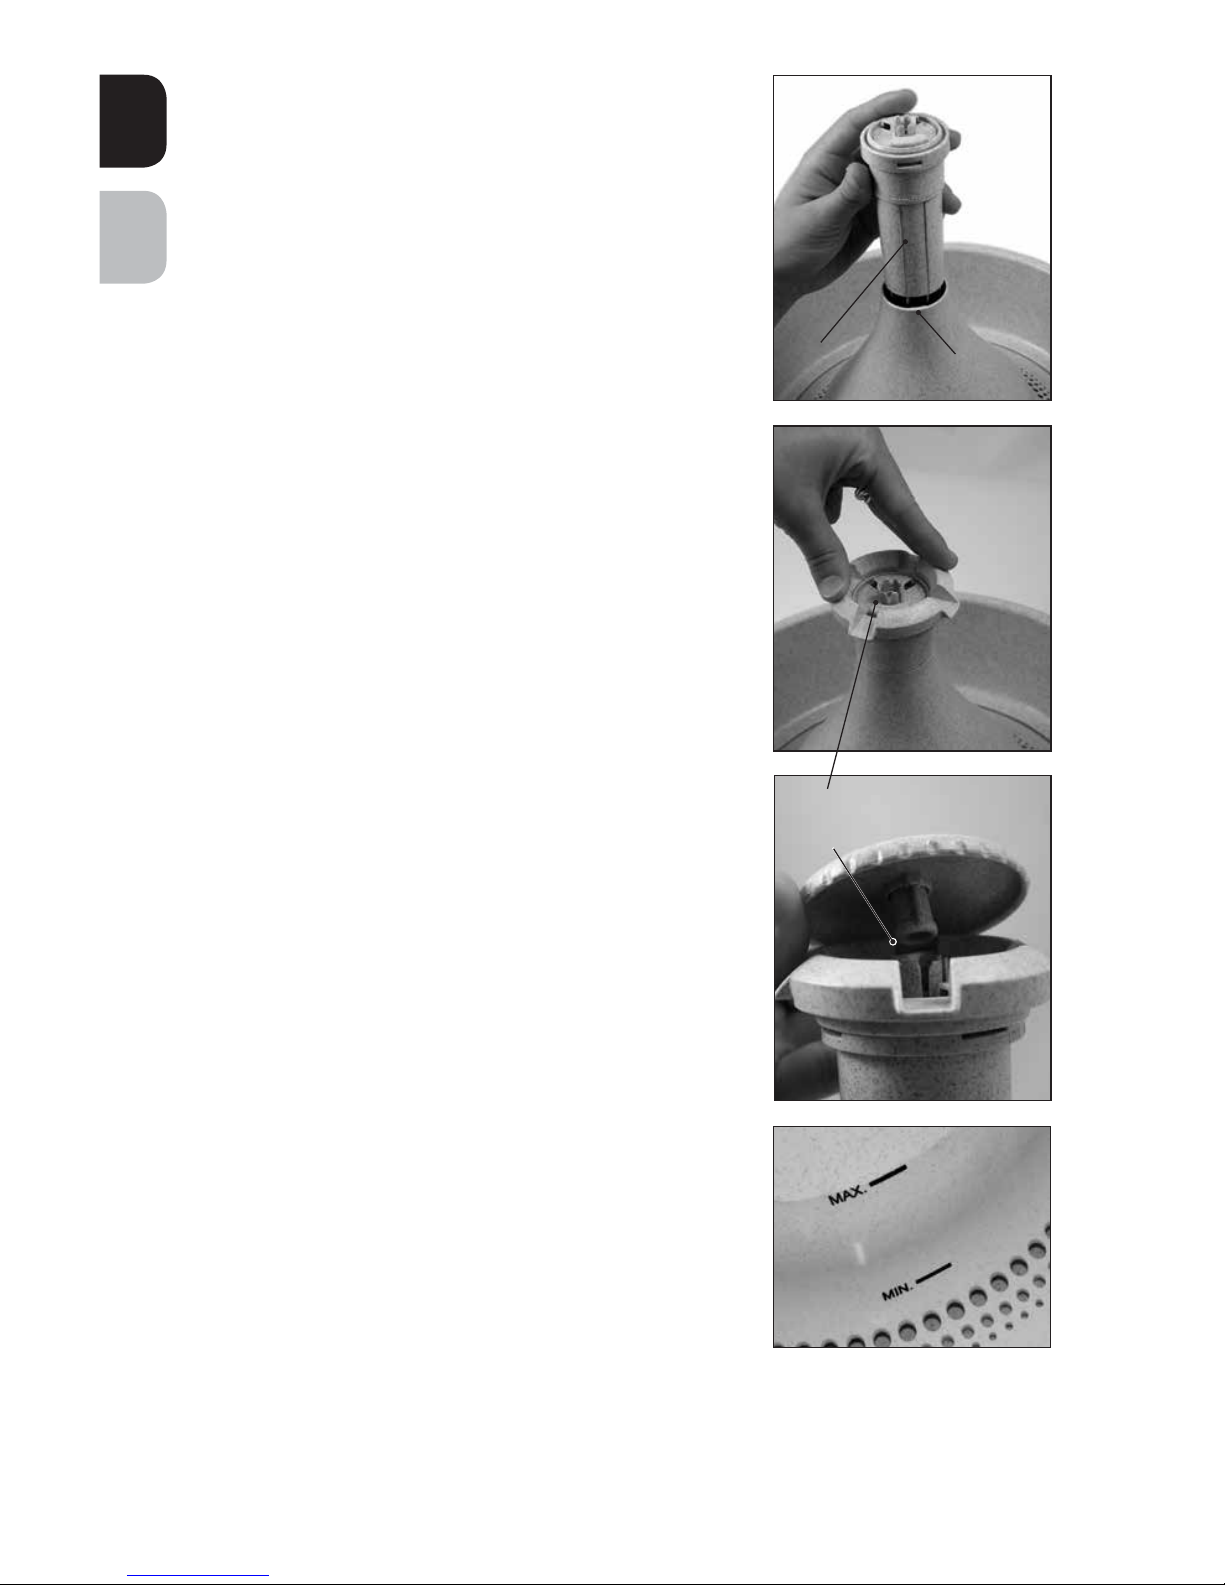
8. Align the side grooves of the Filter Housing with the
inner notches of the Cone opening. The Filter
Housing should slide easily into place. Turn Filter
Housing a quarter turn to the right (clockwise) until it
locks in place (Fig. 8).
9. Select one of the five interchangeable Spout Rings
based upon your personal preference or your pet’s.
Place the chosen Spout Ring on top of Filter Housing
Cap and gently press down evenly to secure in
place(Fig. 9).
10. Align Flow Control Cap with the raised notches
(Fig. 10) on the Filter Housing Cap. Press down gently
and the cap will snap into place. With the Flow Control
Cap, you will be able to easily adjust the flow intensity
of the water. Turn the cap to the right to increase the
flow and turn to the left to decrease.
Important: If you notice a decrease in the flow of the
water that is not corrected by turning the Flow Control Cap
toward max this may be an indication of a clogged and
dirty Filter and/or the need to rinse and clean the Filter
Housing. Consult the “Filters and Pet Fountain Cleaning”
section of this Operating Guide for details on cleaning and
maintaining your Pet Fountain.
11 . Fill the Pet Fountain Bowl with water. Make sure the
water level is at least to the MIN (minimum) fill line so
the Pump does not run dry. This will prime the Pump
for use. Do not fill the Pet Fountain past the MAX
(maximum) fill line.
12. Place Pet Fountain in desired location.
Do not pick up a
full Pet Fountain by the Cone piece. To properly pick up
the Pet Fountain, use both hands and grip the sidewalls
of the Pet Fountain Bowl and lift.
Important: To take
care of your floors, always use a protective mat, such
as a towel or place mat. This will help protect your floor
from any water that may splash out from your pet’s use
of the Pet Fountain.
13. Before you plug in the Pet Fountain make sure the
Power Cord and your hands are dry. Plug the Pet
Fountain in to an electrical outlet.
14. Add water as needed. Never let the water level fall lower than the MIN (minimum) fill
line (approx. 2.5 cm above the bottom of the Bowl, Fig. 11) or you may risk burning out
the Pump. Replacement Pumps are sold separately by calling a Customer Care Centre.
Visit www.petsafe.net for a telephone listing of the Customer Care Centre near you.
Groove
Notch
Fig. 8
Fig. 9
Fig. 10
Fig. 11
Raised
Notches
www.petsafe.net 9
FREN
Filters and Pet Fountain Cleaning
FILTER SYSTEM
The Pet Fountain is equipped with two types of filters that should be replaced on a regular
basis. The Charcoal Filter removes bad tastes and odours, keeping water fresh. The Foam
Filter collects hair, debris and pet food and prevents them from reaching the Pump,
providing optimal filtration. The filters together will keep the Pump cleaner and provide
fresher water to your pet.
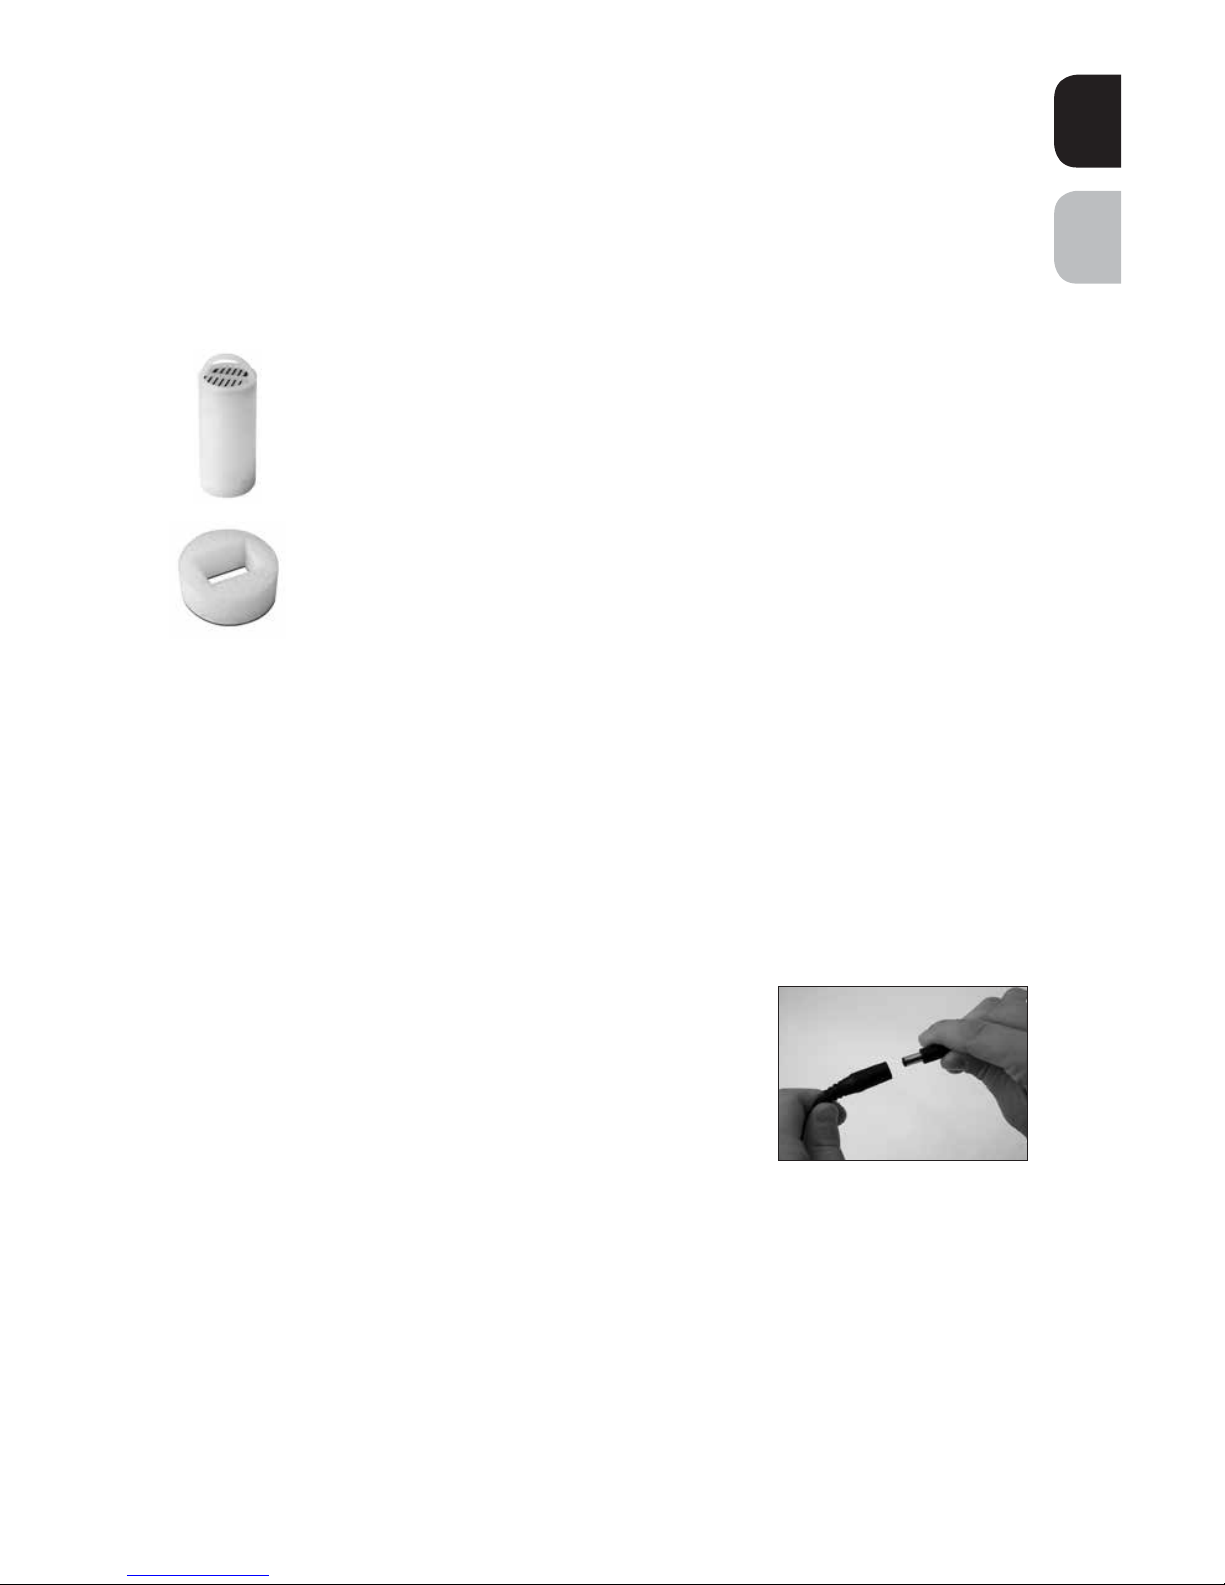
Charcoal Filter: Filters should be changed every two to four weeks.
Replace filters more frequently when using the Pet Fountain for multiple pets
or pets that produce a lot of saliva. Important: Always rinse the Charcoal
Filter prior to use. A small amount of charcoal dust may be released for the
life of the filter, this is normal and is not harmful to your pet.
Foam Filter: Replace the Foam Filter every four to six weeks, depending
on the location of the Pet Fountain and the number of pets using it. If you do
not intend to replace the filter at the time of cleaning, rinse the Foam Filter
thoroughly with fresh water.
Filters are an added feature of the Pet Fountain. Using the filters is not required for normal
operation. However, when used properly and changed regularly, the filters help keep
the water cleaner and fresher, while extending the life of your Pet Fountain. Filters may
be rinsed out when the Pet Fountain is cleaned. Important: Never wash the filters with
soapy water, as the soap residue will seep into the filters and cannot be removed. Only
rinse the filters with water.
PET FOUNTAIN
Important: Clean Pet Fountain once a week.
The Pet Fountain must be cleaned on a regular basis to continue working normally.
1. Unplug Pet Fountain from electrical source and
disconnect the In-Line Plug from the Pump (Fig. 12).
2. Remove the Flow Control Cap and Spout Ring.
3. Remove the Filter Housing by twisting the Filter Housing
Cap counter clockwise to the unlock position. Lift directly
up and set aside.
4. Empty the water out of the Pet Fountain.
5. Once the Pet Fountain is empty, remove the Cone piece by twisting counter
clockwise to unlock the tabs. Lift up and set aside.
Fig. 12
www.petsafe.net 11 10 www.petsafe.net
ENFR
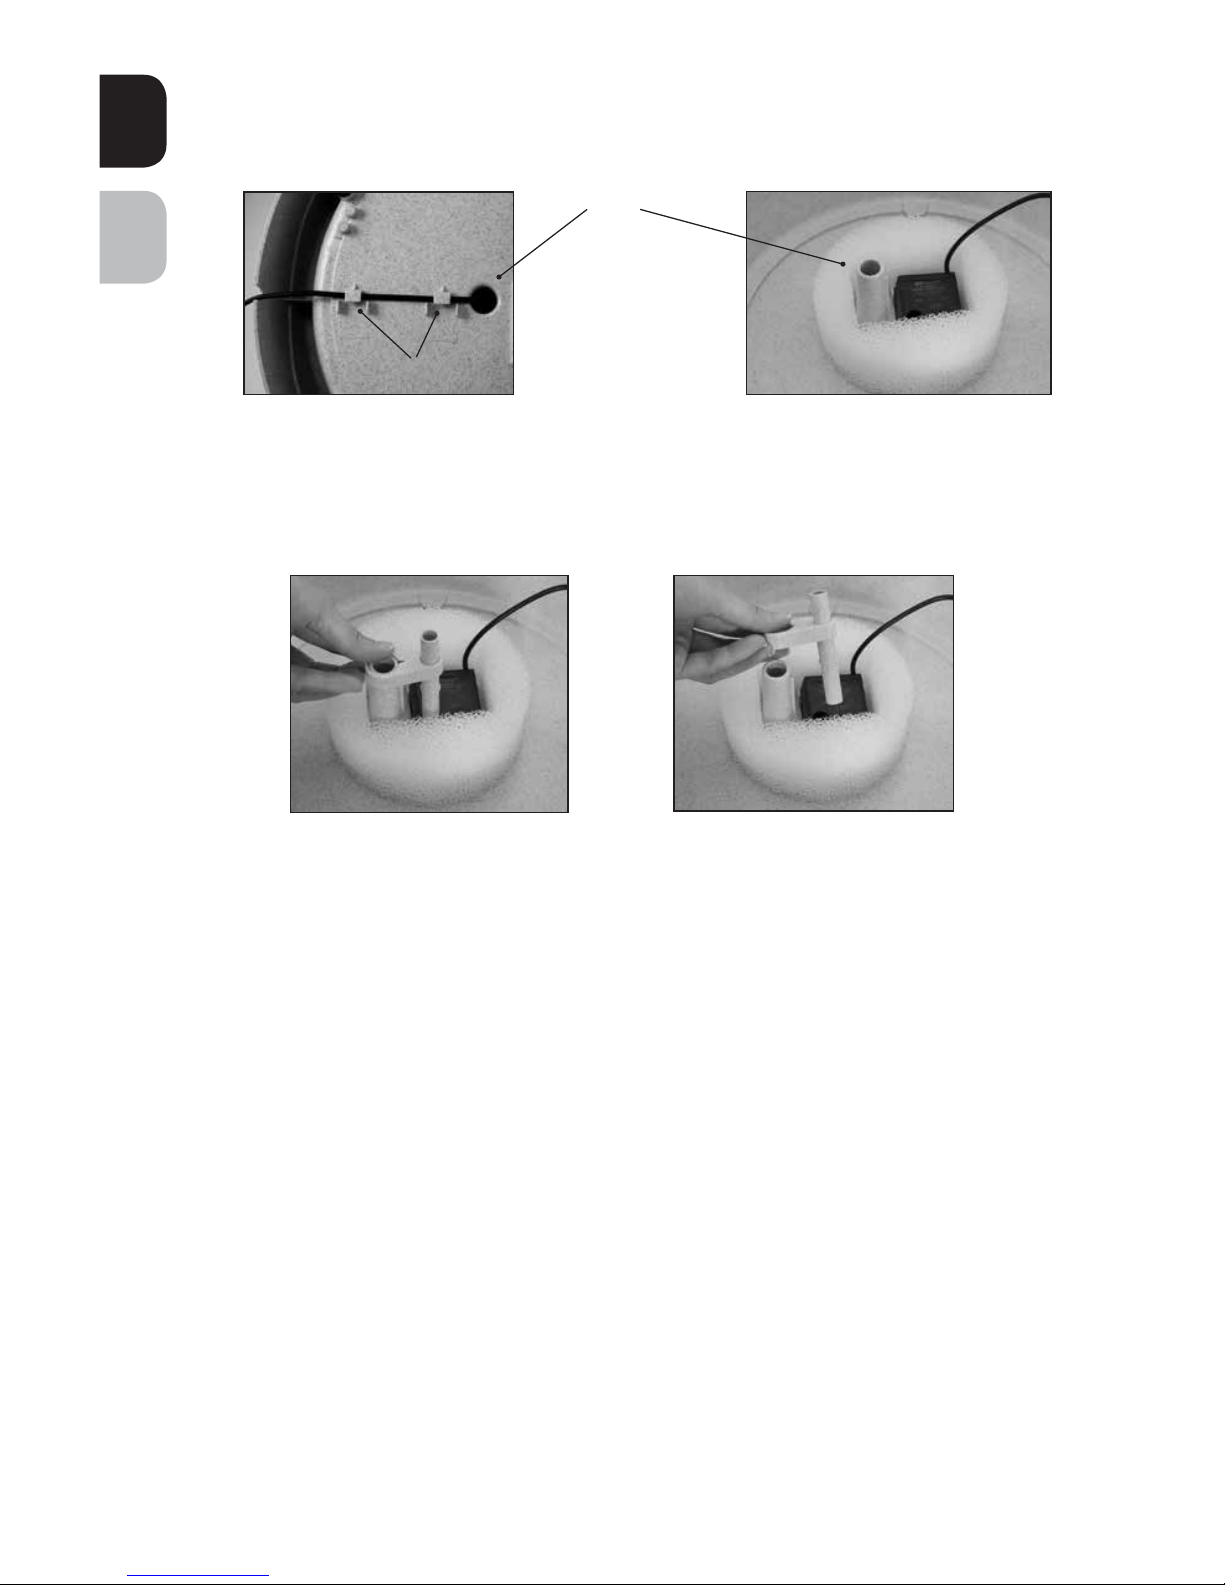
6. Next, flip the Bowl upside down and unhook the electrical Power Cord from the two
Cord Clips (Fig. 13). This will allow you to pull the electrical Power Cord through
the Cord Pass-Through in the Bowl (Fig. 14).
7. Remove the Pump for cleaning. First remove the Intake Tube by lifting up on the Intake
Tube Holder to free the Intake Tube from the Pump (Fig. 15 & 16). This will allow
you to remove the Pump. The Intake Tube can then be pulled from the Intake
Tubeholder.
8. Remove the Foam Filter from the Pump. Clean away any hair, debris or pet food that
may have accumulated on the Faceplate of the Pump (See “Pump Maintenance”
section for detailed cleaning instructions for the Pump).
9. Once the Pet Fountain is completely disassembled you will have 8 plastic parts.
10. Clean the plastic Pet Fountain parts with warm water and soap. You can also put
the Pet Fountain in the top rack of the dishwasher. Remove the Pump before placing
the Pet Fountain in the dishwasher. DO NOT PLACE PUMP IN DISHWASHER!
If possible, it is recommended that you turn down the heat of the water inside
thedishwasher.
11 . If you have trouble reaching certain spots or hard-to-reach corners, try using a cotton
swab or purchase the Drinkwell® Cleaning Kit, a 3-Piece Brush Kit. To
purchase a
Cleaning Kit, visit our website at www.petsafe.net to locate a retailer near
you or to
find a listing of Customer Care Centre telephone numbers for your area.
Fig. 13
Cord Pass-Through
Fig. 14
Cord Clips
Fig. 15
Fig. 16
 Loading...