

Page 1
MODEL300
User’s Guide
Guía del usuario
Mode d’emploi
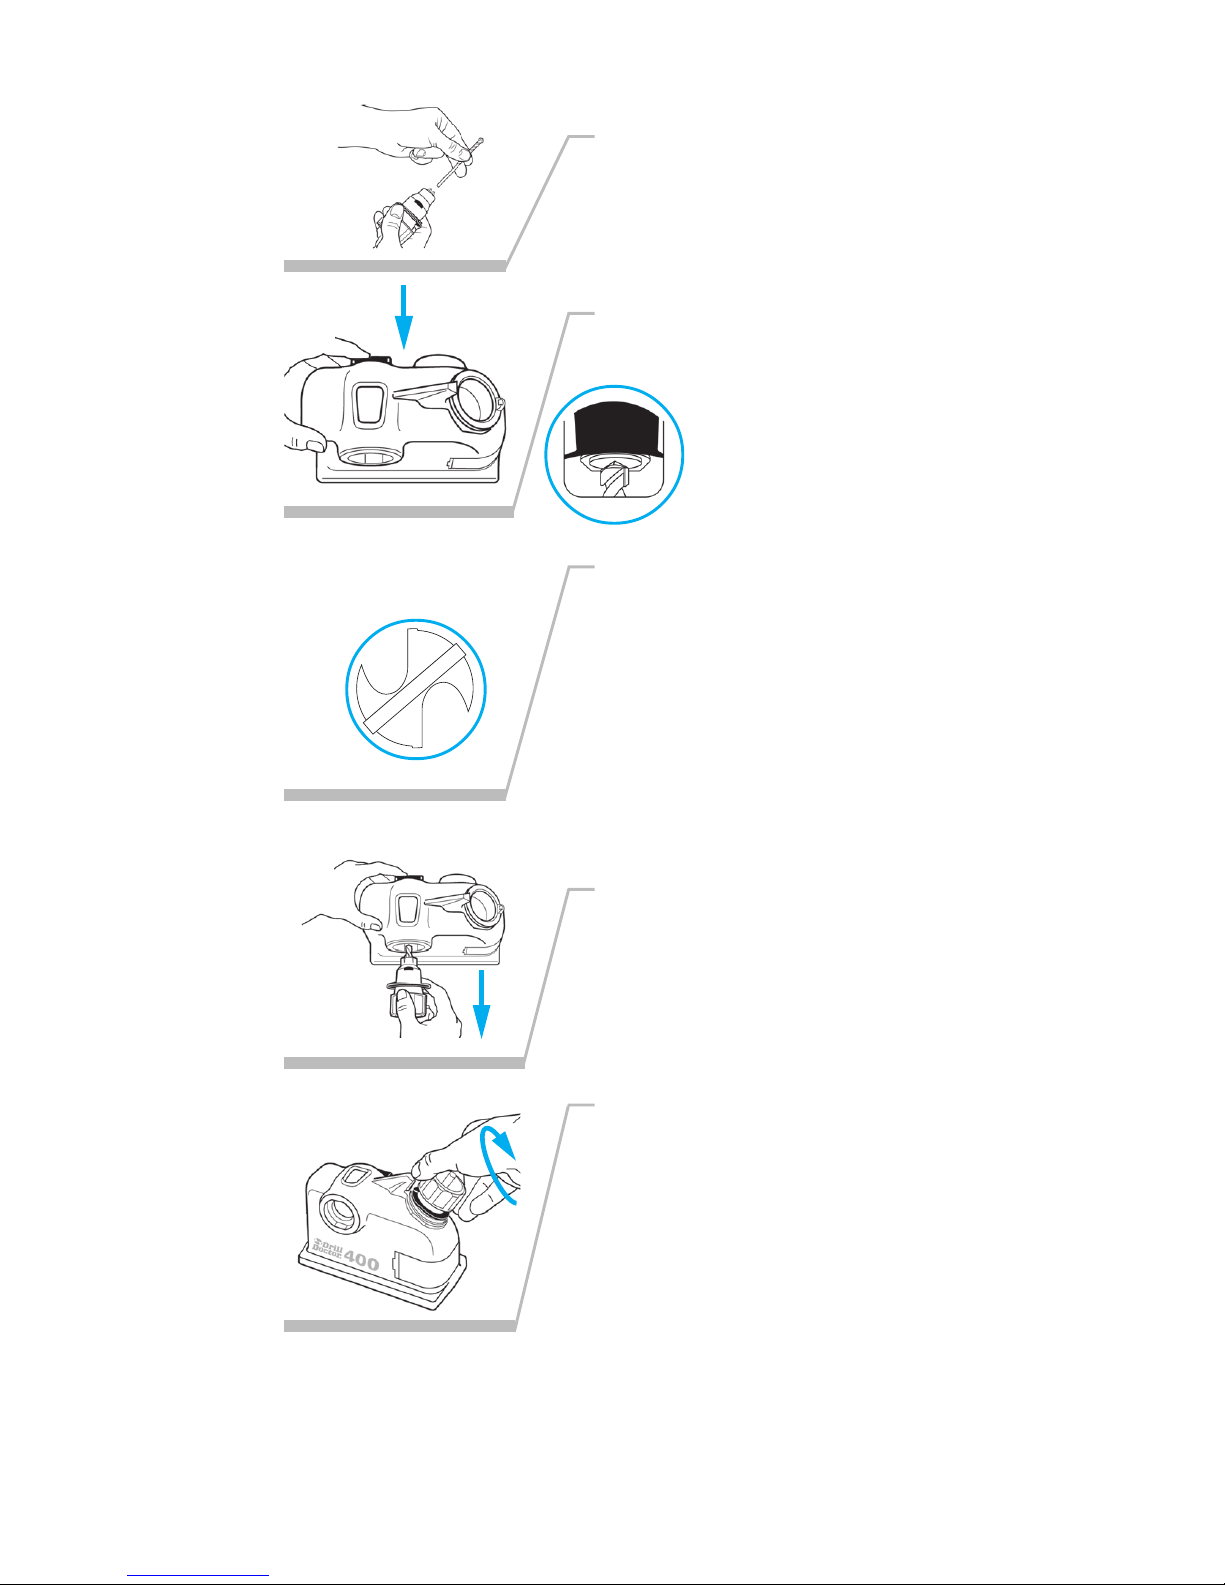
1. ALIGN BITS
3. SPLIT POINTS
2. SHARPEN BITS
<REPLACE IMAGE>
<REPLACE IMAGE>
Page 2

Thank you...
for buying your Drill Doctor®. It will become a valuable tool
because you will now have sharp drill bits before a project,
during a project, and after a project.
I am very proud of the quality of our products and I am equally
proud of the great people at Drill Doctor who design and produce
them. If you have questions or need help with your Drill Doctor,
please contact us and one of our customer representatives will
be there to help. We support what we build!
Use this User’s Guide to learn to operate your Drill Doctor. I also
want to invite you to visit our website at www.DrillDoctor.com.
There you will find:
• Demonstrations of all operations with the sights and sounds
leading to successful drill bit sharpening
• Downloadable copies of the User’s Guide
• Warranty registration
• Service and contact numbers
Again, thank you for buying a Drill Doctor. Now enjoy its
convenience and quality.
Hank O’Dougherty, President, Drill Doctor
®
Phone: 1-888-MYDRILL (693-7455)
1-541-552-1301
Email: [email protected]
Web: www.DrillDoctor.com
Page 3

1
www.DrillDoctor.com
Contents
English
Safety .......................................................................... 2
Getting to Know Your Drill Doctor®............................ 3
Identifying Basic Drill Bits ........................................... 4
Anatomy of a Drill Bit ................................................. 4
The Drill Doctor® Sharpening Process ......................... 5
Aligning the Drill Bit ................................................... 5
Sharpening the Drill Bit .............................................. 8
Identifying Correctly Sharpened Drill Bits ................... 9
Sharpening Bits of Different Lengths
and Diameters ....................................................... 10
Aligning and Sharpening Masonry Drill Bits ............ 11
Questions and Answers ........................................... 12
Drill Doctor® Maintenance ....................................... 15
User-Replaceable Parts ............................................ 18
Warranty .................................................................. 19
Español ........................................................... 20
Français .......................................................... 00
English
Page 4

2
www.DrillDoctor.com
WARNING: Some dust created by power sanding,
grinding, miscellaneous construction activities, as well
as contents from the machine including the molding,
wiring, grinding wheel, or any other parts may contain
chemicals known to the State of California to cause
cancer, birth defects or other reproductive harm and can
be hazardous to your health.
Safety
• Carefully read this User’s Guide before operating the Drill
Doctor.
• When using electric tools, basic safety precautions should
always be followed to prevent the risk of fire, electric shock
and personal injury.
• Always disconnect the Drill Doctor when cleaning or
inspecting. Make sure the switch is in the OFF position before
plugging in the power cord.
• Do not use in wet or damp locations.
• Do not abuse the cord.
• Wear eye protection when using or cleaning the Drill Doctor.
• Never touch internal parts of the sharpener when it is turned
on or plugged in. The rotating diamond wheel can cause injury.
• As with any power tool, the Drill Doctor should be kept out
of the reach of children.
Page 5
3
www.DrillDoctor.com
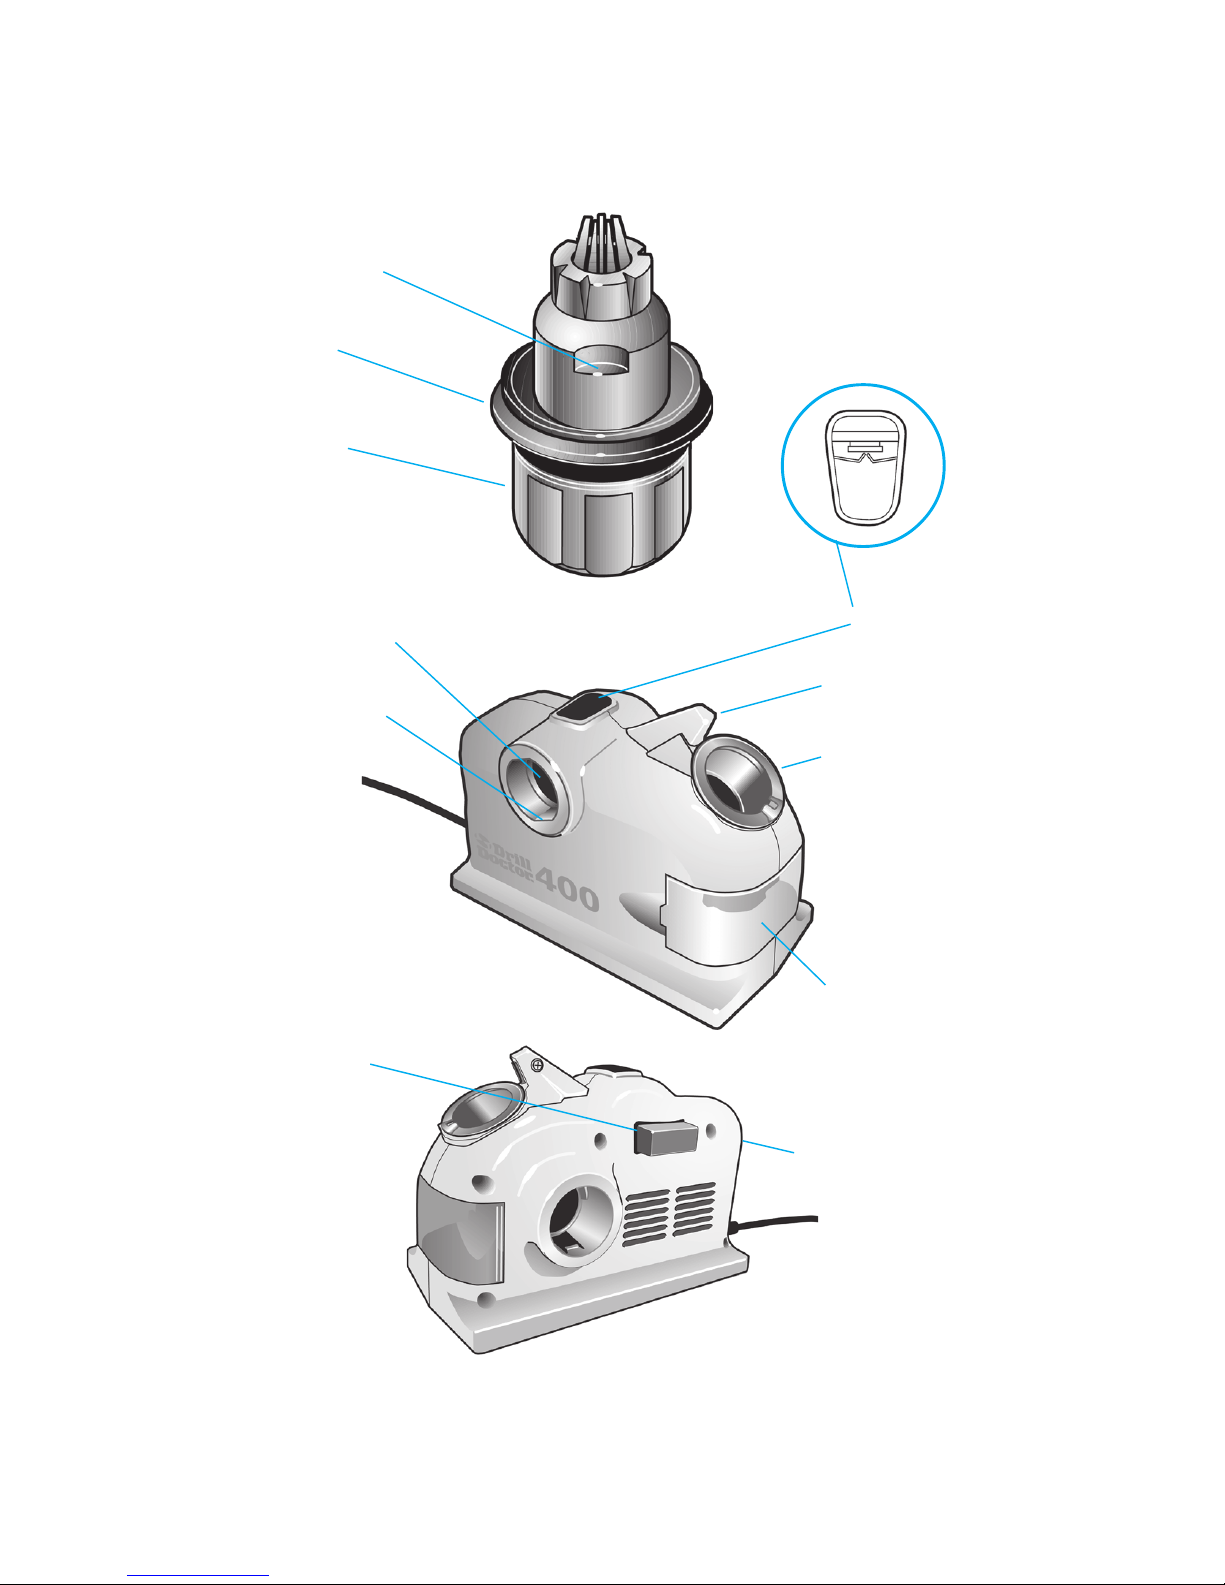
Getting to Know Your Drill Doctor
®
Power Switch
Alignment
Button
Wheel Access
Cover
Alignment
Port
Sharpening
Port
Cam Guide
Flat Spot
Flat Spot
Window
Cam
Chuck
Knob
Chuck
Watch the User Video included with your Drill Doctor
®
and become a sharpening expert in minutes!
<MODIFY ART>
<MODIFY ART>
<MODIFY ART>
<MODIFY ART>
Page 6
4
www.DrillDoctor.com
Identifying Basic Drill Bits
The Drill Doctor® is most efficient when used to sharpen a drill
bit’s original point angle. With its standard diamond sharpening
wheel it will sharpen high-speed steel, cobalt, TiN-coated,
carbide and masonry drill bits.
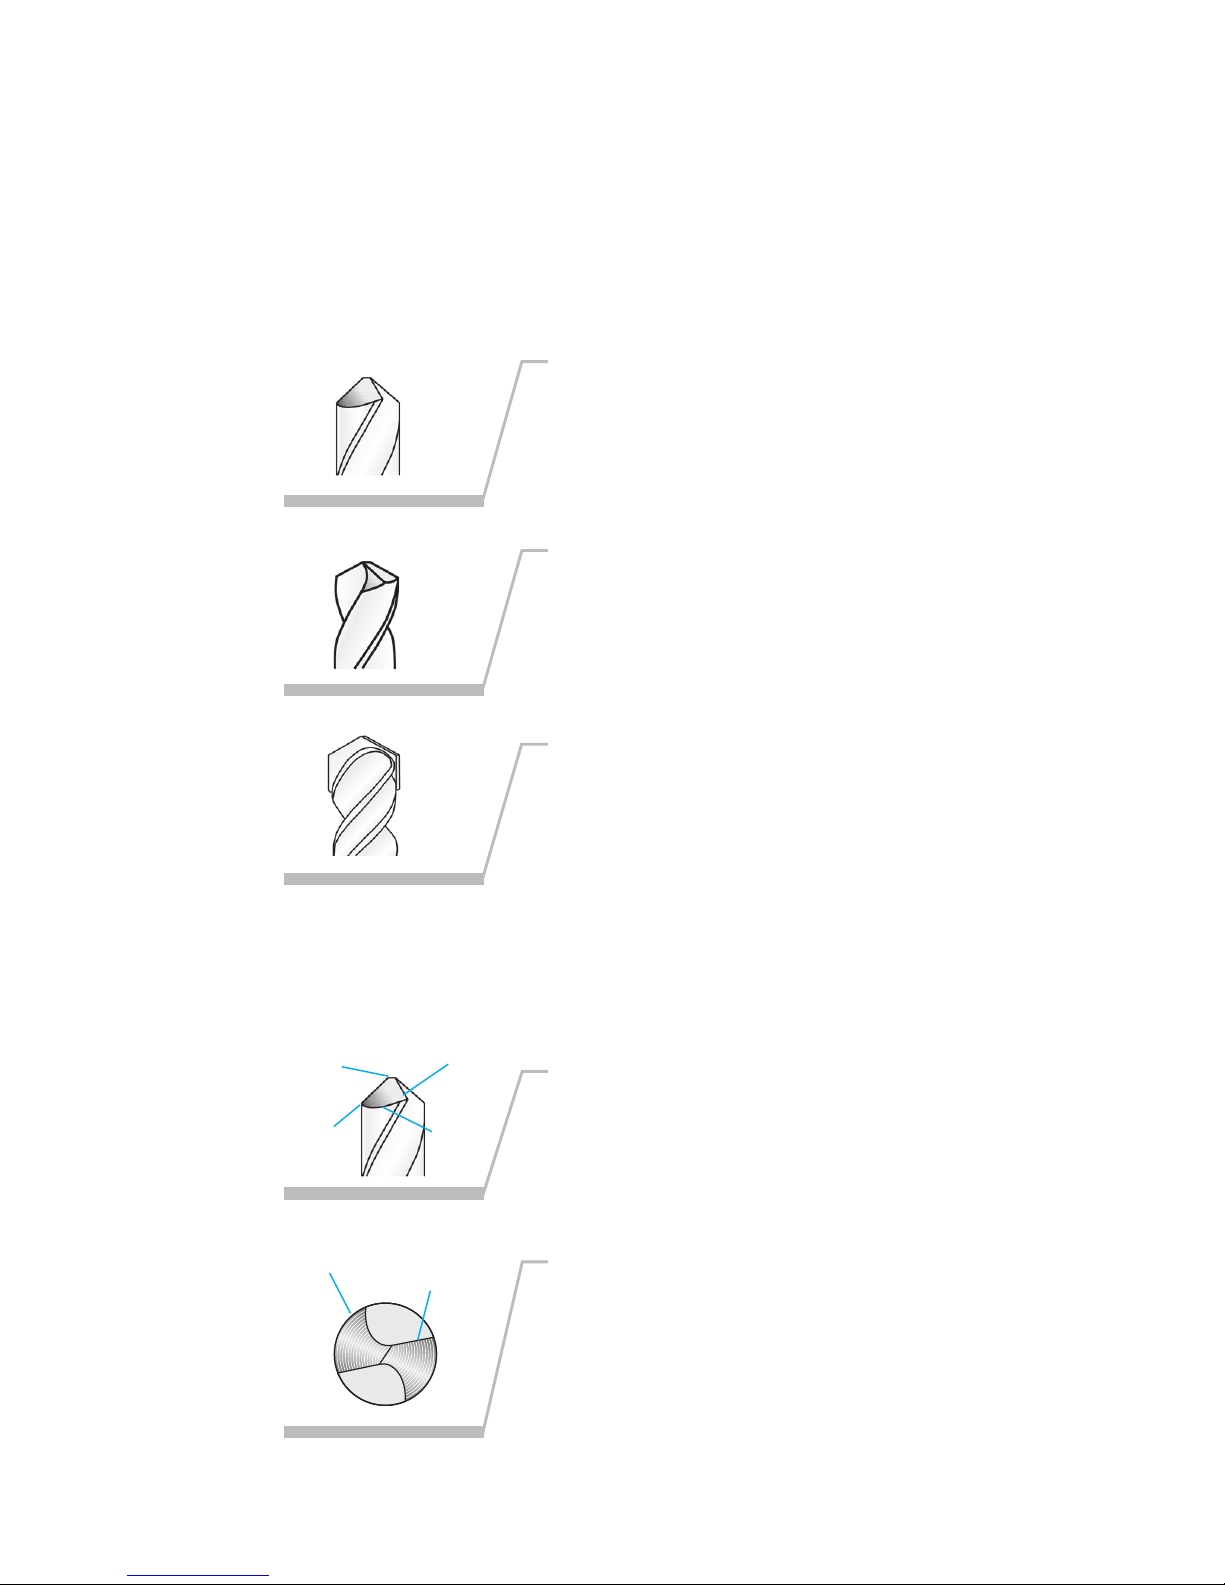
It has been designed and engineered to sharpen three of the
most common drill bit types:
Standard Point
This general purpose point (normally
118°) is used for drilling softer
materials like cold rolled steel,
aluminum, and wood.
Masonry bits (normally 135°) have
a carbide insert at the point and are
used for drilling materials like cement,
brick, and ceramic.
Split point bits (normally 135+°)
are self-centering and are generally
used for tempered steels, hard alloys
or hard cast materials.
Anatomy of a Drill Bit
It is important to understand that
each bit has a Chisel Edge, a Cutting
Edge, a Heel, and a Relief Angle.
When viewing a well sharpened bit
from the end, the entire surface from
the Cutting Edge to the Heel will have
a finely ground surface without ridges
or indentations. The Heel will always be
lower than the Cutting Edge.
Heel
Chisel
Edge
Cutting
Edge
Heel
Cutting
Edge
Relief
Angle
Page 7
5
www.DrillDoctor.com
The Drill Doctor® Sharpening Process
The sharpening process includes 2 easy procedures:
1. Align the bit in the Chuck.
2. Sharpen the bit.
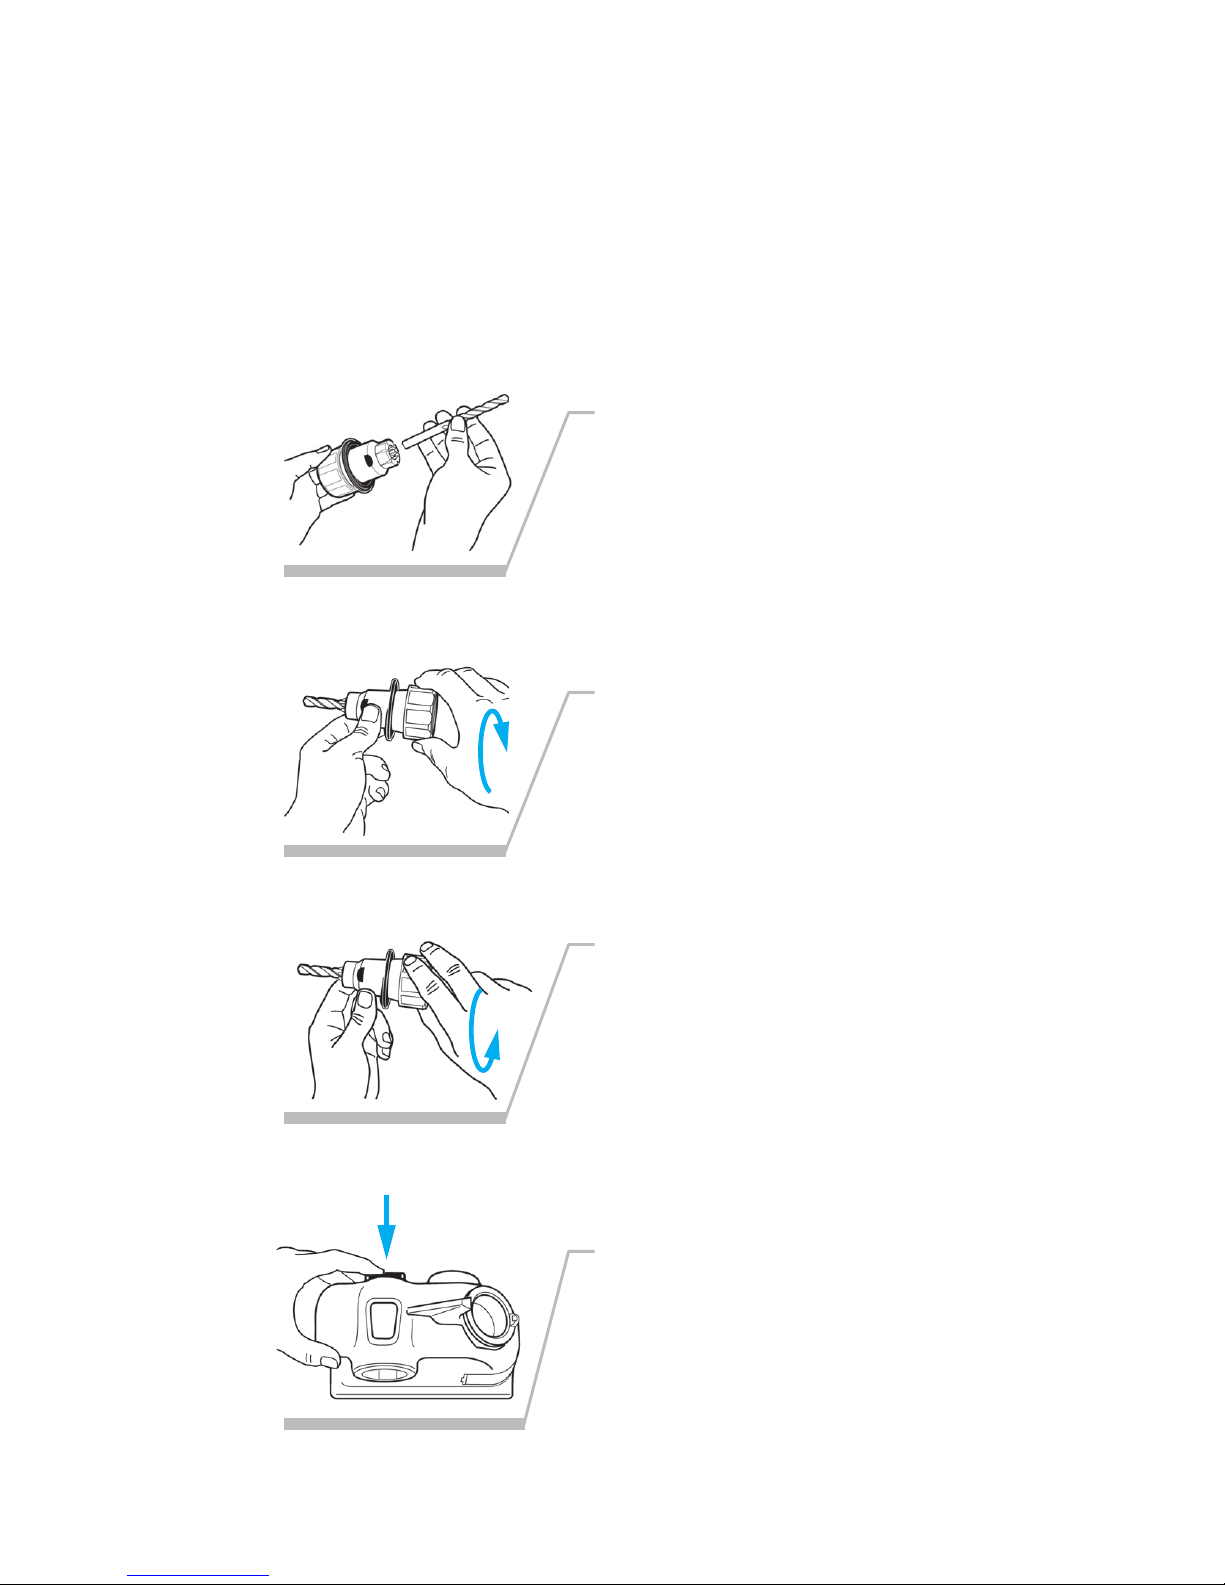
Aligning the Drill Bit
(See page 11 to align and sharpen a Masonry drill bit.)
4.
1.
Turn the Chuck Knob to the left
to open the Chuck and insert
your drill bit into the Chuck
(about halfway in is fine for
now).
Turn the Chuck Knob to the right
to tighten.
Turn the Chuck Knob to the left
just until the bit will slide and
rotate in the Chuck.
With one hand, press in and
hold the Alignment Button on
the Drill Doctor (do not release
until Step 7).
2.
3.
<MODIFY ART>
<MODIFY ART>
Page 8
6
www.DrillDoctor.com
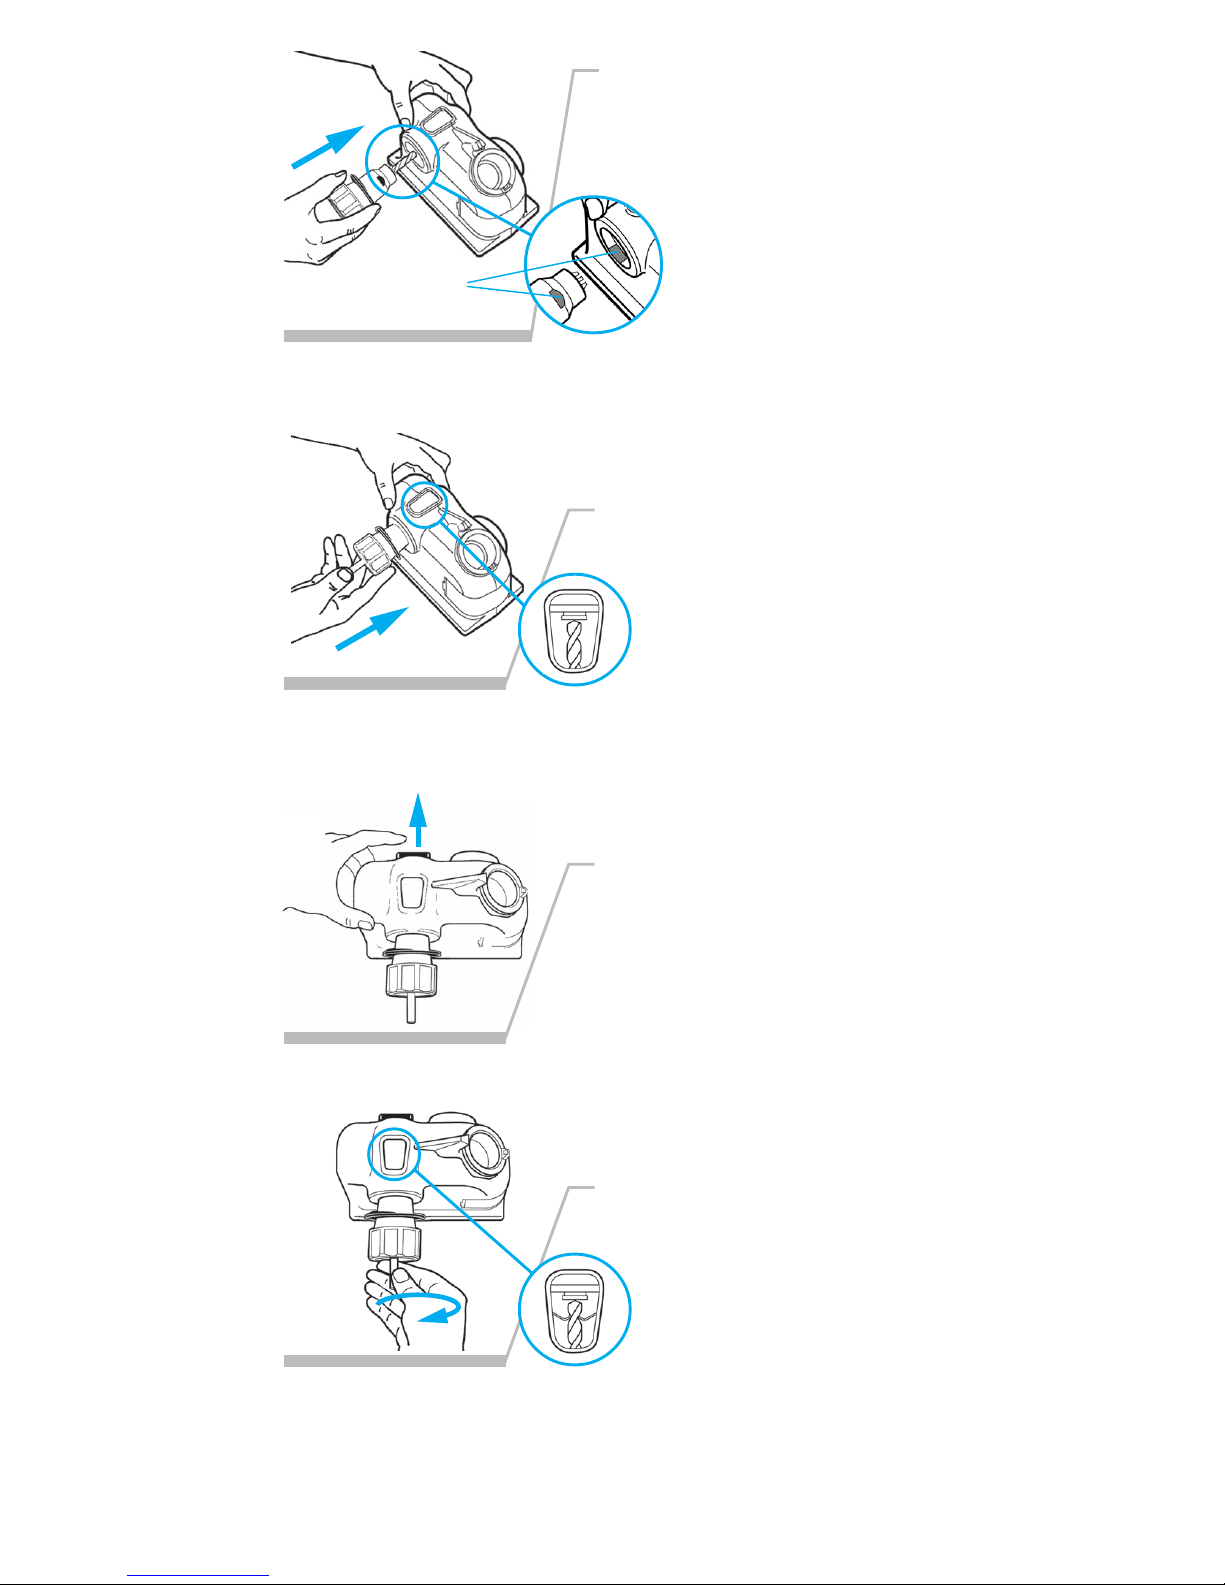
Flat Spots
5.
With your free hand, insert the
Chuck into the Alignment Port—
make sure the flat spots on the
Chuck match the flat spots in the
port.
At this point, the Chuck
should be inserted into the
Alignment Port with the
flat spots hidden, and the
Chuck should be locked in the port.
6.
8.
With the Alignment Button held
in, push the drill bit forward until
it is against the Drill Stop.
Look at the drill bit through
the Window over the
Alignment Port—it should be
against the Drill Stop.
Release the Alignment Button
and hold the chuck in place with
your thumb.
While looking in the Window,
turn the drill bit to the right until
you feel the Bit Clamps grip
the bit at its narrowest
point (the bit is now difficult
to turn either way).
7.
<MODIFY ART>
<MODIFY ART>
<MODIFY ART>
<MODIFY ART>
<MODIFY ART>
<MODIFY ART>
<MODIFY ART>
<MODIFY ART>
Page 9
7
www.DrillDoctor.com
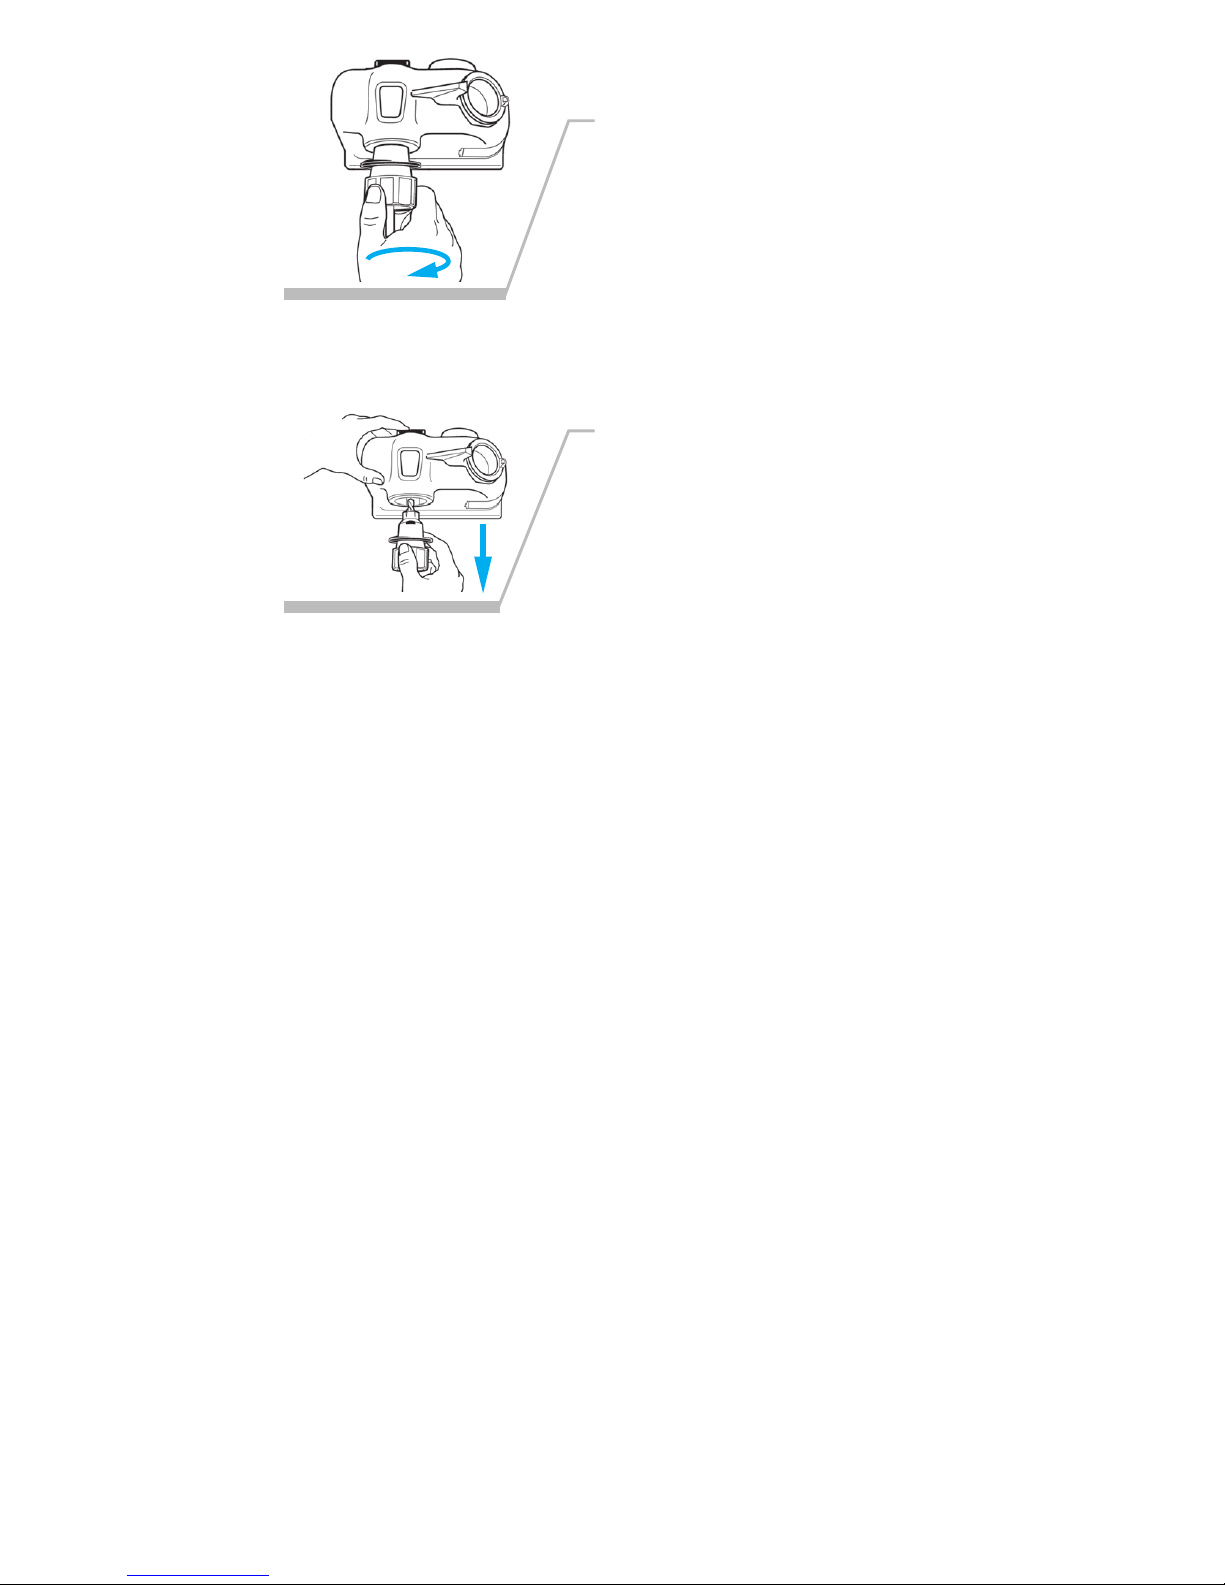
Press the Alignment Button in
and remove the Chuck from the
Alignment Port. Tighten the
Chuck Knob firmly.
You are now ready to sharpen the
drill bit.
10.
9.
Turn the Chuck Knob to the right
until it is tight but make sure that
the bit did not turn and the Chuck
did not back out of the Port.
<MODIFY ART>
<MODIFY ART>
<MODIFY ART>
<MODIFY ART>
Page 10
8
www.DrillDoctor.com
Sharpening the Drill Bit
Before sharpening you should know:
• Keep the Cam in contact with the Cam Guide as you
sharpen—push the Chuck straight into the port.
• Only light pressure is required—let the diamond wheel do
its work.
• Turn the Chuck an even number of half-turns:
3/32 inch bits—use 2 to 4 half-turns,
1/8 inch bits—use 4 to 6 half-turns,
3/8 inch bits—use 16 to 20 half-turns.
• You will hear a grinding noise as you complete each half-
turn and each side of the bit face is ground. (z
zzzzzzzz)
• The Chuck will rock as you turn it and the Cam rides on the
Guide.
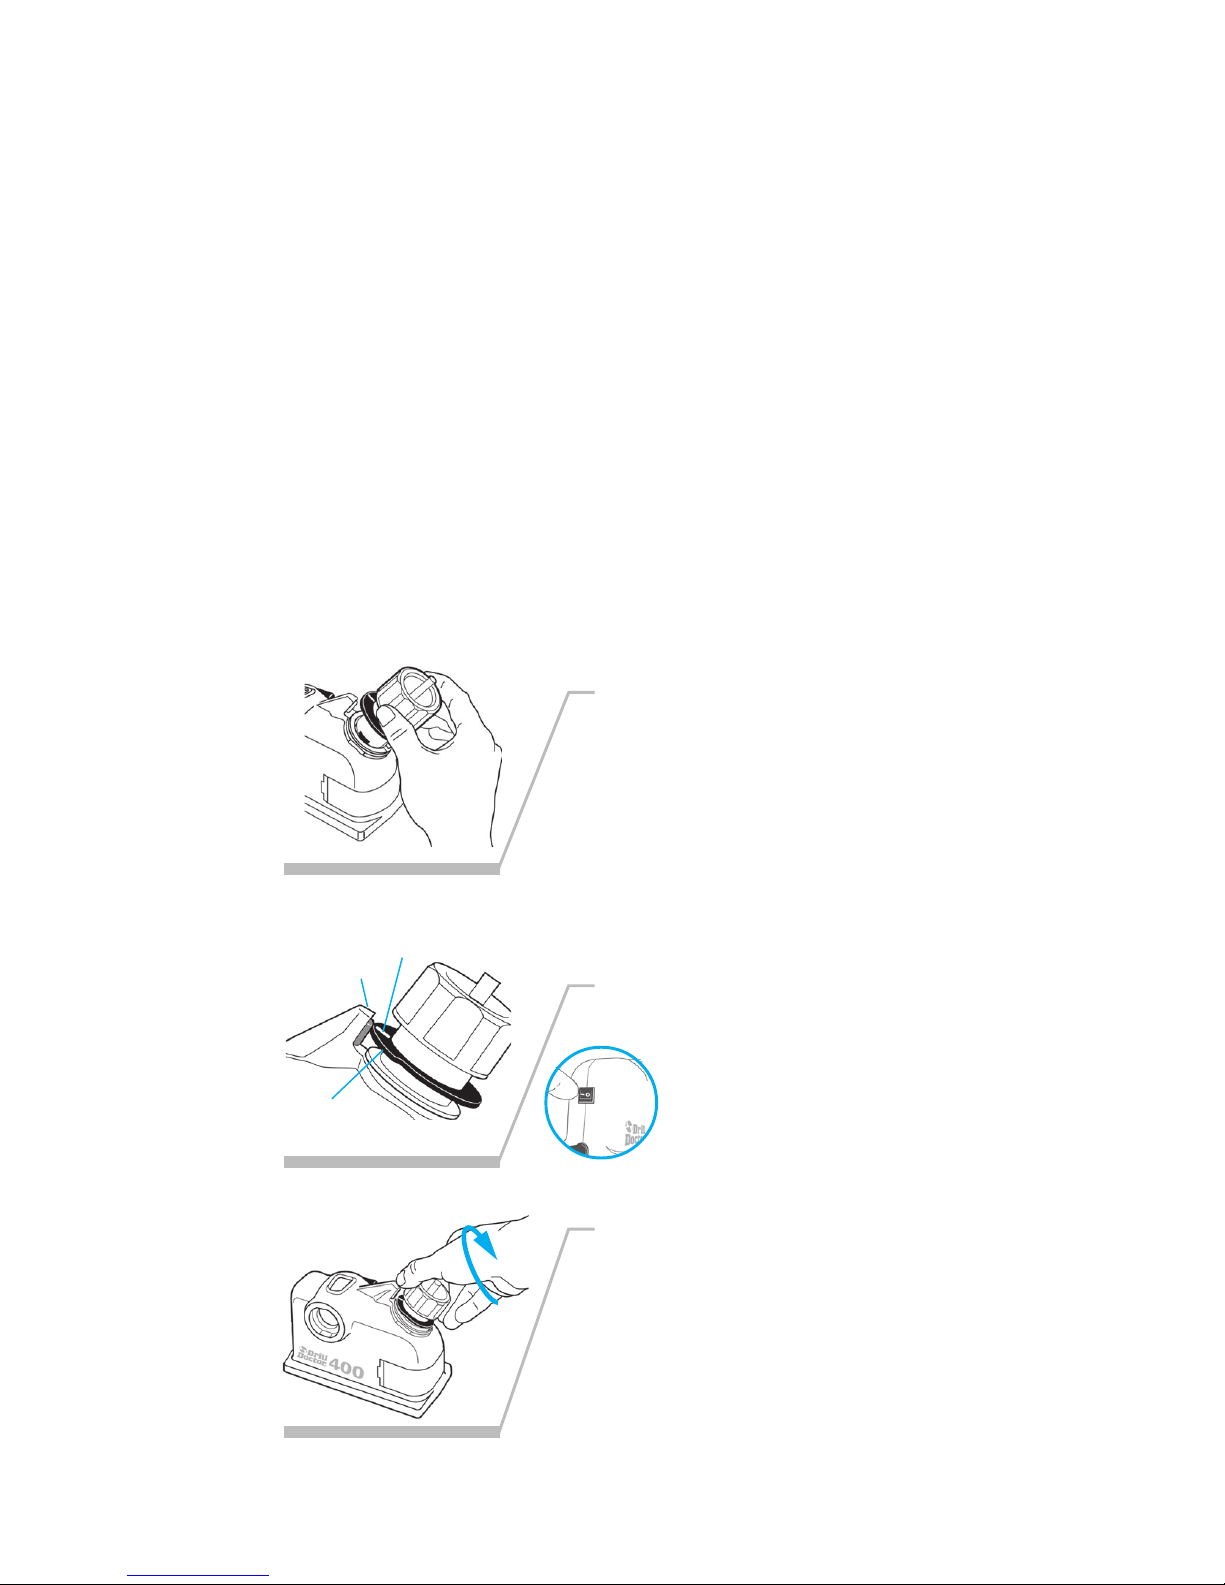
13.
12.
Insert the Chuck into the
Sharpening Port.
It will be easier to sharpen the
bit if you stand up.
Align one of the white marks on
the Cam with the Cam Guide,
and push the Power
Switch to the ON (I)
position.
14.
Turn the Chuck in complete halfturns to the right so the white
marks on the Chuck move to the
Cam Guide one after the other.
It is important that your halfturns be continuous—do not
stop or hesitate in the middle.
Cam Guide
White Mark
Cam
Page 11
9
www.DrillDoctor.com
Identifying Correctly-Sharpened Drill Bits
(and what to do with those that aren’t!)
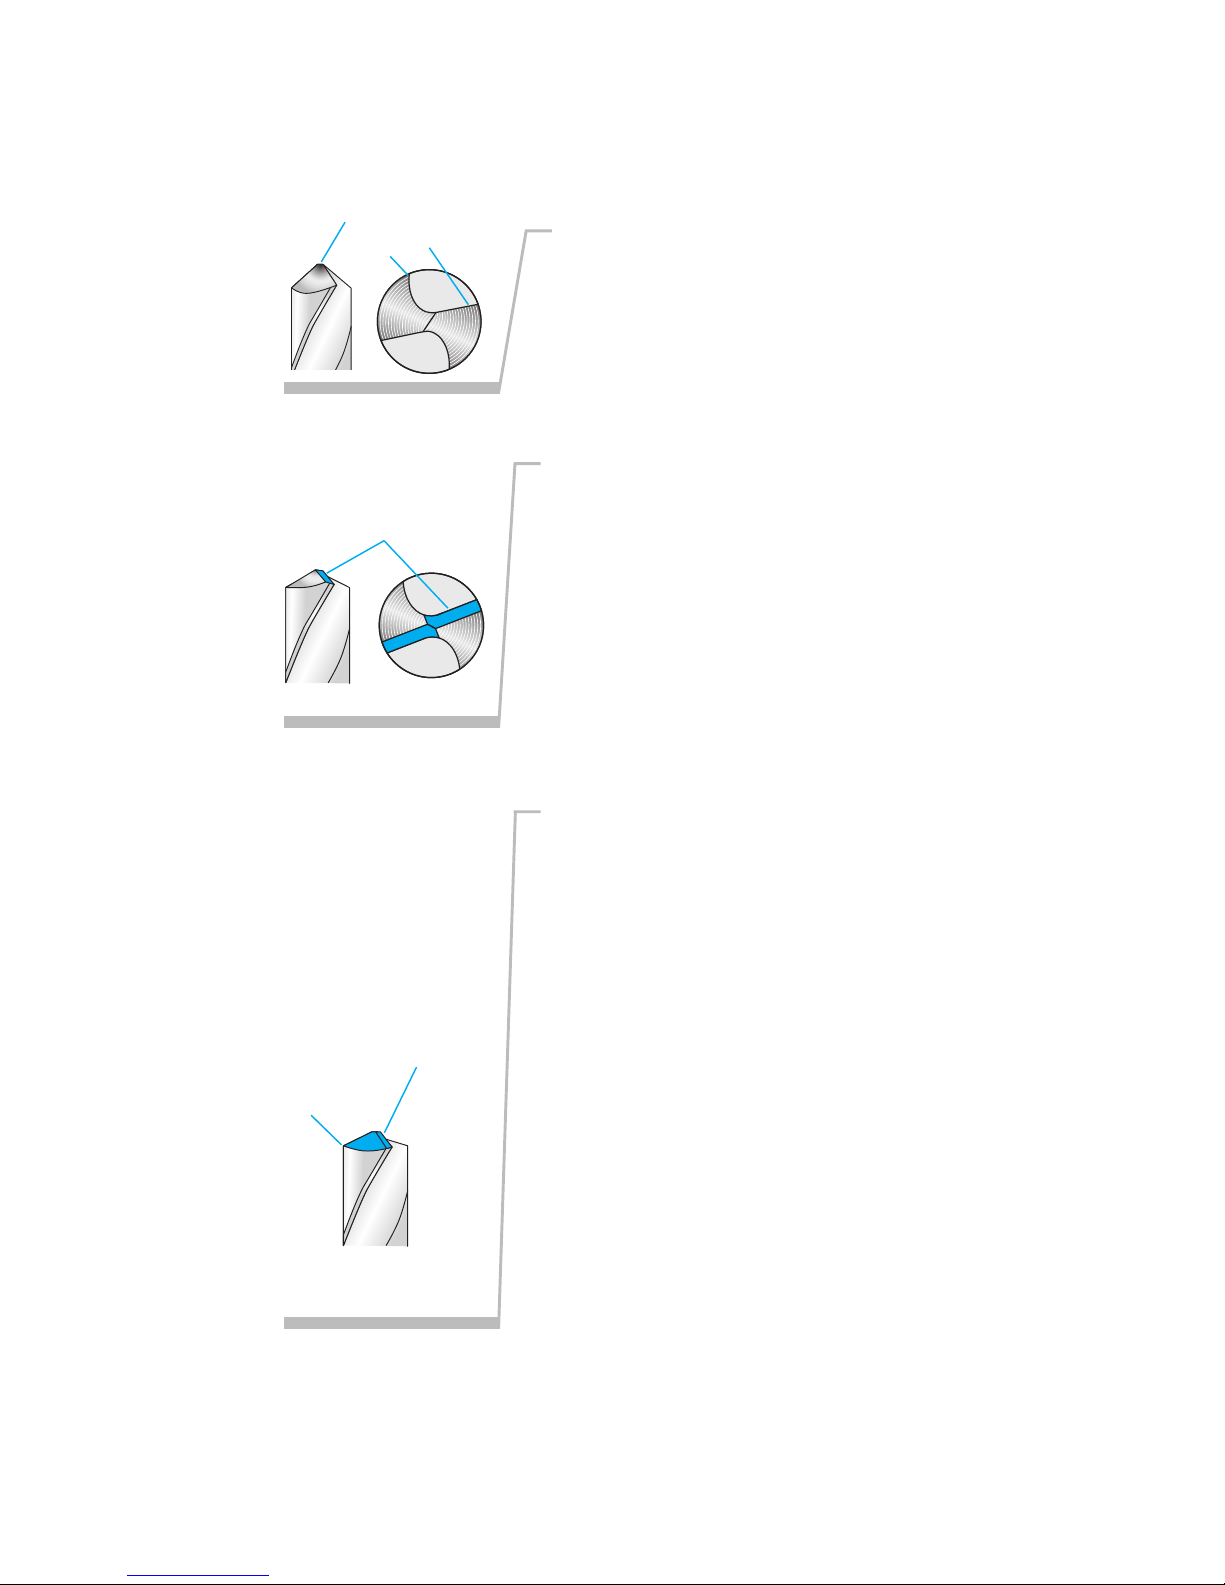
The entire surface from the Cutting
Edge to the Heel will have a finely
ground surface without ridges or
indentations. The Heel will always be
lower than the Cutting Edge.
Correctly Sharpened
Cause
Bit Clamps did not grip drill bit at
narrowest point in the aligning process
(Page 6).
Solution
Realign the bit by carefully following
steps 1 through 10 on Pages 5 to 7.
Cause
Sharpening Port not functioning
properly.
Solution
The Sharpening Port is where you rotate
the Chuck when sharpening. Locate the
bump on the bottom of the Port and
press down on it. If the tube does not
spring back, please contact our
Technical Support group for assistance.
Cause
Dirty Chuck.
Solution
Insert a drill bit into the Chuck, tighten
Misaligned
Heel
The Chisel Edge is
ground flat.
Heel
Same Height
or Higher
Than the
Cutting Edge
Chisel Point
Cutting Edge
it, then press the bit against a hard surface. Does the bit slide in
the Chuck? If so, clean the Chuck as described on Page 16.
Cutting Edge
Heel
Page 12

10
www.DrillDoctor.com
Sharpening Bits of Different Lengths
and Diameters
Drill Bits Of Different Sizes
Too many rotations of a small diameter bit may result in incorrect
sharpening and too few on a large bit may not sharpen enough.
3/32 inch bits—use 2 to 4 half-turns,
1/8 inch bits—use 4 to 6 half-turns,
3/8 inch bits—use 16 to 20 half-turns.
Large Drill Bits
Large drill bits (3/8" to 1/2") will require more half-turns (20 or
more) of the Chuck. A well-sharpened bit will have a smooth
surface from cutting edge to heel. It may take two or three
complete sharpenings (repeat all steps) to resharpen a very dull
or chipped large drill bit.
Short Drill Bits
Often bits smaller than 1/8" in diameter are so short they will
not stick out of the back of the Chuck. After inserting a small bit
into the Chuck and while holding the Alignment Button in, insert
the Chuck into the Alignment Port. Then, insert a finger into the
back of the Chuck Knob and push the bit forward against the
Drill Stop. Look through the Window and make sure the Bit
Clamps grasp the bit at the narrowest point when you release
the Alignment Button.
Tighten the Chuck Knob, but
before sharpening small bits,
look through the back of the
Chuck to be sure all Chuck Jaws
are straight against the drill bit.
If the Jaws appear to be out of
line, move the Chuck Knob
slightly to the left just until the
Jaws straighten—do not loosen
the Chuck Knob or the bit will
loosen and the alignment will be
lost. Now, sharpen the bit in the
usual manner.
Correct
Incorrect
Page 13
11
www.DrillDoctor.com
Aligning and Sharpening Masonry Drill Bits
1.
3.
5.
Note: The Drill Doctor will place a curved grind on the carbide
insert, altering the appearance of the factory point.
4.
Now, sharpen the bit in the
Sharpening Port. Always use an
even number of half-turns when
sharpening. Start with four half-
turns and then add as many
even number of half-turns as
needed. Remember, you are only
sharpening the carbide insert.
While looking through the
window, start with the carbide tip
of the bit straight up and down
(12:00 and 6:00), and then turn
it 1/8 turn to the right (the
carbide tip should point to
between the 1:00 and 2:00
o’clock position when looking at
a clock face).
Push the Alignment Button back
to the housing and hold it in
through Step 4. Insert the
chucked drill bit to the
stop.
Bit Clamps are not
used when aligning
masonry bits.
Insert your masonry bit in the
Chuck in the same manner as
other bits (See page 5).
Tighten the Chuck Knob and
remove the chuck from the Alignment Port. Release the Alignment
Button and tighten the Chuck
Knob firmly.
12:00
1:00
2:00
3:00
6:00
9:00
2.
<MODIFY ART>
<MODIFY ART>
<MODIFY ART>
<MODIFY ART>
Page 14

12
www.DrillDoctor.com
Questions and Answers
1. Question:
Why was my drill bit sharpened improperly?
Answer:
The most common cause of improper sharpening is improper
drill bit alignment.
Key causes are:
1. Drill point not pushed all the way to the Drill Stop.
2. Chuck not pushed all the way into the Alignment Hole.
3. Drill not aligned in the Bit Clamps correctly.
4. Chuck jaws are not in their grooves. See page 16, Cleaning
the Chuck, to realign.
5. Too many rotations of a small diameter bit results in
incorrect sharpening, and too few on a large bit may not
sharpen enough. See page 10, “Drill Bits of Different Sizes.”
In order to correct these problems be sure the Chuck is all the
way in the Alignment Port with the flats entirely hidden. The
drill point must be against the Drill Stop and the Bit Clamps
must be at the narrowest part of the drill bit. (See pages 5-7.)
2. Question:
When I aligned the drill bit and sharpened it, why was no
material removed?
Answer:
This happens when the bit is not protruding out of the Chuck
far enough. You may have allowed the Alignment Button to
knock the drill back into the Chuck when aligning the bit.
Carefully realign the bit in the Alignment Port again. Make sure
the drill is pushed all the way against the Drill Stop before you
release the Alignment Button. (See page 6.)
Page 15
13
www.DrillDoctor.com
3. Question:
I sharpened the bit. Why will it not cut?
Answer:
This happens when the heel on the bit is higher than the cutting
edge (negative relief). Realign the drill and resharpen in the
Sharpening Port.
Maintain consistent inward light pressure during the half-turns
of the Chuck.
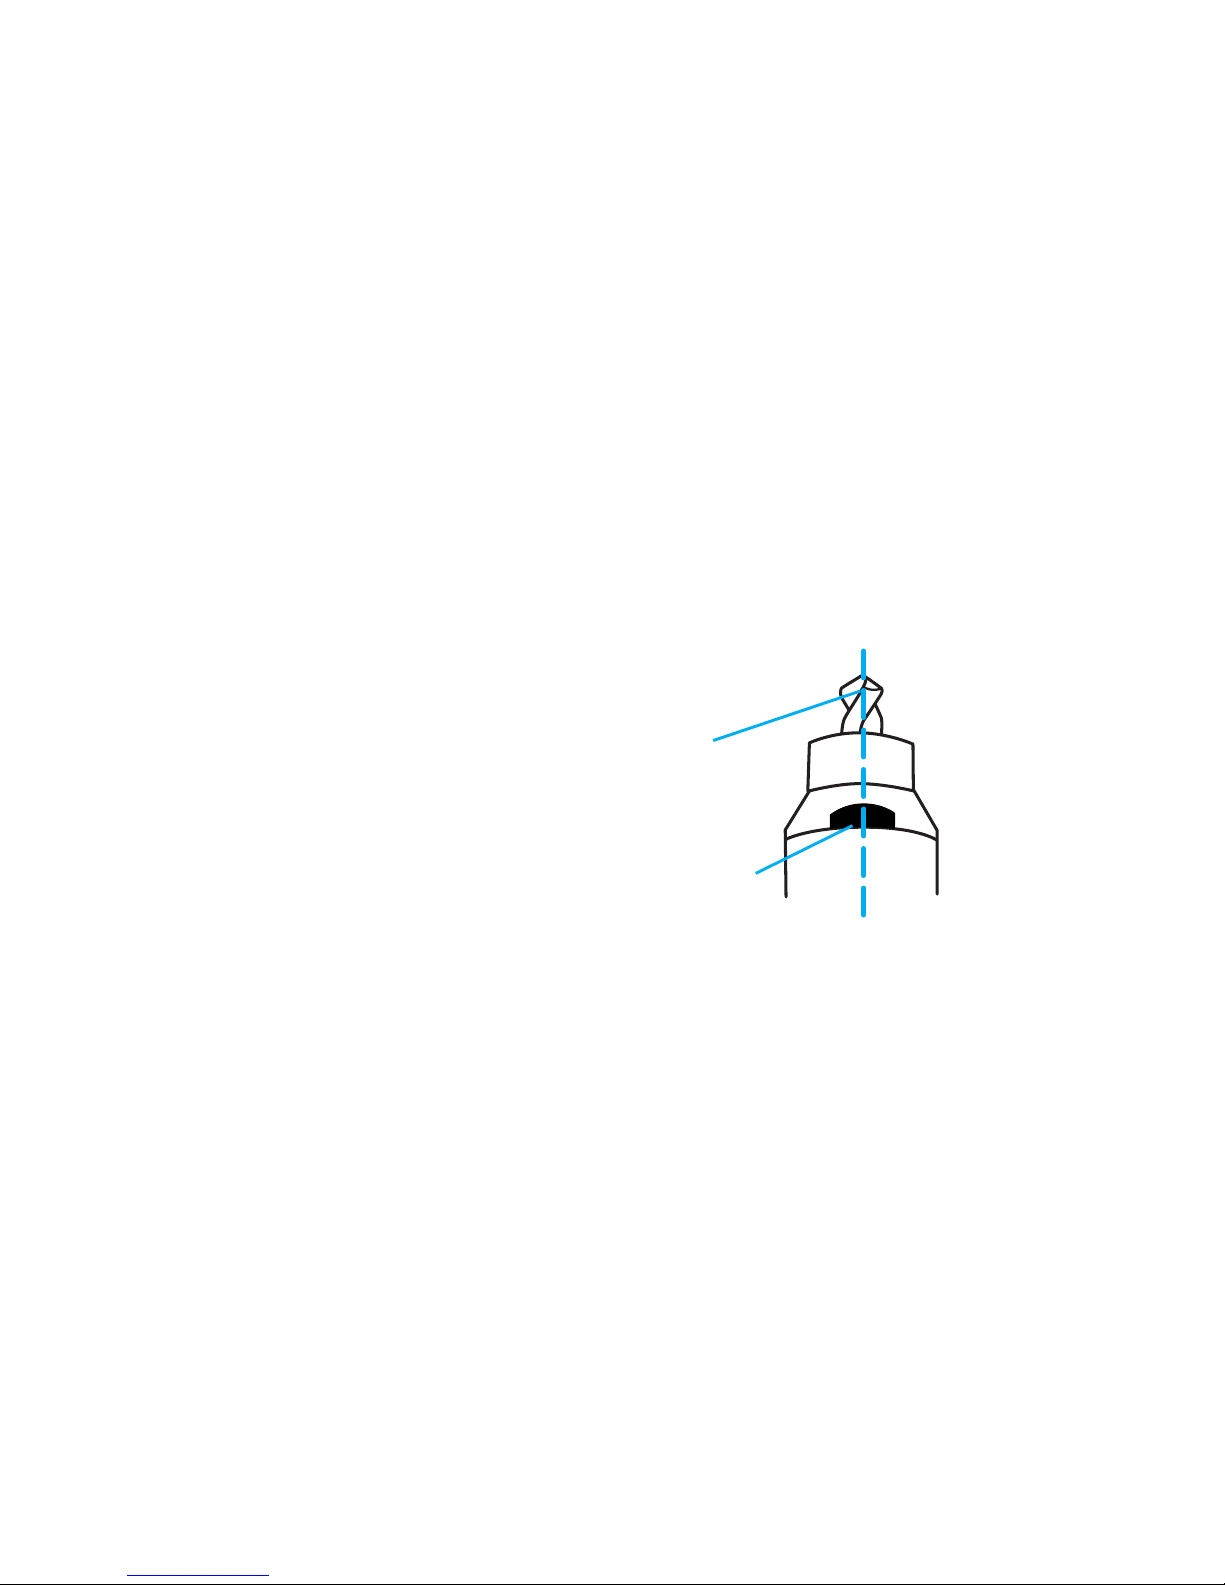
You may have a specialty drill bit. Slow and Fast Spiral, Helix,
Turbo Flutes, and Raised Margin drill bits are considered specialty
bits. To sharpen them, align them in the Chuck as you do standard
bits. Check the position of the two Flats on the Chuck and draw
an imaginary line from the middle of the flat up through the drill
bit (3/32" to 1/2").
If the alignment does not match the illustration shown, align
the drill bit so that the heel of the drill bit
is in alignment with the middle of the
chuck’s flat (see illustration), and
tighten the Chuck.
Follow the normal sharpening
procedure. You may have to
realign and sharpen more than
once to ensure that the bit is
sharpened correctly.
4. Question:
Why is the drill point off center?
Answer:
If the tip of the drill bit appears to be sharpened off center,
check the following items:
• You may not have completed an even number of half-turns
when you sharpened and one face of the bit was ground
more than the other. Always use an even number of half-
turns when you sharpen.
• Make sure that there are no particles between the chuck jaws
and the drill bit which could hold it off center.
• Make sure the bit is not loose in the Chuck.
Heel
Flat Spot
Page 16

14
www.DrillDoctor.com
• During the sharpening process be sure to keep the same
pressure on each half-turn.
5. Question:
What can I do about flat spots on the bit point between
the cutting edge and the heel?
Answer:
The flat spots on a sharpened bit are the result of an incomplete
or paused half-turn of the Chuck in the Sharpening Port. To correct,
apply light, not firm inward pressure and rotate the Chuck
smoothly while sharpening. Be sure to complete the half-turns.
6. Question:
Why is the chisel edge on my drill bit flat?
Answer:
During the alignment process the Bit Clamps were gripping the high
points of the drill bit. Realign the drill bit making sure that the Bit
Clamps are located in the narrowest section of the bit. (See page 6.)
7. Question:
Why are my small drill bits not cutting?
Answer:
After aligning the small bit, look into the back of the chuck and
determine if the jaws are straight against the bit. (The jaws will
not be in alignment for bits 1/8” and smaller.) If the jaws appear
to be out of line, move the Chuck Knob slightly to the left just
until the Jaws straighten. Do not loosen the Chuck Knob or the
bit will loosen and the alignment will be lost. Do not retighten
Chuck. If that happens, you will need to align the bit again.
(See page 10.)
8. Question:
Why does the drill bit back up into the Chuck during the
sharpening procedure?
Answer:
Make sure the bit is tight in the Chuck before sharpening.
Page 17

15
www.DrillDoctor.com
Your Chuck may be dirty. Follow the steps for cleaning the Chuck
on page 16.
9. Question:
Can I change a 135-degree drill bit into a 118-degree drill
bit?
Answer:
You can change the degree angle of any drill bit from 135 degrees
to 118 degrees.
The alignment and sharpening procedure will need to be
performed three or more times to remove the old angle and
produce the new angle desired.
Drill Doctor® Maintenance
After sharpening 20 to 25 drill bits, the drill bit grinding dust
will accumulate in the grinding compartment. Grinding particles
will promote wear in the Alignment, Sharpening, and Splitting
Ports and Chucks, so cleaning on a consistent basis can add life
to your machine. Before any maintenance or cleaning is
performed, be sure to disconnect your Drill Doctor.
®
Removing the Wheel Access Cover
Disconnect the Drill Doctor.® Using the narrow end of the
wrench provided (or a flat head screwdriver), insert it into the
slot of the clear Wheel Access Cover on the front of the machine
and use a twisting motion to pry the cover off.
Cleaning Your Drill Doctor
®
Disconnect the Drill Doctor.® Shake accumulated drill bit
grinding dust from behind the Wheel Cover into a disposable
container. Remove dust particles around the wheel with a small
dry brush. Dispose of the container and drill bit dust in a safe
and environmentally approved manner. With a dry cloth wipe
the inside and outside of the three Ports to remove any grinding
dust that may have accumulated. A standard 1" vacuum hose
works equally well.
Page 18
16
www.DrillDoctor.com
Determining if Replacing the Diamond
Sharpening Wheel is Required
You can double the life of the diamond sharpening wheel by
reversing it before you replace it. The sharpening wheel supplied
with the Drill Doctor® is designed to give you long and trouble
free service, with an average of more than 200 sharpenings for
3/32" to 1/2" drill bits.
The diamond wheel may need to be changed if:
1. Sharpened drill bits burn or turn blue no matter how fast
or slow you rotate the chuck.
2. When touching the sharpening wheel (with the machine
unplugged), the lower portion feels too smooth
(nonabrasive).
3. When sharpening the drill bit, it takes too many half-
rotations to sharpen.
Contact the store or dealer where you purchased the Drill
Doctor,
®
or contact Drill Doctor® directly, to purchase a
replacement sharpening wheel.
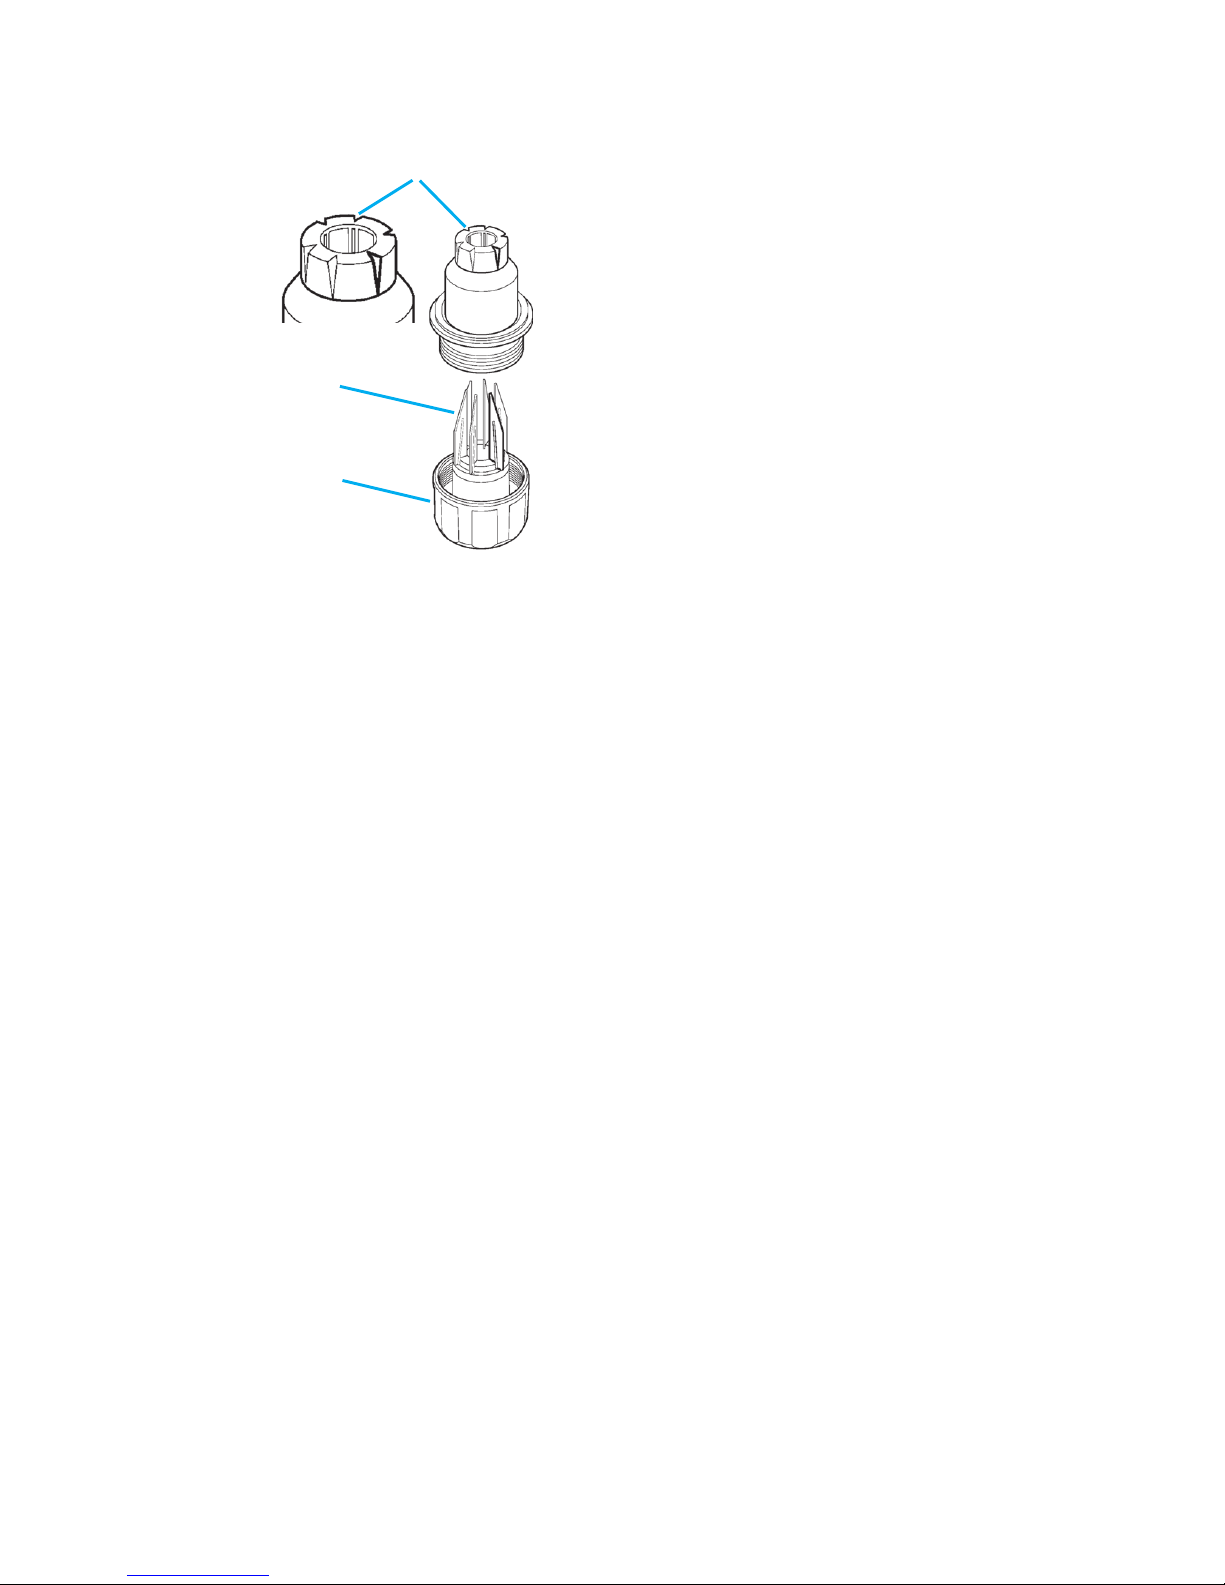
Jaw Alignment
Grooves
Jaws
Chuck
Knob
Cleaning the Chuck
With compressed air, blow out the
Chuck from the Knob end. After 20 to
25 sharpenings, you will need to
disassemble the Chuck for cleaning:
• Keep the Chuck upright (vertical)
and remove the Chuck Knob.
• Do not remove the springs or Jaws.
• Use a small brush or rag to remove
all grinding particles.
• Reassemble with all of the Jaws in
their respective grooves. If some
Jaws do not slip into their grooves
on the inside of the Chuck, reach
through the hole in the bottom of
the Chuck Knob (or use a paper clip
or small bit) and align them.
Page 19
17
www.DrillDoctor.com
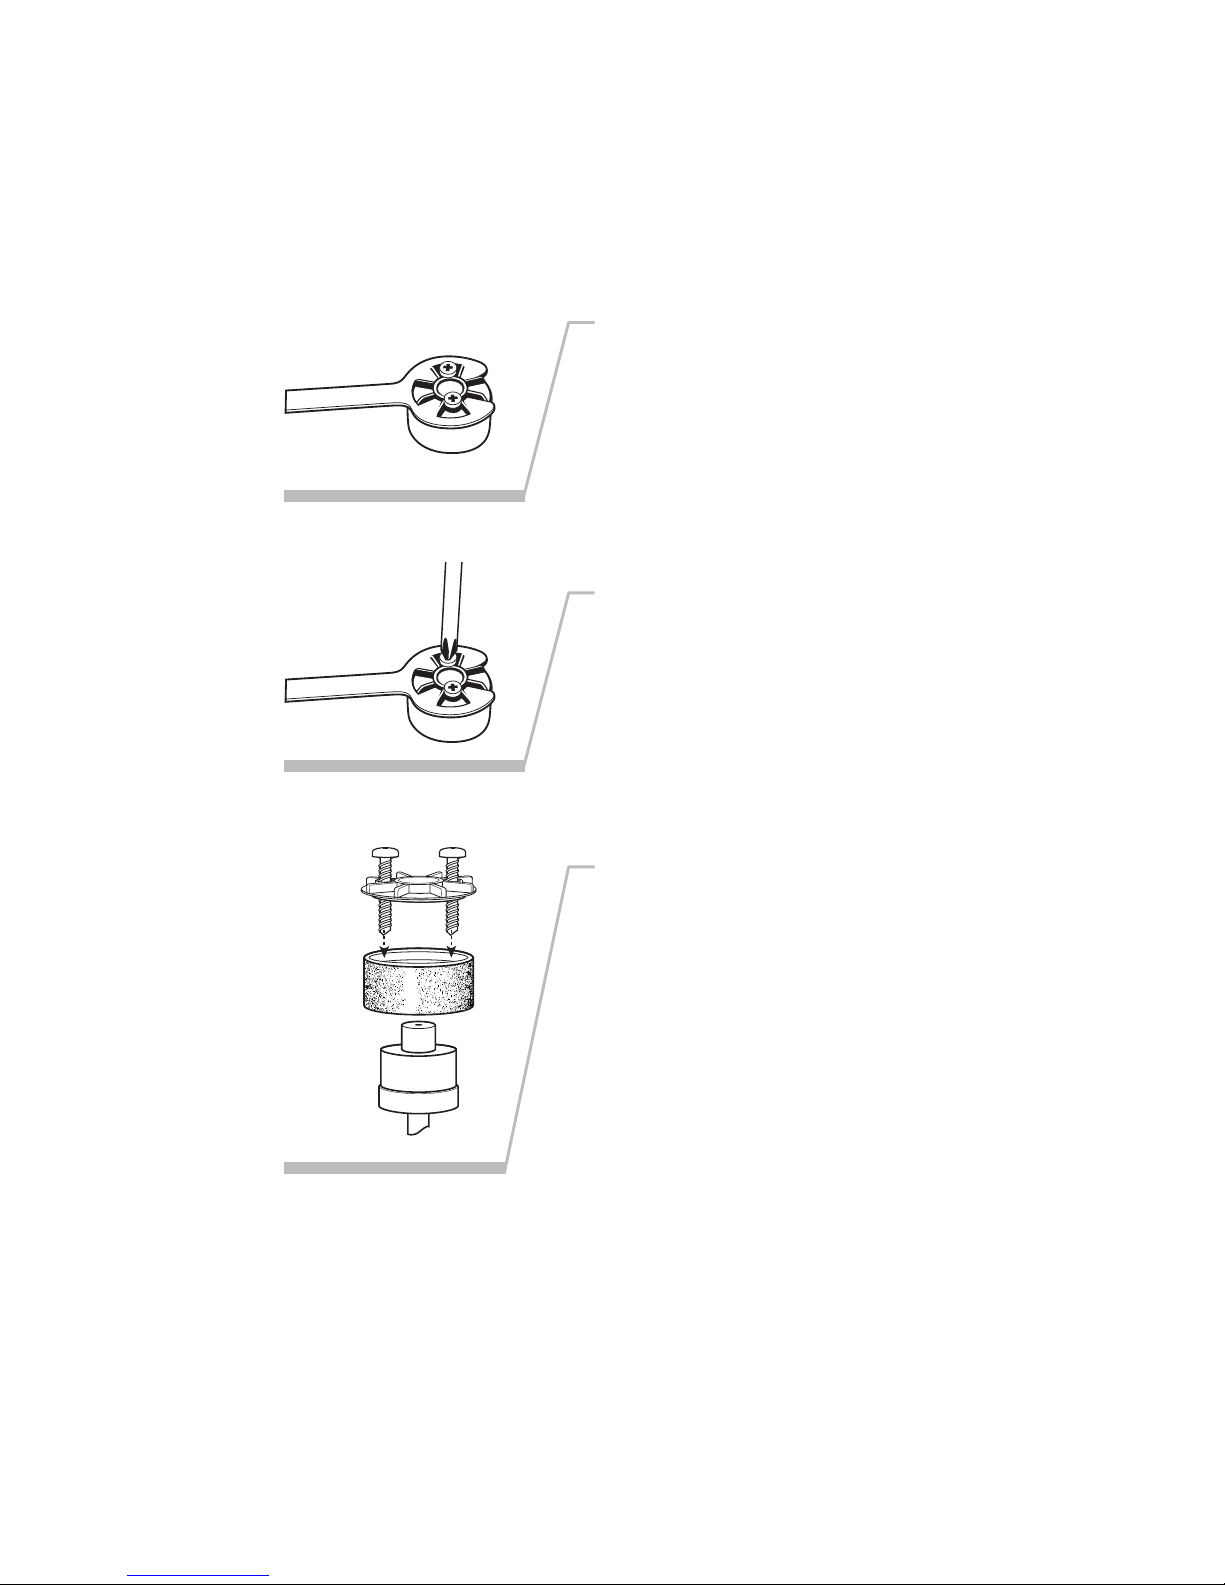
2.
3.
With Phillips-head screwdriver,
remove the two screws and
wheel retainer.
Use wrench supplied with your
Drill Doctor® to lock sharpening
wheel in place.
1.
Disconnect your Drill Doctor,® make sure machine is cool,
then remove wheel cover.
Reversing or Replacing Your Diamond
Sharpening Wheel
4.
Remove worn wheel by twisting
slightly and lifting wheel off
shaft. Install new wheel and
reinstall wheel retainer and
screws. Don’t over-tighten
mounting screws. Remove the
wrench and replace the wheel
access cover before turning on
the machine.
Page 20
18
www.DrillDoctor.com
User-Replaceable Parts
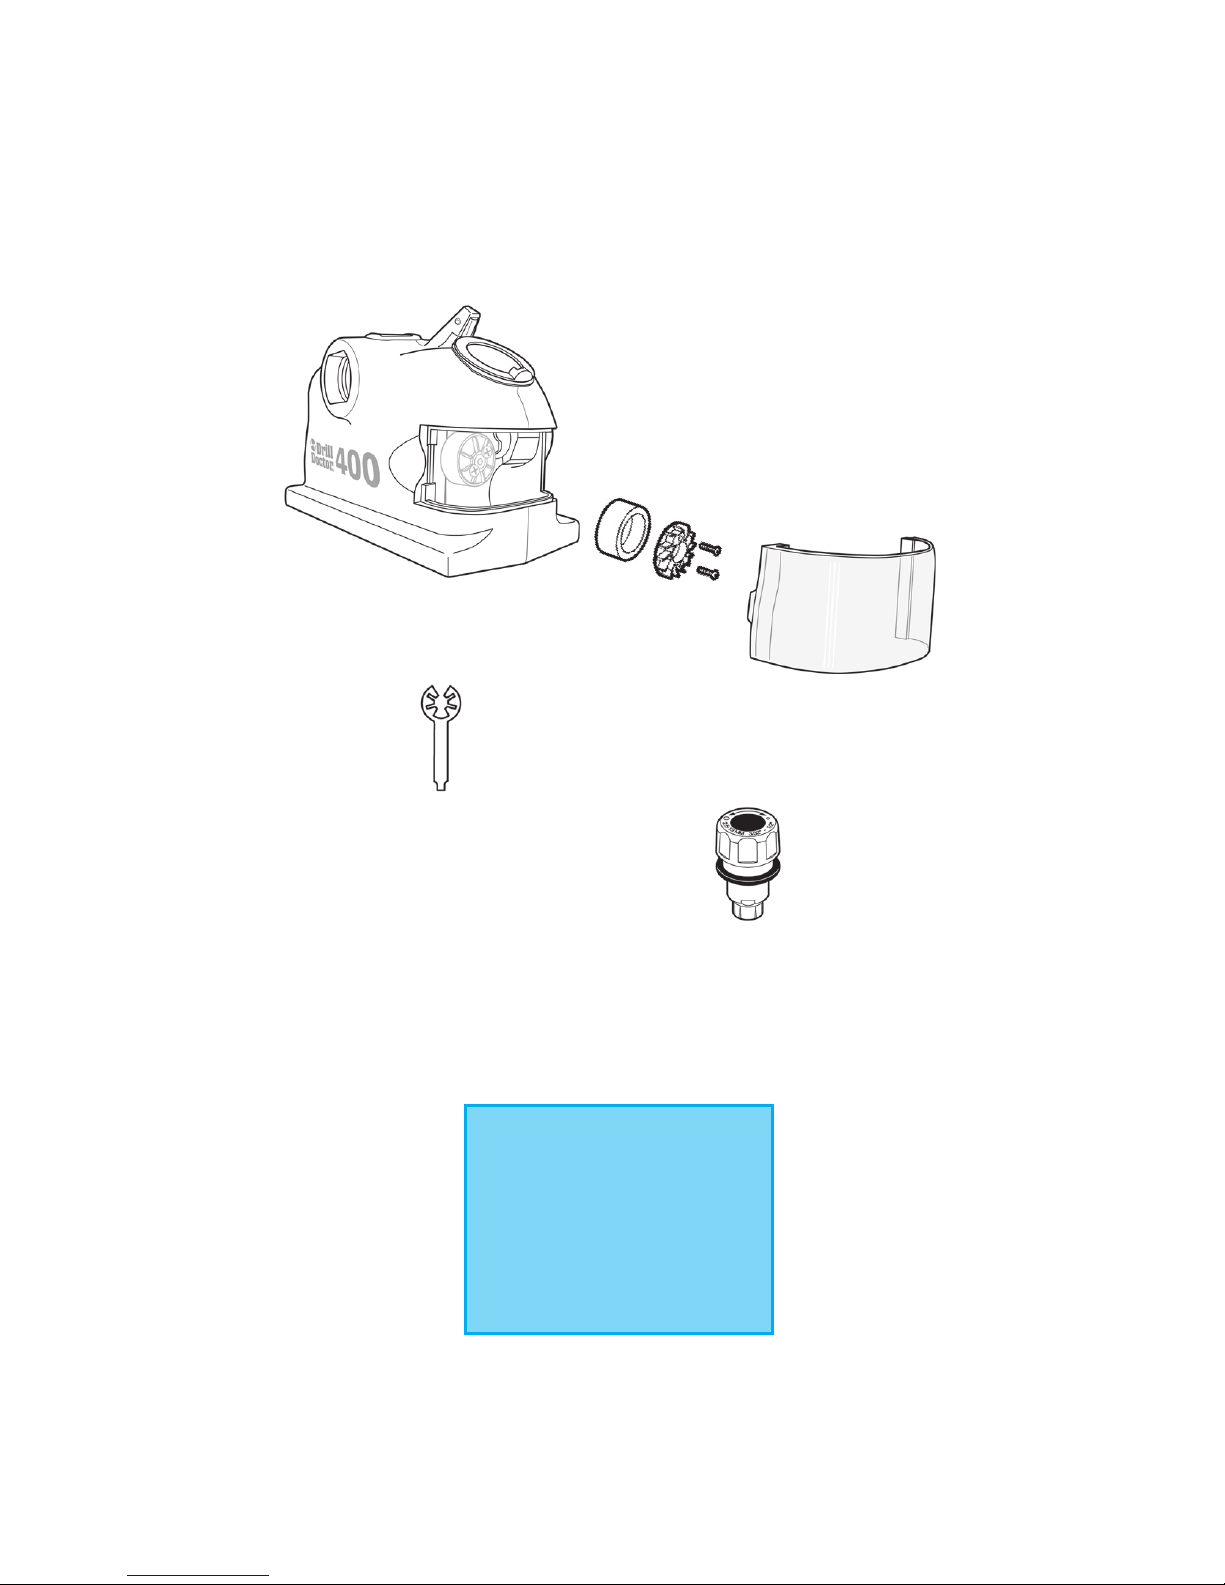
Hub Wrench
(Part #PP01336SF)
Wheel Access Cover
(Part #PP40150PF)
3/32" to 1/2" Chuck
(Part #SA01500PA)
180 grit Standard Diamond
Sharpening Wheel
(Part #SA01326GA)
The use of any
accessory other than
one recommended in
this user’s manual may
present a risk of
personal injury.
<MODIFY ART>
<MODIFY ART>
Order Replacement Parts and Accessories through our website:
www.DrillDoctor.com or by contacting us at the phone number listed
on the Warranty page.
Page 21

19
www.DrillDoctor.com
Complete and mail back the Warranty Registration & Customer
Survey, or register online at:
www.DrillDoctor.com
Please Fill in the Following for Your Records.
Drill Doctor® Model #: _____ _____ _____
Date of Purchase_____ / _____ / _____
Purchased from __________________________________
USA and Canada Only
See Warranty Card insert for countries outside the USA and Canada.
Your Drill Doctor is warranted to be free of defects due to
workmanship or design for 1 year from the purchase date. If your
Drill Doctor fails to operate, or if any operating problem occurs, contact
Drill Doctor Technical Service at:
1-888-683-7455 (toll-free USA and Canada only)
1-541-552-1301
Please call 8:00 AM - 3:30 PM Pacific Time.
Do not return this product to the store where you purchased it. Do
not attempt any service or repairs other than those suggested by a
Drill Doctor Technical Service Representative (TSR). During the period
of warranty, Drill Doctor will, at our discretion, repair or replace this
product free of charge and refund postage or shipping charges
providing that the following conditions are met:
1. A copy of the proof of purchase is provided.
2. The product has been operated for the purpose intended as
described in the operating instructions and has not been abused
or mishandled in any way.
3. The product has not been dismantled and no service or repairs
have been attempted other than those suggested by a Drill Doctor
TSR.
4. The Return Goods Authorization number (RGA #) (assigned by the
Drill Doctor TSR) is written on the shipping label. Please make
certain to package items in such a way as to eliminate further
damage during shipping. Ship via a traceable carrier and properly
insure the package.
No CODs are accepted. Unapproved shipping charges are nonrefundable.
Page 22

Phone/Teléfono/Téléphone:
1-888-MYDRILL (693-7455)
1-541-552-1301
Professional Tool Manufacturing, LLC
P.O. Box 730
210 E. Hersey St.
Ashland, OR 97520
USA/
EE.UU./USA
Fax/
Fax/Télécopieur
:
541-552-1377
Email/
Correo electrónico/Courriel
:
Web/
Dirección en Internet/Site Web
:
www.DrillDoctor.com
Page 23

PP30500KF 05/03 Rev 0
Phone/Teléfono/Téléphone:
1-888-MYDRILL (693-7455)
1-541-552-1301
Professional Tool Manufacturing, LLC
P.O. Box 730
210 E. Hersey St.
Ashland, OR 97520
USA/
EE.UU.
Fax/
Fax/Télécopieur
:
541-552-1377
Email/
Correo electrónico/Courriel
:
Web/
Dirección en Internet/Site Web
:
www.DrillDoctor.com
Drill Doctor® is a registered trademark of
Professional Tool Manufacturing, LLC.
Drill Doctor
®
es una marca comercial registrada de
Professional Tool Manufacturing, LLC.
Drill Doctor
®
est une marque de commerce déposée
de Professional Tool Manufacturing, LLC.
 Loading...