

Page 1
User Manual
USA 76
Voltage220V-240V
Page 2

User manual
ELECTRIC IN BUILT OVEN | USA 76
2
1. INTRODUCTION ............................................................................................. 3
2. INSTRUCTION FOR USE ............................................................................... 6
3. START / CONTROL ........................................................................................ 7
4. USING THE OVEN ........................................................................................ 13
5. VIEW THE OVEN .......................................................................................... 15
6. TEMPERATURE PROBE .............................................................................. 15
7. GENERAL CLEANING .................................................................................. 31
8. PROBLEM SOLVING .................................................................................... 36
Page 3

User manual
ELECTRIC IN BUILT OVEN | USA 76
3
1. INTRODUCTION
We recommend carefully read this manual before using for better performance and extend
the life of the device, as it will provide the necessary instructions for installation, use and
maintenance. Always keep this manual handy as you may need it in the future.
Security is a good habit in which you have to get involved, however not taken into
consideration:
Children playing with the appliance.
Using the appliance for very young children.
Using the appliance unsupervised children.
Maintenance by children, including cleaning.
To maintain efficiency and safety of the appliance, we recommend the following:
Just call the Service Center authorized by the manufacturer.
Only use original spare parts.
In case of damage to the power cord, cable special purpose vehicles or any
component, or buy it from Fabricate maintenance department is to replace him.
A circuit breaker omnipolar with minimum contact opening 3mm must be
incorporated between the apparatus and the mains. The circuit omnipolar switch
should be according to the load and comply with regulations (the earth wire must
not be interrupted by the circuit breaker).
When handling the device, it is recommended to always use the handles provided on
the sides of the oven to avoid harming people or damage the appliance.
The device was designed for one will not only professional home use and function
should not be changed.
The electrical system of the apparatus can only be used safely when connected to
a system ground efficiently under standard security measures.
WARNING: The apparatus and accessible parts are heated to use. Take safety
measures to avoid touching parts that are hot. Children under 8 years must stay
away unless they are supervised. Make sure the appliance is off when replacing the
lamps to avoid possible electric shock.
The following items are potentially dangerous, and therefore should take appropriate
measures to prevent children and people with disabilities come into contact with these
measures:
Page 4

User manual
ELECTRIC IN BUILT OVEN | USA 76
4
And controls the overall apparatus.
Packaging (bags, polyethylene, nails, etc.).
The device itself, immediately after use of the oven or grill due to the heat
generated.
The apparatus itself, when not in use (potentially dangerous parts must be
secure).
Avoid the following:
Touch the appliance with wet parts of the body.
Using the appliance with bare feet.
Pull the cord or unplug it from the electrical outlet.
incorrect or dangerous operations:
Obstructing the ventilation or heat dissipation.
Allow power cords of small appliances come into contact with hot parts of the
appliance. Expose the appliance to atmospheric agents such as rain, or sunlight.
Using the oven for storage purposes.
Using flammable liquids near the appliance.
The use of adapters, multiple sockets and / or extension cords.
Attempting to install or repair the appliance without the assistance of qualified
personnel.
Qualified personnel must be contacted in the following cases:
Installation (following the manufacturer's instructions)
When in doubt the operation of the apparatus.
Replacing the electrical outlet when it is not compatible with the appliance plug.
The temperature probe is a part of the thermostat, if damaged; it should be
replaced by authorized personnel.
Authorized Service Center by the manufacturer should be contacted in the following
cases:
If in doubt about the soundness of the appliance after removing it from its
packaging.
If the power cord is damaged or needs to be replaced.
If the appliance breaks down or malfunctions; ask for original spare parts.
It is a good idea if it meets the following:
Steam cleaners cannot be used to clean the oven.
Page 5

User manual
ELECTRIC IN BUILT OVEN | USA 76
5
Do not use abrasive or sharp metal scrapers to clean the glass of the oven door
as it can scratch the surface, which can cause glass breakage.
Only use the device for cooking food and nothing else.
Check the solidity of the device after being unpacked.
Unplug from the mains if it is not functioning properly and before cleaning or
maintenance.
When not used, disconnect the appliance from the mains.
Use oven mitts to place the container or removing it.
Always handle grip the oven door in the center as the ends thereof may be hot
due to leakage of hot air.
Make sure the knobs are in position " "/" "When the apparatus is not in use.
Unplug the power cord from the mains when you decide not to use the device for a
while.
The manufacturer is not liable for damage due to: incorrect installation, improper,
wrong and irrational use.
Page 6
User manual
ELECTRIC IN BUILT OVEN | USA 76
6
2. INSTRUCTION FOR USE
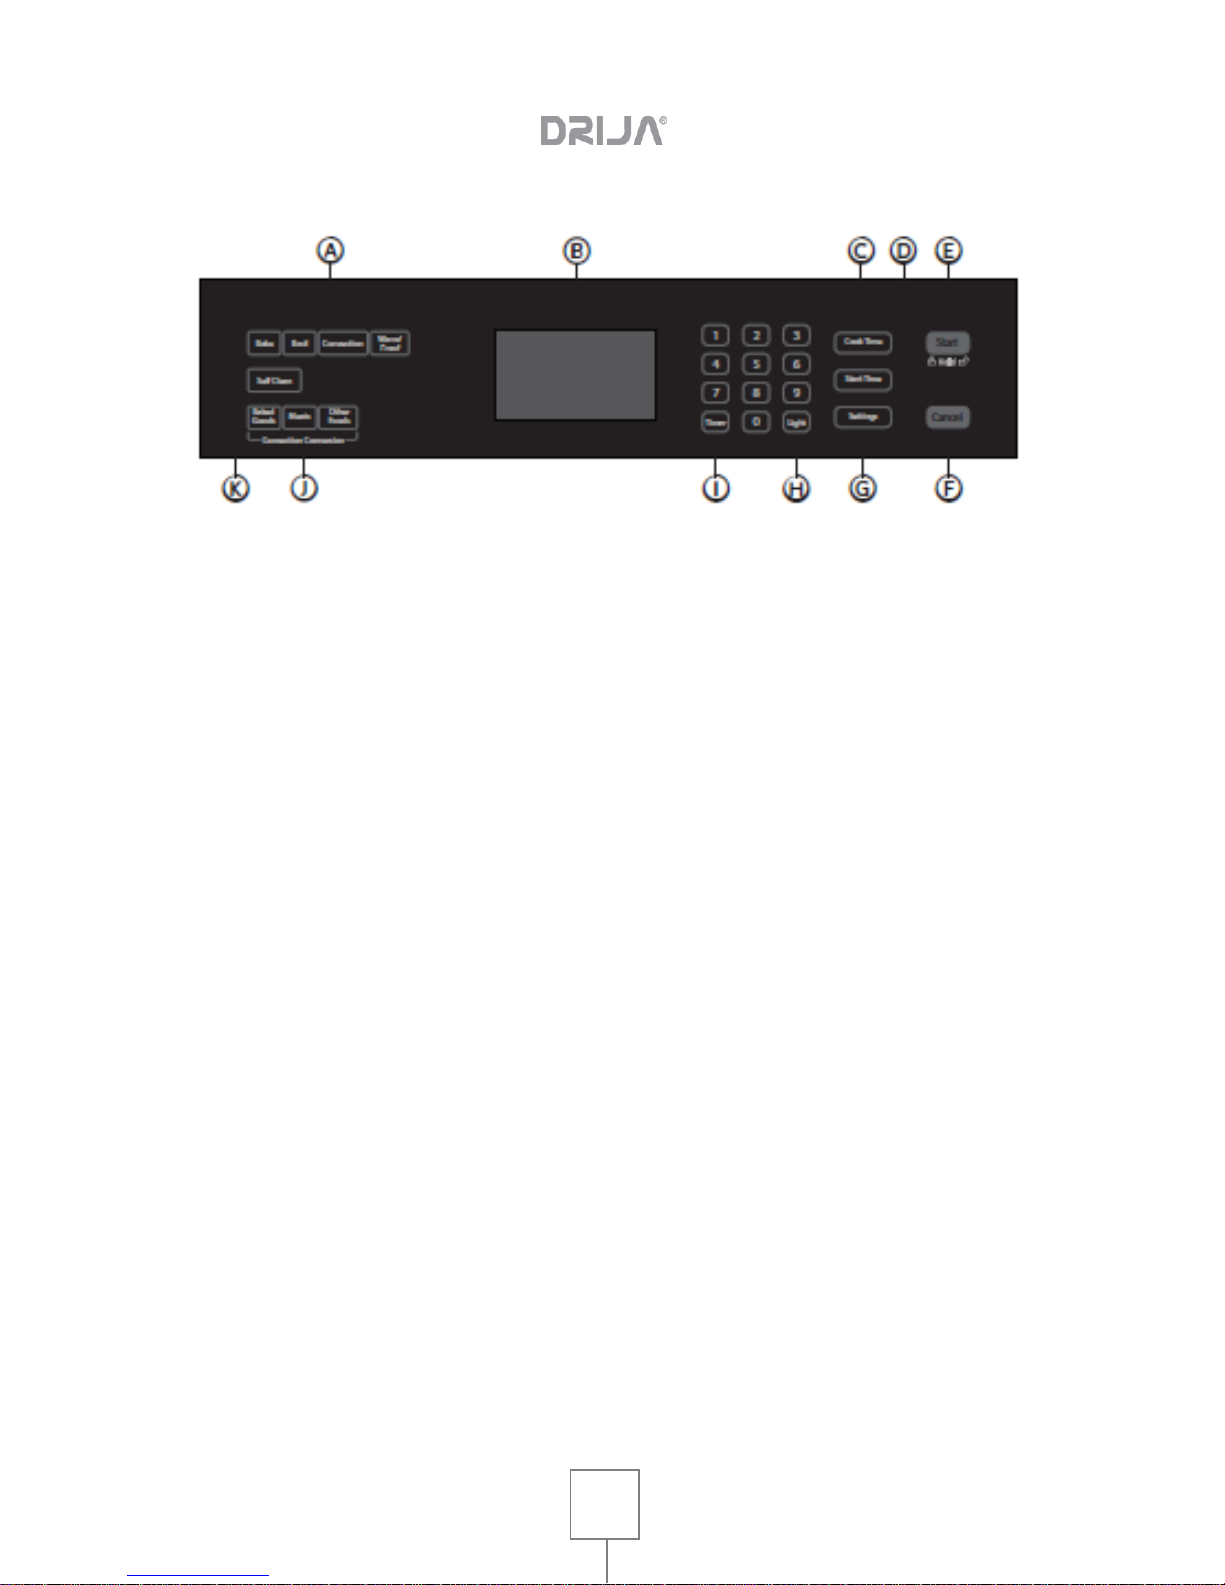
A. Oven mode controls
B. screen
C. Cooking time
D. Start Time
E. Start / Control lock (press and
hold 3 seconds)
F. Cancel
G. settings
H. Light
I. timer
J. Conversion mode controls
convection
K. Self-cleaning
OVEN MODE CONTROLS
Select Bake oven modes (Bake), Broil (Grilling) Convection
(Convection) and Warm / Proof (Heat / Leudar)
NOTE: Warm / Proof (Heat / Leudar) control is used for both modes oven.
SCREEN
When power is first supplied to the furnace or in case of power outage, will show
"12:00" on the screen.
See "Clock" later in this section for instructions to set the time of day. When the
oven is not in use, the display will show the time of day.
Page 7

User manual
ELECTRIC IN BUILT OVEN | USA 76
7
3. START / CONTROL
START
The Start control (Start) will activate any oven function. If Start (Start) is pressed in
less than 2 minutes after pressing a key, the function will be canceled and the time
of day appear on the screen.
CONTROL PANEL LOCKOUT
The control panel can be locked to prevent accidental use of the oven.
NOTES:
• You cannot lock the control if the oven is in use or is active Cook Time (cooking
time) function.
• The time now remain on the screen when control is locked.
To lock the control panel:
• Hold START (Start) for 3 seconds or until "LOCKED" (Locked) appears on the
screen. "LOCKED" (Locked) remain on the screen.
To unlock the control panel:
• Hold START (Start) for 3 seconds or until "LOCKED" (Locked) appears on the
screen.
CANCEL
• Press the Cancel (Cancel) button to stop any function except to
Cook Time (cooking time) and Control Panel Lockout (Control Panel Lock).
LIGHT
The oven lights turn on and off automatically when the oven door is opened and
closed.
• Press the Light button (light) to turn on / off lights oven when the oven door is
closed.
Page 8

User manual
ELECTRIC IN BUILT OVEN | USA 76
8
TIMER
The timer (Timer) can be set in hours or minutes to 11 hours and
59 minutes.
To set the timer:
1. Press TIMER (Timer).
2. Use the numeric keypad to enter the length of time in hours and minutes.
3. Press TIMER (Timer) to start the countdown. If activated, it will sound the tone
timer at the end of the countdown.
Four. Press TIMER (Timer) to cancel the timer and return to the time of day.
NOTE: No press CANCEL (Cancel), as doing so will turn off the oven.
COOKING TIME
Cook Time (cooking time) function allows the oven to be programmed to turn on at a
certain time of day, cook for a certain period of time and then turn off automatically.
IMPORTANT: You must select a mode the oven before you can program a cooking
time.
NOTES:
• Cook Time (cooking time) can be set in hours or minutes to 11 hours and 59
minutes.
• To change the cooking time during cooking, press CANCEL (Cancel). Enter the
new cooking time and press START (Start).
• At the end of the programmed cooking time, the oven will turn off automatically
tone sounds cycle end and the legend "Cooking Complete" (finished cooking) in the
text area.
SETTING A TIME OF COOKING:
1. Select the cooking mode.
2. Select the temperature.
3. Press COOK TIME (cooking time). Enter the desired cooking time by pressing the
keypad.
Four. Press START (Start). The oven will begin preheating.
Page 9

User manual
ELECTRIC IN BUILT OVEN | USA 76
9
NOTES:
• The format of the Cook Time (cooking time) option is H: MIN, and switches to MIN:
SEG during the last minute.
• The alert tone will sound until the Cook Time (cooking time) option is canceled.
START TIME
This feature allows you to set the oven to come on later.
IMPORTANT: The clock must be set to the correct time of day.
1. Select a mode from the oven.
2. Select the temperature.
3. Set the cooking time.
Four. Press START TIME (Start Time).
5. Enter the desired start time by pressing the keypad. "Press START" (Press Start)
appears on the screen. If you have not programmed Cook Time (cooking time), the
control will indicate "Set Cook Time" (Set cooking time).
6. Place food in the oven and close the door of this.
7. Press START (Start). Start Time (Start Time) will begin counting down until it
reaches the scheduled time of day.
NOTE: At the end of the cooking time, the oven will automatically turn off, the alert
tone will sound and "Cooking Complete" (Complete Cooking) appear on the screen.
Danger of food poisoning
Do not leave food in the oven for more than an hour before or after cooking.
Failure to do so can cause food poisoning or illness.
ADJUSTMENTS
The Control Settings (Settings) lets you access the menu to use additional functions
and features.
Press SETTINGS (Settings) to display the menu options 1 to 6. Then press START
(Start) to display options 7 to 9.
CLOCK
The clock can be programmed to display time in a 12 or 24 hours. The clock is
factory set at the 12-hour format.
Page 10
User manual
ELECTRIC IN BUILT OVEN | USA 76
10
To set the clock:
NOTE: Before setting the clock, make sure the oven and Timer are off.
1. Press SETTINGS (Settings). They appear several options on the screen.
2. Press "1" on the keypad. "Clock" (Clock) appear on the screen.
3. Press the keypad to enter the time of day.
Four. Press START (Start) to toggle between AM and PM.
5. Press SETTINGS (Settings) to confirm and thus has been scheduled time of day.
To change the clock to 24-hour format:
1. Press SETTINGS (Settings). They appear several options on the screen.
2. Press "5" on the numeric keypad. "12/24 HOUR" (12/24 hours) and "12" appear in
the display.
3. Press "1" on the numeric keypad to change the setting 12/24 hours to 24 hours.
Four. Press SETTINGS (Settings) to confirm. 12/24 hour setting has changed.
SHADES
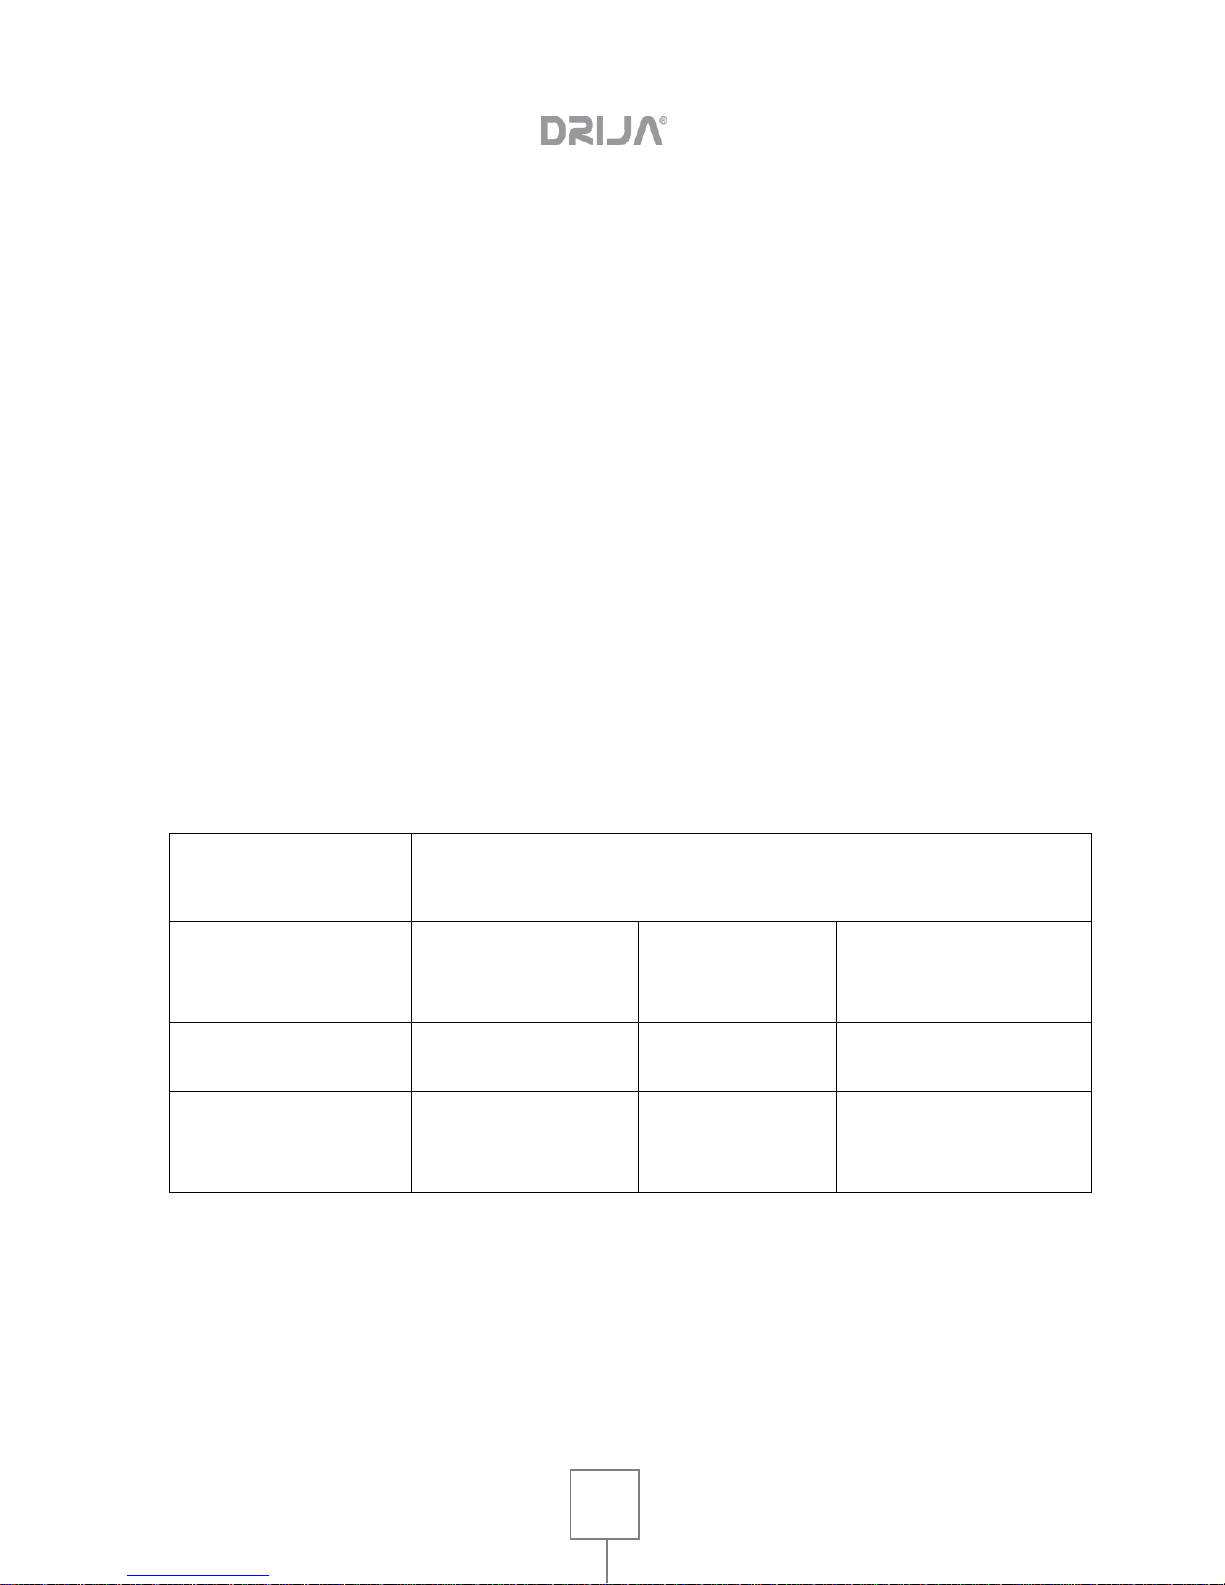
The tones are audible signals, indicating the following:
Number of
Ringtones
indicates
1
valid button
It has entered
a function
The oven
It preheated
2
Invalid touch button
4
End of cycle
End Account
regressive
TURNING ON / OFF THE SOUND:
The sound of the oven is factory set to the on position (On), per se can switch to the
off (Off) position.
1. Press SETTINGS (Settings). They appear several options on the screen.
2. Press "3" on the keypad. "SOUND" (Sound) and "ON" (On) will appear on the
screen.
Page 11

User manual
ELECTRIC IN BUILT OVEN | USA 76
11
3. Press "1" on the keypad. "ON / OFF" (On / off) appears on the screen.
Four. Press "1" on the keypad to turn off the sound.
5. Press SETTINGS (Settings) to confirm. Now the sound is off.
6. Press SETTINGS (Settings), and then follow the instructions on the screen to
reactivate the sound.
TO REGULATE THE VOLUME OF SOUND:
The sound of the oven is factory set to High (High), but can be changed to Low
(Low).
1. Press SETTINGS (Settings). They appear several options on the screen.
2. Press "4" on the numeric keypad. "SOUND VOLUME" (volume of sound) and
"HIGH" (high) appear on the screen.
3. Press "1" on the keypad. "HIGH / LOW" (High / Low) appears on the screen.
Four. Press "1" on the keypad to place the sound Low (Low).
5. Press SETTINGS (Settings) to confirm. Now it changed the sound volume.
6. Press SETTINGS (Settings), and then follow the instructions on the screen to
reposition the sound setting in High (High).
And CELSIUS DEGREES FAHRENHEIT
The control panel is factory set to display the temperature in degrees Fahrenheit, but
can be changed to display in Celsius.
CHANGING DISPLAY FAHRENHEIT CELSIUS A:
1. Press SETTINGS (Settings). They appear several options on the screen.
2. Press "2" on the numeric keypad. "TEMP UNIT" (unit temperature) and
"Fahrenheit" (F) appear on the screen.
3. Press "1" on the keypad. "DEGREE F / C" (Fahrenheit / Celsius)
appears on the screen.
Four. Press "1" on the numeric keypad to change the setting unit
to degrees Celsius temperature.
5. Press SETTINGS (Settings) to confirm. Changed unit
Page 12

User manual
ELECTRIC IN BUILT OVEN | USA 76
12
temperature.
6. Press SETTINGS (Settings), and then follow the instructions on the
screen to return to Fahrenheit.
SABBATH MODE
The Sabbath (Rest day) mode is designed for those whose
religious practices require disable certain features of the oven. To the
activate the Sabbath mode (Rest day), the oven will comply with the requirements
Jewish rest according Star-K.
NOTE: The oven is factory set with the Sabbath mode (Rest day)
disabled.
To turn on / off the Sabbath (Rest day) mode:
1. Make sure the oven is off and the meat probe is not plugged.
NOTE: The Sabbath (Rest day) mode cannot be set when the
oven is on. The oven will not recognize the meat probe while
On the Sabbath (Rest day) mode.
2. Press SETTINGS (Settings)> press START (Start)> press 7 and
then press 1 to toggle ON / OFF (On / off).
3. Press SETTINGS (Settings) to activate the Sabbath mode again (Day
Rest). The only cooking function works while the oven is
set in Sabbath mode (Rest day) is Bake (Bake).
Baking while the oven is in the Sabbath (Rest day) mode:
1. Hold BAKE (Baking) for 3 seconds.
2. Enter the desired oven temperature by pressing the keypad.
3. After selecting Bake (Bake) and a temperature you have the option to set Cook
Time (cooking time) and Start Time (Start Time) before pressing START (Start). See
"Cooking time" and "Start Time".
Four. Press START (Start). Pressing Start (Start), the Sabbath (Rest day) mode is
activated.
Page 13

User manual
ELECTRIC IN BUILT OVEN | USA 76
13
Only Cancel (Cancel) control is active.
• Press CANCEL (Cancel) twice to exit the Sabbath (Rest day) mode and resume
normal operation of the furnace. The display will return to the time of day.
NOTE: In case of a power outage while the oven is in Sabbath (Rest day) mode, the
oven will exit the Sabbath (Rest day) mode and resume normal mode when power is
restored.
DIOMA
The language is factory set to English, but can be changed to French.
To change the language from English to French:
1. Press SETTINGS (Settings). They appear several options on the screen.
2. Press "6" on the keypad. "LANGUAGE, English1, and French 2" (Language,
English 1 and French 2) "appears on the screen.
3. Press "2" on the numeric keypad to select French.
Four. Press SETTINGS (Settings), and then follow the prompts on the screen to
return the Language setting (language) English (Ingles).
SELF-CLEANING
Controls the automatic self-cleaning. See "Oven Care".
4. USING THE OVEN
BEFORE USING THE OVEN
1. Turn the temperature control to the highest setting.
2. Turn the cooking mode selecting a cooking mode.
3. Allow the oven to run for 30 minutes with the door closed and no food in the
cavity.
NOTE: Any odor that can be detected during this first use, due to evaporation of the
substances used to protect the oven during storage.
Four. Turn off oven and allow cooling.
GENERAL
Page 14

User manual
ELECTRIC IN BUILT OVEN | USA 76
14
IMPORTANT: Do not place any objects, including plates, paper and baking trays at
the bottom of the oven when it is operating to avoid damaging the enamel.
1. Place bake ware with food in one or both grills provided with the oven.
2. Press control oven mode to select the desired oven function.
3. Use the numeric keypad to enter the oven temperature.
Four. Press START (Start).
PREHEAT THE OVEN
• Preheat the oven when using modes baking, convection baking and convection
Grill.
• Select a higher temperature does not shorten preheat time.
• Preheating is needed to obtain good results when baking cakes, cookies, pastries
and breads.
• Preheated help sear roasts and meat retain its juices.
• Place oven racks in their proper position before preheating.
• During preheat the display shows the selected cooking temperature.
• A beep will confirm that the oven is preheated and the display "PREHEAT" will be
disabled.
SUGGESTIONS FOR USE
• Use cooking tables as a guide
• Do not place containers on the open oven door
• Use the internal oven light to look at food through the oven window instead of
opening the door frequently.
Page 15
User manual
ELECTRIC IN BUILT OVEN | USA 76
15
5. VIEW THE OVEN
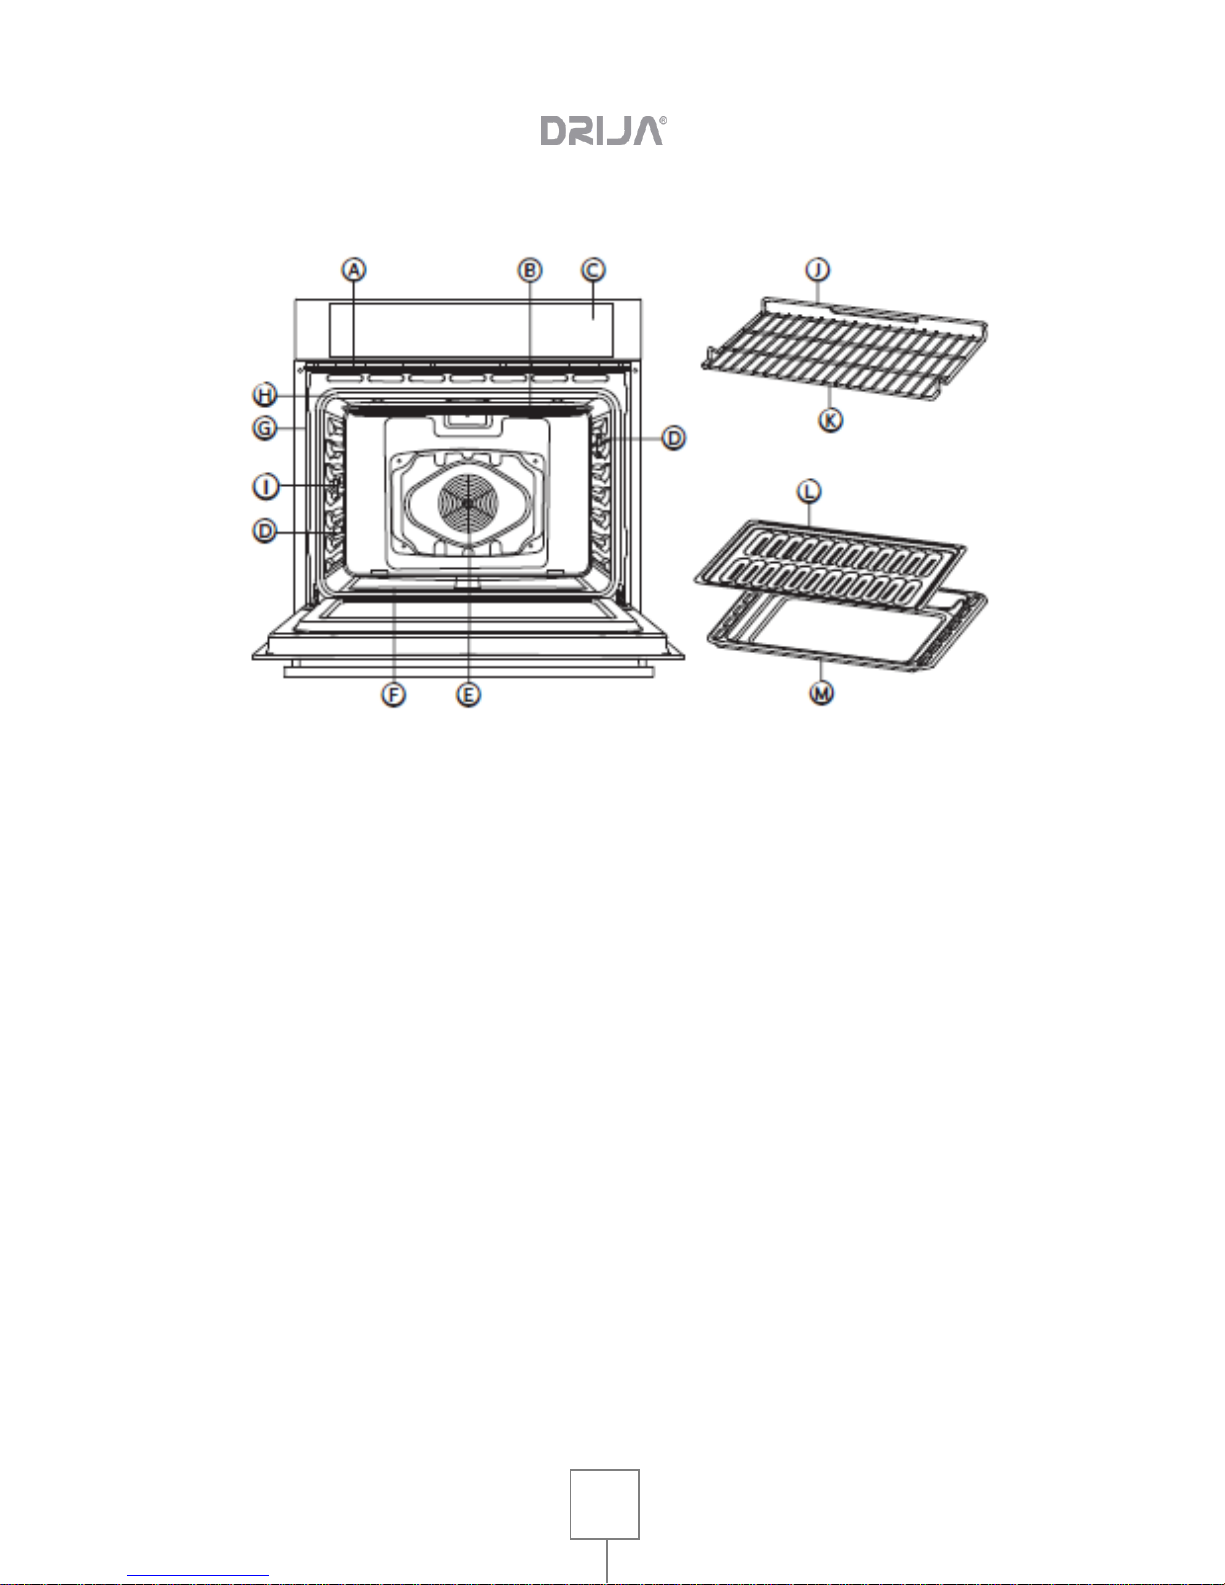
A. Oven vent
B. Broil element
C. Control Panel
D. halogen lamps
E. Convection fan and element
F. Bake element (not visible)
G. Plate with model and serial #
H. Door gasket
I. Temperature sensor
J. Grid background
K. Front grid
L. Grill tray
M. Roasting tray
6. TEMPERATURE PROBE
Burning danger
Use an oven mitt to remove temperature probe.
Do not touch the broil element.
Failure to follow this instruction can cause burns
Page 16

User manual
ELECTRIC IN BUILT OVEN | USA 76
16
The temperature sensor controls the internal temperature of the food, which is often
used as an indicator of cooking, especially for meat and poultry and turns the oven
off when the internal temperature of the food reaches the set temperature. The
temperature probe works with all oven modes except the Warm / Proof (Heat /
Leudar), Sabbath (Rest) and Self-Clean (self-cleaning) modes.
IMPORTANT: Always disconnect and remove the probe oven temperature when
removing food.
To use the temperature sensor:
1. Insert the probe into the food.
NOTE: For meat, to insert the probe tip in the center of the thickest part of the meat.
Make sure the tip of the probe is not in fat or touching the bone.
2. Place food in the oven. Keep the temperature sensor as far as possible from the
heat source and plug into the outlet of the furnace. Close the oven door.
3. Select the oven mode.
Four. Enter the oven temperature; by pressing numbers on the keypad.
5. Press START (Start). The set oven temperature appears on the display during
cooking.
6. Press the numbers on the keypad to enter the desired internal food temperature
and then press START (Start) again.
NOTES:
• The internal temperature of the food can be set between 110 ° F and 200 ° F (43 °
C
and 93 ° C).
• When the set temperature of the probe is reached, the oven will shut.
7. Press CANCEL (Cancel) when finished. Unplug the temperature probe and
remove the food from the oven.
NOTE: Probe icon will remain on the display until the probe is unplugged.
VESSELS
• Glass containers absorb heat baking. Reduce oven temperature 25 ° F (15 ° C)
when baking with glass molds.
Page 17

User manual
ELECTRIC IN BUILT OVEN | USA 76
17
• Use containers that produce the desired browning. The type of container finish
helps determine the amount of gold to be produced in the oven.
- Bright molds, smooth metal or slightly antia- adherents / Anodized reflect heat and
result in a lighter and more delicate gold. Cakes and cookies require this type of
mold.
- The dark, rough or brightness been heat absorb containers and produce a more
golden and crispy crust. Use this type for pies.
• No bake with roast empty tray in the oven as this can change the baking
performance. Keep roasting tray out of the oven.
HIGH ALTITUDE BAKING A
• When baked at high altitude, recipes and cooking times vary with respect to
standards.
OVEN RACKS
IMPORTANT: To avoid permanent damage to the porcelain finish, place food or
bake ware on a broiler. Do not place food or bake ware directly on the door or the
oven floor.
• Oven racks can be placed in any of six positions of oven height.
• Position racks before turning on the oven.
• Make sure oven racks are level.
• Oven racks are capped to prevent them from being inadvertently removed
completely.
To remove the grids
• Hale out rack to the stop, lift the front edge, and then lift it out.
To get a grid
• Place oven rack on the wire supports located on the sides of the oven. Slightly lift
the front edge and the slide rack back past the stop position. Lower front and slide
In the oven.
Page 18

User manual
ELECTRIC IN BUILT OVEN | USA 76
18
COOLING FAN COMPONENTS
It is activated in any cooking or cleaning mode auto cool internal components and
the exterior surfaces of the doors. This air is expelled through the duct located
above the oven door. It continues to operate until the components have cooled
sufficiently. The fan runs double speed (or RPM) mode whenever self cleaning and
increase the temperature of the internal components.
GLASS OVEN DOOR
To avoid glass breakage of the oven door:
• Do not close the oven door if the grids are not fully within the oven cavity or when
bake ware protrude from the front edge of the oven rack.
• Do not place objects on the glass surface of the oven door.
• Do not strike the glass surfaces with bake ware or other objects.
• Not clean glass surfaces until the oven is completely cooled.
PIPELINES furnace exhaust
Block or cover the kiln exhaust ducts generates a poor air circulation, which will
affect the results of cooking, cleaning and cooling.
• Exhaust ducts upper and lower oven allow entry of fresh air to the cooling system.
• The vent allows lower furnace hot air outlet from the cooling system.
OVEN TEMPERATURE CONDENSATION
• It is normal for a certain amount of moisture evaporates from the food during the
cooking process. The amount depends on the moisture content in the foods.
• The moisture may condense on a cooler or in the oven and the control panel
surface.
• Your new oven has an electronic temperature sensor that can maintain the desired
temperature accurately. His previous oven maybe had a mechanical thermostat
gradually changing to a higher temperature. It will be normal that you have to adjust
your favorite recipes when you start cooking with your new oven.
TEMPERATURE CONTROL OVEN
Page 19
User manual
ELECTRIC IN BUILT OVEN | USA 76
19
The oven provides accurate temperatures; however, it may cook faster or slower
than the previous oven, so that it can adjust the temperature calibration. It can be
adjusted in degrees Fahrenheit or Celsius.
A minus sign means the oven will be cooler with the amount shown on the screen.
The absence of the minus sign means the oven will be hotter with the amount shown
on the screen temperature.
Use the following table as a guide:
ADJUSTMENT ° F (ADJUSTMENT ° C)
FOOD KITCHEN
10 ° F (6 ° C)
a little more
20 ° F (12 ° C)
moderately
30 ° F (17 ° C)
much more
-10 ° F (-6 ° C)
a little less
-20 ° F (-12 ° C)
moderately less
-30 ° F (-17 ° C)
a lot less
TO ADJUST calibration Oven temperature:
1. Press SETTINGS (Settings). They appear several options on the screen.
2. Press "9" on the keypad. "CALIBRATION" (Calibration) "PRESS TO INCREASE 3
/ PRESS TO DECREASE 6" (Press 3 to increase / decrease Press 6 to) is displayed
on the screen.
3. Press the number 3 on the keyboard to increase or decrease the number 6 for the
temperature in increments of 5 ° F (3 ° C). The setting can be set between 30 ° F
(18 ° C) and -30 ° F (-18 ° C).
Four. Press SETTINGS (Settings) to save the setting and then exit the menu
Temperature Calibration (calibration temperature).
MODES OVEN
Page 20

User manual
ELECTRIC IN BUILT OVEN | USA 76
20
The illustrations show the heating elements and fans used for each mode of the
oven.
NOTE: The lower element is hidden beneath the base of the furnace.
BAKE (BAKE)
Baking is cooking with hot air. Both upper and lower parts of the oven are used to
heat the air, but the fan is used for circulation.
Select the baking temperature, time and position of the grid according to recipe
instructions or precooked foods. Baking time will vary with the temperature of the
ingredients, and the size, shape and finish of bake ware being used.
1. Press BAKE (Baking) to select the bake mode. "BAKE" (Bake) appears on the
screen and displays 350 ° F (177 ° C). Will appear in the "Set temp or Press Start"
screen (Set the temperature and press Start).
2. Press START (Start), if desired bake at 350 ° F (177 ° C). OR Enter the desired
temperature by pressing the keypad, then press START (Start). The temperature
can be between 170 ° F (77 ° C) and 500 ° F (260 ° C).
NOTES:
• The temperature can be changed at any time during cooking.
Press CANCELS (Cancel) to delete the settings. Select the oven mode, and then
enter the desired temperature by pressing the keypad, then press START (Start).
• After selecting an oven mode and temperature, you have the option to set Cook
Time (cooking time) and Start Time (Start Time) before pressing START (Start). See
"Cooking time" and "Start Time".
3. Press CANCEL (Cancel) when finished cooking and remove food from the oven.
BROIL (ROASTED)
Mode broiling uses direct radiant heat to cook food. The lower the temperature, the
slower the cooking. Thicker cuts and pieces of meat, fish and poultry irregularly may
cook better at lower temperatures for grilling.
• For best results, use only the broiler pan on the grill and grill. It is designed to drain
juices and help prevent spatter and fumes.
Page 21

User manual
ELECTRIC IN BUILT OVEN | USA 76
21
• For proper drainage, cover the grid with aluminum foil. The base of the tray may be
covered with foil to facilitate cleaning.
• Cut excess fat to reduce spattering fat. Cut the fat that is on the banks to avoid
screwing meats.
• Select broiling HI / 550 ° F (HIGH / 288 ° C) for most of the grilled. Select broiling
LO / 450 ° F (LOW / 232 ° C) grid for grilled food at low temperatures requiring
longer cooking, such as birds, to prevent excessive browning.
• Pull oven rack to stop position before turning or removing food. Use tongs to turn
food to avoid them losing juice. Very thin cuts of fish, poultry or meat may not need
to turn around.
FOR GRILLING:
1. Place food on rack in broiler pan on the grill and place in the oven. Close the oven
door.
NOTE: No need to preheat.
2. Press BROIL (Grilling) in the desired oven. "BROIL" (Grilling) and "Set temp or
Press START" (Set the temperature or press Home) will appear on the screen and it
will show "550 ° F" (288 ° C).
3. Press START (Start), if desired broiling at 550 ° F (288 ° C). OR Enter the desired
temperature by pressing the keypad, then press START (Start). The temperature
can be between 450 ° F (232 ° C) and 550 ° F (288 ° C). 4. "BROIL" (Grilling)
appear on the screen after you press Start (Start).
NOTES:
• The temperature can be changed at any time during cooking. Press CANCEL
(Cancel) to delete the settings. Select the oven mode, and then enter the desired
temperature by pressing the keypad, then press START (Start).
• After selecting an oven mode and temperature, you have the option to set Cook
Time (cooking time) and Start Time (Start Time) before pressing START (Start). See
"Cooking time" and "Start Time".
5. Press CANCEL (Cancel) when you are finished grilling and remove food from the
oven.
WARMING / Leudar
Page 22

User manual
ELECTRIC IN BUILT OVEN | USA 76
22
Warm mode (Heat) keeps the hot cooked food to a temperature to be served.
The Proof mode (Leudar) preparing the dough for baking activating yeast. Follow the
recipe instructions as a guide.
Danger of food poisoning
Do not leave food in the oven for more than an hour before or after cooking. Failure
to do so can cause food poisoning or illness.
IMPORTANT: Food must be at a temperature as to be served before placing in a
hot oven. Food can be kept inside for up to 1 hour. However, breads and casseroles
may become too dry if left in the oven during Warm (Warm) function. For best
results, cover food.
Warm (Heat)
1. Press WARM / PROOF (Heat / Leudar). "Warm" (Heat), "Set temp or Press
START" (Set the temperature or press Start) and 140 ° F (60 ° C) appear.
2. Press START (Start), if you want to heat the food to 140 ° F (60 ° C). OR Enter
the desired temperature by pressing the keypad, then press START (Start). The
temperature can be between 140 ° F (60 ° C) and 210 ° F (99 ° C).
3. The word "WARM" (Heat) appear on the screen, once you press Start (Start).
NOTE: After selecting an oven mode and temperature, you have the option to set
Cook Time (cooking time) and Start Time (Start Time) before pressing START
(Start). See "Cooking time" and "Start Time".
Four. Place food in the oven and close the door.
5. Press CANCEL (Cancel) when done and remove food from the oven.
To cancel the Warm function (Heat):
• Press CANCEL (Cancel). Remove food from the oven.
Proof (Leudar)
1. Before unleavened bread, place the dough in a lightly greased bowl and cover
loosely with wax paper coated butter. In the second place from the bottom grill and
close the oven door.
2. Hold WARM / PROOF (Heat / Leudar) for 3 seconds. "Proof" (Leudar), "Set temp
or Press START" (Set the temperature or press Start) and 100 ° F (38 ° C). Appear
Page 23

User manual
ELECTRIC IN BUILT OVEN | USA 76
23
3. Press START (Start), whether to leave the dough at 100 ° F (38 ° C). OR Enter
the desired temperature by pressing the keypad, then press START (Start). The
temperature can be between 80 ° F (27 ° C) and 120 ° F (49 ° C).
Four. The word "Proof" (Leudar) appear on the screen, once you press Start (Start).
NOTE: After selecting an oven mode and temperature, you have the option to set
Cook Time (cooking time) and Start Time (Start Time) before pressing START
(Start). See "Cooking time" and "Start Time".
5. Let the dough to swell until almost doubled in size; check after 20 to 25 minutes.
Proofing time may vary depending on the type and amount of mass.
6. Press CANCEL (Cancel) when you have finished leavening.
7. Before the second leavened, give shape the dough, place it on a baking sheet
and cover loosely with plastic wrap coated with cooking spray. Follow the same
steps above to locate and control. Before baking, remove the plastic wrap.
CONVECTION
During convection cooking, the fan provides warm air circulation throughout the
oven. The movement of the hot air around foods can help speed up cooking,
penetrating the colder outer surfaces.
In the convection mode, the ring-shaped element, the elements bake and broil and
the fan operated to heat the oven cavity. If the oven door is opened during
convection cooking or preheating, the fan is switched off immediately and (the)
element (s) is off (n) after 30 seconds. Once the door is closed, (the) item (s) will
turn on.
CONVECTION FAN
The convection fan operates during any convection mode. When the oven is
operating in the convection mode, the fan will turn off automatically when the door is
opened. The convection fan always runs during the preheating time.
ADVANTAGES OF CONVECTION COOKING
• Save time and energy.
• an even, golden and crispy baked is achieved.
Page 24

User manual
ELECTRIC IN BUILT OVEN | USA 76
24
• During roasting, the juices and flavors are preserved while the outside is crisp.
• Yeast breads are lighter, with a more uniform, texture and golden crispier crusts.
• Fermented foods such as cream puffs, meringues and souffles are taller and
lighter.
• It is possible to bake on multiple racks at the same time, with consistent results.
• Prepare meals with whole foods simultaneously without flavor transfer.
• dehydrated vegetables, fruits and vegetables.
• Bake ware does not require specialized.
• Broil convection roast allows an extraordinary food with thicker cuts.
CONVECTION BAKE
Use the Convection Bake function (Convection Bake) baking with one or more grills.
When using this function, reduce baking temperature recipe in 25 ° F (15 ° C).
SETTING CONVECTION BAKE (CONVECTION BAKE):
1. Press CONVECTION (convection) once. "Convection" (convection) and "Press 1-
3 To Choose" (Press 1 to 3 to choose from) appear on the screen.
2. Press 1. CONVECT BAKE (Convection Bake) on the menu screen. They appear
on the screen "Set temp or Press START" (Set the temperature or press Home) and
325 ° F (162 ° C).
3. Press START (Start), if you want to convection bake at 325 ° F (162 ° C). OR
Enter the desired temperature by pressing the keypad, then press START (Start).
The temperature can be between 170 ° F (77 ° C) and 500 ° F (260 ° C).
NOTE: After selecting an oven mode and temperature, you have the option to set
Cook Time (cooking time) and Start Time (Start Time) before pressing START
(Start). See "Cooking time" and "Start Time".
Four. Preheating the oven will begin once you press Start (Start).
A tone when the oven temperature reaches the set.
5. Place food in the oven and close the oven door when preheating is completed.
6. Press CANCEL (Cancel) when done and remove food from the oven.
Page 25

User manual
ELECTRIC IN BUILT OVEN | USA 76
25
GRILLING CONVECTION
When broiling convection, enter your normal roasting temperature. The oven door
must be closed for grilling convection. No need to preheat the oven with this
function.
1. Place food in the oven and close the door of this.
2. Press CONVECTION (convection) once. "Convection" (convection) and "Press 1-
4 To Choose" (Press 1 to 4 to choose) appear on the screen.
3. 3. Press BROIL CONVECT (Broiling convection) on the menu screen. Will appear
on the screen "Set temp or Press START" (Set the temperature or press Start) and
450 ° F (232 ° C).
Four. Press START (Start), if desired broiling at 450 ° F (232 ° C). OR Enter the
desired temperature by pressing the keypad, then press START (Start). The
temperature can be between 170 ° F (77 ° C) and 550 ° F (288 ° C).
NOTE: After selecting an oven mode and temperature, you have the option to set
Cook Time (cooking time) and Start Time (Start Time) before pressing START
(Start). See "Cooking time" and "Start Time".
5. It appears in the "Convect Broil" screen (Broiling convection), once you press
Start (Start).
6. Press CANCEL (Cancel) when done and remove food from the oven.
ROAST CONVECTION
When convection broils, roast enter the normal temperature. Roasting time should
be programmed in less than 15 to 30% than in conventional cooking. No need to
preheat the oven with this function.
1. Place food in the oven and close the door of this.
2. Press CONVECTION (convection) once. "Convection" (convection) and "Press 1-
4 To Choose" (Press 1 to 4 to choose) appear on the screen.
3. 2. Press CONVECT ROAST (Asar convection) on the menu screen.
Page 26

User manual
ELECTRIC IN BUILT OVEN | USA 76
26
They appear in the "Set Temp or Press Start" screen (Set the temperature or press
Home) and 325 ° F (163 ° C).
Four. Press START (Start), if you want to convection roast at 325 ° F (163 ° C). OR
Enter the desired temperature by pressing the keypad, then press START (Start).
The temperature can be between 170 ° F (77 ° C) and 500 ° F (260 ° C).
NOTE: After selecting an oven mode and temperature, you have the option to set
Cook Time (cooking time) and Start Time (Start Time) before pressing START
(Start). See "Cooking time" and "Start Time".
5. It appears in the "Convect Roast" screen (Asar convection), once you press Start
(Start).
6. Press CANCEL (Cancel) when done and remove food from the oven.
CONVECTION CONVERSION Convection Conversion
NOTES:
• When Convection Conversion (Convection Conversion) is used, enter the normal
cooking temperature and time.
• The oven door must be closed before programming Convection Conversion
(Conversion convection).
MEAT (ONLY)
No need to preheat the oven for MEATS option (Carnes) of Convection
Conversion (Conversion convection). Preheating can cause overcooking. If
preheating is required for the recipe, add 15 minutes cooking time and place food in
the oven at the appropriate time.
1. Place food in the oven and close the door of this.
2. Press CONVECTION (convection) once. "Convection" appear
(Convection) and "Press 1 to 4 To Choose" (Press 1 to 4 to select) on the screen.
3. Press the number 4 on the keypad. "Convection" (convection) and "Press 1-3 To
Choose" appear (Press 1 to 3 to select) on the screen.
Four. Press numeric keypad to select from the options 1.MEAT (Meat), 2.BAKED
GOODS (Baked goods) and 3.Other FOODS (other foods).
Page 27

User manual
ELECTRIC IN BUILT OVEN | USA 76
27
5. Press START (Start) to confirm the selection. will appear in the "Set temp and
Press Start" screen (Set the temperature and press Start).
6. Enter the broiling temperature normally pressing the keypad.
7. Enter the normal cooking time. See "Cooking time" and then press START (Start).
NOTE: It is required to program a cooking time for oven mode
Convection Conversion (Conversion Convection) See "Cooking time".
BAKED FOODS AND OTHER FOODS (ONLY)
1. Begin preheating. Once the oven is preheated reaching the set temperature, the
control will beep. Place food in the oven and close the door of this.
2. At the end of the programmed cooking time, the oven will turn off automatically.
The alert tone will sound and "Cooking Complete" (finished cooking) appear on the
screen.
3. Press CANCEL (Cancel) when done and remove food from the oven.
BAKING TIPS
• For best results bake food in a single grid with at least one "- 2/11" (2.5 - 3 cm)
space between the molds and the oven walls.
• Use a grid when you select the bake mode.
• Check that is cooked in the shortest time.
• Use of metal molds (with or without nonstick finish), refractory glass, glass
ceramic, ceramic or other suitable ovenware.
• When using refractory glass, reduce the temperature 25 ° F (15 ° C) with respect to
the recommended temperature. Use baking sheets without sides or with or jelly roll
pans.
• Use baking trays with or without sides or molds charlotas.
• Casseroles black or metal nonstick coating cook faster and more browned.
Insulating molds slightly lengthen the cooking time for most food.
Page 28
User manual
ELECTRIC IN BUILT OVEN | USA 76
28
• Do not use aluminum foil or disposable aluminum trays to cover any part of the
oven. The leaves are excellent heat insulation and heat will be trapped underneath.
This will alter the cooking performance and can damage the finish of the oven.
• Avoid using open doors to support casseroles.
• See Troubleshooting for suggestions for solving problems baking and roasting.
TABLE OF COOKING BAKING
ALIMIENTO
Louver position
TEMP. ° F (° C) (OVEN RECALENDADO)
TIME (MIN)
CAKE
Glazed
Cake
risks
2
1
1
350 (175)
350 (175)
350 (175)
19-22
40-45
35-39
PAY
2 rinds, fresh 9 "
2 cortices. congel fruit. 9
"
2
2
375-400 (190-205)
375 (190)
45-50
68-78
BISCUITS
Sugar
chocolate chip
brownies
2
2
2
350-375 (175-190)
350-375 (175-190)
350 (175)
8-10
8-13
29-36
BREADS
Yeast bread, 9x5
Yeast rolls
Bun, Bun
muffins
2
2
2
2
375 (190)
375-400 (190-205)
375-400 (190-205)
425 (220)
18-22
12-15
7-9
15-19
PIZZA
Frozen
Fresca
2
2
400-450 (205-235)
475 (246)
23-26
15 to 18
CONVECTION BAKING TIPS
Page 29

User manual
ELECTRIC IN BUILT OVEN | USA 76
29
Lower temperatures baking recipes 25 ° F (15 ° C).
• For best results, we recommend putting food on flat trays not covered to take
advantage of the forced air circulation.
Use shiny aluminum molds to get the best results if nothing else is specified.
• You can use refractory glass or ceramic. Reduce the temperature another 25 ° F
(15 ° C) when using refractory plates of glass, with a total reduction of 50 ° F (30 °
C).
• Molds can be used in dark metals. Note that the food brown more quickly by using
dark metal containers.
• The number of grids used is determined by the height of the food you have to
cook.
• baked, mostly, well they cooked products on convection. Do not try to convert
recipes like flans, quiches, pumpkin pie, or cheesecakes, which do not benefit from
convection-heating process. Use the normal mode for these foods baked.
• Multiple cooking racks made baked food is because the position of the grids 1, 2,
3, 4 and 5 can be used all the grids, for cookies, muffins and crackers.
- With 2 baking racks. Use positions 1 and 3.
- With 3 baking racks. Use positions 2, 3 and 4 or 1, 3 and 5.
- When baking cakes with four layers while placing the molds so that no mold is
directly above another.
For best results, place the molds in front of upper grid and the bottom of the lower
grid (see figure to the right). Allow 1”
-11/2 "clearance around the molds.
• Transform your own recipe can be easy. Choose a recipe that works well in the
convection mode.
• Reduce heat and cooking time if necessary. Some judgment may be necessary
and make a mistake to get a perfect result.
Keep the results of your technique to the next time you prepare the same recipe
using the convection system?
• See Troubleshooting for suggestions for solving problems baking and roasting.
Page 30
User manual
ELECTRIC IN BUILT OVEN | USA 76
30
FOOD RECOMMENDED MODE OF BAKING
CONVECTION:
Crackers and wafers
Cookies for coffee
Cakes (2 to 4 grids) Yeast dough
Cream puffs
Popovers
Casseroles and entrees
Catering oven (position of the grids 1, 2, 3)
Food rising air (Soufflés, meringues, coated Desserts meringues, Angel cake,
cakes).
TABLE CONVECTION BAKE
Reduce the temperature of the standard recipe of 25 F (15 ° C) for baking
convection. Temperatures have reduced this.
ALIMIENTO
Louver position
TEMP. ° F (° C) (OVEN
RECALENDADO)
TIME (MIN)
CAKE
Glazed
Cake
risks
2
1
1
350 (175)
350 (175)
350 (175)
19-22
40-45
35-39
PAY
2 rinds, fresh 9 "
2 cortices. Congel
fruit. 9 "
2
2
375-400 (190-205)
375 (190)
45-50
68-78
BISCUITS
Sugar
chocolate chip
2
2
350-375 (175-190)
350-375 (175-190)
8-10
8-13
Page 31
User manual
ELECTRIC IN BUILT OVEN | USA 76
31
brownies
2
350 (175)
29-36
BREADS
Yeast bread, 9x5
Yeast rolls
Bun, Bun
muffins
2
2
2
2
375 (190)
375-400 (190-205)
375-400 (190-205)
425 (220)
18-22
12-15
7-9
15-19
PIZZA
Congelada
Fresca
2
2
400-450 (205-235)
475 (246)
23-26
15 to 18
TIPS GRILL CONVECTION
• Do not preheat for convection roast.
• Grill cooks on a low tray and uncovered.
• When chickens and turkeys whole au gratin, raise wings back and strong tie legs
with kitchen string.
• Use container for grilling 2 parts gratin discovered.
Use a probe or a meat thermometer to determine doneness when the interior
temperatures "END" (see table cooking).
• Check the temperature inside the meat / of introducing a meat thermometer bird
twice.
• It may also be necessary to cover larger birds with aluminum foil (and roasting
pan) during a portion of the roasting time to avoid excessive browning.
• The minimum safe temperature for filling birds is 165 ° F (75 ° C).
• After removing the article from the oven, cover without too tightly with foil for 10 or
15 minutes before cutting in the case it was necessary to increase the final food
temperature of 5 ° to 10 ° F (3 ° to 6 ° C).
7. GENERAL CLEANING
IMPORTANT: Before cleaning, make sure all controls are off and the oven is cool.
Always follow the instructions printed on the label cleaning products.
HOW TO USE THE TABLE OVEN CLEANING
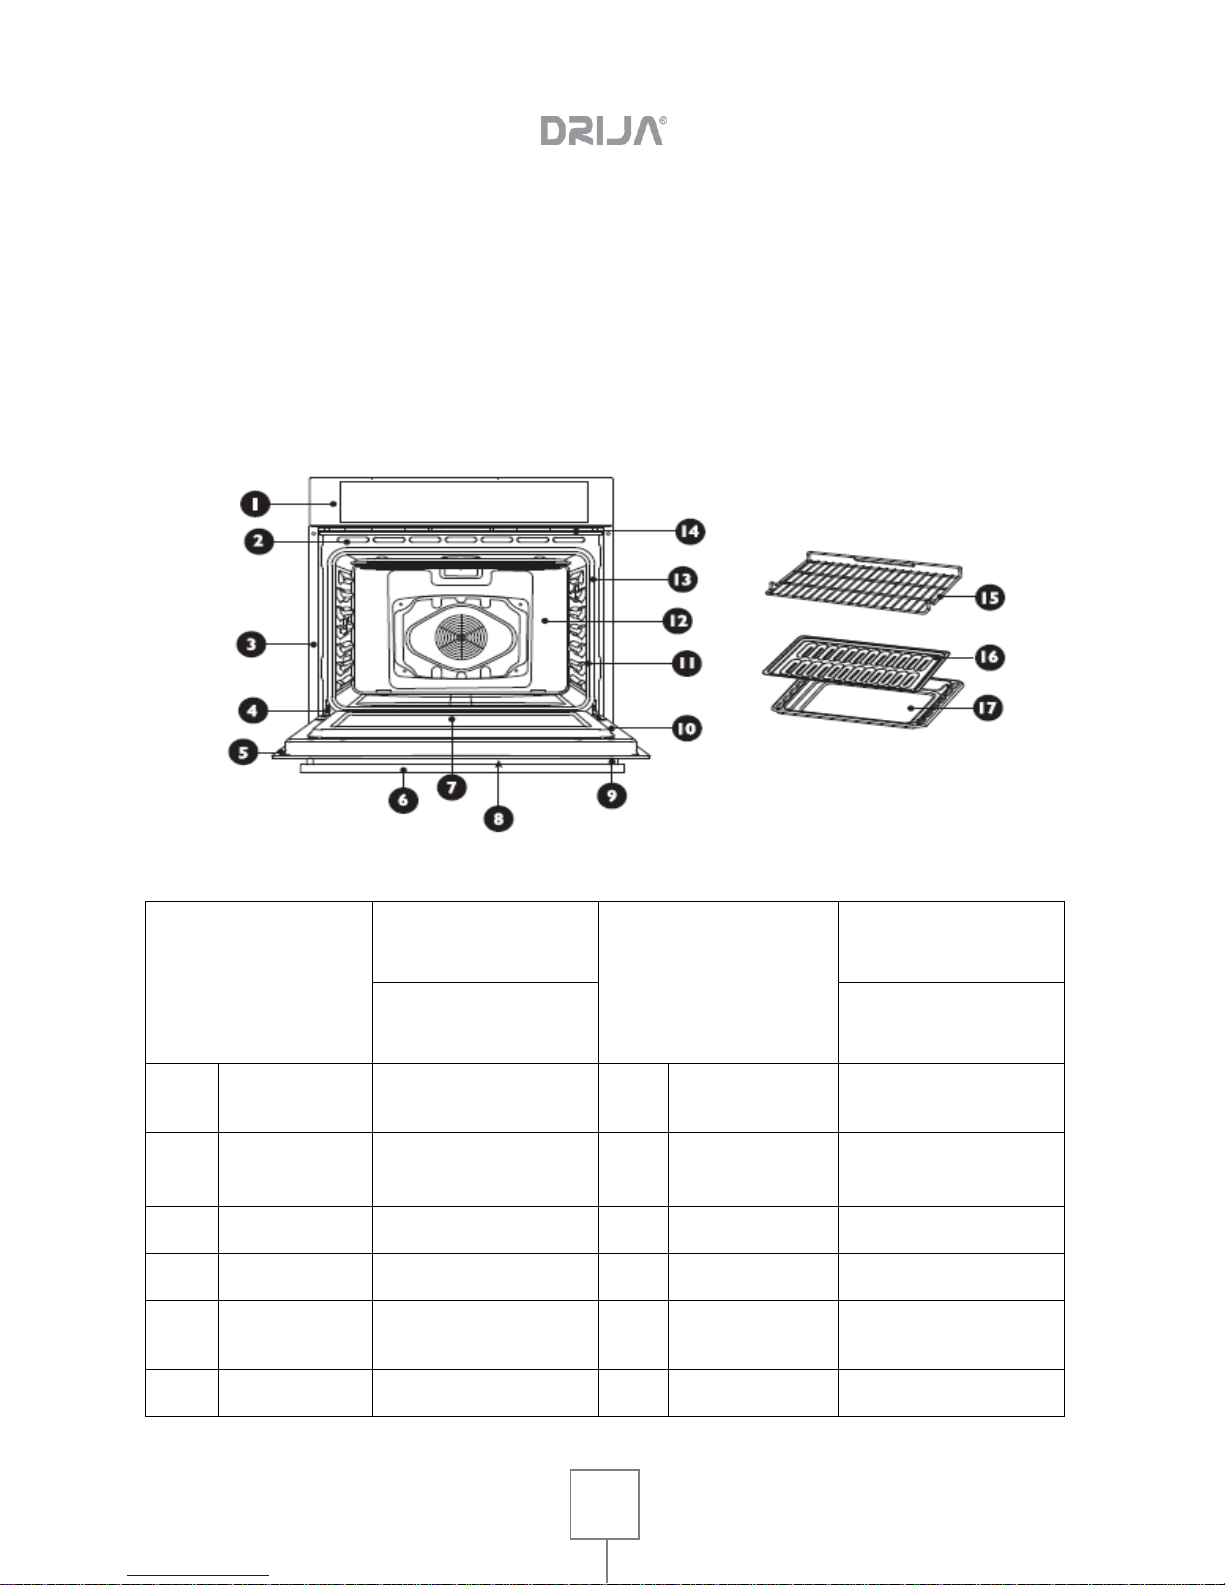
1. Locate the part number you have to clean the figure on this page.
Page 32
User manual
ELECTRIC IN BUILT OVEN | USA 76
32
2. Find the name of the part on the table.
• Use the cleaning method shown in the left column if the oven is white or black.
• Use the cleaning method shown in the right column if the oven is stainless steel.
3. Match the letter with the cleaning method the on the next page.
Piece
Method of
cleaning
Piece
Method of
cleaning
Steel furnace
stainless
Steel furnace
stainless
1
Control Panel
CG
10
inside of the oven
door
AND
2
Cooling ducts
door
AND
eleven
front frame of the
oven
AND
3
side trim
D
12
Oven Cavity
AND
4
bottom trim
D
13
Door gasket
B
5
Door frame
AND
14
Furnace cooling
ducts
D
6
Door handle
G
fifteen
Broiler
TO
Page 33
User manual
ELECTRIC IN BUILT OVEN | USA 76
33
FINISHING OVEN / CLEANING METHODS
The entire furnace is to be cleaned safely with a soapy sponge, rinse and dry. If you
do not manage to eliminate persistent waste, follow the cleaning methods shown
below.
• Always use the mildest cleaner to do the job.
• Rub the metal finish in the direction of the grain.
• Use clean, soft cloths, sponges or paper towels.
• Rinse thoroughly with minimum water so that water does not drop inside the slots.
• Dry to avoid forming pinions.
Cleaners listed below indicate the type of products to be used and are not
recommended. Use all products according to package directions.
This oven has a self cleaning function that eliminates the need to manually scrub the
oven. During self-cleaning, the oven uses very high temperatures burning dirt,
making ash.
IMPORTANT: The health of some birds is extremely sensitive to the gases emitted
during the Self-Cleaning Cycle (Auto cleaning). Exposure to gases can kill certain
birds. Always move birds to another closed and well ventilated room.
• Keep well ventilated during the Self-Cleaning Cycle (Auto cleaning) kitchen; this
will help you have less heat, odors and smoke.
• It is normal to see smoke and / or an occasional flame during the self-clean cycle,
depending on the content and amount of soil remaining in the oven. If the flame
persists, turn off the oven and allow cooling before opening the door to clean food
residue with a cloth.
• Do not block (the) pipeline (s) furnace exhaust during the self-clean cycle. Air
should flow freely. See "Ducting furnace exhaust."
• Do not clean, rub, damage or move the seal of the oven door.
7
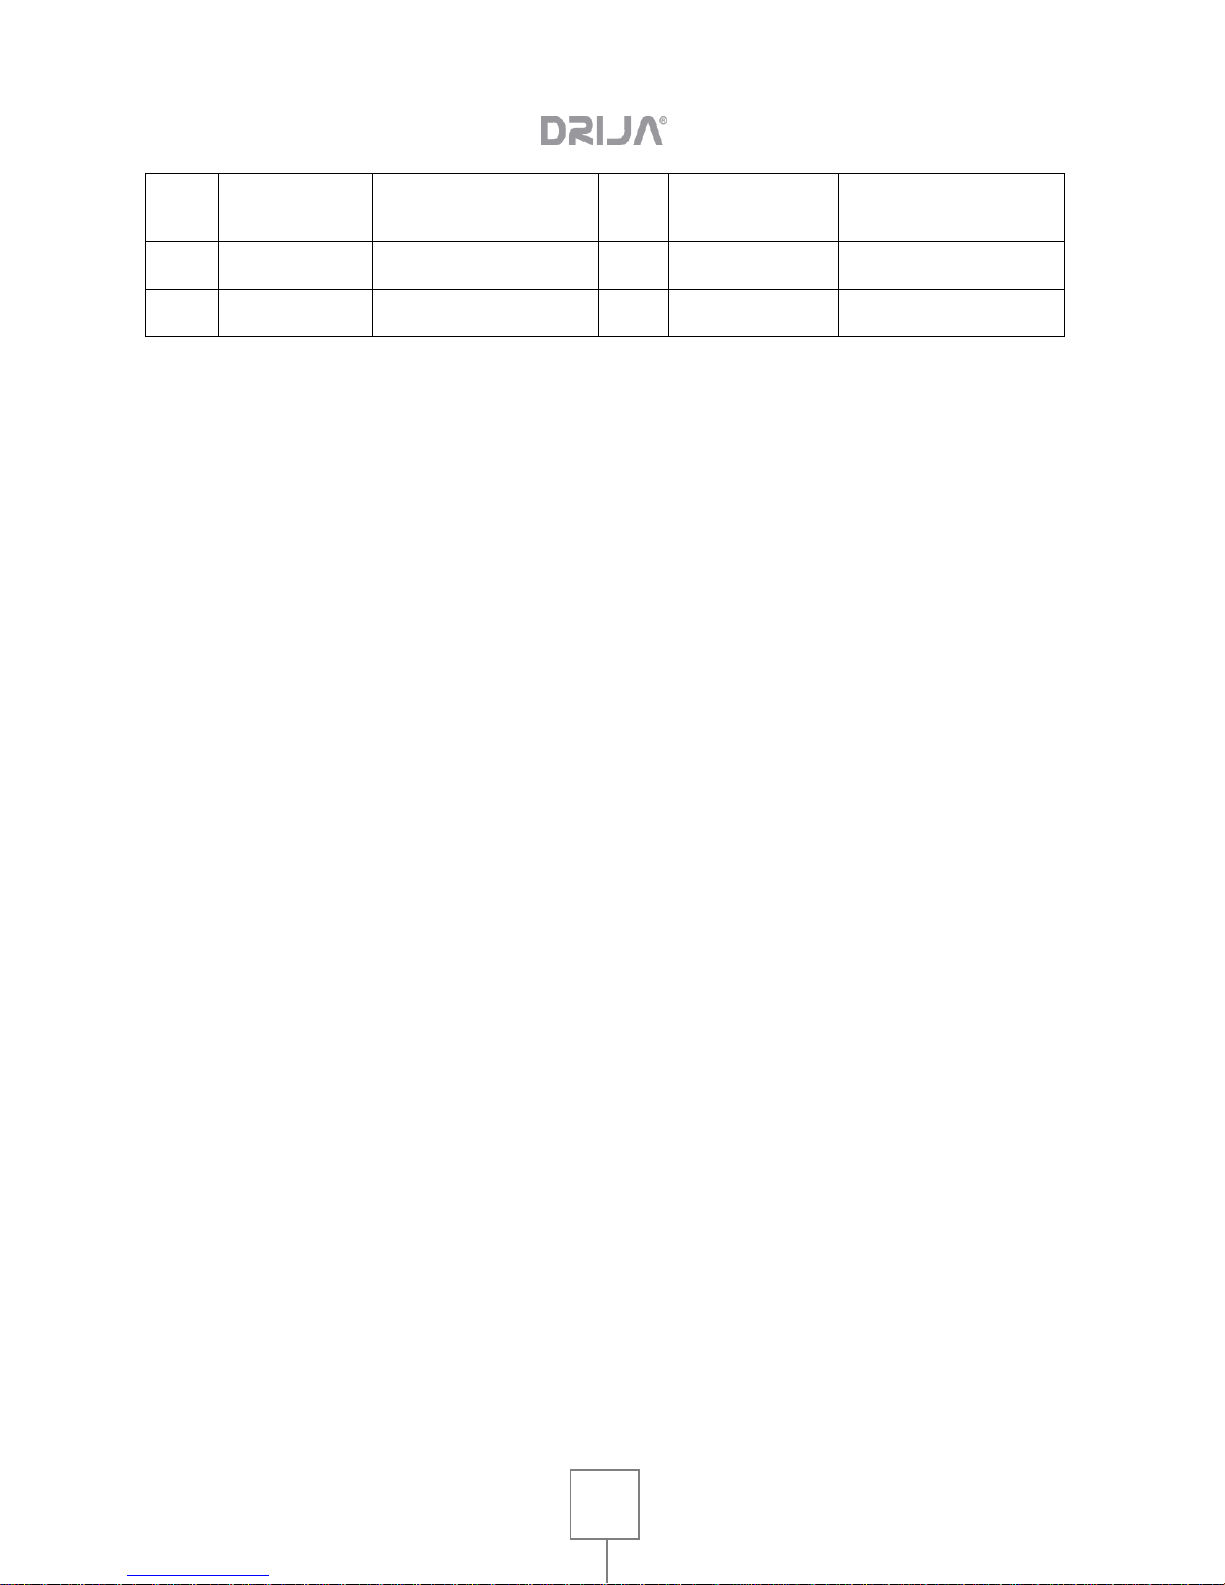
Internal door
windows
F
16
Grill broiler pan
AND
8
Front Door
C & G
17
Broiler pan
AND
9
End caps
D
Page 34

User manual
ELECTRIC IN BUILT OVEN | USA 76
34
• The door latch is automatically activated after selecting the self-cleaning cycle.
Closed icon appears on the screen. This ensures that the door cannot be opened
while the oven is cleaning temperature.
• The oven light does not work during self-cleaning mode.
• During cleaning car must ventilate the kitchen to help eliminate odors associated
with self-cleaning. Odors will be lost with use.
• The furnace is preset in a cleaning cycle of 2.5 hours. However, this time can be
changed. Recommended cleaning time is 2 hours for lightly soiled and 3 to 3.5
hours for normal soil to deep.
• The oven light does not work during the cleaning mode.
BEFORE SELF CLEANING
1. Remove all containers and roasting tray.
2. Remove the oven racks that are not porcelain. If chrome grills
Left in the oven during the self-clean cycle, permanently lose the shiny finish and
change to a dark and opaque finish. See Table Cleaning the oven to learn about
proper care.
3. Clean up spilled soft dirt and grease with paper towels.
Excess fat will cause flames and smoke inside the oven during cleaning car.
Four. Make sure the oven interior lights are turned off and the lights and lens covers
are in place.
5. Some areas of the oven, as the edge of the oven door, the window of the oven
door, the oven front frame and to 1½ "(2-3 cm) within the frame is not sufficiently
heated during the cleaning cycle so that dirt is consumed and must be cleaned by
hand before the cycle begins. Wipe with a soapy sponge or plastic scrubber and a
solution of detergent and hot water. Rinse and dry completely all areas.
NOTE: Do not rub the board of the oven door.
SELF-CLEANING CYCLE
It is recommended to wait at least 24 hours between cleaning cycles.
To clean car:
1. Close the oven door.
2. Press SELF CLEAN (Auto cleaning). "REMOVE RACKS" (Remove grills) in the
text area of the screen displays the selected oven.
Page 35

User manual
ELECTRIC IN BUILT OVEN | USA 76
35
3. Appears "2:00 3:00 3:30" on the screen.
Four. Use the numeric keypad to select the level of cleanliness.
5. If you want to delay starting the self-cleaning cycle, press DELAY START
(Delayed Start), then schedule a time using the numeric keypad.
6. Press START (Start).
After the door is closed, "SELF CLEAN" (Auto cleaning) or "CLEAN LOWER" (less
clear) appears in the text area of the selected oven until the end of the cleaning
cycle.
WHEN YOU'RE SELF-CLEANING CYCLE:
You will see "COMPLETE" (Full) on the screen and the oven door is unlocked.
7. Once the furnace has cooled completely, remove ash with a damp cloth.
NOTE: To avoid glass breakage, not to apply a wet, cold inside glass furnace before
it has cooled completely.
REMOVING THE OVEN DOOR
For normal use of oven it is not necessary to remove the oven door. However, if you
need to remove the door, follow the instructions in this section.
IMPORTANT:
• Make sure the oven is cool and has been off the power before removing door.
• Grasp the oven door only on the sides. Do not use the handle as you could rotate
your hand and cause damage or injury.
• The oven door is heavy and fragile. Use both hands to remove the oven door.
• The front door is glass. Handle it carefully to avoid breakage.
To remove the door:
1. Open the door.
2. Lift the locking hinge on each side.
3. Hold the oven door firmly and close it completely.
Four. Take both sides, lift the oven door while pushing to close and pull out the door
frame.
5. Place the door in a safe place.
To replace the door:
Page 36

User manual
ELECTRIC IN BUILT OVEN | USA 76
36
1. When firmly holding the door, enter the upper arms of both hinges into the slots.
The slits should be hooked on the edges.
2. Open the oven door.
NOTE: You should hear a "snap" when the door is in place.
3. Move the locking hinge on each side back to the locked position.
Four. Open and close the door to prove that it works properly. Otherwise, repeat the
process of removing the door and replacing it.
5. Close and slowly open the door to make sure it is placed correctly and firmly.
CHANGING AN OVEN LAMP
NOTE:
Shock Hazard
Make sure the oven and the lamps are cool and the power is off before replacing the
(s) bulb (s).
The lenses must be mounted when the furnace is used. The lenses serve to prevent
bulbs from breaking.
The lenses are made of glass. Handle carefully to avoid breakage.
Failure to do so may result in electrical shock, cuts, burns or death.
The oven light is a standard 25-watt bulb (G9) appliance.
IMPORTANT: Before replacing the bulb, make sure the oven is cool and the
controls are off.
1. Disconnect power to the main power supply (circuit breaker or fuse box).
2. Using a Phillips screwdriver remove the screw and remove the cover.
3. Remove the bulb burned focus.
NOTE: To avoid damaging or decreasing the life of the new bulb, do not touch it with
bare fingers. Wear cotton gloves or a tissue when you change the focus.
Four. Replace the bulb and then replace the bulb cover.
5. Reconnect the electricity from the main power supply (fuse or breaker).
8. PROBLEM SOLVING
First try the solutions suggested here to possibly avoid the cost of a service call.
Page 37
User manual
ELECTRIC IN BUILT OVEN | USA 76
37
Bake and broil
Bake both as convection baking; the poor results can occur for many reasons in
addition to a malfunction of the oven. Check the table for the causes of the most
common problems. Because the size, shape and material of the bake ware have a
direct effect on baking results, the best solution might be to replace the old bake
ware that have darkened and distorted with time and use. Also check the table
baking the grid position and the baking time.
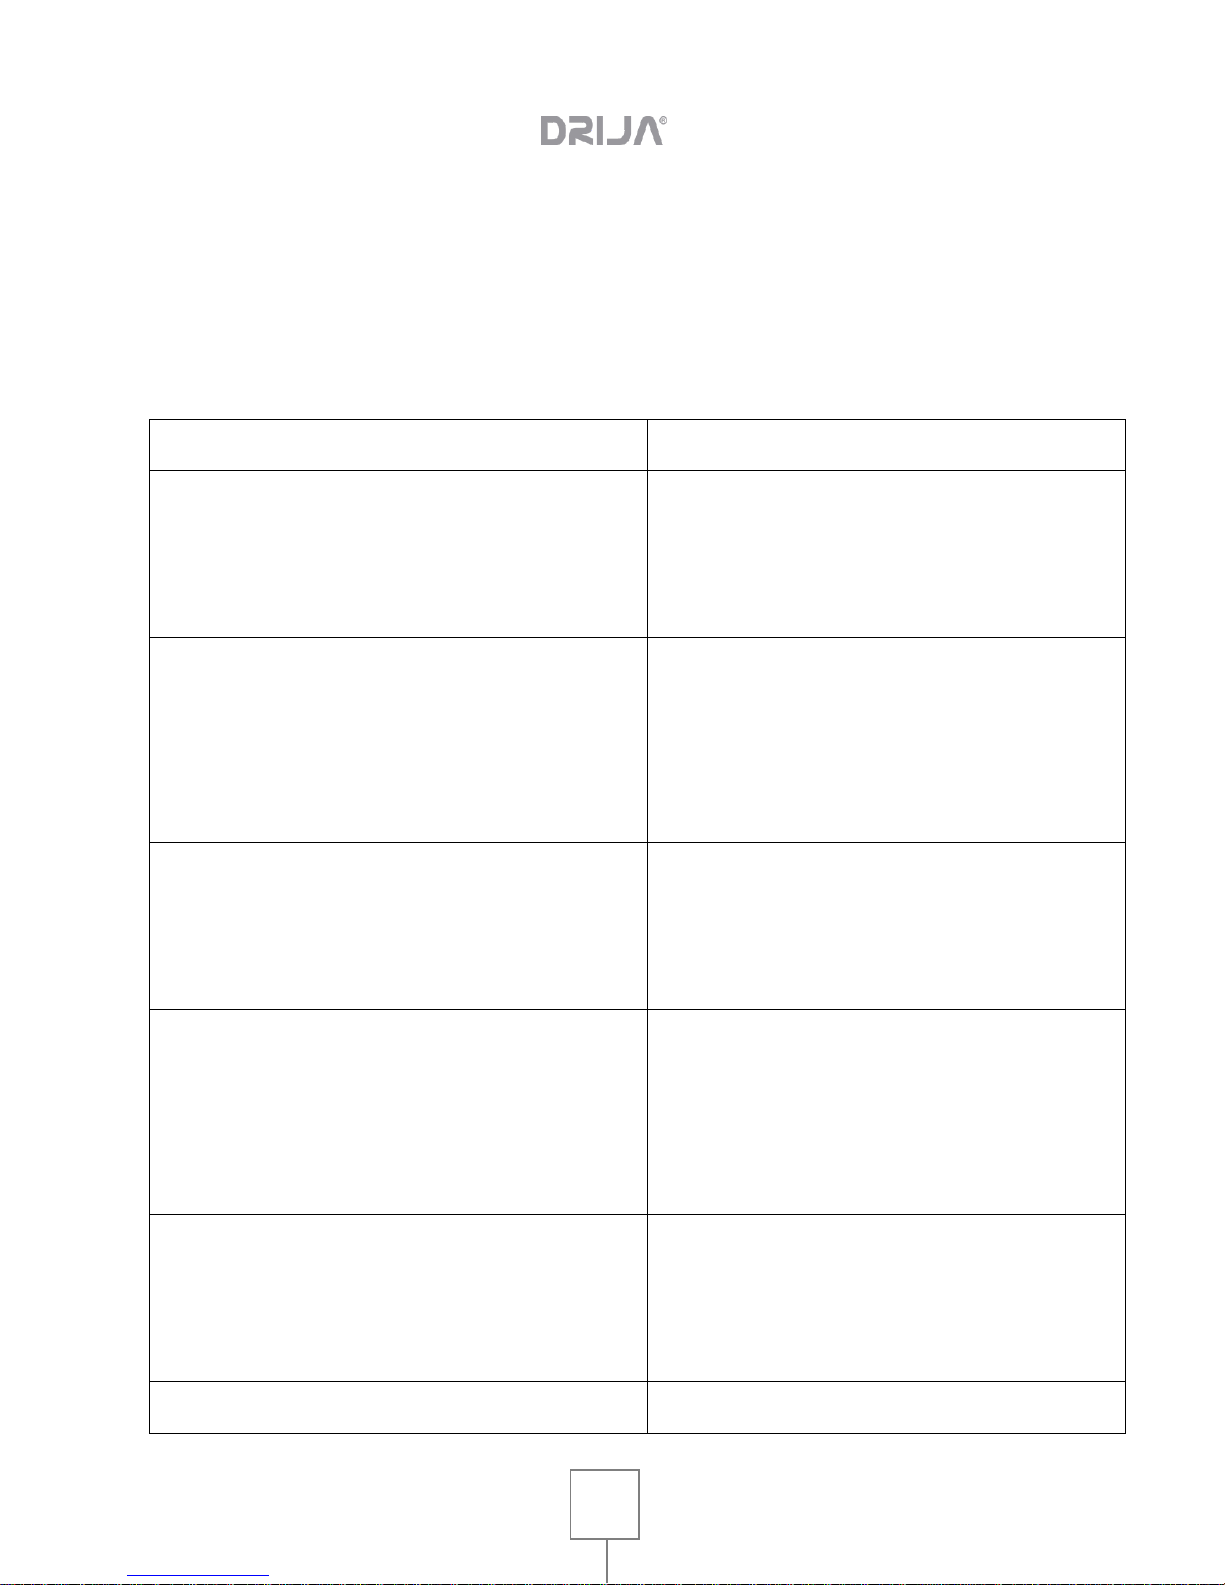
Bake problem
Cause
Foods brown patchy
• The oven is preheated
• Aluminum foil on the rack or oven bottom
• Bake ware are too big
• Molds have contact or touch the wall
Foods are very
• The oven is preheated
• a glass mold, matte or metal is used
Dark
• Incorrect grid position
• Molds have contact or touch the wall
Foods are very dry or very cramped
• High temperature furnace
• Baking time too long
• the oven door opened frequently
• The mold is too large
Foods are baked or roasted very slowly
• Oven temperature too low
• The oven is preheated
• the oven door opened frequently
• Very sealed with aluminum foil
• The mold is too small
Pays crusts do not brown on the bottom or are very
soggy.
• Insufficient baking time
• shiny steel molds are used
• Incorrect grid position
• Oven temperature too low
The cakes do not brown and are flat, perhaps
• Oven temperature too low
Page 38
User manual
ELECTRIC IN BUILT OVEN | USA 76
38
unfinished in
• Wrong baking time
• the cake was tested before time
• the oven door opened frequently
• The mold is too large
The cakes are high in the center with cracks at the top
• High temperature furnace
• Baking time too long
• Molds have contact or touch the wall
• Incorrect grid position
• Pan size too small
• The mold is too small
The edges of the crust are very golden pays
• High temperature furnace
• The edges of the crust are very thin
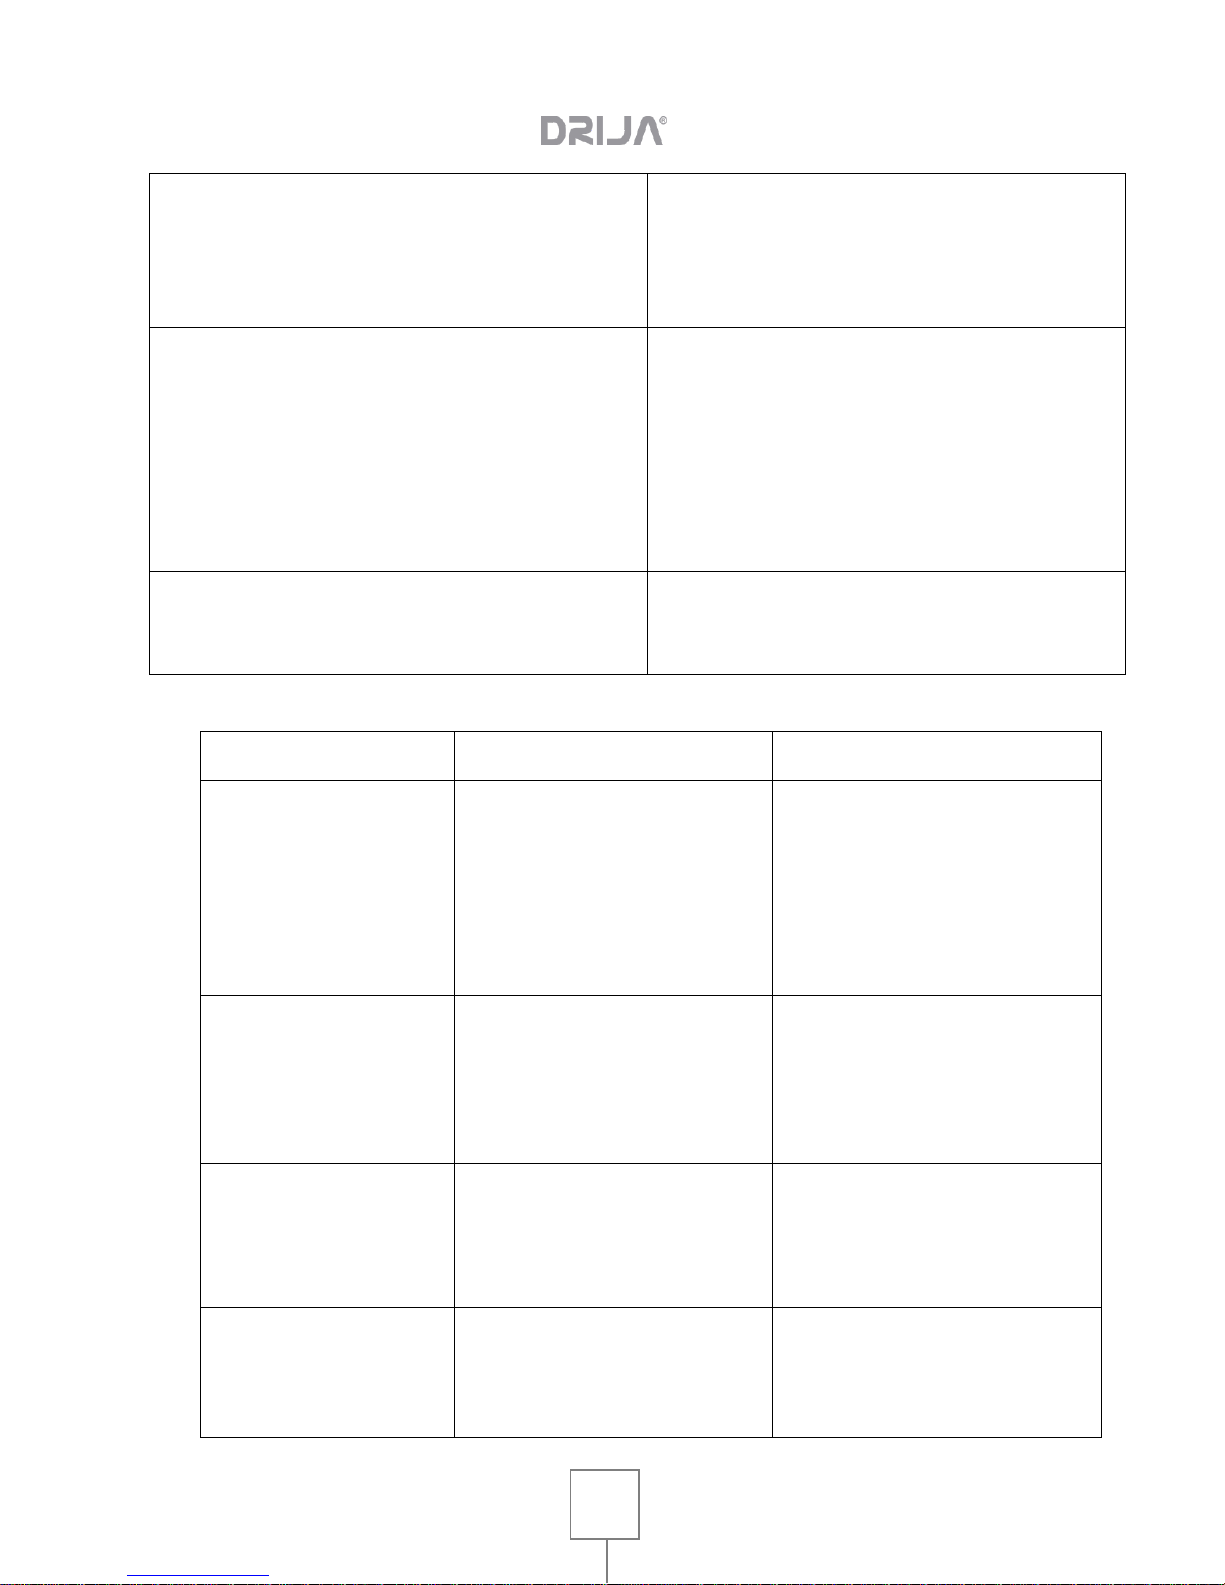
FUNCTIONING
PROBLEM
POSSIBLE CAUSE
SOLUTION
F03 or F04 The error
appears on the screen.
A problem has occurred with the
mechanism of insurance.
Turn off power at the main power
supply (fuse box or circuit breakers),
wait a few seconds and turn it on
again. The oven should run an
automatic proof of insurance. If the
condition persists, note the code
number and call an authorized service
center.
F_ another error appears
on the screen.
Turn off power at the main power
supply (fuse box or circuit breaker),
wait a few seconds and turn it on
again. If the condition persists, note the
code number and call an authorized
service center.
The oven display will not
turn on.
Turn off power from the main power
supply (fuse box or circuit breaker).
Turn on the circuit breaker. If the
condition persists, call an authorized
service center.
The cooling fan continues
on after the oven is turned
off.
The furnace components are not
sufficiently cooled.
The fan is turned off automatically
when the electronic components have
cooled sufficiently.
Page 39
User manual
ELECTRIC IN BUILT OVEN | USA 76
39
The oven door is locked
and not released even after
cooling.
Turn the oven on and wait a few
seconds breaker. Turn on the circuit
breaker. The oven should automatically
reset and will operate.
The oven does not heat.
No power in the oven.
Connect the power supply from the
main power supply (fuse box or circuit
breaker). If the condition persists, call
an authorized service center.
Oven mode or selected temperature.
Turn control knobs to select the oven
mode and temperature.
The oven does not cook
evenly
The grill is not in the correct position.
See cooking charts for recommended
grills position.
Convection Bake mode (Convection
Bake)
Always reduce recipe temperature at
25 ° F (15 ° C) when baking the
Convention Bake mode (convection
bake).
The oven light is not
working properly.
The focus is loose or burned.
Change or replace the light bulb if
loose or defective. If you touch the bulb
with your fingers, you can make it burn.
The oven light is on.
The oven door does not close
completely.
Check if the oven door is blocked.
Check if the hinge is bent or the door
switch is broken.
You cannot remove the
lens cover light.
The lens cover is dirty.
It could be accumulation of dirt around
the lens cover. Clean the area of the
lens cover with a dry, clean towel
before attempting to remove it.
The oven is not self
cleaned properly.
The oven was still hot when the
Cleaning (Cleaning) mode is
selected.
Allow the oven to cool before running
self cleaning.
The oven is very dirty.
Always clean the dirt that is loose or
large surplus before running the selfcleaning. See How to Prepare oven for
self-cleaning.
If the oven is heavily soiled, set oven
for cleaning car 4 hours.
The clock and the timer do
No power in the oven.
Connect the electric supply from the
main power supply (fuse or circuit
Page 40
User manual
ELECTRIC IN BUILT OVEN | USA 76
40
not work properly.
breaker). If the condition persists, call
an authorized service center.
The clock or timer is not set correctly.
See the Clock and Timer sections.
 Loading...