

Page 1

user manual
Page 2

contents
precauons
overview
using the camera
inial setup
powering on and o
charging
formang a micro SD card
the camera menu system
video mode
recording video
Flashback Video Tag/Loop
simultaneous photos and videos
video mode sengs
photo mode
capturing photos
photo sengs
melapse mode
capturing melapse sequences
melapse sengs
/ 3
/ 4
/ 5
/ 6
/ 7
/ 8
/ 9
connecvity
connecng to Windows PC
connecng to Mac
connecng to WiFi device
connecng to a TV
conserving baery
updang rmware
camera care
cleaning the camera
cleaning the lens and LCD screen
cleaning the seals
technical specicaons
warranty
disclosures
/ 16
/ 17
/ 18
/ 19
/ 20
/ 21
/ 22
photoburst mode
capturing photoburst sequences
photoburst sengs
playback
video playback
viewing photos
viewing melapse
viewing photoburst
deleng les
camera sengs
WiFi
date and me
camera sengs proles
rmware
the two-way remote control
powering on and o
pairing camera to a remote control
pairing mulple cameras to a remote control
using the remote control
shot setup
xing the camera to the universal clip
mounng the camera to a Dri Mount
lens rotaon
zoom
/ 10
/ 11
/ 12
/ 13
/ 15
2
Page 3
precautions
General precautions
Please take note of the following guidelines when using your HD Ghost camera:
• The camera is 2m shock resistant, but not shock proof—please take care of
your camera and accessories, mounting and storing them securely
• For your safety, do not press the buttons on the camera during sports activities
• Do not store the camera anywhere prone to dust or damp for extended periods
of time
• Do not leave the camera exposed to extremely high temperatures—such as
under direct sunlight—for extended periods of time as this may affect the
camera housing and internal components
• Clean the lens and screen with a micro fibre, antistatic cloth to remove
fingerprints or dust—no cleaning chemicals are required
• The camera has a working temperature range of -10°C to 40°C (50°F to 104°F)
• Power o the camera before removing the battery or memory card—the
memory card and stored data may be damaged if it is removed or inserted
while the camera is powered on
• Remove the battery and memory card before storing the camera for long
periods of time
Weather resistance
The HD Ghost is engineered to withstand dust, snow, rain, splashes and
submersion up to 3m.
• Operating the camera at temperatures below 0°C reduces battery life and
lowers battery performance
• Do not charge the battery at temperatures below 0°C
• Do not leave the camera submerged for longer than 30 minutes
• Clean o any salt water or dirt from the camera immediately and prior to storing
• Do not subject the camera to sudden impact of water—the camera should always
be used in the waterproof case when in intensive water-based applications
• Always use the universal clip as a rear hatch key to ensure the camera is sealed
tightly to ensure full water proofing
Attention
! Rechargeable batteries are only to
be charged under adult supervision
! DO NOT short-circuit the battery
terminals
! DO NOT open, puncture or
otherwise damage the rechargeable
battery, or dispose of it in fire
Disclaimer
Drift Innovation will not, under any
circumstances, be responsible for
injuries or property damaged incurred
during participation of any high-risk
sport or activity not endorsed or
recommended by Drift Innovation.
Remember that the warranty will only
cover manufacturing defects.
3
Page 4
overview
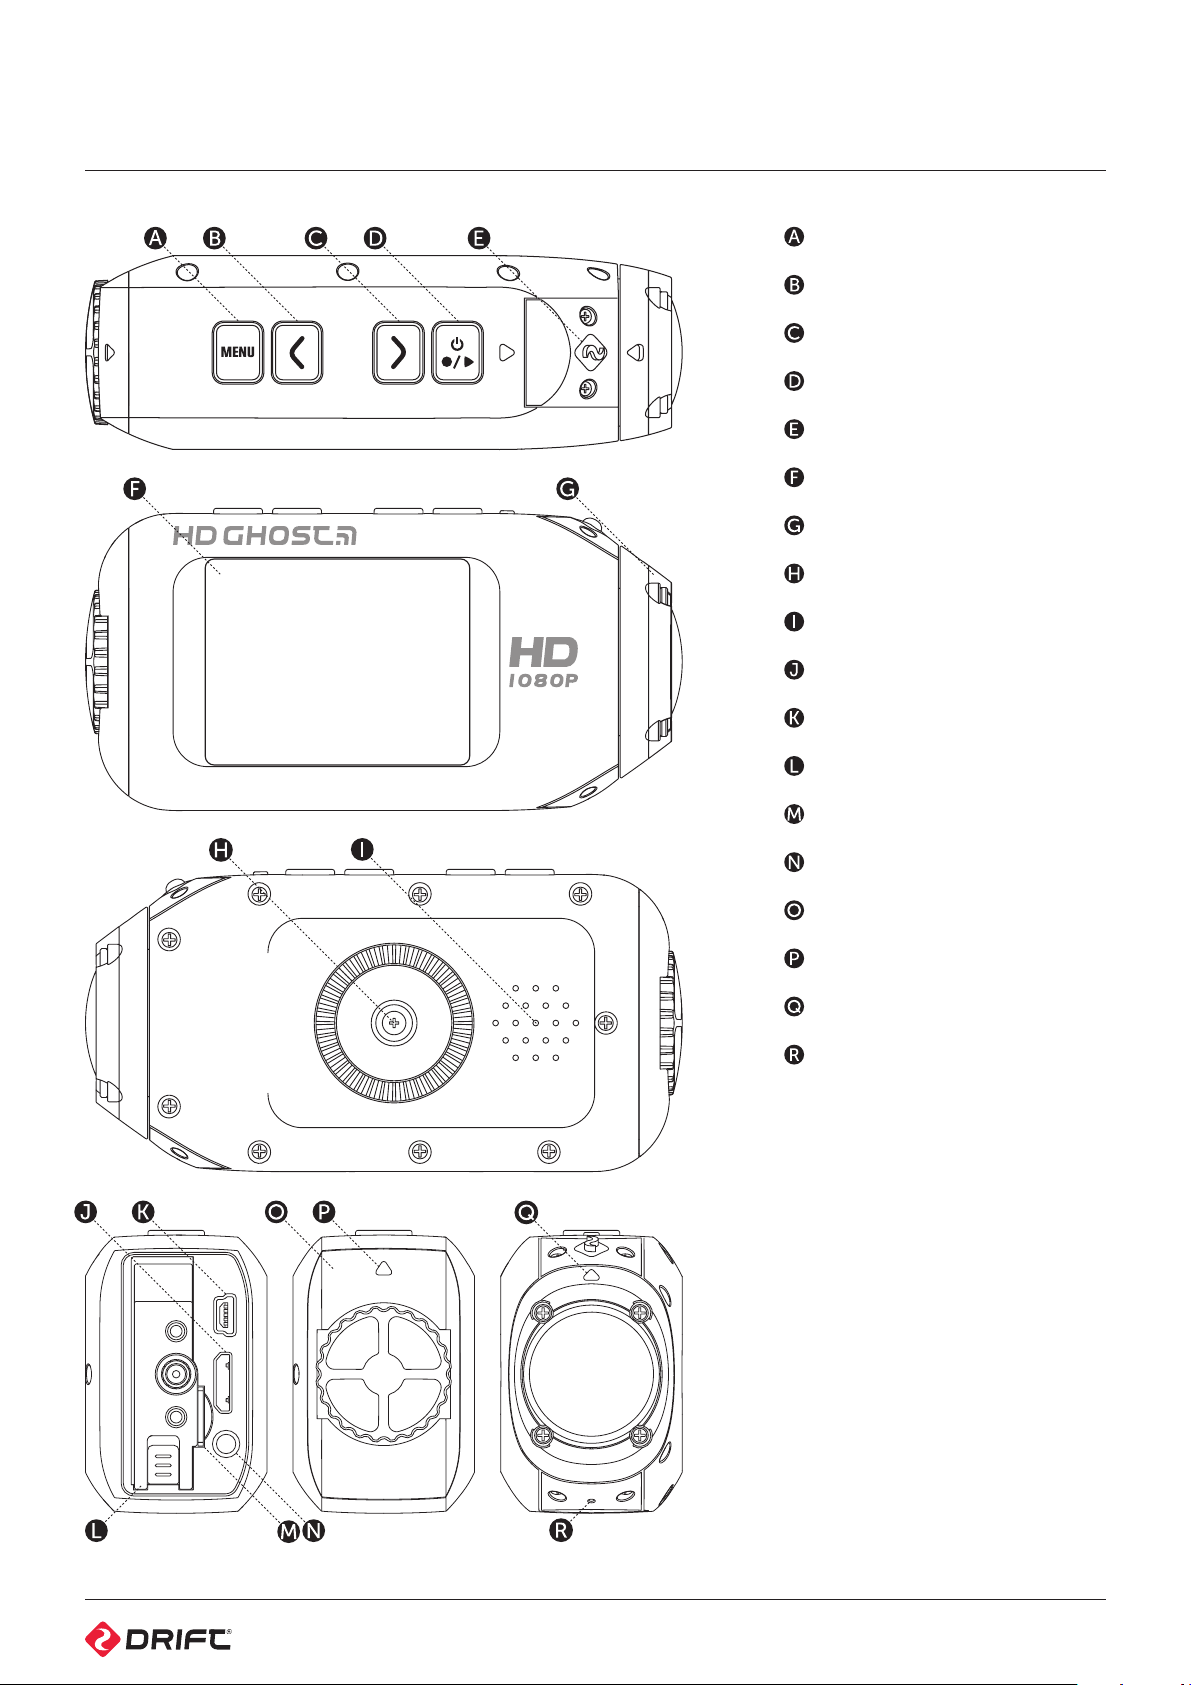
MENU Button (Tag)
LEFT Button (Zoom Out)
RIGHT Button (Zoom In)
ACTION Button (On/O/Rec/Stop)
LED Indicator
2.0” LCD Screen
300° Rotating / Replaceable Lens
¼”-20 Thread
Speaker
HDMI Port (Mini C)
USB Port (Mini B)
Battery Slot Cover
Micro SD Card Slot
3.5mm Microphone Input
Standard Rear Hatch
Rear Hatch ‘Up’ Indicator
Lens ‘Up’ Indicator
Built-in Noise Reducing Microphone
4
Page 5
using the camera
Initial setup
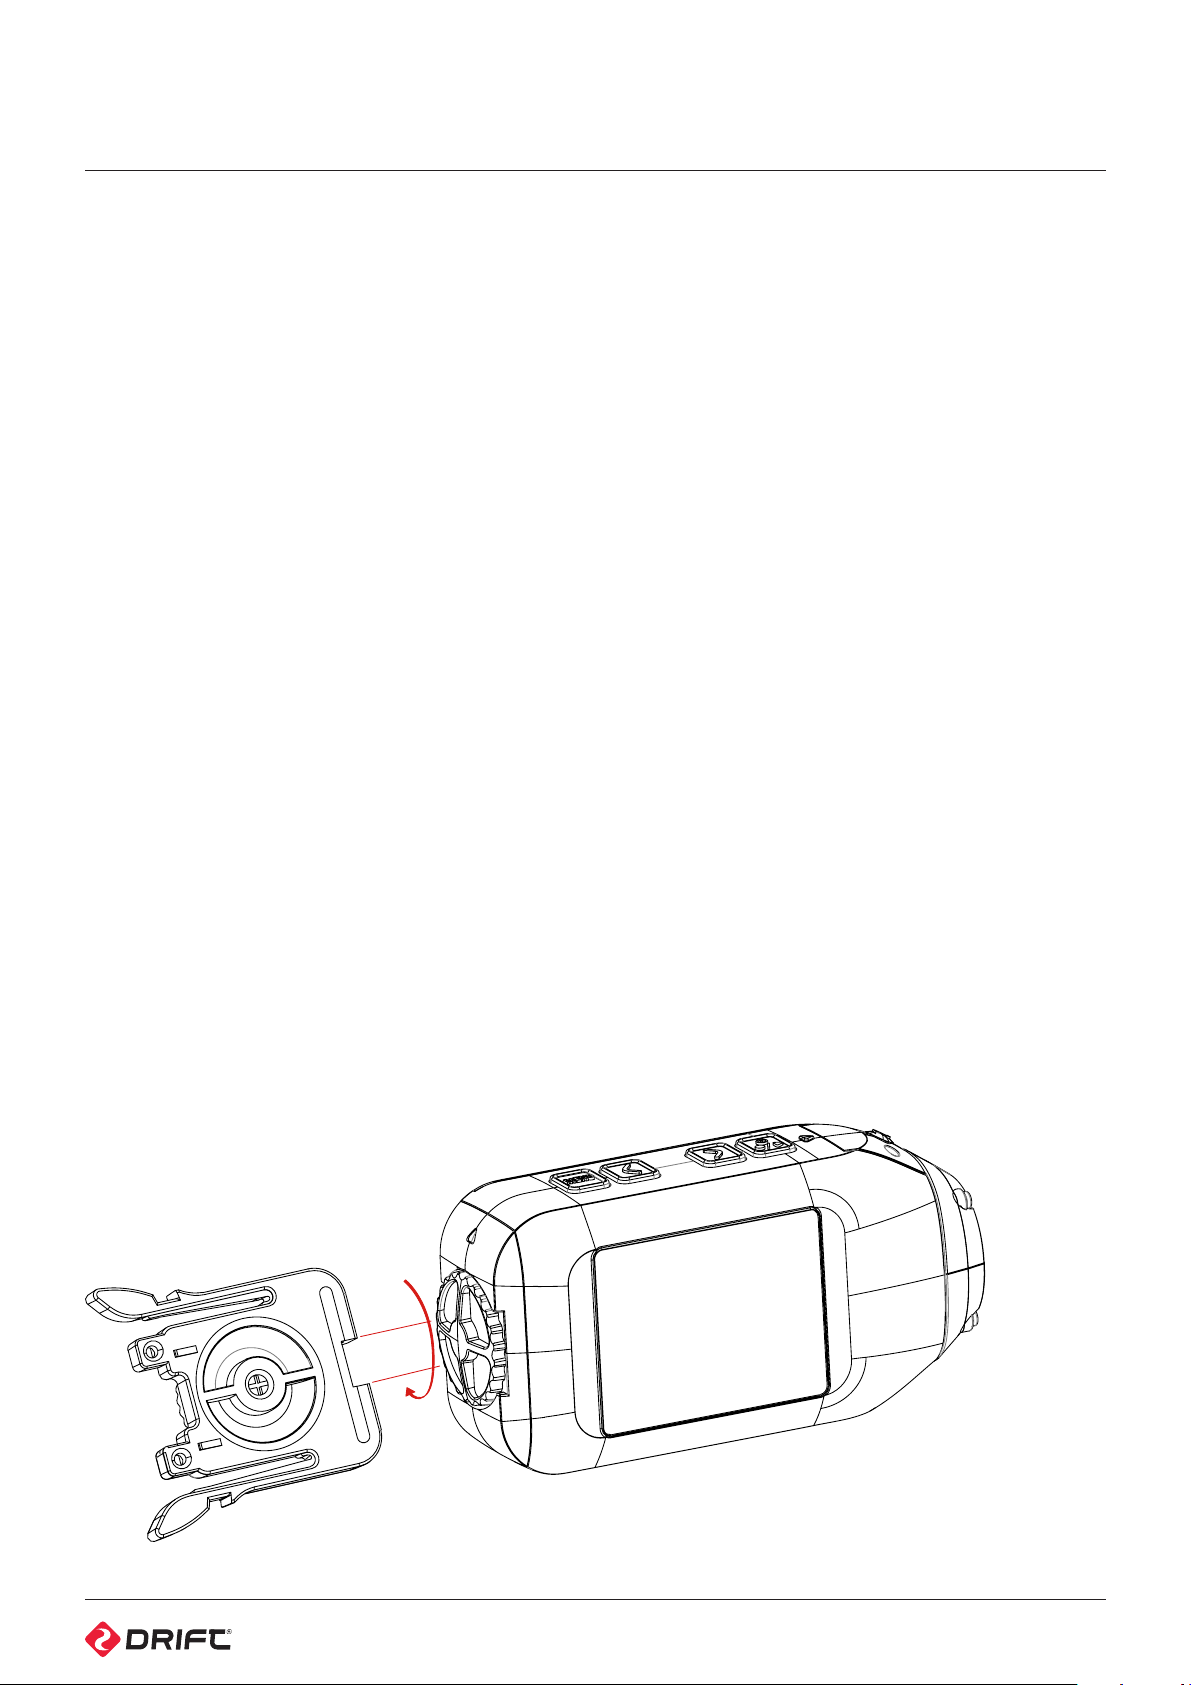
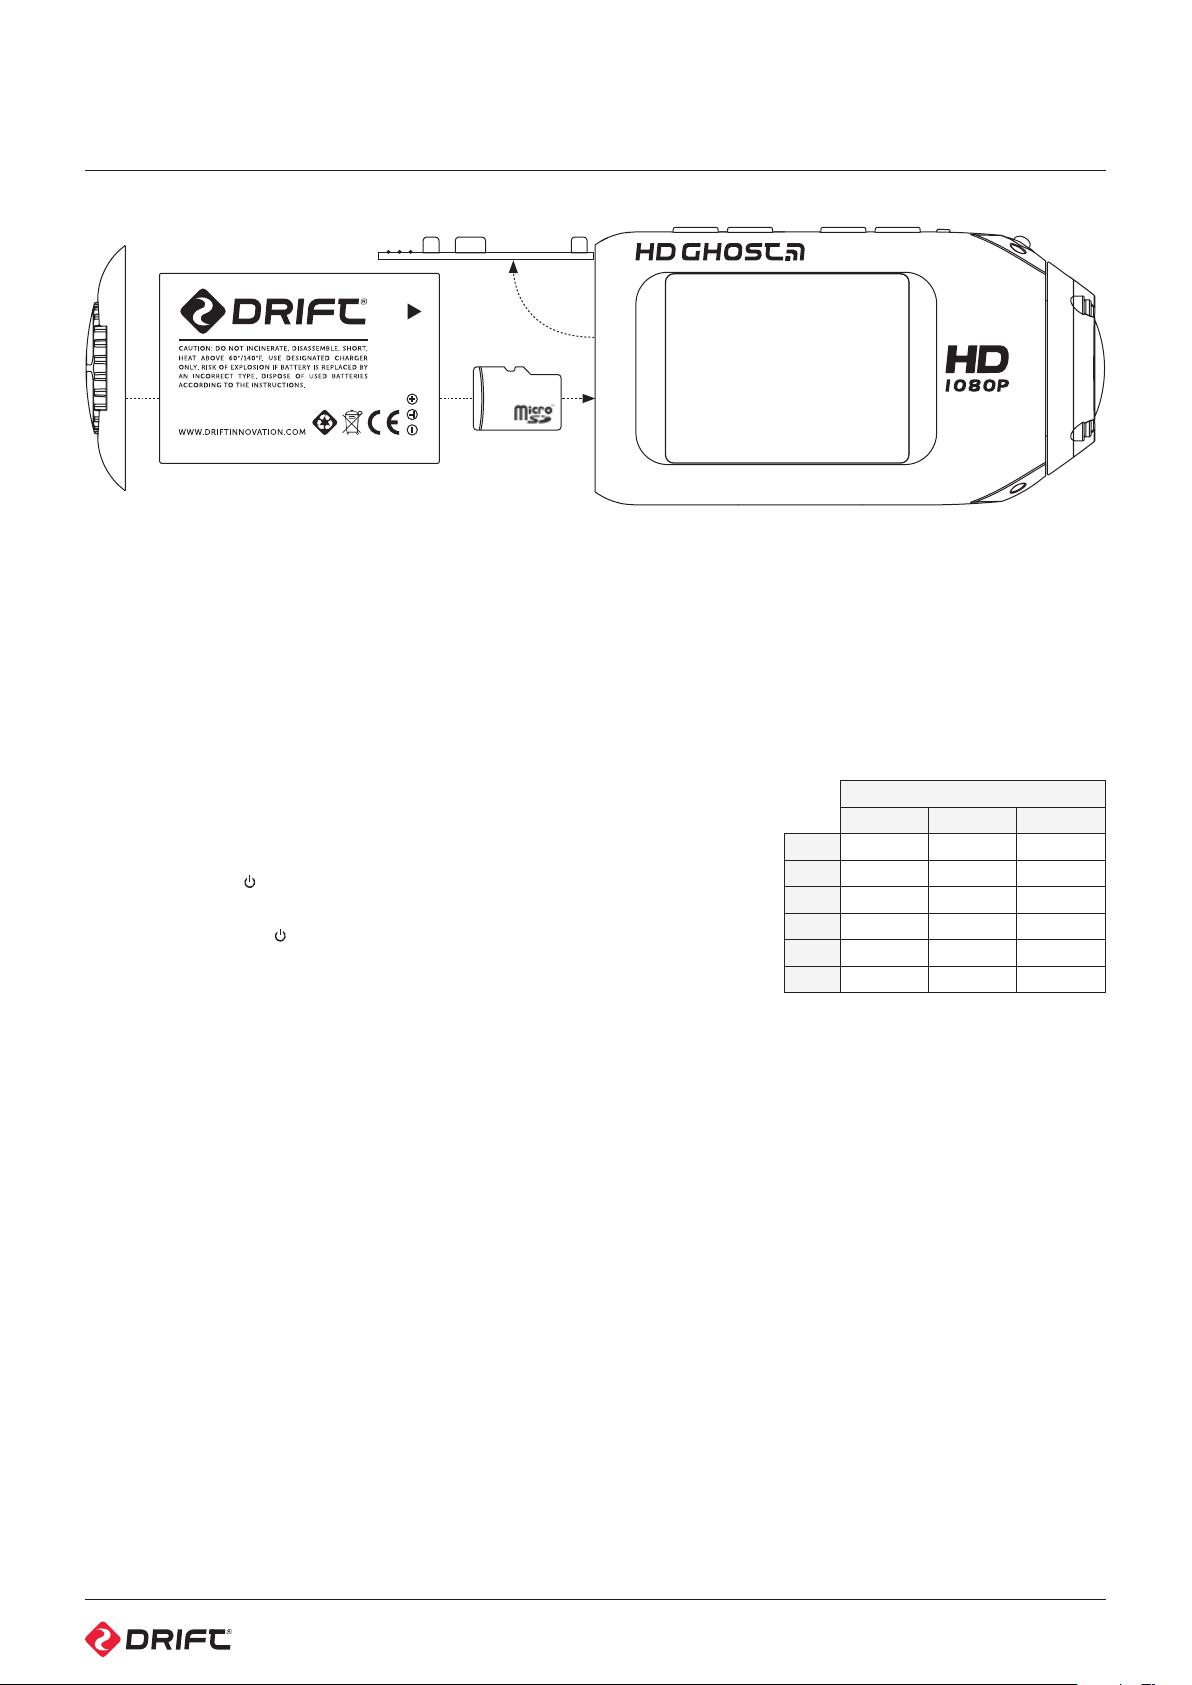
1. Unscrew the rear hatch of the camera by hand, or by using the notch in the
Universal clip (anti-clockwise movement)
2. Slide the catch and open the battery slot cover, lift and insert the battery as
above, before closing the cover
3. Insert a micro SD card into the card slot, as above, until you hear a click
4. Connect the camera by the mini USB cable (provided) to a powered USB port
and charge for 4 hours before first use
5. Replace the rear hatch, ensuring the arrow indicator points to the camera face
with the control buttons
Powering on and o
Press and hold the @ ACTION button on the camera—the LED indicator and
screen will power on and display a welcome message
To power o, hold the @ ACTION button for 3 seconds, or until the LED indicator
and screen power o
Charging
1. Ensure the battery is inside the camera and the camera is powered o
2. Connect the mini USB cable to the port at the rear of the camera and then
to a powered USB port in your computer, other USB device or USB power
adaptor (not included)
! If connected to a computer, the camera screen will show a USB symbol
! If connected to a USB power adaptor, the screen will show ‘Charging...’
3. A full charge takes around 4 hours (at 2A)—once the camera is fully charged,
remove the mini USB cable and replace the rear hatch and screw closed
Battery life
At a temperature of 25°C (77°F), with all power saving features o and the camera
recording continuously, the battery will last for about 3 hours on a full charge (see
Conserving Battery Life, p17 ).
Using an external power supply
The camera can be powered by an external power supply such as a USB power
adapter, Drift Power Pack or Drift 12V Charger. We do recommend you to power
o your camera before plugging your camera to any external power supply.
Press the action button to begin normal usage when using an external power supply.
If the external power is cut o for any reason during recording, the camera will
immediately start drawing power from the rechargeable battery instead and
continue recording, protecting your footage from file corruption.
Selecting a micro SD card
The Drift HD Ghost is compatible
with Micro SD or SDHC cards of up to
32GB, and of Speed Class 6 or above.
We recommend Class 10 cards for
recording HD video.
Below is a table of approximate video
recording times against card size.
Approximate Recording Time
1080P 720P* WVGA
1 GB 11min 24min 42mi n
2 GB 22min 49 min 1h24min
4 GB 44min 1h 38m in 2h 48min
8 GB 1h 24min 3h 1 5min 5 h 36min
16 GB 2h 55min 6h 30m in 11h 11min
32 GB 5h 51mi n 1 3h 00m in 16h 42min
* Recording 720P video at 60fps gives
similar recording times as 1080P video.
Formatting a micro SD card
Formatting will remove all files from
a memory card. When using a new
card for the first time, formatting is
recommended. With the card inserted
in the camera:
1. Open the Main Menu (see p6) and
select Camera Settings
2. Select ‘Format Memory Card’, press
ACTION and then confirm
Formatting may take a few moments
to complete—please be patient.
Removing a micro SD card
To remove the card, push it until you hear
a click. The card slot is spring loaded and
the card will slide from the slot.
5
Page 6
the camera menu system
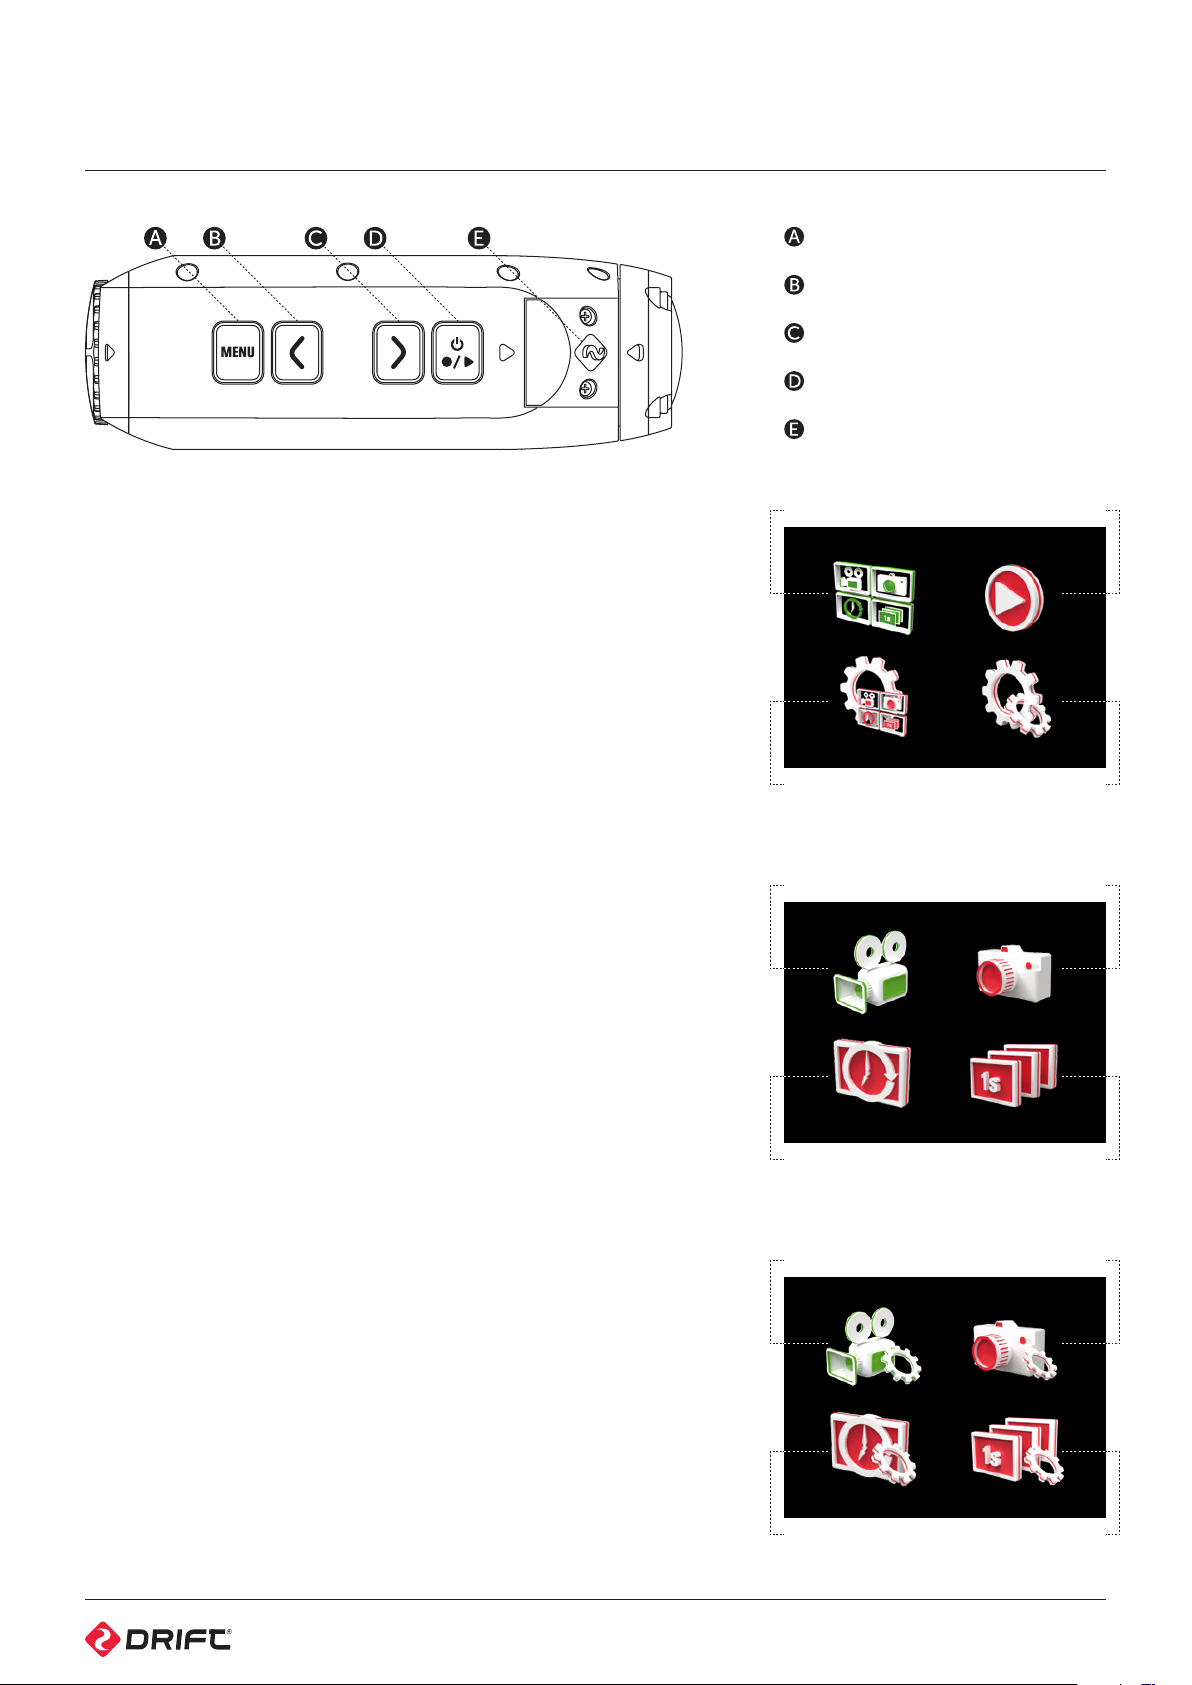
MENU Button (Tag/Back)
LEFT Button (Zoom Out)
RIGHT Button (Zoom In)
ACTION Button (On/O/Rec/Stop)
LED Indicator
The Drift HD Ghost has an easy-to-use menu system which can be navigated
using the camera’s four control buttons.
Main Menu
To open the Main Menu, press MENU while the camera is powered on. The Main
Menu screen will display the four menu options.
Use LEFT and RIGHT to navigate between the menu options. A highlighted
option will show a green icon instead of the usual red. To select a highlighted
menu option, press ACTION and a sub-menu will open.
! To go back a step, at any time, press MENU
Mode Selection Menu
The Mode Selection menu is used to select the camera mode.
On opening the Mode Selection menu, the screen will display the four camera
mode icons. Move between the dierent camera modes using LEFT and RIGHT.
To select a highlighted camera mode, press ACTION. The screen will return to
Live Preview for the selected mode and the camera is ready to capture.
For more information about the four camera modes, (see p7-10)
Mode Settings Menu
The Mode Settings menu is used to view and edit settings for each of the four
camera modes.
On opening the Mode Settings menu, the screen will display the four camera
mode icons. To select a highlighted camera mode, press ACTION. A further submenu will open, listing adjustable settings for the selected camera mode. Use
LEFT and RIGHT to navigate between settings. Use ACTION to edit and confirm
settings; LEFT and RIGHT to adjust setting values.
For more information about the four camera modes and their settings, (see p7-
10)
Playback Menu
The Playback menu is used to view video and images for each of the four
camera modes.
For full details, (see p11)
Camera Settings Menu
The Camera Settings menu is used to view and adjust camera settings.
For full details, (see p12).
Mode Selection
Mode Settings
Video Mode
Timelapse Mode
Video Settings
Playback
Camera Settings
Photo Mode
Photoburst Mode
Photo Settings
Timelapse Settings
Photoburst Settings
6
Page 7
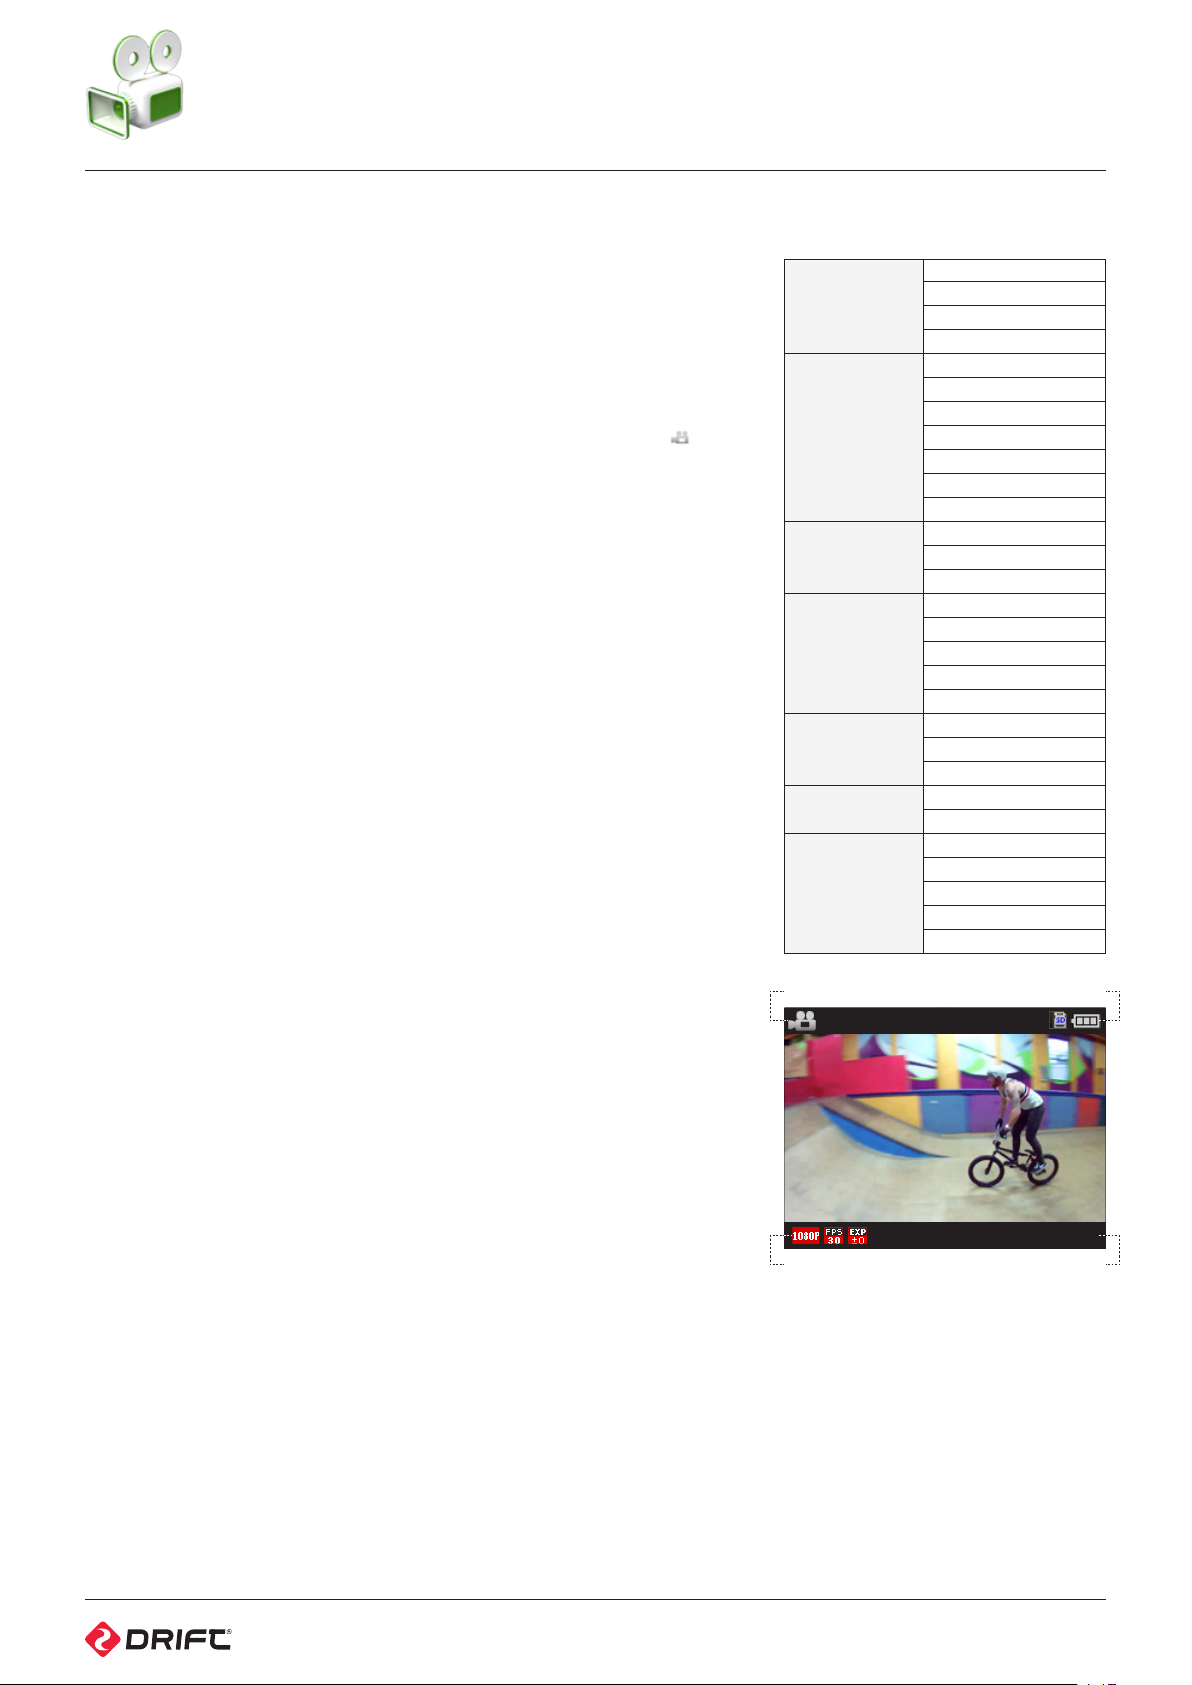
video mode
VIDEO MODE (GREEN LED)
While the camera is powered on and in Video Mode—with a micro SD card
inserted with enough free memory—it will record video when ACTION is pressed
on the camera or the remote control.
1. To enter Video Mode, ensure the camera is powered on
2. Press MENU to enter the Main Menu
3. Open the Mode Selection menu, highlight Video Mode and press ACTION
The screen will return to Live Preview and display the Video Mode icon @ in the
top-lefthand corner of the screen, and the LED indicator will turn green—the
camera is ready to record video.
Recording Video
1. Press ACTION on the camera or remote control to begin recording video
2. The LED indicator will blink red while the camera is recording
! The duration of the current recording is indicated by the on-screen timer
3. To stop recording, press ACTION on the camera, or STOP on the remote
control—the LED indicator will turn green
Video Tagging
When activated, this feature allows the camera to continuously record video, but
save only ‘tagged’ footage. For example, with Video Tagging turned on and a
Video Tagging Interval of 30s selected, pressing MENU while recording video will
save the previous 30s, the current 30s and an additional 30s—a total of 1m30s of
tagged footage.
Video Tagging can be turned on or o in the Video Mode Settings menu.
1. To turn Video Tagging on, open Mode Settings from the Main Menu and select
Video Mode
2. Under ‘Video Tagging’, select On and press ACTION to confirm
3. Under ‘Video Tagging Interval‘, choose the desired interval time and press
ACTION to confirm
4. While recording video, press MENU on the camera to tag video—the LED
indicator will begin blink red while a tagged interval is being saved
! While recording video, pressing ACTION on the remote control will tag video
5. Tagging can be stopped by pressing ACTION on the camera, or STOP on the
remote control
Pressing ACTION again while tagging will add an additional tagging interval to
the end of the saved footage.
! Please ensure you have at least 4GB of free space on your micro SD card for
video tagging to function properly
Taking simultaneous photos while recording video
With Video Tagging turned o, pressing MENU on the camera while recording
video will simultaneously take a still photo. Simultaneous Photo is available in the
following video setups: 1080p (30/25 FPS), 960p (30/25 FPS), 720p (30/25 FPS),
WVGA (3025 FPS).
With Video Tagging turned o, pressing ACTION on the remote control while
recording video will simultaneously take an still photo.
! This feature is only available when Video Tagging (see above) is turned o
Video Mode Settings
Resolution
25 (1080/960/720/WVGA)
30 (1080/960/720/WVGA)
Frame Rate
170° (1080/960/720/WVGA)
FOV
Exposure
Self Timer
Video Tagging
Video Tagging
Interval
Video Mode
Video Resolution
Frame Rate
Exposure
SD Card / Battery Indicator
1080P
960P
720P
WVGA
40 (960)
50 (960 / 720 / W VG A)
60 (720/WVGA)
100 (WVGA)
120 (WVGA)
127° (1080)
90° (1080)
-2
-1
0
+1
+2
3s
5s
10s
On
Off
10s
30s
1m
2m
5m
98%
00:00:00
Record Timer
7
Page 8
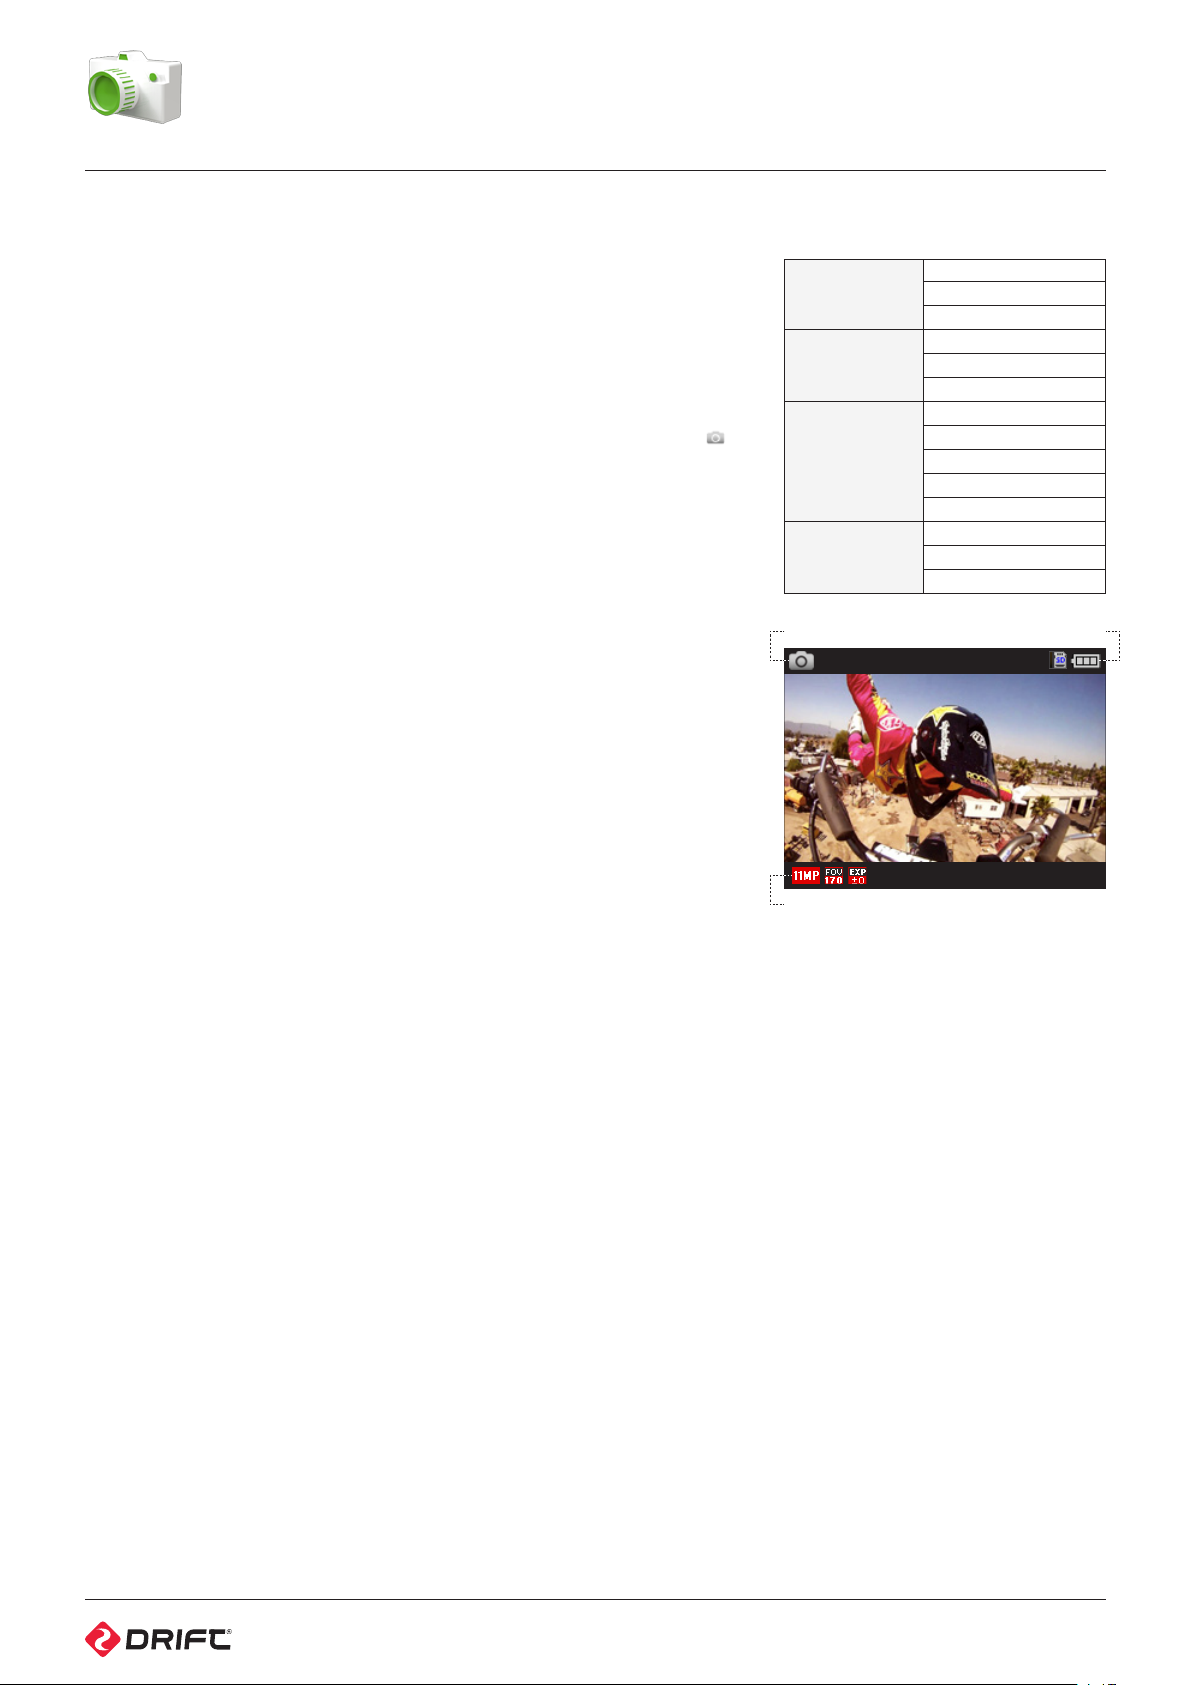
photo mode
PHOTO MODE YELLOW LED
While the camera is powered on and in Photo Mode—with a micro SD card
inserted with available memory—it will capture a 5, 8 or 11MP still image when
ACTION is pressed on the camera or the remote control.
1. To enter Photo Mode, ensure the camera is powered on
2. Press MENU to enter the Main Menu
3. Open the Mode Selection menu, highlight Photo Mode and press ACTION
The screen will return to Live Preview and will display the Photo Mode icon @ in
the top-lefthand corner of the screen, and the LED indicator will turn yellow—the
camera is ready to take photos.
Capturing photos
1. Press ACTION on the camera or remote control to take a photo
2. The LED indicator will blink red once before returning to yellow
Photo Mode Settings
Resolution
FOV
Exposure
Self Timer
Photo Mode
WVGA / Battery Indicator
11MP
8MP
5MP
170°
127°
90°
-2
-1
0
+1
+2
3s
5s
10s
45%
Photo Resolution
Field of View Angle
Exposure
8
Page 9
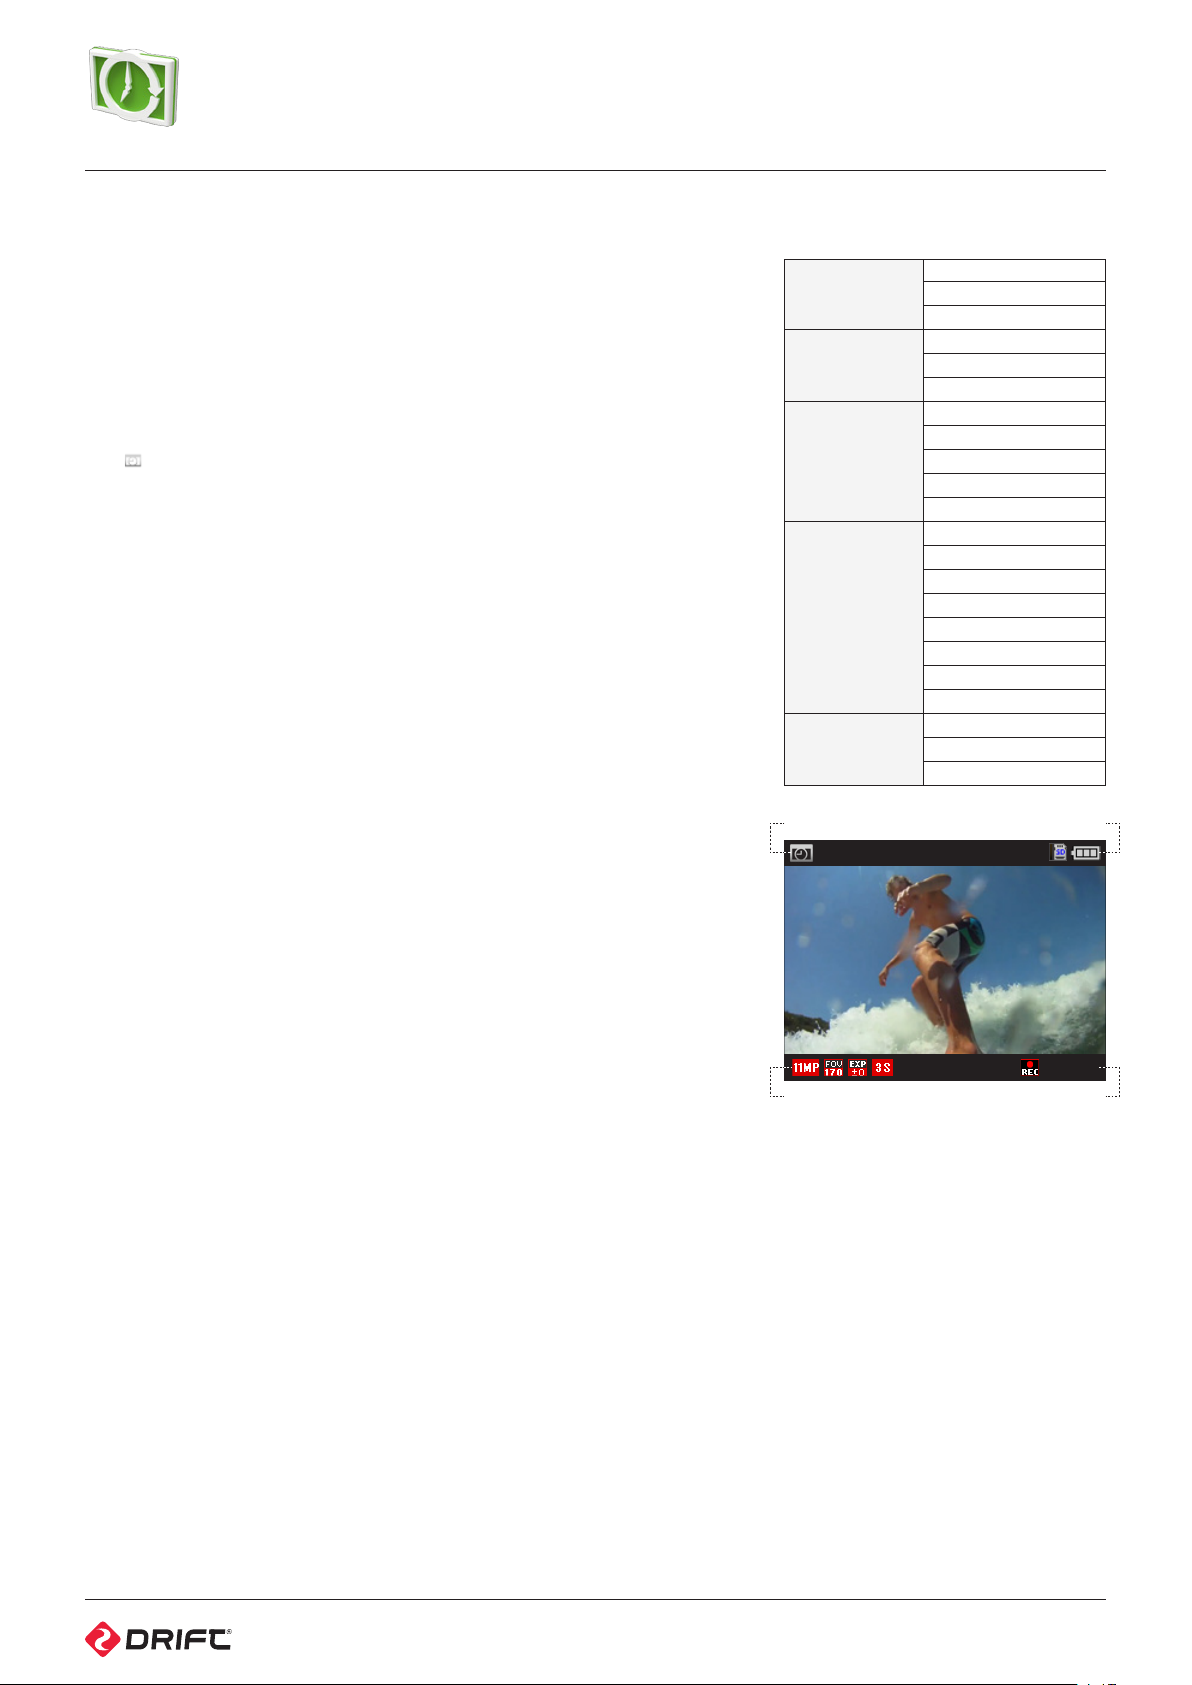
timelapse mode
TIMELAPSE MODE (PURPLE LED)
While the camera is powered on and in Timelapse Mode—with a micro SD card
inserted with enough free memory—it will capture a series of still images at a
specified rate when ACTION is pressed on the camera or the remote control.
1. To enter Timelapse Mode, ensure the camera is powered on
2. Press MENU to enter the Main Menu
3. Open the Mode Selection menu, highlight Timelapse Mode and press ACTION
The screen will return to Live Preview and will display the Timelapse Mode
icon @ in the top-lefthand corner of the screen, and the LED indicator will turn
purple—the camera is ready to take timelapse photos.
Capturing Timelapse
The Timelapse Sequence Interval can be set from the Mode Settings menu.
1. Open Mode Settings from the Main Menu and select Timelapse Mode
2. Under ‘Sequence Interval’, choose the desired interval time and press ACTION
to confirm
3. Return to Live Preview and press ACTION on the camera or remote control to
start timelapse
4. The LED indicator will blink red once when each photo is taken
5. To stop timelapse, press ACTION on the camera or STOP on the remote control
Timelapse Mode Settings
Resolution
FOV
Exposure
Sequence Interval
Self Timer
11MP
8MP
5MP
170°
127°
90°
-2
-1
0
+1
+2
0.5s
1s
2s
3s
5s
10s
30s
1m
3s
5s
10s
Timelapse Mode
Photo Resolution
Field of View Angle
Exposure
Sequence Interval
SD / Batter y Indicator
67%
000000
Photos Captured
9
Page 10
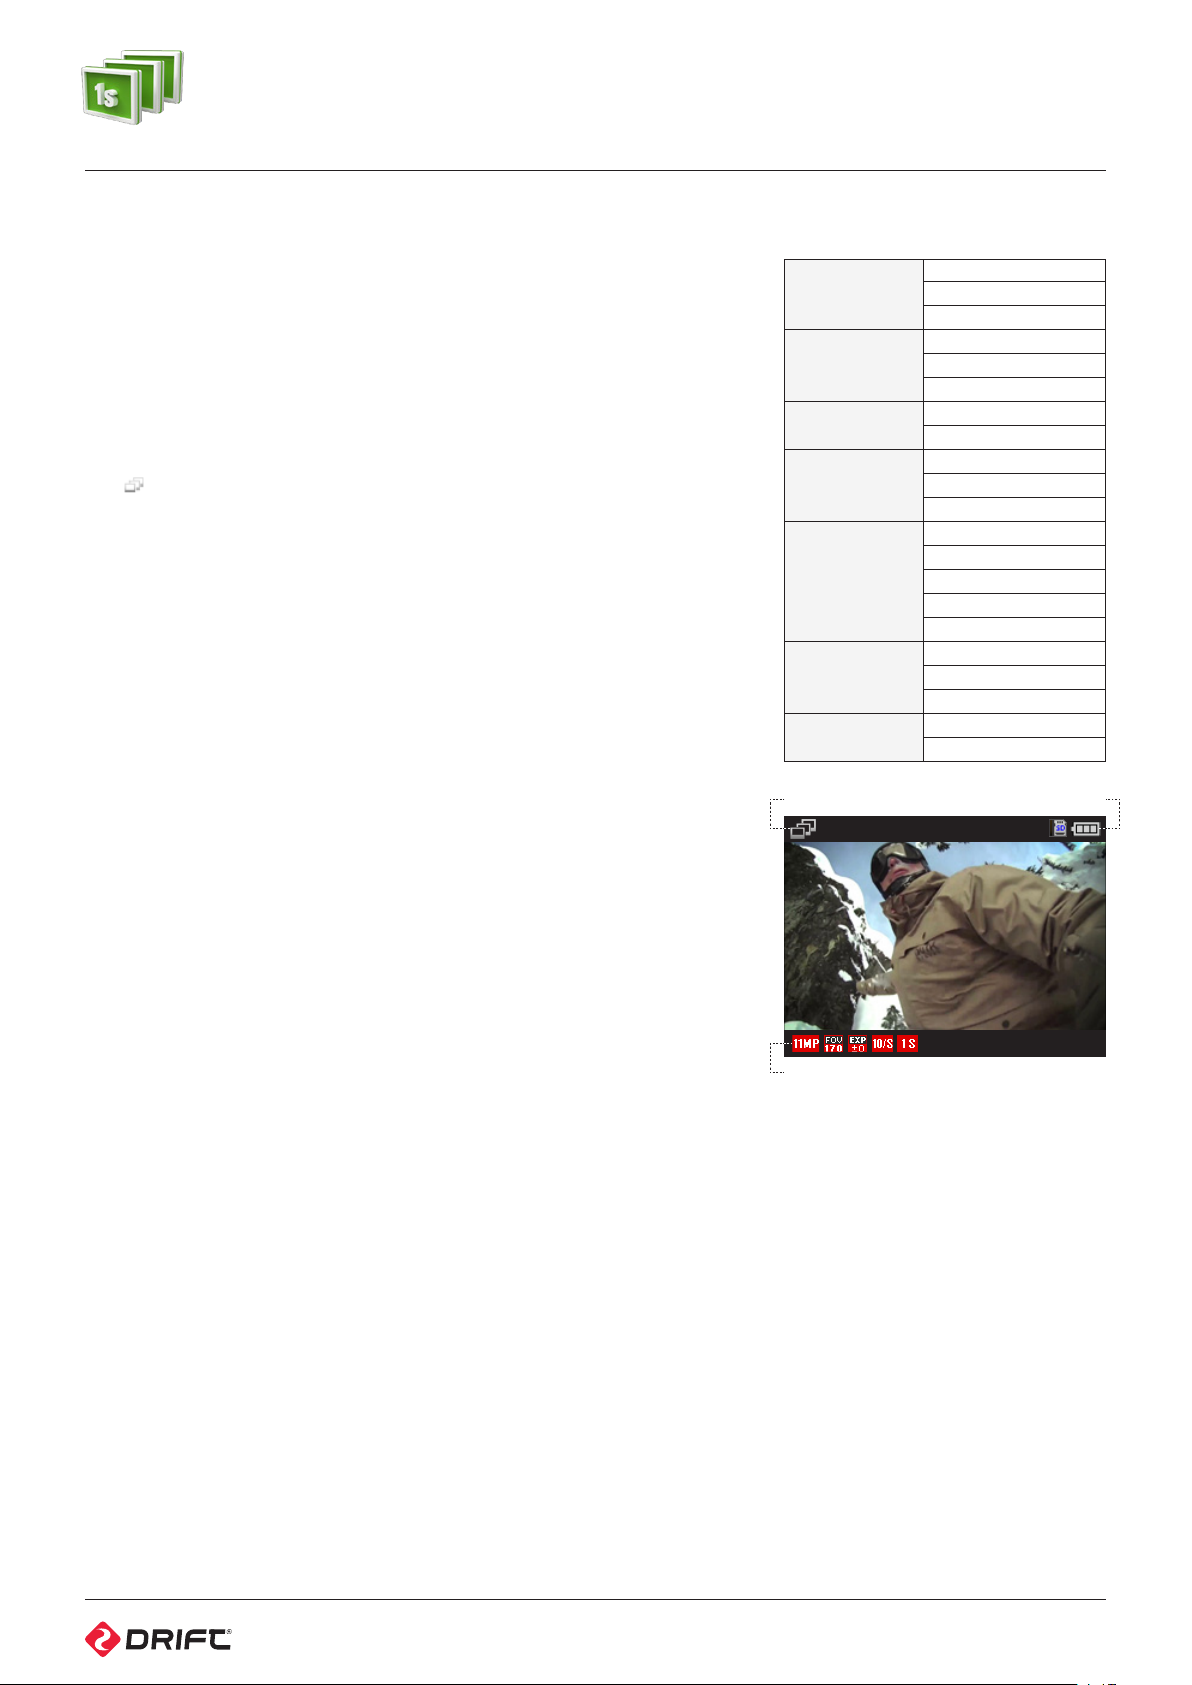
photoburst mode
PHOTOBURST MODE (CYAN BLUE LED)
While the camera is powered on and in Photoburst Mode—with a micro SD card
inserted with enough free memory—it will capture a burst of still images for an
allotted duration, at a specified rate when ACTION is pressed on the camera or
the remote control.
1. To enter Photoburst Mode, ensure the camera is powered on
2. Press MENU to enter the Main Menu
3. Open the Mode Selection menu, select Photoburst Mode and press ACTION
The screen will return to Live Preview and will display the Photoburst Mode
icon @ in the top-lefthand corner of the screen, and the LED indicator will turn
cyan (light blue)—the camera is ready to take a photoburst series.
Capturing Photoburst
The Photoburst Mode settings can be set from the Mode Settings menu.
1. Open Mode Settings from the Main Menu and select Photoburst Mode
2. Under ‘Capture Rate’, highlight the desired photo capture rate and press
ACTION to confirm
3. Under ‘Burst Duration’, highlight the desired duration and press ACTION to
confirm
4. Return to Live Preview and press ACTION on the camera or remote control to
start photoburst
5. The LED indicator will blink red once when each photo is taken
! Please note, 11MP at 10 images per second is limited to a maximum 2 second
burst duration.
Photoburst Mode Settings
Resolution
FOV
Capture Rate
Burst Duration
Exposure
Self Timer
Default Settings
Photoburst Mode
Cancel
SD / Batter y Indicator
11MP
8MP
5MP
170°
127°
90°
5/s
10/s
1s
2s
5s
-2
-1
0
+1
+2
3s
5s
10s
Yes
90%
Photo Resolution
Capture Rate
Burst Duration
10
Page 11
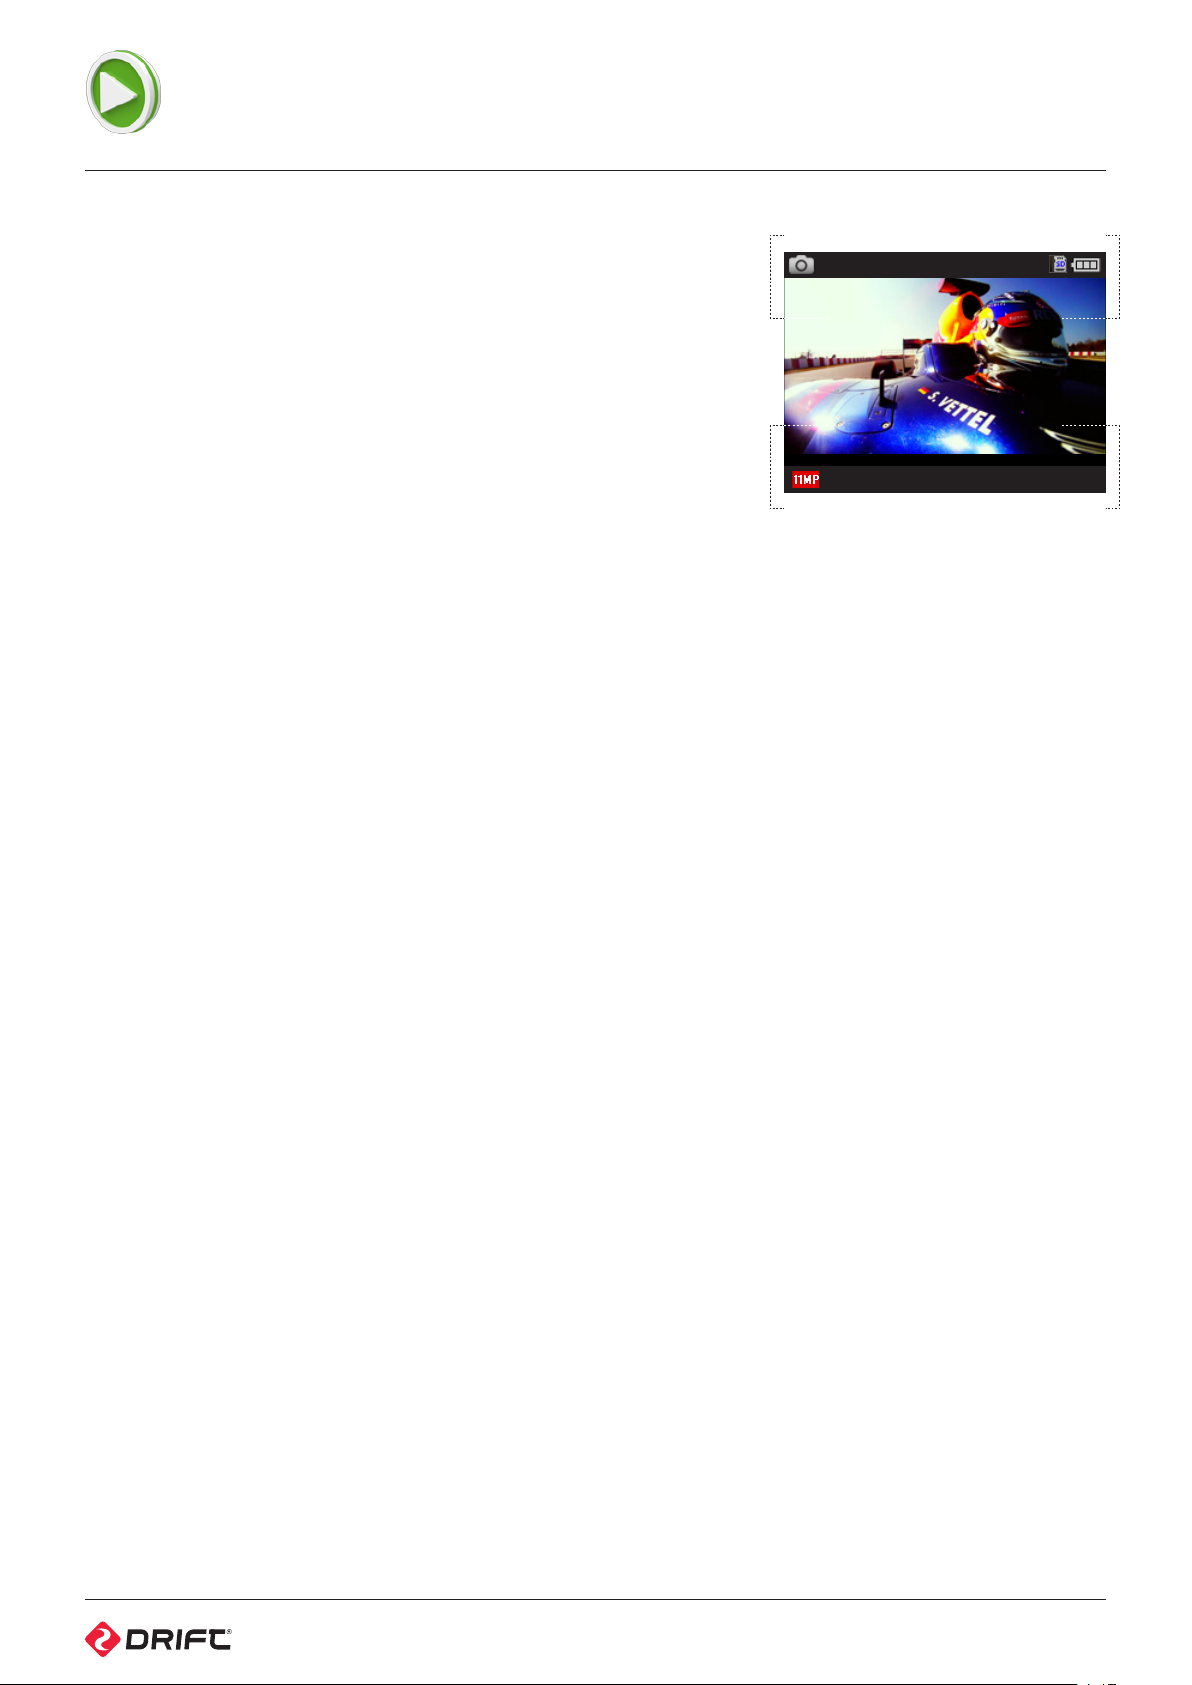
playback
On opening Playback from the Main Menu, the screen will display the four
camera mode icons. A number will be displayed beside each camera mode icon
to indicate how many files are stored on the memory card for each mode.
To select a highlighted camera mode, press ACTION.
The screen will display the most recent video, photo or timelapse or photoburst
folder. To move between files, use LEFT and RIGHT. To return to Live Preview,
press the menu button to backout.
Video Playback
1. Select the video file you wish to playback using LEFT/ RIGHT, then press ACTION
2. The screen will display a sub-menu—highlight ‘View’ to watch the selected
video and press ACTION
! Highlight ‘View All’ to watch all the videos stored on the memory card and
press ACTION
3. Pressing ACTION will stop playback and pressing ACTION again will play the
selected video.
4. Use LEFT and RIGHT during playback to rewind and fastforward
Viewing Photos
On opening Photo Mode from the Playback menu, the screen will display the
most recent photo. To move between photos, use LEFT and RIGHT.
Viewing Timelapse photos
On opening Timelapse Mode from the Playback menu, the screen will display
the first image in the most recent timelapse sequence. To move between
sequences, use LEFT and RIGHT. Press ACTION and select ‘View Series’ to open
the desired sequence.
Viewing Photoburst photos
On opening Photoburst Mode from the Playback menu, the screen will display
the first image in the most recent photoburst sequence. To move between
sequences, use LEFT and RIGHT. Press ACTION and select ‘View Series’ to open
the desired sequence.
Deleting files
1. Pressing ACTION while viewing any file in Playback will open a sub-menu
2. Highlight ‘Delete’ to delete the selected video or photo, or ‘Delete All’ to delete
every file for the selected camera mode, and press ACTION and confirm
3. You can also choose to timelapse or photoburst sequences in the same
manner as above
! Please be aware when using ‘Delete All’ that all files for the selected camera
mode will be removed from the memory card and cannot be retrieved
! Using this function will not delete any other files from the micro WVGA card
Playback
40%
11
Page 12
camera settings
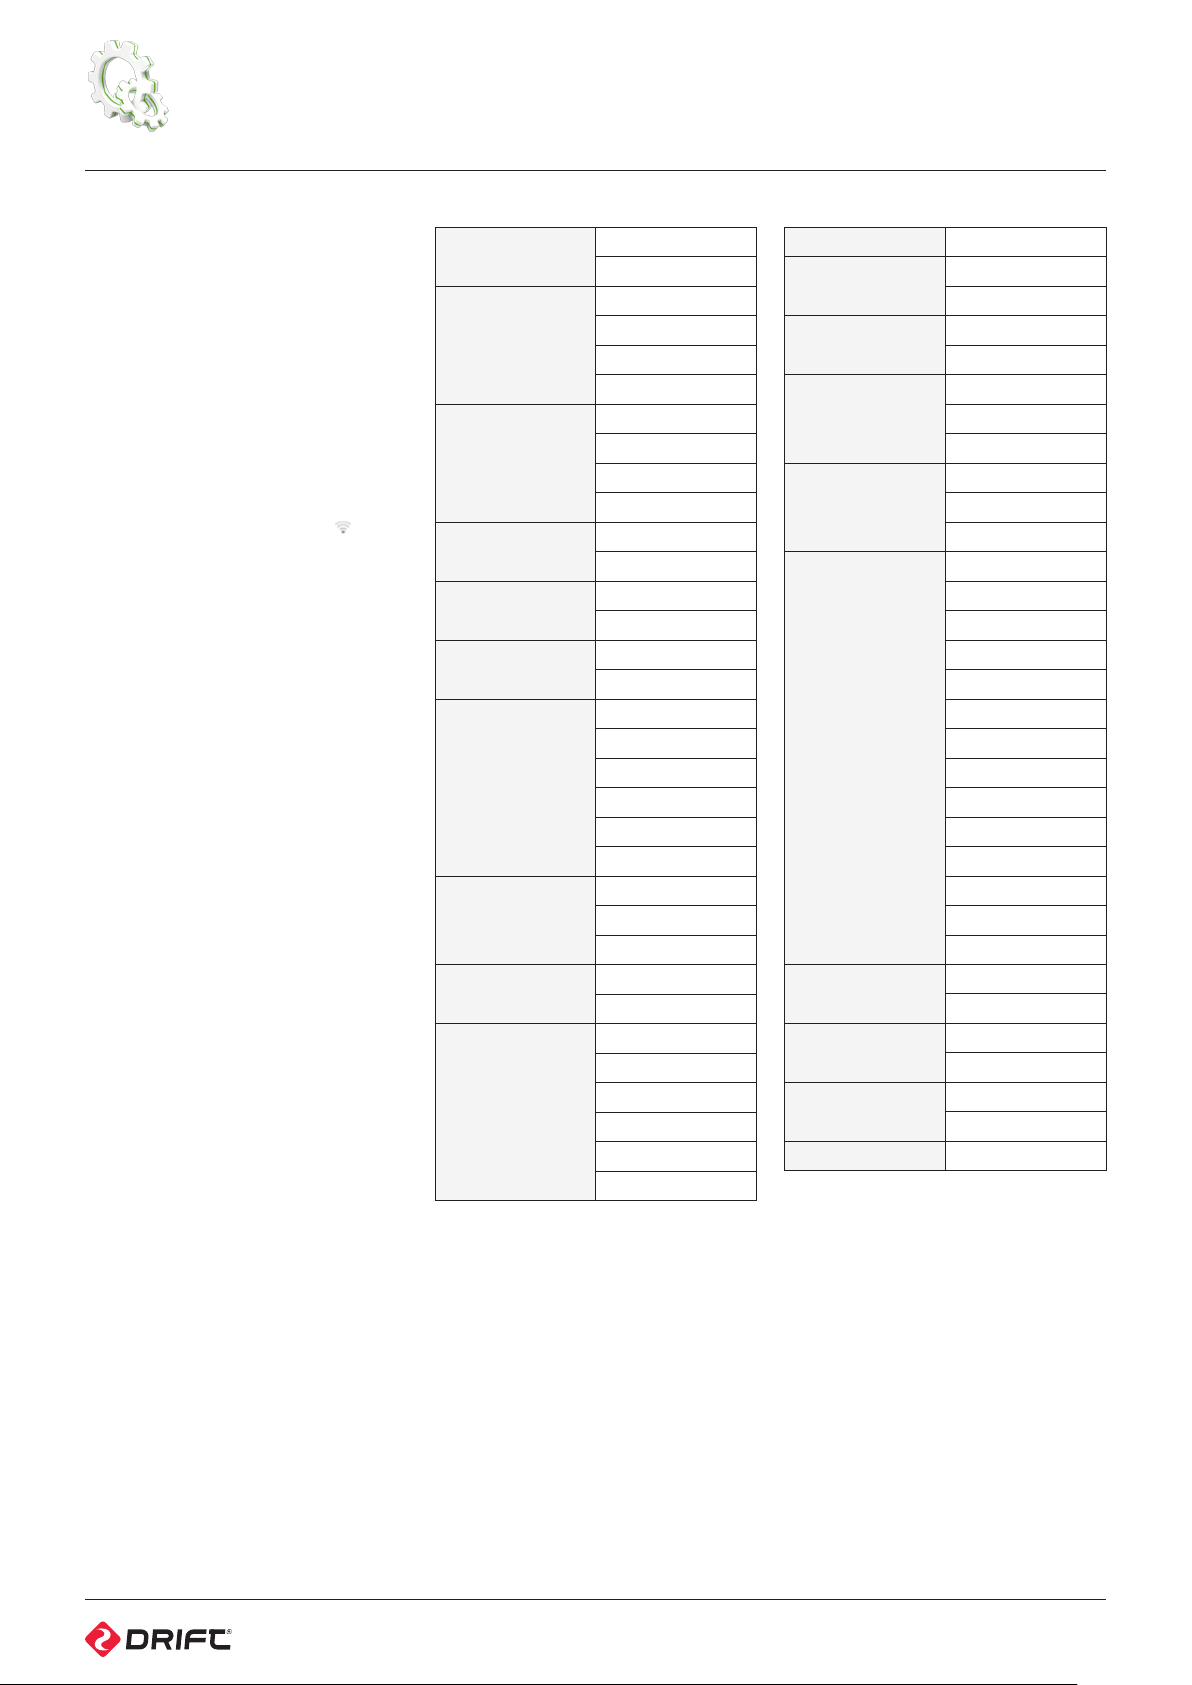
On opening Camera Settings from the
Main Menu, the screen will display the
list of adjustable camera settings.
Use LEFT and RIGHT to move between
settings. Use ACTION to edit and
confirm settings; LEFT and RIGHT to
move between setting values.
WiFi
To turn WiFi on or o, highlight ‘WiFi’
from the Camera Settings menu and
press ACTION.
While WiFi is on, the WiFi icon @ will
show in Live Preview.
For more about connecting the
camera to other WiFi devices, (see
p15)
Setting the date and time
1. Highlight ‘Date’ from the Camera
Settings menu and press ACTION
2. Adjust the year using LEFT / RIGHT
and press ACTION to confirm
3. Set the month, day and time,
pressing ACTION to confirm each
Camera Settings Profiles
All camera settings can be saved
by selecting Save Settings from the
Camera Settings menu and choosing a
save profile: A, B or C.
Settings profiles can be loaded by
selecting Load Settings from the
menu, then A, B or C.
The camera will power on in the same
settings configuration it was powered
o in.
Reset Default Settings
To restore the factory camera settings,
highlight ‘Reset Settings’ from the
Camera Settings menu and press
ACTION, then confirm.
Firmware
Selecting ‘Firmware Version’ from the
Camera Settings menu will display the
camera’s current firmware version.
For more details about updating
firmware, (see p17)
WiFi
Mic Sensitivity
Speaker Volume
Remote Control
Remote Pairing
Date/Time
Stamp
LCD O
LCD Brightness
LED Indicator
Camera Auto O
On
O
O
Low
Med
High
O
Low
Medium
High
Yes
No
Refresh
Cancel
On
O
Never
5s
10s
20s
1m
5m
Low
Medium
High
On
O
Never
1m
5m
10m
20m
30m
Date/Time Year/Month/Day
Digital Zoom
Remote LED
Save Settings
Load Settings
Language
Video Format
Format Memory
Card
Reset Settings
Firmware Version
On
O
On
O
Profile A
Profile B
Profile C
Profile A
Profile B
Profile C
English
Français
Deutsch
Español
Italiano
Português
Russian
Nederlands
Dansk
Polski
Român
Svenskt
Český
ελληνικά
.MOV
.MP4
Yes
Cancel
Yes
Cancel
12
Page 13
the two-way remote control
Powering on and o
1. Ensure the camera is powered on (see p5)
2. Press and hold the @ ACTION button on the remote—the LED will power on
and indicate the current camera mode
! The remote will automatically power o if it does not find a camera after 15s
Charging
Connect the remote control using the Mini USB cable (provided) to a powered
USB port. The LED will blink red. A full charge takes around 2 hours using a 2
amps charger. Once the remote is fully charged, the LED will show solid green—
remove the mini USB cable and replace the rubber dust-proof USB seal.
Pairing camera to a remote control - one to one
[The camera and remote control included in the package are already paired to
one another]
1. On the camera, press MENU, select Camera Settings from the Main Menu and
press ACTION
2. Highlight ‘Remote Pairing’ on the Camera Settings menu and press ACTION
3. On the remote control, press @ ACTION—The camera will beep and return to
the Camera Settings menu if it has recognised the remote
! If the camera does not display ‘successful’ and return to the Camera Settings
menu it will not be paired—try pressing @ ACTION on the remote again
4. On the camera, the icon beside Remote Pairing will change to indicate it is
paired to a remote control
Using the remote control - one to one
While the camera and remote are both powered on and paired, pressing @ACTION
on the remote control will begin recording video, capture a photo, start
timelapse or photoburst, depending on the camera mode.
Pressing @ ACTION while recording video will capture a photo, or start Video
Tagging (if activated, see p7). Pressing STOP will end video recording or timelapse.
Pressing STOP while the camera is in Live Preview will toggle between camera
modes, as indicated by the LED indicator on the camera and remote (see over)
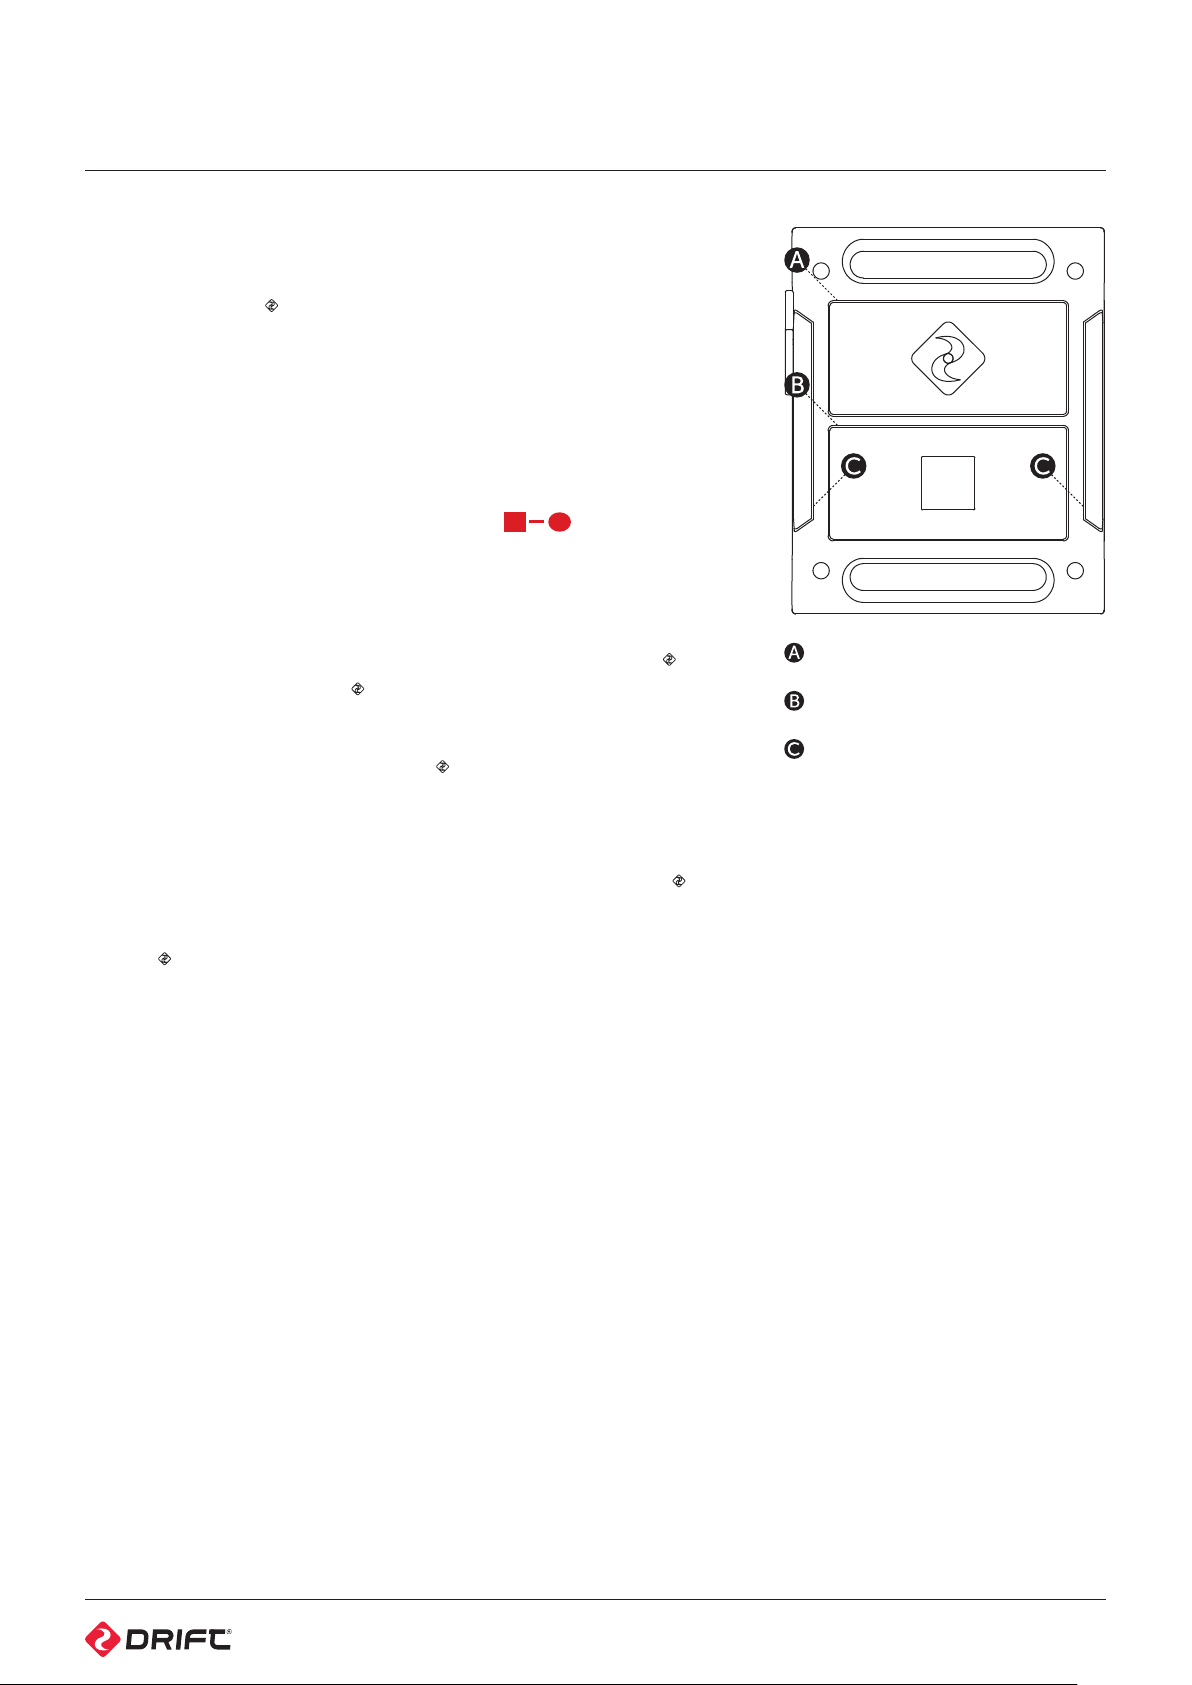
ACTION Button
STOP Button (Tag/Toggle Mode)
LED Indicator
! The Remote is NOT waterproof.
13
Page 14
two way remote control (cont’d)
Pairing camera to a remote control - one to all
A single remote control can be paired to an infinite number of cameras in a 10m
range from the remote control, to enable footage to be captured from every
angle.
1. On the cameras, press MENU, select Camera Settings from the Main Menu
and press ACTION
2. Highlight ‘Remote Pairing’ from the Camera Settings menu and press ACTION
3. On the remote control, press ACTION—the camera will display ‘successful’
and return to the Camera Settings menu if it has recognised the remote
! Any camera that does not display ‘successful’ and return to the Camera
Settings menu it will not be paired—try pressing ACTION on the remote
again
4. On the camera, the icon beside Remote Pairing will change to indicate it is
paired to a remote control
! When pairing multiple cameras, always test the remote control to see if it
operates all the cameras before mounting them
Using the remote control - one to all
While the camera and remote are both powered on and paired, pressing ACTION
on the remote control will begin recording video, capture a photo, start
timelapse or photoburst, depending on the camera mode.
Pressing ACTION while recording video will capture a photo, or start Video
Tagging (if activated, (see p7). Pressing STOP will end video recording or
timelapse.
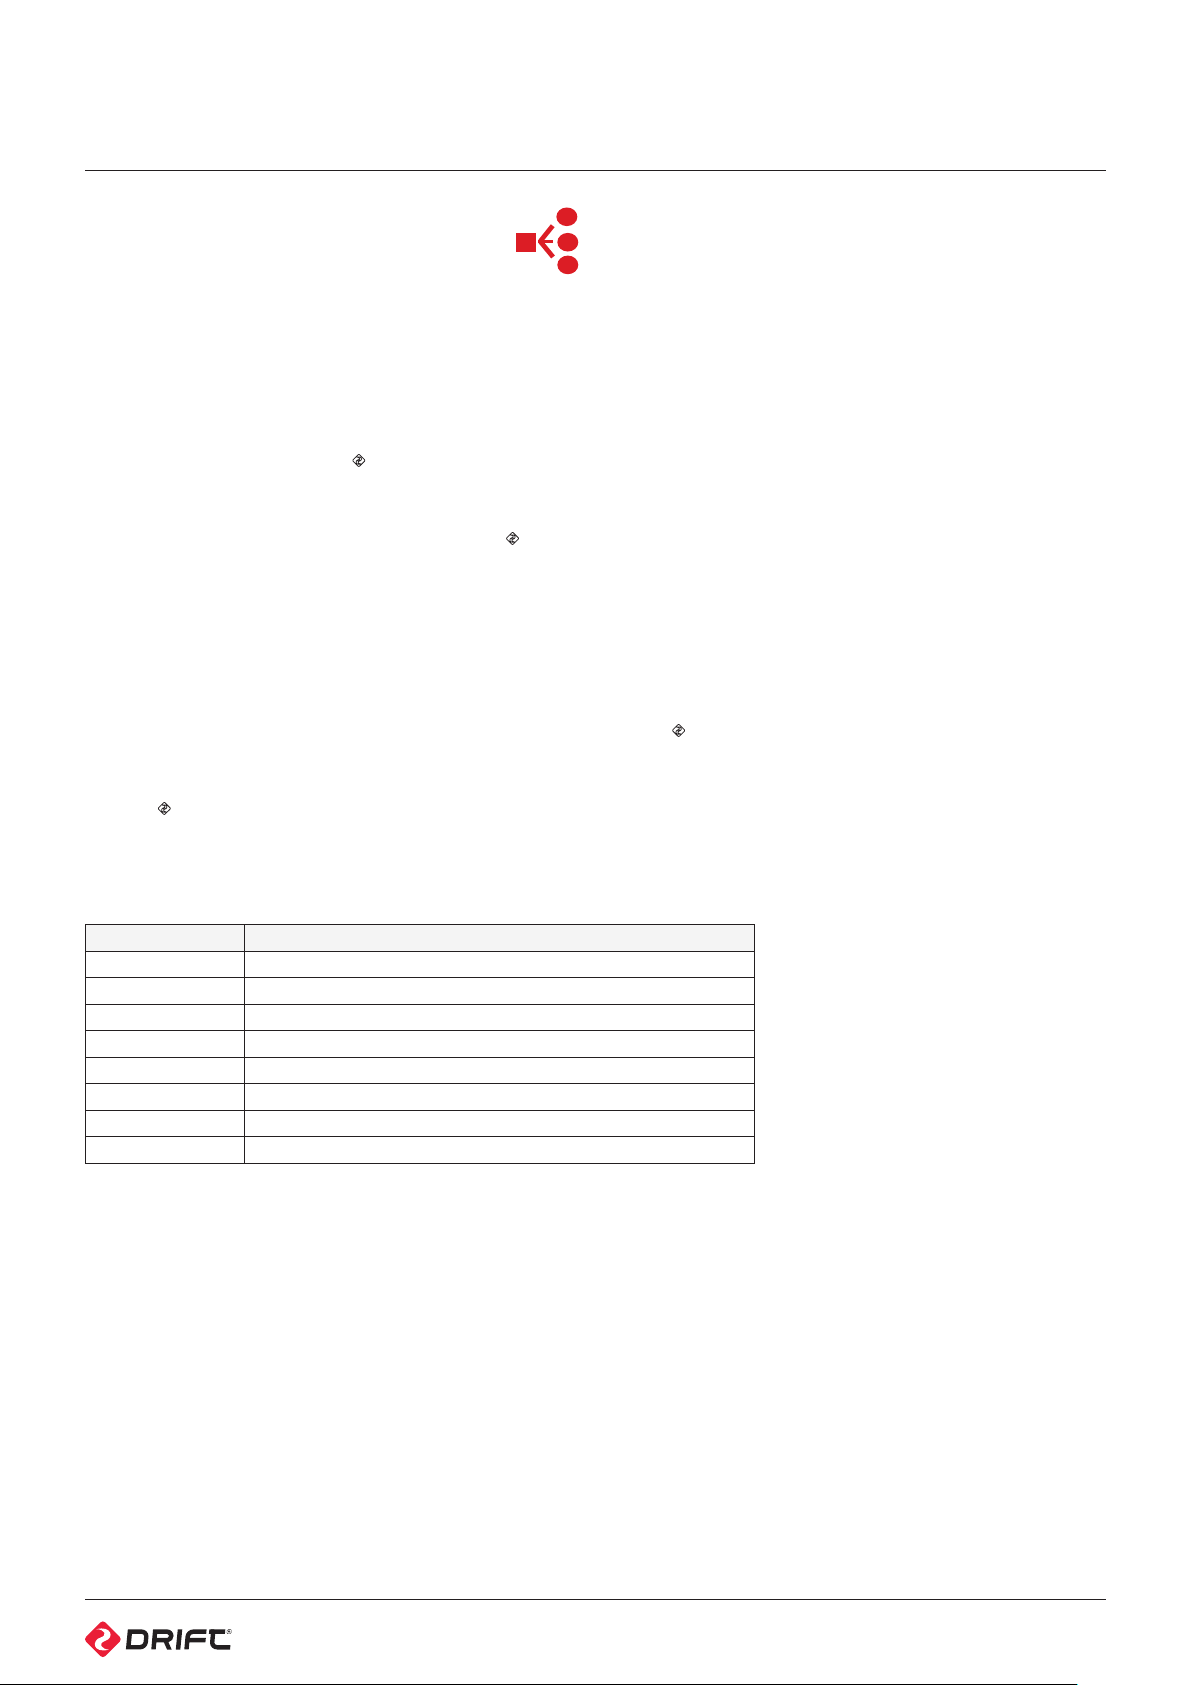
The remote contol indicator lights will show white to indicate the remote control
is paired to multiple cameras.
LED Status Description
Rapid Blinking Red Less than 15% battery life remains
Blink Red Once Taking a photo (Photo, Timelapse and Photoburst Modes)
Blinking Red Recording video (Video Mode)
Blinking Blue When the camera receives a signal from the remote control
Blinking Green Camera is in Video Mode
Blinking Yellow Camera is in Photo Mode
Blinking Purple Camera is in Timelapse Mode
Blinking Cyan Camera is in Photoburst Mode
14
Page 15
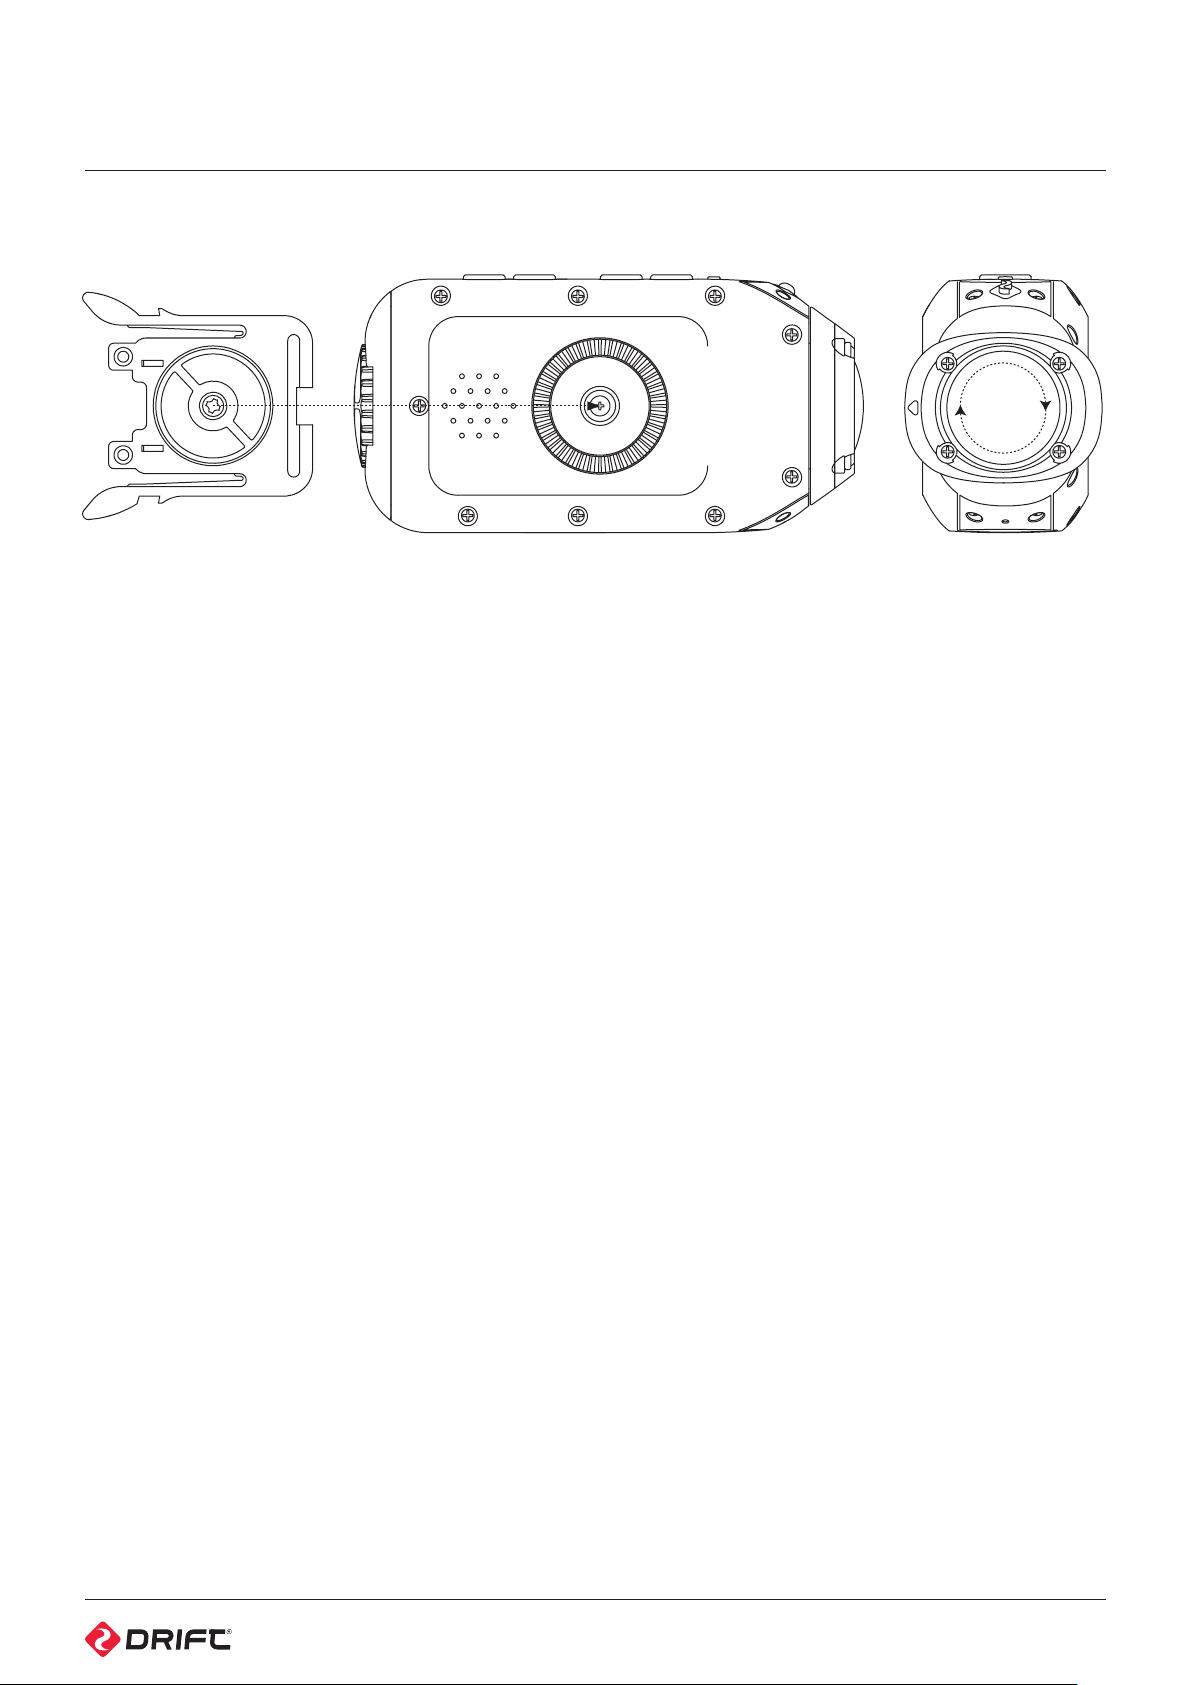
shot setup
Fixing the camera to the Universal Clip
1. Align the screw of the universal clip with the thread on the underside of the
camera body
2. Twist the screw thread in a clockwise direction
3. As the universal clip tightens against the body of the camera, rotate the
camera to provide the desired angle of attachment, holding the clip in place
4. Tighten the screw on the universal clip until it fits firmly against the camera
body
Closing the rear hatch
1. Ensure the directional arrow “up” indicator is pointing up towards the buttons
2. Use the notch in the universal clip to tighten the screw on the rear hatch
! Failure to completely seal the rear hatch for water-based applications will result
in permanent damage to the camera (see p3).
Mounting the camera to a Drift mount
Included with the camera are several Drift mounts which will help you find the
shot you want.
Mounting the camera on goggles
1. Attach the Goggle Mount to the strap of your goggles
2. Slide the camera (with universal clip attached) into the mount until the two
arms on the clip click into place
Mounting the camera on a helmet
1. Position the Curved Surface Mount against your helmet to find the optimum
mounting position
2. Ensure the mounting surface is clean, dry and free of oil and dust
3. Remove the cover of the mount’s 3M adhesive and fix the mount to the
helmet—allow 24 hours to cure
4. Slide the camera (with universal clip attached) into the mount until the two
arms on the clip click into place
Fixing the camera to the standard ¼” thread
Thread the camera onto a tripod, or any other mount with a standard camera
thread, turning the camera body on the thread clockwise to secure.
! However you choose to mount your camera, ensure that the camera is fitted
firmly to reduce the risk of losing it. Give it a tug before you set out.
Lens Rotation
In order to maximise your mounting
options, the camera lens is rotatable
through 300°, allowing for the perfect
shot from even the most awkward of
positions.
Whilst holding the camera body in
one hand, use the index finger and
thumb of the other hand to hold the
camera lens firmly, then twist the
lens to the desired angle. The arrow
indicator above the lens indicates ‘up’
and corresponds with the top of the
display in Live Preview.
! Be sure to rotate the lens back to
the 0° position (so the ‘up’ indicator
on the lens is aligned with the
LED indicator on the camera, and
the edge of the lens is flush with
the body of the camera) before
mounting, or removing the camera
from a mount to reduce the risk of
damage to the lens.
Zoom
The Drift HD Ghost includes a digital
zoom function that allows you to take
close-up photo and video.
While in Live Preview, or while
recording video, press and hold the
RIGHT button to zoom in, and the
LEFT button to zoom out.
15
Page 16

connectivity
Recorded video footage and photos can be copied to a computer using the USB
cable provided or—if your computer has an appropriate card reader—directly
from the micro WVGA card.
Connecting to a Windows PC by USB cable
1. Connect the camera to your PC using the USB cable—the camera screen will
display a USB logo and the LED status indicator will blink red.
2. Your PC’s operating system may be setup open new devices automatically; if
not, open My Computer
3. Your PC should recognise the camera as a removable device—look for DRIFT
CARD in the list of devices and open
4. Open the DCIM folder—inside, you will find the 100DRIFT folder which
contains all the files saved on the memory card by the camera.
! If there are a very large numbers of files, there will be multiple folders
(100DRIFT, 101DRIFT, etc)
5. Copy the desired files to your PC
Connecting to a Mac by USB cable
1. Connect the camera to your Mac using the USB cable—the camera screen will
display a USB logo and the LED status indicator will blink red.
2. Your Mac’s operating system may be setup open new devices automatically; if
not, open a new Finder window
3. Your Mac should recognise the camera as a removable device—look for DRIFT
CARD in the list of devices and open
4. Open the DCIM folder—inside, you will find the 100DRIFT folder which
contains all the files saved on the memory card by the camera.
! If there are a very large numbers of files, there will be multiple folders
(100DRIFT, 101DRIFT, etc)
5. Copy the desired files to your Mac
Connecting the camera to a TV
1. While the camera is turned o, connect it to your TV using a Mini HDMI cable
(not included)
2. Power on the camera
3. Once booted up, the image usually displayed on the camera’s LCD screen will
instead be displayed directly on your TV, and the sound will come out of the
TV speakers
4. Press MENU to cycle through camera modes while connected to a TV.
Playing video on a computer
Some computers may not have the
correct codecs required for video
playback and editing.
If you experience diculties playing
video recorded with your camera, you
can download VLC media player for
free from ww w.videolan.org.
If you are experiencing diculties
editing video or do not wish to use
VLC player for playback, you will need
to download and install a codec pack.
The FFDshow codec pack can be
downloaded from www.free-codecs.
com/FFDshow_download.htm.
Recommended System Requirements
To smoothly view and edit 1080p video,
powerful hardware is required:
Windows
• 3.2 GHz Pentium 4 processor or
higher
• At least 2GB of RAM
• Graphics card with at least 256MB
of video RAM (512MB for video
editing)
• Direct X 9.0c or later
• Microsoft Windows XP (SP2 or
later), Windows Vista or Windows 7
Macintosh
• 2.2 GHz Intel Core Duo or higher
• At least 1GB of RAM
• Graphics Card with at least 256MB
of video RAM (512MB for video
edition)
• Mac OS X v10.4.11 or later
16
Page 17

conserving battery
The HD Ghost comes with a rechargeable 1700mAh Lithium-Ion battery, allowing
you to record continuously for hours between charges. However, sometimes you
may find yourself in a location without a power outlet to charge your camera. If
you’re outside, cold conditions can drain battery power at a faster rate than usual.
Fortunately, the HD Ghost comes with a number of features to conserve the
battery life. These can all be found in the Camera Settings menu.
LCD O
The camera’s LCD screen consumes power, so one of the best ways to
extend battery life is to use the ‘LCD O’ feature. By default, LCD screen will
automatically power o after 20 seconds (the time interval can be chosen when
selecting ‘LCD O’ from the Camera Settings menu).
The camera will still function as normal when the screen is o: in Live Preview,
the camera is ready to record at any time; and if recording is in progress, the
camera will continue to record. The remote can also be used while the screen is
o. The screen can be turned back on again at any time by pressing any button.
LCD Brightness
The LCD screen is backlight, and this too consumes power. It is possible to
reduce the intensity of this light by adjusting the ‘LCD Brightness’ setting in the
Camera Settings menu—you will notice a slight increase in battery life if you use
a lower brightness setting.
Camera Auto O
It is possible to set the camera to power o entirely when no buttons are pressed
for a number of minutes (the duration can be chosen selecting ‘Camera Auto
O’ from the Camera Settings menu). This can be useful to reduce battery
consumption if the camera is accidently left powered on.
! The camera will not power o while recording is in progress. However,
once the camera has powered o, you will need to power it on again before
capturing any footage.
! The remote control will not operate the camera while the unit is powered o.
Spare batteries
You can also charge a second battery
before you set out and then swap it
when the first is empty. Spare 1700mAh
Ghost batteries and Power Packs are
available from ocial Drift retailers.
Please visit driftinnovation.com for more
information and where to purchase.
! Always change the battery in a
clean, dry and safe environment.
Getting camera batteries wet will
damage them and may result in
injury to yourself. For your own
safety, never use damaged batteries.
17
Page 18

updating firmware
The Drift HD Ghost should always be operated on the latest firmware available,
downloadable from http://www.driftinnovation.com. Be sure to check back
often for updates as we will continue to add features and options to your
camera after you purchase it
We have refined how we update the firmware on the HD Ghost and it can be
done easily by following the simple steps below which are
1) Go to www.driftinnovation.comn and download the latest firmware file (‘’HD_
Ghost.bin’’) which will be found easily in the Drift HD Ghost section, or by
navigating to ‘Firmware’ listed in the bottom footer of any page
2) Plug your Drift HD Ghost unit into your computer (MAC or PC) using the
supplied USB cable
3) Your camera should come up as an External Device with the ‘’Drift Card’’
Micro SD card being visible as a storage device (see connectivity p16). Please
copy the ‘’HD_Ghost.bin’’ firmware file into the root folder of the ‘’Drift Card’’
Micro SD card
4) Safely eject your Drift HD Ghost and Micro SD as a storage device from your
computer
5) Power on the camera and wait for it to automatically update itself. You will get
a “Firmware update in Progress” message, and the LED status indicator will
blink red. This should take a few seconds and the camera will automatically
power o after
6) Navigate to the settings menu and check the “Firmware Version” to ensure the
firmware has been successfully updated
18
Page 19

camera care
The HD Ghost is specifically designed for extreme sports. It is a very durable
piece of equipment. However, to ensure a long and healthy life for your camera,
please follow the guidelines below.
Cleaning the camera
During your sporting activities, the camera will inevitably get dirty or wet.
Although this is not an issue, it is recommended that you clean the camera
after each use. Clean the camera thoroughly with a damp cloth and let it air dry
before you open the back hatch or rotate the lens. Take extra care when cleaning
the built-in microphone and speaker.
Cleaning the lens and LCD screen
In order to provide a clear image for high definition video, it is important to keep
the camera lens clean. Be careful not to scratch the camera lens whilst cleaning
it. Wipe o any surface mud or water from the lens with a damp cloth and use a
dry, micro fibre, scratch proof cloth to polish the lens once it is dry.
Cleaning the seals
To ensure that the camera remains waterproof, it may be necessary to
occasionally clean the contact surfaces around the rear hatch seal. This can be
done by wiping a damp cloth around the seal. Be careful not to leave excessive
water on the seal, then let it air dry.
! Scratch proof cloths are available from any camera shop or optician.
19
Page 20
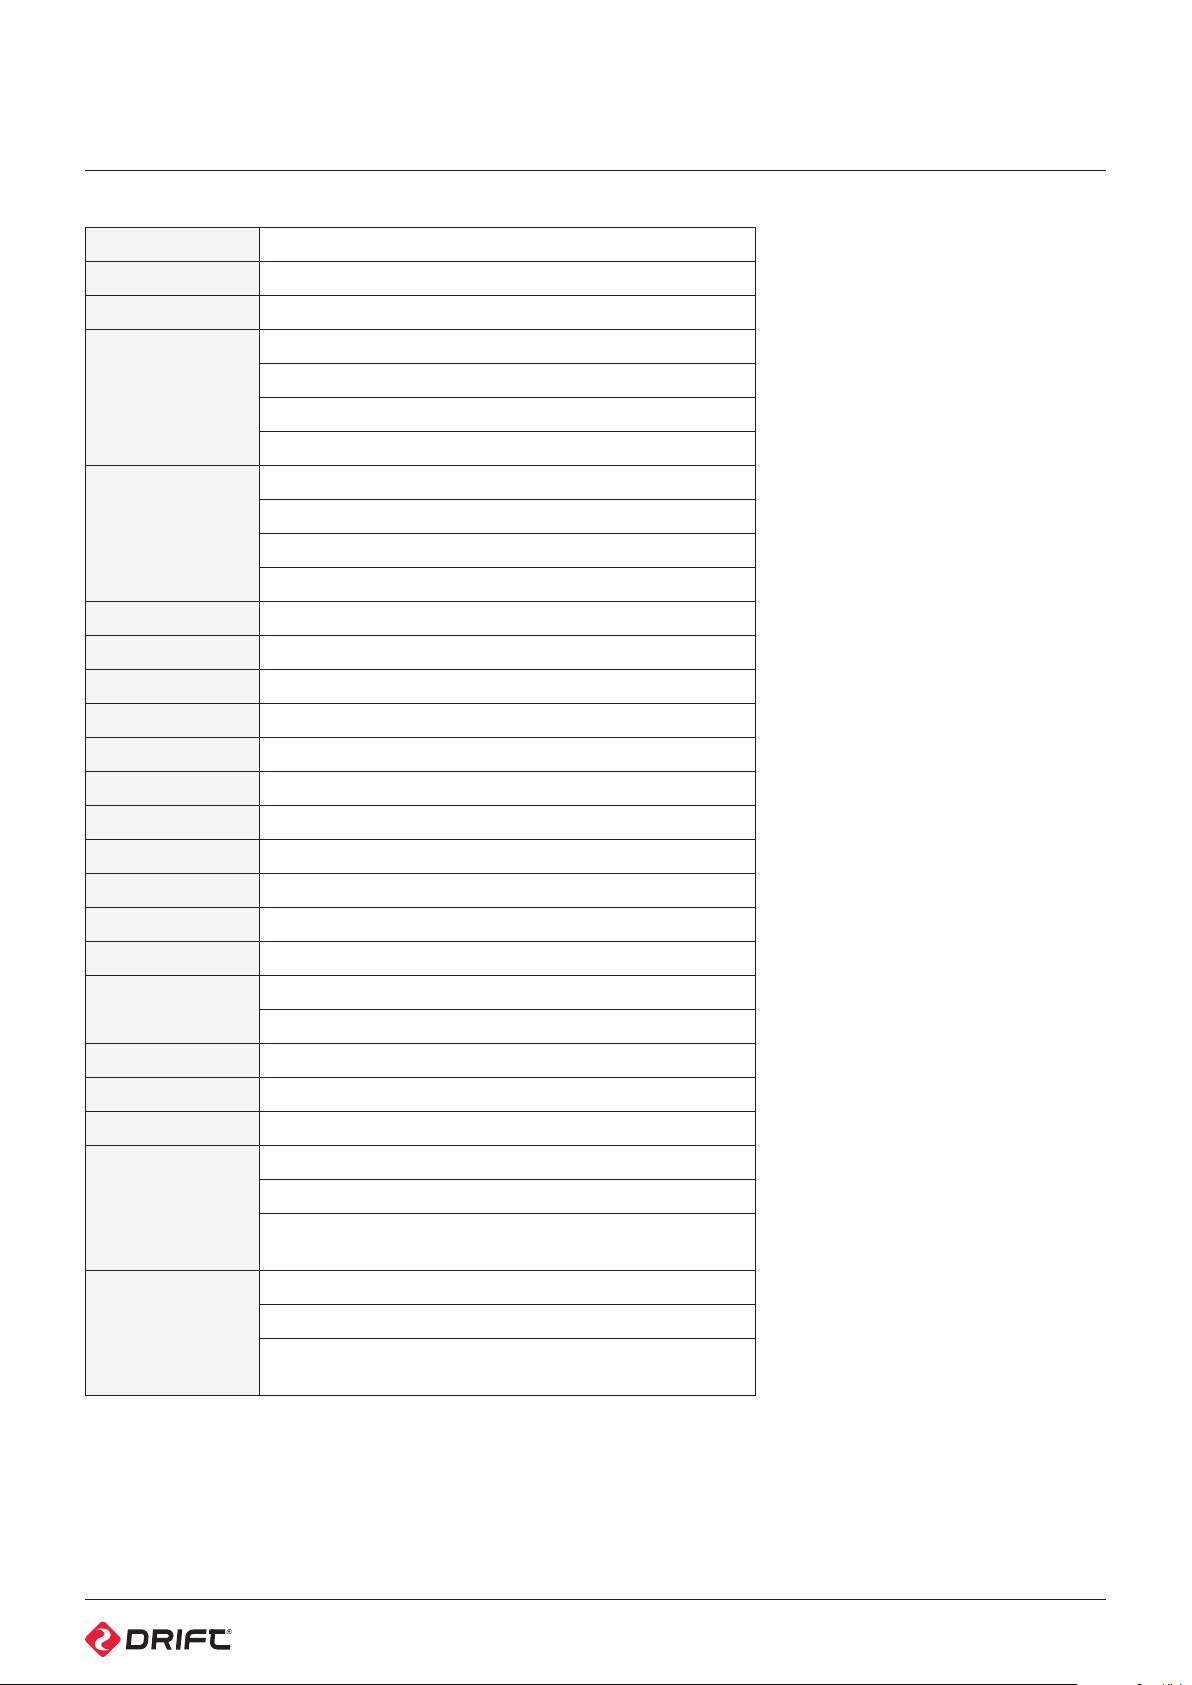
technical specifications
Video resolution 1080p, 960p (4:3), 720p and WVGA (16:9)
File format .MP4 / .MOV (H.264 codec)
Sensor type CMOS
1080P: 25 / 30 fps
Frame rate
Field of view
Lens focal range 0.5m to infinity
Lens rotation 300°
Zoom ×10 (digital)
Photo mode 5 / 8 / 11 megapixels
Exposure Auto / Manual (advanced users)
LCD Screen 2.0” colour TFT
Waterproof 3m (9.84ft)
Microphone Built-in, noise reducing microphone
Built-in memory 256MB (not user accessible)
Memory capacity Micro SD memory cards up to 32GB
Inputs 3.5mm external microphone (extension included)
960p: 25 / 30 / 48 fps
720p: 25 / 30 / 50 / 60 fps
WVGA: 25 / 30 / 50 / 60 / 100 / 120 fps
1080p: 90° / 127° / 170°
960p: 170°
720p: 170°
WVGA: 170°
Outputs
Compatibility Windows XP and up / Mac OS 10.2 and up
Remote range 10m (32ft)
Radio frequency 2.4G
Camera
Remote control
HDMI connector type C (cable not included)
USB Plug and Play, mini-B USB connector
Dimensions: 105 (L) × 52 (W) × 33 (D) mm
Weight: 167g
Power: 1700mAh rechargeable lithium-ion battery
(included) (DC 3.7V)
Dimensions: 59 (L) × 48 (W) × 12 (D) mm
Weight: 22g
Power: 350mAh rechargeable lithium-ion battery
(DC 3.7V)
20
Page 21

warranty
Drift Innovation (“Manufacturer”) warrants to the original End User (“Purchaser”)
that this product purchased from us or any authorized dealer is free from
manufacturing defects in material and workmanship for the applicable warranty
period, as set forth in the product specification, or 12 months—whichever is the
less. Drift Innovation products purchased from non-authorized dealers might not
be covered by the oered warranty. The warranty period is considered valid from
the issue date confirmed on the sale invoice.
This limited warranty covers defects encountered in the normal use of the
product during the warranty period and does not apply under the following
conditions:
• Product is damaged due to physical abuse, mishandling, accident, negligence
or failure to follow the supplied operating instructions;
• Product is physically modified by Purchaser in any manner other than that for
which it was intended or otherwise previously approved by the Manufacturer;
• Product is damaged or has developed defects caused by the use of
unauthorized parts or by an unauthorized repair service;
• The product has been subject to unsuitable operating or physical conditions
outside those recommended in product specifications as provided by the
Manufacturer;
• Product has it’s serial numbers altered or removed
• Product is damaged due to improper packaging of the warranty return to the
dealer or Manufacturer.
In the event of a product failure under normal use and within the warranty
period, a repair or replacement will be provided at the discretion of the
Manufacturer or the authorized dealer. The Manufacturer warranty does not
cover loss, accidental damage or costs incurred during the handling and
shipping of repairs or replacement products.
The Manufacturer shall have no liability or responsibility whatsoever to Purchaser
or any other person for any loss, injury, death, or any damages derived from the
use of the product or accessories.
Service
To obtain our warranty service, register
your product at driftinnovation.com.
Customer Support
• Check driftinnovation.com for
firmware updates, product updates
and user videos.
• We are here to help you make the
most of your HD Ghost camera;
if you have any suggestions,
comments or complaints, please visit
the support section of our website—
support.driftinnovation.com—or
contact our customer support team
on [email protected].
21
Page 22

disclosures
FCC Information
This device complies with Part 15 of the FCC Rules.
Operation is subject to the following two conditions:
1. This device may not cause harmful interference, and;
2. This device must accept interference received, including interference that may
cause undesired operation.
Warning
Changes or modifications to this unit not expressly approved by the party responsible
for compliance could void the user’s authority to operate the equipment.
The equipment has been tested and found to comply with the limits for a Class
B digital device, pursuant to Part 15 of the FCC Rules. These limits are designed
to provide reasonable protection against harmful interference in a residential
installation. This equipment generates, uses, and can radiate radio frequency
energy and, if not installed and used in accordance with the instructions,
may cause harmful interference to radio communications. However, there is
no guarantee that interference will not occur in a particular installation. If this
equipment does cause harmful interference to radio or television reception, which
can be determined by powering the equipment on and o, the user is encouraged
to try to correct the interference by one or more of the following measures:
• Reorient or relocate the receiving antenna;
• Increase the separation between the equipment and the receiver;
• Connect the equipment into an outlet on a circuit dierent from that which
the receiver is connected;
• Consult the dealer or an experienced radio / TV technician for help.
Industry Canada Information
This device complies with Industry Canada license-exempt RSS standard(s).
Operation is subject to the following two conditions:
1. This device may not cause interference, and;
2. This device must accept any interference, including interference that may
cause undesired operation of the device.
This Class [B] digital apparatus complies with Canadian ICES-003.
Cet appareil s’accorde avec Industrie Canada licence-exempte RSS standard.
Son fonctionnement est soumis aux deux conditions suivantes:
1. Cet appareil ne peut pas causer l’intervention, et;
2. Cet appareil doit accepter de l’intervention, y compris l’intervention qui peut
causer l’opération non désirée de.
Cet appareil numérique de la classe [B] est conforme à la norme NMB-003 du Canada.
Cet appareil s’accorde avec Industrie Canada licence-exempte RSS standard.
FCC RADIATION EXPOSURE
This equipment complies with FCC radiation exposure limits set forth for an
uncontrolled environment . This equipment should be installed and operated with
minimum distance 20cm between the radiator & your body.
This transmitter must not be co-located or operating in conjunction with any other
antenna or transmitter.
Motorcycle Disclaimer
Interacting with the camera while riding
could cause a crash and you or others
may be seriously injured or killed.
• Keep your eyes and mind on the road;
• Avoid looking at the camera for
too long;
• Stop the vehicle in a safe location
before adjusting the camera.
22
 Loading...