

Page 1

Owner’s Manual
WARNING
Dragon Mobile Furnace
Model F507
DRI-EAZ PRODUCTS, INC.
15180 Josh Wilson Road, Burlington, WA 98233
Phone: 800-932-3030 Fax: 360-757-7950 www.Dri-Eaz.com
The Dragon Mobile Furnace is an indirect fired furnace provi ding heated ai r for water damage restoration,
structural drying, construction, event shelters and other temporary heating applications.
READ AND SAVE THESE INSTRUCTIONS
Safety Information
Read this document carefully to learn how to properly
operate and service your Dragon Mobile Furnace. This
manual should be kept with the unit and remain with the
Dragon for the life of the product.
WARNING! Do not alter or modify your Dragon in
any way. Use only replacement parts authorized b y
Dri-Eaz Products, Inc. Modifications or use of
unapproved parts could create a hazard and will
void your warranty. Contact your authorized Dri-Eaz
distributor for assistance.
WARNING! Failure to comply with the instructions
and precautions provided in this Owner’s Manual
can result in death, serious bodily injury, and/or
property loss or damage from hazards of fire,
explosion, burn, asphyxiation, carbon monoxide
poisoning, and/or electrical shock.
WARNING! Check the Dragon for proper air-to-fuel
ratio at each location. Failure to adjust for altitude
changes could cause injury, permanent dam age to
the unit and secondary damage when ducting into a
structure. It may also void the Dri-Eaz warranty.
Refer to “Adjusting for Altitude,” p. 5, for
instructions.
• Do not stand closer than 8 ft. (2 m) from the outlet of
the heater. Do not lean or sit on the heater.
• Keep children and pets away.
• Make sure there is sufficient air circulation around
the unit during operation.
• Only do repair and maintenance after the heater has
cooled sufficiently and the heater is disconnected
from the electric power.
WARNING! Fire and Explosion Hazard
• Burner produces sparks and flame and unit
becomes hot during use. Hot surfaces can ignite f uel
vapors.
• Keep away from flammable vapors, such as tho se
from gasoline, paint thinner or solvents.
• Keep all flammable material away from the heater,
including combustible dusts, such as coal dust or
sawdust.
• Keep unit at least 8 ft. (2 m) away from any combustible material.
• Diesel fuel is flammable and can be explosive.
• Do not smoke while operating, servicing, or ref uel i ng
the Dragon.
• Before refueling, turn the unit off, allow it to cool, and
then unplug.
WARNING! Electric Shock Hazard
• Unit must be grounded. Use only with 3-hole
grounded outlet.
• Never modify plug or use an adaptor. If an extension
cord is needed, it must have a three-prong
grounding plug and be rated for outdoor use.
• Never operate the Dragon in pooled or standing
water. If electrical components become wet, allow
them to dry before using.
WARNING! Breathing Hazard. Fuel exhaust contains
deadly carbon monoxide gas. Operate the Dragon
only outdoors in open area. NEVER operate indoors
or in enclosed spaces.
07-01810A 2012-10 Warranty 07-00424 1 Dri-Eaz Products, Inc.
Page 2

•
conditions. Use of the the external fuel pickup can
extend continuous operation up to 72 hours.
OVERVIEW
Introduction
The Dragon Mobile Furnace is an indirect fired heater.
This design keeps combustion air separate from heated
air and allows the Dragon to heat air without adding any
moisture, fumes or smoke. An electric fan directs heated
air into the structure through ducting. The remote
thermostat automatically cycles the Drag on on and off to
maintain a preset temperature in the target area.
Principles of Use
The clean, dry heat from the Dragon helps redu ce drying
times while maintaining stable and comfortable
temperatures. The Dragon is ideal for wide range of
applications, including
• water damage restoration
• new construction drying
• unheated jobsites
• temporary event shelters
• workshops, storage rooms, and warehouses
• greenhouses and polyurethane tunnels for
agriculture
• any situation calling for clean, dry temporary heat
For use in water damage restoration and new
construction drying, the Dragon can increas e drying
efficiency. The added heat from the Dragon will increase
the rate of evaporation by decreasing the relativ e
humidity of the affected area. Raising the temperature of
a drying area with the Dragon from 60° to 70°F can
increase the evaporative potential of your exi st ing drying
system up to 45 percent.
NOTE: The fuel lines must be adapted for use wit h the
external fuel pickup. See “Modifiying the Dragon for use
with the Fuel Pickup,” p. 7, for instructions.
The Dragon is designed to operate on no. 2 diesel. In
cold weather, you may add kerosene to the diesel as
described under “Cold temperature recommendations,”
below.
WARNING: Failure to use diesel fuel or a dieselkerosene mixture as specified could cause injury
and permanent damage to the unit. It may also void
the Dri-Eaz warranty.
For best results, purchase fresh fuel from a reli abl e fuel
oil distributor. Keep the Dragon fuel tank full to help
prevent the formation of condensation inside the tank.
When not using the Dragon for extended periods of ti m e,
consider the addition of a diesel fuel stabili zer to the fuel,
available at most automobile parts stores.
Cold temperature recommendations
In temperatures below 23°F (−5°C), diesel tends to
thicken and may block the fuel filters. To improve fuel
flow characteristics in cold temperatures, a mixture
containing up to 15% kerosene may be used. The
Dragon may be operated with higher percentages of
kerosene up to 100% kerosene, but may require special
adjustments. Contact Dri-Eaz Service at 800-932-3030
for instructions.
To adjust for proper combustion and for use at high
altitudes, see “Adjusting for Altitude,” p. 5.
For best results when using the Dragon for restoration,
you should understand the basic principles of structural
drying. You can learn these skills in an IICRC-certified
Applied Structural Drying (ASD) course. To learn more
about ASD courses, contact the Dri-Eaz Education
Department at 800-932-3030.
Electrical requirements
The Dragon Mobile Furnace is designed to operate
on a 115V/60 Hz electrical connection. The unit requi res
10 amps. Make sure that the electrical outlet is a three
prong type grounded outlet. When using with an
extension cord, use only a grounded cord intended for
outdoor use and rated to deliver enough power to the
Dragon.
Run time and fuel type
The Dragon Mobile Furnace can operate for approximately 13.5 hours on the built-in tank, depending on
07-01810A 2012-10 Warranty 07-00424 2 Dri-Eaz Products, Inc.
Page 3

KEY
E. Control Panel
A. Air intake
F. Fuel fill and cap
B. Furnace exhaust flue
G. Fuel lev el indicator
C. Fuel filter and fuel line connectors
H. Fuel tank drain plug (not shown)
D. Heated air outlet with 12 in. duct mounting r ing
J. Heater access panel
Figure 1: Parts Identification
B
D
F E G
J
A
C
OPERATING THE DRAGON
Before First Use
Some assembly is required before using the Dragon.
See “Assembly Instructions,” p. 8.
Use of the Dragon with an external fuel tank (sold
separately) can significantly extend the run time.
Converting the Dragon for use with an external tank
requires a one-time modification of the external fuel line
connections. See “Modifying the Dragon for use with the
External Fuel Pick-up,” p. 7 for instructions.
Choosing a location
WARNING! Use the Dragon outdoors only. Place the
unit on a level, stable surface. Be sure to chock the
trailer wheels securely to prevent the unit from
rolling. Choose a location away from high-traffic
areas, children and pets, and ensure there are no
obstructions to the air intake.
CAUTION: Keep air intake vents clean and cl ear of any
obstruction. Avoid setting up unit in a location where the
intake could be blocked or restricted. Blocking t he air
intake will cause the unit to produce sooty exhaust,
potentially damaging the unit and the structure being
heated.
NOTICE: Install and operate the Dragon in ac cor dance
with all local and regional regulations. In Canada, refer
to CSA B139 and CSA B140-1962.
Fill the fuel tank
The Dragon is shipped with the fuel tank empty. Before
operating, fill the tank with no. 2 diesel or fuel oil. In cold
conditions, a diesel-kerosene mixture as described on
p. 2 may be used. The tank has a 13.5 gal. (51 L)
maximum capacity. Do not overfill.
CAUTION: Do not put gasoline, motor oi l , or any other
product in the fuel tank.
CAUTION: Do not fill the tank while the uni t is operating.
07-01810A 2012-10 Warranty 07-00424 3 Dri-Eaz Products, Inc.
Page 4

FAILURE
Figure 2: Dragon Controls
Power cord
Thermostat remote
socket.
Fuel fill cap
Fuel gauge
Red light
indicates system
fault. See
Troubleshooting,
p. 7.
OVERHEAT
Amber light
indicates an
excessive
internal temp.
Fan will run
until unit is cool.
See Troubleshooting, p. 7.
WORKING
Green light
indicates normal
operation. See
Troubleshooting,
p. 7.
RESET
Press to restart
after system
failure.
control cord
POWER
Provides power
to unit.
START
Press to start
burner.
Attaching ducting to the Dragon
The Dragon is supplied with one 25 ft. length of 12 in.
diameter (7.6 m × 30 cm) high-temperature ducting. This
ducting is used to direct the heat produced by the
Dragon into the structure. To attach the ducting to the
Dragon, locate the end of the ducting with the sewn-in
cuff and buckle. Attach the ducting to the hot air outlet
(Fig. 1) and secure it with the quick-connect duct clamp.
NOTE: If the duct clamp is too tight or too loose, adjust
the clamping force of the quick-connect duct clamp by
turning the clamp screw with a small screwdriv er.
Place the other end of the ducting into a suit abl e i nlet in
the structure. For best air flow rates avoid tight bends in
the ducting.
Securing ducting to the structure
In most drying situations you will need to attach the end
of the ducting to an opening in the structure such as a
basement window or crawlspace vent block. Since each
structure is unique, you will usually need t o bui l d an
adapter to fit the specific opening.
Operating the Dragon
Inspecting before operation
WARNING! Before starting the Dragon:
• Check for any fuel leaks around the fuel tank or fuel
lines.
• Check for nearby hazards like combustible mat erials
or flammable vapor sources.
• Check the power cord for damage.
Correct these and any other safety hazards before
starting the Dragon.
Starting the Dragon
1. Check the fuel tank. If needed, add diesel fuel to the
fuel tank. Do not overfill. See “Fuel Type,” p. 2, for
recommended fuels.
2. With the ducting secured to the hot air outlet, plug the
power cord into a suitable 115V outlet.
3. If you are using the remote thermost at, place the
thermostat sensor in the target area. See “Using the
Remote Thermostat” for instructions. To prevent
overheating of the drying environment, we
recommend using the thermostat at all times.
07-01810A 2012-10 Warranty 07-00424 4 Dri-Eaz Products, Inc.
Page 5

4. Press the Power switch to the on position.
Fig. 3: To adjust for
“4” mark.
5. Press the Start switch to the on position.
The unit will begin operation.
CAUTION. Monitor the settings on the D ragon and
conditions in the structure at least once a day during
operation.
Controlling the temperature
The Dragon is supplied with a remote thermostat that
can be used to control the temperature in the target
area. To use the Dragon in thermostat mode, first plug
the thermostat cord into the socket in the control panel
(Fig. 2). Then set the desired temperature on the
thermostat control for a maximum of 100°F (38°C) and
place the control in the target area.
To prevent overheating of the drying environment, we
recommend using the thermostat at all times.
Special Instructions
Adjusting for Altitude
The combustion air intake control for the furnace is
factory set for operation at sea level. To assure proper
operation and maximum performance at higher altitudes,
it may be necessary to adjust the combustion air/fuel
mixture.
The best guide to proper air/fuel mixture is exhaust
color. The Dragon exhaust should always be clear.
Black or white smoke indicates an improper ai r/fuel
mixture:
a) If the exhaust is clear, no adjustment is needed.
b) If the smoke is dark or black, there is not enough air
in the mixture.
c) If the smoke is white, there is too much air and not
enough fuel in the mixture, or there is water in t he fuel.
Shutting the Dragon Off
First, switch the START button to the “Off” position. If the
unit is still warm, the fan will run for approxi m ately 1½
minutes to cool down the unit. When the fan turns off,
turn the POWER to the “Off” position.
CAUTION: Do not unplug the unit or otherwise turn off
the power until the fan stops operating. Failure to let the
unit complete the cooling cycle could damage t he heat
exchanger and will not be covered under warranty .
altitude: Use air
adjust-ment collar.
Loosen bolt and slide
collar to adjust.
Factory setting is the
If the smoke color is either black or white, follow
these steps to adjust the air/fuel ratio.
1. Open the access cover by removing the screws. Lift
cover and set aside. The hood is hinged on one side.
2. The AIR ADJUSTMENT COLLAR is located on the
burner assembly. The factory setting is 4. See Fig. 3.
3. Loosen the adjustment nut and slide the collar in the
appropriate direction:
a) A lower number corrects for black smoke (allows
more air into the combustion chamber);
b) A higher number corrects for white smoke (allows
less air into the combustion chamber).
4. Tighten the shutter adjustment s cre w, replace the
hood, secure hood with the sheet metal screws.
Restart the unit and check for proper operation.
WARNING: Replace access cover to test after each
adjustment. Do not operate the unit without the hood
securely in place as serious injury could r esult.
NOTE: If the exhaust remains white even when adjusted
to the 10 mark, there is probably water in the fuel. You
may need to replace the fuel filter and/or clean the fuel
tank (p. 6).
Always adjust the Dragon so that it produces clear
exhaust.
07-01810A 2012-10 Warranty 07-00424 5 Dri-Eaz Products, Inc.
Thermal overload protection
The remote thermostat provided with the Dragon is
factory set to limit the maximum room temperature to
100°F (38°C). We recommend that you always use the
thermostat, as this can help to prevent overheating of
and possible damage to the drying environment .
For additional safety, the Dragon is fitted wit h an internal
high temperature limit switch. If the heat exchanger
reaches 356°F (180°C), the limit switch will shut down
the Dragon and the OVERHEAT light will glow amber
(Fig. 2). In this case, the burner will automatically turn off
Page 6
and the fan will continue to run until the unit cools. The
Flame
Dragon will not operate until the OVERHEAT l i ght goes
out and the RESET switch is pressed.
d. Replace the fuel drain plug.
e. Dispose of waste fuel in accordance with local
regulations.
To restart the Dragon after a thermal overload fault
shutoff, press in the red RESET button (Fig. 2). The
Dragon may now be started. See “Starting the Dragon,”
p. 4.
If the unit will not start after pressing the RESET button,
contact the Dri-Eaz Service Department at
800-932-3030 for assistance.
NOTE: The most common cause of thermal overload
is restricted airflow. To help prevent thermal overload,
you should
• Make ducting runs as straight and short as possible
• Keep the ducting free of debris and unobstru ct ed
• Keep the air intake grill unobstructed
Restarting after running out of fuel
If the Dragon runs out of fuel, a fuel cutoff sensor will
automatically shut the heater off and the red FAILURE
light (Fig. 2) will glow. The fan may continue to cycle on
and off until cooling is completed.
Refuel the Dragon, switch on POWER and press
START. It may require several tries until sufficient fuel is
drawn through the fuel line.
Tip: If the unit will not restart after several attempts,
contact Dri-Eaz Service at 800-932-3030.
NOTICE: You should continue to physi cally check the
Dragon at least once a day during operation. Observe
the exhaust smoke to ensure that it is clear. If the
exhaust is not clear, see “Adjusting for proper
combustion,” p. 5, for instructions.
NOTICE: Always use clean, fresh fuel and a trusted fuel
source to help prevent problems with fuel contamination.
Be sure to replace the fuel tank cap to prevent moisture
and other contaminants from getting into the fuel.
WARNING! Diesel fuel and diesel/kerosene mixtures
are flammable and potentially explosive. Always turn
off and unplug the Dragon before draining the fuel
tank. Do not smoke while draining fuel. Keep away
from open flame.
2. Replace the fuel filter
Replace the fuel filter once a year. Replacement fuel
filters may be purchased from Dri-Eaz, 800-932-3030.
The filter is a spin-on type and is located inside t he right
side cabinet behind the control panel. Have rag s or
paper towels on hand to clean up any spills, and dispose
of the filter and waste fuel according to local regulat i ons.
3. Servicing the burner.
To ensure proper operation, service of the burner should
be conducted by a qualified HVAC technician once a
year or at the beginning of the heating season in y our
area.
4. Servicing the heat exchanger
In time, soot may accumulate in the the heat exchanger.
To ensure proper operation, this component should be
inspected once a year and cleaned if necessary by a
qualified HVAC technician. Contact your local distribut or
or the Dri-Eaz Service Department at 800-932-3030 for
the location of a service center near you.
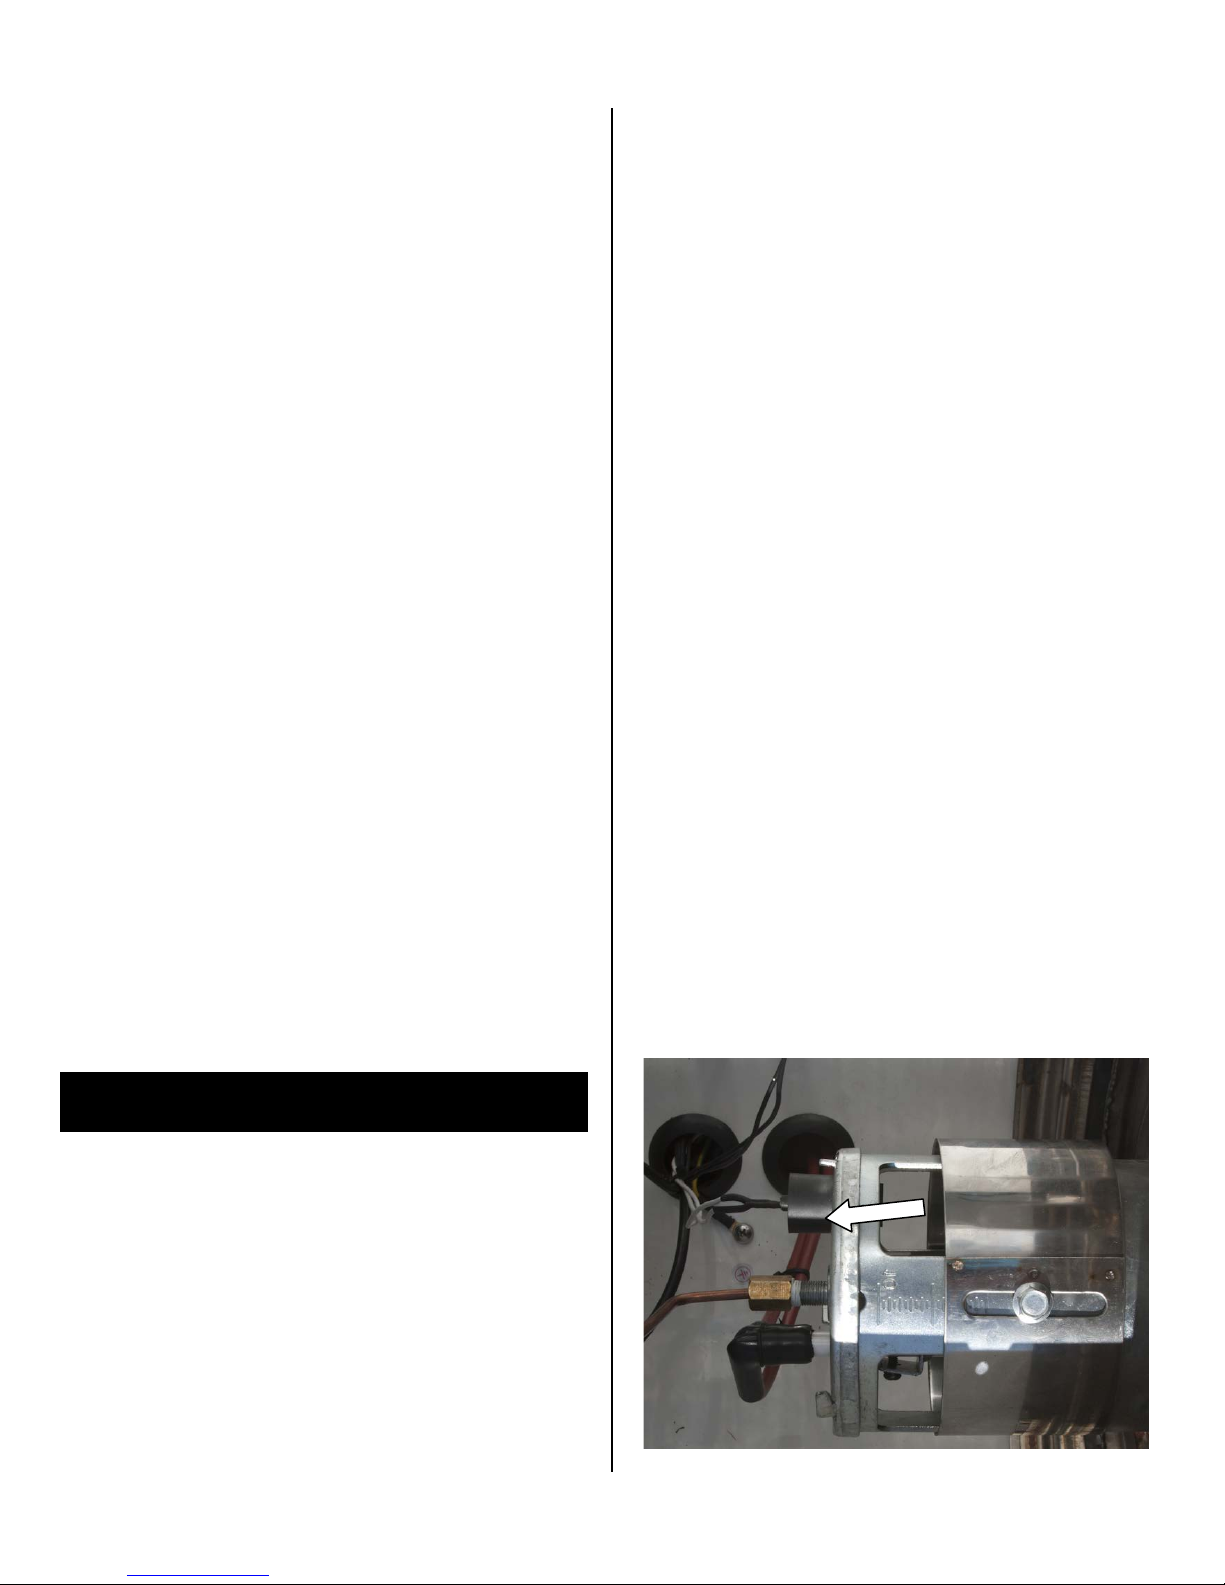
5. Cleaning the flame detector
The burner is equipped with a flame detector designed
to ensure the burner is operating properly. In time, this
sensor can become obscured by accumulat ed soot
deposits and will no longer operate properly. When this
happens, the unit will produce a FAILURE red light and
turn itself off. To clean the sensor, remove t he cov er,
and carefully work the rubber sensor boot free from the
burner. The sensor lens may be cleaned with a cotton
swab. Replace the sensor boot and the cover.
MAINTENANCE
Recommended Maintenance Intervals
NOTICE: Always turn unit off and unplug before
performing any maintenance.
The following maintenance tasks should be
performed once a year.
1. Cleaning the fuel tank.
The fuel tank should be cleaned once a year. To clean
the tank, follow these steps:
a. Place an appropriate container beneath the fuel
drain plug to catch any fuel.
b. Remove the fuel drain plug with a wrench.
c. Allow the tank to drain completely.
07-01810A 2012-10 Warranty 07-00424 6 Dri-Eaz Products, Inc.
detector.
Clean lens
inside with a
cotton swab
to remove
soot.
Page 7
6. Clean fuel tank interior
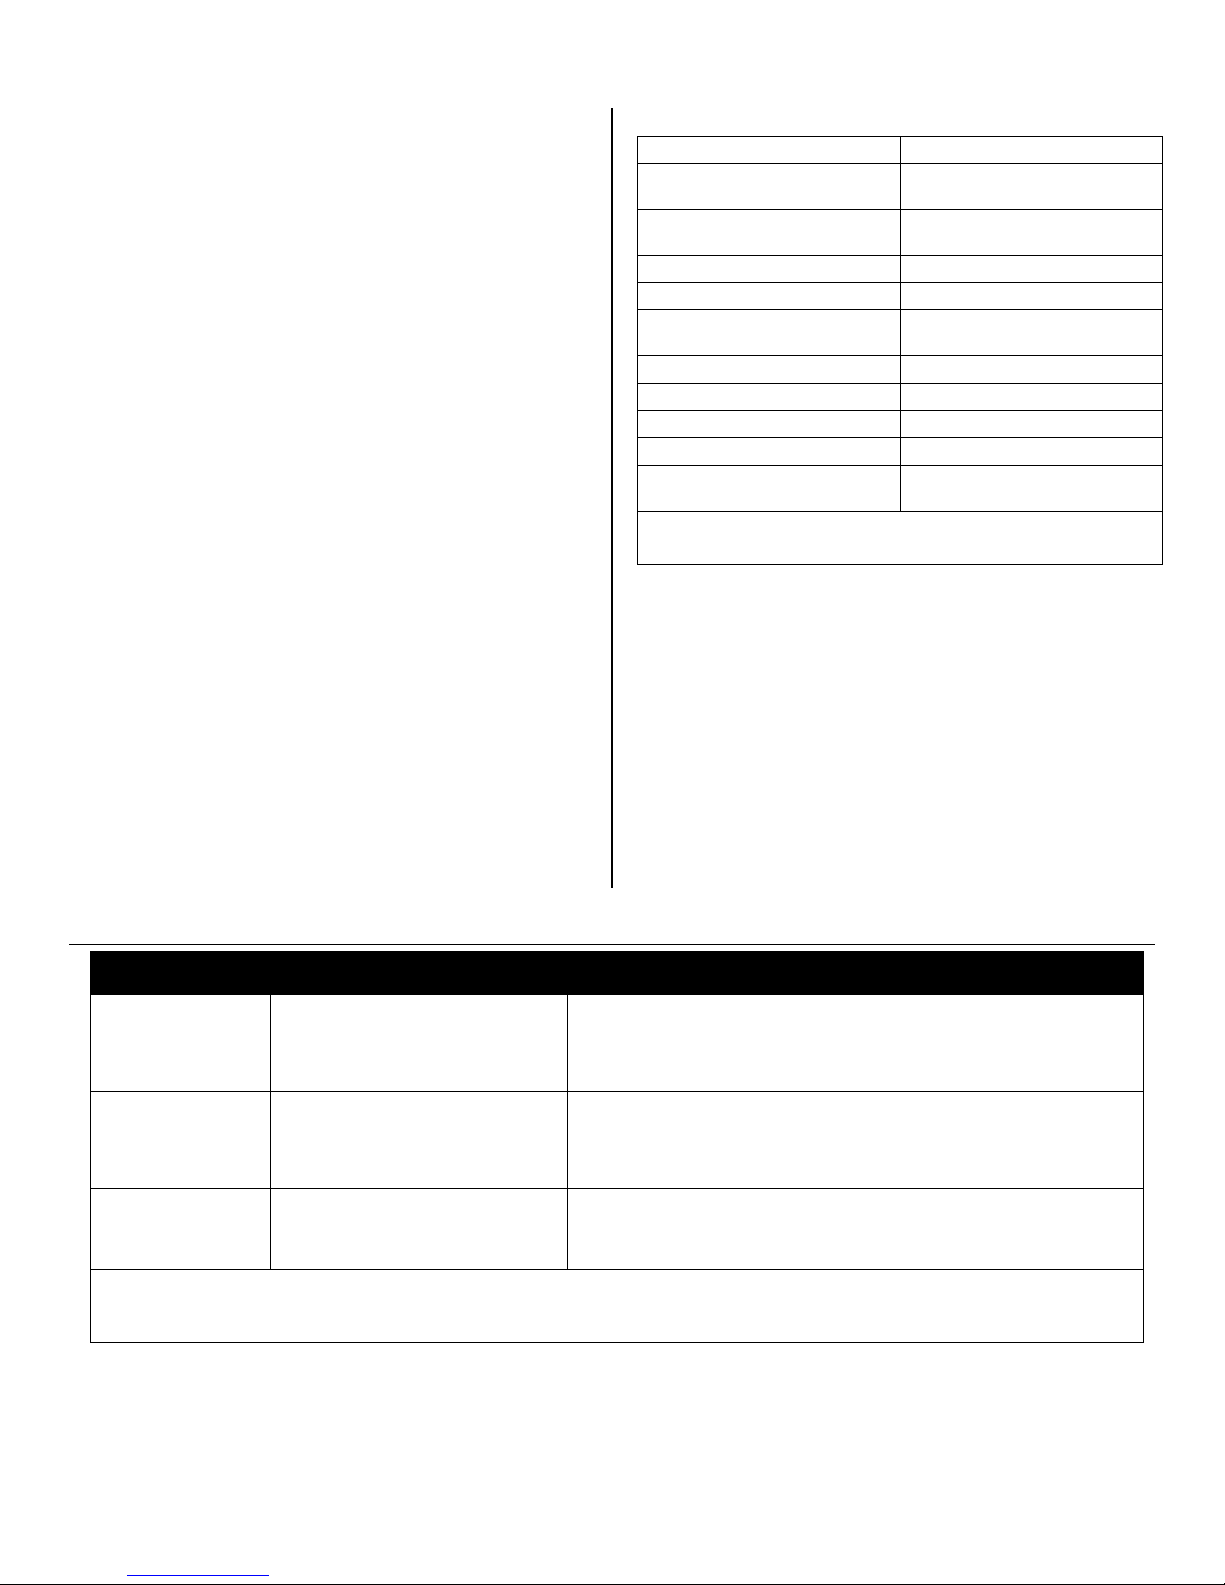
Model
Dragon Mobile Furnace F507
23 × 40 × 55 in.
142 lb. | 64 kg dry
Power
115V, 60 Hz, 5.3 amps
Fuel consumption
1.2 gal/hr | 4.5 L/hr
Diesel fuel oil #2
Fuel tank capacity (on-board)
13.5 gal. | 51.1 L
Rated heat output
130,000 BTU/hr
Process air output
900 CFM | 1530 CMH
Temp. Increase
+144°F | +80°C
12 in. × 25 ft.
Flame detector fault.
Air in fuel lines at startup.
Clean flame detector. See p. 6.
Wait 15 seconds and repeat starting sequence. See p. 4.
Ensure adequate airflow through unit.
NOTE: Fan will continue to run until unit is co ol .
In time, moisture, debris and other impurities may
accumulate in the on-board fuel tank. If these are not
removed, they can be drawn up into the burner and
damage the unit. To clean the tank, follow t hese steps.
1) Place a drain pan under the fuel drain plug. Remove
the plug and allow the contents to drain out. 2) Replace
the fuel drain plug and add a quart of kerosene to the
tank. Tilt unit back and forth a few times to help dissolve
and suspend any debris that may have accumulated on
the bottom of the tank. Drain out the kerosene and
replace the cap. The unit may now be refueled.
Dispose of contaminated fuel according to state and
local regulations.
SPECIFICATIONS
Dimensions (W × H × L)
Use weight
Fuel type
58 × 102 ×140 cm
241 lb. | 109 kg full tank
Kerosene
7. Cleaning the external housing
Ducting
To clean the exterior of the Dragon housing, use a
cleaner with a degreasing agent such as ProRestore’s
Degrease-All (ProRestore part no. 161252000).
Service
For parts and service call your local distribut or or the
Dri-Eaz Service Department at 800-932-3030 or
360-757-7776. Copies of the Dragon manual and related
information are available at www.Dri-Eaz.com. Go to
warranty.Dri-Eaz.com to register your purchase.
Specifications are subject to change without notice. Some values may
be approximate.
Accessories Included
1 25 ft. section of 12 in. (7.6 m × 30 cm) high-
temperature ducting. One end is fitted with a cuf f and
integrated belt and buckle.
1 Remote thermostat with 40 ft. (12 m) extension cord.
1 Owner’s Manual (07-01810A)
1 Pickup fuel line assembly with threaded tank fitting
(external tank not included)
1 Fuel line conversion kit
SYSTEM INDICATOR TROUBLESHOOTING
INDICATOR ISSUE SOLUTION
FAILURE
red light
Fuel depleted.
Fuel filter full.
Refuel.
Replace fuel filter. See p. 6.
30 cm × 7.6 m
OVERHEAT
amber light
WORKING
green light
Unit has overheated. Burner is
off. Fan may be operating.
Normal operation. Unit is operating normally. No action is required.
If the solutions described here do not resolve the pro bl em or the issue you are experiencing is not listed here,
call your local distributor or contact our Service Department toll-free at 800-932-3030 for further assist ance.
07-01810A 2012-10 Warranty 07-00424 7 Dri-Eaz Products, Inc.
Ensure ducting is not kinked or collapsed.
Ensure ducting does not exceed 25 ft. (7.6 m) in l ength.
Page 8
BEFORE FIRST USE: Assembly Instructions
The Dragon requires some assembly before us e. Follow these instructions.
Tools and supplies required:
Wrenches
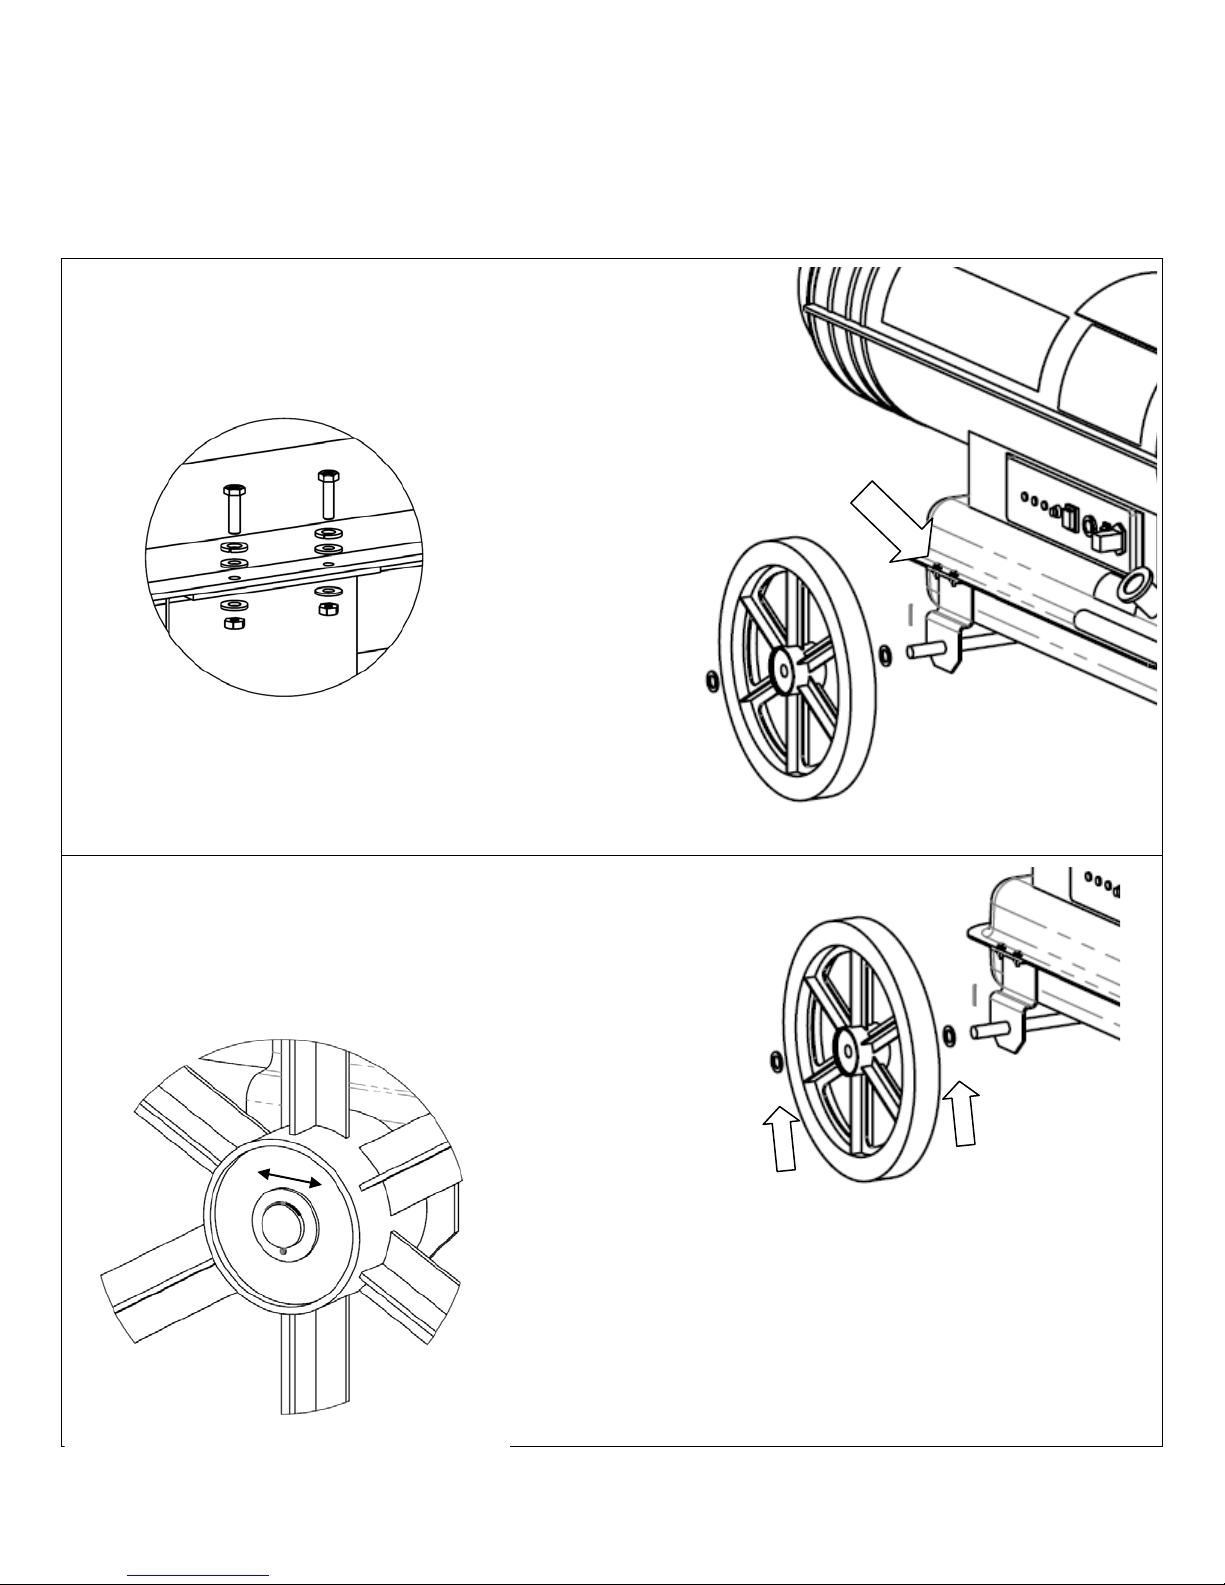
Wheel base, axle, and wheel installation.
Attach the wheel base assembly to both sides of the tank
using the fasteners provided.
Install both wheels. Place a washer on either side of the
wheel hub and secure the wheel with the cotter pin. Bend
tips of cotter pin around axle as shown below to secure it
the wheel. Follow this procedure for both wheels.
07-01810A 2012-10 Warranty 07-00424 8 Dri-Eaz Products, Inc.
Page 9
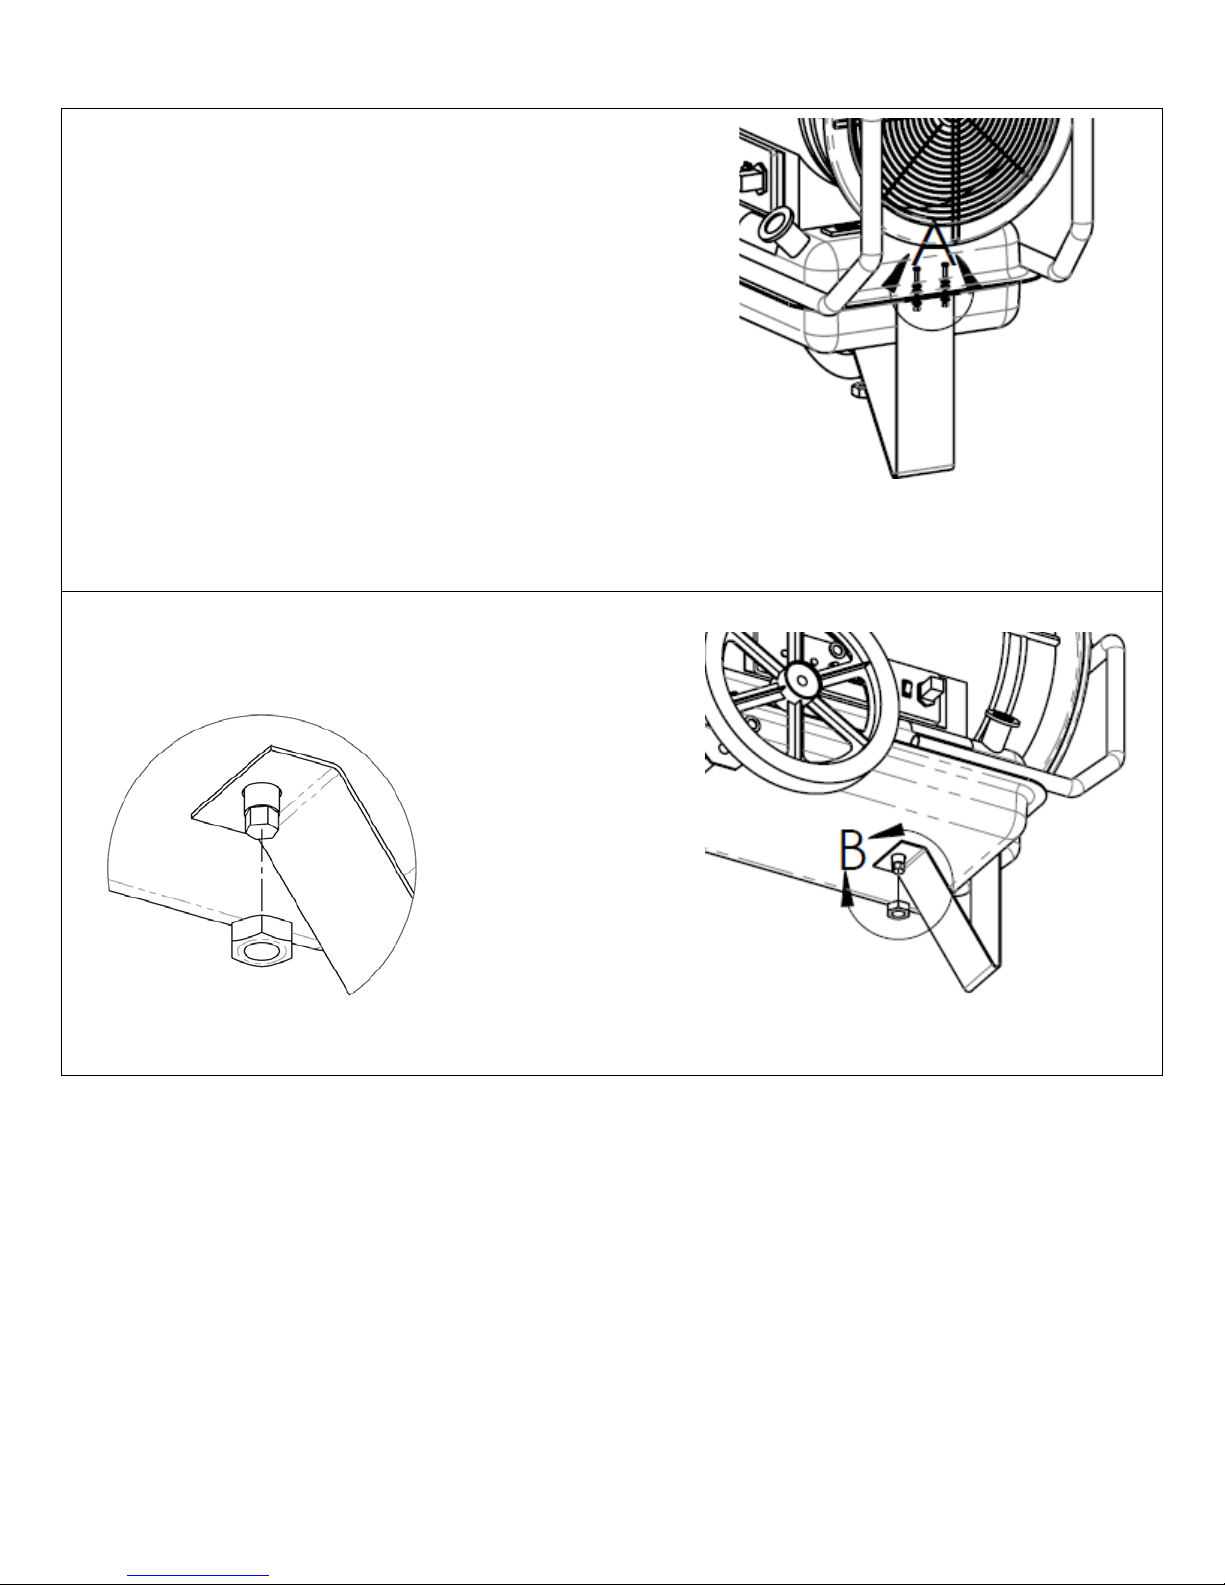
Install rear stand. First, attach top of stand to the back
edge of the tank using the fasteners provided.
Secure the front of the stand over the fuel drain plug with
the nut provided.
07-01810A 2012-10 Warranty 07-00424 9 Dri-Eaz Products, Inc.
Page 10
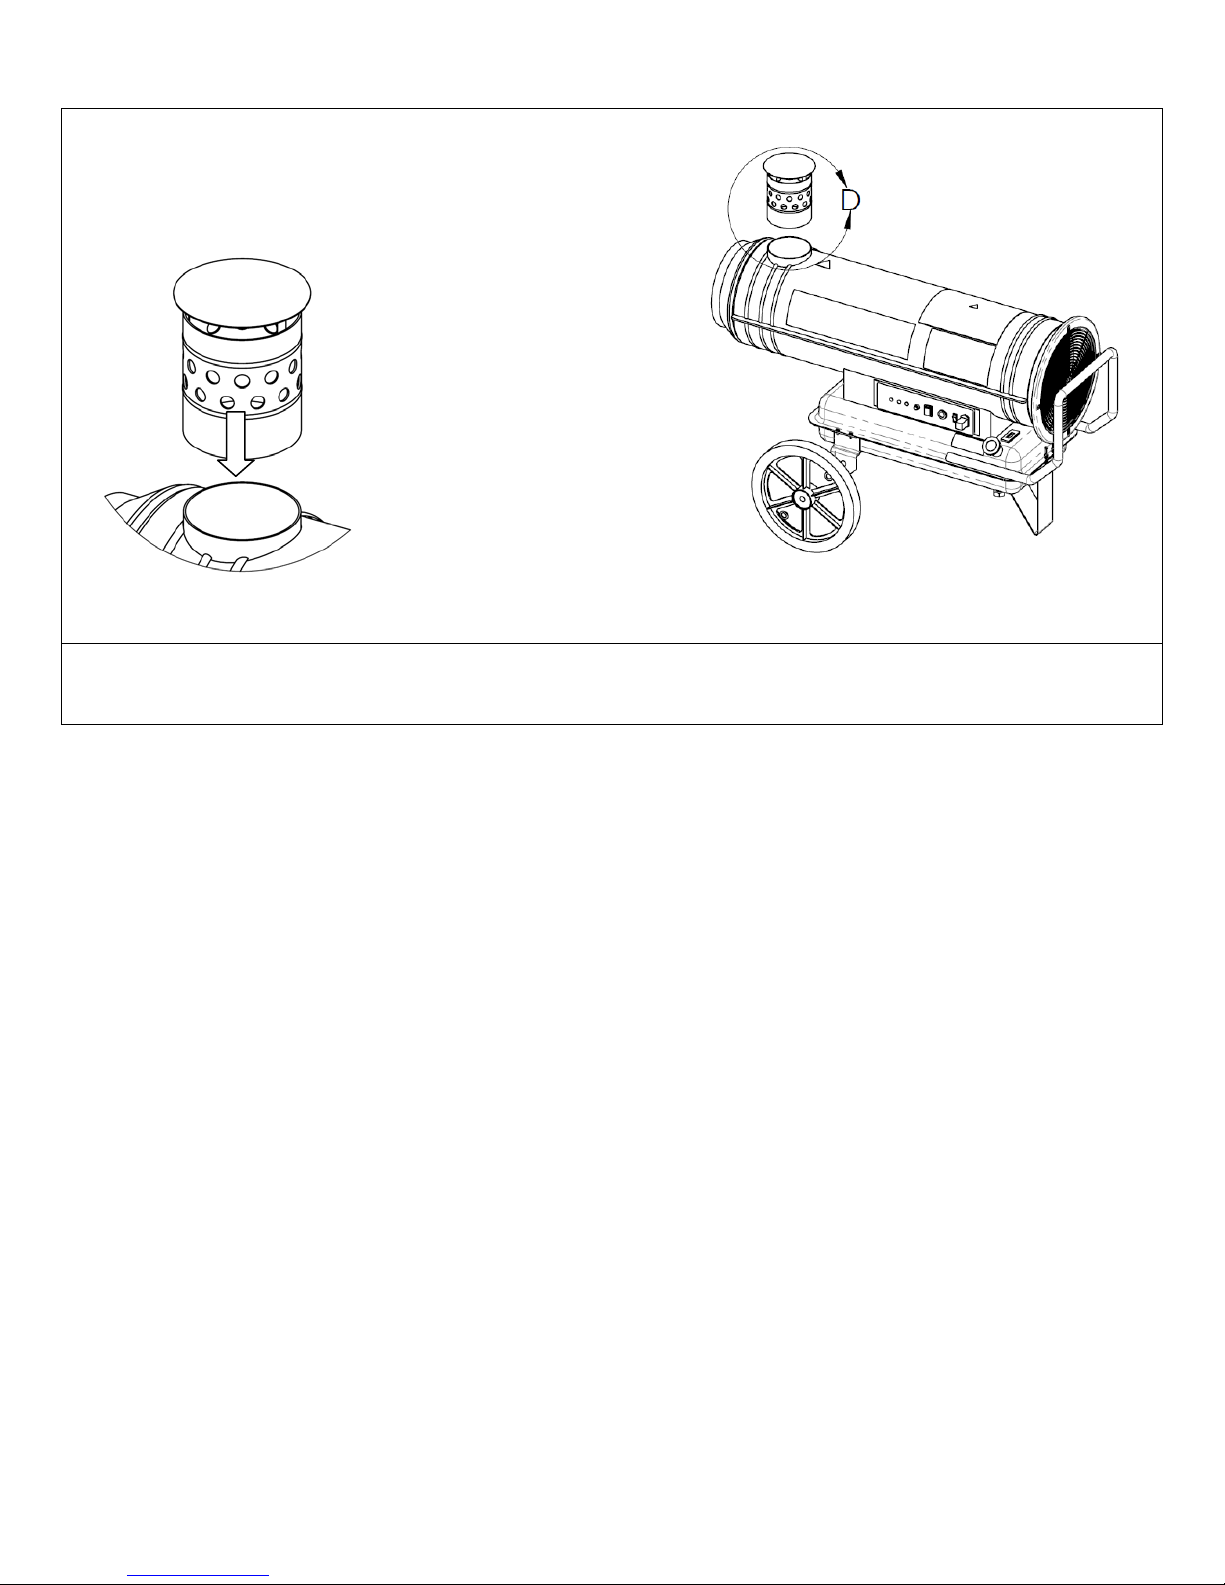
Exhaust flue installation
Slide flue down over exhaust flange as shown.
Ensure all fasteners are properly tightened and secure. The Dragon is now ready for use.
07-01810A 2012-10 Warranty 07-00424 10 Dri-Eaz Products, Inc.
Page 11
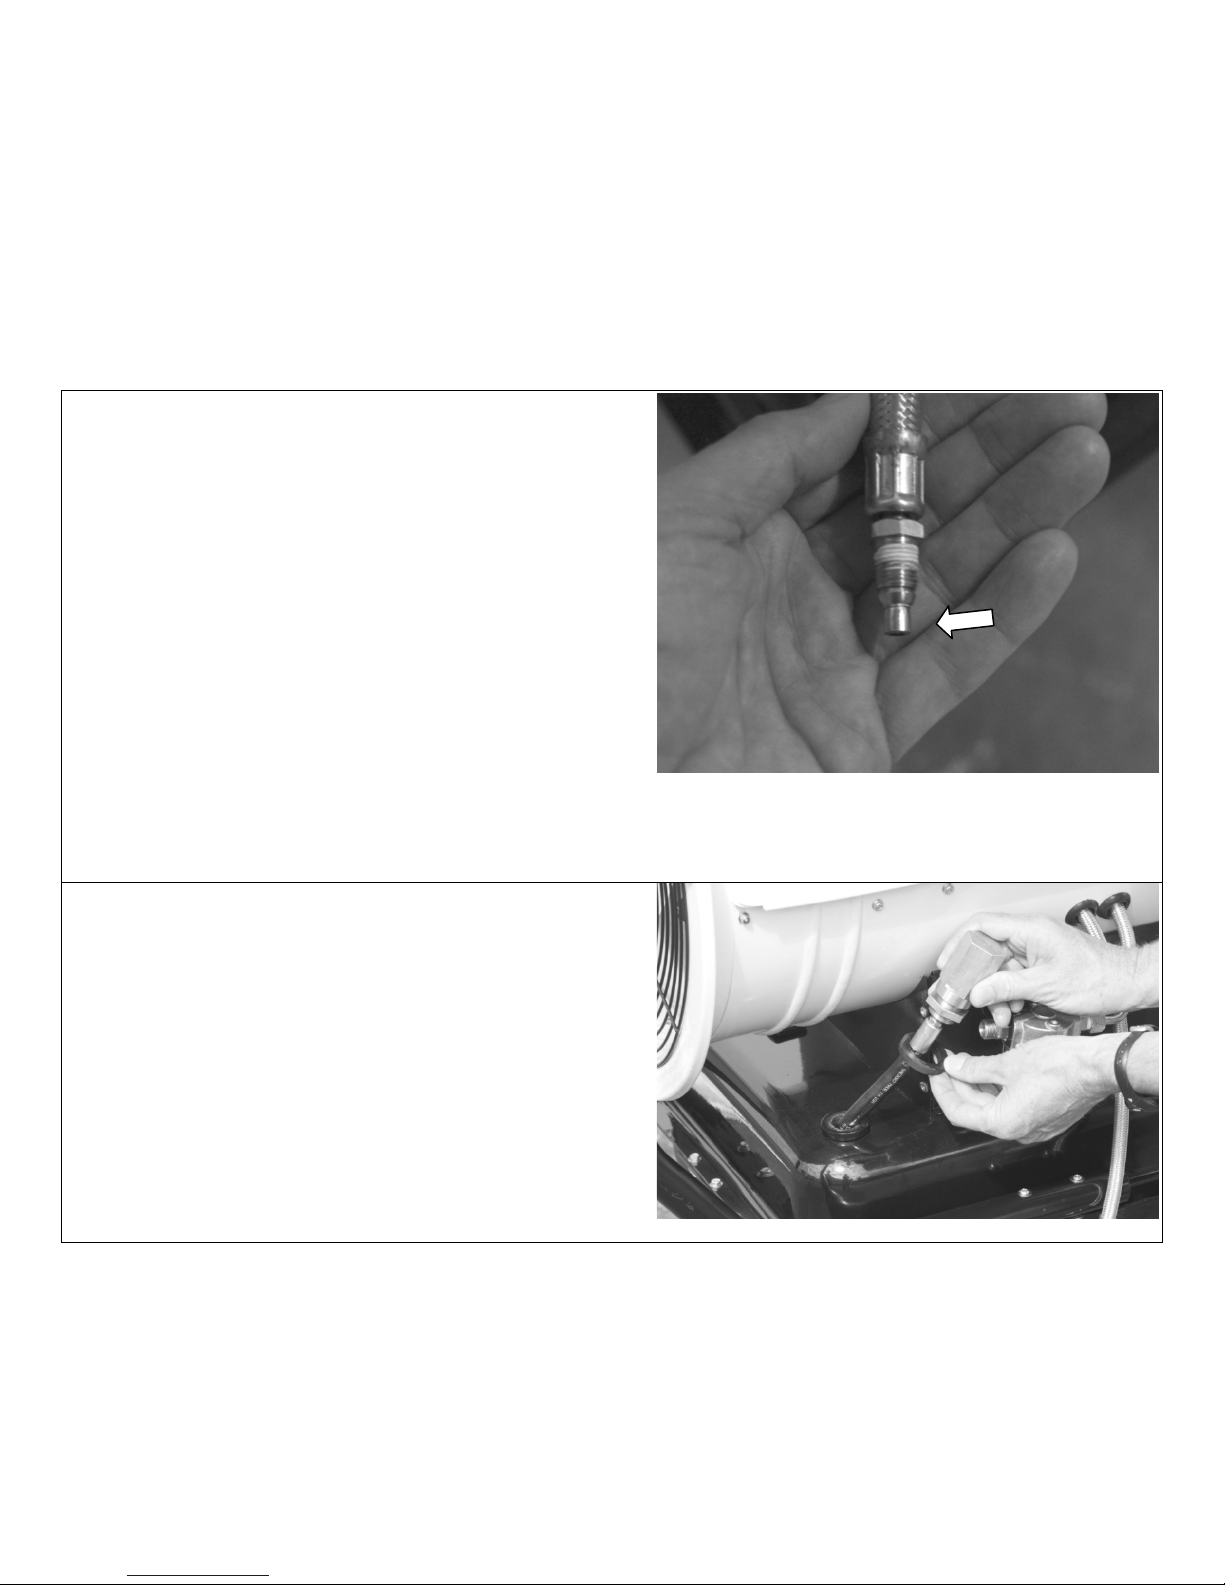
Modifying the Dragon for use with the External Fuel Pick-up
Use of the Dragon with the external fuel pickup provided can significantly extend the run time. Converting the Dragon for
use with the pickup requires a one-time modification of the external fuel line connections. Follow these instructions
carefully.
Tools and supplies required:
Wrenches
Small tube cutter
Rags or paper towels
Pipe thread sealant or Teflon
Dissassembly and preparing fittings
1. Remove fuel lines from fuel tank fitting.
2. Re-route return line outside of fuel filter bracket
3. Remove the existing fuel tank fitting from the tank. Slide
fitting off of fuel pickup tube and discard fitting.
4. Using a tube cutter, cut off metal pickup tube
approximately ½ in. below the brass compression sleeve
as shown.
5. Disconnect the fuel pick-up line from the fil ter adapter.
6. Disconnect the filter adapter from the filter (filter may
hang free at this point).
7. Retain the filter adapter for later use.
Prepare threaded fittings. To ensure a proper seal, use a
liquid thread sealant or Teflon tape on all pipe thread
fittings. Leave the first two threads dry in order to ensure a
tight seal.
®
tape
Attach new fuel tank pickup assembly to tank u sing
supplied grommet and jam nut. Orient the assembly as
shown in the next frame, and use the jam nut to hold the
assembly in place. Ensure that the assembly is tightened
firmly over the foam seal.
07-01810A 2012-10 Warranty 07-00424 11 Dri-Eaz Products, Inc.
Page 12
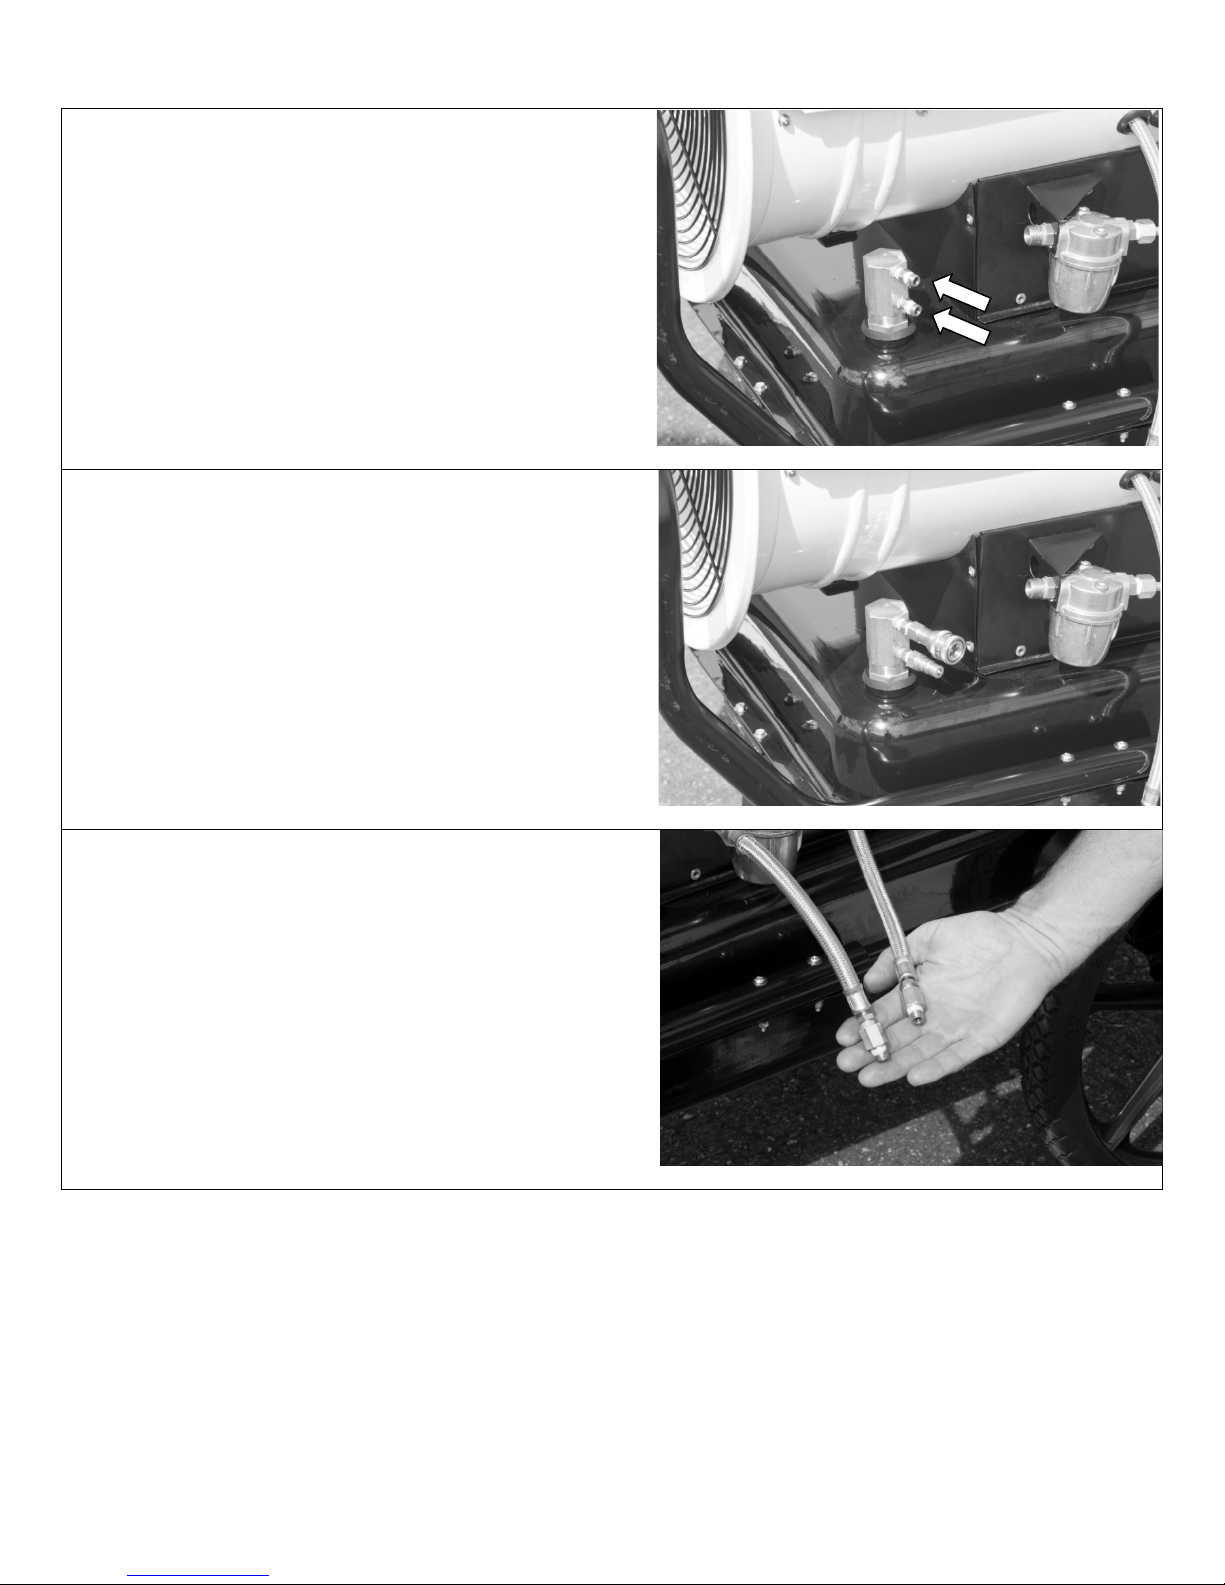
Modifying fuel tank attachment fittings
Attach the two nipples to the hexagonal fuel tank fitting
Attach a quick-disconnect socket to the top nipple.
Attach a quick-disconnect plug to the bottom nippl e.
Attach an adapter to each of the fuel line ends and tighten.
Ensure that the compression fittings hav e bottomed out
inside the adapter.
07-01810A 2012-10 Warranty 07-00424 12 Dri-Eaz Products, Inc.
Page 13
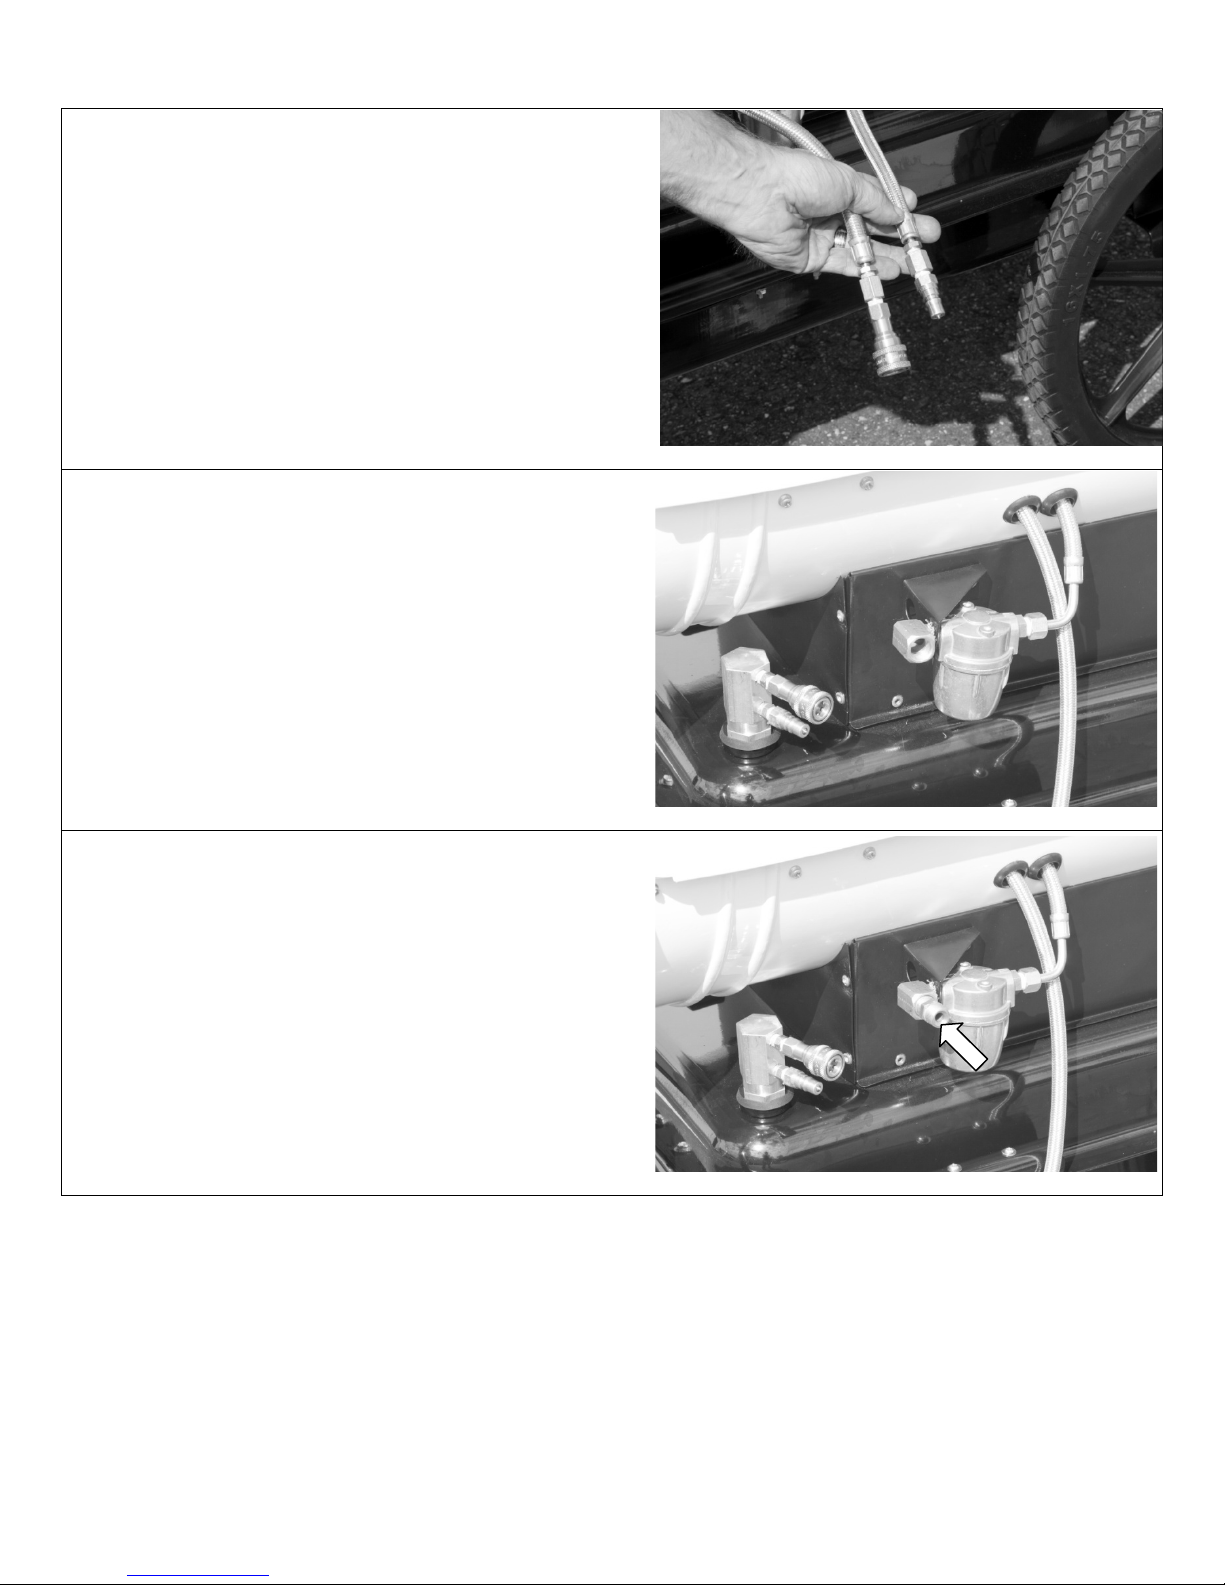
Attach a quick-disconnect plug to the adapter on the end of
the return line. Attach a quick-disconnect socket to the
adapter on the end of the fuel pick-up line.
Attach a 90° fitting thru the filter bracket i nto the filter.
Rotate the fitting so that it points directly out from the
heater as shown:
Attach the filter adapter (removed in the first step) to the
90° fitting.
07-01810A 2012-10 Warranty 07-00424 13 Dri-Eaz Products, Inc.
Page 14
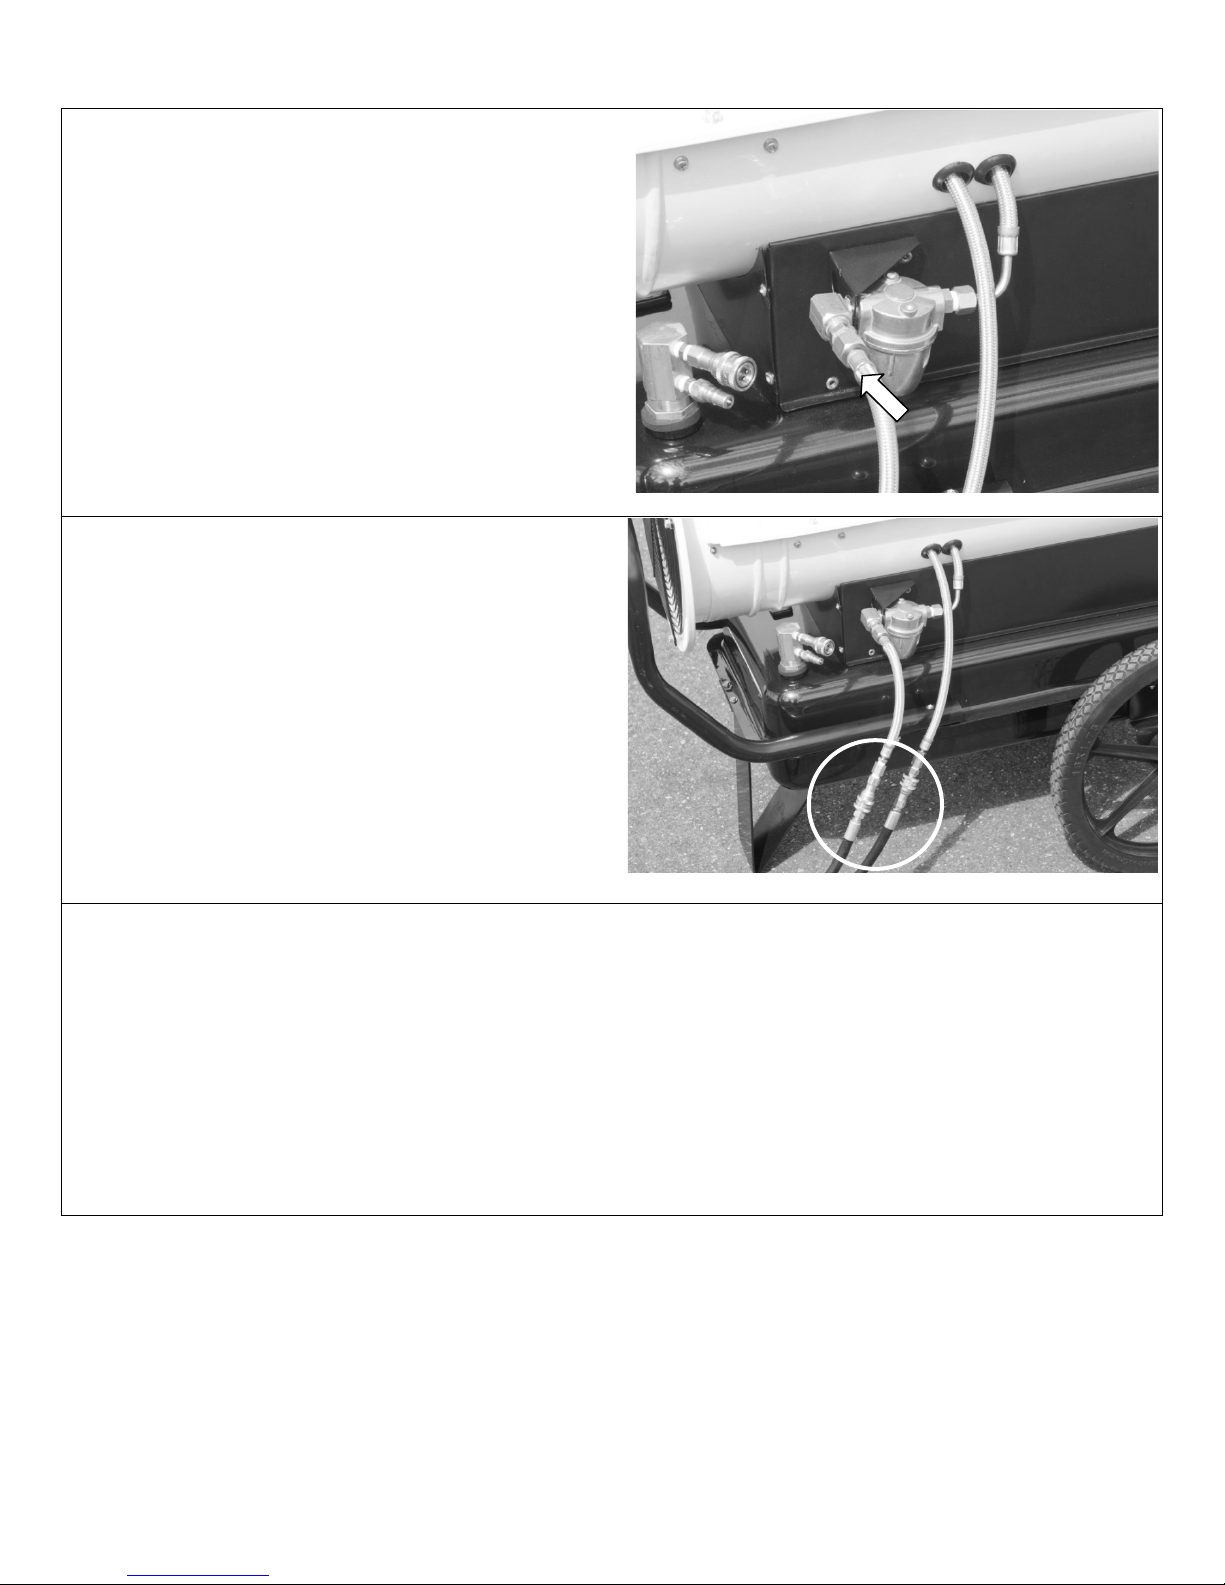
Reattach the fuel pick-up line to the filter adapter, ensuring
that the compression fitting is bottomed out i nside the
adapter.
Connect the quick-disconnect socket and plug ends
together.
External fuel tank pickup setup.
The pickup fuel line assembly (provided) must be installed in an ext ernal fuel tank (not supplied) before use.
1. Remove the pickup tank cover.
2. Screw in the pickup tank cover/hose assembly and tighten.
The conversion is now complete.
To use the unit with the fuel pickup, simply disconnect the two fuel lines from the onboa rd tank a nd att ach t hem
to the pickup fuel lines.
07-01810A 2012-10 Warranty 07-00424 14 Dri-Eaz Products, Inc.
Page 15
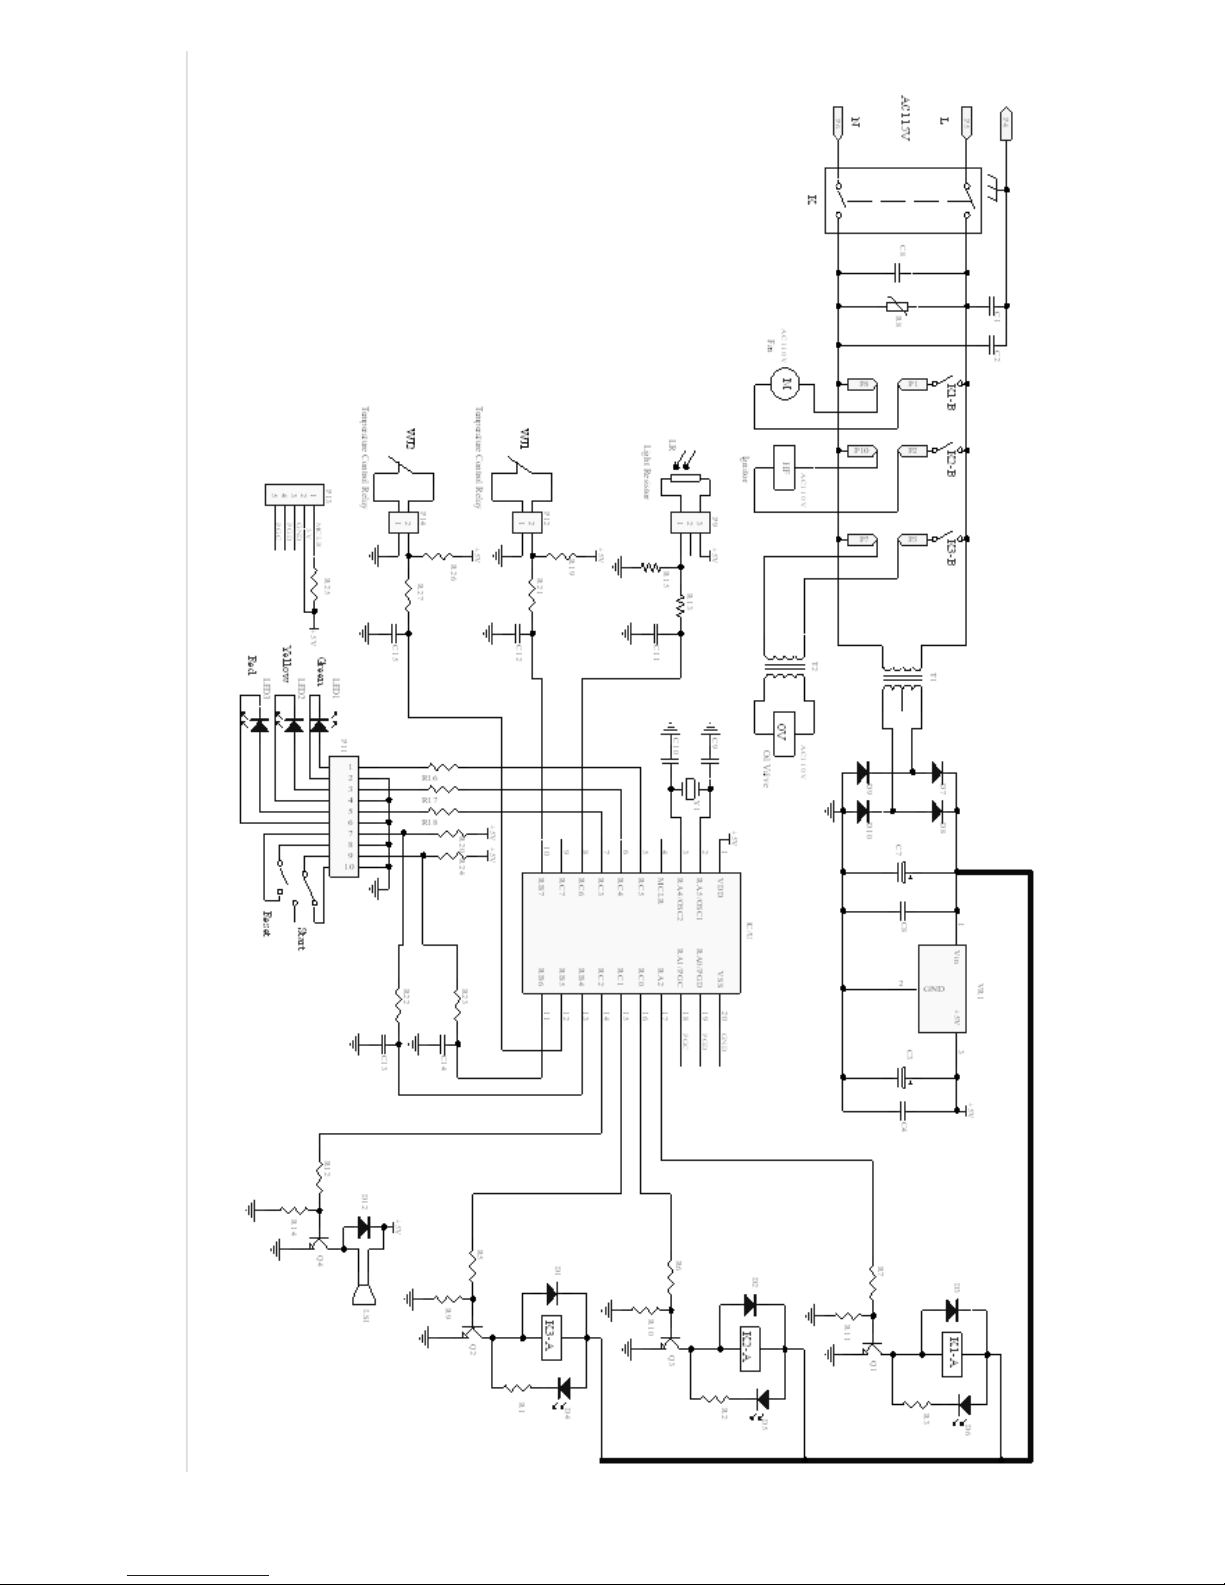
Fig. 4: Electrical Schematic
07-01810A 2012-09 Warranty 07-00424 15 Dri-Eaz Products, Inc.
Page 16
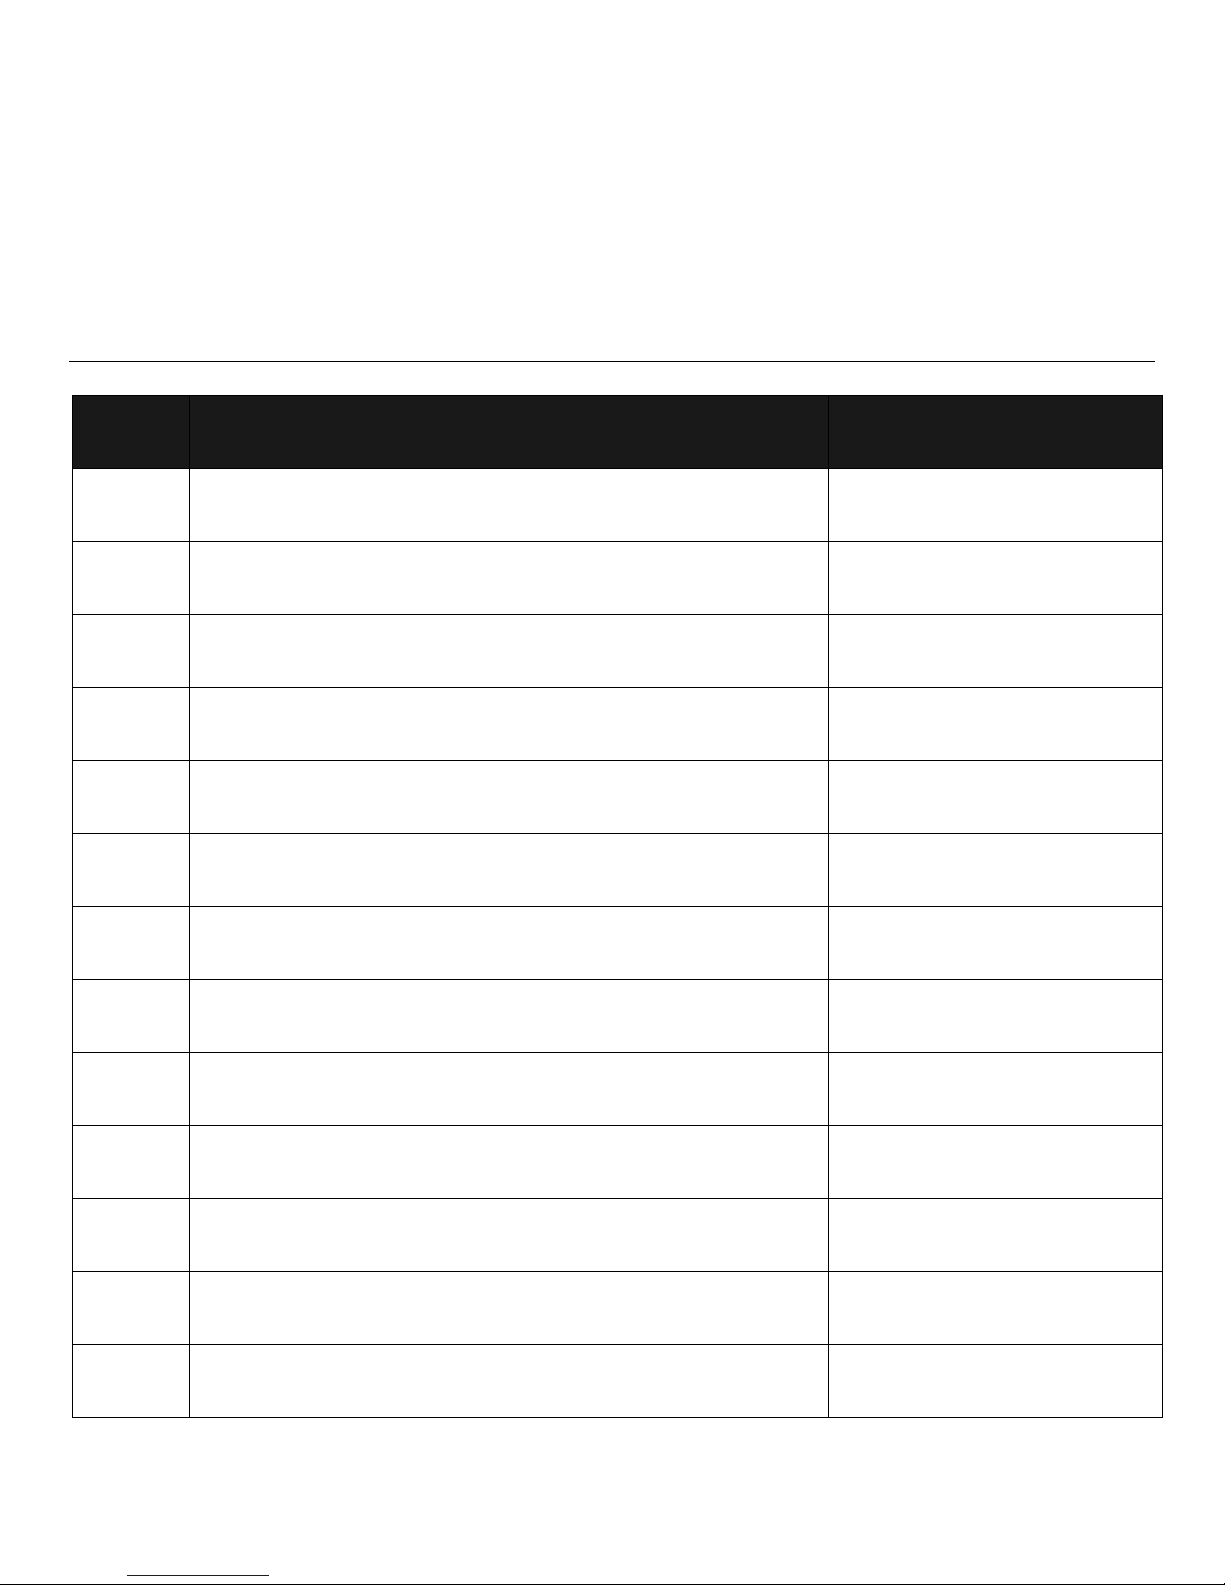
PURCHASE / COMPRA / ACHAT
DATE
MAINTENANCE EFFECTUÉE
EFFECTUÉE PAR
Purchase date / Fecha de compra / Date d’achat : ________________________________________________________
Serial number / Número de serie / Numéro de série : ______________________________________________________
Distributor / Distribuidor / Di stributeur : ____________________________ Tel. / Tel. / Tél. : ________________________
MAINTENANCE / MANTENIMIENTO / MAINTENANCE
DATE
FECHA
SERVICE PERFORMED
SERVICIO PROPORCIONADO
PERFORMED BY
PROPORCIONADO POR
07-01810A 2012-09 Warranty 07-00424 16 Dri-Eaz Products, Inc.
 Loading...