

Page 1

Owner’s Manual
Dri-Eaz® Building Dryer BD1000
F435-DV (110–230V UK)
Legend Brands Holdings, Ltd.
22 Plover Close, Interchange Park, Newport Pagnell, MK16 9PS
Tel: +44 (0)1908-611-211 Fax: +44 (0)1908-611-363 www.dri-eaz.co.uk
WARNING: Read and understand these warnings and instructions.
DO NOT operate the unit with covers open or removed.
WARNING: Do not alter or modify your BD1000 in any way. Use only replacement
parts authorized by Dri-Eaz Products. Modifications or use of unapproved parts
could create a hazard and will void your warranty. Contact your authorized DriEaz distributor for assistance.
WARNING:
Unplug before servicing.
WARNING: ELECTRIC SHOCK HAZARD
Unplug before opening cover.
Use with a residual current device (RCD) where possible.
Ensure power cord is properly earthed.
Check that power cord is not damaged.
Unplug before opening cover.
WARNING:
Moving parts may injure hands. Unplug before servicing.
WARNING:
Surfaces may be hot. Allow unit to cool before servicing.
07-01742C F435-DV (110–230V UK) 1 Legend Brands Holdings, Ltd.
Page 2

INITIAL INSTALLATIONS
HANDLE INSTALLATION
1. Remove 2 screws on top
of moulded cover (A).
2. Hinge open front cover (B).
3. Place handle in upright
position (C).
4. Secure handle with
supplied screws, Nyloc nuts
and washers (D) as shown
5. Close cover and replace 2
screws. Tighten fully with a
wrench.
DRAIN HOSE
INSTALLATION
1. After opening the housing,
place hose clamp (A) over
end of interior drain hose (B)
and thread drain hose
through hole in rear cabinet
wall.
2. Insert nipple (C) into end
of drain hose. Tighten hose
clamp (A).
3. Exterior drain hose may
now be attached to quickconnect (D) for use.
07-01742C F435-DV (110–230V UK) 2 Legend Brands Holdings, Ltd.
Page 3

UK power cord
replacement fuses.
UK power cord fuse
location (13A / 230V 3
pin plug #BS1363 only).
Remove cover to
replace blown fuse.
POWER SETUP
1. Remove 2 screws on top of moulded
cover and hinge open.
2. Voltage selection. Select 115V or 230V
on the VOLTAGE SELECTION switch (A).
3. Plug correctly rated power cord (D) into
power receptacle (B). (See p. 7 for available
cords.)
4. Slide cable strain relief fitting (E) into cord
grip slot in back panel.
5. Check that cable is correctly positioned
into outlet slot and close cover. Close cover
and replace 2 screws. Tighten fully with a
wrench.
Reset after incorrect voltage selection:
The electrical system is internally protected
against incorrect voltage selection. To reset
following incorrect connection, disconnect
the power cord and press the CIRCUIT
BREAKER button (C). Select correct voltage
(A) before connecting the power cord.
Replacement 13 amp Fuses for UK power
cord:
If the voltage selection switch is set to 115V
and 230V power is supplied to the unit, the
breaker may trip and/or the fuse in the UK
power cord (left) plug may blow. Replace
with spare fuse (stored in spare fuse box) if
necessary.
07-01742C F435-DV (110–230V UK) 3 Legend Brands Holdings, Ltd.
Page 4
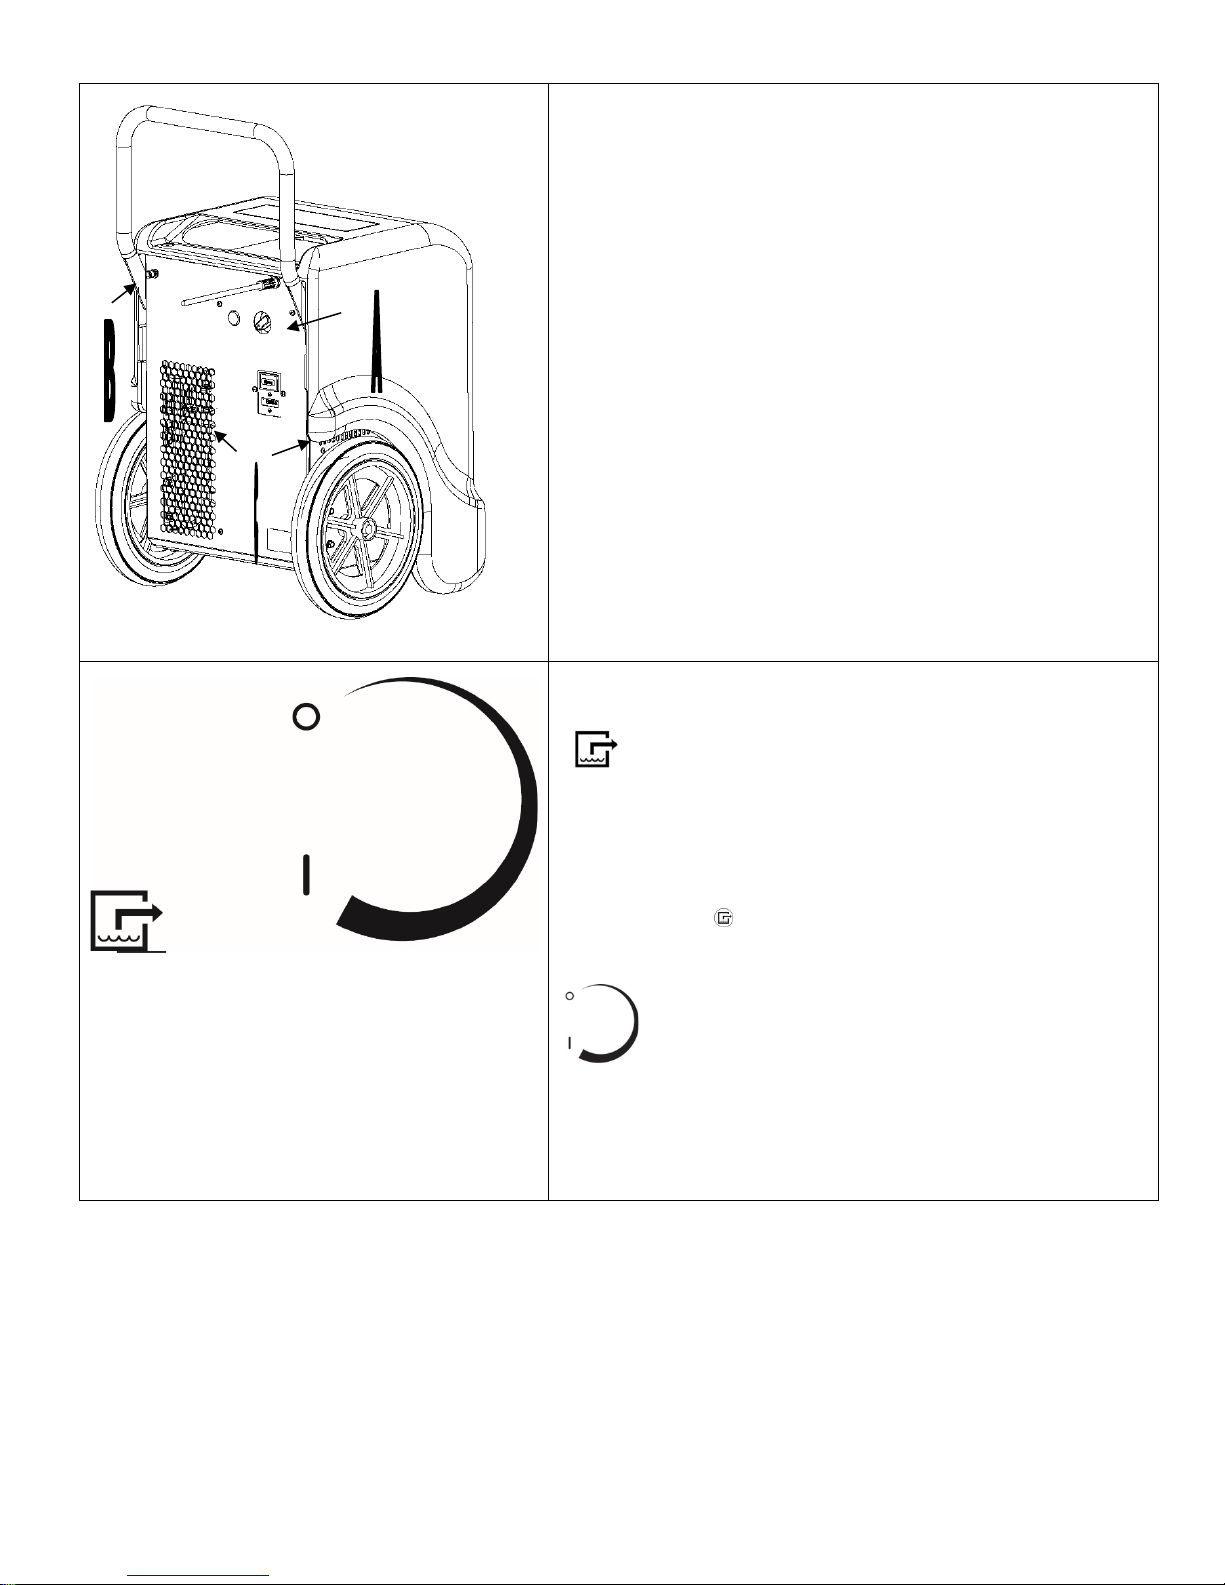
USER CONTROLS, DRAIN, AND AIR OUTLETS
(A) Control panel (see Control Panel Detail below).
(B) Condensate drain hose connector. Attach hose with quick-connect,
then uncoil completely, ensuring there are no kinks or restrictions. Place
end in drain or receptacle before operation.
(C) Process air outlets. IMPORTANT: Do not block airflow.
Control Panel Detail
Purge pump button. Press and hold to purge pump.
IMPORTANT
To help prevent drip tray overflow after using the
dehumidifier, always purge the unit before moving.
1. Turn the unit off and allow the plugged in dehumidifier to rest for
10 minutes.
2. Press the PURGE button. Hold until no more water is
pumped out of the hose.
3. Remove the dehumidifier promptly from the job site.
Humidity control dial. Set to desired dehumidification level.
O = Off
| = Maximum dehumidification
07-01742C F435-DV (110–230V UK) 4 Legend Brands Holdings, Ltd.
Page 5
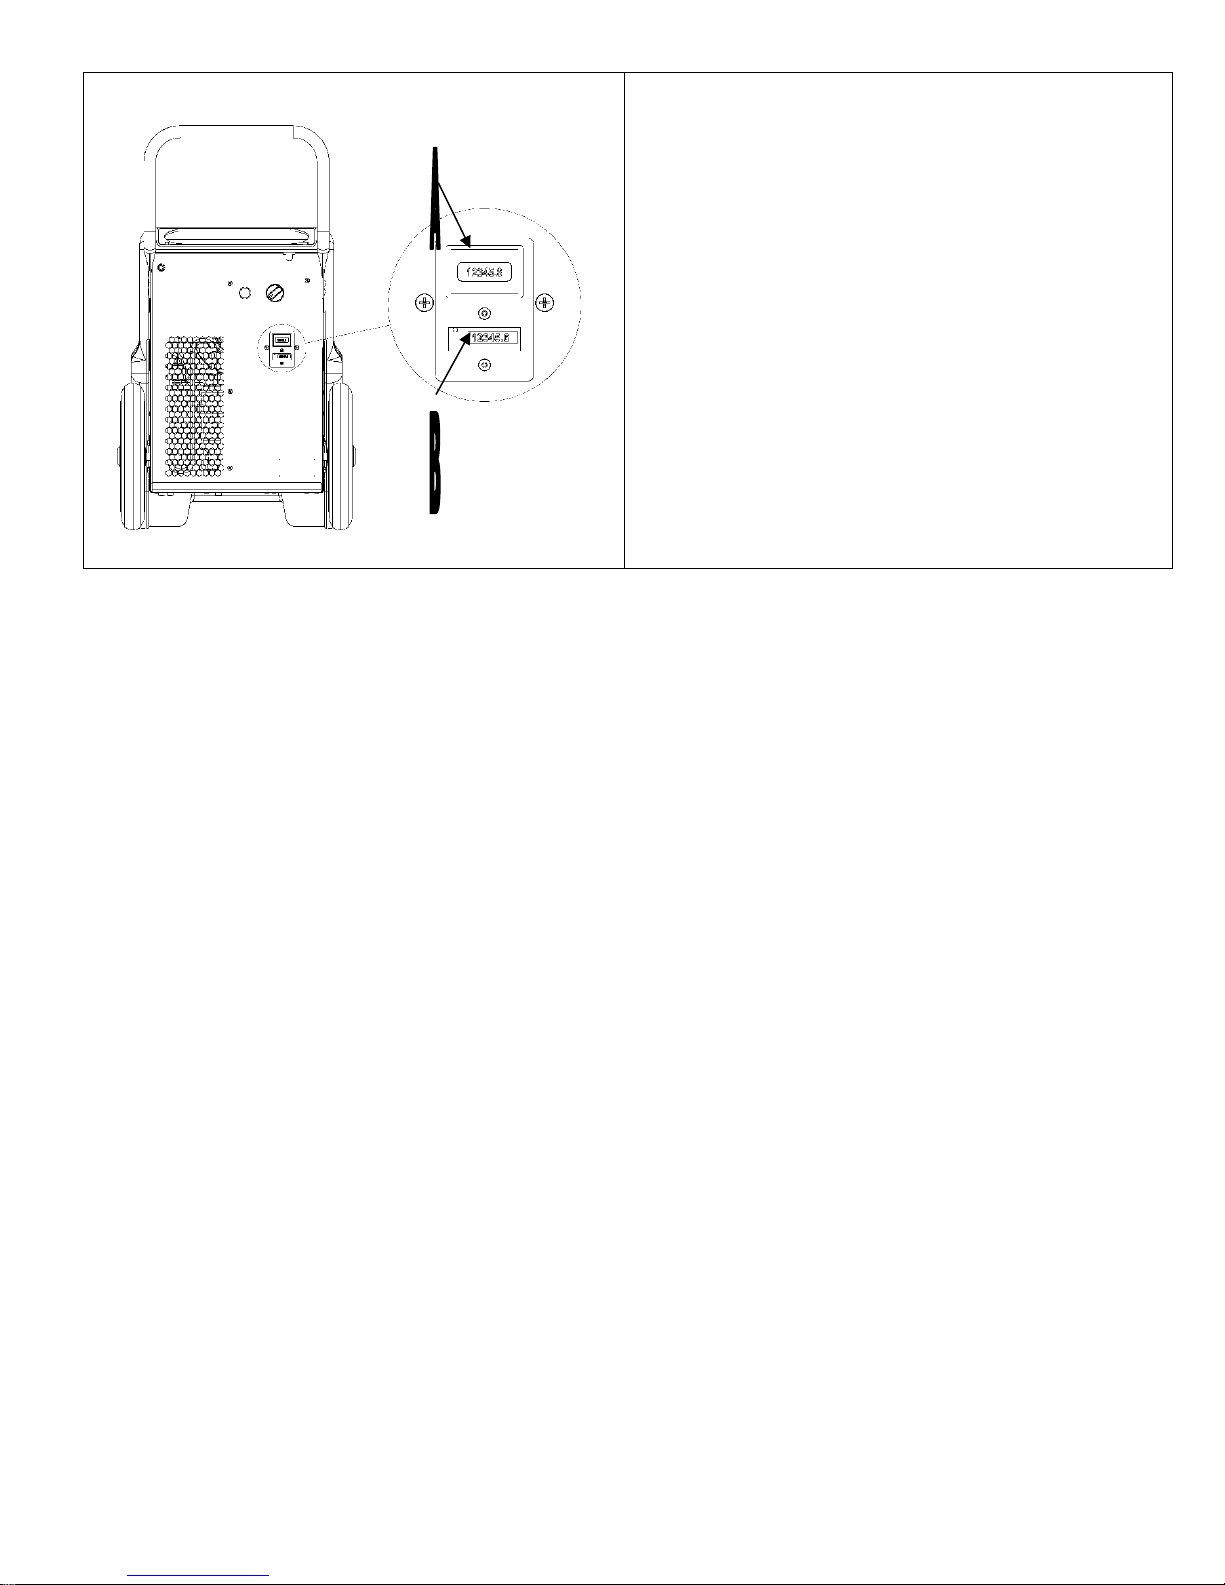
METER LOCATION, TOP VIEW, COVER OPEN
(A) Hour meter
(B) kW-hour meter
Storage & Transport
Store the building dryer vertically. If transported horizontally, position dryer in normal operating position and leave in place for 30
minutes to allow refrigerant to recirculate before use.
07-01742C F435-DV (110–230V UK) 5 Legend Brands Holdings, Ltd.
Page 6
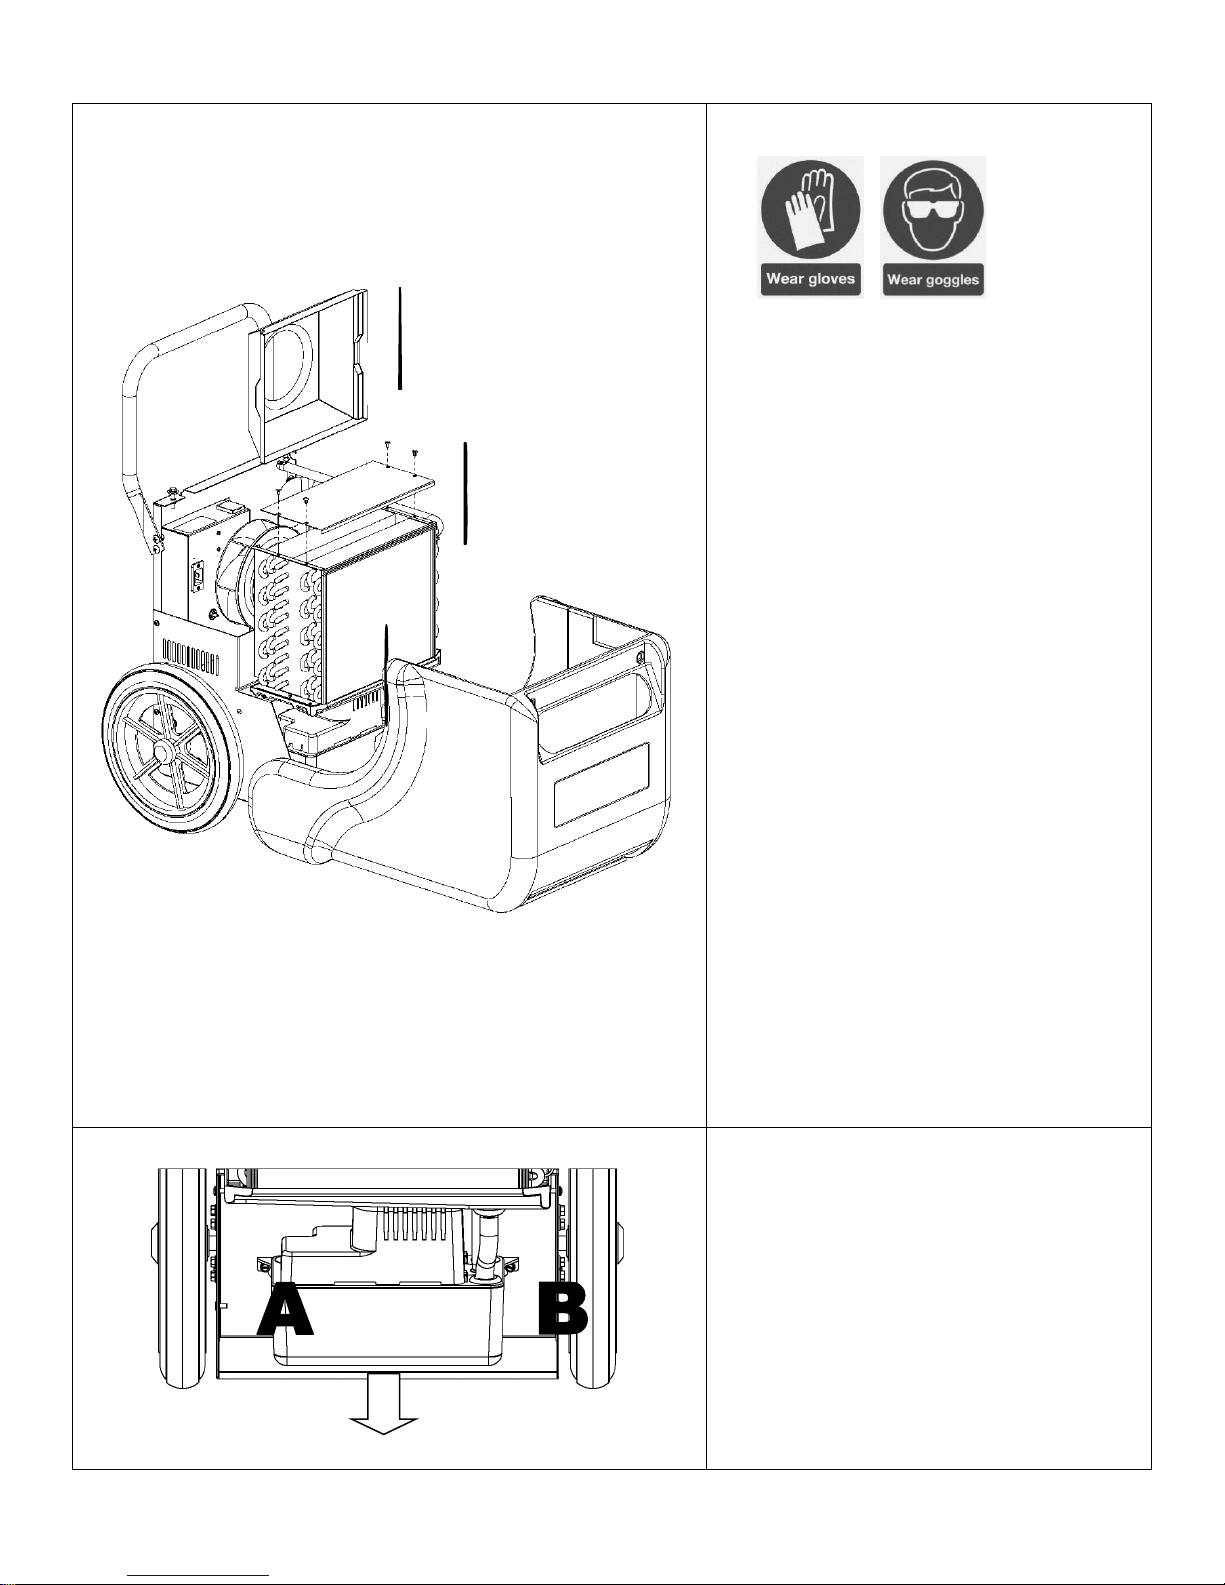
CLEANING
Safety Precautions
Pumpout cleaning
IMPORTANT. Unplug unit from electrical supply
before starting to clean.
Filter
1. Optional 4-PRO filters should be replaced
whenever the accumulation of dust or debris is
visible.
2. Standard fibreglass and paper filters cannot be
cleaned and should be replaced when full.
External Cleaning
1. Wipe surfaces with damp cloth.
Internal Cleaning
1. Remove 2 screws on top of moulded cover.
2. Hinge open moulded cover
3. Slide up and remove Fan Shroud (A) for cleaning.
4. Remove four plastic snap rivets from Coil Shroud
(B) and lift off shroud. To remove rivets, press up on
the center rivet pin underneath the shroud until
flanges are released. The rivets may then be lifted
out of the shroud and the shroud can be removed.
5. Vacuum coils (C).
6. Clean pumpout. See “Pumpout Cleaning” below.
7. When finished, replace Fan Shroud and Coil
Shroud and secure with fasteners. Ensure that the
power cable and strain relief is correctly positioned
into cable outlet slot on chassis. Hinge the cover
closed. Secure cover with 2 screws.
07-01742C F435-DV (110–230V UK) 6 Legend Brands Holdings, Ltd.
1. After opening the housing, remove screws (A) and
(B). Remove drain hose from basin cover. 2. Slide
pump assembly out and place on firm surface
(electrical cable will remain attached). 3. Lift pump
off catch tray. Wipe out tray with a clean cloth. 4.
Reassemble, slide tray in and reattach with screws.
Make sure electrical cable is tucked in neatly above
the pump before closing lid.
NOTICE: Pump and check valve should be
inspected and cleaned after each job or at least
once per month.
Page 7
Power Cord Options
The following power cord options are available:
Filter Options
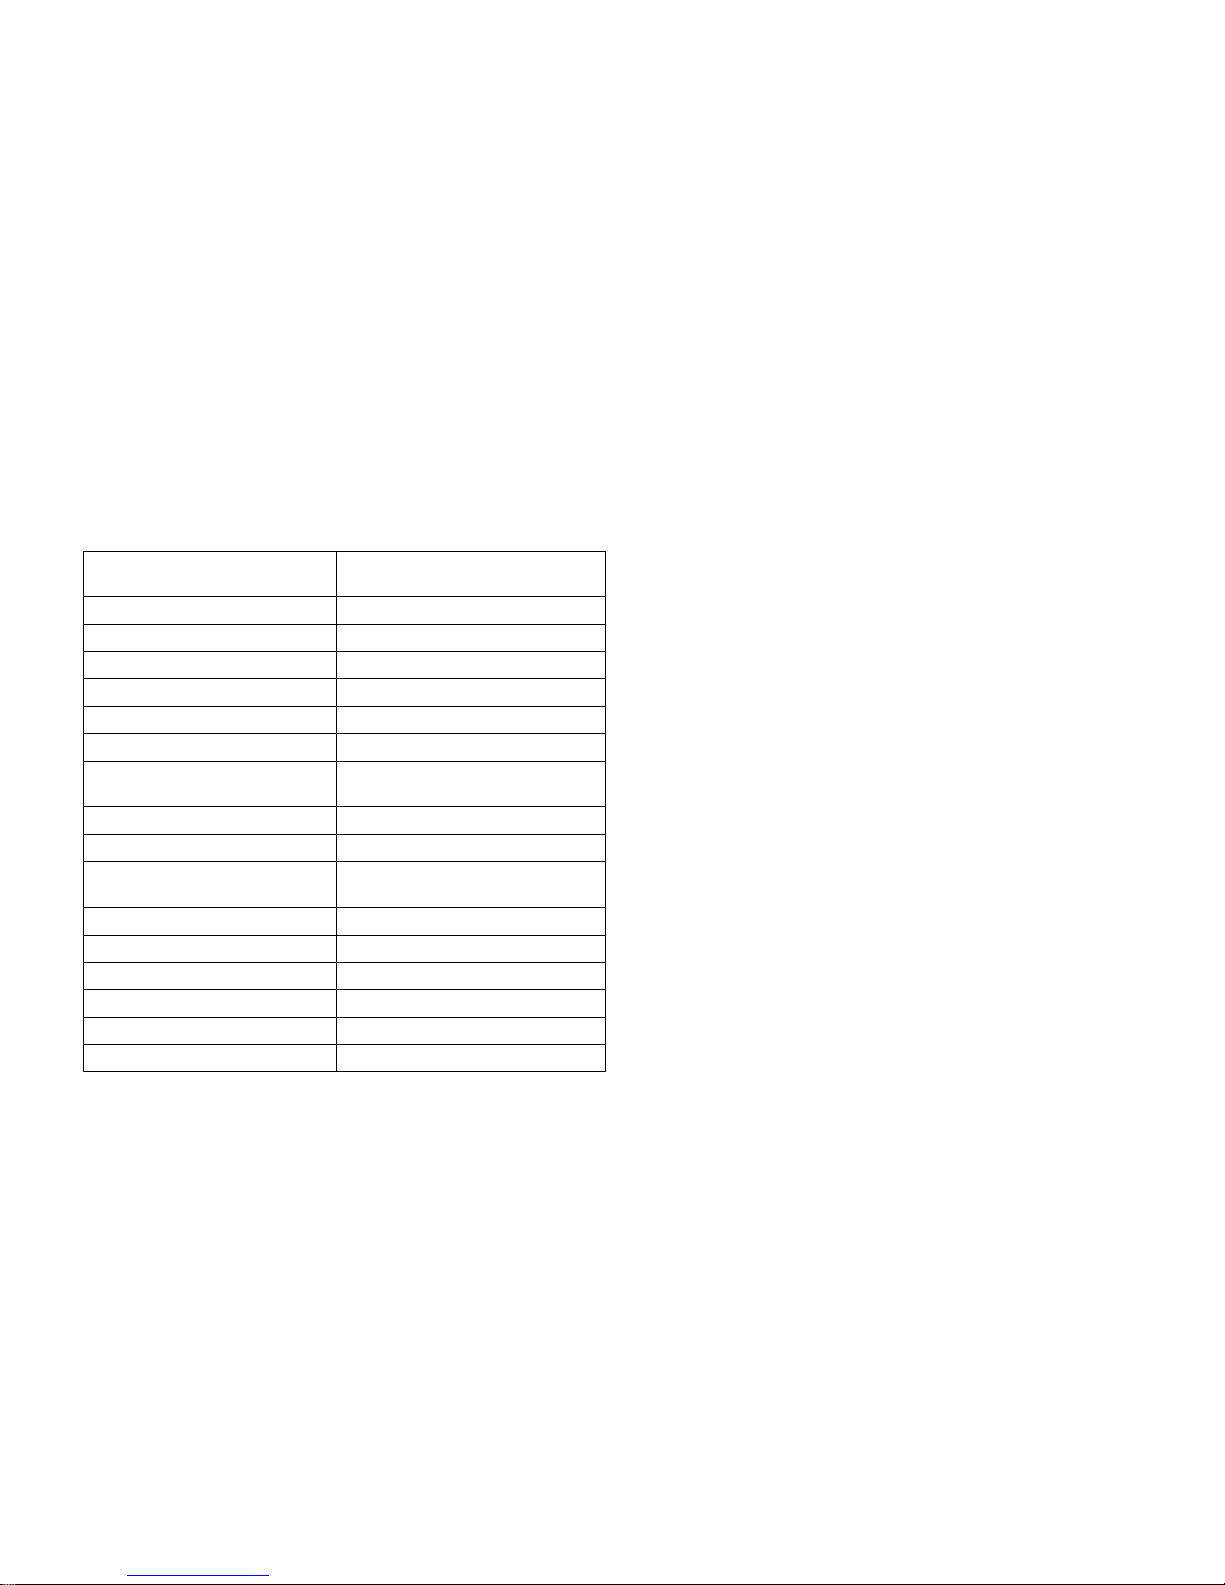
Building Dryer BD1000
Dimensions (W × H × D)
50 × 51 × 85 cm
Weight
39 kg
Water removal (AHAM)
25 L/day (27°C/60%RH)
Water removal (Max)
48 L/day (32°C/90%RH)
Water removal (EU standard)
21 L/day (20°C/60%RH)
Water removal (EU standard)
42.6 L/day (30°C/80%RH)
6.5A / 110V
Voltage
110V/230V
Frequency
50Hz
0.68 kW / 110V
Sound level
73.4 dB (avg.)
Air movement
350 m³/hr
Humidistat control
30–100%
Condensate pump
Internal (included)
Condensate pump lift capacity
6.1 m
Operating temperature range
1°– 38°C
13A / 230V 3 pin plug BS1363 to 16A IEC socket. 5 m.
Part no. F457 (02-01644)
16A / 110V 3 pin plug IEC60309 to 16A IEC socket. 5 m.
Part no. F456 (02-01641)
Call +44 (0)1908 611211 to order power cords and filters.
SERVICE
Legend Brands Holdings, Ltd.
22 Plover Close
Interchange Park
Newport Pagnell
MK16 9PS
United Kingdom
Tel. +44 (0)1908 611211
Fax. +44 (0)1908 611363
SPECIFICATIONS
Fibreglass filter (standard): Part no. F459A
4-PRO filter (optional): Part no. F581
Filter dimensions: 296 × 296 × 22 mm
Name
Amperage
Power
Model F435
3.3A / 230V
0.68 kW / 230V
07-01742C F435-DV (110–230V UK) 7 Legend Brands Holdings, Ltd.
 Loading...