

Page 1
Instructions
DBE_INS_A.indd 1 08/11/2013 16:58
Page 2
Thank you for purchasing DriBUDDI Elite from JML. To get the best
performance from this warm air clothes dryer, please read these instructions
in full and retain for future reference.
Contents
Safety Warnings & Advice .................................................................................................... 3
Your DriBUDDI Elite.............................................................................................................. 4
Assembling DriBUDDI Elite ................................................................................................ 5
Using DriBUDDI Elite ............................................................................................................ 9
Recommendations ............................................................................................................. 10
Technical Infomation .......................................................................................................... 10
Fuse & mains plug replacement ...................................................................................... 10
Disposal & the environment ............................................................................................. 10
Cleaning & Maintenance .................................................................................................... 11
Guarantee .......................................................................................................................... 11
2
DBE_INS_A.indd 2 08/11/2013 16:58
Page 3
Safety Warnings & Advice
• DO NOT use DriBUDDI for any purpose other than those described in this manual.
• For indoor household use only.
• This appliance is not intended for use by anyone with reduced physical, sensory or mental
capabilities, or a lack of experience and knowledge, unless they have been given
supervision or instruction concerning the use of this appliance by a person responsible for
their safety.
• DO NOT overload your DriBUDDI. Its maximum capacity is 15kg of damp clothing.
• Keep your DriBUDDI at least 1.5m away from any water or fire source.
• This appliance is only intended for drying fabrics washed in water.
• Keep children away from DriBUDDI whilst in use. DO NOT allow them to play with
DriBUDDI or near it when it is in use.
• Unplug the cord after use, before assembly or disassembly, and before cleaning.
• Periodically check the power cord and plug for any damage. If it is damaged,
DO NOT use.
• If the power cord and plug is damaged, it must be exclusively replaced by the
manufacturer or a similarly qualified electrician in order to avoid a hazard.
• Keep the power cord away from hot surfaces and sharp edges.
• DO NOT open the Motor Unit or attempt to change or repair it. Unauthorised repairs will
invalidate the warranty and could result in injury.
• The Motor Unit may become hot during use. NEVER touch any metal parts as they may
cause burns to the skin.
• Ensure that the area around DriBUDDI is kept clear.
• Ensure that the holes on top of the cover are not covered during operation.
• Keep DriBUDDI away from water or other liquids to avoid electrical discharge. DO NOT
plug in if it is resting on a wet surface.
• DriBUDDI should only be used in a well-ventilated area. If ventilation is lacking, it can also
be used near an open window. DO NOT push directly up against a wall; leave at least a
gap of an inch so air can circulate around it.
• DO NOT leave DriBUDDI unattended when using the ON setting. DO NOT use this setting
for more than a few hours at a time.
3
DBE_INS_A.indd 3 08/11/2013 16:58
Page 4
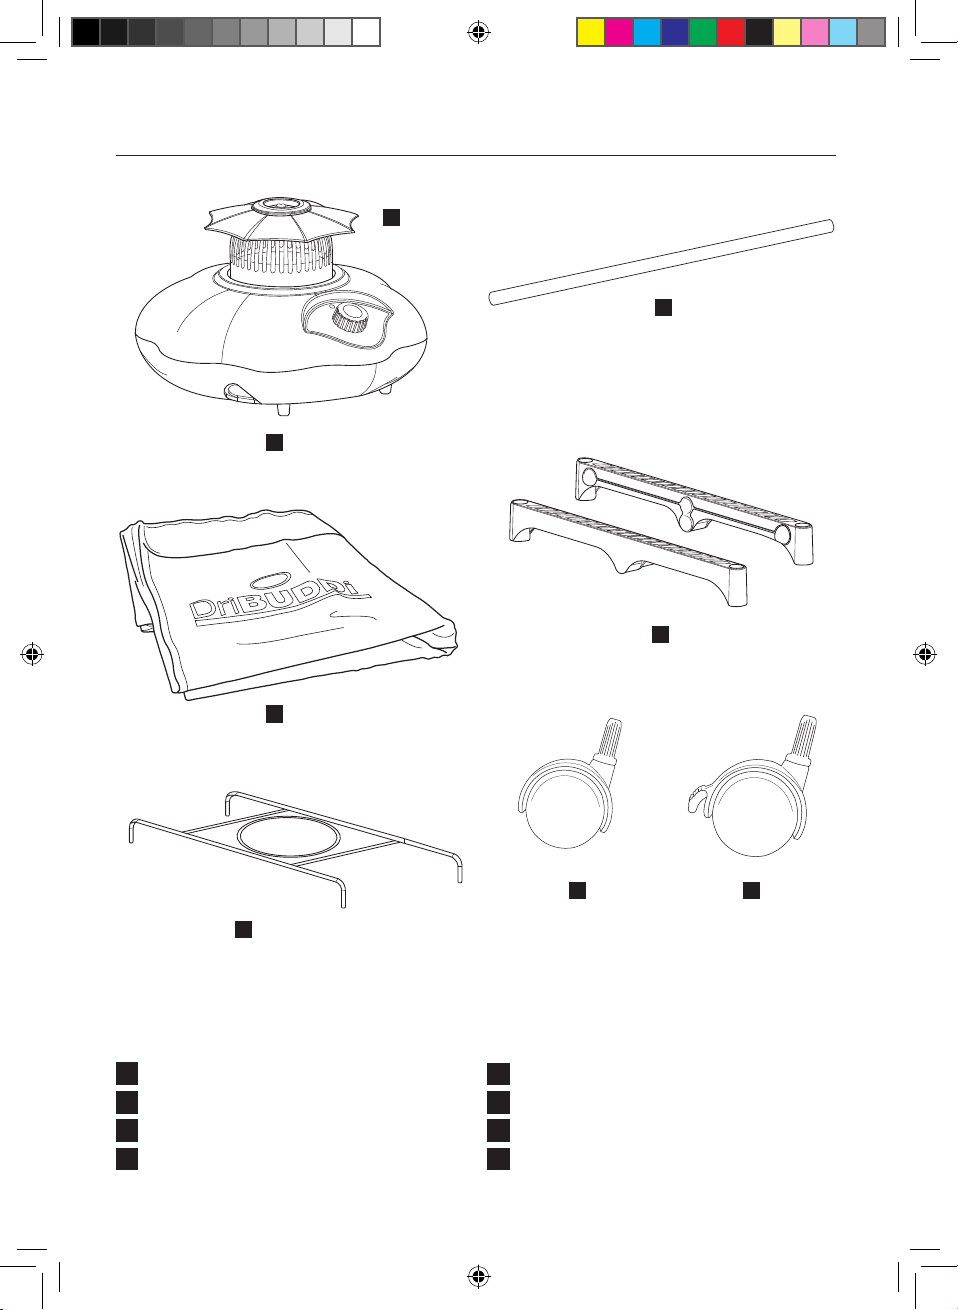
Your DriBUDDI Elite
A
B
C
E
D
H
A
Motor Unit Top
B
Motor Unit
C
16 x Poles
D
Cover
G
F
6 x Brackets
E
Motor Unit Shelf
F
2 x Wheels
G
2 x Locking Wheels
H
4
DBE_INS_A.indd 4 08/11/2013 16:58
Page 5
Your DriBUDDI Elite
Assembling DriBUDDI Elite
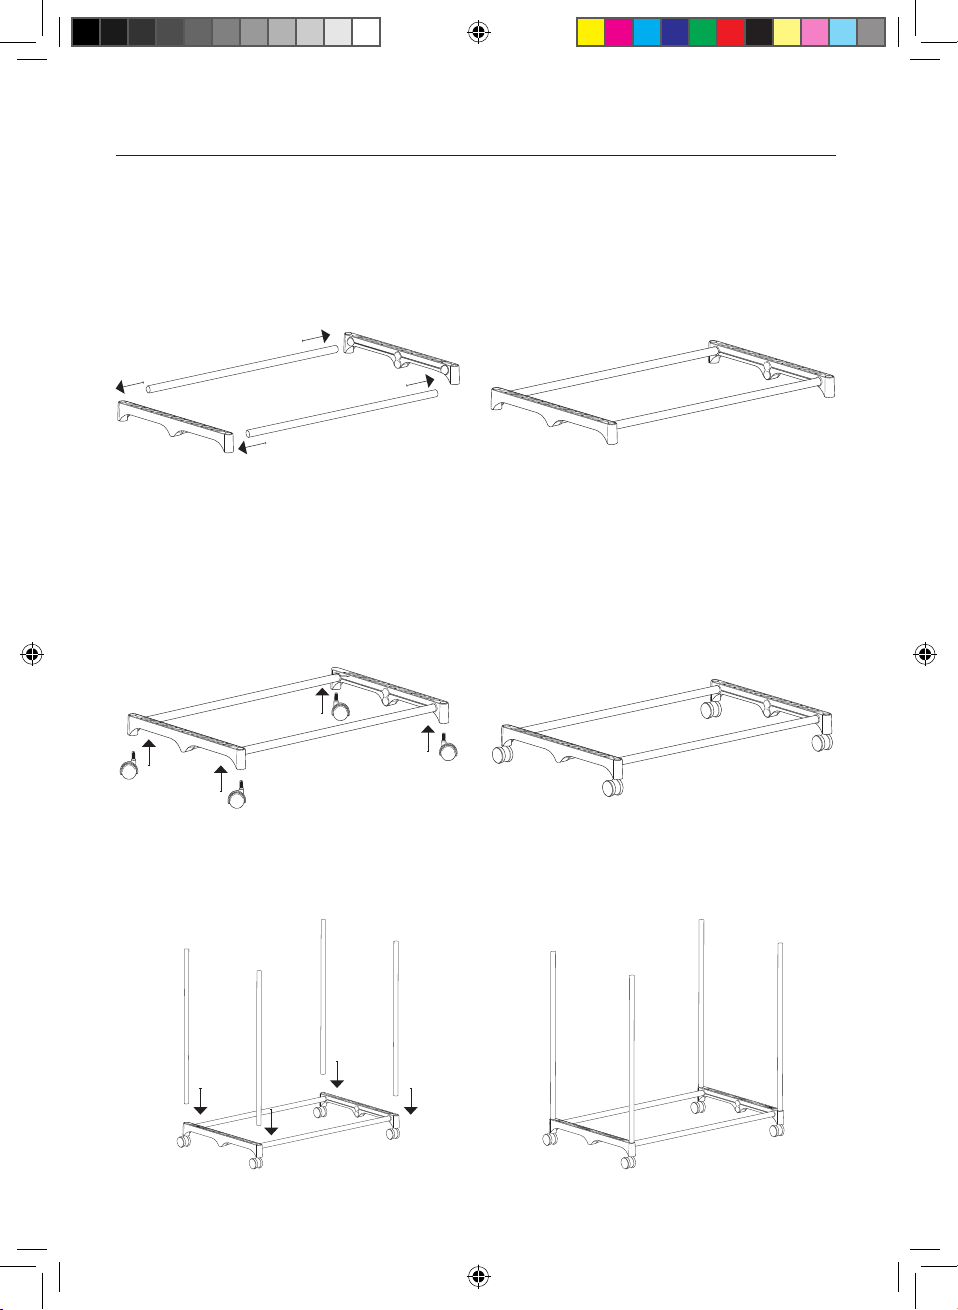
Step 1
Take two Poles and two Brackets and join them together.
Step 2
The curved edge of a Bracket should point downwards. Insert wheels into all four empty
downward sockets.
Note: Two wheels have brake clamps. Place these where you will be able to easily access
them when DriBUDDI is in use.
Step 3
Take four Poles and push them firmly into the four upward sockets on the base.
5
DBE_INS_A.indd 5 08/11/2013 16:58
Page 6
Your DriBUDDI Elite
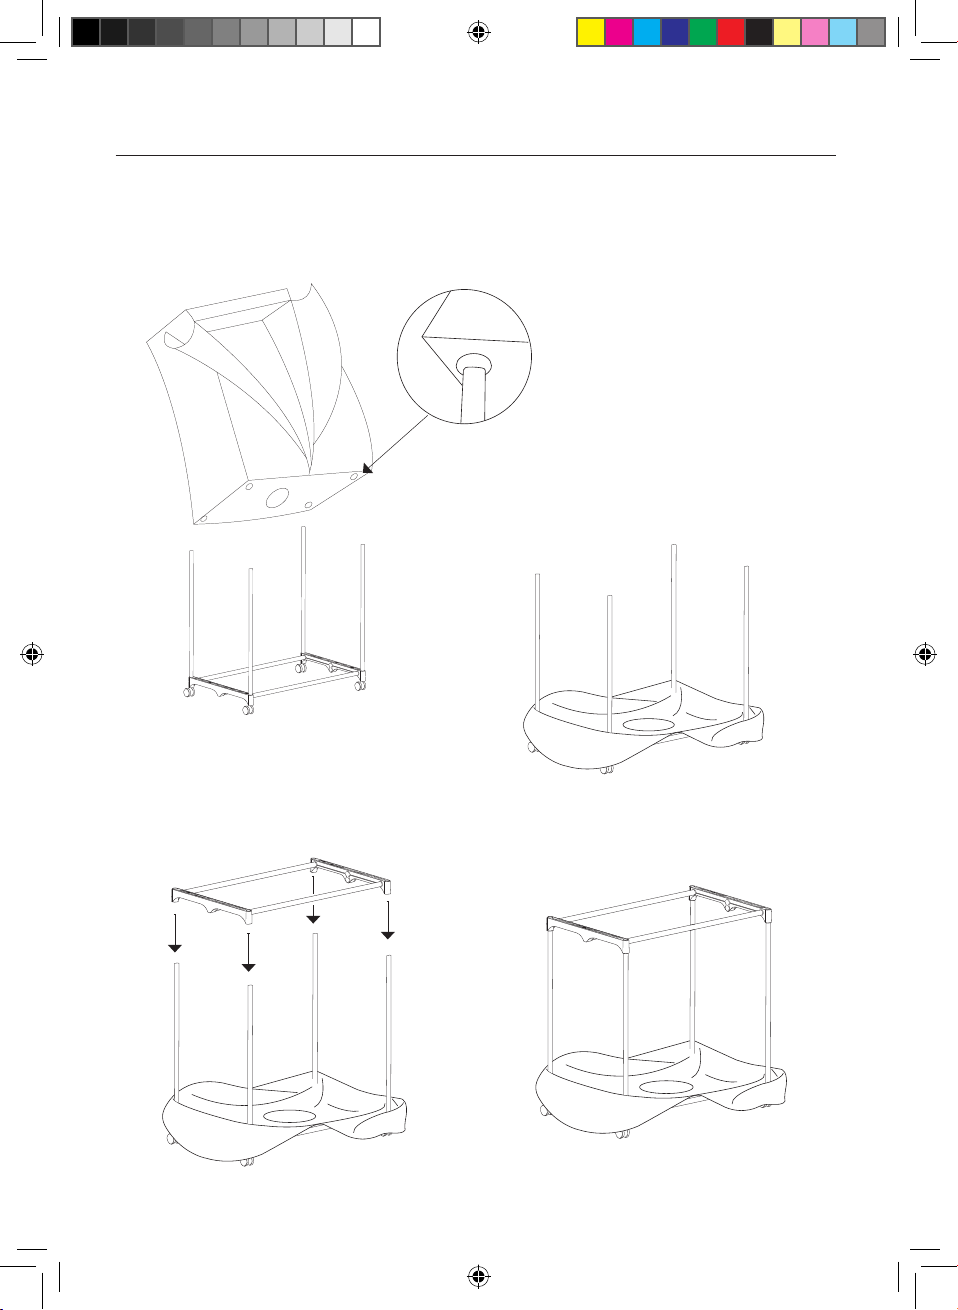
Step 4
Unfold the Cover and unzip. Locate the four corner holes at the bottom of the Cover (these
are different to the round air holes at the top).
Place each of the Poles on the frame through
a corner hole, then slide the cover down over
the Poles. Push the Cover all the way down
so it lies on the floor.
Step 5
Take two more poles and two more brackets and join them together. Add them to the frame,
with the curved ends pointing downwards.
6
DBE_INS_A.indd 6 08/11/2013 16:58
Page 7
Your DriBUDDI Elite
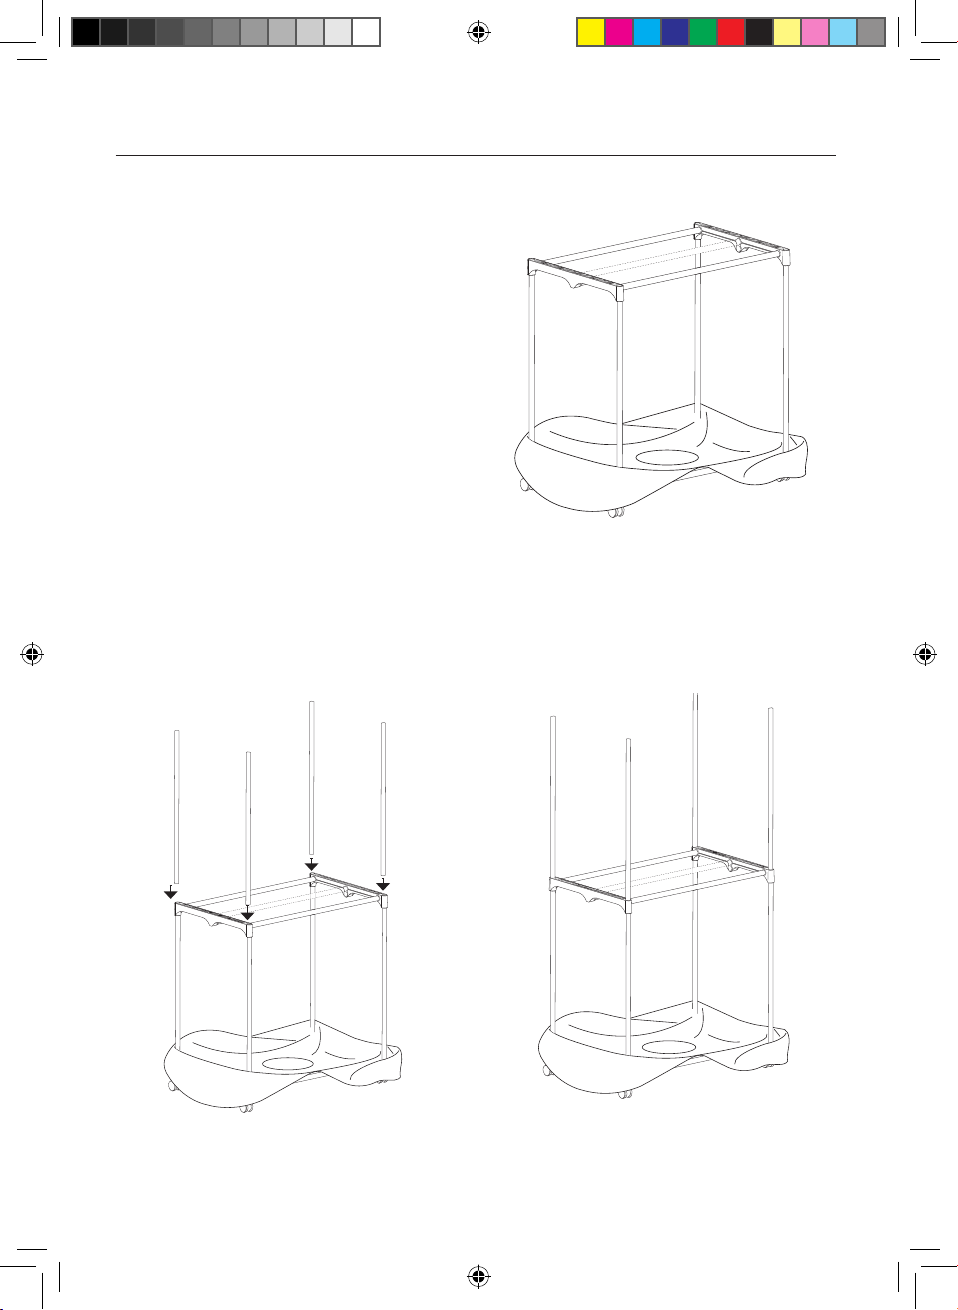
Step 6
You can add a third Pole to the middle if you
want to hang two rows of smaller items, like
children’s clothes or underwear.
Step 7
Add four more Poles.
7
DBE_INS_A.indd 7 08/11/2013 16:58
Page 8
Your DriBUDDI Elite
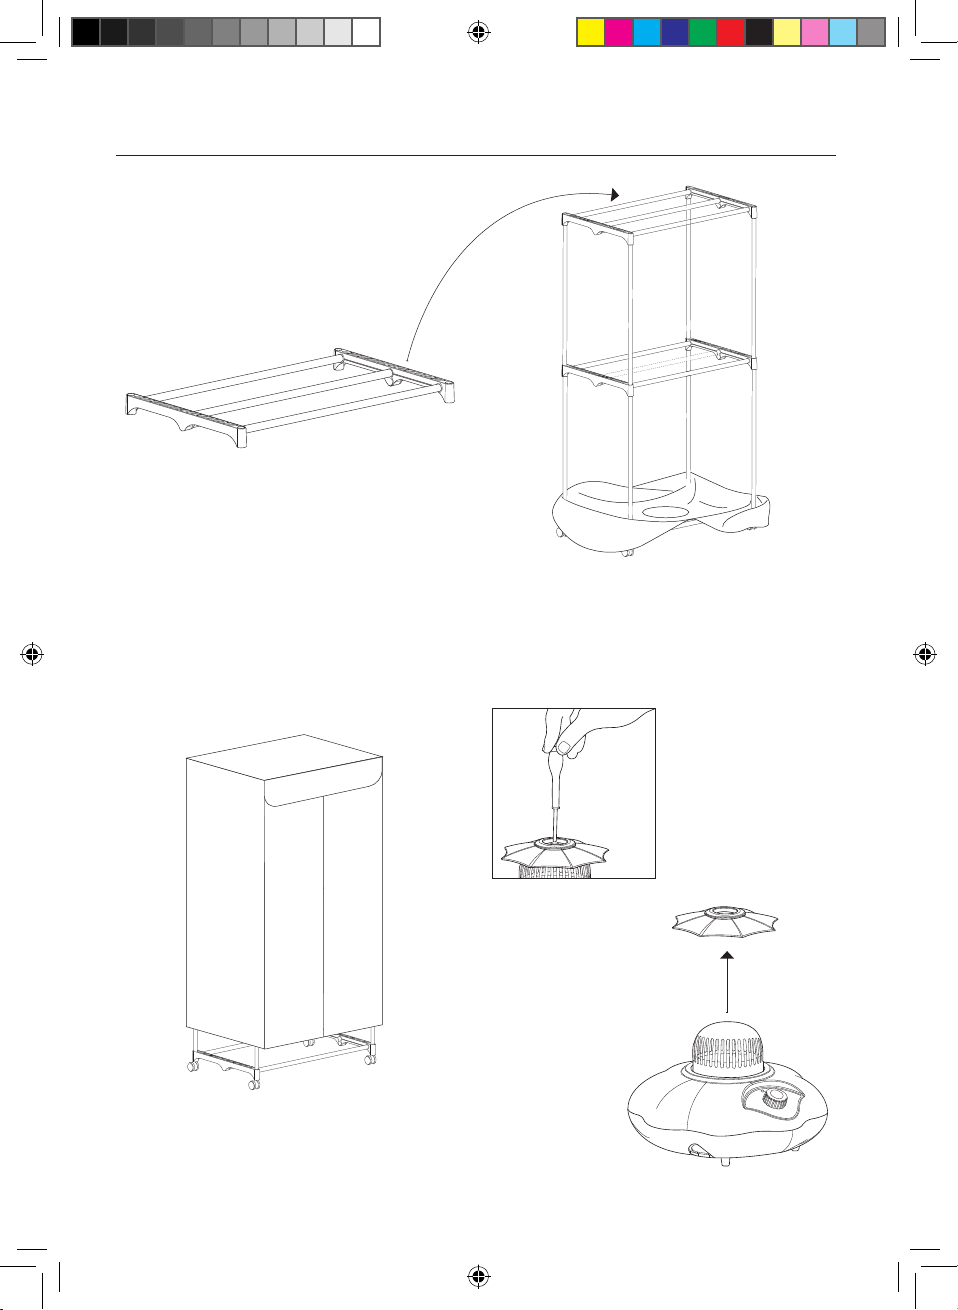
Step 8
Take the last two Brackets and three Poles
and join them together. Place on top of the
frame to complete it.
Step 9 Step 10
Pull the Cover up and over the frame. Using a Philips-head screwdriver, remove the
Motor Unit Top from the Motor Unit.
8
DBE_INS_A.indd 8 08/11/2013 16:58
Page 9
Your DriBUDDI Elite
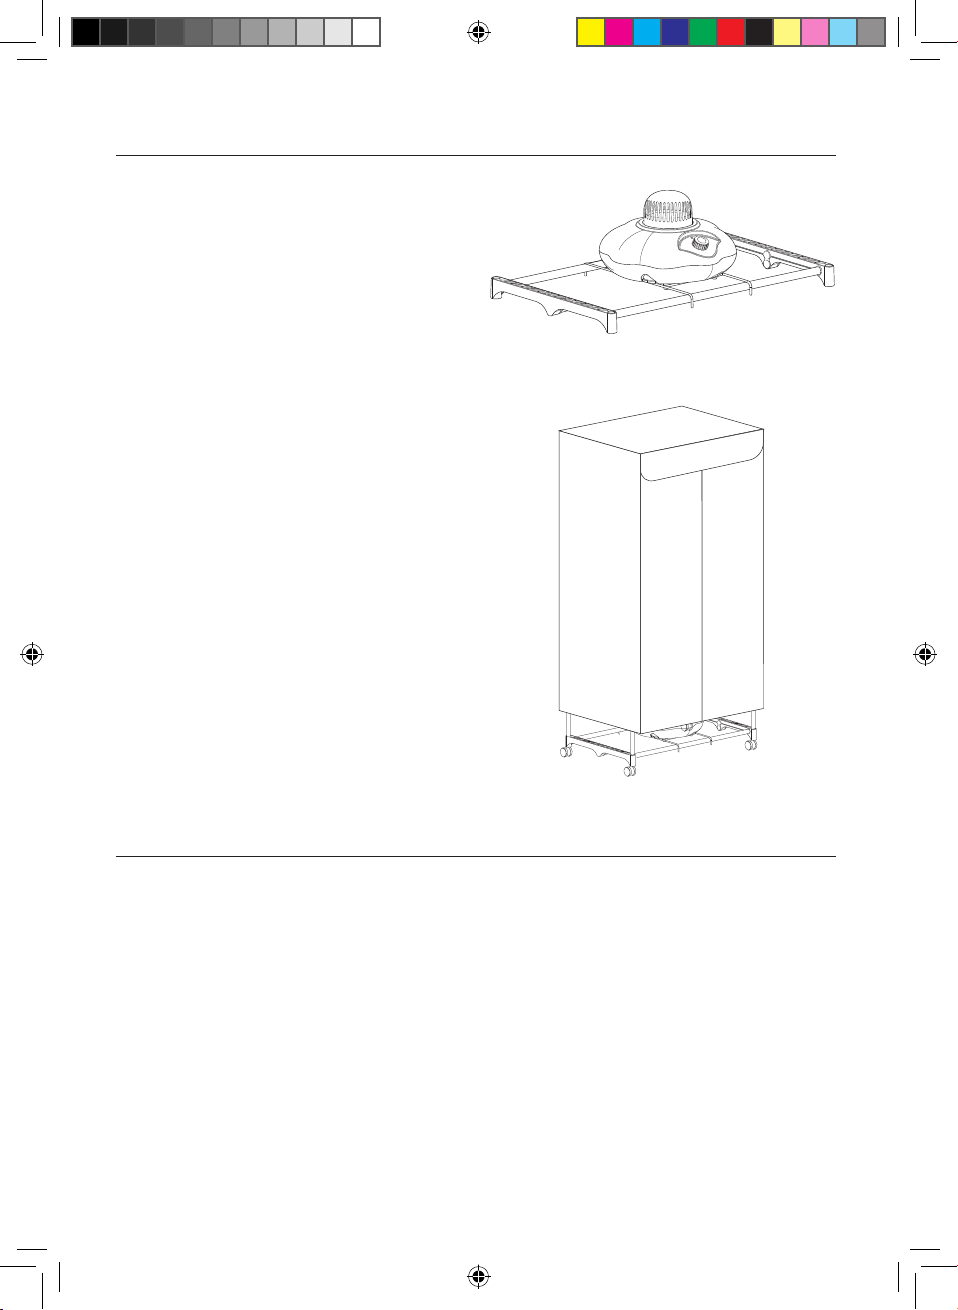
Step 11
Place the Motor Unit Shelf across the bottom
bars of DriBUDDI, placing it roughly in the
middle under the Cover. Place the Motor
Unit on the Shelf.
Step 12
Open the Cover and put the black ring at the
bottom of Cover over the metal grill on the
Motor Unit. Move the Motor Unit if necessary
so the ring fits easily over it.
Re-attach the Motor Unit Top using
a screwdriver.
Using DriBUDDI Elite
1. Plug DriBUDDI into a mains socket and switch on. A light should appear on the Motor
Unit, just above the dial. This signifies that DriBUDDI is on.
2. Unzip the Cover and hang your clothes inside DriBUDDI. DriBUDDI Elite can hold up to
15kg of damp clothing. Plastic hangers are recommended.
3. Close the zips.
4. You can use DriBUDDI in two different ways:
Set the Timer:
turn off.
Set to ON: Turn the dial anti-clockwise to turn DriBUDDI on. It will remain on until you turn
it off.
DBE_INS_A.indd 9 08/11/2013 16:58
Turn the dial clockwise to set the timer. When the time is up, DriBUDDI will
9
Page 10
Use only
BS1363A
approved
Recommendations
Please Note: DriBUDDI should only be used in a well-ventilated area. If ventilation is
lacking, it can also be used near an open window. DO NOT push directly up against a wall;
leave at least a gap of an inch so air can circulate.
• DriBUDDI is not recommended for clothes that are soaking/dripping wet. Clothes
should be ideally spin-dried by a washing machine or well-wrung if hand washed.
• DO NOT hang clothes too close together. They will dry quicker if air is allowed to
circulate between them.
Technical Information
Technical Information
Model Number Rated voltage Rated frequency Rated power
T-F90 220-230V 50/60Hz 1200W
Fuse and Mains Plug Replacement (UK & Ireland only)
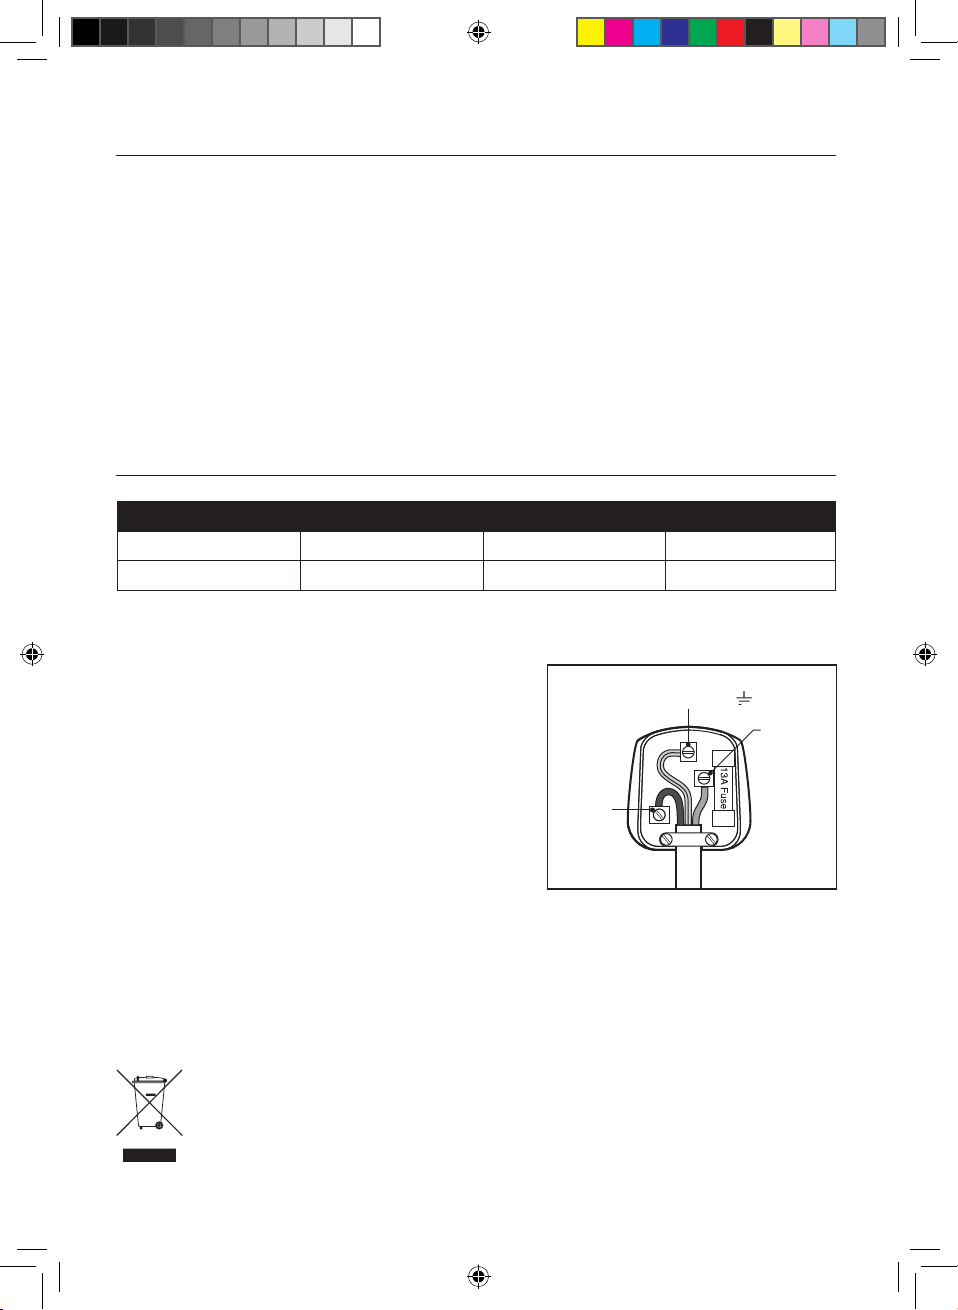
This appliance is fitted with a BS 1363
13-amp plug. If you have to replace the fuse,
only use those that are ASTA or BSI
approved to BS 1362 and with a rated
current of 13 amps.
Should you need to replace the plug; the
wires in the power cord are coloured in the
following way:
Connect
blue lead
to ‘N’ Neutral
Connect green/yellow
lead to ‘E’ or - Earth
E
L
N
Connect
brown lead
to ‘L’ - Live
Blue – Neutral Brown – Live Green & Yellow – Earth
As the colours of the wires in the power cord may not correspond with the coloured
markings identifying the terminals in your plug, and proceed as follows:
Disposal and the Environment
This product is covered by the waste electrical and electronic equipment (WEEE)
regulations. It should not be discarded with normal household waste, but taken to
your local collection centre for recycling. For further information, please contact the
local authority or approved disposal agency.
10
DBE_INS_A.indd 10 08/11/2013 16:58
Page 11
Cleaning and Maintenance
Clean only with a damp cloth. DO NOT rinse with water in any way.
Guarantee
This product is unconditionally guaranteed for one year against all defects of workmanship
and materials. This guarantee does not affect your statutory rights. If you have any problems
or queries about this product please contact JML.
UK Customer Services: 0800 781 7831 (Freephone)
ROI Customer Services: 041-978 0003 (Local rate)
11
DBE_INS_A.indd 11 08/11/2013 16:58
Page 12
Distributed by JML
JML Unit 1 Eastside, Port of Tyne
South Shields, NE33 5SP
UK Customer Services: 0800 781 7831 (Freephone)
ROI Customer Services: 041-978 0003 (Local rate)
E-mail: [email protected]
Product code: V04079 10/13
DBE_INS_A.indd 12 08/11/2013 16:58
 Loading...