

DRI Sleeper excel, Excel Instructions For Use And Care Manual

AND
The joy of a dry night’s sleep
Instructions for Use and Care
Please read the instructions before use
These instructions apply to both the DR I Sleeper® excel alarm
and the DRI Excel™ alarm (USA market).
In the context of these instructions reference to the
DRI Sleeper
Congratulations on the purchase of your DRI Sleeper® excel
bedwetting alarm.
Successful treatment with the DR I Sleeper
from a few weeks to a few months. For the best results work with
your child. Teach him or her how the alarm works and practise what
to do when the alarm is triggered. In the early stages of treatment
we advise that you help your child wake when the alarm sounds.
Always encourage your child and acknowledge their progress.
Keep using the DRI Sleeper
have been no wet beds for 14 consecutive nights.
®
excel also includes the DRI Excel™.
®
excel ty pically takes
®
excel EVERY NIGHT until there
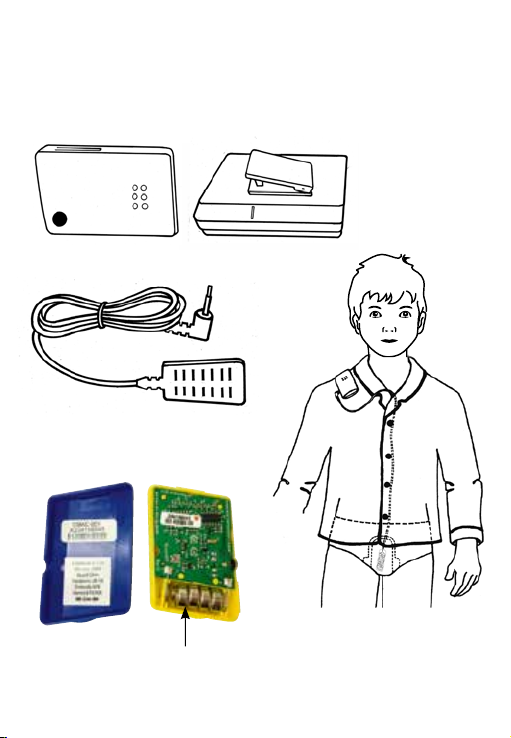
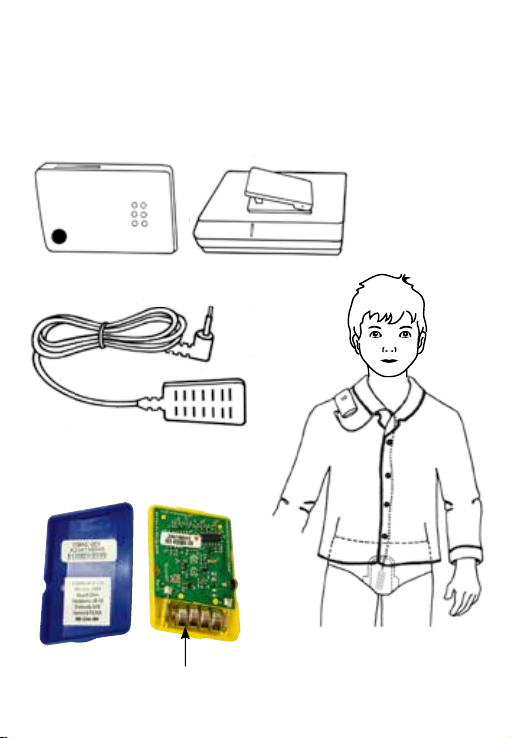
DRI Sleeper® excel Alarm
The DRI Sleeper® excel uses a plug-in conductive plastic sensor to detect when
the child wets the bed at night. The DRI Sleeper
• A clip-on body worn alarm that can be easily attached to the shoulder of the
night clothes
®
excel comprises:
• One Urosensor
™
• Four 1.5V alkaline button cell batteries
(included in the alarm)
batteries
Cleaning the DRI Sleeper® excel Alarm
Alarm: Wipe clean with a damp cloth that has been soaked in mild detergent or
skin disinfectant and wrung out. NEVER immerse the alar m in water or locate it
where urine can enter the device.
Urosensor
NOTE: do not use chlorine-based detergents or cleaners or put the Urosensor
™
: Rinse in liquid soap and water and dry well.
™
in the washing machine or dryer as this will irreparably damage the sensor.
How to use your DRI Sleeper® excel
1. Plug the Urosensor™ into the DR I Sleeper® excel alarm.
2. Test the alarm by placing something metal (stainless steel knife or stainless
steel scissors) across the Urosensor
3. Unplug the Urosensor
™
from the alarm box to disconnect the alar m after
testing.
4. Clip the alarm to the child’s night clothes – at the shoulder near the ear is best
and avoids the child lying on it.
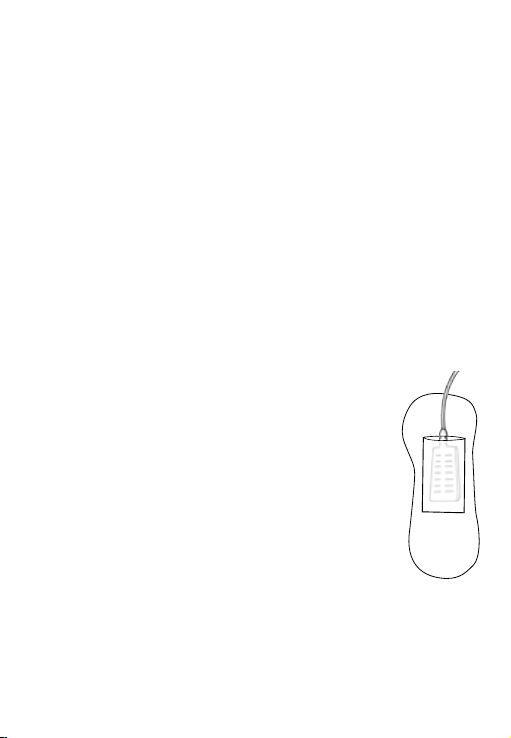
5. Place the Urosensor
™
inside a minipad by making a pocket
in the absorbent layers of the material. To do this, cut a
25mm (1 inch) slit into the absorbent layers with a sharp pair
of scissors. Alternatively, cut the top off the minipad. With
the point of the scissors create a pocket for the Urosensor
to slide into.
NOTE: the top layer of a minipad is designed to stay dr y and
if the Urosensor
not become wet and trigger the alarm when your child wets.
Make sure the Urosensor
absorbent material so that they will become wet and press onto
the Urosensor
™
is placed just under the top layer it may
™
is inserted under some layers of
™
.
Avoid using the very thin type of minipad because they can cause un reliable
triggering e.g. triggering in response to sweat or not t riggering at all due to
insufcient absorbent material.
™
and the alarm will trigger.
™
6. Stick the minipad into the crotch of the underwear
NOTE: Wrapping the Urosensor™ in a paper handkerchief or tissue before
inser ting it into the slit in the gusset can also help bedwetting to be detected more
qu i ckly.
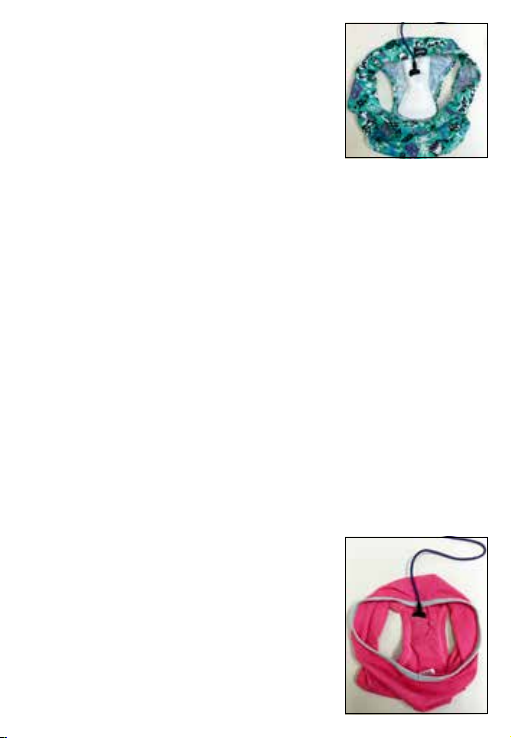
Using two pairs of underpants
1. Put on two pairs of close tting underpants.
2. Inser t the Urosensor
™
™ in between both pairs of
under pants above the crotch area, near where the
urine will rst escape.
NOTE: Wrapping the Urosensor
™
in a paper
handkerchief or tissue before inserting it between
the underpants can also help the bedwetting to be
detected more quickly.
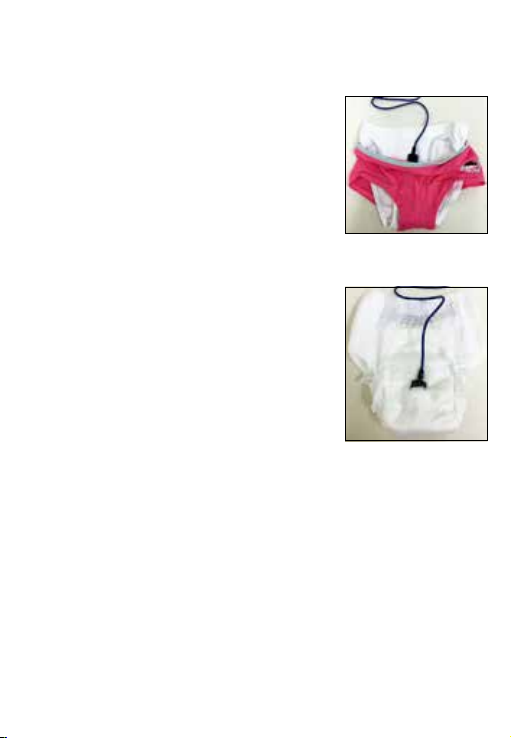
Using a disposable diaper or pull-ups
1. With a sharp pair of scissors, cut a 25mm
(1 inch) slit in the absorbent layers on the inside
of the pull-up diaper near the area where the urine
will rst escape.
2. With the point of the scissors, create a pocket for
the Urosensor
™
to slide into.
3. Insert the Urosensor
™
inside the pocket.
NOTE: Make sure the Urosensor
™
does not slide
down towards the back of the diaper or pull-ups away from the initial wetting
area.
NOTE: As with the minipad, it is important the Urosensor
™
is inserted under
some absorbent layers. However, disposable diapers tend to be highly absorbent
so wrapping the Urosensor
™
in a paper handkerchief or tissue, and inserting it
between the body and the diaper can help the moisture reach the Urosensor
™
before it is absorbed by the diaper. Diapers that include an absorbent gel layer
should be avoided as these will not result in sufcient moisture getting to the
Urosensor
™
to enable it to trigger.
close to where the urine will escape.
7. Put the Urosensor
and extend it up to the alarm. Plug the Urosensor
into the alarm.
8. When the alarm triggers make sure your child
gets out of bed promptly, unplugs the Urosensor
from the alarm to disconnect it and goes to the
bathroom.
9. Remove the Urosensor
detergent and dry it well.
NOTE: Do not use chlorine-based detergents or soaps as these will irreparably
damage the sensor.
10. Inser t the Urosensor
11. Plug the Urosensor
12. Repeat steps 5-10 if the alarm triggers again.
NOTE: During the day, and when not in use, unplug the Urosensor
battery life and put it in a safe place to prevent damage.
13. Keep using the DRI Sleeper
beds for 14 consecutive nights.
Using a paper handkerchief or some tissue
1. Wrap the Urosensor
2. Put on a pair of close tting underpants.
3. Insert the wrapped Urosensor
under pants near where the urine will rst escape.
Using double-gusset underpants
1. Cut a 25mm (1 inch) slit through one layer only of
a pair of double-gusset under pants, down towards
™
cord inside the night clothes
™
from the minipad and wash it in liquid soap or
™
in a new, dry minipad.
™
back into the alarm before getting back into bed.
®
Other ways to position the Urosensor™
excel every night until there have been no wet
™
in ½ a 2-3 ply paper handkerchief or tissue.
™
inside the
™
™
™
to save
the crotch area. The cut can be made on the inside
or the outside of the under wear.
2. Inser t the Urosensor
™
inside the slit near where
the urine will rst escape.
NOTE: Wrapping the Urosensor™ in a paper handkerchief or tissue before
inser ting it into the slit in the gusset can also help bedwetting to be detected more
qu i ckly.
Using two pairs of underpants
1. Put on two pairs of close tting underpants.
2. Inser t the Urosensor
™
™ in between both pairs of
under pants above the crotch area, near where the
urine will rst escape.
NOTE: Wrapping the Urosensor
™
in a paper
handkerchief or tissue before inserting it between
the underpants can also help the bedwetting to be
detected more quickly.
Using a disposable diaper or pull-ups
1. With a sharp pair of scissors, cut a 25mm
(1 inch) slit in the absorbent layers on the inside
of the pull-up diaper near the area where the urine
will rst escape.
2. With the point of the scissors, create a pocket for
the Urosensor
3. Insert the Urosensor
NOTE: Make sure the Urosensor
™
to slide into.
™
inside the pocket.
™
does not slide
down towards the back of the diaper or pull-ups away from the initial wetting
area.
NOTE: As with the minipad, it is important the Urosensor
some absorbent layers. However, disposable diapers tend to be highly absorbent
so wrapping the Urosensor
™
in a paper handkerchief or tissue, and inserting it
between the body and the diaper can help the moisture reach the Urosensor
™
is inserted under
™
before it is absorbed by the diaper. Diapers that include an absorbent gel layer
should be avoided as these will not result in sufcient moisture getting to the
Urosensor
™
to enable it to trigger.

Sewing a pocket of material into the underwear
1. If you do not wish to use any of the above methods,
then a pocket of material can be sewn into the
crotch of the underwear near where the urine will
rst escape and the Urosensor
into the pocket. The pocket must t the Urosensor
™
can be inserted
™
tightly to hold it in place and must be made of a
material that allows the urine to pass thought it onto
the Urosensor
™
.
‘Priming’: preparing your child to use the alarm
To help your child use the alarm it is recommended you practise what to do when
the alar m triggers during the night. This is called ‘Priming’.
Priming is based on a strategy called Prospective Memory which is setting
something up in the brain that has to be remembered in the future. In order
to prime your child’s brain to wake to the sound of the alarm, it is a matter of
practising what she or he needs to do when the alarm sounds.
Before your child settles down to go to sleep have him or her lie in bed
pretending to be asleep. Plug in the Urosensor
something metal across the Urosensor
alarm and go to the bathroom.
Practise this three or four times so that your child’s brain is more ready to
respond when she or he hears the alarm.
At the outset you may also need to get up when the alarm sounds in the night to
ensure your child follows this procedure. Also, depending on your child’s age,
you may need to assist him or her prepare the Urosensor
We recommend that parents do this every night until the child is successfully
responding to the feeling of a full bladder and waking to go to the bathroom
before the alarm sounds. This may take a week or two, but in the end it will be
worth it.
™
and trigger the alarm by putting
™
. Ask your child to get up, unplug the
™
for re-use.

Troubleshooting
1. The Urosensor™ does not trigger the alarm when tested prior to use. This
means either:
a. The batteries in the alarm need replacing.
To replace the batteries:
• Remove the back of the alarm casing by separating the two raised areas on
the side of the alarm. This is easy to do by putting any rigid item between
them and twisting gently.
• Take care not to touch the inter nal circuitry.
• Inser t 4 new LR44 button batteries in the direction indicated by the diagram
inside the alarm.
b. The Urosensor
NOTE: Just as the earphones of on an i-phone or i-pod need replacing the
Urosensor
At any time you can test the functioning of the Urosensor
Urosensor
water starting with the rst set of raised black detecting bars on the sensor.
Note how many raised black detecting bars need to be inserted before the alarm
triggers. If more than 6 pairs of bars need to be inser ted it is time to replace the
Urosensor
2. The child unplugs the Urosensor
In this case it can be helpful to put a rubber band tightly around the alarm with
the Urosensor
3. The batteries are rusty.
This is not caused by faulty batteries. It is caused by water having entered
inside the alarm casing e.g. by being put though the washing machine. If the
batteries have got wet it is also likely the circuitry in the alarm will be damaged
and the alarm will need to be replaced.
4. The alarm has suddenly lost its volume.
Sudden lowering of the volume will be due to interference with the buzzer.
This is not a warranty issue.
™
has worn out or has broken wires due to wear and tear.
™
will also need to be replaced over time.
™
™
into the alarm and slowly dipping the sensor into a glass of hot
™
.
™
during the night.
™
cord under the rubber band.
by plugging the

BATTERIES
Four LR44 button batteries are provided free of charge with the DRI Sleeper®
excel alarm. Replacement batteries should be available from local electronic and
photographic stores.
Battery life depends on usage. The batteries should last 6 months with nightly
use provided the alarm is unplugged when not in use.
WA R N I NG: Batteries should NOT be accessed by small children and should
only be replaced by adults. If a battery is accidentally swallowed by a child
please go IMMEDIATELY to your local hospital emergency centre. Do not
allow your child to eat or drink anything until examined by a doctor.
Always dispose of batteries in an environmentally responsible and safe way.
MA NUFAC T UR E R
Made in New Zealand by Anzacare Limited
PO Box 400, 13 Mahara Place, Waikanae 5036, NEW ZEALAND
www.dri-sleeper.com
WA R R AN TY
The manufacturer will replace any alarm which fails due to manufacturing fault
within 6 months of purchase (proof of purchase date must be provided).
Contact info@dri-sleeper.com if you have a war ranty claim.
This warranty does not cover batteries or misuse of or accidental damage to the
alarm or Urosensor
™
.

ET
Le bonheur d’une nuit de sommeil au sec
Indications d’utilisation et d’entretien
Veuillez lire les instructions avant d’utiliser le produit
Ces instructions concernent à la fois l’alarme DRI Sleeper® excel
et l’alarme DRI Excel
Dans le cadre de ces instructions, toute référence au
DRI Sleeper
®
excel fait aussi référence au DRI Excel™.
Félicitations pour votre achat de l’alarme DRI Sleeper® excel contre
l’incontinence nocturne.
Un traitement efcace à l'aide du DRI Sleeper
généralement entre quelques semaines et quelques mois. Vous
obtiendrez de meilleurs résultats en travaillant main dans la main avec
votre enfant. Montrez-lui comment fonctionne l’alarme et répétez
plusieurs fois la procédure à suivre lorsque l’alarme se déclenche.
Nous vous conseillons, au cours des premières phases du traitement,
d’aider votre enfant à se réveiller lorsque l’alarme sonne. Encouragez
systématiquement votre enfant et reconnaissez ses progrès.
Continuez à utiliser le DRI Sleeper
jusqu’à ce qu’il n’y ait plus d’accidents pendant 14 nuits consécutives.
™
(marché USA).
®
excel prend
®
excel TOUTES LES NUITS
Alarme DRI Sleeper® excel
Le DRI Sleeper® excel emploie un détecteur en plastique conducteur qui se
branche et qui permet de détecter lorsque l’enfant mouillera son lit la nuit. Le
DRI Sleeper
• d’une alarme qui se porte sur le corps et s’attache aisément à l’épaule du
pyjama par une pince
®
excel est composé :
• d’un Urosensor
™
• de quatre piles boutons alcalines de 1,5 V
(incluses dans l’alarme)
piles

Nettoyage de l’alarme DRI Sleeper® excel
Alarme : Essuyer à l’aide d’un chiffon humide qui a été trempé dans un détergent doux
ou un désinfectant pour la peau et essoré. NE JAMAIS immerger l’alarme dans l’eau ni
la placer à un endroit où des urines pourraient pénétrer à l’intérieur de l’appareil.
™
Urosensor
REMARQUE : ne pas utiliser de détergents ou de produits nettoyants à base de
chlore ni mettre l’Urosensor
: Rincer au savon liquide et à l’eau, puis sécher soigneusement.
™
dans la machine à laver ou le sèche-linge, car ceci
endommagerait le détecteur de façon irréversible.
Comment utiliser votre DRI Sleeper® excel
1. Branchez l’Urosensor™ sur l’alarme DRI Sleeper® excel.
2. Vériez le fonctionnement de l’alarme en plaçant un objet métallique (couteau ou
ciseaux en inox) sur l’ Urosensor™ et l’alarme se déclenchera.
3. Débranchez l’Urosensor™ du boîtier de l’alarme pour déconnecter l’alarme après
le test.
4. Attachez l’alarme au pyjama de l’enfant. Le meilleur emplacement est au niveau
de l’épaule, près de l’oreille, car cette position permet d’éviter que l’enfant ne
s’allonge dessus.
5. Placez l’Urosensor™ à l’intérieur d’une serviette hygiénique mini en créant une
poche à l’intérieur des couches absorbantes de la matière. Pour ce faire, faites
une entaille de 25 mm dans les couches absorbantes à l’aide d’une paire de
ciseaux pointus. Vous pouvez aussi couper la partie supérieure
de la serviette hygiénique mini. À l’aide de la pointe des
ciseaux, créez une poche dans laquelle vous pourrez glisser
l’Urosensor™.
REMARQUE : la couche supérieure de la serviette hygiénique
mini est conçue pour rester au sec et si l’ Urosensor™ est placé juste
en-dessous de la couche supérieure, il est possible que l’humidité
ne l’atteigne pas et qu’il ne déclenche pas l’alarme lorsque votre
enfant mouillera le lit. Assurez-vous que l’Urosensor™ est inséré
sous quelques couches de matière absorbante an qu’elles puissent
s’humidier et être en contact avec l’Urosensor™.
Évitez d’utiliser une serviette hygiénique mini très mince, car celles-ci rendent le
déclenchement moins able (par ex. l’alarme se déclenche à cause de la transpiration
ou ne se déclenche pas, car il n’y a pas assez de matière absorbante).

6. Collez la serviette hygiénique mini à l’entrejambe des
sous-vêtements, proche de là où s’écoulent les urines.
7. Placez le cordon de l’ Urosensor™ à l’intérieur
du pyjama et tirez-le jusqu’à l’alarme. Branchez
l’Urosensor™ sur l’alarme.
8. Lorsque l’alarme se déclenche, assurez-vous que
votre enfant sorte du lit rapidement, qu’il débranche l’
Urosensor™ de l’alarme pour la désactiver et qu’il se
rende aux toilettes.
9. Retirez l’Urosensor™ de la serviette hygiénique mini et lavez-le à l'aide d'un savon
liquide ou d'un détergent, puis séchez-le soigneusement.
REMARQUE : Ne pas utiliser de détergents ou de savons à base de chlore, ceux-ci
endommageraient le détecteur de façon irréparable.
10. Insérez l’Urosensor™ dans une nouvelle serviette hygiénique mini sèche.
11. Rebranchez l’Urosensor™ sur l’alarme avant de vous recoucher.
12. Renouvelez les étapes 5 à 10 si l’alarme se déclenche à nouveau.
REMARQUE : Pendant la journée et quand il n’est pas utilisé, débranchez
l’Urosensor™ an d’économiser l’autonomie de la batterie et conservez-le dans un
lieu sûr pour éviter qu’il ne soit endommagé.
13. Continuez à utiliser le DRI Sleeper® excel toutes les nuits jusqu’à ce qu’il n’y ait
plus d’accidents pendant 14 nuits consécutives.
Autres façons de mettre l’Urosensor™ en place
À l’aide d’un mouchoir en papier
1. Emballez l’Urosensor™ dans la moitié d’un mouchoir en papier de double ou
triple épaisseur.
2. Mettez un sous-vêtement près du corps à votre enfant.
3. Insérez l’Urosensor™ ainsi emballé à l’intérieur du sous-vêtement, proche de là
où s’écoulent les urines.
Avec des sous-vêtements à double gousset
1. Faites une entaille de 25 mm à travers une seule
couche du sous-vêtement à double gousset, au niveau
de l’entrejambe. Cette entaille peut être à l’intérieur
ou à l’extérieur du sous-vêtement.
2. Insérez l’Urosensor™ dans l’entaille, proche de là où
s’écoulent les urines.
 Loading...