

Page 1

1
English
1. Introduction ........................................................................................................... 2
1.1 Overview
1.2 Main Features
2. Safety/Precautions ............................................................................................... 3
2.1 Safety
2.2 Precautions
3. Check Point before Use ....................................................................................... 5
3.1 Accessories
4. Controls/Functions .............................................................................................. 6
4.1 Front Panel
4.2 Rear Panel
4.3 Remote controller
5. How to Connect .................................................................................................. 11
6. Operation ............................................................................................................ 12
6.1 Getting Started
6.2 System Setting
6.3 Channel Manager
6.4 Installation
6.5 Utils
6.6 Game
6.7 Common Interface
6.8 Conditional Access System
6.9 PVR
7. Trouble Shooting ............................................................................................... 61
8. Specifications ..................................................................................................... 62
Contents
DiSEqC is a trademark of EUTELSAT
Page 2
3
English
2
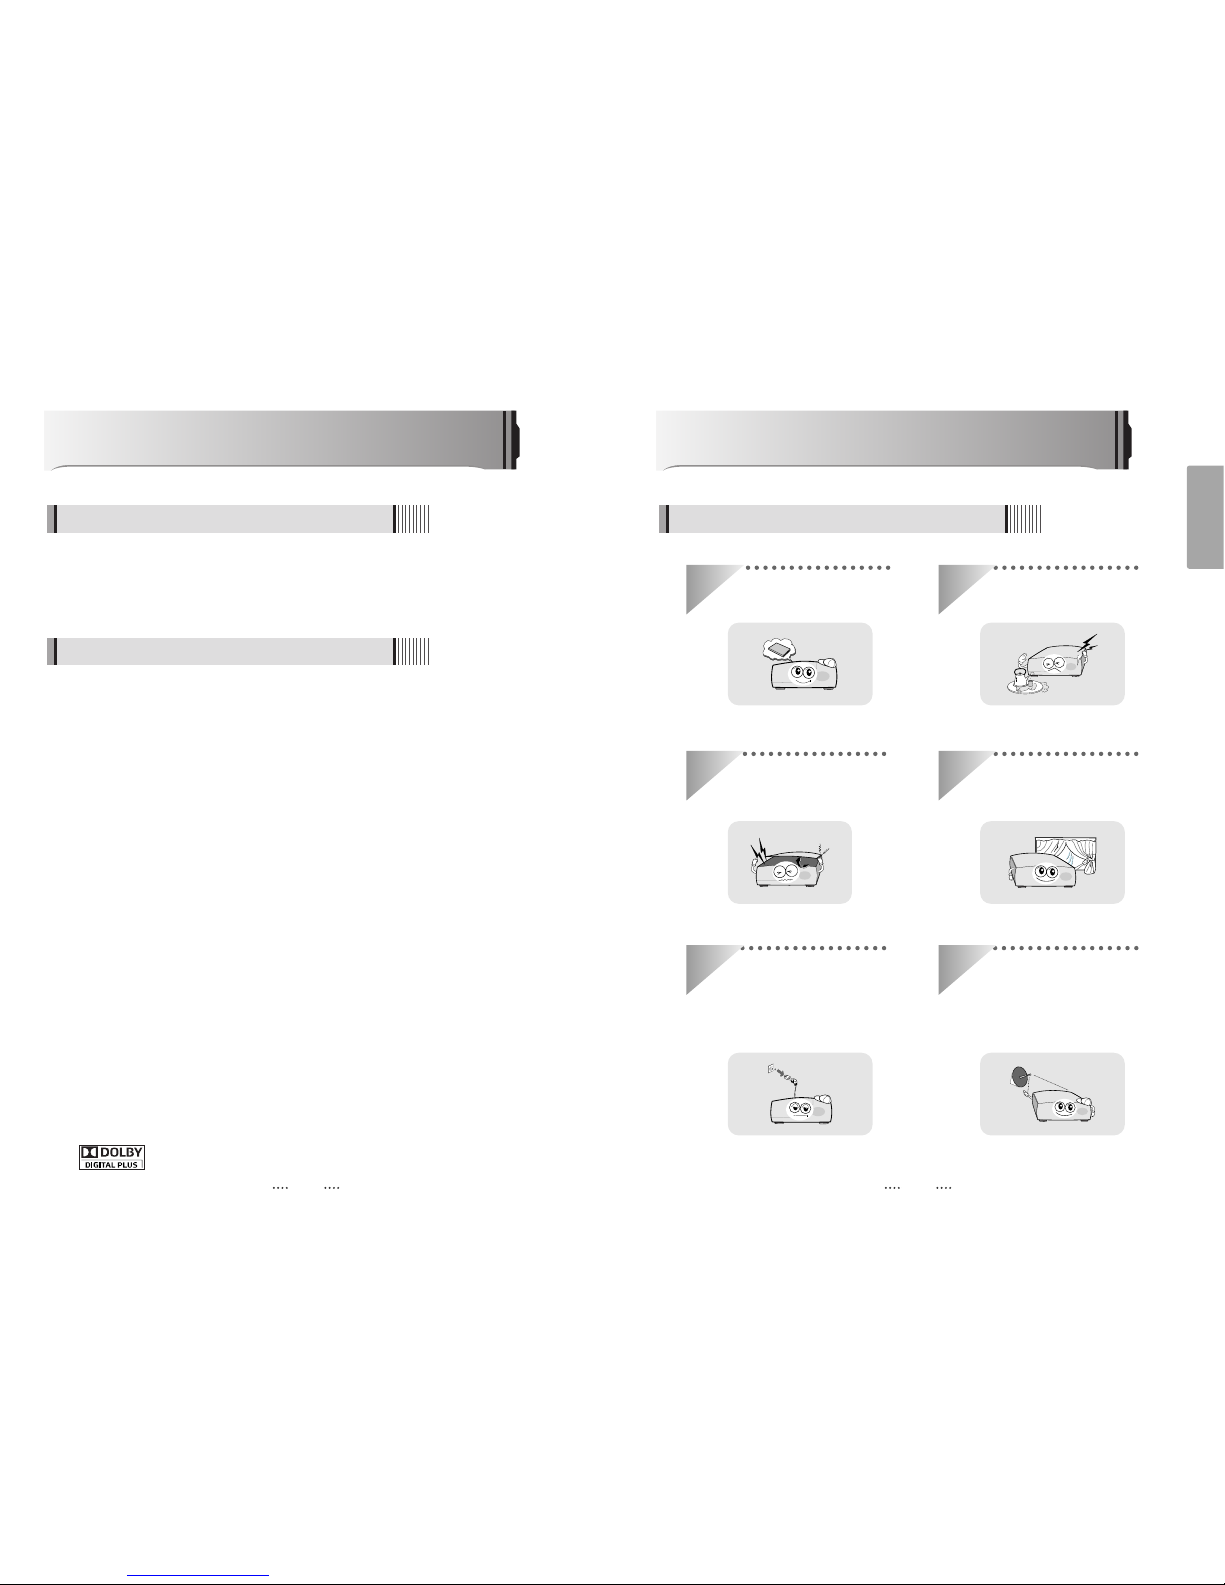
Be sure to read this user's manual before
starting the operation of the unit.
Do not touch the power cord with wet
hands as it may cause electric shock.
Never open the cover. It is very
dangerous to touch the inside of the
unit due to possible electric shock.
Place the unit in a well ventilated and
no-heat environment.
When you do not use this unit for a
long time, make sure that power cord
is pulled out from the outlet. Also do
not use a damaged power cord as it
may cause fire or electric shock.
A professional installation is required.
If reception is interrupted, contact
your local service centre.
Safety/Precautions
2.1 Safety
This satellite receiver is designed for using digital free-to-air channel reception. Enjoy the rich
choice of more than 10,000 different channels, broadcasting a large range of culture,
sports, cinema, news, events, etc. This receiver is a technical masterpiece, assembled with
the highest qualified electronic parts.
Introduction
1.1 Overview
ᶀ
Video Resolution : 1080p / 1080i / 720p / 576p / 576i
ᶀ
DVR Ready via USB External Mass Data Storage Device
ᶀ
Time Shift, Record & Playback
ᶀ
Embedded CONAX CAS7
ᶀ
Common Interface
ᶀ
DVB-S, MPEG-2/MPEG-4 Compliant
ᶀ
Advanced Blind Scan
ᶀ
1 HDMI output
ᶀ
Multisatellite search.
ᶀ
On-screen display with true color full resolution.
ᶀ
DiSEqC control version 1.0, 1.1, 1.2 and USALS compatible.
ᶀ
Enhanced 16 favorite channel groups.
ᶀ
Powerful channel control by favorites, lock, skip, move and delete function.
ᶀ
Channel sort by alphabet, transponder and CAS.
ᶀ
Multilingual GUI (OSG & Menu): English, Russian, Deutsch, Czech.
ᶀ
Installation wizard
ᶀ
Extended EPG and program reservation on EPG.
ᶀ
Teletext & Subtitle by OSD and VBI
ᶀ
Last channel memory function.
ᶀ
Total 10,000 channels programmable.
ᶀ
Preprogrammed channels (Optional)
ᶀ
Dolby digital audio output (S/PDIF)
ᶀ
Component output (YPbPr)
ᶀ
Various games
ᶀ
Software & channel database upgrade via RS-232C: PC to STB/ STB to PC.
ᶀ
Parental lock / Installation lock / receiver lock.
ᶀ
Zoom in function on pause/ live channel
ᶀ
Multipicture display.
ᶀ
High speed software upgrade via USB 2.0
ᶀ
MP3 play and JPEG viewer
ᶀ
Support 3 USB Port on Front Panel & Rear Panel
ᶀ
Auto Voltage (AC 100 - 250V) SMPS.
ᶀ
Lan 10/100Mbps Ethernet
ᶀ
Manufactured under license from Dolby Laboratories.
“Dolby” and the double-D Symbol are trademarks of Dolby Laboratories.
1.2 Main Features
Page 3
5
English
4
The accessories below are included with this receiver:
Points to Check before Use
3.1 Accessories
Your dish should be properly installed and azimuth and elevation must be precisely set up.
ᶀ
This unit supports DiSEqC 1.2 and can work with a compatible antenna positioner.
Ask your dealer for information.
3.2 The Satellite dish
When installing the unit
2.2 Precautions
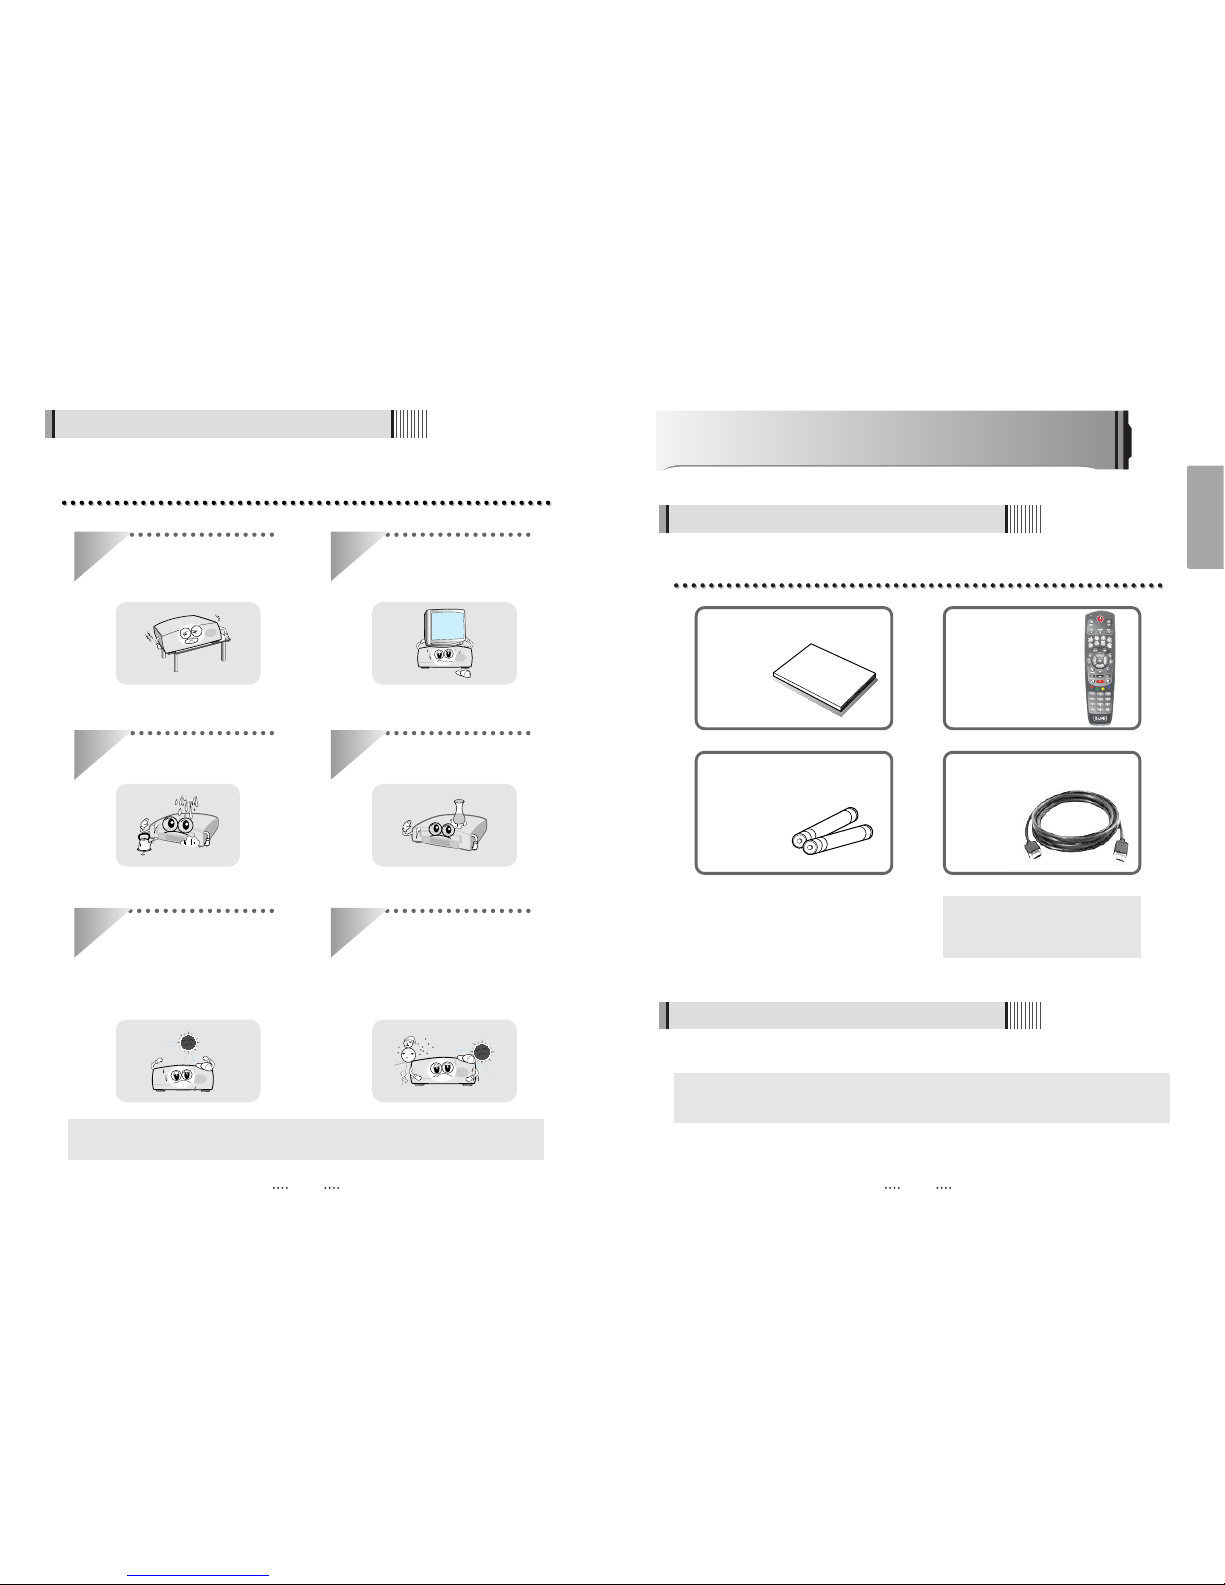
Install the unit horizontally. An uneven
installation may cause the unit to be
damaged.
Do not put heavy items such as a TV
set on the unit. That may damage
the unit.
Do not leave the unit where the
water drops or splashes.
Do not put water holding items such
as vases on the unit.
Moving the unit to a hot area from a
cold one will cause condensation.
Do not operate the unit for one or two
hours or until it has dried completely.
ᶀ The mains plug is used as the disconnect device.
The disconnect device shall remain readily operable.
Do not install the unit:
⍥Where it is subject to vibrations
⍥Where it is exposed to direct sunlight
⍥Where there is humidity
⍥Where the temperature is too high or too low.
⍥Where there is no ventilation
User's manual : 1
User's manual
Remote control : 1
Batteries (AAA type) : 2 HDMI cable : 1
ᶀ
If any of the above-listed
accessories is missing, contact
your sales representative.
Page 4
7
English
6
4.2 Rear Panel
Controls/Functions
4.1 Front Panel
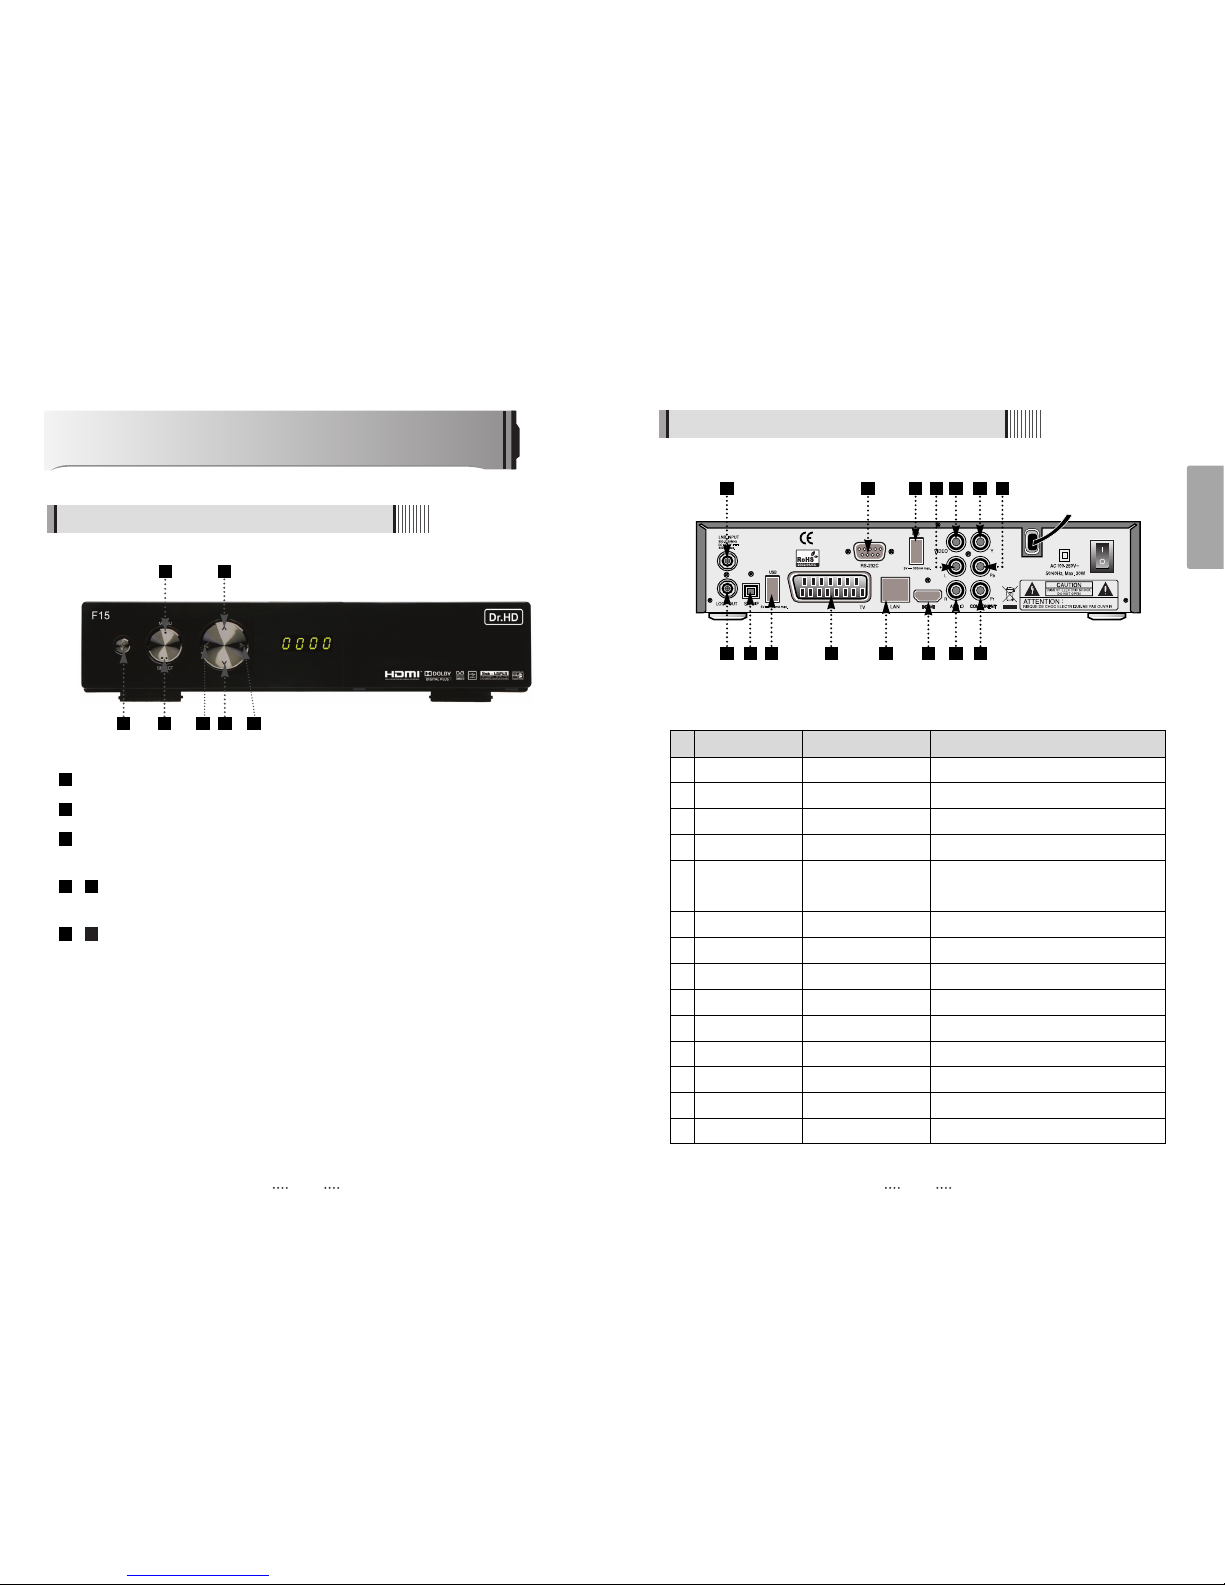
Power : Switches the receiver between “Standby” and “Power ON” modes.
Menu : To enter or exit the main menu.
Select : To show the Channel List in non-menu mode and select on item or confirm in
menu mode.
- VOL
ȜȞ : To change the volume level in non-menu mode and modify a setting
in menu mode.
- CH ƌƊ : To switch channels or change the cursor position on the application
screen.
76
54
3
2
1
2 6
1 3 7
No. Name Connector Function
1 LNB INPUT IEC 169-24 FEMALE IF input from LNB to digital tuner
2 LNB OUTPUT IEC 169-24 FEMALE IF loop-through output from digital tuner
3 S/PDIF Fiber Optic Digital audio output (Optical)
4 USB USB A-type USB 2.0
5 TV SCART SCART Video output(CVBS, RGB)
Audio output(R, L)
6 RS-232C DB-9 Low speed serial port
7 LAN RJ-45 10/100Mbps Ethernet
8 HDMI HDMI Digital Video/Audio Output
9 VIDEO RCA cinch Composite video output
10 AUDIO L RCA cinch Left audio output
11 AUDIO R RCA cinch Right audio output
12 Y RCA cinch Component video output(Y)
13 Pb RCA cinch Component video output(Pb)
14 Pr RCA cinch Component video output(Pr)
1 6
9 124 10 13
2 3 54
7 8 11 14
54
Page 5
9
English
8
4.3 Remote controller4.3 Remote controller
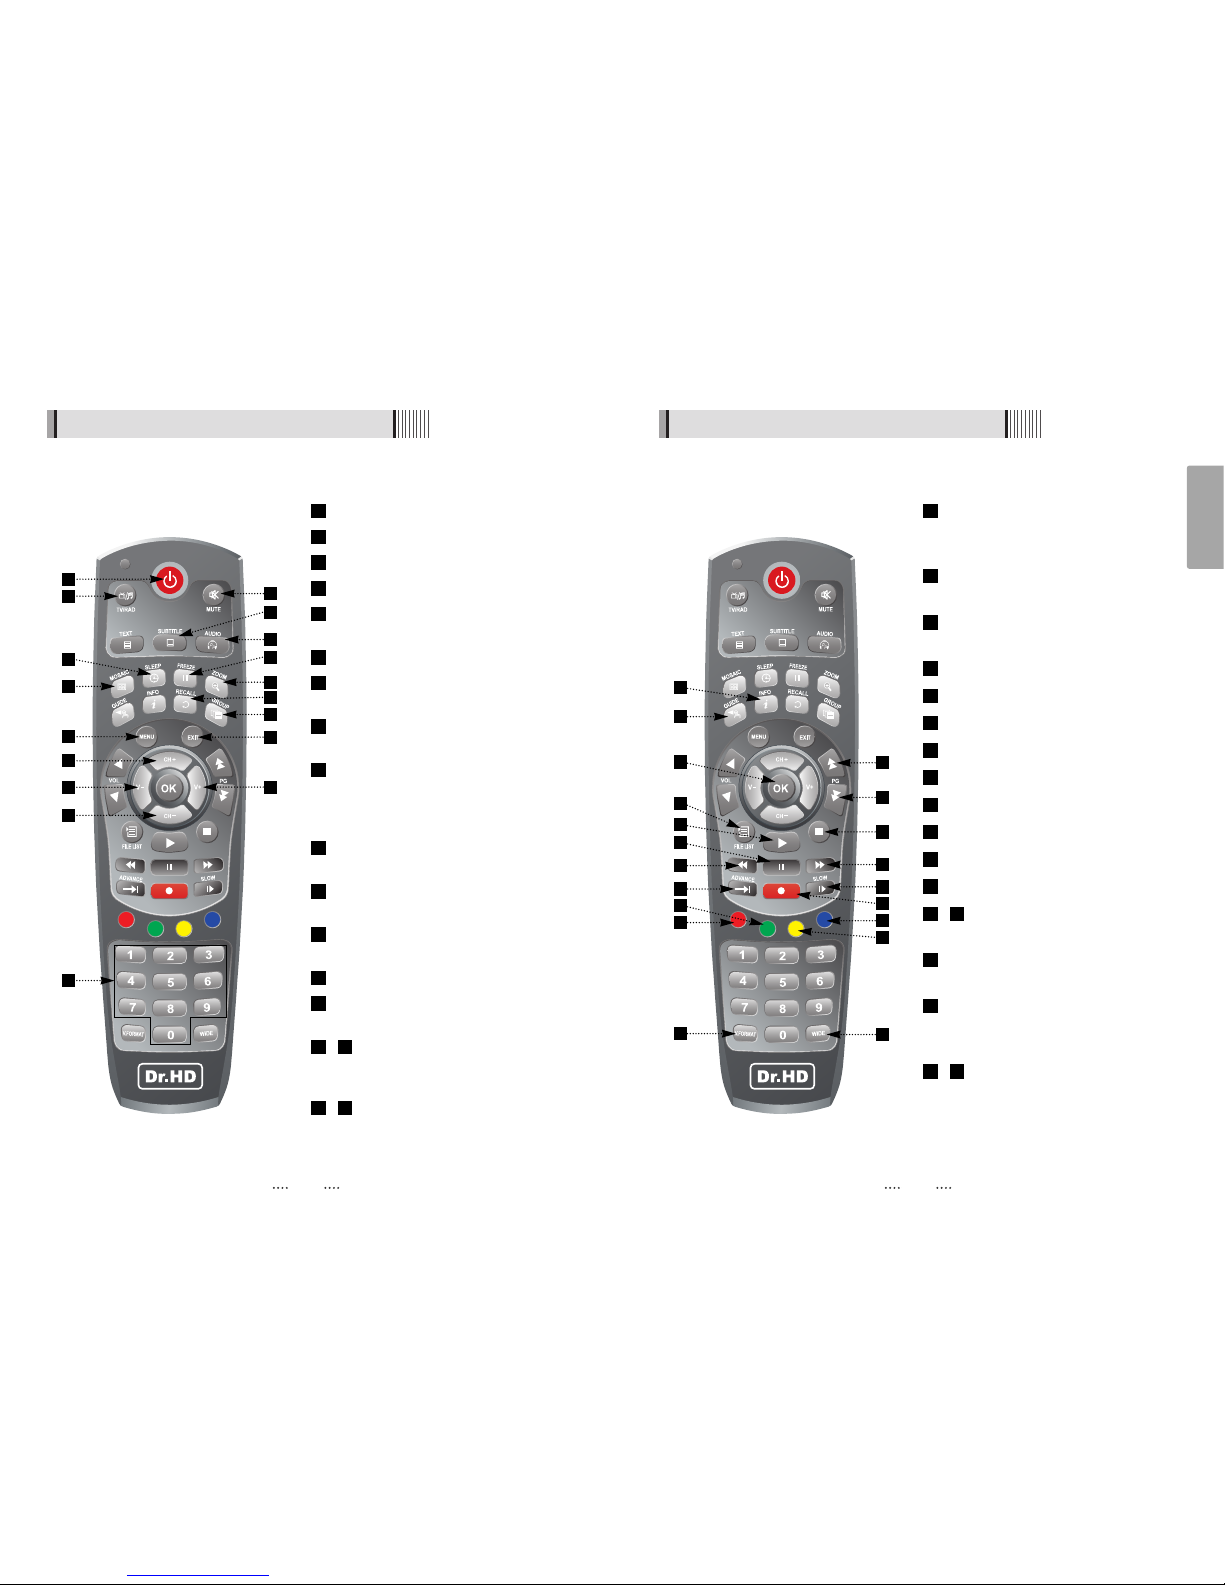
POWER :To turn the receiver On/Off.
MUTE: To turn the sound On/Off.
MOSAIC : To display multiple pictures.
SLEEP : To set the STB off after minutes.
FREEZE : To pause the video. Press again
to resume the video.
ZOOM : To zoom In/Out.
TV/RADIO: To switch between TV and
Radio.
SUBTITLE : To show the subtitle contents if
subtitle is transmitted.
AUDIO : To show the Multi-language audio
track, the stereo-mono mode and subtitle
information. Used for special functions in
menu mode.
Numeric Keys (0-9) : To enter numerical
settings (such as channel numbers) directly.
RECALL :To move to the previous channel.
Used for special functions in menu mode.
GROUP :To change the channel
groups(Satellites or favorite groups)
MENU : To enter or exit the main menu.
EXIT :To exit from the present menu and
move to the previous menu.
- Up & Down : To switch channels in non-
menu mode and move the cursor
up/down in menu mode.
- Left & Right : To change the volume
level in non-menu mode and modify a
setting in menu mode.
1817
1615
14
13
12
11
10
9
8
7
6
5
4
3
2
1
OK: To show the Channel List in non-menu
mode and select an item or confirm in
menu mode.
INFO : To show information about the current
program. Press twice to show detail.
GUIDE : To show the TV/Radio program
guide.
PLAY :Play Content.
PAUSE : Pause playback.
FILELIST :To display the filelist.
STOP :Stop Playback.
REC : Start recording.
RWD : Playback in rewind mode.
FWD : Playback in forward mode.
SLOW : Playback in slow mode.
ADVANCE : Go to live channel.
- Color Key : Select the option such as
View List, Select Disk, Rename.
V.FORMAT : To switch the resolution of
video output.
Wide : To select a TV aspect ratio with Pan
Scan or Letter-Box(4:3) (Full screen or
Pillar box(16:9).
- Page Up/Down : To move to the next or
previous page when many pages are
available.
3837
36
35
3431
30
29
28
27
26
25
24
23
22
21
20
19
1
7
13
15
16
17
2
6
12
9
21
14
18
28
37
38
25
29
34
35
27
30
31
36
5
11
8
33
26
3
4
22
24
19
23
32
20
10
Page 6
11
English
10
Operation
6.1 Getting Started
After your receiver is powered on, proceed with installation as follows :
(1) Installation Wizard
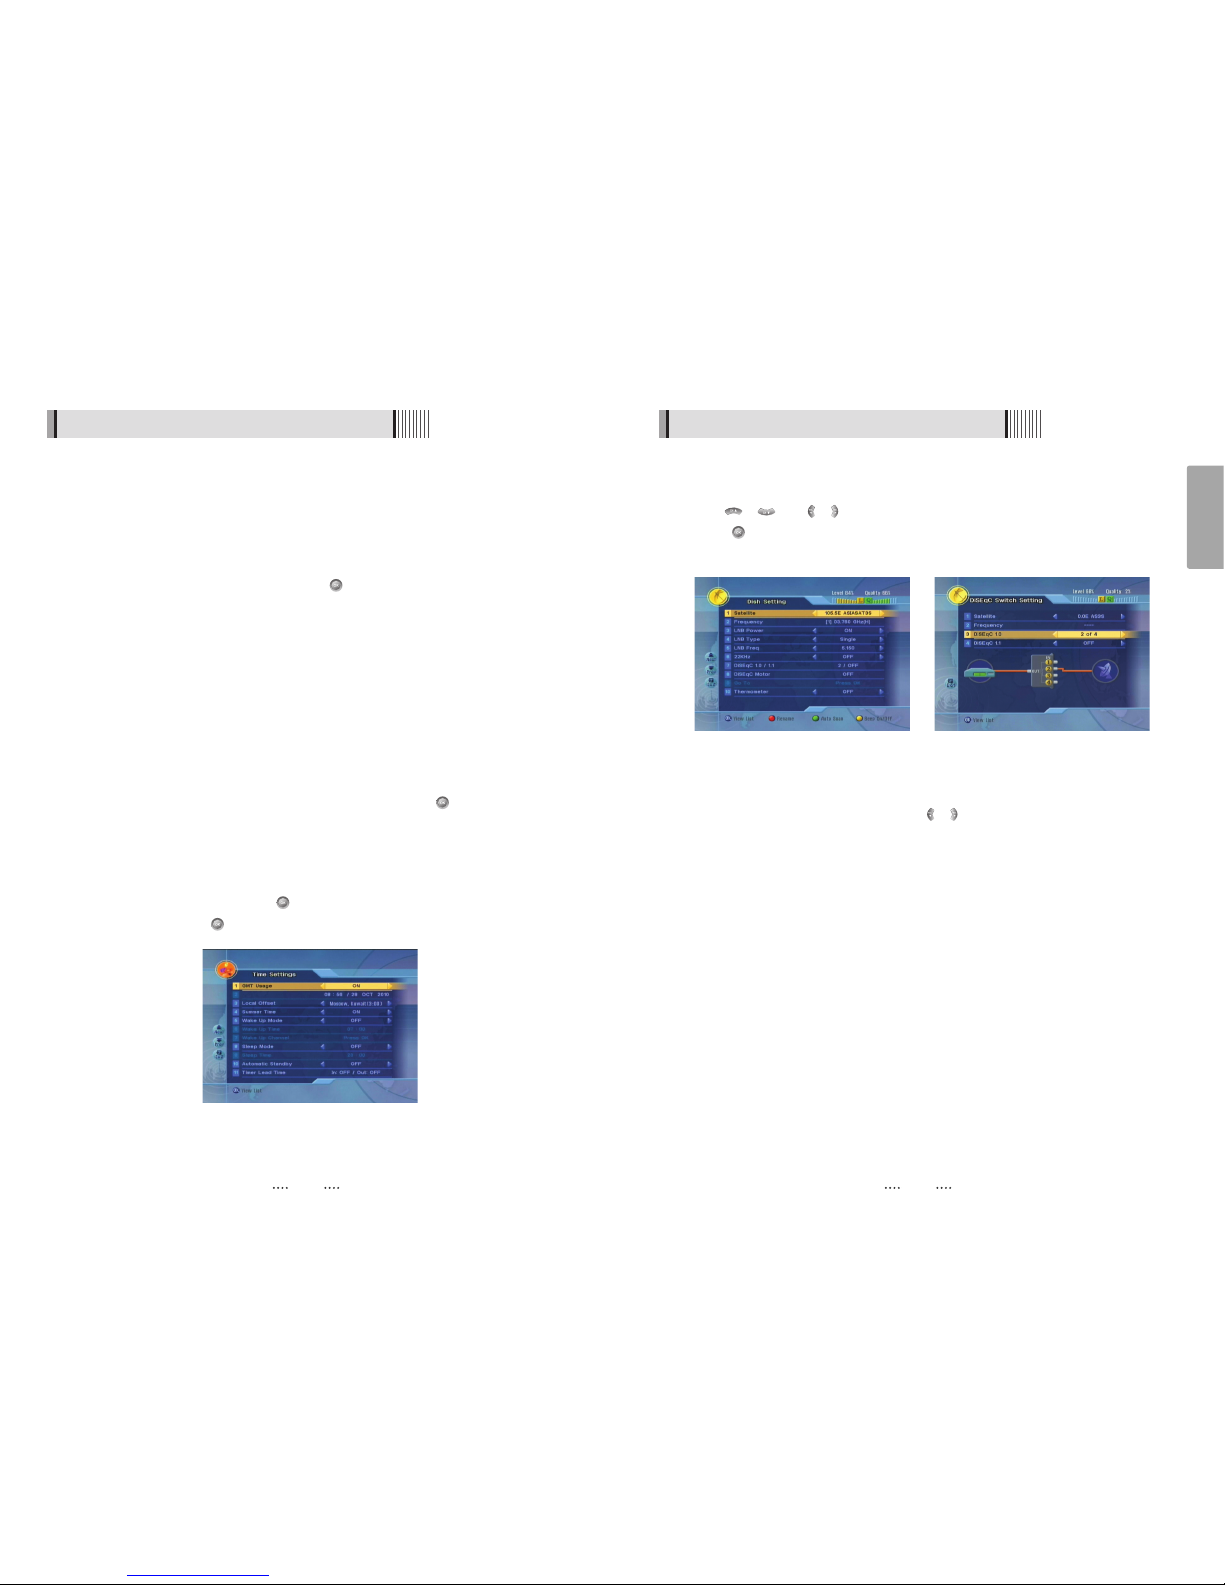
1) A/V Output Setting
This sub menu allows you to set audio/video output setting. <Figure 6-1-1>
- SCART : Select the SCART output. (CVBS/RGB)
- Screen Format : Select the screen format. (16:9/4:3)
- Display Format : Select the TV aspect ratio(Full Screen/Pillar Box, Letter Box/Pan Scan)
- Video Format : Select the Scanning type(Interaced, Progressive)
- SPDIF : Select the Audio output type (Dolby/PCM)
<Figure 6-1-1>
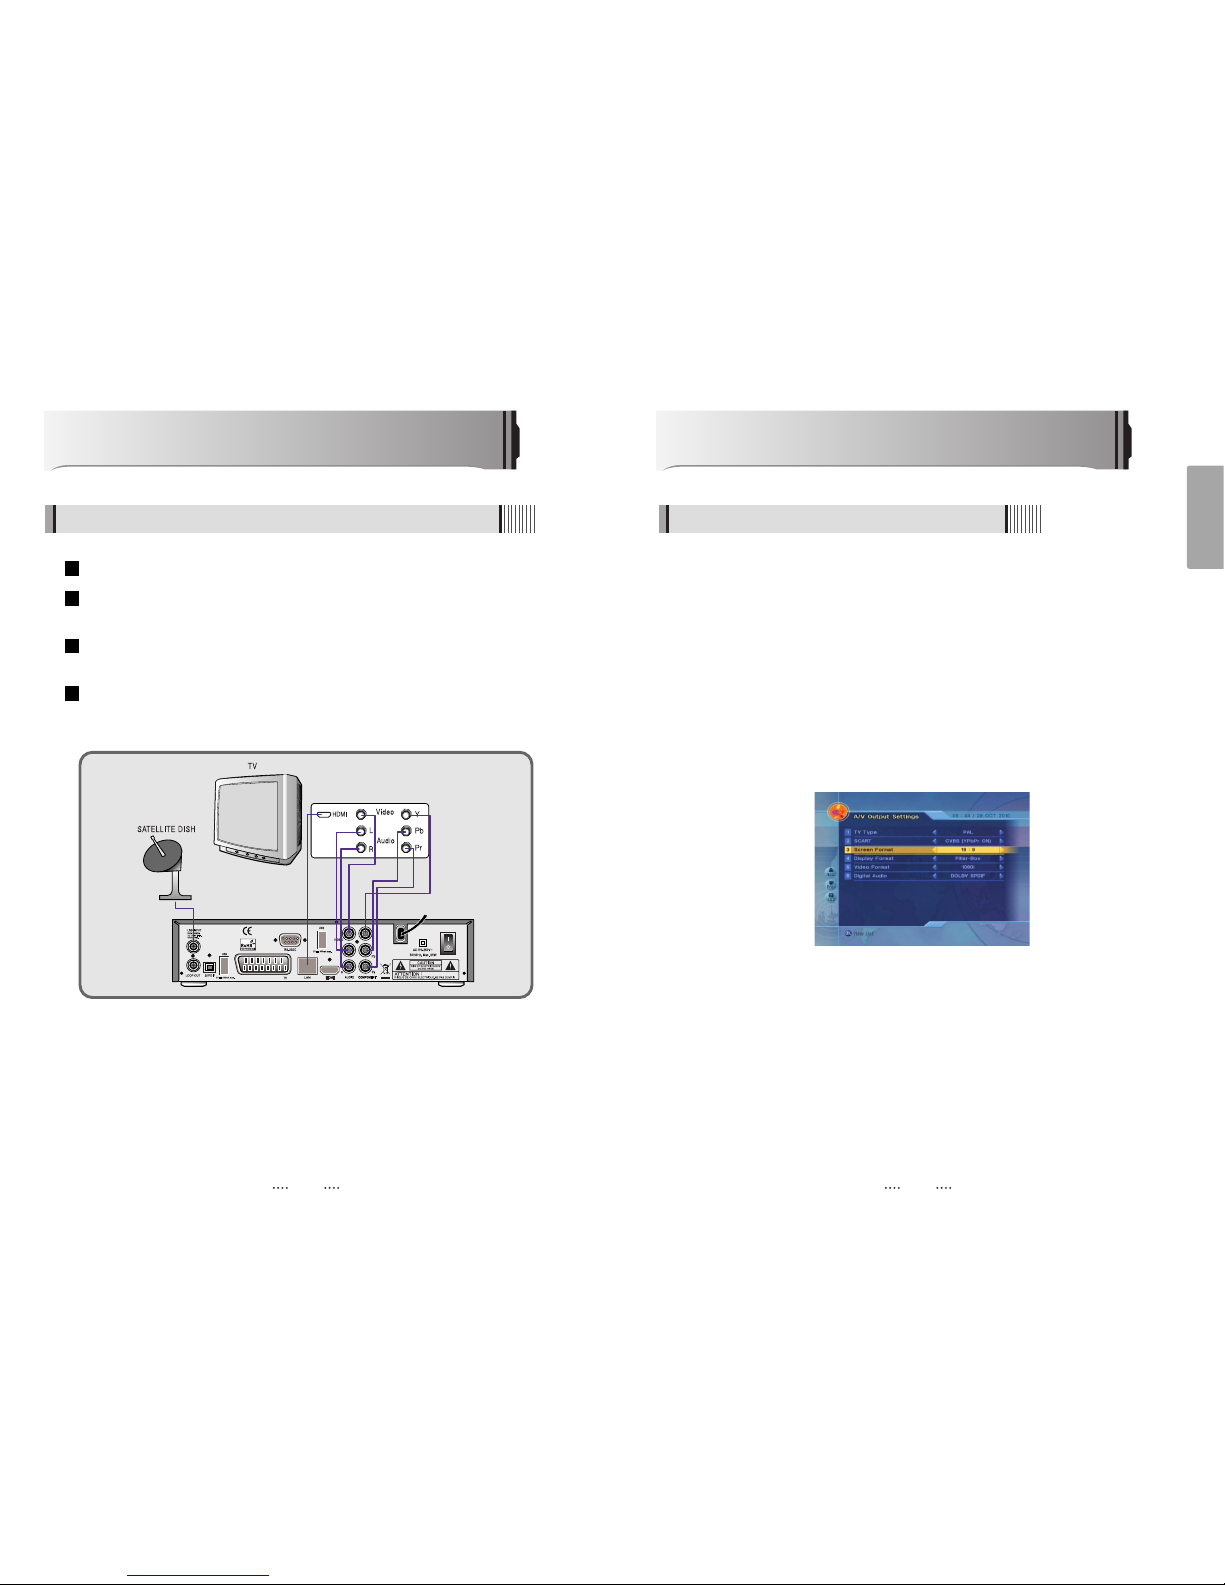
How to Connect
5.1 When Connecting IRD to TV with AV connectors
Connect the TV antenna to TV ANT IN
Connect the Video and Audio of TV to the Video and Audio. Connect Red and White
connector to Audio R and Audio L, and Yellow into Video port respectively
Connect the Component Video of your TV to Component Video for best quality: connect
the Y, Pb and Pr of your TV to Y, Pb and Pr respectively
Connect your satellite dish
4
3
2
1
Page 7
13
English
12
6.1 Getting Started
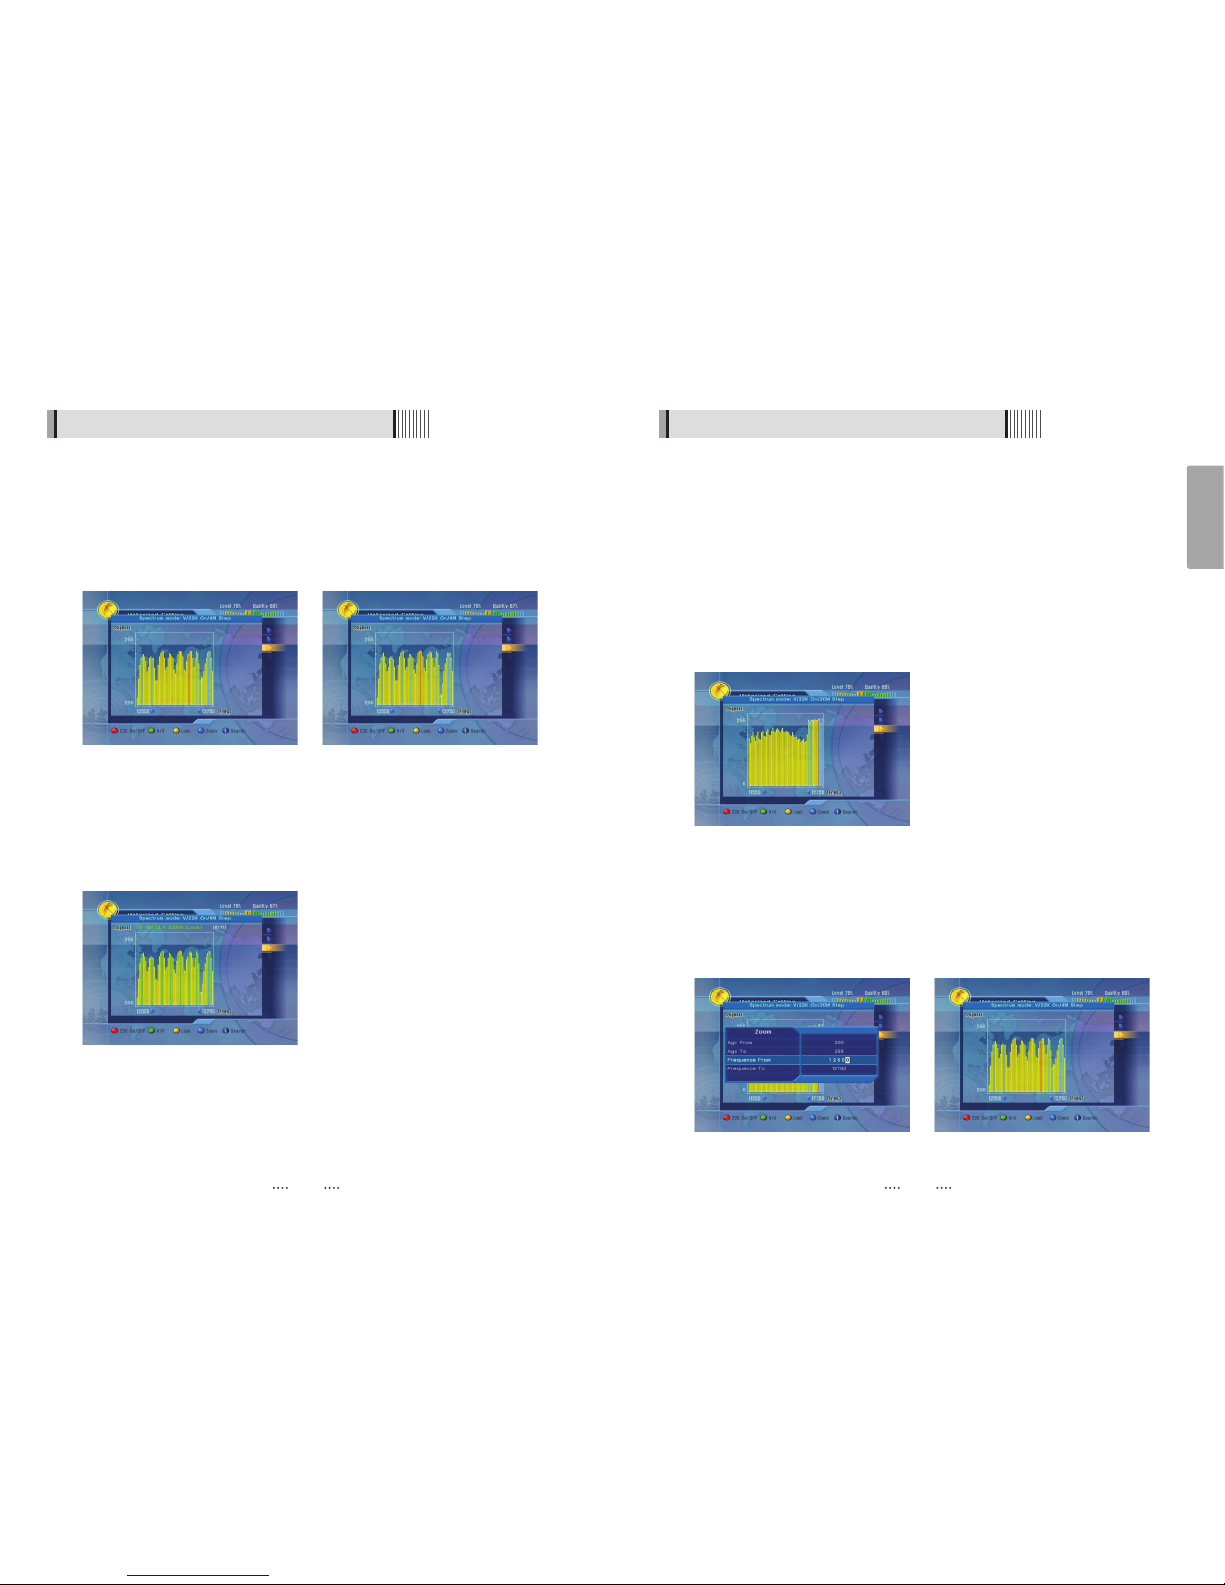
3) Dish Setup
⊹ Press the MENU button to display the main menu.
⊺ Use / and / to move in the menu.
⊻ Press on ‘Dish Setting’. The following window will appear. <Figure 6-1-3>
ҫ
Note : Enter a 4-Digit password if need arise. The default password is ‘0000’.
⊼ Select the item that you want to edit, and set its parameters as desired. <Dish Setting>
- Satellite : Select any satellite by pressing / buttons.
- Frequency : If the default TP frequency is not appropriate, you can select another TP
frequency at which to check for signal
- LNB Power : Select among ON/OFF/13V/18V.
- LNB Type : Select among Universal/OCS/Single.
- LNB Freq : Set the frequency of the LNB oscillator.
- 22KHz : When not AUTO, set the signal path from LNB or switch by selecting a control
signal among 0/22KHz.
- DiSEqC 1.0 / 1.1 : Select DiSEqC protocol among OFF/1.0/1.1 as appropriate for your
configuration. <Figure 6-1-4>
- DiSEqC Motor : Select DiSEqC protocol among OFF/1.2/USALS as appropriate for your
Motor. <Figure 6-1-5>
- Thermometer : Turn the thermometer ON/OFF.
- Rename : Change the name of satellite.(if selected Russian Language that Support
Russian keypad).
- Beep On/Off : Beep Sound as signal level.
⊽ Auto Scan : Press Green button the remote to begin Auto Scan.
<Figure 6-1-3> <Figure 6-1-4>
6.1 Getting Started
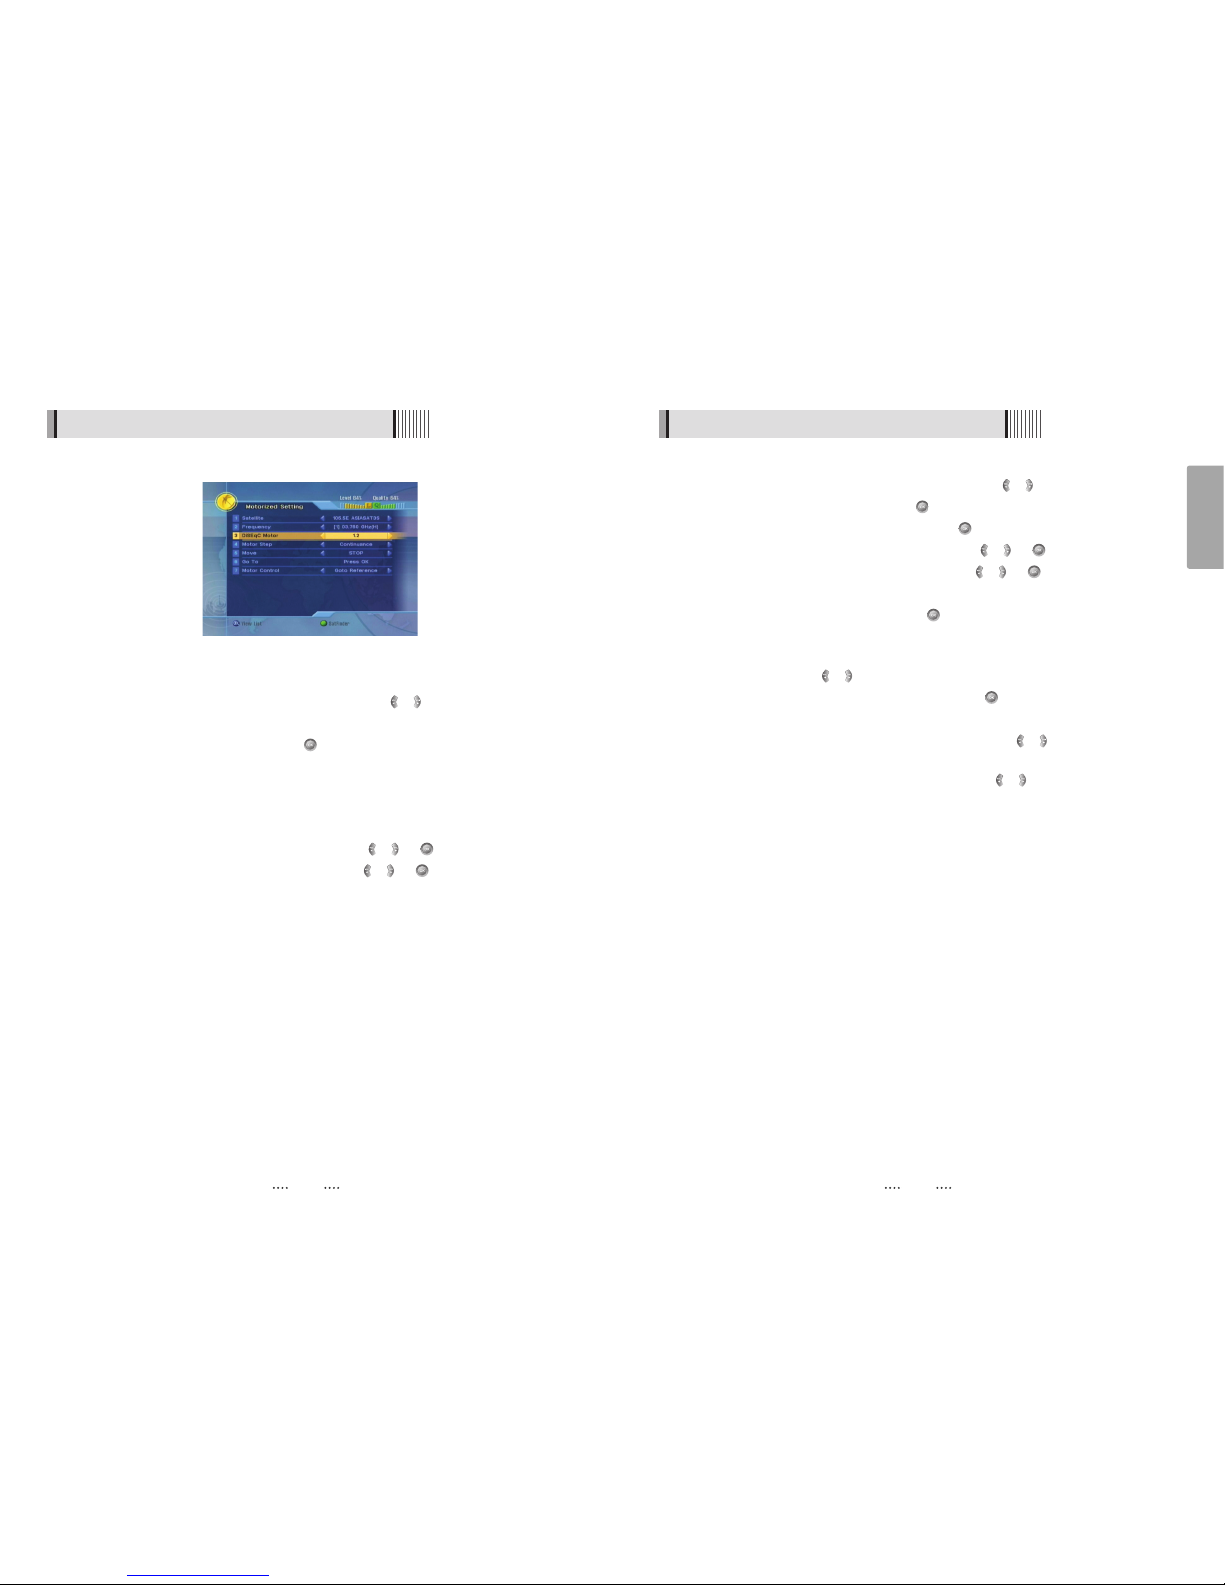
2) Time Setting
This sub menu allows you to set your local time, wake up time, wake up channel and
sleep time. <Figure 6-1-2>
- GMT Usage : If you set ON, local time is determined by adjusting the differences from
GMT (Greenwich Meantime) according to your location.
- Current Date : If GMT Usage ON, this date is determined by GMT. If GMT Usage OFF, you
can modify this by pressing the button. If you set OFF, receiver doesn’t
refer to GMT. Local time is determined by adjusting current date and
current time.
- Current Time : If GMT Usage ON, this time is determined by GMT. If GMT Usage OFF, you
can modify this by pressing the NUMERIC button.
- Local Offset : If GMT Usage ON, Local time is GMT time + Local Offset.
- Summer Time : you can set the summer time mode (Off/Last Sun in Oct~Mar/First Sun in
Oct~Mar/Mar~Oct)
- Wake Up Mode : You can set the cycle of the wake up mode (Off/Once/Daily/Mon~Fri)
- Wake Up Time : You can set wake up time by pressing the NUMERIC button on the
remote.
- Wake Up Channel : You can set wake up channel by pressing the button on the
remote.
- Sleep Mode : You can set the cycle of the sleep mode (Off/Once/Daily/Mon~Fri)
- Sleep Time : You can set sleep time by pressing the NUMERIC button on the remote
- Automatic Standby : Selects auto standby time (OFF/After 1~8Hour) After making your
selection press to confirm
- Timer Lead Time : Press to set the Timer Lead In And Lead Out Time.
<Figure 6-1-2>
Page 8
15
English
14
6.1 Getting Started
(When the DiSEqC Motor parameter is set as USALS)
- Move : Move the dish position to west/east by pressing / buttons.
- Motor Control : Control motor by press button ot the remote.
⍜ Goto Reference : Goto reference by pressing button.
⍜ Set West Limit : Edit & Save west limit by pressing / or buttons.
⍜ Set East Limit : Edit & Save east limit by pressing / or buttons.
⍜ Enable Limit : Enable the saved east and west limit.
⍜ Disable Limit : Disable Limit by pressing button.
⍜ Save : Save the current Setting of USALS system.
- Sat Degree : Displays the current defree of the selected satellite. Edit degree by
pressing / buttons and numeric buttons.
- Position Setting : Select position setting by pressing button.
⍜ Goto Reference : Move the dish to the 0 position.
⍜ Antenna Longitude : Edit antenna longitude by pressing / buttons and numeric
buttons.
⍜ Antenna Latitude : Edit antenna latitude by pressing / buttons and numeric
buttons
- Go To : Save the current setting of USALS Systme.
6.1 Getting Started
(When the DiSEqC Motor parameter is set as 1.2)
- Motor Step : Select Motor Step
- Move : Move the dish position to west/east by pressing / buttons.
- Go To : Go to the position of the saved satellite.
- Motor Control : Control motor by press button ot the remote.
⍜ Recalculate : Recalculate the position of all other saved satellites relative to the
known position.
⍜ Reset System : Reset the position of all saved satellites.
⍜ Goto Reference : Move the dish to the 0 position.
⍜ Set West Limit : Edit & Save west limit by pressing / or buttons.
⍜ Set East Limit : Edit & Save east limit by pressing / or buttons.
⍜ Enable Limit : Enable the saved east and west limit.
⍜ Disable Limit : Disable east and west limit.
⍜ Save : Save the current setting of DISEqC 1.2 system.
<Figure 6-1-5>
Page 9
17
English
16
6.1 Getting Started
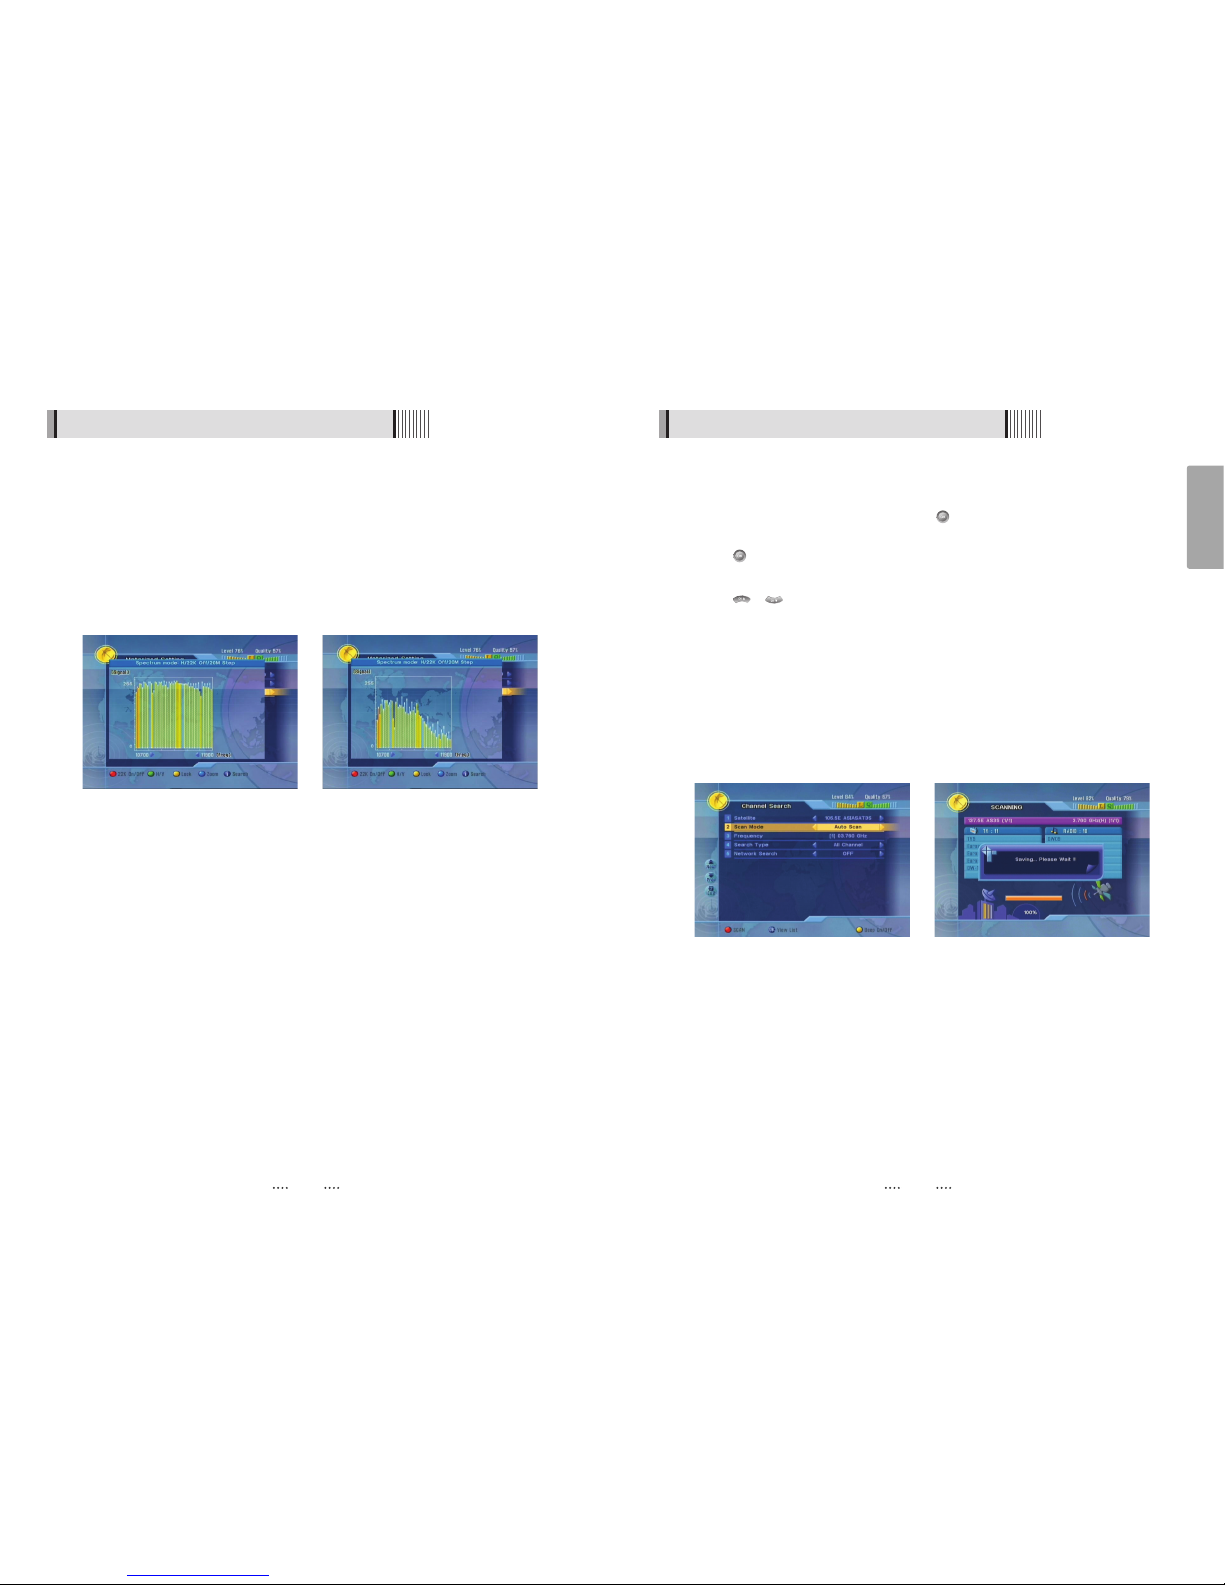
The bars height indicates the LNB input mode of the receiver. High values (close to 255)
show that input signal is suppressed by the attenuator at high degree and input signal
overload can occur. Low values (close to 0) show the maximum boost of the input signal.
Noise level may highly interfere with the input signal in this case. The best quality signal is
normally displayed in the upper part of the graph and does not exceed the limits.
Adding new transponders
Zoom function is used for detailed display of the histogram. It allows locate transponders
which are not in the preset list, set the expected frequency range and then add those
transponders by “Blind Scan” to the list. Moreover, many well known satellites can be
recognized by their spectrum shape.
Fine tuning of the dish position
Zoom function allows the fine tuning of the dish position. To set the dish position very
precisely the part of the spectrum can be zoomed in. For example, you can display
spectrum only within level 50~255 if LNB cable is short and the spectrum is located in the
upper part of the graph. On the contrary, if the signal is low you can set upper limit to 150 or
100 to see more detailed picture of the spectrum.
6.1 Getting Started
SPECTRUM ANALYSER
General information
The spectrum is displayed as histogram. YELLOW bars indicate signal presence. BLUE bars
indicate signal presence and transponder presence of the selected satellite. RED bars
indicate the frequency of the selected transponder. GREEN bars indicate the locked
frequencies.
Press “LOCK” YELLOW button to verify all the transponders indicated by all the BLUE bars
visible in the active window: whether the transponders are locked or not. The transponder
which is under checking is displayed above the histogram. Here you can see ratio: locked
transponders / all transponders. Press YELLOW button again to cancel verify mode. This
function mainly used for testing transponders’ signal
In spectrum analyzer mode you can switch LNB mode quickly. Press GREEN button to
change polarization, press RED button to switch between high and low frequency ranges.
Selected LNB mode is displayed above the histogram. Frequency bar width (in MHz) is
displayed above the histogram too. Minimum and maximum frequency limits are shown at
the horizontal axis of the graph.
<Three new transponders (no blue bars under the
three “bells”) can be added by “blind scan” to preset
list (12 500 ~ 12 700 MHz, vertical polarization)>
<New transponders found and added to preset list>
<Zoom function (setting level and frequency limits)> <Spectrum part after Zoom applied>
<Transponders under testing for locked signal>
<Full spectrum>
Page 10
19
English
6.1 Getting Started
4) Satellite Channel Search
ᶀ Auto Scan <Figure 6-1-7>
⊹
To select more than one satellite, press the button when the selection bar is
positioned on the satellite.
⊺
Press on the names of the satellites that you want to scan under ‘Satellite List’.
Press the EXIT button to close the ‘Satellite List’.
⊻
Press / and set the ‘Search Type’ and ‘Network Search’ parameters.
- Search Type : Decide for which channels to search (All channels/ Free channels
only/ TV channels only).
- Network Search : Set ON to find more transponders (frequencies) through a Network
Information Table (NIT) scan. That is, when the broadcaster is
sending a NIT through a given transponder, the receiver will also
scan for transponders listed in the NIT and not otherwise recognized.
(this can happen when a transponder is new)
⊼ Press RED buttom under ‘SCAN’ to scan the selected satellites. <Figure 6-1-8>
6.1 Getting Started
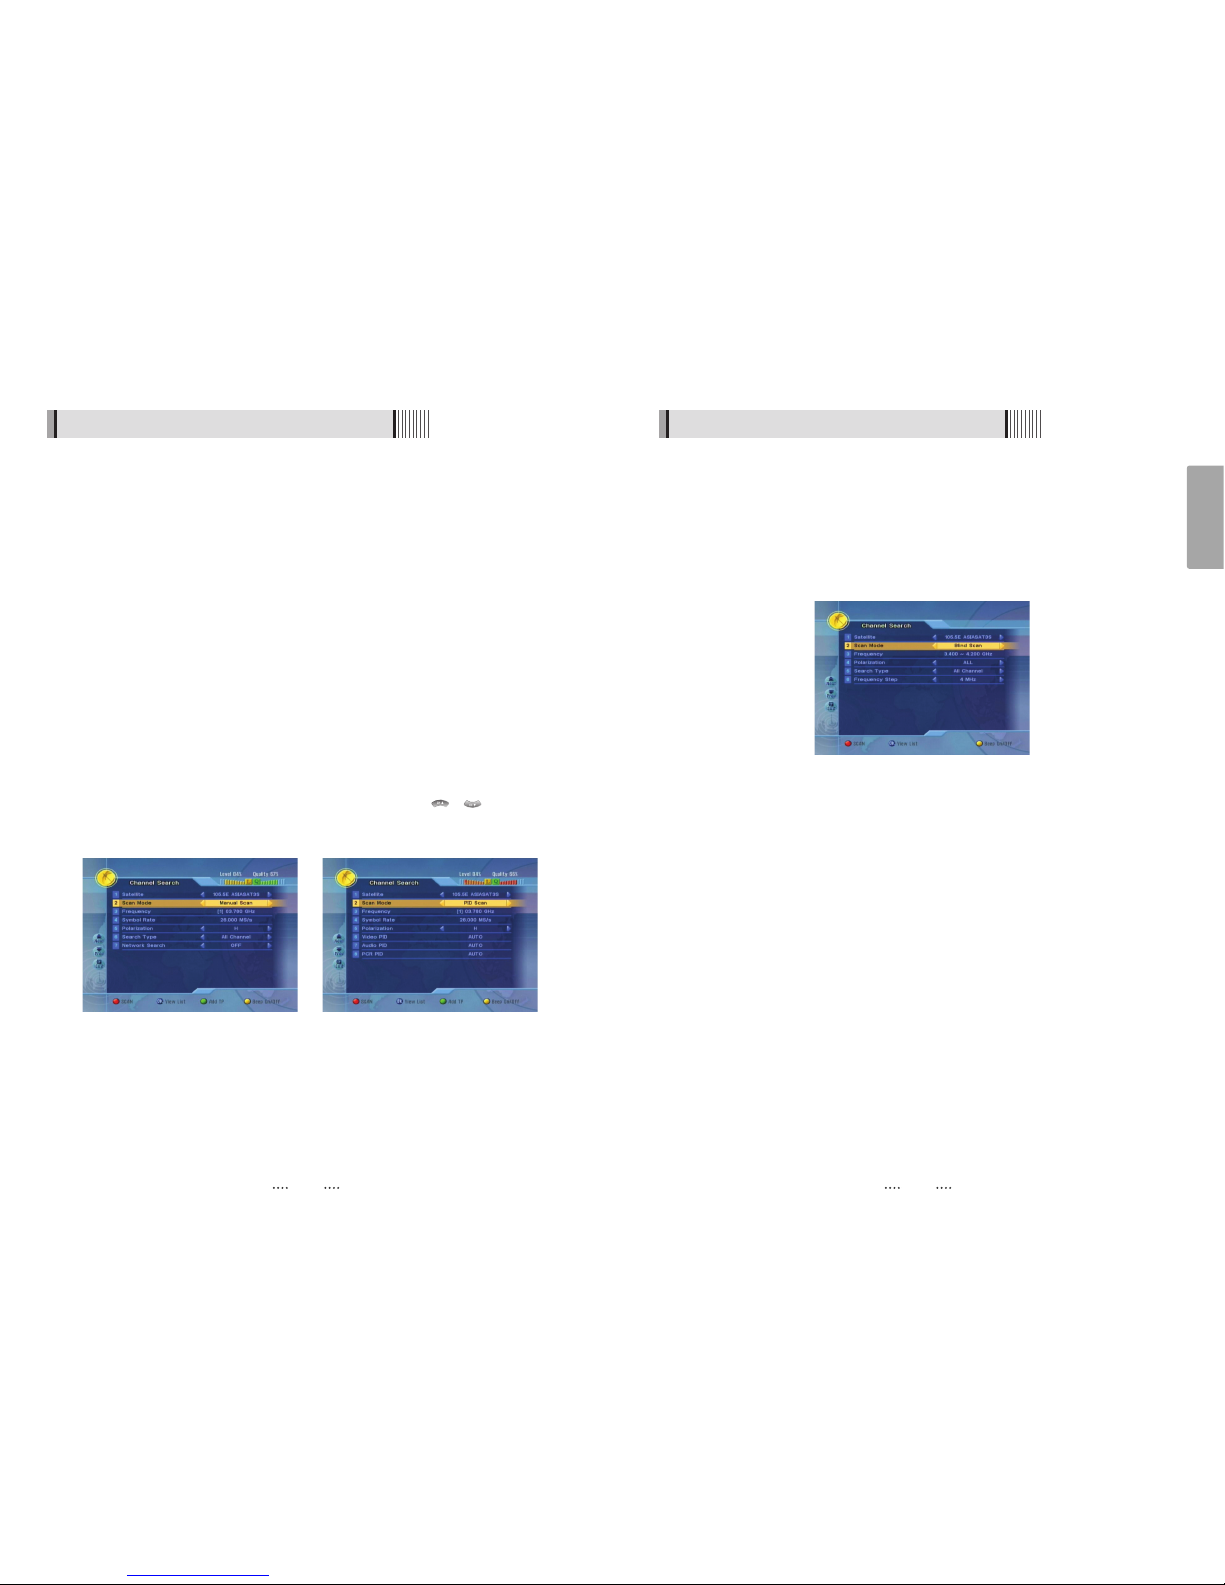
Cable system (LNB cable, LNB, DiSEqC switches, positioners, motors, other commutation
items) general test
You can check cable quality by spectrum analyzer. Low quality cable system causes signal
fade out and distortion: higher frequency results more steep fade out. This leads to poor
quality input signal. You can see the typical poor quality signal spectrum on the last picture
(see below): spectrum fades out and sometimes signal gaps (zero level) can occur on
some frequencies. On the contrary: signal level is more or less equal at all the frequencies if
cable system is good or signal amplifier installed. You can compare pictures below.
<Figure 6-1-7> <Figure 6-1-8>
18
<Hotbird 13E, high quality LNB and cable system> <Hotbird 13E, low quality LNB or cable system>
Page 11
21
English
20
<Figure 6-1-11>
6.1 Getting Started
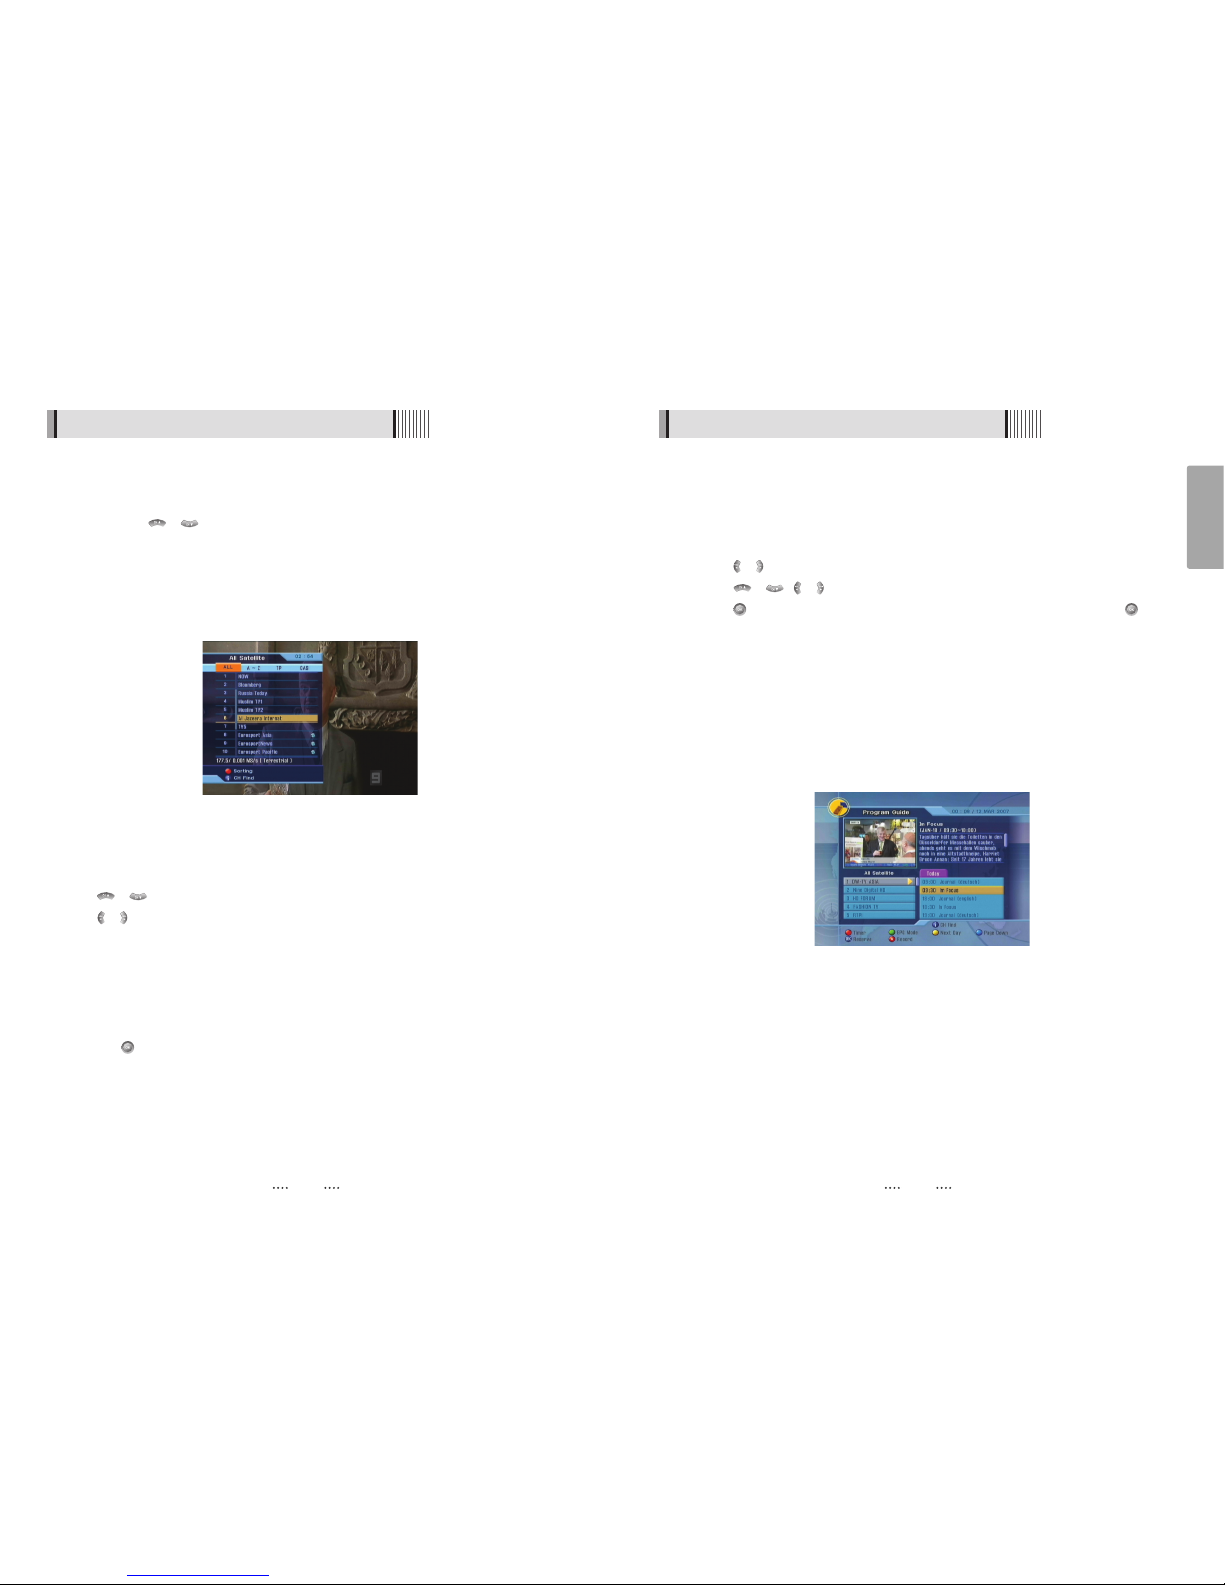
ᶀ Blind Scan<Figure 6-1-11>
⊹
To change a transponder’s Frequency use the NUMERIC buttons.
⊺
Select a range of Symbol Rate(FULL/7.5M Over/7.5M Under/3.7M Under/DETAIL).
⊻
Select a Poliariaztion(V/H/ALL).
⊼ Select a Search Type(All/FTA/TV).
⊽ Press RED to begin the scan.
6.1 Getting Started
ᶀ Manual Scan <Figure 6-1-9>
⊹
Select a transponder.
⊺
To change a transponder’s information (Frequency, Symbol Rate), use the NUMERIC
buttons.
⊻
To add a new transponder, press the GREEN button.
⊼ To delete a transponder, press the YELLOW button with the cursor next to the
Frequency parameter.
⊽ To search a transponder, set its different parameters and RED button.
ᶀ Package Identifier (PID) Scan <Figure 6-1-10>
⊹
Select a transponder.
⊺
To change a transponder’s information (Frequency, Symbol Rate), use the NUMERIC
buttons.
⊻
To add a new transponder, press the GREEN button.
⊼ To delete a transponder, press the YELLOW button with the cursor next to the
Frequency parameter.
⊽ To search a transponder, set its different parameters and press / You can
search a specific channel of the transponder by setting its PID data (Video, Audio and
PCR).
ҫ
Note : If you cannot access programs after correctly completing a scan procedure,
please contact your seller or your installer.
<Figure 6-1-9> <Figure 6-1-10>
Page 12
23
English
22
6.1 Getting Started
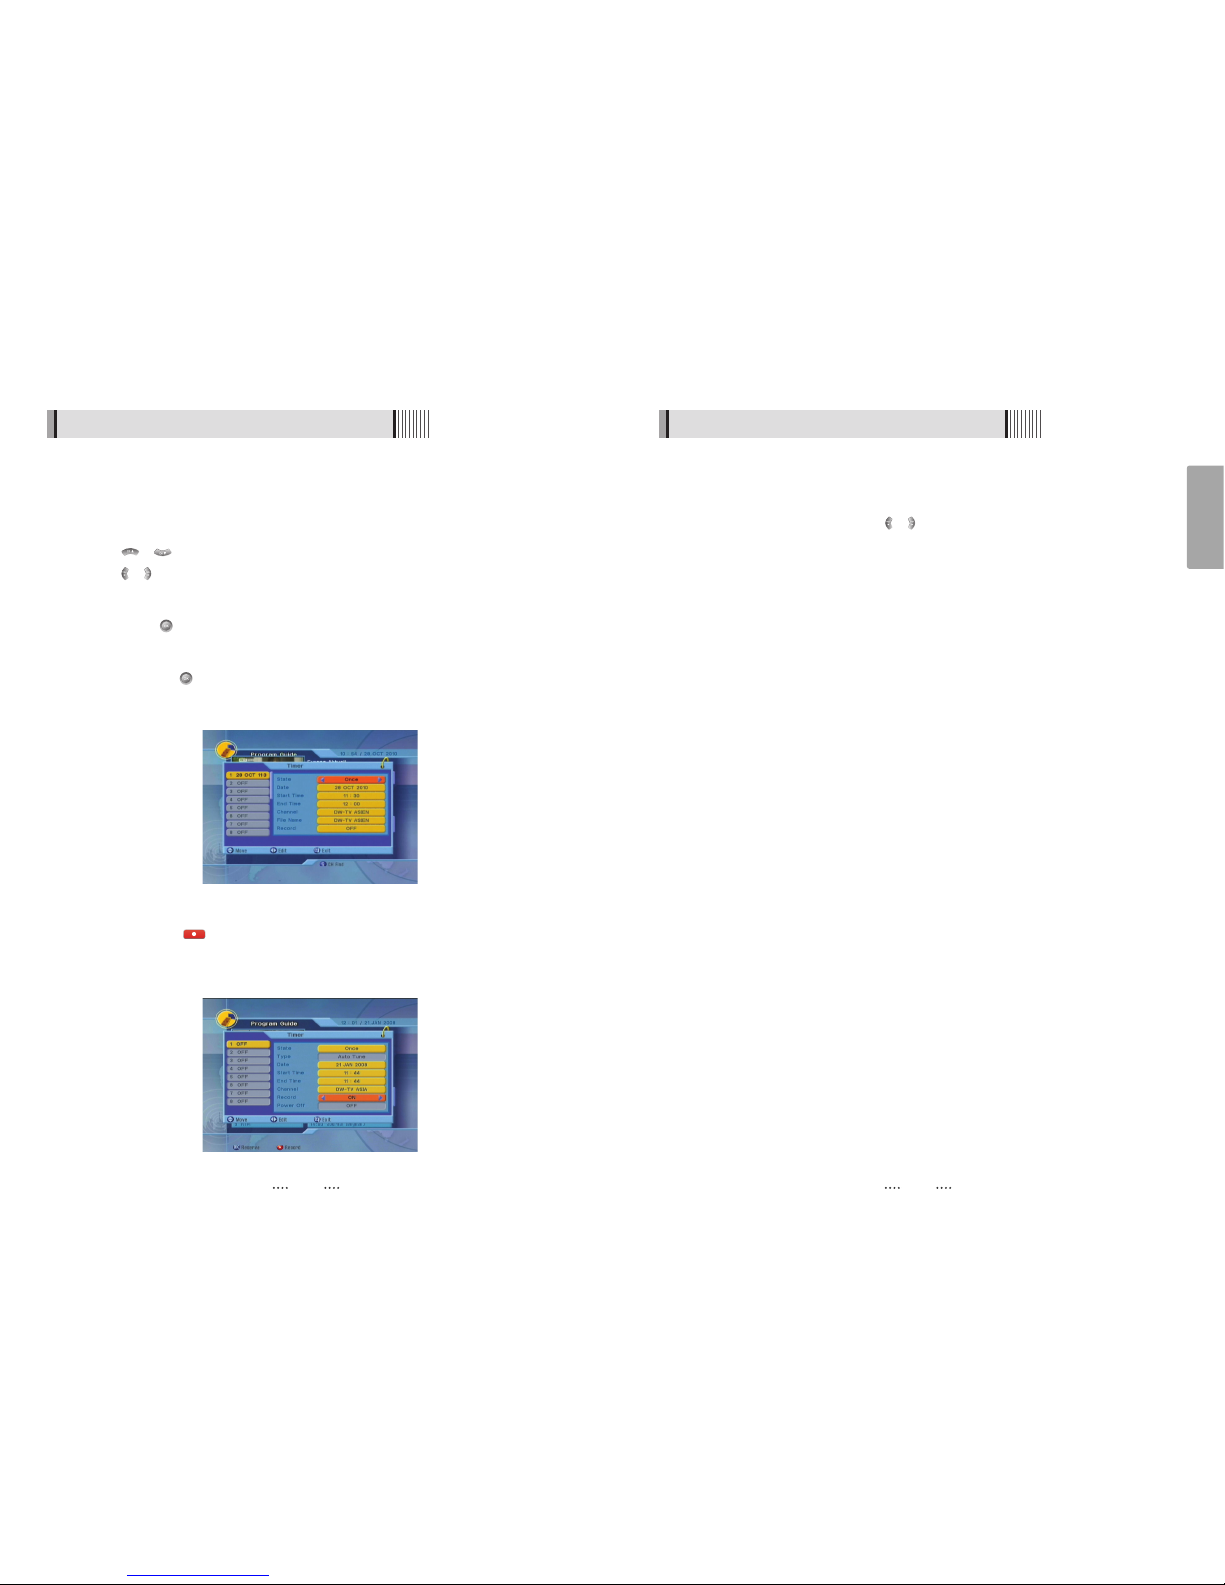
(3) Electronic Program Guide
1) EPG
This submenu allows you to access the electronic program guide when available.
⊹
Press the EPG button to display the guide menu. <Figure 6-1-13>
⊺
Press / to see the previous/next guide.
⊻
Press / , / to select another channel. <Figure 6-1-13>
⊼ Press to watch the selected channel and access its EPG data. If you press in
the right side of the screen (Event display list).
- If the current time EPG is selected, you will return to the previous menu and get signal
from the selected channel.
- If a future time (next) EPG is selected, the selected program will be reserved and the
event color w ill change.
⊽ You can select TV or Radio channels by pressing the TV/RADIO button
≊ You can choose a channel list group by pressing the GROUP button.
≋ You can access the timer menu by pressing the RED button. <Figure 6-1-13>
<Figure 6-1-13>
6.1 Getting Started
(2) To View Program
1) Channel Selection
You can use / to navigate between channels until you find the channel you
want.
- If you know the channel number, you can enter it with the NUMERIC buttons and wait 2
seconds until the channel is changed.
- If you know the channel name or transponder or CAS, you can press to display the
channel list <Figure 6-1-12>
⊹
Detailed information about the selected channel will be displayed. (Satellite Name,
Frequency(Polar) and Channel Name)
⊺
You can use the following buttons to navigate between channels:
- / : Moves one channel up/ down.
- / : Moves one page up / page down.
- RED : Press RED button on the remote to use channel sorting.
⍜ ALL : Shows all channels in the current group.
⍜ A~Z : Shows all channels sorted alphabetically.
⍜ TP : Shows all channels sorted by Transponder.
⍜ CAS : Shows all channels sorted by CAS system.
⊻
Press when the selection bar is positioned on the desired channel.
<Figure 6-1-12>
Page 13
25
English
24
6.1 Getting Started
(4) Other Functions of Remote Control
ᶀ Volume Control
⊹
While watching a program, press / control the volume.
⊺
You can press the MUTE button to remove the sound of the program: the mute icon
will be displayed. Press the MUTE button again to turn the sound back on.
ᶀ Channel Information
⊹
You can press the INFO button to display the information banner for a few seconds.
⊺
If you then press the INFO button again, a detailed banner will be displayed.
ᶀ TV/ RADIO switching
You can press this key to change from a TV channel to a Radio channel or vice versa.
ᶀ RECALL
Press this key to return to the previous channel.
ᶀ Audio
Press to adjust the subtitle and/or audio status of the current channel:
- Audio Mode : Select between, Stereo/Mono-Left/Mono-Right
- Audio Track : Select between tracks available in this program
- Audio Level : Select between, Low/Medium/High
ᶀ FREEZE
You can press this key to freeze the video. Press it again to resume the video.
ᶀ GROUP
When watching TV or listening to Radio, you can press this button to view the list of
satellites and/or favorite channel groups.
Only registered satellites and favorite groups are displayed.
6.1 Getting Started
2) Timer
This sub menu allows you to set the on/off time of your receiver.
⊹
This submenu allows you to set on/off times of your receiver. To display the timer menu,
press the RED button while in the guide menu. <Figure 6-1-14>
⊺
Press / to select a timer’s parameter.
⊻
Press / to change the parameter.
- Timer No : Select the timer that you want to modify. (1- 8)
- State : Select the timer frequency. (off/once/daily/weekly)
- Date : Press to display a Calendar pop-up; Select a date
- Start Time : Input the time for your receiver power-on; use the NUMERIC buttons
- End Time : Input the time for your receiver power-off; use the NUMERIC buttons
- Channel : Press to display a Channel list pop-up; Select a channel
- File Name : You can change recording file name.
- Record : Set record On/Off.
<Figure 6-1-14>
- If you want to record a program in the right side of the screen, you can select a
program by using . The selected program will be reserved and the evnet color text
will change to red. <Figure 6-1-15>.
- You can also see change the timer menu.
ҫ
It is worked when a USB device is connected.
<Figure 6-1-15>
Page 14
27
English
26
6.1 Getting Started
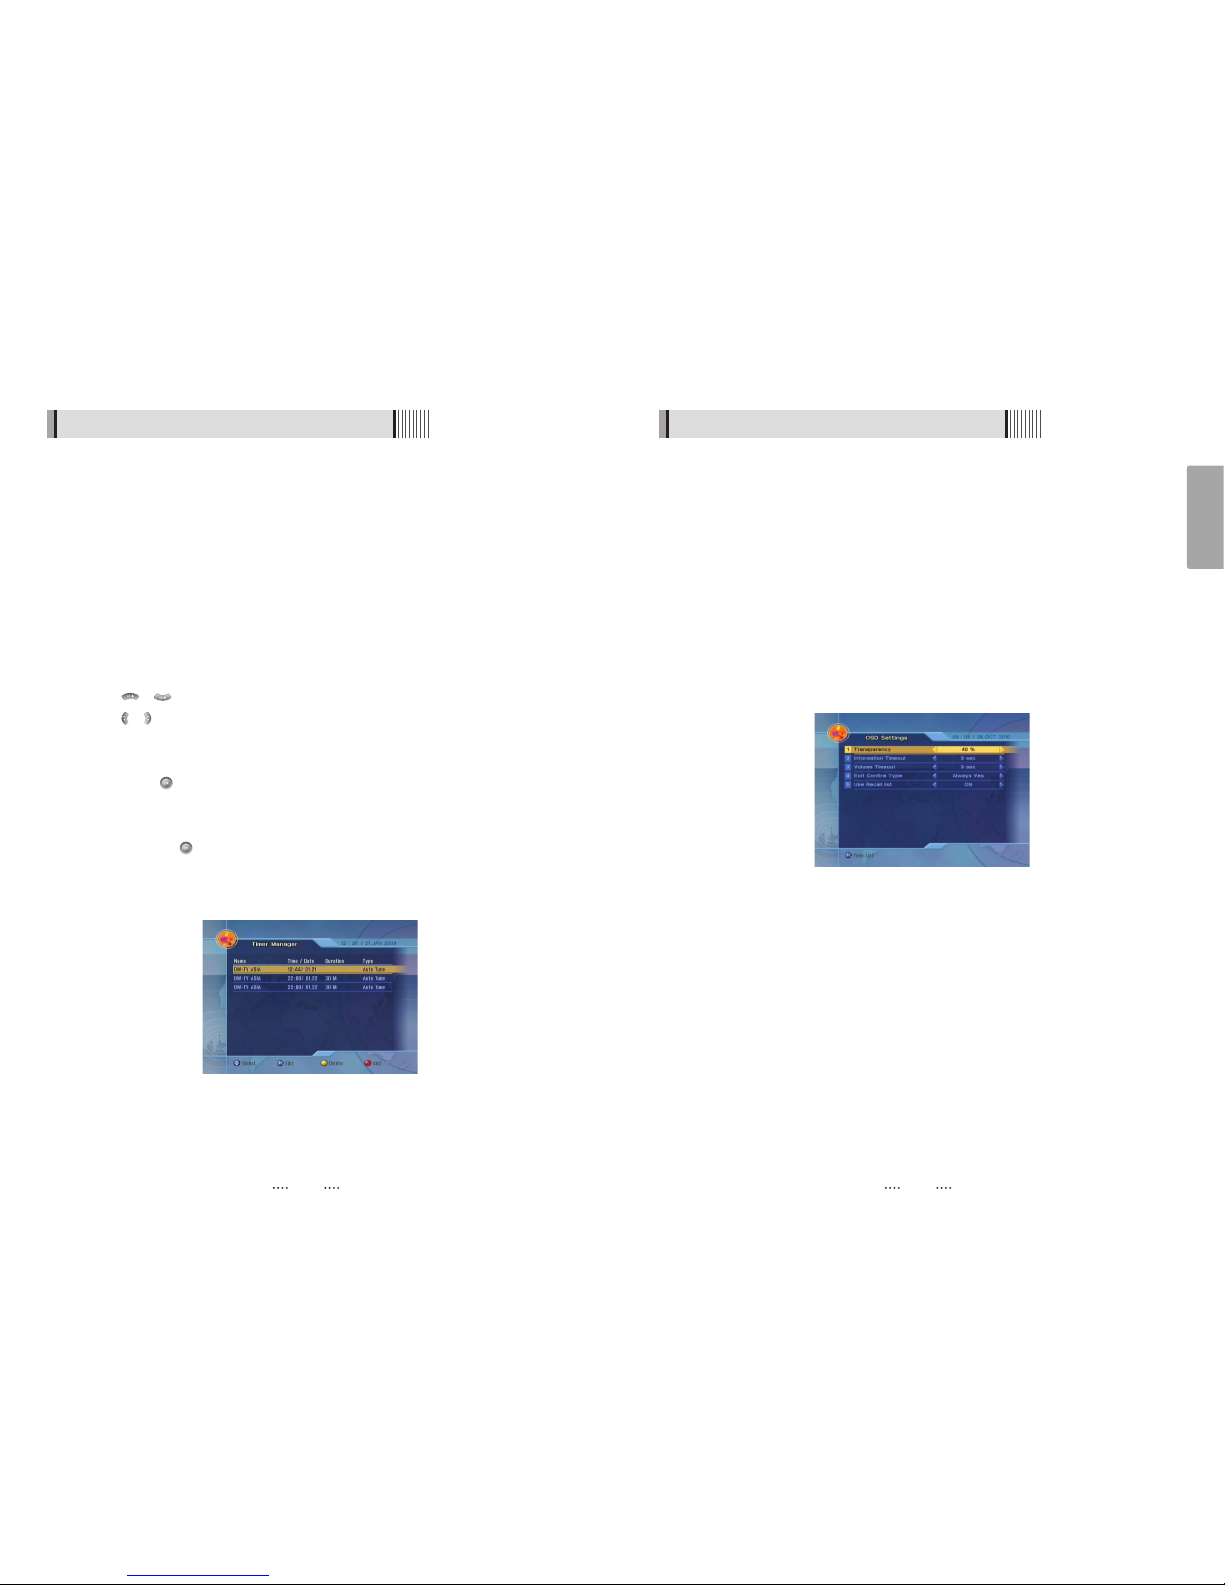
ᶀ Subtitle <Figure 6-1-19>
You can press to select the subtitle language of current channel.
ᶀ SLEEP <Figure 6-1-20>
You can set the your receiver to turn off after a few minutes. Press to set the sleep
timer.
- To cancel the sleep timer, please press until you set time as “0 min”.
(Disable, 10, 20, 30, 60, 100, 120 Minutes)
<Figure 6-1-19> <Figure 6-1-20>
ᶀ V.FORMAT <Figure 6-1-21>
You can press to change the video resoultion Select between, 1080p ƍ 1080i ƍ 720p ƍ
576p ƍ 576i
ᶀ WIDE <Figure 6-1-22>
You can press to change the TV aspect ratio.
- 4:3 : Pan-Scan or Letter-Box
-16:9 : Full-Screen or Pillar-Box
<Figure 6-1-21> <Figure 6-1-22>
6.1 Getting Started
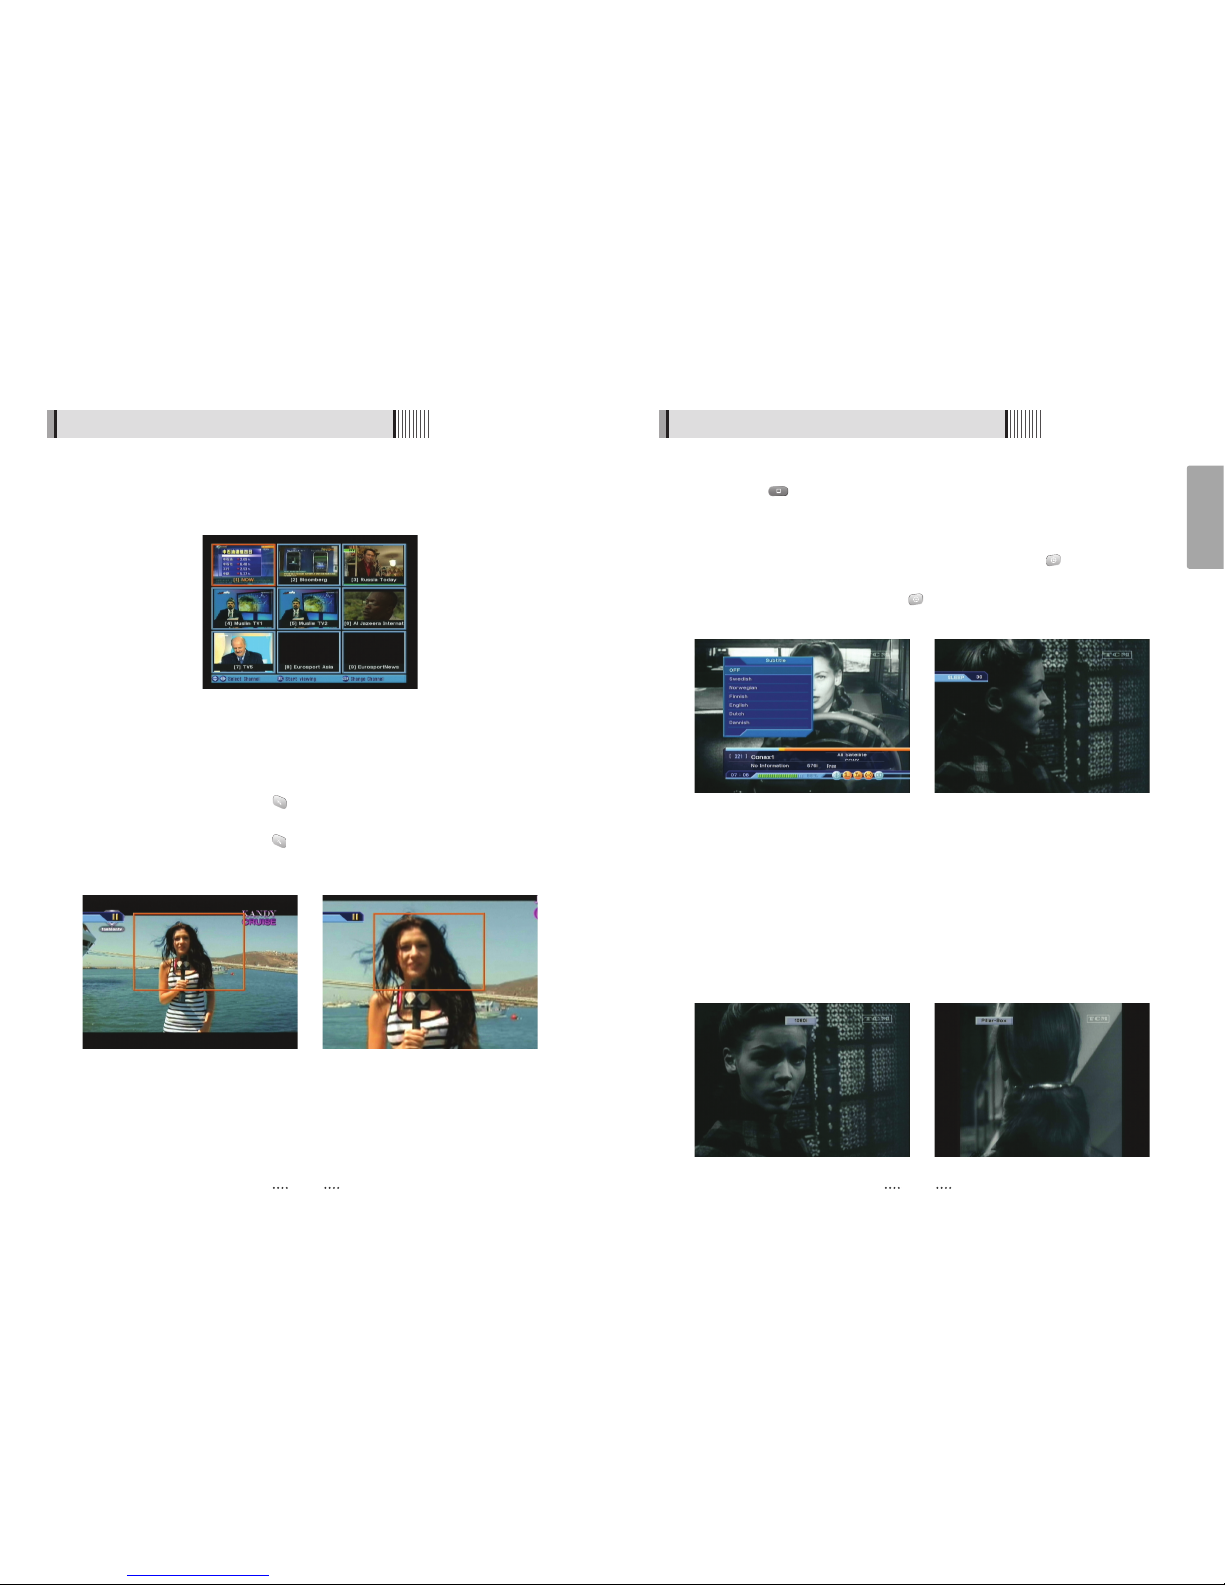
ᶀ ZOOM
You can press to zoom in the video. <Figure 6-1-17>
⊹
Press the PAUSE button and press . You can zoom in sections of Freezed Video
<Figure 6-1-18>
⊺
While watching a program, press . You can zoom in sections of playing video.
⊻
To cancel the freeze status, please release the zoom status.
ᶀ Multi Picture Display <Figure 6-1-16>
You can press the MOSAIC button to display multiple pictures; you can choose the
number of pictures such as 1X2, 2X2, 2X3 or 3X3.
<Figure 6-1-16>
<Figure 6-1-17>
<Figure 6-1-18>
Page 15
29
English
28
6.2 System Setting
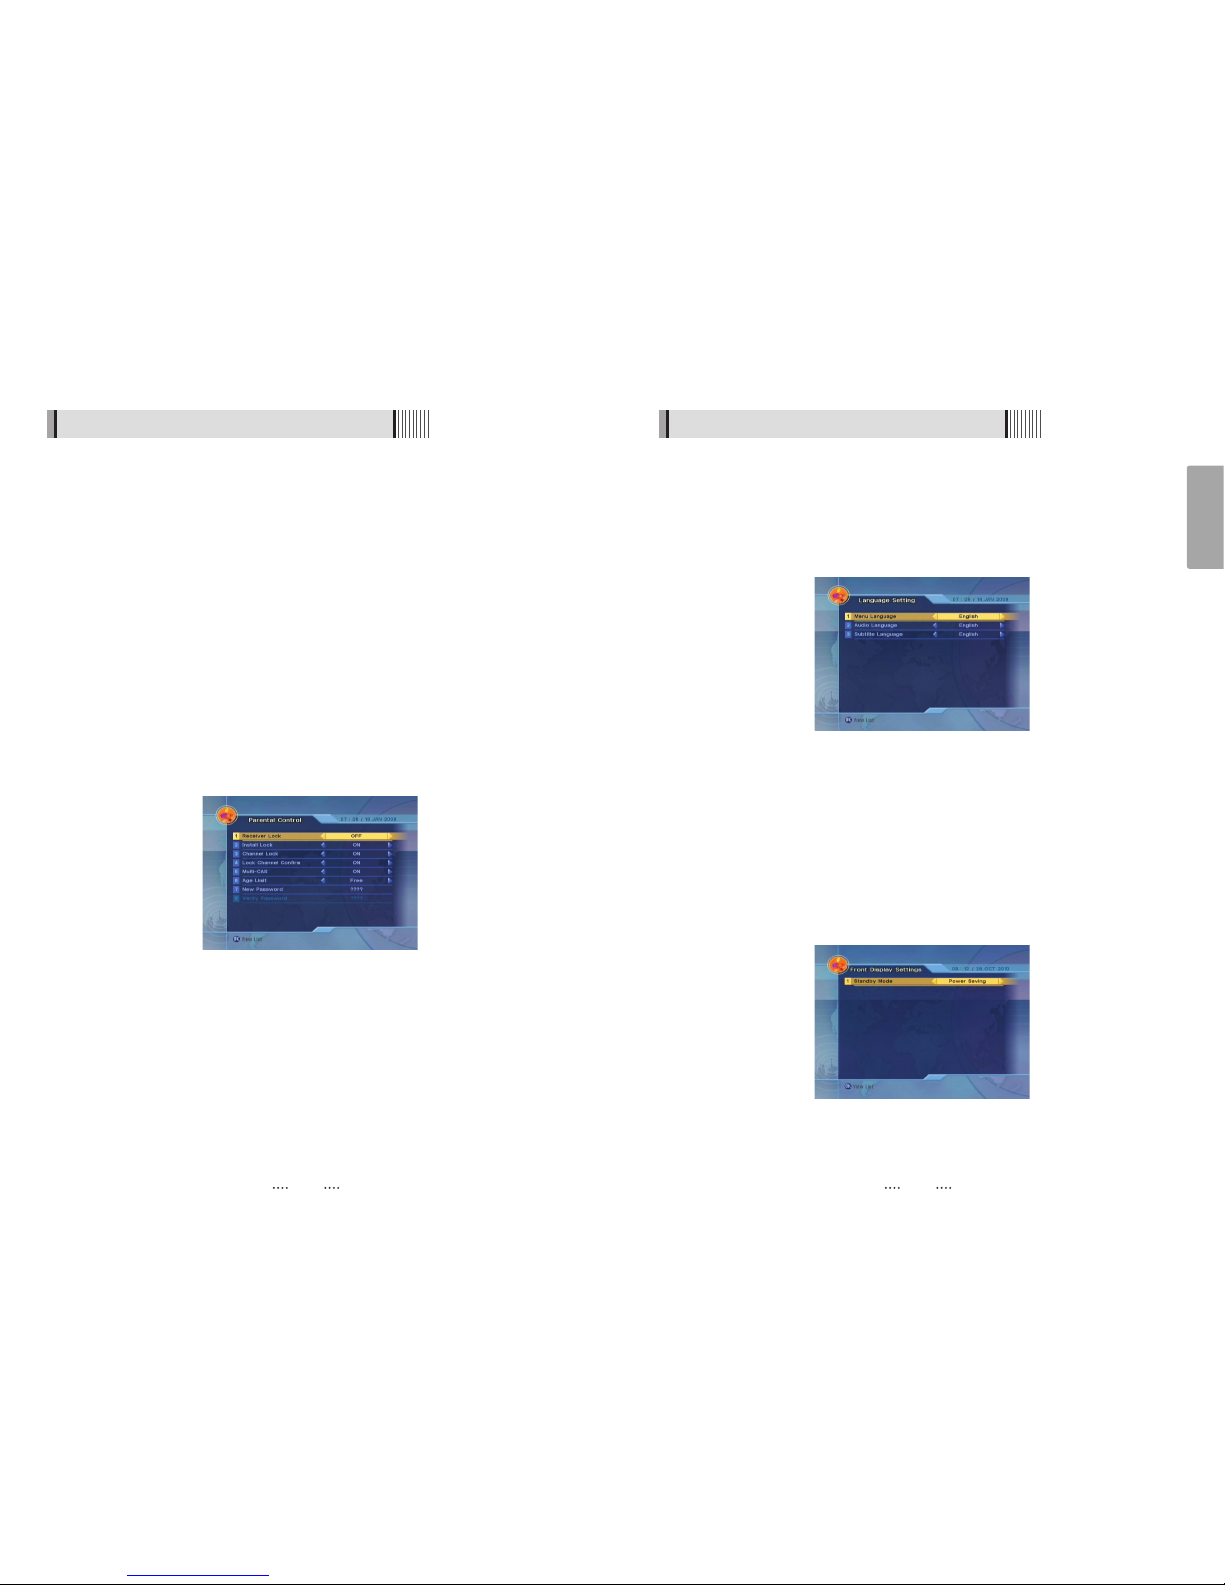
3) OSD Setting
This submenu allows you to set the menu language, OSD transparency and Information
and Volume timeouts. <Figure 6-2-2>
- Transparency : Set the OSD transparency of the menu. (1% ~ 100%)
- Information Timeout : Select the display duration of the information banner. (1, 2, 3, 5 or
10 seconds)
- Volume Timeout : Select the display duration of the volume box. (1, 2, 3, 5 or 10
seconds)
- Exit Confirm Type : Set the Exit Confirm Type.(Always Yes / Popup(default Yes) /
Popup(Default No))
- Use Recall list : Store previous channels. If you press recall key on RCU then you will
show recall list.
<Figure 6-2-2>
6.2 System Setting
1) Time Settings
This submenu allows you to set your local time, wake up time, wake up channel and
sleep time.
- See (6.1 Getting Started 4) Time Settings) for detailed description.
2) Timer Manager
This sub menu allows you to set the on/off time of your receiver.
⊹
This submenu allows you to set on/off times of your receiver. To display the timer menu,
press the RED button while in the guide menu. <Figure 6-2-1>
⊺
Press / to select a timer’s parameter.
⊻
Press / to change the parameter.
- Timer No : Select the timer that you want to modify. (1- 8)
- State : Select the timer frequency. (off/once/daily/weekly)
- Date : Press to display a Calendar pop-up; Select a date
- Start Time : Input the time for your receiver power-on; use the NUMERIC buttons
- End Time : Input the time for your receiver power-off; use the NUMERIC buttons
- Channel : Press to display a Channel list pop-up; Select a channel
- File Name : You can change recording file name.
- Record : Set record On/Off.
<Figure 6-2-1>
Page 16
31
English
30
5) Language Setting
This submenu allows you to specify the audio/video output <Figure 6-2-4>
- Menu Language : Set the default Menu language.
- Audio Language : Set the default audio language when selecting a channel.
- Subtitle Language : Set the default subtitle language.
6) A/V Output Setting
This sub menu allows you to set audio/video output setting.
See (6.1 Getting Started 3) A/V Output Setting) for detailed description.
7) Front Display Setting
This submenu allows you to set the Standby Mode. <Figure 6-2-5>
- Standby Mode : Select the standby Mode. (Normal / Power Saving)
6.2 System Setting
<Figure 6-2-4>
<Figure 6-2-5>
6.2 System Setting
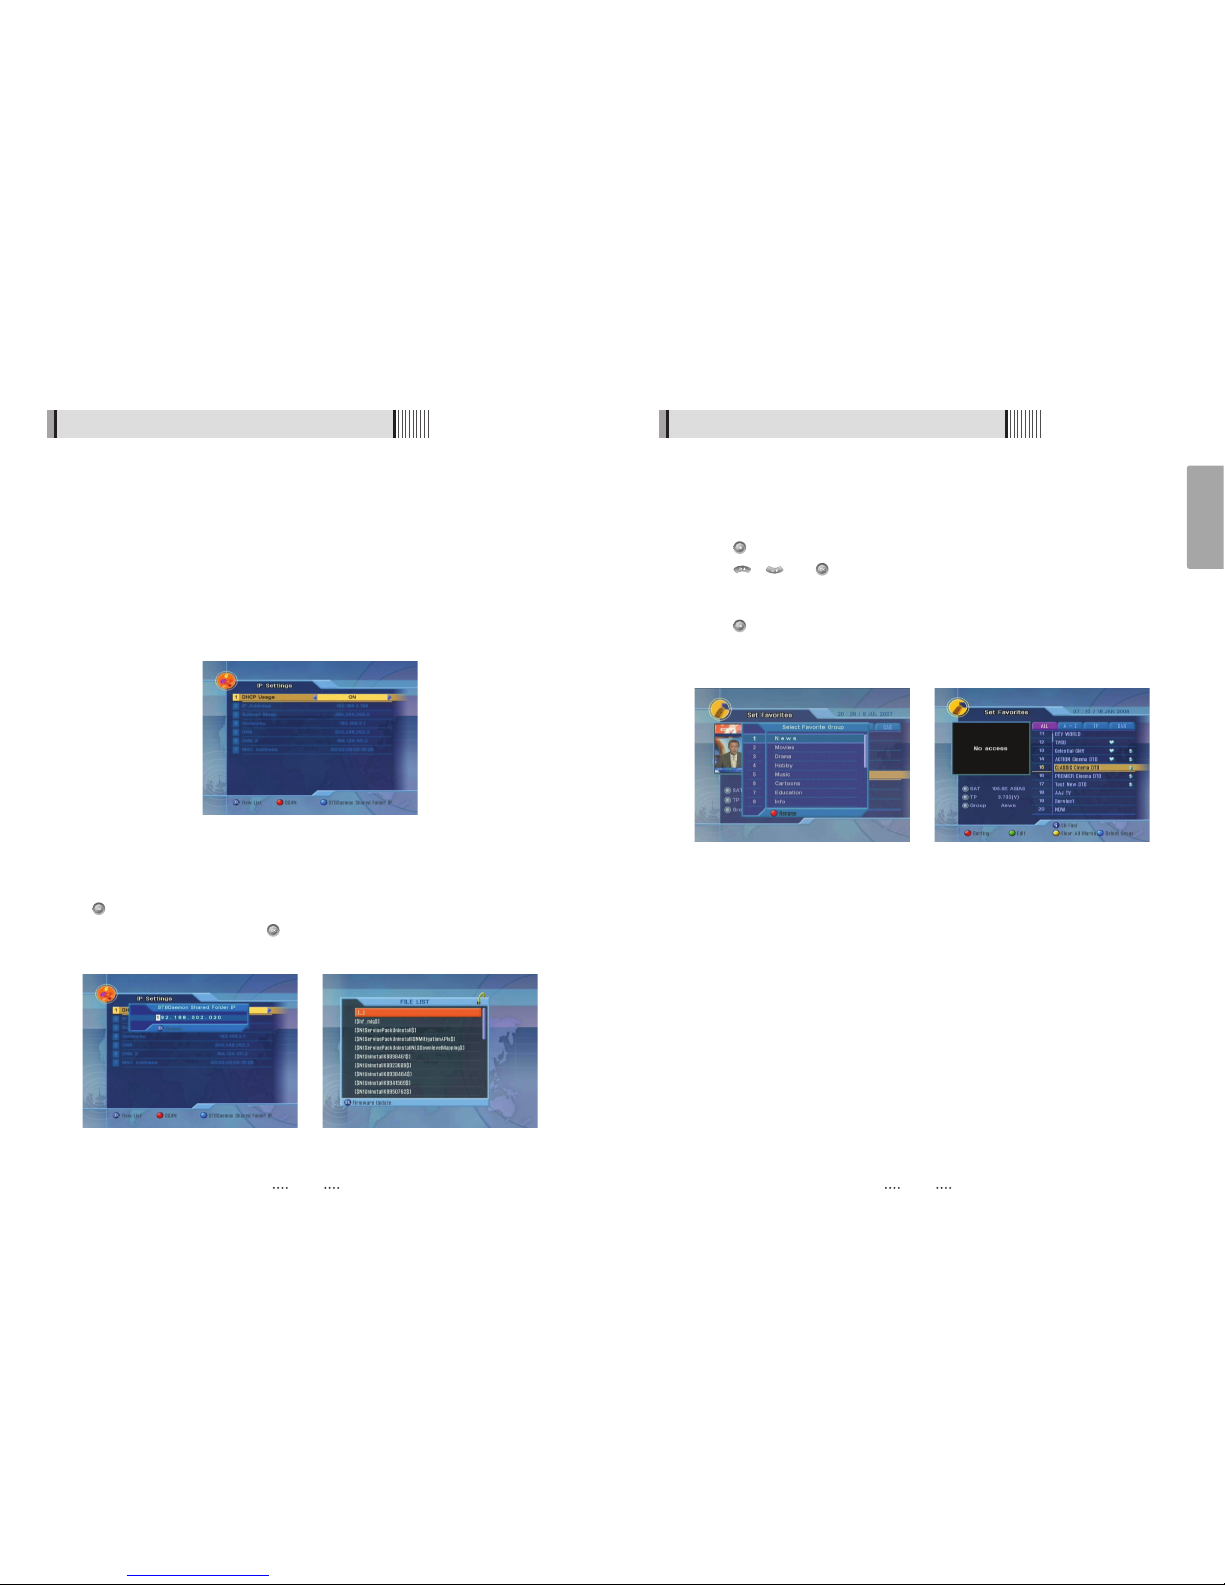
4) Parental Control
This submenu allows you to set password options and to lock or unlock access to menus
ҫ
Note : PIN code and password are the same). <Figure 6-2-3>
- Receiver Lock : Set ON to require entering a PIN code at powering on.
- Install Lock : Set ON to require entering a PIN code to access the installation menu.
- Channel Lock : Set ON to require entering a PIN code to access the channels menu.
- Lock Channel Confirm : Set ON to require entering a PIN code to access a locked
channel.
- Age Limit : Set to prevent children or unauthorized people from watching programs.
Select among (Free/ 8 above/12 above/15 above/18 above). When
program information (age limit) is available from broadcaster and this age
limit exceeds the selection, a PIN code is required to access the
channel/program.
- New Password : Enter the new password that you want to set.
- Verify Password : Enter the new password again for confirmation.
ҫ
Note : The default password is ‘0000’.
<Figure 6-2-3>
Page 17
33
English
32
6.3 Channel Manager
1) Set Favorites
This submenu allows you to set up favorite groups of channels. You can select TV or
Radio channels in an alternative way by pressing the TV/RADIO button. The receiver
supports 16 favorite groups.
⊹
Press on ‘Set Favorites’. The list of groups will be displayed. <Figure 6-3-1>
⊺
Press / and to choose a group. The following menu will be displayed.
<Figure 6-3-2>
If you want to change the name of a favorite group, press the RED button.
⊻
Press to add (or remove if previously added) the selected channel to/from the
favorite channel group.
⊼ Press the EXIT button to return to the previous menu.
<Figure 6-3-1> <Figure 6-3-2>
8) IP Setting
If the Network supports DHCP , IP settings can be allocated automatically. If the Network
does not support DHCP, the Addresses must enter manually (Static IP).<Figure 6.2.6>
- DHCP Usage : On/Off to receive IP settings automatically
- IP Address : Here enter the IP address
- Subnet Mask : Here enter Subnet Mask Number from your Network
- Gateway : Here enter IP address of Gateway (e.g. router)
- DNS : Here Enter IP address of main DNS Server
- Mac Address : Mac Address display
- Firmware update : Support download from a LAN.
⊹
BLUE button, appear input target IP address.
⊺
button to connect after input a target IP.
⊻
Choose a update software and button for downloading.
ҫ
Note : Have to run PC tool before connect PC.
6.2 System Setting
<Figure 6-2-6>
<Figure 6-2-7> <Figure 6-2-8>
Page 18
35
English
34
6.3 Channel Manager
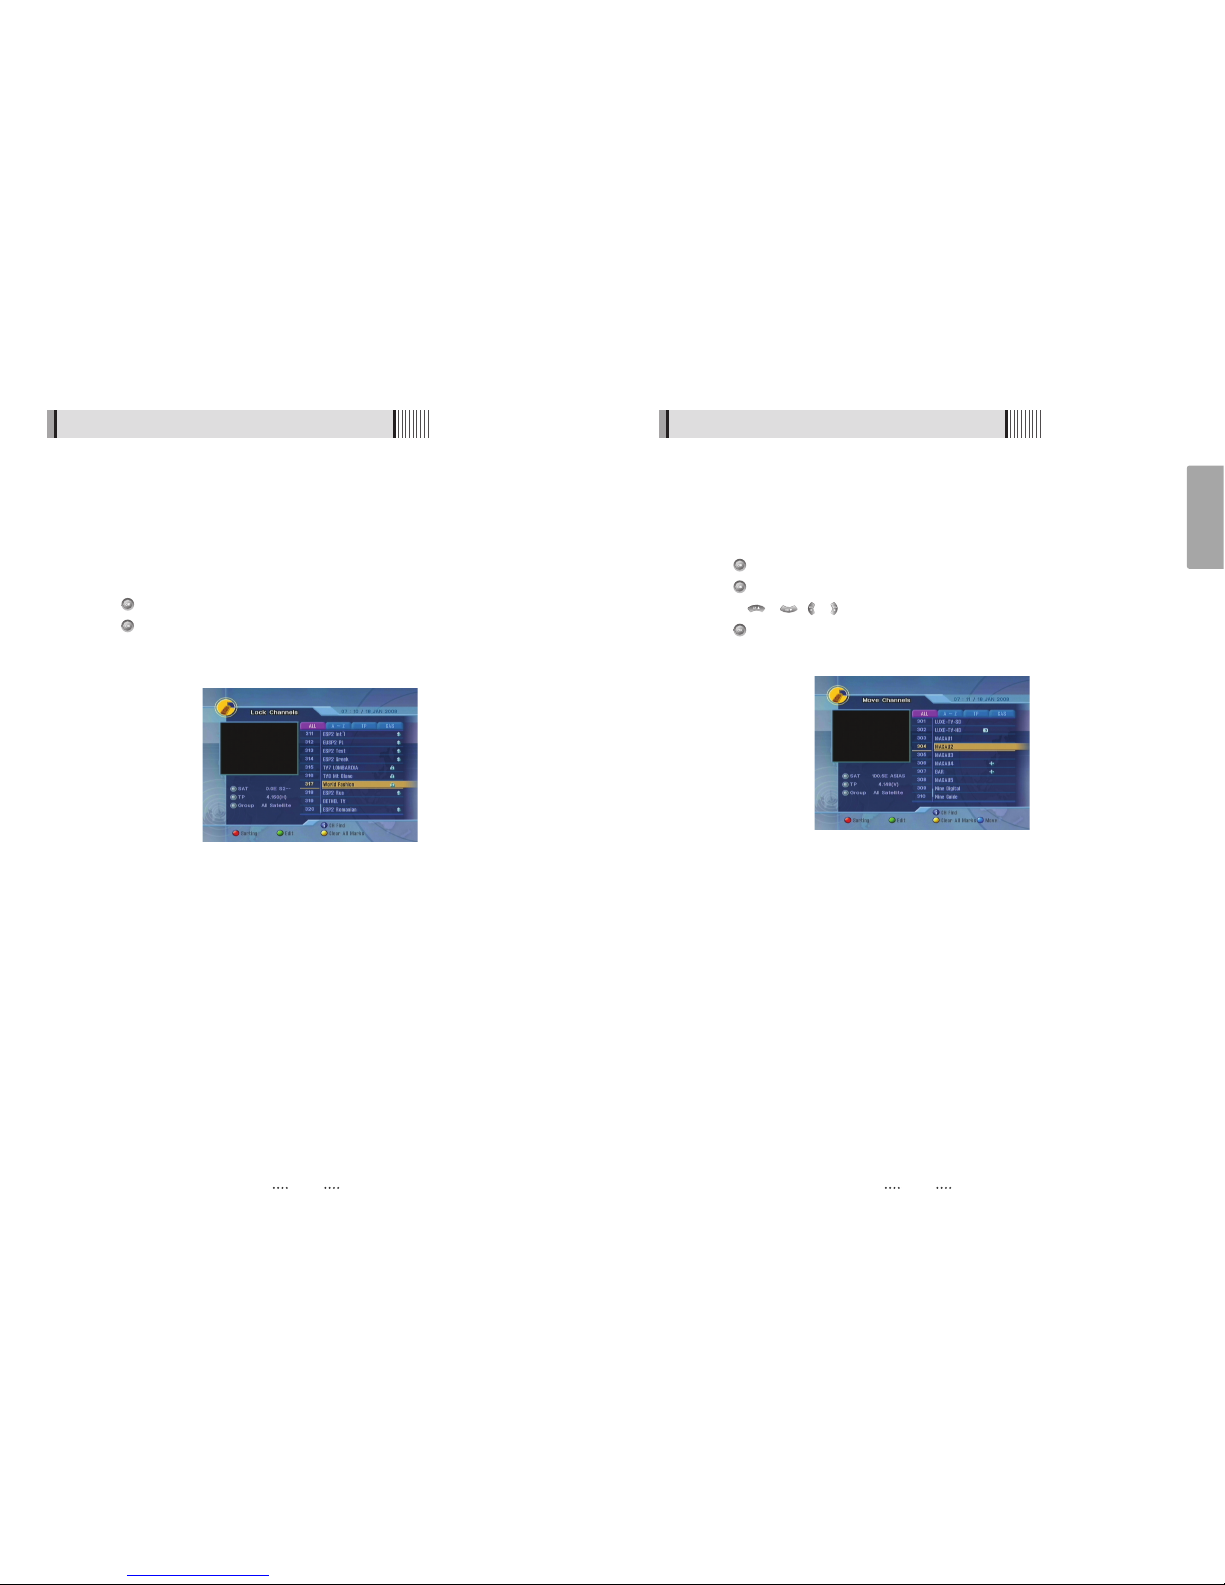
3) Move Channels
This submenu allows you to move channels.
You can select TV or Radio channels in an alternative way by pressing the TV/RADIO
button.
You can choose a channel list group by pressing the GROUP button.
⊹
Press on ‘Move Channels’. The following menu will be displayed.<Figure 6-3-4>
⊺
Press on the channel that you want to move; a ‘move’ icon will be displayed.
⊻
Use the / , / NUMERIC buttons to move the selected channel.
⊼ Press again to place the channel.
⊽ Press the EXIT button to return to the previous menu.
<Figure 6-3-4>
6.3 Channel Manager
2) Lock Channels
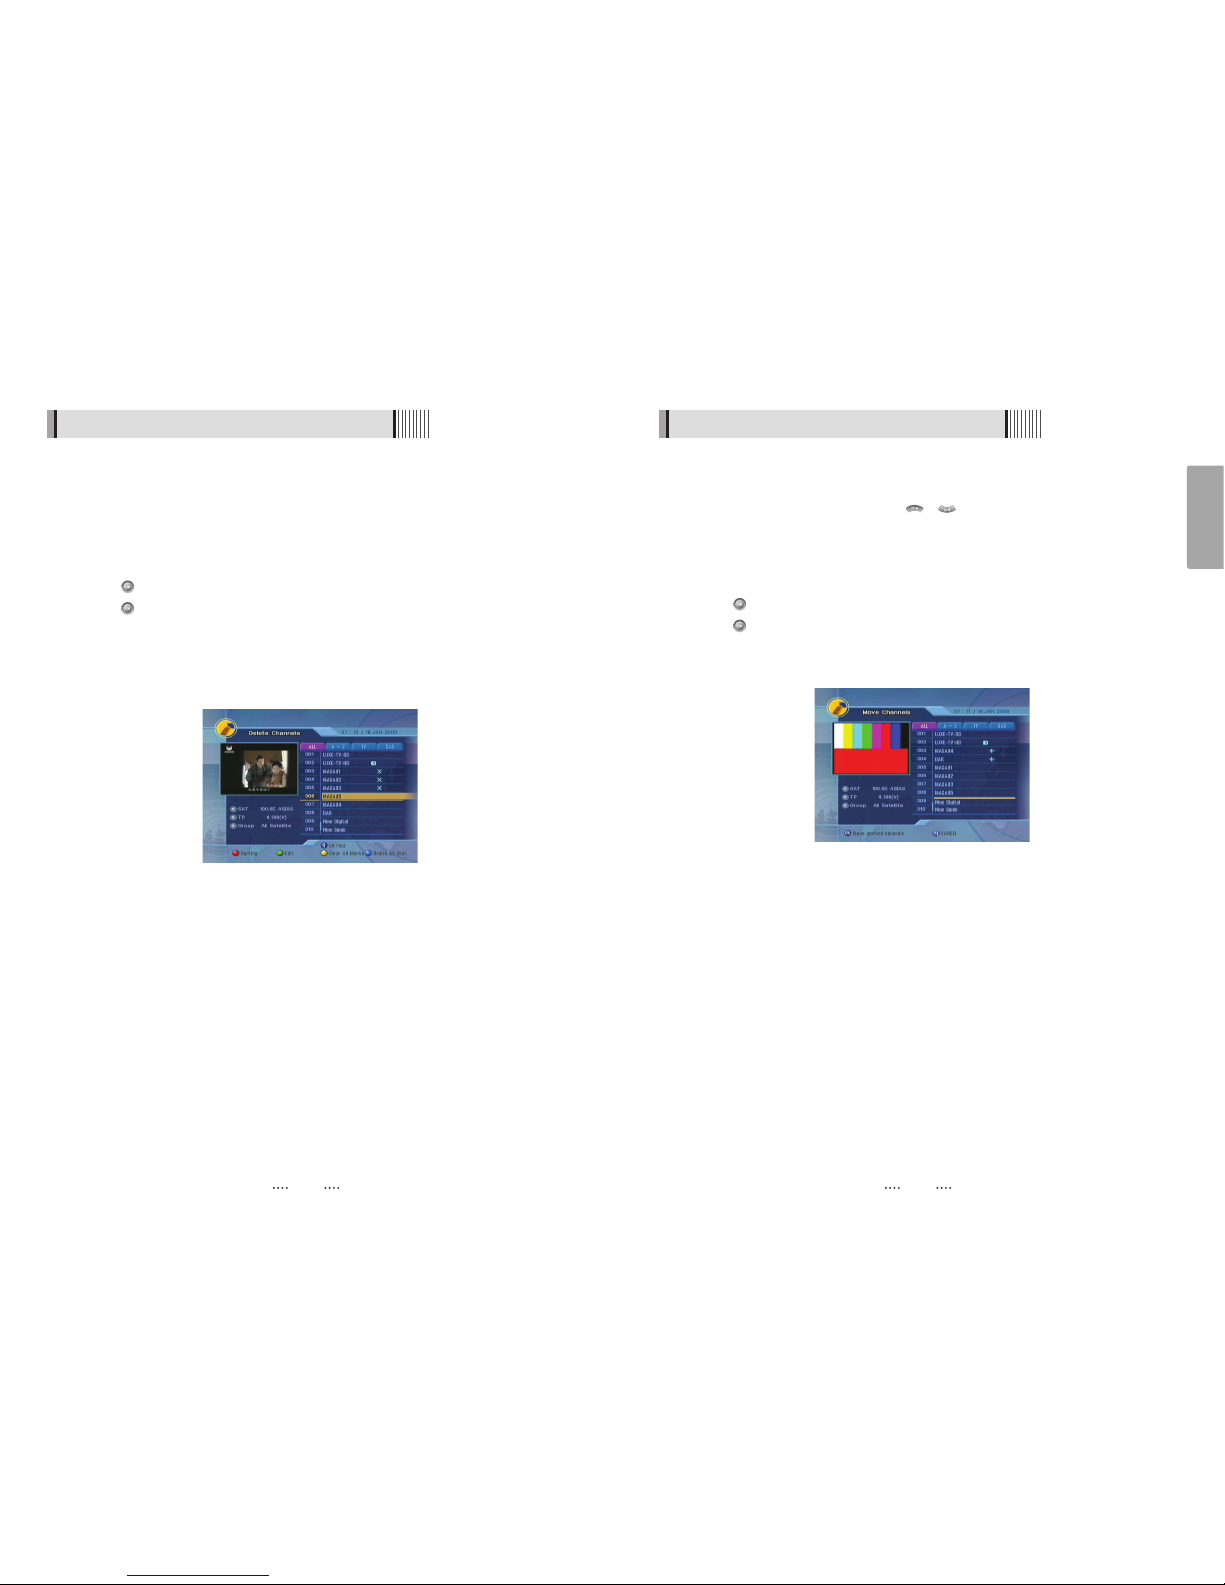
This submenu allows you to lock channels to control access to them. Once a channel is
locked, you will be asked to enter a password whenever you try to watch it. You can
select TV or Radio channels in an alternative way by pressing the TV/RADIO button. You
can choose a channel list group by pressing the GROUP button.
If you set ‘Lock Channel Confirm’ (refer to <6.2>security setting) to OFF, you will not be
asked to enter a password even if the channel is locked.
⊹
Press on ‘Lock Channels’. The following menu will be displayed. <Figure 6-3-3>
⊺
Press on the channel that you want to lock/unlock; the lock icon will be
displayed/removed.
⊻
Press the EXIT button to return to the previous menu.
<Figure 6-3-3>
Page 19
37
English
36
6.3 Channel Manager
5) Skip Channels
This submenu allows you to skip channels. Once a channel is set to be skipped, it will be
whenever you navigate channels using / in non-menu mode. You can select TV
or Radio channels in an alternative way by pressing the TV/RADIO button. You can
choose a channel list group by pressing the GROUP button.
ҫ
Note : You can still access a ‘skipped’ channel if you enter its number using the
NUMERIC buttons in non-menu mode.
⊹
Press on ‘Skip Channels’. The following menu will be displayed.<Figure 6-3-6>
⊺
Press on the channel that you want to skip/un-skip; the skip icon will be displayed /
removed.
⊻
Press the EXIT button to return to the previous menu.
<Figure 6-3-6>
6.3 Channel Manager
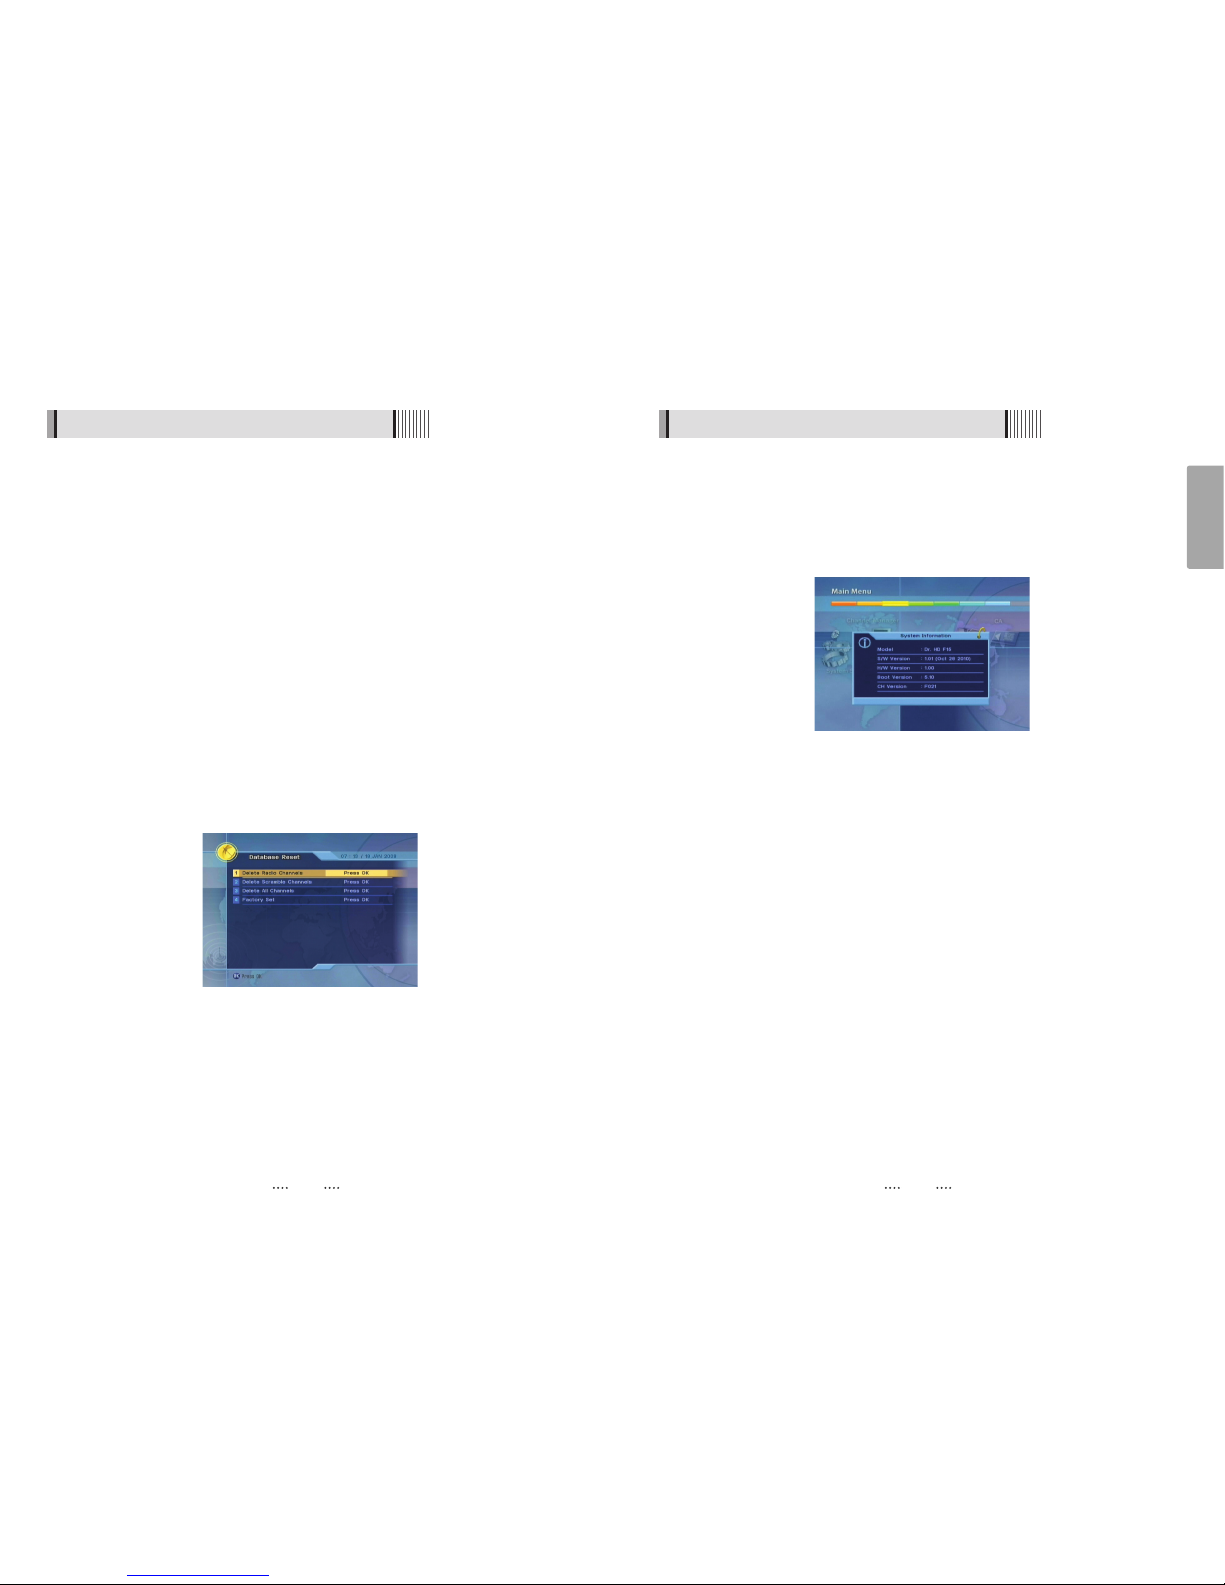
4) Delete Channels
This submenu allows you to delete channels. You can select TV or Radio channels in an
alternative way by pressing the TV/RADIO button. You can choose a channel list group
by pressing the GROUP button.
ҫ
Note : Be careful! If you delete a channel, you will not be able to access it again until
you rescan.
⊹
Press on ‘Delete Channels’. The following menu will be displayed. <Figure 6-3-5>
⊺
Press on the channel that you want to set/unset for deletion; the delete icon will
be displayed/removed.
⊻
Press the INFO button to delete all channels in the current list; you will be asked to
enter your password.
⊼ Press the EXIT button to return to the previous menu and confirm deletion.
<Figure 6-3-5>
Page 20
39
English
38
6.4 Installation
4) System Information
You can check the current information about your receiver such as receiver model
name, S/W (software) version, H/W (hardware) version, manufacturing date, etc. <Figure
6-4-2>
ҫ
Note : This information is useful to download new software and/or repair the receiver.
<Figure 6-4-2>
6.4 Installation
1) Dish Setting
Select the item that you want to edit, and set its parameters as desired. <Dish Setting>
See (6.1 Getting Started 3) Dish setup) for detailed description.
2) Channel Search
Through this function, the receiver searches for all the available channels and saves
them in Memory. Chose Auto Scan to search using transponders (frequencies) in
memory, or chose Blind Scan to look for new satellite/transponders.
See (6.1 Getting Started 4) Channel Search) for detailed description.
3) Database Reset
This submenu allows you to restore the factory set values (useful when encountering
problems after changing settings). <Figure 6-4-1>
- Delete Radio Channels : Erase all radio channels in the database.
- Delete Scramble Channels : Erase all scramble channels in the database.
- Delete All Channels : Erase all channels.
- Factory Set : Erase all channels and restore the factory default settings.
<Figure 6-4-1>
Page 21
41
English
40
6.5 Utils
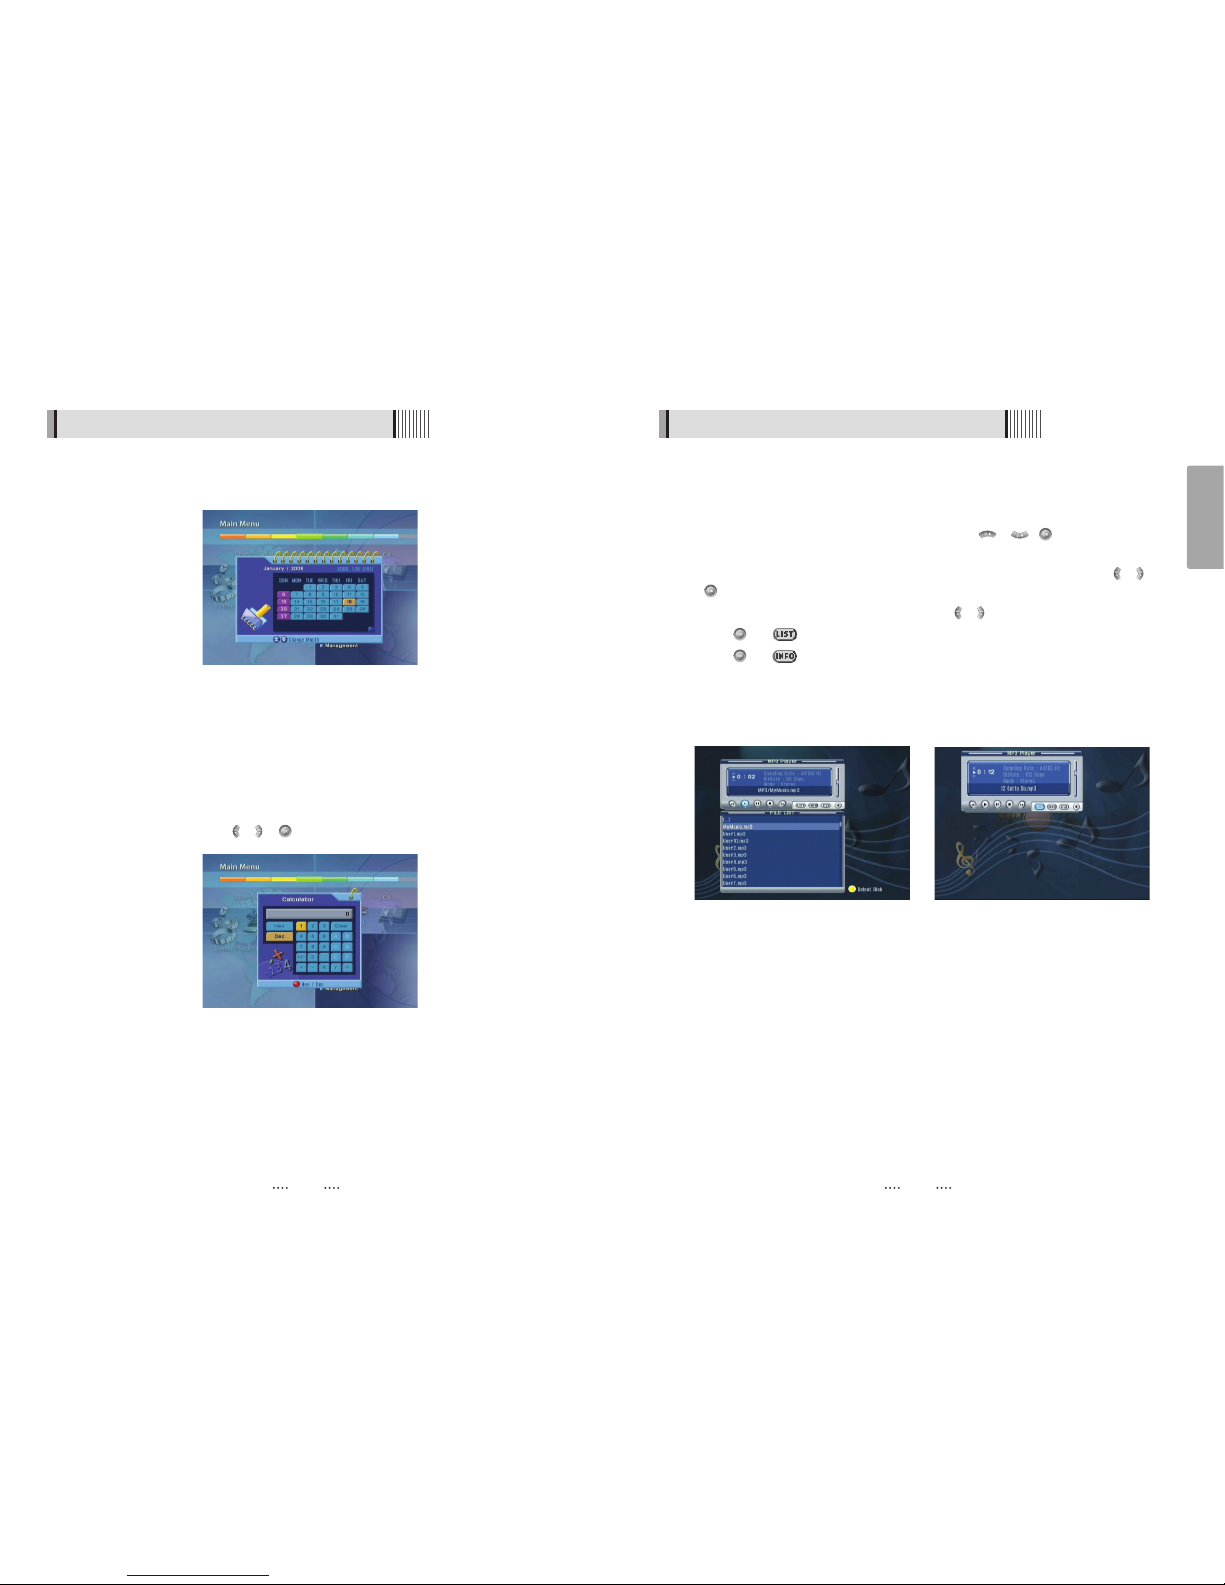
3) MP3 Menu
This submenu allows you to play various MP3 files, view JPG files or download a new
software by connecting your USB flash drive.
⊹
Select the MP3 file you want to play back by using / , in the file list. <Figure
6-5-3>
⊺
Press the EXIT button to hide the file list. You can then select an option using / ,
. <Figure 6-5-4>
⊻
You can then change the volume by pressing / .
⊼ Press on to display the MP3 file list.
⊽ Press on to display information about the selected MP3 file.
- FILELIST : Shows/Hides the MP3 file list
- INFO : Shows information about the MP3 file you selected.
- YELLOW : Choose the Hard disk volume or usb device with USB hub.
<Figure 6-5-3> <Figure 6-5-4>
6.5 Utils
1) Calendar
This submenu allows you to use a calendar on the screen <Figure 6-5-1>
2) Calculator
This submenu allows you to use a calculator on the screen. <Figure 6-5-2>
- You can switch between Hex (Hexadecimal) and Dec (Decimal) basis for arithmetic
with the RED button of the remote control unit.
- Use the Numerical and the / / buttons on the remote control unit.
<Figure 6-5-1>
<Figure 6-5-2>
Page 22
43
English
42
6.5 Utils
6) Disk Manager
- Default Disk : Set the pvr disk.
ҫ
Note : If External SATA is connected, External SATA can be captured in “volume0”.
Otherwise, one of other disks can be captured in “volume0”
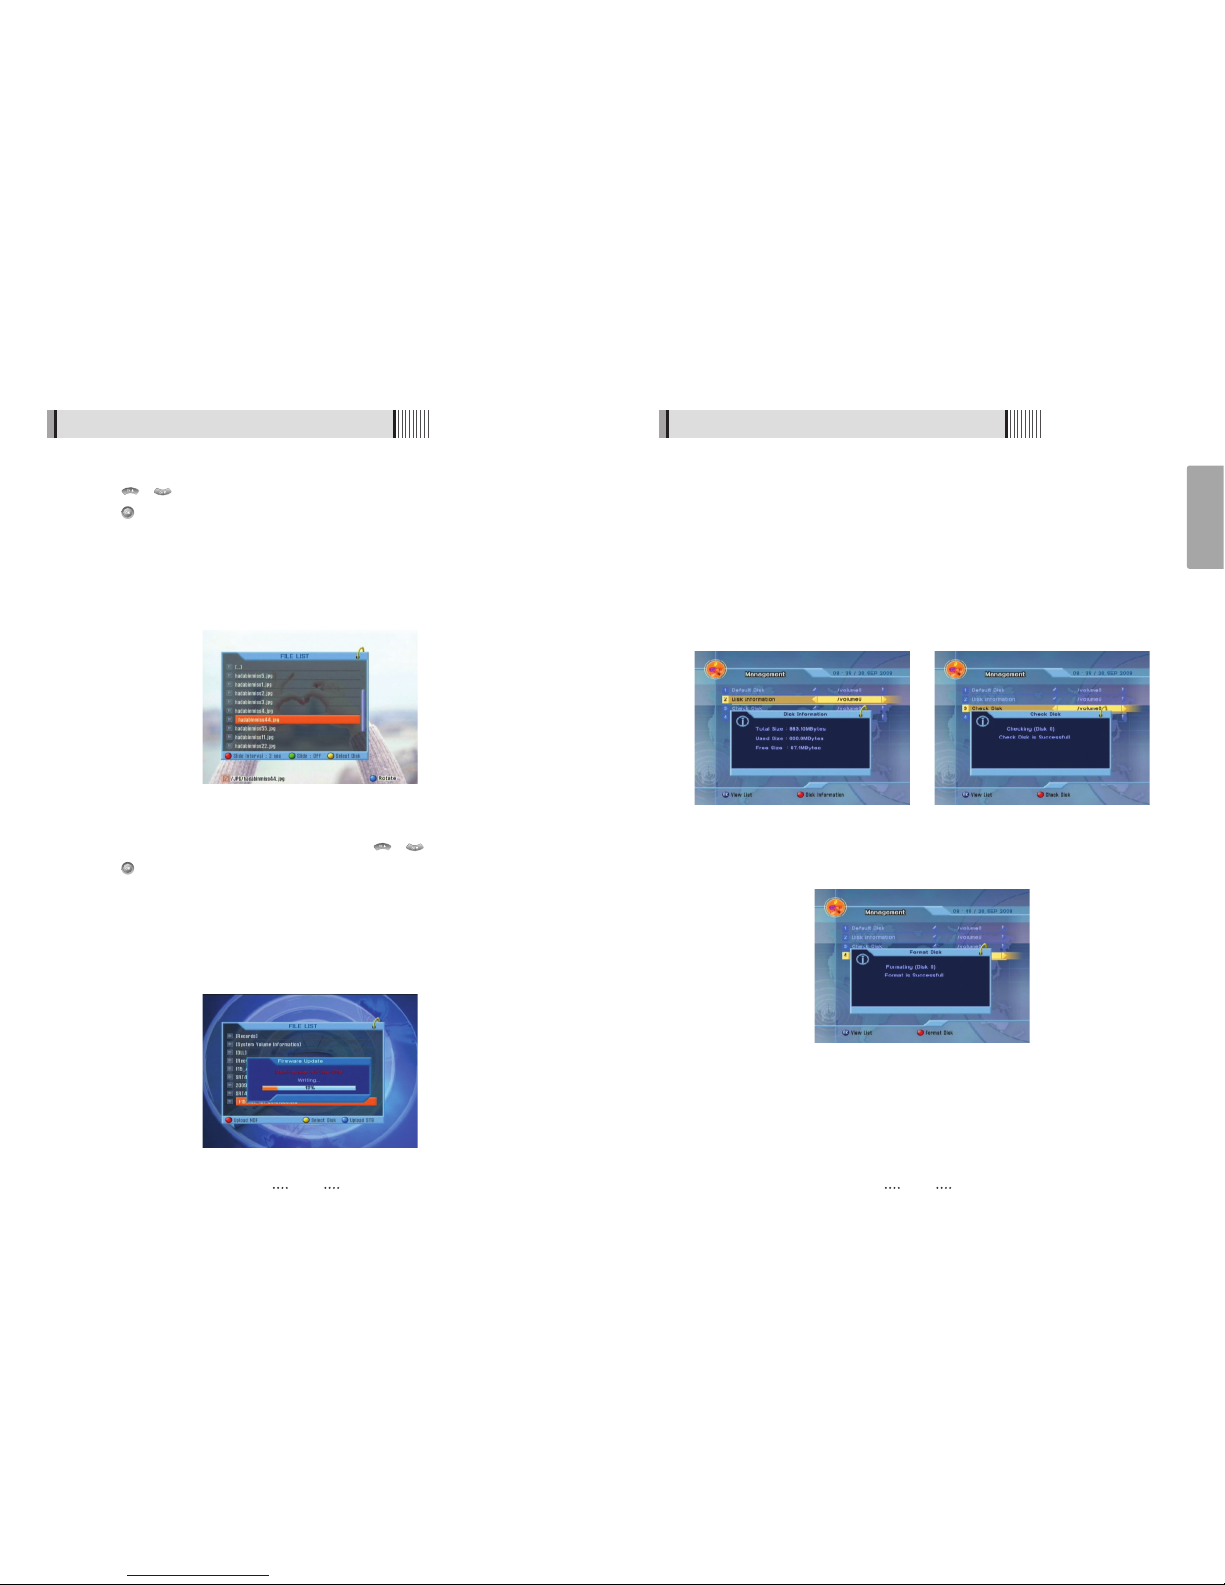
- Disk Information : Choose the Hard disk volume or usb device with USB hub. You can
view a information of usb devices (used size, total size, free size)
<Figure 6-5-7>
- Chek Disk : Choose the Hard disk volume or usb device with USB hub. You can check
the usb devices. <Figure 6-5-8>
- Format Disk : You can format the usb devices. <Fig 6-5-9>
<Figure 6-5-9>
<Figure 6-5-7> <Figure 6-5-8>
6.5 Utils
5) Download
⊹
Select the software you want to download by using / in the list <Figure 6-5-6>
⊺
Press to start software downloading
- RED : Upload the current CNDF(compressed dish and channel data file).
- YELLOW : Choose the Hard disk volume or usb device with USB hub.
- BLUE : Upload the current software.
ҫ
Warning : Please do not switch off your receiver before software downloading is
completed.
4) JPG menu
⊹
Press / to select a picture. <Figure 6-5-5>
⊺
Press to show the picture you want to display.
- RED : Sets the time interval between slides.
- GREEN : Selects slide show.
- YELLOW : Choose the Hard disk volume or usb device with USB hub.
- BLUE : Rotate the picture.
- FILELIST : Shows/Hides the JPEG file list.
<Figure 6-5-5>
<Figure 6-5-6>
Page 23
45
English
44
6.5 Utils
7) File Manager
⊹
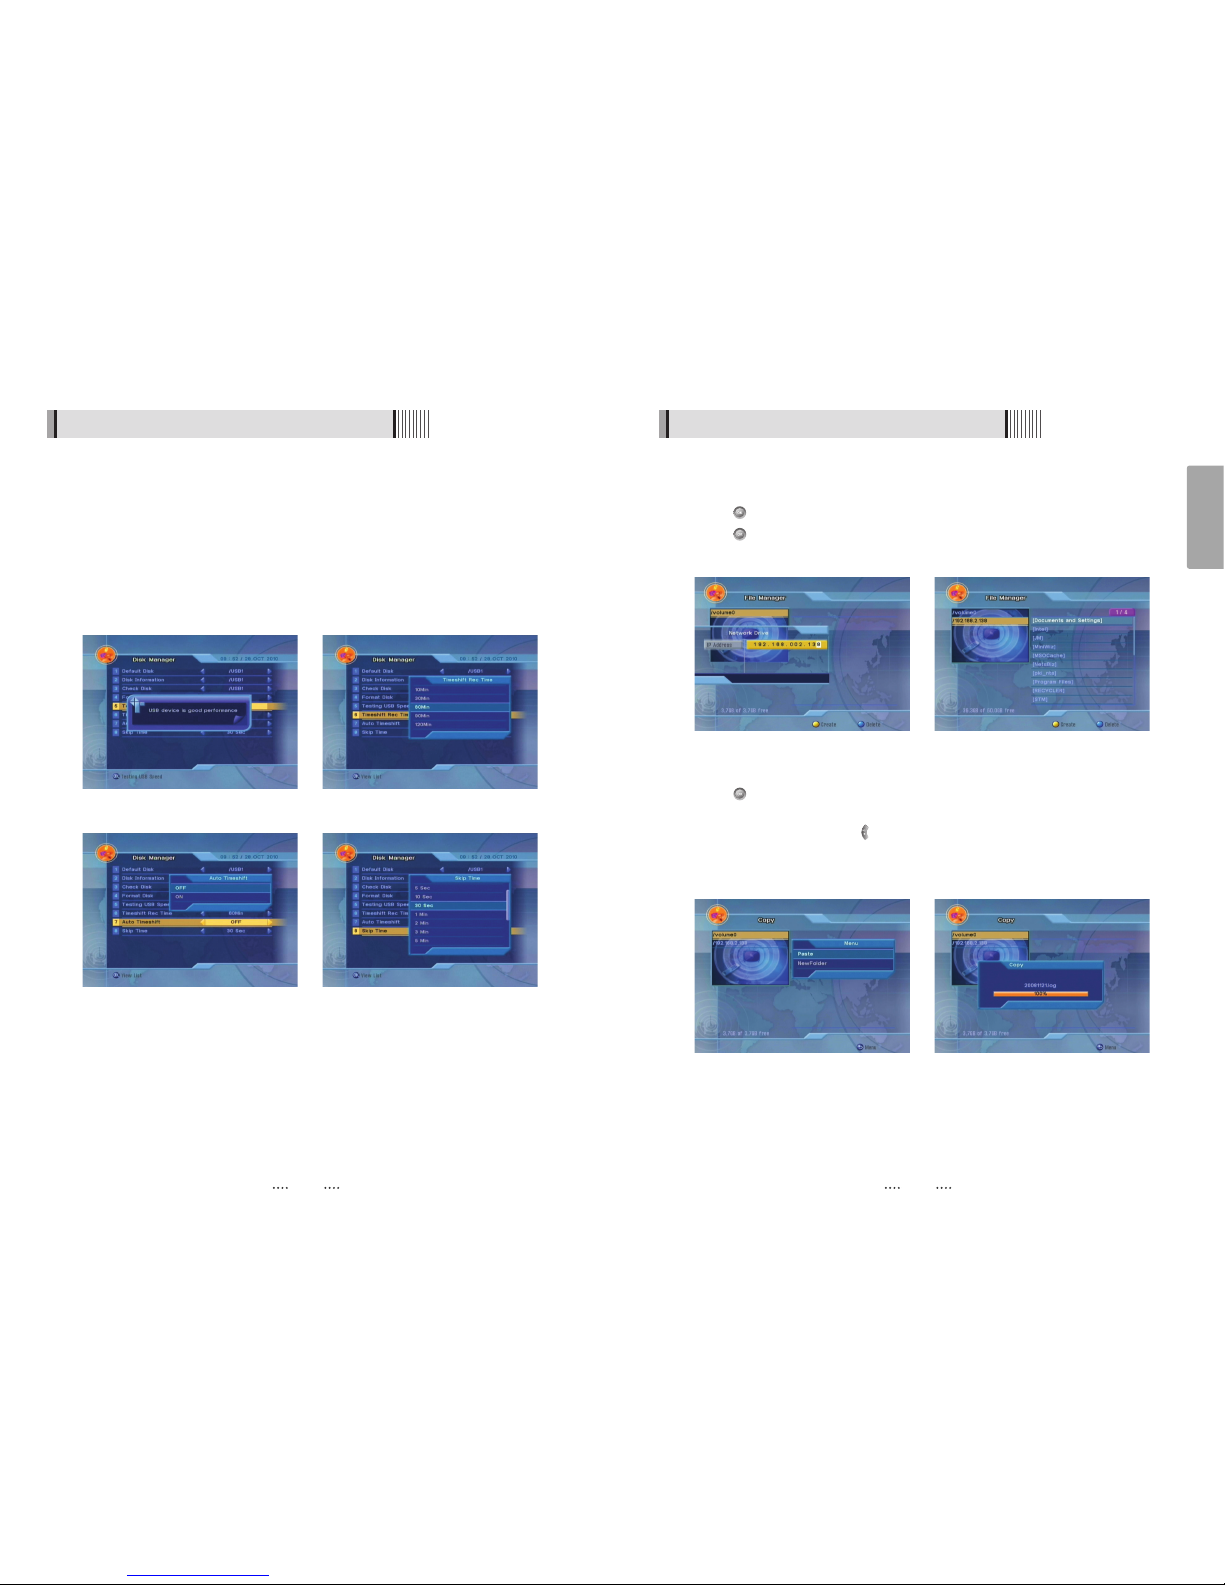
Press YELLOW button for connect PC.
⊺
Press button after input IP address of PC.
⊻
Press button after choose target.
ҫ
Note : Have to run PC tool before connect PC.
⊼ Press Right button and Press RED for chooses files.
⊽ Press button to choose Copy/Move/NewFolder/Delete/Rename after press MENU
button.
≊ If select copy or move, press button to move target for paste.
≋ Press MENU button to paste target.
≌ Select a Paste for Copying or Moving files.
<Figure 6-5-10> <Figure 6-5-11>
<Figure 6-5-12> <Figure 6-5-13>
6.5 Utils
- Testing USB speed : Choose the Hard disk volume or usb device with USB hub. You can
test USB speed the usb device <Figure 6-5-10>
ҫ
It works even its status is bad performance.
- Timeshift Rec Time : Set timeshift record time.(10 / 30 / 60 / 90 / 120 Min).
<Figure 6-5-11>
- Auto Timeshift : Set automatic timeshift On/Off. <Figure 6-5-12>
- Skip Time : Set jump time when you press / key on RCU during file playback.
<Figure 6-5-13>
<Figure 6-5-10> <Figure 6-5-11>
<Figure 6-5-12> <Figure 6-5-13>
Page 24
47
English
46
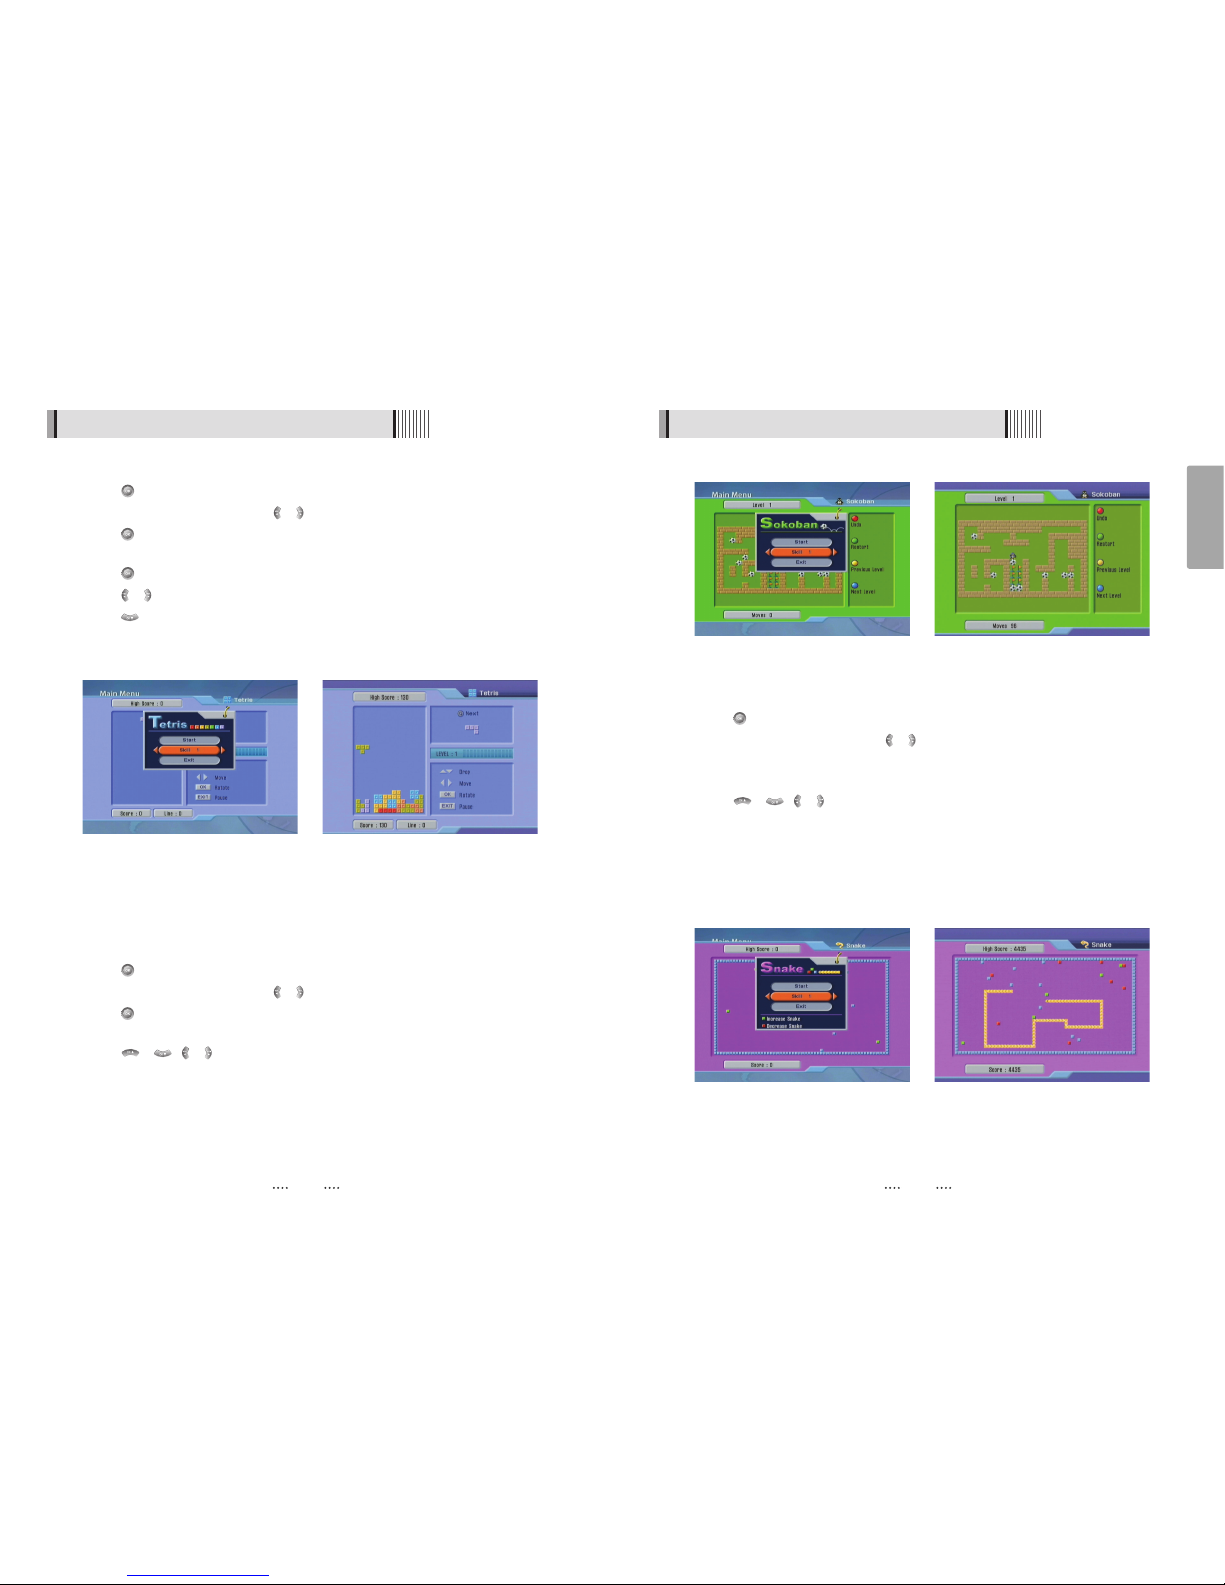
<Figure 6-6-3> <Figure 6-6-4>
6.6 Game
3) Snake
⊹
Press on ‘Snake’. The following menu will be displayed. <Figure 6-6-5>
⊺
You can choose a skill level using / .
⊻
Press to start the game <Figure 6-6-6>, or press the EXIT button to return to the
previous menu.
⊼ Press / , / to move.
⊽ Pass through the GREEN icon to increase your score; the length of the snake
increases.
≊ Pass through the RED icon to decrease the snake’s length.
≋ Avoid the BLACK icons. If you hit a BLACK icon (block), the game ends.
≌ Press the EXIT button to quit the game.
<Figure 6-6-5> <Figure 6-6-6>
6.6 Game
1) Tetris
⊹
Press on ‘Tetris’. The following menu will be displayed. <Figure 6-6-1>
⊺
You can choose a skill level using / .
⊻
Press to start the game <Figure 6-6-2>, or press the EXIT button to return to the
previous menu.
⊼ Press to rotate a block.
⊽ Press / to move a block.
≊ Press to drop a block.
≋ You can see the next block in the top-right small window.
≌ Press the EXIT button to quit the game
2) Sokoban
How to play Sokoban: you have to push the balls to their correct positions. The balls can
only be pushed, never pulled, so you have to be careful not to push them into a corner
where you can’t get them out from. You can only push one ball at a time.
⊹
Press on ‘Sokoban’. The following menu will be displayed. <Figure 6-6-3>
⊺
You can choose a skill level using / .
⊻
Press to start the game <Figure 6-6-4>, or press the EXIT button to return to the
previous menu.
⊼ Press / , / to move.
⊽ Press the RED button to undo the previous move. You can undo only one step.
≊ Press the GREEN button to restart the game.
≋ Press the YELLOW/BLUE buttons to jump to the previous/ next level. You can jump
only between completed levels.
≌ Press the EXIT button to quit the game.
<Figure 6-6-1> <Figure 6-6-2>
Page 25
49
English
48
6.7 Common Interface
2) The Status of the CAM
⊹
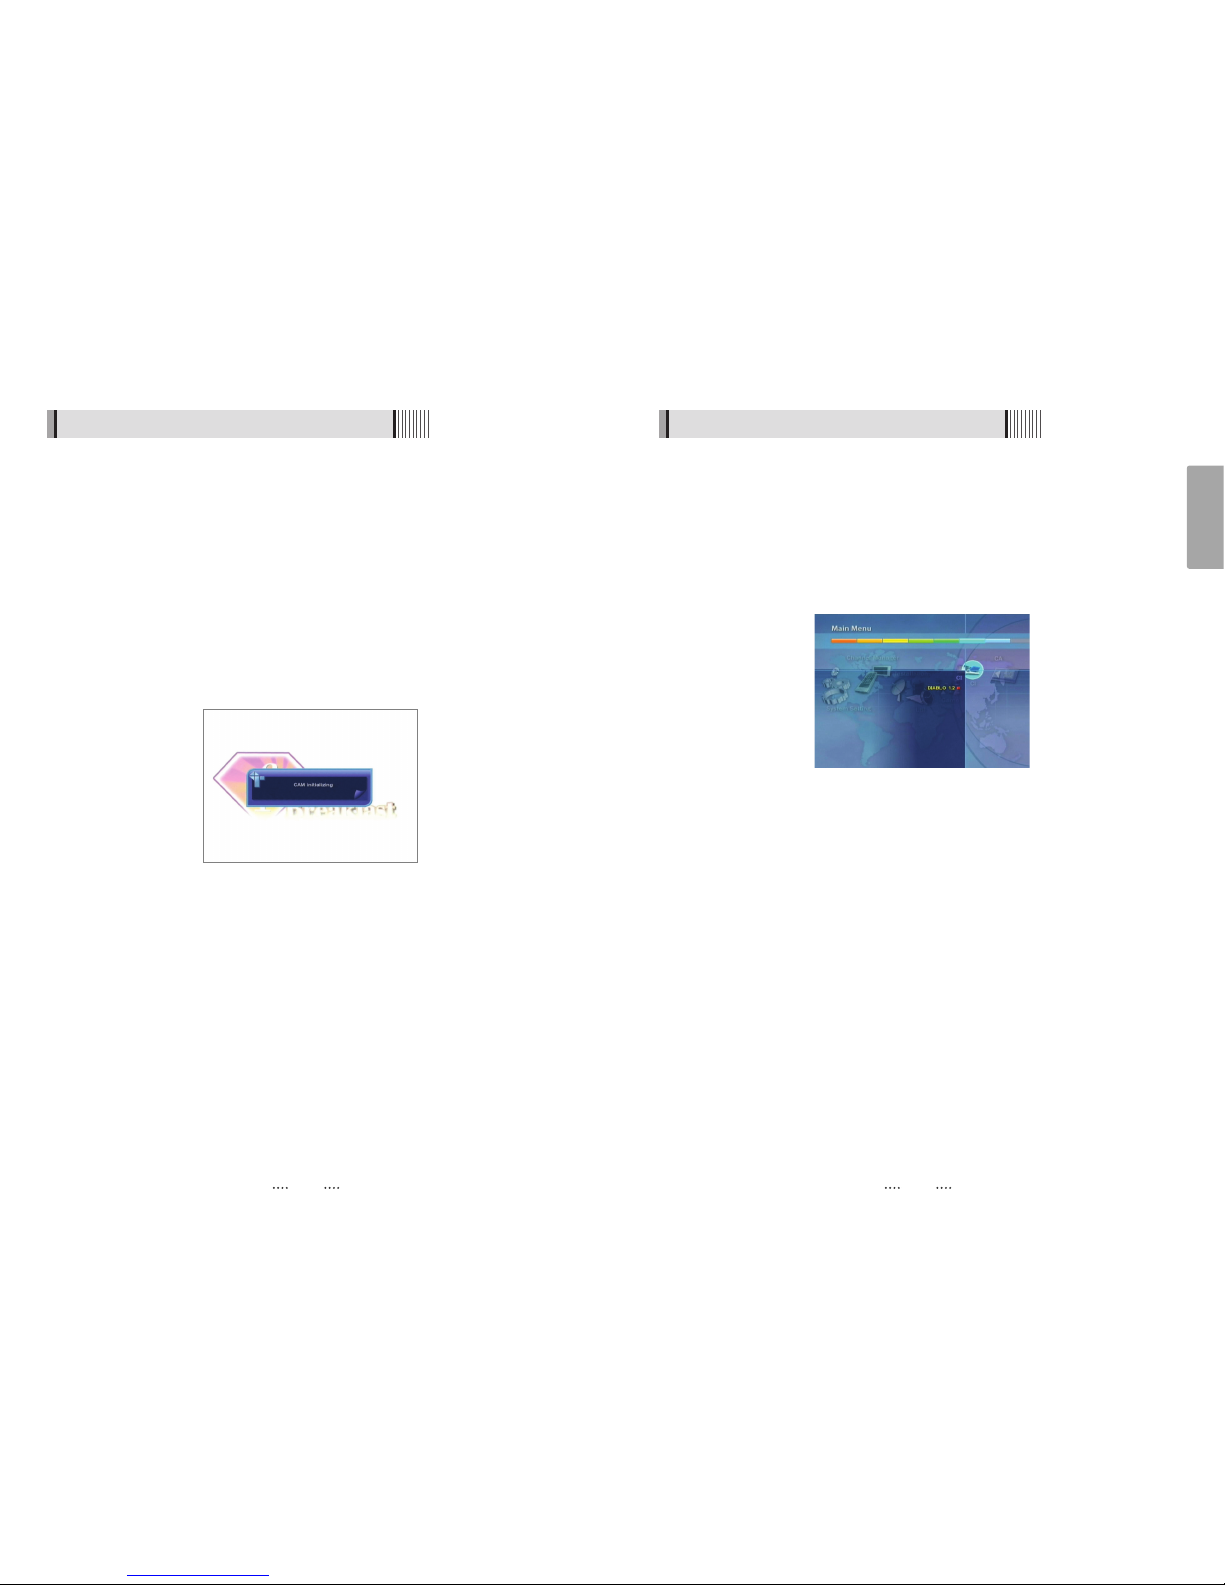
You can access detailed information about the CAM using the / keys in the Main
Menu to select ‘CI’ and pressing . <Figure 6-7-2>
⊺
Proceed with further instructions displayed on the screen to check more detailed
information depending on the CAM in use.
ҫ
Note : Further detailed information is not mentioned in this manual since the
information depends on the CAM in use.
<Figure 6-7-2>
6.7 Common Interface
1) CAM Initializing
To enjoy scrambled channels, you will need a Common Interface Conditional Access
Module (CAM) and a Smart Card from the service provider (program distributor). If you
are subscribing to services from more than one service provider, you will need a Smart
Card from each one, and may even need different CAMs (depending on the DVB
Common Interface standard each uses). Since a Smart Card is connected to a single
service provider, a limited range of channels will be available via it.
ҫ
Note : Without the CAM and the smart card, you can watch only Free-to-Air programs.
⊹
Insert a CAM into a receiver’s slot designed for it, and a Smart Card into the CAM.
⊺
The message ‘CAM Initializing’ will appear on the screen. <Figure 6-7-1>
⊻
After the message ‘CAM Initializing’ has disappeared, you can select the channel that
you want to watch.
<Figure 6-7-1>
Page 26
51
English
50
2) The Status of the Smart Card
⊹
You can access detailed information about the Smart Card using the / keys in
the Main Menu to select ‘CA’ and pressing . <Figure 6-8-2>
⊺
Proceed with further instructions displayed on the screen to check more detailed
information depending on the Smart Card in use.
ҫ
Note: Further detailed information is not mentioned in this manual since the
information depends on the Smart Card in use.
<Figure 6-8-2>
6.8 Conditional Access System6.8 Conditional Access System
1) Card Initializing
To Enjoy CONAX CAS7 scrambled channels, you will need a Smart Card from the service
provider (program distributor). If you are subscribing to services from more than one
service provider, you will need a Smart Card from each one. Since a Smart Card is
connected to a single service provider, a limited range of channels will be available via
it.
ҫ
Note : Without the Smart Card, you can watch only Free-To-Air programs.
⊹
Insert the Smart Card into the receiver’s slot designed for it.
⊺
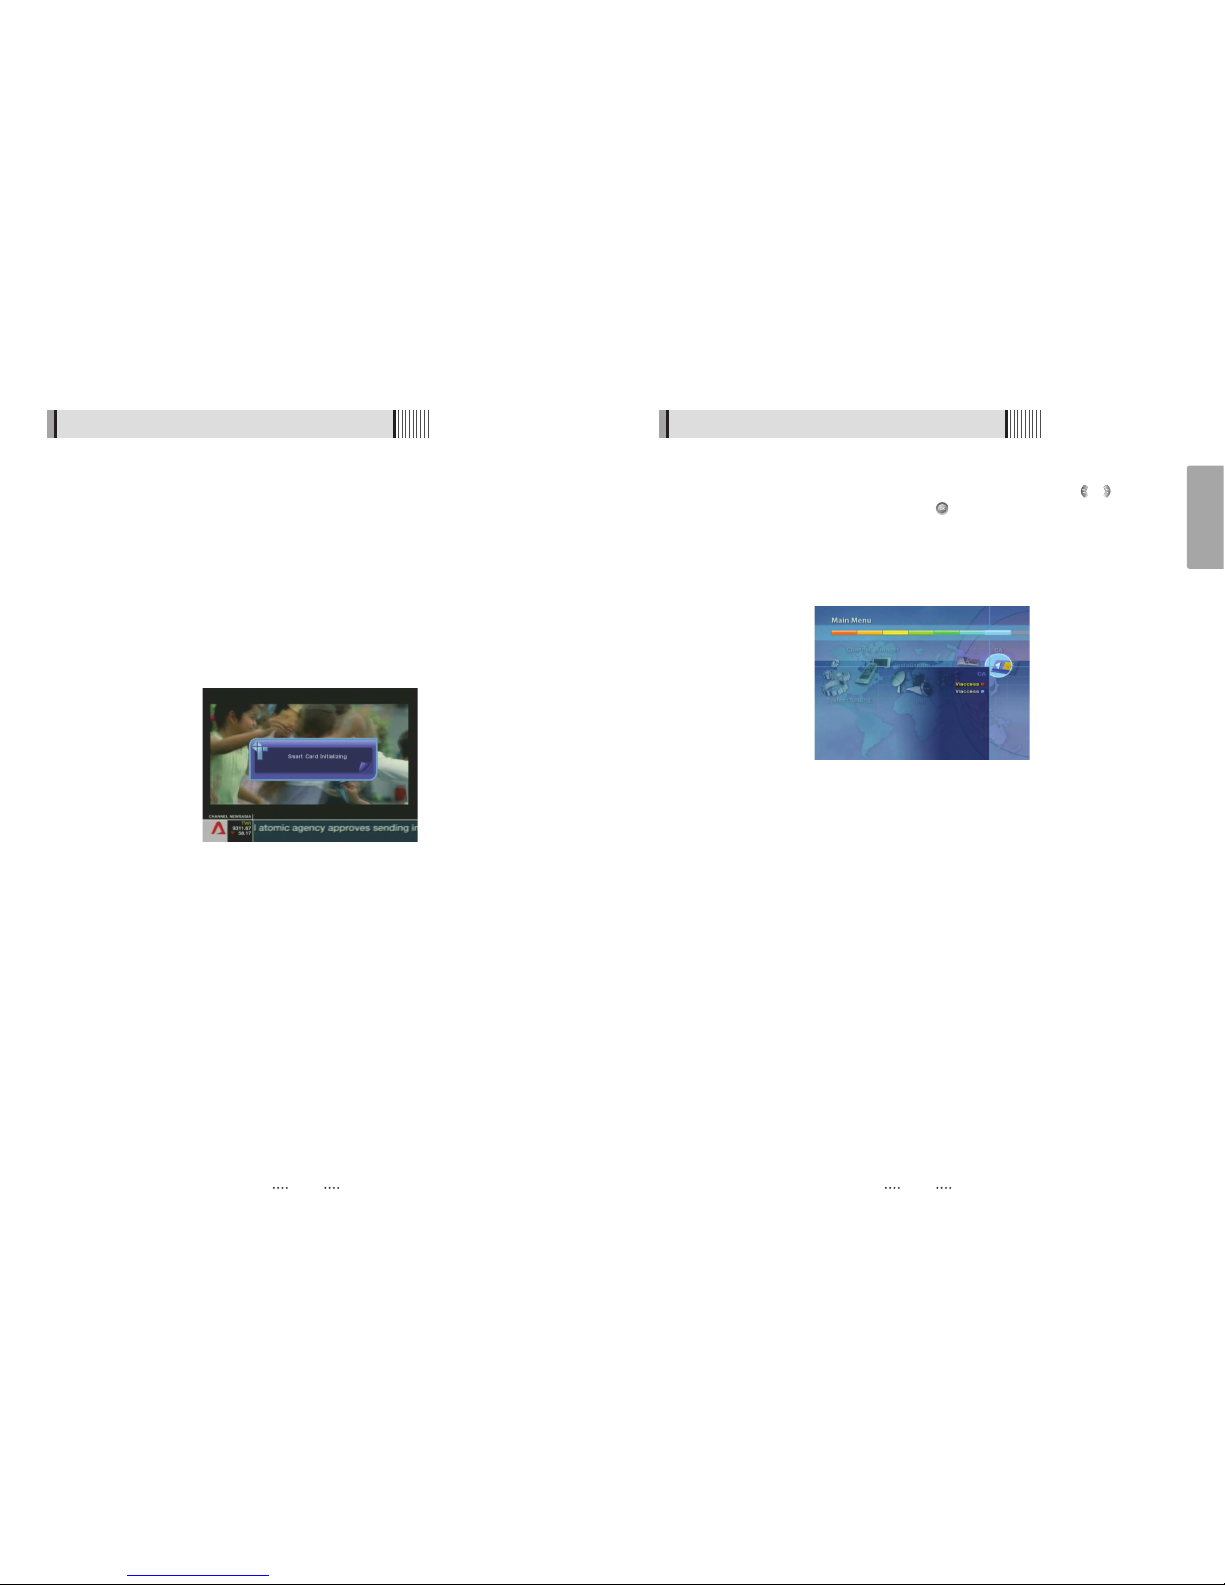
The message ‘Smart Card Initializing’ will appear on the screen. <Figure 6-8-1>
⊻
After the message ‘Smart Card Initializing’ has disappeared, you will be able to watch
the channels offered by the service provider.
<Figure 6-8-1>
Page 27
53
English
52
6.9 PVR
ᶀ Edit Menu
You will be asked to enter a password whenever you try to enter it. Press . The pop-up
menu for selection will appear<Figure 6-9-3>.
Select the item that you want to edit, and set its parameters as desired
⊹ Normal Mode : Press on the file that you can see the preview of a selected file.
⊺ Lock Mode : Press on the file that you want to lock/unlock.
Delete Mode : Press on the file that you want to delete.
- GREEN : Select between, File Mode Ƒ Dir Mode
- BLUE : Shows all sorted files. Select between, Sort by name Ƒ Sort by time.
ҫ
If you set ‘Channel Lock’ (refer to <Figure 6.2.4>security setting) to OFF, you will not be
asked to enter a password even if the channel is locked.
<Figure 6-9-3>
6.9 PVR
1) File List
ᶀ File Playback
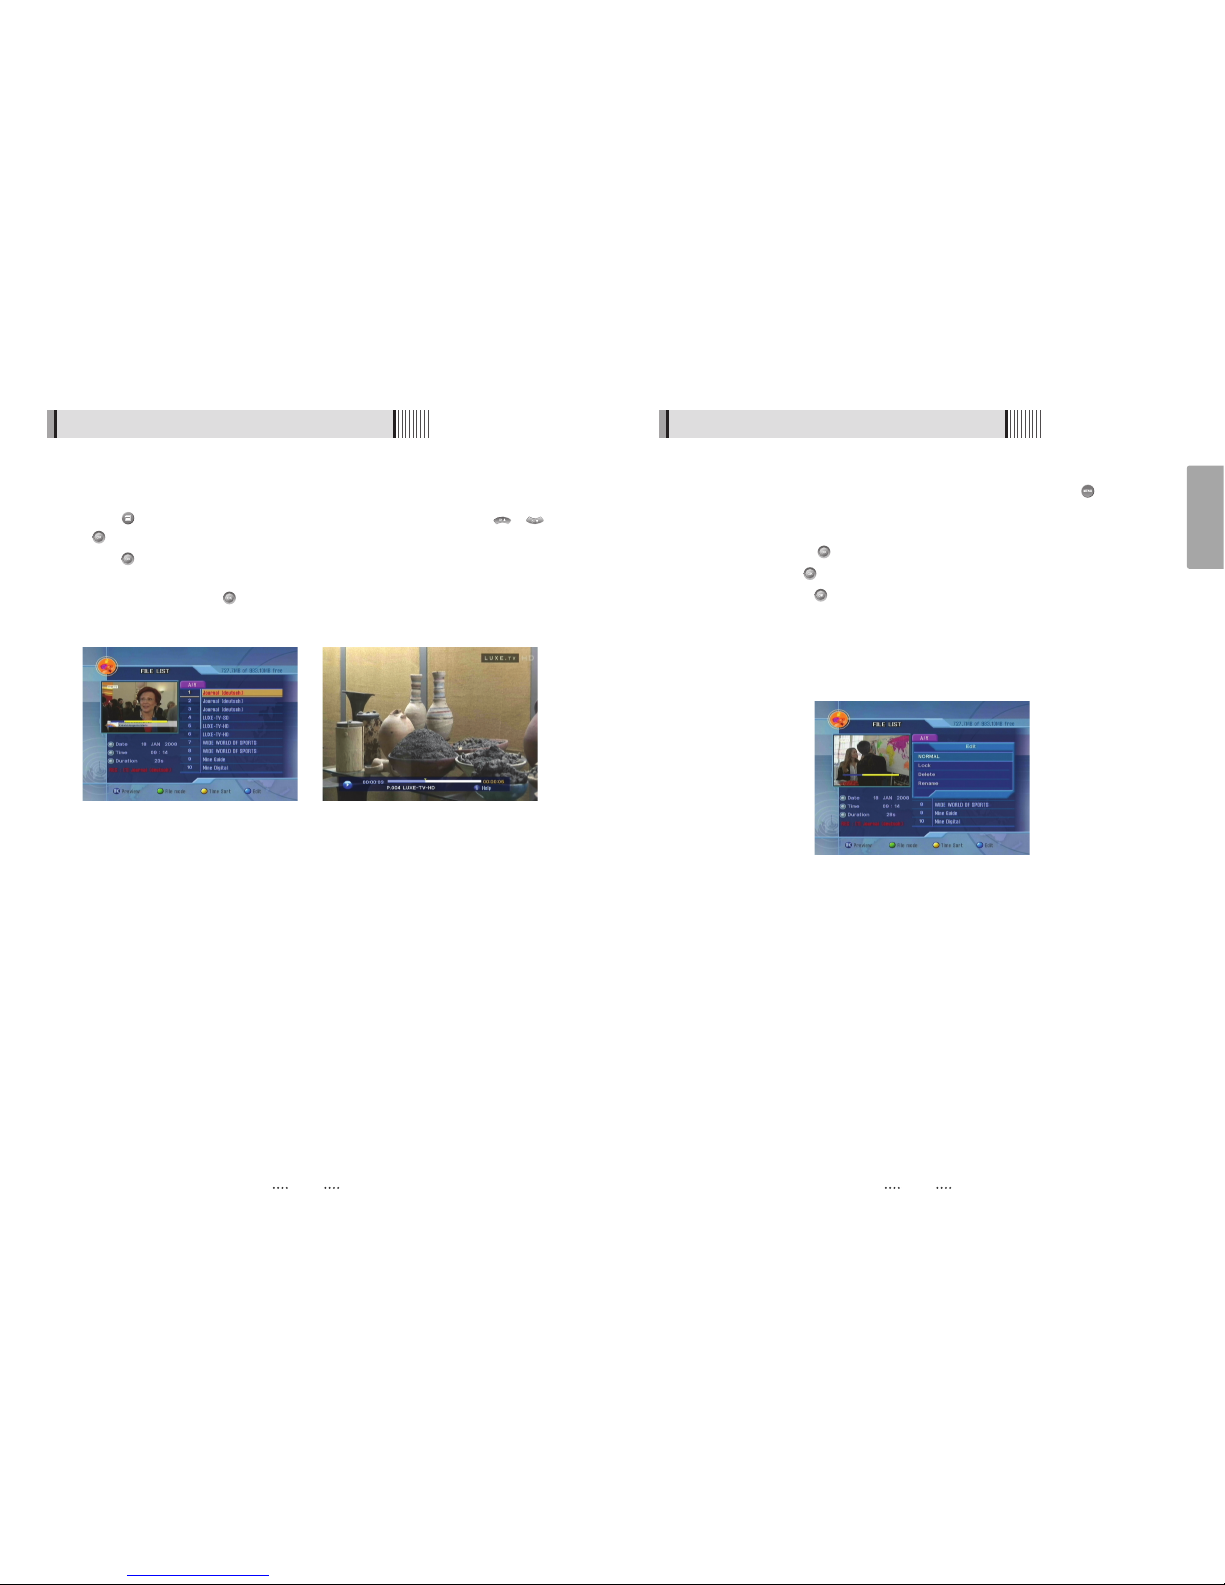
⊹ Press to show the file list. Select the file you want to play back by using / ,
.
⊺ Press . In the left side of screen, detailed information about the selected file will be
displayed. (Recorded Date/Time, Used size, Total Size) <Figure 6-9-1>
- To see a full screen, press once more. And then the following time-bar will appear.
<Figure 6-9-2>
<Figure 6-9-1> <Figure 6-9-2>
Page 28
55
English
54
6.9 PVR
3) Trick Mode
You can operate the trick mode while you are playing the recorded files. These functions
are available in playback mode or time-shift mode powerfully.
ᶀ PLAY
This button will display a time- banner. If you want to show the play list while playing the
file by using .
ᶀ PAUSE
This button will pause the playing file until you play again with or .
<Figure 6-9-6>
ᶀ ADVANCE
- If the time-shift mode is enabled, You can press to jump the live program.
- If the recording mode is enabled, You can press to jump to the current recording
position.
ᶀ FF(Fast Forward)
- When playing the file, you can press to adjusting the playing speed.<Figure 6-9-7>
- The speed will change to x2, x4 and x8.
<Figure 6-9-6> <Figure 6-9-7>
6.9 PVR
2) Play List
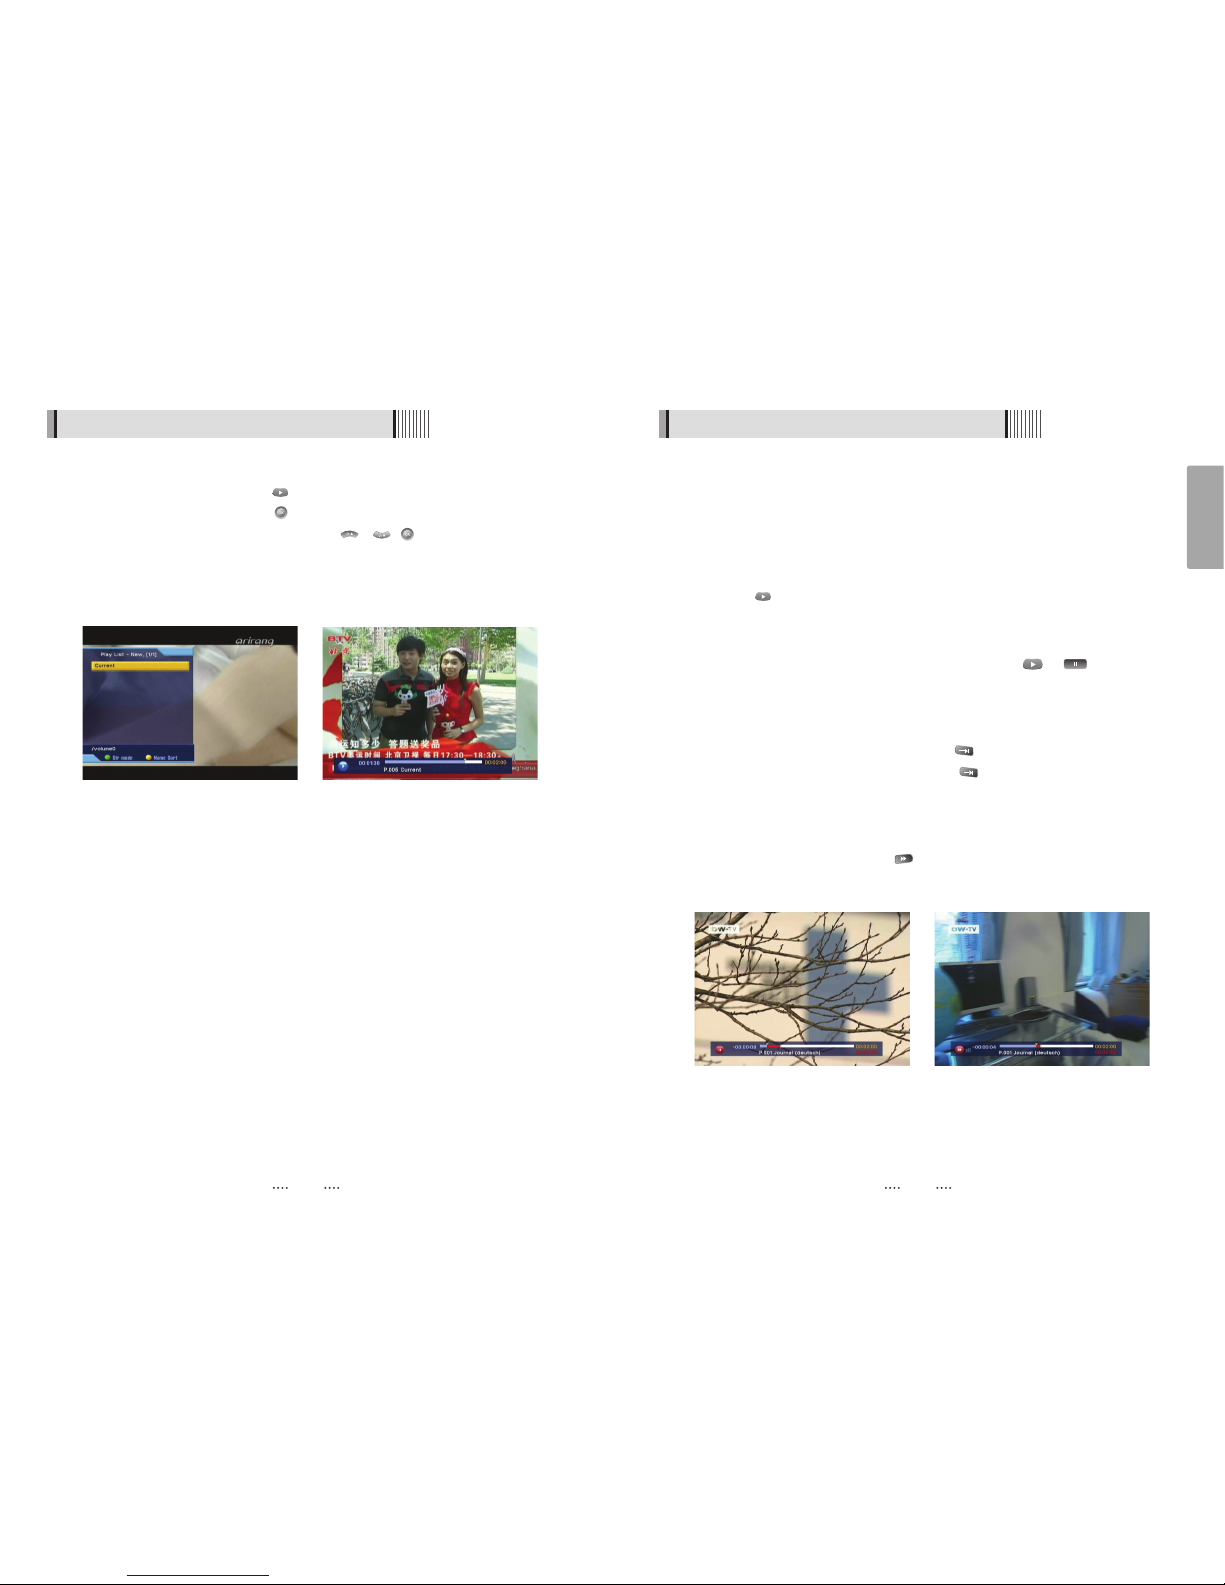
⊹ While watching a program, press to show the play list. <Figure 6-9-4>
⊺ While recording a program, press to show the play list. <Figure 6-9-4>
Select the file you want to play back by using / , . And then the following
time-banner will appear. <Figure 6-9-5>
- GREEN : Select between, File Mode ƍ Dir Mode
- YELLOW : Shows all sorted files. Select between, Sort by name ƍ Sort by time
<Figure 6-9-4> <Figure 6-9-5>
Page 29
57
English
56
6.9 PVR
ᶀ Bookmark
To mark a specific place in a file for later retrieval. <Figure 6-9-10>
- RED : Press this button and red small triangle cursor will be placed at that position. If you
want to delete the bookmarked position, press a this button once more when red
small triangle cursor appear.
- GREEN : Press this button and the current position will jump to the previous bookmarked
position and playback starts from this point.
- YELLOW : Press this button and the current position will jump to the next bookmarked
position and playback starts from this point.
ҫ
Note : The maximum number of the bookmark is 20 in a file.
- BLUE : Press this button and edit(copy, cut) the file. <Figure 6-9-11>
Press button to select edit start position and one more button to select
edit end position. Select cut or copy. <Figure 6-9-12>
<Figure 6-9-10>
<Figure 6-9-11> <Figure 6-9-12>
6.9 PVR
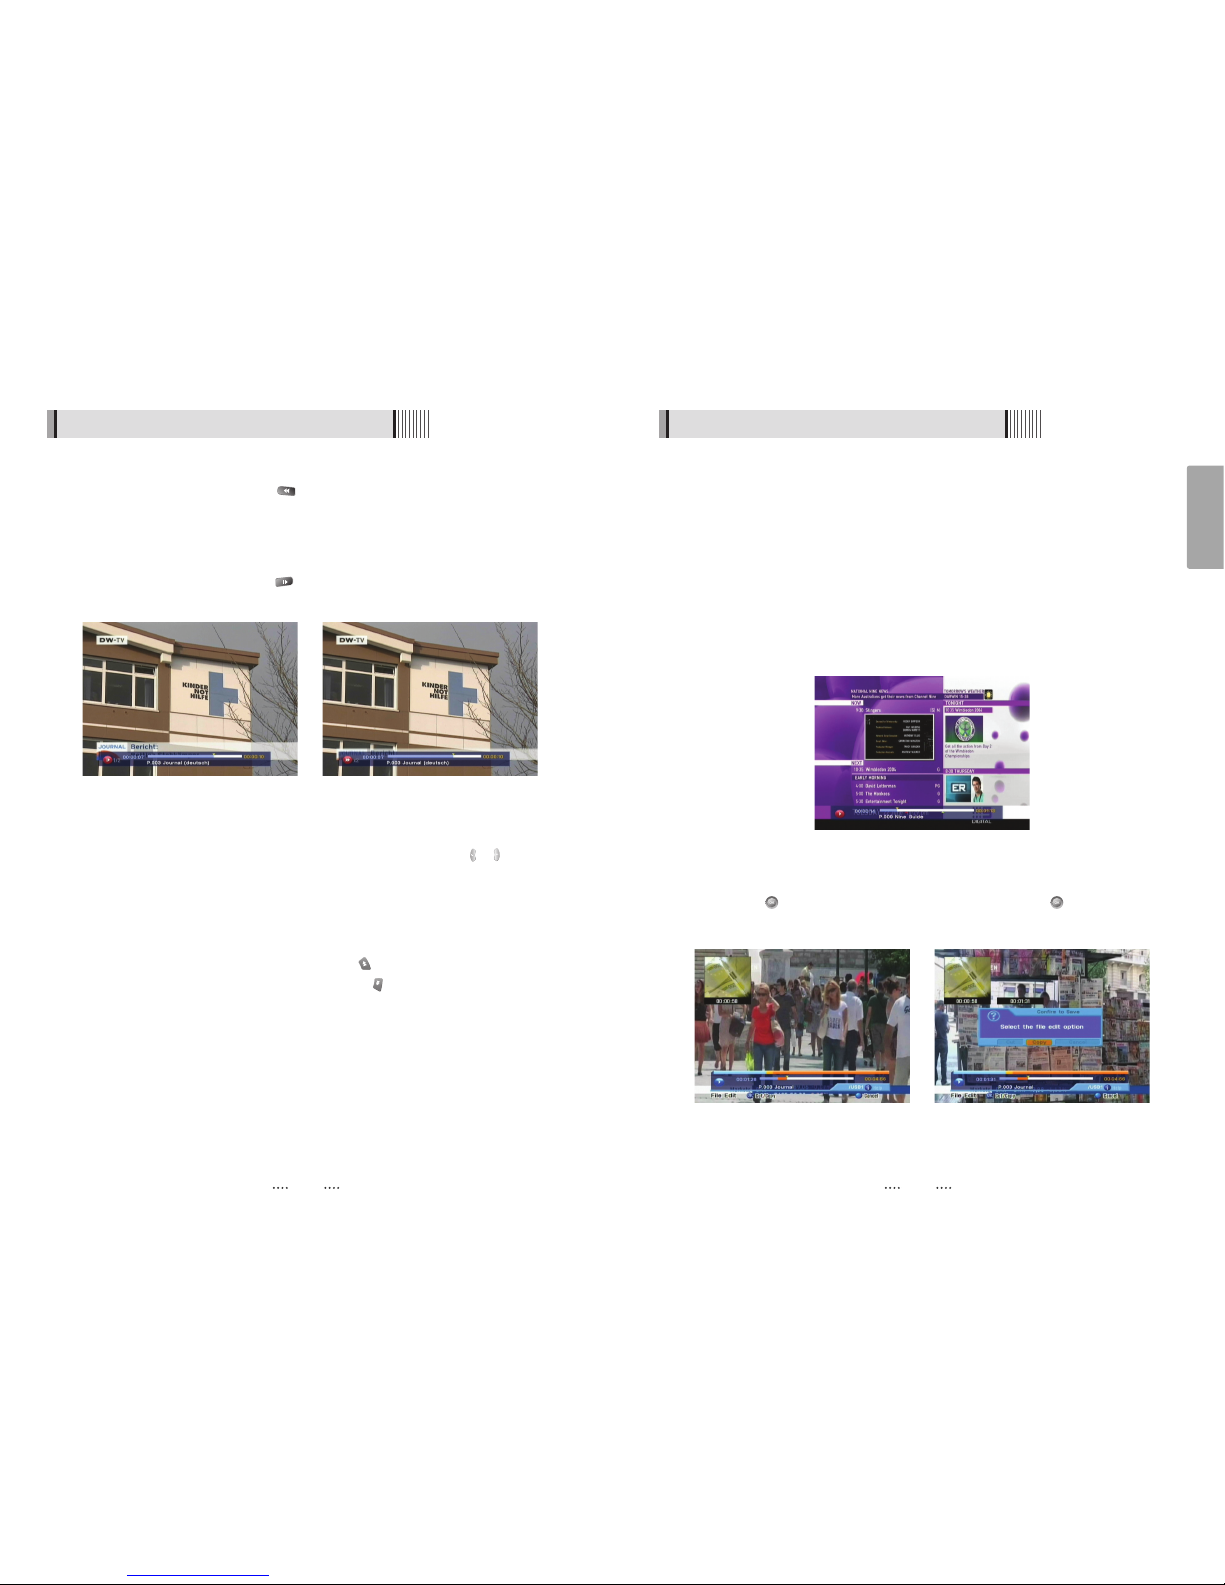
ᶀ RWD(Rewind)
When playing the file, you can press to adjusting the playing speed. <Figure 6-9-8>
The speed will change to x2, x4 and x8.
ᶀ Slow(1/2x, 1/4x)
When playing the file, you can press to adjusting the playing speed. <Figure 6-9-9>
ᶀ Jump
- You can locate the control position to the desired position by using the / .
- If you press this key continuosly, You can locate the control position to the desired
position very quickly.
ᶀ Skip
- You can skips and forward in 15 seconds using the
N
- You can skips and backward in 15 seconds using the
N
<Figure 6-9-8> <Figure 6-9-9>
Page 30
59
English
58
6) Timer Recording
This function is availabe when usb device is connected. You can choose a channel to
record the Program Guide menu by using . (Refer to 6.4 Electric Program Guide,
2)Timer)
6.9 PVR
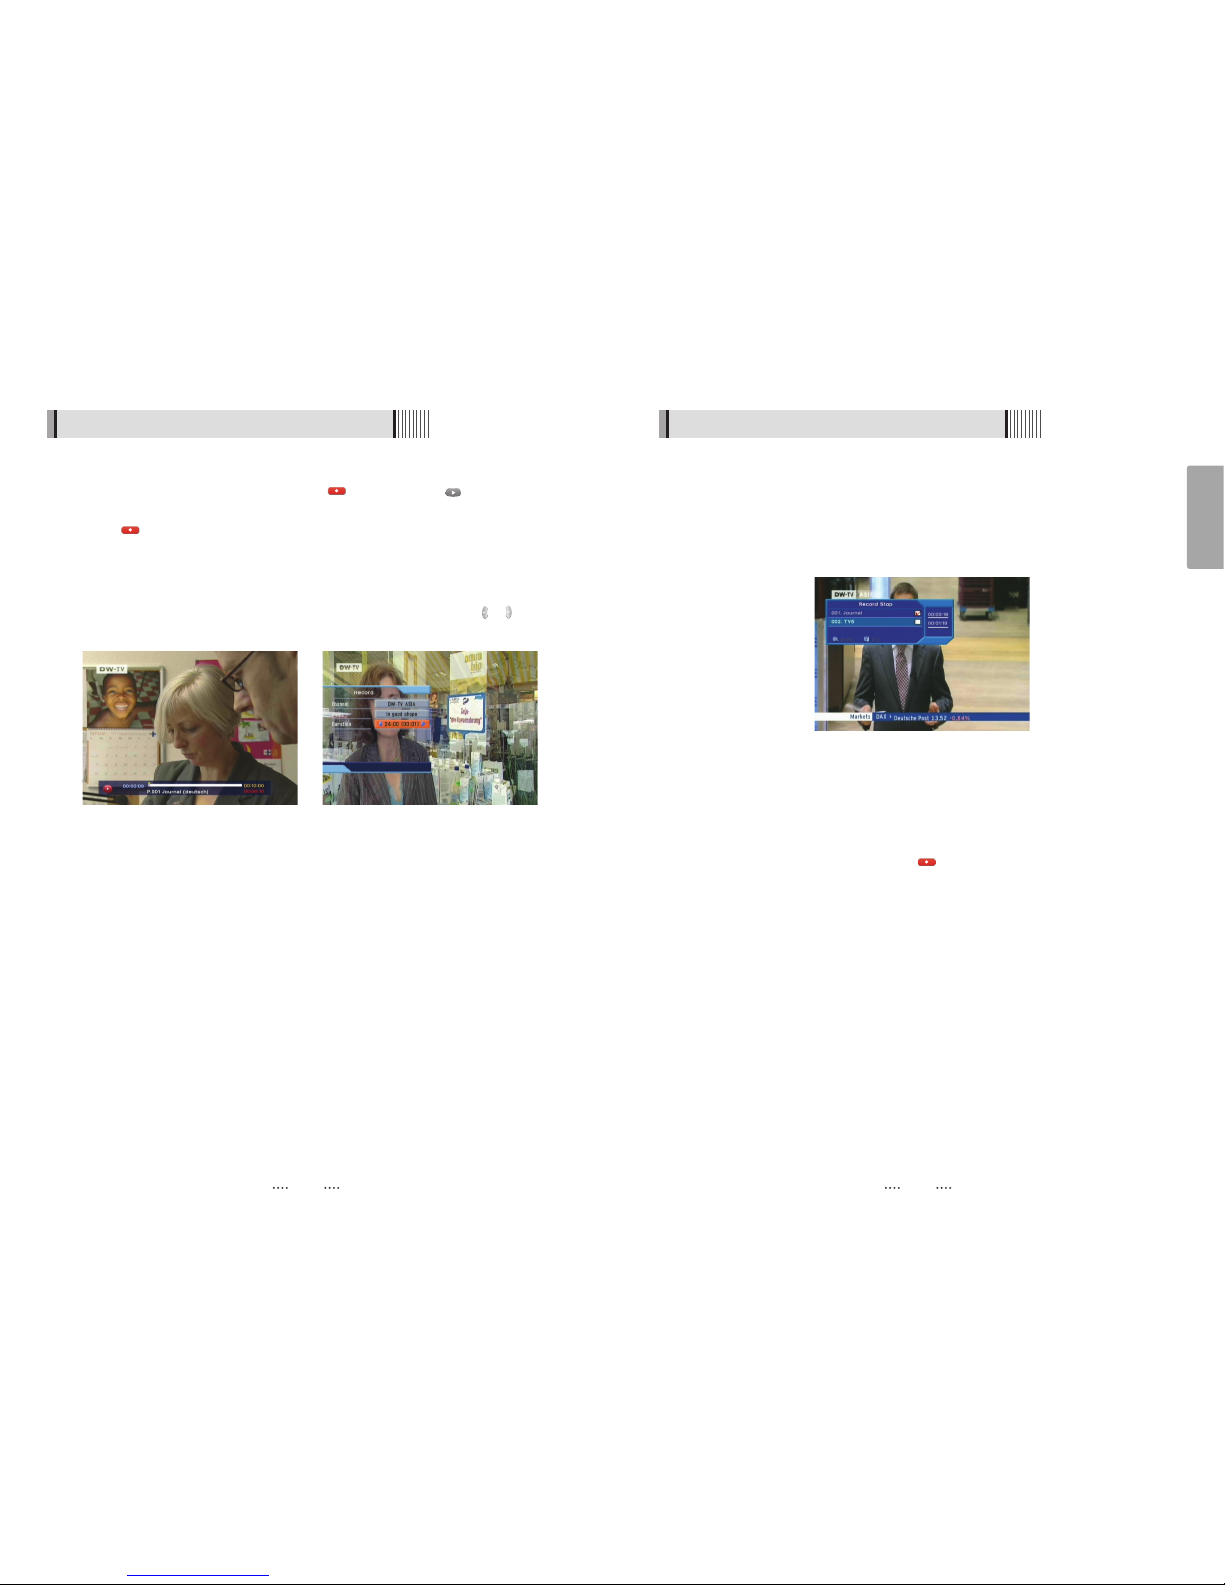
5) Record Stop
⊹
Press the STOP button on the remote to stop the recording then Record Stop will be
displayed.
⊺
Select the recording file by OK / STOP button.
Press EXIT button then selected recording is stopped. <Figure 6-9-15>
<Figure 6-9-15>
6.9 PVR
ҫ
Note : 1. Do not remove the USB device while recording a program.
4) Instant Recording
⊹
You can record a current channel by using . If you then press , a time-banner
will be displayed.<Figure 6-9-13>
⊺
Press once more. The following picture shows that you can select item when you
record a current channel. <Figure 6-9-14>
- Channel : It shows a current channel.
- Name : It shows a current recording name.
- Duration : You can change the duration of recording time by using the / . And
current recorded time appear.
<Figure 6-9-13> <Figure 6-9-14>
Page 31
61
English
60
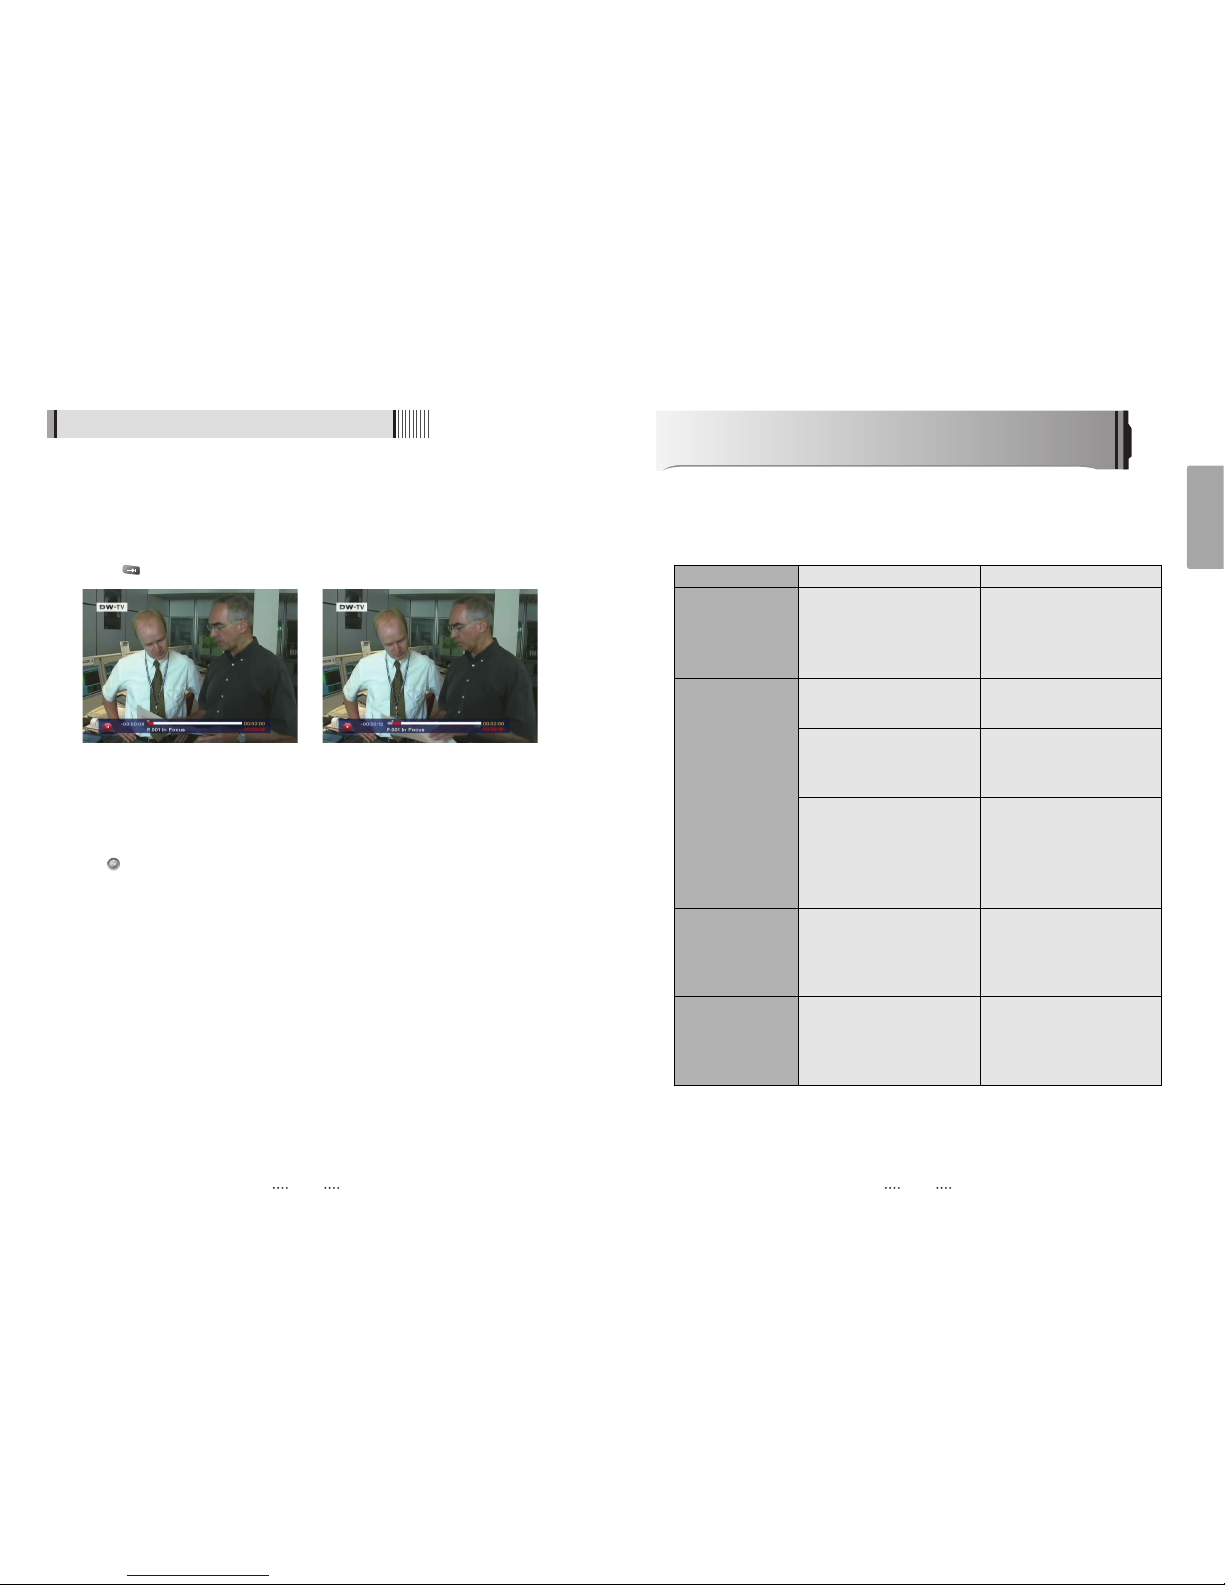
Trouble Shooting
There may be various reasons for the abnormal operation of the unit. Therefore, if the unit
does not work properly, check it according to the procedures shown in the table below:
Problem Possible causes Remedy
LED on front panel AC power cord is not Make sure that power cord is
does not light. connected. connected properly into the
power socket.
Make sure power switch is on.
No Picture or sound The video/audio output of the Make sure that video/audio
receiver with TV is connected. cable is connected to the TV.
The aerial is not connected to Make sure that the aerial is
the receiver. connected properly to the
receiver.
Menu setting is not done Make sure that menu setting is
properly. done properly on each menu.
If you are not sure about
proper menu setting, please
contact your local dealer.
Black-and-white Your TV mode is different from Use TV of same mode.
screen broadcasting mode. Use the NITSC/PAL converter
connected to the receiver and
TV.
The remote Battery exhausted. Change the batteries of remote
controller is not Remote controller is incorrectly control.
working. aimed. Aim the remote control at the
Receiver correctly.
6.9 PVR
7) Time Shift
⊹
If you want to pause and resume live TV channel, press PAUSE button. The default
time of Time-Shift is 30 min in your STB.<Figure 6-9-16>
⊺
If you want to resume live TV channel, press PLAY button. <Figure 6-9-17>
The trick-mode operations are provided. If you want to jump to live channel, please
press .
8) Divx Play
Press Ȟbutton to display divx file list.
Press button to play the selected file.
<Figure 6-9-16> <Figure 6-9-17>
Page 32
63
English
62
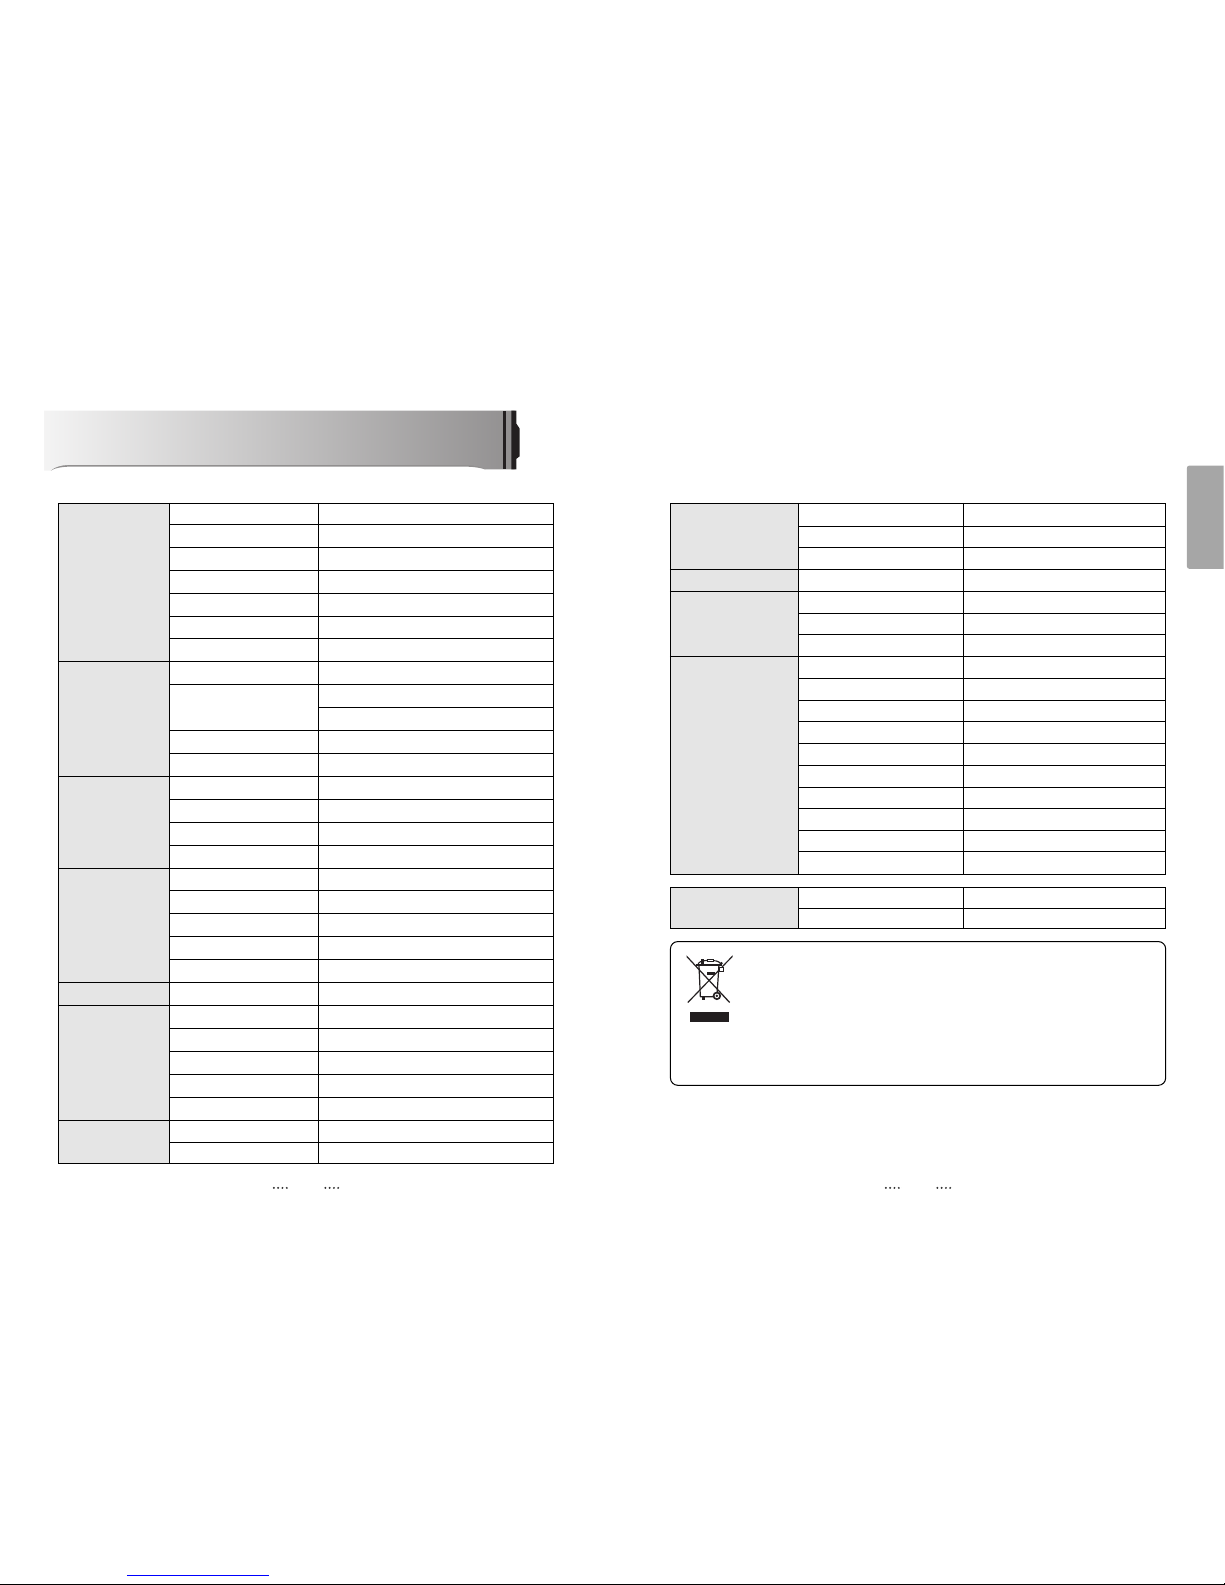
Serial data interface Connector 9pin D-sub male, Max 115K bps
Remote control Code NEC-IR
Operating condition up to 7 Meter
USB USB Supply DC 5V Max 500mA
Power supply Power consumption max 30W
Supply voltage 100V ~ 250V
Supply frequency 50Hz ~ 60Hz
Rear Panel Video 1 X RCA cinch
connectors Audio L/R 2 X RCA cinch
Component(Y/Pb/Pr) 3 X RCA cinch
Serial data 9pin D-sub
Digital tuner input IEC 169 - 24
Loop-through Digital tuner IEC 169 - 24
S/PDIF Fiber Optic
HDMI Digital Video/Audio Output
USB 2*USB A-type
LAN RJ-45
260 X 54 X 232(mm
)
1.8 Kg
Size (W X H X D
)
Weight (Net
)
Physical
Specification
Disposal of Old Electrical & Electronic Equipment(Applicable in the European
Union and other European Countries with separate collection systems)
This symbol on the product or on its packaging indicates that this product shall not be treated as
household waste. Instead it shall be handed over to the applicable collection point for the
recycling of electrical and electronic equipnent. By ensuring this product is disposed of correctly,
you will help prevent potential negative consequences for the environment and human health,
which could otherwise be caused by inappropirate waste handling of this product. The recycling
of materials will help to conserve natural resources.
For more detailed information about recycling of this product, please contact your local city
office, your household waste disposal service or the shop where you purchased the product.
Specifications
System capabilities
Fully DVB compliant
satellite
connector IEC 169-24, female
LNB/Tuner input
Frequency range 950MHz ~ 2150MHz
Signal level -65dBm ~ -25dBm
LNB supply DC 13/18V, max 400mA
LNB switch control 22KHz
DiSEqC Ver 1.0/1.1/1.2/USALS Compatible
Demodulator
Front end DVB-S/S2 QPSK, 8PSK
Symbol rate DVB-S : 2~45Msps
DVB-S2 : 10~30Msps(QPSK) 10~30Msps(8PSK)
SCPC and MCPC Capable
Spectral inversion Auto conversion
System resource
Processor 32bit processor (450MHz)
DDR SDRAM 128Mbyte X 2
FLASH 8Mbyte
EEPROM 256Kbit
Video decoder
MPEG 2 MPEG-2, MPEG-4, H.264
Data Rate up to 15M bits/s
Resolution 1920 X 1080p/i, 1280 X 720p, 720 X 576i/p
Video format PAL
Aspec Ratio 4:3,16:9
Teletext
DVB compliant
MPEG Audio
MPEG 1 layer I/II,
MPEG 2 layer II,
AC3 Dolby Digital
Type
Mono, Stereo, Joint Stereo
Sampling rates 32, 44.1 and 48 KHz
Conditional Access
Smart Card Reader 2Slot
Interface
PCMCIA 1Slot
 Loading...