

Page 1

Please
Please
Please
Please read
read
read
read this
this
this
this manual
manual
manual
manual before
before
before
before using
using
using
using this
this
this
this product
product
product
product
MID
MID
MID
MID Manual
Manual
Manual
Manual
TP-
TP-
TP-
TP- 973
973
973
973 Ver
Ver
Ver
Ver : 1.0
1.0
1.0
1.0
A
A
A
A ndroid
ndroid
ndroid
ndroid Ver
Ver
Ver
Ver:4.0.
4.0.
4.0.
4.0. 4
4
4
4
Directory
Directory
Directory
Directory
Directory ................................................................................................................................................................................... 1
1. Safety tips ................................................................................................................................................................. 2
Page 2

9.7 inch Tablet PC User Manual
1
1.1 Choose the place of use .................................................................................................................................. 2
1.2 Battery ................................................................................................................................................................ 3
1.3 Connect adaptor ............................................................................................................................................... 3
1.4 Use of equipment .............................................................................................................................................. 4
2. Know your MID ........................................................................................................................................................ 5
2.1 Know your MID .................................................................................................................................................. 4
2.1.1 Front view ....................................................................................................................................................... 5
2.1.2 Back view ........................................................................................................................................................ 6
2.1.3 Right view ....................................................................................................................................................... 7
2.2 Know attachments ............................................................................................................................................ 7
2.2.1 Adaptor ............................................................................................................................................................ 7
2.2.2 USB device ( optional ) .................................................................................................................................... 7
3. Use your MID ........................................................................................................................................................... 8
3.1 Battery charge ................................................................................................................................................... 8
3.2 Storage space ................................................................................................................................................... 8
3.3 Use memory card ............................................................................................................................................. 9
3.3.1 Installation memory card .............................................................................................................................. 8
3.3.2 Use memory card .......................................................................................................................................... 9
3. 4 Key instructions .............................................................................................................................................. 1 0
3. 4 .1 Power button ................................................................................................................................................11
3. 4 .2 Back button …………………………………………………………………………………………… ... ...
11
3. 4. 3 Home(desk)button .......................................................................................................................................11
3.4.4 Recently taskbar............................................................................................................................
11
3. 4 . 5 Menu(desk)button .......................................................................................................................................11
3. 4 . 6 Reset button ................................................................................................................................................. 1 2
3. 4 . 7 DC button ..................................................................................................................................................... 1 2
3. 4.8 USB Interface .............................................................................................................................................. 1 2
3. 4.9 HDMI Interface ............................................................................................................................................. 1 5
3. 4.10 Volume plus or minus ............................................................................................................................... 1 5
3. 5 Touch instructions ........................................................................................................................................... 1 5
3. 5 .1 Continuous pressing operation ……………………… ……………………………………………… . 1 6
3. 5 .2 Sliding operation ........................................................................................................................................... 1 6
3. 6 Network connection ……………………………… ………………………………………………………… 1 6
4. Application software installation and system upgrade ………………………………………………… …… ..18
4.1 APK intsallation ............................................................................................................................................... 1 8
4.1.1 Local installation / expansion card installed application software ........................................................ 1 9
4.1. 2 The location of APk ……………………………………………………………………………… … ........2 0
4.2 System Upgrade ............................................................................................................................................. 22
4.2.1 Upgrade system by USB …………………… … …………………………………………………… .. .....22
5. Under the system of WIN7 brush machine method ....................................................................................26
Page 3

9.7 inch Tablet PC User Manual
2
1.
1.
1.
1. Safety
Safety
Safety
Safety tips
tips
tips
tips
Thank you for using the company's products, We will provide you with reliable products manufactured under strict
environmental and testing.
Please read the manual carefully before using the product. This manual may be some differences with the actual
products, please prevail in kind body!
1.1
1.1
1.1
1.1 Choose
Choose
Choose
Choose the
the
the
the place
place
place
place of
of
of
of use
use
use
use
Warning
Warning
Warning
Warning
a. Away from the bathroom, swimming pool and other operating equipment near water, or the device may work
improperly and have led to the danger of short circuit.
b. Equipment operation. Within the temperature range of 10-35 degrees Celsius (50-95 degrees Fahrenheit) and
humidity ranging from 20 to 80% within the environment.
c. Do not directly exposed to the equipment in an enclosed space, prolonged exposure to direct sunlight (such as
in a closed car) equipment at high temperatures may cause deformation or fire.
d. Safe handling of packaging materials, such as plastic bags.
e. This product in a place away from the children.
Careful
Careful
Careful
Careful
a. Please try to keep the environment clean equipment, to avoid dust, or there will be danger of destroying
equipment.
b. From electromagnetic fields.
c. Devices away from other electrical equipment, such as audio; stereo speakers may produce a strong magnetic
field. Open magnetic field may cause data loss or damage to the LCD screen.
1.2
1.2
1.2
1.2 Battery
Battery
Battery
Battery
Warning
Warning
Warning
Warning
Do not use the equipment free to use other than the the supporting power adapter (5V/2A) to charge the battery,
otherwise it will cause the battery to fire or damaged.
b. Please use the device away from the source of fire, otherwise it will cause the battery to explode or catch fire
danger.
c. Equipment environment at 65 degrees Celsius (149 degrees Fahrenheit), otherwise it will cause the battery to
explode or catch fire danger.
1.3
1.3
1.3
1.3 Connect
Connect
Connect
Connect adaptor
adaptor
adaptor
adaptor
Warning
Warning
Warning
Warning
a. Do not use loose or damaged power outlet, otherwise there will be danger of electric shock and fire.
Page 4

9.7 inch Tablet PC User Manual
3
b. Correct grounding, not properly grounded outlet will lead to the risk of electric shock and destroyed equipment.
c. Do not wet hand contact with an electrical outlet, otherwise there is a risk of electric shock.
d. Keep socket in mobile power line while tight touch. Otherwise, there will be the danger of fire and damage to
the equipment.
e. Appropriate voltage / current standard to use your equipment, improper voltage / current work will cause
electric shock, fire or damage to the equipment.
f. If you hear the power cord and power interface at the noise, immediately unplug the power cord to your sales
representative to seek help, otherwise there will be a risk of fire or electric shock.
g. Please ensure that the power outlet and the power plug in the device can be in close contact with loose contact
may cause a fire hazard.
h. Do not bend the power cord or place heavy objects on the power cord to avoid damage to the power cord of
children and pets, and damaged power cord may result in electric shock or fire hazard.
i. Keep the power cord and plug sanitation. Otherwise, there will be a fire hazard.
j. If foreign objects or liquids enter the device or adapter, power cord and any other cables away from the device
to the sales representative to seek help, otherwise, there will be an electric shock, fire and damage to the
equipment.
k. Before cleaning the device, be sure to unplug the power cord from the device as well as other cable, otherwise
there will be danger of electric shock or damage to equipment.
1.4
1.4
1.4
1.4 Use
Use
Use
Use of
of
of
of equipment
equipment
equipment
equipment
Warning
Warning
Warning
Warning
a. Before mobile devices, turn off the power and unplug all cables; otherwise tripped over the cable
may be loose.
b. Flying, to comply with aviation guidance, the use of the equipment may cause the aircraft on a
moving aircraft accident.
c. Cleaning equipment, please use the gentle nature of computer products, please do not use the
equipment until the equipment is completely dry, otherwise it will lead to the risk of electric shock
or fire.
d. Lightning storm unplug the device power cord, otherwise there is a risk of electric shock or fire.
e. Do not water, chemical reagents and other liquid is placed on the device, any type of liquid into
the inside of the machine will result in electric shock, fire or damage to the equipment.
f. LCD fluorescent screen equipment containing mercury, if the LCD is damaged, the inside of the
liquid into your eyes or skin, flush the affected area immediately with water, if necessary, consult a
doctor immediately.
g. Do not use sharp objects contact or scratching the screen. Otherwise, the touch screen and LCD
screen may be damaged.
h. Do not press the screen, the weight may lead to a touch screen and LCD screen is broken or
damaged.
Page 5

9.7 inch Tablet PC User Manual
4
i. Do not remove the power supply, otherwise there is a risk of electric shock.
2
2
2
2 Know
Know
Know
Know your
your
your
your MID
MID
MID
MID
2.1
2.1
2.1
2.1 Know
Know
Know
Know your
your
your
your MID
MID
MID
MID
Introduced the T ablet PC components and their functions.
2.1.1
2.1.1
2.1.1
2.1.1 Front
Front
Front
Front view
view
view
view
( 1 ) Front camera
( 2 ) Recently taskbar
( 3 ) Home button
( 4 ) Back button
( 1
1
1
1 )
( 4
4
4
4 )
( 3
3
3
3 )
( 2
2
2
2 )
Page 6

9.7 inch Tablet PC User Manual
5
2.1.2
2.1.2
2.1.2
2.1.2 Rear
Rear
Rear
Rear view
view
view
view
(1)(3
)
Speaker
(2) Rear camera
2.1.3
2.1.3
2.1.3
2.1.3 Right
Right
Right
Right view
view
view
view
( 1 ) MIC
( 2 ) T card slot
( 3 ) 3.5mm Headphone jack
( 4 ) HDMI interface
( 5 ) USB interface
( 6 ) DC jack
( 1
1
1
1 )
( 2
2
2
2 )
( 5
5
5
5 )
( 8
8
8
8 )( 10)
10)
10)
10)
( 1
1
1
1 )
( 3
3
3
3 )
( 2
2
2
2 )
( 3
3
3
3 )
( 4
4
4
4 )
( 6
6
6
6 )
( 7
7
7
7 )
(9
(9
(9
(9 )
)
)
)
Page 7
9.7 inch Tablet PC User Manual
6
( 7 ) Reset button
( 8 ) Volume down
( 9 ) Volume increase
( 10 ) Power button
2.2
2.2
2.2
2.2 Know
Know
Know
Know attachments
attachments
attachments
attachments
2.2.1
2.2.1
2.2.1
2.2.1 Adapter
Adapter
Adapter
Adapter
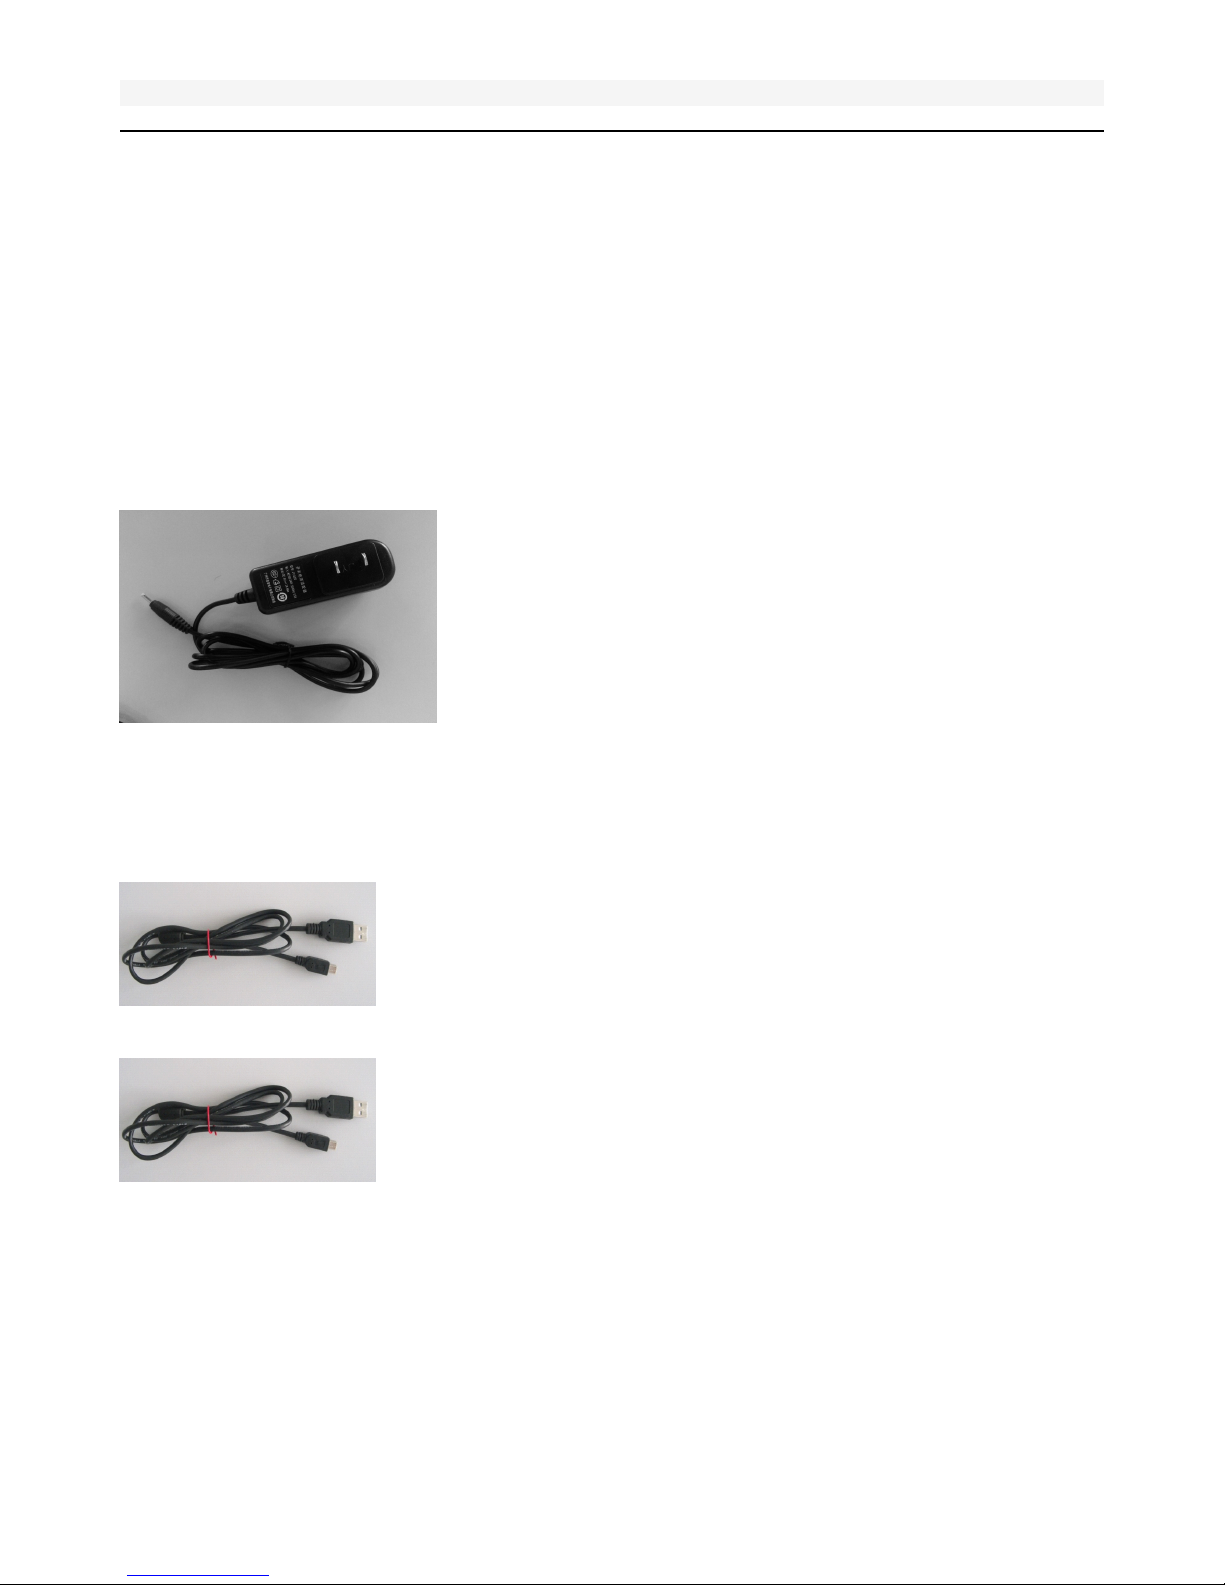
For this product in the electricity grid charging.
2.2.2
2.2.2
2.2.2
2.2.2 USB
USB
USB
USB expansion
expansion
expansion
expansion devices
devices
devices
devices (
(
(
( optional
optional
optional
optional )
)
)
)
Connect PC device
Scalable U disk, 3G stick, GPS sticks and other USB devices
Page 8
9.7 inch Tablet PC User Manual
7
3
3
3
3 Use
Use
Use
Use your
your
your
your MID
MID
MID
MID
3.1
3.1
3.1
3.1 Battery
Battery
Battery
Battery charge
charge
charge
charge
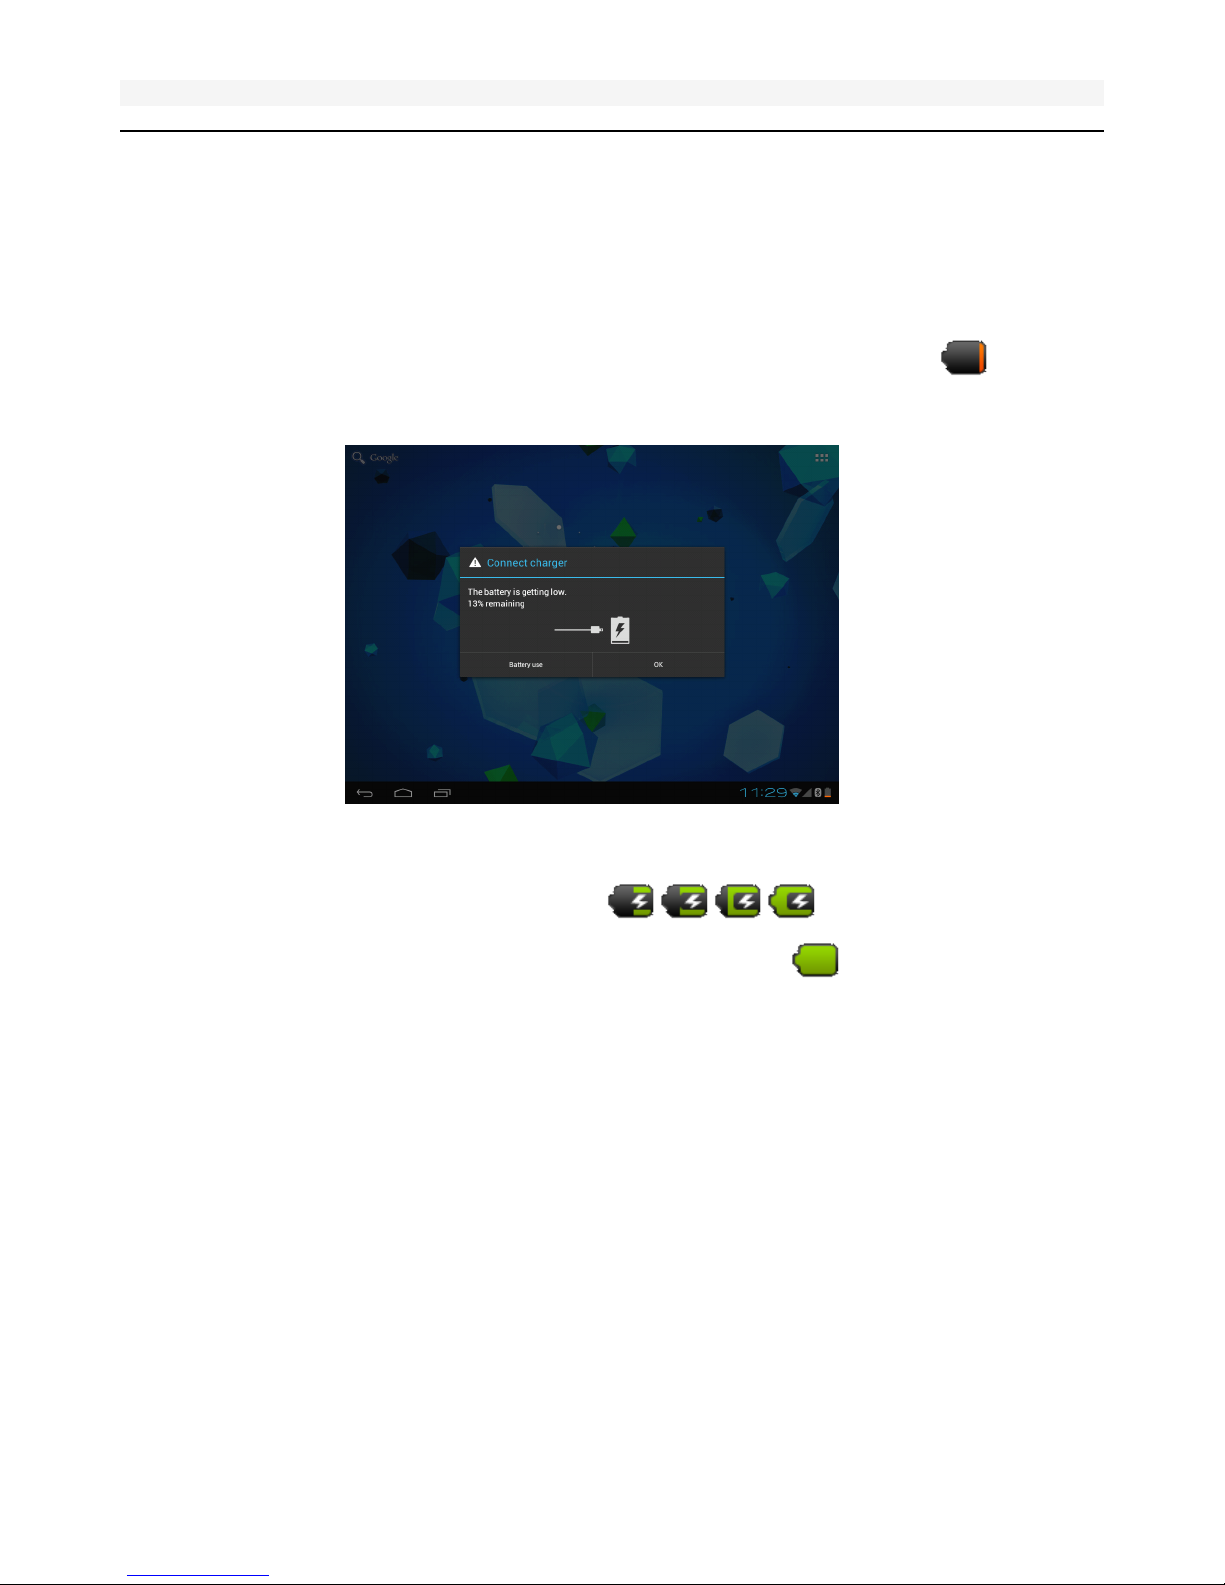
Tablet PC built-in battery warning window pop up when the battery icon appears , or on the
main screen, this time the power is low, the device needs to be charged.
Charging mode:
1
.
Plug in the power adapter
2 . Screen displays charging logo animation
3 . After charging is completed, the full battery icon will appear
Attention :
The boot state charging time will be longer.
3.2
3.2
3.2
3.2 Storage
Storage
Storage
Storage space
space
space
space
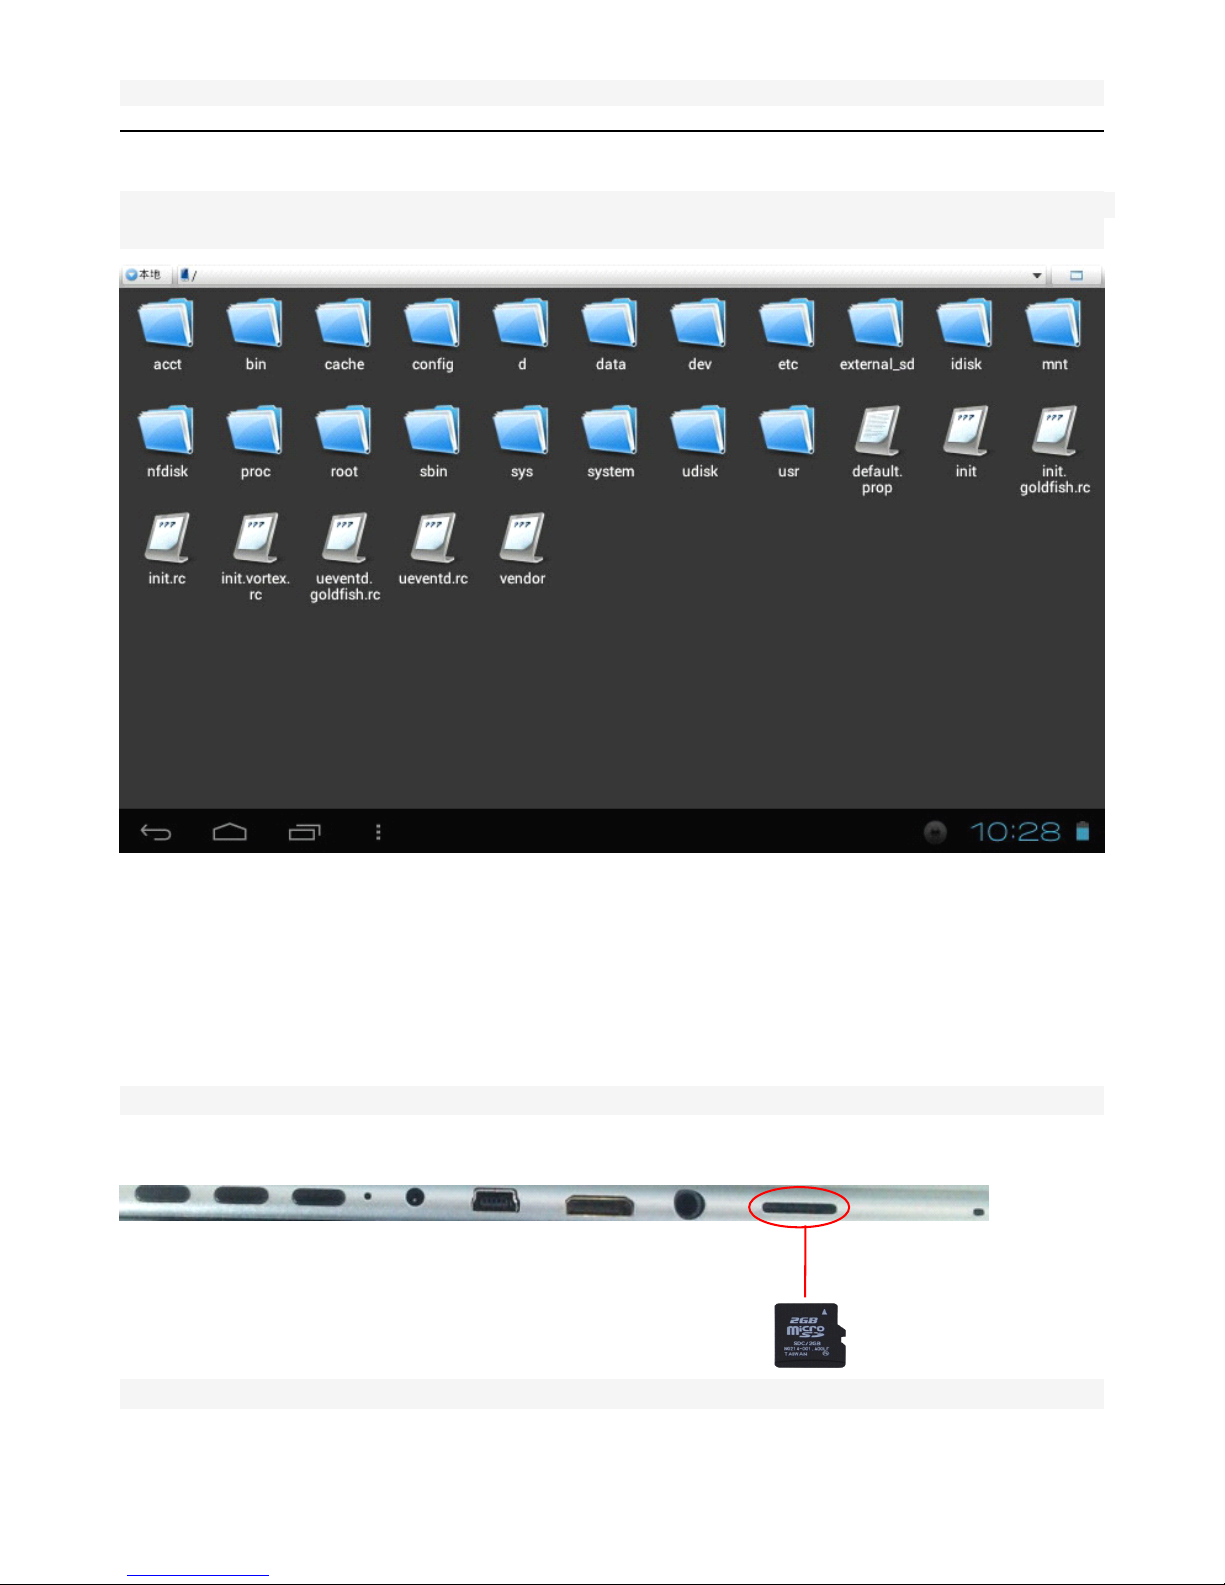
This equipment storage space is divided into three parts: the local storage space, memory card
space, external U disk storage space
Open the "ES File Browser"
“
Internal memory
”
corresponding to the local storage space
,
path:/mnt/ sdcard
;
“
External SD card
”
corresponding to the memory card space
,
path:/mnt/ ext ernal_sd
;
“
USB storage
”
corresponding to the U disk storage space
,
path:/mnt/ u sb_storage
;
Others: Download, Pictures, Music, Movies, P-* /
, Ringtones option System Preferences directory used to store downloaded files, pictures, music,
Page 9
9.7 inch Tablet PC User Manual
8
video, video clips, ring tones and other
Into the folder of the file in the corresponding storage space to browse, copy, cut, paste, rename,
delete operation
3.3
3.3
3.3
3.3 Use
Use
Use
Use of
of
of
of the
the
the
the external_sd
external_sd
external_sd
external_sd
3.3.1
3.3.1
3.3.1
3.3.1 Installation
Installation
Installation
Installation of
of
of
of the
the
the
the external_sd
external_sd
external_sd
external_sd
See TF card slot, insert the TF card to hear Kolkata sound, TF card in place
( TF card insert text side toward the screen side )
Page 10

9.7 inch Tablet PC User Manual
9
Note: card slot position may different without notice
3.3.2
3.3.2
3.3.2
3.3.2 Use
Use
Use
Use of
of
of
of the
the
the
the external_sd
external_sd
external_sd
external_sd
TF memory card is inserted, the main screen will display the word " Preparing SD card " when it
disappears before TF external_sd to operate
Open " the ES file management program " , click on the "external _sd" option, r elated to the operation
of the file in the external_sd
3.
3.
3.
3. 4
4
4
4 Key
Key
Key
Key (button)
(button)
(button)
(button) instructions
instructions
instructions
instructions
3.
3.
3.
3. 4
4
4
4 .1
.1
.1
.1 Power
Power
Power
Power button
button
button
button
Off state : Press 3 seconds the power button, the device boot
Running state : Short press the power button to enter standby
Long pressed 2 seconds the power button, the Shut Down menu appears, click on the
"OK" icon shutdown
Page 11

9.7 inch Tablet PC User Manual
10
Standby mode: Short press the power button to enter the running state
3.
3.
3.
3. 4
4
4
4 .2
.2
.2
.2 Back
Back
Back
Back button
button
button
button
1. Short click the Back button to return to the previous menu
2. Press the Back button, we should gradually return to the main interface
3.
3.
3.
3. 4.
4.
4.
4. 3
3
3
3 Home
Home
Home
Home button
button
button
button
Short press the HOME button will return to the desktop
3.
3.
3.
3. 4.4
4.4
4.4
4.4 Rencently
Rencently
Rencently
Rencently taskbar
taskbar
taskbar
taskbar button
button
button
button
Short press recently taskbar button will display the most recently run program
3.
3.
3.
3. 4
4
4
4 .
.
.
. 5
5
5
5 Menu
Menu
Menu
Menu button
button
button
button
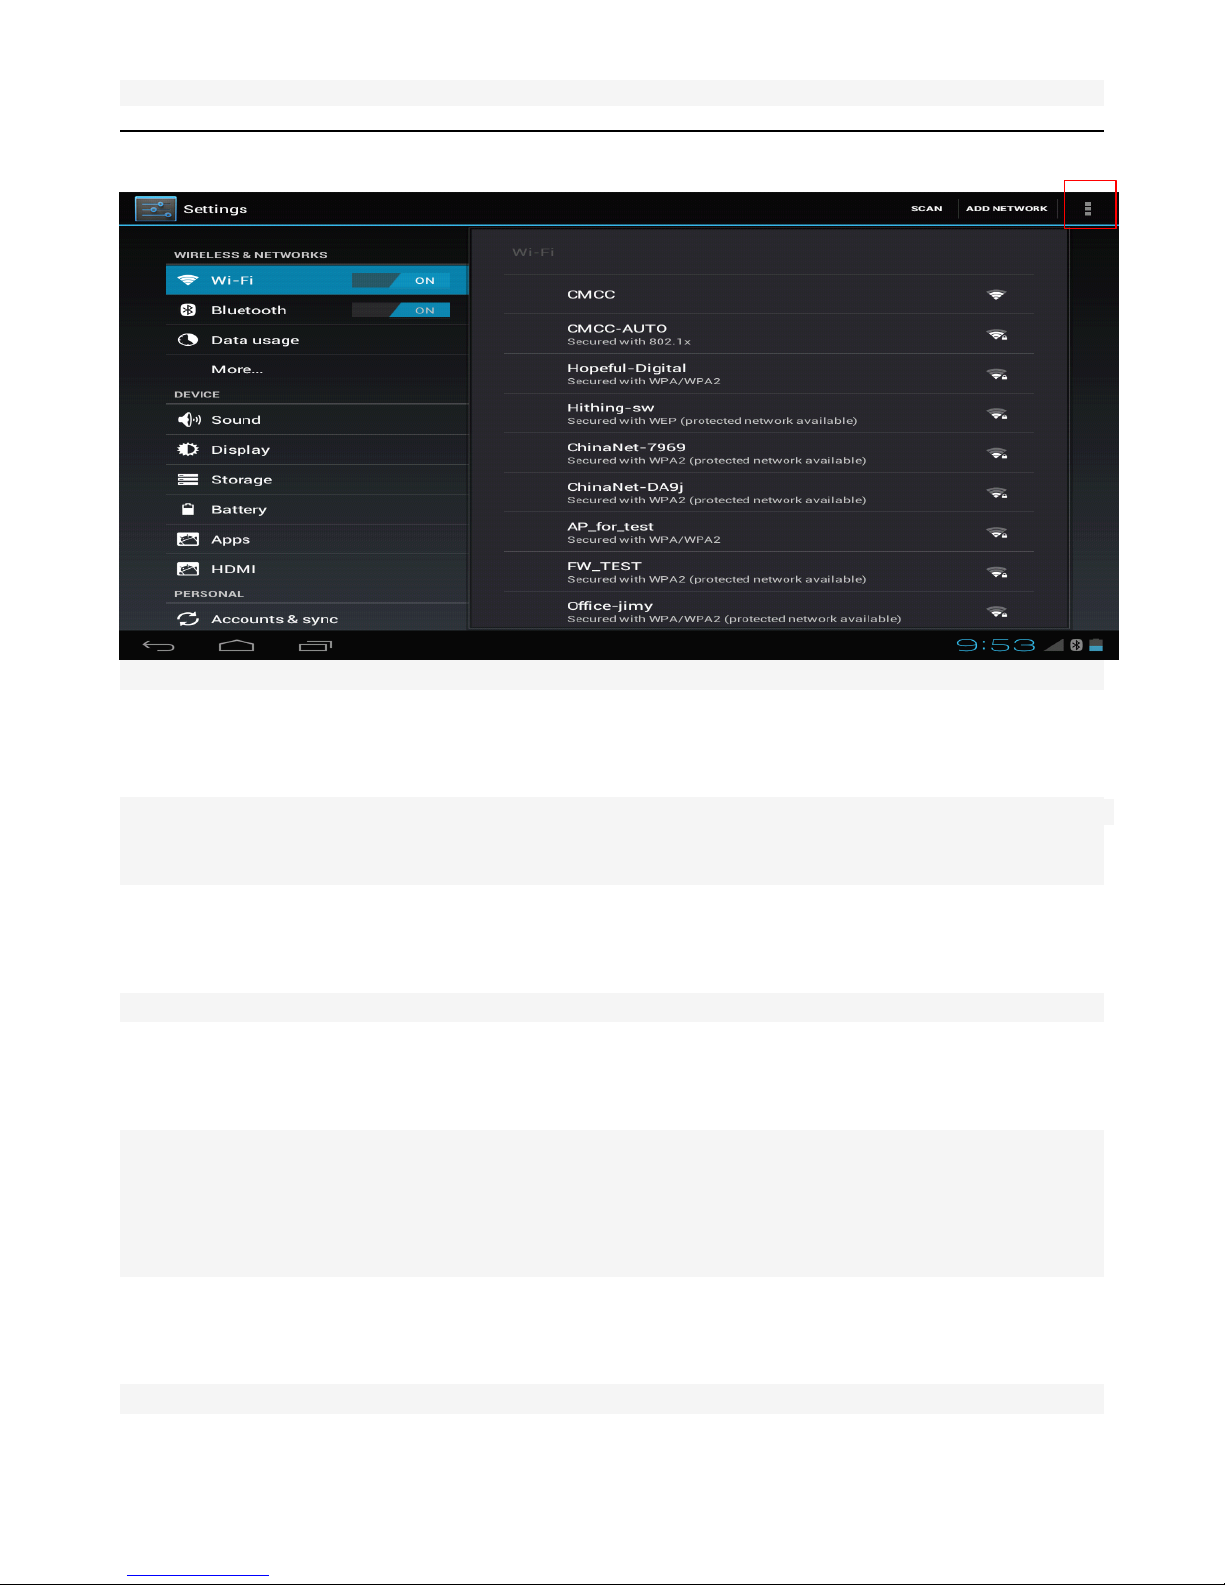
Short press the MENU button to enter the menu interface, the different settings of the
corresponding interface
Page 12
9.7 inch Tablet PC User Manual
11
Note: The different modules the MENU - Content (as shown in the red box)
3.
3.
3.
3. 4
4
4
4 .
.
.
. 6
6
6
6 Reset
Reset
Reset
Reset button
button
button
button
Once the device crashes other buttons can not be operated, the available fine-like objects (such as
a paper clip) touches the reset button, the forced shutdown
Note: repeatedly touched the reset button may cause data loss, please do not try
3.
3.
3.
3. 4
4
4
4 .
.
.
. 7
7
7
7 DC
DC
DC
DC button
button
button
button
Connection supporting charger can charge the product
3.
3.
3.
3. 4.8
4.8
4.8
4.8 USB
USB
USB
USB i
i
i
i nterface
nterface
nterface
nterface
Connect the PC data can be copied
(" Settings " → " Developer options " → " USB debugging " check )
Note: 1. "Auto-rotate screen" function is turned off, the screen will be fixed in the direction previously
maintained, does not rotate
2. Part of the interface does not support screen rotation, will be fixed in one direction
3.
3.
3.
3. 4.9
4.9
4.9
4.9 HDMI
HDMI
HDMI
HDMI i
i
i
i nterface
nterface
nterface
nterface (
(
(
( Hot
Hot
Hot
Hot swappable
swappable
swappable
swappable and
and
and
and shutdown
shutdown
shutdown
shutdown connected
connected
connected
connected HDMI
HDMI
HDMI
HDMI )
)
)
)
1.
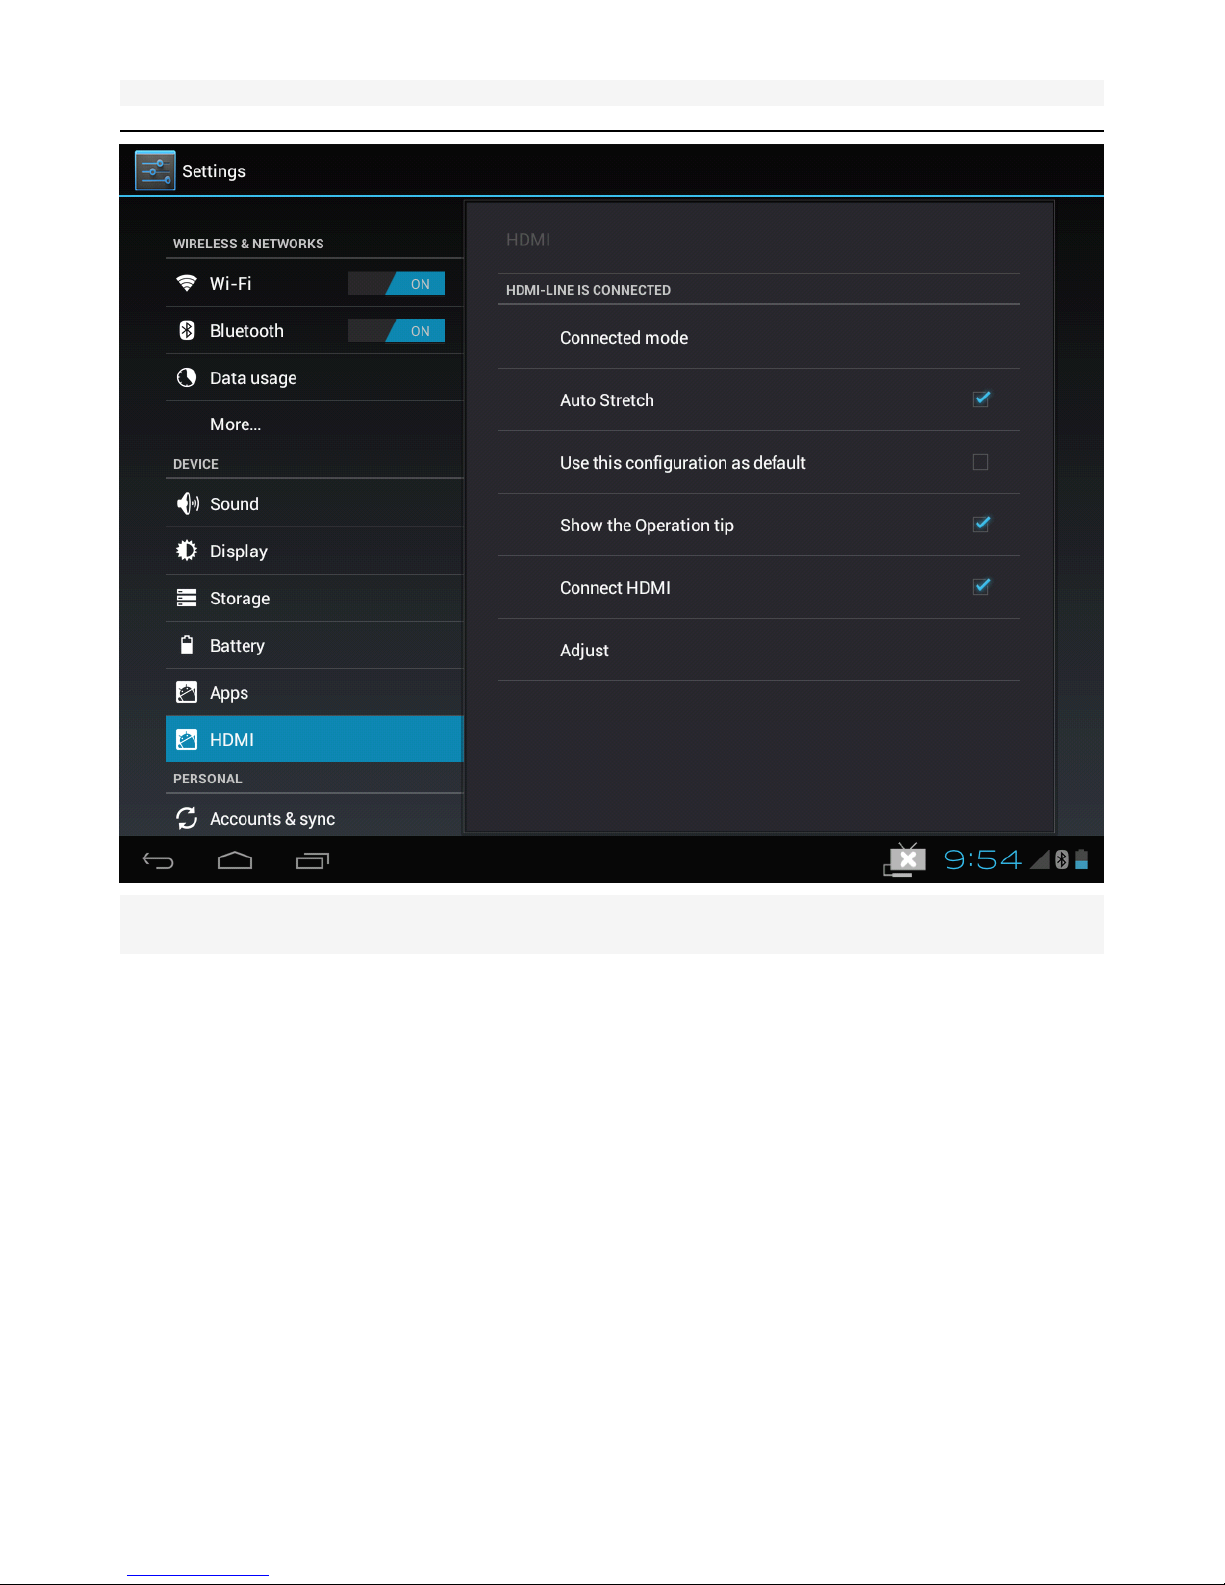
This interface is used to connect the HDMI high-definition television
Page 13
9.7 inch Tablet PC User Manual
12
2.
TV output mode can be switched to the "HDMI 1080P" connection mode
(
Recommend an external mouse when using the HDMI test, easy to operate )
Page 14

9.7 inch Tablet PC User Manual
13
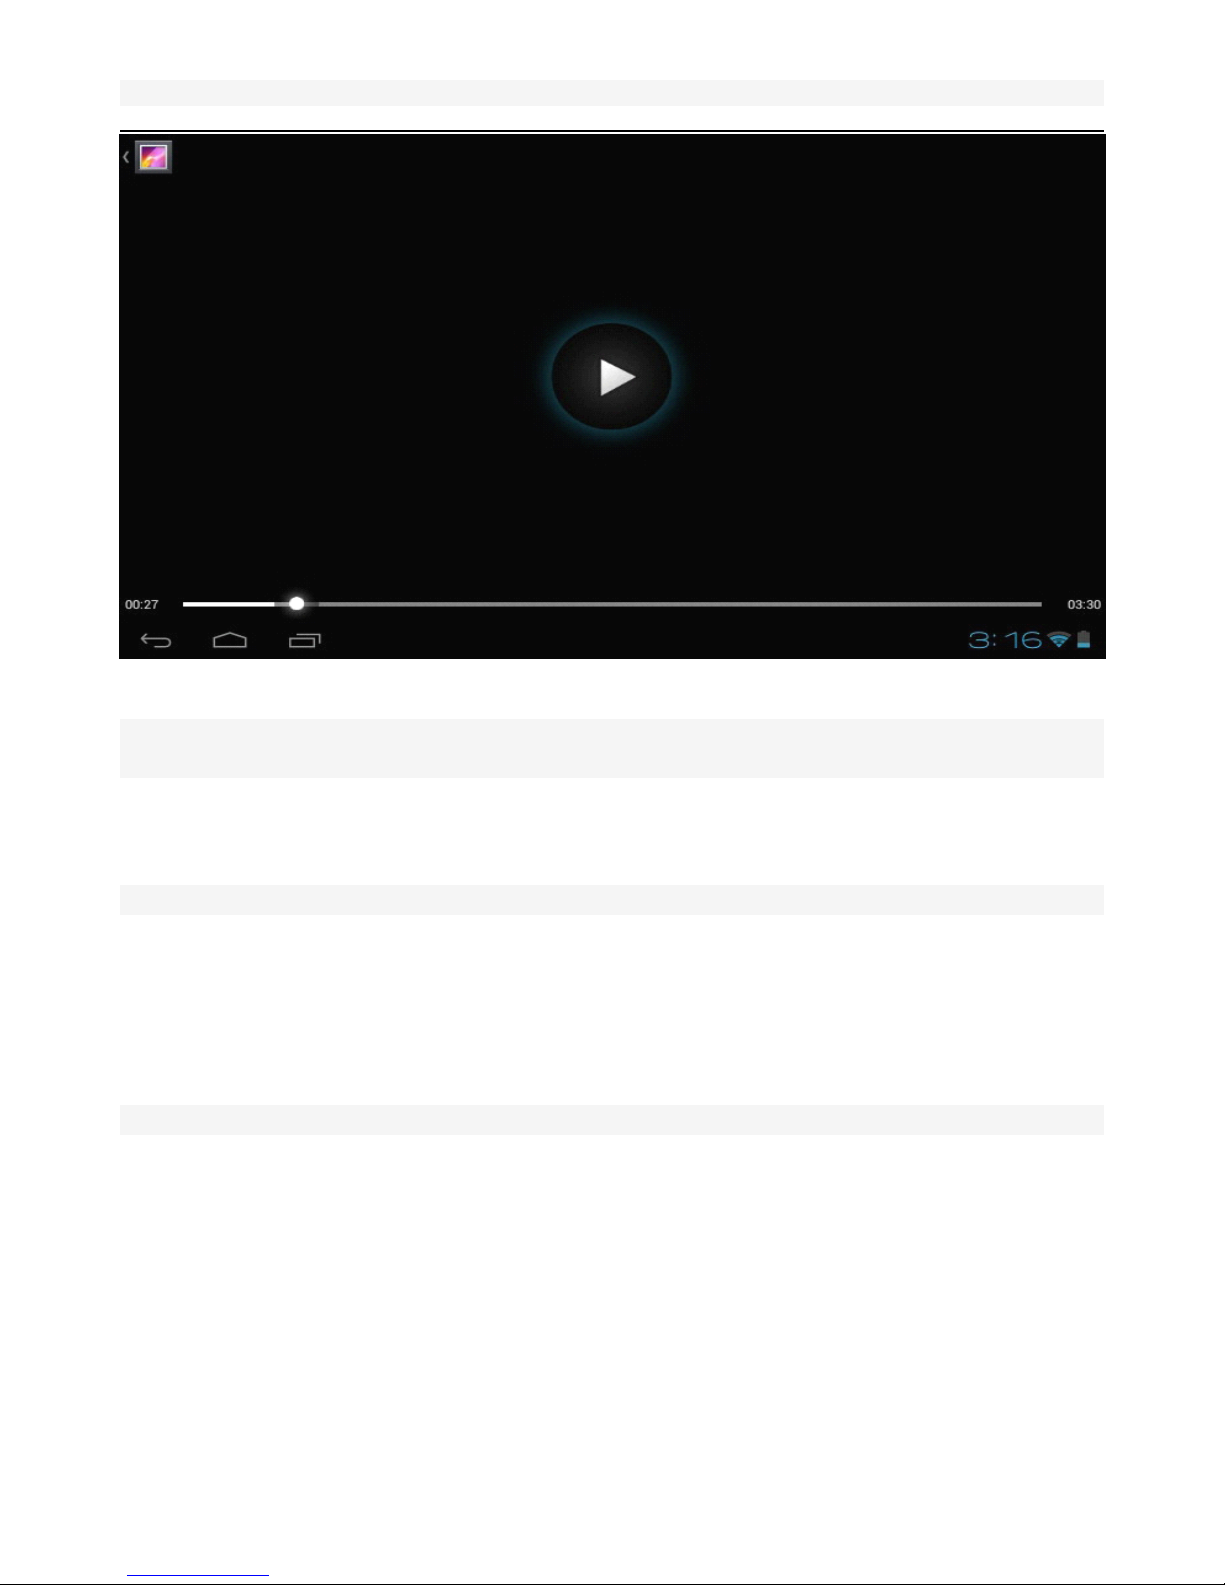
3. HD MI video playback :
After connecting HDMI video playback into the "File Manager" or "Gallery"
( As shown below )
Page 15
9.7 inch Tablet PC User Manual
14
4.
Switching between HDMI and Native
Click the "switch to the TV output from the HDMI switch to Native
3.
3.
3.
3. 4
4
4
4 .
.
.
. 10
10
10
10 Volume
Volume
Volume
Volume plus
plus
plus
plus or
or
or
or minus
minus
minus
minus
The media volume can be increased or decreased operating
3.
3.
3.
3. 5
5
5
5 Touch
Touch
Touch
Touch instructions
instructions
instructions
instructions
3.
3.
3.
3. 5
5
5
5 .
.
.
. 1
1
1
1 Continuous
Continuous
Continuous
Continuous pressing
pressing
pressing
pressing operation
operation
operation
operation
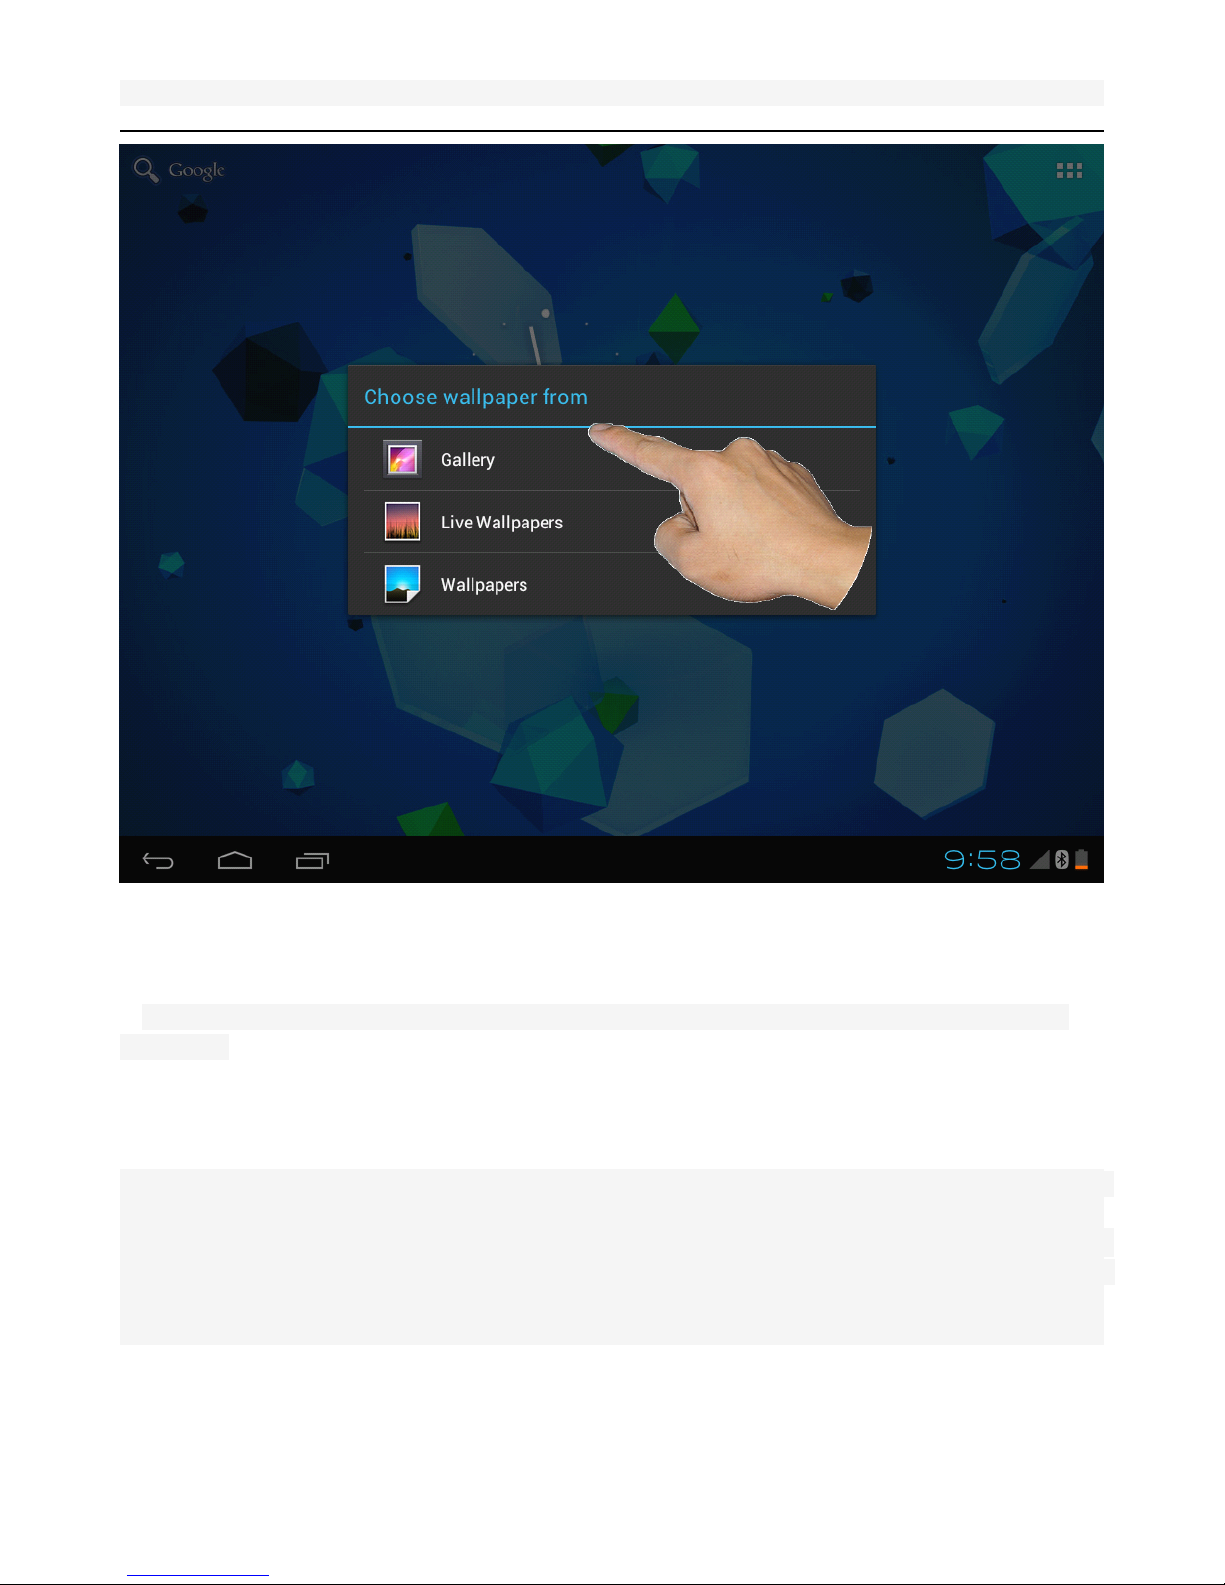
Press and hold the desktop operation required part, until the animation
Page 16
9.7 inch Tablet PC User Manual
15
3.
3.
3.
3. 5
5
5
5 .
.
.
. 2
2
2
2 Sliding
Sliding
Sliding
Sliding operation
operation
operation
operation
Sliding point to the left and right direction on the screen by hand, to show a different sliding
interface
3.
3.
3.
3. 6
6
6
6 Network
Network
Network
Network connection
connection
connection
connection
This equipment via WIFI module connected to a wireless network that complies with IEEE
802.11b/g/n standards
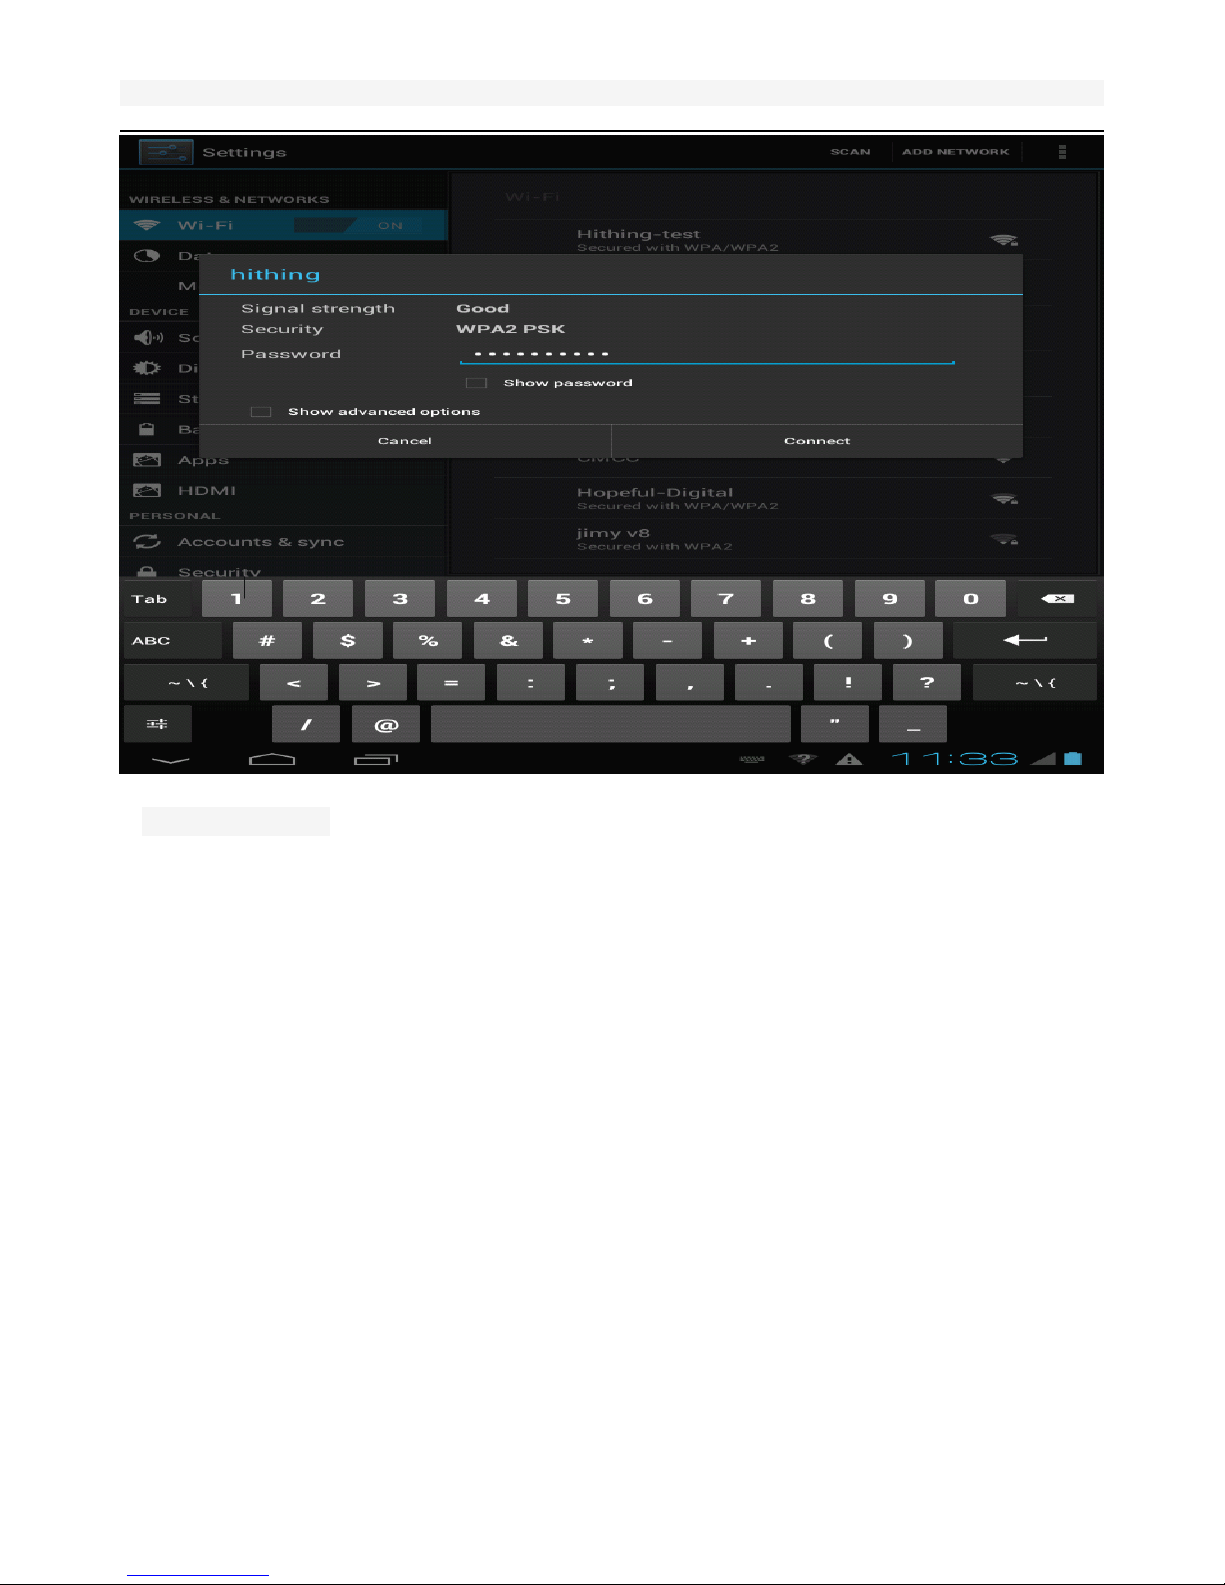
Under "Settings" → "Wi-Fi"
,
Click "Open" icon to open the WIFI function, you can search near the
WIFI SSID ,s elect the appropriate hot spot and enter the password, you will be able to connect to
wireless networks corresponding
Page 17
9.7 inch Tablet PC User Manual
16
( Before connecting : )
Page 18

9.7 inch Tablet PC User Manual
17
(
After connecting : Red logo section ; Menu: yellow region section ; Note: different interface menu
options may vary )
4
4
4
4 Application
Application
Application
Application software
software
software
software installation
installation
installation
installation and
and
and
and system
system
system
system upgrade
upgrade
upgrade
upgrade
4.1
4.1
4.1
4.1 Application
Application
Application
Application software
software
software
software installation
installation
installation
installation
Android system are the application software *. Apk extension ,w hen the installation of third-party
applications ,s elect the "unknown sources" under " s ettings" → " security " → "Device Manager" to
allow installation of application not obtained from the electronic market.
Page 19
9.7 inch Tablet PC User Manual
18
4.1.1
4.1.1
4.1.1
4.1.1 The
The
The
The native
native
native
native installation
installation
installation
installation or
or
or
or ex
ex
ex
ex ternal_sd
ternal_sd
ternal_sd
ternal_sd installation
installation
installation
installation application
application
application
application
Software
Software
Software
Software
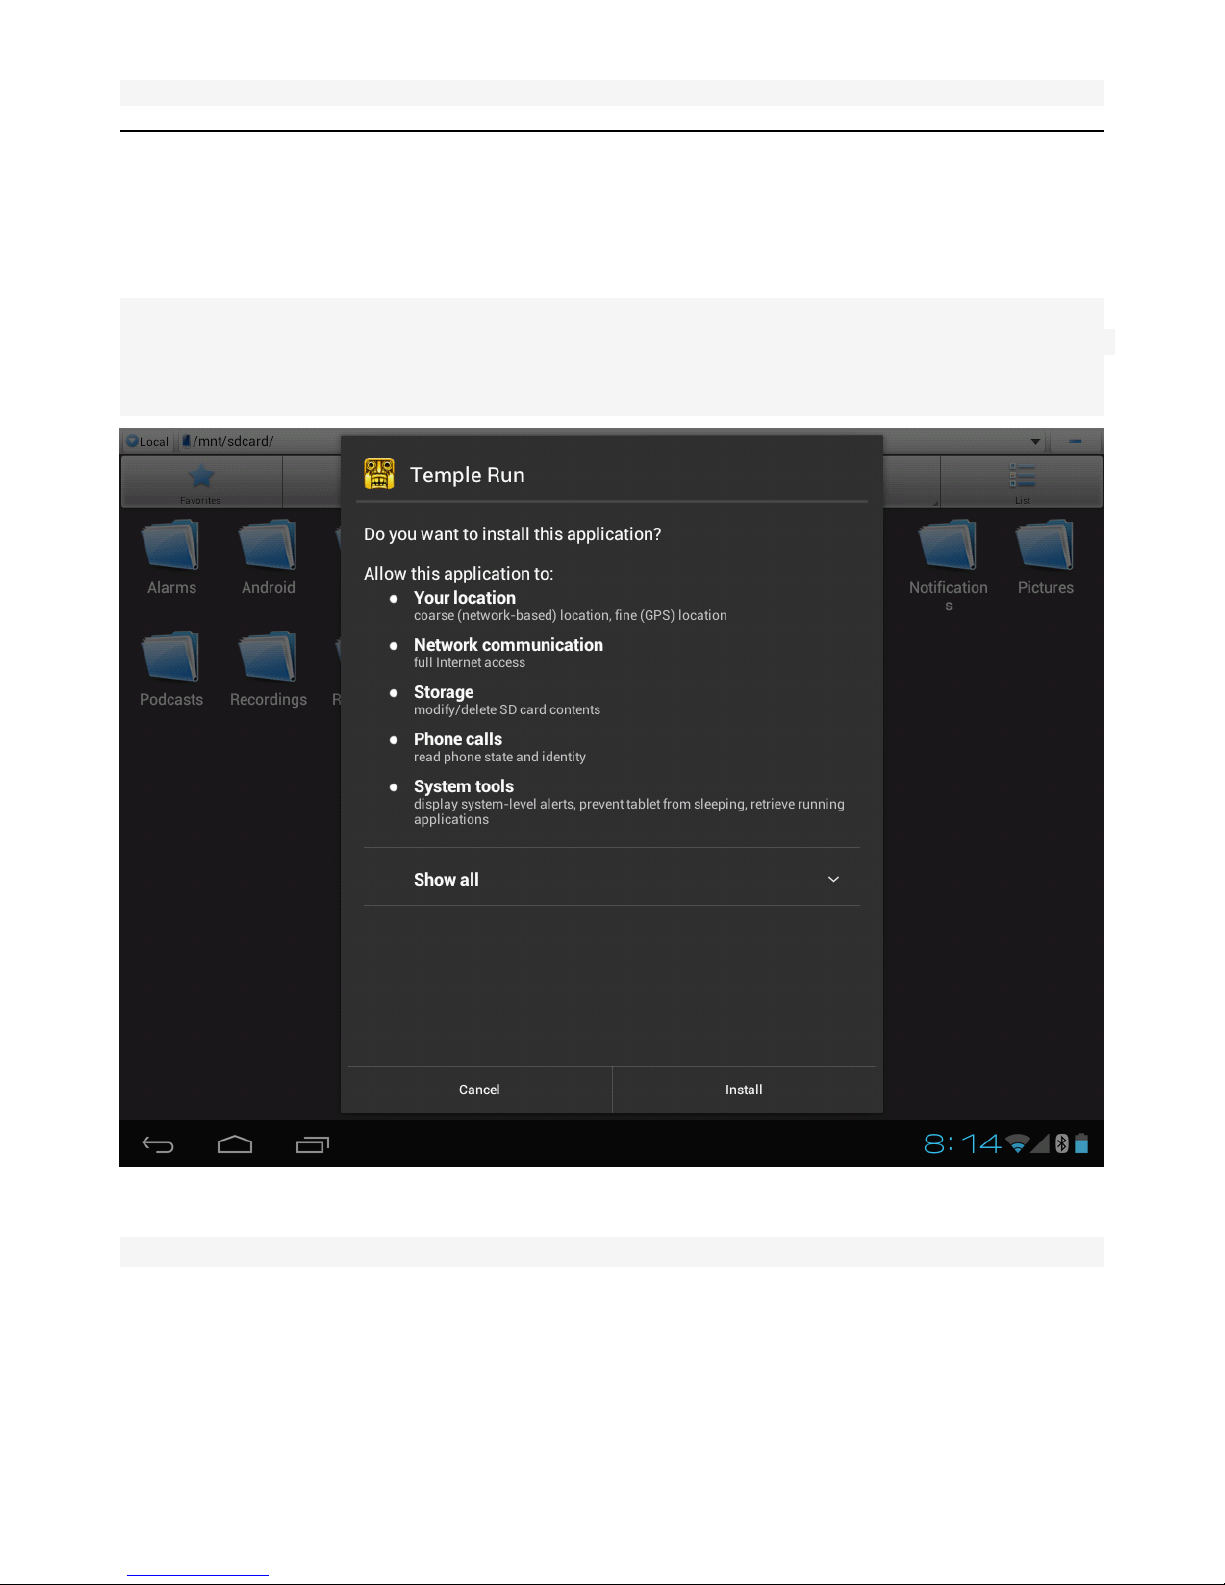
" ES file management program "to find the required applications installed in the system tray or
expansion card, just click the software icon
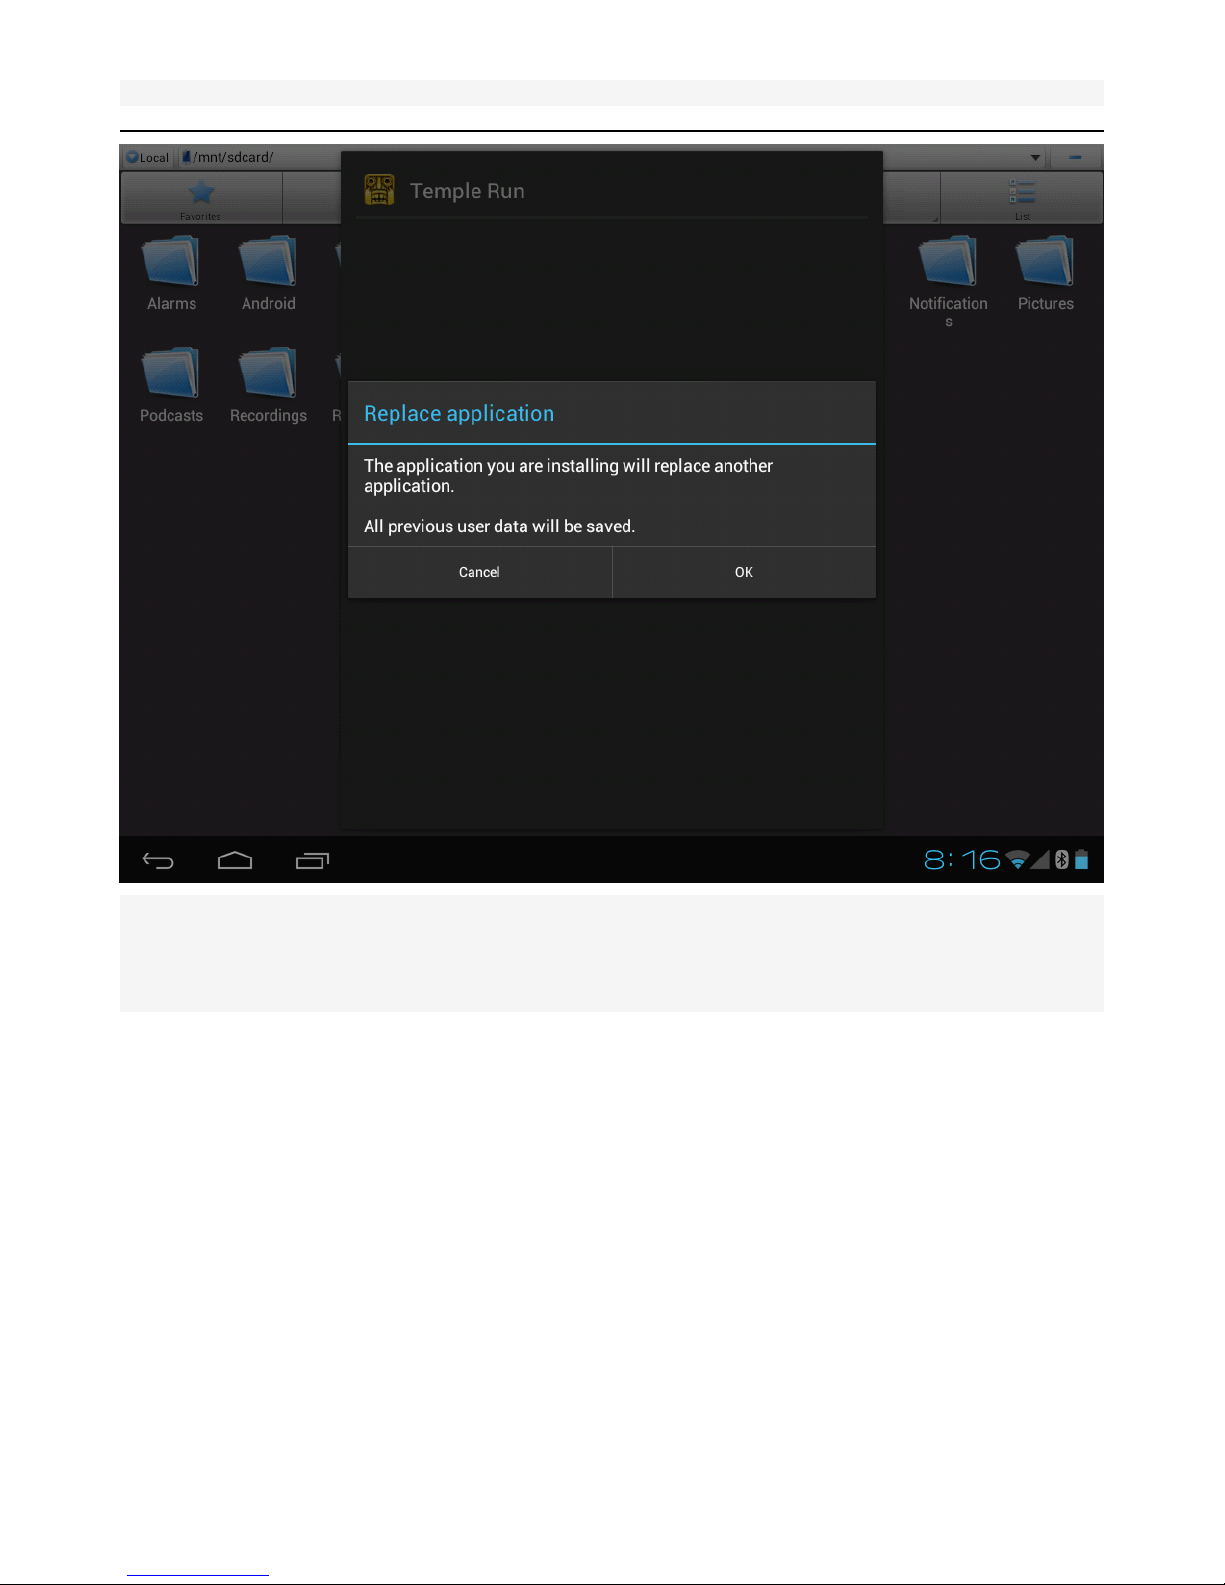
Installation will first check the same procedure on the Tablet PC will be prompted to replace :
Page 20
9.7 inch Tablet PC User Manual
19
Click "OK" to replace an installed third-party APK
After the installation is complete, the prompt has been installed :
Click "Finish" to exit the installation interface, click "Open" to open the installation program directly
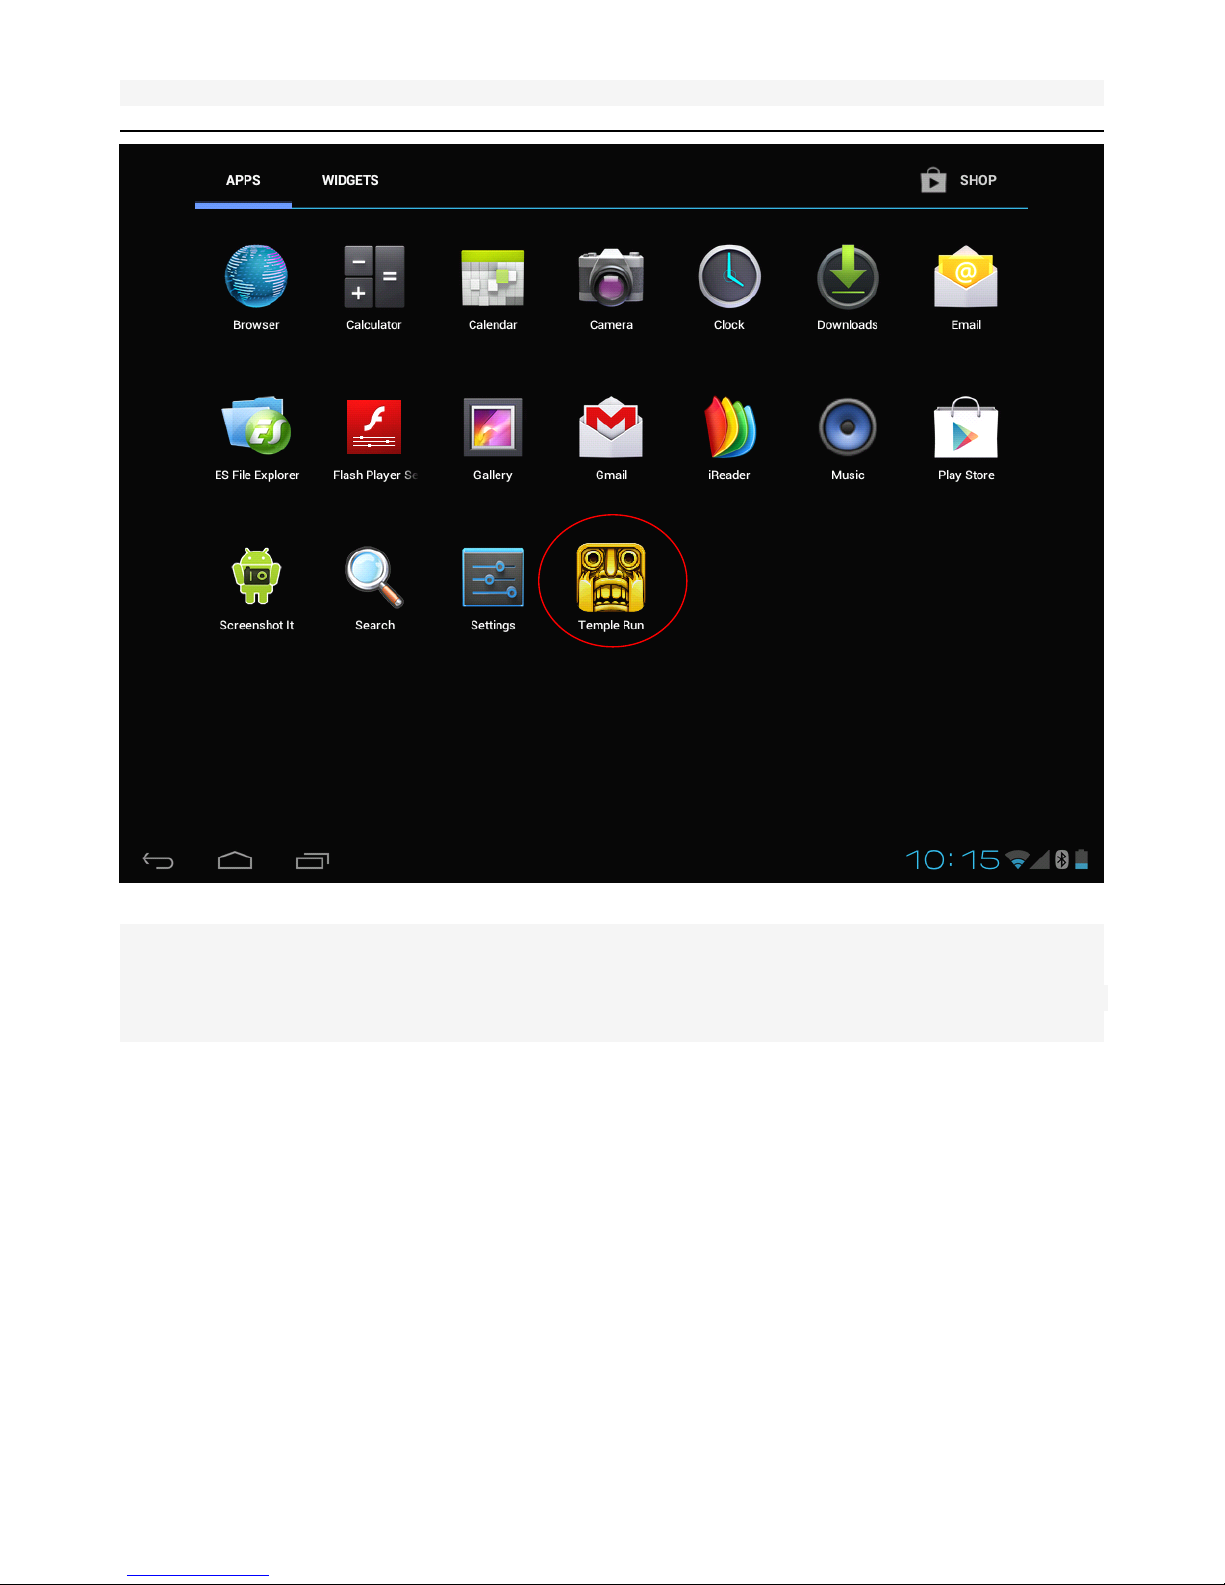
The installed application can find the corresponding icon in the main program menu :
Page 21
9.7 inch Tablet PC User Manual
20
4.1. 2
Application software installation location :
The application is installed by default to the native
You
need to set the software application interface by "set" → "Application" , select "Move to SD card",
the software will be moved to the ex ternal_sd
Page 22

9.7 inch Tablet PC User Manual
21
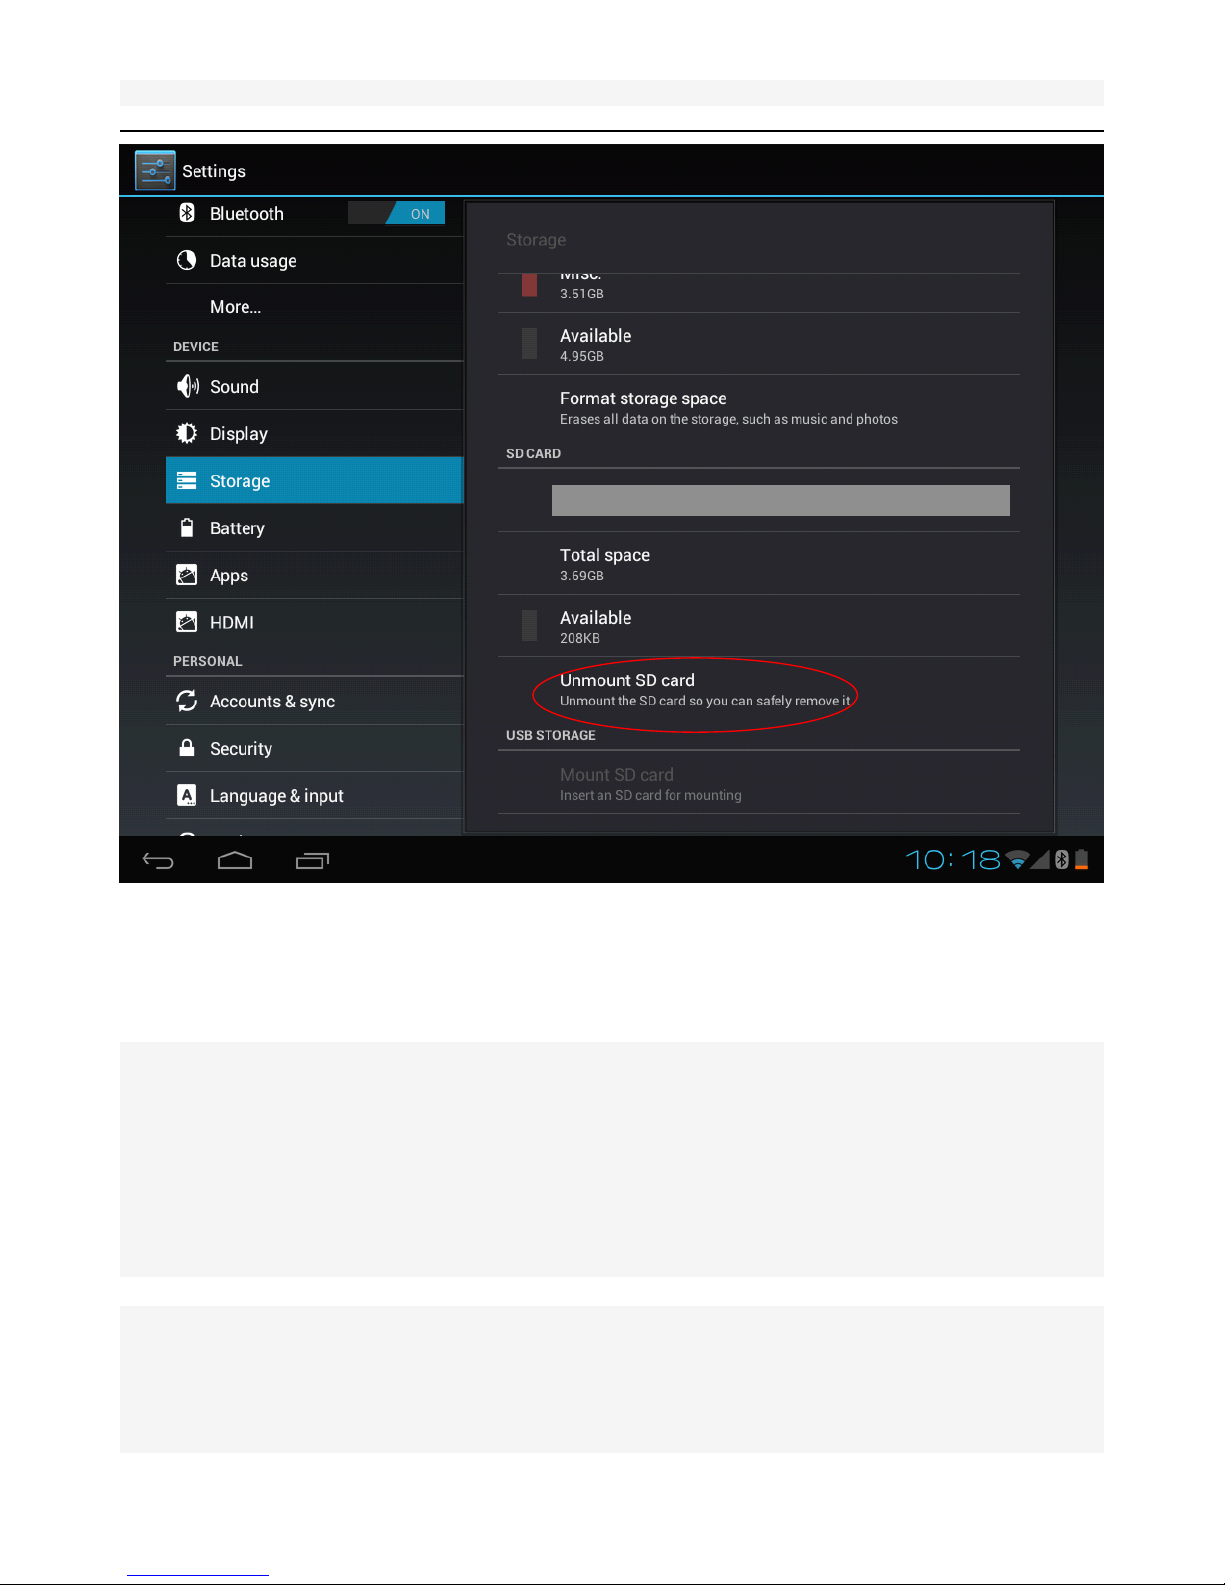
Note: Be sure to remove the ex ternal_sd by "set" --" storage "-- "SD Card" and select "uninstall SD
card"
Page 23
9.7 inch Tablet PC User Manual
22
4.2
4.2
4.2
4.2 System
System
System
System upgrade
upgrade
upgrade
upgrade
4.2.1
4.2.1
4.2.1
4.2.1 U
U
U
U pgrade
pgrade
pgrade
pgrade system
system
system
system with
with
with
with USB
USB
USB
USB cable:
cable:
cable:
cable:
Brush with battery
:
● Shutdown
● O pen the Brush Pack ,c onnected to a PC via a USB cable ,f ind the executable file "MPT ool.exe"
● Run MPT ool.exe
● Press and hold the machine "VOL-" (volume down) and hold and press the "Power" button
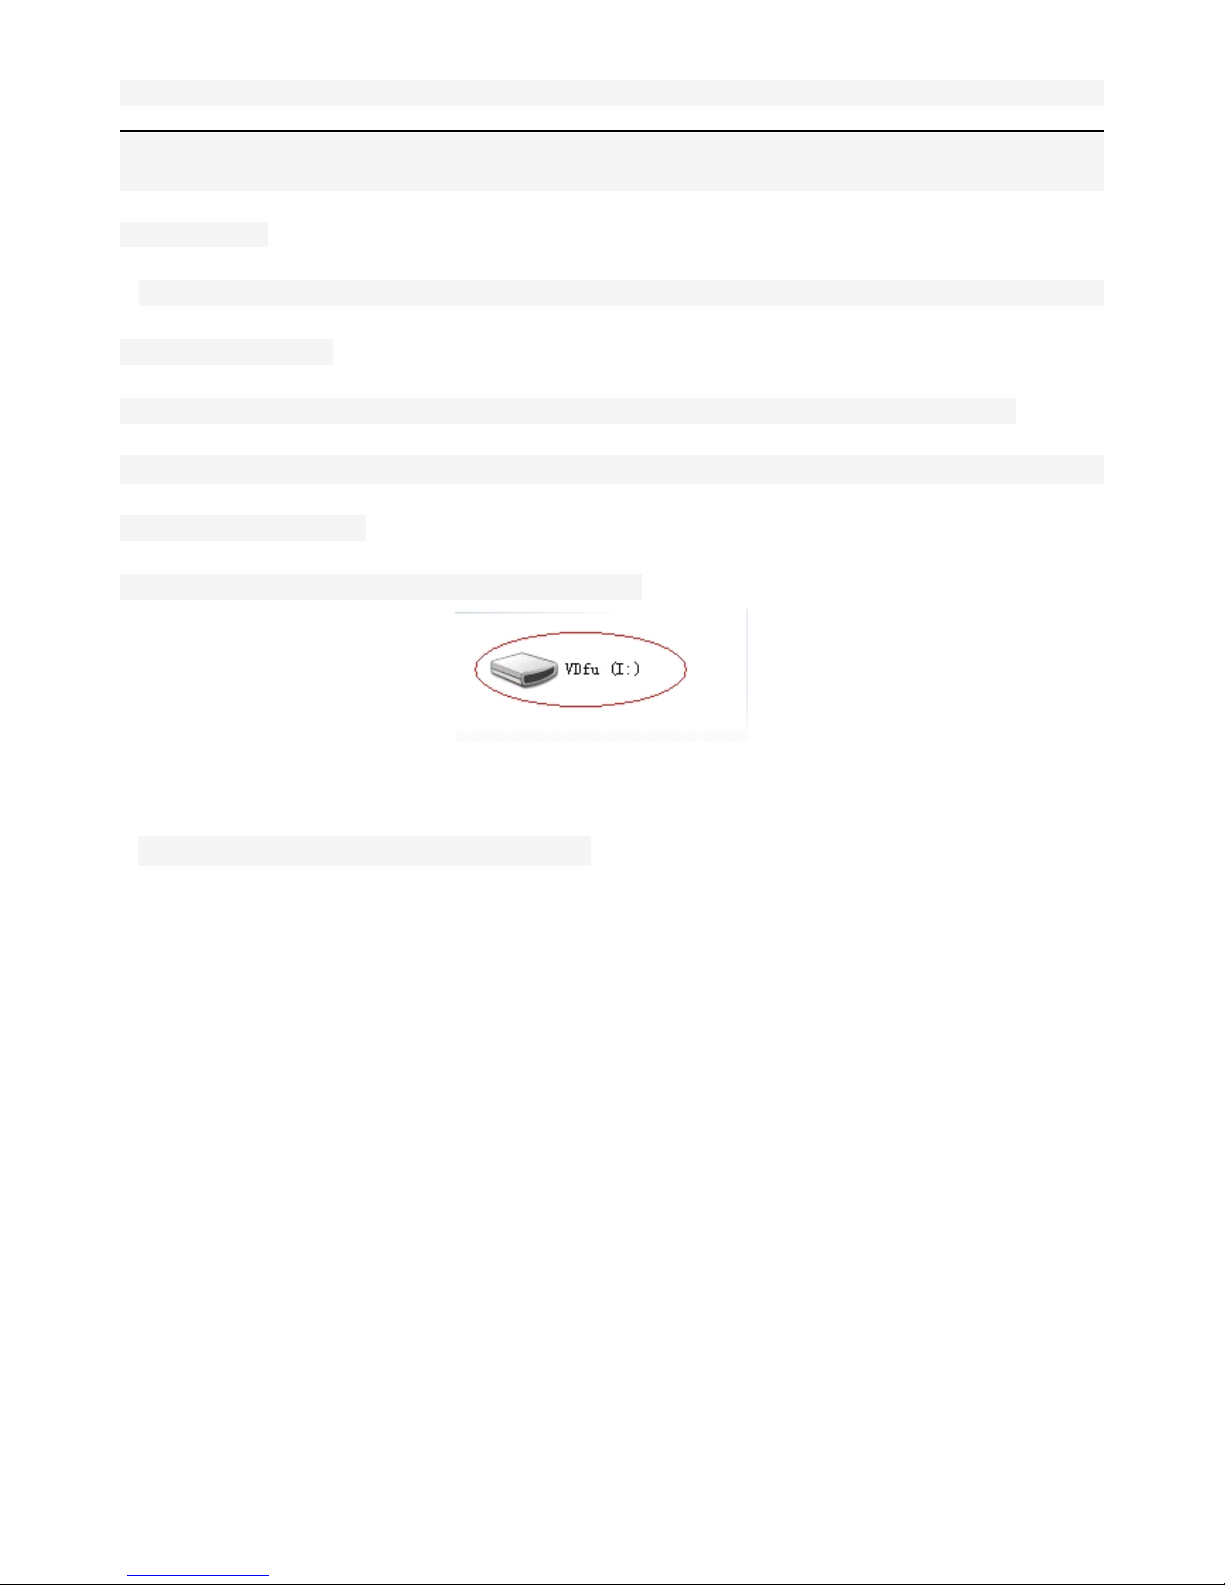
● PC pop-up USB Mobile Equipment Identity Tips ,w hen appear VDfu, release the button
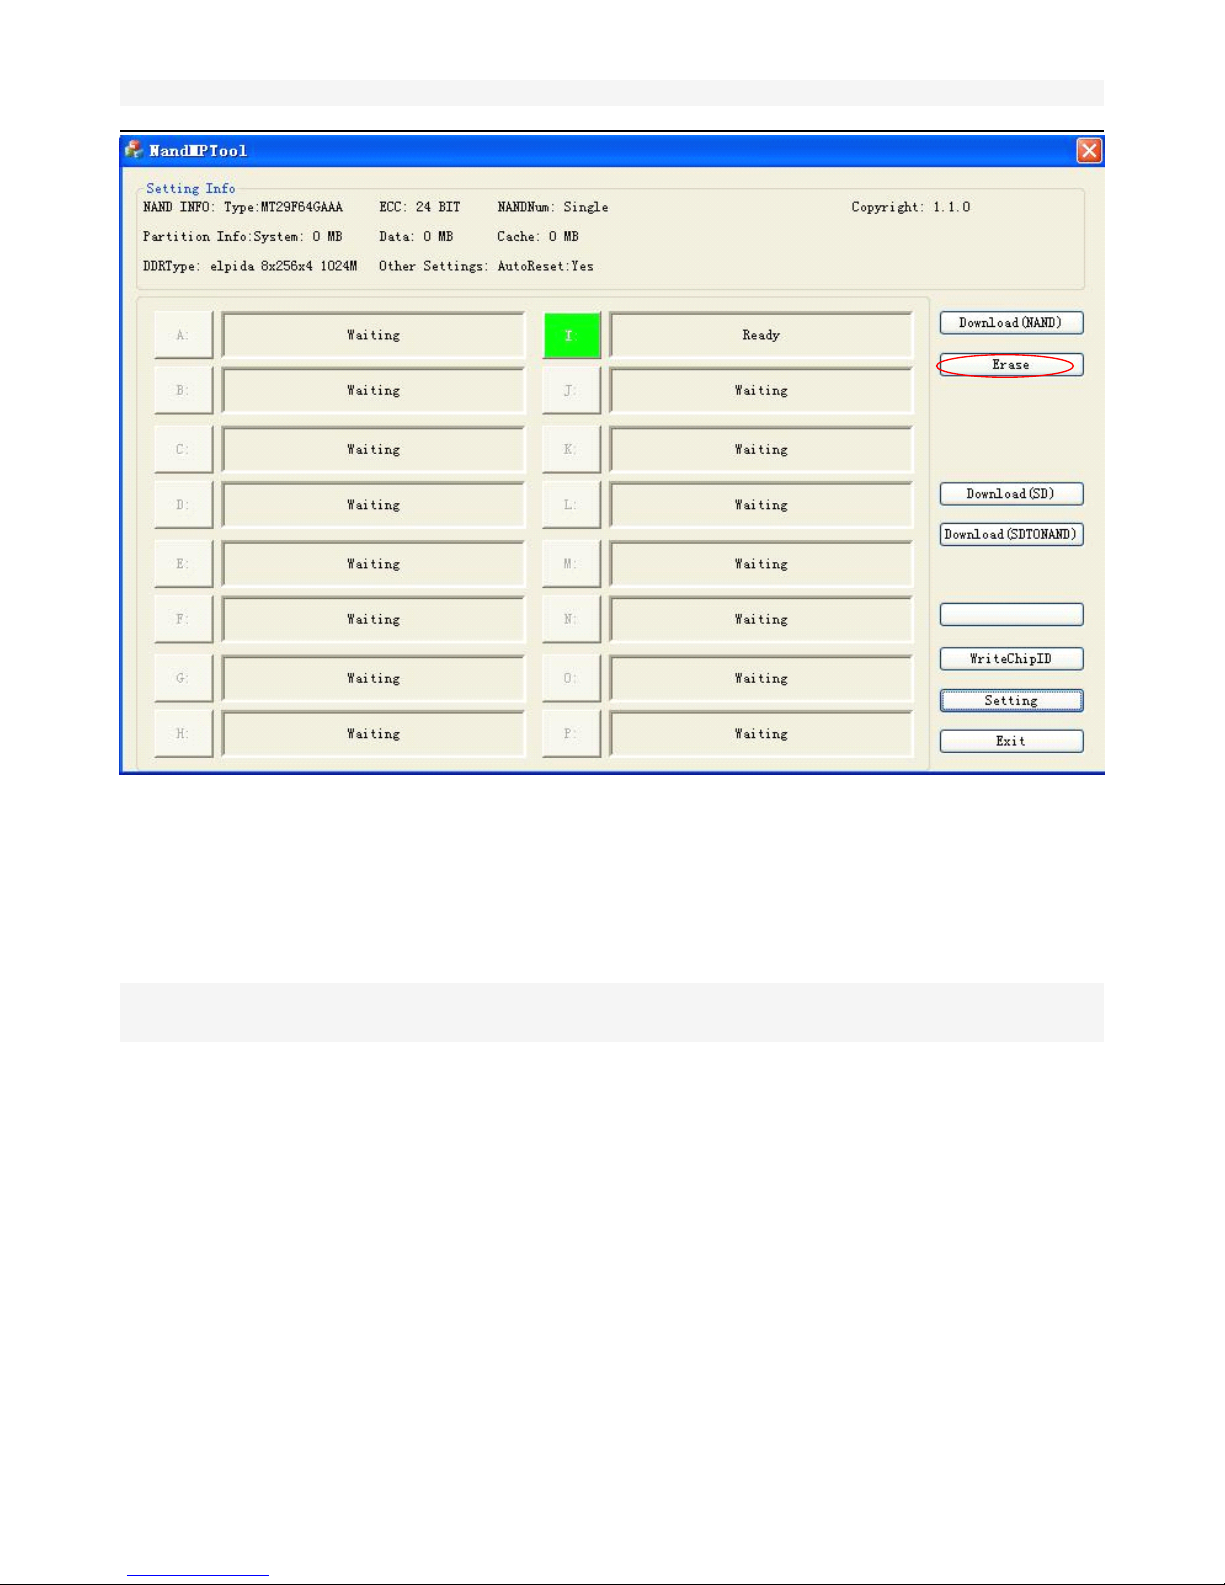
● Click "Erash" button
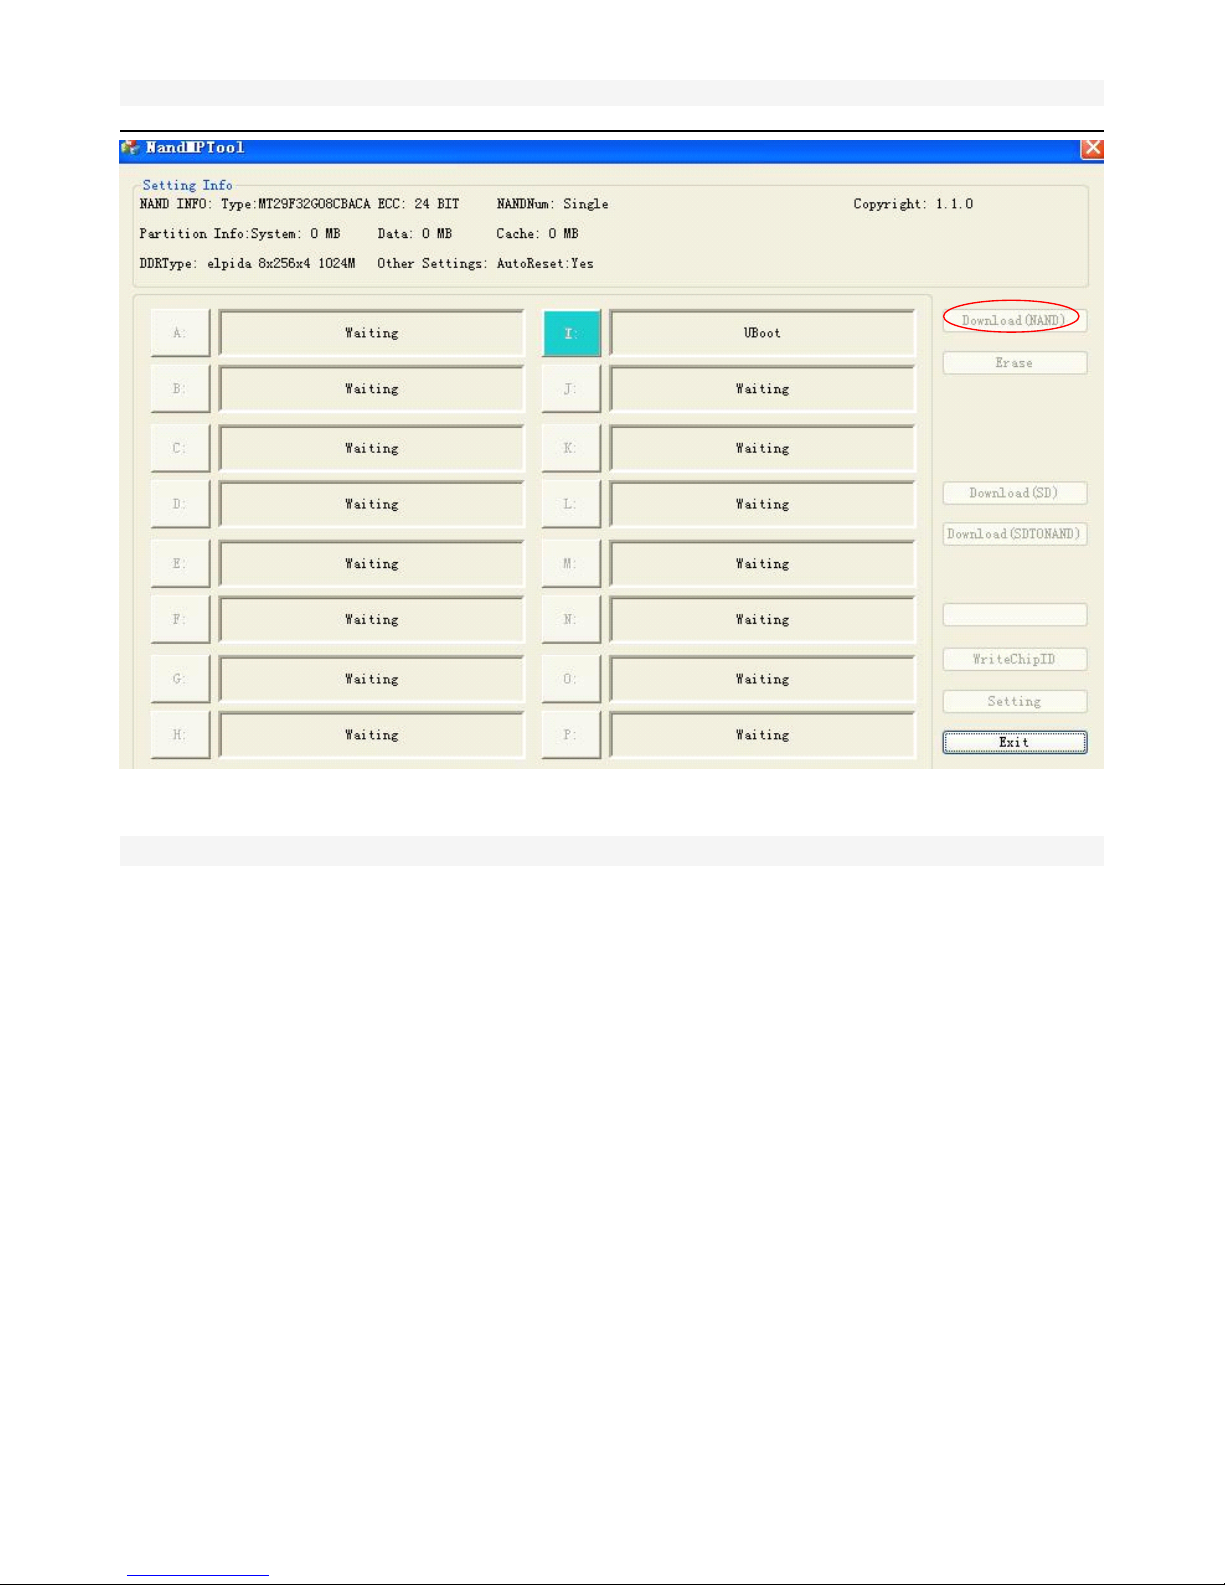
● Click "Download (NAND)" button of MPTool.exe
Page 24
9.7 inch Tablet PC User Manual
23
Brush with Power :
● Shutdown
● O pen the Brush Pack ,c onnected to a PC via a USB cable ,f ind the executable file "MPT ool.exe"
● Run MPT ool.exe
● Press and hold the machine "VOL-" (volume down) and c onnected to a power source
● PC pop-up USB Mobile Equipment Identity Tips ,w hen appear VDfu, release the button
● Click "Erash" button
● Click "Download (NAND)" button of MPTool.exe
Brush
Brush
Brush
Brush flowchart
flowchart
flowchart
flowchart :
:
:
:
1. Click “ Erase ” button,s ee the following figure :
Page 25
9.7 inch Tablet PC User Manual
24
2.Click "Download (NAND) "button to start the download file (NAND)" ,s ee the following figure :
Page 26
9.7 inch Tablet PC User Manual
25
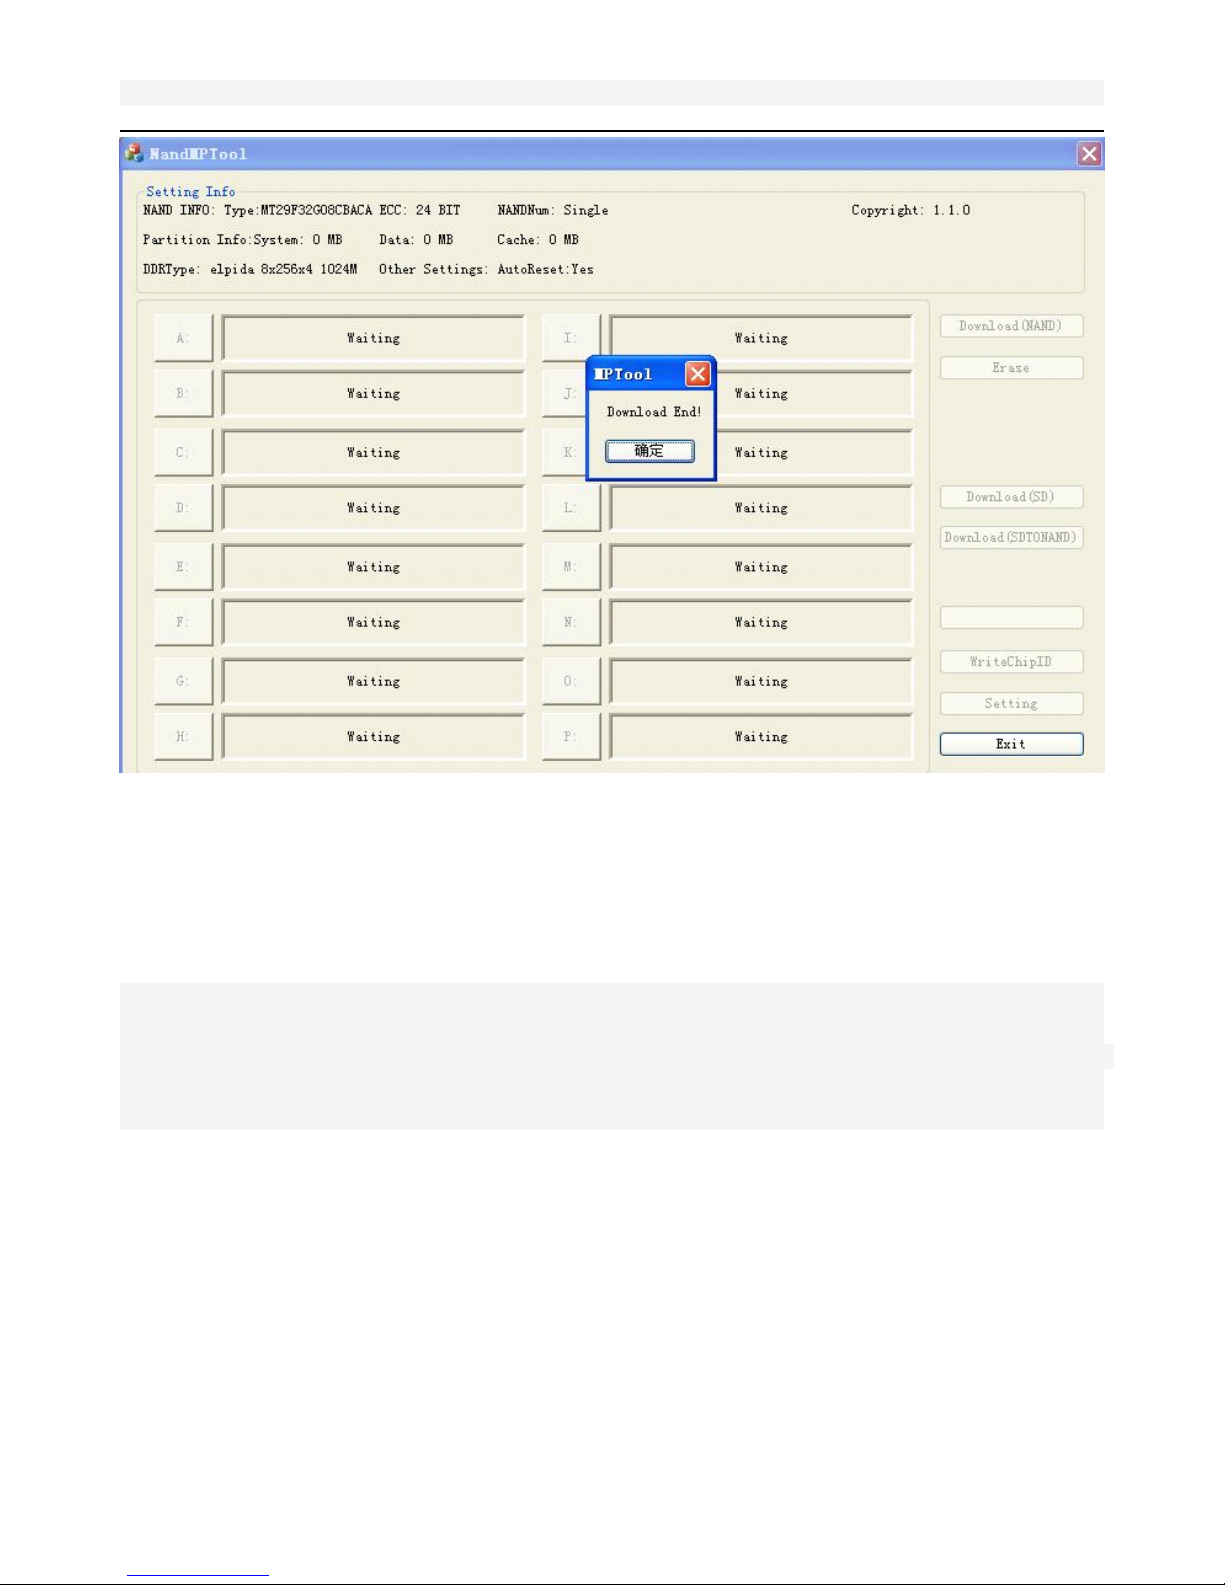
3.End brush
(
It l t ake s three to five minutes
) :
Page 27
9.7 inch Tablet PC User Manual
26
5.
5.
5.
5. Under
Under
Under
Under the
the
the
the system
system
system
system of
of
of
of WIN7
WIN7
WIN7
WIN7 brush
brush
brush
brush machine
machine
machine
machine method
method
method
method :
:
:
:
It may meet MPT ool.exe cannot recognize the USB device ,handling skills are as follows :
● When to run MPT ool.exe file, you need to run it as Administrator , Set as follows :
Right-click MPTool.exe, select " Run " as administrator , Or right-click the MPTool.exe, select
"Properties" and select the "compatibility" red box , click OK
 Loading...