

Page 1

version:1.0
User Manual
Blood Pressure Monitor
Arm Type
Please do read the user manual carefully and thoroughtly so as to ensure
the safe usage of this product, and keep the manual well for further
reference in case you have problems.
Page 2

CATALOGUE CATALOGUE
Table of Contents
INTRODUCTION ...................................................................................................................... 2
General Description
Indications for Use
Safety Information
LCD Display Signal
Monitor Components
Measurement Principle
BEFORE YOU START ...................................................................................................................... 7
Installing and Replacing the Batteries
Tie the Cuff
MEASUREMENT...................................................................................................................... 8
Start the Measurement
INFORMATION FOR USER. ................................................................................................... 9
Tips for measurement
Maintenances
ABOUT BLOOD PRESSURE ................................................................................................ 11
What are systolic pressure and diastolic pressure?
What is the standard blood pressure classification?
Why does my blood pressure fluctuate throughout the day?
Why do I get a different blood pressure at home compared to the hospital?
Is the result the same if measuring on the right arm?
TROUBLESHOOTING ........................................................................................................... 13
SPECIFICATIONS ................................................................................................................. 14
CONTACT INFORMATION. .................................................................................................. 15
COMPLIED EUROPEAN STANDARDS LIST ...................................................................... 15
EMC GUIDANCE.................................................................................................................... 16
1
Page 3
INTRODUCTION INTRODUCTION
General Description
Readings taken by the BM-201 are equivalent to those obtained by a
trained observer using the cuff and stethoscope auscultation method.
This manual contains important safety and care information, and
provides step by step instructions for using the product.
Read the manual thoroughly before using the product.
Features:
60mm×40.5 mm Digital LCD display
3rd technology: Measuring during inflation
(The updated technol og y in the worl d)
Indications for Use
The Blood Pressure Monitor is digital monitors intended for use in
measuring blood pressure and heartbeat rate with arm circumference ranging
from 22 cm to 32 cm ( about 8¾˝-12½˝ ) .
It is intended for adult indoor use only.
Safety Information
The signs below might be in the user manual, labeling or other component.
They are the requirement of stan da rd a nd us in g.
CAUTION
This device is intended for adult use only.
This device is intended for no-invasive measuring and monitoring of arterial blood pressure.
It is not intended for use on extremities other than the arm or for functions other than
obtaining a blood pressure measurement.
Do not confuse self-monitoring with self-diagnosis. This unit allows you to monitor your blood
pressure.Do not begin or end medical treatment without asking a physician for treatment
advice.
If you are taking medication,consult your physician to determine the most appropriate time to
measure your blood pressure. Never change a prescribed medication without consulting
your Physician.
When the device was used to measure patients who have common arrhythmias such as
atrial or ventricular premature beats or atrial fibrillation, the best result may occur with
deviation. Please consult your physician about the result.
If the cuff pressure exceeds 40 kPa (300 mmHg), the unit will automatically deflate. Should
the cuff not deflate when pressures exceeds 40 kPa (300 mmHg), detach the cuff from the
arm and press the START/STOP button to stop inflation.
The equipment is not AP/APG equipment and not suitable for use in the presence of a
flammable anesthetic mixture with air of with oxygen or nitrous oxide.
The operator shall not touch output of batteries and the patient simultaneously.
To avoid measurement errors, please avoid the condition of strong electromagnetic field
radiated interference signal or electrical fast transient/burst signal.
The user must check that the equipment functions safely and see that it is in proper working
condition before being used.
This device is contraindicated for any female who may be suspected of, or is pregnant.
Besides providing inaccurate readings, the effects of this device on the fetus are unknown.
Manufacturer will make available on request circuit diagrams, component parts list etc.
This unit is not suitable for continuous monitoring during medical emergencies or operations.
Otherwise, the patient’s arm and fingers will become anaesthetic, swollen and even purple
due to a lack of blood.
Please use the device under the environment which was provided in the user manual.
Otherwise, the performance and lifetime of the device will be impacted and reduced.
During use, the patient will be in contact with the cuff. The materials of the cuff have been
tested and found to comply with requirements of ISO 10993-5:2009 and ISO 10993-10:2010.
It will not cause any potential sensization or irritation reaction.
Please use ACCESSORIES and detachable partes specified/ authorised by
MANUFACTURE. Otherwise, it may cause damage to the unit or danger to the
user/patients.
The device doesn’t need to be calibrated within the two years of reliable service.
Please dispose of ACCESSORIES, detachable parts, and the ME EQUIPMENT according to
the local guidelines.
If you have any problems with this device, such as setting up, maintaining or using, please
contact the SERVICE PERSONNEL of Transtek. Don’t open or repair the device by yourself.
Please report to Transtek if any unexpected operation or events occur.
Please use the soft cloth to clean the whole unit. Don’t use any abrasive or volatile cleaners.
2 3
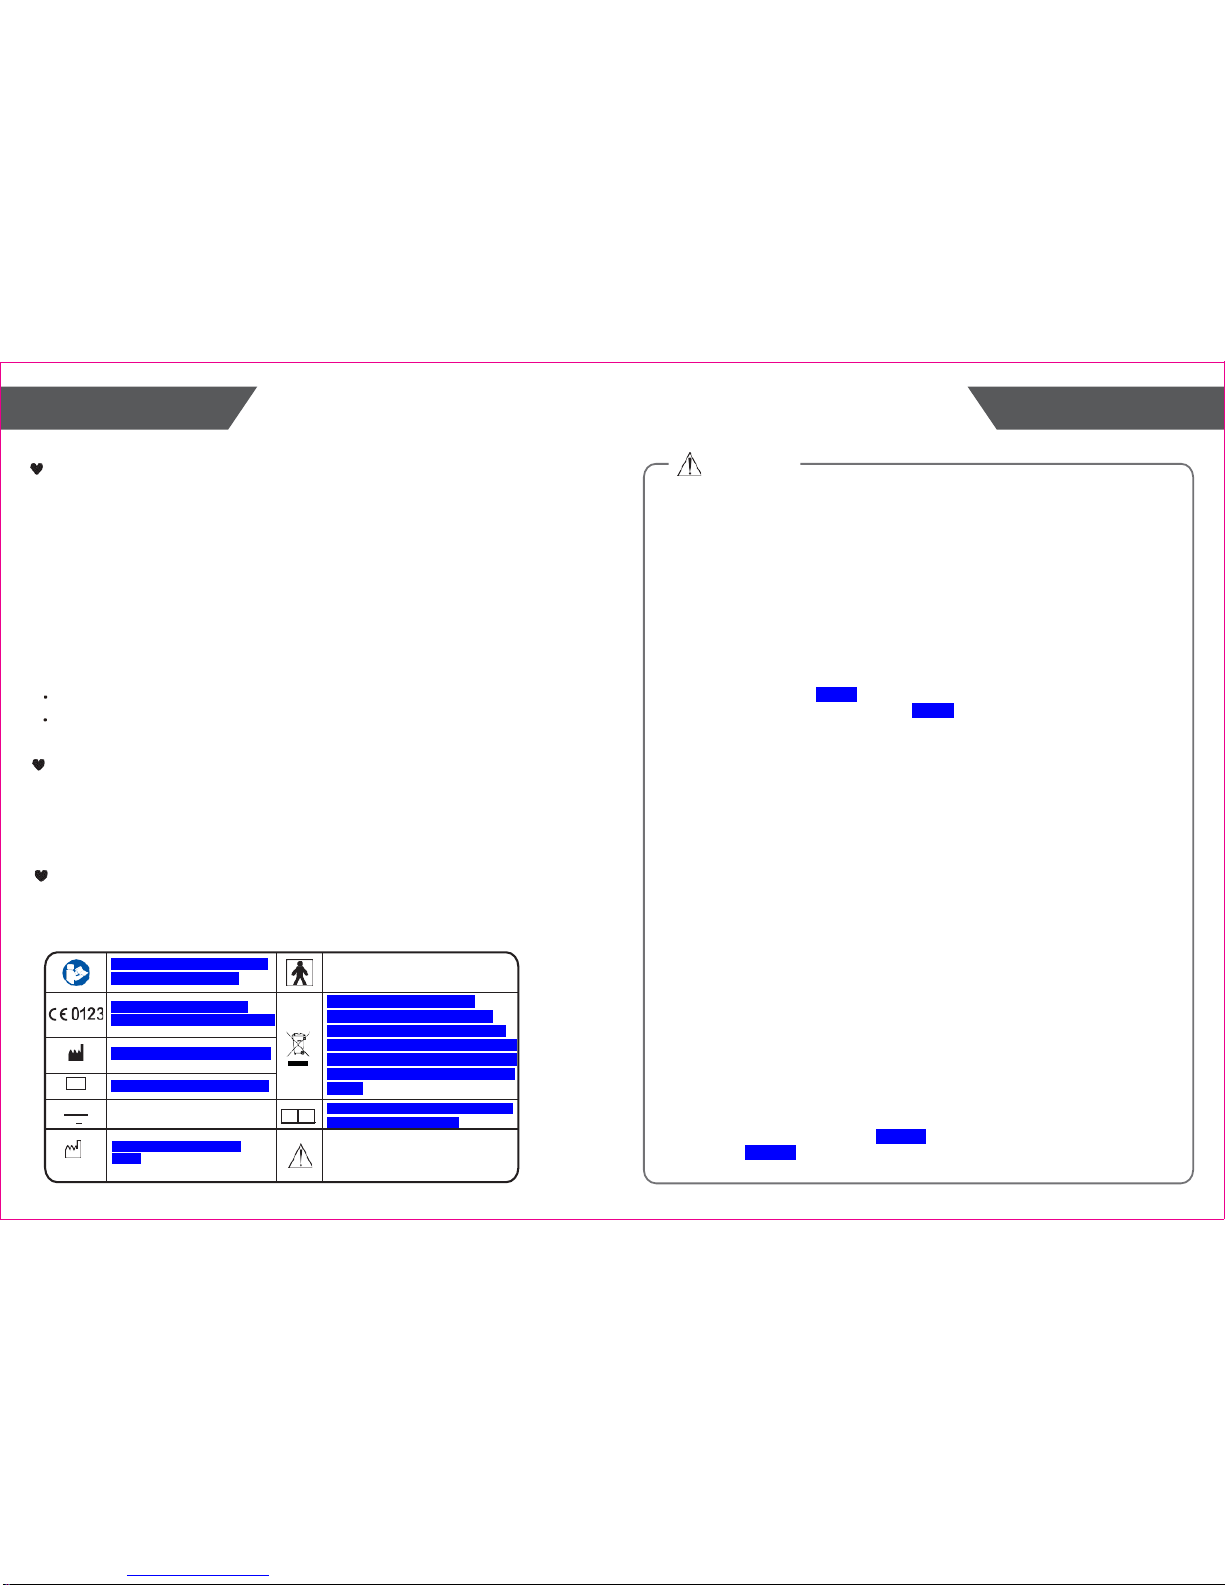
Symbol for “THE OPERATION
GUIDE MUST BE READ”
Symbol for “TYPE BF APPLIED
PARTS”
Symbol for “COMPLIES WITH
MDD 93/4 2/ EE C
REQUIREMENTS”
Symbol for “ENVIRONMENT
PROTECTION - Electric al wast e
products should not be disposed of
with household waste. Please recycle
where facilities exist. Check with your
local authority or retailer for recycling
advice”
Symbol for “MANUFACTURER”
SN
Symbol for “SERIAL NUMBER”
Symbol for “DIRECT CURRENT”
EC REP
Symbol for “Authorised Representative
in the European Community
Symbol for “MANUFACTURE
DATE”
Caution: These notes must be
observed to prevent any damage
to the device.
Page 4
INTRODUCTION INTRODUCTION
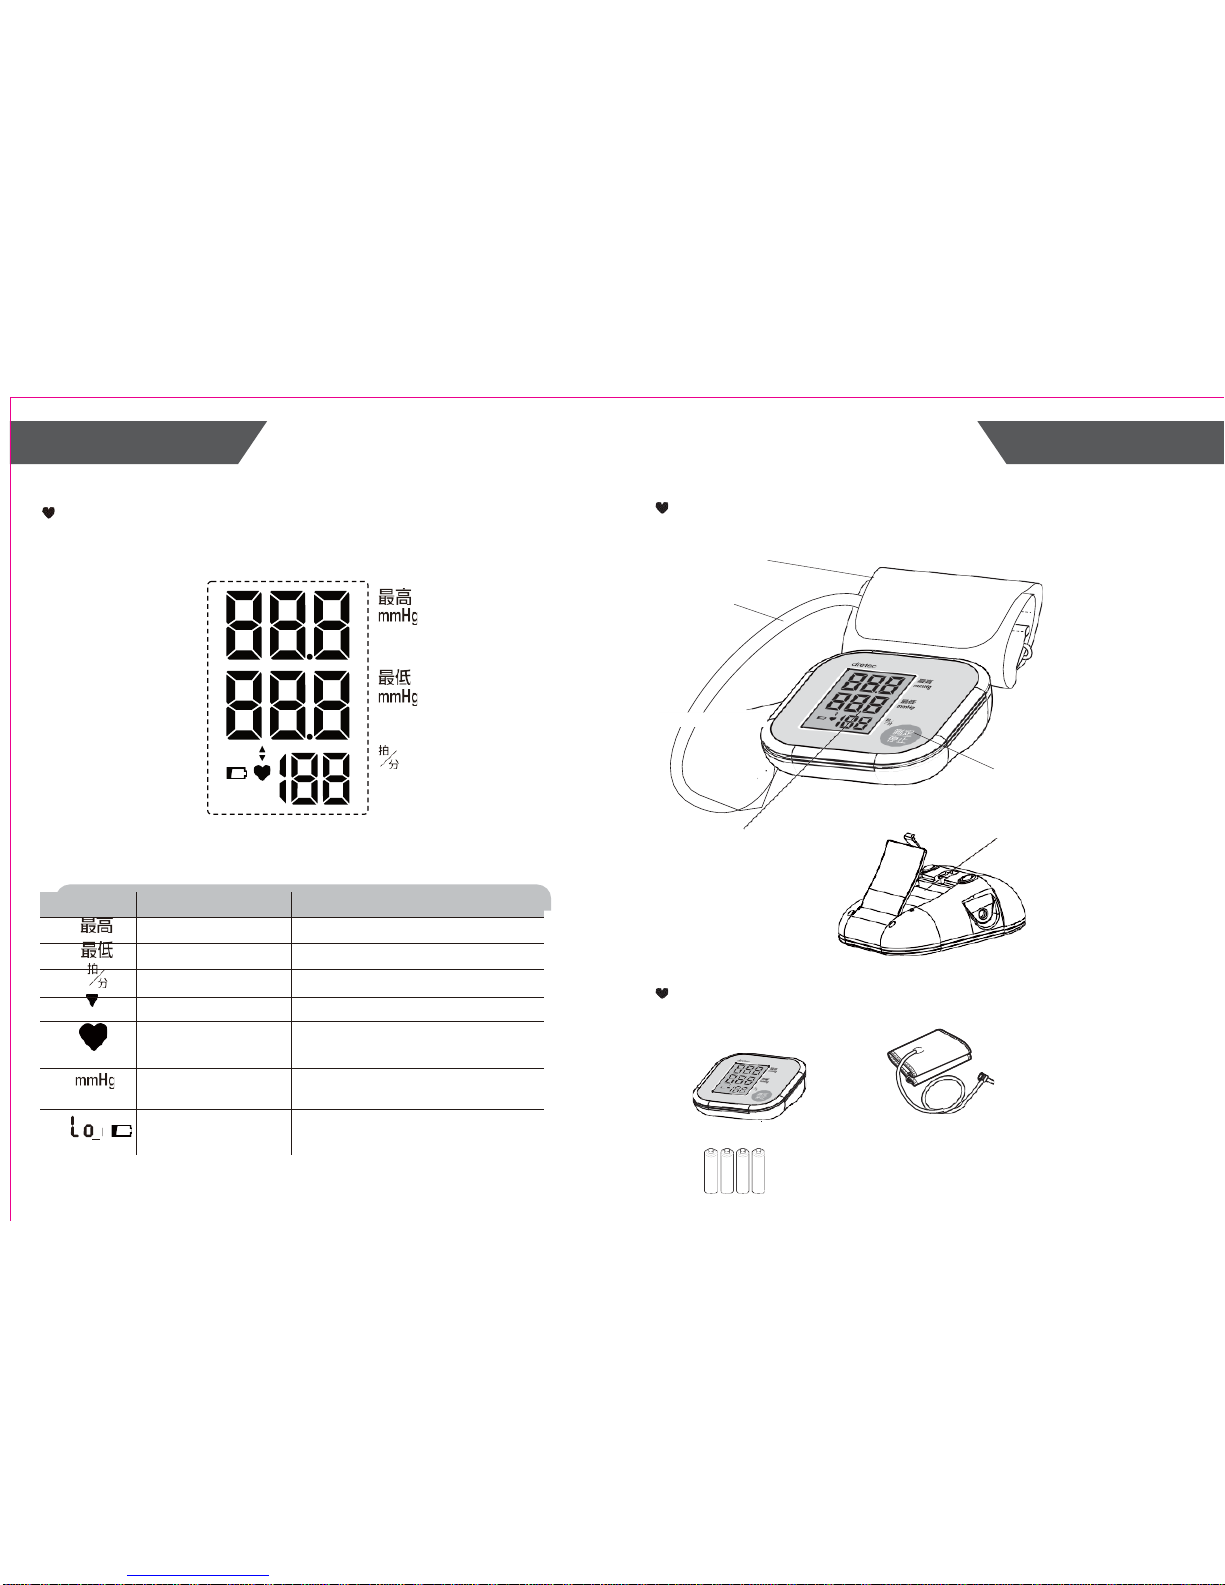
LCD display signal
Monitor Compone nts
AIR HOSE
CUFF
Component list of
pressure measuring
system
1
Cuff
2
Air pipe
3
PCBA
4
Pump
5
Valve
AIR CONNECTOR PLUG
START/STOP BUTTON
LCD DISPLAY
BATTERY COMPARTM ENT
List
1.
Blood Pressure Monitor
(TMB-1491-A)
2.
Cuff (Type BF applied part)
(22cm~32cm)
(Please use TRANSTEK
authorized cuff. The size
of the actual cuff please
refer to the label on the
attached cuff.)
3.
4×AAA batteries 4.User manual
SYMBOL
DESCRIPTION
EXPLANATION
Systolic blood pressure High blood pressure
Diastolic blood pressure Low blood pressure
Pulse display
Pulse in beats per minute
Deflation symbol
The cuff is deflating.
Heartbeat
Blood pressure monitor is detecting a
heartbeat during measurement.
mmHg
Measurement Unit of the blood
pressure
(1mmHg=0.133kPa)
Low battery
Batteries are low and need to be
replaced
Page 5

4 5
Page 6
INTRODUCTION BEFORE YOU START
Measurement Principle
This product uses the Oscillometric Measuring method to detect
blood pressure. Before every measurement, the unit establishes a
“zero pressure” equivalent to the air pressure. Then it starts inflating the
arm cuff, meanwhile, the unit detects pressure oscillations generated by
beat-to-beat pulsatile, which is use d to determine the systolic and
diastolic pressure, and also pulse rate.
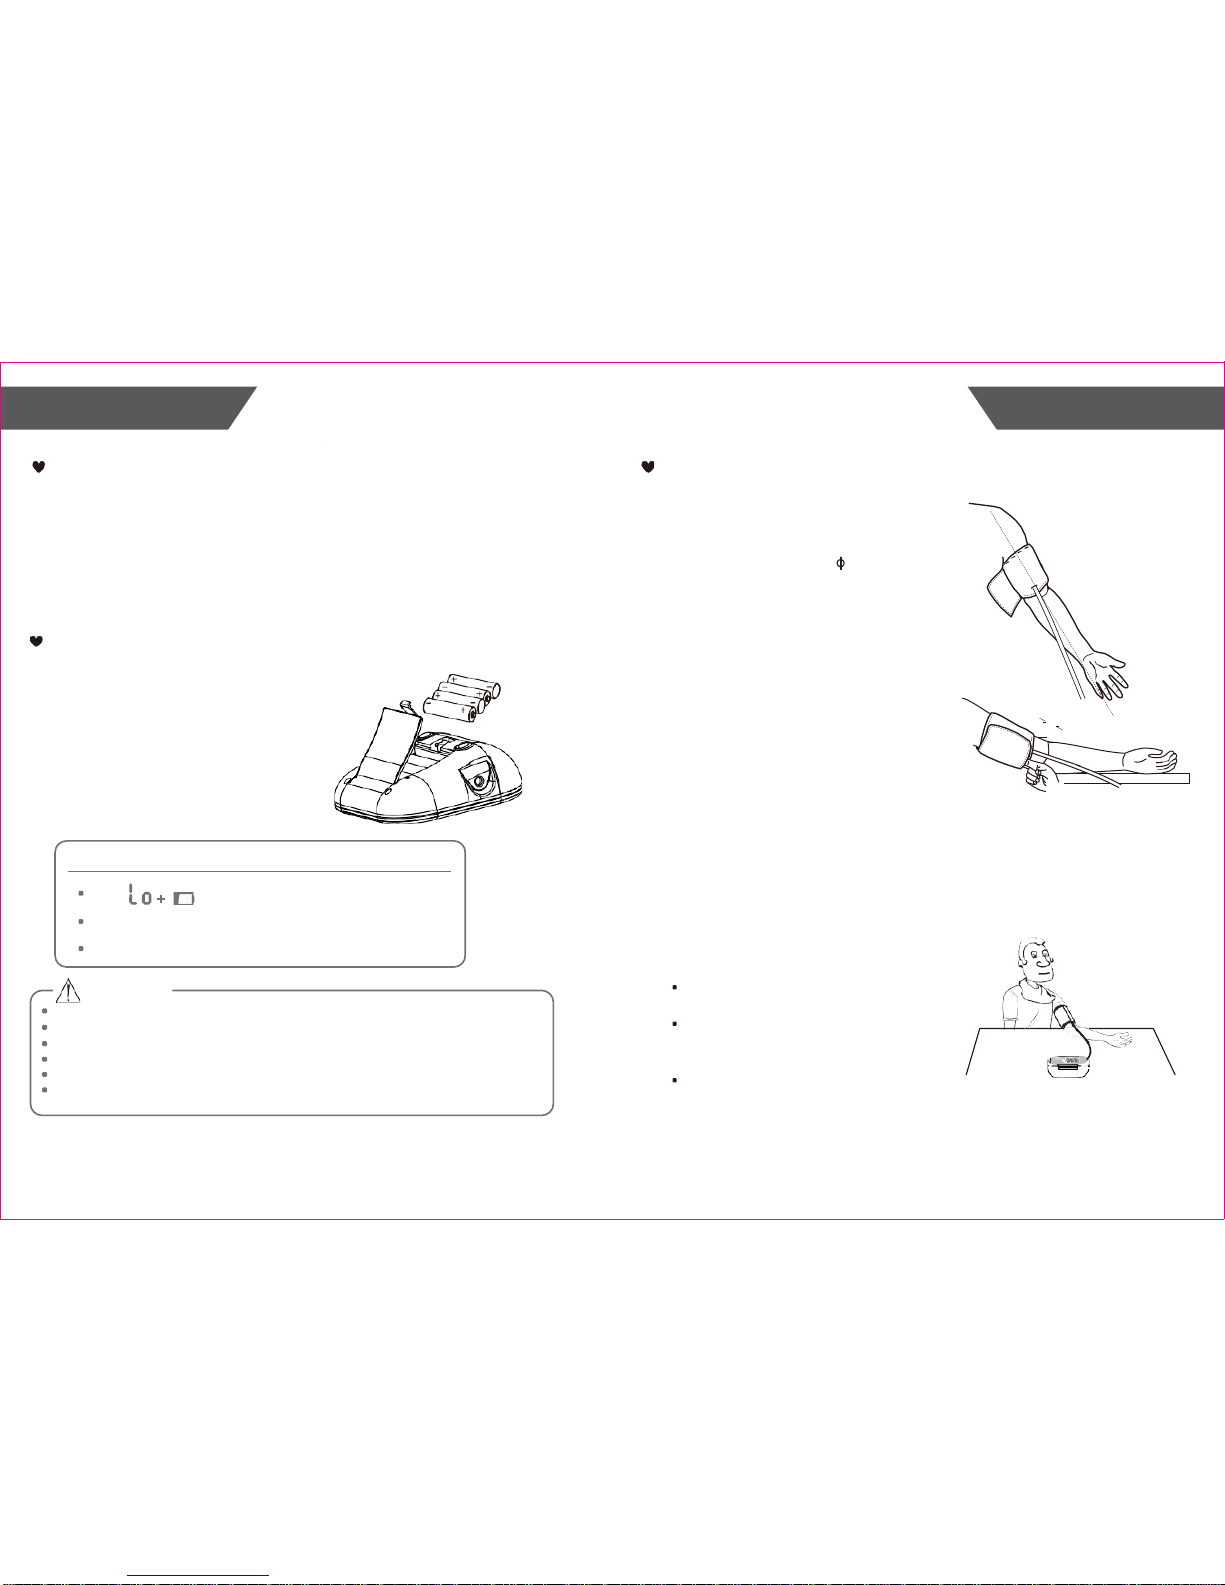
Installing and Replacing the Batteries
• .Open the battery cover.
•
.
Install the batteries as indicated in
the battery compartment.
(Always select the
authorized / specified
battery: Four AAA-size batteries).
•
.
Replace the battery cover.
Replace the batteries whenever the below happen
The shows
The display is dim
The display does not light up
CAUTION
Do not use new and used batteries together.
Do not use different types of batteries together.
Do not dispose the batteries in fire. Batteries may explode or leak.
Remove batteries if the device is not likely to be used for some time.
Worn batteries are harmful to the environment. Do not dispose with daily garbage.
Remove the old batteries from the device following your local recycling guidelines.
6
Tie the cuff
1.
Tie the cuff on your upper arm,
then position the tube off-center
toward the inner side of arm in
line with the little finger. Or
position the artery mark over
the main artery (on the inside of
your arm). Note: Locate the main
artery by pressing with 2 fin ger s
approximately 2 cm above the
bend of your elbow on the inside
of your left arm. Identif y where
the pulse can be felt the
strongest. This is your main
artery.
2.
The cuff should be snug but not
too tight. You should be abl e to
insert one finger between the
cuff and your arm.
3.
Sit comfortably with your tested
arm resting on a flat surface.
4. Patients with Hypertension:
The middle of the cuff should be
at the level of the right atrium of the heart;
Before starting measurement, please sit
comfortably with legs uncrossed,
feet flat on the floor, back and arm supported.
Rest for 5 minutes before
measuring.
Wait at least 3 minutes between
measurements. This allows your
blood circulation to recover.
For a meaningful comparison,
try to measure under similar
conditions. For example, take daily
measurements at approximately
the same time, position of upper
arm, or as directed by a physician.
2~3cm
7
Page 7
MEASUREMENT INFORMATION FOR USER
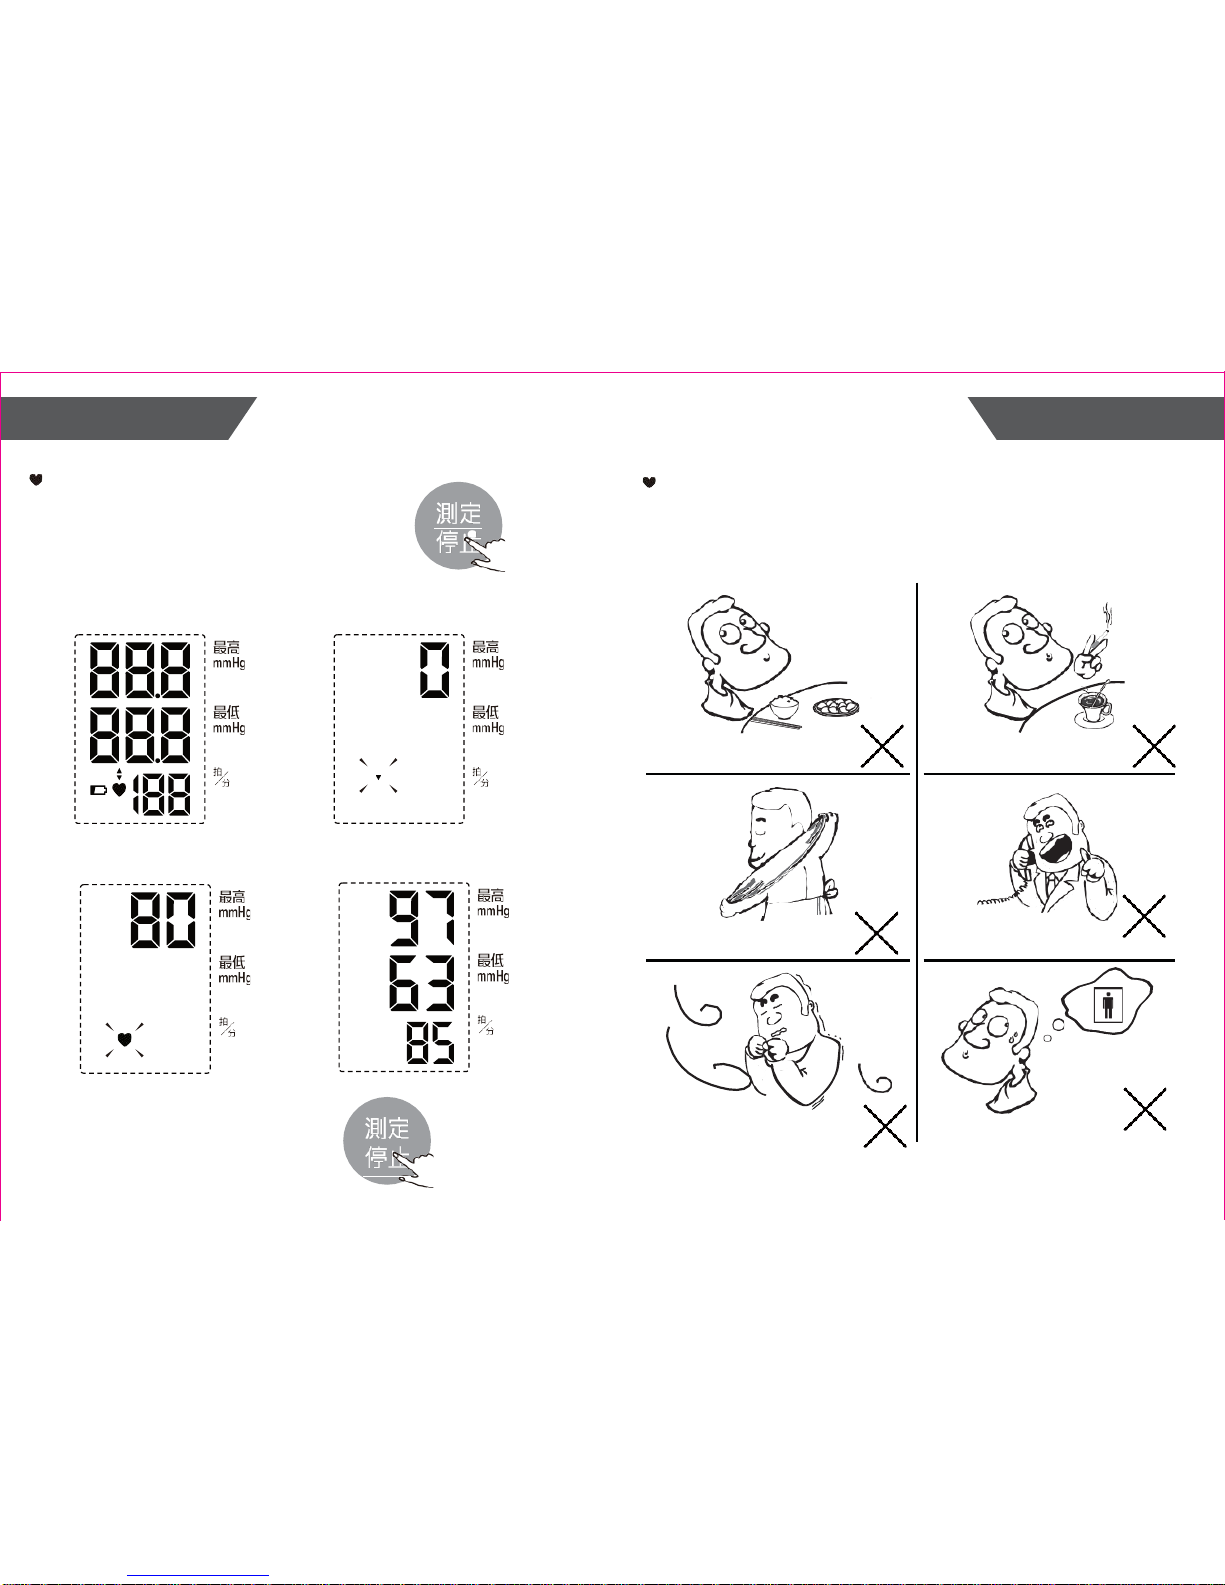
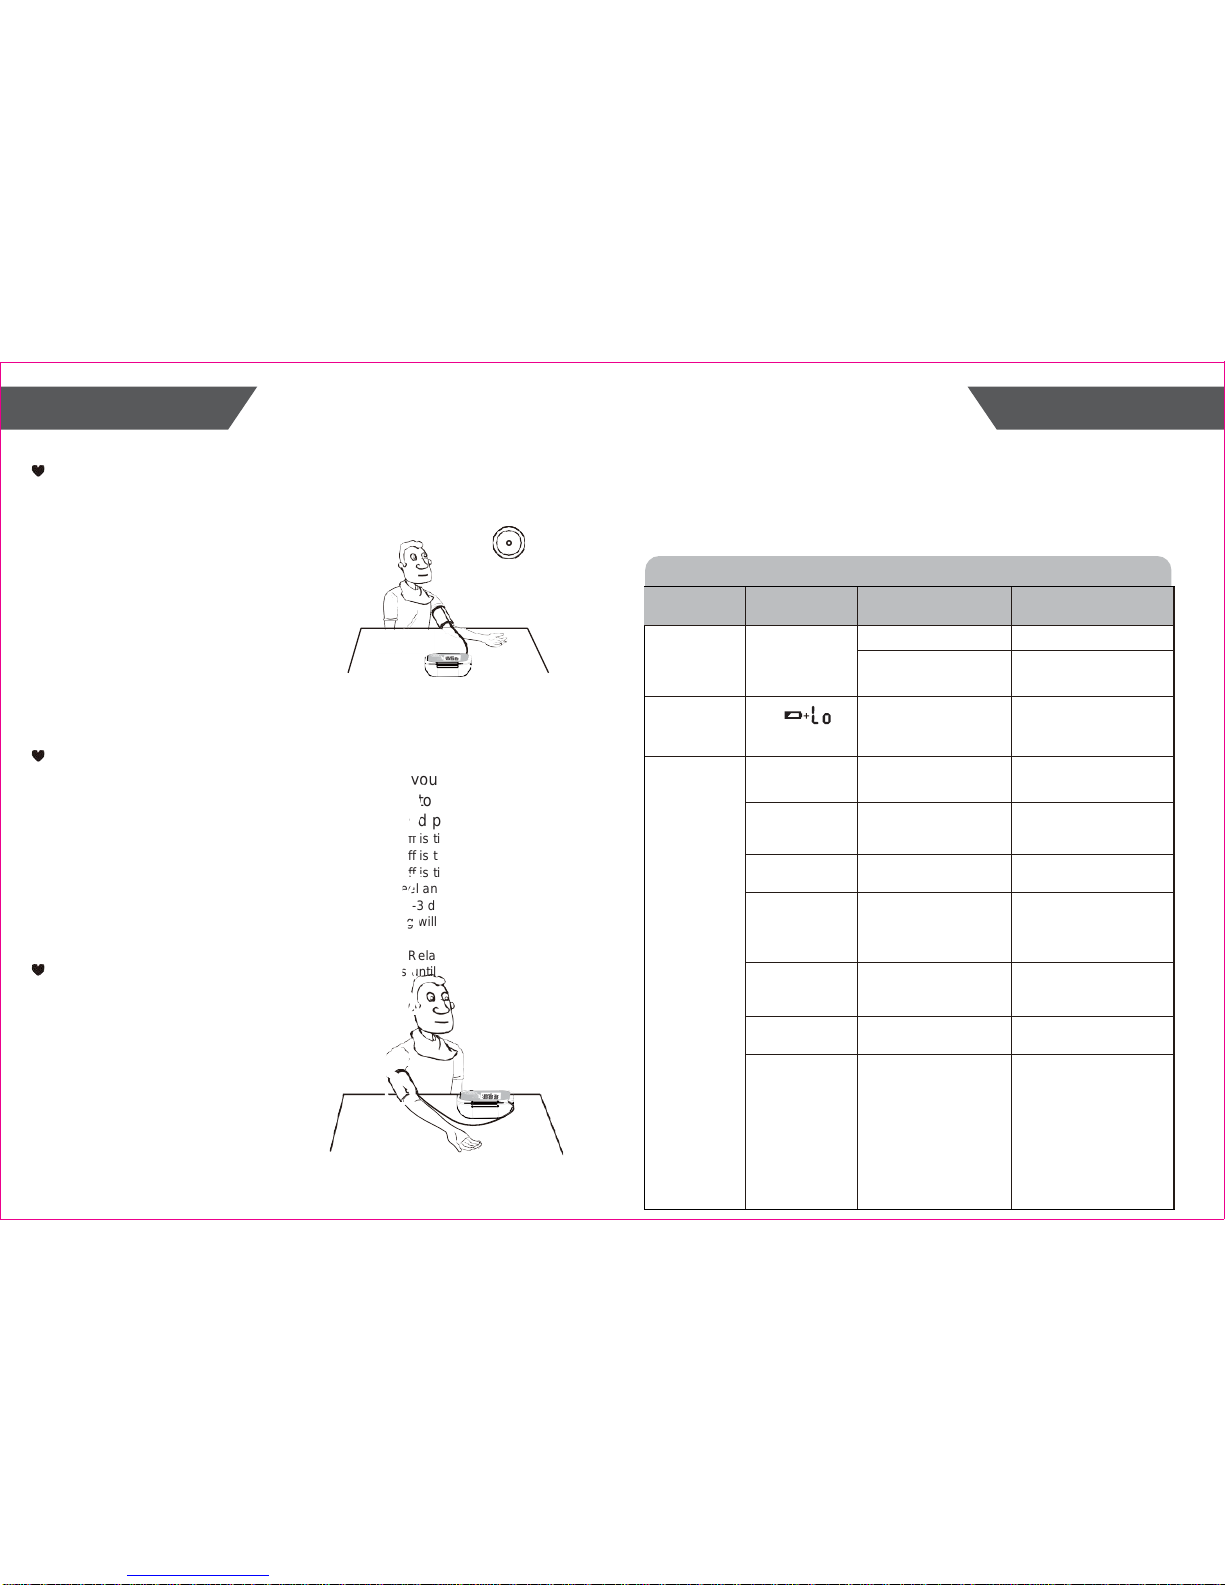
Start the Measurement
1.
When the monitor is off,
press the “START/STOP” button to turn on
the monitor, and it will finis h the whole
measurement .
Tips for Measurement
Measurements may be inaccurate if taken in the following
circumstances.
LCD display Adjust to zero.
Within 1 hour
after dinner or drinking
Immediate measurement
after tea, coffee, smoking
Inflating and measuring. Display the result.
Within 20 mi nutes
after taking a bath
When talkin g or moving yo ur f ingers
2. Press the “START/STOP” to power
off, otherwise it will turn off
within 1 minute.
In a very cold environment
When you want to discharge urine
Page 8

8 9
Page 9
INFORMATION FOR USER ABOUT BLOOD PRESSURE
Maintenance
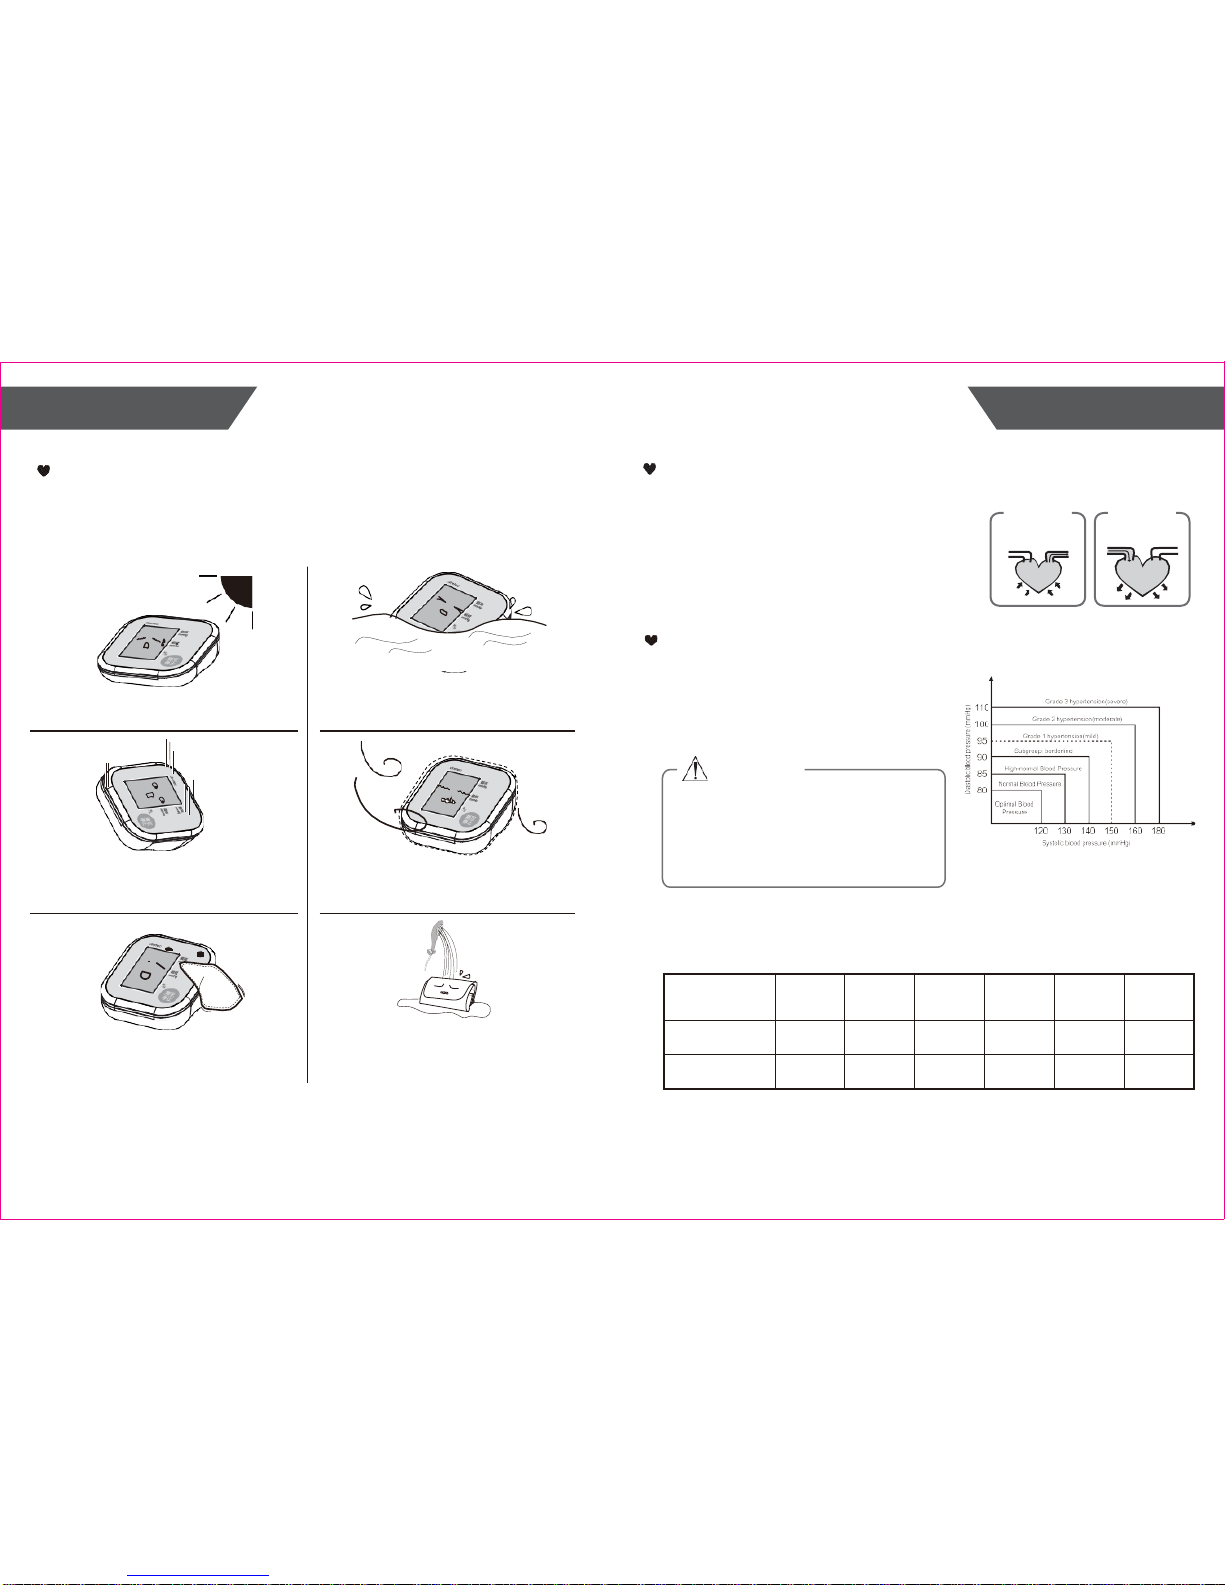
In order to get the best performance, please follow the
What are systolic pressure and diastolic pressure?
instructions below.
When ventricles contract and pump blood
out of the heart, the blood pressure reaches
Systolic
blood disc har ging
Diastolic
blood entering
its maximum value in the cycle, which is called
systolic pressure. When the ventricles relax,
the blood pressure reaches its minimum value
in the cycle, which is called diastolic pressure.
artery
vein
press
relax
What is the standard blood pressure classification?
Put in a dry place and
avoid the sunshine
Avoid intense shaking
and collisi ons
Using wet cloths to
remove dirt
Avoid touching water,
clean it with a dry cloth in case.
Avoid dusty a nd unstabl e
temperature environment
Do not attempt to clean the
resuable cuff with water and
never immerse the cuff i n w ater.
The blood pressure classification
published by World Health Organization
(WHO) and International Society of
Hypertension (ISH) in 1999 is as follows:
CAUTION
Only a physi c ian can tell your normal BP ran ge.
Please contact a phys ician if your measuring
result falls out of the range.
Please note that only a physician can tell
whether your blood pressure value has reached
a dangerous point.
Level
Blood
Pressure (mm Hg)
Optimal
Normal
High-normal
Mild
Moderate
Severe
SYS
<120
120-129
130-139
140-159
160-179
≥180
DIA
<80
80-84
85-89
90-99
100-109
≥110
Page 10

10 11
Page 11
ABOUT BLOOD PRESSURE TROUBLESHOOTING
Why does my blood pressure
fluctuate throughout the
day?
1.
Individual blood pressure varies
multiple times everyday. It is also affected
by the way you tie your cuff and your
measurement position, so please take the
measurement under the same conditions.
2.
If the person takes medicine, the
pressure will vary more.
3.
Wait at least 3 minutes for another
measurement.
This section includes a list of error messages and frequently
asked questions for problems you may encounter with your blood
pressure monitor. If the products not operating as you think it
should, check here before arranging for service.
Why do I get a different
blood pressure at home
compared to the hospital?
The blood pressure is different even
throughout the day due to weather,
emotion, exercise etc, Also, there is the
“white coat” effect, which means blood
pressure usually increases in clinical
settings.
Is the result the same
if measuring on the
right arm?
What you need t o pay
attention to when you measure
your blood pre ssure at home:
If the cuff is tied properly.
If the cuff is too tight or too loose.
If the cuff is tied on the upper arm.
If you feel anxious.
Taking 2-3 deep breaths before
beginning will be better for
measuring.
Advice: Relax yourself for 4-5
minutes until you calm down.
It is ok for both arms, but there
will be some different res ults f or
different people. We suggest you
measure the same arm every time.
PROBLEM SYMPTOM CHECK THIS
REMEDY
No power
Display will not
light up.
Batteries are exhausted.
Replace with new batteries
Batteries are inserted
incorrectly.
Insert the batteries
correctly
Low
batteries
Display is dim or
show
Batteries are low.
Replace with new batteries
Error
message
E 1 shows
The cuff is not secure.
Refasten the cuff and then
measure again.
E 2 shows
The cuff is very tight
Readjust the cuff ,not too
loose or too tight and then
measure again.
E 3 shows
The pressure of the
cuff is excess.
Relax for a moment
and then measure again.
E10 or E11
shows
The monitor detected
motion,talking or the
pluse is too poor
while measuring.
Relax for a
moment and then
measure again.
E20 shows
The measurement
process
does not detect
the pulse signal.
Loosen the clothing on the
arm and then measure
again
E21 shows
The treatment of the
measurement failed.
Relax for a moment and
then measure again.
EExx,shows on
the display.
A calibration error
occurred.
Retake the measurement.
If the problem persists,
contact the retailer or our
customer service
department for further
assistance.Refer to the
warranty for contact
information and return
instructions.
Page 12

12 13
SPECIFICATIONS CONTACT INFORMATION
Contact Information
WARNING: No modification of this equipment is allowed.
14 15
Power supply
Battery powered mode:
6VDC 4×AAA batteries
Display mode
Digital LCD V.A.60mm×40.5mm
Measurement mode
Oscillographic testing mode
Measurement range
Rated cuff pressure: 0mmHg~300mmHg
Measurement pressure: 40mmHg-230mmHg
Pulse value: (40-199) beat/minute
Accuracy
Pressure:
5℃-40℃within±3mmHg
Pulse value:±5%
Normal working
condition
Temperature:5℃ to 40
℃
Relative humidity: ≤85%RH
Storage &
transportation
condition
Temperature:-20℃-60
℃
Relative Humidity: 10%RH-93%RH
Measurement perimeter
of the upper arm
About 22cm~32cm
Net Weight
Approx.170g(Excluding the dry cells and cuff)
External dimensions
Approx.110mm×110mm×41mm
Attachment
4×AAA batteries, user manual
Mode of operation
Continuous operation
Degree of protection
Type BF applied part
Page 13

EMC GUIDANCE
EMC Guidance
1)
This equipment needs to be installed and put into service in accordance with
the information provided in the user manual;
2)
Wireless communications equipment such as wireless home network
devices, mobile phones, cordless telephones and their base stations,
walkie-talkies can affect this equipment and should be kept at least a distance
d=3,3m away from the equipment.
(Note: As indicated in Table 6 of IEC 60601-1-2:2007 for ME EQUIPMENT, a
typical cell phone with a maximum output power of 2 W yields d=3, 3m at an
IMMUNITY LEVEL of 3V/m)
16 17
 Loading...