


DRESTER RDX 9012
“DRESTER DYNAMIC TRIPLE 9000”
ENGLISH
DEUTSCH
FRANÇAIS
SVENSKA
ITALIANO
ESPAÑOL
INSTR: 11143 REV: 030429/Bom GODK: SID: 1/37

**********ENGLISH**********
CONTENTS
PAGE:
3 APPLICATION
3 ASSEMBLY
3 PLACING THE UNIT
3 COLLECTING TRAY
3 PREPARATIONS BEFORE INSTALLATION
4 INSTALLATION
5 PREPARATIONS FOR USE
5 OPERATING MANUAL
5 Operating instructions for the “Drester Dynamic Triple”
6 What to do when you run out of solvent
6 Recycling foreign solvent
7 PERMITTED SOLVENTS
7 SAFETY INFORMATION
7 SERVICE
7 WARRANTY
7 TECHNICAL DATA
2

APPLICATION
The DRESTER RDX 9012 is the Docking Unit that, when connected to the DRESTER 9000 Gun Cleaner and DRESTER 120
Recycler forms the closed system called the “DRESTER DYNAMIC TRIPLE 9000”. This brings safe handling of both clean and
contaminated solvent. The system eliminates heavy lifting and handling of solvent drums. It minimises solvent losses, and speeds
up the work.
This manual describes the DRESTER RDX 9012 Docking Unit, how to install it, and how to operate the complete “DRESTER
DYNAMIC TRIPLE 9000” system. The DRESTER 9000 Gun Cleaner is described in detail in manual no. 10259. The DRESTER
120 Recycler is described in detail in manual no. 11213. The descriptions below also apply to the DRESTER 9000-TT Gun
Cleaner.
ASSEMBLY
The DRESTER RDX 9012 Docking Unit is supplied complete in a box. The unit does not require any further assembly. The
Docking Unit is installed in accordance with the instructions below with the aid of the enclosed accessories.
Note: Air lines for compressed air and associated couplings (for 1/4” internal thread) must be supplied by the purchaser.
PLACING THE UNIT
The DRESTER RDX 9012 is placed inside the DRESTER 9000. The DRESTER 9000 with RDX 9012 are equipment Category 2
(ref. ATEX-directive 94/9 EC) and may therefore be placed in locations classified as Zone 1 (ref. ATEX-directive 1999/92 EC). If
the DRESTER 9000 with RDX 9012 are installed in locations classified as Zone 2 (or in unclassified locations), the area within a
radius of 1 m from the DRESTER 9000 with RDX 9012 is to be classified as Zone 1, and within a radius of an additional 2.5 m
from the unit as Zone 2 (total classification: 3.5 m around the machinery and 1 m above it). Within this area, all equipment such as
electrical items must be approved for the Zones described. Equipment that generates naked flames or sparks (e.g. welding or
grinding equipment) may not be used in this area. Smoking is not permitted.
If in any doubt, contact the local fire service authorities for advice.
Always ensure that the unit is correctly grounded.
This manual is part of the equipment and must be kept accessible at all times.
COLLECTING TRAY
To prevent accidental leakage of solvent that runs onto the floor from spreading into a drain water system, the DRESTER 9000
with RDX 9012 must be installed in a location where floor and walls can hold the accidental leakage. If this is not possible, the
unit must be equipped with the “DRESTER COLLECTING TRAY 10250”.
PREPARATIONS BEFORE INSTALLATION
General
To ensure an effective, trouble-free installation of the DRESTER DYNAMIC TRIPLE 9000, the following preparations should be
made:
DRESTER 9000 Gun Cleaner
Install the Gun Cleaner according to manual no. 10259.
DRESTER 120 Recycler
Install the Recycler according to manual no. 11213. Note that the electrical installation must be carried out by a qualified
electrician.
Compressed air connection
By the Recycler, compressed air of 3–10 bar must be available.
By the Gun Cleaner, compressed air of 7–12 bar must be available.
If the supply of compressed air is between 7 and 10 bar, the system may be connected to the same outlet.
The compressed air supplied to the units must be clean and dry, otherwise it may cause damage to the pneumatic components of
the unit, which will invalidate any warranty claims.
Combined or separate
If the Recycler is to be installed at some distance from the Gun Cleaner, the “PIPING KIT 10810” will be required for installation.
Apart from components, this kit also includes manual no. 11161, which describes such an installation.
Air lines and couplings
Note: Air lines for compressed air and associated couplings (for 1/4” internal thread) must be supplied by the purchaser.
Solvents
60 litres of solvent are required to prime the “DRESTER DYNAMIC TRIPLE 9000” system.
3

INSTALLATION
(see illustration enclosure 11144)
At the Gun Cleaner
1. Remove the original suction hoses with their plugs from the Gun Cleaner’s pumps (see Picture 1).
2. Place the Docking Unit in the Gun Cleaner so that the “DRESTER RDX” label is facing the front. Run the Docking Unit’s
long hoses (black and white) through the left (or right) side-wall (see Picture 2).
3. Connect the Docking Unit’s short hoses (black and white) to the Gun Cleaner’s pumps (see Picture 4).
The black hose is connected to the lower pump.
The white hose is connected to the upper pump.
Now move the Docking Unit as far to the right as possible.
4. Cut off about 250 mm from the solvent return hose of the Gun Cleaner, then insert it in the Docking Unit (see Picture 3).
5. Insert the Gun Cleaner’s suction hose (black, 6 mm in diameter) for manual cleaning with clean solvent (marked with a white
cable tie) through the centre plug of the Docking Unit (see Picture 5).
6. Insert the Gun Cleaner’s suction hose (black, 6 mm in diameter) for manual cleaning with recirculating solvent (marked with a
black cable tie) in the front plug of the Docking Unit (see Picture 6).
7. Fit the maximum level indicator hose (transparent, 6 mm in diameter) onto the brass tube (see Picture 7).
8. Fit the two gas return hoses (transparent, 6 mm in diameter) onto the brass tubes (see Picture 8).
9. Connect the grounding cable (see Picture 9).
10. Disconnect the blue air line from the left side of the pressure regulator (see Picture 10).
11. Fit the control valve on the pressure regulator, and run the red hose through the left (or right) side-wall and place it with the
long black and white hoses (see Picture 11).
12. Connect the blue air line to the lower outlet fitting on the left side of the control valve. Connect the black hose for the Docking
Unit’s pumps to the upper outlet fitting on the left side of the control valve (see Picture 12).
The installation at the Gun Cleaner is now completed.
At the Recycler
1. Picture 13 shows the enclosed valve components.
2. Fit the console with the control valve on the right side of the Recycler (see Picture 14).
3. Remove the plug from the solvent inlet and fit the 90º-coupling. If necessary, use the enclosed bushing (1/4 -3/8”).
Then fit the brass connector (see Picture 15).
4. Connect the solvent hose (black with protective metal hose, see Picture 16).
5. Connect the distillate hose (see Picture 17).
6. Picture 18 shows the distillate container with level indicator.
7. Place the distillate container underneath the Recycler and insert the distillate hose (see Picture 19).
8. Connect the suction hose for clean solvent (white with protective metal hose, see Picture 20).
9. Trim the hoses from the Gun Cleaner to the correct length (see Picture 21).
10. Connect the hoses from the Gun Cleaner. Note the colour-coding: white for clean solvent, and black for
contaminated solvent (see Picture 22).
11. Connect the red air line (see Picture 23).
12. Connect clean, dry compressed air of 3–10 bar to the control valve inlet (see Picture 24).
13. Tie the hoses together using the supplied cable ties (see Picture 25).
The installation at the Recycler is now completed and the “DRESTER DYNAMIC TRIPLE 9000” is ready to be taken into use
(see Picture 26).
Warning:
Make sure that all parts of the system are grounded (machines and drums).
4

PREPARATIONS FOR USE
Gun Cleaner – topping up with solvent
1. Open the lid of the Gun Cleaner.
2. Top up with 40-45 litres of solvent poured directly into the Gun Cleaner.
3. Close the lid.
Recycler – topping up with solvent
1. Remove the three clips from the cover of the distillate container and remove the cover. Take care to avoid damaging the
level indicator float.
2. Fill the distillate container with 12 litres of clean solvent, i.e. up to 100 mm from the top edge.
3. Refit the cover and secure it with the three clips.
Operating manual
This manual and the manuals for the Gun Cleaner and the Recycler must always be kept available and in legible condition by the
system. Pin up the plastic-covered operating manual (no. 11151) so that it is clearly visible in the immediate vicinity of the
Recycler. If necessary, it must also be translated into other languages spoken by the employees.
Service personnel
It is essential that the personnel gets special training in the system´s use. Only personnel who have undergone such training may
use the system.
Starting up for the first time
The system can now be taken into operation. Follow the “Operating instructions for the Drester Dynamic Triple” below and check
that there are no leaks from any of the connections.
OPERATING MANUAL
This operating manual applies to the complete DRESTER DYNAMIC TRIPLE system.
The DRESTER 9000 Gun Cleaner and DRESTER 120 Recycler are described in detail in their own manuals (nos. 10259 and
11213).
Operating instructions for the ”Drester Dynamic Triple”:
1. FIRST CHECK
* Check that the green lamp is lit and that the oil temperature has dropped to 50°C.
(This means that the Recycler is cold, ready to start and may be opened.)
* Check the plastic bag in the Recycler.
(This is a single-use disposable bag and must be replaced after each use. If the bag is full of solvent, check that the
distillate container under the Recycler is empty and then go directly to step 4.)
2. TRANSFERRING SOLVENT
* Start the pumps of the RDX Docking Unit.
(Open the control valve on the right side of the Recycler)
* Turn off the pumps when they start to pump air.
(Turn off the control valve after about 2–3 minutes)
3. SECOND CHECK
* Check that the level indicator of the distillate container is all the way down.
(If not, start the pumps again and let them run for a few more minutes. If the level indicator still does not drop to its lowest level,
then the feed hose is may be blocked or a pump faulty, in which case you should contact an authorised Drester retailer.)
* Check that the plastic bag in the Recycler is full of solvent.
(Roughly up to the level of the ring clamp holding the bag. If not, start the pumps again and let them run for a few more
minutes.
If the bag still is not full, then the feed hose may be blocked or a pump faulty, in which case you should contact an
authorised Drester retailer.)
4. CLOSE THE COVER AND START THE RECYCLER
* Note: Information about settings for time and temperature can be found in the manual for the Recycler, no. 11213, section 5.5.
5
What to do when you run out of solvent:
NO CLEAN SOLVENT IN GUN CLEANER
Do not top up with clean solvent
(See “Operating instructions for the Drester Dynamic Triple” above.)
NO RECIRCULATING SOLVENT IN GUN CLEANER
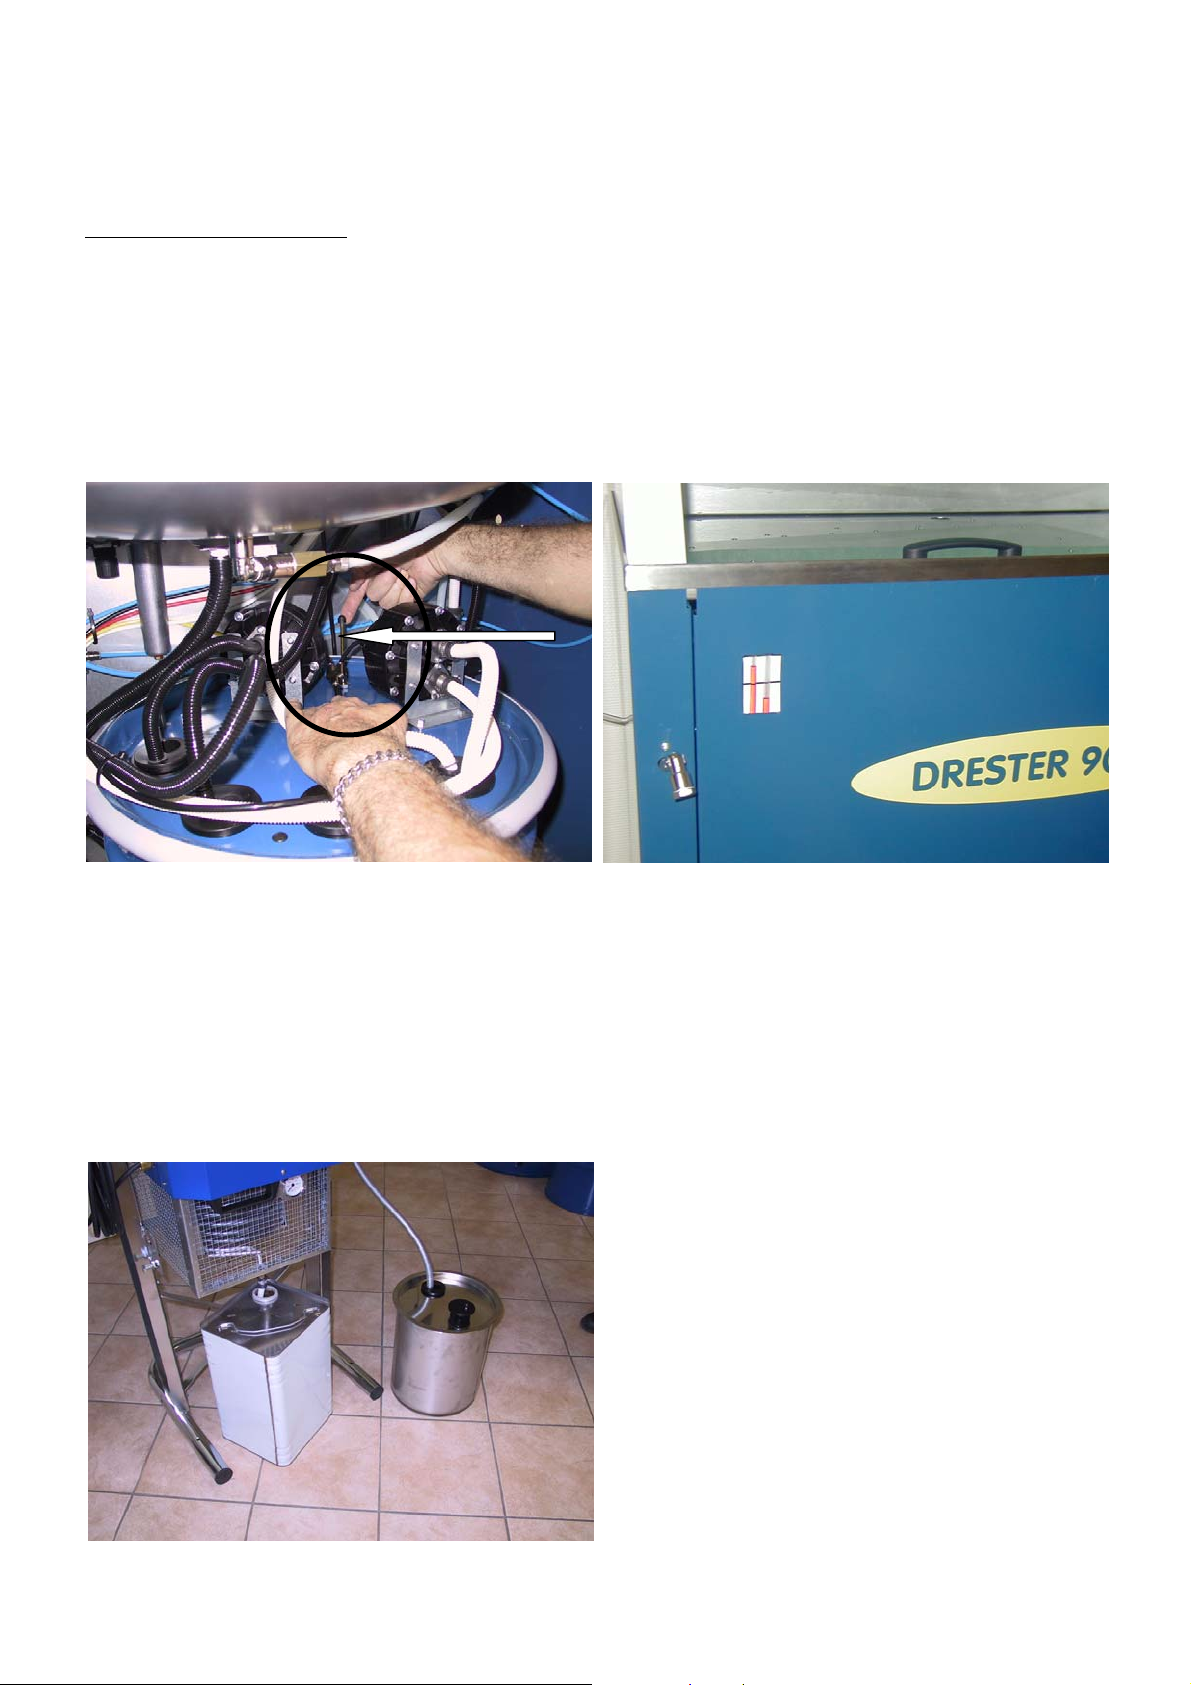
If the pump for the automatic cleaning cycle only pumps air and no solvent, there is not enough solvent in the Docking Unit. If
this is the case, pour 10 litres of solvent straight into the Gun Cleaner. Check that the level indicator can move freely and that it
sits at a height of 10–70mm. (See Picture below left)
The maximum level indicator on the Gun Cleaner shows when the solvent level is too high in the Docking Unit (by showing
different heights of the red fluid columns, see Picture below right). If this is the case, do not top up with more solvent, since the
recycler will then be overfilled at the next transfer.
, instead make a transferpumping and start the Recycler.
Recycling foreign solvent:
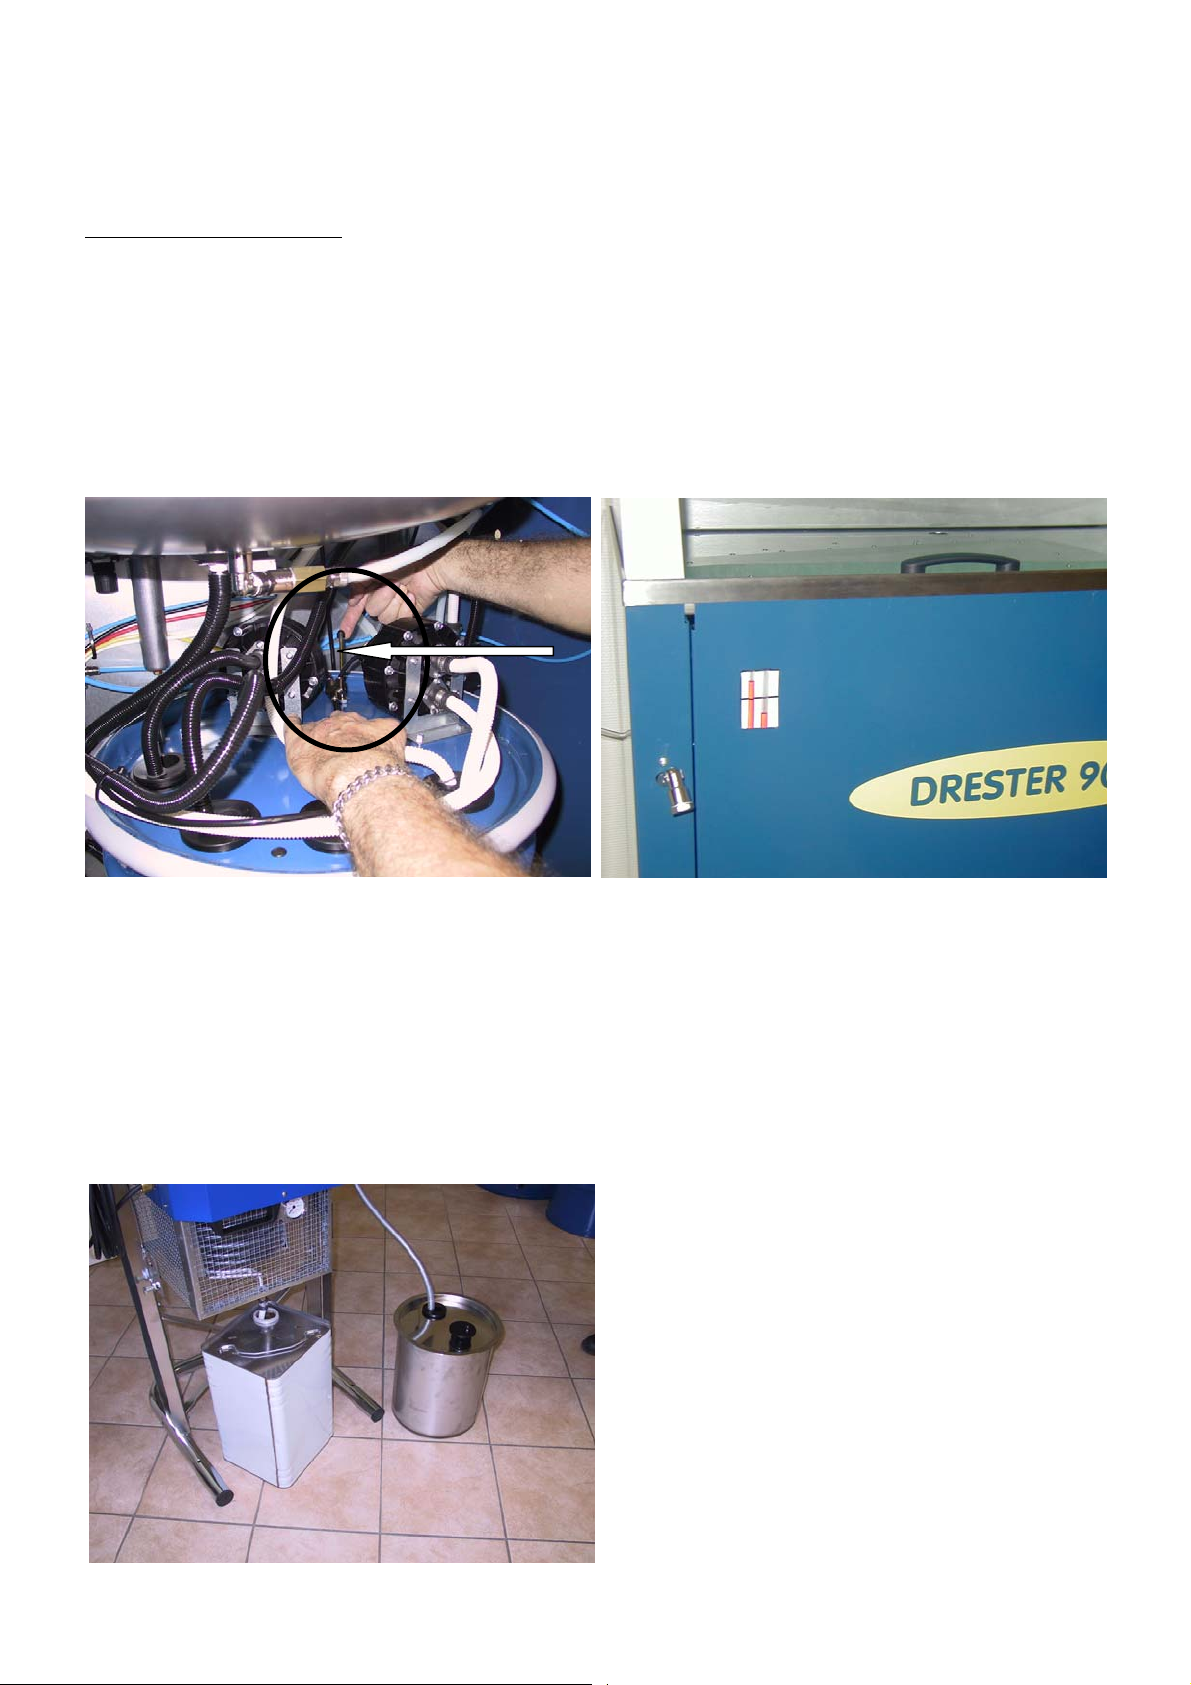
To recycle solvents that are not part of the system, follow the steps listed below:
1. Change the plastic bag in the Recycler
2. Move the distillate container to the side.
3. Place an empty drum that will hold at least 12 litres underneath the Recycler (see Picture below).
4. Fill the Recycler with dirty solvent (no more than 12 litres).
5. Close the lid of the Recycler and start the timer. Note: Information about settings for time and temperature can be found
in the manual for the Recycler, no. 11213, section 5.5.
When the distillation cycle is complete, put the distillate container back in place.
6

PERMITTED SOLVENTS
The machine can be used with all thinners and solvent mixtures, such as acetone, toluene, xylene, isobutanol (2-methylpropan-1ol) listed as Group IIA according to IEC 79-20 (EN 60079-20).
SAFETY INFORMATION
In order to maintain the high safety standard of the machine, you should ensure the following:
- that the system is installed in the manner prescribed in this manual
- that the machine is used in the manner prescribed in this manual
- that the machine is maintained in the manner prescribed in this manual
- that only original spare parts are used
- that this manual and the manuals for the Gun Cleaner and the Recycler are kept available and in legible condition nearby the
system.
Always wear protective gloves and goggles (solvent-resistant) when you work with the system, as well as additional personal
protective equipment when appropriate.
Personnel suffering from chronic respiratory problems or allergies to solvents must not operate the system.
A fire extinguisher must always be kept nearby when working with solvents.
SERVICE
Check daily that there are no leaks.
The DRESTER RDX Docking Unit must be removed, opened and cleaned out once a year. The authorised Drester retailer can
advise you further on this matter.
WARRANTY
Hedson Technologies AB will replace all faulty parts on the DRESTER RDX 9012 with new parts in accordance with the
“Warranty Terms for Hedson Technologies AB No. 7.2-8”. This warranty only remains valid if the machine is used in the
prescribed manner, and it does not cover the cost of repairs. Always state the machine’s serial number and year of manufacture if
making a claim under warranty. These can be found on the machine’s silver-coloured rating plate.
TECHNICAL DATA
Manufacturer HEDSON TECHNOLOGIES AB
Hammarvägen 4
SE-232 37 Arlöv
Sweden
+46-40-53 42 00
Type of machine DRESTER RDX 9012 Docking Unit
Solvent capacity Max. 80 litres
Compressed air needed Clean, dry air at 3–10 bar
Pump capacity 10 l/minute
Liquid pressure 2 bar
Weight 21 kg
Overall dimensions Height: 700 mm, max. diameter: 500 mm
Sound pressure level < 70 dB(A)
7

**********DEUTSCH**********
INHALTSVERZEICHNIS
SEITE:
9 VERWENDUNGSZWECK
9 MONTAGE
9 AUFSTELLUNG
9 AUFFANGWANNE
9 VORBEREITUNG ZUR INSTALLATION
10 INSTALLATION
11 VORBEREITUNG ZUM BETRIEB
11 BETRIEBSANLEITUNG
11 Handhabung des Systems „ Drester Dynamic Triple“
12 Maßnahmen bei Lösemittelmangel
12 Destillation von Fremdlösemittel
13 ZULÄSSIGE LÖSEMITTEL
13 SICHERHEITSINFORMATIONEN
13 WARTUNG
13 GARANTIE
13 TECHNISCHE DATEN
8

VERWENDUNGSZWECK
DRESTER RDX 9012 ist die Docking-Einheit, die mit dem DRESTER 9000 Pistolenreiniger und mit dem DRESTER 120
Destillationsgerät zu dem Kreislaufsystem ”DRESTER DYNAMIC TRIPLE 9000” zusammengeschlossen wird. Dadurch werden
Lösemittel, sowohl Frischware als auch verschmutzte Ware, sicher gehandhabt. Schweres Tragen und offenes Umfüllen entfallen
weitgehend. Dadurch werden Zeit, Mühe und Lösemittel gespart.
Diese Betriebsanleitung beschreibt die Docking-Einheit DRESTER RDX 9012, wie sie installiert wird und wie das ganze System
DRESTER DYNAMIC TRIPLE 9000 betrieben wird. Der DRESTER 9000 Pistolenreiniger wird im Detail in der
Betriebsanleitung Nr. 10259 beschrieben. Das DRESTER 120 Destillationsgerät wird im Detail in der Betriebsanleitung Nr.
11214 beschrieben. Die vorliegende Beschreibung ist auch für den Pistolenreiniger DRESTER 9000-TT zu verwenden.
MONTAGE
Die Docking-Einheit DRESTER RDX 9012 wird komplett in einem Karton geliefert. Sie erfordert keine weitere Montage. Sie
wird, wie unten beschrieben, mit den mitgelieferten Zubehörteilen installiert.
Hinweis: Druckluftanschlussschlauch mit dazu gehörenden Kupplungen (Innengewinde ¼”) müssen vom Betreiber gestellt
werden.
AUFSTELLUNG
DRESTER RDX 9012 wird in den DRESTER 9000 hineingestellt. DRESTER 9000 mit RDX 9012 entspricht der
Gerätekategorie „2“ (ATEX-Richtlinie 94/9 EG) und darf demnach in einem Arbeitsraum Zone 1 (ATEX-Richtlinie 1999/92 EG)
aufgestellt werden. Sollte DRESTER 9000 mit RDX 9012 in einen Arbeitsraum Zone 2 (oder in einem unklassifizierten Bereich)
aufgestellt werden, ist der Aufstellungsplatz im Umkreis von 1m zum DRESTER 9000 mit RDX 9012 wie Zone 1 und weitere
2,5 m um das Gerät wie Zone 2 zu betrachten (Klassifizierung insgesamt: 3,5 m um das Gerät und 1 m darüber). In diesem
Bereich muss alle Ausstattung wie z.B. elektrische Betriebsmittel für die entsprechende Zone zugelassen sein. Offenes Feuer oder
andere wirksame Zündquellen (z.B. Schweißgeräte, Schleifmaschinen usw.) sind verboten. Ebenso das Rauchen. Im Zweifelsfall
berät die Feuerwehr bzw. die zuständige Berufsgenossenschaft.
Auf guten Potentialausgleich (Erdung) der Geräte achten.
Diese Benutzerinformation ist Bestandteil des Geräts und ständig verfügbar aufzubewahren.
AUFFANGWANNE
Um zu vermeiden, dass bei einer Leckage Lösemittel unabsichtlich auf den Boden und infolgedessen ins Wassersystem gelangt,
muss DRESTER 9000 mit RDX 9012 in einem Raum aufgestellt werden, in dem dies durch z.B. undurchlässige Wände und
Fußböden verhindert wird. Wenn dies nicht möglich ist, muss das Gerät mit der Auffangwanne „DRESTER COLLECTING
TRAY 10250“ ausgestattet werden.
VORBEREITUNG ZUR INSTALLATION
Allgemeines
Um eine zeitsparende und reibungslose Installation durchführen zu können, sind folgende Vorbereitungen zur Installation der
DRESTER DYNAMIC TRIPLE 9000 erforderlich:
Pistolenreiniger DRESTER 9000
Pistolenreiniger gemäß Betriebsanleitung Nr. 10259 installieren.
Destillationsgerät DRESTER 120
Destillationsgerät gemäß Betriebsanleitung Nr. 11214 installieren. Dabei beachten, dass die elektrische Installation nur durch eine
Elektrofachkraft erfolgen darf.
Druckluftanschluss
Für die Steuerluft wird in der Nähe des Destillationsgerätes ein Druckluftanschluss von 3-10 bar benötigt.
Für die Betriebsluft des Pistolenreinigers ist in seiner Nähe ein Druckluftanschluss von 7-12 bar erforderlich.
Liegt die Druckluftversorgung zwischen 7 und 10 bar, kann das System an einem einzigen Anschluss betrieben werden.
Die Druckluft muss frei von Schmutzpartikeln und Feuchtigkeit sein. Anderenfalls ist mit Störungen der Funktion zu rechnen. In
diesem Fall erlöschen alle Garantieansprüche.
Zusammen oder getrennt
Wenn das Destillationsgerät entfernt von Pistolenreiniger installiert werden soll, wird „PIPING KIT 10810“ benötigt. Dieses Kit
enthält außer Komponenten auch die Benutzerinformation Nr. 11161, in der die Ferninstallation beschrieben wird.
Luftschlauch und Kupplungen
Hinweis: Druckluftanschlussschlauch mit dazuhörenden Kupplungen (Innengewinde ¼”) müssen vom Betreiber gestellt werden.
Lösemittel
Zum Auffüllen des Systems DRESTER DYNAMIC TRIPLE 9000 werden 60 Liter Lösemittel benötigt.
9

INSTALLATION
(siehe Bildbeilage 11144)
Am Pistolenreiniger
1. Original-Saugschläuche (mit Stopfen) von den Pumpen demontieren (siehe Bild 1).
2. Docking-Einheit im Pistolenreiniger so unterbringen, dass die Aufschrift „DRESTER RDX“ frontseitig sichtbar ist. Lange
Schläuche (schwarz und weiß) der Docking-Einheit durch die linke Seitenwand ziehen (siehe Bild 2).
3. Kurze Schläuche (schwarz und weiß) der Docking-Einheit an die Pumpen des Pistolenreinigers anschließen (siehe Bild 4):
Schwarz an die untere Pumpe.
Weiß an die obere Pumpe.
Danach die Docking -Einheit so weit wie möglich nach rechts hinten schieben.
4. Lösemittel-Rücklaufschlauch des Pistolenreinigers etwa 250 mm kürzen und in die Docking-Einheit einsetzen (siehe Bild 3).
5. Saugschlauch vom Pistolenreiniger (schwarz, φ6mm) für manuelle Reinigung mit sauberem Lösungsmittel (mit weißem
Kabelbinder markiert) in den mittigen Stopfen der Docking-Einheit hineinstecken (sieh e Bild 5).
6. Saugschlauch vom Pistolenreiniger (schwarz, φ6mm) für manuelle Reinigung mit umlaufendem Lösungsmittel (mit schwarzem
Kabelbinder markiert) in den vorderen Stopfen der Docking-Einheit hineinstecken (siehe Bild 6).
7. Schlauch des Max-Niveauindikators (farblos φ6mm) auf Messingstutzen aufschieben (siehe Bild 7).
8. Die zwei Gaspendelschläuche (farblos φ6mm) auf Messingstutzen aufschieben (siehe Bild 8).
9. Erdungskabel anschließen (siehe Bild 9).
10. Blauen Luftschlauch links am Druckregler des Pistolenreinigers abziehen (siehe Bild 10).
11. Steuerventil auf Druckregler montieren, anhängenden roten Schlauch durch die linke Seitenwand stecken und zu den
Transferschläuchen legen (siehe Bild 11).
12. Blauen Luftschlauch in unteren linken Ausgang des Steuerventils hineinstecken. Schwarzen Schlauch für die Pumpen der
Docking-Einheit in oberen linken Ausgang des Steuerventils stecken (siehe Bild 12).
Die Installation am Pistolenreiniger ist damit beendet.
Am Destillationsgerät
1. Bild 13 zeigt die mitgelieferte Ventilkomponenten.
2. Konsole mit Druckluftventil an der Seite des Destillationsgeräts montieren (siehe Bild 14).
3. Stopfen am Lösemitteleinlauf demontieren und Winkelkupplung montieren. Falls nötig, die beigelegte Gewindekupplung 1/4 -
3/8” benutzen. Danach Messinganschluss an Winkelkupplung montieren (siehe Bild 15).
4. Lösemittelschlauch (schwarz mit Metallschutzschlauch) anschließen (siehe Bild 16).
5. Destillatschlauch montieren (siehe Bild 17).
6. Bild 18 zeigt Destillatfass mit Niveauanzeiger.
Destillatfass unter das Destillationsgerät stellen und Destillatschlauch einstecken (siehe Bild 19).
7.
8. Saugschlauch für sauberes Lösemittel (weiß mit Metallschutzschlauch) anschließen (siehe Bild 20).
9. Schläuche vom Pistolenreiniger auf passende Länge kürzen (siehe Bild 21).
10. Schläuche vom Pistolenreiniger montieren. Auf die Farben achten: Weiß für sauberes Lösemittel und schwarz für
verschmutztes Lösemittel (siehe Bild 22).
11. Roten Luftschlauch anschließen (siehe Bild 23).
12. Den Eingang des Steuerventils an saubere und trockene Druckluft, 3-10 bar, anschließen (siehe Bild 24).
13. Schläuche mit beigefügtem Kabelbinder verbinden (siehe Bild 25).
Die Installation am Destillationsgerät ist damit beendet und die „DRESTER DYNAMIC TRIPLE 9000“ ist einsatzbereit (siehe
Bild 26).
Achtung:
Kontrollieren, dass alle Teile des Systems (Geräte und Fässer) vorschriftsmäßig geerdet sind.
10

VORBEREITUNG ZUM BETRIEB
Pistolenreiniger - Einfüllen von Lösemittel
1. Klappe des Pistolenreinigers öffnen.
2. 40-45 Liter Lösemittel direkt in den Pistolenreiniger füllen.
3. Klappe des Pistolenreinigers schließen.
Destillationsgerät - Einfüllen von Lösemittel
1. Am Deckel des Destillatfasses 3 Federbleche entfernen und den Deckel abnehmen. Darauf achten, dass der Schwimmer des
Niveauanzeigers nicht beschädigt wird.
2. 12 Liter sauberes Lösemittel in das Destillatfass einfüllen (d.h. bis auf 100 mm von der oberen Kante gemessen).
3. Den Deckel aufsetzen und die 3 gelösten Federbleche wieder anbringen.
Betriebsanleitung
Diese Betriebsanleitung sowie die Betriebsanleitungen für den Pistolenreiniger und das Destillationsgerät müssen immer in gut
lesbarer Form beim System vorhanden sein. Die Betriebsanweisung in Plastik (Nr. 11152) muss gut sichtbar in der Nähe vom
Destillationsgerät angebracht werden. Ggf. muss sie in die Sprache der Beschäftigten übertragen werden.
Bedienungspersonal
Es wird empfohlen, für den folgenden Ablauf betriebliche Zuständigkeiten zu schaffen. Nur hierfür eingewiesene Personen
dürfen diese Tätigkeiten ausführen.
Erstmalige Inbetriebnahme
Das System kann jetzt in Betrieb genommen werden. Dabei entsprechend der Betriebsanleitung Handhabung des Systems
„Drester Dynamic Triple“ vorgehen. Alle Verbindungen bei jedem Schritt auf Dichtheit kontrollieren.
BETRIEBSANLEITUNG
Diese Betriebsanleitung gilt für das komplette System DRESTER DYNAMIC TRIPLE. Der DRESTER 9000 Pistolenreiniger
und das DRESTER 120 Destillationsgerät werden weiter im Detail in ihrer entsprechenden Betriebsansleitungen Nr. 10259 und
11214 beschrieben.
Handhabung des Systems „Drester Dynamic Triple“:
1. ERSTE KONTROLLE
* Kontrollieren, ob das grüne Licht leuchtet und die Öltemperatur bis auf 50°C abgekühlt ist.
(Dies bedeutet: Das Destillationsgerät ist kalt, einsatzbereit und darf geöffnet werden)
* Den Plastikbeutel im Destillationsgerät kontrollieren
(Dieser Einmalbeutel muss für jeden Destillationsvorgang gewechselt werden. Sollte der Beutel voll Lösemittel sein,
sicherstellen, dass das Destillatfass unter dem Destillationsgerät leer ist. In diesen Fall weiter bei Punkt 4)
2. UMPUMPEN DES LÖSEMITTELS
* Die Pumpen der Docking-Einheit RDX starten
(Druckluftventil auf der rechten Seite des Destillationsgeräts öffnen)
* Die Pumpen abschalten, wenn sie anfangen, Luft zu pumpen
(d.h. Druckluftventil nach etwa 2-3 Minuten schließen)
3. ZWEITE KONTROLLE
* Kontrollieren, ob der Niveauanzeiger des Destillatfasses ganz unten ist.
(Falls nicht, die Pumpe noch einmal starten und einige Minuten laufen lassen. Wenn der Niveauanzeiger danach immer noch
nicht ganz unten ist, kann der Förderschlauch verstopft oder die Pumpe defekt sein. In diesem Fall mit dem Kundendienst
Kontakt aufnehmen)
* Kontrollieren, ob der Beutel im Destillationsgerät mit Lösemittel gefüllt ist.
(Niveau ca. bis am Klemmring des Beutels. Ist dies nicht der Fall, die Pumpe noch einmal starten und einige Minuten laufen
lassen. Ist der Beutel immer noch nicht gefüllt, kann der Förderschlauch verstopft oder die Pumpe defekt sein. In diesem Fall
mit dem Kundendienst Kontakt aufnehmen)
4. DAS DESTILLATIONSGERÄT SCHLIESSEN UND STARTEN
* Hinweis: Einstellung von Zeit und Temperatur siehe Betriebsanleitung des Destillationsgerätes, Nr. 11214 Abschnitt 5.5.
11
Maßnahmen bei Lösemittelmangel:
SAUBERES LÖSEMITTEL FEHLT IM PISTOLENREINIGER
Kein neues Lösemittel einfüllen
(Siehe Handhabung des Systems „Drester Dynamic Triple“ )
UMLAUFLÖSEMITTEL FEHLT IM PISTOLENREINIGER
Sollte die Pumpe für die automatische Vorwäsche am Pistolenreiniger nur Luft und kein Lösemittel pumpen, ist zu wenig
Lösemittel vorhanden. 10 Liter Lösemittel direkt in den Pistolenreiniger einfüllen. Kontrollieren , dass der Niveauanzeiger frei
beweglich ist, und 10-70 mm hoch steht (siehe Bild unten links).
Einen zu hohen Pegel des Lösemittels zeigt der Max-Niveauindikator am Pistolenreiniger an (unterschiedlicher Stand der
Flüssigkeitssäulen, siehe Bild unten rechts). Es darf dann kein Lösemittel mehr eingefüllt werden. Sonst wird d as
Destillationsgerät beim nächsten Umpumpen überfüllt.
, sondern das Destillationsgerät in Betrieb setzen.
Destillation von Fremdlösemittel:
1. Plastiktüte im Destillationsgerät wechseln.
2. Destillatfass an die Seite ziehen.
3. Ein anderes Fass mit einem Füllvolumen von mindestens 12 Litern unter das Destillationsgerät stellen (siehe Bild unten).
4. Fremdlösemittel einfüllen, max. 12 Liter.
5. Destillationsgerät schließen und mit dem Timer starten. Hinweis: Einstellung von Zeit und Temperatur siehe
Betriebsanleitung des Destillationsgerätes, Nr. 11214 Abschnitt 5.5.
Wenn der Destillationsvorgang beendet ist, soll das Destillatfass unter das Destillationsgerät zurückgestellt werden.
12

ZULÄSSIGE LÖSEMITTEL
Waschverdünnung, Mischungen von Lösemitteln wie z.B. Aceton, Toluol, Xylol, Isobutanol (2-Methylpropan-1-ol) die laut IEC
79-20 (EN 60079-20) der Gruppe IIA zugeordnet sind.
SICHERHEITSINFORMATIONEN
Um die Sicherheit des Systems zu gewährleisten, müssen folgende Punkte befolgt werden:
- Das System muss laut Vorgabe installiert werden.
- Das System muss bestimmungsgemäß betrieben werden.
- Die Wartung des Systems muss laut Vorgaben ausgeführt werden.
- Es darf nur Originalersatzteile verwendet werden.
- Diese Betriebsanleitung, sowie die Betriebsanleitungen für den Pistolenreiniger und das Destillationsgerät,
muss immer in gut lesbarer Form beim System vorhanden sein.
Beim Bedienen des Systems müssen lösemittelfeste Schutzhandschuhe benutzt werden.; ggf. weitere Persönliche
Schutzausrüstung.
Personen mit chronischen Atembeschwerden und allergischen Reaktionen gegen die verwendeten Lösemittel dürfen nicht an dem
Gerät beschäftigt werden.
Ein Handfeuerlöscher muss immer im Aufstellungsraum vorhanden sein.
WARTUNG
Regelmäßig kontrollieren, dass keine Leckage vorhanden ist.
Die Docking-Einheit DRESTER RDX ist jährlich mindestens einmal zu demontieren und zu reinigen. Anfragen beantwotet der
Drester-Distributor jeder Zeit gerne.
GARANTIE
Für DRESTER RDX 9012 übernimmt Hedson Technologies AB eine Garantie für fehlerhafte Teile laut „Warranty Terms for
Hedson Technologies AB Nr. 7.2-8”. Die Garantie erlischt bei unsachgemäßem Gebrauch sowie bei Fremdeinwirkungen und
deckt keine Reparaturarbeiten. Bei Garantieansprüchen sind stets die Seriennummer und das Baujahr anzugeben. Diese Angaben
befinden sich auf dem silbernen Fabrikschild des Geräts.
TECHNISCHE DATEN
Hersteller HEDSON TECHNOLOGIES AB
Hammarvägen 4
SE-232 37 Arlöv
Schweden
+46-40-53 42 00
Gerätetyp Docking-Einheit DRESTER RDX 9012
Fassungsvermögen Lösemittel Max. 80 Liter
Druckluftanschluss Trockene, saubere Luft von 3-10 bar
Pumpenförderleistung 10 l/min, wenn aufgefüllt
Lösemitteldruck 2 bar
Gewicht 21 kg
Maße Höhe: 700 mm, Max. Durchmesser: 500 mm
Schalldruckpegel < 70 dB(A)
13

**********FRANÇAIS**********
SOMMAIRE
PAGE :
15 DOMAINES D’UTILISATION
15 MONTAGE
15 EMPLACEMENT
15 RÉCIPIENT COLLECTEUR
15 PRÉPARATIONS AVANT L’INSTALLATION
16 INSTALLATION
17 PRÉPARATIONS AVANT LA MISE EN SERVICE
17 MODE D’EMPLOI
17 Mode d’emploi du système « Dynamic Triple Drester »
18 Mesures en cas d’absence de solvant
18 Distillation de solvants étrangers
19 SOLVANTS AUTORISÉS
19 CONSIGNES DE SÉCURITÉ
19 ENTRETIEN
19 GARANTIE
19 CARACTÉRISTIQUES TECHNIQUES
14

DOMAINES D’UTILISATION
DRESTER RDX 9012 est une unité d’amarrage qui, connectée au laveur de pistolets DRESTER 9000 et au recycleur DRESTER
120, constitue le système en circuit fermé « DYNAMIC TRIPLE DRESTER ». Ce système garantit une manipulation fiable et de
toute sécurité aussi bien des solvants neufs que des solvants usagés. Les astreignantes opérations de levage du solvant sont
éliminées ce qui facilite et accélère le travail. En outre, les pertes de solvant sont réduites au minimum.
Ce mode d’emploi décrit l’unité d’amarrage DRESTER RDX 9012, son installation et de quelle manière le système « DYNAMIC
TRIPLE DRESTER » est utilisé. Le laveur de pistolets DRESTER 9000 est décrit en détail dans le manuel n° 10259. Le recycleur
DRESTER 120 est décrit en détail dans le manuel n° 11215. Les descriptions ci-après concernent également le laveur de pistolets
DRESTER 9000-TT.
MONTAGE
L’unité d’amarrage DRESTER RDX 9012 est livrée complète dans un carton. Elle ne nécessite aucun montage supplémentaire.
L’installation de l’unité d’amarrage s’effectue à l’aide des accessoires fournis à la livraison, conformément aux descriptions du
présent manuel. Remarque: Les tuyaux d’air comprimé et les raccords (filetage femelle 1/4” ) doivent être fournis par l’acheteur.
EMPLACEMENT
DRESTER RDX 9012 se place à l’intérieur de DRESTER 9000. DRESTER 9000 avec RDX 9012 constitue un équipement de
Catégorie 2 (cf. directive ATEX n° 94/9/CE) et peut donc être placé dans un espace de travail classé comme Zone 1 (cf. directive
ATEX n° 1999/92 CE). Si DRESTER 9000 avec RDX 9012 est installé dans un espace de travail classé comme Zone 2 (ou non
classé), le lieu de l’installation est classé comme Zone 1 dans un rayon d’1 mètre autour de DRESTER 9000 avec RDX 9012, et
comme Zone 2 dans un rayon supérieur de 2,5 mètres (soit, pour le classement, un rayon total de 3,5 mètres autour de la machine
et 1 mètre au-dessus). Tous les équipements se trouvant dans ce rayon, p.ex. les installations électriques, doivent être homologués
pour les zones respectives. Aucun feu ouvert ou équipement pouvant produire des étincelles (par exemple une unité de soudage,
une ponceuse, etc.) ne sont autorisés. Il est également interdit de fumer.
En cas de doute, contacter les services pompiers locaux.
Vérifier que la machine est correctement mise à la terre.
Ce manuel fait partie de l’équipement et doit être conservé de manière à être toujours accessible.
RÉCIPIENT COLLECTEUR
Afin d’empêcher qu’une éventuelle fuite de solvant ne se répande sur le sol et n’atteigne une bouche d’égout, DRESTER 9000
avec RDX 9012 doit être placé dans un local dont les murs et le sol tolèrent les fuites de solvant. Si cela n’est pas possible, la
machine doit être équipée d’un récipient collecteur « DRESTER COLLECTING TRAY 10250 ».
PRÉPARATIONS AVANT L’INSTALLATION
Généralités
Les préparations suivantes sont nécessaires pour que l’installation du DYNAMIC TRIPLE DRESTER 9000 s’effectue
efficacement et sans problème :
Laveur de pistolets DRESTER 9000
Installer le laveur de pistolets conformément aux instructions figurant dans le manuel n° 10259.
Recycleur DRESTER 120
Installer le recycleur conformément aux instructions figurant dans le manuel n° 11215. Remarque : L’installation électrique ne
peut être effectuée que par un électricien agréé.
Raccordement de l’air comprimé
Le recycleur nécessite un raccord d’air comprimé de 3-10 bars (air de commande).
Le laveur de pistolets nécessite un raccord d’air comprimé de 7-12 bars (air d’entraînement).
Si le raccord d’air comprimé est de 7 à 10 bars, le système peut être connecté à un seul et même raccord.
L’air comprimé doit être sec et propre, faute de quoi les composants pneumatiques de la machine risquent d’être endommagés,
auquel cas la garantie de la machine sera annulée.
Ensemble ou séparément
Si le recycleur doit être installé à une certaine distance du laveur de pistolets, le kit de tuyaux « PIPING KIT 10810 » est
nécessaire à l’installation. Outre les composants, il contient le manuel n° 11161, dans lequel l’installation est décrite.
Tuyaux pneumatiques et raccords
Remarque : Les tuyaux d’air comprimé et les raccords correspondants (filetage femelle 1/4”) doivent être fournis par l’acheteur.
Solvant
Le remplissage du système DRESTER DYNAMIC TRIPLE 9000 nécessite 60 litres de solvant.
15

INSTALLATION
(voir l’annexe des illustrations 11144)
Sur le laveur de pistolets
1. Démonter les tuyaux d’aspiration d’origine des pompes (y compris leurs bouchons) (voir l’illustration 1).
2. Placer l’unité d’amarrage dans le laveur de pistolets de manière à ce que l’autocollant « DRESTER RDX » soit visible à
l’avant. Passer les tuyaux longs (noirs et blancs) à travers la paroi gauche (ou droite) (voir l’illustration 2).
3. Connecter les tuyaux courts (noirs et blancs) de l’unité d’amarrage aux pompes du laveu r de pistolets (voir l’illustration 4):
Tuyau noir sur la pompe inférieure.
Tuyau blanc sur la pompe supérieure.
Placer ensuite l’unité d’amarrage le plus à droite possible.
4. Raccourcir d’environ 250 mm le tuyau de retour du solvant sur le laveur de pistolets avant de le passer dans l’unité d’amarrage
(illustration 3).
5. Passer le tuyau d’aspiration du laveur de pistolets (tuyau noir de φ 6mm) destiné au nettoyage manuel avec du solvant propre
(signalé par un collier de serrage blanc) à travers le bouchon du milieu sur l’unité d’amarrage (voir l’illustration 5).
6. Passer le tuyau d’aspiration du laveur de pistolets (tuyau noir de φ 6mm) destiné au nettoyage manuel avec du solvant en
circulation (signalé par un collier de serrage noir) dans le bouchon antérieur de l’unité d’amarrage (voir l’illustration 6).
7. Brancher le tuyau de l’indicateur de niveau maximal (tuyau transparent de φ 6mm) sur le tuyau en laiton (voir l’illustration 7).
8. Brancher les deux tuyaux de retour de gaz (tuyaux transparents de φ 6mm) sur les tuyaux en laiton (voir l’illustration 8).
9. Brancher le fil de terre (voir l’illustration 9).
10. Démonter le tuyau d’air bleu sur le côté gauche du régulateur de pression (voir l’illustration 10).
11. Monter la valve de commande sur le régulateur de pression, passer le tuyau rouge à travers la paroi latérale gauche (ou droite)
et placez-le près des longs tuyaux noirs et blancs (voir l’illustration 11).
12. Brancher le tuyau d’air bleu du côté gauche de la valve de commande sur le nippel de sortie inférieur. Brancher le tuyau noir
des pompes de l’unité d’amarrage sur le nippel de sortie supérieur (voir l’illustration 12).
L’installation sur le laveur de pistolets est maintenant terminée.
Sur le recycleur
1. Composants pneumatiques livrés avec la machine (illustration 13).
2. Monter la console avec la valve d’air comprimé sur la paroi droite du recycleur (voir l’illustration 14).
3. Démonter le bouchon sur l’admission du solvant et monter le raccord en T. En cas de besoin, utiliser le manchon fourni à la
livraison (1/4 - 3/8”). Monter ensuite le raccord en laiton sur le raccord en T (voir l’illustration 15).
4. Brancher le tuyau du solvant (noir avec boyau protecteur métallique, voir l’illustratio n 16).
5. Monter le tuyau du distillat (voir l’illustration 17).
6. Récipient collecteur avec indicateur de niveau (illustration 18).
7. Placer le récipient collecteur sous le recycleur et y mettre le tuyau du distillat (voir l’illustration 19).
8. Brancher le tuyau d’aspiration du solvant propre (blanc avec boyau protecteur métallique, voir l’illustration 20).
9. Couper les tuyaux en provenance du laveur de pistolets à la longueur appropriée (voir l’illustration 21).
10. Monter les tuyaux du laveur de pistolets. Noter les couleurs. Blanc pour le solvant propre et noir pour le solvant sale (voir
l’illustration 22).
11. Brancher le tuyau d’air rouge (voir l’illustration 23).
12. Connecter l’entrée de la valve de commande à de l’air comprimé sec et propre d’une pression de 3-10 bars (voir l’illustration
24).
13. Attacher les tuyaux à l’aide du collier de serrage fourni à la livraison (voir l’illustration 25).
L’installation sur le recycleur est maintenant terminée et le système DYNAMIC TRIPLE DRESTER 9000 est prêt à être mis en
service (voir l’illustration 26).
Avertissement !
Contrôler que tout le système est mis à la terre (machines et récipient).
16

PRÉPARATIONS AVANT LA MISE EN SERVICE
Laveur de pistolets – Remplissage du solvant
1. Ouvrir le couvercle sur le laveur de pistolets.
2. Verser 40 à 50 litres de solvant directement dans le laveur de pistolets.
3. Refermer le couvercle.
Recycleur – Remplissage de solvant
1. Retirer les trois rondelles à ressort du couvercle du récipient collecteur et enlever le couvercle. Veiller à ne pas endommager le
flotteur de l’indicateur de niveau.
2. Remplir le récipient de 12 litres de solvant propre, c.-à-d. jusqu’à environ 100 mm du bord supérieur.
3. Remettre en place le couvercle et les trois rondelles à ressort.
Mode d’emploi
Ce manuel ainsi que les manuels se rapportant au laveur de pistolets et au recycleur doivent toujours être à proximité du système
et en bon état de visibilité. La carte plastifiée résumant le mode d’emploi (n° 11154) doit être placée sur le mur, le plus près
possible du recycleur, et être bien visible. En cas de besoin, les instructions doivent être traduites dans d’autres langues que
parlent les employés.
Personnel d’entretien
Il est recommandé de faire suivre au personnel une formation sur le fonctionnement du système. Seules les personnes ayant suivi
cette formation sont autorisées à utiliser le système.
Première mise en service
Le système peut maintenant être mis en service. Suivre les consignes du Mode d’emploi du système « Dynamic Triple Drester » et
contrôler que tous les raccords sont étanches.
MODE D’EMPLOI
Ce mode d’emploi concerne le système complet DYNAMIC TRIPLE DRESTER. Le laveur de pistolets DRESTER 9000 et le
recycleur DRESTER 120 sont décrits en détails dans leurs modes d’emploi respectifs (n°s 10259 et 11215).
Mode d’emploi du système « Dynamic Triple Drester » :
1. PREMIER CONTRÔLE
* Contrôler que le voyant vert est allumé et que la température de l’huile est tombée à 50 °C.
(Ceci indique que le recycleur est froid, prêt à être mis en marche et peut être ouvert.)
* Contrôler le sac en plastique dans le recycleur.
(Ce sac étant à usage unique, il doit être remplacé après chaque distillation. Si le sac est plein de solvant, contrôler que le
récipient collecteur sous l’unité est vide. Passer ensuite directement au point 4.)
2. POMPAGE DE TRANSFERT DU SOLVANT
* Démarrer les pompes de l’unité d’amarrage RDX.
(Ouvrir la valve de l’air comprimé sur le côté droit du recycleur.)
* Arrêter les pompes quand elles commencent à pomper de l’air.
(Fermer la valve de l’air comprimé après environ 2 à 3 minutes.)
3. DEUXIÈME CONTRÔLE
* Contrôler que l’indicateur de niveau dans le récipient collecteur est tout en bas.
(Sinon, démarrer de nouveau la pompe et la laisser tourner quelques minutes. Si l’indicateur de niveau ne descend toujours pas,
soit le tuyau d’alimentation est bouché, soit la pompe est défectueuse. Dans ce cas, contactez votre distributeur Drester.)
* Contrôler que le sac dans le recycleur est rempli de solvant.
(Le solvant doit être environ au niveau de la bague de serrage du sac. Sinon, démarrer de nouveau les pompes et les laisser
tourner quelques minutes. Si le sac ne se remplit toujours pas, soit le tuyau d’alimentation est bouché, soit la pompe est
défectueuse. Dans ce cas, contactez votre distributeur Drester.)
4. FERMER LE COUVERCLE ET DÉMARRER LE RECYCLEUR
* Remarque : Pour savoir comment régler la minuterie et la température, consulter la section 5.5 du manuel n° 11215 se rapportant
au recycleur.
17

Mesures en cas d’absence de solvant:
PAS DE SOLVANT PROPRE DANS LE LAVEUR DE PISTOLETS
Ne pas ajouter de solvant.
(Voir le Mode d’emploi du Système « Dynamic Triple Drester »)
PAS DE SOLVANT EN CIRCULATION DANS LE LAVEUR DE PISTOLETS
Si la pompe de prélavage automatique pompe uniquement de l’air mais pas de solvant, cela signifie qu’il n’y a pas suffisamment
de solvant dans l’unité d’amarrage. Verser 10 litres de solvant directement dans le laveur de pistolets. Contrôler que l’indicateur
de niveau se déplace librement et qu’il se stabilise à une hauteur de 10-70 mm (voir l’illustration ci-dessous).
L’indicateur de niveau maximal sur le laveur de pistolets indique si le niveau de solvant dans l’unité d’amarrage est trop élevé
(différents niveaux sur les colonnes de liquide, voir l’illustration en bas à droite). Dans ce cas, il ne faut pas ajouter de solvant, car
le recycleur sera trop rempli lors du prochain transfert.
Démarrer le recycleur.
Distillation de solvants étrangers :
S’il est nécessaire de distiller du solvant étranger au système, respecter les étapes suivantes :
1. Remplacer le sac en plastique du recycleur.
2. Déplacer le récipient collecteur sur le côté.
3. Placer un bidon vide d’une contenance d’au moins 12 litres sous le recycleur (voir l’illustration ci-dessous).
4. Verser le solvant (12 litres au maximum) dans le recycleur.
5. Fermer le recycleur et démarrer la minuterie. Remarque : Pour savoir comment régler la minuterie et la température,
consulter la section 5.5 du manuel n° 11215 se rapportant au recycleur.
Une fois le cycle de distillation terminé, remettre en place le récipient collecteur sous le recycleur.
18

SOLVANTS AUTORISÉS
Les diluants de nettoyage, les mélanges de solvants, p.ex. l’acétone, le toluène, le sylène, l’isobutanol (2-méthylpropan-1-ol) qui,
selon la norme CEI 79-20 (EN 60079-20) appartiennent au groupe IIA.
CONSIGNES DE SÉCURITÉ
Respecter les points suivants pour conserver au système son haut niveau de sécurité :
- Installer le système de la manière prescrite dans ce manuel.
- Utiliser le système de la manière prescrite dans ce manuel.
- Effectuer l’entretien du système de la manière prescrite dans ce manuel.
- N’utiliser que des pièces de rechange d’origine.
- Ce manuel ainsi que les manuels se rapportant au laveur de pistolets et au recycleur doivent toujours se trouver à proximité du
système et être en bon état de lisibilité.
Lors de travail avec le système, toujours utiliser des gants et des lunettes de protection (to léran t les solvants). En cas de besoin,
utiliser d’autres équipements de protection.
Les personnes souffrant de problèmes respiratoires chroniques ou de réactions allergiques aux solvants ne doivent pas utiliser la
machine.
Un extincteur d’incendie doit toujours être disponible en cas de travail avec des solvants.
ENTRETIEN
Contrôler tous les jours qu’aucune fuite ne s’est produite.
Démonter et nettoyer au moins une fois par an l’unité d’amarrage DRESTER RDX. Pour plus de renseignements, contacter votre
distributeur Drester.
GARANTIE
Hedson Technologies AB remplace tous les éléments défectueux de DRESTER RDX 9012 par des composants neufs,
conformément aux conditions énoncées sous « Warranty Terms for Hedson Technologies AB Nr. 7.2-8 ». La garantie n’est
valable que si la machine a été utilisée de la manière prescrite et ne couvre pas les travaux de réparation. En cas de demande en
garantie, le numéro de série de la machine et son année de fabrication doivent toujours être indiqués. Ces informations sont
disponibles sur la plaque signalétique de couleur métallique apposée sur la machine.
CARACTÉRISTIQUES TECHNIQUES
Fabricant HEDSON TECHNOLOGIES AB
Hammarvägen 4
SE-232 37 Arlöv
Suède
040-53 42 00
Type de machine Unité d’amarrage DRESTER RDX 9012
Volume de liquide dans la machine Max. 80 litres
Raccordement de l’air comprimé Air sec et propre, 3-10 bar
Capacité de pompe 10 l/min
Pression du liquide 2 bar
Poids 21 kg
Dimensions Hauteur : 700 mm, diamètre maximal: 500 mm
Niveau sonore < 70 dB (A)
19

**********SVENSKA**********
INNEHÅLLSFÖRTECKNING
SIDA:
21 ANVÄNDNINGSOMRÅDE
21 MONTERING
21 PLACERING
21 UPPSAMLINGSKÄRL
21 FÖRBEREDELSER INFÖR INSTALLATIONEN
22 INSTALLATION
23 FÖRBEREDELSER FÖR IDRIFTTAGANDE
23 BRUKSANVISNING
23 Handhavande av system ”Drester Dynamic Triple”
24 Åtgärder vid lösningsmedelsbrist
24 Destillation av annat lösningsmedel
25 TILLÅTNA LÖSNINGSMEDEL
25 SÄKERHETSINFORMATION
25 SERVICE
25 GARANTI
25 TEKNISKA DATA
20

ANVÄNDNINGSOMRÅDE
DRESTER RDX 9012 är den Dockingenhet, som tillsammans med DRESTER 9000 Pistoltvätt och DRESTER 120 Destillator
kopplas samman till kretsloppsystemet ”DRESTER DYNAMIC TRIPLE 9000”. Detta ger en säker hantering av både nytt och
använt lösningsmedel. Tunga lyft vid hantering av lösningsmedel elimineras. Systemet sparar lösningsmedel och arbetet går
snabbare och lättare.
Denna manual beskriver Dockingenheten DRESTER RDX 9012, hur den installeras, samt hur hela systemet ”DRESTER
DYNAMIC TRIPLE 9000” används. DRESTER 9000 Pistoltvätt beskrivs i detalj i manual nr. 10259. DRESTER 120 Destillator
beskrivs i detalj i manual nr. 11213. Föreliggande beskrivningar gäller även Pistoltvätt DRESTER 9000-TT.
MONTERING
Dockingenhet DRESTER RDX 9012 levereras komplett i en kartong. Ingen ytterligare montering krävs. Dockingenheten
installeras med hjälp av de bifogade tillbehören enligt beskrivningarna i denna manual.
Obs! Tryckluftslangar och kopplingar (innergänga ¼” ) tillhandahålls av köparen.
PLACERING
DRESTER RDX 9012 ställs in i DRESTER 9000. DRESTER 9000 med RDX 9012 är utrustning Kategori 2 (ref. ATEX-direktiv
94/9 EG) och får följaktligen placeras i ett arbetsutrymme klassat som Zon 1 (ref. ATEX-direktiv 1999/92 EG). Om DRESTER
9000 med RDX 9012 installeras i ett arbetsutrymme klassat som Zon 2 (eller i ett oklassat utrymme) klassas installationsplatsen
inom 1 m radie från DRESTER 9000 med RDX 9012 som Zon 1 och ytterligare 2,5 m från maskinen som Zon 2 (klassning totalt:
3,5 m runt maskinen och 1 m över den). Inom detta område måste all utrustning, t.ex. elektriska anordningar, vara godkänd för
respektive Zon. Öppen eld eller gnistbildande utrustning (t.ex. svetsaggregat och slipmaskiner) får inte förekomma. Rökning är
heller inte tillåtet.
Kontakta den lokala brandmyndigheten om tveksamhet råder.
Se till att maskinen jordas ordentligt.
Denna manual är en del av utrustningen och skall förvaras så att den alltid finns tillgänglig.
UPPSAMLINGSKÄRL
För att förhindra att ett eventuellt läckage av lösningsmedel rinner ut på golvet och vidare ut till ett vattenavlopp, måste
DRESTER 9000 med RDX 9012 placeras i ett rum där väggar och golv inte släpper igenom ett läckande lösningsmedel. Om detta
inte är möjligt måste maskinen utrustas med ett uppsamlingskärl ”DRESTER COLLECTING TRAY 10250”.
FÖRBEREDELSER INFÖR INSTALLATIONEN
Allmänt
För att installationen av DRESTER DYNAMIC TRIPLE 9000 skall kunna genomföras effektivt och problemfritt måste följande
förberedelser göras:
Pistoltvätt DRESTER 9000
Installera Pistoltvätten enligt manual nr. 10259.
Destillatorn DRESTER 120
Installera Destillatorn enligt manual nr. 11213. Observera att den elektriska installationen endast får utföras av en behörig
elektriker.
Tryckluftanslutning
Intill Destillatorn behövs en tryckluftanslutning på 3-10 bar.
Intill Pistoltvätten behövs en tryckluftanslutning på 7-12 bar.
Om tryckluftförsörjningen ligger mellan 7 och 10 bar kan systemet kopplas till en och samma anslutning.
Tryckluften skall vara ren och torr, annars kan maskinens luftkomponenter skadas. I sådant fall upphör garantin att gälla.
Tillsammans eller åtskilda
Om Destillatorn skall installeras på avstånd från Pistoltvätten, behövs ”PIPING KIT 10810” för installationen. Förutom
komponenter innehåller denna sats även manual nr. 11161, där en sådan installation beskrivs.
Luftslangar och kopplingar
Obs! Tryckluftslangar och kopplingar (innergänga ¼”) tillhandahålls av köparen.
Lösningsmedel
60 liter lösningsmedel behövs för att fylla systemet DRESTER DYNAMIC TRIPLE 9000.
21

INSTALLATION
(se bildbilaga 11144)
På Pistoltvätten
1. Demontera orginalsugslangarna (inklusive pluggar) från pumparna (se Bild 1).
2. Ställ in Dockingenheten i Pistoltvätten så, att dekalen ”DRESTER RDX“ syns rakt framifrån. Dra Dockingenhetens långa
slangar (svarta och vita) genom vänstra (alt. högra) gaveln (se Bild 2).
3. Anslut Dockingenhetens korta slangar (svarta och vita) till pistoltvättens pumpar (se Bild 4):
4. Svart till den undre pumpen.
5. Vit till den övre pumpen.
6. Skjut därefter Dockingenheten så långt till höger som möjligt.
7. Korta returslangen för lösningsmedel från Pistoltvätten ca. 250 mm och stick därefter ner den i Dockingenheten (se Bild 3).
8. Stick ner Pistoltvättens sugslang (svart, φ6mm) för manuell rengöring med rent lösningsmedel (markerad med vitt buntband)
i den mittersta pluggen på Dockingenheten (se Bild 5).
9. Stick ner Pistoltvättens sugslang (svart, φ6mm) för manuell rengöring med cirkulerande lösningsmedel (markerad med svart
buntband) i den främre pluggen på Dockingenheten (se Bild 6).
10. Tryck maxnivåindikatorns slang (transparent φ6mm) på mässingsröret (se Bild 7).
11. Tryck de två gasåterföringsslangarna (transparent φ6mm) på mässingsrören (se Bild 8).
12. Anslut jordningskabeln (se Bild 9).
13. Demontera den blå luftslangen på tryckregulatorns vänstra sida (se Bild 10).
14. Montera styrventilen på tryckregulatorn, stick den röda slangen genom den vänstra (alt. högra) gaveln och lägg den vid de
långa svarta och vita slangarna (se bild 11).
15. Stick den blå luftslangen i den undre vänstra, utgående nippeln på styrventilen. Stick den svarta slangen för
Dockingenhetens pumpar i den övre vänstra, utgående nippeln på styrventilen (se Bild 12).
Installationen på Pistoltvätten är därmed avslutad.
På destillatorn
1. Bild 13 visar de ventilkomponenter som medföljer.
2. Montera konsolen med tryckluftventil på Destillatorns högra sida (se Bild 14).
3. Demontera pluggen på inloppet för lösningsmedel och montera vinkelkopplingen. Använd vid behov den bifogade muffen
(1/4 - 3/8”). Montera därefter mässingsanslutningen på vinkelkopplingen (se Bild 15).
4. Anslut lösningsmedelslangen (svart med metallskyddsslang, se Bild 16).
5. Montera destillatslangen (se Bild 17).
6. Bild 18 visar destillatkärlet med nivåindikatorn.
7. Ställ destillatkärlet under Destillatorn och stick ner destillatslangen (se Bild 19).
8. Anslut sugslangen för rent lösningsmedel (vit med metallskyddsslang, se Bild 20).
9. Korta slangarna från pistoltvätten till lämplig längd (se Bild 21).
10. Montera slangarna från pistoltvätten. Observera färgerna: Vitt för rent lösningsmedel och svart för smutsigt lösningsmedel
(se Bild 22).
11. Anslut den röda luftslangen (se Bild 23).
12. Anslut styrventilens ingång till ren och torr tryckluft på 3-10 bar (se Bild 24).
13. Bind ihop slangarna med medföljande buntband (se Bild 25).
Installationen på Destillatorn är därmed avslutad och ”DRESTER DYNAMIC TRIPLE 9000” är klar att tas i drift (se Bild 26).
Varning:
Kontrollera att systemets alla delar (maskiner och kärl) är jordade.
22

FÖRBEREDELSER FÖR IDRIFTTAGANDE
Pistoltvätt – påfyllning av lösningsmedel
1. Öppna luckan på Pistoltvätten.
2. Häll 40-45 liter lösningsmedel direkt i Pistoltvätten.
3. Stäng luckan på Pistoltvätten.
Destillator – påfyllning av lösningsmedel
1. Ta bort de tre fjäderblecken från locket på destillatkärlet och ta av locket. Se upp så att flottören på nivåindikatorn inte
skadas.
2. Fyll på 12 liter rent lösningsmedel i destillatkärlet, dvs. upp till 100 mm från den övre kanten.
3. Sätt på locket och sätt tillbaka de tre fjäderblecken.
Bruksanvisning
Denna manual samt manualerna till Pistoltvätten och Destillatorn måste alltid finnas tillgängliga vid systemet och vara i gott
läsbart skick. Den inplastade bruksanvisningen (nr. 11154) skall sättas upp väl synlig i Destillatorns omedelbara närhet. Vid
behov måste den även översättas till andra språk de anställda talar.
Servicepersonal
Det rekommenderas att personalen genomgår utbildning i hur systemet används. Endast personer som har fått denna utbildning får
använda systemet.
Första driftstart
Systemet kan nu tas i drift. Följ bruksanvisningen Handhavande av system ”Drester Dynamic Triple”. Kontrollera att alla
anslutningar håller tätt.
BRUKSANVISNING
Denna bruksanvisning gäller det kompletta systemet DRESTER DYNAMIC TRIPLE. Pistoltvätt DRESTER 9000 och Destillator
DRESTER 120 beskrivs i detalj i respektive manual (nr. 10259 och 11213).
Handhavande av system ”Drester Dynamic Triple”:
1. FÖRSTA KONTROLLEN
* Kontrollera att den gröna lampan lyser och att oljetemperaturen har sjunk it till 50 °C.
(Detta betyder att Destillatorn är kall, startklar och får öppnas.)
* Kontrollera plastpåsen i Destillatorn.
(Denna engångspåse måste bytas inför varje destillering. Om påsen är full med lösningsmedel, så kontrollera
att destillatkärlet under destillatorn är tomt. Gå i så fall vidare till punkt 4.)
2. TRANSFERPUMPNING AV LÖSNINGSMEDEL
* Starta pumparna i Dockingenheten RDX.
(Genom att öppna tryckluftventilen på Destillatorns högra sida.)
* Stäng av pumparna när de börjar pumpa luft.
(Stäng tryckluftsventilen efter ca. 2-3 minuter.)
3. ANDRA KONTROLLEN
* Kontrollera att destillatkärlets nivåindikator är helt nere.
(Om inte, starta pumparna igen och låt dem gå ett par minuter till. Skulle nivåindikatorn trots detta inte vara helt nere kan det
bero på att matarslangen är tilltäppt eller på att det är fel på pumpen. Tag i så fall kontakt med Drester-återförsäljaren.)
* Kontrollera att påsen i Destillatorn är full med lösningsmedel.
(Lösningsmedlet skall ungefär vara i nivå med påsens klämring. Om inte, starta pumparna igen och låt dem gå ett par minuter
till. Skulle påsen trots detta inte fyllas kan det bero på att matarslangen är tilltäppt eller på att det är fel på p umpen. Tag i så fall
kontakt med Drester-återförsäljaren.)
4. STÄNG LOCKET OCH STARTA DESTILLATORN
* Obs! Information om hur tid och temperatur ställs in finns i manualen till Destillatorn, nr. 11213, avsnitt 5.5.
23

Åtgärder vid lösningsmedelsbrist:
DET RENA LÖSNINGSMEDLET I PISTOLTVÄTTEN ÄR SLUT
Fyll inte på något nytt lösningsmedel
(Se Handhavande av systemet ”Drester Dynamic Triple”)
DET CIRKULERANDE LÖSNINGSMEDLET I PISTOLTVÄTTEN ÄR SLUT
Om pumpen för automatisk förtvätt endast pumpar luft och inget lösningsmedel, finns det inte tillräcklig t med lösn ingsmedel i
Dockingenheten. Häll i sådant fall 10 liter lösningsmedel direkt i Pistoltvätten. Ko ntrollera att nivåindikatorn kan röra sig fritt och
att den står 10-70 mm högt. (se bilden nedan till vänster).
Maxnivåindikatorn på pistoltvätten markerar om lösningsmedelsnivån är för hög i Dockingenheten (genom olika nivåer på
vätskepelarna, se bilden nedan till höger). I sådana fall får inget mer lösningsmedel fyllas på, eftersom destillatorn då blir överfull
vid nästa transferpumpning.
, gör istället en transferpumpning och starta Destillatorn.
Destillation av annat lösningsmedel:
Om lösningsmedel som inte ingår i systemet skall destilleras, skall följande steg följas:
1. Byt plastpåse i Destillatorn.
2. Flytta destillatkärlet åt sidan.
3. Ställ en tom dunk som rymmer minst 12 liter under destillatorn (se bilden nedan).
4. Häll lösningsmedlet, max 12 liter, i Destillatorn
5. Stäng destillatorn och starta med timern. Obs! Information om hur tid och temperatur ställs in finns i bruksanvisningen till
Destillatorn, nr. 11213, avsnitt 5.5.
När destillationscykeln är klar skall destillatkärlet ställas tillbaka under Destillatorn.
24

TILLÅTNA LÖSNINGSMEDEL
Tvättförtunning, blandningar av lösningsmedel t.ex. aceton, toluen, xylen, isobutanol (2-metylpropan-1-ol) som enligt IEC 79-20
(EN 60079-20) tillhör grupp IIA.
SÄKERHETSINFORMATION
För att upprätthålla systemets säkert måste följande punkter följas:
- Systemet måste installeras som denna manual föreskriver.
- Systemet måste användas som denna manual föreskriver.
- Underhållet av systemet måste utföras som denna manual föreskriver.
- Endast originalreservdelar får användas.
- Denna manual samt manualerna till Pistoltvätten och Destillatorn måste alltid finnas tillgängliga vid systemet
och vara i gott läsbart skick.
När man arbetar med systemet skall alltid skyddshandskar och skyddsglasögon som tål lösningsmedel användas, och därtill
ytterligare personlig skyddsutrustning vid behov.
Personer med kroniska andningsbesvär och med allergiska reaktioner mot lösningsmedel får ej handha systemet.
En brandsläckare skall alltid finnas tillhands där arbete med lösningsmedel förekommer.
SERVICE
Kontrollera dagligen att inget läckage har uppstått.
Dockingenheten DRESTER RDX måste demonteras och rengöras minst en gång om året. Drester-återförsäljaren står till tjänst för
rådgivning.
GARANTI
Hedson Technologies AB ersätter alla felaktiga delar på DRESTER RDX 9012 med nya, i enlighet med ”Warranty Terms for
Hedson Technologies AB Nr. 7.2-8”. Garantin gäller endast om maskinen använts på föreskrivet sätt och omfattar ej
reparationsarbete. Om garanti åberopas, skall maskinens serienummer och tillverkningsår alltid uppges. Dessa uppgifter finns på
den silverfärgade märkskylten på maskinen.
TEKNISKA DATA
Tillverkare HEDSON TECHNOLOGIES AB
Hammarvägen 4
SE-232 37 Arlöv
040-53 42 00
Maskintyp Dockingenhet DRESTER RDX 9012
Vätskevolym i maskinen Max. 80 liter
Tryckluftanslutning Torr, ren luft, 3-10 bar
Pumpkapacitet 10 l/min
Vätsketryck 2 bar
Vikt 21 kg
Mått Höjd: 700 mm, maximal diameter: 500 mm
Ljudtrycksnivå < 70 dB (A)
25

**********ITALIANO**********
INDICE
PAGINA:
27 APPLICAZIONE
27 MONTAGGIO
27 POSIZIONAMENTO
27 RECIPIENTE DI RACCOLTA
27 PREPARATIVI PRIMA DELL’INSTALLAZIONE
28 INSTALLAZIONE
29 PREPARATIVI PRIMA DELLA MESSA IN FUNZIONE
29 ISTRUZIONI PER L’USO
29 Uso dell’impianto ”Drester Dynamic Triple”
30 Interventi in caso di esaurimento del solvente
30 Distillazione di solventi estranei
31 SOLVENTI CONSENTITI
31 AVVERTENZE DI SICUREZZA
31 ASSISTENZA
31 GARANZIA
31 DATI TECNICI
26

APPLICAZIONE
DRESTER RDX 9012 è un’unità di collegamento che, assieme alla lavapistola DRESTER 9000 e al distillatore DRESTER 120,
forma il sistema a circuito chiuso ”DRESTER DYNAMIC TRIPLE 9000” per il trattamento di solventi nuovi ed usati in
condizioni di sicurezza. La soluzione elimina il sollevamento di carichi pesanti e riduce al minimo le perdite di solventi, rendendo
nello stesso tempo più agevole e veloce il lavoro.
Le presenti istruzioni per l’uso descrivono l’unità di collegamento DRESTER RDX 9012, la sua installazione e le modalità d’uso
dell’intero impianto ”DRESTER DYNAMIC TRIPLE 9000”. La lavapistola DRESTER 9000 è descritta dettagliatamente nel
manuale nr. 10259. Il distillatore DRESTER 120 è descritto dettagliatamente nel manuale nr. 11216. Le istruzioni in oggetto si
applicano anche al lavapistola DRESTER 9000-TT.
MONTAGGIO
L’unità di collegamento DRESTER RDX 9012 è fornita completa in una scatola di cartone e non richiede ulteriori operazioni di
montaggio. L’unità viene installata per mezzo degli accessori in dotazione secondo le istruzioni contenute nel presente manuale.
N.B. - Flessibili pneumatici e relativi raccordi (filettatura interna ¼” ) per la connessione alla rete pneumatica centrale, devono
essere procurati dall’acquirente.
POSIZIONAMENTO
L’unità DRESTER RDX 9012 viene collocata all’interno della lavapistola DRESTER 9000. L’apparecchio DRESTER 9000 con
RDX 9012 costituisce equipaggiamento di Categoria 2 (rif. direttiva ATEX 94/9 EG) e può di conseguenza essere collocata in
una postazione di lavoro classificata come Zona 1 (rif. direttiva ATEX 1999/92 EG). Se l’apparecchio DRESTER 9000 con RDX
9012 viene installato in una postazione di lavoro classificata come Zona 2 (o non classificata), lo spazio dell’installazione viene
classificato come Zona 1 entro 1 m di raggio, e come Zona 2 entro ulteriori 2,5 m di raggio da esso (classificazione totale: 3,5 m
intorno all’apparecchio ed 1 m sopra di esso). All’interno di questa zona tutti gli equipaggiamenti, ad es. attrezzature elettriche,
devono essere omologate per ciascuna Zona. È inoltre vietato fumare ed utilizzare fiamme libere o attrezzature che producono
scintille (ad es. saldatrici e levigatrici).
In caso di dubbi, consultare la locale autorità preposta alla prevenzione degli incendi.
L’attrezzatura deve essere munita di adeguato collegamento a terra.
Il presente manuale costituisce parte integrante dell’attrezzatura e deve essere conservato in modo tale da essere sempre
disponibile.
RECIPIENTE DI RACCOLTA
Per evitare che eventuali perdite di solventi sul pavimento penetrino in scoli di acqua, la lavapistola DRESTER 9000 dotata di
RDX 9012 deve essere posizionata in un locale munito di pareti e pavimento a prova di infiltrazione di solventi. Ove ciò non sia
possibile, l’attrezzatura può essere equipaggiata con un recipiente di raccolta ”DRESTER COLLECTING TRAY 10250”.
PREPARATIVI PRIMA DELL’INSTALLAZIONE
Generalità
Per garantire un’efficiente e sicura installazione di DRESTER DYNAMIC TRIPLE 9000, effettuare i seguenti preparativi:
Lavapistola DRESTER 9000
Installare la lavapistola secondo le istruzioni del manuale nr. 10259.
Distillatore DRESTER 120
Installare il distillatore secondo le istruzioni del manuale nr. 11216. Notare che i collegamenti elettrici devono essere effettuati
esclusivamente da un elettricista autorizzato.
Collegamenti pneumatici
Per il distillatore è necessario un collegamento pneumatico da 3-10 bar.
Per la lavapistola è necessario un collegamento pneumatico da 7-12 bar.
Se l’alimentazione pneumatica ha una pressione compresa tra 7 e 10 bar, il sistema può essere connesso allo stesso collegamento.
L’aria in entrata alla macchina deve essere pulita ed asciutta, per prevenire danni ai componenti pneumatici della macchina. Tali
danni non sono coperti dalla garanzia.
Insieme o separati
Se il distillatore viene installato a distanza dalla lavapistola, l’installazione necessita del ”PIPING KIT 10810”. Oltre alle
componenti occorrenti, questo kit comprende anche il manuale nr. 11161, contenente la descrizione di tale tipo di installazione.
Flessibili pneumatici e raccordi
N.B. - Flessibili pneumatici e relativi raccordi (filettatura interna ¼” ) per la connessione alla rete pneumatica centrale, devono
essere procurati dall’acquirente.
Solvente
Per riempire l’impianto DRESTER DYNAMIC TRIPLE 9000 occorrono 60 litri di solvente.
27

INSTALLAZIONE
(vedere allegata figura 11144)
Lavapistola
1. Rimuovere dalle pompe i flessibili di aspirazione originali con i relativi tappi (vedere fig. 1).
2. Sistemare l’unità di collegamento nella lavapistola in modo che l’etichetta ”DRESTER RDX“ sia visibile sul lato anteriore.
Infilare i flessibili lunghi (nero e bianco) attraverso la parete sinistra (o destra) (vedere fig. 2).
3. Connettere i flessibili corti (neri e bianchi) dell’unità di collegamento alle pompe del lavapistola (vedere fig. 4):
4. Il flessibile nero alla pompa inferiore.
5. Il flessibile bianco alla pompa superiore.
6. Spingere quindi il più possibile verso destra l’unità di collegamento.
7. Accorciare il flessibile di ritorno del solvente dal lavapistola di circa 250 mm, ed inserirlo quindi nell’unità di collegamento
(vedere fig. 3).
8. Infilare il tubo rilsan di aspirazione della lavapistola (nero, φ 6 mm) per pulizia manuale con solvente pulito (marcato con
fascetta bianca) nel tappo centrale dell’unità di collegamento (vedere fig. 5).
9. Infilare il tubo rilsan di aspirazione della lavapistola (nero, φ 6 mm) per pulizia manuale con solvente di ricircolo (marcato con
fascetta nera) nel tappo anteriore dell’unità di collegamento (vedere fig. 6).
10. Infilare il tubo rilsan indicatore di livello massimo (trasparente φ 6 mm) sul tubo di ottone (vedere fig. 7).
11. Infilare i due tubi rilsan recupero dei vapori (trasparenti φ 6 mm) sui tubi di ottone (vedere fig. 8).
12. Collegare il cavo di massa (vedere fig. 9).
13. Staccare il tubo rilsan pneumatico blu sul lato sinistro del regolatore di pressione (vedere fig. 10).
14. Montare la valvola di comando sul regolatore di pressione, infilare il tubo rilsan rosso attraverso la parete sinistra (o destra) e
disporlo con i flessibili lunghi neri e bianchi (vedere fig. 11).
15. Infilare il tubo rilsan pneumatico blu sul raccordo di uscita inferiore sinistro della valvola di comando. Infilare il tubo rilsan
nero delle pompe dell’unità di collegamento sul raccordo di uscita superiore sinistro della valvola di comando (vedere fig. 12).
L’installazione della lavapistola è ora completata.
Distillatore
1. La fig. 13 mostra i componenti delle valvole acclusi.
2. Montare la staffa con la valvola pneumatica sul lato sinistro del distillatore (vedere fig. 14).
3. Rimuovere il tappo dall’entrata del solvente ed installare il raccordo a ”T”. Se necessario, utilizzare il raccordo in dotazione
(1/4 - 3/8”). Montare quindi il raccordo di ottone sul raccordo a ”T” (vedere fig. 15).
4. Collegare il flessibile del solvente (nero con protezione metallica, vedere fig. 16).
5. Installare il flessibile del distillato (vedere fig. 17).
6. La fig. 18 mostra il recipiente del distillato con l’indicatore di livello.
7. Disporre il recipiente del distillato sotto il distillatore ed infilare il flessibile del distillato (vedere fig. 19).
8. Collegare il flessibile di aspirazione del solvente pulito (bianco con p rotezione metallica, vedere fig. 20).
9. Tagliare i flessibili in uscita dalla lavapistola alla lunghezza corretta (vedere fig. 21).
10. Installare i flessibili in uscita dalla lavapistola. Fare attenzione ai colori: bianco per il solvente pulito e nero per il solvente
sporco (vedere fig. 22).
11. Collegare il tubo rilsan pneumatico rosso (vedere fig. 23).
12. Collegare l’entrata della valvola di comando ad una fonte di aria compressa pulita ed asciutta a 3-10 bar (vedere fig. 24).
13. Raccogliere i flessibili e fissarli con le fascette in dotazione (vedere fig. 25).
L’installazione del distillatore è ora completata e ”DRESTER DYNAMIC TRIPLE 9000” è pronto per la messa in funzione
(vedere fig. 26).
Avvertenza:
Verificare che l’intero impianto sia collegato a terra (macchine e recipienti).
28

PREPARATIVI PRIMA DELLA MESSA IN FUNZIONE
Lavapistola – rabbocco del solvente
1. Aprire lo sportello della lavapistola.
2. Versare 40-45 litri di solvente direttamente nella lavapistola.
3. Chiudere lo sportello della lavapistola.
Distillatore – rabbocco del solvente
1. Rimuovere i tre fermi a molla dal coperchio del recipiente del distillato e togliere il coperchio,
2. facendo attenzione a non danneggiare il galleggiante dell’indicatore di livello.
3. Versare 12 litri di solvente pulito nel recipiente del distillato, cioè fino a 100 mm dal bordo superiore.
4. Risistemare il coperchio e rimontare i tre fermi a molla.
Istruzioni per l’uso
Il presente manuale, così come i manuali della lavapistola e del distillatore devono sempre essere disponibili nei pressi
dell’impianto e devono essere in buono stato e leggibili. La guida rapida plastificata (nr. 11154) deve essere apposta in luogo ben
visibile nelle immediate vicinanze del distillatore. Se necessario, deve essere tradotta nelle altre lingue parlate dal personale
addetto.
Personale addetto
Si raccomanda che il personale addetto venga addestrato all’uso dell’impianto. L’impianto deve essere utilizzato solo da persone
appositamente addestrate.
Primo avviamento
L’impianto può essere ora messo in funzione. Seguire le Istruzioni per l’uso dell’impianto ”Drester Dynamic Triple” ed
accertarsi che tutti i raccordi siano a tenuta.
ISTRUZIONI PER L’USO
Le presenti istruzioni per l’uso sono valide per l’impianto completo DRESTER DYNAMIC TRIPLE.
La lavapistola DRESTER 9000 ed il distillatore DRESTER 120 sono descritti dettagliatamente nei rispettivi manuali (nr. 10259 e
11216).
Istruzioni per l’uso dell’impianto ”Drester Dynamic Triple”:
1. PRIMO CONTROLLO
* Accertarsi che la spia verde sia accesa e la temperatura dell’olio sia scesa a 50°C.
(In altre parole il distillatore deve essere freddo, pronto per l’uso e può essere aperto.)
* Controllare il sacchetto di plastica nel distillatore.
(Essendo un sacchetto monouso, deve essere sostituito prima di ogni distillazione. Se il sacchetto è pieno di solvente, controllare
che il recipiente del distillato sotto l’unità sia vuoto. In tal caso, passare direttamente al punto 4.)
2. POMPAGGIO DI TRAVASO DEL SOLVENTE
* Avviare le pompe dell’unità di collegamento RDX.
(Aprendo la valvola pneumatica sul lato destro del distillatore.)
* Spegnere le pompe quando iniziano a pompare aria.
(Chiudere la valvola pneumatica dopo circa 2-3 minuti.)
3. SECONDO CONTROLLO
* Accertarsi che l’indicatore di livello nel recipiente del distillato sia completamente abbassato.
(In caso contrario, riavviare le pompe e farle funzionare ancora per un paio di minuti. Se nonostante ciò l’indicatore di livello
non è completamente abbassato, probabilmente il flessibile di alimentazione è bloccato oppure la pompa è difettosa. In tal caso,
rivolgersi al concessionario Drester.)
* Accertarsi che il sacchetto all’interno del distillatore sia pieno di solvente.
(Il solvente deve raggiungere approssimativamente l’anello di occlusione del sacchetto. In caso contrario, riavviare le pompe e
farle funzionare ancora per un paio di minuti. Se nonostante ciò il sacchetto non si riempie, probabilmente il flessibile di
alimentazione è bloccato oppure la pompa è difettosa. In tal caso, rivolgersi al concessionario Drester.)
4. CHIUDERE IL COPERCHIO ED AVVIARE IL DISTILLATORE
* N.B. - Nel manuale del distillatore, nr. 11216, sezione 5.5, sono presenti istruzioni per la regolazione di tempo e temperatura.
29

Interventi in caso di esaurimento del solvente:
ESAURIMENTO DEL SOLVENTE PULITO NELLA LAVAPISTOLA
Non aggiungere nuovo solvente
(Vedere Istruzioni per l’uso dell’impianto ”Drester Dynamic Triple”)
ESAURIMENTO DEL SOLVENTE DI RICIRCOLO NELLA LAVAPISTOLA
Se la pompa di prelavaggio automatico pompa solo aria, il solvente presente nell’unità di collegamento non è sufficiente. In
questo caso, versare 10 litri di solvente direttamente nella lavapistola. Accertarsi che l’indicatore di livello sia libero di muoversi e
che si trovi ad un’altezza di 10-70 mm. (Vedere figura in basso a sinistra).
L’indicatore di massimo livello della lavapistola mostra se il livello del solvente nell’unità di collegamento è troppo alto (per
mezzo di differenti livelli sulle colonne di liquido, vedere figura in basso a destra). In tal caso non deve essere aggiunto nuovo
solvente, poiché il distillatore verrebbe riempito eccessivamente nel prossimo pompaggio di travaso.
, ma avviare invece il distillatore.
Distillazione di solventi estranei:
Se deve essere distillato solvente non compreso nell’impianto, agire come segue:
1. Sostituire il sacchetto di plastica nel distillatore.
2. Spostare di lato il recipiente del distillato.
3. Sistemare una tanica vuota della capacità di almeno 12 litri sotto il distillatore (vedere figura in basso).
4. Versare il solvente nel distillatore, max 12 litri.
5. Chiudere il distillatore ed avviare con il timer. N.B. - Nel manuale del distillatore, nr. 11216, sezione 5.5, sono presenti
istruzioni per la regolazione di tempo e temperatura.
Al termine del ciclo di distillazione, risistemare il recipiente del distillato sotto il distillatore.
30

SOLVENTI CONSENTITI
Diluenti di lavaggio, miscele di solventi, ad es. acetone, toluene, xilolo, isobutanolo (2-metilpropano-1-olo), appartenenti al
gruppo IIA a norma IEC 79-20 (EN 60079-20).
AVVERTENZE DI SICUREZZA
Per il mantenimento della sicurezza del sistema, devono essere osservati i seguenti punti:
- L’impianto deve essere installato secondo le istruzioni del presente manuale.
- L’impianto deve essere utilizzato nel modo prescritto dal presente manuale.
- La manutenzione dell’impianto deve essere eseguita nel modo prescritto dal presente manuale.
- Devono essere impiegati unicamente ricambi originali.
- Il presente manuale ed i manuali della lavapistola e del distillatore devono sempre essere disponibili nei pressi dell’impianto ed
essere in buone condizioni e leggibili.
Nell’utilizzo della macchina è necessario indossare sempre occhiali e guanti protettivi a prova di solventi e, all’occorrenza,
ulteriori equipaggiamenti di protezione personale. La macchina non deve essere utilizzata da persone affette da disturbi respiratori
cronici o allergiche ai solventi.
In luoghi in cui sono presenti solventi devono sempre essere disponibili estintori.
ASSISTENZA
Accertarsi quotidianamente che non siano presenti perdite.
Smontare e pulire l’unità di collegamento DRESTER RDX almeno una volta all’anno. Il concessionario Drester è a vostra
disposizione per eventuali consigli.
GARANZIA
La Hedson Technologies AB si impegna a sostituire tutti i particolari difettosi della DRESTER RDX 9012 in conformità ai
“Termini di garanzia della Hedson Technologies AB Nr. 7.2-8”. La garanzia è valida solo se l’attrezzatura è stata impiegata nei
modi prescritti e non copre il lavoro di riparazione.
produzione della macchina. Tali dati sono riportati sulla targhetta color argento presente sulla stessa.
Nei reclami in garanzia occorre sempre indicare il numero di serie e l’anno di
DATI TECNICI
Produttore HEDSON TECHNOLOGIES AB
Hammarvägen 4
SE-232 37 Arlöv
Svezia
+46-40-53 42 00
Tipo Unità di collegamento DRESTER RDX 9012
Capacità della macchina Max. 80 litri
Collegamento pneumatico Aria pulita ed asciutta, 3-10 bar
Portata della pompa 10 l/min
Pressione del liquido 2 bar
Peso 21 kg
Ingombro Altezza: 700 mm. Diametro max: 500 mm
Livello di pressione acustica < 70 dB (A)
31

**********ESPAÑOL**********
ÍNDICE
PÁG.:
33 APLICACIONES
33 MONTAJE
33 UBICACIÓN
33 RECIPIENTE COLECTOR
33 PREPARATIVOS PARA LA INSTALACIÓN
34 INSTALACIÓN
35 PREPARATIVOS PARA LA PUESTA EN SERVICIO
35 INSTRUCCIONES DE OPERACIÓN
35 Instrucciones de operación del sistema “Drester Dynamic Triple”
36 Medidas en caso de falta de disolvente
36 Destilación de disolventes extraños
37 DISOLVENTES PERMITIDOS
37 INFORMACIÓN DE SEGURIDAD
37 MANTENIMIENTO
37 GARANTÍA
37 DATOS TÉCNICOS
32

APLICACIONES
La DRESTER RDX 9012 es una unidad de acoplamiento que, junto con la lavadora de pistolas DRESTER 9000 y la destiladora
DRESTER 120, se conecta a un sistema de circuito cerrado denominado “DRESTER DYNAMIC TRIPLE 9000”. Así, se obtiene
un tratamiento seguro de disolventes nuevos y usados. Se eliminan los esfuerzos de elevación pesados en la manipulación de
disolventes, las pérdidas de disolventes se reducen al mínimo y el trabajo resulta más fácil y rápido.
Este manual de operación describe la unidad de acoplamiento DRESTER RDX 9012, su instalación, y la manipulación de todo el
sistema “DRESTER DYNAMIC TRIPLE 9000”. La lavadora de pistolas DRESTER 9000 se describe en detalle en el manual nº
10259 y la unidad destiladora DRESTER 120 en el nº 11218. Estas descripciones se aplican también a la lavadora de pistolas
DRESTER 9000-TT.
MONTAJE
La unidad de acoplamiento DRESTER RDX 9012 se suministra completa en una caja y no necesita montaje. Con ayuda de los
accesorios en las bolsas de plástico incluidas en el suministro, se instala la máquina según las instrucciones detalladas en este
manual. Nota: Las mangueras de aire comprimido y los acoplamientos correspondientes (rosca interior 1/4”) son proporcionados
por el comprador.
UBICACIÓN
La DRESTER RDX 9012 se coloca en la lavadora de pistolas DRESTER 9000. La DRESTER 9000 junto con la unidad RDX
9012 constituye un equipo de categoría 2 (ref. Directiva ATEX 94/9 CE) y por ello deberá colocarse en un espacio clasificado
como Zona 1 (ref. Directiva ATEX 1999/92 CE). Si se instala la DRESTER 9000 con la RDX 9012 en un espacio de trabajo
clasificado como Zona 2 (o en un espacio no clasificado), se clasifica el lugar de instalación en un radio de 1 m de la DRESTER
9000 con la RDX 9012 como Zona 1, y 2,5 m adicionales desde la máquina como Zona 2 (clasificación total: 3,5 m alrededor de
la máquina y 1 m por encima de ella). En ese área todo el equipo, p. ej., los dispositivos eléctricos, deberá estar aprobado para la
zona correspondiente. No deberá haber llamas ni equipos que generen chispas (p. ej. equipos de soldadura o amoladoras).
Tampoco está permitido fumar.
En caso de duda, dirigirse al servicio de bomberos local.
Asegurarse de que la máquina está debidamente conectada a tierra.
Este manual es parte del equipo y deberá guardarse de forma que siempre esté accesible.
RECIPIENTE COLECTOR
Para evitar que eventuales fugas de disolvente causen derrames en el suelo que puedan desembocar en el alcantarillado, la
DRESTER 9000 con la RDX 9012 deben colocarse en una habitación cuyas paredes y suelo sean resistentes a las fugas de
disolventes. Si no es posible esto, será necesario equipar la máquina con un recipiente colector “DRESTER COLLECTING
TRAY 10250”
PREPARATIVOS PARA LA INSTALACIÓN
Generalidades
Para lograr una instalación eficaz y sin problemas del sistema DRESTER DYNAMIC TRIPLE 9000, se deben hacer los siguientes
preparativos:
Lavadora de pistolas DRESTER 9000
Instalar la lavadora de pistolas como se indica en el manual de instrucciones nº 10259.
Unidad destiladora DRESTER 120
Instalar la destiladora como se indica en el manual de instrucciones nº 11218. Tener en cuenta que las instalaciones eléctricas
deberá realizarlas un electricista cualificado exclusivamente.
Conexión de aire comprimido
Para la destiladora se necesita una conexión de aire comprimido de 3 a 10 bares.
Para la lavadora de pistolas se necesita una conexión de aire comprimido de 7 a 12 bares.
Si la alimentación de aire comprimido es de 7 a 10 bares, se puede acoplar el sistema a una misma conexión.
El aire comprimido que va a la máquina debe estar limpio y seco, pues de lo contrario se pueden estropear los componentes
neumáticos de la máquina. En tal caso, no tendrá validez la garantía.
Juntas o separadas
Si se va a instalar la destiladora a distancia de la lavadora de pistolas, se necesitará el “PIPING KIT 10810” para la instalación.
Además de los componentes, el juego contiene el manual nº 11161, con la descripción de la instalación.
Mangueras de aire y acoplamientos
Nota: Las mangueras de aire comprimido y los acoplamientos (diámetro interior 1/4”) son proporcionados por el comprador.
Disolvente
Para llenar el sistema “DRESTER DYNAMIC TRIPLE 9000” se requieren 60 litros de disolvente.
33

INSTALACIÓN
(ver el anexo con figuras 11144)
En la lavadora de pistolas
1. Desmontar de las bombas las mangueras de aspiración originales (con los tapones) (figura 1).
2. Colocar la unidad de acoplamiento en la lavadora de pistolas de manera que la etiqueta “DRESTER RDX” quede visible al
frente. Pasar las mangueras largas (blancas y negras) de la unidad de acoplamiento a través de la pared izquierda
(alternativamente la pared derecha) (figura 2).
3. Conectar las mangueras cortas (blancas y negras) de la unidad de acoplamiento a las bombas de la lavadora de pistolas
(figura 4)
Negra a la bomba inferior.
Blanca a la bomba superior.
A continuación, desplazar la unidad de acoplamiento lo más posible hacia la derecha.
4. Cortar la manguera de retorno para el disolvente en la lavadora de pistolas unos 250 mm y seguidamente introducirla en la
unidad de acoplamiento (figura 3).
5. Introducir la manguera de aspiración de la lavadora de pistolas (negra, Ø6 mm) para limpieza manual con disolvente limpio
(marcado con abrazadera de plástico blanca) a través del tapón central de la unidad de acoplamiento (figura 5).
6. Introducir la manguera de aspiración de la lavadora de pistolas (negra, Ø6 mm) para limpieza manual con disolvente
circulante (marcado con abrazadera de plástico negra) a través del tapón delantero de la unidad de acoplamiento (figura 6).
7. Colocar a presión la manguera del indicador de nivel máximo (transparente, Ø6 mm) en el tubo de latón (figura 7).
8. Colocar a presión las dos mangueras de retorno de gases (transparente, Ø6 mm) en los tubos de latón (figura 8).
9. Conectar el cable de puesta a tierra (figura 9).
10. Desmontar la manguera de aire azul en el lado izquierdo del regulador de presión (figura 10).
11. Montar la válvula de control en el regulador de presión, introduciendo la manguera roja a través de la pared izquierda
(alternativamente la pared derecha) y colocarla junto a las mangueras negras y blancas (figura 11).
12. Colocar la manguera izquierda en el racor inferior izquierdo saliente de la válvula de control. Colocar la manguera negra
de las bombas de las unidad de acoplamiento en el racor superior saliente de la válvula de control (figura 12).
Así habrá finalizado la instalación en la lavadora de pistolas.
En la unidad destiladora
1. La figura 13 muestra los componentes de válvulas incluidos.
2. Montar el soporte con la válvula de aire comprimido en el lado derecho de la unidad destiladora (figura 12).
3. Desmontar el tapón de la entrada para disolvente y montar el acoplamiento acodado. Si es necesario, usar el manguito
incluido (1/4” a 3/8”). A continuación, montar la conexión de latón en el acoplamiento acodado (figura 15).
4. Conectar la manguera de disolvente (negra con manguera protectora de metal, según figura 16).
5. Montar la manguera de destilado (figura 17).
6. La figura 18 muestra el recipiente de destilado con indicador de nivel.
Colocar el recipiente de destilado debajo de la destiladora e introducir la manguera de destilación (figura 19).
7.
8. Conectar la manguera de aspiración para disolvente limpio (blanca con manguera protectora de metal, según la figura 20).
9. Cortar las mangueras provenientes de la lavadora de pistolas a una longitud adecuada (figura 21).
10. Montar las mangueras provenientes de la lavadora de pistolas. Prestar atención a los colores: Color blanco para disolvente
limpio y color negro para disolvente contaminado (figura 22).
11. Conectar la manguera de aire roja (figura 23)
12. Conectar la entrada de la válvula de control a aire comprimido limpio y seco de 3 a 10 bares (figura 24).
13. Atar las mangueras con las abrazaderas de plástico incluidas en el suministro (figura 25).
Así, habrá finalizado la instalación del destilador y el sistema “DRESTER DYNAMIC TRIPLE 9000” estará listo para comenzar
a funcionar (figura 26).
Advertencia:
Comprobar que todos los componentes del sistema (máquinas y recipiente) están conectados a tierra.
34

PREPARATIVOS PARA LA PUESTA EN SERVICIO
Lavadora de pistolas – llenado de disolvente
1. Abrir la tapa de la lavadora de pistolas.
2. Llenar 40 a 45 litros de disolvente directamente en la lavadora de pistolas.
3. Cerrar la tapa de la lavadora de pistolas.
Destiladora – llenado de disolvente
1. Quitar las tres chapitas de resorte de la tapa del recipiente de destilado y quitar la tapa. Proceder con cu idado para no dañar el
flotador del indicador de nivel.
2. Llenar 12 litros de disolvente limpio en el recipiente de destilado, es decir hasta 100 mm del borde superior.
3. Colocar nuevamente la tapa y las tres chapitas de resorte.
Instrucciones de operación
Este manual y los manuales para la lavadora de pistolas y para la destiladora deberán estar siempre accesibles junto al sistema, y
estar en estado legible. Las instrucciones plastificadas (nº 11154) deberán estar en en un lugar bien visible y en las cercanías de la
destiladora. Si es necesario, habrá que traducirlas también a los demás idiomas de los empleados.
Personal de servicio
Se recomienda instruir al personal en el uso del sistema. Sólo deberán usar el sistema personas que hayan recibido formación
especial para ello.
Primera puesta en servicio
Entonces se puede poner en servicio el sistema. Leer las Instrucciones de operación de la destiladora más abajo y comprobar que
todas las conexiones están herméticas.
INSTRUCCIONES DE OPERACIÓN
Estas instrucciones de operación se aplican al sistema completo DRESTER DYNAMIC TRIPLE.
La lavadora de pistolas DRESTER 9000 y la unidad destiladora DRESTER 120 se describen en detalle en el manual de
instrucciones correspondiente (nº 10259 y 11218).
Instrucciones de operación del sistema “Drester Dynamic Triple”
1. PRIMER CONTROL
* Comprobar que la lámpara verde está encendida y que la temperatura del aceite ha descendido a 50°C. (Esto significa que la
destiladora está fría, lista para arrancar y puede abrirse).
* Comprobar la bolsa de plástico en la destiladora.
(Como se trata de una bolsa desechable, se debe cambiar después de cada destilación. Si la bolsa está llena de disolvente,
comprobar que el recipiente de destilado debajo de las unidades está vacío. En caso afirmativo, pasar directamente al punto 4.)
2. BOMBEO DE TRANSFERENCIA DE DISOLVENTE
* Poner en marcha las bombas en la unidad de acoplamiento RDX.
(Abrir la válvula en el lado derecho del destilador.)
* Cerrar las bombas cuando comiencen a bombear aire.
(Cerrar la válvula de aire comprimido al cabo de 2 o 3 minutos).
3. SEGUNDO CONTROL
* Comprobar que el indicador de nivel en el recipiente de destilación está en el fondo.
(Si no lo está, poner otra vez en marcha la bomba y hacerla funcionar un par de minutos. Si, a pesar de esto, el indicador de
nivel no desciende hasta el fondo, probablemente la manguera de alimentación está obstruida o la bomba está defectuosa. En ese
caso, ponerse en contacto con el concesionario de Drester).
* Comprobar que la bolsa de la destiladora está llena de disolvente.
(Aproximadamente hasta el anillo de fijación de la bolsa.(Si no lo está, poner otra vez en marcha la bomba y hacerla funcionar
unos minutos. Si, a pesar de esto, la bolsa no se llena, probablemente la manguera de alimentación está obstruida o la bomba
está defectuosa. En ese caso, ponerse en contacto con el concesionario de Drester).
4. CERRAR LA TAPA Y PONER EN MARCHA LA DESTILADORA
* NOTA: Las instrucciones para el ajuste del tiempo y la temperatura se encuentran en el manual de la destiladora, nº 11218,
apartado 5.5.
35

Medidas en caso de falta de disolvente:
SE HA ACABADO EL DISOLVENTE LIMPIO EN LA LAVADORA DE PISTOLAS
No llenar disolvente nuevo
(Consultar las Instrucciones de operación del sistema “Drester Dynamic Triple”).
SE HA ACABADO EL DISOLVENTE USADO EN LA LAVADORA DE PISTOLAS
Si la bomba de prelavado automático sólo bombea aire, y ningún disolvente, será debido a que no hay suficiente disolvente en la
unidad de acoplamiento. En ese caso, verter 10 litros de disolvente directamente en la lavadora de pistolas. Comprobar q ue el
indicador de nivel puede moverse libremente y que se encuentra a una altura entre 10 y 70 mm. (Ver la figura de abajo a la
izquierda).
El indicador de nivel máximo en la lavadora de pistolas marca si está demasiado alto en la unidad de acoplamiento (mediante
distintos niveles en las columnas de líquidos, según la figura de abajo a la derecha). En tales casos, no se deberá llenar más
disolvente, debido a que la destiladora estará demasiado llena para el próximo bombeo de transferencia.
, en lugar de eso poner en marcha la unidad destiladora.
Destilación de disolventes extraños:
Si se va a destilar un disolvente que no está incluido en el sistema, proceder de la siguiente manera:
1. Cambiar la bolsa de plástico en la destiladora.
2. Apartar el recipiente de destilado a un lado.
3. Colocar un bidón vacío, con una capacidad mínima de 12 litros, debajo de la destiladora (ver la figura de abajo).
4. Llenar disolvente en la destiladora, 12 litros como máximo.
5. Cerrar la tapa de la destiladora y poner en marcha el temporizador. NOTA: Las instrucciones para el ajuste del tiempo y la
temperatura se encuentran en el manual de la destiladora, nº 11218, apartado 5.5.
Cuando haya finalizado el ciclo de destilación, colocar el recipiente de destilado de nuevo bajo la destiladora.
36

DISOLVENTES PERMITIDOS
Diluyente de lavado, mezclas de disolventes tales como acetona, tolueno, xileno o isobutanol (2 metil propano 1 ol) que según
IEC 70-20 (EN 60079-20) pertenecen al grupo IIA.
INFORMACIÓN DE SEGURIDAD
Para mantener el nivel de seguridad de la máquina, se debe proceder de la siguiente manera:
– Instalar la máquina según las instrucciones de este manual.
– Usar el sistema según según las instrucciones de este manual.
– Realizar el mantenimiento del sistema según las instrucciones de este manual.
– Usar exclusivamente repuestos originales.
– Mantener este manual, junto con los manuales de la lavadora de pistolas y de la destiladora, siempre accesibles junto al
sistema, y deberán estar en estado perfectamente legible.
Para el trabajo con el sistema, usar siempre guantes de protección y gafas de protección resistentes a los disolventes. Si es
necesario, usar también otros equipos de protección personal.
Las personas con trastornos respiratorios crónicos y reacciones alérgicas a los disolventes no deben usar la máquina.
Al trabajar con disolventes, tener siempre a mano un extintor de incendios.
MANTENIMIENTO
Controlar diariamente que no se han producido fugas.
La unidad de acoplamiento DRESTER RDX debe desarmarse y limpiarse como mínimo una vez al año. El concesionario de
Drester está a disposición del cliente para aconsejarle.
GARANTÍA
Durante 1 año a partir de la fecha de compra, Hedson Technologies AB reemplazará todas las piezas defectuosas de la DRESTER
RDX 9012 por otras nuevas, según “Warranty Terms for Hedson Technologies AB, nº 7.2-8”. La garantía sólo tiene validez si se
ha usado la máquina en la forma prescrita y no incluye los trabajos de reparación. Para reclamaciones de la garantía, indicar
siempre el número de serie y el año de fabricación de la máquina. Esto aparece indicado en la placa de características plateada de
la máquina.
DATOS TÉCNICOS
Fabricante HEDSON TECHNOLOGIES AB
Hammarvägen 4
SE-232 37 Arlöv
Suecia
+46-40-53 42 00
Tipo de máquina Unidad de acoplamiento DRESTER RDX 9012
Volumen de líquido en la máquina Máx. 80 litros
Conexión de aire comprimido Aire seco y limpio de 3 a 10 bares
Capacidad de bombeo 10 l/min
Presión del líquido 2 bares
Peso 21 kg
Medidas principales Altura: 700 mm, diámetro máximo: 500 mm
Nivel de presión sonora < 70 dB(A)
37
 Loading...