

Page 1
IMPORTANT: IMPORTANT : IMPORTANTE:
Read Before Using Lire avant usage Leer antes de usar
Operating/Safety Instructions
Consignes de fonctionnement/sécurité
Instrucciones de funcionamiento y seguridad
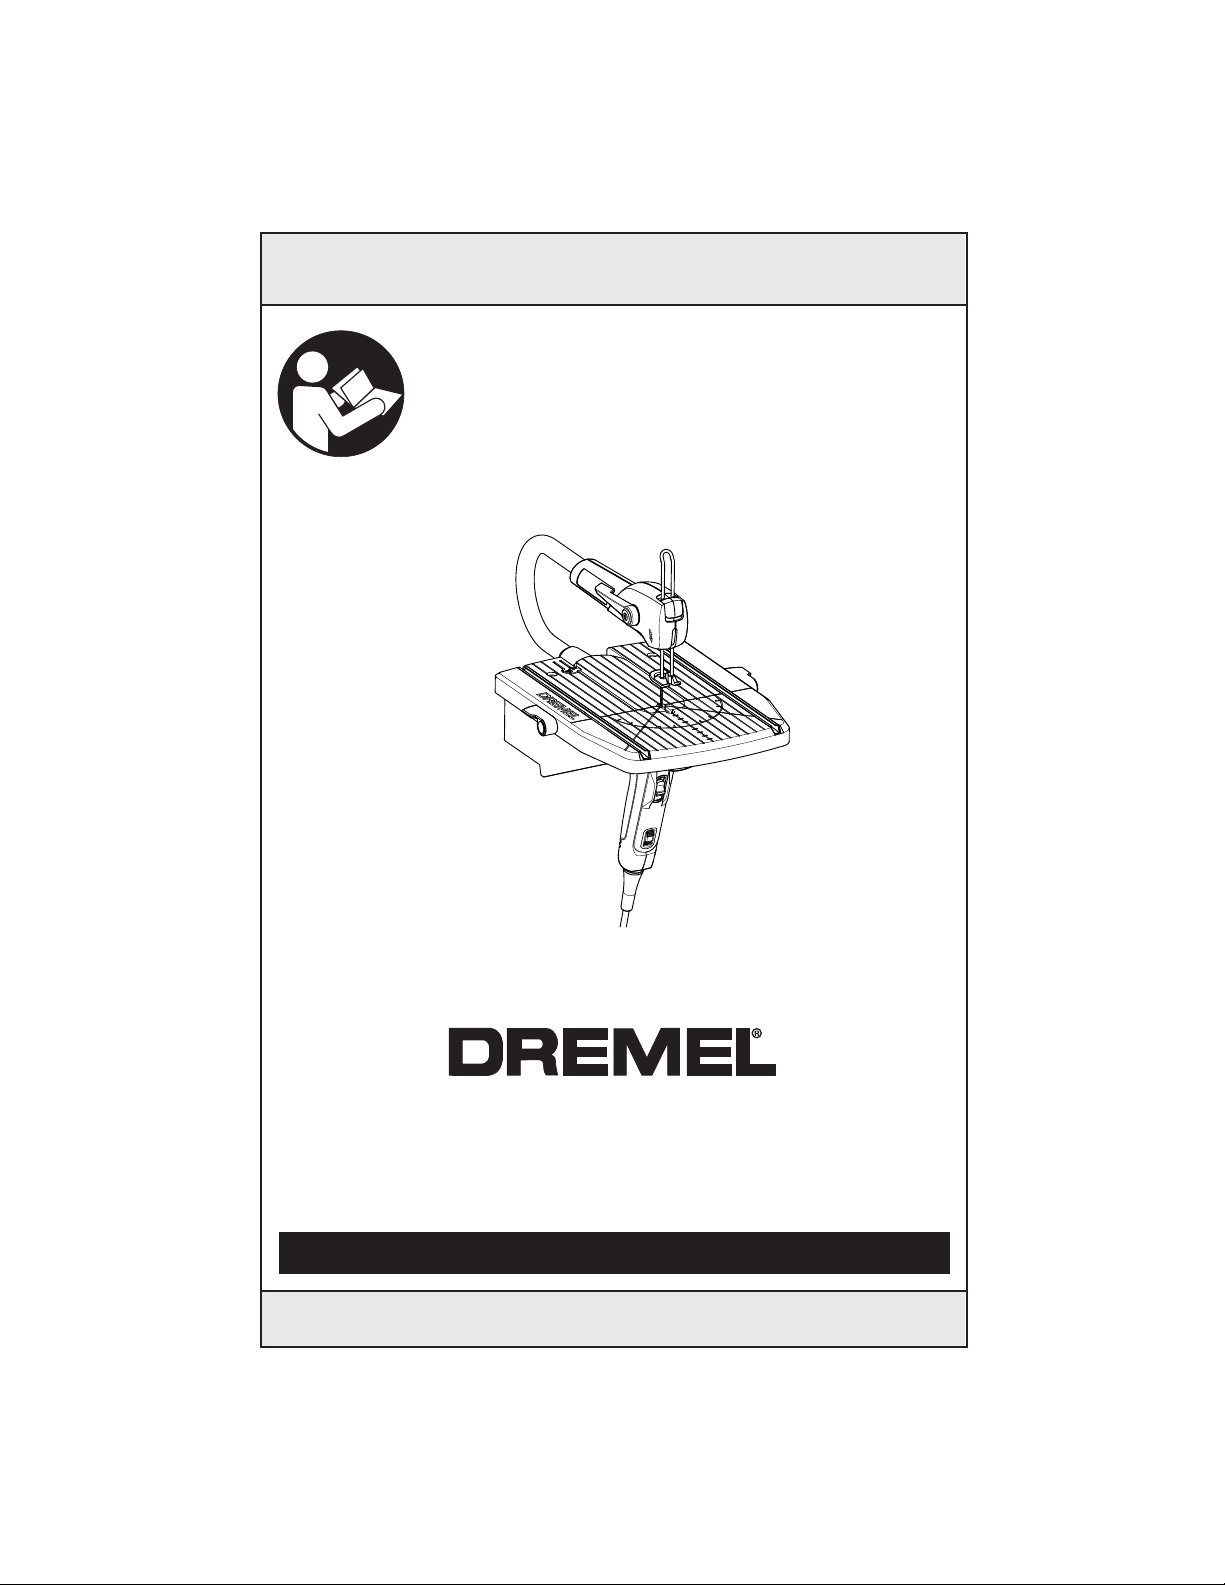
MS20
Call Toll Free for
Consumer Information
& Service Locations
For English Version
See page 2
Find Quality Products Online at: [email protected]
www.GlobalTestSupply.com
Pour obtenir des informations
et les adresses de nos centres
de service après-vente,
appelez ce numéro gratuit
Llame gratis para
obtener información
para el consumidor y
ubicaciones de servicio
Page 2

General Power Tool Safety Warnings
WARNING
!
Read all safety warnings and instructions. Failure to follow the warnings
and instructions may result in electric shock, fire and/or serious injury.
SA VE ALL WARNINGS AND INSTRUCTIONS FOR FUTURE REFERENCE
The term “power tool” in the warnings refers to your mains-operated (corded) power tool or
battery-operated (cordless) power tool.
Work area safety
Keep work area clean and well lit. Cluttered
or dark areas invite accidents.
Do not operate power tools in explosive
atmospheres, such as in the presence of
flammable liquids, gases or dust. Power
tools create sparks which may ignite the dust
or fumes.
Keep children and bystanders away while
operating a power tool. Distractions can
cause you to lose control.
Electrical safety
Power tool plugs must match the outlet.
Never modify the plug in any way. Do not
use any adapter plugs with earthed
(grounded) power tools. Unmodified plugs
and matching outlets will reduce risk of electric
shock.
Avoid body contact with earthed or grounded
surfaces such as pipes, radiators, ranges
and refrigerators. There is an increased risk
of electric shock if your body is earthed or
grounded.
Do not expose power tools to rain or wet
conditions. Water entering a power tool will
increase the risk of electric shock.
Do not abuse the cord. Never use the cord
for carrying, pulling or unplugging the power
tool. Keep cord away from heat, oil, sharp
edges or moving parts. Damaged or entangled
cords increase the risk of electric shock.
When operating a power tool outdoors,
use an extension cord suitable for outdoor
use. Use of a cord suitable for outdoor use
reduces the risk of electric shock.
If operating the power tool in a damp location
is unavoidable, use a Ground Fault Circuit
Interrupter (GFCI) protected supply. Use of
a GFCI reduce the risk of electric shock.
Personal safety
Stay alert, watch what you are doing and
use common sense when operating a
power tool. Do not use a power tool while
you are tired or under the influence of drugs,
alcohol or medication. A moment of inattention
while operating power tools may result in
serious personal injury.
Use personal protective equipment. Always
wear eye protection. Protective equipment
such as dust mask, non-skid safety shoes, hard
hat, or hearing protection used for appropriate
conditions will reduce personal injuries.
Prevent unintentional starting. Ensure the
switch is in the off-position before
connecting to power source and / or battery
pack, picking up or carrying the tool.
Carrying power tools with your finger on the
switch or energizing power tools that have the
switch on invites accidents.
Remove any adjusting key or wrench before
turning the power tool on. A wrench or a key
left attached to a rotating part of the power
tool may result in personal injury.
Do not overreach. Keep proper footing and
balance at all times. This enables better
control of the power tool in unexpected
situations.
Dress properly. Do not wear loose clothing
or jewelry. Keep your hair, clothing and
gloves away from moving parts. Loose
clothes, jewelry or long hair can be caught in
moving parts.
If devices are provided for the connection
of dust extraction and collection facilities,
ensure these are connected and properly
used. Use of dust collection can reduce dust-
related hazards.
Power tool use and care
Do not force the power tool. Use the correct
power tool for your application. The correct
power tool will do the job better and safer at
the rate for which it was designed.
Do not use the power tool if the switch does
not turn it on and off. Any power tool that
cannot be controlled with the switch is
dangerous and must be repaired.
2
Find Quality Products Online at: [email protected]
www.GlobalTestSupply.com
Page 3

Disconnect the plug from the power source
and/or the battery pack from the power tool
before making any adjustments, changing
accessories, or storing power tools. Such
preventive safety measures reduce the risk of
starting the power tool accidentally.
Store idle power tools out of the reach of
children and do not allow persons unfamiliar
with the power tool or these instructions to
operate the power tool. Power tools are
dangerous in the hands of untrained users.
Maintain power tools. Check for misalignment
or binding of moving parts, breakage of
parts and any other condition that may
affect the power tool’s operation. If damaged,
have the power tool repaired before use.
Many accidents are caused by poorly
maintained power tools.
Safety Rules for Coping Saw
Keep cutting tools sharp and clean. Properly
maintained cutting tools with sharp cutting
edges are less likely to bind and are easier to
control.
Use the power tool, accessories and tool
bits etc. in accordance with these instructions,
taking into account the working conditions
and the work to be performed. Use of the
power tool for operations different from those
intended could result in a hazardous situation.
Service
Have your power tool serviced by a qualified
repair person using only identical
replacement parts. This will ensure that the
safety of the power tool is maintained.
Hold power tool by insulated gripping
surfaces, when performing an operation
where the cutting accessory may contact
hidden wiring or its own cord. Cutting
accessory contacting a "live" wire may make
exposed metal parts of the power tool "live"
and could give the operator an electric shock.
Use clamps or another practical way to
secure and support the workpiece to a
stable platform. Holding the work by hand
or against your body leaves it unstable and
may lead to loss of control.
Never leave the switch in "ON" position.
Before plugging the tool in, check that the
switches are "OFF". Accidental start-ups
could cause injury.
Keep hands away from cutting area. Do
not reach under the material being cut.
The proximity of the blade to your hand may
be hidden from your sight.
Keep hands away from the space between
the gear housing and saw blade holder.
The reciprocating blade holder can pinch
your fingers.
Use only Dremel Moto-Saw blades. Use
the right blade size, style and cutting
speed for the material and the type of cut.
Using the proper blade minimizes the risk of
breakage.
Do not use dull or damaged blades. Dull
blades can bend and break easily potentially
striking the operator.
Before starting to cut, turn tool "ON" and
allow the blade to come to full speed. Tool
can chatter or vibrate if blade speed is too
slow at beginning of cut and may cause a
loss of control.
Make certain all adjusting screws and the
blade holder are tight before making a
cut. Loose adjusting screws and holders can
cause the tool or blade to slip and loss of
control may result.
When removing the blade from the tool
avoid contact with skin and use proper
protective gloves when grasping the
blade or accessory. Accessories may be
hot after prolonged use and present a burn
hazard.
3
Find Quality Products Online at: [email protected]
www.GlobalTestSupply.com
Page 4

Safety Rules for the Saw Station
Never leave tool running unattended. Turn
power off. Don't leave tool until it comes to a
complete stop.
Never leave the switch in "ON" position.
Before plugging the tool in, check that the
switches are "OFF". Accidental start-ups
may cause injury.
Avoid awkward operations and hand
positions and always make sure you have
good balance. A sudden slip could cause
your hand to move into the blade.
Firmly clamp or bolt your saw station to a
stable, level workbench or table. The most
comfortable table height is approximately
waist height.
Never stand on tool. Injury may occur if the
tool is tipped or if the blade is unintentionally
contacted.
Before making a cut, be sure all
adjustments are secure. Loose table or
guards could shift in use and cause you to
lose control of the workpiece.
Always adjust drop foot to just clear the
workpiece. Proper adjustment of the drop
foot will stabilize the workpiece, help protect
your fingers, and minimize blade breakage.
Always support large workpieces while
cutting to minimize risk of blade pinching
and loss of control. A heavy workpiece may
cause the table to slip, walk or slide while
cutting.
Be sure the blade path is free of nails.
Inspect for and remove nails from lumber or
workpiece before cutting or sanding.
Keep hands away from cutting area. Do
not hand-hold pieces so small that your
fingers go under the drop foot. Do not
reach underneath work or in blade cutting
path with your hands and fingers for any
reason. Close hand proximity to the blade
may result in blade contact and injury.
Never start the tool when the blade is in
contact with the workpiece. Allow the
motor to come up to full speed before
starting a cut. Having the blade in contact
with the workpiece on start up may cause
loss of control.
Observe and follow correct direction of
feed and do not feed the material too
quickly. Hold the work firmly against the
table. Feed work into a blade against the
teeth of the blade. Feeding material too
forcefully may cause blade to break.
Use caution when cutting materials with
an irregular cross-section or rounds like
dowel rods. If possible lay the material on
its "flat" side when cutting. For round
stock use a "Vee" block to support the
material. Wavy material like molding will
tend to rock and may bind while cutting.
Rounds will tend to roll while being cut and
the blade may "bite" and grab it from your
control.
Do not remove jammed cutoff pieces until
blade has stopped. Never touch blade or
other moving parts during use. Contacting
the blade or other moving mechanism may
cause injury.
Use base only with the Dremel Moto-Saw.
Other tools may not fit and cause a
hazardous condition.
Position vacuum hoses such that you do
not block the power switch. You must
maintain clear access to the ON/OFF switch
for full control.
When connecting tool to dust collection
and extraction systems, be sure these are
connected and used according to tool and
vacuum instructions. Proper use of dust
collection systems maximizes effectiveness.
When using tool with dust collection and
extraction systems, empty the dust
container before beginning work,
frequently during work, after completion
of work, and before storing the tool. Use
care when disposing dust, materials in fine
particle form may be explosive.
Do not throw dust on an open fire. Fine
dust particles may burn explosively.
Do not use dust extraction for operations
that include burning, smoking or
smoldering items like hot ashes or
sparks. Fire inside the vacuum bag/tank may
occur. Dust may smolder and set vacuum on
fire long after work is completed.
4
Find Quality Products Online at: [email protected]
www.GlobalTestSupply.com
Page 5

Do not use dust extraction with explosive
dusts, varnish, polyurethane coatings,
cleaners, or oil-based paints. The electrical
vacuum and tool components may create
sparks which may ignite dust or fumes.
Additional Safety Warnings
Do not use dust extraction when working
on metal. Particles from sanding, grinding or
cutting metal may be hot and may spark
which may melt plastic adaptors, vacuum
hoses, and may cause a fire inside the
vacuum bag/tank.
Keep handles dry, clean and free from oil
and grease. Slippery hands cannot safely
control the power tool.
Develop a periodic maintenance schedule
for your tool. When cleaning a tool be
careful not to disassemble any portion of
the tool since internal wires may be
misplaced or pinched or safety guard return
springs may be improperly mounted.
Certain cleaning agents such as gasoline,
carbon tetrachloride, ammonia, etc. may
damage plastic parts.
The product must only be serviced by a
Bosch Factory Service Center or Authorized
Bosch Service Station. This product does not
contain user serviceable parts other than those
addressed in this manual.
WARNING
!
grinding, drilling, and other construction
activiti es contains chemicals known to
cause cancer, birth defects or other
reproductive harm. Some examples of
these chemicals are:
• Lead from lead-based paints,
• Crystalline silica from bricks and cement and
other masonry products, and
• Arsenic and chromium from chemicallytreated lumber.
Your risk from these exposures varies,
depending on how often you do this type of
work. To reduce your exposure to these
chemicals: work in a well ventilated area, and
work with approved safety equipment, such as
those dust masks that are specially designed
to filter out microscopic particles.
Some dust created by
power sanding, sawing,
5
Find Quality Products Online at: [email protected]
www.GlobalTestSupply.com
Page 6
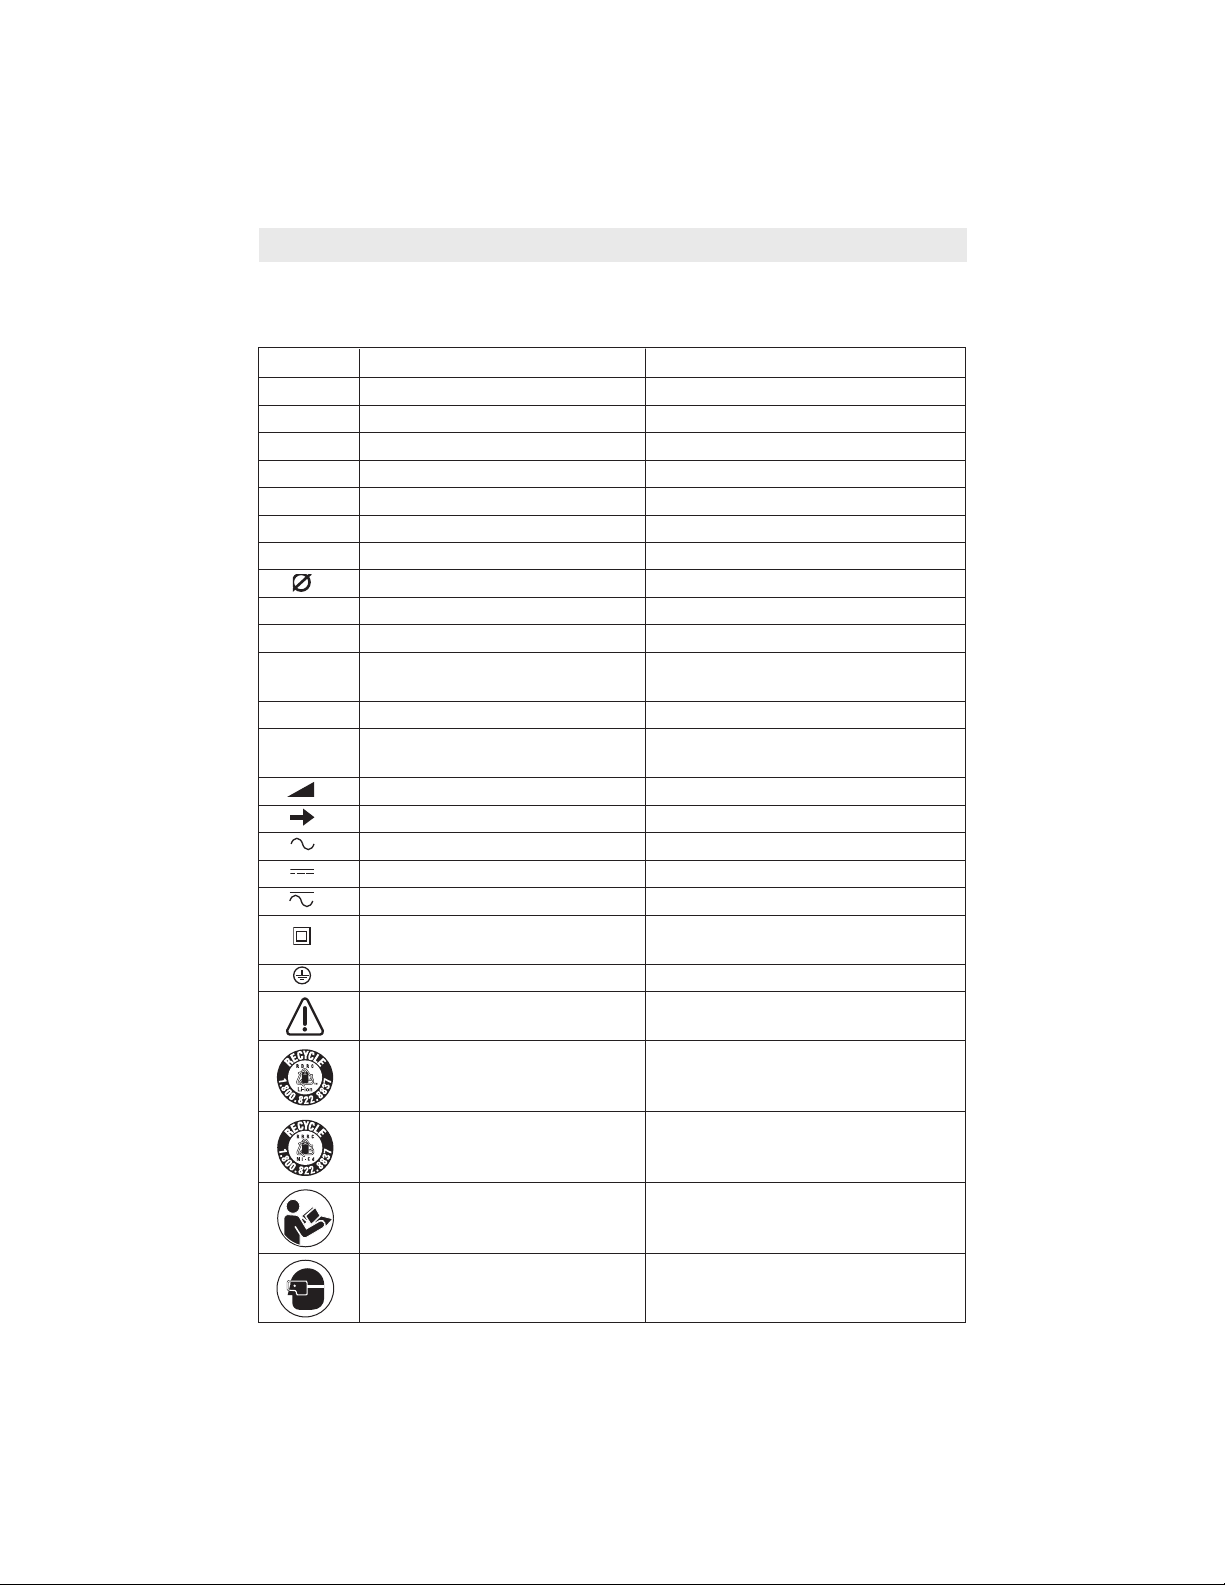
Symbols
0
IMPORTANT: Some of the following symbols may be used on your tool. Please study them
and learn their meaning. Proper interpretation of these symbols will allow you to operate the
tool better and safer.
Symbol Name Designation/Explanation
V Volts Voltage (potential)
A Amperes Current
Hz Hertz Frequency (cycles per second)
W Watt Power
kg Kilograms Weight
min Minutes Time
s Seconds Time
Diameter Size of drill bits, grinding wheels, etc.
n
0
n Rated speed Maximum attainable speed
.../min Revolutions or reciprocation Revolutions, strokes, surface speed,
0 Off position Zero speed, zero torque...
1, 2, 3, ... Selector settings Speed, torque or position settings.
I, II, III, Higher number means greater speed
No load speed Rotational speed, at no load
per minute orbits etc. per minute
Infinitely variable selector with off Speed is increasing from 0 setting
Arrow Action in the direction of arrow
Alternating current Type or a characteristic of current
Direct current Type or a characteristic of current
Alternating or direct current Type or a characteristic of current
Class II construction Designates Double Insulated
Construction tools.
Earthing terminal Grounding terminal
Warning symbol Alerts user to warning messages
Li-ion RBRC seal Designates Li-ion battery recycling
program
Ni-Cad RBRC seal Designates Ni-Cad battery recycling
program
Read manual symbol Alerts user to read manual
Wear eye protection symbol Alerts user to wear eye protection
6
Find Quality Products Online at: [email protected]
www.GlobalTestSupply.com
Page 7
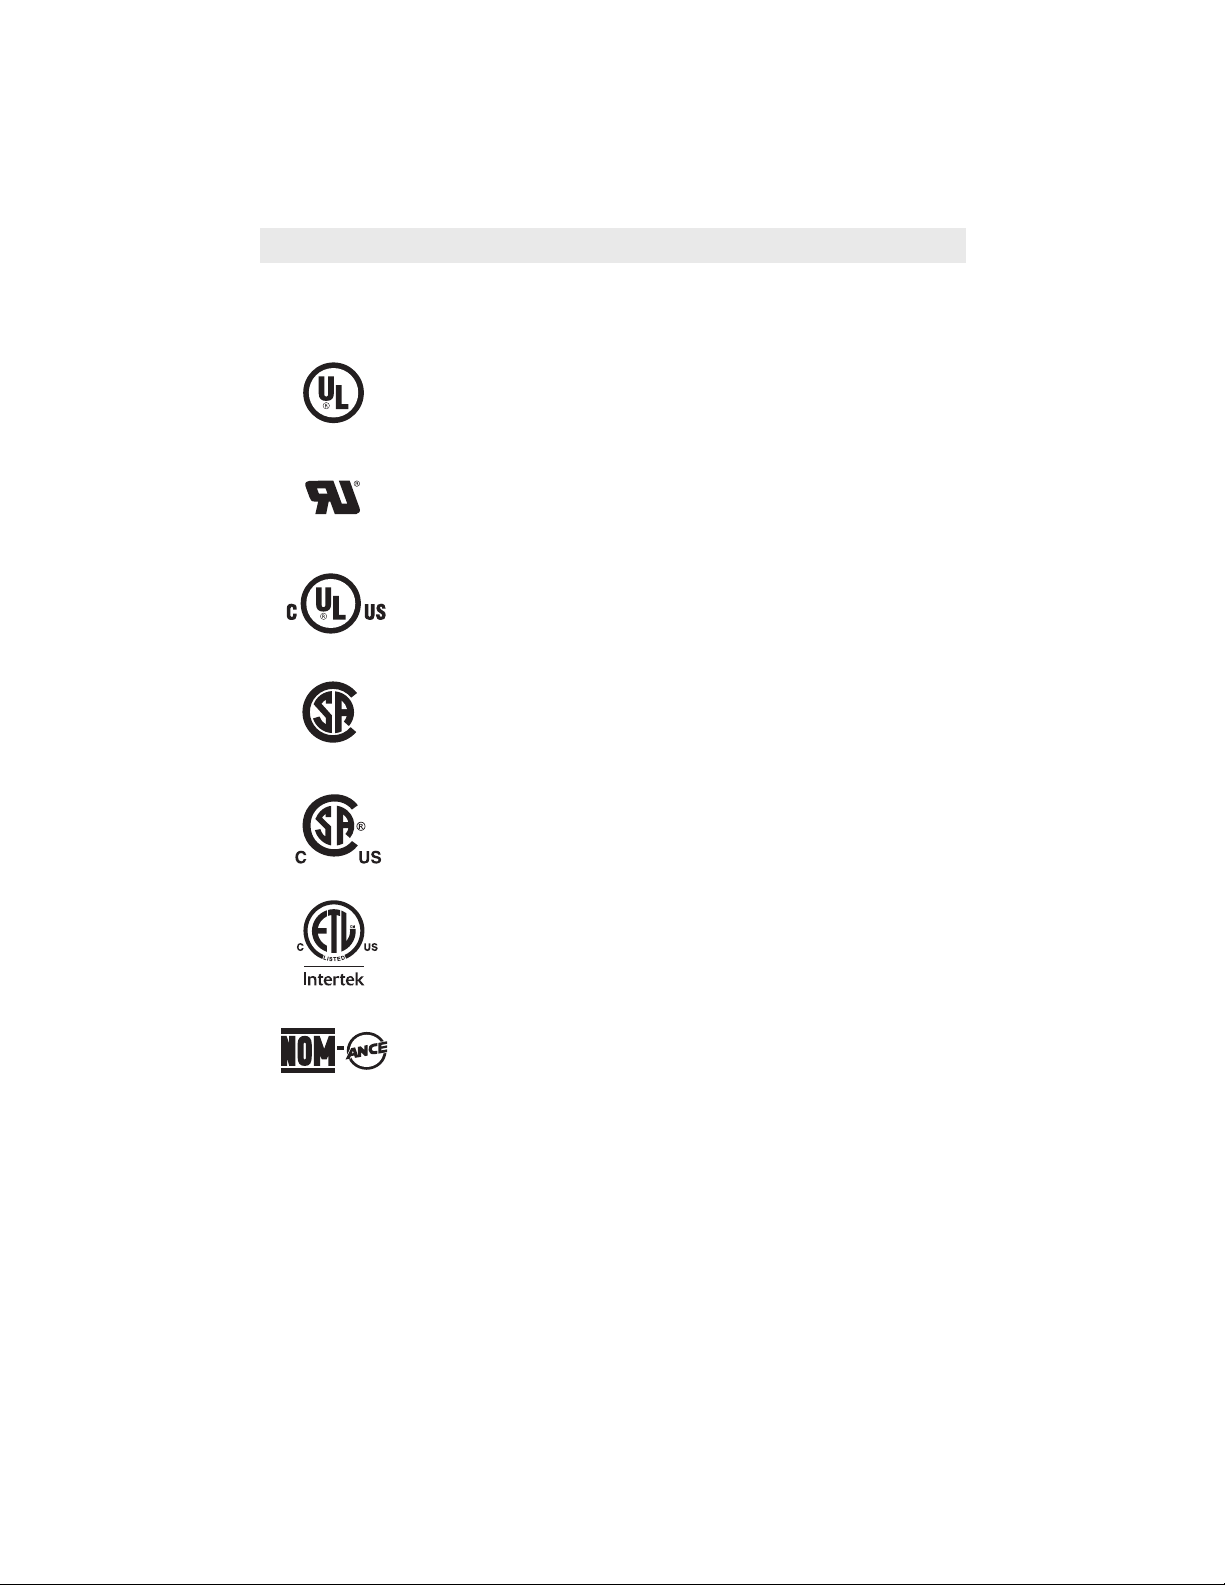
Symbols (continued)
IMPORTANT: Some of the following symbols may be used on your tool. Please study them
and learn their meaning. Proper interpretation of these symbols will allow you to operate the
tool better and safer.
This symbol designates that this tool is listed by Underwriters Laboratories.
This symbol designates that this component is recognized by Underwriters
Laboratories.
This symbol designates that this tool is listed by Underwriters Laboratories,
to United States and Canadian Standards.
This symbol designates that this tool is listed by the Canadian Standards
Association.
This symbol designates that this tool is listed by the Canadian Standards
Association, to United States and Canadian Standards.
This symbol designates that this tool is listed by the Intertek Testing
Services, to United States and Canadian Standards.
This symbol designates that this tool complies to NOM Mexican Standards.
7
Find Quality Products Online at: [email protected]
www.GlobalTestSupply.com
Page 8
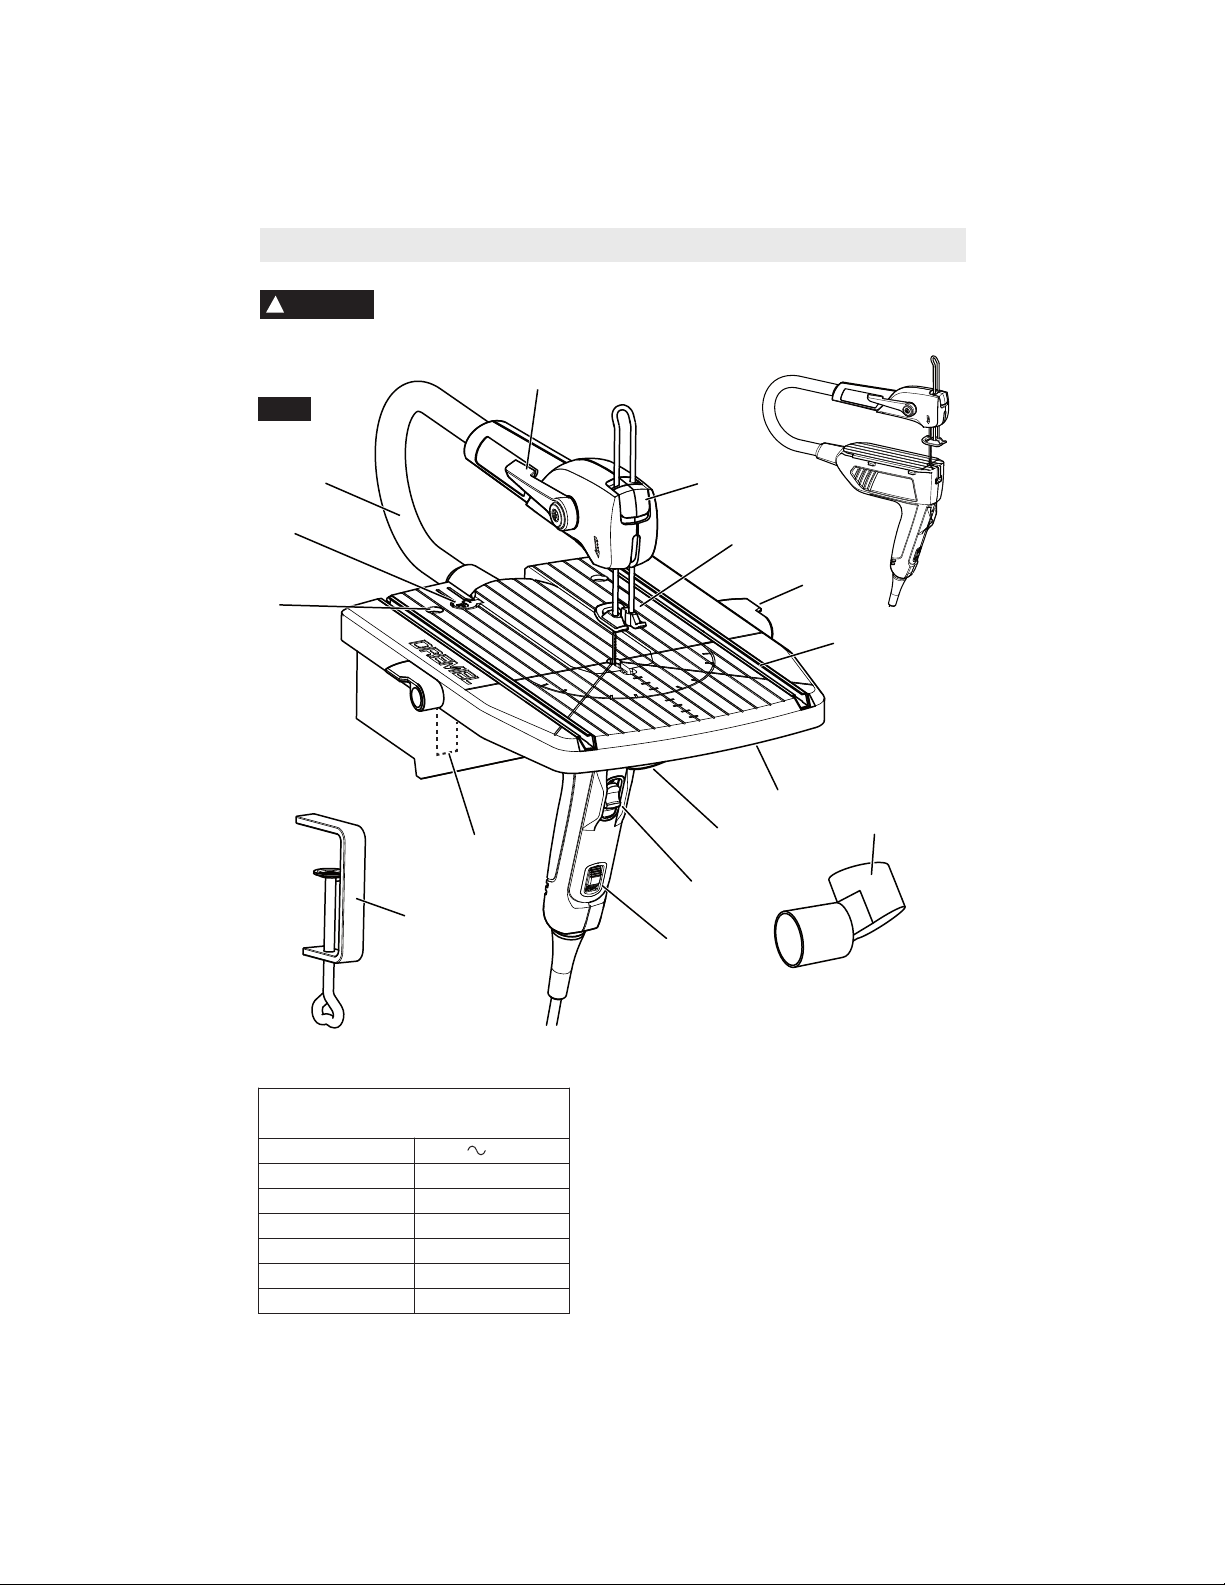
Functional Description and Specifications
WARNING
!
measures reduce the risk of starting the tool accidentally.
Disconnect the plug from the power source before making any
assembly, adjustments or changing accessories. Such preventive safety
N
FIG. 1
M
L
K
J
A
B
C
D
E
O
F
I
Dremel Moto-Saw 2-in-1
Compact Scroll Saw MS20
Voltage Rating 120V 60Hz
Amps 0.6A
No load speed 1500 - 2250
Throat Depth 9.84 inches
Stroke Length .31 inches
Weight 2.4 pounds
Blade Length 3.8 inches
G
H
A. Hold-Down Foot Release Button
B. Hold-Down Foot
C. Fence Lock Lever
D. Guide Rail
E. Base
F. Vacuum-Cleaner Connection
G. On/Off Switch
H. Speed Dial Switch
I. Securing Clamps
J. Clamp Slot
K. Permanent Fixing Hole
L. Quick Release Button
M. Moto-Saw
N. Accessory Quick Change Lever
O. Vacuum Dust Adapter
8
Find Quality Products Online at: [email protected]
www.GlobalTestSupply.com
Page 9
Assembly
WARNING
!
making any assembly, adjustments or
changing accessories. Such preventive
safety measures reduce the risk of starting
the tool accidentally.
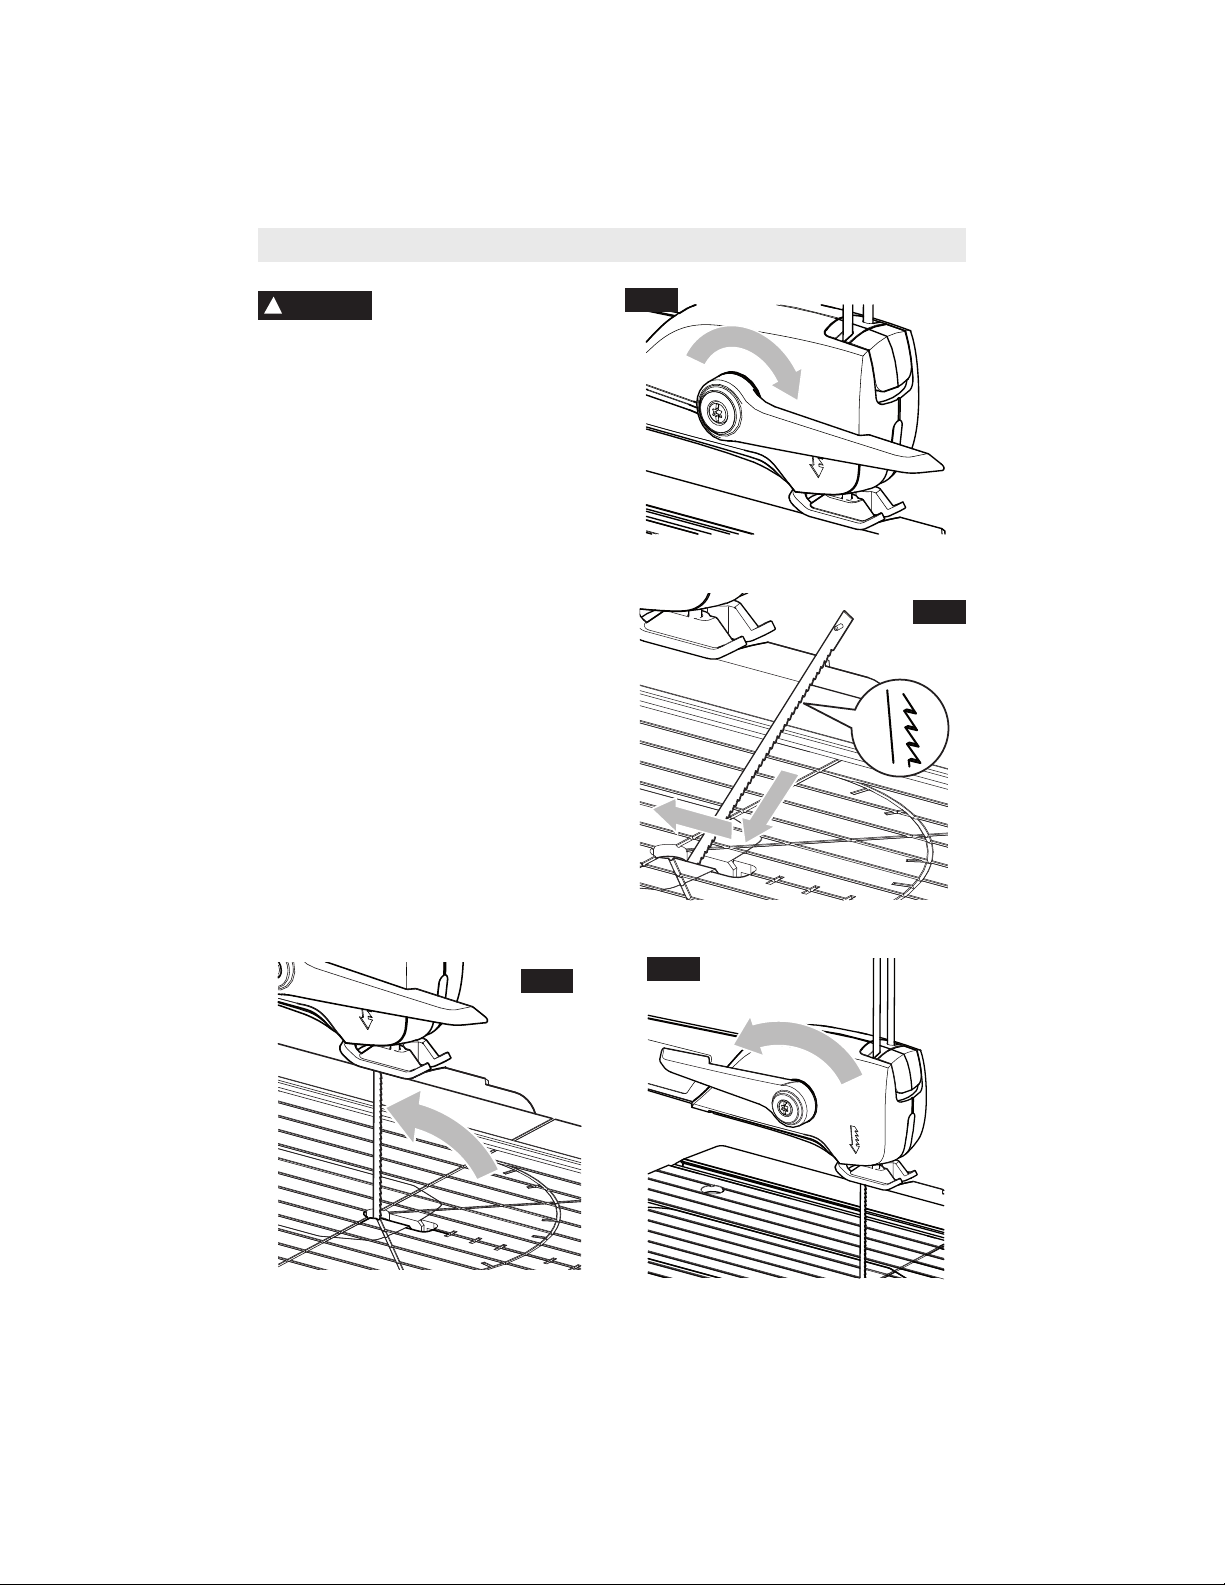
Attaching Blade onto Moto-Saw
1. When facing front of tool, pull quick
change lever towards yourself to the
loosened position, Fig. 2.
2. Place bottom pin end of saw blade into
bottom corner of lower accessory holding
area. The blade teeth must be pointing
down, Fig. 3.
3. Place top pin end of saw blade into top
accessory holding area of tool by pivoting
it forward into top holding area of tool,
Fig. 4.
4. Push quick change lever away from you to
tightened position to secure blade,
Fig. 5.
To remove the accessory, reverse the above
steps.
Disconnect the plug from
the power source before
FIG. 2
7
FIG. 3
FIG. 4
FIG. 5
9
Find Quality Products Online at: [email protected]
www.GlobalTestSupply.com
Page 10
Assembling Base Station for
Stationary Use
WARNING
!
making any assembly, adjustments or
changing accessories. Such preventive
safety measures reduce the risk of starting
the tool accidentally.
Mount the Base Station to a flat working
surface of a comfortable height. Insure that
the working surface is of a thickness that can
accept the clamps and/or mounting screws.
Mounting the Base Station to an unstable
surface can invite an accident.
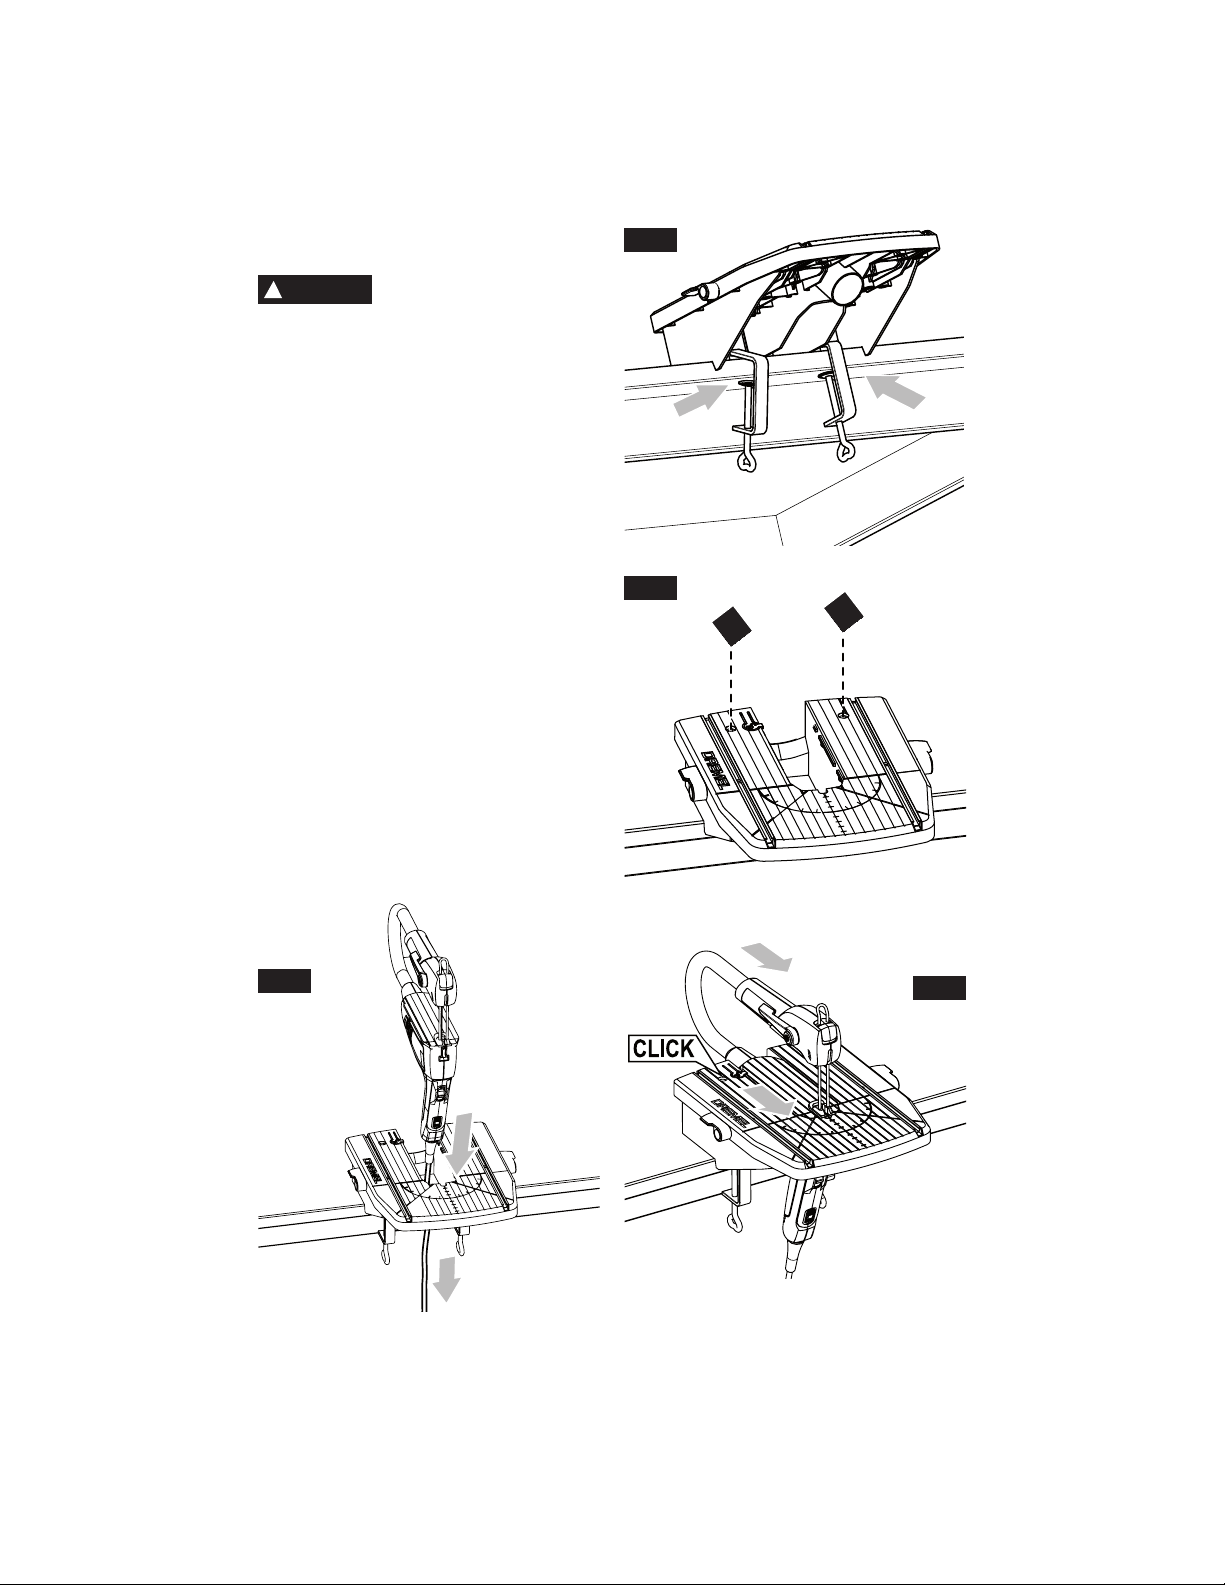
1. Position the saw station at the front edge
of the flat work surface the saw station will
be clamped to.
2. Unthread the provided clamps to ensure
they will be able to clamp to the work
surface. Slide the flat edge of the clamp
into the slot in the bottom of the saw
station and tighten the clamp to prevent
the saw station from shifting during use,
Fig. 6.
The base can be permanently secured to a
work bench with regular screws through
the two holes located on the top of the
base, Fig. 7.
3. Feed the Moto-Saw cord through the hole
in the center of the base, Fig. 8.
4. Lower the Moto-Saw to the saw station
surface then push forward until it clicks
into the locked position, Fig. 9.
Disconnect the plug from
the power source before
FIG. 6
FIG. 7
FIG. 8
FIG. 9
10
Find Quality Products Online at: [email protected]
www.GlobalTestSupply.com
Page 11
To remove the Moto-Saw for
hand held use
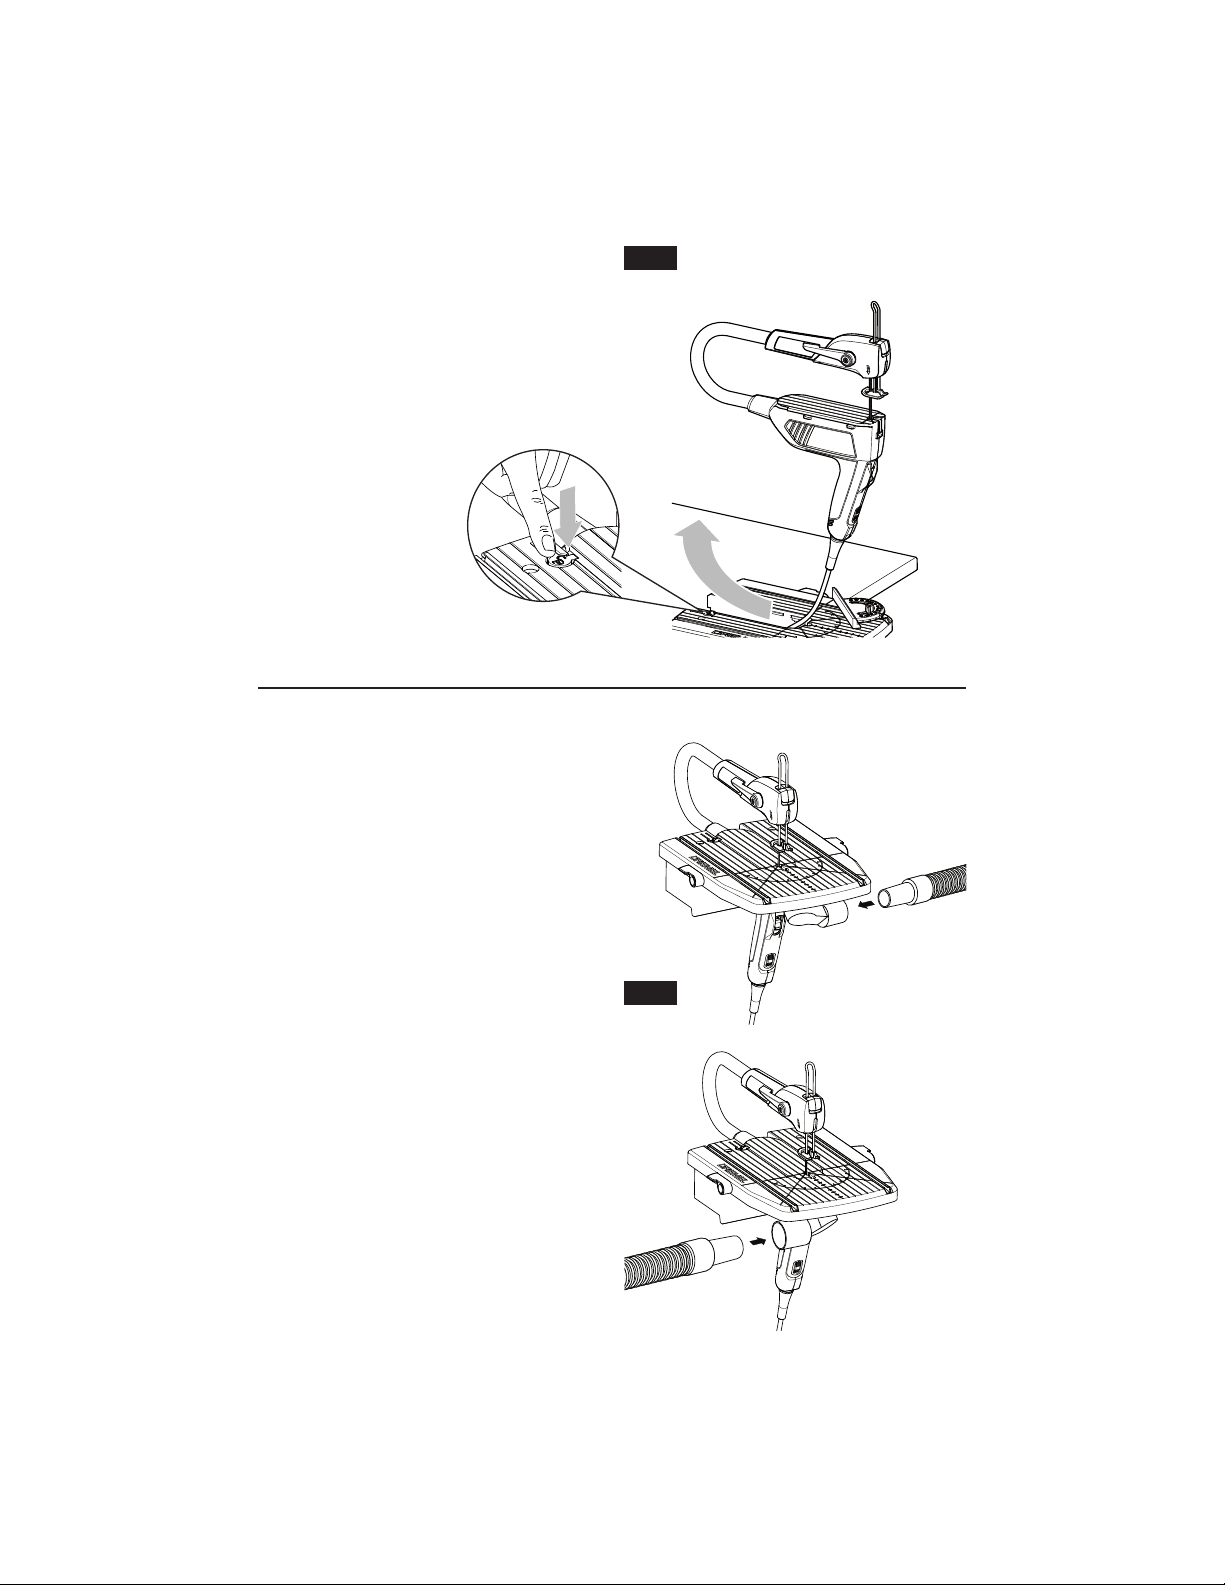
1. Unplug the Moto-Saw.
2. Press the release lock release button at
the rear of the saw station work surface.
3. Slide the Moto-Saw back to release from
the lock mechanism.
4. Pull the Moto-Saw up from the saw station
and pull the cord through the saw station.
Installing Dust Extraction
When connecting tool to dust collection and
extraction systems, be sure these are
connected and used according to tool and
vacuum instructions. Proper use of dust
collection systems maximizes effectiveness.
Do not use dust extraction when working on
metal. Particles from sanding, grinding or
cutting metal may be hot and may spark
which may melt plastic adaptors, vacuum
hoses, and may cause a fire inside the
vacuum bag/tank.
Position vacuum hoses such that you do not
block the power switch. You must maintain
clear access to the ON/OFF switch for full
control.
Your Moto-Saw includes a vacuum dust
adapter. The adaptor can be used to connect
the vacuum hose to either the left or the right
side of the tool, Fig. 11.
The outside of the adaptor can be used to
connect 1 5/8 in. and the inside of the
adapter can be used to connect 1 3/8 in.
1. Attach dust extraction adaptor onto saw
station.
2. Attach vacuum hose to vacuum adaptor.
To remove, reverse instructions.
FIG. 10
FIG. 11
11
Find Quality Products Online at: [email protected]
www.GlobalTestSupply.com
Page 12
Installing Fence / Miter Gauge
(Optional Accessory)
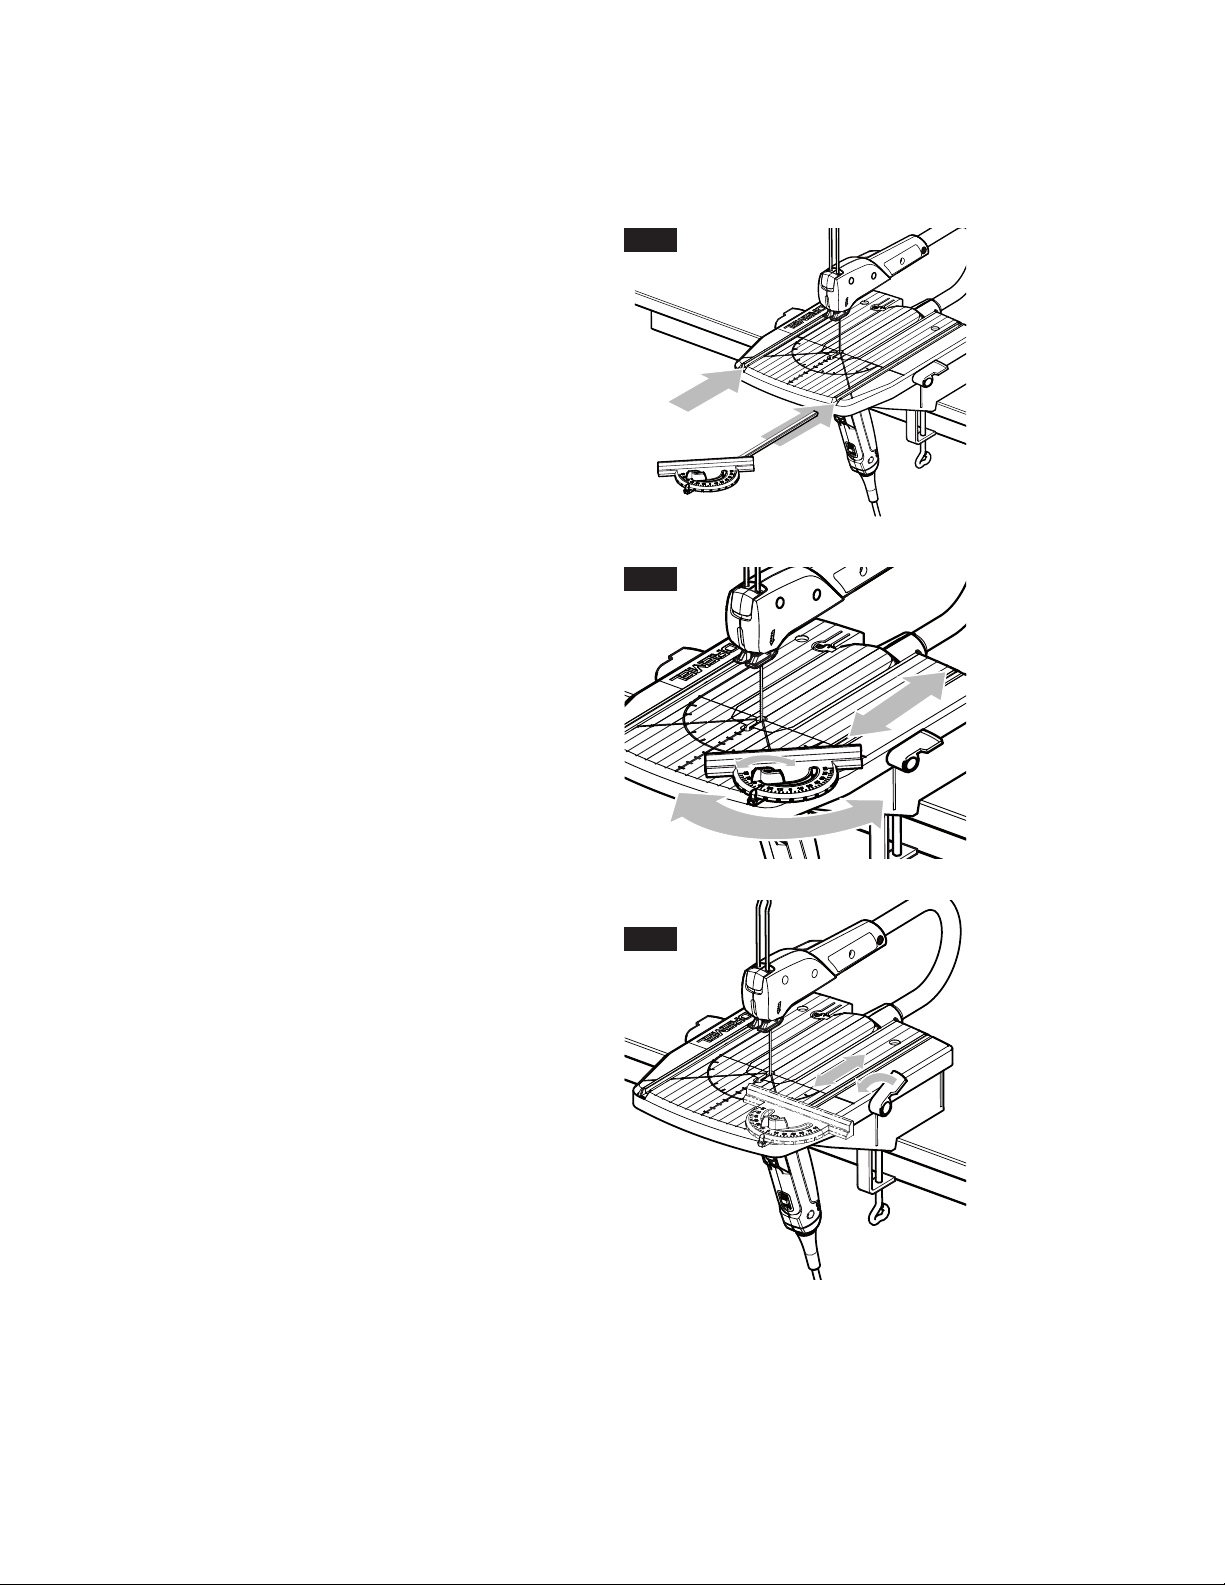
Your Moto-Saw can use a combination fence
and miter gauge.
For use as a miter gauge:
1. To use the miter gauge slide the metal T
section into the track in the surface of the
saw station, Fig. 12.
2. Twist the knob on the miter gauge to
adjust the angle of the miter gauge and
tighten at the desired angle, Fig. 13.
For use as a fence:
1. Install the miter gauge as described
above.
2. Adjust the miter angle to 90° then slide the
miter gauge to the desired fence position,
Fig. 14.
3. Rotate the blue lever on the side of the
saw station forward to lock.
To remove, reverse procedure.
FIG. 12
FIG. 13
12
FIG. 14
Find Quality Products Online at: [email protected]
www.GlobalTestSupply.com
Page 13
Operating Instructions
The Moto-Saw is a compact and very easy to
use 2-in-1 scroll saw. It can be used either in
stationary mode, when the tool is docked in
its base or in hand-held mode. This tool is
intended to perform precise straight and
curved cuts in different materials including
soft wood, hard wood, composite boards,
laminate, PVC or soft sheet metal using the
applicable accessories recommended by
Dremel.
Operation - Hand-Held Mode
Using the Moto-Saw in hand-held mode is
advised when the work piece is too big or
fixed and therefore cannot be put onto and
maneuvered about the base. Typical handheld operation includes coping or shaping
large wood workpieces. Do not cut materials
other than wood in hand held mode.
WARNING
!
plugging the tool in, check that the
switches are "OFF". Accidental start-ups
may cause injury.
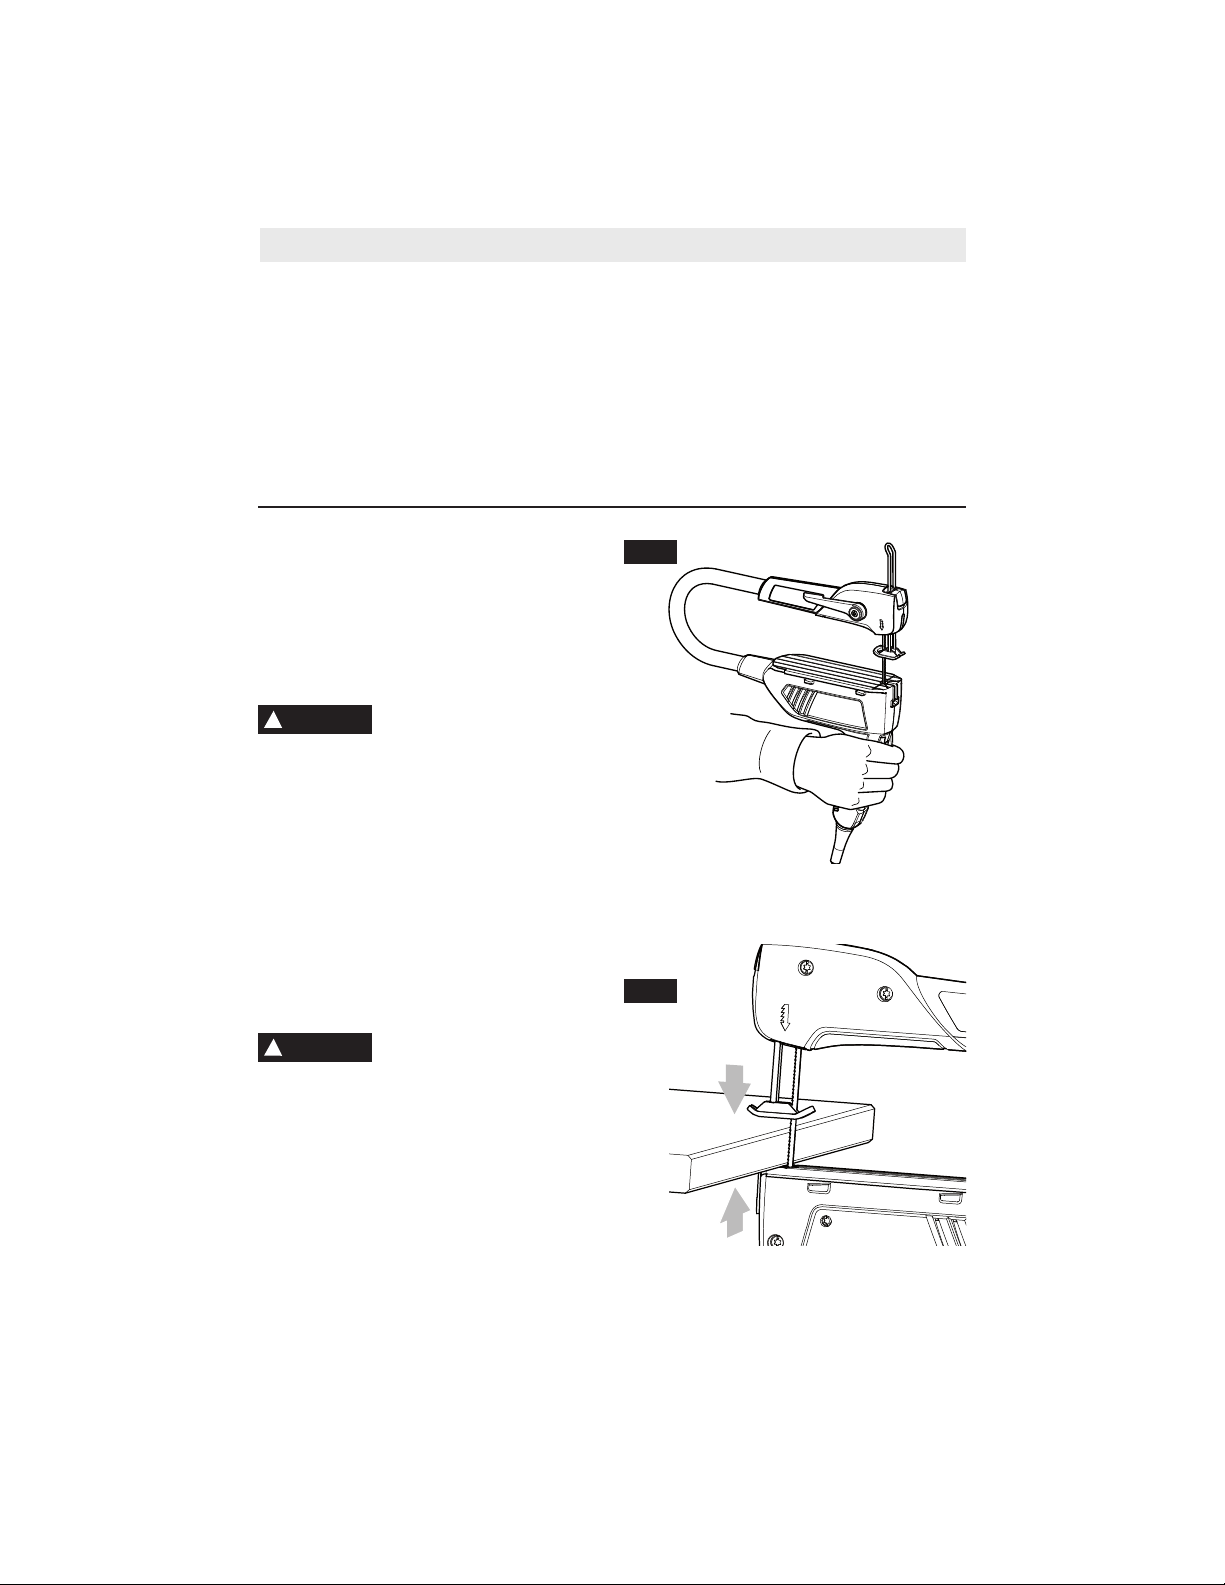
1. Grasp the Moto-Saw as shown in Fig. 15.
2. Adjust the variable speed dial based on
the blade and material you are going to
cut. You can refer to the chart on page 18
to determine the proper speed. This chart
enable you to select both the correct
accessory and the optimum speed at a
glance.
3. With the work securely clamped take the
tool the work and adjust the hold down foot
so that it rests on the workpiece, Fig. 16.
WARNING
!
the workpiece. Allow the motor to come
up to full speed before starting a cut.
Having the blade in contact with the
workpiece on start up may cause loss of
control.
4. Turn the tool ON and let the tool come up
to speed before contacting the work piece.
The tool is switched "ON" by the slide
switch located on the front of primary
handle.
TO TURN THE TOOL "ON", slide the
switch button up.
Never leave the switch in
"ON" position. Before
Never start the tool when
the blade is in contact with
The teeth of this tool only cut on the down
stroke. The work must be fed into the saw
blade very slowly because the teeth are
small and can remove only small amounts of
material on each stroke. Trying to cut too
fast will bend or break the blade.
To get most accurate cuts, compensate for
the blades tendency to follow the wood grain
as you are cutting.
FIG. 15
FIG. 16
13
Find Quality Products Online at: [email protected]
www.GlobalTestSupply.com
Page 14

5. Slowly feed the workpiece into the blade
while guiding the cut.
WARNING
!
workpiece. Cut accuracy may be
compromised and the blade may break from
excessive force.
6. When the cut is complete, move the tool
and blade clear of the workpiece and turn
the switch to OFF.
TO TURN THE TOOL "OFF", slide the
switch button down.
Do not force the saw into
and through the
Stationary Mode
Using the Moto-Saw in stationary mode gives
you the freedom to cut with both hands
holding your work piece. In this mode you
can complete different hobby or wood
working projects by precisely cutting wood,
plastic and thin metal workpieces easily
when using the correct blade.
WARNING
!
plugging the tool in, check that the
switches are "OFF". Accidental start-ups
could cause injury.
1. Make sure the base is securely attached to
a flat work surface with the help of the
clamps provided or secured with screws.
2. Adjust the variable speed dial based on
the blade and material you are going to
cut. You can refer to the chart on page 18
to determine the proper speed. This chart
enable you to select both the correct
accessory and the optimum speed at a
glance. In order to reduce vibrations when
cutting plastics and sheet metal, place
your workpiece on top of a piece of
cardboard as a dampener. Cut through
both materials for a cleaner, more accurate
cut.
3. Take the work piece to the tool.
WARNING
!
hold pieces so small that your fingers go
under the drop foot. Do not reach
Never leave the switch in
"ON" position. Before
Keep hands away from
cutting area. Do not hand-
underneath work or in blade cutting path
with your hands and fingers for any
reason. Close hand proximity to the blade
may result in blade contact and injury.
4. Press down the hold down foot onto your
work piece to prevent it from bouncing.
WARNING
!
the workpiece. Allow the motor to come
up to full speed before starting a cut.
Having the blade in contact with the
workpiece on start up may cause loss of
control.
5. Turn the tool ON and let the tool come up
to speed before contacting the work piece.
The tool is switched "ON" by the slide
switch located on the front of primary
handle.
TO TURN THE TOOL "ON", slide the
switch button up.
WARNING
!
workpiece. Cut accuracy may be
compromised and the blade may break from
excessive force.
6. When the cut is complete, move the
trailing edge of the workpiece beyond the
hold down foot and turn the switch to OFF.
TO TURN THE TOOL "OFF", slide the
switch button down.
Never start the tool when
the blade is in contact with
Do not force the saw into
and through the
14
Find Quality Products Online at: [email protected]
www.GlobalTestSupply.com
Page 15
Interior Cutting – Hand-Held Mode
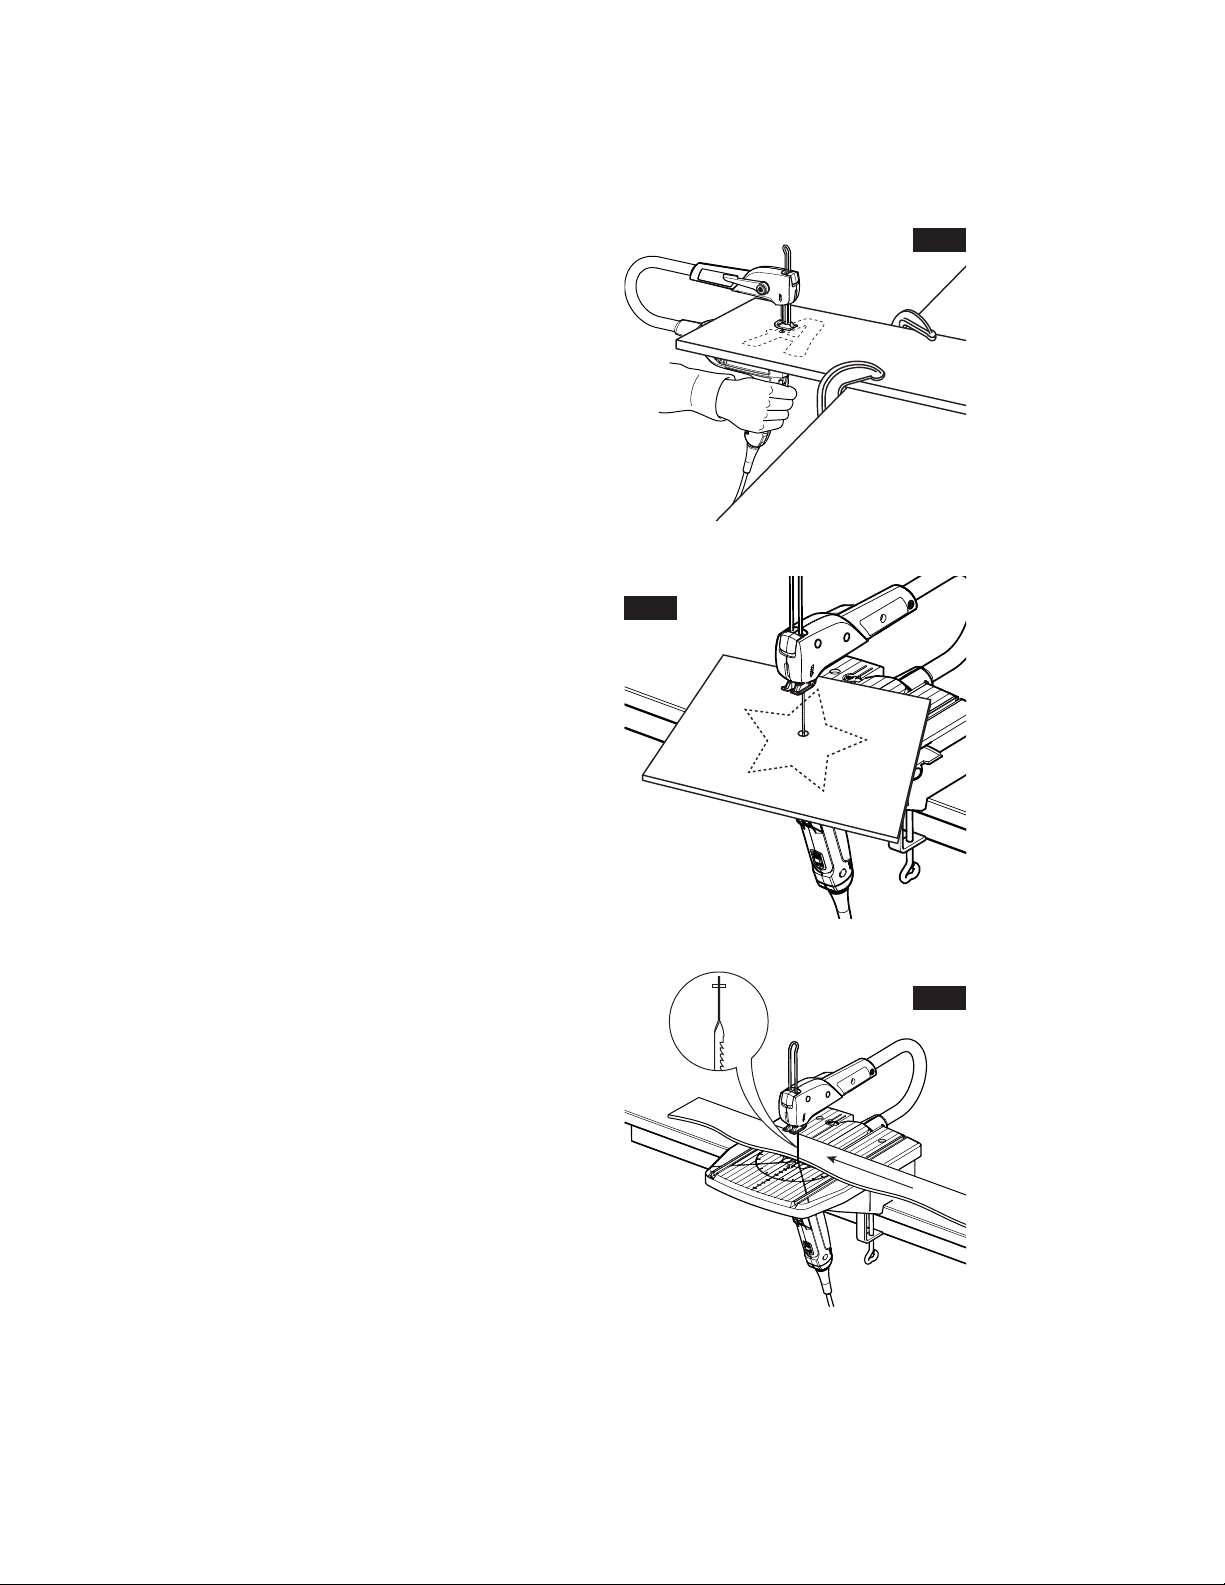
1. Lay-out the design of the workpiece. Drill a
¼“ hole into the workpiece.
2. Remove the blade from the saw. Refer to
the section “Attaching Blade onto MotoSaw.”
3. Refer to the section “Attaching Blade onto
Moto-Saw” and reinstall the blade through
the hole in the workpiece.
4.Follow steps three through five in
“Operation – Hand-Held Mode.”
5. When cutting is complete, refer to the
section ““Attaching Blade onto Moto-Saw”
to remove the saw blade to free the
workpiece.
Interior Cutting – Stationary Mode
1. Lay-out the design of the workpiece. Drill a
¼“ hole into the workpiece.
2. Remove the blade from the saw. Refer to
the section “Attaching Blade onto MotoSaw.”
3. Place the workpiece on the saw table with
the hole in the workpiece over the access
hole in the table.
4. Refer to the section “Attaching Blade onto
Moto-Saw” and reinstall the blade through
the hole in the workpiece.
5. Follow the steps in “Operation – Stationary
Mode.”
6. When cutting is complete, refer to the
section “Attaching Blade onto Moto-Saw”
to remove the saw blade to free the
workpiece.
FIG. 17
FIG. 18
Side Cutting
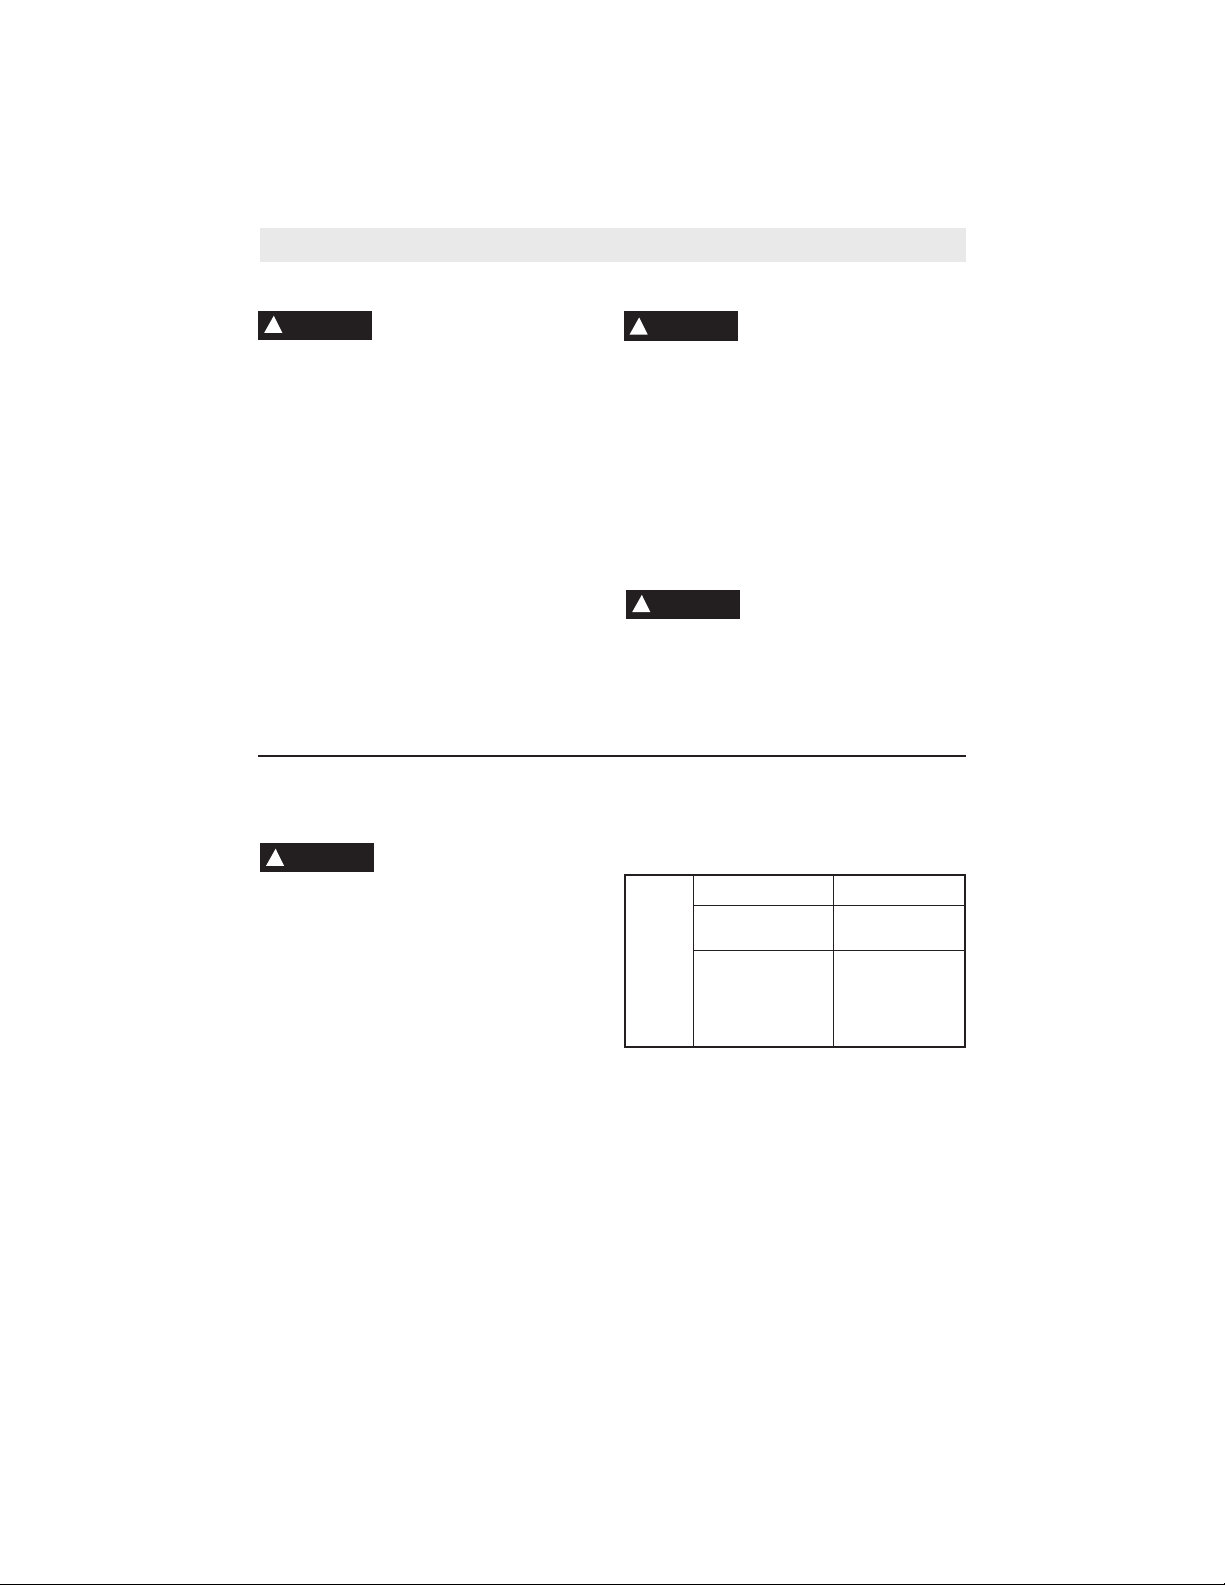
Using the Moto-Saw with a side cutting blade
allows you to make cuts from left to right or
right to left across the tool. In this
configuration you have the ability to work with
longer pieces of wood and plastic materials
that may be too large for cutting in a front-toback direction as material will not strike the
back of the tool. Do not side cut metal.
1. Refer to the section “Attaching Blade onto
Moto-Saw” and install the MS50 side
cutting blade to the Moto-Saw.
2. Follow the steps in “Operation – Hand
Held Mode” for side cutting wood or
“Operation – Stationary Mode” for side
cutting wood and plastic.
15
Find Quality Products Online at: [email protected]
www.GlobalTestSupply.com
FIG. 19
Page 16
Maintenance Information
Service
!
WARNING
the battery pack from the power tool before
making any adjustments, changing
accessories, or storing power tools. Such
preventive safety measures reduce the risk of
starting the power tool accidentally.
The product must only be serviced by a
Dremel Factory Service Center. This
product does not contain user serviceable
parts other than those addressed in this
manual.
Disconnect the plug from
the power source and/or
Extension Cords
WARNING
!
adequate size conductors that is capable
of carrying the current necessary for your
tool must be used. This will prevent
excessive voltage drop, loss of power or
overheating. Grounded tools must use 3-wire
extension cords that have 3-prong plugs and
receptacles.
NOTE: The smaller the gauge number, the
heav i er the cord.
If an extension cord is
necessary, a cord with
Cleaning
!
WARNING
battery pack from the power tool before
making any adjustments, changing
accessories, or storing power tools. Such
preventive safety measures reduce the risk of
starting the power tool accidentally.
The tool may be cleaned most effectively with
compressed dry air. Always wear safety
goggles when cleaning tools with
compressed air. Ventilation openings and
switch levers must be kept clean and free of
foreign matter. Do not attempt to clean by
inserting pointed objects through openings.
!
CAUTION
plastic parts. Some of these are: gasoline,
carbon tetrachlo ride, chlo rinated cleaning
solvents, ammonia and house hold detergents
that contain ammonia.
RECOMMENDED SIZES OF EXTENSION CORDS
120 VOLT ALTERNATING CURRENT TOOLS
Tool’s
Ampere
Rating
2-6
6-8
8-10
10-12
12-16
Disconnect the plug from
the power source and/or the
Certain cleaning agents
and sol vents damage
Cord Size in A.W.G.
Cord Length in Feet Cord Length in Meters
25 50 100 150 15 30 60 120
18 16 16 14 0.75 0.75 1.5 2.5
18 16 14 12 0.75 1.0 2.5 4.0
18 16 14 12 0.75 1.0 2.5 4.0
16 16 14 12 1.0 2.5 4.0 —
14 12 — — — — — —
Wire Sizes in mm
2
16
Find Quality Products Online at: [email protected]
www.GlobalTestSupply.com
Page 17

Moto-Saw Accessories
!
WARNING
minimizes the risk of breakage.
Teeth on Moto-Saw blades wear out and
must be replaced frequently for best cutting
results.
Moto-Saw blades are intended to stay sharp
for ½ hour to 2 hours of cutting.
Blade life depends on the material being cut,
thickness, blade type and the user.
Users can shorten the life of the blade by
pushing too hard when cutting.
MS51 General Wood & Plastic Blade
Intended for making straight and larger
diameter curved cuts in materials such as
soft wood, laminate and plastics.
Use only Dremel Moto-Saw blades. Use the right blade size, style and
cutting speed for the material and the type of cut. Using the proper blade
Moto-Saw Blades
MS52 Fine Wood Cutting Blade
Intended for makng straight and smaller
diameter intricate curved cuts in materials
such as soft wood, laminate and plastics.
MS53 Metal Cutting Blade
Intended for making straight and curved cuts
in soft sheet metal.
MS50 Side Cutting Blade
Intended for making long straight and curved
cuts in larger pieces of soft wood and plastic
materials.
17
Find Quality Products Online at: [email protected]
www.GlobalTestSupply.com
Page 18

Speed Settings
Tool
Material
Wood
Metal
Plastic
Plywood 6 .75” x x x
Pine 6 .75” x x x
Poplar 6 .75” x x x
Balsa 6 1.75” x x x
Laminate Flooring 6 .5” x x x
HVAC 6 20-ga. x
TIN 6 20-ga. x
AL sheet 6 20-ga. x
Gal. Sheet Metal 6 20-ga. x
Plexiglass 4 .2” x x x
PVC Pipe 4 .75” x x x
Speed
Recommended
Thickness
Scroll Saw/Moto-Saw Tips
• Three things will have great effect on the
cut when using a scroll type saw:
1. The material being cut.
2. Blade speed (strokes per minute blade).
3. Cutting speed (how fast material is
pushed into blade).
• There is not ONE blade that is the best for
every given job.
• A coarse blade should be used for thicker
material and a finer blade for thinner
material. The thinner the blade, the
sharper the turn it can execute.
• There should always be 3 to 4 teeth in
contact with the work at all times.
• Cutting hard material like metal and
material that can melt, like acrylic, will
generally require slower speed on the tool
and a lower feed rate.
• The best starting point on any cut is at a
point or corner because you can control
MS51 Wood
& Plastic
Blade
MS52 Fine
Wood
Blade
MS53
Metal
Blade
MS50 Side
Cutting
Blade
the intersection of the cut and make it as
smooth as it needs to be.
• Certain actions will require practice – like
cutting a corner or a 180° turn.
• Saws that scroll can present a challenge
when attempting a straight cut. With some
practice, it’s easy to do. Practice
compensating for the grain by turning the
material slightly to stay on a straight line.
Once the degree of compensation is
determined for any material, being able to
then cut a straight line will only be a matter
of blade selection, speed, and feed rate.
• If a blade seems to be cutting slowly or
seems to wander with little means of
control, chances are the blade is becoming
dull. There’s no substitute for a sharp
blade. Wood and metal will both dull a
blade quickly. If a lot of cutting is being
completed, change your blade as often as
necessary.
18
Find Quality Products Online at: [email protected]
www.GlobalTestSupply.com
Page 19

Dremel®Limited Warranty
Your Dremel product is warranted against defective material or workmanship for a period of two years from
date of purchase. In the event of a failure of a product to conform to this written warranty, please take the
following action:
1. DO NOT return your product to the place of purchase.
2. Carefully package the product by itself, with no other items, and return it, freight prepaid, along with:
A. A copy of your dated proof of purchase (please keep a copy for yourself).
B. A written statement about the nature of the problem.
C. Your name, address and phone number to:
We recommend that the package be insured against loss or in transit damage for which we cannot be
responsible.
This warranty applies only to the original registered purchaser. DAMAGE TO THE PRODUCT RESULTING
FROM TAMPERING, ACCIDENT, ABUSE, NEGLIGENCE, UNAUTHORIZED REPAIRS OR ALTERATIONS,
UNAPPROVED ATTACHMENTS OR OTHER CAUSES UNRELATED TO PROBLEMS WITH MATERIAL OR
WORKMANSHIP ARE NOT COVERED BY THIS WARRANTY.
No employee, agent, dealer or other person is authorized to give any warranties on behalf of Dremel. If
Dremel inspection shows that the problem was caused by problems with material or workman ship within the
limitations of the warranty, Dremel will repair or replace the product free of charge and return product
prepaid. Repairs made necessary by normal wear or abuse, or repair for product outside the warranty period,
if they can be made, will be charged at regular factory prices.
DREMEL MAKES NO OTHER WARRANTY OF ANY KIND WHATEVER, EXPRESSED OR IMPLIED, AND ALL
IMPLIED WARRANTIES OF MERCHANTABILITY AND FITNESS FOR A PARTICULAR PURPOSE WHICH
EXCEED THE ABOVE MENTIONED OBLIGATION ARE HEREBY DISCLAIMED BY DREMEL AND EXCLUDED
FROM THIS LIMITED WARRANTY.
This warranty gives you specific legal rights and you may also have other rights which vary from state to
state. The obligation of the warrantor is solely to repair or replace the product. The warrantor is not liable for
any incidental or consequential damages due to any such alleged defect. Some states do not allow the
exclusion or limitation of incidental or consequential damages, so the above limitations or exclusion may not
apply to you.
For prices and warranty fulfillment in the continental United States, contact your local Dremel distributor.
19
Find Quality Products Online at: [email protected]
www.GlobalTestSupply.com
 Loading...