

Page 1
1
USER'S MANUAL
PLEASE READ ALL THE INSTRUCTIONS IN THE MANUAL
CAREFULLY BEFORE ASSEMBLY AND USE OF THE TREADMILL.
PLEASE KEEP THIS FOR FUTURE REFERENCE.
Page 2

2
CONTENT
CONTENT --------------------------------------------------------------------------------------------------------------------------------
IMPORTANT SAFETY PRECAUTIONS ----------------------------------------------------------------------------------
ASSEMBLY INSTRUCTION------------------------------------------------------------------------------------------------------
GROUNDING METHODS ----------------------------------------------------------------------------------------------------------
OPERATION GUIDE ------------------------------------------------------------------------------------------------------------
GETTING STARTED GUIDE ----------------------------------------------------------------------------------------------------
SAFETY EXERCISES --------------------------------------------------------------------------------------------------------------
WARM-UP EXERCISES -----------------------------------------------------------------------------------------------------------
MAINTENANCE INSTRUCTIONS -------------------------------------------------------------------------------------------
2
Page 3
3
IMPORTANT SAFETY PRECAUTIONS
T
N
1
2
M4*15
3
5#
4
6#
5
13-14#
WARNING: Before starting any exercise program, consult with your physician or health professional , especially any
person who is above 35 years old or has experienced some health problems before. We cannot be responsible for any injuries
or accidents due to the above reasons. Don't turn the power on until you finish assembling the treadmill and covering the
motor.
ATTENTION:
1. When using this treadmill, ensure you attach the safety pull pin
rope to your clothes or belt.
2. Do not plug anything into any parts of this equipment, as it may cause damage.
3. Position the treadmill on a clear, level surface. Do not place the treadmill on thick carpet as it may interfere with proper
ventilation. Also, do not place the treadmill near water or outdoors.
4. Never start the treadmill while you are standing on the walking belt. After turning the power on and adjusting the speed
control, there may be a pause before the walking belt begins to move, always stand on the foot rails on the sides of the frame
until the belt is moving.
5. Wear appropriate clothing when exercising on the treadmill. Do not wear long, loose fitting clothing that could become
caught in the treadmill. Always wear running or aerobic shoes with rubber soles.
6. Keep children or pets away from the treadmill during operation.
7. Do not do exercise until 40 minutes after a meal.
8. The treadmill is specifically for adult use, mature children who use the treadmill must have adult supervision.
9. Always hold the handrails when initially walking or running on the treadmill, until you are familiar with the use of the
treadmill.
10. The treadmill is for indoor equipment, do not use outdoor. Position the treadmill on a clean, level surface. The treadmill
is made using special equipment, please do not remodel or copy others.
11. The power cord of motorized treadmill is specialized. If the power cord is damaged, please purchase it from distributor or
contact our company directly.
12. If the treadmill should suddenly increase in speed due to an electronics failure or the speed inadvertently increased, the
treadmill will come to a sudden stop when the pull pin is disengaged from the console.
13. Do not connect anything in the middle of the power cord, extend the power cord or replace the power cord plug. DO
NOT Stack weight objects on the power cord or place the power cord near high temperature heat, prohibit use the porous
socket, otherwise it will cause fire or electric shock injury accident
because of poor contact.
14. When the treadmill is not being used, the power cord should be unplugged and the safety pull pin
removed.
15. The treadmill is for home use only.
16. The treadmill maximum user weight is 100kgs
17. Please do not overuse the treadmill. Overuse can lead to an injury and do not misuse the treadmill, for your safety.
18. When the treadmill is not being used, please keep the safety pull pin in a safe place to avoid the other use.
ATTENTION: Please confirm that the complete assembly is as required above and all bolts are locked. Do the following
operations after checking everything is OK. Before you use the treadmill, please read the instructions carefully.
As above drawing, you can adjust lifting angle by changing pin’s position. There are 3 sections adjust key to be used.
ASSEMBLY INSTRUCTION
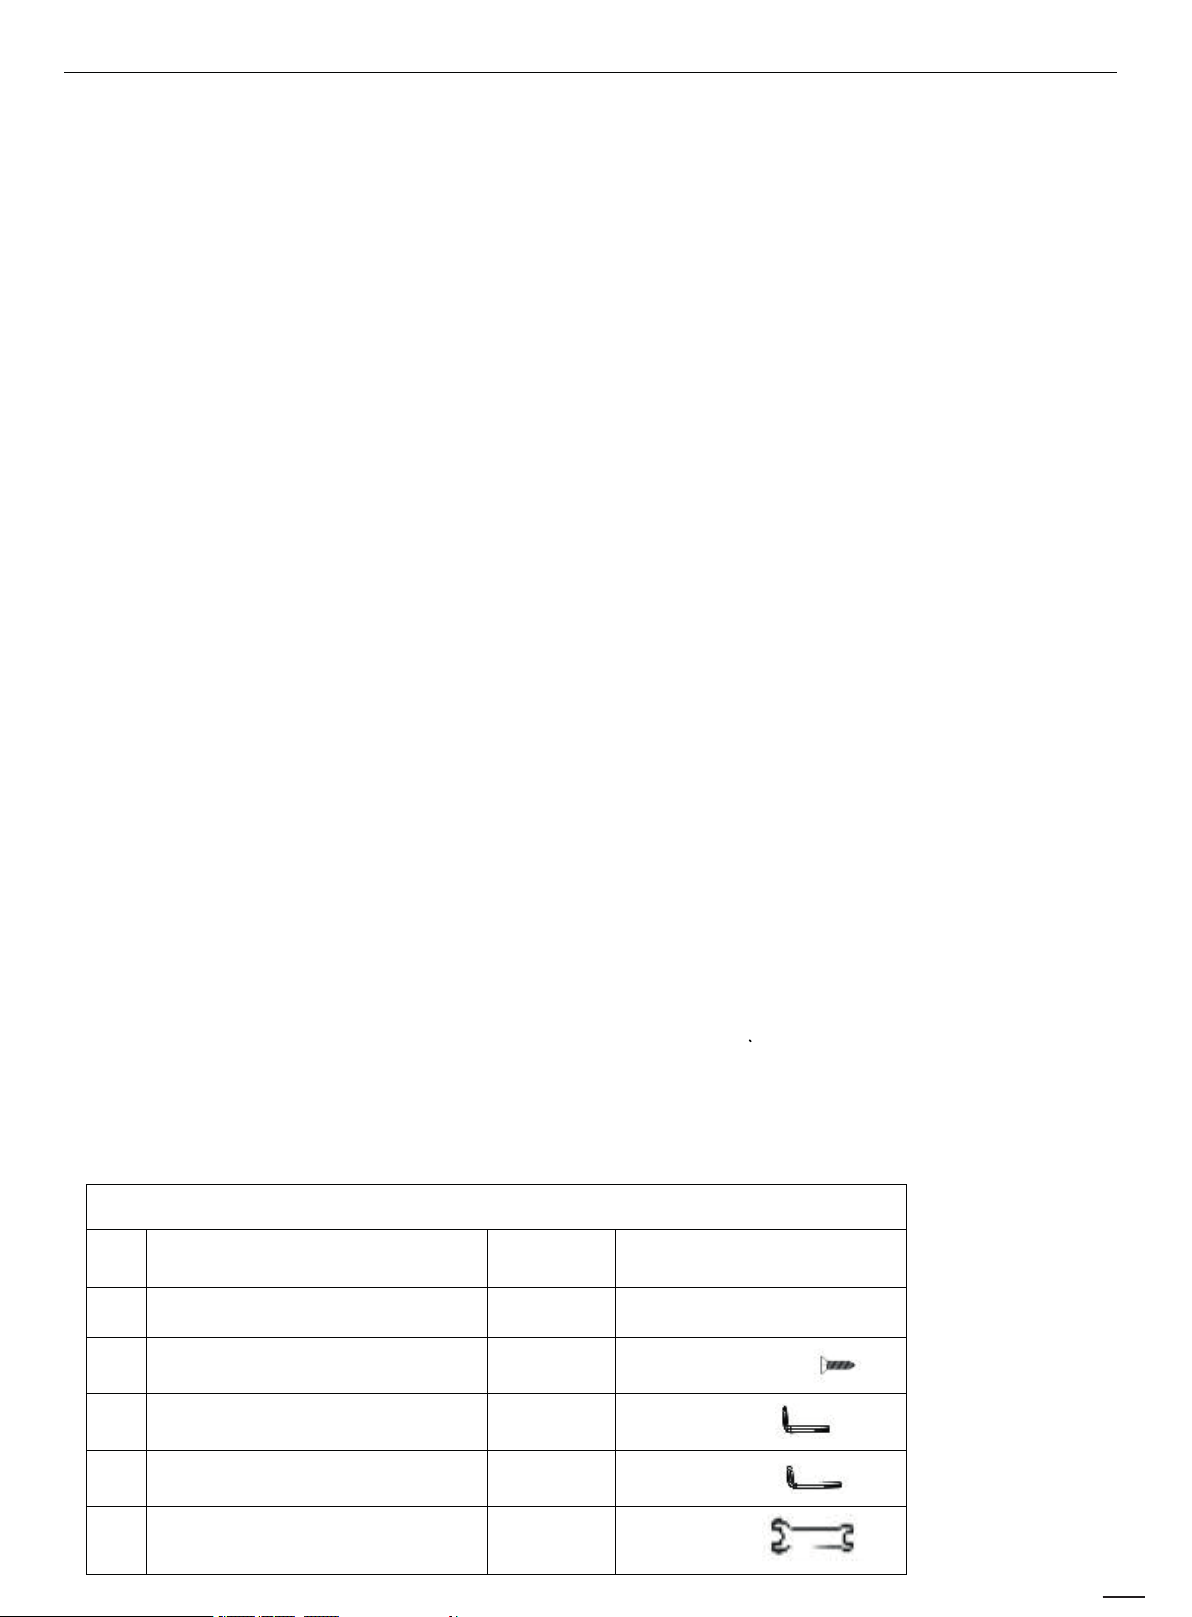
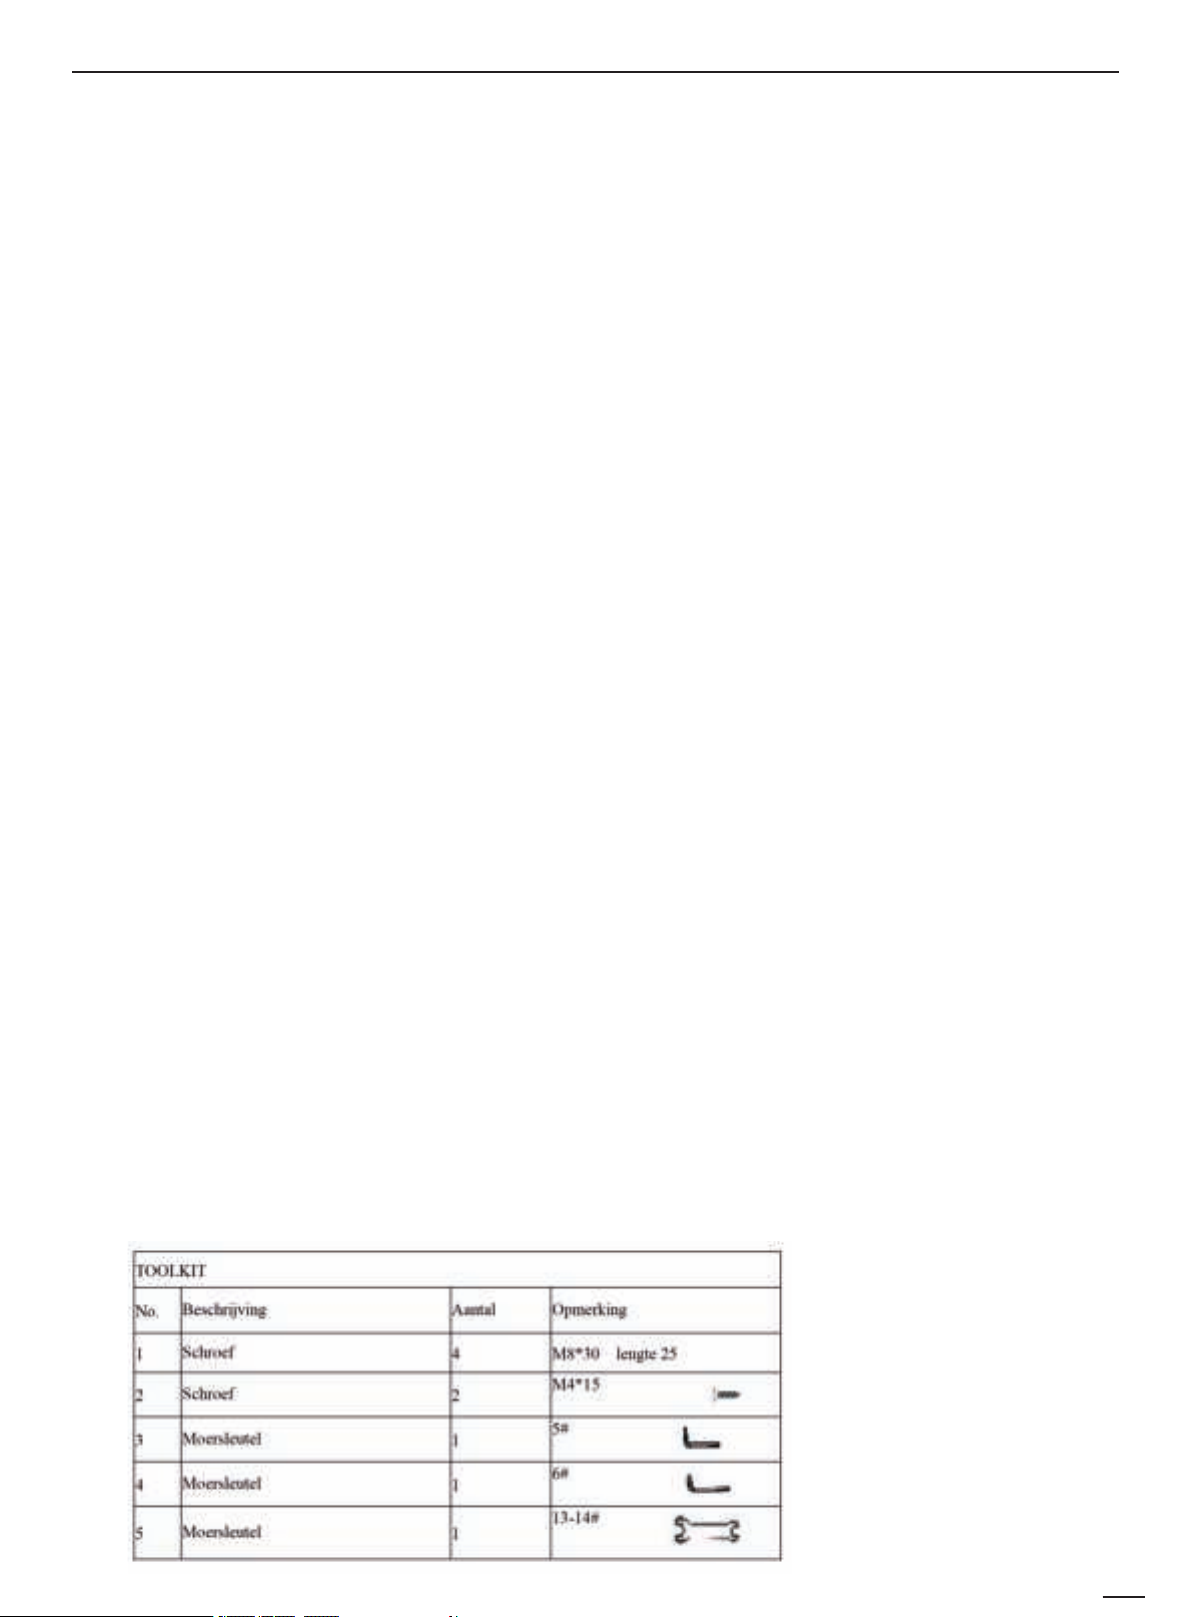
OOLKIT
o. Description Qty. Remark
Screw 4 M8*30 length 25
Screw 2
Wrentch 1
Wrentch 1
Wrentch 1
3
Page 4
4
Grounding Methods
This product must be grounded. If it should malfunction or breakdown, grounding provides a path of least resistance for
electric current to reduce the risk of electric shock. This product is equipped with a cord having an equipment-grounding
conductor and a grounding plug. The plug must be plugged into an appropriate outlet that is properly installed and grounded
in accordance with all local codes and ordinances.
DANGER – Improper connection of the equ
ipment-grounding conductor can result in a risk of electric shock. Check with a
qualified electrician or serviceman if you are in doubt as to whether the product is properly grounded. Do not modify the
plug provided with the product – if it will not fit the outlet, Please find a proper outlet installed by a qualified electrician.
. This product is for use on a nominal 220V circuit and has a grounding plug. Make that the product is connected to an outlet
4
Page 5
having the same configuration as the plug. No adapter should be used with this product.
Operation Guide
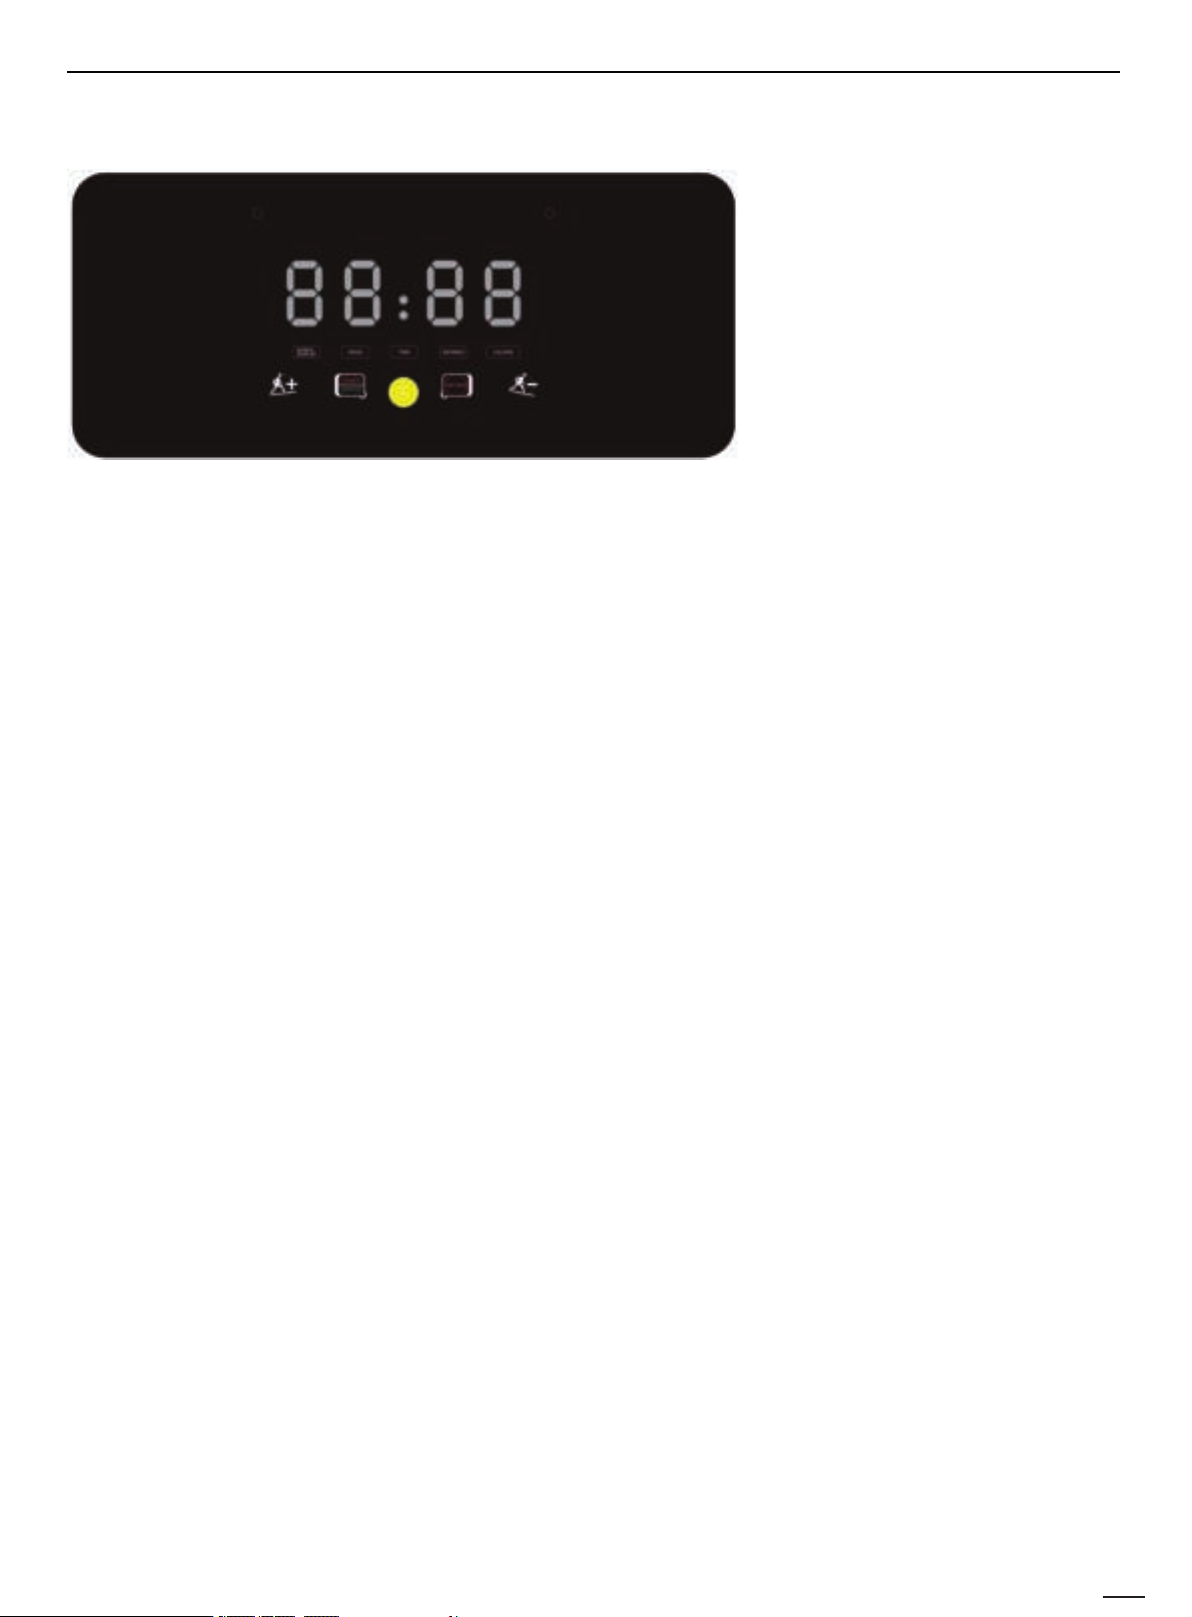
WIDOW DISPLAY
1. "TIME" window displays the exercise time, forward timing from 0: 00-59: 59, when the timing reaches 59: 59, the
walking machine will slow down and stop running and display "End", it will enter standby after 5 seconds of complete stop
State; the countdown counts down from the set time to zero. When the countdown reaches 0: 00, the walking machine stops
slowly and stops running and displays "End". It enters the standby state after 5 seconds of complete stop.
2. “DIS.”window displays the distance of movement. The forward count is from 0.00-99.9, the overflow is cleared and
counted up from 0, and the reverse count is decremented from the set value to zero. In the countdown mode, when the
countdown reaches At 0 o'clock, the walking machine stops at a steady speed and displays "End". It enters the standby state
after 5 seconds of complete stop.
3. "CAL." Window displays the caloric value of athletes. It counts from 0-999 when counting forward, clears when overflow
occurs and starts counting from 0. When counting backwards, it counts down from the set value to 0. In the countdown mode,
when the countdown reaches 0, the walking machine stops running at a slow speed and displays “End”, and enters the
standby state after 5 seconds of complete stop.
KEY FUNCTIONS
1. "PATTERN" is the mode selection key: Press this key in the standby mode to cycle through "0: 00", "10:00", "1.0",
"50" ("0: 00" is the manual mode, " "10:00" is the time countdown mode, "1.0" is the distance countdown mode, and "50"
is the calorie countdown mode.) When selecting various modes, you can use the speed and slope plus and minus keys to
set the relevant countdown. Value, press the "ON / OFF" key after setting is completed to start the walking machine.
2. "START / STOP" is the start / stop key: When the power is on and the safety lock is engaged, press this key at any time to
start the running of the walking machine. During the movement, you can use this button to stop the running of the walking
machine and reset it to zero.
3. "SPEED +" and "SPEED-" are speed plus and minus keys: standby state, used to adjust the set value. It is used to adjust
the speed after startup. Its adjustment range is 0.5 km / time. When it is continuously held for more than 0.5 seconds, it will
automatically increase or decrease.
OPERATION DURING EXERCISE
1. Pressing the deceleration key will reduce the running speed of the walking machine.
2. Pressing the accelerator will increase the running speed of the walking machine.
3. Press the stop button to decelerate to stop running.
MANUAL MODE
1. In the standby state, directly press the "START / STOP" key, the walking machine starts running at a speed of 1.0 km / h;
other windows start counting from 0, press the "SPEED +", "SPEED-" keys to change the speed .
2. In the standby state, press the "PATTERN" key to enter the time countdown mode. The "TIME" wi
ndow displays "10:00"
and flashes. Press the SPEED“+” and SPEED“-” keys to set the exercise time. The fixed range is: 5: 00—59: 00.
3. In the time countdown mode, press the "MODE" key to enter the distance countdown mode. The "DISTANCE" window
displays "1.0" and blinks. Press the SPEED“+” and SPEED“-” keys to set the movement distance and the distance setting.
The range is: 1.0-99.0.
4. In the distance countdown mode, press the "M" key to enter the calorie countdown mode. The "
CAL" window displays
"50" and flashes. Press theSPEED“+” and SPEED“-” keys to set the calories. The range is: 10-990.
5. Select one of the three countdown modes and press the start key after the setting is completed. The treadmill will start
running after a delay of 3 seconds. Press the SPEED“+” and SPEED“-”keys to adjust the speed; press the stop key to
5
5
Page 6
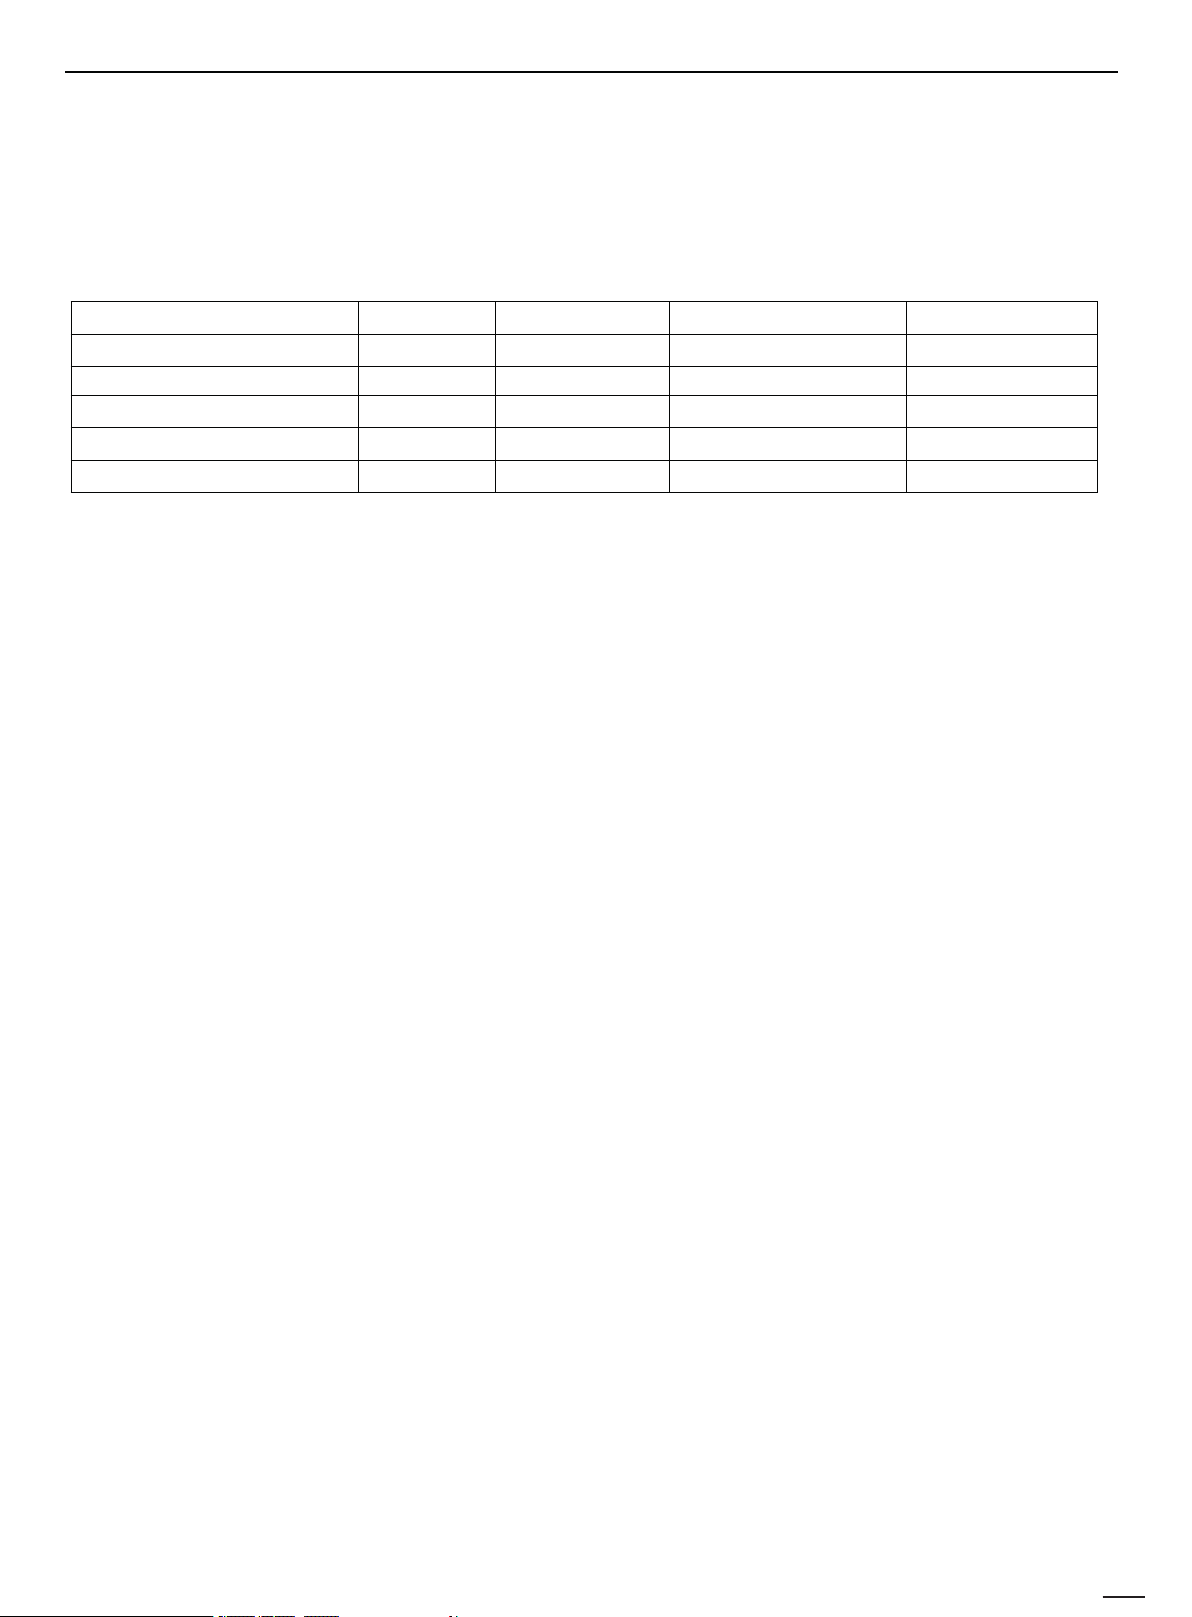
walk the machine Slowly stop running.
Set initial value
10:00
Speed (KM / H)
1.0
1.0
1.0-6.0
1.0-6.0
1.0
N/A
50
DISPLAY SWITCHING
1. After the walking machine is started, press the speed plus key to switch to the automatic window display; the display
window is switched every 5 seconds; the speed, time, distance, and road distance are displayed in turn, and the real-time
motion data is displayed.
2. After the walking machine is started, press the "PATTERN" key to switch the display window. Press in sequence: speed,
time, distance, calories, and tour display.
DISPLAY RANGE OF EACH VALUE
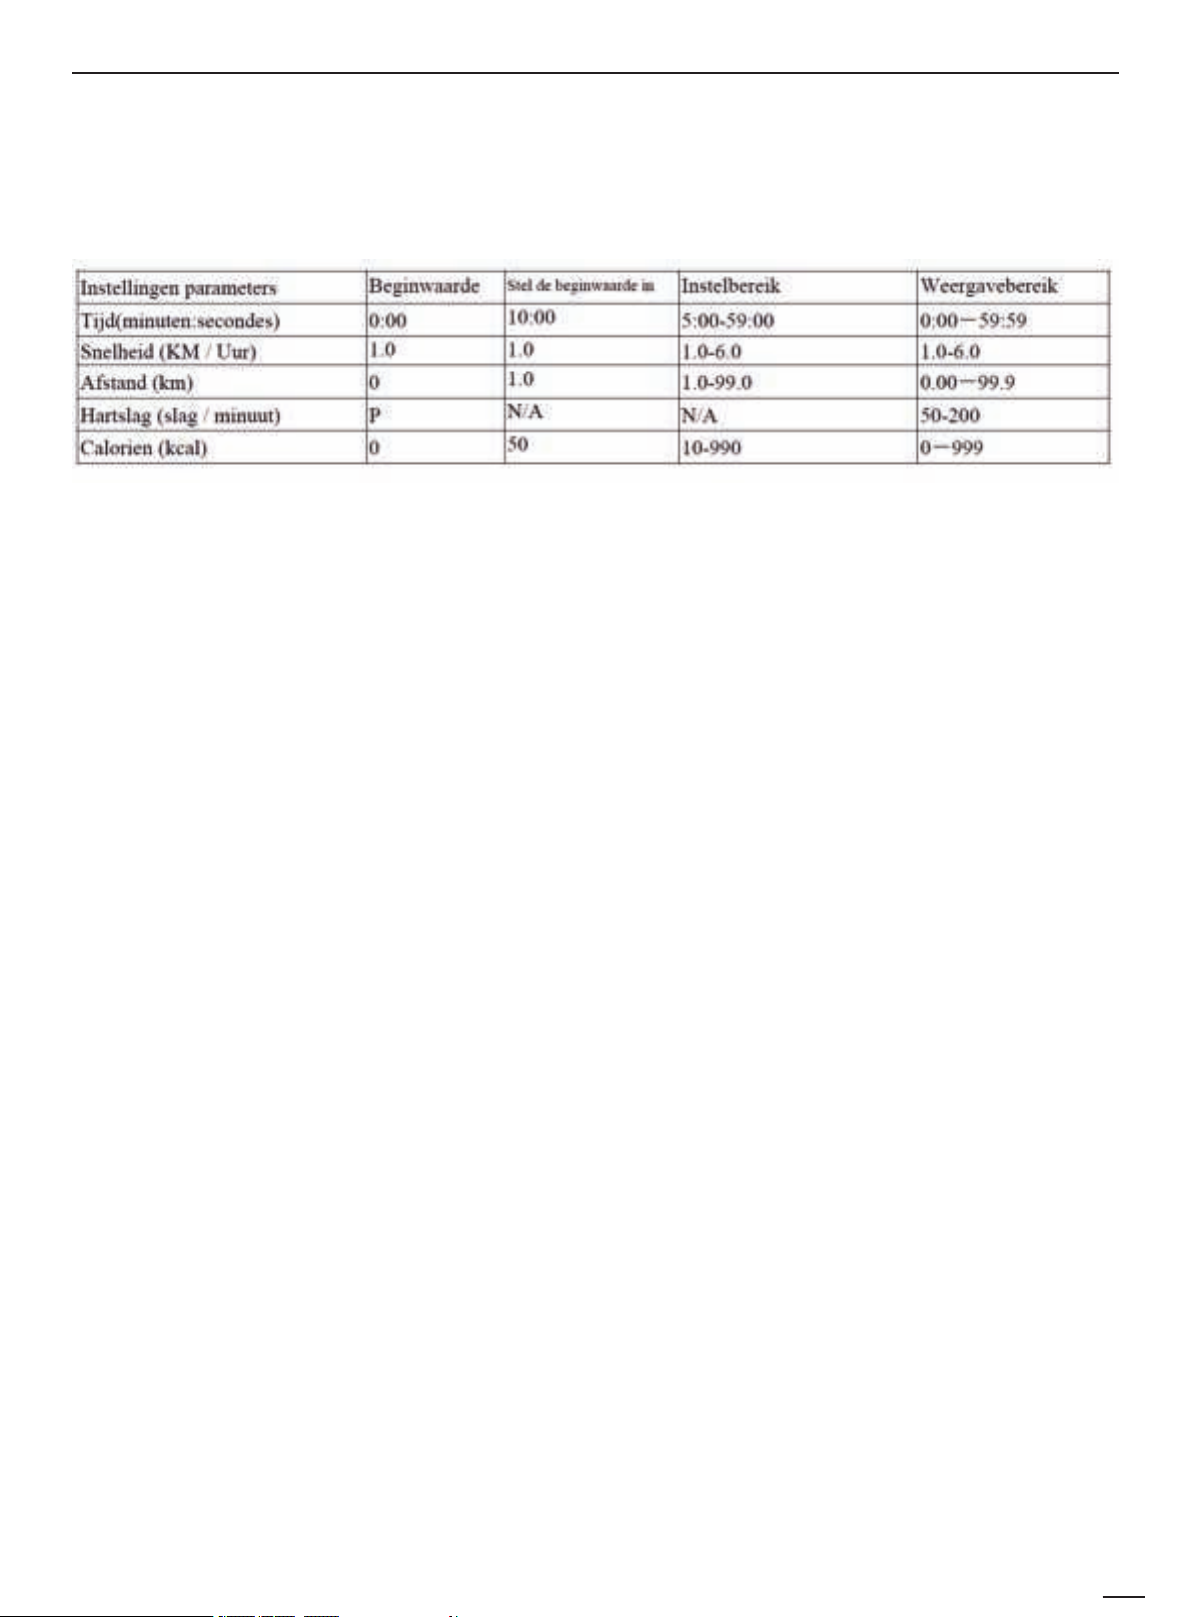
Setting parameters Initial
Time(minutes:seconds) 0:00
Distance (km) 0
Heart rate (beats / minute) P
Calories (kcal) 0
Setting range Display range
5:00-59:00 0:00-59:59
1.0-99.0 0.00-99.9
N/A 50-200
10-990 0-999
·.
POWER SAVING MODE
This system has a power saving function. In the standby state, if there is no key command input within 10 minutes, the
system enters the power saving mode, and the display is automatically turned off. Press any key to wake the system again.
SHUTDOWN
The treadmill can be turned off at any time by turning off the power switch, so that the walking machine will not be
damaged.
TROUBLE SHOOTING
1. The electronic me
ter does not display after the power is turned on. Possible cause: The communication cable from the
electronic meter to the control is not plugged in or the transformer is burnt out. Each core is fully inserted. Or the
communication line is bad (broken or broken), you need to reconnect or replace the wire; or replace a transformer to see.
2. If the electronic meter displays "E01" after running, it is a signal communication failure. Possible cause: The
communication between the electronic control and the electronic meter is blocked. Check the connection between the
electronic meter and the lower control communication line to ensure that each core is fully inserted. Check whether the
connecting cable between the electronic watch and the controller is damaged, and replace the connecting cable.
3. If the electronic meter displays "E05" after explosion protection, check whether the power supply voltage is lower than
50% of the normal voltage, please retest with the correct voltage specifications; check if the controller has a strange smell,
replace the controller; check the motor Whether the cable is connected well, reconnect the motor cable.
4. If the electronic meter displays "E02" after running, there is no sensor signal, the possible reasons are: no motor signal
input is detected for more than 5-8 seconds, the motor cable is not plugged in or the motor is defective.
5. If the electronic meter displays “E06” af
ter running, it is an overcurrent protection. The possible cause is that the current
exceeds the rated load, the system is self-protecting, or a part of the treadmill is stuck, which causes the motor to fail to
rotate and the load Excessive weight, excessive current, the system protects itself; adjust the treadmill and start again.
Another is to check whether there is over-flow noise or burning odor when the motor is running, and replace the motor; or
check whether the controller is burning odor, and replace the controller; Re-test the voltage specifications.
6. If the motor does not run after pressing the start key, the reason may be that the related motor of the control motor is
abnormal, the control fuse is damaged or falling off, or the motor cable is not plugged in, or the IGBT on the control is
burned out. Whether the circuit is plugged in and connected properly, check whether the fuse on the electrical control is
intact, install or replace it; check whether the motor wire is loose, and plug the motor wire. Use a multimeter to measure
whether the IGBT on the lower controller is burnt out and short-circuited. Replace or replace the lower IGBT on the lower
controller.
CALORIE CALCULATION FORMULA
70.3 × V (Km / h) × t (h) × (1 +?%)
Calories burned for each kilometer run with ascension to 0 is 70.3 calories.
Getting started guide
If you are above 35 years old, or have any health problems, even this is your first time to do fitne
doctor or professional before use it.
Before do exercise, please stand on the side to learn how to operate, such as start, stop and speed adjustment. After that stand
on the plastic deck of the treadmill board, catch hold of the handrail, start by 1.6--3.2 km/h low speed, stand straight, look
6
ss exercise, please consult
6
Page 7
forward, start slowly by taking a few steps. After adapting, you can adjust the speed to 3--5 km/h and keep doing about 10
It is better to do some warm-up exercise. Warm the muscle easy stretch, so use 5-10 mins to warm-up. Then
stop and according below method to do stretch exercise for five times, and each foot do 10 seconds or more
every time. After running, do those stretch exercises again
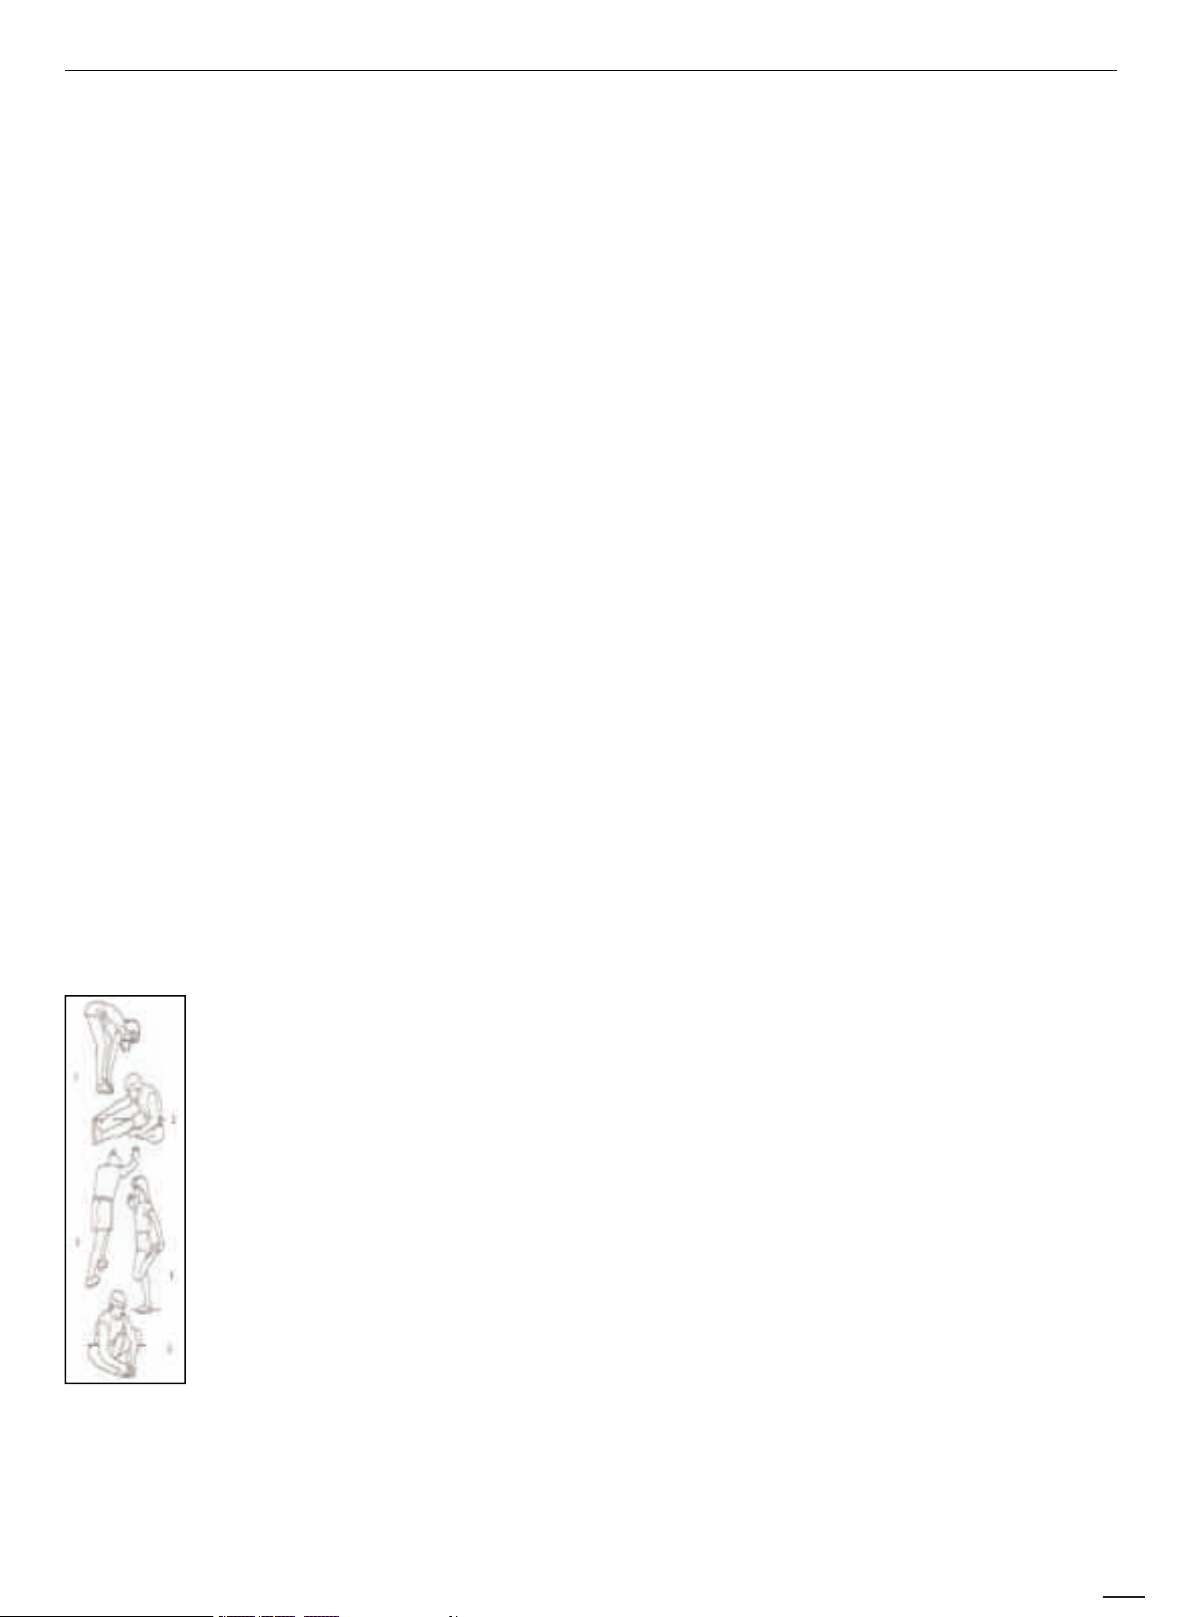
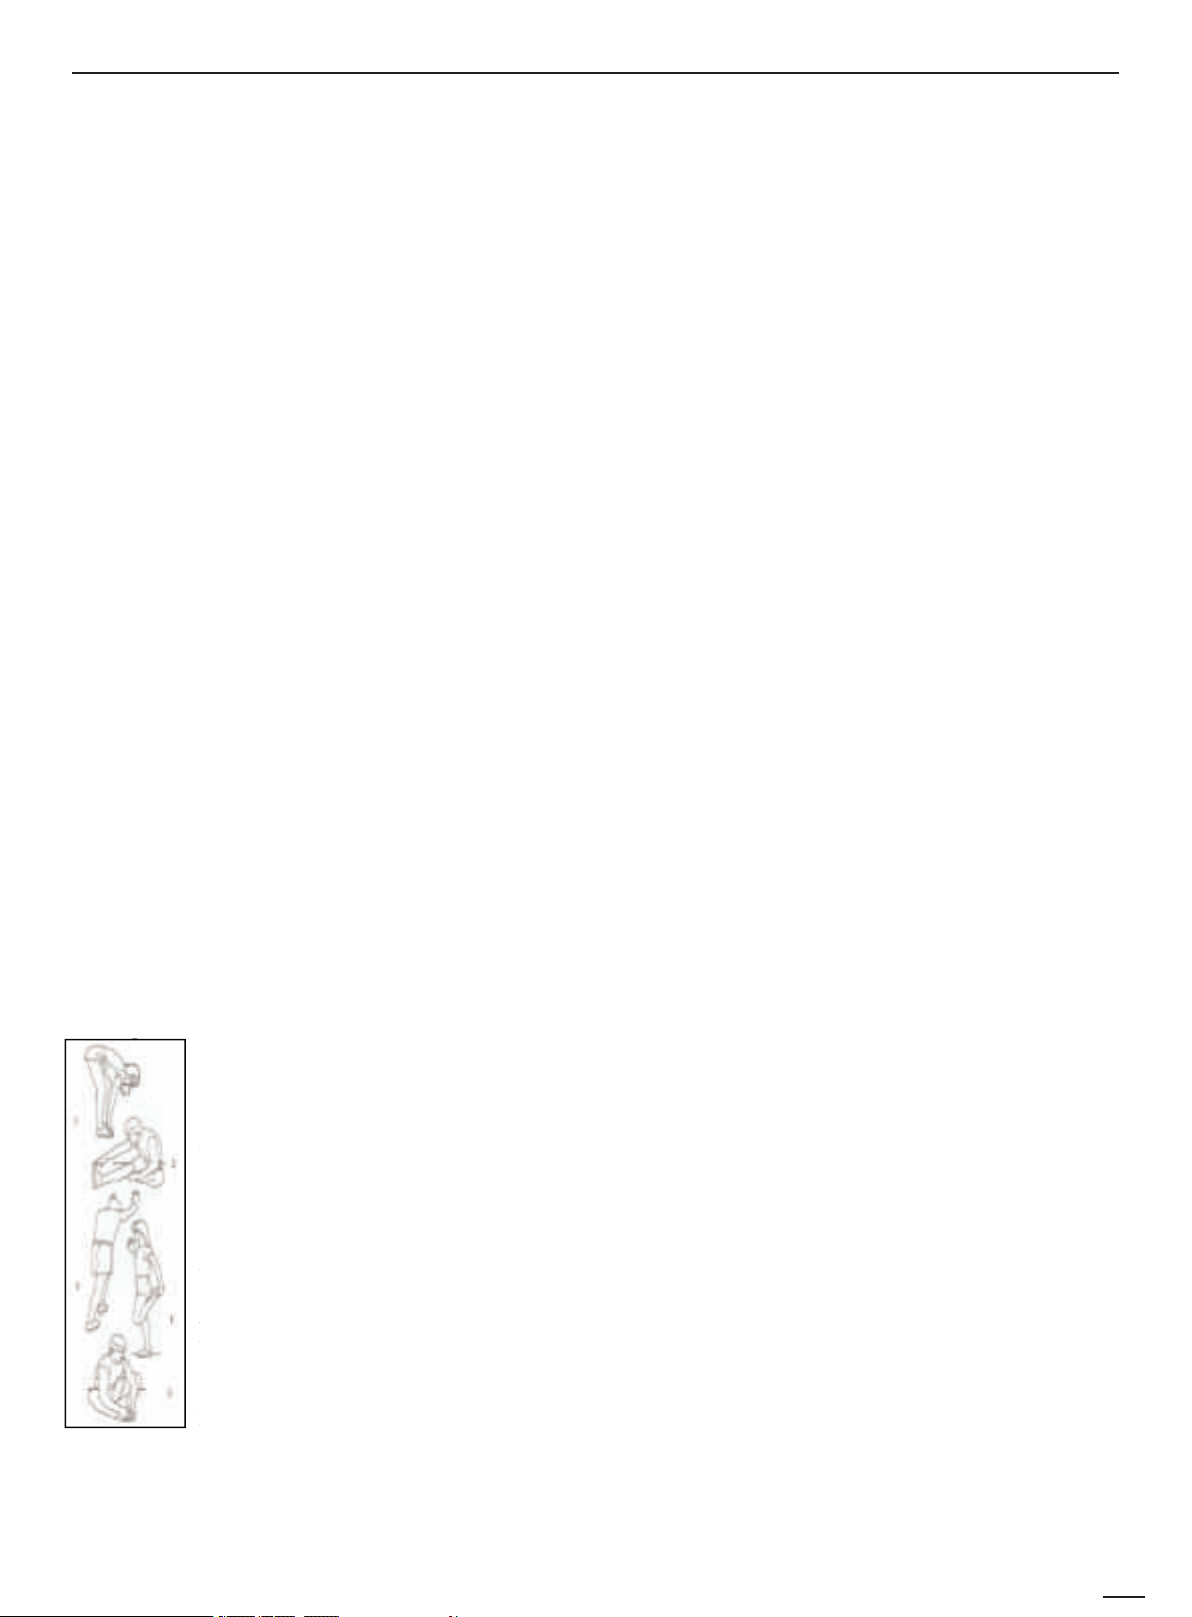
1. Reach Down
touch toes. Keep 10-15 seconds and relax. Repeat 3 times(See picture l).
2. Hamstrings Stretches: Sitting on a clean cushion, put one leg straight, the other inward and close to the
inside of the straight leg. Try to touch your toes with your hands. Keeping for 10 to 15 seconds, and relax.
Repeat 3 times for each leg (See picture 2).
3. Crus and Feet Tendon Stretches: Standing with two hands on the wall or tree, one leg behind. Keeping
your legs straight and the heel on the ground, tilt to the wall or tree. Keep 10 to 15 seconds, and relax.
Repeat 3 times for each leg (See picture 3).
4. Quadriceps Stretches: Keeping your balance with your left hand holding on the wall or table, then stretch
your right heel toward your buttocks slowly, until you feel very tense in the front of your thigh. Keep10 to 15
seconds, and relax. Repeat 3 times for each leg (See picture 4).
5. Sartorius (Inner Muscles of the Thigh Muscle Stretches: Sitting down with your soles opposite and
knees outward Pull your feet toward your groin Keep 10 to 15 seconds
minutes, then stop.
SAFETY EXERCISE
Please stand on the side to learn how to operate, such as speed and incline, until you become familiar, then you can start do
exercise. Walk 1 km by constant step need about 15-25 minutes, please record it in fact. And walk 1km by 4.8 km/h need
about 12 minutes. If you can do it easily by few times, then can adjust the high speed and incline, and go on to do 30 minutes,
you can take a good exercise. Before do slow walk exercise,please remember it is for your health and can not irritable.
AMOUNT OF EXERCISE
SHORTCUT——The best way to save time is do 15-20 minutes exercise.
Warm up 2 minutes by 4.8 km/h, and adjust the speed to 5.3 km/h and 5.8 km/h, continue do exercise by this two speeds.
Then add 0.3 km/h per 2mins speed increase, until you feel breathing quickened but not breathe hard. Keep this speed to do
exercise, if feels uncomfortable, please reduce 0.3 km/h. Leave 4 minutes to reduce speed at last. If you fell it is hard to
strengthen exercises by increase speed, then you can choose the way of increase incline slowly, it also can strengthen
exercise.
CONSUMPTION OF HEAT——This way can really consumption the heat.
Warm up 5 minutes by 4--4.8 km/h speed, then add 0.3 km/h per 2 minutes increasing speed, you can do 45mins on the
speed that you feel it is comfortable and challenge. In order to strengthen do exercise. You can do 1 hour by this speed and
add 0.3 km/h speed when you heard some business advertisements, and return the speed back when go to next program, so at
this period, the heat will be consumed enough. At last keep 4 minutes to reduce the speed.
EXERCISE FREQUENCY
Target is 3--5 times per week, do 15-60mins each time. It is better to make a time schedule, do not accord to your favor. You
can get the strenuous exercise degree through adjusting speed . We'd suggest that do not set incline when start do exercise.
Please consult professional doctor before you do exercise. They can help recommend exercise rate/intension and time
according to your age and health condition. When running, if you feel chest tightness or chest pain, irregular Heartbeats,
short of breath, dizziness or other unwell, please stop immediately! And consult doctor before you continue to exercise. If
you often use treadmill, you can choose normal walk speed or jog speed.
If you have no experience or can't make sure the best testing speed, you can reference below standard:
Speed 1-3.0 km
Speed 3.0-4.5 km
Speed 4.5-6.0 km
Speed 6.0-7.5 km
Speed 7.5-9.0 km
Speed 9.0-10.0 km
More than 10.0 km
weak constitution people.
sedentary or not often exercise people.
walking quickly people.
fast walk people.
jogger.
intermediate speed runner.
excellent runner.
ATTENTION:It is suitable for walker to choose less than or equal to 6 km speed.
Warm-up Exercise
: Knees slightly bent and body slowly bent forward, back and shoulders relax, trying to
picture 5).
Maintenance Instruction
, and relax. Repeat 3 times (See
WARNING:Please make sure pull out the treadmill's power plug before cleaning or maintaining the product.
CLEANSING:General cleaning will greatly prolong the treadmill's life.
Keep your treadmill clean by dusting regularly. Be sure to clean the exposed part of the deck on either side of the walking
belt and also the side rails. This reduces the build up of foreign material underneath the walking belt. Make sure your shoes
7
7
Page 8
are clean. The top of the belt may be cleaned with a wet soapy cloth. Be careful to keep liquid away from inside the
I
t
a
d
S
I
p
o
d
S
T
u
b
m
R
motorized treadmill frame or from underneath the belt.
WARNING:Always unplug the treadmill from the electrical outlet before removing the motor cover. At least once a year
remove the motor cover and vacuum under the motor cover.
This treadmill's walking belt and deck are equipped with a pre-lubricated, low maintenance deck system. The belt/ deck
friction may p
lay a major role in the function and life of your treadmill, thus requiring periodic lubrication. We recommend a
periodic inspection of the deck.
We recommend lubrication of the deck according to the following timetable:
Light user (less than 3 hours/ week) Every 60 days
Medium user (3-5 hours/ week) Every 45 days
Heavy user (more than 5 hours/ week) Every 30 days
We suggest you buy lubricating oil from local distributors or contact our company directly.
Please follow the instructions carefully. If you are unsure about anything contact a technician or the manufacturer.
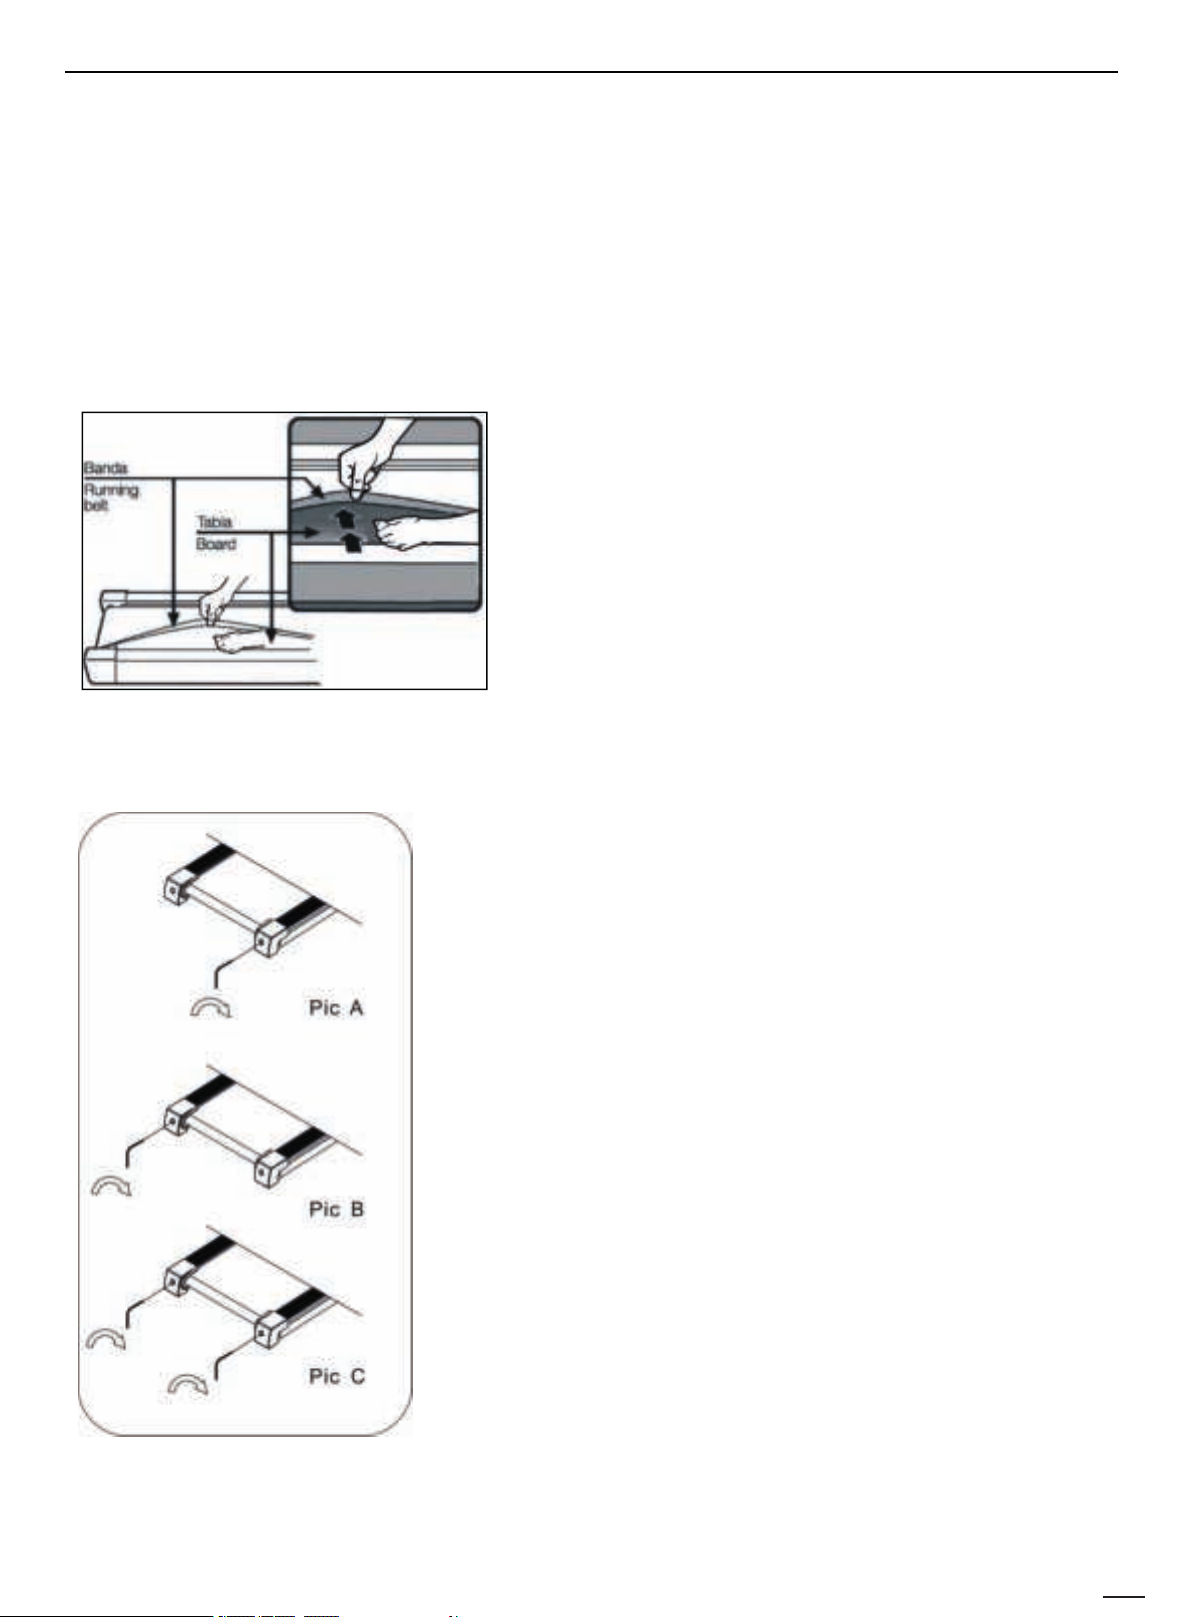
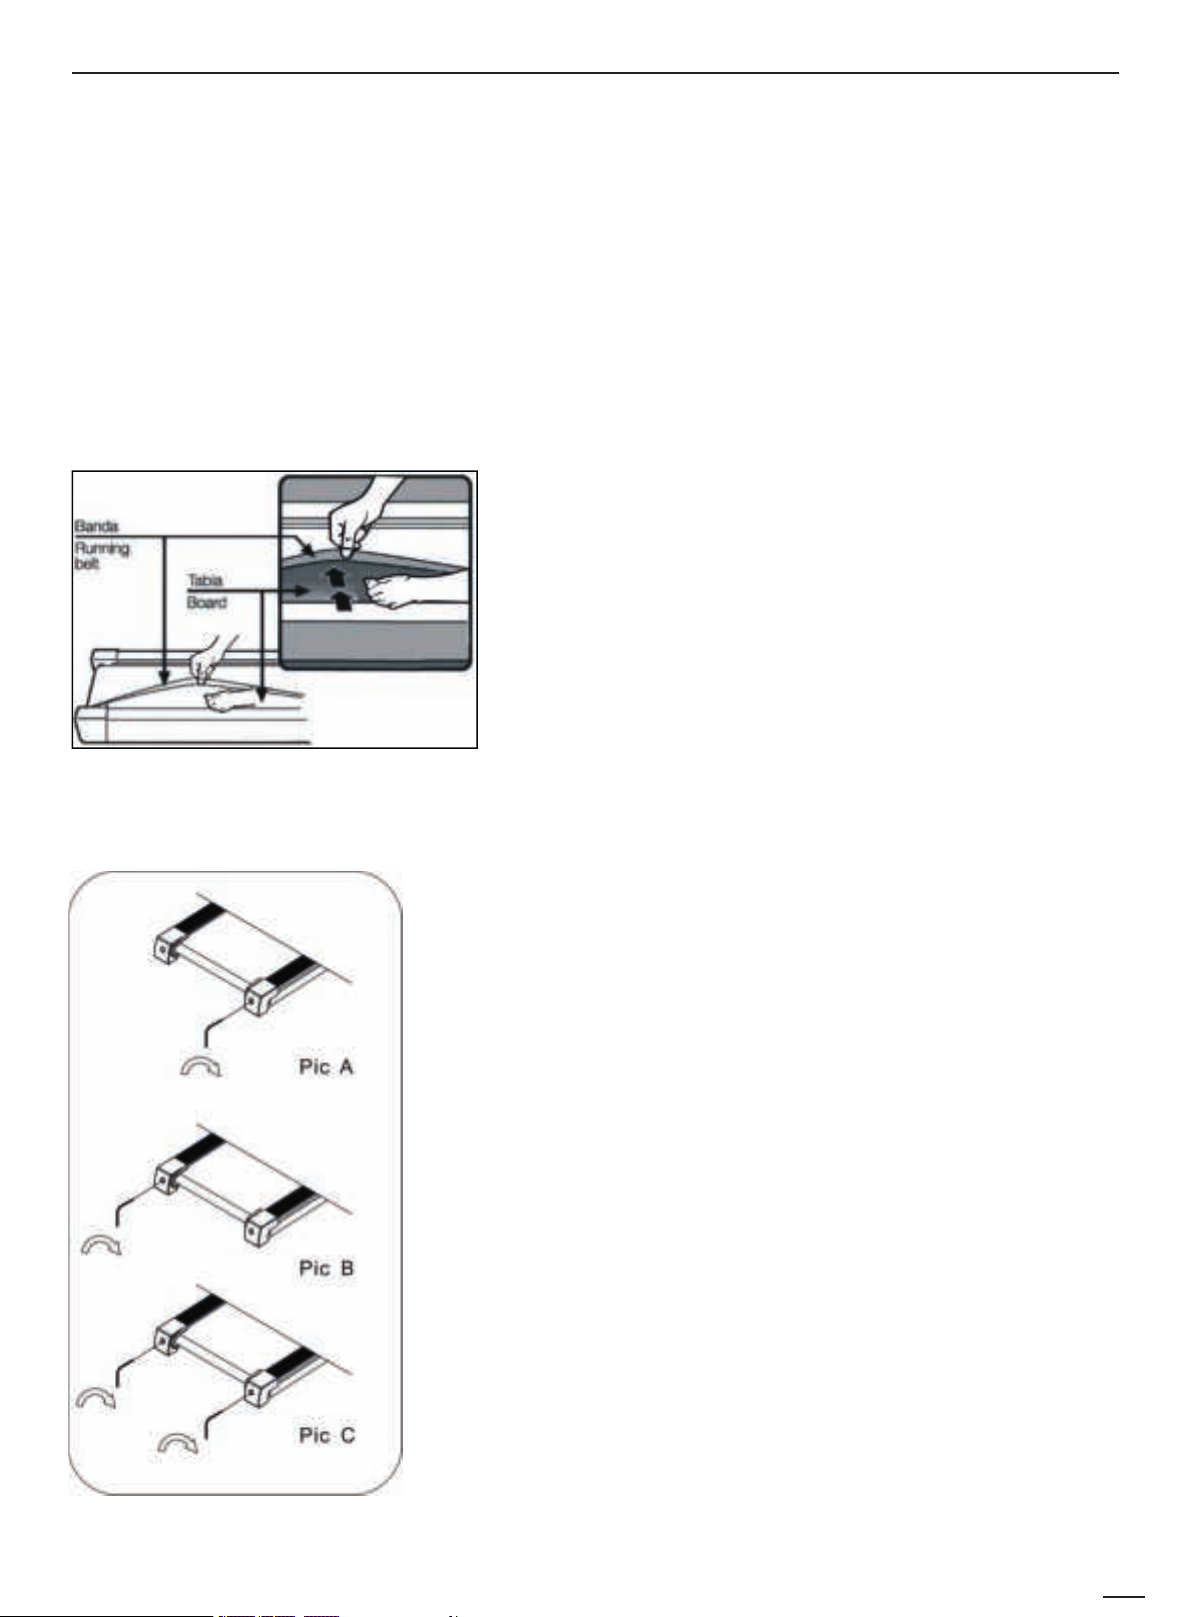
Place treadmill on a level surface. Run the treadmill at approximately 6-8 km/h, observe the running
belt deviate condition.
f the belt has drifted to the right, unplug the safety lock and power switch, and
urn the right adjusting bolt 1/4 turn clockwise, then insert the power switch
nd safety lock, re-start the treadmill and observe the running belt to see if it
eviates. Repeat the above steps until the running belt is aligned in the middle.
ee picture A
f the treadmill belt is swerving to the left, unplug the safety lock, turn off the
ower, then with the left adjusting bolt clockwise rotation 1 / 4 laps, and turn
n the safety lock and power on to make treadmill running, checking the
eviation of the treadmill belt. Repeat the above steps until the belt centered.
ee picture B
he treadmill belt will gradually relax after above steps or after a period of time
sing, unplug the safety lock, and turn off the power, with the two adjusting
olt clockwise rotation 1 / 4 laps, and turn on the safety lock and power to
ake treadmill running, then standing on the belt to confirm the tightness.
epeat the above steps until the belt moderate tightness. See picture C
8
8
Page 9
GEBRUIKERSHANDLEIDING
LEES ALLE INSTRUCTIES IN DE HANDLEIDING ZORGVULDIG DOOR
VOOR DE MONTAGE EN GEBRUIK VAN DE LOOPBAND. BEWAAR DIT
AUB VOOR TOEKOMSTIGE REFERENTIE.
Page 10

INHOUD:
INHOUD
BELANGRIJKE VEILIGHEIDSMAATREGELEN
MONTAGE-INSTRUCTIES
STABILISERING METHODES
HANDLEIDING VOOR DE BEDIENING
HOE GA JE AAN DE SLAG
VEILIGHEIDSOEFENINGEN
DE WARMING-UP
ONDERHOUD INSTRUCTIES
2
Page 11
BELANGRIJKE VEILIGHEIDSMAATREGELEN
WAARSCHUWING: Voordat u met een trainingsprogramma begint, dient u uw arts of gezondheidswerker te raadplegen, vooral
elke persoon die ouder is dan 35 jaar of eerder gezondheidsproblemen heeft gehad. Om de bovenstaande redenen kunnen wij niet
verantwoordelijk worden gehouden voor enig letsel of ongeval. Schakel de stroom niet in voordat u klaar bent met het monteren van
de loopband en het afdekken van de motor.
LET OP:
1. Als u deze loopband gebruikt, zorg er dan voor dat u het veiligheidskoord aan uw kleding of riem vastmaakt.
2. Sluit niets aan op enig onderdeel van deze apparatuur, aangezien dit schade kan veroorzaken.
3. Plaats de loopband op een helder, horizontaal oppervlak. Plaats de loopband niet op een dik tapijt, aangezien dit de ventilatie kan
belemmeren. Plaats de loopband ook niet in de buurt van water of buitenshuis.
4. Start de loopband nooit terwijl u op de loopband staat. Na het inschakelen van de stroom en het afstellen van de snelheidsregeling,
kan er een pauze zijn voordat de loopband begint te bewegen; ga altijd op de voetrails aan de zijkanten van het onderstel staan totdat
de band in beweging is.
5. Draag geschikte kleding wanneer u op de loopband traint. Draag geen lange, loszittende kleding die in de loopband verstrikt kan
raken. Draag altijd hardloopschoenen of aerobicsschoenen met rubberen zolen.
6. Houd kinderen en huisdieren uit de buurt van de loopband als deze in werking is.
7. Doe de oefening pas 40 minuten na een maaltijd.
8. De loopband is speciek bedoeld voor gebruik door volwassenen. Oudere kinderen die de loopband gebruiken, moeten onder
toezicht van een volwassene staan.
9. Houd altijd de handleuningen vast wanneer u voor het eerst op de loopband loopt of rent, totdat u vertrouwd bent met het gebruik
van de loopband.
10. De loopband is bedoeld voor gebruik binnenshuis, niet buitenshuis. Plaats de loopband op een schoon, horizontaal oppervlak.
De loopband is gemaakt met speciale apparatuur; verbouw of kopieer geen andere.
11. Het netsnoer van de gemotoriseerde loopband is gespecialiseerd. Als het netsnoer beschadigd is, koop het dan bij een distributeur
of neem rechtstreeks contact op met ons bedrijf.
12. Als de loopband plotseling in snelheid toeneemt als gevolg van een elektronicafout of als de snelheid per ongeluk wordt verhoogd, zal de loopband plotseling tot stilstand komen wanneer de trekpen uit het bedieningspaneel wordt gehaald.
13. Sluit niets in het midden van het netsnoer aan, verleng het netsnoer en vervang de stekker van het netsnoer niet. Stapel GEEN
gewichten op het netsnoer en plaats het netsnoer niet in de buurt van hoge temperaturen, verbied het gebruik van het poreuze stopcontact, anders kan dit brand of elektrische schokken veroorzaken vanwege een slecht contact.
14. Als de loopband niet wordt gebruikt, dient u de stekker uit het stopcontact te halen en de veiligheidstrekpin te verwijderen.
15. De loopband is alleen voor thuisgebruik.
16. Het maximale gebruikersgewicht van de loopband is 100 kg.
17. Gebruik de loopband niet te veel. Overmatig gebruik kan tot letsel leiden en voor uw veiligheid mag u de loopband niet verkeerd
gebruiken.
18. Bewaar de veiligheidstrekpin op een veilige plaats wanneer u de loopband niet gebruikt, om ander gebruik te vermijden.
LET OP: Bevestig dat de volledige montage is zoals hierboven vereist en dat alle bouten zijn vergrendeld. Voer de volgende
bewer-kingen uit nadat u hebt gecontroleerd of alles in orde is. Lees de instructies zorgvuldig door voordat u de loopband
gebruikt.
Net als in de bovenstaande tekening kunt u de hijshoek aanpassen door de positie van de pen te veranderen. Er zijn 3
sectiesleutels om te gebruiken.
MONTAGE-INSTRUCTIES
3
Page 12
4
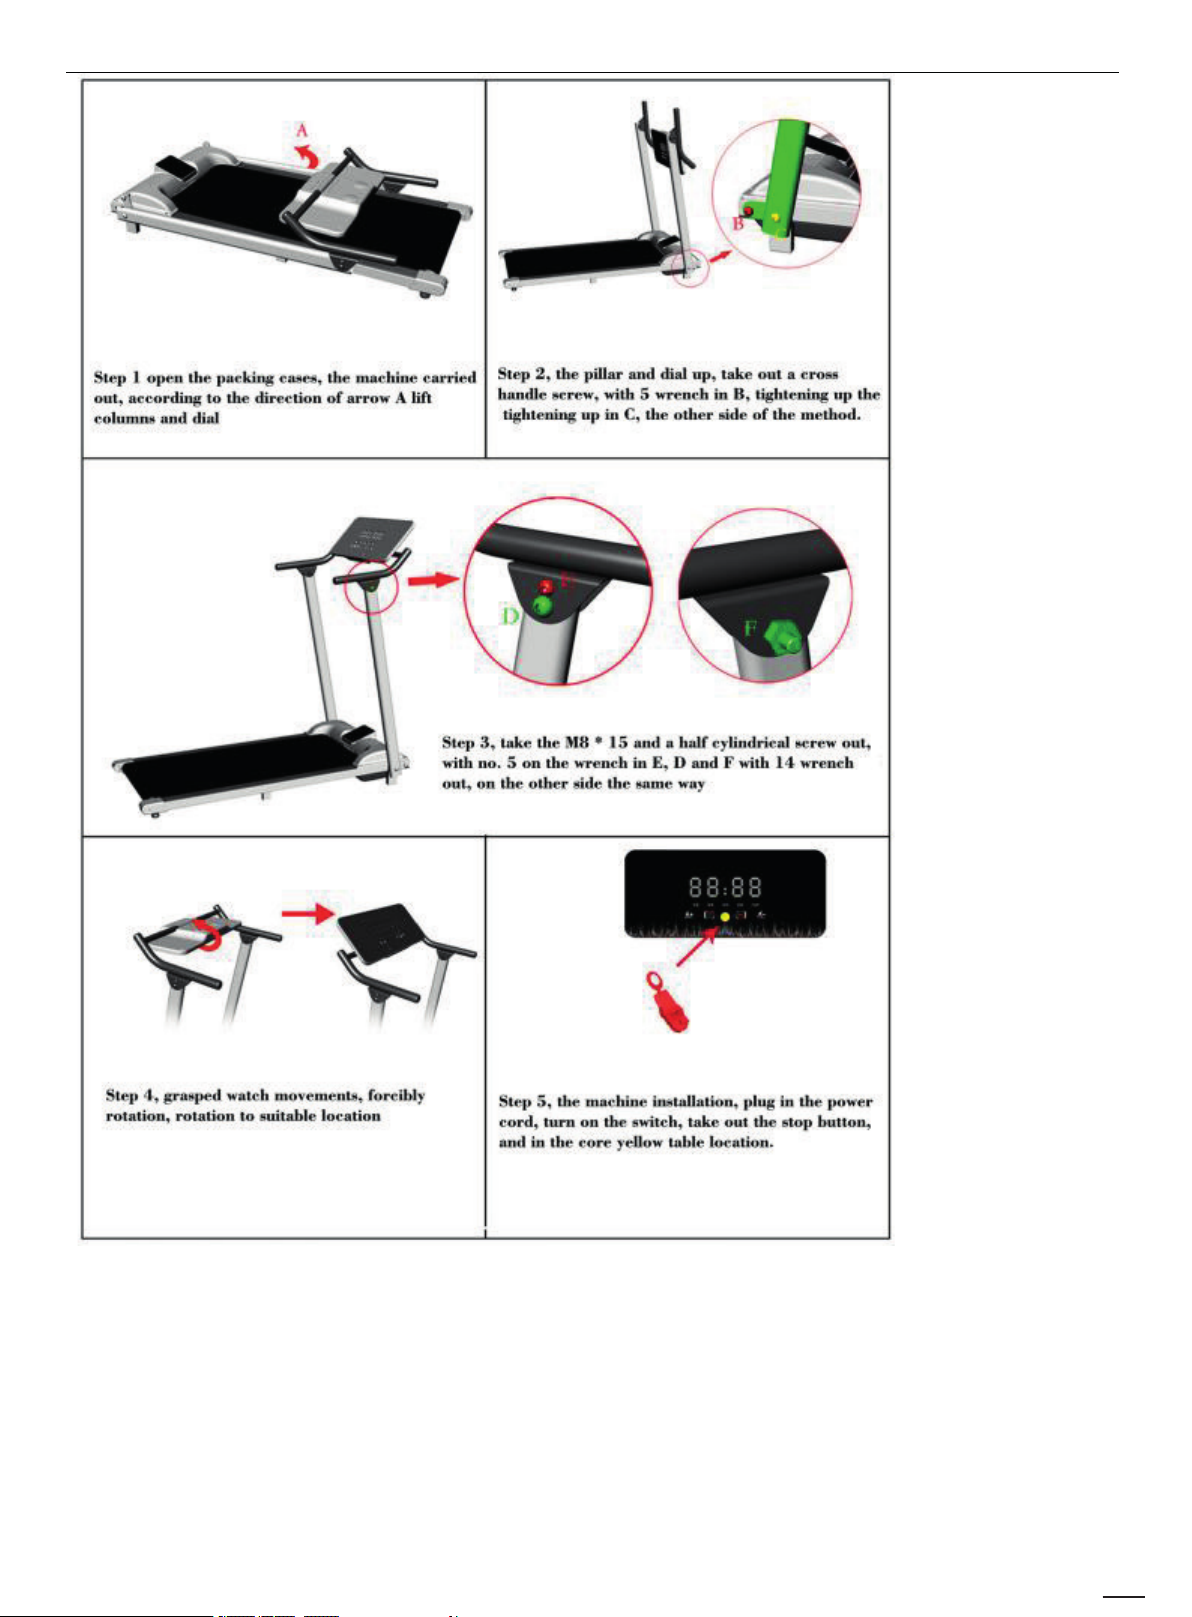
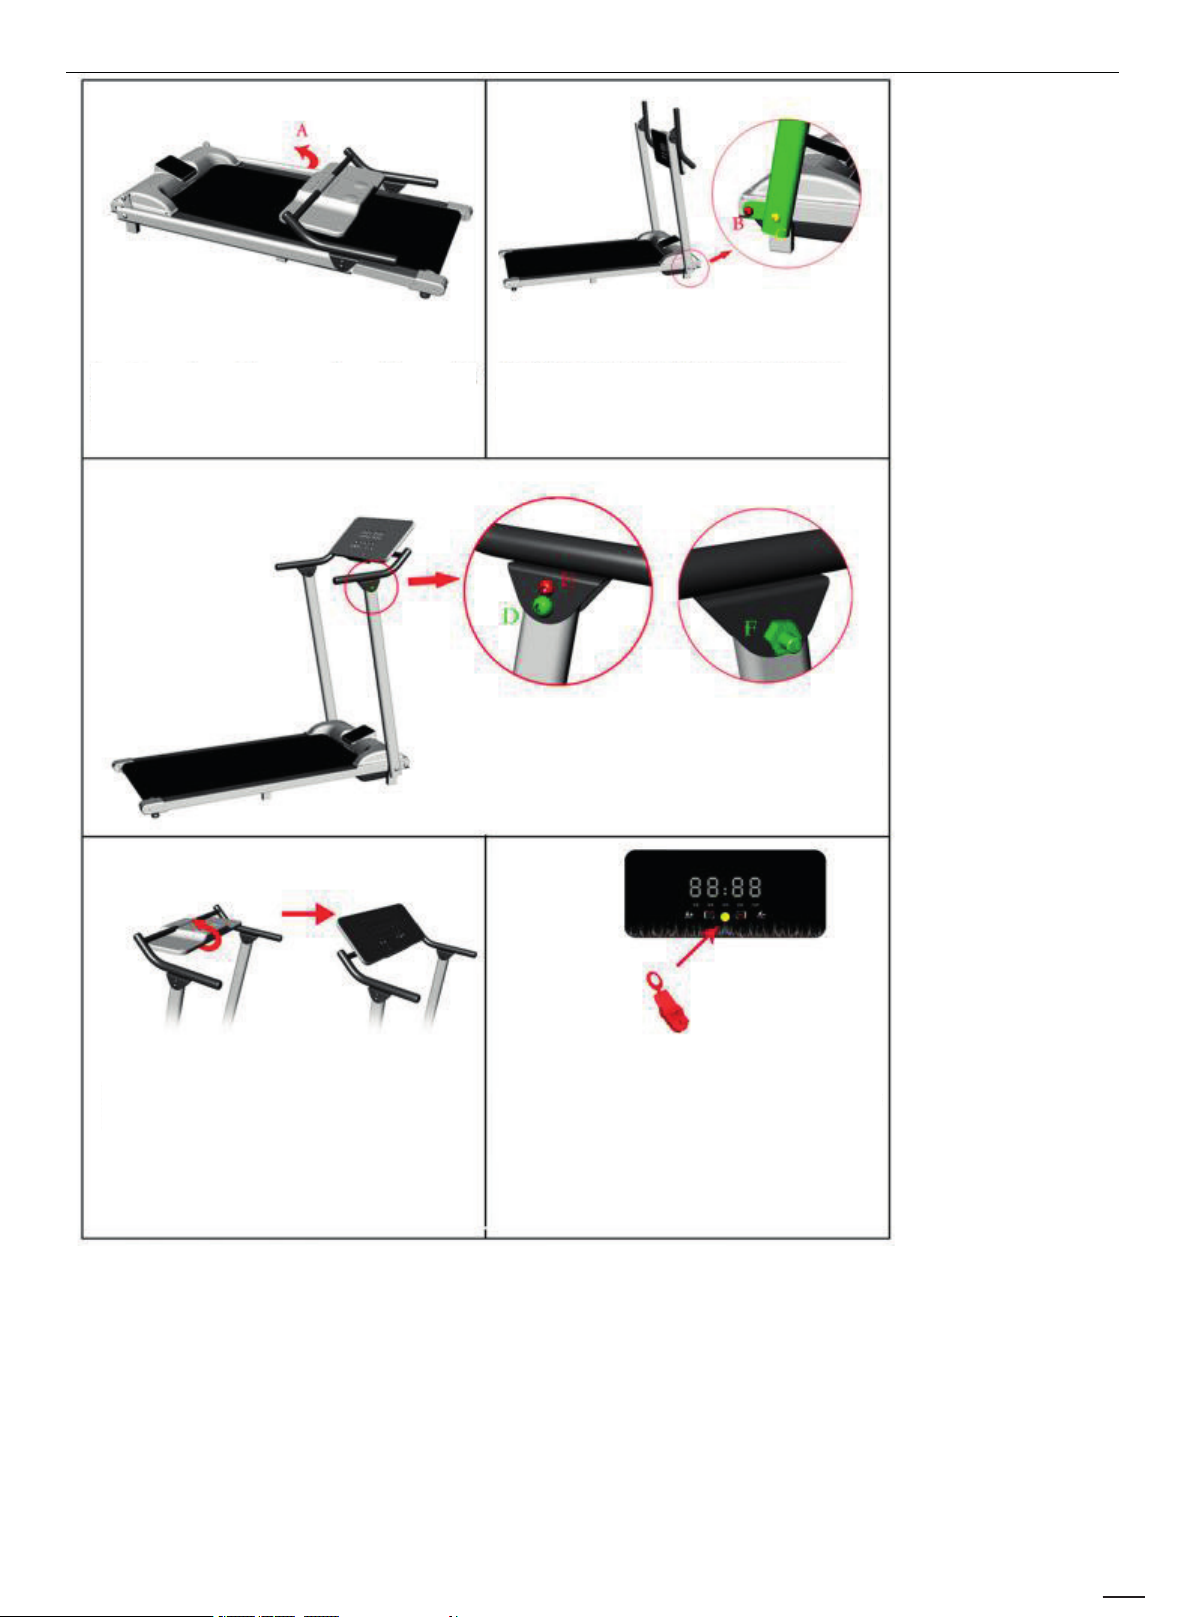
Stap 1: Open de verpakkingsdozen, de machine
uitgevoerd, volgens de richting van pijl A. Til de
kolommen en wijzerplaat.
Stap 3: Haal de M*15 en een halfcilindrische schroef
eruit. Haal met nummer 5 op de sleutel E, D en F met
14 sleutels eruit, aan de andere kant hetzelfde.
Stap 2: De pijler en dial-up, neem een kruishendel
schroef, met 5 sleutels in B. Aanscherping in C, de
andere kant van de methode.
Stap 4: Houd de Handvatten bij beweging
vast, gedwongen rotatie, rotatie op een
geschikte locatie
Stap 5: De installatie van de machine, sluit
het netsnoer aan, zet de schakelaar aan, haal
de stopknop eruit en op de gele locatie in het
midden.
Stabilisering Methoden
Dit product moet worden aangesloten. Indien storingen of uitvallen, gebruik stabilisatie onderdeel van de minste weerstand voor
elektrische stroom om het risico van een elektrische schok. Dit product is uitgerust met een snoer met een apparatuur-aansluitingsgeleider en een aansluit pin. De stekker moet worden aangesloten op een geschikt stopcontact dat op juiste wijze is geïnstalleerd en
geaard in overeenstemming met alle plaatselijke voorschriften en verordeningen. GEVAAR – verkeerd aansluiten van de appara-
tuur-aarding geleider kan resulteren in een risico van een elektrische schok. Neem contact op met een gekwaliceerde elektricien of
monteur als u twijfelt of het apparaat goed is geinstalleerd. Verander niet de stekker die bij het product – als het niet in het stopcon-
tact past, u vindt een passend stopcontact installeren door een gekwaliceerde elektricien.
Dit product is bedoeld voor gebruik op een nominaal 220 V-circuit en heeft een geaarde stekker. Zorg ervoor dat het product is aan-
gesloten op een stopcontact met dezelfde conguratie als de stekker. Bij dit product mag geen adapter worden gebruikt.
4
Page 13
5
having the same configuration as the plug. No adapter should be used with this product.
Operation Guide
HANDLEIDING VOOR DE BEDIENING:
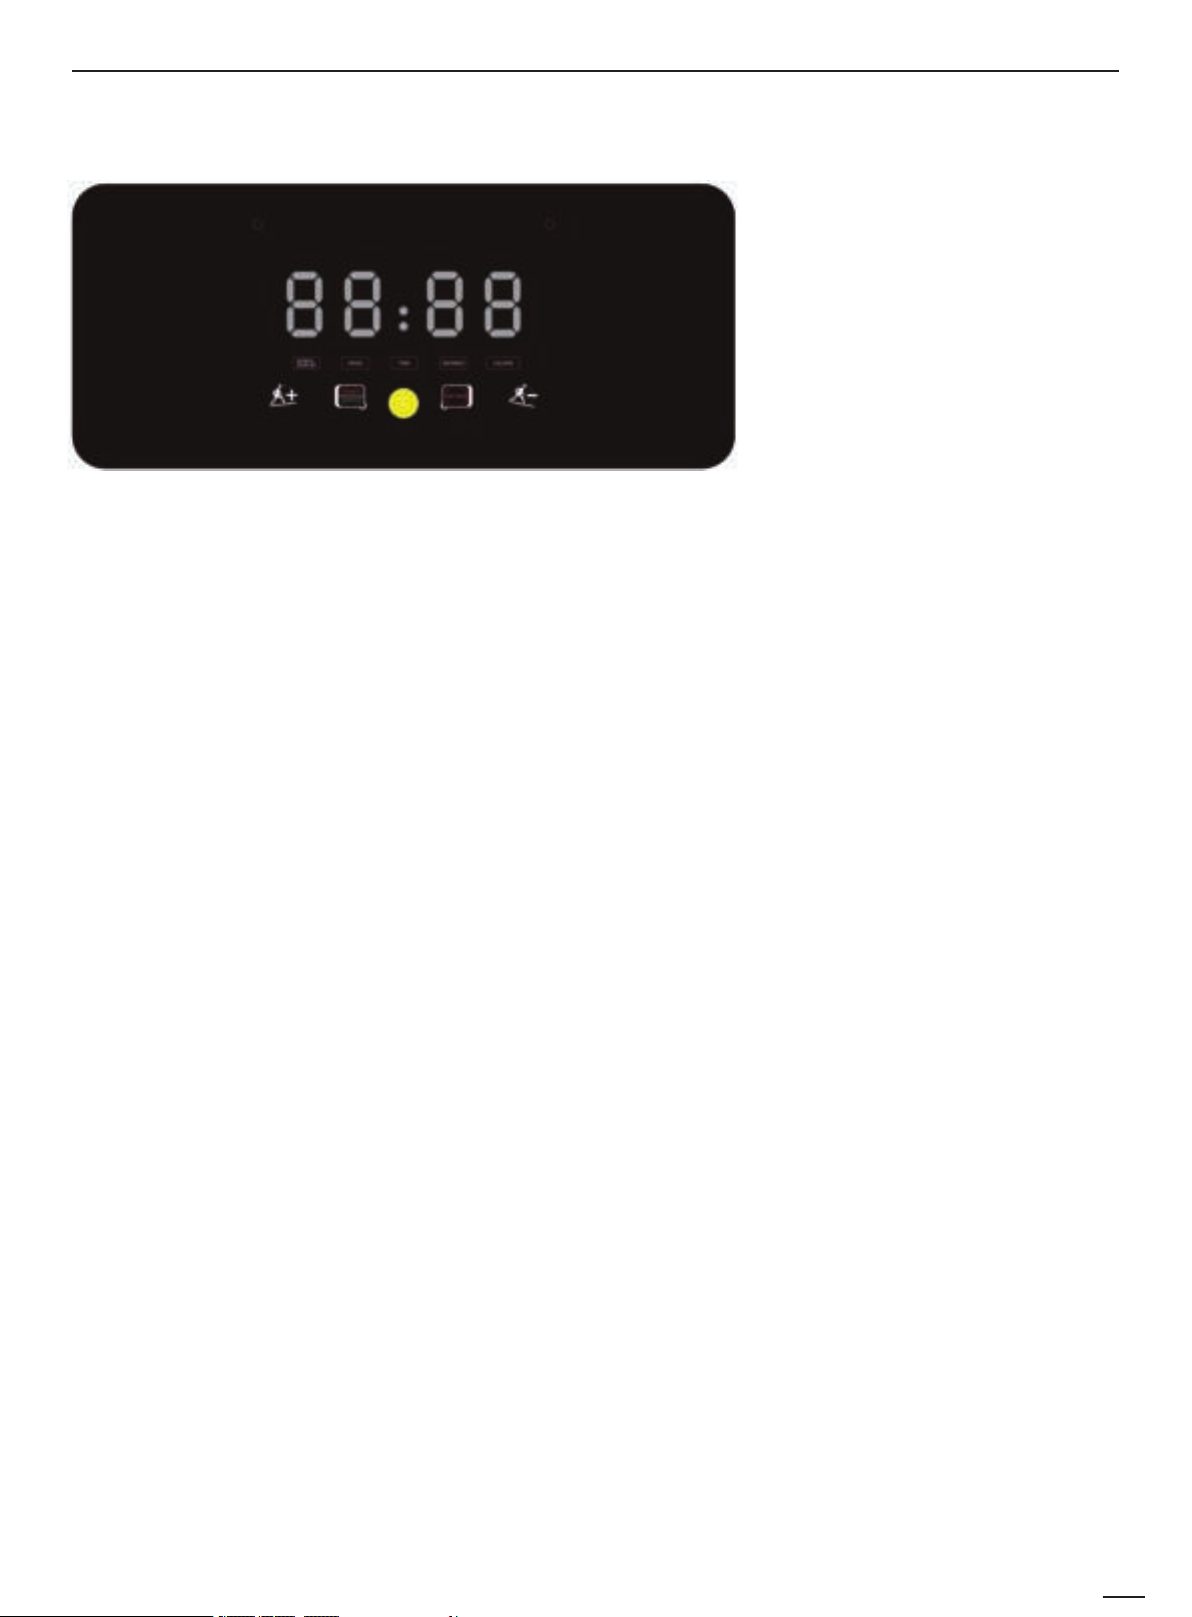
SCHERM DISPLAY
1. Het “TIME” -venster toont de trainingstijd, voorwaartse timing van 0: 00-59: 59, wanneer de timing 59:59 bereikt, zal de loop-
machine langzamer gaan lopen en stoppen met rennen en zal hij “End” weergeven. Stand-by na 5 seconden van een volledige stop.
Staat; het aftellen telt af van de ingestelde tijd tot nul. Wanneer het aftellen 0:00 bereikt, stopt de lopende machine langzaam en stopt
met rennen en wordt “End” weergegeven. Het gaat in de standby-toestand na 5 seconden van een volledige stop.
2. “DIS.” venster toont de bewegingsafstand. De voorwaartse telling is van 0,00-99,9, de overloop wordt gewist en opgeteld vanaf
0, en de achterwaartse telling wordt verlaagd van de ingestelde waarde naar nul. In de countdown-modus, wanneer het aftellen Om
0 uur bereikt, stopt de loopmachine met een constante snelheid en geeft “End” weer. Het gaat in de standby-toestand na 5 seconden
van een volledige stop.
3. “CAL.” Venster geeft de calorische waarde van atleten weer. Het telt van 0-999 bij het vooruit tellen, wordt gewist wanneer er
sprake is van overow en begint te tellen vanaf 0. Bij het achteruit tellen telt het af van de ingestelde waarde naar 0. In de countdown-modus, wanneer het aftellen 0 bereikt, stopt de loopmachine draait op een lage snelheid en geeft “End” weer, en gaat in de
standby-toestand na 5 seconden van een volledige stop.
TOETSFUNCTIES
1. “PATROON” is de modusselectietoets: Druk op deze toets in de standby-modus om door “0:00”, “10:00”, “1.0”, “50” te bladeren
(“0: 00” is de handmatige modus, “” 10:00 “is de modus voor het aftellen van de tijd,” 1.0 “is de modus voor het aftellen van de afstand en” 50 “is de modus voor het aftellen van calorieën.) Wanneer u verschillende modi selecteert, kunt u de snelheid en de helling
plus en min gebruiken toetsen om de relevante countdown in te stellen. Waarde, druk op de “AAN / UIT” -toets nadat de instelling
is voltooid om de loopmachine te starten.
2. “START / STOP” is de start / stop-toets: Als de stroom is ingeschakeld en het veiligheidsslot is ingeschakeld, kunt u op elk moment op deze toets drukken om de lopende machine te laten draaien. Tijdens de beweging kunt u deze knop gebruiken om het lopen
van de loopmachine te stoppen en op nul te zetten.
3. “SPEED +” en “SPEED-” zijn snelheid plus en min toetsen: stand-by toestand, gebruikt om de ingestelde waarde aan te passen.
Het wordt gebruikt om de snelheid aan te passen na het opstarten. Het instelbereik is 0,5 km / tijd. Als het continu langer dan 0,5
seconde wordt vastgehouden, wordt het automatisch verhoogd of verlaagd.
BEDIENING TIJDENS DE TRAINING
1. Door op de deceleratietoets te drukken, wordt de loopsnelheid van de loopmachine verlaagd.
2. Door het gaspedaal in te drukken wordt de loopsnelheid van de loopmachine verhoogd.
3. Druk op de stopknop om te vertragen om te stoppen.
HANDMATIGE MODUS
1. Druk in de stand-by toestand direct op de “START / STOP” -toets, de loopmachine begint te lopen met een snelheid van 1,0 km /
u andere vensters beginnen te tellen vanaf 0, druk op de “SPEED +”, “SPEED-” toetsen om de snelheid te wijzigen.
2. Druk in de stand-by toestand op de “PATTERN” -toets om de tijdaftelmodus te openen. Het venster “TIJD” geeft “10:00” weer en
knippert. Druk op de SPEED “+” en SPEED “-” toetsen om de trainingstijd in te stellen. Het vaste bereik is 5: 00-59: 00.
3. Druk in de tijdaftelmodus op de toets “MODE” om de aftelmodus voor afstanden te openen. Het venster “DISTANCE” geeft
“1.0” weer en knippert. Druk op de SPEED “+” en SPEED “-” toetsen om de bewegingsafstand en de afstandsinstelling in te stellen.
Het bereik is 1,0-99,0.
4. Druk in de modus voor het aftellen van de afstand op de toets “M” om de modus voor het aftellen van calorieën te openen. Het
“CAL” -venster toont “50” en knippert. Druk op de SPEED “+” en SPEED “-” toetsen om de calorieën in te stellen. Het bereik is
10-990.
5. Selecteer een van de drie aftelmodi en druk op de starttoets nadat de instelling is voltooid. De loopband begint te lopen na een
vertraging van 3 seconden. Druk op de SPEED “+” en SPEED “-” toetsen om de snelheid aan te passen; Druk op de stoptoets om
de machine te laten lopen. Stop langzaam met lopen.
5
Page 14
SCHAKELEN VAN HET DISPLAY
1. Nadat de loopmachine is gestart, drukt u op de snelheid plus toets om over te schakelen naar de automatische vensterweergave;
het weergavevenster wordt elke 5 seconden gewisseld; de snelheid, tijd, afstand en wegafstand worden om beurten weergegeven
en de realtime bewegingsgegevens worden weergegeven.
WEERGAVE VAN ELKE WAARDE:
ENERGIEBESPARINGSMODUS
Dit systeem heeft een energiebesparende functie. Als er in de stand-by toestand geen toetsopdrachten binnen 10 minuten wordt ingevoerd, gaat het systeem naar de energiebesparende modus en wordt het display automatisch uitgeschakeld. Druk op een willekeurige
toets om het systeem weer te activeren.
UITSCHAKELEN
De loopband kan op elk moment worden uitgeschakeld door de stroomschakelaar uit te zetten, zodat de loopmachine niet beschadigd raakt.
PROBLEEMOPLOSSING
1. De elektronische meter wordt niet weergegeven nadat de stroom is ingeschakeld. Mogelijke oorzaak: De communicatiekabel van
de elektronische meter naar de besturing is niet aangesloten of de transformator is doorgebrand. Elke kern is volledig ingebracht. Of
de communicatielijn is defect (kapot of kapot), u moet de draad opnieuw aansluiten of vervangen, of een transformator vervangen
om te zien.
2. Als de elektronische meter “E01” weergeeft na het draaien, is er een signaalcommunicatiestoring. Mogelijke oorzaak: De communicatie tussen de elektronische besturing en de elektronische meter is geblokkeerd. Controleer de verbinding tussen de elektronische
meter en de onderste communicatielijn om er zeker van te zijn dat elke kern volledig is ingestoken. Controleer of het verbindingskabel tussen het elektronische horloge en de controller is beschadigd, en vervang de verbindingskabel.
3. Als de elektronische meter na explosiebeveiliging “E05” weergeeft, controleer dan of de voedingsspanning lager is dan 50% van
de normale spanning, test opnieuw met de juiste spanningsspecicaties; controleer of de controller een vreemde geur heeft, vervang
de controller; controleer de motor Of de kabel goed is aangesloten, sluit de motorkabel weer aan.
4. Als de elektronische meter na het draaien “E02” weergeeft, is er geen sensorsignaal, de mogelijke redenen zijn: geen motorsignaalingang wordt gedetecteerd gedurende meer dan 5-8 seconden, de motorkabel is niet aangesloten of de motor is defect.
5. Als de elektronische meter “E06” weergeeft na het draaien, is dit een overstroombeveiliging. De mogelijke oorzaak is dat de
stroom de nominale belasting overschrijdt, het systeem zelfbeschermend is, of een deel van de loopband zit vast, waardoor de motor
niet draait en de belasting overgewicht, overmatige stroom, het systeem beschermt zichzelf; pas de loopband aan en begin opnieuw.
Een andere manier is om te controleren of er overstroomgeluid of een brandgeur is wanneer de motor loopt, en de motor te vervan-
gen; of controleer of de controller een brandgeur heeft en vervang de controller; Test de spanningsspecicaties opnieuw.
6. Als de motor niet draait na het indrukken van de starttoets, kan de reden zijn dat de betreffende motor van de regelmotor dat wel
is abnormaal, de besturingszekering is beschadigd of valt eraf, of de motorkabel is niet aangesloten, of de IGBT op de besturing is
doorgebrand. Of het circuit is aangesloten en correct is aangesloten, controleer of de zekering op de elektrische bediening intact is,
installeer of vervang deze; controleer of de motordraad los zit en sluit de motordraad aan. Gebruik een multimeter om te meten of
de IGBT op de onderste controller is doorgebrand en kortgesloten. Vervang of vervang de onderste IGBT op de onderste controller.
CALORIEN BEREKENINGSFORMULE
70.3 × V (Km / h) × t (h) × (1 +?%)
Calorieën die worden verbrand voor elke kilometer hardlopen met een stijging naar 0 is 70,3 calorieën.
Hoe ga je aan de slag
Als u ouder bent dan 35 jaar of gezondheidsproblemen heeft, zelfs als dit de eerste keer is dat u aan tnessoefening doet, dient u
een arts of professional te raadplegen voordat u het apparaat gebruikt. Ga voordat u gaat trainen aan de zijkant staan om te leren hoe
u moet werken, zoals starten, stoppen en snelheidsaanpassing. Ga daarna op het plastic dek van de loopband staan, pak de leuning
vast, begin met 1,6-3,2 km / u lage snelheid, sta rechtop, kijk vooruit, begin langzaam met een paar stappen. Nadat je je hebt aangepast, kun je de snelheid aanpassen naar 3-5 km / u en ongeveer 10 minuten blijven doen, en dan stoppen.
6
Page 15
VEILIGHEIDSOEFENING
7
forward, start slowly by taking a few steps. After adapting, you can adjust the speed to 3--5 km/h and keep doing about 10
minutes, then stop.
SAFETY EXERCISE
Please stand on the side to learn how to operate, such as speed and incline, until you become familiar, then you can start do
exercise. Walk 1 km by constant step need about 15-25 minutes, please record it in fact. And walk 1km by 4.8 km/h need
about 12 minutes. If you can do it easily by few times, then can adjust the high speed and incline, and go on to do 30 minutes,
you can take a good exercise. Before do slow walk exercise,please remember it is for your health and can not irritable.
AMOUNT OF EXERCISE
SHORTCUT——The best way to save time is do 15-20 minutes exercise.
Warm up 2 minutes by 4.8 km/h, and adjust the speed to 5.3 km/h and 5.8 km/h, continue do exercise by this two speeds.
Then add 0.3 km/h per 2mins speed increase, until you feel breathing quickened but not breathe hard. Keep this speed to do
exercise, if feels uncomfortable, please reduce 0.3 km/h. Leave 4 minutes to reduce speed at last. If you fell it is hard to
strengthen exercises by increase speed, then you can choose the way of increase incline slowly, it also can strengthen
exercise.
CONSUMPTION OF HEAT——This way can really consumption the heat.
Warm up 5 minutes by 4--4.8 km/h speed, then add 0.3 km/h per 2 minutes increasing speed, you can do 45mins on the
speed that you feel it is comfortable and challenge. In order to strengthen do exercise. You can do 1 hour by this speed and
add 0.3 km/h speed when you heard some business advertisements, and return the speed back when go to next program, so at
this period, the heat will be consumed enough. At last keep 4 minutes to reduce the speed.
EXERCISE FREQUENCY
Target is 3--5 times per week, do 15-60mins each time. It is better to make a time schedule, do not accord to your favor. You
can get the strenuous exercise degree through adjusting speed . We'd suggest that do not set incline when start do exercise.
Please consult professional doctor before you do exercise. They can help recommend exercise rate/intension and time
according to your age and health condition. When running, if you feel chest tightness or chest pain, irregular Heartbeats,
short of breath, dizziness or other unwell, please stop immediately! And consult doctor before you continue to exercise. If
you often use treadmill, you can choose normal walk speed or jog speed.
If you have no experience or can't make sure the best testing speed, you can reference below standard:
weak constitution people.
sedentary or not often exercise people.
walking quickly people.
fast walk people.
jogger.
intermediate speed runner.
Speed 1-3.0 km
Speed 3.0-4.5 km
Speed 4.5-6.0 km
Speed 6.0-7.5 km
Speed 7.5-9.0 km
Speed 9.0-10.0 km
More than 10.0 km
excellent runner.
ATTENTION:It is suitable for walker to choose less than or equal to 6 km speed.
Warm-up Exercise
It is better to do some warm-up exercise. Warm the muscle easy stretch, so use 5-10 mins to warm-up. Then
stop and according below method to do stretch exercise for five times, and each foot do 10 seconds or more
every time. After running, do those stretch exercises again
1. Reach Down : Knees slightly bent and body slowly bent forward, back and shoulders relax, trying to
touch toes. Keep 10-15 seconds and relax. Repeat 3 times(See picture l).
2. Hamstrings Stretches: Sitting on a clean cushion, put one leg straight, the other inward and close to the
inside of the straight leg. Try to touch your toes with your hands. Keeping for 10 to 15 seconds, and relax.
Repeat 3 times for each leg (See picture 2).
3. Crus and Feet Tendon Stretches: Standing with two hands on the wall or tree, one leg behind. Keeping
your legs straight and the heel on the ground, tilt to the wall or tree. Keep 10 to 15 seconds, and relax.
Repeat 3 times for each leg (See picture 3).
4. Quadriceps Stretches: Keeping your balance with your left hand holding on the wall or table, then stretch
your right heel toward your buttocks slowly, until you feel very tense in the front of your thigh. Keep10 to 15
seconds, and relax. Repeat 3 times for each leg (See picture 4).
5. Sartorius (Inner Muscles of the Thigh Muscle Stretches: Sitting down with your soles opposite and
knees outward Pull your feet toward your groin Keep 10 to 15 seconds , and relax. Repeat 3 times (See
Ga alsjeblieft aan de zijkant staan om te leren hoe met het apparaat om te gaan, zoals snelheid en hellingshoek, totdat je vertrouwd
raakt. Daarna kun je beginnen met oefenen. Lopen 1 km met constante stap heeft ongeveer 15-25 minuten nodig, noteer het in feite.
En lopen 1 km bij 4,8 km / u ongeveer 12 minuten nodig. Als u het gemakkelijk een paar keer kunt doen, dan kunt u de hoge snelheid
en helling aanpassen en doorgaan met 30 minuten, dan kunt u een goede oefening doen. Voordat u een langzame looptraining gaat
doen, moet u er rekening mee houden dat het voor uw gezondheid is en niet prikkelbaar kan zijn.
HOEVEELHEID TRAINING
SHORTCUT—— De beste manier om tijd te besparen is door 15-20 minuten aan lichaamsbeweging te doen.
Opwarmen 2 minuten bij 4,8 km / u, en de snelheid aanpassen naar 5,3 km / u en 5,8 km / u, blijf trainen met deze twee snelheden.
Voeg vervolgens 0,3 km / u per 2 minuten snelheidsverhoging toe, totdat u sneller voelt ademen maar niet hard ademt. Houd deze
snelheid aan om te oefenen, het voelt oncomfortabel aan, verminder 0,3 km / u. Wacht 4 minuten om de snelheid eindelijk te verlagen. Als u vindt dat het moeilijk is om oefeningen te versterken door de snelheid te verhogen, dan kunt u de manier kiezen om de
helling langzaam te verhogen, het kan ook de oefening versterken.
VERBRUIK VAN WARMTE
Op deze manier kan de warmte echt worden verbruikt. Opwarmen 5 minuten met een snelheid van 4-4,8 km / u, voeg vervolgens
0,3 km / u per 2 minuten toenemende snelheid toe, u kunt 45 minuten doen op de snelheid die u comfortabel en uitdagend vindt. Om
te versterken, doe aan lichaamsbeweging. Je kunt 1 uur met deze snelheid doen en 0,3 km / u snelheid toevoegen als je zakelijke
advertenties hoorde, en de snelheid teruggeven wanneer je naar het volgende programma gaat, dus in deze periode wordt de warmte
voldoende verbruikt. Houd ten slotte 4 minuten aan om de snelheid te verlagen.
OEFENINGSFREQUENTIE
Het doel is 3-5 keer per week, doe elke keer 15-60 minuten. Het is beter om een tijdschema te maken, wees niet in uw voordeel.
U kan de inspannende trainingsgraad krijgen door de snelheid aan te passen. We raden aan om geen helling in te stellen wanneer u
begint met trainen. Raadpleeg een professionele arts voordat u gaat trainen. Ze kunnen u helpen bij het aanbevelen van trainingssnelheid / -intensiteit en -tijd op basis van uw leeftijd en gezondheidstoestand. Als u tijdens het hardlopen een beklemmend gevoel op de
borst of pijn op de borst, een onregelmatige hartslag, kortademigheid, duizeligheid of ander onwel voelt, stop dan onmiddellijk! En
raadpleeg een arts voordat u doorgaat met trainen. Als u vaak loopbanden gebruikt, kunt u de normale loop- of jogsnelheid kiezen.
Als je geen ervaring hebt of niet zeker weet wat de beste testsnelheid is, kun je de onderstaande norm raadplegen:
Snelheid 1-3,0 km = mensen met een zwak gestel.
Snelheid 3,0-4,5 km = sedentaire of niet vaak sporten mensen.
Snelheid 4,5-6,0 km = snel wandelende mensen.
Snelheid 6,0-7,5 km = snelle mensen lopen.
Snelheid 7,5-9,0 km = jogger.
Snelheid 9.0-10.0 km = gemiddelde snelheidsloper.
Meer dan 10,0 km = uitstekendeloper.
AANDACHT! Het is geschikt voor wandelaars om een snelheid van minder dan of gelijk aan 6 km te kiezen.
Onderhoudsinstructies
WAARSCHUWING: Zorg ervoor dat u de stekker van de loopband uit het stopcontact haalt voordat u het product reinigt of onderhoudt. REINIGING: Algemene reiniging zal de levensduur van de loopband aanzienlijk verlengen.
Houd uw loopband schoon door regelmatig af te stoffen. Zorg ervoor dat u het blootgestelde deel van het dek aan weerszijden van
OPWARMINGSOEFENING:
Het is beter om een opwarmingsoefening te doen. Verwarm de spier gemakkelijk door uit te rekken, gebruik 5-10
minuten om op te warmen. Stop dan en volg de onderstaande methode om vijf keer rekoefeningen te doen, en doe
dit elke keer 10 seconden of meer. Doe na het hardlopen die rekoefeningen opnieuw.
1. Buig naar beneden: knieën licht gebogen en lichaam langzaam naar voren gebogen, rug en schouders ontspannen
en proberen de tenen aan te raken. Houd 10-15 seconden vast en ontspan. Herhaal dit 3 keer (zie afbeelding l).
2. Rekoefeningen voor de hamstrings: zittend op een schoon kussen, één been gestrekt, het andere naar binnen gericht en dicht bij de binnenkant van het gestrekte been. Probeer uw tenen met uw handen aan te raken. Houd 10 tot
15 seconden vast en ontspan. Herhaal 3 keer voor elk been (zie afbeelding 2).
3. Crus en voetenpees strekken: Staand met twee handen op de muur of boom, een been achter. Houd je benen recht
en de hiel op de grond, kantel naar de muur of boom. Houd 10 tot 15 seconden vast en ontspan. Herhaal 3 keer voor
elk been (zie afbeelding 3).
4. Quadriceps strekt zich uit: houd uw evenwicht met uw linkerhand tegen de muur of tafel, en strek vervolgens uw
rechterhiel langzaam naar uw billen, totdat u zich erg gespannen voelt in de voorkant van uw dij. Houd 10 tot 15
seconden vast en ontspan. Herhaal 3 keer voor elk been (zie afbeelding 4).
5. Sartorius (innerlijke spieren van de dijspier strekken zich uit: ga zitten met uw zolen tegenover en knieën naar
buiten. Trek uw voeten naar uw lies 10 tot 15 seconden aan en ontspan. Herhaal dit 3 keer (zie afbeelding 5).
7
Page 16
de loopband en ook de zijrails reinigt. Dit vermindert de opeenhoping van vreemd materiaal onder de loopband. Zorg ervoor dat je
are clean. The top of the belt may be cleaned with a wet soapy cloth. Be careful to keep liquid away from inside the
motorized treadmill frame or from underneath the belt.
WARNING:Always unplug the treadmill from the electrical outlet before removing the motor cover. At least once a year
remove the motor cover and vacuum under the motor cover.
This treadmill's walking belt and deck are equipped with a pre-lubricated, low maintenance deck system. The belt/ deck
friction may pl
ay a major role in the function and life of your treadmill, thus requiring periodic lubrication. We recommend a
periodic inspection of the deck.
We recommend lubrication of the deck according to the following timetable:
Light user (less than 3 hours/ week) Every 60 days
Medium user (3-5 hours/ week) Every 45 days
Heavy user (more than 5 hours/ week) Every 30 days
We suggest you buy lubricating oil from local distributors or contact our company directly.
Please follow the inst
ructions carefully. If you are unsure about anything contact a technician or the manufacturer.
I
t
a
d
S
I
p
o
d
S
T
u
b
m
R
schoenen schoon zijn. De bovenkant van de riem kan worden schoongemaakt met een natte zeepachtige doek. Zorg ervoor dat er
geen vloeistof in het onderstel van de gemotoriseerde loopband of onder de band terechtkomt.
WAARSCHUWING: Haal altijd de stekker van de loopband uit het stopcontact voordat u de motorkap verwijdert.
Verwijder minstens één keer per jaar de motorkap en stofzuig onder de motorkap. De loopband en het loopvlak van deze loopband
zijn uitgerust met een voorgesmeerd, onderhoudsarm deksysteem. De wrijving tussen de band en het dek kan een belangrijke rol
spelen in de functie en levensduur van uw loopband, waardoor periodieke smering nodig is. We raden een periodieke inspectie van
het dek aan. We raden aan om het dek te smeren volgens het volgende tijdschema:
Lichte gebruiker (minder dan 3 uur / week) elke 60 dagen.
Middelgrote gebruiker (3-5 uur / week) elke 45 dagen.
Zware gebruiker (meer dan 5 uur / week) elke 30 dagen.
We raden u aan smeerolie te kopen bij lokale distributeurs of rechtstreeks contact op te nemen met ons bedrijf. Volg de instructies
aandachtig door. Als u niet zeker bent over iets neem contact op met een installateur of de fabrikant.
Place treadmill on a level surface. Run the treadmill at approximately 6-8 km/h, observe the running
Plaats de loopband op een vlakke ondergrond. Laat de loopband draaien met ongeveer 6-8 km / u,
let op de afwijkende conditie van de loopband.
belt deviate condition.
f the belt has drifted to the right, unplug the safety lock and power switch, and
Als de band naar rechts is gedreven, ontkoppel dan de veiligheidsver-
urn the right adjusting bolt 1/4 turn clockwise, then insert the power switch
grendeling en de stroomschakelaar, en draai de rechter afstelbout een
nd safety lock, re-start the treadmill and observe the running belt to see if it
kwartslag met de klok mee, plaats vervolgens de stroomschakelaar en
eviates. Repeat the above steps until the running belt is aligned in the middle.
de veiligheidsvergrendeling, start de loopband opnieuw en bekijk de
ee picture A
loopband om te zien als het afwijkt. Herhaal de bovenstaande stappen
f the treadmill belt is swerving to the left, unplug the safety lock, turn off the
totdat de loopband in het midden is uitgelijnd. Zie afbeelding A.
ower, then with the left adjusting bolt clockwise rotation 1 / 4 laps, and turn
Als de loopband naar links slingert, ontkoppel dan de veiligheidsver-
n the safety lock and power on to make treadmill running, checking the
grendeling, schakel de stroom uit en draai vervolgens met de linker
eviation of the treadmill belt. Repeat the above steps until the belt centered.
stelbout een kwartslag rechtsom en draai de veiligheidsvergrendeling
ee picture B
en stroom aan om de loopband te laten draaien. het controleren van de
he treadmill belt will gradually relax after above steps or after a period of time
afwijking van de loopbandband. Herhaal de bovenstaande stappen totdat
sing, unplug the safety lock, and turn off the power, with the two adjusting
de riem gecentreerd is. Zie foto B.
olt clockwise rotation 1 / 4 laps, and turn on the safety lock and power to
De loopband zal geleidelijk ontspannen na de bovenstaande stappen of
ake treadmill running, then standing on the belt to confirm the tightness.
na een bepaalde periode van gebruik, ontkoppel de veiligheidsvergren-
epeat the above steps until the belt moderate tightness. See picture C
deling, en schakel de stroom uit, met de twee stelbouten 1/4 ronden
rechtsom, en zet de veiligheidsvergrendeling aan en zet de stroom aan
om laat de loopband draaien en ga dan op de riem staan om de strakheid
te bevestigen. Herhaal de bovenstaande stappen totdat de riem matig
strak zit. Zie afbeelding C.
8
 Loading...