

Page 1
Part. No.: R699867
INSTALLATION MANUAL
Date: 30032016 Rev: 01
www.dreamvision.net
Page 2

R699867 - Very BEST 3D Passive Kit User Manual
2
Changes
Dreamvision provides this manual ‘as is’ without warranty of any kind, either expressed or implied, including but
not limited to the implied warranties or merchantability and fitness for a particular purpose. Dreamvision may
make improvements and/or changes to the product(s) and/or the program(s) described in this publication at any
time without notice.
This publication could contain technical inaccuracies or typographical errors. Changes are periodically made to
the information in this publication; these changes are incorporated in new editions of this publication.
Copyright
All right reserved. No part of this document may be copied, reproduced or translated. It shall not otherwise be
recorded, transmitted or stored in a retrieval system without the prior written consent of Dreamvision.
Guarantee
Dreamvision provides a guarantee relating to perfect manufacturing as part of the legally stipulated terms of
guarantee. On receipt, the purchaser must immediately inspect all delivered goods for damage incurred during
transport, as well as for material and manufacturing faults. Dreamvision must be informed immediately in writing
of any complaints. If the purchaser or third party caries out modifications or repairs on goods delivered by
Dreamvision, or if the goods are handle incorrectly, in particular if the systems are commissioned operated
incorrectly or if, after the transfer of risks, the goods are subject to influences not agreed upon in the contract, all
guarantee claims of the purchaser will be rendered invalid. Not included in the guarantee coverage are system
failures which are attributed to programs or special electronic circuitry provided by the purchaser, e.g. interfaces.
Normal wear as well as normal maintenance are not subject to the guarantee provided by Dreamvision either.
The environmental conditions as well as the servicing and maintenance regulations specified in this manual must
be complied with by the customer.
Trademarks
Brand and product names mentioned in this manual may be trademarks, registered trademarks or copyrights of
their respective holders. All brands and product names mentioned in this manual serve as comments or examples
and are not to be understood as advertising for the products of their manufactures.
Page 3

R699867 - Very BEST 3D Passive Kit User Manual 3
TABLE OF CONTENTS
1.0 SAFETYINSTRUCTIONS .....................................................................................................4
1.1 Important Information ....................................................................................................................4
1.2 Regional Specic Information........................................................................................................4
1.3 Important Safeguards .....................................................................................................................4
2.0 OvERvIEw ...............................................................................................................................5
2.1 Description .....................................................................................................................................5
2.2 Requirements ..................................................................................................................................5
3.0 INSTALLATION .......................................................................................................................5
3.1 Air-Flow and Space Requirements .................................................................................................5
3.2 Polarizer Position ...........................................................................................................................6
3.3 Table Mounting ..............................................................................................................................7
3.4 Ceiling Mounting ...........................................................................................................................8
3.5 Drilling holes distances ..................................................................................................................8
4.0 GETTINGSTARTED ..............................................................................................................9
4.1 Front Side .......................................................................................................................................9
4.2 Rear side .........................................................................................................................................9
4.3 Side View and Connections panel .................................................................................................. 9
4.4 Projector settings ..........................................................................................................................10
5.0 CONNECTIONS .................................................................................................................... 10
5.1 Caution when connecting or disconnecting a device ...................................................................10
5.2 Connecting the main power ..........................................................................................................10
5.3 Power On / Off this unit ...............................................................................................................10
5.4 Connecting a 3D Syncro signal to the Kit .................................................................................... 11
5.5 Connecting this unit to the Network.............................................................................................11
6.0 OpERATINGSYSTEm .........................................................................................................11
6.1 OSD on the Touch Screen ............................................................................................................11
6.2 Polarity setting ..............................................................................................................................12
6.3 Synchro delay setting ...................................................................................................................12
6.4 Temperature and Fan Speed .........................................................................................................12
6.5 Modifying the settings using the Ethernet Connection ................................................................12
6.6 Connecting this unit using WiFi ...................................................................................................12
6.7 Advanced settings.........................................................................................................................12
7.0 TROUbLEShOOTING ........................................................................................................ 13
8.0 DImENSIONS
......................................................................................................................... 14
Page 4
R699867 - Very BEST 3D Passive Kit User Manual
SAFETY INSTRUCTIONS
4
1.0 SAFETY INSTRUCTIONS
1.1 Important Information
Information for Users on Disposal information
This symbol indicates that the electrical and electronic equipment should not be disposed as general
household waste at its end of life. Instead, the product should be handed over to the applicable
collection point for the recycling of electrical and electronic equipment for proper treatment, recovery
and recycling in accordance with your national legislation.
By disposing of this product correctly, you will help to conserve natural resources and will help
prevent potential negative effects on the environment and human health which could otherwise be caused by
inappropriate waste handling of this product.
For more information about collection point and recycling of this product, please contact your local municipal
office, your household waste disposal service or the shop where you purchased the product. Penalties may be
applicable for incorrect disposal of this waste, in accordance with national legislation.
1.2 RegionalSpecicInformation
CE mark and Directive 2011/65/EU - ROHS 2 (Europe only)
In accordance with Article 7 and the adoption into national law by 2nd January 2013, this product has been
designed and manufactured in accordance with Article 4. The technical documentation and the written declaration
of conformity that assesses the product conformity can be provided to the competent National Authority upon an
email request to: rohs2@dreamvision.net
Other Countries outside the European Union:
If you wish to dispose of this product, please do so in accordance with applicable national legislation or other rules
in your country for the treatment of old electrical and electronic equipment.
FCC Information (USA only)
Changes or modification not approved by Dreamvision could void the user’s authority to operate the equipment.
Note: This equipment has been tested and found to comply with the limits for Class B digital devices, pursuant to
Part 15 of the FCC Rules. These limits are designed to provide reasonable protection against harmful interference
in a residential installation. This equipment generates, uses, and can radiate radio frequency energy and, if not
installed and used in accordance with the instructions, may cause harmful interference to radio communications.
However, there is no guarantee that interference will not occur in a particular installation.
About the installation place
Do not install this unit in a place that cannot support its weight securely. If the installation place is not sturdy
enough, the polarizer could fall or overturn, possibly causing personal injury.
To prevent fire or shock hazards, do not expose this appliance to rain or moisture.
1.3 Important Safeguards
Electrical energy can perform many useful functions. This unit has been engineered and manufactured to
assure your personal safety. IMPROPER USE CAN RESULT IN POTENTIAL ELECTRICAL SHOCK OR FIRE
HAZARD. In order not to defeat the safeguards incorporated into this product, observe the following basic rules
for its installation, use and service.
The power input is auto-ranging from 110 to 240 VAC 50Hz/60Hz.
Page 5
OvERvIEw
R699867 - Very BEST 3D Passive Kit User Manual 5
2.0 OVERVIEW
2.1 Description
The Very BEST 3D Passive Kit is the latest Dreamvision 3D passive kit using the fastest and most efficient
technologies. The polarization modulator is intended to be used in front of compatible projectors to generate 3D
stereoscopic images using ultra-light passive 3D glasses.
This kit is also suitable for professional applications and can be used in numerous applications such as 3D
presentations, shows, conferences, lectures, as well as for simulations and high-quality visualizations, up to
32,000 lumens.
The latest PiCell polarizing technology, allows rapid setups and optimal performances, together with a clear and
bright 3D image.
2.2 Requirements
To perform normally, this kit needs a 3D source, connected to a projector equipped with a standard VESA 3D or
a BNC syncro. A polarized screen and passive glasses with circular polarization are also required.
3D source and 3D projector
The Very BEST 3D Passive Kit is optimized for the Siglos and Siglos+ projector Series. But it also has great
performances with a majority of single chip and three-chip DLP projectors. To perform well, the projector should
be able to send a synchronization signal through a BNC or VESA mini-DIN3 connector. If you have any doubt
about the projector compatibility, please consult your dealer.
Polarization preserving screen fabric
In order to view a 3D image of the highest quality, a polarization preserving screen is required, such screens
are also historically called “silver screens”. They are specifically designed for 3D projection. In the case that the
screen is not designed for 3D, the 3D picture may be uncomfortable, blurry with a lot of ghosting and crosstalk
phenomenons.
3D Glasses
To fully enjoy the performances of the kit, use one of our 3D glasses references. You can also use any 3D glasses
possessing circular polarization such as the ones used in commercial theaters.
3.0 INSTALLATION
3.1 Air-Flow and Space Requirements
This unit can be installed in table or ceiling position. Make sure that the unit is installed so that the air flow is not
obstructed as described below.
fresh air blow
8 cm
Air ow.
Page 6

R699867 - Very BEST 3D Passive Kit User Manual
INSTALLATION
6
Minimum distance
The distance between the lens of the projector and the Very BEST 3D Passive Kit window must be at least 8 cm.
8cm minimum
Minimum distance to the projector lens must be at least 8 cm.
Important limitation: the projector minimum Throw Ratio
Before making any installation, make sure that the projector throw ratio is compatible with the configuration
required. To be compatible, the TR must be at least 0.55:1, and the environment setup would be as such that the
light beam can use the maximum surface of the frame window. The light beam should go through the polarizing
window without touching the metallic frame.
3.2 Polarizer Position
Optimum window fill ratio
To optimize the Very BEST 3D Passive Kit performances, the projected picture must completely fill the polarizing
window. Depending on the configured zoom, the distance to the kit may vary.
Adjust the projection zoom and distance to obtain the maximum ll ratio.
It is important to ensure that the device is compatible with the configuration required. The “Throw Ratio”
must be > 0.55:1 to ensure that the minimum distance of 8 cm is attained and that the projector light
beam doesn’t go beyond the frame limits.
Page 7

INSTALLATION
R699867 - Very BEST 3D Passive Kit User Manual 7
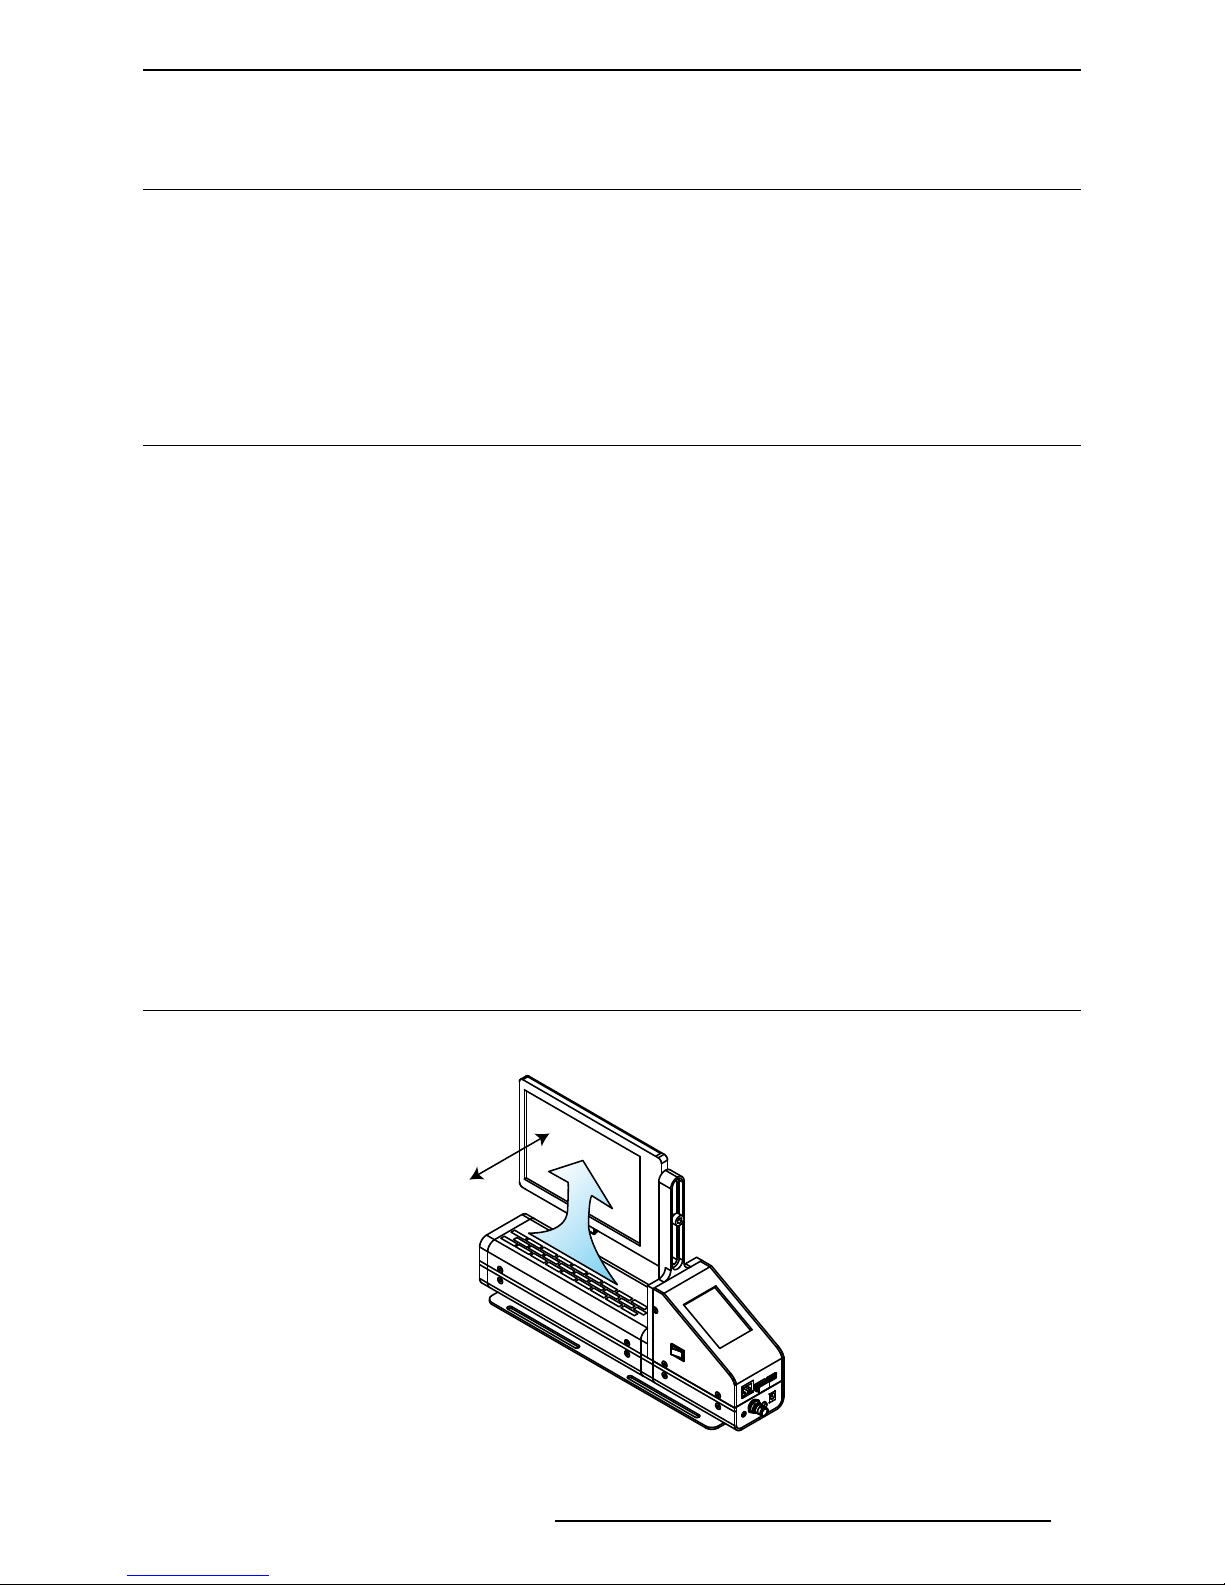
Adjusting the frame height
The position of the frame can be adjusted. To raise, lower or tilt the frame you must release the screw located on
the side of this unit using the supplied Allen wrench. Move the frame to the desired position before tightening the
screw.
release the screw to
adjust the postion
Adjusting the height and tilt of the polarizing frame.
3.3 Table Mounting
The Very BEST 3D Passive Kit should be placed on a flat and stable surface then fixed with 4 screws. It should
also be placed in front of the projector lens, the side with a “Projector Side” label printed on it facing the lens.
PROJECTOR
SIDE
Make sure to place the projection device on the “Projector Side” label side.
The polarizer of the window should be approximately perpendicular to the axis of the luminous flux.
Adjust the frame tilt so it is perpendicular to the projector beam.
Page 8

R699867 - Very BEST 3D Passive Kit User Manual
INSTALLATION
8
3.4 Ceiling Mounting
It is possible to fix the Very BEST 3D Passive Kit to the ceiling. In this case it is necessary to reverse the direction
of the frame on its support.
If installing in ceiling position, the frame must be reversed to show the thermal sensor at the bottom.
When reversing the window frame, make sure to insert the cable in the new position.
Special instructions when ceiling-mounting this unit
• To ceiling-mount this unit, special expertise and techniques are necessary. Be sure to ask your dealer or
specialist to perform mounting.
• Do not mount at places that may be subjected to vibration and shock.
• Depth of the screw holes should be sufficient to support the total weight of this unit (6 Kg).
• Regardless whether the unit is still under guarantee, Dreamvision is not liable for any product damage caused
by mounting the unit with third party ceiling mount or when the environment is not suitable for ceiling-mount.
3.5 Drilling holes distances
d
D
D
280 mm
11.0”
80 mm
3.1”
84 mm
3.3”
Drilling holes for table or ceiling mounting.
• Distance between front and back holes is d = 84 mm, 3.3”
• Distance between left and right screws is between D = 80 mm and 280 mm
Page 9

GETTING STARTED
R699867 - Very BEST 3D Passive Kit User Manual 9
4.0 GETTING STARTED
4.1 Front Side
Vertical support arm
Main chassis
Polarizing frame
Polarizing window
External
temperature
sensor
4.2 Rear side
Projector Side
label
Height adjusting
screw
Power Switch
4.3 Side View and Connections panel
Height adjusting
screw
Touch screen LCD
Input panel
USB port 2
WIFI Dongle
Ethernet port
3D Sync (1x BNC)
Reset button
Operating LED (green)
Power connector
Syncro LED (white)
On the side of this unit is located the connections panel
Page 10

R699867 - Very BEST 3D Passive Kit User Manual
CONNECTIONS
10
4.4 Projector settings
If this unit is installed with a DLP projector, you can browse into the projector’s menu and search for the “Dark
Time” parameter in the 3D settings menu. The “Dark Time” should be adjusted to 0 μs and the “delay” should also
be adjusted to 0 μs.
5.0 CONNECTIONS
5.1 Caution when connecting or disconnecting a device
Prior to connecting or disconnecting any device to this unit, switch the Very BEST 3D Passive Kit in
standby mode. To do so, use the interrupter et switch it to the Off position and wait until complete
shutdown of the LCD screen.
5.2 Connecting the main power
Connect the Power Supply to the main power
Then connect the power supply power cord to the power connector on this unit.
Power Cord
Power Switch
Connecting the Power Cord
5.3 Power On / Off this unit
Power On
To Power ON the Very BEST 3D Passive Kit, check that the power supply is correctly connected to this unit
and press the Power switch to the ON position, indicated by a “I” label. Wait until the unit has completed its boot
sequence on the Touch Screen LCD.
Page 11

OpERATING SYSTEm
R699867 - Very BEST 3D Passive Kit User Manual 11
Power Off
To Power Off this unit, press the Power Switch in the Off position, indicated by a “O” label, and wait until the unit
is completely Off and that the green Operating Led shuts Off.
For safety reasons, avoid to plug or unplug any connection when this unit is running and that the operating
LED (green) is light ON.
5.4 Connecting a 3D Syncro signal to the Kit
This unit is equipped with a native BNC male syncro connector and it comes with 2 different syncro wires to
connect the device to a large panel of 3D projectors. Use the best suited cable that fits your install:
-Standard VESA Mini-DIN 3 to BNC female cable
-BNC female to BNC female cable
This unit will automatically detect the voltage level between 5V and 12V.
5.5 Connecting this unit to the Network
Local Area Network (LAN)
Connect this unit to the LAN, inserting the ethernet cable into the available Ethernet port located on the connection
panel.
Wireless Network
This unit comes with a WiFi dongle connected to one of its USB ports. For the correct behavior of the
product, it is essential to keep the WiFi dongle connected.
6.0 OPERATING SYSTEM
6.1 OSD on the Touch Screen
This unit boots on its own Operating System (OS) that is displayed on the Touch Screen, from which you have
access to the most common settings.
Polarity:
Normal
Delay Sync:
0 µs
Temperature:
26°C
Fan:
Auto: 30%
Alerts and Error Messages
IP : 192.168.2.123
Date / Time
Ver. LCV150130_V00.05.00
Hz
96,0
OSD on the Touch Screen.
Page 12

R699867 - Very BEST 3D Passive Kit User Manual
OpERATING SYSTEm
12
Table Description
Current Frequency (in Hz) Displays the current 3D synchro frequency.
Polarity setting Displays the current setting Normal or Inverted
Sync Delay setting (in μs) Displays the current Sync setting.
Temperature (in °C) Displays the Polarizing window temperature
Fan Mode and Speed (in %) Displays the current fan setting: can be Auto or Fixed
Alerts and Error Messages This table may vary depending of the current state of this unit
General info Displays the current IP, Date, Time and Software version.
6.2 Polarity setting
To change the Polarity setting, press on the “Polarity” box, then press on the desired setting and confirm by
pressing the “Save” button. Available settings: Normal or Inverted.
6.3 Synchro delay setting
To change the Synchro delay setting, press on the “Delay Sync” box, then select the desired setting. Confirm the
new value by pressing the “Save” button. Available settings from -5000 up to +5000 μs.
6.4 Temperature and Fan Speed
The temperature is continuously monitored and controlled by Operating System. The fan speed is adjusted
automatically according to the temperature measured.
6.5 Modifying the settings using the Ethernet Connection
To access the general settings of this unit, it can be done by using the ethernet connection and an internet
browser from a computer, tablet or smartphone. To do so:
• Open a new window in your browser
• Type in the address field the IP of this unit. By default it is 192.168.2.123 and confirm.
6.6 Connecting this unit using WiFi
To access wirelessly the settings of this unit, please check that the WiFi dongle is correctly inserted into the USB
port then activate the WiFi on your device to join the WiFi network SSID.
The default SSID is VOLFONI_XXXXX, and enter the “Volfoni1RD” password when prompted. Open a browser on
your device connected to the WiFi and enter the WLAN IP which is 10.10.0.1 by default.
6.7 Advanced settings
When connecting with your browser, you have access to advanced settings as follow:
Settings Description
Sync Delay -5000 μs up to +5000 μs (within 100 μs steps)
IP Settings Change network configuration
Rotate 180° Reverses the display direction (up/down) for ceiling mounting
Date/Time Adjust the current date and time
Fan control
Selects the mode operation of the fan.
On: the fan is always On at 100% speed
Auto: the fan speed varies with the polarizer temperature
Alarm settings
Determines the threshold for the system alarms: LCD Temperature
Threshold and Dysfunctions
Product Update Updating one or more system features.
Log Retrieve the log files stored on the system.
Log Settings Configure the logging parameters.
Page 13

TROUbLEShOOTING
R699867 - Very BEST 3D Passive Kit User Manual 13
7.0 TROUBLESHOOTING
Symptoms Possible reasons Solutions
Picture is hazy,
poor contrast
Focus may be incorrectly set Fix the lens focus
The protective films on the front
and polarizing window have not
been removed
Check if the protective films have been
removed
Presence of fingerprints or
dirt on the lens and/or on the
polarizer
Clean the polarizer with the appropriate
equipment, i.e using nonabrasive cloth
No 3D effect
Problem with the silvered screen
Check if the screen is silver
anddesigned for 3D
Projector settings are not correct
Check if the values ‘Dark Time’ and
‘Delay’ are configured correctly.
No 3D effect
This unit is not connected to the
projector’s 3D synchronization
signal.
Check the connections and the status
of the syncro LED (white).
This unit is not connected to the
main power.
The Operating LED (green) must be
light On when this unit is On.
The projection window of the
booth depolarizes the light.
Remove the window to make sure it
doesn’t affect the light polarization
Picture is too dark
The power of the projector lamp
is too low.
Change the lamp settings
The lamp settings are not
properly adjusted.
The image seems to be
in 3D but the rendering is
uncomfortable
The eye polarity (left / right
eyes) is probably reversed in the
projector or on this unit.
Go into the settings and change the
current .Polarity setting.
Flickering picture
The content is not 3D Check that the source is in 3D
The 3D format is not supported
by the projector
Check that the frame rate on the Touch
Screen is higher than 60Hz (typically
96Hz or 120Hz)
Page 14

R699867 - Very BEST 3D Passive Kit User Manual
DImENSIONS
14
8.0 DIMENSIONS
26 cm
10.2”
10 cm
3.9”
6 cm
2.4”
17 cm x 12 cm
7.6” x 4.5”
40 cm
15.7”
Page 15

R699867 - Very BEST 3D Passive Kit User Manual 15
Page 16

Contact information
TEC - DreamVision
7, rue La Caille, 75017 Paris, France
www.dreamvision.net
 Loading...