

Page 1
Page 2

Changes
Dreamvision provides this manual ‘as is’ without warranty of any kind, either expressed or implied, including but
not limited to the implied warranties or merchantability and tness for a particular purpose. Dreamvision may
make improvements and/or changes to the product(s) and/or the program(s) described in this publication at any
time without notice.
This publication could contain technical inaccuracies or typographical errors. Changes are periodically made to
the information in this publication; these changes are incorporated in new editions of this publication.
Copyright
All right reserved. No part of this document may be copied, reproduced or translated. It shall not otherwise be
recorded, transmitted or stored in a retrieval system without the prior written consent of Dreamvision.
Guarantee
Dreamvision provides a guarantee relating to perfect manufacturing as part of the legally stipulated terms of
guarantee. On receipt, the purchaser must immediately inspect all delivered goods for damage incurred during
transport, as well as for material and manufacturing faults. Dreamvision must be informed immediately in writing
of any complaints. If the purchaser or third party caries out modications or repairs on goods delivered by
Dreamvision, or if the goods are handle incorrectly, in particular if the systems are commissioned operated
incorrectly or if, after the transfer of risks, the goods are subject to inuences not agreed upon in the contract, all
guarantee claims of the purchaser will be rendered invalid. Not included in the guarantee coverage are system
failures which are attributed to programs or special electronic circuitry provided by the purchaser, e.g. interfaces.
Normal wear as well as normal maintenance are not subject to the guarantee provided by Dreamvision either.
The environmental conditions as well as the servicing and maintenance regulations specied in this manual must
be complied with by the customer.
Trademarks
Brand and product names mentioned in this manual may be trademarks, registered trademarks or copyrights
of their respective holders. All brands and product names mentioned in this manual serve as comments or
examples and are not to be understood as advertising for the products of their manufactures.
2
R699854 - Dreamy Geek 2 User Manual
Page 3

TABLE OF CONTENTS
1.0 IMPORTANTSAFEGUARDS ...............................................................................................5
2.0 INSTALLATIONGUIDELINES ...........................................................................................7
2.1 Introduction ....................................................................................................................................7
2.2 Packaging .......................................................................................................................................7
2.3 Environment of Use........................................................................................................................7
2.4 Attaching the Unit ..........................................................................................................................8
2.5 Projection Distance.........................................................................................................................8
2.6 Lens Offset, Picture Zoom and Focus ............................................................................................9
3.0 REMOTECONTROLUNIT(RCU) ................................................................................. 10
3.1 General View ................................................................................................................................10
3.2 Loading and Replacing Batteries .................................................................................................10
4.0 GENERALVIEW ...................................................................................................................11
4.1 Top view and Touch Pad .............................................................................................................. 11
4.2 Front View ....................................................................................................................................11
4.3 Rear View .....................................................................................................................................11
5.0 GETTINGSTARTED ........................................................................................................... 12
5.1 Connecting the Power Cord .........................................................................................................12
5.2 Power ON .....................................................................................................................................12
5.3 Power OFF ...................................................................................................................................12
6.0 CONNECTIONS .................................................................................................................... 13
6.1 Caution when connecting a Device to HDMI Input .....................................................................13
6.2 Connecting a Video Source to the Projector.................................................................................13
7.0 MENUSTRUCTURE ............................................................................................................ 14
8.0 RECOMMENDSCREEN .................................................................................................... 15
8.1 General View ................................................................................................................................15
9.0 LOCALSCREEN ................................................................................................................... 16
9.1 General View ................................................................................................................................16
9.2 Using the Media Player ................................................................................................................16
10.0 SETTINGSSCREEN ............................................................................................................ 18
10.1 General View ................................................................................................................................18
10.2 Apps Manager ..............................................................................................................................18
10.3 Network Settings ..........................................................................................................................18
10.4 Image Settings ..............................................................................................................................19
10.5 Video Settings...............................................................................................................................19
10.6 Others ...........................................................................................................................................20
11.0 GAMESSCREEN .................................................................................................................. 20
11.1 General View ................................................................................................................................20
12.0 APPSSCREEN ....................................................................................................................... 21
12.1 General View ................................................................................................................................21
13.0 PICTUREMENU ................................................................................................................... 22
13.1 Auto 3D ........................................................................................................................................22
13.2 Picture Prole ............................................................................................................................... 22
13.3 Sound Prole ................................................................................................................................ 22
13.4 Zoom ............................................................................................................................................22
13.5 3D Mode (manual Setting) ........................................................................................................... 22
13.6 Clean Memory .............................................................................................................................. 23
13.7 Focus Figure ................................................................................................................................. 23
13.8 ScreenShot .................................................................................................................................... 23
13.9 Luminance Mode .......................................................................................................................... 23
14.0 MAINTENANCE ................................................................................................................... 23
14.1 Clean Dirt .....................................................................................................................................23
R699854 - Dreamy Geek 2 User Manual 3
Page 4

14.2 Unexpected Behavior ...................................................................................................................23
15.0 SPECIFICATIONS ................................................................................................................ 24
4
R699854 - Dreamy Geek 2 User Manual
Page 5
Important SafeguardS
Regional Specic Information
CE mark and Directive 2011/65/EU - ROHS 2 (Europe only)
In accordance with Article 7 and the adoption into national law by 2nd January 2013, this product has been
designed and manufactured in accordance with Article 4. The technical documentation and the written declaration
of conformity that assesses the product conformity can be provided to the competent National Authority upon an
email request to: rohs2@dreamvision.net
Information for Users on Disposal of Old Equipment
This symbol indicates that the electrical and electronic equipment should not be disposed as general
household waste at its end of life. Instead, the product should be handed over to the applicable
collection point for the recycling of electrical and electronic equipment for proper treatment, recovery
and recycling in accordance with your national legislation.
By disposing of this product correctly, you will help to conserve natural resources and will help
prevent potential negative effects on the environment and human health which could otherwise be caused by
inappropriate waste handling of this product.
For more information about collection point and recycling of this product, please contact your local municipal
ofce, your household waste disposal service or the shop where you purchased the product. Penalties may be
applicable for incorrect disposal of this waste, in accordance with national legislation.
Other Countries outside the European Union:
If you wish to dispose of this product, please do so in accordance with applicable national legislation or other rules
in your country for the treatment of old electrical and electronic equipment.
FCC Information (USA only)
Changes or modication not approved by Dreamvision could void the user’s authority to operate the equipment.
Note: This equipment has been tested and found to comply with the limits for Class B digital devices, pursuant to
Part 15 of the FCC Rules. These limits are designed to provide reasonable protection against harmful interference
in a residential installation. This equipment generates, uses, and can radiate radio frequency energy and, if not
installed and used in accordance with the instructions, may cause harmful interference to radio communications.
However, there is no guarantee that interference will not occur in a particular installation.
1.0 IMPORTANT SAFEGUARDS
Electrical energy can perform many useful functions. This unit has been engineered and manufactured to
assure your personal safety. IMPROPER USE CAN RESULT IN POTENTIAL ELECTRICAL SHOCK OR FIRE
HAZARD. In order not to defeat the safeguards incorporated into this product, observe the following basic rules
for its installation, use and service.
The power input is auto-ranging from 100 to 240 VAC.
• Place this product near a wall outlet where the plug can be easily unplugged.
• Do not use this product near water and to prevent re or shock hazards, do not expose this appliance to rain
or moisture.
• Do not use immediately after moving from a low temperature to high temperature, as this causes condensation,
which may result in re, electric shock, or other hazards.
• Do not place this product on an unstable cart, stand, or table. The product may fall, causing serious injury
to a child or adult, and serious damage to the product. The product should be mounted according to the
manufacturer’s instructions
• This product should be operated only with the type of power source indicated on the label. If you are not sure
of the type of power supply to your home, consult your product dealer or local power company.
• For added protection of this product during a lightning storm, or when it is left unattended and unused for long
periods of time, unplug it from the wall outlet and disconnect the cable system. This will prevent damage to
the product due to lightning and power line surges.
• Do not overload wall outlets, extension cords, or convenience receptacles on other equipment as this can
result in a risk of re or electric shock.
• Slots and openings are provided for ventilation to ensure reliable operation and to protect this unit from
overheating. These openings must not be blocked or covered.
• Never push objects of any kind into this product through openings as they may touch dangerous voltage
points or short out parts that could result in a re or electric shock. Never spill liquid of any kind on the product.
R699854 - Dreamy Geek 2 User Manual 5
Page 6
Important SafeguardS
Slots and openings are provided for ventilation must not be blocked or covered. Do not place this unit
on a bed, sofa, rug or other similar surface.
• Do not attempt to service this product yourself as opening or removing covers may expose you to dangerous
voltages and other hazards. Refer all service to qualied service personnel.
• Unplug this product from the wall outlet and refer service to qualied service personnel under the following
conditions:
a) When the power supply cord or plug is damaged.
b) If liquid has been spilled, or objects have fallen on the product.
c) If the product has been exposed to rain or water.
d) If the product does not operate normally by following the operating instructions. Adjust only those controls
that are covered by the Operation Manual, as an improper adjustment of controls may result in damage
and will often require extensive work by a qualied technician to restore the product to normal operation.
e) If the product has been dropped or damaged in any way.
f) When the product exhibits a distinct change in performance - this indicates a need for service.
• The product should be placed more than one foot away from heat sources such as radiators, heat registers,
stoves, and other products (including ampliers) that produce heat.
• When connecting other products such as VCR’s, and personal computers, you should turn off the power of
this product for protection against electric shock.
• Do not place combustible behind the cooling fan. For example, cloth, paper, matches, aerosol cans or gas
lighters that present special hazards when over heated.
• Do not face the projector lens to the sun. It can lead to re.
• Do not ceiling-mount the projector to a place which tends to vibrate; otherwise, the attaching xture of the
projector could be broken by the vibration, possibly causing it to fall or overturn, which could lead to personal
injury.
• Use only the accessory cord designed for this product to prevent shock.
• The power supply voltage rating of this product is AC120 V, AC100 V – AC240 V, the power cord attached
conforms to the following power supply voltage. Use only the power cord designated by our dealer to ensure
Safety and EMC.
• Ensure that the power cable used for the projector is the correct type for the AC outlet in your country. Consult
your product dealer.
• Never push objects of any kind into this product cabinet as they may touch dangerous voltage points or shortout parts that could result in a re or an electric shock.
Important Notice
Do not look into the projection lens while the illumination lamp is turned on. Exposure of your eyes to the
strong light can result in impaired eyesight.
6
R699854 - Dreamy Geek 2 User Manual
Page 7
InStaLLatIon guIdeLIneS
2.0 INSTALLATION GUIDELINES
2.1 Introduction
This product is powered by a single HD-Ready DLP® chip with a native resolution of 1280 x 800 pixels. It supports
both Standard and HD video formats. Thanks to the use of a 1200 lumens color LED system, the Dreamy Geek 2
can sustain a continuous projection of 20,000 hours (30,000 hours in eco mode).
• 2x HDMI 1.4 with HDCP (supports HD resolutions including 1080p24/60 and Blu-Ray 3D)
• 1x Audio/Video (Headphone jack 3.5mm input using the “jack 3.5mm to 3x RCA” cable)
The Dreamy Geek 2 can also read and play media les such as AVI, MP4 or MKV stored on USB keys, MicroSD
(TF) cards or on a multimedia folder shared on the LAN or WLAN.
Thanks to the 2x 2W stereo loudspeakers, the Dreamy Geek 2 is a simple stand-alone solution capable
of video playback with audio.
2.2 Packaging
The box contains the following items:
• 1x Dreamy Geek 2 HD-Ready 3D DLP LED projector
• 1x Power supply 19V/3.42A with power cord
• 1x Remote Control Unit (RCU)
• 1x Jack 3.5mm (4 connectors) to 3x RCA cable
2.3 Environment of Use
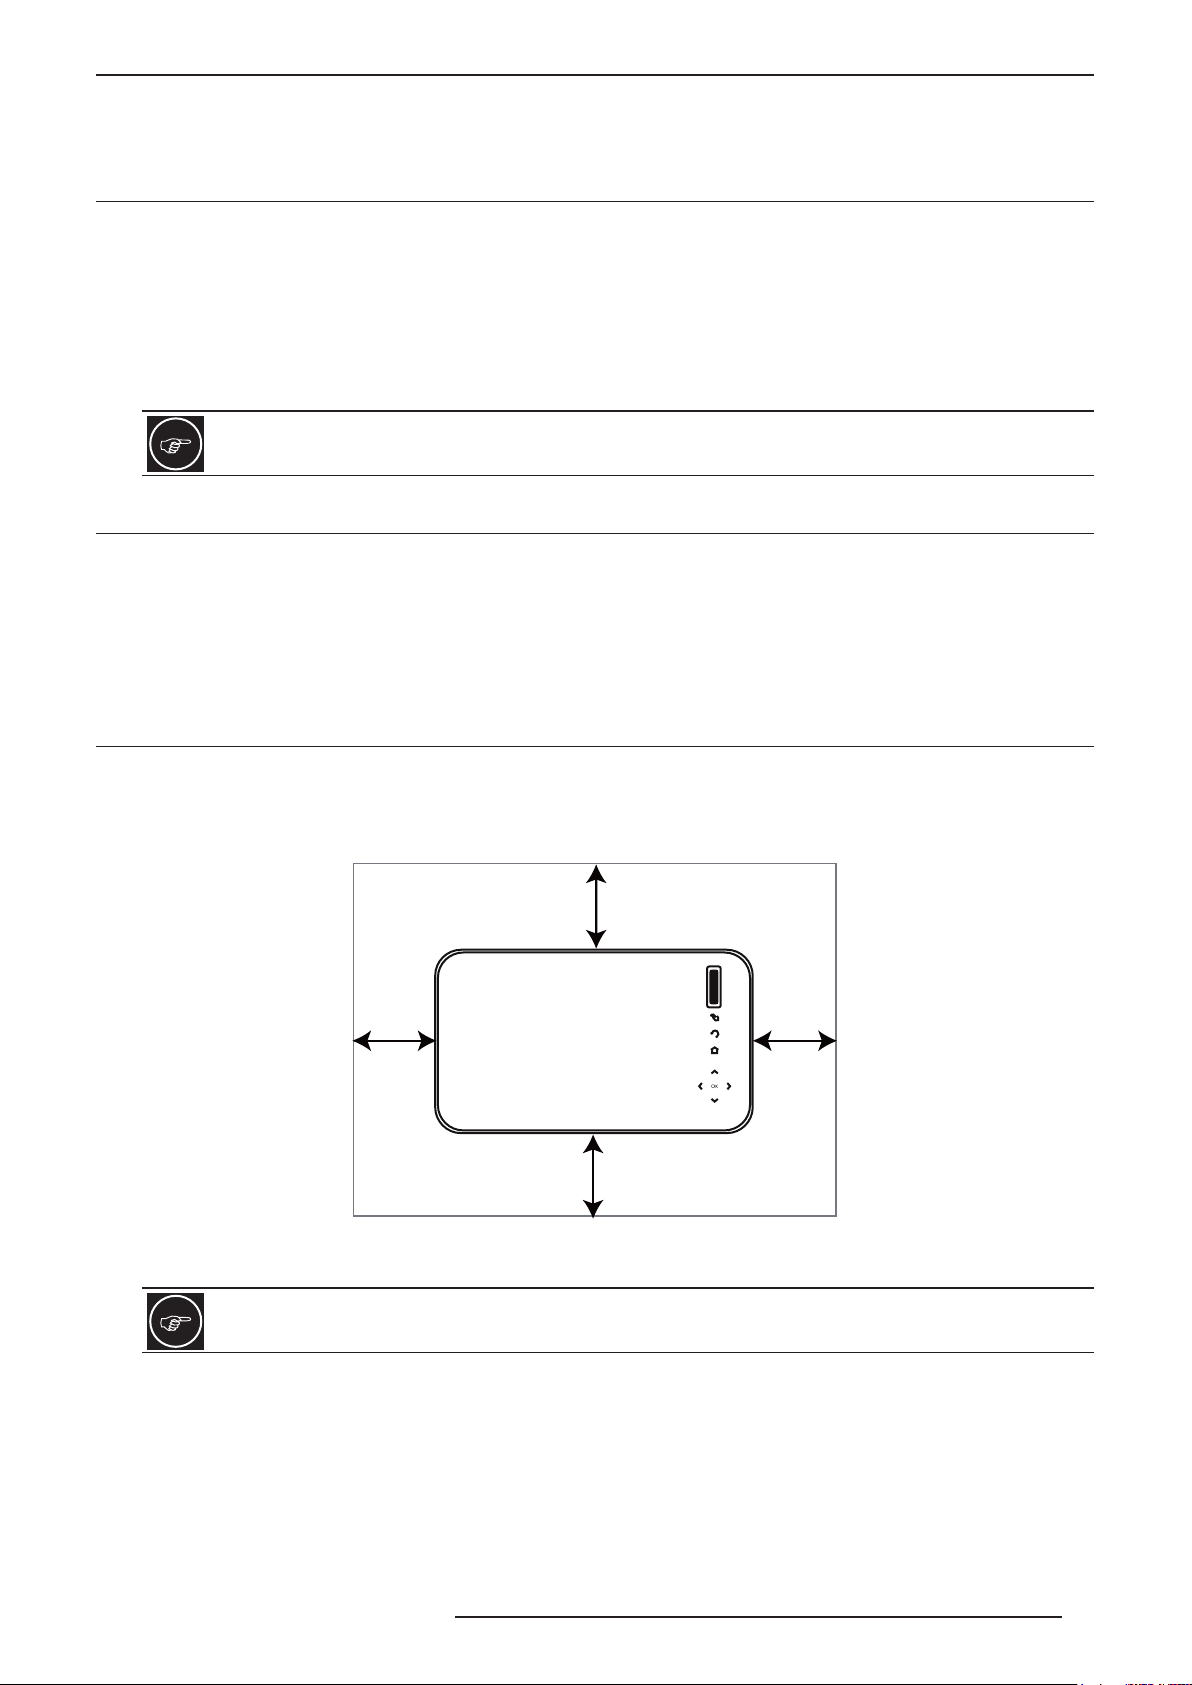
This unit must be installed with at least 5 cm clearance space from walls and requires a free ow of fresh air.
Prevent locations where temperatures may become excessively high, contains humidity, dust, or cigarette smoke
that will cause the unit to malfunction and shorten the electronic component life spans.
5 cm
5 cm 5 cm
5 cm
Space requirements.
Do not install in places higher than 3000m/10000 feet or in a place exposed to direct sunlight as it may
overheat and cause this unit to stop functioning.
Precautions of Usage
This unit makes use of a light source that may reach high temperature during normal operation. Do not allow
projection under the following conditions:
• Projection with the unit laid on sides.
• Projection at a location that blocks the air inlets or exhaust vents.
R699854 - Dreamy Geek 2 User Manual 7
Page 8

InStaLLatIon guIdeLIneS
1/4”-20 thread
2.4 Attaching the Unit
The Dreamy Geek 2 comes with a standard centered 1/4”-20 camera xation thread that may be used to suspend
or attach this unit. Make sure during installation to allow sufcient space around the air inlets to avoid blocking
them.
This unit can be mounted on a camera tripod.
Precautions for Ceiling-mount
• Do not mount at places that may be subjected to vibration and shock.
• Depth of the screw hole is 5 mm, longer screw will damage the
mounting thread.
• Install at a safe place in case this unit or a part of it may drop.
• Regardless whether the unit is still under guarantee, Dreamvision is
not liable for any product damage caused by improper installation.
2.5 Projection Distance
Fixed Zoom projection Distance Chart
The Dreamy Geek 2 has a xed zoom lens with a throw ratio of 1.20:1
Projection Screen
Diagonal Size
(Aspect Ratio 16:10)
20” (51 cm) 17.0” (43 cm) 10.6” (27 cm) 52 cm
30” (76 cm) 25.4” (65 cm) 15.9” (40 cm) 78 cm
50” (127 cm) 42.4” (108 cm) 26.5” (67 cm) 129 cm
70” (178 cm) 59.4” (151 cm) 37.1” (94 cm) 180 cm
100” (254 cm) 84.8” (215 cm) 53.0” (135 cm) 259 cm
138” (350 cm) 117” (297 cm) 73.1” (186 cm) 357 cm
200” (508 cm) 170” (431cm) 106” (269 cm) 517 cm
• The projection screen sizes and projecting distances in the table above are provided only as a guide. Please
use them as reference during installation.
• The distances are calculated for a projection image of 16:10 aspect ratio.
Projection Screen
Base Size
(Aspect Ratio 16:10)
Projection Screen
Height
(Aspect Ratio 16:10)
Dreamy Geek 2
Projection Distance
8
R699854 - Dreamy Geek 2 User Manual
Page 9

InStaLLatIon guIdeLIneS
2.6 Lens Offset, Picture Zoom and Focus
Lens Offset
The optimum image can be obtained when this projector is place perpendicular to the projection screen. The lens
offset is xed to 50%, that means that the projector can be placed either at the top or at the bottom of the picture
as shown in the below picture.
This unit comes with a vertical offset xed to +50%. It means that the optimal position of this projector
is at the bottom or top of your screen. Placing the unit in one of these positions prevents the use of
electronic trapezoidal correction and will give the best picture quality.
If the projector is not installed perpendicularly to the screen, use vetical keystone correction to fulll your screen.
You can also use up to +/- 40° up and down keystone correction. Note that using keystone correction is not
recommended if you want the best image quality.
Picture Focus
Adjust the picture focus with the focus adjustment tab located on the top cabinet of this unit as shown below.
Focus tab
OK
Use the manual focus tab to obtain a sharp picture.
This is important to note that the picture focus should be adjusted only when the projector is warm. Wait
at least 20 minutes after this unit has been powered On to n adjust the focus.
R699854 - Dreamy Geek 2 User Manual 9
Page 10

remote ControL unIt (rCu)
[Mute] sound
3.0 REMOTE CONTROL UNIT (RCU)
3.1 General View
[Power] On / Standby
[Picture Menu]
[Custom] button
Directionnal Keys
[Back] to previous screen
[Menu]
• The [Mute] sound button prevents this unit to render audio. Press again the button to enable sound.
The remote control unit can be used by having the signal reected off a screen, as the effect of signals
reected from the RCU differ with the type of screen used, operable distance may decrease.
[3D] menu
[OK] to conrm selection
[Home] button
Volume setting [-] or [+]
3.2 Loading and Replacing Batteries
a) Turn cover anti-clockwise with the ngernail one eighth of turn (45°).
b) Pull cover to open the battery compartment. Insert one CR 2032 battery making sure the + polarity is on the
cover side and the - polarity remote compartment side.
c) Insert the cover back in place with the battery and close it turning it clockwise.
If the remote control has to be brought closer to the projector to operate, it means that the battery is
wearing out. When this happens, replace the battery.
CR2032
10
R699854 - Dreamy Geek 2 User Manual
Page 11
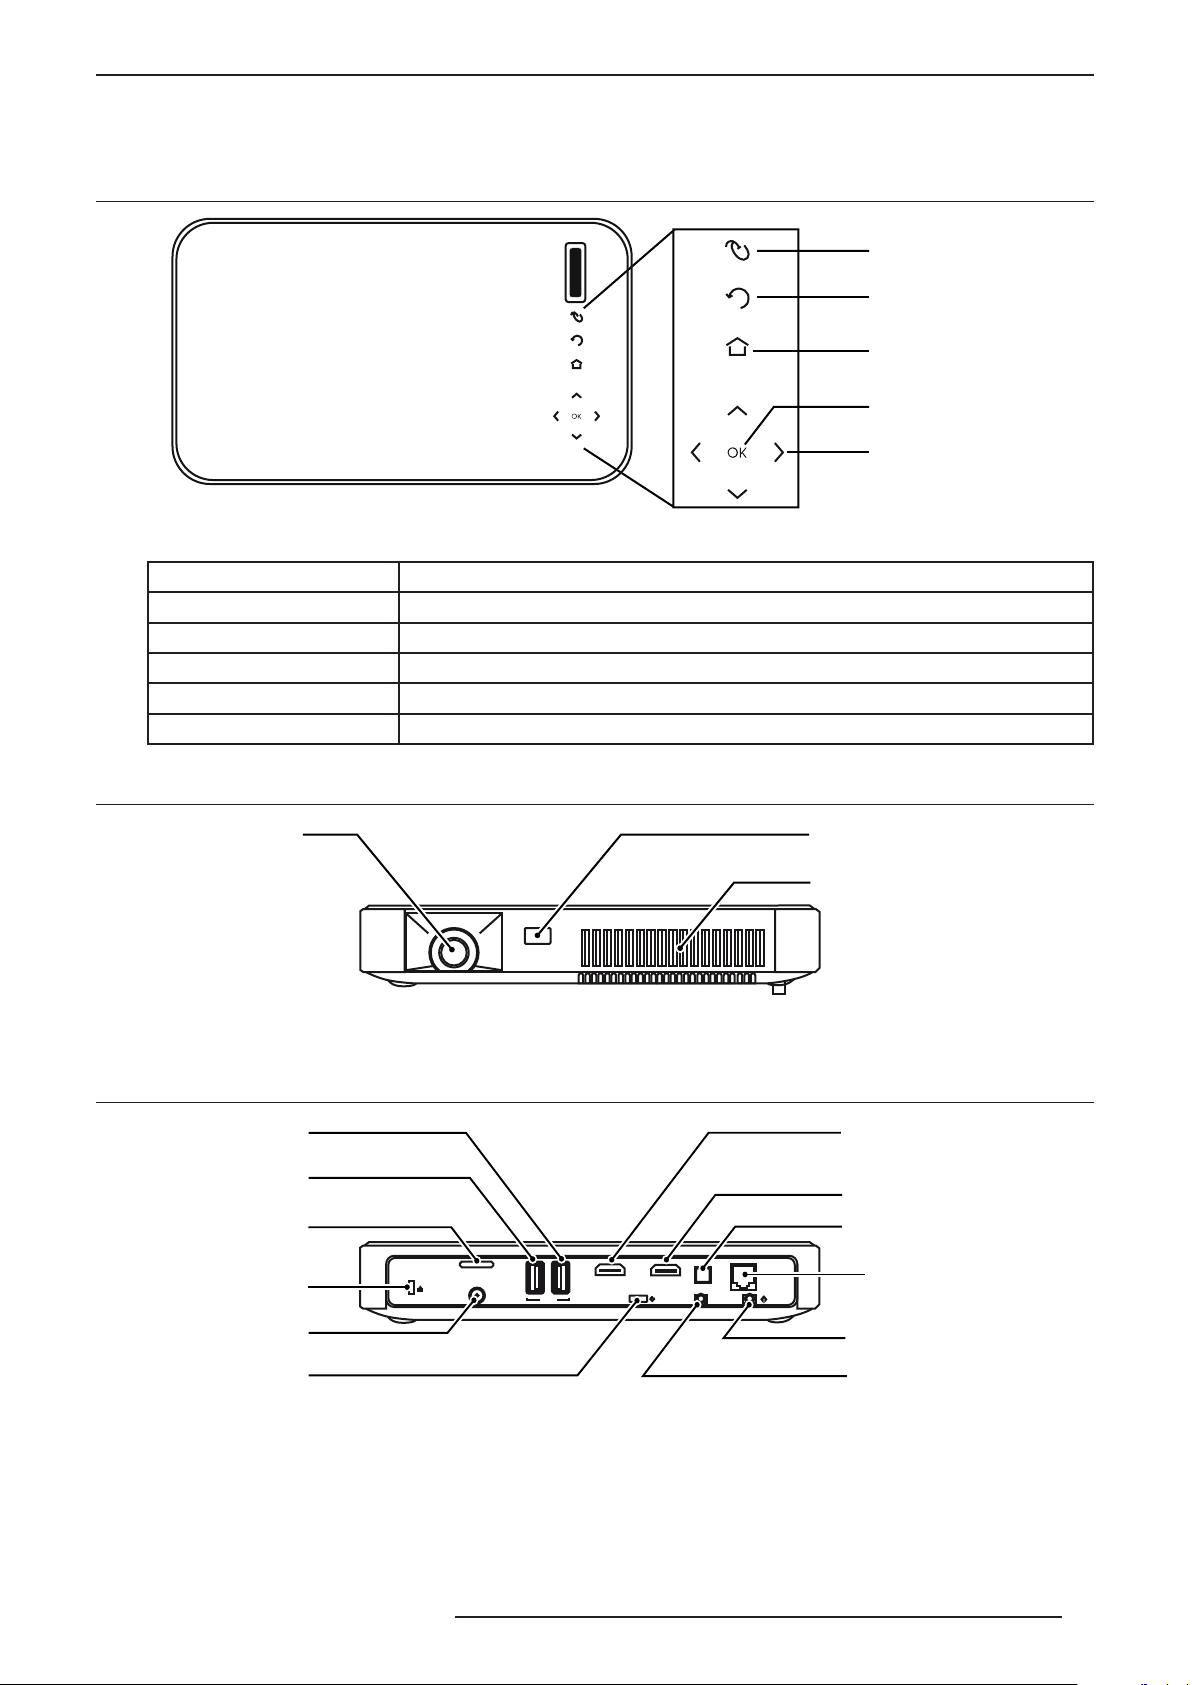
4.0 GENERAL VIEW
Projection lens
IR Receiver
USB 3.0
HDMI 1 input
4.1 Top view and Touch Pad
Touch Pad buttons
Mouse Set the Mouse pointer and use the directional keys to move the pointer
Back Go back to previous screen
Home Go back to Home screen
Up - down - left - right Navigate into the menus
OK To select or conrm an action
generaL VIeW
[Mouse] mode
[Back] to previous screen
[Home] button
[OK] button
Directionnal Keys
Description
4.2 Front View
4.3 Rear View
USB 2.0
Micro-SD input
Anti-theft lock
Power input
Air Outlet
Front view
HDMI 2 input
S/PDIF out (optical)
RJ-45 LAN
Audio out (jack)
R699854 - Dreamy Geek 2 User Manual 11
Power button
Rear view and input panel.
• Inputs: connect your video source to the correct input or connect a multimedia disc to the corresponding input.
• Power input: connect the 19V - 3.42A power cord as shown below.
A/V input (jack)
Page 12

gettIng Started
5.0 GETTING STARTED
5.1 Connecting the Power Cord
Connecting the Power cord to this unit
CAUTION AGAINST FIRE AND ELECTRIC SHOCK.
Since the power consumption of this unit is high, insert the power plug directly into a wall outlet. Do not
use a power voltage different from that which is indicated. Do not cut, tear or modify the power cords.
Power Outlet
110 - 240 V
5.2 Power ON
Ensure that the power cord is securely connected. Turn this unit ON by pressing the Power button located at the
rear of this unit for 3 seconds or by pressing the Power button on the IR-RCU.
Power button
OR
Press the Power button to power ON this unit.
5.3 Power OFF
To turn OFF this unit, press and hold for 3 seconds the Power button on the Control Panel or on the IR-RCU.
WAIT UNTIL COOLING CYCLE IS COMPLETE.
When switching this unit OFF, make sure that it completes its cooling cycle before disconnecting the
main power. Do not unplug from the main power during operation.
12
R699854 - Dreamy Geek 2 User Manual
Page 13

6.0 CONNECTIONS
6.1 Caution when connecting a Device to HDMI Input
ConneCtIonS
Prior to connecting any device to this unit, switch the projector in standby mode. Never connect a HDMI
source to this unit when the projector is in operate mode. The HDMI termination is a self-powered
connection and can cause electric discharges.
6.2 Connecting a Video Source to the Projector
HDMI 1
HDMI 2
Audio/Video Connection Device to connect
HDMI 1, HDMI 2
(DVI compatible)
Video Composite
(1x Yellow RCA)
HDMI or DVI-D sources: Blu-ray Disc player, DVD-player equipped with HDMI
output, Game Console, Computer with DVI-D output. The Audio signal is
embedded in the HDMI signal.
HDMI inputs support 3D signals with the following formats: Frame Packing
(Bluray discs), Top&Bottom and Side-by-Side.
DVD-player, HDTV Receiver, Game Console, DVB-T receiver, Multimedia box,
Analog Camera.
NB: The additional 2x RCA (white and red) are used for Left and Right audio
respectively.
Video Composite
Audio Right
Audio Left
R699854 - Dreamy Geek 2 User Manual 13
Page 14

menu StruCture
7.0 MENU STRUCTURE
SCREENS MENUS SUB MENUS AND OPTIONS
Recommend Screen Hulu plus
Youtube
Netix
Online TV
Local Screen Media Player
HDMI 1
HDMI 2
A/V Input
Settings Screen Apps Manager Settings
Network Status
Image Gyro horizontal Set
Video Audio Balance 0 - 100
Others Perzonalization
All Applications
SD Card
Internal Storage Space
Sdcard Storage
Ethernet Setting
Wireless
PPoE
Proxy Setting
Hotspot (WiFi)
Miracast
Projection mode set Normal Front
Normal Back
Invert Front
Invert Back
Zoom adjust
Zoom Factor 16:9 / 16:10
Zoom adjust 0 - 99
V Zoom adjust 0 - 99
H Zoom Adjust 0 - 99
Auto Keystone On / Off
T Rectify -50 +50
HDMI version 1.4 / 1.3
SPDIF Pcm / Raw
Speaker On / Off
Boot play video open / close
Wallpaper
Update boot animation On / Off
Adb debug On / Off
LED Timeout 0.5h, 1h, 2h, 3h, Off
Power Source HDMI1,HDMI2,video,Off
Hide Bar yes / auto / no
X-Key
Auto3D, PictureMode, SoundMode,
ZoomMode, Shotscreen, App
Fan Fan1-Fan10, auto
Date Settings
Bluetooth Settings
Bluetoothe On/Off
Device Name
Discoverable Timeout
2min, 5min, 1hour, never
14
R699854 - Dreamy Geek 2 User Manual
Page 15

Others Scan for devices
System Upgrade
System Update
System Information
Restore to Factory Default
Language and keyboard settings
About
Games Screen Turn your phone and tablet into a remote
Angry Birds
Epic Defense
Smash Hit
Apps Screen All the other Apps
Picture Menu (*) Mute / Hide Picture Menu
Auto 3D
Picture Bright, Standard, Soft, Custom
Sound Standard, Music, Movie, News, Outside
Zoom Default, 16:9, 16:10, 4:3, Zoom1, Zoom2, P2P
3D Mode Off, Auto, TopDown, LeftRight,
FramePack, 3DT2D (UD), 3DT2D (LR)
Clean Memory Close all opened apps
Focus Figure Display test pattern
ScreenShot
Luminance TextMode, MovieMode, Custom, SaveMode,
Led Off
reCommend SCreen
(*): The Picture Menu is a overlay window located on the right side of the picture. To show this popup
window you can press the [Picture Menu] button on the RCU or press the [Picture Menu] icon during a
video playback.
8.0 RECOMMEND SCREEN
8.1 General View
This screen highlights 4 online Apps: Hulu plus, Youtube, Netix and OnlineTV. Select one App icon and press
OK to launch the App.
R699854 - Dreamy Geek 2 User Manual 15
Page 16
LoCaL SCreen
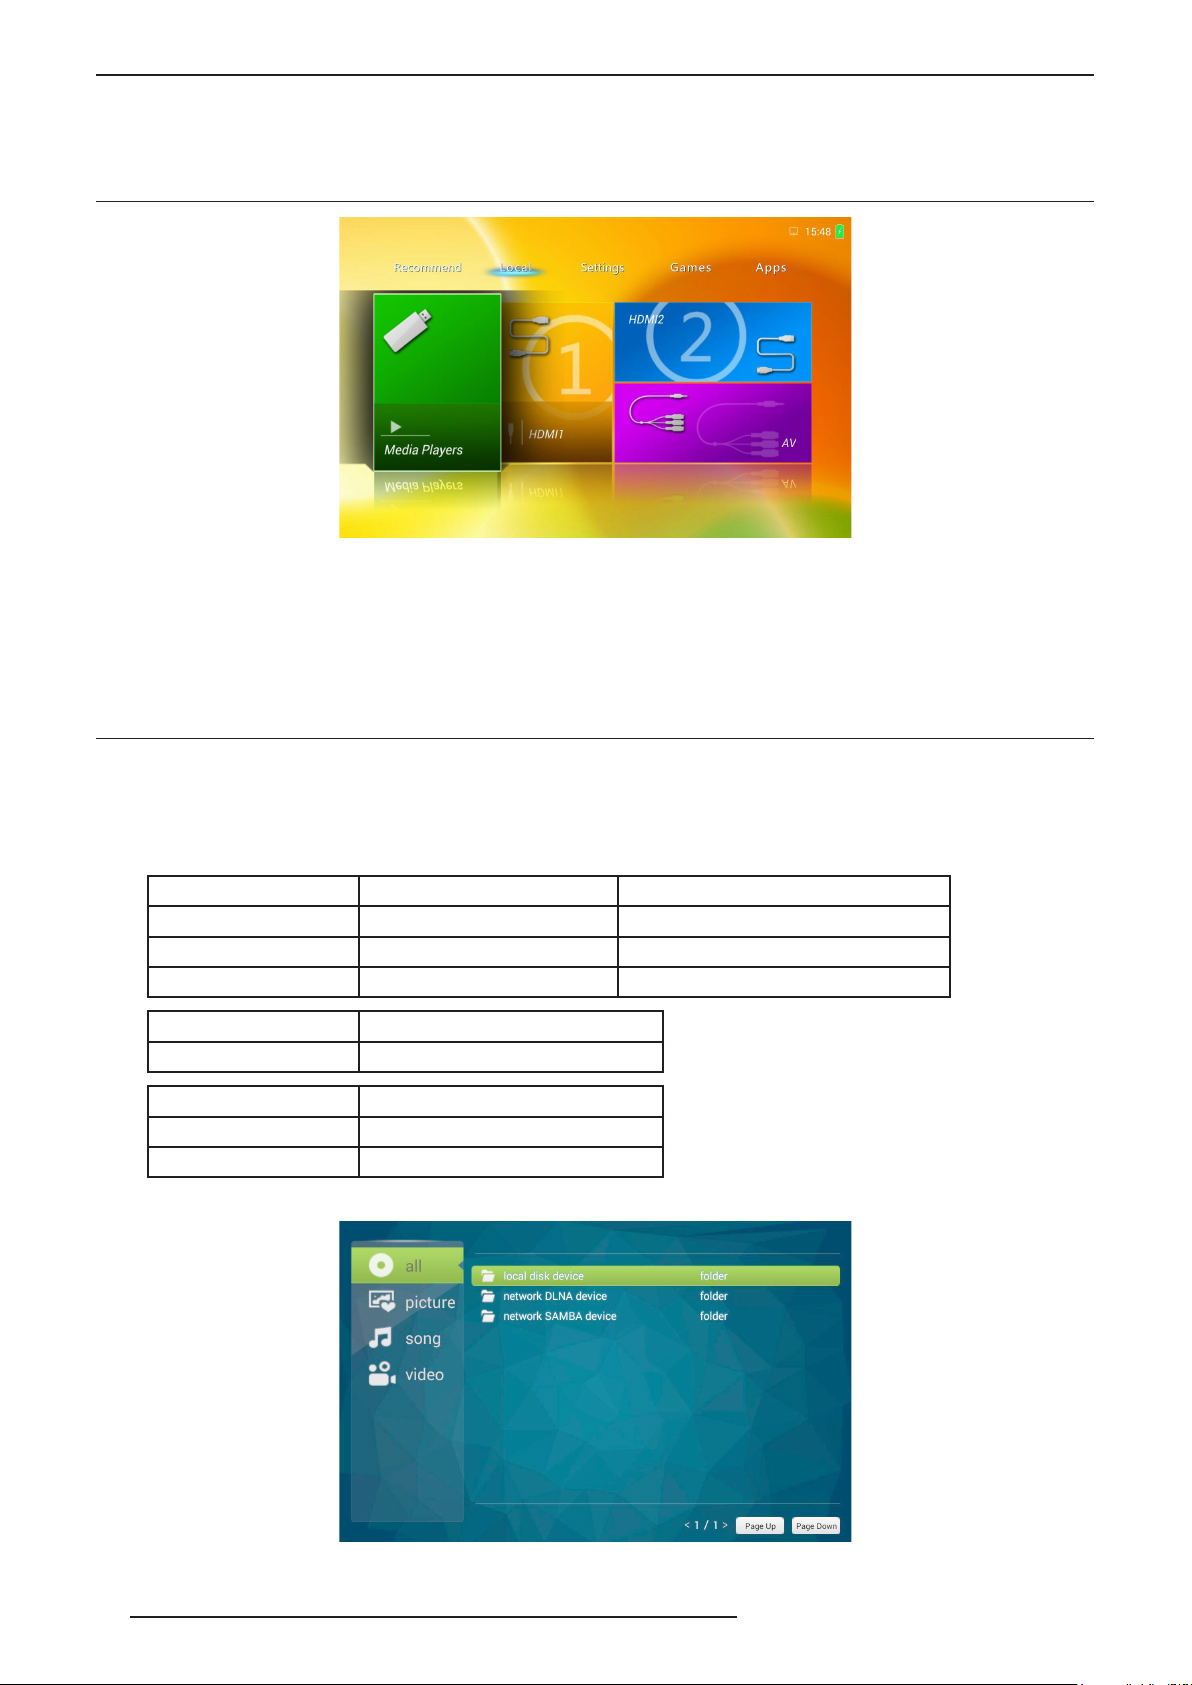
9.0 LOCAL SCREEN
9.1 General View
Use this screen to select the current active input. Select desired input between:
• Media Player, browses and reads any supported format les on TF-Card, USB disc, USB key, LAN or WLAN.
• HDMI 1
• HDMI 2
• A/V Input
9.2 Using the Media Player
The Media Player can read les from USB disc and MicroSD cards formatted in NTFS, FAT16 or FAT32. We
strongly recommend NTFS when high quality video les are required. When encoding your multimedia le,
please make sure to use one of the format and codec listed below.
File compatibility:
Video Formats Codec Maximum resolution
MPEG1, MPEG2 MPG, MPEG 1920x1080/30P (20 Mbps)
AVI, MP4 DVIX, XVID 1920x1080/30P (20 Mbps)
MKV, MOV H.264 AVC, H.265 HEVC 1920x1080/30P (20 Mbps)
Audio Formats Maximum bandwidth
WMA, MP3, M4A 320 Kbps
Image Formats Maximum Resolution
JPEG 15000x8500 px
BMP 9000x6000 px
Select a le from a MicroSD card or from an USB disc
16
Press [OK] on the Local disk device.
R699854 - Dreamy Geek 2 User Manual
Page 17
LoCaL SCreen
Select the correct input where is located the multimedia le: “TF card” or “USB”, then select the correct type of le
between: Photo (JPG or BMP), Music (WMA, MP3 or M4A) or Movie (AVI, MKV, MP4, MOV or MPEG).
Browse into the folders where is located the le then press the [OK] button to read the le.
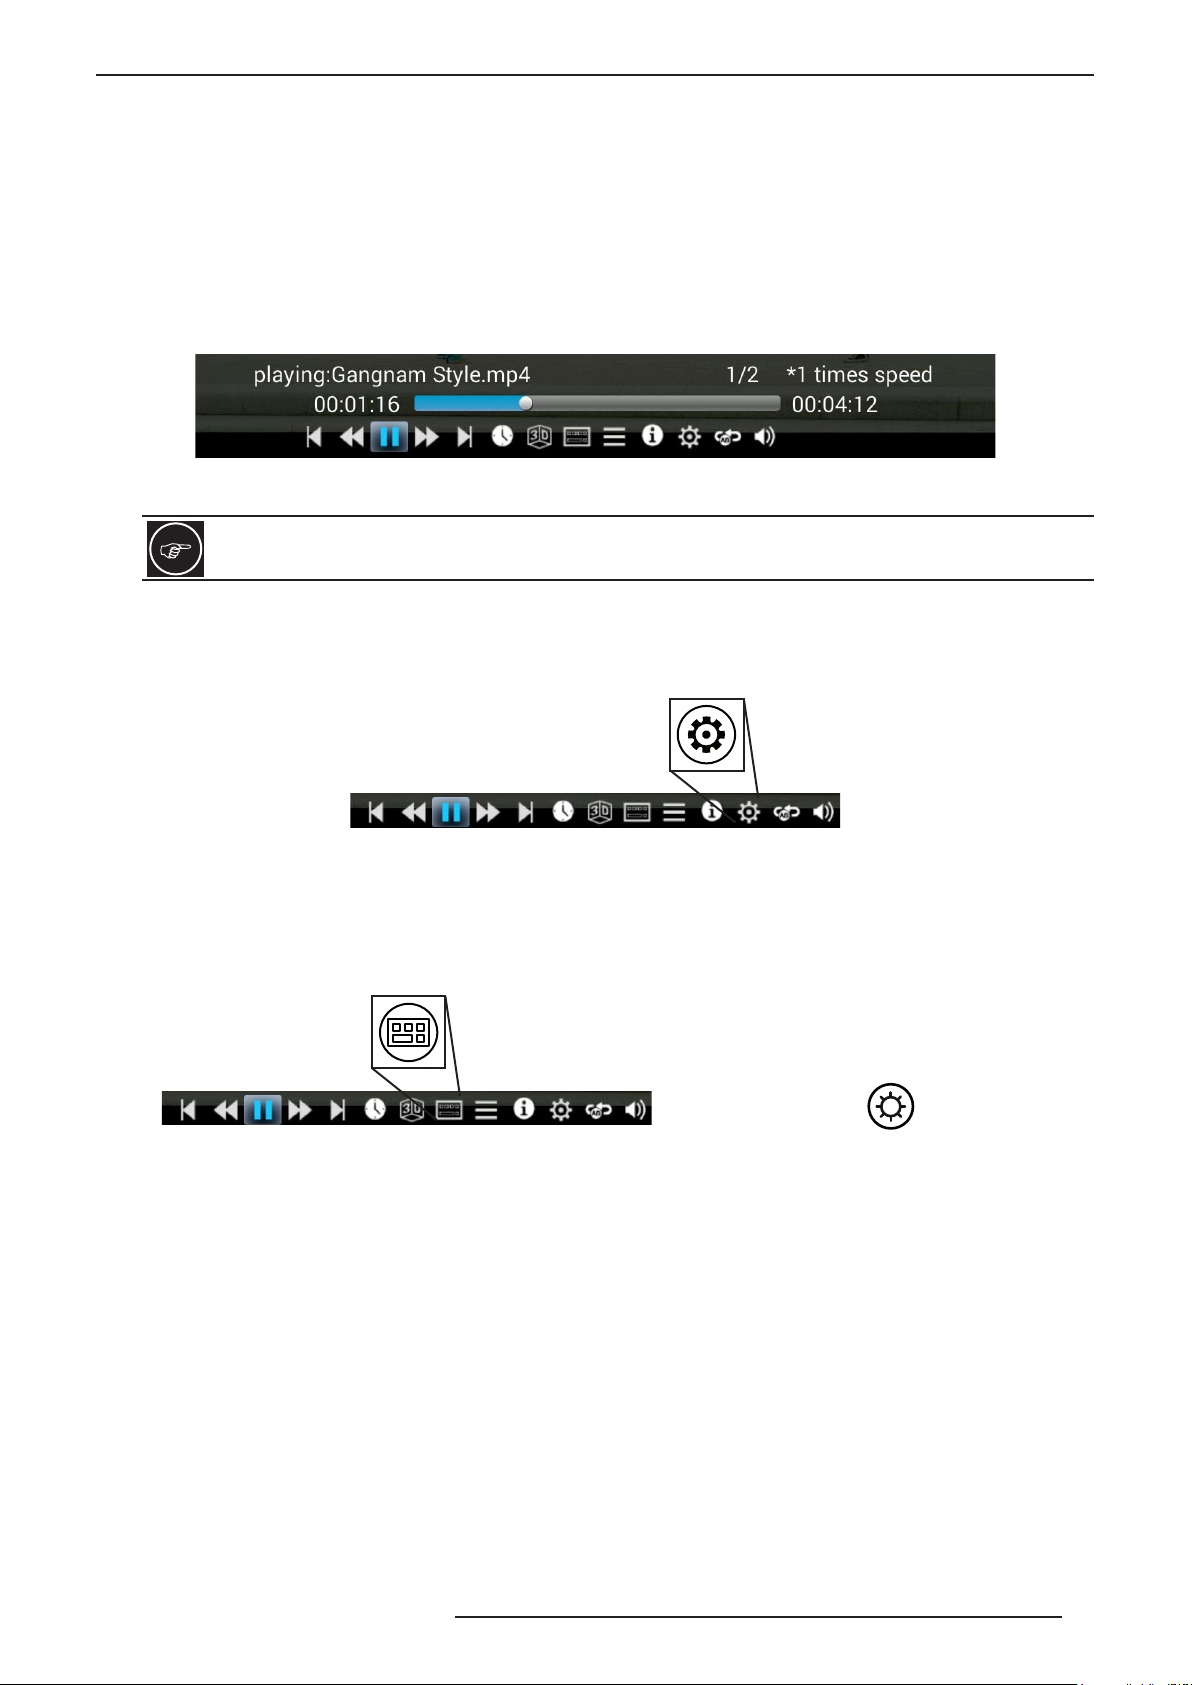
Basic operations during Playback
When reading a multimedia le, you can quickly fast forward or rewind by pressing [RIGHT] or [LEFT] arrows.
Use the [+] and [-] buttons to control the volume output.
Media Player Control Panel
You can also display the multimedia control panel and have access to basic operations such as pause, fast
forward, go to time, etc.
Media Player Control Panel
Press the [OK] button when playing a le to display the control panel.
Press the [BACK] button to hide the Multimedia Control Panel.
Selecting the correct audio track and subtitles
If you are reading a video le with multiple audio track or subtitles, you can browse into the Media Player Control
Panel and select [Playing Settings] icon. A new window appears and you can select the correct audio track and/
or subtitle.
[Playing Settings] icon
Picture Menu
To set and congure the picture mode, picture color, brightness, 3D settings etc, please enter the Picture Menu
from the Media Player Control Panel by pressing the Picture Menu icon or directly by pressing the button on the
Remote Control Unit.
[Picture Menu] icon or RCU button
R699854 - Dreamy Geek 2 User Manual 17
Page 18
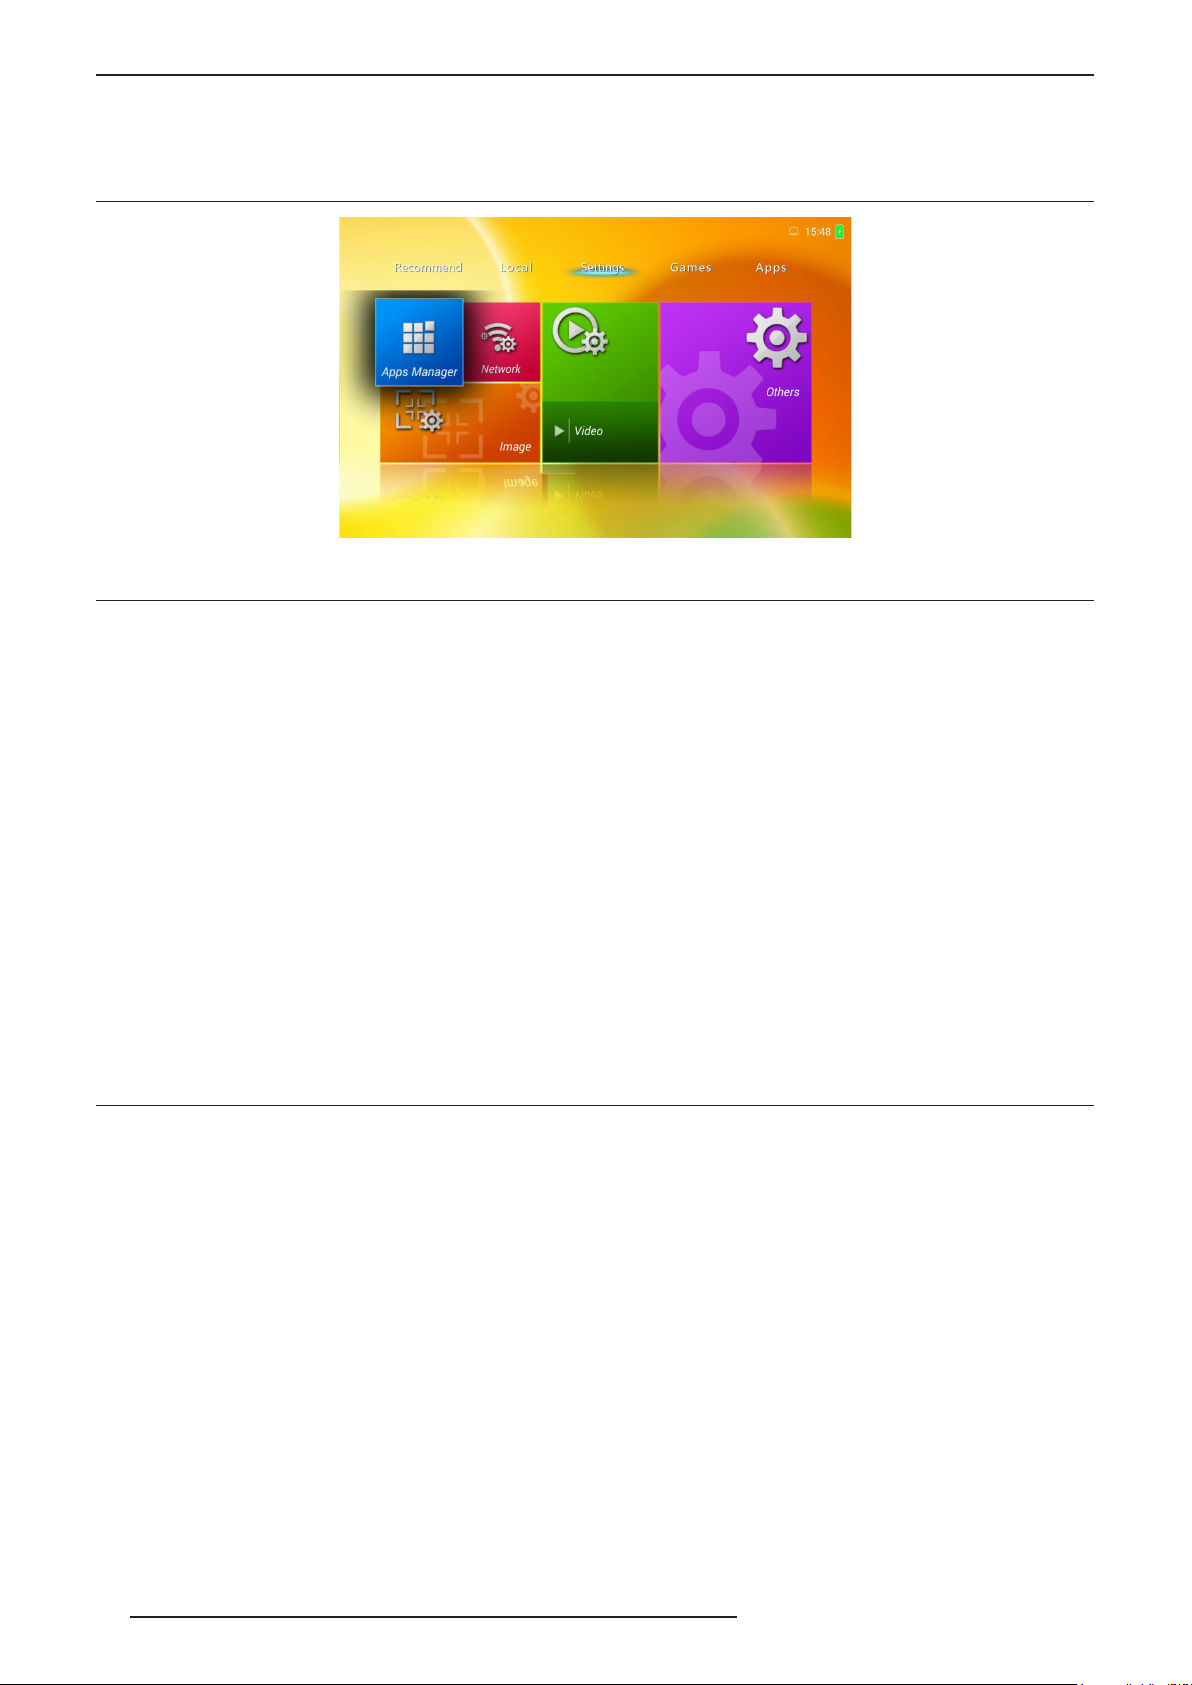
SettIngS SCreen
10.0 SETTINGS SCREEN
10.1 General View
10.2 Apps Manager
Settings
Install Applications from App Store: allow or disable the installation of new Apps from the App Store.
Default Installation Location: select where the new Apps will be installed, select between Default, Internal or
External. By default, the new Apps will be installed on the internal memory if enough space is available, on the
external memory otherwise.
All Applications
List of all the installed Apps and their respective storage sizes.
SD Card
If a SD Card (TF-Card) is inserted, this menu lists all the Apps that have been installed on the card.
Internal Storage
This menu gives the current used and free storage space on the internal memory.
SDcard Storage
This menu gives the current used and free storage space on the SD card.
10.3 Network Settings
Status
Information about the current network status, connection and ip.
Ethernet Setting (LAN)
When using the LAN port (RJ-45), set the ethernet connection through this menu. It is better to use a wired
connection to connect this unit to the LAN connection if you plan to stream or watch HD videos.
This sub menu let you choose between automatic or manual conguration of the LAN parameters. When set to
manual, ll the empty elds with the correct parameters to connect this unit to your LAN.
• Automatic acquisition IP (DHCP Client): When set to ON, the projector’s IP address will be automatically set
by the DHCP server on the LAN.
• IP Address: Sets the IP (Internet Protocol) address of the projector. A valid address must be set for this unit.
• Subnet Mask: Sets the Subnet Mask
• Default Gateway: Sets the Default IP Gateway of the projector.
• MAC Address: A 6 byte hex number that uniquely identies the projector on the LAN. The value is unique to
each individual unit on the LAN network.
Wireless (WLAN)
When using Wi-Fi, set the WLAN connection through this menu.
18
R699854 - Dreamy Geek 2 User Manual
Page 19

SettIngS SCreen
PPoE
To set an internet connection using the Point-to-Point protocole. PPoE protocole is generally used to establish an
internet connection when using DSL. Use the login and password given by your ISP to ll the empty elds
Proxy Setting
To set a proxy if needed for your internet connection. Ask your network administrator how to ll the elds.
Hotspot (WiFi)
To turn this unit into a WiFi Hotspot and sharing wirelessly its internet connection to the WLAN.
Miracast
Use this menu to set and turn On the Miracast function.
10.4 Image Settings
Gyro horizontal
Conrm and set the current horizontal inclinaison set by the integrated gyroscope.
Projection mode set
Set the correct mode:
• Normal Front for standard projection on a white screen or on the wall, the projector being in table position.
• Normal Back, this setting ips horizontally the projected picture in rear-projection installs where the picture is
directly watched on a transparent screen.
• Invert Front, this setting ips vertically the projected picture in cases where this unit is installed at the ceiling
or similar position.
• Invert Back, this setting ips both horizontally and vertically the projected picture when this unit is installed at
the ceiling and behind a transparent screen.
Zoom Adjust Menu
• Zoom Factor, set the correct picture geometry depending of your source 16:9 is typically best suited for video
playback and 16:10 for computer sources.
• Zoom Adjust, ne tune the digital zoom on both horizontal and vertical axis.
• V Zoom and H Zoom concerns only ne tuning of vertical zoom and horizontal zooms.
Auto Keystone
When enable, this function will self-calibrate the vertical keystone during operation.
T Rectify
Manual Keystone adjustment. -50 to +50.
HDMI Version
This function will modify the characteristics of the HDMI inputs. This may be useful to downgrade the HDMI
version 1.4 down to 1.3 when you want to disable the 3D functions from your source (Bluray player or computer).
10.5 Video Settings
Audio Balance
Sets the balance between the left and right audio channels. Balanced audio channels are set at 50.
SPDIF
Sets the digital output format. Use Raw for the best quality, PCM for compatibility.
Speaker
Turns On or Off the integrated speakers of this unit.
Boot Play video
Turns On the boot screen animation.
R699854 - Dreamy Geek 2 User Manual 19
Page 20

gameS SCreen
10.6 Others
Perzonalization
Enter to set a new Wallpaper.
Update the boot animation, update to the latest boot animation available online. (requires an internet connection)
Adb debug: turn on to log additional debug les.
Power Source: sets the input source selection upon Power up.
Hide / Show the Android bar.
X-Key, sets the function for the [Custom] button on the RCU.
Fan speed setting: choose Auto or custom speed. Be carefull of not setting a fan speed lower than the Auto
setting that may overheat and damage this unit.
Date Settings
Set the Date and Time and their format.
Bluetooth Settings
Set the Bluetooth On or Off.
Device Name: changes this unit Bluetooth Name for the Bluetooth protocole.
Discoverable Timeout: set the timeout duration.
Scan for Devices: conrm to scan and to establish a connection with a Bluetooth device.
System Upgrade
System update: use only if recommended by an ofcial Dreamvision reseller.
System Information: current system revision.
Restore to Factory Default: use to restore the Dreamy Geek 2 settings to default. Note that all the custom picture
and system settings will be lost.
11.0 GAMES SCREEN
11.1 General View
This screen highlights 4 Apps including 3 android games: Turn your phone & Tablet into a remote, Angry Birds,
Epic Defense and Smash Hit. You can download additional games in the next Apps Screen.
20
R699854 - Dreamy Geek 2 User Manual
Page 21
appS SCreen
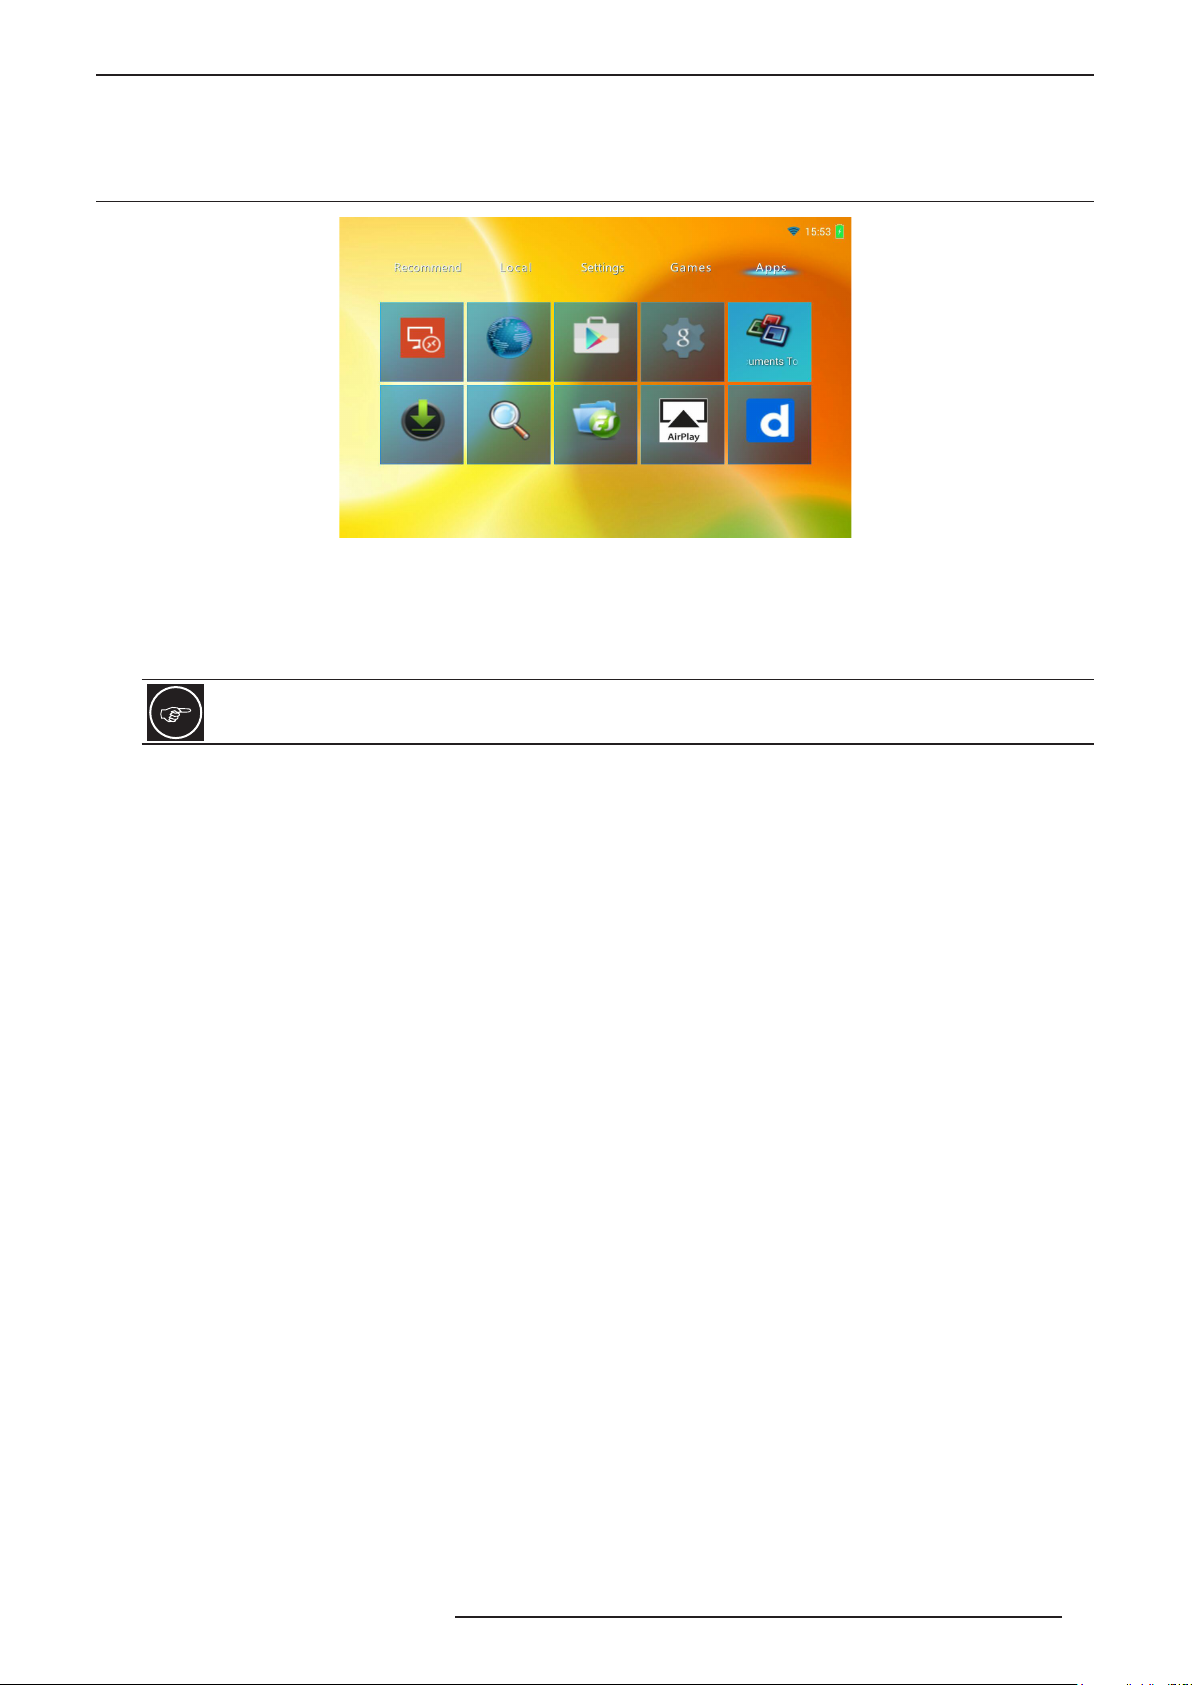
12.0 APPS SCREEN
12.1 General View
The All Apps screen lets you browse the entire set of Apps that are installed on your device. You can add more
App, to do so please launch the “Play Store App” and login with your account (or create a new account) then
browse and choose an App to install between the thousands App available on the Play Store.
Once the Apps are installed, you can browse and choose any App from this screen and move it to the top or to
uninstall it by pressing and maintening pressed the button [OK].
An internet connection is required for installing a new App.
R699854 - Dreamy Geek 2 User Manual 21
Page 22

pICture menu
13.0 PICTURE MENU
Enter the Picture Menu by pressing the Remote Control Unit button.
Press the [Picture Menu] button to adjust the picture quality.
13.1 Auto 3D
Conrm to Auto detect the 3D format. Note that most 3D sources contains the 3D format description but in a few
cases, the 3D format has to be manually selected.
13.2 Picture Prole
Select one of the pre-congured Picture Prole between: Bright, Standard, Soft and Custom.
The Custom mode may be fully adjusted: Luminance, Contrast, Saturation (MultColor), Sharpness (Acute), Noise
Reduction (3DNR), Color Temperature and RGB on 1024 steps.
13.3 Sound Prole
Select one of the pre-congured Sound Prole between: Standard, Music, Movie, News and Outside.
13.4 Zoom
Select the Picture Zoom that matches your video between: Default,16:9, 16:10, 4:3, Zoom1, Zoom2 and P2P
13.5 3D Mode (manual Setting)
Comfort and Caution with 3D Content
3D content has the spectator to focus on extruding objects on the screen. The visual perception of the image and
the real focus distance cause a great contradiction, this strain contributes to fatigue and discomfort.
Please stop watching if you do not feel well and consult a physician if necessary. People who already has
a kind of photosensitivity, suffers from heart disease, and people in poor physical condition should not
watch 3D stereoscopic images. It is also recommended that you take a break periodically.
Prevent child under 5 years old to watch 3D
The comprehensive brain function to judge stereoscopic vision which includes the feeling for real distances,
develops while growing up by touching and seeing real objects, but in early childhood, it is still in an underdeveloped
state. Letting them frequently watch virtual 3D video images can be an obstacle for the development of a
comprehensive three-dimensional feel. Please accompany your child while it watches 3D programs.
TopDown, LeftRight, FramePack (Blu-Ray 3D)
Choose the correct setting between TopDown, LeftRight and FramePack to obtain a correct 3D picture.
3DT2D (UD) or 3DT2D (LR)
Convert a Up&Down 3D input into a watchable 2D picture without glasses. Same as previously, but compatible
with a Left Right 3D signal.
22
R699854 - Dreamy Geek 2 User Manual
Page 23

maIntenanCe
13.6 Clean Memory
Conrm to close all the running Apps and to release used memory.
13.7 Focus Figure
Conrm to display a Focus test pattern.
13.8 ScreenShot
Conrm to take a screenshot of the current screen. The picture is stored in the TF-Card (sda1/Pictures/
Screenshots/). If no TF-Card is inserted, the screenshot will fail.
13.9 Luminance Mode
Select one of the pre-congured Luminance Mode between: TextMode, MovieMode, Custom, SaveMode and
LedOff. The Custom mode gives access to the adjustment of the Light Intensity output, and R G B individual
adjustments. Additionally, the LED duty cycle may be adjust to compensate the ambiant light or wall color.
14.0 MAINTENANCE
14.1 Clean Dirt
Dirt on the Cabinet
Always use a soft cloth. In case of heavy soiling, soak a cloth in neutral detergent diluted with water, wring dry
and wipe, followed by wiping again using a dry cloth.
Pay attention to the following as the cabinet may deteriorate in condition, get damaged or paint may
come off:
-Do not wipe with a stiff cloth.
-Do not wipe with force.
-Do not wipe with thinner or benzene.
Dirt on the Lens
The lens shall be cleaned using commercial blowers or lens cleaning papers (for cleaning glasses and cameras).
Do not use uid-type cleaning agents. The lens surface is fragile. Avoid rubbing it hard or knocking.
14.2 Unexpected Behavior
The Unit is unresponsive
In a few cases, this unit may not respond to the remote control or may display a wrong picture. Make sure that
the batteries used in the remote control have still some power in it.
If the problem persists, try to switch OFF this unit and wait at least 3 minutes before powering it ON again.
Video is playing but there is no Sound
If there is no sound coming from the internal loudspeakers, make sure that the Audio settings have been correctly
set.
a) Double check that the sound is not muted by pressing the [Mute] button on the RCU.
b) Make sure that the HDMI source is set to send audio through the HDMI input, and if you are using the RCA
Video input, make sure to have the audio cable correctly connected to this unit using the Audio L/R inputs
(white and red RCA connectors).
c) Please note that the Headphone stereo Jack 3,5mm may be used only as an audio output.
R699854 - Dreamy Geek 2 User Manual 23
Page 24

SpeCIfICatIonS
15.0 SPECIFICATIONS
Overview
The Dreamy Geek 2 projection device is based on a DLP WXGA DarkChip 3
Emission method Darkchip 3 DLP
Display panel size 0.45” Darkchip 3
Native Resolution 1280 x 800 pixels
Contrast ratio 20,000:1
Projection lens Fixed Zoom: throw ratio of 1.2:1 with manual Focus
Brightness 1,200 ANSI Lumens
Light source life time LED illumination system - 20,000 hours or 30,000 hours in eco mode
Screen size 10” to 200” (Aspect ratio 16:10)
Distance range from 50cm to 500cm
Inputs:
Composite Video Headphone jack 3.5mm TRRS - 4 connectors
A/V cable Jack 3.5mm to 3x RCA (Video and Left/Right Audio)
HDMI 1 input version 1.4 with HDCP and audio
HDMI 2 input version 1.4 with HDCP and audio
3D Compatibility This unit uses DLP-Link 3D synchronisation. It can display video sources that
are encoded in Frame Packing, Side by Side and Top and Bottom.
Outputs:
Loudspeakers 4W Stereo (2x 2W speakers)
Stereo Jack Headphone jack 3.5mm can be used as:
-Stereo analog output (3.5mm jack to 2x RCA cable)
-5.1 /7.1 digital output (3.5mm jack to single RCA cable)
Bluetooth 4.0 High Speed and Low Energy protocols for audio connection
Multimedia Slots MicroSD (TF) card slot: up to 64GB
1x USB 2.0 (white)
1x USB 3.0 (blue)
1x RJ45 for LAN connection
1x WiFi 2.4/5Ghz dual band for WLAN, Miracast, Airplay, etc
Power Requirements 100V - 240V AC, 50Hz/60Hz
Power Consumption <65W at max brightness
<1W in Standby mode
Unit size (W x D x H) 232 x 134 x 45 mm - 9.13” x 5.28” x 1.77”
Net Weight 760 g (1.67 lbs)
Box size (W x D x H) 275 x 184 x 106 mm - 10.83” x 7.24” x 4.17”
Gross Weight 1,85 Kg (4.1 lbs)
Operation Environment Temperature: 5°C to 35°C (Storage Temperature: -10°C to 60°C)
Humidity: 20% to 80% without condensation
• Design and specications are subject to change without prior notice.
• Please note that some of the pictures and illustrations may have been abridged, enlarged or contextualized
in order to aid comprehension. Images may differ from the actual product.
24
R699854 - Dreamy Geek 2 User Manual
Page 25

Dimensions
134 mm
45 mm
SpeCIfICatIonS
232 mm
45 mm
232 mm
R699854 - Dreamy Geek 2 User Manual 25
Page 26

26 R699854 - Dreamy Geek 2 User Manual 27
R699854 - Dreamy Geek 2 User Manual
Page 27

Page 28

 Loading...