

Page 1

1
DreamWeaver II
ENGLISH
Dear Customers,
Thanks a lot for choosing the DreamWeaver II digital Cinema Projector, Wide PAL
(576 x 1024) version of the DreamWeaver
You will find in the following document the small modification that differentiate the
Weaver II from its «big brother» DreamWeaver.
If you have any further question, do not hesitate to contact either your local distributor, getting its contact details on our website : www.dreamvision.net
Or send us a mail to info@dreamvision.net
Original pages that have been modified:
Page 3
Page 5
Page 9
Page 12
Page 13
Page 14
Page 19
Page 21
Page 22
Page 24
Page 25
Page 26
Page 27
Page 30
Page 33
Page 34.
Page 2
2
Modification of the Page 3 of the user’s Guide
Introduction
First of all, we would like to thank you for chosing a DreamVision
®
Home
Cinema Projector. Your new DreamWeaver II projector from DreamVision
®
is specifically designed for home cinema applications. The DreamWeaver II
sets the standard for enhanced-definition digital perfection, featuring
enhanced Definition 1024x576 resolution using the latest DLP™ technology
and new DCDi video processing from Faroudja™. Calibrated to D65 color
mastering standards, the DreamWeaver II reproduces colors and details the
way the director intended. Whether you are watching movies or High Definition broadcasts, you will enjoy breathtaking image quality.
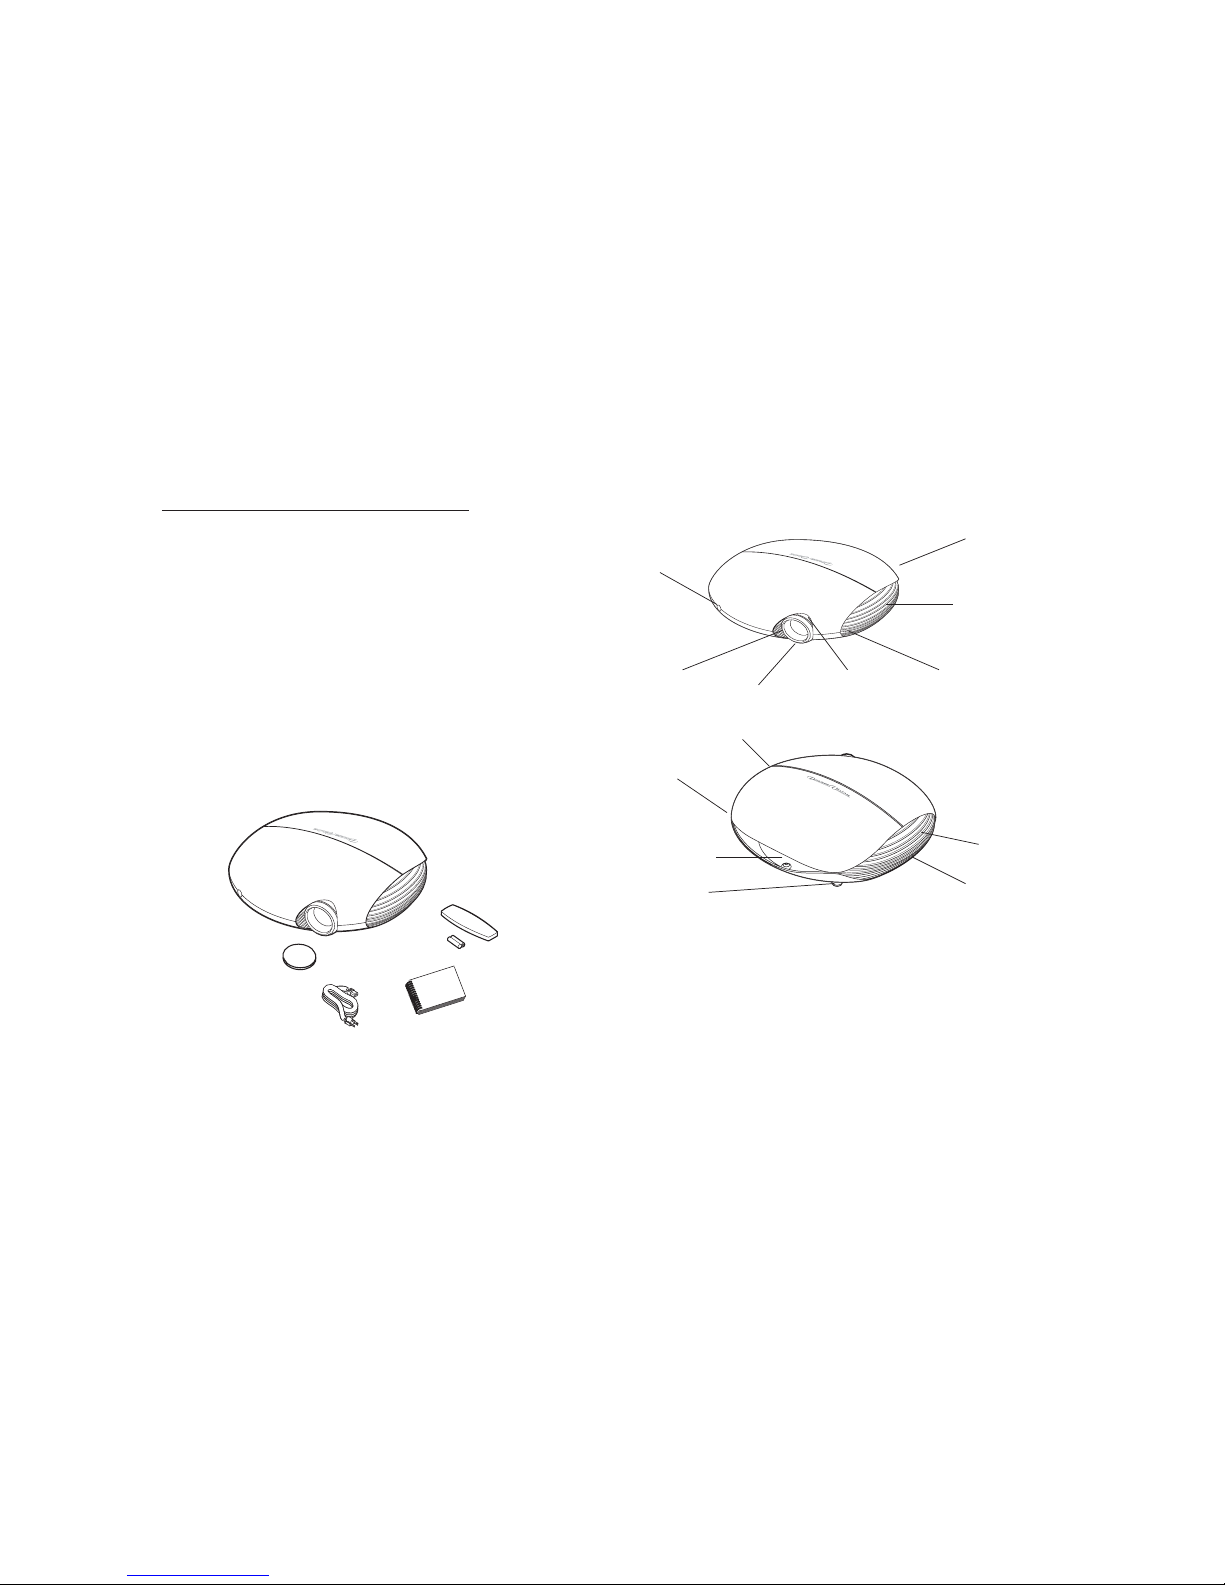
Included items
Projector components and features
user’s guide
remote control
projector
lens cap
power
cable
and baterries
keypad
zoom
focus
elevator foot release
remote
control
receiver (IR)
air intake
IR
(under the top
cabinet)
vent
I/O panel
leveling
foot
exhaust
heat vent
Remote Receiver
IR
under the top cabinet
Under the top cabinet
Page 3
3
Modification of the Page 5 of the user’s Guide
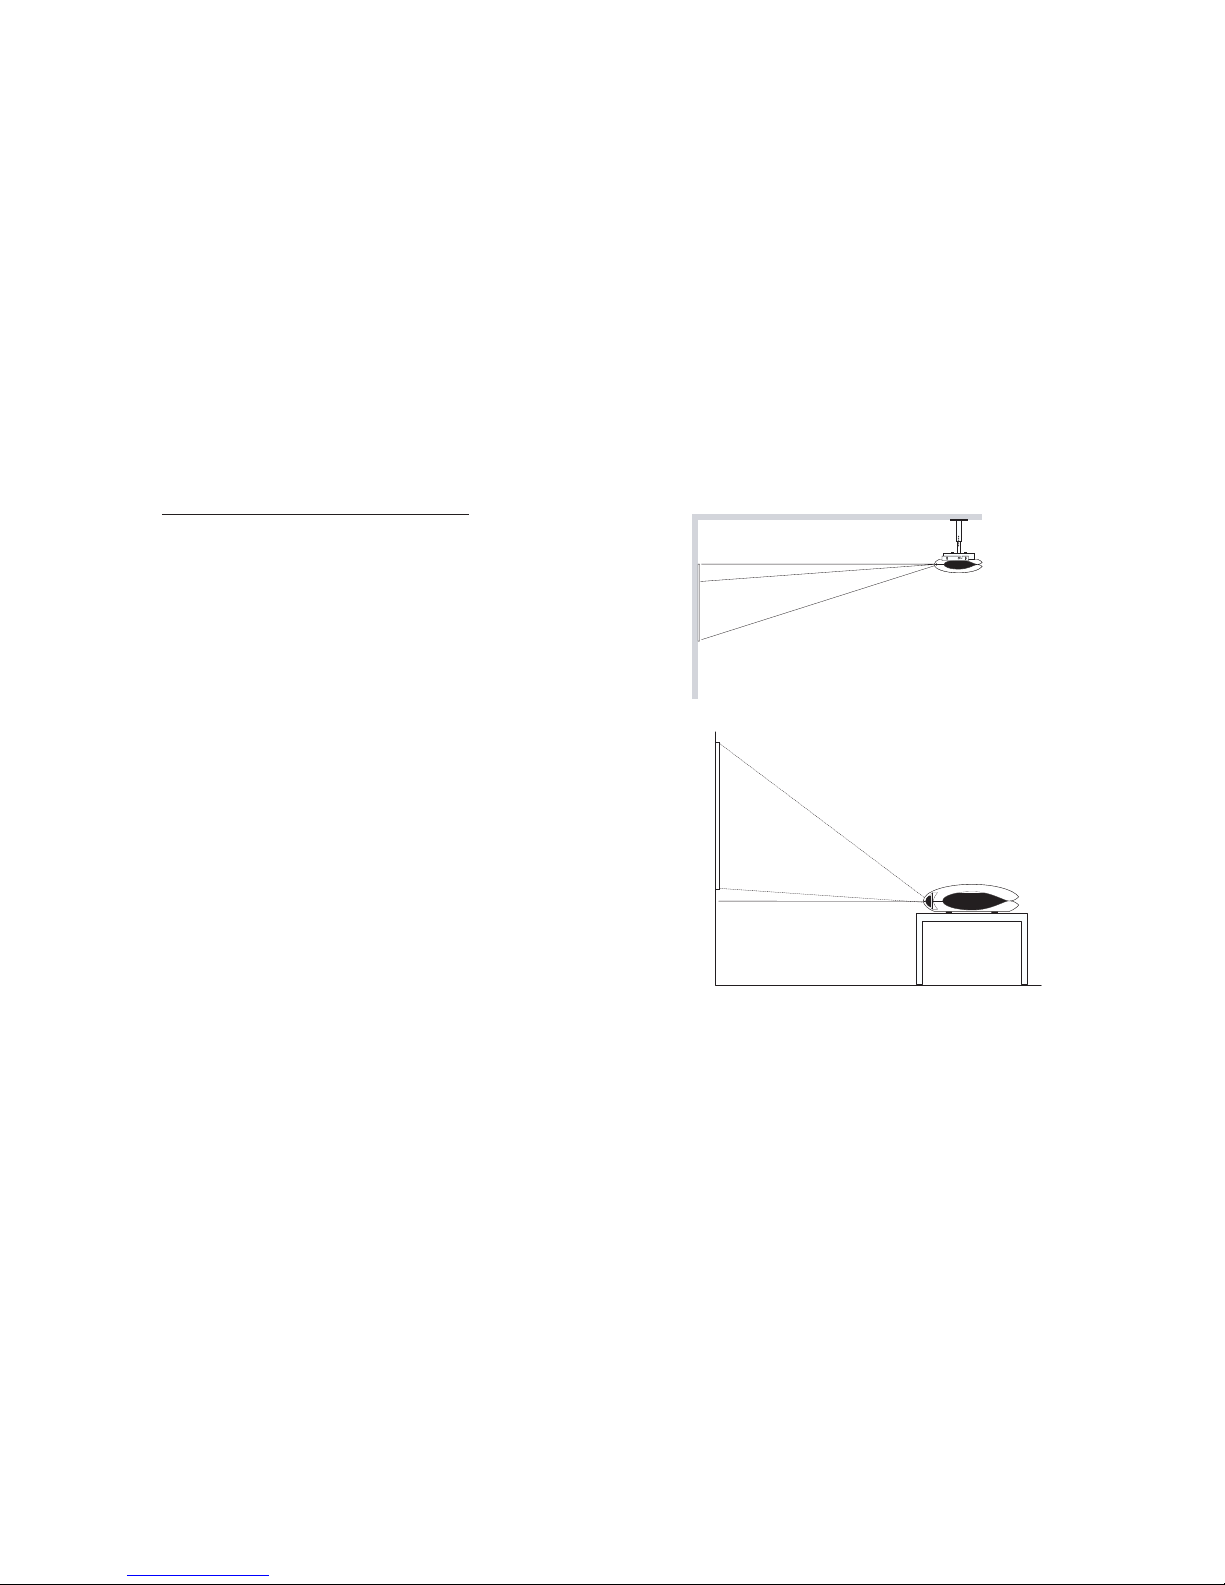
Positioning the projector
There are a number a factors to consider when determining where to set up
the projector, including the size and shape of your screen, the location of
your power outlets, and the distance between the projector and the rest of
your equipment. Here are some general guidelines.
1
Position the projector on a flat surface at a right angle to the screen.
The projector must be within 10 feet (3 m) of your power source. To
ensure adequate cable access, place the projector at least 6 inches
(0.15m) from a wall or other objects. Place the projector at least 5.6 feet
(1.7 m) from the projection screen.
If you install the projector on the ceiling, refer to the installation guide
that comes with the Ceiling Mount Kit for more information. To turn
the image upside down, see page 14. DreamVision recommends use of
an authorized DreamVision ceiling mount. The Ceiling Mount Kit is
sold separately, see page 11.
2
Position the projector the desired distance from the screen.
The distance from the lens of the projector to the screen, the zoom setting, and the video format determine the size of the projected image.
For more information about projected image sizes, see page 12.
The image exits the projector at a given angle. This image offset is 133%.
This means that if you have an image 10’ high, the bottom of the image will
be 3.3’ above the center of the lens.
Check Page 34 for further help.
lens center
bottom of image
3.3’ above lens
10’ high
image
Page 4
4
Modification of the Page 9, 12, 13, 14, 21, 22 of the user’s Guide
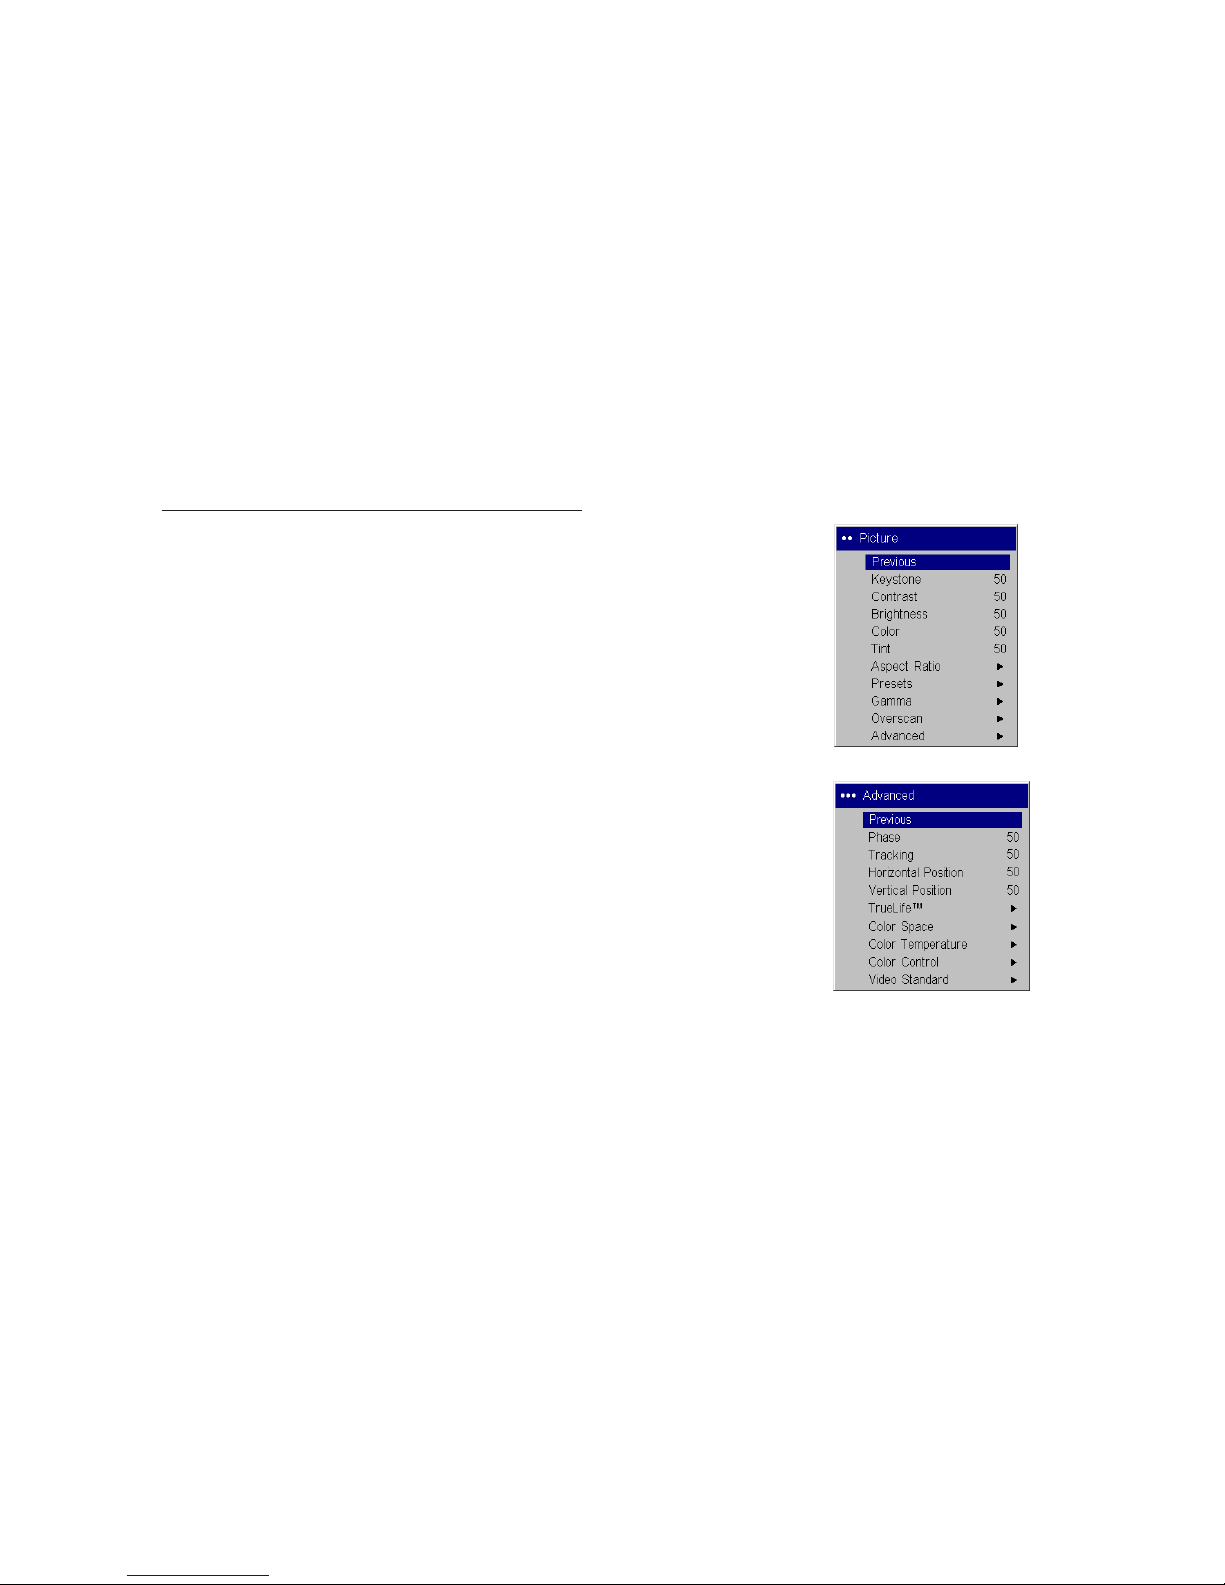
Both Menu «Picture» and «Advanced» have been slightly modified for an
optimised ease of use.
So the typical window of the Picture Menu is now:
The typical window of the Advanced Menu is now:
New Picture Menu Window
New Advanced Menu Window
Page 5

5
Modifi
cation of the page 19 of the User’s Guide
Using the remote control
The remote uses two (2) provided batteries. They are easily installed by sliding the cover off the remote’s back, aligning the + and - ends of the batteries,
sliding them into place, and then replacing the cover.
To operate, point the remote at the projection screen or at the projector (not
at the video device). The optimum operation range is 0 to 30 feet (9.14m)
Press the remote’s Menu button to open the projector’s menu system. Use
the arrow buttons to navigate, and the Select button to select features and
adjust values in the menus. See page 21 for more info on the menus.
The remote also has:
Power On and Power Off buttons (see page 11 for shut down info)
Brightness + / -, contrast + / - buttons to adjust the image
Blank button to display a blank screen instead of the current image (see also
page 29)
Source 1, 2, 3, 4 buttons to switch among sources (to assign a particalur
source to a source button, see page 28)
Source select button which is a source toggle.
Native, 16:9, 4:3, Letterbox to have direct access to the main aspect ratio
Resize button to change the Aspect Ration (See also page 22)
Auto image button to resynch the projector to the source
Preset button to restaure stored settings (see page 24)
Overscan button to remove noise in a video image (page 24)
Freeze button, to freeze the displayed picture.
Key + and Key - buttons to adjust the keystone.
Page 6

6
Modifi
cation of the page 24 of the User’s Guide
Presets : This allows you to customize settings and save the settings to be
restored later. To restore the factory default settings, choose Factory Reset in
the Settings>Service menu.
To set a preset for the current source, adjust the image, select Save Settings
in the Presets menu, then choose Save User 1, 2, or 3. You can recall these
settings in the future by selecting the appropriate user presets.
Gamma : gamma tables contain preset intensity configurations optimized
for the input source. You can select a gamma table that has been specifically
tuned for either film, video, Bright Room, or PC input. (Film input is material originally captured on a film camera, like a movie; video input is material originally ccaptured on a video camera, like a TV show or sporting
event.) White Peaking inccreases the brightness of whites that are near
100%.
NOTE: Your viewing preferences may vary. Cycle through the gamma
options and pick the one you like the best.
Overscan : Lets you crop the input or zoom the input if desired.
Save User Presets
Presets
Gamma
Overscan
Page 7

7
Modifi
cation of the page 25 of the User’s Guide
Advanced settings
The following 4 options are for commputer of HDTV sources only
Phase: adjust the phase of the video signal’s digital conversion.
Tracking : Adjust the frequency of the video signal’s digital conversion.
Horizontal / Vertical position : Adjust the position of the source.
TrueLife : This option refers to Faroudja’s TrueLife processing of the image.
All standard definition interlaced video signals (composite, S-video and
component) are routed through this processor. Extended and High Definition progressive component sources are not routed though this processor by
default. You can turn TrueLife on to route these signals through the processor and then adjust the following 3 options:
Chroma Detail : This adjusts the color sharpness.
Luma Detail : This adjusts the sharpness.
Chroma Delay : aligns the Luma and Chroma Detail
CCS : (Cross Color Suppression) processes the signal to remove any color
information from the luma portion of the signal. It is On for all composite
signals, Off for all component signals, and can be turned on or off for all
S-video signals.
Film Mode : controls deinterlacing. 2:2/3:2 Enable If selected, the deinter-
lacer attempt to perform 3:2 pulldown, assuming the source was originally
created on 24fps film. If the original source is 30fps film, you should select
NTSC 2/2 pulldown.
Noise Reduction : adjusts signal noise reduction. Choose Off to have no
noise reduction, choose Auto to have the software determine the amount of
noise reduction, or choose Manual and adjust the Level.
Skintone Bypass prevents the noise reduction processing from being
applied to skin tones. Images of people often look better with less processing. Available when Auto or Manual are selected.
Advanced
True Life
Film Mode
Noise reduction
Page 8
8
Modifi
cation of the page 26 of the User’s Guide
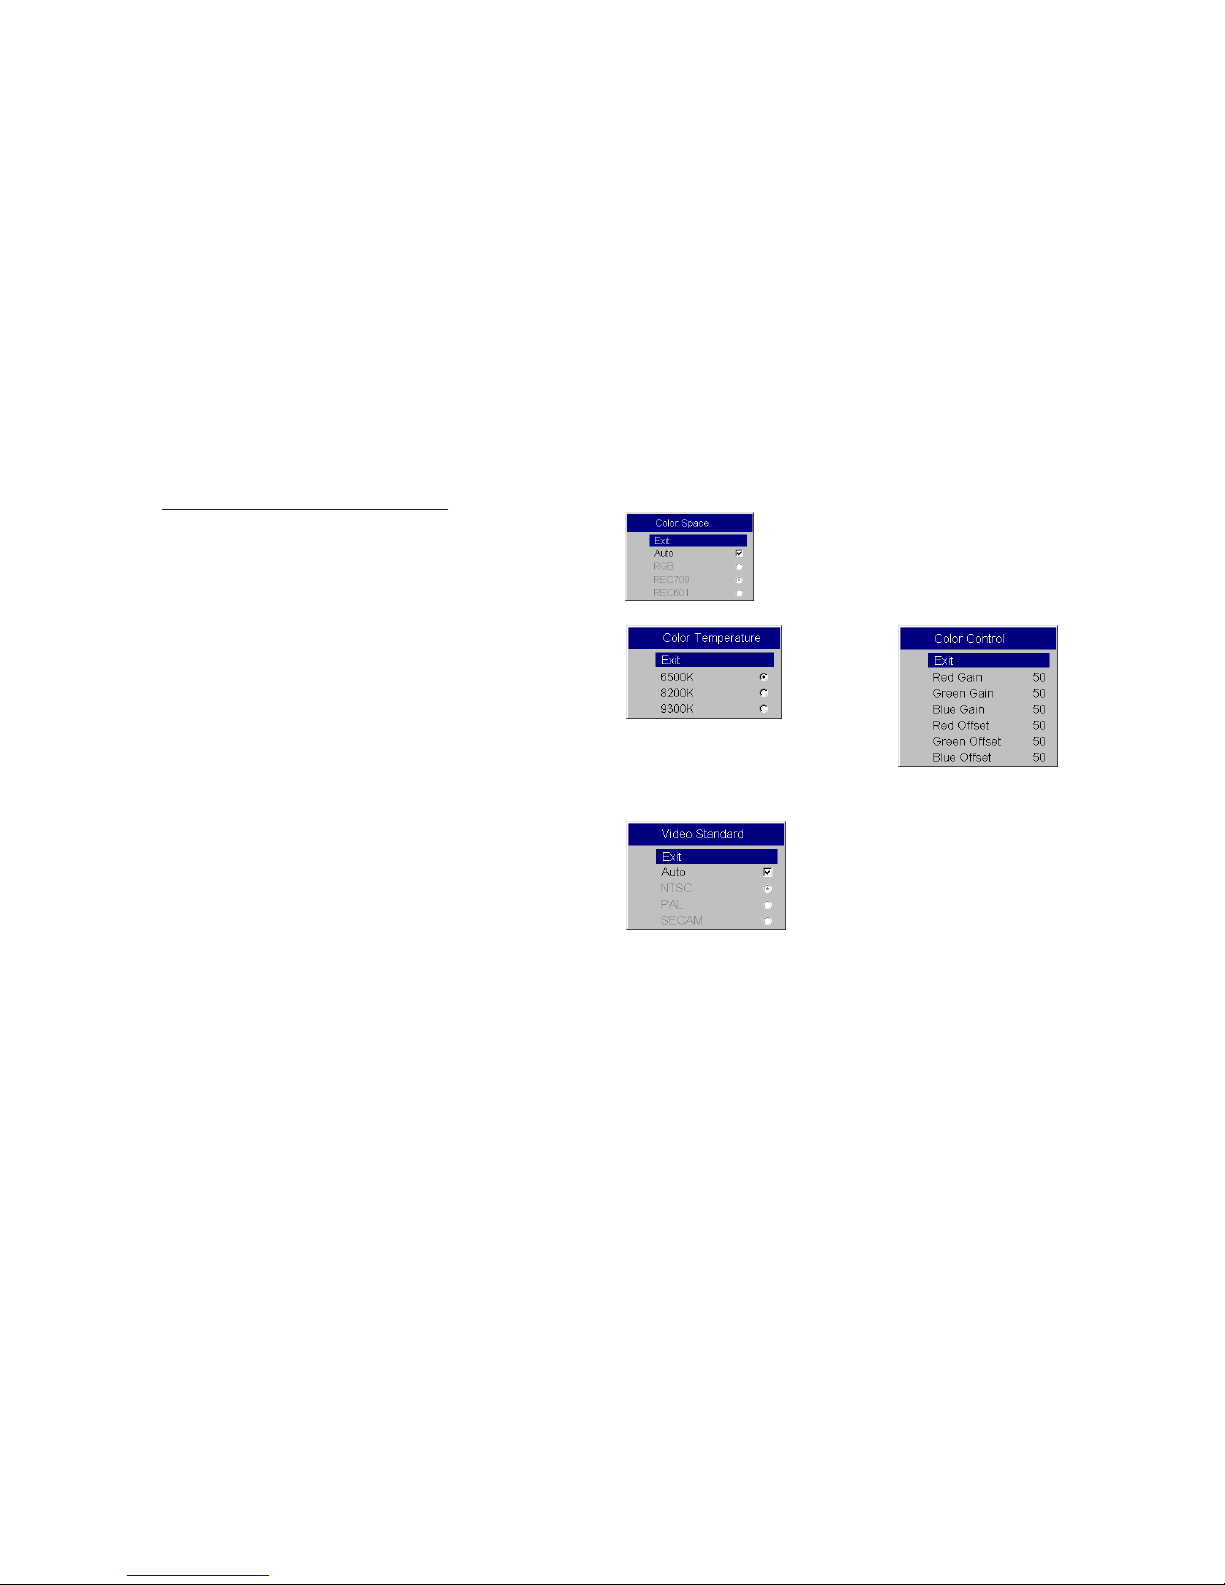
Color Space : This option applies to computer and HDTV sources (it won’t
appear in the menu for video sources). It allows you to select a color space
that has been specifically tuned for the video input. When Auto is selected,
the projector automatically determines the standard. To choose a different
setting, turn off Auto, then choose RGB for computer sources, choose
REC709 for component 1080i or 720p sources, or choose REC601 for component 480p or 576p sources.
Color Temperature : changes the intensity of the colors. Select a listed
value.
Color Control : allows you to individually adjust the gain (relative warmth
of the color) and the offset (the amount of black in the color) of the red,
green, and blue colors.
Video Standard : When it is set to Auto, the projector attempts to pick the
video standard automatically based on the input signal it receives. (The
video standard options may vary depending on your region of the world.)
If the projector is unable to detect the correct standard, the colors may not
look right or the image may appear “torn.” If this happens, manually select
a video standard by selecting NTSC, PAL, or SECAM from the Video Standard menu.
Color Space
Color Temperature
Color Control
Video Standard
Page 9

9
Modification of the page 27 of the User’s Guide.
This page remains blank in the DreamWeaver II User’s Guide.
Page 10

10
Modifi
cation of the Page 30 of the User’s Guide
Service : to use these features, highlight them and press Select .
Factory Reset : restores all settings (except Lamp Hours, Ceiling, and Rear)
to their default after displaying a confirmation dialog box.
Test Pattern : displays a test pattern when the Blank button on the remote
is pressed. To select the patterns, use the up/down arrows on the remote or
keypad.
Blue only : Tuns off the Red and Green portions of the input, allowing you
to properly adjust the color balance with a SMPTE color bar pattern.
Color Wheel Index : Makes the hue of various gray levels consistent.
ADC calibration : allows adjustment of thee calibrated ADC values so that
color accuracy can be optimized. Adjust the slidebars for each value and
note the change in the appropriate color. Use a component input when
adjusting the component controls.
Service Code : only used by authorized service personnel.
Maintenance
Cleaning the lens
1
Apply a non-abrasive camera lens cleaner to a soft, dry cloth.
Avoid using an excessive amount of cleaner, and don’t apply the
cleaner directly to the lens. Abrasive cleaners, solvents or other harsh
chemicals might scratch the lens.
2
Lightly wipe the cleaning cloth over the lens in a circular motion. If you
don’t intend to use the projector immediately, replace the lens cap.
Service menu
clean the lens
with a soft dry cloth
and non-abrasive
cleaner
Page 11

11
Modifi
cation of the page 33 of the User’s Guide
Appendix
Specification
Accessories
NOTE : Use only approved accessories.
Temperature Operating
50 to 95
°
F (10 to 35
°
C) at 0 - 10,000 feet
Non-operating
-4 to 158
°
F (-20 to 70
°
C) at 0 -20,000 feet
Altitude Operating 0 to 2,286 meters (7,500 feet)
Non-operating 0 to 6,096 meters (20,000 feet)
Humidity Operating 10% to 95% relative humidity, non-condensing
Non-operating 10% to 90% relative humidity, non-condensing
Dimensions
Diameter: 439 mm - Height: 127 mm
Weight
4. 4 kg unpacked
Optics Focus Range
1.5 - 10 meters (5 - 32.8 feet)
Lamp Type
UHP lamp (dual watt: 200 and 250 watt)
Input Power Requirements 100V-120V 4A, 50/60 Hz
200V-240V 2A 50 Hz
Standard Accessories
(ship with the projector)
Shipping Box (with packaging)
Power Cable (country-dependent)
Remote (and batteries)
Projection Lamp Module (included in projector)
Lens Cap
User’s Guide
Optional Accessories
Projector Mount
Replacement Lamp Module
Page 12

12
Modifi
cation of the Page 34 of the User’s Guide
Red LED behavior and projector errors
If the projector is not functioning properly and the red LED is blinking, consult Ta b le 2 to determine a possible cause. There are two second pauses
between the blinking cycles.
Projected image size
Ta b le 1: Red LEDs
Red LED Behavior Explanation
One (1) blink The lamp won't strike after five (5)
attempts. Check the lamp and lamp door
installations for loose connections.
Three (3) blinks The projector has shut down the lamp.
Turn off the projector, wait one minute,
then turn it back on. Replace the lamp.
Contact Technical Support for repair if
replacing the lamp does not solve the
problem.
Four (4) blinks The fan has failed. Replace the lamp (the
lamp module contains a fan). Contact
Technical Support for repair if replacing
the fan does not solve the problem.
Five (5) blinks The projector is overheating. Check for a
blocked air vent. Contact Technical Support for repair if clearing the air vents
does not solve the problem.
Ta b le 2:
Range of projection distances for a given screen size
16:9 Screen
dimensions
(inches/m)
Projection Distance
Screen
diagonal
(inches/m)
Maximum
zoom
(feet/m)
Minimum
zoom
(feet/m)
27x48
.69x1.22
55.1/1.4 7.5/2.3 10.4/3.19
34x60
.9x1.5
68.8/1.75 9.42/2.87 13.06/3.98
40.5x72
1.0/1.8
82.6/2.1 11.09/3.38 15.36/4.68
45x80
1.1x2.0
91.8/2.3 12.27/3.74 17.03/5.19
49x87
1.2/2.2
99.8/2.5 13.48/4.11 18.7/5.7
52X92
1.3X2.3
105.6/2.7 14.21/4.33 19.69/6.0
54X96
1.4X2.4
110.1/2.8 14.93/4.55 20.07/6.31
58X104
1.5X2.6
119.3/3.0 16.14/4.92 22.38/6.82
65X116
1.7X3
133.1/3.4 18.54/5.65 25.72/7.84
 Loading...