

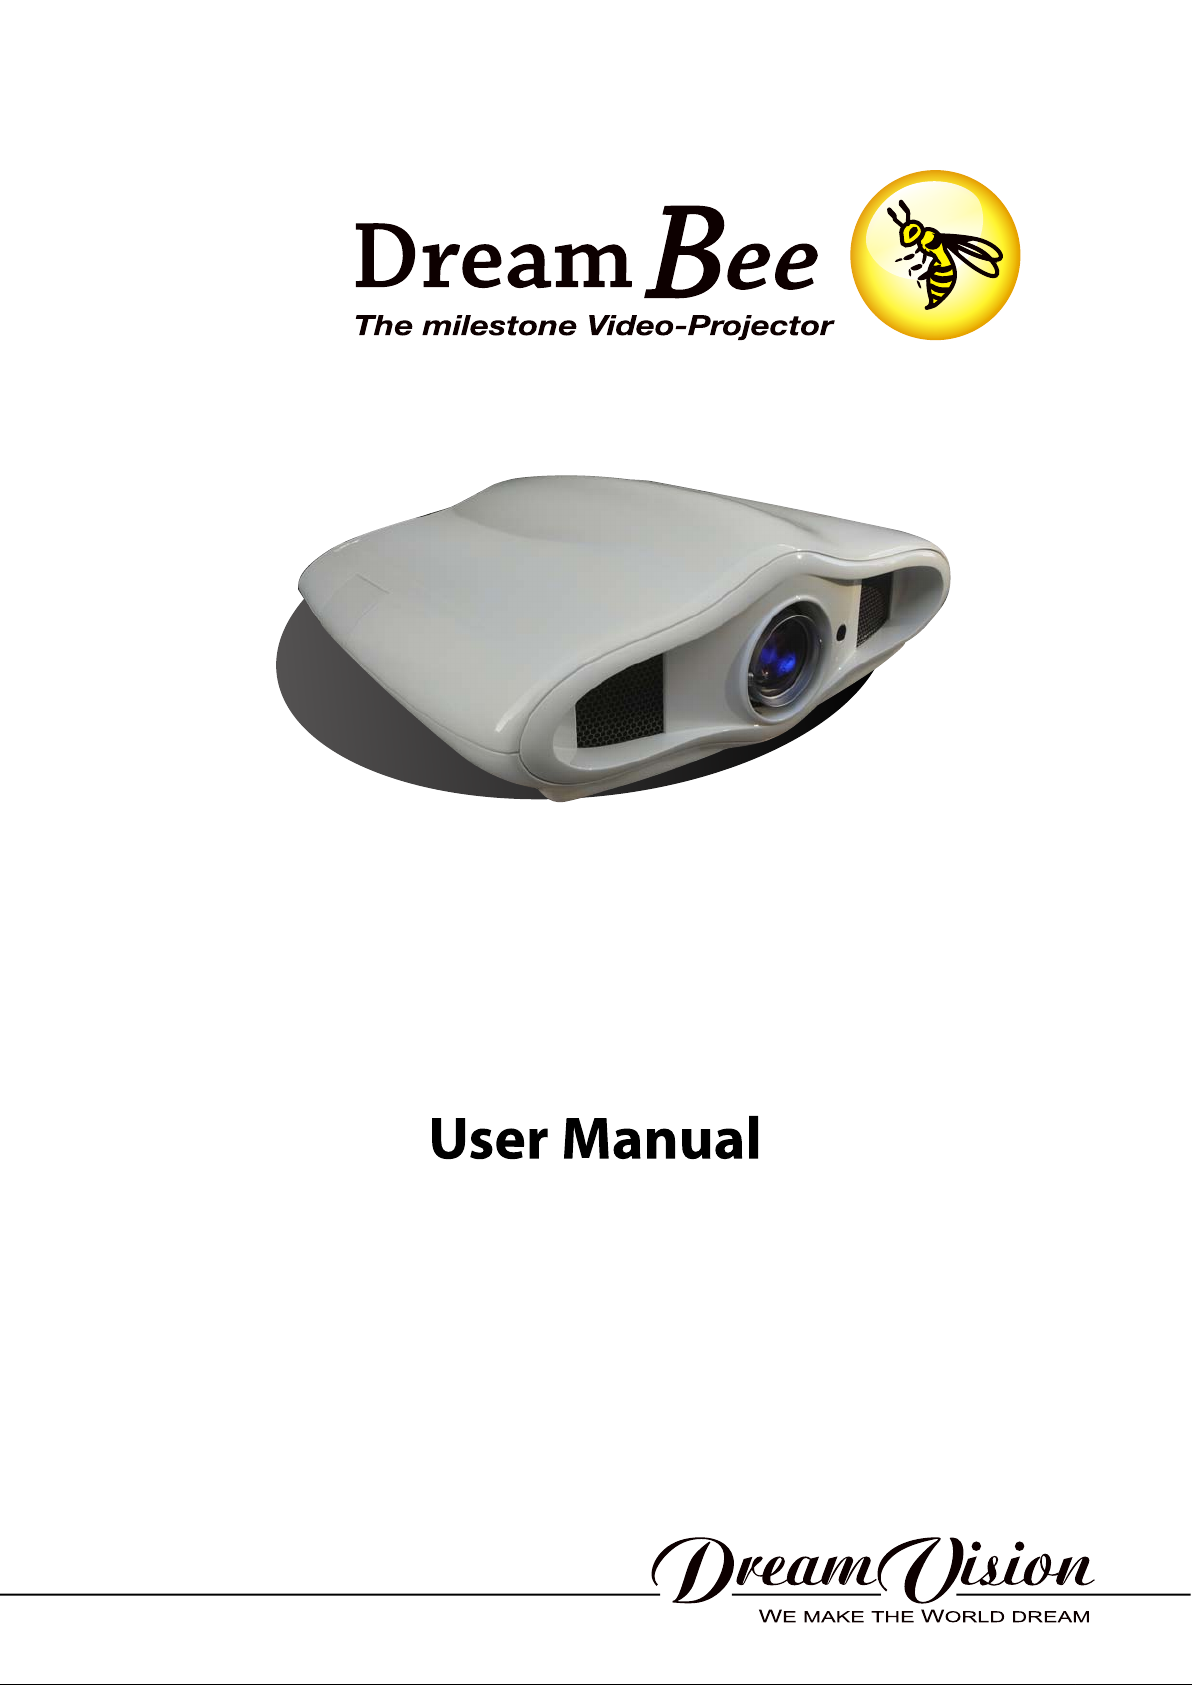
Page 1
Page 2

Changes
DreamVision provides this manual ’as is’ without warranty of any kind, either expressed or implied, including but not
limited to the implied warranties or merchantability and fitness for a particular purpose. DreamVision may make
improvements and/or changes to the product(s) and/or the program(s) described in this publication at any time
without notice.
This publication could contain technical inaccuracies or typographical errors. Changes are periodically made to the
information in this publication; these changes are incorporated in new editions of this publication.
Copyright
All right reserved. No part of this document may be copied, reproduced or translated. It shall not otherwise be
recorded, transmitted or stored in a retrieval system without the prior written consent of DreamVision.
Guarantee
DreamVision provides a guarantee relating to perfect manufacturing as part of the legally stipulated terms of
guarantee. On receipt, the purchaser must immediately inspect all delivered goods for damage incurred during
transport, as well as for material and manufacturing faults. DreamVision must be informed immediately in writing of
any complaints.
If the purchaser or third party caries out modifications or repairs on goods delivered by DreamVision, or if the goods
are handle incorrectly, in particular if the systems are commissioned operated incorrectly or if, after the transfer of
risks, the goods are subject to influences not agreed upon in the contract, all guarantee claims of the purchaser will
be rendered invalid. Not included in the guarantee coverage are system failures which are attributed to programs or
special electronic circuitry provided by the purchaser, e.g. interfaces. Normal wear as well as normal maintenance
are not subject to the guarantee provided by DreamVision either.
The environmental conditions as well as the servicing and maintenance regulations specified in this manual must
be complied with by the customer.
Trademarks
Brand and product names mentioned in this manual may be trademarks, registered trademarks or copyrights of
their respective holders. All brands and product names mentioned in this manual serve as comments or examples
and are not to be understood as advertising for the products of their manufactures.
2 R699740 - DreamBee User Manual
Page 3

TABLE OF CONTENTS
1.0 PACKAGING AND DIMENSIONS ............................................................................... 6
1.1 Box content........................................................................................................................................ 6
1.2 Projector Packaging ........................................................................................................................... 6
Way of Packaging................................................................................................................6
To unpack ............................................................................................................................ 6
1.3 Projector Dimensions......................................................................................................................... 6
2.0 SAFETY INSTRUCTIONS ............................................................................................. 7
2.1 Important information........................................................................................................................ 7
Lead-free regulation ............................................................................................................7
Information for Users on Disposal of Old Equipment ........................................................ 7
About burning-in of the D-ILA device................................................................................ 7
About the installation place................................................................................................. 7
2.2 Important safeguards.......................................................................................................................... 7
2.3 REGIONAL SPECIFIC INFORMATION......................................................................................... 9
FCC INFORMATION (USA ONLY) ................................................................................. 9
3.0 INSTALLATION GUIDELINES .................................................................................. 10
3.1 Viewing Conditions ......................................................................................................................... 10
3.2 Environment of Use......................................................................................................................... 10
Mounting this unit to the ceiling ....................................................................................... 10
Installation Environment................................................................................................... 10
Precautions of Usage......................................................................................................... 10
3.3 Air-Flow and Space Requirements.................................................................................................. 11
3.4 Ceiling mounting the unit ................................................................................................................ 12
Precautions for Ceiling-mount .......................................................................................... 12
3.5 Projection Distance and Offset Setting............................................................................................ 12
Projection Distance ........................................................................................................... 12
Vertical and Horizontal Offset Setting .............................................................................. 13
4.0 REMOTE CONTROL UNIT (RCU) ............................................................................ 16
4.1 General view.................................................................................................................................... 16
4.2 Loading and replacing batteries....................................................................................................... 16
4.3 How to use the remote control unit.................................................................................................. 17
5.0 GETTING STARTED .................................................................................................... 18
5.1 General View ................................................................................................................................... 18
Front side........................................................................................................................... 18
Rear side............................................................................................................................ 18
5.2 Connecting the Power Cord............................................................................................................. 18
5.3 Focus and Zoom Adjust ................................................................................................................... 19
5.4 Operating LEDs ............................................................................................................................... 20
5.5 Operating and Navigation Buttons .................................................................................................. 21
6.0 CONNECTIONS............................................................................................................. 22
6.1 The DreamBee PRO Version ........................................................................................................... 22
6.2 Connecting a device with Digital Output ........................................................................................ 22
Connecting a device with DVI-D Output.......................................................................... 22
Connecting to a device with HDMI Output ...................................................................... 22
6.3 Connecting a device with S-Video Output....................................................................................... 23
6.4 Connecting a device with Video Output .......................................................................................... 23
6.5 Connecting a device with Component Output................................................................................. 23
6.6 Connecting a device with SCART Output (European market)........................................................ 24
6.7 Automation and control port: RS-232 Input....................................................................................24
7.0 MENU AND PICTURE SETTING............................................................................... 25
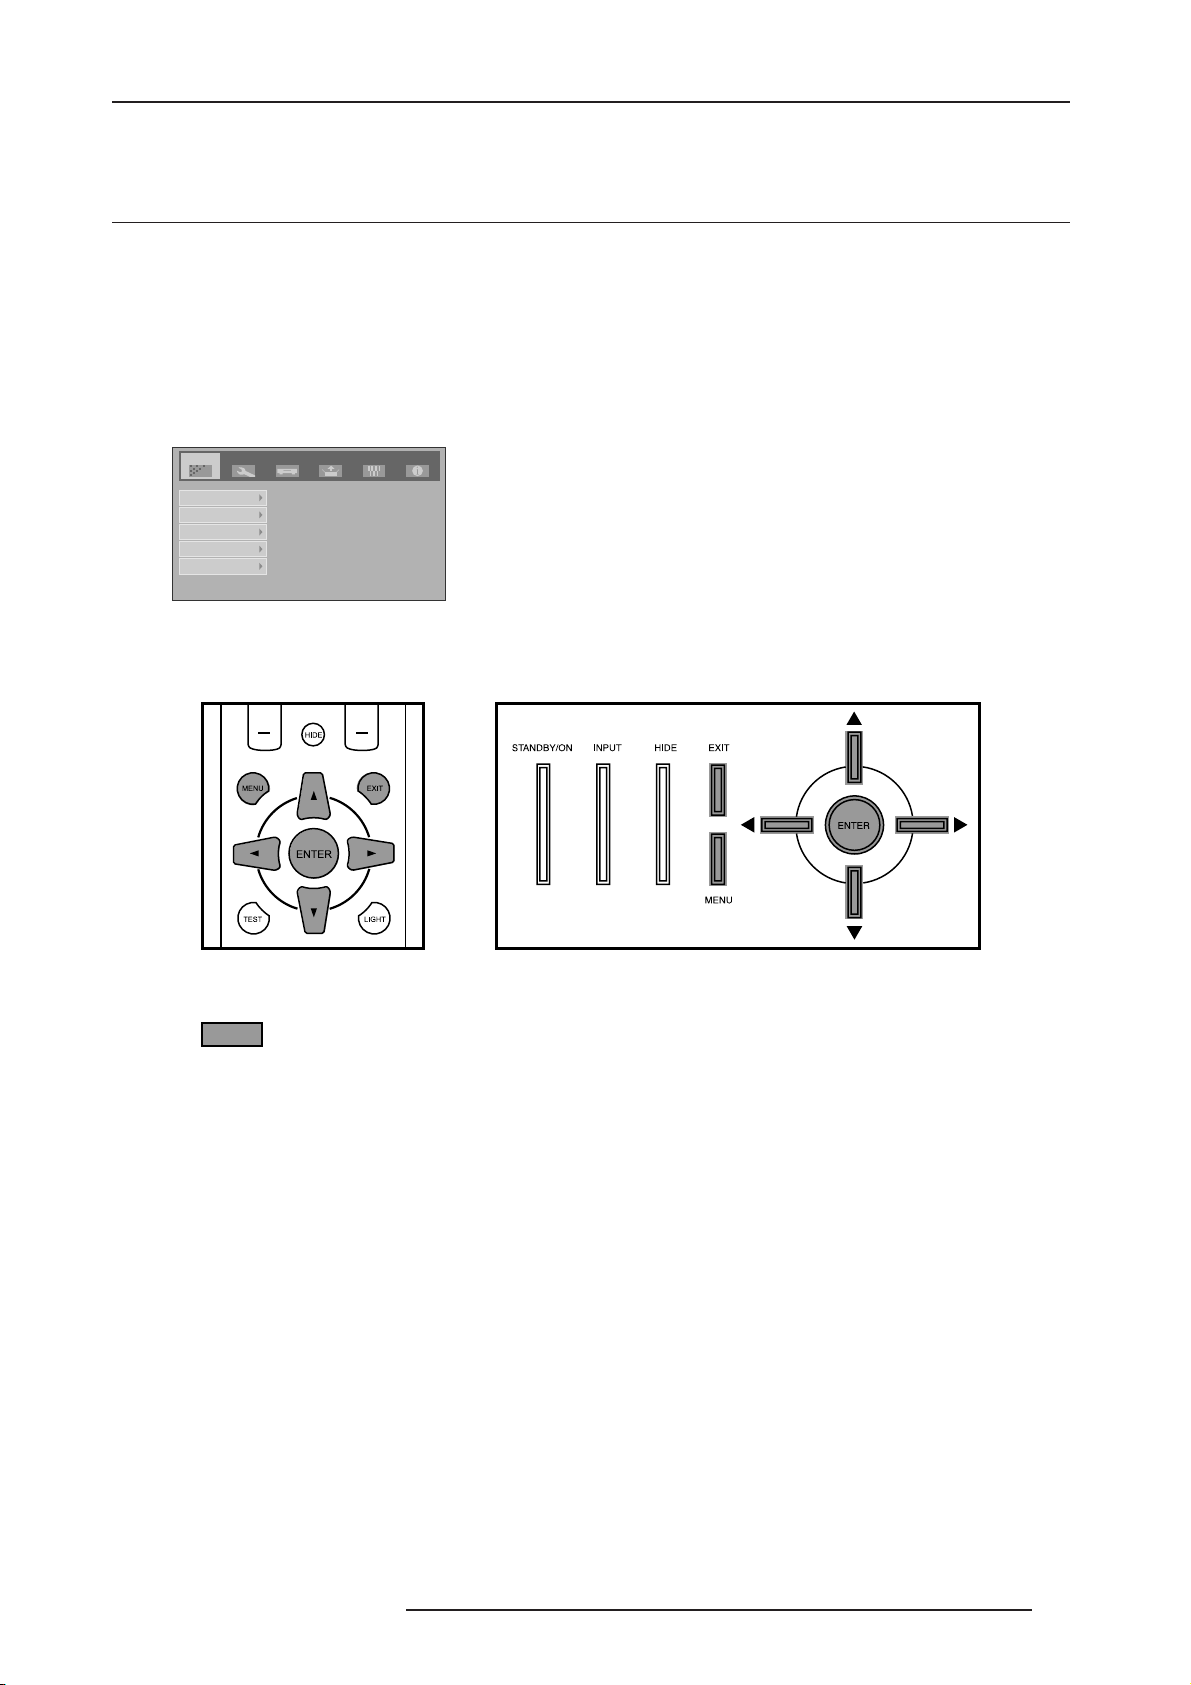
7.1 How to start up the Menu ................................................................................................................ 25
Box like Menu Structure ................................................................................................... 25
How to activate the Menu Structure.................................................................................. 25
How to select an Item and make an Adjustment............................................................... 25
R699740 - DreamBee User Manual 3
Page 4

7.2 Menu Structure ................................................................................................................................ 26
7.3 Image Menu ..................................................................................................................................... 28
Contrast ............................................................................................................................. 28
Brightness.......................................................................................................................... 28
Color.................................................................................................................................. 28
Tint .................................................................................................................................... 28
Sharpness........................................................................................................................... 28
DNR .................................................................................................................................. 28
Color Temp........................................................................................................................ 28
Gamma .............................................................................................................................. 29
Offset................................................................................................................................. 29
Pixel Adjust ....................................................................................................................... 29
7.4 Setup Menu...................................................................................................................................... 29
Image Profile..................................................................................................................... 29
Profile Memory ................................................................................................................. 29
Picture Position ................................................................................................................. 29
Picture Shift setting ...........................................................................................................29
HDMI Input Level............................................................................................................. 29
Mask.................................................................................................................................. 30
7.5 Custom Image Profile ...................................................................................................................... 30
Parameters stored into an Image Profile ........................................................................... 30
Setting a new Image Profile .............................................................................................. 30
7.6 Video Menu...................................................................................................................................... 30
COMP ............................................................................................................................... 30
HDMI Color Space ........................................................................................................... 31
Aspect................................................................................................................................ 31
Film Mode......................................................................................................................... 31
Color System..................................................................................................................... 31
Black Level ....................................................................................................................... 31
7.7 Install Menu ..................................................................................................................................... 31
Menu Position ...................................................................................................................31
Menu Display ....................................................................................................................31
Line Display ...................................................................................................................... 31
Flip H. ............................................................................................................................... 31
Flip V. ................................................................................................................................ 31
High Altitude..................................................................................................................... 31
7.8 Function Menu................................................................................................................................. 32
Back Color ........................................................................................................................ 32
Sleep Timer ....................................................................................................................... 32
D-ILA Logo....................................................................................................................... 32
Lamp Power ......................................................................................................................32
Test Pattern........................................................................................................................ 32
Language ........................................................................................................................... 32
7.9 Information Menu............................................................................................................................ 32
Input .................................................................................................................................. 32
Source................................................................................................................................ 32
Lamp Time ........................................................................................................................ 32
8.0 MAINTENANCE............................................................................................................ 33
8.1 Clean Dirt on the Cabinet ................................................................................................................ 33
Caution .............................................................................................................................. 33
8.2 Dirt on the Lens ............................................................................................................................... 33
8.3 Replacing the Lamp......................................................................................................................... 33
Light-source Lamp and Lamp Usage Time....................................................................... 33
Procedure for Lamp Replacement..................................................................................... 34
Resetting Lamp Time........................................................................................................ 34
8.4 Cleaning and Replacing the Dust Filter........................................................................................... 34
Pull out the plug from the power outlet ............................................................................ 34
Remove the inner filter...................................................................................................... 34
Clean the filter................................................................................................................... 35
4 R699740 - DreamBee User Manual
Page 5

Reinstall the inner filter..................................................................................................... 35
8.5 Troubleshooting ............................................................................................................................... 35
On Screen Warnings .......................................................................................................... 35
LED Warning .................................................................................................................... 36
Before sending the projector to repair............................................................................... 37
9.0 MISCELLANEOUS ....................................................................................................... 38
9.1 RS-232C input ................................................................................................................................. 38
Pin Assignment..................................................................................................................38
External Control ................................................................................................................38
Communication Specifications ......................................................................................... 38
Command Format.............................................................................................................. 38
Response data format ........................................................................................................ 38
Available Commands and Parameters............................................................................... 39
9.2 Specifications.................................................................................................................................. 41
Overview ........................................................................................................................... 41
Dimensions........................................................................................................................ 42
R699740 - DreamBee User Manual 5
Page 6
1.0 PACKAGING AND DIMENSIONS
1.0 PACKAGING AND DIMENSIONS
1.1 Box content
The following accessories are packed together with this unit. Please confirm all items.
If any item is missing, please contact your dealer.
•1 DreamVision Full HD projector, model DreamBee (R9010086)
•1 User Manual (R699740)
•1 Remote control unit RCU
•1 Power Cord
•2 AAA size batteries
1.2 Projector Packaging
Way of Packaging
The projector is packed in a carton box. To provide protection during transportation, the projector is surrounded with
foam. The package is secured with banding and fastening clips.
To unpack
a) Pull off the adhesive tape or cut the adhesive tape but take care not to insert the knife too deep otherwise the
projector can be damaged.
b) Take the projector out of its shipping carton, remove the foam rubber and place it on a table.
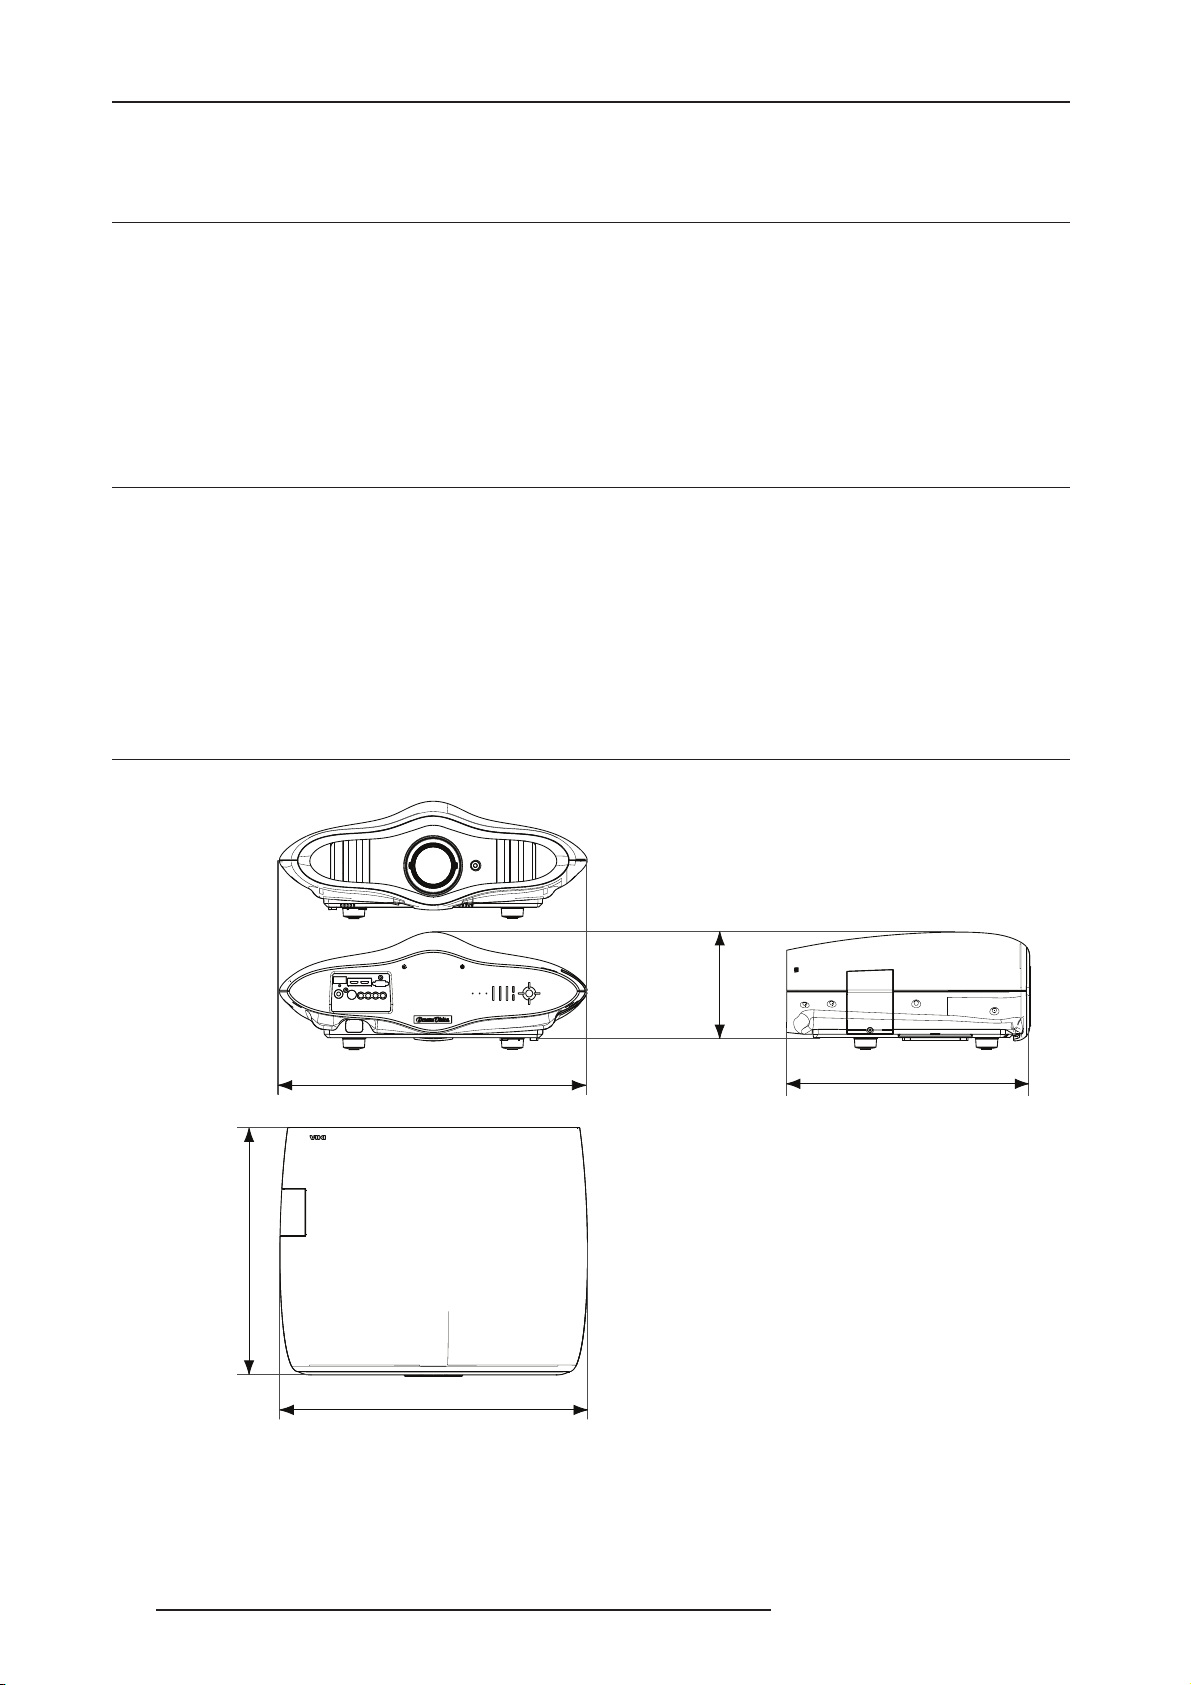
1.3 Projector Dimensions
585 mm
23.0’’
18.5’’
470 mm
205 mm 8.0’’
470 mm
18.5’’
585 mm
23.0’’
6 R699740 - DreamBee User Manual
Page 7
2.0 SAFETY INSTRUCTIONS
2.0 SAFETY INSTRUCTIONS
2.1 Important information
Lead-free regulation
This product has a High Intensity Discharge (HID) lamp that contains a small amount of mercury. It also contains
lead in some components.
Disposal of these materials may be regulated in your community due to environmental considerations. For disposal
or recycling information please contact your local authorities, or the Electronics Industries Alliance: http://
www.eiae.org.
Information for Users on Disposal of Old Equipment
This symbol indicates that the electrical and electronic equipment should not be disposed as general
household waste at its end of life. Instead, the product should be handed over to the applicable
collection point for the recycling of electrical and electronic equipment for proper treatment, recovery
and recycling in accordance with your national legislation.
By disposing of this product correctly, you will help to conserve natural resources and will help
prevent potential negative effects on the environment and human health which could otherwise be caused by
inappropriate waste handling of this product.
For more information about collection point and recycling of this product, please contact your local municipal office,
your household waste disposal service or the shop where you purchased the product. Penalties may be applicable
for incorrect disposal of this waste, in accordance with national legislation.
Other Countries outside the European Union:
If you wish to dispose of this product, please do so in accordance with applicable national legislation or other rules
in your country for the treatment of old electrical and electronic equipment.
About burning-in of the D-ILA device
Do not allow the same still picture to be projected for a long time or an abnormally bright video picture to be
projected. Do not project video images with high-intensity or high contrast on a screen. The video image could be
burnt into the D-ILA device.
Use special care when projecting video games or computer program images. There is no problem with ordinary
video-cassette playback images.
About the installation place
Do not install the projector in a place that cannot support its weight securely.
If the installation place is not sturdy enough, the projector could fall or overturn, possibly causing personal injury.
CAUTION:
To reduce the risk of electric shock, do not remove cover. Refer servicing to qualified service personnel. This
projector is equipped with a 3-blade grounding type plug to satisfy FCC rule. If you are unable to insert the plug
into the outlet, contact your electrician.
WARNING:
To prevent fire or shock hazards, do not expose this appliance to rain or moisture. This apparatus must be
earthed.
2.2 Important safeguards
Electrical energy can perform many useful functions. This unit has been engineered and manufactured to assure
your personal safety. But IMPROPER USE CAN RESULT IN POTENTIAL ELECTRICAL SHOCK OR FIRE
HAZARD. In order not to defeat the safeguards incorporated into this product, observe the following basic rules for
its installation, use and service.
The power input is auto-ranging from 100 to 240 VAC.
Please read these Important Safeguards carefully before use.
• All the safety and operating instructions should be read before the product is operated.
R699740 - DreamBee User Manual 7
Page 8

2.0 SAFETY INSTRUCTIONS
• All warnings on the product and in the operating
instructions should be adhered to.
• All operating instructions should be followed.
• Place the projector near a wall outlet where the
plug can be easily unplugged.
• Unplug this product from the wall outlet before
cleaning. Do not use liquid cleaners or aerosol
cleaners. Use a damp cloth for cleaning.
• Do not use attachments not recommended by the
product manufacturer as they may be hazardous.
• Do not use this product near water. Do not use
immediately after moving from a low temperature
to high temperature, as this causes
condensation, which may result in fire, electric
shock, or other hazards.
• Do not place this product on an unstable cart,
stand, or table. The product may fall, causing
serious injury to a child or adult, and serious
damage to the product. The product should be
mounted according to the manufacturer’s
instructions, and should use a mount
recommended by the manufacturer.
• When the product is used on a cart, care should
be taken to avoid quick stops, excessive force,
and uneven surfaces which may cause the
product and cart to overturn, damaging
equipment or causing possible injury to the
operator.
• Slots and openings in the cabinet are provided
for ventilation. These ensure reliable operation of
the product and protect it from overheating.
These openings must not be blocked or covered.
(The openings should never be blocked by
placing the product on bed, sofa, rug, or similar
surface. It should not be placed in a built-in
installation such as a bookcase or rack unless
proper ventilation is provided and the
manufacturer’s instructions have been adhered
to). For proper ventilation, separate the product
from other equipment, which may prevent
ventilation and keep a distance of more than 5-9“
(150 mm).
• This product should be operated only with the
type of power source indicated on the label. If you
are not sure of the type of power supply to your
home, consult your product dealer or local power
company.
• This product is equipped with a three-wire plug.
This plug will fit only into a grounded power
outlet. If you are unable to insert the plug into the
outlet, contact your electrician to install the
proper outlet. Do not defeat the safety purpose of
the grounded plug.
•Power-supply cords should be routed so that they
are not likely to be walked on or pinched by items
placed upon or against them. Pay particular
attention to cords at doors, plugs, receptacles,
and the point where they exit from the product.
•For added protection of this product during a
lightning storm, or when it is left unattended and
unused for long periods of time, unplug it from the
wall outlet and disconnect the cable system. This
will prevent damage to the product due to
lightning and power line surges.
• Do not overload wall outlets, extension cords, or
convenience receptacles on other equipment as
this can result in a risk of fire or electric shock.
•Never push objects of any kind into this product
through openings as they may touch dangerous
voltage points or short out parts that could result
in a fire or electric shock. Never spill liquid of any
kind on the product.
• Do not attempt to service this product yourself as
opening or removing covers may expose you to
dangerous voltages and other hazards. Refer all
service to qualified service personnel.
• Unplug this product from the wall outlet and refer
service to qualified service personnel under the
following conditions:
a) When the power supply cord or plug is
damaged.
b) If liquid has been spilled, or objects have fallen
on the product.
c) If the product has been exposed to rain or
water.
d) If the product does not operate normally by
following the operating instructions. Adjust only
those controls that are covered by the Operation
Manual, as an improper adjustment of controls may
result in damage and will often require extensive
work by a qualified technician to restore the product
to normal operation.
e) If the product has been dropped or damaged in
any way.
f) When the product exhibits a distinct change in
performance - this indicates a need for service.
• When replacement parts are required, be sure
the service technician has used replacement
parts specified by the manufacturer or with same
characteristics as the original part. Unauthorized
substitutions may result in fire, electric shock, or
other hazards.
• Upon completion of any service or repairs to this
product, ask the service technician to perform
safety checks to determine that the product is in
proper operating condition.
• The product should be placed more than one foot
away from heat sources such as radiators, heat
registers, stoves, and other products (including
amplifiers) that produce heat.
• When connecting other products such as VCR’s,
and personal computers, you should turn off the
power of this product for protection against
electric shock.
• Do not place combustible behind the cooling fan.
For example, cloth, paper, matches, aerosol cans
or gas lighters that present special hazards when
over heated.
• Do not look into the projection lens while the
illumination lamp is turned on. Exposure of your
eyes to the strong light can result in impaired
8 R699740 - DreamBee User Manual
Page 9
2.0 SAFETY INSTRUCTIONS
eyesight.
• Do not look into the inside of this unit through vents (ventilation holes), etc. Do not look at the illumination lamp
directly by opening the cabinet while the illumination lamp is turned on. The illumination lamp also contains
ultraviolet rays and the light is so powerful that your eyesight can be impaired.
• Do not drop, hit, or damage the light-source lamp (lamp unit) in any way. It may cause the light-source lamp to
break and lead to injuries. Do not use a damaged light source lamp. If the light-source lamp is broken, ask your
dealer to repair it. Fragments from a broken light-source lamp may cause injuries.
• The light-source lamp used in this projector is a high pressure mercury lamp. Be careful when disposing of the
light source lamp. If anything is unclear, please consult your dealer.
• Do not ceiling-mount the projector to a place which tends to vibrate; otherwise, the attaching fixture of the
projector could be broken by the vibration, possibly causing it to fall or overturn, which could lead to personal
injury.
• Use only the accessory cord designed for this product to prevent shock.
• The power supply voltage rating of this product is AC120 V, AC100 V – AC240 V, the power cord attached
conforms to the following power supply voltage. Use only the power cord designated by our dealer to ensure
Safety and EMC.
• When it is used by other power supply voltage, power cable must be changed.
• Ensure that the power cable used for the projector is the correct type for the AC outlet in your country. Consult
your product dealer.
• Caution: Do not allow any unqualified person to install the unit. Be sure to ask your dealer to install the unit (e.g.
attaching it to the ceiling) since special technical knowledge and skills are required for installation. If installation
is performed by an unqualified person, it may cause personal injury or electrical shock.
2.3 REGIONAL SPECIFIC INFORMATION
FCC INFORMATION (USA ONLY)
Changes or modification not approved by DreamVision could void the user’s authority to operate the equipment.
Note: This equipment has been tested and found to comply with the limits for Class B digital devices, pursuant to
Part 15 of the FCC Rules. These limits are designed to provide reasonable protection against harmful interference
in a residential installation. This equipment generates, uses, and can radiate radio frequency energy and, if not
installed and used in accordance with the instructions, may cause harmful interference to radio communications.
However, there is no guarantee that interference will not occur in a particular installation. If this equipment does
cause harmful interference to radio or television reception, which can be determined by turning the equipment off
and on, the user is encourage to try to correct the interference by one or more of the following measures:
• Reorient or relocate the receiving antenna.
• Increase the separation between the equipment and receiver.
• Connect the equipment into an outlet on a circuit different from that to which the receiver is connected.
• Consult the dealer or an experienced radio/TV technician for help.
FCC
The Federal Communications Commission (FCC) is an independent United States government agency, created,
directed, and empowered by Congressional statute.
The FCC was established by the Communications Act of 1934 as the successor to the Federal Radio Commission
and is charged with regulating all non-Federal Government use of the radio spectrum, including radio and television
broadcasting, and all interstate telecommunications like wire, satellite and cable as well as all international
communications that originate or terminate in the United States. The FCC's jurisdiction covers the 50 states, the
District of Columbia, and U.S. possessions.
R699740 - DreamBee User Manual 9
Page 10

3.0 INSTALLATION GUIDELINES
3.0 INSTALLATION GUIDELINES
3.1 Viewing Conditions
Brightness of the room
Avoid direct exposure of screen to direct sunlight and illumination. Block light using a curtain. Images can be well
projected by darkening the brightness of the room.
Do not view screen for prolonged hours.
Looking at the screen continually for a prolonged time will cause your eyes to get tired. Allow your eyes to rest at
intervals.
Do not use this unit when image flickers
This may cause your eyesight to deteriorate.
3.2 Environment of Use
• Do not use this unit in rooms with cigarette smoke or oily smoke. This may cause the unit to malfunction.
Mounting this unit to the ceiling
Check temperature around the unit. When a heater is in use, the ceiling may reach a temperature higher than
anticipated, hence leading to malfunction of the unit.
Installation Environment
This unit is a precision device. Do not install it at the following places. Doing so may cause fire or malfunction of the
unit.
• Where there is water, humidity or dust.
• Where the unit may be subjected to oily or cigarette smoke.
• On a soft surface such as carpet or cushion.
• Where the unit may be subjected to high temperature due to direct sunlight.
• When temperature is high or low.
Operation temperature range: +5°C to +35°C.
Storage temperature range: -10°C to +60°C.
Relative humidity range 20% to 80% (without condensation).
Precautions of Usage
This unit makes use of a light source lamp that may reach a high temperature during projection. Do not allow
projection under the following conditions. Doing so may cause fire or malfunction of the unit.
• Projection with the unit laid on sides.
• Projection with the unit installed in an unreasonable angle. Avoid using this unit at an angle of more than 5°
horizontally and 25° vertically. Doing so may cause unevenness in the color or shorten the lamp life.
• Projection at a location that blocks the air inlets or exhaust vents.
• Projection at a place exposed to air blasts from an air conditioner.
10 R699740 - DreamBee User Manual
Page 11
3.0 INSTALLATION GUIDELINES
3.3 Air-Flow and Space Requirements
This unit can be installed in table position. Make sure that the unit is installed within the space requirements
described below.
AB
A
B
AB
A
A
•A: Air inlets
•B: Air outlets
150 mm
100 mm
Air flow
150 mm
150 mm
100 mm
150 mm
Space requirements
R699740 - DreamBee User Manual 11
Page 12
3.0 INSTALLATION GUIDELINES
3.4 Ceiling mounting the unit
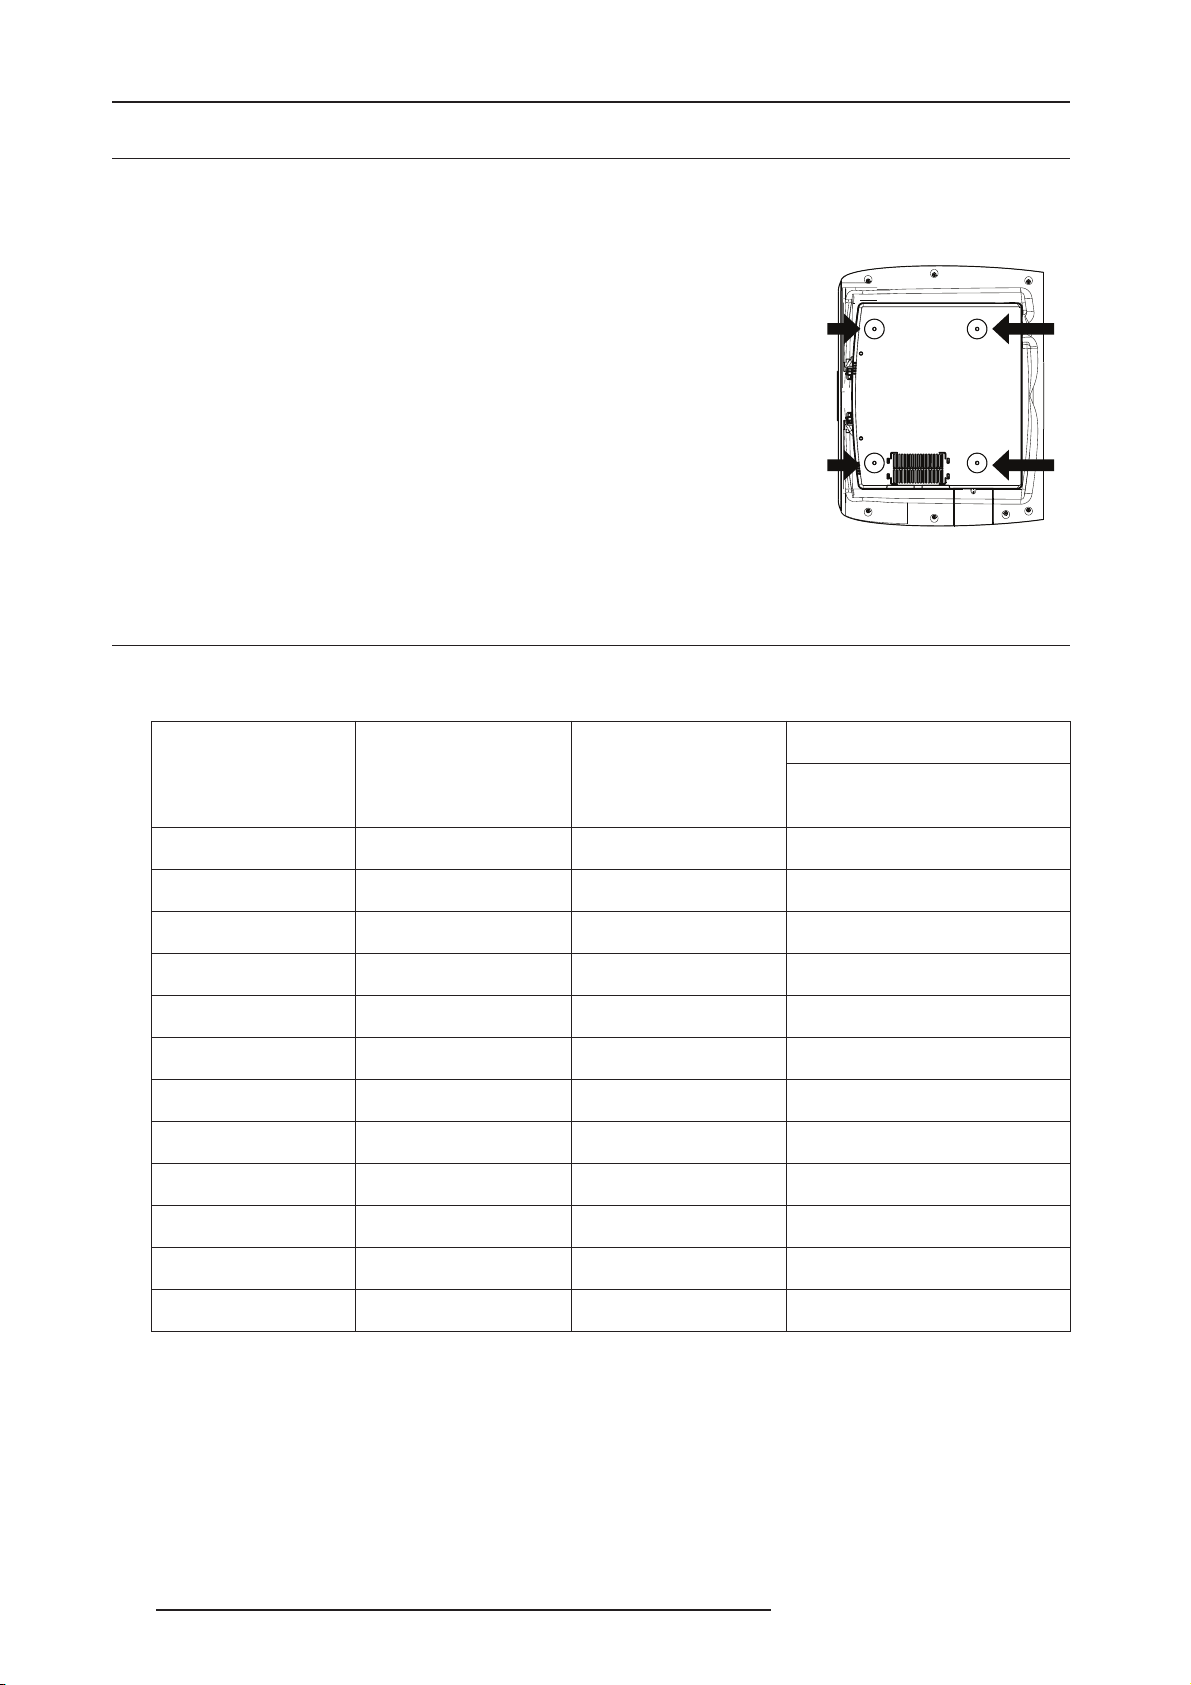
When mounting of this unit is required, do so by removing the 4 feet and make use of the 4 screw holes (M5
screws) at the bottom of this unit. Allow sufficient space around the air inlets to avoid blocking them
Precautions for Ceiling-mount
•To ceiling-mount this unit, special expertise and techniques are necessary.
Be sure to ask your dealer or specialist to perform mounting.
• Do not mount at places that may be subjected to vibration and shock.
• Depth of the screw holes (screw length) is 30 mm. Use screws shorter than
30 mm but longer than 19 mm.
• Install at a safe place in case this unit or a part of it may drop. If the lightsource lamp is broken, small pieces of glass from the mesh of the filter may
appear outside the unit.
• Regardless whether the unit is still under guarantee, DreamVision is not
liable for any product damage caused by mounting the unit with third party
ceilling mount or when the environment is not suitable for ceiling-mount.
3.5 Projection Distance and Offset Setting
.
Projection Distance
Projection Screen Size
Diagonal size
(Aspect Ratio 16:9)
50" (1270 mm) 43,6" (1107 mm) 24,5" (623 mm) 1518 mm - 3050 mm
60" (1524 mm) 52,3" (1328 mm) 29,4" (747 mm) 1821 mm - 3659 mm
70" (1778 mm) 61,0" (1550 mm) 34,3" (872 mm) 2125 mm - 4269 mm
83" (2108 mm) 72,3" (1837 mm) 40,7" (1034 mm) 2519 mm - 5062 mm
92" (2337 mm) 80,2" (2037 mm) 45,1" (1146 mm) 2792 mm - 5611 mm
100" (2540 mm) 87,2" (2214 mm) 49,0" (1245 mm) 3035 mm - 6099 mm
110" (2794 mm) 95,9" (2435 mm) 53,9" (1370 mm) 3339 mm - 6709 mm
138" (3505 mm) 120,3" (3055 mm) 67,7" (1718 mm) 4188 mm - 8417 mm
150" (3810 mm) 130,7" (3321 mm) 73,5" (1868 mm) 4553 mm - 9149 mm
180" (4572 mm) 156,9" (3985 mm) 88,2" (2241 mm) 5463 mm - 10978 mm
200" (5080 mm) 174,3" (4428 mm) 98,1" (2491 mm) 6070 mm -12198 mm
Projection Screen Size
Base size
(Aspect Ratio 16:9)
Projection Screen
Height
(Aspect Ratio 16:9)
DreamBee
Projecting Distance
minimum - maximum
250" (6350 mm) 218" (5535 mm) 122,6" (3113 mm) 7588 mm - 15248 mm
• The projection screen sizes and projecting distances in the table above are provided only as a guide. Please use
them as reference during installation.
• Use a projection image of 16:9 aspect ratio for setup adjustment.
12 R699740 - DreamBee User Manual
Page 13
3.0 INSTALLATION GUIDELINES
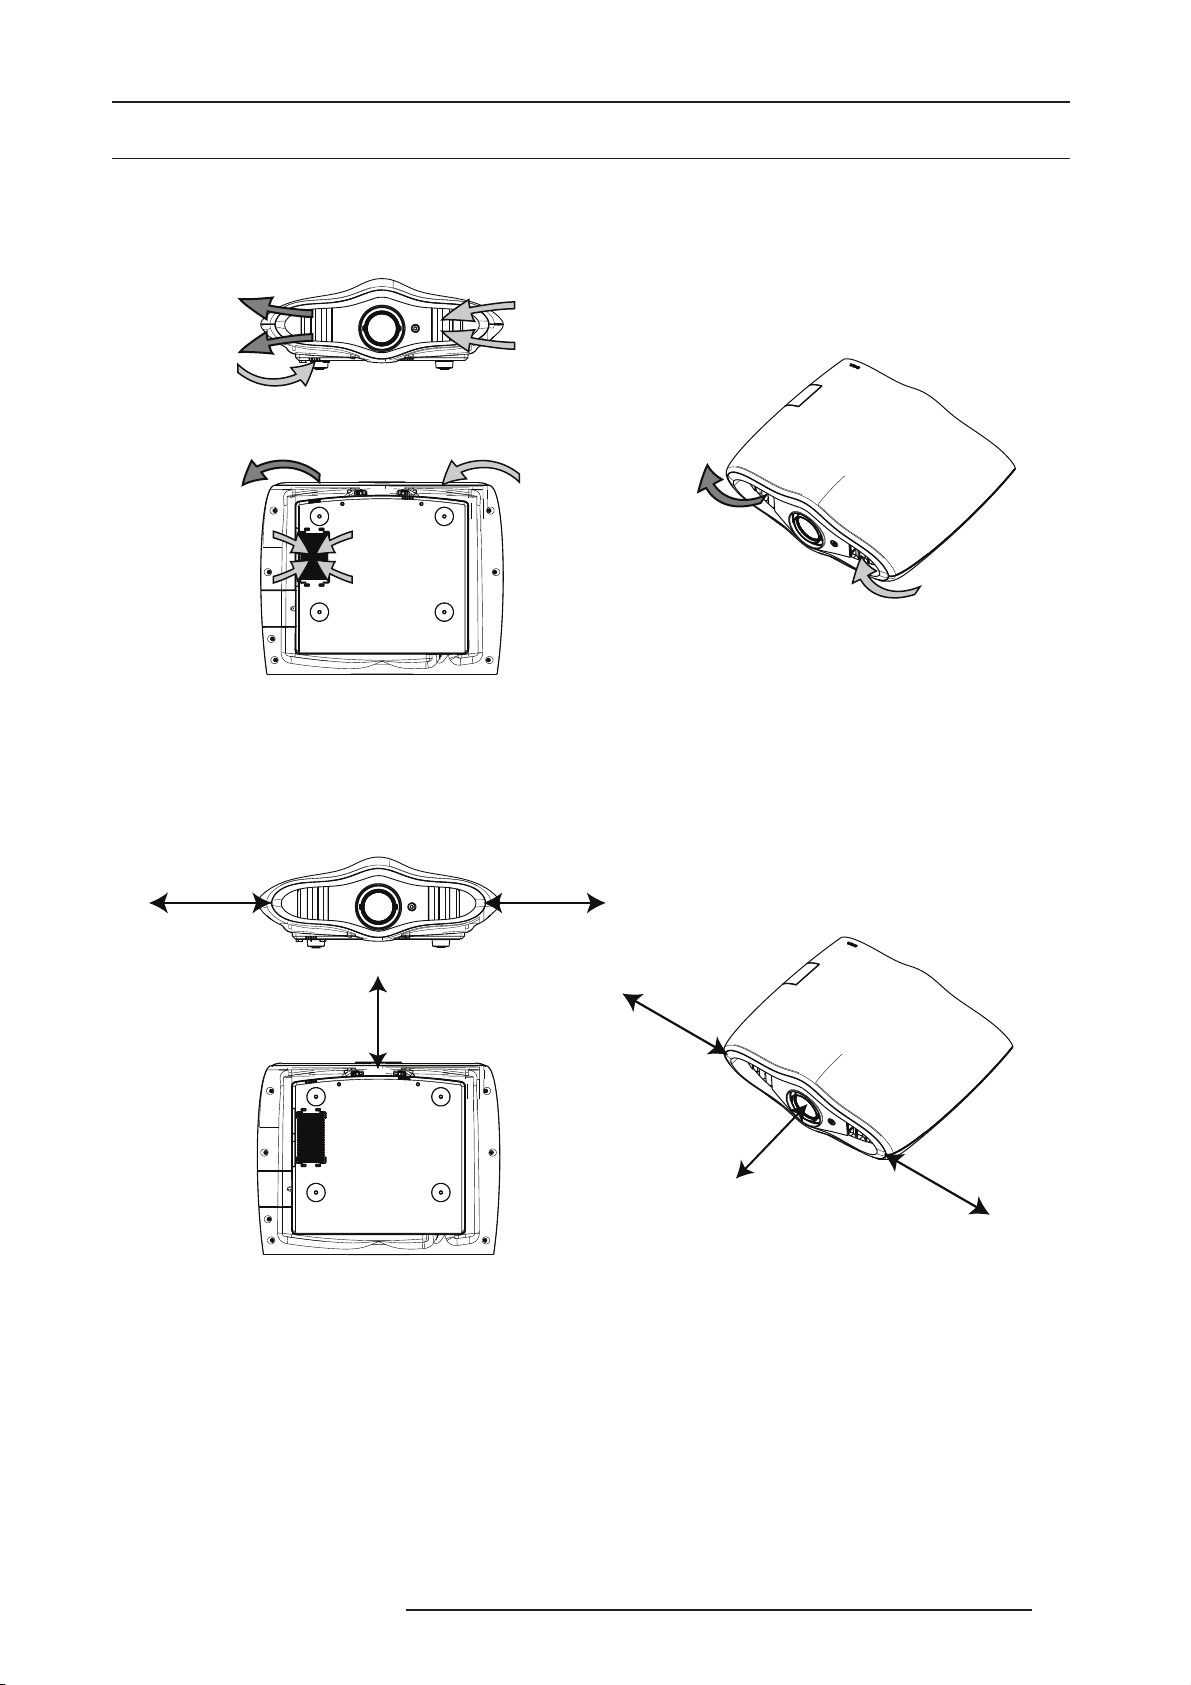
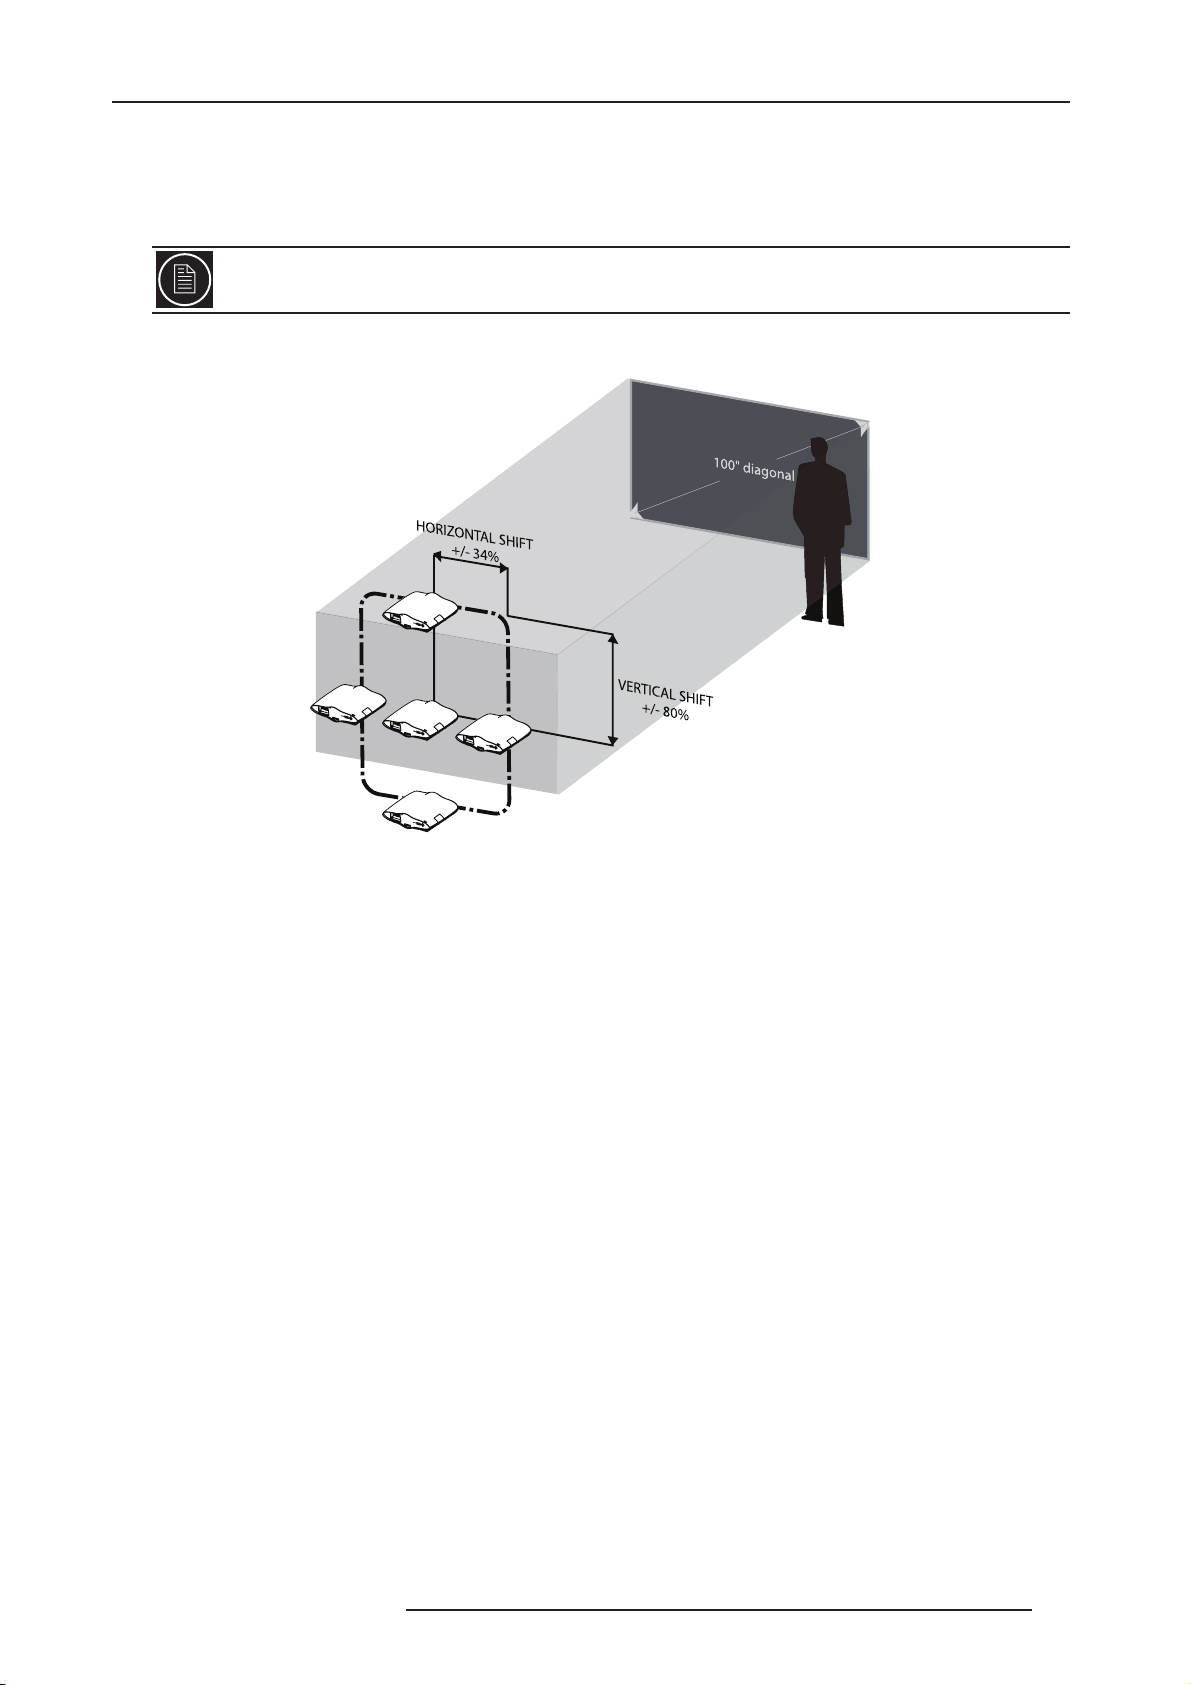
Ver tical and Horizontal Offset Setting
The optimum image can be obtained when the centre of this projector’s lens and the screen are placed
perpendicular to each other. Take note of the projection angle when placing them. Failing to do so may give rise to
trapezoidal distortion of the projected image.
This unit comes with a vertical and horizontal shift to suit most installations. Make sure that your installation
does not exceed 80% vertical offset and 34% horizontal offset.
This unit comes with a optical shift that features vertical and horizontal adjustment of the projection screen position.
Adjust the picture to your screen.
• The vertical shift level is between -80% and 80% of the screen height.
• The horizontal shift level is between -34% and 34% of screen base.
• The shift level is set to 0% vertically and horizontally by default.
• The position of the projection screen may be out of alignment due to the gear movement.
R699740 - DreamBee User Manual 13
Page 14
3.0 INSTALLATION GUIDELINES
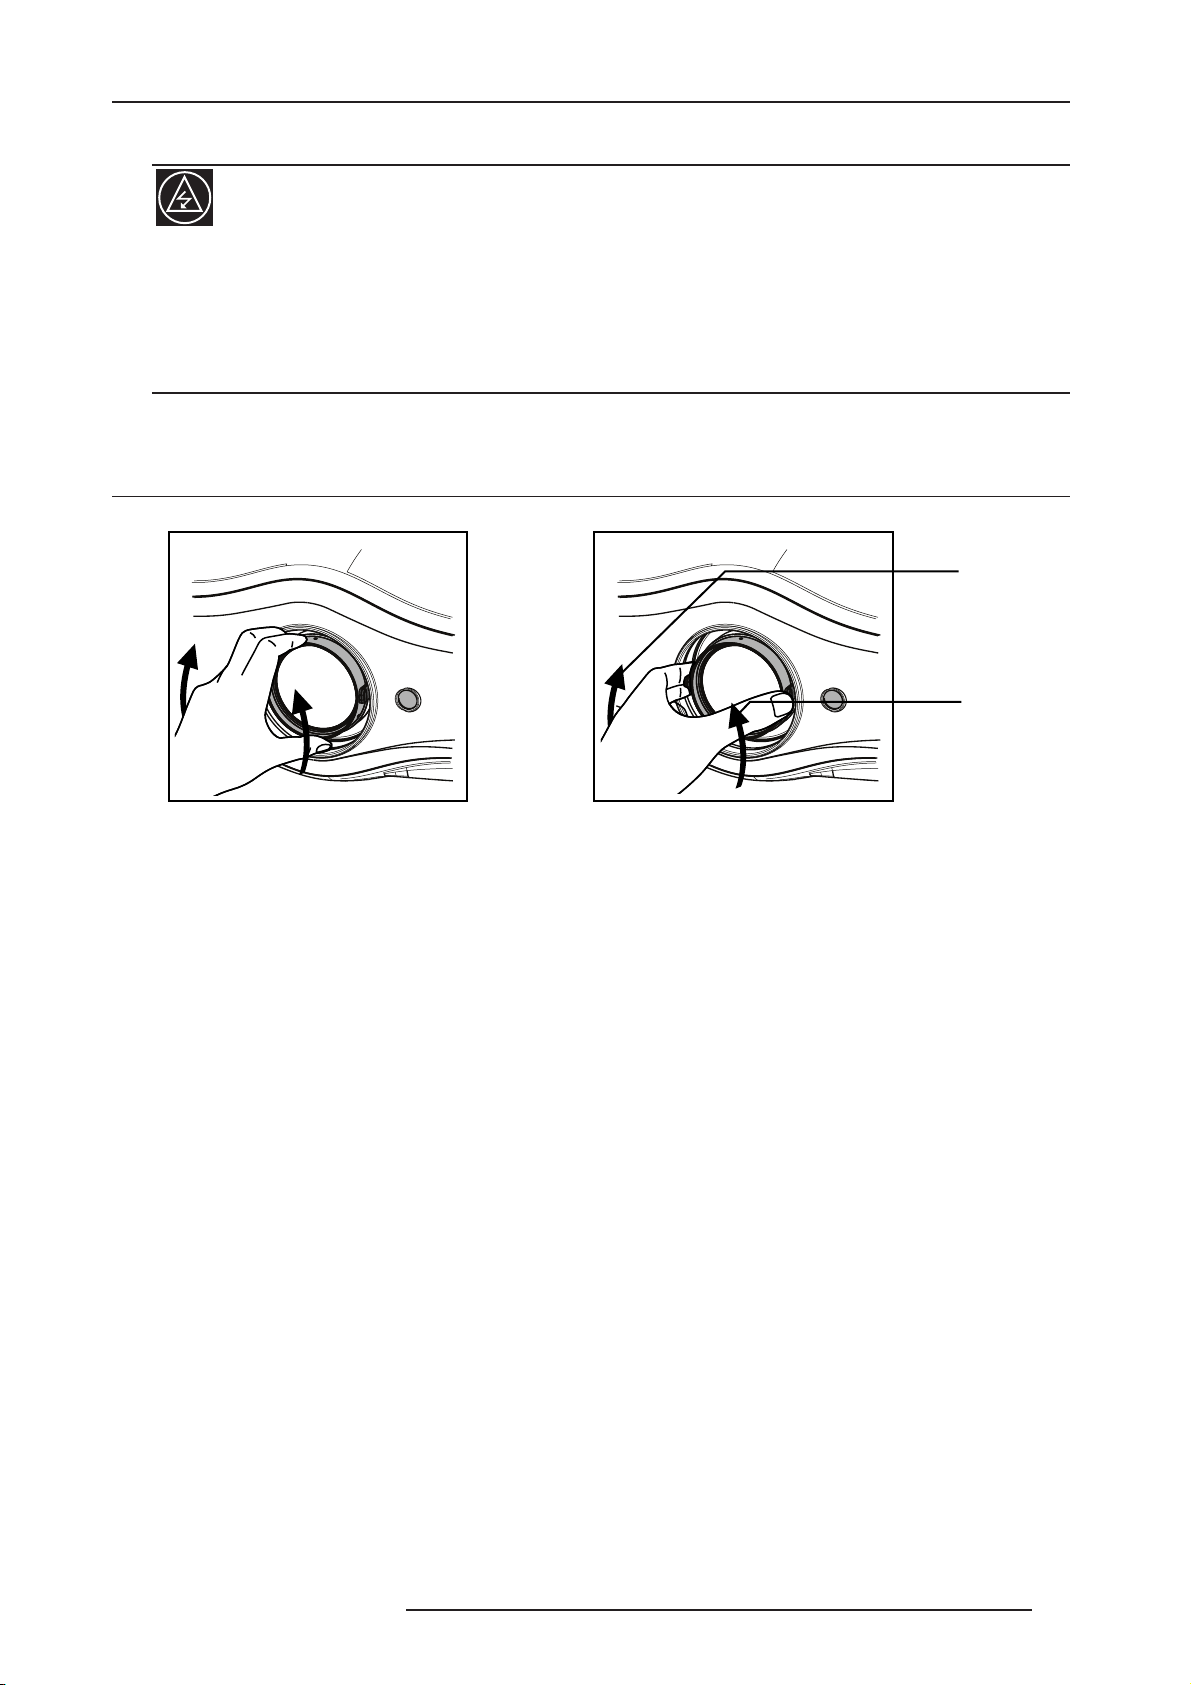
3.5.0.1 Adjust the picture position vertically
The DreamBee projector has two dials to center the picture to the screen vertically and horizontally. Refer to the
picture below to locate the dials.
Horizontal Shift Dial
(-34% to +34%)
The Vertical and Horizontal shift dials are located at the bottom of the unit.
Vertical Shift Dial
(-80% to +80%)
Turn clockwise to shift the picture on the screen downward.
Turn anti-clockwise to shift the picture on the screen upward.
14 R699740 - DreamBee User Manual
Page 15

3.5.0.2 Adjust the picture position horizontally
Turn clockwise to shift right the picture on the screen.
3.0 INSTALLATION GUIDELINES
Turn anti-clockwise to shift left the picture on the screen.
R699740 - DreamBee User Manual 15
Page 16

4.0 REMOTE CONTROL UNIT (RCU)
-
-
4.0 REMOTE CONTROL UNIT (RCU)
4.1 General view
Power OFF button
Select Active Input
Image profile switch
Color Adjust buttons
Display Information
Contrast Adjust buttons
Display Menu
OFF ........ OPERATE ......... ON
HDMI 1 HDMI 2
VIDEO ASPECT
CINEMA NATURAL DYNAMIC
C
USER
1
COLOR
+
COLOR
CONTRAST
MENU
ENTER
S-VIDEO
N
USER
2
SHARP
+
SHARP
INFO
HIDE
COMP
GAMMA
COLOR
BRIGHT
USER
TEMP
EXIT
D
3
Power ON button
Screen Aspect Ratio
Gamma setting button
Sharpness Adjust buttons
Color Temperature button
Brightness Adjust buttons
Hide Display
Exit to previous menu
Navigation buttons
Test Pattern button
4.2 Loading and replacing batteries
LIGHTTEST
Backlight button
• Push the cover tab with the fingernail a little backwards and pull upwards the cover top.
Slide the cover forward to remove.
16 R699740 - DreamBee User Manual
Page 17

4.0 REMOTE CONTROL UNIT (RCU)
• Push the battery body towards the spring and lift up to remove.
Insert two AAA size batteries, making sure the polarities match the + and - marks inside the battery
compartment.
• Insert the lower tab of the battery cover in the gap at the bottom of the remote control, and press the cover until
it clicks in place.
CAUTION WHEN USING BATTERIES
Do not mix new and old batteries.
Do not mix different type of batteries as they are different in characteristics.
Insert batteries according to the + and - marks on the battery case.
Do not put batteries into fire or recharge them if they are not design to.
Remove the batteries if the remote control is not to be used for a prolonged period.
Use manganese batteries wherever possible, Do not use rechargeable batteries.
NOTICE
If the remote control has to be brought closer to the projector to operate, it means that the batteries are wearing out.
When this happens, replace the batteries. Insert the batteries according to the + and - marks.
4.3 How to use the remote control unit
The operable distance of the remote control unit is about 7m for direct reception and within 30 degree angle with
respect to the sensor.
Back InfraRed sensor
Front InfraRed sensor
The remote control unit can be used by having the transmission signal reflected off a screen, as the effect of
signals reflected from the RCU differ with the type of screen used, operable distance may decrease.
R699740 - DreamBee User Manual 17
Page 18

5.0 GETTING STARTED
5.0 GETTING STARTED
5.1 General View
Front side
Air Outlet
Air Inlet
• Air Outlet / Inlet: see “Air-Flow and Space Requirements”, page 11.
•Focus and Zoom Adjust: see “Focus and Zoom Adjust”, page 19.
• This unit comes with buffer material that cushions the lens during transport. Remove the material before use.
Focus Adjust
IR sensor
Zoom Adjust
Rear side
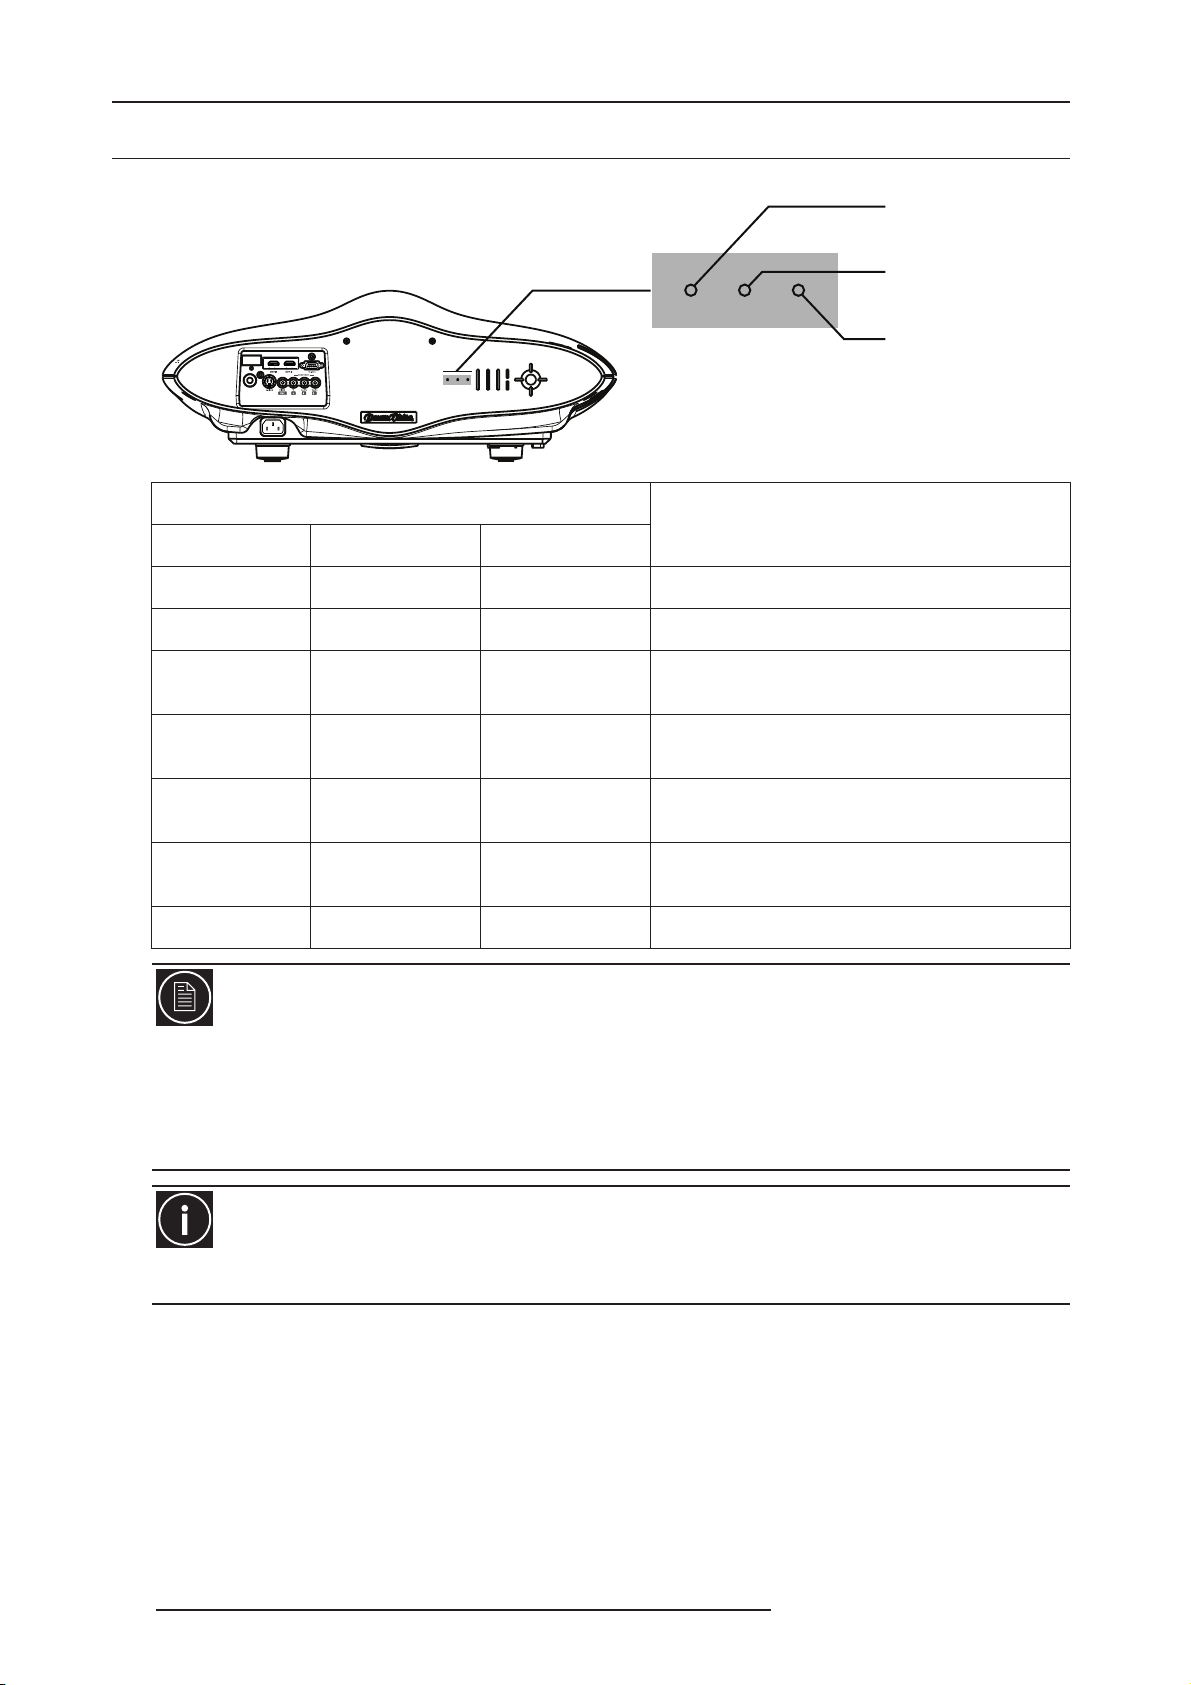
Input Panel
Main Power
• Input Panel: see page 22.
• Main Power: connect the power cord. See below.
• Operating LEDs: see page 20 for more details.
• Operating and Navigation buttons described in section 5.5, page 21.
5.2 Connecting the Power Cord
•Before plugging in the Power Cord, ensure that all devices have been
connected.
•Connect the power cord to the power input terminal of the projector.
Operating LEDs
Navigation buttons
Operating buttons
18 R699740 - DreamBee User Manual
Page 19
5.0 GETTING STARTED
CAUTION AGAINST FIRE AND ELECTRIC SHOCK
Since the power consumption of this unit is high, insert the power plug directly into a wall outlet.
When not using devices, remove the power plug from the wall outlet.
Do not use power cords for connection other than specified.
Do not use a power voltage different from that which is indicated.
Do not cut, tear or modify the power cords. Also, do not place a heavy object on, heat or stretch the power cords as
this may cause damage to the cords.
Do not insert or pull plugs with a wet hand.
5.3 Focus and Zoom Adjust
Zoom In
Focus Adjust Zoom Adjust
Zoom Out
R699740 - DreamBee User Manual 19
Page 20
5.0 GETTING STARTED
5.4 Operating LEDs
Operating LED
WARNING LAMP STANDBY/ON
Off Off Light On (red) Unit is in standby mode
Off Off Light On (green) Unit is in operate mode (during projection)
WARNING
(red LED)
LAMP
(orange LED)
STANDBY/ON
(red / greenLED)
Description
Off Off Blinking (green)
Off Off Blinking (red)
Light On (red) Off -
Off Light On (orange) -
Light On (red) Blinking (orange) - An error occurred with the lamp or the lamp cover.
The video image is temporarily cleared upon
pressing the [HIDE] button during projection.
Unit is in CooL Down* mode
(when cooling lamp)
An error occurred during operation, the projector
will enter Cool Down* mode.
Lamp replacement is near
(Lamp usage time has exceeded 1900 hours)
ABOUT COOL DOWN MODE
After projection or when warning occurred, the heated lamp will go through a 60-seconds cool-down process known
as the Cool Down mode. This function is to prevent damage and deformation from the heated lamp may cause to
the internal components of the projector. It also prevents lamp breakage and shortened lamp life.
The Cool Down mode is indicated by the blinking red [STANDBY/ON] Indicator. When in Cool Down mode, the
projector cannot be turned ON for 60 seconds.
After the Cool Down process is completed, the unit will automatically switch to the Standby mode.
CAUTION
When in Cool Down mode, do not pull out the plug from the outlet. Also, do not block the air inlets/exhaust vents by
standing the projector on its end or laying it on its side.
20 R699740 - DreamBee User Manual
Page 21

5.5 Operating and Navigation Buttons
Button Description
Enter To select or confirm.
Up - down - left - right To navigate into Menu.
Switch On/Off To turn On or Off the projector.
Input To switch the input selection.
5.0 GETTING STARTED
Enter
Up - down - left - right
Switch On/Off
Input
Hide
Exit
Menu
Hide To hide temporary the picture.
Exit To return to previous menu or cancel action.
Menu To display On Screen Display (OSD) Menu.
R699740 - DreamBee User Manual 21
Page 22
6.0 CONNECTIONS
6.0 CONNECTIONS
The DreamBee can be connected to any compatible devices. The available inputs are:
• 2x HDMI revision 1.2 with HDCP
• 1x S-Video (or Composite)
• 1x Video
• 1x Component (YCbCr or YPbPr or RGB or SCART with adapter)
The RS-232C terminal can be used for automation or software updates.
During the connection, make sure that the unit is powered OFF.
For audio output, connect your audio video source to an amplifier.
6.1 The DreamBee PRO Version
To get the best performances, the DreamBee PRO features an external high-definition video processor with VRS
technology. The projection system would accept up to twelve different multi-standard sources. Each source is
automatically de-interlaced and upscaled to the DreamBee’s native resolution using the latest technology in video
processing.
Get with the PRO Version:
•4 plug and play HDMI inputs.
• Up to 12 inputs: 4x HDMI, 2x Video, 2x S-Video, 2 Component, 1 RGBHV and D-SDI input
•2 dedicated Game modes for low latency
• Film-grade video processing algorithms
• 12 Volt screen trigger
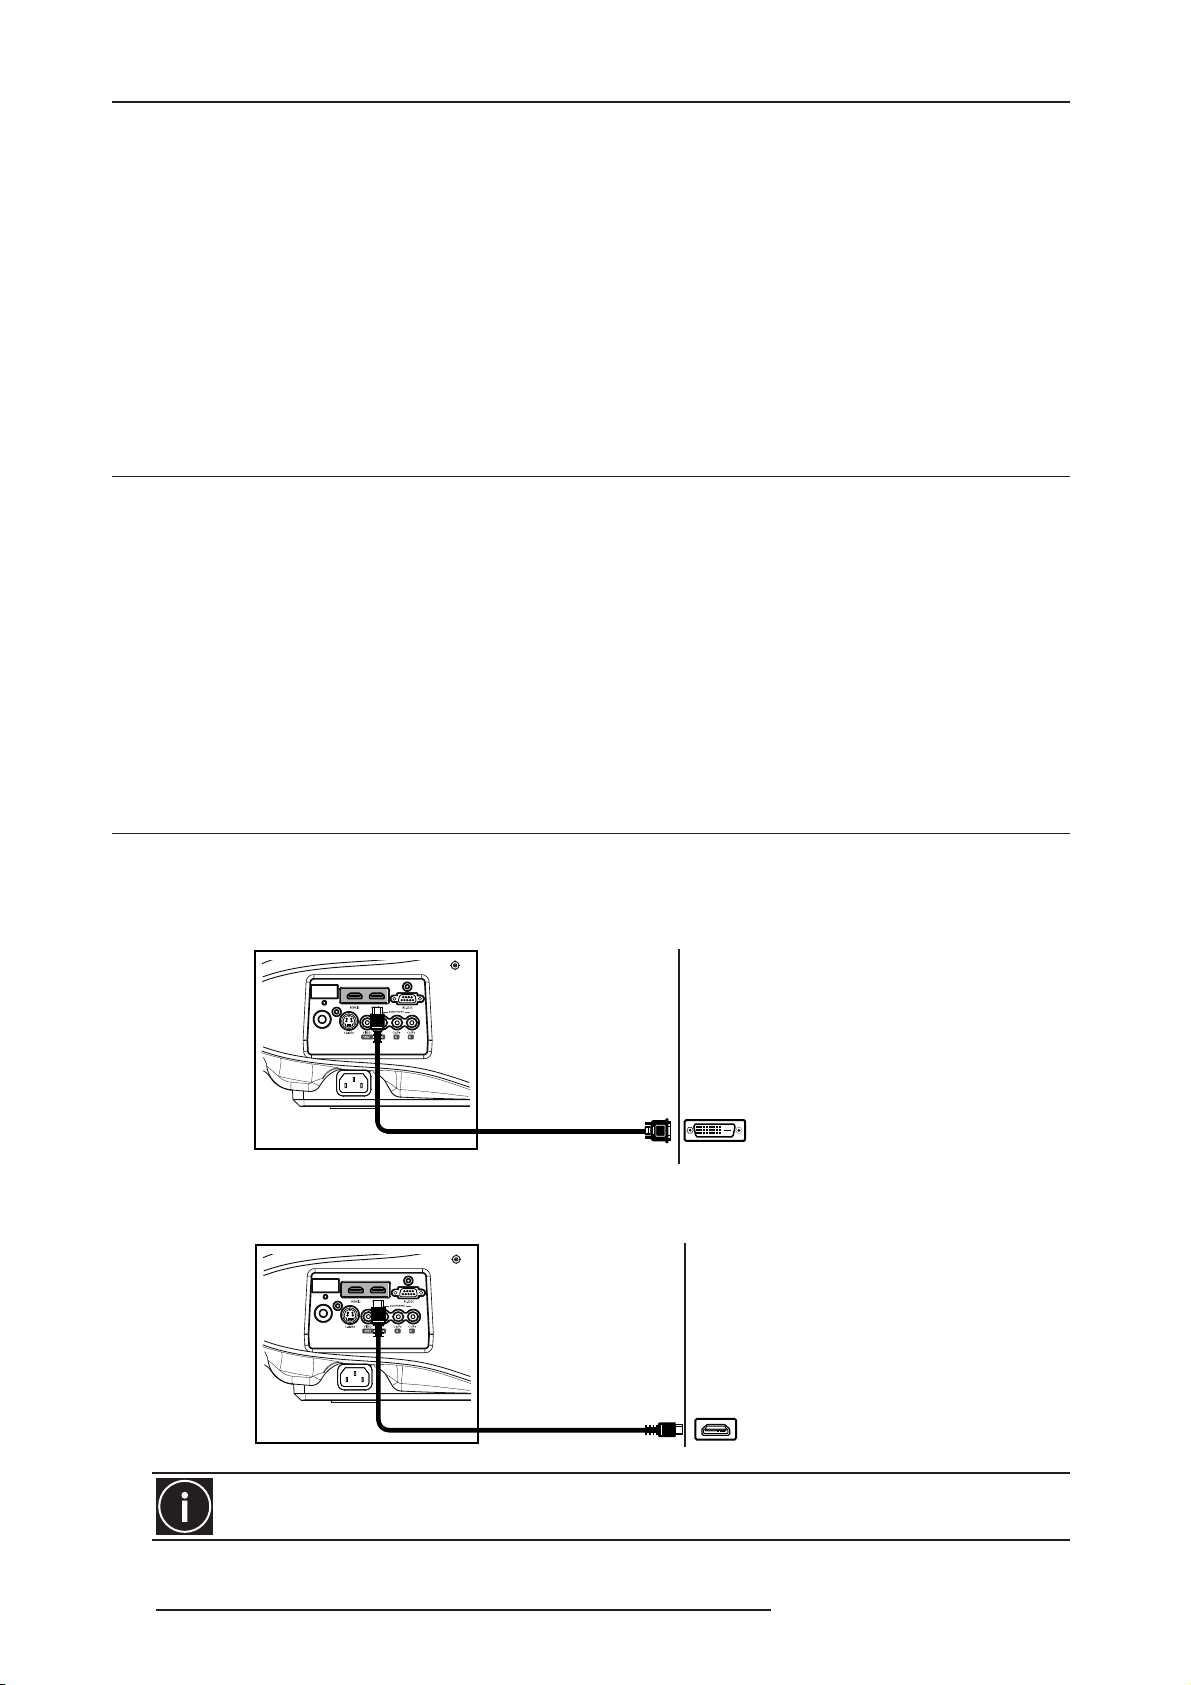
6.2 Connecting a device with Digital Output
The two HDMI inputs fully support HDMI 1.2 revision and are compatible with HDCP protection. You can connect
this unit to a HDMI 1.3 video source configured to output a signal coded up to 24 color bits per pixel.
Connecting a device with DVI-D Output
Audio Video Source:
DVD-Player
HD-DVD Player
HDTV receiver
Computer with DVI output
Digital Game Console
DVI-D to HDMI cable
Connecting to a device with HDMI Output
DVI-D output
Audio Video Source:
DVD-Player
HD-DVD Player
HDTV receiver
HD-Multimedia Box
Computer with HDMI output
Game Console
HDMI to HDMI cable
Make sure to use a good quality cable, especially when the distance between the different devices are
longer than 5 meters. If it is the case, the use of a split system or optical fiber cable is highly recommended.
HDMI output
22 R699740 - DreamBee User Manual
Page 23
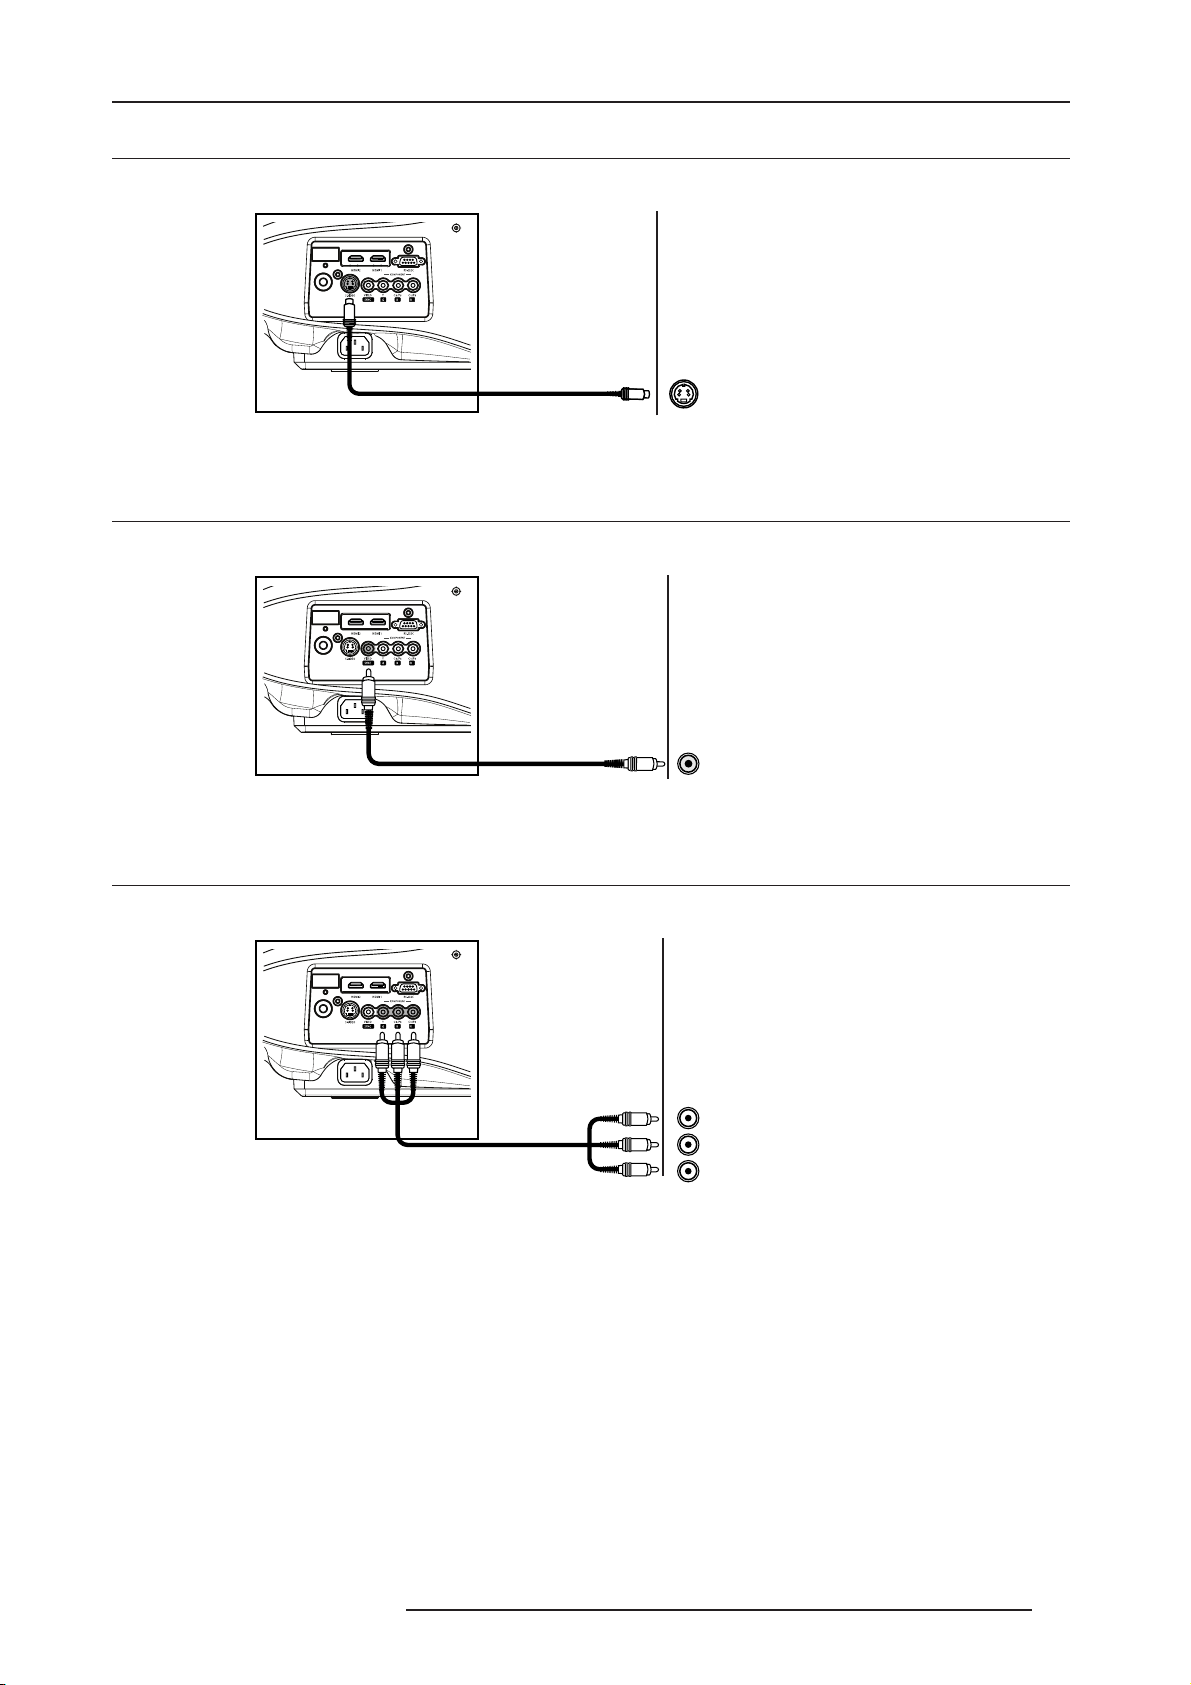
6.3 Connecting a device with S-Video Output
Audio Video Source:
DVD-Player
Multimedia Box
DVB-T Television receiver
Game Console (SD output)
Video Camera
Digital Camera
S-Video output
6.4 Connecting a device with Video Output
Audio Video Source:
DVD-Player
Multimedia Box
DVB-T Television receiver
Game Console (SD output)
Video Camera
Digital Camera
6.0 CONNECTIONS
Video output
6.5 Connecting a device with Component Output
Audio Video Source:
DVD-Player
HDTV receiver
Game Console (SD or HD)
DVB-T Television receiver
Multimedia Box
Analog Camera
Cr/Pr - Red
Cb/Pb - Blue
Y - Green
R699740 - DreamBee User Manual 23
Page 24

6.0 CONNECTIONS
6.6 Connecting a device with SCART Output (European market)
Audio Video Source:
European DVD-Player
DVB-T Television recevier
Game Console
Multimedia Box
SCART output
You must configure in the DreamBee’s Menu the Component Input to ‘SCART’. Making so will configure the
Video Input as Sync. Input. See “COMP”, page 30 for more details.
6.7 Automation and control port: RS-232 Input.
Automation Device
Control Device
Computer with RS-232*
RS-232 output
*USING RS-232C WITH A COMPUTER
The RS-232 Control and Automation may require specific softwares and tools. See “RS-232C input”, page 38 for
more details on RS-232C cabling and protocol.
24 R699740 - DreamBee User Manual
Page 25
7.0 MENU AND PICTURE SETTING
7.0 MENU AND PICTURE SETTING
7.1 How to start up the Menu
Box like Menu Structure
The menu structure is built up with boxes which allow easy access to different parameters for setting up the
projector. A menu box item can generate an adjustment box on the right of the main menu.
How to activate the Menu Structure
• Press the [MENU] on the RCU or Digital Control Panel located at the rear side of the projector.
• The main menu will be displayed
Setup
Image
Image Adjust
Color Temp.
Gamma
Offset
Pixel Adjust
How to select an Item and make an Adjustment
Video Install.Func. Info.
Remote Control Unit Digital Control Panel
Navigation Keys
• Use the [UP] or [DOWN] keys to highlight the desired Menu
• Press [ENTER] to select
If the selected item has adjustment values, use the [LEFT] and [RIGHT] to change the value.
If the selected item has a sub menu, this sub menu will open. (Input Adjust, Offset, etc.)
• Use the [EXIT] key to return to the previous menu, or to clear the menu screen when the main menu is
displayed.
R699740 - DreamBee User Manual 25
Page 26

7.0 MENU AND PICTURE SETTING
7.2 Menu Structure
MAIN MENU SUBMENU AVAILABLE OPTIONS
Image Image Adjust Contrast -30 +30
Brightness -30 +30
Color -30 +30
Tint (for NTSC sources) -30 +30
Sharpness -30 +30
DNR (Digital Noise Reduction)
Color Temp. Presets: Low, Middle, High
User 1
Red -255 to 0
Green -255 to 0
Blue -255 to 0
User 2
Red -255 to 0
Green -255 to 0
Blue -255 to 0
Gamma Normal, A, B, C
Offset Red -30 +30
Green -30 +30
Blue -30 +30
Pixel Adjust Horiz. Red 1 to 7
Horiz. Green 1 to 7
Horiz. Blue 1 to 7
Ver t . Red 1 to 5
Vert. Green 1 to 5
Vert. Blue 1 to 5
Setup Image Profile
Parameters:
Contrast / Brightness
Color / Sharpness
DNR / ColorTemp
Gamma / Offset
Profile Memory Save:
Picture Position Adjust the horizontal and vertical position of
HDMI Input Level
(Available for HDMI1 and 2 inputs)
Mask
(for High Definition picture)
Cinema (Movie quality in dark room)
Natural (Picture as is in dark room)
Dynamic (Bright scenes or bright room)
User1 (User defined)
User2 (User defined)
User3 (User defined)
User1
User2
User3
Clear
User1
User2
User3
Reset (to default settings)
Cinema
Natural
Dynamic
the picture on the screen
Standard
Enhanced (see page 29)
2.5%, 5%, Off
-30 +30
26 R699740 - DreamBee User Manual
Page 27

7.0 MENU AND PICTURE SETTING
Video COMP
(for Component Input)
HDMI
(for HDMI 1 and HDMI 2 Inputs)
Aspect
(fixed to 16:9 for HD pictures)
Film Mode Auto
Color System
(for Video or S-Video Inputs)
Black Level
(for NTSC sources)
Install Menu Position Upper Left
Menu Display 15 sec. The menu fade out after 15 sec.
Line Display
(Display the active input when
switching input)
Flip H.
(for rear projection)
Flip V.
(for ceiling mounting)
High Altitude
(>900m above sea level)
Func. Back Color
(background color when no signal)
Sleep Timer
(The projector goes automatically
into Standby Mode when no signal)
D-ILA Logo
(Logo displayed during startup)
Lamp Power Normal (170W)
Test Pattern* 6 Test Patterns
Language Japanese, English, German, Spanish,
Info. Input Display selected video Input
Source Display the type of the current input video
Lamp Time Display the accumulated hours usage of the
Y PbCb/PrCr
RGB
SCART
Auto (Autodetect the HDMI color space)
YCbCr (4:4:4)
YCbCr (4:2:2)
RGB
4:3
16:9
Zoom
Off
Auto, NTSC, NTSC4.43, PAL, PAL-M, PALN, SECAM
0%, 7.5%
Upper Center
Upper Right
Left Center
Center
Right Center
Lower Left
Lower Center
Lower Right
On Must press [EXIT] to exit menu
5 sec.
Off
On
Off
On
Off
On
Off
Blue
Black
15 (in minutes)
30
60
Off
On (D-ILA logo is displayed 5 sec.)
Off
High (200W)
Italian, French, Portuguese, Dutch, Swedish,
Norwegian, Chinese (Simplified)
signal
lamp
R699740 - DreamBee User Manual 27
Page 28
7.0 MENU AND PICTURE SETTING
*TEST PATTERN MENU
Press the [ENTER] button to switch to the test pattern image. Press the [ENTER] or [TEST] button to alter the test
pattern to be projected. Press the [EXIT] button to clear the menu screen.Press the [EXIT] button again to clear the
test pattern.
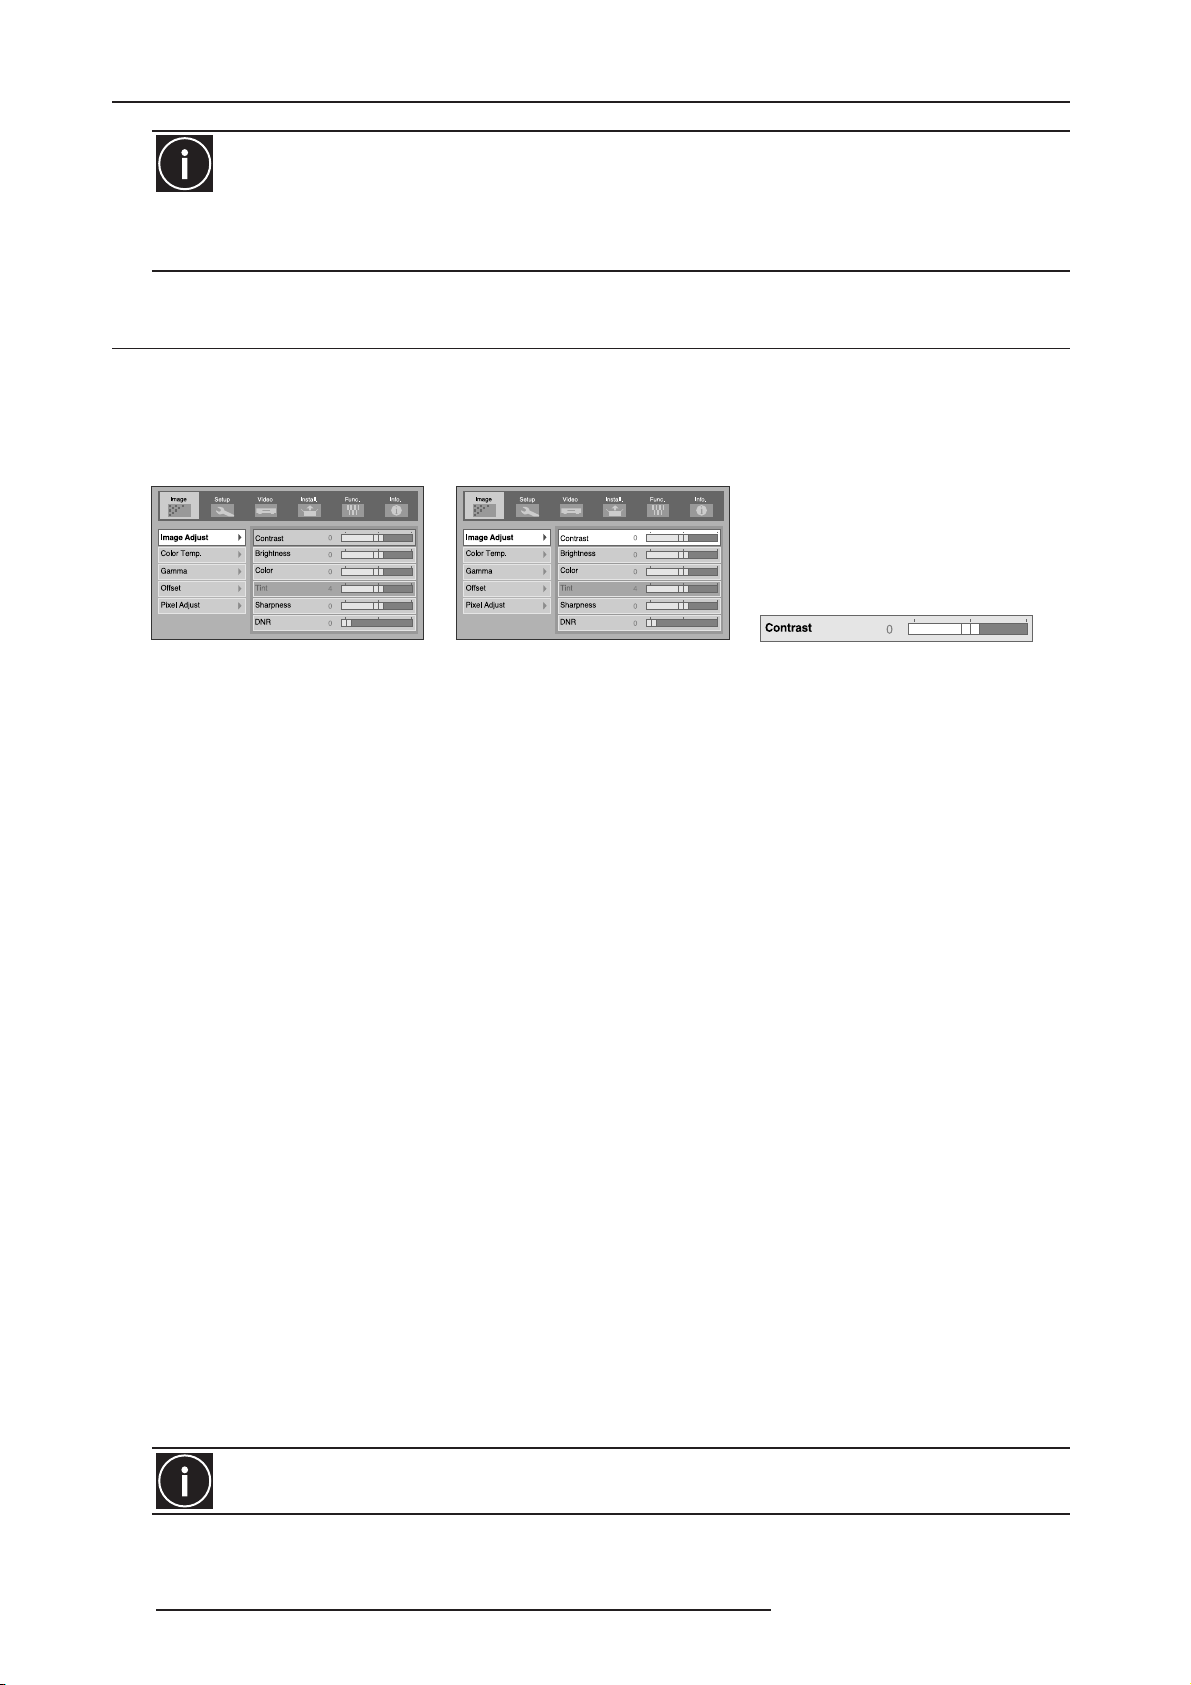
7.3 Image Menu
Contrast
The contrast function is used to adjust the contrast between the light and dark areas of the displayed image. A
correct contrast setting is important for good image reproduction. Adjust the Contrast value between -30 and +30.
Enter Image Adjust Menu Select Contrast tab Set a Value between -30 and +30
Brightness
The brightness function is used to adjust the overall light output. Adjust the Brightness value between -30 and +30.
⇒⇒
MENU
⇒⇒
Image ⇒⇒⇒⇒ Image Adjust ⇒⇒⇒⇒ Brightness
Color
The Color function (or Saturation) is used to adjust the color saturation levels. Adjust the Color value between -30
and +30.
⇒⇒
MENU
⇒⇒
Image ⇒⇒⇒⇒ Image Adjust ⇒⇒⇒⇒ Color
Tint
The Tint function is used to adjust the color hue to obtain true color reproduction and is only active for NTSC
sources on Video and S-Video inputs. Adjust the Tint value between -30 (more red) and +30 (more green).
⇒⇒
MENU
⇒⇒
Image ⇒⇒⇒⇒ Image Adjust ⇒⇒⇒⇒ Tint
Sharpness
The Sharpness function is used to adjust the image sharpness of the picture. Adjust the Sharpness value between
-30 (soft) and +30 (sharp).
⇒⇒
MENU
⇒⇒
Image ⇒⇒⇒⇒ Image Adjust ⇒⇒⇒⇒ Sharpness
DNR
The DNR function (Digital Noise Reduction) is used to reduce digital noise on the picture. Adjust the DNR value
between 0 (low) and +30 (high).
⇒⇒
MENU
⇒⇒
Image ⇒⇒⇒⇒ Image Adjust ⇒⇒⇒⇒ DNR
Color Temp.
Color temperature can be set to Low, Middle, High, User 1 or User 2. (User 1 and 2 allows a fine adjustment of the
values for red, green, and blue channels).
Color temperature stands for the spectral properties of a light source. Low color temperature implies warmer (more
yellow/red) light while high color temperature implies a colder (more blue) light.
The User settings allow a manual configuration of each primary color Red, Green and Blue from -255 to 0.
Accurate picture calibrations may require professional tools such as dedicated software and colormeter.
28 R699740 - DreamBee User Manual
Page 29

7.0 MENU AND PICTURE SETTING
Gamma
Gamma is the relationship between the color values of the data and the color values displayed. The Gamma
coefficient makes it possible to adjust the brightness of the midtones only without affecting the very bright and very
dark areas. If gamma is set too high, middle tones appear too dark. If it's set too low, middle tones appear too light.
The Gamma correction factor can be set to Normal, A, B or C.
⇒⇒
MENU
⇒⇒
Image ⇒⇒⇒⇒ Gamma
Offset
The Offset function is used to adjust the black level. Adjust the Offset values for each color channel between -30
and +30 (red, blue and green).
⇒⇒
MENU
⇒⇒
Image ⇒⇒⇒⇒ Offset ⇒⇒⇒⇒ red / blue / green
Pixel Adjust
The pixel adjust can fine-tune the overall image position and the panel alignments up to +/- 3 pixels horizontally and
+/- 2 pixels vertically. Modifying the optical lens shift may require a pixel adjustment.
⇒⇒
MENU
⇒⇒
Image ⇒⇒⇒⇒ Pixel Adjust
7.4 Setup Menu
Image Profile
An Image Profile defines a set of values that customize a picture setting. These values are stored into memory in
Cinema, Natural Dynamic, User 1, User 2 and User 3 Image Profiles. The following parameters can be adjusted and
memorized:
• Contrast
•Brightness
• Color
• Sharpness
• DNR
• Color Temp.
• Gamma
• Offset
See “Custom Image Profile”, page 30 for more details.
Profile Memory
Profile memory menu is used to save, clear or reset an Image Profile stored into memory. See “Custom Image
Profile”, page 30 for more details.
Picture Position
Picture Shift setting
When projecting images with black bands at the top and bottom (cinema image), use this to move the image up or
down while retaining one of the black bands at the upper or lower end. The default value is 0 (Off) and can be set
from -30 Screen Masking
Mask adjustment affects only the edges of the projected image and are used to frame the projected image on to the
screen and to hide or black out unwanted information and noise. The masking can be set to 0% (off), 2.5% or 5%).
⇒⇒
MENU
⇒⇒
Setup ⇒⇒⇒⇒ Picture Position
HDMI Input Level
The HDMI input level function is used to setup the HDMI 1 and HDMI 2 input terminals. It can be set to:
• Standard, for normal circumstances, typically using a video source with HDMI output.
• Enhanced. select this setting when the black and white of the picture is unclear with RGB video signals from DVI
devices.
⇒⇒
⇒⇒
MENU
Setup ⇒⇒⇒⇒ HDMI Input Level ⇒⇒⇒⇒ Standard / Enhanced
R699740 - DreamBee User Manual 29
Page 30

7.0 MENU AND PICTURE SETTING
Mask
The Mask function is used to hide the outer area of the picture. Adjust the Mask value between 0%, 2,5% and 5%.
⇒⇒
MENU
⇒⇒
Setup ⇒⇒⇒⇒ Mask ⇒⇒⇒⇒ Off, 2,5% or 5%
7.5 Custom Image Profile
You can adjust the projected image to a desired image quality and save the adjusted values into the Image profile
Menu. Besides the default “Cinema”, “Natural” and “Dynamic” settings, there are 3 more types of user-defined
settings for image profile.
Parameters stored into an Image Profile
An Image Profile defines a set of values that customize a picture setting. These values can be stored into memory
in User 1, User 2 and User 3 Image Profiles. The following parameters can be adjusted and memorized:
• Contrast
•Brightness
• Color
• Sharpness
• DNR
• Color Temp.
• Gamma
• Offset
Setting a new Image Profile
• Select a Preset Image Profile
⇒⇒
⇒⇒
MENU
• Go to Image Adjust Menu and modify the Contrast / Brightness / Color / Sharpness / DNR / Color Temp. /
Gamma and Offset values to your convenience.
MENU
MENU
MENU
MENU
MENU
MENU
MENU
MENU
•Save these values into a User Profile, by example User 1:
MENU
• If you want to reset the Preset Image Profiles (Cinema, Natural and Dynamic), you can reset to default values
through the Profile Memory Menu.
MENU
MENU
MENU
Setup ⇒⇒⇒⇒ Image Profile ⇒⇒⇒⇒ Cinema
⇒⇒
⇒⇒
Image ⇒⇒⇒⇒ Image Adjust ⇒⇒⇒⇒ Contrast ⇒⇒⇒⇒ set a value between -30 and +30
⇒⇒
⇒⇒
Image ⇒⇒⇒⇒ Image Adjust ⇒⇒⇒⇒ Brightness ⇒⇒⇒⇒ set a value between -30 and +30
⇒⇒
⇒⇒
Image ⇒⇒⇒⇒ Image Adjust ⇒⇒⇒⇒ Color ⇒⇒⇒⇒ set a value between -30 and +30
⇒⇒
⇒⇒
Image ⇒⇒⇒⇒ Image Adjust ⇒⇒⇒⇒ Sharpness ⇒⇒⇒⇒ set a value between -30 and +30
⇒⇒
⇒⇒
Image ⇒⇒⇒⇒ Image Adjust ⇒⇒⇒⇒ DNR ⇒⇒⇒⇒ set a value between 0 and +30
⇒⇒
⇒⇒
Image ⇒⇒⇒⇒ Color Temp. ⇒⇒⇒⇒ set a value between -255 and 0 for each color
⇒⇒
⇒⇒
Image ⇒⇒⇒⇒ Gamma ⇒⇒⇒⇒ set to Normal / A / B or C
⇒⇒
⇒⇒
Image ⇒⇒⇒⇒ Offset ⇒⇒⇒⇒ set a value between -30 and +30 for each color
⇒⇒
⇒⇒
Setup ⇒⇒⇒⇒ Profile Memory ⇒⇒⇒⇒ Save User 1
⇒⇒
⇒⇒
Profile Memory ⇒⇒⇒⇒ Reset Cinema
⇒⇒
⇒⇒
Profile Memory ⇒⇒⇒⇒ Reset Natural
⇒⇒
⇒⇒
Profile Memory ⇒⇒⇒⇒ Reset Dynamic
You can set up to 6 profiles: Cinema, Natural, Dynamic, User 1, User 2 and User 3. The Image Profile can
be directly accessed with the Remote Control Unit buttons.
7.6 Video Menu
COMP
30 R699740 - DreamBee User Manual
Page 31

7.0 MENU AND PICTURE SETTING
The COMP function is used to configure the input signal of the Component Input terminal.
•Y Pb/Cb Pr/Cr to be selected when a component video signal is input.
• RGB to be selected when a RGB video signal is input.
• SCART to be selected when a RGB video signal with Sync signal is input. Typically from a video source
equipped with a SCART output. (European market)
HDMI Color Space
The HDMI function is used to define the active color space of the HDMI input.
•Auto, Configure the color space automatically
• YCbCr(4:4:4) for a video source with YCbCr 4:4:4 color encoding.
• YCbCr(4:2:2) for a video source with YCbCr 4:2:2 color encoding.
• RGB for a video source with RGB color encoding.
Aspect
The Aspect function can stretch the picture on the screen.
• 4:3 sets the screen size of the picture into a 4:3 image.
• 16:9 set the screen size of the picture to 16:9
• Zoom enlarge the picture vertically to fill the screen
Film Mode
The Film Mode function can detect the video cadence of film based video. This function can be switch off.
•Auto, for normal circumstances
• Off, switch the Film Mode Off when you are not watching movies shot on film
Color System
The Color System function is available for S-Video and Video inputs. This function is used to configure the color
system to be used. Adjust the Color System value to Auto / NTSC / NTSC4,43 / PAL / PAL-M / PAL-N / SECAM.
Black Level
The Black Level function enhances the black level of NTSC sources on S-Video and Video inputs. Adjust its value to
0% or 7,5%.
7.7 Install Menu
Menu Position
Sets the On Screen Menu position.
Menu Display
Sets the duration for displaying the Menu.
• 15 sec.
•On
Line Display
Sets whether to display the input when switching input.
•5 sec. Displays the selected input during 5 seconds after switching.
• Off, the active input is not displayed.
Flip H.
Set Flip H. On if the unit is used for rear projection.
Flip V.
Set Flip V. On if the unit is installed in ceiling position.
High Altitude
Set High Altitude On when using the unit at low atmospheric pressure, typically higher than 900 meters above sea
R699740 - DreamBee User Manual 31
Page 32

7.0 MENU AND PICTURE SETTING
level.
7.8 Function Menu
Back Color
Configures the screen color displayed when there is no signal input.
• Blue
• Black
Sleep Timer
The Sleep Timer function is used to automatically switch Off the unit when there is no active video signal. Adjust the
value between 15 minutes, 30 minutes, 60 minutes and Off.
D-ILA Logo
This function is used to display the D-ILA logo during the startup or not. Setting this function to On will display for 5
seconds the D-ILA Logo during the startup.
•On
• Off
Lamp Power
The Lamp Power function is used to configure the light output of the lamp.
• Normal, for normal circumstances the lamp is set to 170W.
• High, for bright rooms: sets the lamp to 200W.
Test Pattern
Use the 6 test patterns to adjust the focus, zoom, screen size or position.
NOTICE
The projector internal test patterns are intended to be used only for low level calibration and debugging such as
panel alignments, table/ceiling-mounting or troubleshooting. It is recommended to use a video switch with advanced
calibration tools to get a perfect calibration on every video source.
Language
Choose the language of the On Screen Display Menu between Japanese, English, German, Spanish, Italian,
French, Portuguese, Dutch, Swedish, Norwegian and Chinese (simplified).
7.9 Information Menu
Input
Displays the active video input.
Source
Displays the type of the current input video signal.
Lamp Time
Displays the accumulated hours of usage of the lamp.
32 R699740 - DreamBee User Manual
Page 33

8.0 MAINTENANCE
8.0 MAINTENANCE
8.1 Clean Dirt on the Cabinet
Always use a soft cloth. In case of heavy soiling, soak a cloth in neutral detergent diluted with water, wring dry and
wipe, followed by wiping again using a dry cloth.
Caution
Pay attention to the following as the cabinet may deteriorate in condition, get damaged or paint may come
off.
• Do not wipe with a stiff cloth.
• Do not wipe with force.
• Do not wipe with thinner or benzene.
• Do not spray volatile chemicals like insecticide.
• Do not allow prolonged contact with rubber or plastic products.
8.2 Dirt on the Lens
The lens shall be cleaned using commercial blowers or lens cleaning papers (for cleaning glasses and cameras).
Do not use fluid-type cleaning agents. This may lead to peeling of the surface coating film. The lens surface is
fragile. Avoid rubbing it hard or knocking.
8.3 Replacing the Lamp
Light-source Lamp and Lamp Usage Time
The life of light-source lamps used for this unit is about 2000 hours.
• The lamp life of 2000 hours is merely the average life span of light-source lamps and we do not provide any
guarantee for this figure. The lamp life may not reach 2000 hours depending on the operating conditions.
Deterioration progresses rapidly when the remaining lamp usage time is short. Get ready or replace with a new
lamp when the accumulated usage time exceeds 1900 hours. Depending on the operating conditions, the lamp
may have to be exchanged earlier.
If the image is dark or color tone abnormal, replace the lamp as soon as possible.
•You can also check the accumulated hours of usage. Please refer to Lamp Time of the Information menu.
• Setting Power Save of the Options menu to On does not affect the usage time of the light-source lamp.
Please consult your authorized dealer when purchasing a new lamp unit.
When the lamp usage time exceeds 1900 hours (but less than 2000 hours
The [LAMP] indicator lights On orange and the Lamp replacement message will be displayed on the screen when
projection starts.
• The message can be cleared by pressing any button on the remote control or this unit.
When the lamp usage time exceeds 2000 hours
The [LAMP] indicator lights On orange and the Lamp replacement message will be displayed on the screen when
projection starts and the Warning mark will appear blinking.
• Press the [EXIT] button to clear the display. However, the same Warning and Lamp replacement messages will
be displayed after 1 hour.
• When the unit is switched to the standby mode or turned off after the lamp usage time exceeds 2000 hours, it
cannot be switched back to the projection mode again. In this case, replace with a new lamp and reset the lamp
time.
• The projection mode (operating mode) cannot be restored until a new lamp is replaced and the lamp time reset.
R699740 - DreamBee User Manual 33
Page 34
8.0 MAINTENANCE
ABOUT LAMP REPLACEMENT
If this unit is installed in a constricted place, attempting to replace the lamp in that place may cause injury. Move this
unit to a place large enough to perform work.
Use only genuine replacement parts for the lamp unit. Otherwise, malfunction may occur. Also, never attempt to reuse an old lamp unit. This may cause marked performance deterioration or lamp blowout, thus leading to unit
malfunction. Broken pieces of the lamp outside this unit may also cause injuries during lamp unit exchange.
Do not replace the lamp immediately after this unit has been used. The temperature of the lamp is still high and this
may cause a burn. Allow a cooling period of 1 hour or more before replacement.
Before replacing the lamp unit, pull out the power plug from the outlet while the [STANDBY/ON] indicator is still light
red. Replacing a lamp with the plug connected to the outlet may cause injuries or electric shocks.
Procedure for Lamp Replacement
During the lamp replacement process, you may have access to sensitive parts of the projector.
• Open the lamp Cover, on the side of the projector.
• Loosen the 2 screws on the lamp unit and lift up the handle.
• Pull out the lamp unit.
• Insert the new lamp unit until it is fully in.
• Tighten the screws of the lamp unit and close the handle.
• Attach the lamp cover and fasten the screw.
Resetting Lamp Time
After installing a new lamp, reset the lamp time. The lamp time counter will be reset and a new count
will start.
up) unless the lamp time is reset.
a) Insert plug into the power outlet
The main power turns on and the [STANDBY/ON] indicator on the unit lights up.
b) Press the [EXIT], [ENTER] and [HIDE] buttons sequentially, then press the [DOWN] button for 2 seconds or
more.
• The [STANDBY/ON] indicator will alternately blink for a duration of about 3 seconds each. After blinking stops,
If the accumulated lamp time has reached 2000 hours, this unit will not work (lamp does not light
lamp time resets and the unit returns to the standby mode ([STANDBY/ON] indicator lights up red).
TO ENSURE THE LAMP TIME HAS BEEN RESET
The lamp time can be checked via the Lamp Time item of the Information menu.
CAUTION DURING RESET WORK
Reset the lamp time only when you have replaced the lamp.
Never reset it when the lamp is still in use.
Otherwise, the approximate standard for gauging replacement time may be inaccurate, lamp performance may
deteriorate and lamp blowout may occur.
8.4 Cleaning and Replacing the Dust Filter
The filter must be cleaned regularly to allow an efficient air intake. If the filter is extremely dirty and cannot
be cleaned, or if it is damaged, replace the filter with a new one. Otherwise, dirt may enter the unit and
appear on the screen, preventing you from enjoying the video fully. If dirt has entered the unit or if you need
information about the filter, please consult your authorized dealer.
Pull out the plug from the power outlet
Pull out the power plug from the outlet while the [STANDBY/ON] indicator is still on.
Remove the inner filter
Push up and lift the claw at the base of the inner filter, followed by drawing out the filter.
34 R699740 - DreamBee User Manual
Page 35
8.0 MAINTENANCE
Clean the filter
Clean the filter with water and dry it, avoiding direct sunlight. In extremely soiled cases, use of a neutral detergent is
recommended.
Reinstall the inner filter
Check that the 2 claws at the left and right of the inner filter are locked to this unit.
8.5 Troubleshooting
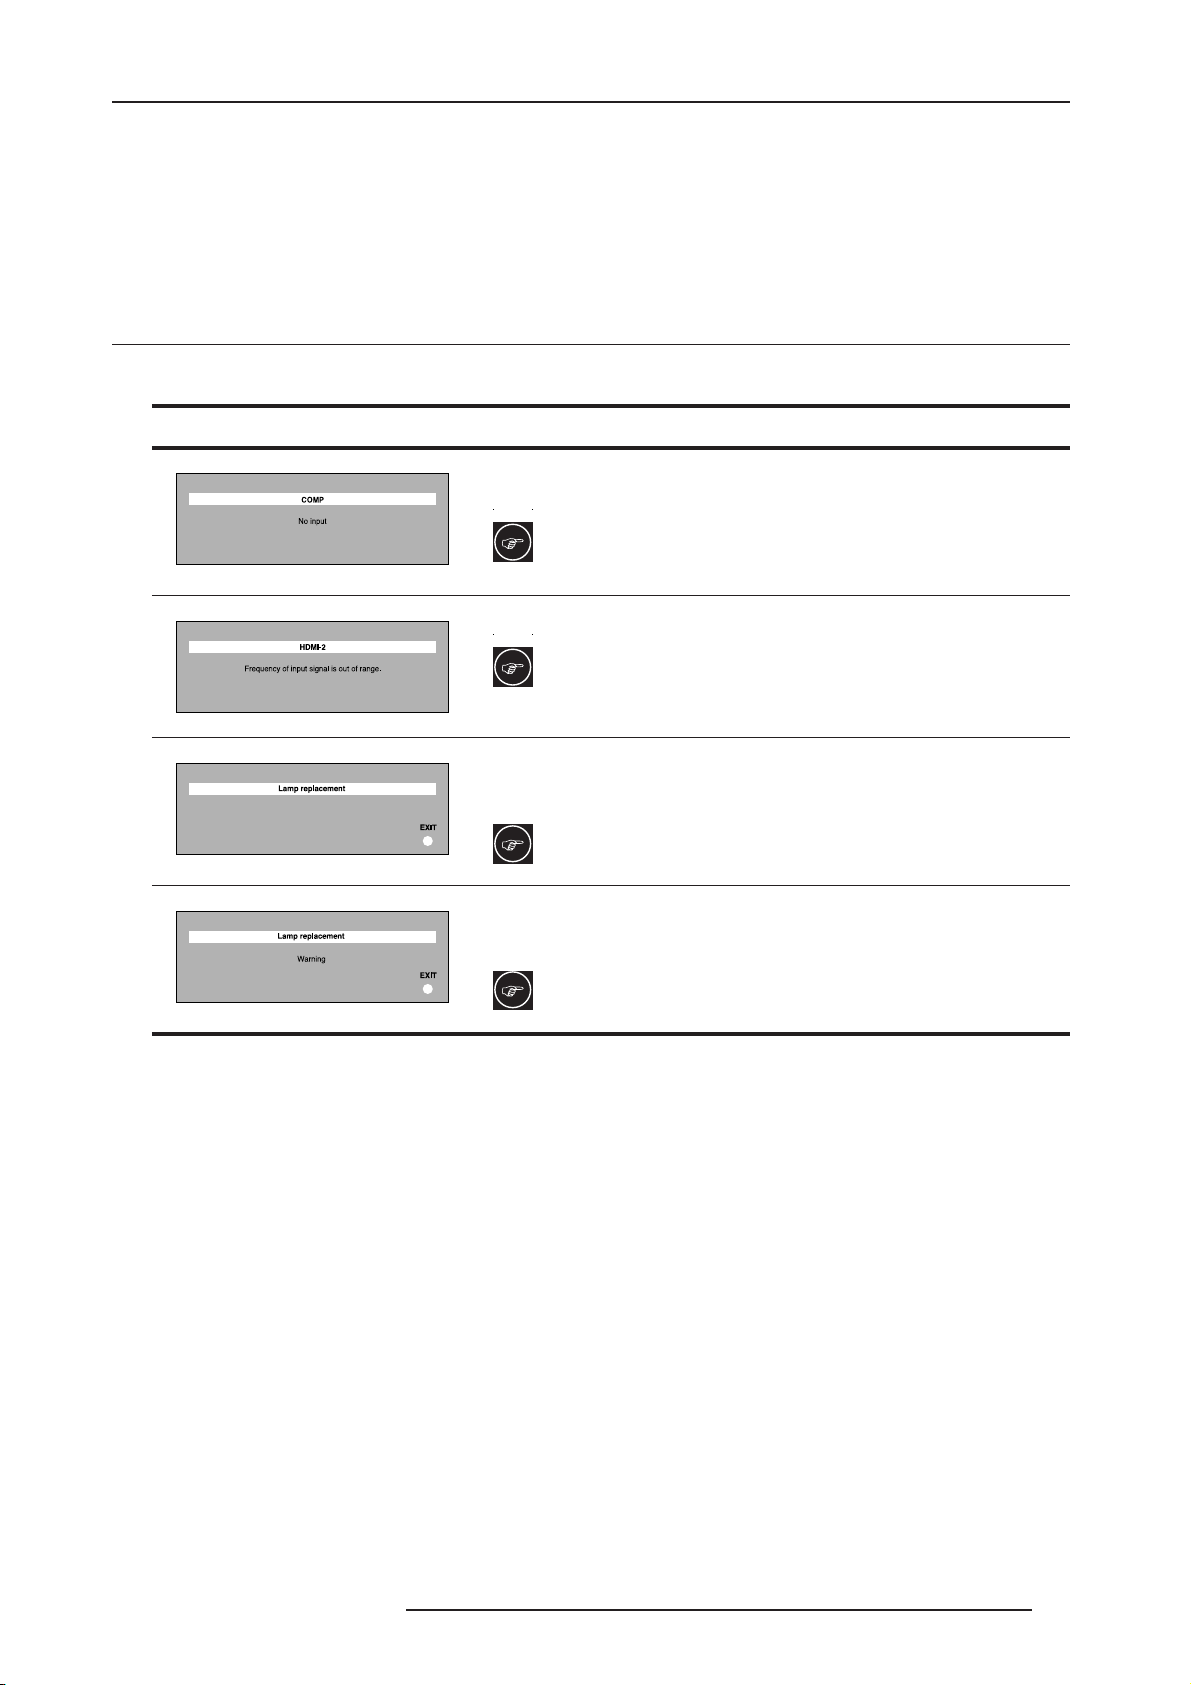
On Screen Warnings
MESSAGE CAUSE DETAIL
No device is connected to the Input terminal. The terminal is
connected but there is no signal.
Input a video signal.
A video signal that cannot be used with this unit has been input.
Input a compatible video signal.
The message is displayed when the accumulated lamp time reaches
1900 hours. The message can be cleared by pressing the [EXIT]
button.
Get ready a new lamp in advance or replace as soon as
possible.
The message will be displayed with the Warning word when the
accumulated lamp time exceeds 2000 hours. The message can be
cleared by pressing the [EXIT] button.
Install a new lamp and reset the lamp time. see “Procedure
for Lamp Replacement”, page 34.
R699740 - DreamBee User Manual 35
Page 36
8.0 MAINTENANCE
LED Warning
If abnormality occurs in this unit during projection, the warning LED will light On, and the type of abnormality will be
indicated by a combination of indicators at the rear of this unit.
When the unit enters in Warning Mode, it will automatically stop projection and run the cooling fan for about
60 seconds.
OPERATING LED
No.
STANDBY/ON LAMP WARNING
1 - Light On - Lamp time exceeds 1900 hours.
SIGNIFICATION
2 - Light On -
3 - Blinking Light On Lamp error during startup.
4 - Blinking Light On Lamp error during projection.
5 - - Light On Microprocessor circuit error.
6 - - Light On Drive circuit error.
7 - Blinking Light On Lamp cover is removed.
8 - - Light On Internal temperature is too high.
9 - - Light On External temperature is too high.
10 - - Light On Cooling Fan speed error.
Actions to be taken upon warning indications
No. SIGNIFICATION ACTIONS TO BE TAKEN
1 Lamp time exceeds 1900 hours. Get prepared a new lamp for replacement.
Lamp time exceeds 2000 hours and need
2
replacement.
Lamp time exceeds 2000 hours and need
replacement.
Replace the lamp with a new one, see “Procedure for
Lamp Replacement”, page 34.
3 Lamp error during startup. Tu rn ON the power again.
4 Lamp error during projection.
5 Microprocessor circuit error. Tu rn ON the power again.
6 Drive circuit error. Tu rn ON the power again.
7 Lamp cover is removed.
8 Internal temperature is too high.
9 External temperature is too high.
10 Cooling Fan speed error.
Check that an impact shock has not occurred during
projection, then turn ON again.
Check that the lamp unit and lamp cover are correctly
installed and turn ON the power.
Check that nothing is blocking the air inlets and leave
the unit until it cool down. Then turn ON the power.
Check that the external temperature is normal and
leave the unit until it cools down. After that, turn ON
the power again.
Leave the unit until it cools down, then turn ON the
power again.
36 R699740 - DreamBee User Manual
Page 37
Before sending the projector to repair
Symptom Probable Cause Corrective Action
Is the power cord disconnected? Insert the power cord, see page 18.
Remove the plug when the [STANDBY/ON]
LED is light On red. Close the lamp cover
properly and insert the plug again.
Remove the plug when the [STANDBY/ON]
indicator is light On red. Install a new lamp.
Upon doing so, insert the plug. Reset the
lamp time after installing a new lamp.
Check the lamp usage time on the
Information Menu. Prepare a new lamp or
replace as soon as possible when the lamp
is near exhaustion.
Reset the current Image Profile settings to
default values. See “Custom Image Profile”,
page 30 for details.
Remove the plug when the [STANDBY/ON]
indicator is light On red. Remove any
blocking object that could prevent the
normal air flow. See “Air-Flow and Space
Requirements”, page 11.
Power is not
supplied
Projected image
is too dark
Unit works but
stops abruptly
after a few
minutes
Is the lamp cover properly shut?
Has the lamp life expired (has the lamp
usage time reached 2000 hours)?
Is the lamp near exhaustion?
Have the Picture settings been modified?
Are the air suction openings (air inlets) and
exhaust vents blocked?
Are the filters dirty? Clean the filters.
8.0 MAINTENANCE
No Picture on
the screen
Video image is
fuzzy.
Video images
are missing
Remote control
unit does not
work
Are the video devices properly connected? Connect the devices correctly.
Is the lens cap removed? Remove the lens cap.
Is the video image temporarily turned off
when the [HIDE] button is being pressed?
Is the focus correctly adjusted? Adjust accordingly using the focus button.
Is the unit placed too near or too far away
from the screen?
Has setting been performed for screen
mask?
Has setting been performed for picture
shift?
Are batteries installed correctly?
Are batteries exhausted? Replace with new batteries.
Is there an obstructive object between the
remote control unit and remote sensor?
Is the remote control held too far away from
the sensor?
Press the [HIDE] button to display the video
image again.
Set the unit at a correct distance from the
screen.
Set the Mask setting of the Setup menu to
Off.
Check in the Setup Menu that the picture
position is correctly set and that there is no
picture portion missing.
Match the polarities (+ or -) correctly when
inserting the batteries.
Remove any obstructive objects.
Hold the remote control closer to the sensor
when using.
This unit uses a microcomputer. External noise may cause it to malfunction. If this happens, turn off the
power and remove the plug from the power outlet. Insert plug again into the outlet and check operation of
the unit.
R699740 - DreamBee User Manual 37
Page 38
9.0 MISCELLANEOUS
9.0 MISCELLANEOUS
9.1 RS-232C input
Pin Assignment
15
69
Pin No. Signal Name Pin No. Signal Name
1 N/C 6 N/C
2 RD 7 N/C
3 TD 8 N/C
4 N/C 9 N/C
5 GND
External Control
Control of this unit is possible via a computer by connecting this unit to an automation device or computer with a
RS-232C cross cable (D-sub 9 pins). The commands to control this unit and the response data format against the
received commands are explained here.
Communication Specifications
Communication specifications for this unit are as follows:
Baud Rate 19200 bps
Data Format Binary
Character Length 8 bits
Parity None
Start Bit 1 bit
Stop Bit 1 bit
Flow Control None
Command Format
When sending a command to this unit, use the following data format:
Header Proj. ID Command Com. Parameters LF
1 byte 2 bytes 2 bytes Va riable length: 0, 1 or 4 bytes 1 byte
Header : Designates the Command type. 2 possible headers:
! (21h): Assigns command to the projector (Command)
? (3Fh): Query data from the projector (Asking command)
Proj. ID : Designates the Projector Identification. Fixed to 89h 01h.
Command : Designates command.
Com. Parameters : Designates the command parameters. Variable length from 0 to 4 bytes.
LF : Designates the end of the data. Fixed to Line Feed (0Ah)
*[ ] is not necessary
[ ]
Response data format
Upon receiving a valid control command, the unit sends back the following response data to the computer to
38 R699740 - DreamBee User Manual
Page 39

9.0 MISCELLANEOUS
confirm the command: this command is sent to the computer.
Header Proj. ID Command Received Data LF
1 byte 2 bytes 2 bytes 0 or 1 byte 1 byte
Header : Designates the header of the projector answer, 2 possible headers:
Ack (06h): Acknowledgement of valid Command
@ (40h): Response to a Query data from projector (Asking command)
Proj. ID : Designates the Projector Identification. Fixed to 89h 01h
Command Received : Copy the command received (should be the same as the command sent)
Data : Available only if the command received is a Asking Command.
LF : Designates the end of the data. Fixed to Line Feed (0Ah)
Available Commands and Parameters
a) Commands
Command
Header (21h)
Connection Check 00h 00h none Checks whether communication between the
Power ON/OFF 50h 57h 31h If the projector is in standby mode, this command
Switch Input 49h 50h 30h Switch active input to S-Video
Emulate RCU 52h 43h xxh xxh xxh xxh The command sent is executed as a Remote
ASCII code Parameters Description
projector and the computer is working
switch this unit ON.
30h If the projector is powered ON, this command
switch this unit into Standby Mode.
31h Switch active input to Video
32h Switch active input to Comp.
36h Switch active input to HDMI 1
37h Switch active input to HDMI 2
Control Unit command. (See below the RCU
Command list and Parameters)
b) Emulate Remote Control Unit Commands (4 bytes)
To emulate a command sent by the RCU, you should send the following command:
Header: 21h Proj. ID: 89h 01h Command: 52h 43h Parameters: 4 bytes
Choose the correct Parameters listed below according to the command
Remote Control Button name Parameters / ASCII IR codes
Up button 37h 33h 30h 31h
Down button 37h 33h 30h 32h
EXIT 37h 33h 30h 33h
Operate ON 37h 33h 30h 35h
Operate Off 37h 33h 30h 36h
HIDE 37h 33h 31h 44h
MENU 37h 33h 32h 45h
ENTER 37h 33h 32h 46h
Right button 37h 33h 33h 34h
Left button 37h 33h 33h 36h
VIDEO 37h 33h 34h 42h
S-VIDEO 37h 33h 34h 43h
R699740 - DreamBee User Manual 39
Page 40
9.0 MISCELLANEOUS
COMP. 37h 33h 34h 44h
TEST 37h 33h 35h 39h
Cinema 37h 33h 36h 39h
Natural 37h 33h 36h 41h
Dynamic 37h 33h 36h 42h
User 1 37h 33h 36h 43h
User 2 37h 33h 36h 44h
User 3 37h 33h 36h 45h
HDMI 1 37h 33h 37h 30h
HDMI 2 37h 33h 37h 31h
INFO 37h 33h 37h 34h
GAMMA 37h 33h 37h 35h
Color Temp. 37h 33h 37h 36h
Aspect 37h 33h 37h 37h
Contrast (+) 37h 33h 37h 38h
Contrast (-) 37h 33h 37h 39h
Brightness (+) 37h 33h 37h 41h
Brightness (-) 37h 33h 37h 42h
Color (+) 37h 33h 37h 43h
Color (-) 37h 33h 37h 44h
Sharp (+) 37h 33h 37h 45h
Sharp (-) 37h 33h 37h 46h
Example:
To emulate Brightness (+), send the command: 21h 89h 01h 52h 43h 37h 33h 37h 41h 0Ah
c) Asking Commands and Data sent by the projector
Asking Command
Header (3Fh)
Power state 50h 57h 30h The projector indicates that it is in Standby Mode.
Active Input 49h 50h 30h Indicates that the S-Video Input is the Active Input
d) Examples
You want to... Command (PC -> Projector) Response Data (Projector -> PC)
Check the connection between
the projector and the computer
Switch the projector ON 21h 89h 01h 50h 57h 31h 0Ah ACK: 06h 89h 01h 50h 57h 0Ah
Switch the projector OFF 21h 89h 01h 50h 57h 30h 0Ah ACK: 06h 89h 01h 50h 57h 0Ah
Switch the projector OFF with
OSD confirmation
(Emulate RCU)
Change Active Input to Comp. 21h 89h 01h 49h 50h 32h 0Ah ACK: 06h 89h 01h 49h 50h 0Ah
Display On Screen Menu
(Emulate RCU)
Ask the projector its power state
The projector being powered ON
Ask the projector its Active Input
S-Video being active
ASCII code Data sent to PC Description
31h The projector indicates that it is in Power ON Mode.
32h The projector indicates that it is in Cool Down Mode.
34h The projector indicates that it is in Warning Mode.
31h Indicates that the Video Input is the Active Input
32h Indicates that the Comp. Input is the Active Input
36h Indicates that the HDMI 1 Input is the Active Input
37h Indicates that the HDMI 2 Input is the Active Input
21h 89h 01h 00h 00h 0Ah ACK: 06h 89h 01h 00h 00h 0Ah
21h 89h 01h 52h 43h 37h 33h 30h 36h 0Ah ACK: 06h 89h 01h 52h 43h 0Ah
21h 89h 01h 52h 43h 37h 33h 32h 45h 0Ah ACK: 06h 89h 01h 52h 43h 0Ah
3Fh 89h 01h 50h 57h 0Ah
3Fh 89h 01h 49h 50h 0Ah
ACK: 06h 89h 01h 50h 57h 0Ah
Rsp : 40h 89h 01h 50h 57h 31h 0Ah
ACK: 06h 89h 01h 49h 50h 0Ah
Rsp : 40h 89h 01h 49h 50h 30h 0Ah
40 R699740 - DreamBee User Manual
Page 41

9.0 MISCELLANEOUS
9.2 Specifications
Overview
The DreamBee uses the latest technology developed for professional projectors. The D-ILA is the abbreviation for
Direct drive Image Light Amplifier. D-ILA devices are manufactured using extremely high-precision technology.
Emission Method D-ILA (Reflective Active Matrix Principle)
Display Panel/Size 0.7" D-ILA 4 ms True Motion panel
Native Resolution 3x 1920 x 1080 pixels
Native Contrast Ratio 20,000:1
Projection Lens Throw Ratio 1.4:1 - 2.8:1
2.0x Lens: manual zoom and focus
Brightness 1000 ANSI Lumens
Light-source Lamp 200 W Ultra-high pressure mercury lamp (Ref. No. Rxxx ref lamp)
Screen Size 50" to 250" (Aspect ratio 16:9)
Distance range from1,52 m to 12 m
Input Signals
Video Input NTSC, PAL, SECAM
S-Video Input NTSC, PAL, SECAM
Component Input (YPbPr, RGB and RGsB) 480i/p, 576i/p, 720p50/60, 1080i50/60
HDMI 1 Input 480i/p, 576i/p, 720p50/60, 1080i50/60, 1080p24/50/60
HDMI 2 Input 480i/p, 576i/p, 720p50/60, 1080i50/60, 1080p24/50/60
Color System NTSC, NTSC4.43, PAL, PAL-N, PAL-M, SECAM
Input Sync Frequency
Analog Inputs 74.5 Mhz
Digital Inputs 148,5 Mhz
Power Requirements AC 100 V - 240 V AC, 50 Hz/60 Hz
Power Consumption 280W (2.7W in standby mode)
Operation Environment Te mperature: +5°C to +35°C
Storage Temperature: -10°C to +60°C
Humidity: 20 % to 80 % (No condensation)
Dimensions
(Width x Height x Depth)
Net Weight 11,0 Kg - 24.5 lbs
585 x 205 x 470 mm - 23.0" x 18.5" x 8.0"
(Excluding lens and protrusion portion)
• Design and specifications are subject to change without prior notice.
• Please note that some of the pictures and illustrations may have been abridged, enlarged or contextualized in
order to aid comprehension. Images may differ from the actual product.
D-ILA
D-ILA is the abbreviation for Direct drive Image Light Amplifier. D-ILA devices are the newest display technology for
projection devices, based on reflective L-COS technology. The manufacturing process features a pixel effectiveness
of 99,99% and the fill factor obtained is above 93%.
R699740 - DreamBee User Manual 41
Page 42

9.0 MISCELLANEOUS
Dimensions
205 mm 8.0’’
18.5’’
470 mm
585 mm
23.0’’
585 mm
23.0’’
470 mm
18.5’’
42 R699740 - DreamBee User Manual
Page 43

Contact Information:
TEC - DreamVision
7, rue La CAILLE, 75017 Paris - FRANCE
Phone: +33 1 42 29 44 44, Fax: +33 1 42 29 09 10
e-mail : sales@dreamvision.net, Web: www.dreamvision.net
R699740 - DreamBee User Manual
Page 44

 Loading...