

Page 1

CONTENTS
1.
2.
3.
4.
5.
6.
7.
8.
Before you start.........................................................................................2
Important information...............................................................................5
Connecting a computer to the DreamVision DL500..............................6
Connecting a video source to the DreamVision DL500......................10
Connecting a TV-source to the DreamVision DL500 ..........................12
Using the DreamVision DL500 ..............................................................14
Using the menus .....................................................................................19
Maintenance ............................................................................................33
9.
10.
1
What do I do if (Trouble shooting).........................................................34
Limited Warranty, ‘FCC Statement’ and ‘Trademarks Copyright’ ........36
Page 1
Page 2

1 Before you start
Thank you for choosing the
DreamVision DL500 projector
The DreamVision DL500 will display high brightness
images with vivid colors, even under normal light conditions. As input for your presentation you can use CD-I,
(ask your dealer for the DreamVision CD-I player) CDROM, Photo CDs, Laser Disks, DVD, normal VCRs or
computers. You can have multiple input connected
simultaneously for high impact multimedia presentation.
Thanks to the unique DreamVision Graphical User
Interface, the DreamVision DL500 offers true plug and
play operation from remote control, which by the way
also can control your computer.
1.1 Color coding for ease of use
All connectors, plugs and buttons on the product are
colored to make the connection and use as easy and
intuitive as possible. The following colors are used:
◆ Computer - gray (PC) /black (MAC OPTIONAL)
◆ TV/channel - purple
◆ Video (Composite) - yellow
◆ S-video - dark blue
◆ Stand by - red
◆ Auto setup - green
◆ Audio - red/white
2
Contents
Page 3

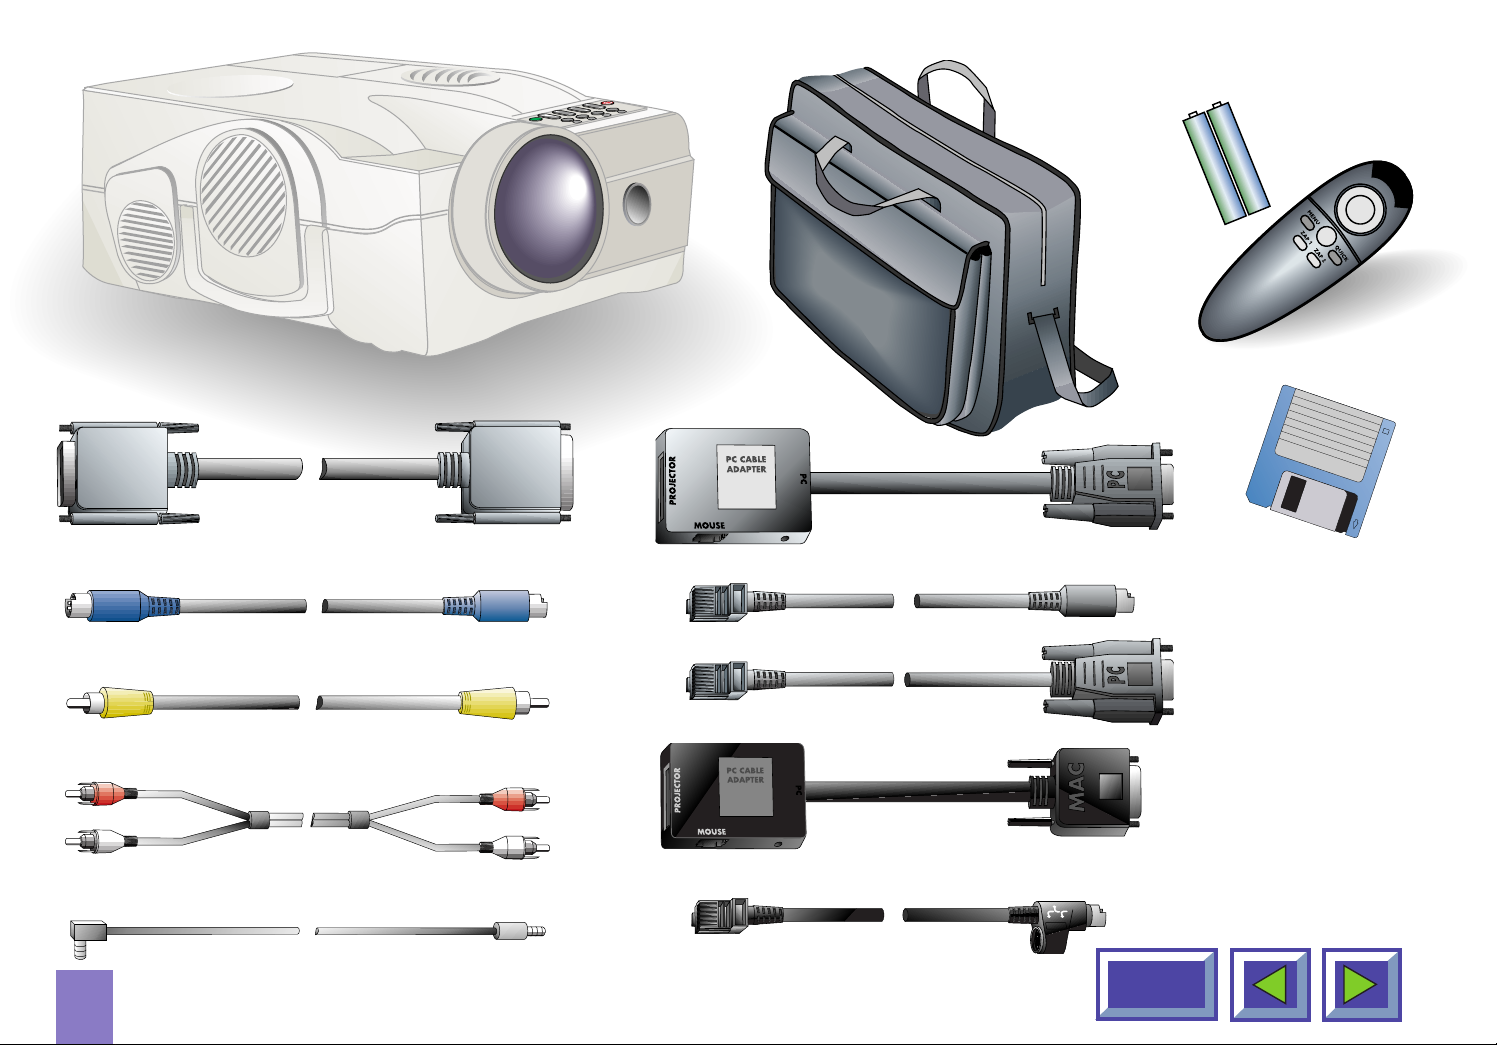
1.2 Accessories
Please take a few minutes to make sure that your
DreamVision DL500 contains all the necessary parts:
1.2.1 Computer accessories for
external PC/(MAC OPTIONAL)
1.2.2 Video accessories
◆ Super-video cable
◆ Composite video cable
◆ Audio cable
1.2.3 Other cables/accessories
◆ Computer cable Enhanced Video Connector (EVC),
male at both ends, 3 m/9.8 ft.
◆ Cable for PC / (MAC OPTIONAL) audio (Stereo
jack, 0.3m/1 ft.)
◆ PC adapter
◆ RS-232 mouse cable for PC
◆ PS/2 mouse cable for PC
◆ (MAC OPTIONAL) adapter
◆ Apple Desktop Bus (ADB) mouse cable for
(MAC OPTIONAL)
◆ Dual soft bag
◆ Power cable, 4m/12 ft.
◆ Remote control including batteries
(type AAA/LR03
1.2.4 (MAC OPTIONAL) cables and accessories
◆ EVC cable, 10-15m
◆ Ceiling mount kit
3
Contents
Page 4
Softbag
EVC cable
Super-video cable
Composite video cable
ZOOM
S-V
FOCUS
V
CHAN
TV
PC
Batteries
Interactive
Remote
Control
Diskette
PC adapter
PS/2 mouse for PC
RS232 mouse for PC
Audio cable
Stereo jack cable
Figure 1: Product and accessories
4
(Mac Optional) adapter
ADB mouse for (Mac Optional)
Contents
Page 5

1.3 Insert batteries in the remote
control
2. Important information
Figure 2 shows the remote control with the battery
lid removed. Slide off the battery lid and insert the
batteries with the + and - poles correct. Slide the
battery lid back on again.
The warranty card or copy of invoice is your proof of
purchase. Please make sure that the warranty card is
returned in order to get the warranty service you are
entitled to.
Failure to return the warranty card may void your
warranty.
NOTE!
Please use caution when transporting the unit.
WARNING!
Tampering with or opening the DreamVision
DL500 can be dangerous.
For replacement of the lamp, see the instructions support with the replacement lamp.
Leave maintenance to authorized DREAMVISION
service personnel. Please contact your local
dealer with any service or maintenance
questions you may have.
Figure 2: Inserting batteries in remote control
5
Contents
Page 6

3. Connecting a computer to the DreamVision DL500
The procedure for connecting a
computer to the DreamVision DL500 is
the same for all types of computers.
1. Make sure the computer, monitor and DreamVision
DL500 are switched off.
2. Identify the RGB out connector on the back of your
computer (where you connect a monitor to the
computer).
3. Connect the computer to the DreamVision DL500
using the EVC cable and the adapter for the computer you are using. See figures 3 and 4.
4. If you have a desktop computer and want to display
the image on your computer monitor, connect the
cable from your monitor to the adapter.
See figure 5 and 6.
5. If you want to use the remote control to control your
computer, connect the correct mouse cable from
the computer to the adapter box. See figures 7 and
8. When your computer is connected to the
DreamVision DL500 with the EVC cable (with EVC
connector on the computer), the remote mouse
control will automatically function as a regular
mouse on your PC or (MAC OPTIONAL).
6. If you want to use sound with your computer,
connect the stereo jack cable to the computer audio
connection and to the PC or (MAC OPTIONAL)
adapter box.
7. Turn on the DreamVision DL500 and the then the
computer. The computer image should now be projected from the DreamVision DL500 and the remote
control should now work as a regular mouse. If the
computer’s image is not displayed simultaneously
on the monitor, or the mouse is not working, see
the section ‘What do I do if’.
6
Contents
Page 7
Connecting to a laptop, notebook
Connecting to an Apple PowerBook
(Mac Optional)
Back panel of
computer
PC adapter
EVC cable
Back panel of
computer
(MAC OPTIONAL)
adapter
EVC cable
Figure 3: Connecting to a laptop, notebook
7
Figure 4: Connecting to an Apple PowerBook
(Mac Optional)
Contents
Page 8

Connecting to a desktop PC
Connecting to an Apple Optionalintosh
with standard RGB
Back panel of
computer
PC adapter
PC monitor
desktop computer (Mac Optional)
Back panel of
computer
(MAC OPTIONAL)
adapter
PC monitor
EVC cable
Figure 5: Connecting to a desktop PC
with standard RGB
8
EVC cable
Figure 6: Connecting to an Apple Optionalintosh
desktop computer (Mac Optional)
Contents
Page 9
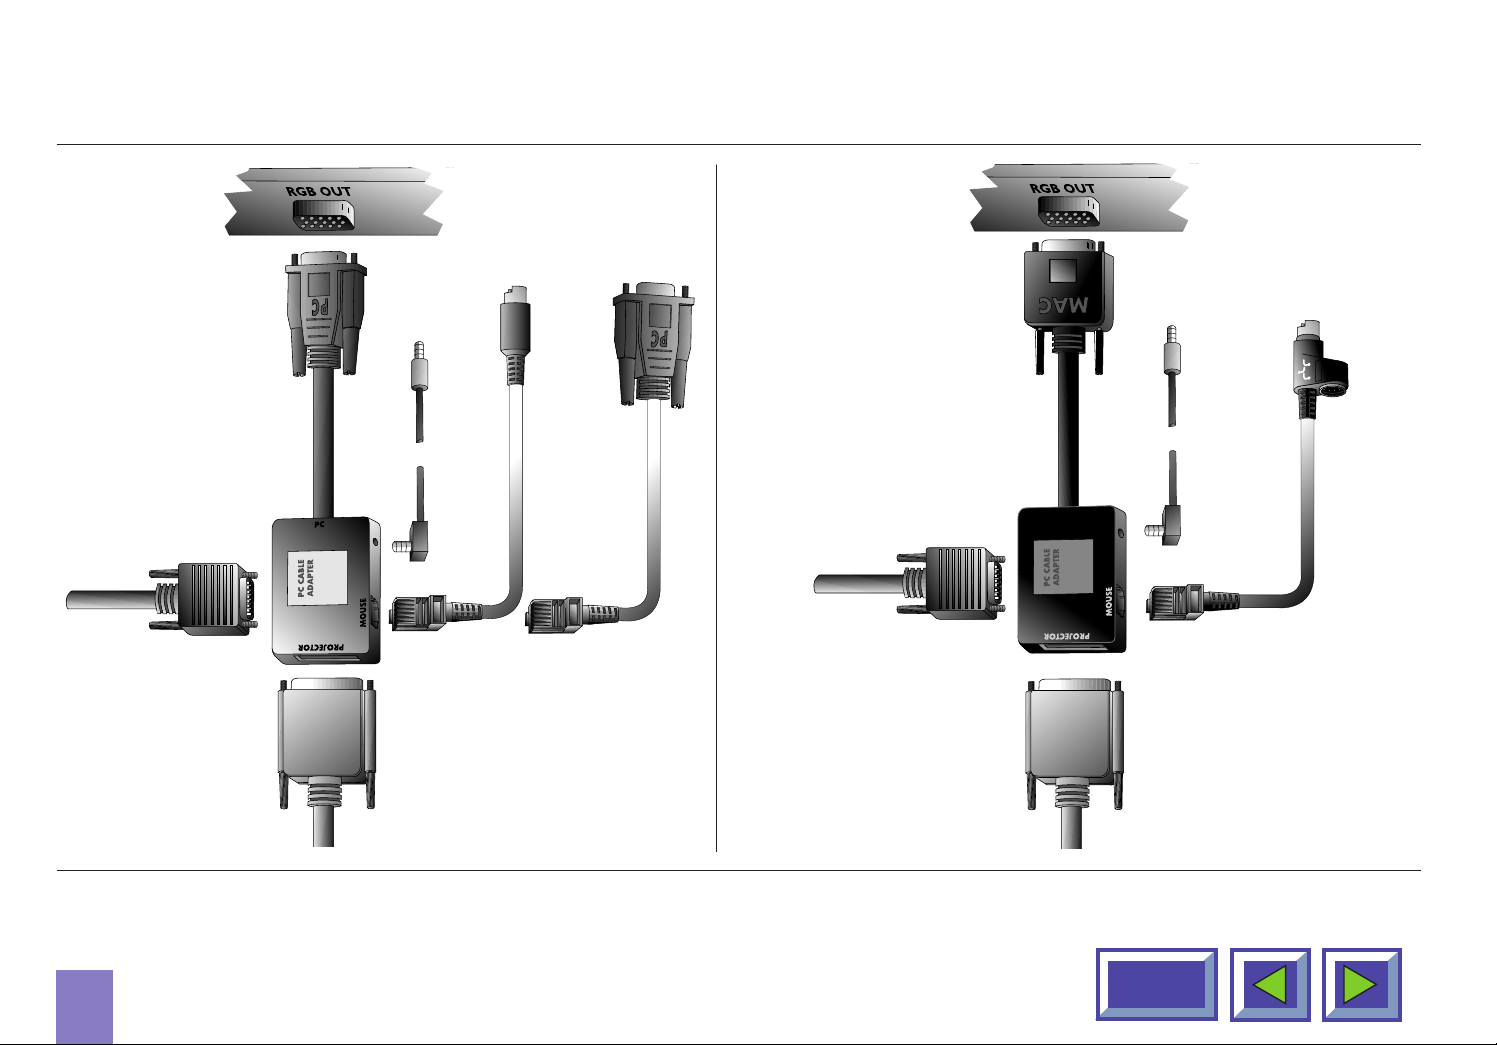
Connecting the mouse cable
Connecting the mouse cable and
and stereo jack (PC)
Back panel of
computer
PC adapter
PC monitor
Stereo jack cable
PS/2 mouse for PC
RS232
mouse for PC
stereo jack (Mac Optional)
Back panel of
computer
(MAC OPTIONAL)
adapter
(MAC OPTIONAL)
monitor
Stereo jack cable
ADB mouse for
Optionalintosh
EVC cable
Figure 7: Connecting the mouse cable and
stereo jack (PC)
9
EVC cable
Figure 8: Connecting the mouse cable and
stereo jack (Mac Optional)
Contents
Page 10
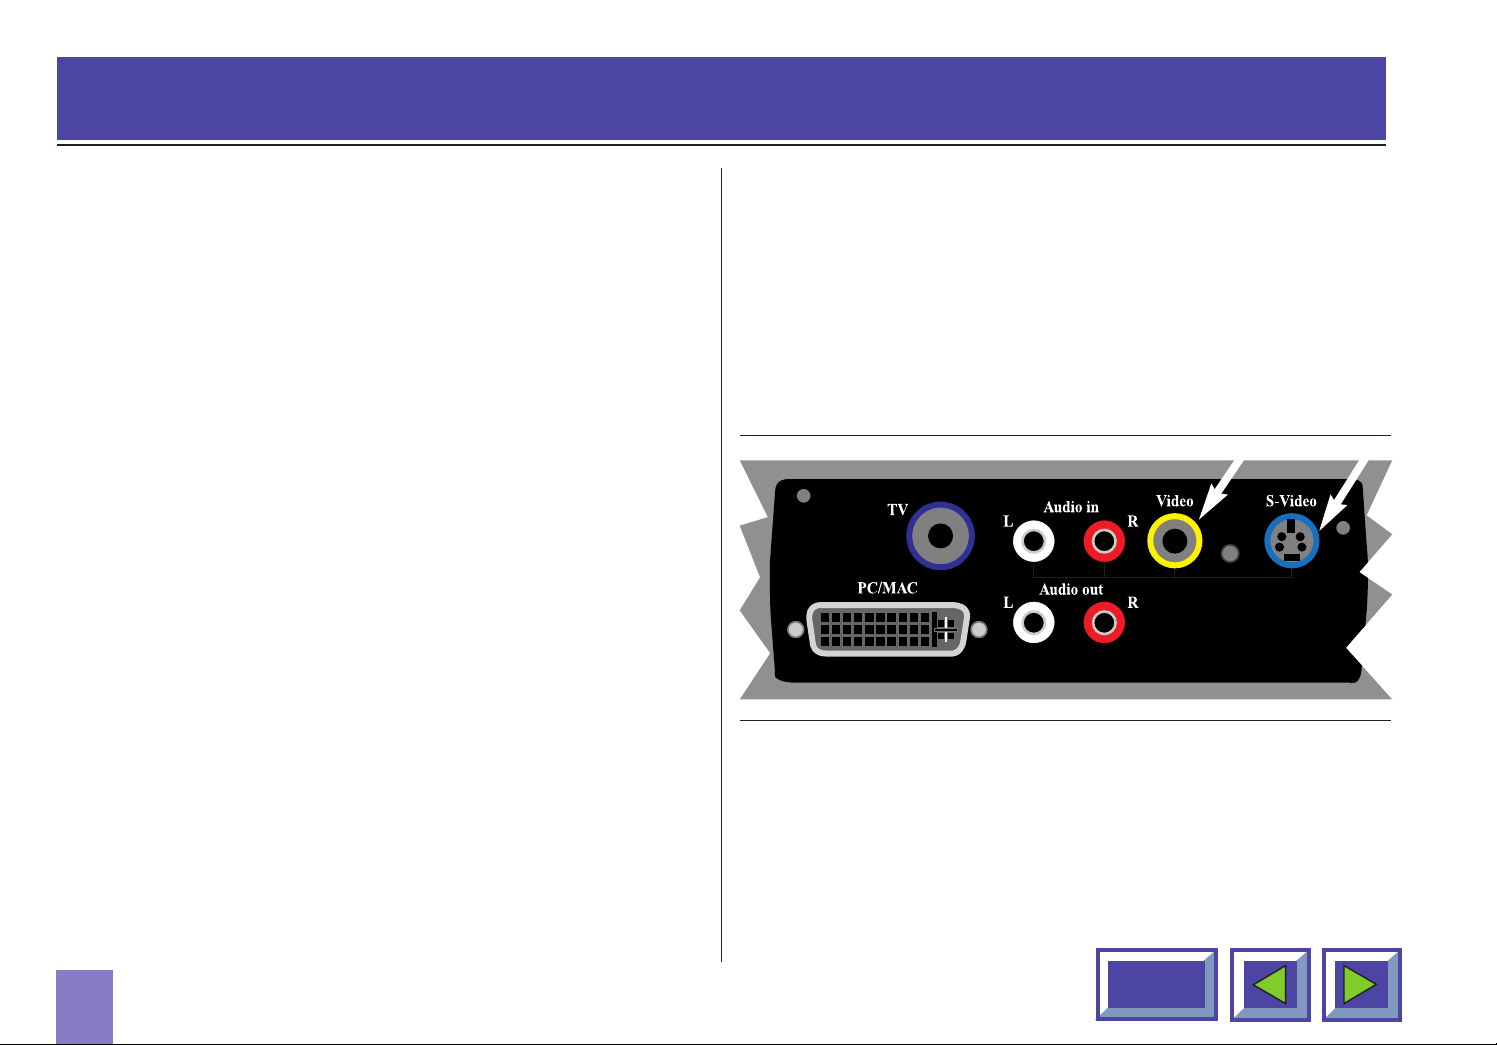
4. Connecting a video source to the DreamVision DL500
The procedure for connecting a video
source to the DreamVision DL500 is
the same for S-video and Composite
video
SECAM, PAL N and PAL M modes are manually
selected by pressing “Green Button“. If the right format
is not found first time, press again. The video format is
stored separately for each connector.
1. Make sure that the video source and the
DreamVision DL500 are switched off.
2. Connect the video cable from the Video out
connector of the video source to the correct video
connector on the DreamVision DL500 plug panel.
3. Connect the audio cable from the Audio out
connectors of the video source to the Audio in
connectors on the DreamVision DL500. Connect
the red plug to the red connector, and the other
plug to the white connector. Red is the right stereo
channel.
4. When all the connections are done and verified,
switch on the video source and the DreamVision
DL500.
5. The DreamVision DL500 will now automatically
display the pictures from the video source. If not,
see the section ‘What do I do if’.
Figure 9: Connecting to video sources
10
Contents
Page 11

4.1 Using external speakers
In order to use external speakers with the DreamVision
DL500 you need an amplifier. Connect the amplifier to
the audio out on the DreamVision DL500.
Figure 10: Using external speakers
When external speakers are connected, these can be
turned on or off from the DreamVision DL500. To control the internal speakers, see section on Adjust audio
settings, section 7.3.3.
11
Contents
Page 12

5. Connecting a TV- source to the
DreamVision DL500
A TV-tuner is (Mac Optional) for the
The DreamVision DL500 behaves just like a normal TV.
See the menus section 7.2.6 on how to adjust the TV
settings.
There are basically three ways of receiving the TV
signals to the DreamVision DL500:
DreamVision DL500
Figure 11: Connecting to TV- source
NOTE! Requires TV tuner to be installed.
In order to use the DreamVision DL500 as a TV output;
connect the TV antenna to the TV connector on the
DreamVision DL500 plug panel.
◆ Antenna (Terrestrial)
◆ Cable
◆ Set-up box for satellite
These three work differently and it is important to
consider the options of each when adjusting the
DreamVision DL500 settings.
Antenna
When you adjust your TV to signals from an antenna
you must store each channel in a different program. .
The same is true for the DreamVision DL500 TV-tuner.
When connected to an antenna you assign the different
channels to the programs in the Television Setup Menu.
Then you use the Up and Down arrows
in the menu, remote control or the channel up/down
button on the control panel to switch between channels.
12
Contents
Page 13

Cable
When you are connected to a cable system you have
two options. If you have a cable decoder you set your
TV to the channel for the cable, and then you use the
remote control for the decoder to switch between channels. If you do not have a decoder you simply set your
TV up just like you would with an antenna. This is also
the same with the DreamVision DL500. You must scroll
the channel name in the TV Setup menu until you find
the correct channel for your cable system. When this
channel has been assigned to one of the program numbers you simply select this program and use the remote
control or control panel to switch between
channels.
Satellite
This works like the cable decoder meaning that you
select the channel that reads the signals from the
atellite dish. Then you use the remote control of the
decoder to switch between channels.
13
Contents
Page 14

6. Using the DreamVision DL500
6.1 Different program modes for the
DreamVision DL500
Stand-by mode
In stand-by mode the projector is turned off and can be
turned on by using defined keys, see section 6.3
Normal mode
In normal mode a picture will be shown on the screen. The
mouse will function as a normal PC/(MAC OPTIONAL)
mouse.
DreamVision DL500 has different modes
of operation:
◆ Stand-by mode
◆ Normal mode
◆ Quick mode
◆ Menu mode
◆ Pointer mode
◆ Blank mode
Quick mode
Quick mode is used with the interactive remote control
(quick key). You assign functionality for the quick key
on the remote control in the quick menu (see section
7.2.5). When clicking on the Quick key you will be able
to switch between all the functions you have selected in
this menu.
Menu mode
In menu mode the menu system is activated and you
use the mouse pad and the mouse buttons on the
remote control to navigate in the menu.
Pointer mode
In pointer mode you can move a pointer cursor on the
screen by using the mouse function.
Blank mode
In blank mode the screen is blanked out (black).
14
Contents
Page 15

6.2 DreamVision Remote control
The DreamVision Remote control has two purposes:
1. To access the Main Menu and control the various
image adjustments and utility functions of the
DreamVision DL500
2. To allow remote control of your computer
Pointing it towards the projection screen operates the
remote control. An infra red beam bounces from the
screen to an infrared receiver on the DreamVision
DL500.
NOTE!
Make sure nothing is blocking the IR receiver in
front of projector located beside the lens, as this
will prevent the communication between the remote
control and the DreamVision DL500.
To ensure smooth operation, the combined distance from the remote control to the screen and
back to the projector should not exceed 10 meters
(33 ft). If the distance via the screen is longer, you
should point the remote control directly towards
the IR receiver.
Figure 12: DreamVision remote control
The remote control works with Optionalintosh and with
Microsoft Windows, for interactive distance control of
your computer. Aunique pressure-sensing pad on the
remote makes it very easy to control the computer and
to perform the exact same operations as you would
with a normal mouse.
15
Contents
Page 16

The Remote control is very easy to operate. It has only
six keys in addition to the pressure sensing mouse pad.
The six keys are:
Key underneath the control
Left mouse key
Small gray key
Interrupt/break an action (right mouse key)
Menu
The menu key gives access to the DreamVision menu
control functions. To move within the various menu
functions, position the arrow cursor by pressing the
sensitive mouse pad and click with the left mouse button which is located underneath the remote control.
If you are in menu mode and press the menu key you
will return to normal mode
Quick
When pressing the Quick key you can switch between
all selected functions for the Quick key. See section
7.2.4 for how to select functions for the Quick key.
Zap
The two zap keys can be programmed to perform an
assigned function. To assign a function to the zap keys,
select the Zap icon from the menu. The zap keys can
be programmed to do the same function e.g. volume
up/down. See section 7.2.5 for further explanations of
the zap menu.
16
Figure 13: The remote mouse communicates with the
DreamVision DL500 projector via the
projection screen
Contents
Page 17

6.3 Using the touch panel on the
CHAN
FOCUS
ZOOM
S-V
V
TV
PC
DreamVision DL500
The touch panel gives you direct access to the most
important functions of the DreamVision DL500. It is
very handy to use when the remote control has low
batteries, or you simply have forgotten to bring it with
you. The key functions are as follows:
Source
The DreamVision DL500 has direct keys for four
sources:
Functionality Text/color
◆ Computer (PC/(MAC OPTIONAL)) (PC)
◆ TV (TV)
◆ Composite video (V)
◆ S-video (S-V)
The TV source button will only work when a
TV-tuner is installed.
Figure 14: The keys on the touch panel on the
DreamVision DL500 projector
17
Contents
Page 18

Volume (+/-)
The Volume key is used to control the sound level
when the DreamVision DL500 is connected to an audio
source.
Channel
Click on the arrows left/right to switch between
pre-programmed TV channels when TV is
selected as source.
Focus
Press the Focus key to focus the projected image after
zooming to the correct size.
Zoom
Press the Zoom key to zoom the projected image to the
desired size.
Stand by
The stand by key will set the DreamVision DL500 in
stand by mode. The lamp will turn off, and the fans will
run for a little while cooling the projector before
stopping. To return to normal mode, press the Stand by
key once more, or press the Menu key on the remote
control.
Automatic set-up
The automatic set-up key will set up the projector with
optimal settings for the connected source. If you want
to do manual adjustments you can do this by using the
menus (see section 7).
Note!
You can not access the screen menu
system without the remote control.
18
Contents
Page 19

6.4 Adjusting the height and angle of
the DreamVision DL500
7. Using the menus
You can adjust the height and angle of the DreamVision
DL500 by adjusting the four small feet underneath the
product.
NOTE!
The DreamVision DL500 should never be left with
an angle of more than 15 degrees over a longer
period of time.This will shorten the
lifetime of the lamp.
7.1 The menu system
Main menu.
Menu with video option installed.
19
Menu with video and TV tuner option installed.
Contents
Page 20

7.1.1 Main menu
The main menu is divided into two parts:
◆ Icons
◆ Help text
Icons
The icons illustrate a function and are grouped into
groups with similar functionality. Clicking an icon
activates it. Some icons have a direct function and
some will activate a second level menu.
Help text
By moving the cursor over the icons the text area will
give a short description of the icon.
Stand by
This function sets the projector in
stand-by mode
Auto set-up
Auto set-up will do automatic set-up of the projector:
20
◆ Horizontal and vertical position
◆ Sampling clock
◆ Phase
◆ Chooses between available video formats and
NTSC/PAL auto detection
Contents
Page 21

Source
Control panel
You can connect four different sources to the
DreamVision DL500; one computer source, two
video sources and one TV tuner (Mac Optional).
You select the source you want to use by clicking on
the icon representing the source. Use the pressuresensing pad on the remote mouse to move the mouse
pointer to an icon and click the button (left mouse)
underneath the remote mouse.
Set-up menu
In this menu you set up the projector with settings that
will not be changed often, e.g. language, mouse system or picture orientation.
In this menu you can make adjustments for picture and
sound.
Removing the main menu
To remove the menu system, press the MENU key on
the Interactive Remote control. You can also remove
the menu by clicking the right mouse button (on the top
of the remote control). The right mouse button will also
function as cancel when in the menus.
The menu will disappear in 40 seconds.
21
Contents
Page 22

7.2 Set-up menu
Set-up menu
In the set-up menu the following
sub-menus are available:
◆ Picture orientation
7.2.1 Picture orientation
◆ Language
◆ Mouse system
◆ Quick key assignment
◆ ZAP keys assignment
22
Picture orientation
The picture orientation menu is used for rotating and
mirroring the picture.
Normal
Normal is used when the projector is standing on a
table projecting a picture on a screen.
Mirror
Mirror is used when the projector is projecting the
picture from the back of the screen
Contents
Page 23

Rotate
Rotate is used when the projector is ceiling mounted
and projecting image from the front.
Rotate and mirror
Rotate and mirror is used when the projector is ceiling
mounted and projects the picture from the back of the
screen.
7.2.2 Mouse system
Mouse system selection
USB and mouse for (MAC OPTIONAL) will be selected
automatically when the mouse cable is connected. If
your PC uses RS232 mouse, you must choose MS
Serial Mouse in this menu. If your PC uses PS/2
mouse, you must choose PS/2 in the menu. Selected
system will be active until another system is chosen.
When shipped the DreamVision DL500 is set up to
PS/2.
23
Contents
Page 24

7.2.3 Language
This menu allows you to choose between six different
menu languages: English, French, German, Italian,
Spanish and Norwegian.
Click in the box next to the language you want to use.
Click on the OK button. The window will disappear, and
the selected language will be used in the main menu
and in all other menus.
Language selection
24
Contents
Page 25

7.2.4 Quick menu
Quick menu settings
In the quick menu you can assign functionality for the
quick key on the remote control. When clicking on the
quick key you will be able to switch between all the
functions you have selected in this menu. In this
example, the first time you click on the quick key you
will activate the volume function. A volume bar will be
displayed at the bottom of the projected image where
you can adjust the volume up and down. You adjust the
bar by either pressing the pressure-sensing pad right
or left or you may use one of the two zap keys on the
remote control. To accept the adjustment, and terminate
the quick mennues click on the left mouse button.
To get back to the original volume, click on the right
mouse button.
The next click on the quick key will accept the volume
adjustment and activate the brightness function and a
brightness bar will be shown at the bottom of the page.
When you have gone through all assigned functions
the menu will disappear.
25
Contents
Page 26

7.2.5 Zap menu
Zap menu
The Zap menu is used to assign functions to the zap
keys on the remote control.
The menu consists of two columns of buttons where
the left column assigns the functions to the left key and
the right column assigns the functions to the right key.
Volume (+/-)
Controls the sound of active source.
TV channel
Controls the pre programmed TV channel assignments.
If a TV tuner is installed and selected as source you
can select TV channel by using the zap keys.
Pointer
You can activate the pointer function in the projector.
One click activates the pointer and the next click
deactivates it.
Blank
Activates blank mode by pressing the Zap key. First click
will activate Blank mode and second click will deactivate it.
Mute
Turns the sound off. First click will turn off the sound
and second click will turn it on.
Computer
Selects Computer as source.
Video
Selects video sources. Both Zap keys can be
programmed to select Video (video input 1 or 2).
Tuner
Select TV-tuner as source.
26
Contents
Page 27

7.2.6 Television programs
This menu is only displayed if the TV tuner is installed
and TV tuner is selected as source. The television
program menu is then activated by pressing the
”television program” icon
The TV setup menu is divided in two parts:
◆ Automatic TV station
◆ Program
Automatic TV station search
This function selects all TV stations with a signal (maximum
60 stations). These will be symbolized with a TV icon.
Programming new channels
There are 30 channels that can be preprogrammed.
By selecting the Search button the system will scan
through all available TV channels. A TV icon will
symbolize all channels found.
When assigning a Channel to a Program:
1. Select a channel in the automatic search menu by
clicking on the TV icon symbolising the wanted TV
station.
2. The TV channel will be activated.
3. Select the program you want to place this channel on.
4. TV icon will appear on this program choice.
27
To search for channels manually, use the arrow keys at
the bottom right.
Contents
Page 28

7.2.7 Product information
Product information
7.3 Control panel menu
Click on the product information icon in order to get
information about the product and company.
Select Exit to leave the menu.
Control panel menu
In the control panel you have access to menus for
adjusting picture and audio settings.
The icons ”Picture positioning” and
”Synchronization Adjustments”are only
visible if PC source is active.
28
Contents
Page 29

7.3.1 Picture control
Select the picture control menu for adjusting brightness,
saturation and tint. When PC is selected as source,
only brightness will be available.
When PAL/SECAM video is selected brightness,
contrast and saturation will be available. All options will
be available for NTSC video.
Select OK to save your changes and exit, or select
Cancel to exit without saving your changes.
Selecting Default restores factory settings.
Picture control
29
Contents
Page 30

7.3.2 Picture positioning
Picture positioning (PC conection)
Adjust vertical and horizontal position of the picture on
the screen with the two sliders.
Select OK to save your changes and exit, or select
Cancel to exit without saving your changes.
7.3.3 Audio control
Audio control
Select this function when you have connected an audio
signal to the ‘Audio in’ on the DreamVision DL500 connectors (or through the EVC cable). Use the four sliders
to adjust volume, bass, treble and balance until you
have a satisfying sound.
Select Internal Mute to mute the internal speakers.
Select External Mute to mute the external audio output.
Select OK to save your changes and exit, or select
Cancel to exit without saving your changes.
30
Selecting Default restores factory settings.
Contents
Page 31
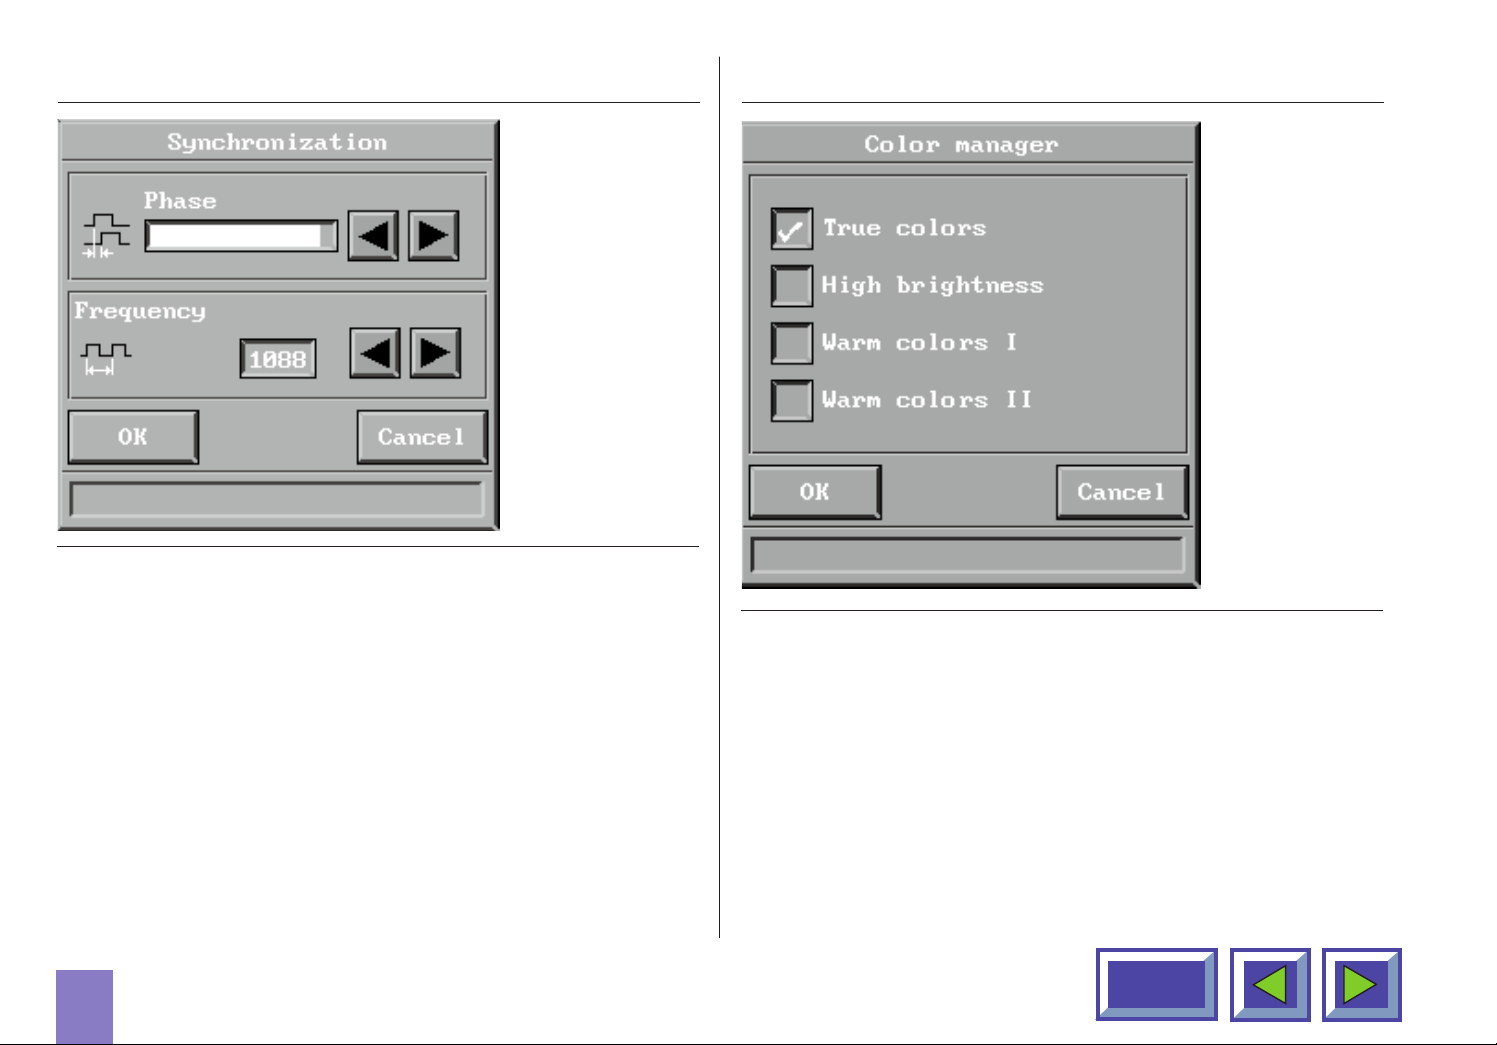
7.3.4 Synchronization Adjustments
Synchronization Adjustments (PC conection)
7.3.5 Color manager
It is possible to adjust the synchronization in Computer
mode by adjusting the Phase and the Frequency. The
synchronization will be set by the automatic set-up
function. Manual sync adjustments should typically not
be required.
31
Color tone settings
The color manager is designed to give you maximum
performance from your DreamVision DL500 projector,
independent of ambient light conditions.
In the color manager menu you can choose between
four pre-defined Color settings.
Contents
Page 32

7.3.6 Zoom/Focus adjustments
7.3.7 Screen size adjustments
Zoom and focus adjustments
In this menu you can adjust the Zoom and Focus of the
DreamVision DL500 by clicking on the up and down
arrows in the menu. When you have adjusted the
image to your satisfaction, click on the OK button to exit
and save your new settings.
32
Screen size adjustments
In this menu you can adjust screen Size
Contents
Page 33

8. Maintenance
All maintenance should be done by
DreamVision authorized service
personnel.
Contact your DreamVision dealer
for maintenance.
The DreamVision DL500 lamp is designed to give you
2000 hours performance. In the unlikely event that
you should have to chenge the lamp, you will find
complete instruction on how to replace the lamp
included in the spare lamp kit.
33
Contents
Page 34

9. What do I do if (Trouble shooting)
No image appears on the screen
7. The DreamVision DL500 is not connected to
electricity. Check that the power cable is connected
to the DreamVision DL500 and the wall outlet.
Possible causes and remedies:
1. The DreamVision DL500 is left in Standby mode. If
the product is in standby mode, there will be a red
light next to the stand-by button. Press the stand-by
button or the Menu key on the remote cotrol.
2. The lamp does not function. Check the light on the
control panel. If the light is orange, the lamp does
not function. Contact your DreamVision dealer.
3. The product is set in ‘blank mode’. Press the zap
keys on the remote control.
4. The brightness is turned on too low. Adjust bright-
ness until a satisfactory image is achieved.
5. The power save or screen save on the PC is
turned on. Turn off the power save and screen
save on the PC.
No source signal is detected
(the logo ”Digital by Design” appears)
Possible causes and remedies:
1. The computer has not been switched on. Turn on
the computer.
2. The cables are not properly connected. Check all
cable connections.
3. For Notebooks: The external RGB port may need
to be manually activated. Please consult the
notebook-operating manual for how to operate.
6. The image is displayed on the laptop screen and
not the projector. Activate the external port on the
laptop by pressing the required key combination on
your computer.
34
Contents
Page 35

The image is not good (noise)
No Image Appears
Possible causes and remedies:
1. The automatic image set-up is not activated. Run
auto set-up by pressing the green button on the
touch panel or run auto set-up from the menu.
2. The synchronization on the PC is not set optimally.
There is poor response from the Interactive
Remote Control
Possible causes and remedies:
1. Check that nothing is blocking the IR receiver at the
front of the DreamVision DL500.
2. Make sure the remote is pointed towards the
screen.
3. Make sure there is no more than 10m/33ft in
distance to the projector.
Possible causes and remedies:
The DreamVision DL500 has not been switched on.
.
1
Check the ON/OFF switch at the back.
2. There is no electricity in the power outlet in the
wall. Check that there is power in the power outlet.
NOTE! When all connections to electricity are OK,
there will be a green light at the control panel.
4. Batteries might be low. Change batteries in the
remote control.
5. Electromagnetic or optic noise may influence the
remote control.
Turn off sharp fluorescent tubes, mobile phones etc
that are near the projector.
35
Contents
Page 36

10. ‘Limited Warranty,‘FCC Statement’ and ‘Trademarks Copyright’
Limited Warranty
Except as otherwise stated herein, DreamVision warrants to the first enduser (‘Customer’) who purchases a DreamVision DL500 from a dealer
that the DreamVision DL500 is free from defects in parts and labor under
normal use during the warranty period. The warranty period means the
12-month period from the date of the Customer’s purchase of the
DreamVision DL500 from a dealer.
During the warranty period, DreamVision will, at its option and in its sole
discretion, repair or replace defective parts, including replacement of the
entire DreamVision DL500, at no additional charge to the Customer. However, the Customer is responsible for all shipping and insurance costs
incurred in returning any DreamVision DL500 to the Customer which does
not require any repair or replacement work, as determined by DreamVision in its sole discretion. This limited warranty does not extend to the
DreamVision DL500 lamp and does not extend to any DreamVision product that has been damaged as a result of accident, misuse, or abuse. Nor
does it extend to the use of parts not manufactured or sold by DreamVision, by unauthorized modification of the DreamVision DL500, or as a
result of servicing by unauthorized personnel. This limited warranty
extends only to the Customer, and is not transferable or applicable to any
other third party or user, including any one who purchases a used
DreamVision DL500. Any person asserting a claim under this limited
warranty must establish to DreamVision satisfaction the date of purchase
and that the DreamVision DL500 was purchased new.
Other warranty and liability limitations
Aside from this standard published warranty, DreamVision makes no
warranty of any kind, express or implied, including without limitation, those
of merchantability and of fitness for a particular purpose. Without limiting
the generality of the foregoing, any description of the DreamVision DL500
is for the sole purpose of identifying it, is not part of the basis of any bargain, and does not constitute a warranty that the item sold shall conform
to that description. The use of any sample or model is for illustrative
purposes only, it is not part of the basis of any bargain, and it is not to be
construed as a warranty that the DreamVision DL500 will conform to the
sample or model.
No affirmation of fact or promise made by DreamVision shall constitute a
warranty that the DreamVision DL500 will conform to the affirmation or
promise. DreamVision makes no warranty that the goods are free from
claims of infringement of patents, trademarks, or copyrights. This limited
warranty shall be the exclusive remedy. DreamVision shall not be liable to
customers or others for incidental, consequential, or special damages, or
lost profits. Under no circumstance shall DreamVision liability or customer’s remedy for damages against DreamVision exceed its cost for the
DreamVision DL500.
Procedure for claims
Any and all questions or claims concerning the DreamVision DL500 shall
be made to DreamVision authorized personnel. In no case shall the
DreamVision DL500 be returned without first securing the authority of
DreamVision or its authorized personnel. Any damages to, defects in, loss
36
Contents
Page 37

of, non conformities in, or any other claim concerning the DreamVision
DL500 which could be discovered by inspection upon delivery must be
reported to the delivering carrier, and in writing to DreamVision at:
DreamVision
Promptly and in no event later than thirty (30) days after delivery. In the
case of any such claim, inspection shall be promptly arranged with
DreamVision or its authorized personnel, and where appropriate, representatives of the carrier. Any other claim or action respecting the condition or
conformity of the DreamVision DL500 or any other matter affecting the
DreamVision DL500 must be submitted in writing to DreamVision promptly
upon discovery and in no event later than expiration of the Warranty Period. Any part of the DreamVision DL500 which is subject of any claim shall
be set aside and protected, without further processing or use, until
DreamVision or its authorized personnel have an opportunity to inspect it
and advice the Customer of the disposition, if any to be made thereof.
Failure to give timely written notice of any claim shall bar any remedy.
FCC Statement
The DreamVision DL500 has been tested and found to comply with the
limits for a Class Adigital device, pursuant to Part 15 of the FCC rules.
These limits are designed to provide reasonable protection against harmful interference when it is operated in a commercial environment. The
DreamVision DL500 generate, uses and can radiate radio frequency
energy and, if not used in accordance with the instructions manual, may
cause harmful interference to radio communications. Operation of the
DreamVision DL500 in a residential area is likely to cause harmful interference in which case the user will be required to correct the interference
at his own expense.
Trademarks Copyright
DreamVision and DreamVision DL500 are registered trademarks of
DreamVision. DLP™and DMD are registered trademarks of Texas
Instrument Inc. IBM is a registered trademark of International Business
Optionalhines Corporation. Apple Optionalintosh and Apple Powerbook
are registered trademarks of Apple Computer Inc. Other trademarks are
the property of their respective owners. Norwegian and foreign patents
are pending.
Technical advice
DreamVision, or its authorized personnel, may furnish technical advice
with reference to the use of the DreamVision DL500, but there is no obligation to furnish such advice. If any advice or assistance is furnished, it
shall be given and accepted at Customer’s risk, DreamVision shall not be
responsible or liable for the advice or assistance given or the results
thereof.
©Copyright 1997 DreamVision. All rights reserved. Specifications subject to change without notice.
37
Contents
Page 38

1.
BEFORE Y OU ST ART................................................................2
• 1.1 Color coding for ease of use.........................................2
• 1.2 Accessories.....................................................................3
• 1.2.1 Computer accessories for external
PC/(MAC OPTIONAL) ...........................................3
• 1.2.2 Video accessories................................................3
• 1.2.3 Other cables/accessories....................................3
• 1.2.4 (Mac Optional) cables and accessories.............3
• 1.3 Insert batteries in the remote control...........................5
Contents
Page 39

4.
CONNECTING A VIDEO SOURCE TO THE
DREAMVISION DL500 ............................................................10
• 4.1 Using external speakers...............................................11
Contents
Page 40

6.
USING THE DREAMVISION DL500 .......................................14
• 6.1 Different program modes for the
DreamVision DL500......................................................14
• 6.2 DreamVision Remote control ......................................15
• 6.3 Using the touch panel on the
DreamVision DL500......................................................17
• 6.4 Adjusting the height and angle of the
DreamVision DL500......................................................19
Contents
Page 41

7.
USING THE MENUS.................................................................19
• 7.1 The Menu System.........................................................19
• 7.1.1 Main menu...........................................................20
• 7.2 Set-up Menu ..................................................................22
• 7.2.1 Picture orientation .............................................22
• 7.2.2 Mouse system ....................................................23
• 7.2.3 Language ............................................................24
• 7.2.4 Quick menu.........................................................25
• 7.2.5 Zap menu ............................................................26
• 7.2.6 Television programs ..........................................27
• 7.2.7 Product information...........................................28
• 7.3 Control Panel Menu......................................................28
• 7.3.1 Picture control....................................................29
• 7.3.2 Picture positioning.............................................30
• 7.3.3 Audio control......................................................30
• 7.3.4 Synchronization Adjustments...........................31
• 7.3.5 Color manager....................................................31
• 7.3.6 Zoom/Focus adjustments..................................32
• 7.3.7 Screen size adjustments ...................................32
Contents
 Loading...