

Page 1
User Guide
Music
Store
Listen to streaming services or purchase music from the
Store when connected to a wireless network. (Streaming
services and ability to purchase music vary by country.
Not all services are available in all countries.)
Streaming or Purchasing Music
1. Connect to a wireless network.
2. Select [Store] from the menu.
3. Select the desired streaming service or store.
4. Check the user guide or help menu within each service
for detailed information.
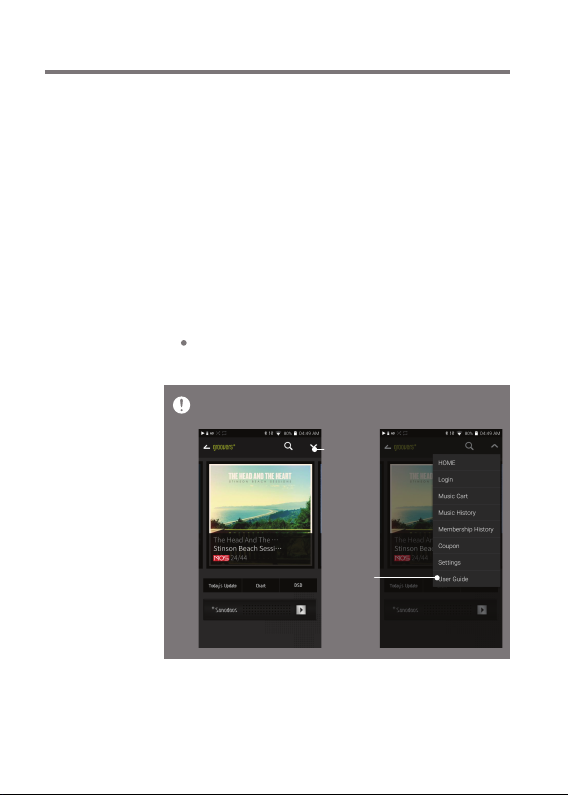
Select [Menu > User Guide] within the Groovers Store
for instructions.
For Wi-Fi connections, see Page 44.
Currently supported STORES are ‘groovers+, TIDAL’.
Show
Menu
User
Guide
Using the Device
22
Page 2
User Guide
AK
CONNECT
The PPR11 can access and play back music files stored on
a computer on the same network, as well as output sound
through compatible speakers.
MQS Streaming Server Installation
1. Visit the Astell&Kern website and download the server
installer that corresponds to your operating system.
[http://www.astellnkern.com > Support > Download].
2. Run the downloaded installer and follow the on-screen
instructions.
3. Check the User Guide within the program for detailed
information on using the MQS Streaming Server.
Please refer to the following Computer/Mac minimum system
requirements.
Minimum Computer Requirements
OS: Windows XP, Windows 7/8/10 (32 & 64-bit)
Mac Requirements
OS X 10.7 (Lion) or later
Connecting AK Connect Library / Speaker
1. Turn On the library to be connected
and connect to the same network
as PPR11.
Run the MQS streaming server
on your computer.
2. Turn on the AK CONNECT function
by pressing and holding [ ] in the
notification bar or selecting [Menu Settings-AK CONNECT].
3. Press [AK Connect] on the menu.
Using the Device
23
Page 3
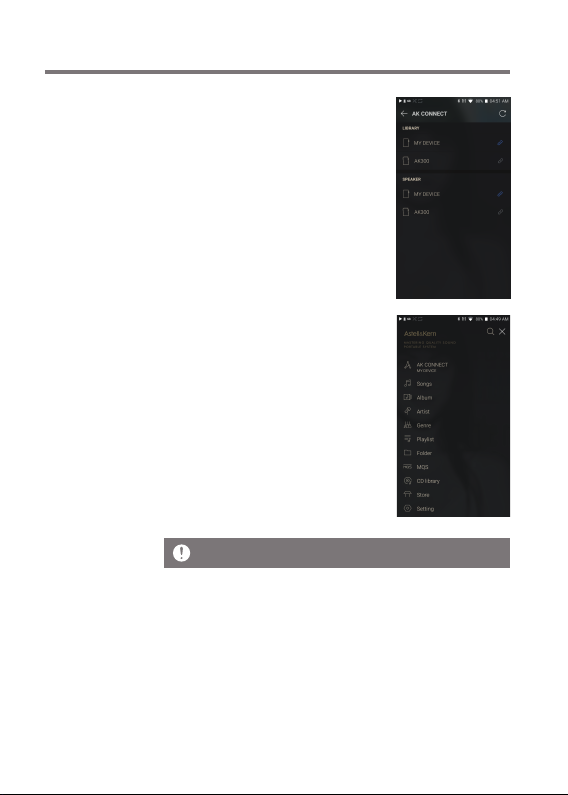
User Guide
4. A list of libraries / speakers that
are on the same network with
PPR11 is displayed.
5. Select a library / speaker to
connect.
6. After selecting a library / speaker,
select a category from the menu
to display the corresponding music
list.
For Wi-Fi connections, see Page 44.
Using the Device
24
Page 4
User Guide
Streaming and downloading music from your library
1. Select a category from the library
menu to see your list of music.
2. Select a song to begin streaming.
3. Press [ ] button at the upper right corner of the music list.
4. Select the desired music, and
press [ ] on the top to download
the music.
A message on the Notification
Bar will indicate when the
download is complete.
Depending on network conditions, song loading may be slow or
streaming may stutter.
Performing other operations on the library PC may cause slower
response time.
If you stream and download at the same time, it may slow the
device’s response time depending on the speed of the Wi-Fi network
or server.
Stop downloading by touching the item you're downloading in the
notification bar and moving to the window.
Using the Device
25
Page 5
User Guide
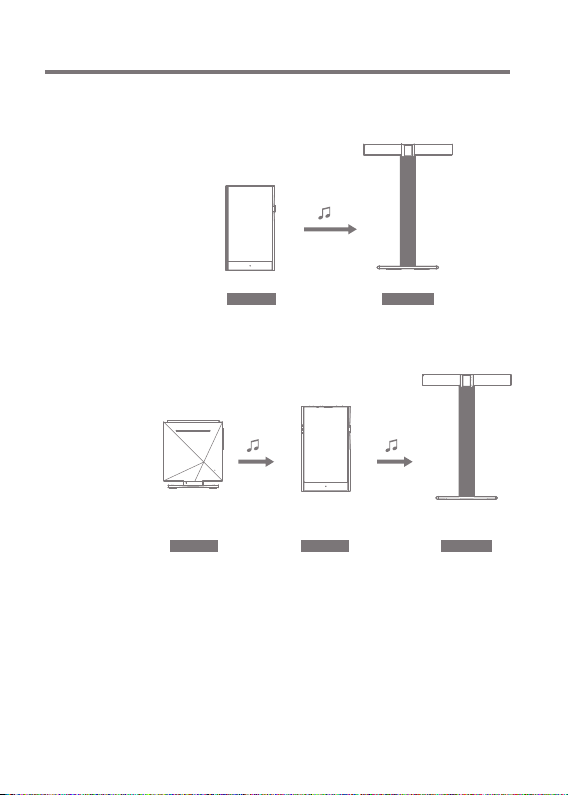
AK Connect Usage Examples
Case 1
LIBRARY SPEAKER
AK T1PPR11
Case 2
AK500N
LIBRARY REMOTE SPEAKER
AK T1PPR11
Using the Device
26
Page 6

User Guide
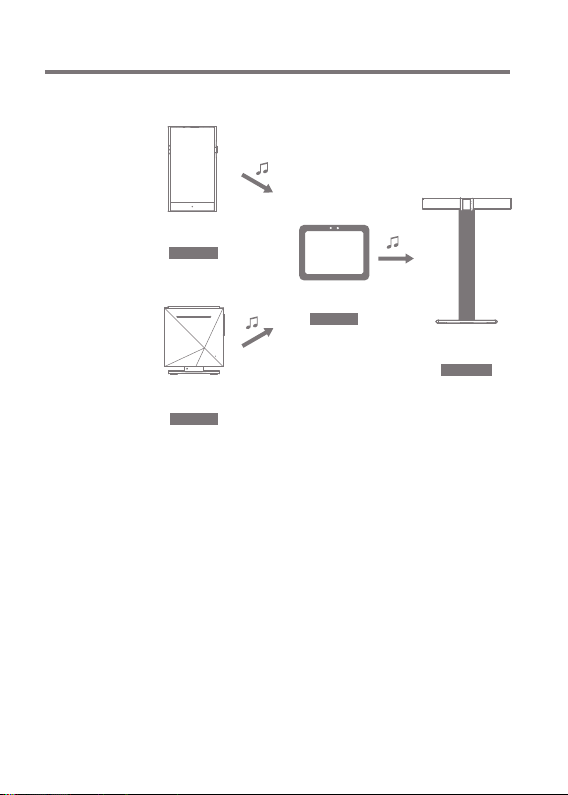
Case 3
PPR11
REMOTE & LIBRARY
AK500N
SPEAKER
Case 4
AK500N
LIBRARY SPEAKER
REMOTE
AK T1PPR11
Using the Device
27
Page 7
User Guide
Case 5
PPR11
LIBRARY
AK500N
LIBRARY
or
AK Connect APP
REMOTE
AK T1
SPEAKER
Using the Device
28
Page 8
User Guide
Listening
to Music
Selecting Music
1. Select a category from the menu to display the corresponding
music list.
2. Select a song from the list to begin playback.
Select [Folder] to search music by folder.
Continuous Playing Time: Approximately 12 hours (Music: FLAC,
16bit, 44.1kHz, Unbalanced, Volume 75, EQ Off, LCD Off)
Supported Formats: PCM [8~384kHz(8/16/24/32bit)]
DSD [2.8/5.6/11.2MHz]
Listening to Music
To search, press [ ] on the menu list and enter the title.
The search result will be displayed.
Playback history is provided in the order of most recent
playback, but pressing [ ] at the top, sorts the music
list by the number of playbacks.
After selecting the [MQS] category, press [ / ] at the
top to sort the music list in order of high quality /
alphabetical order.
In the [MQS] category, the MQS tab shows PCM files of 24
bits or more, and the DSD tab shows DSD files.
MQS: PCM[8~384kHz(24/32bit)]
DSD: DSD [2.8/5.6/11.2MHz]
Select the [Folder] category to check the internal / external
memory capacity and number of files / folders, and copy /
move music.
Press [ ] on the music list to add all music to the
current playlist.
Using the Device
29
Page 9

User Guide
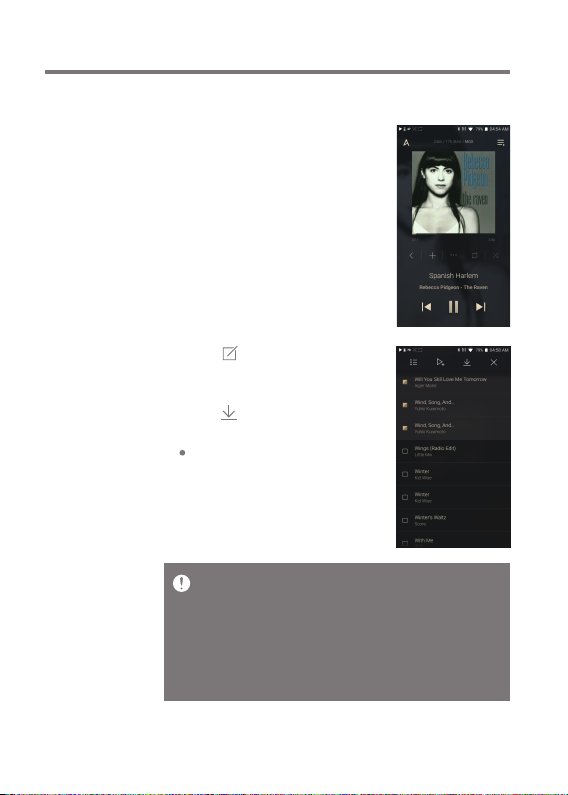
Press [ ] on top of the music list to view the options. :
: Add selected list at the first / at the last / after the
current song of Now Playing
: Add selected list to playlist
: Select / deselect entire list
: Delete selected list
: Exit
Turn the [volume wheel] to adjust the volume.
Press [ ] during playback to pause and [ ] to resume
playback.
Press [ / ] to play the previous/next file.
Press and hold [ / ] to rewind/fast-forward the file.
Drag the indicator to the desired location during playback.
Press album art on the Home screen to display the lyrics.
Press the [ ] to go to Home Screen.
Press [ ] at the top of the menu list to hide the menu list.
Using the Device
30
Page 10

User Guide
Playlist Screen
1
2
Previous
1
Playlist
2
Edit mode
3
Play All
4
3
4
Return to the previous screen.
Displays the current playlist.
Display the editing options for the music list.
Play all songs in the current list.
Using the Device
31
Page 11

User Guide
Manage
Playlist
Creating a Playlist
1. Press [Playlists] on the Home
screen to view the playlists.
2. Select [ + ] in the upper right corner
of the screen.
3. Enter a name for the playlist, and
then press [Add] to create a new
playlist.
Adding a Song to a Playlist
1. Press [Playlists] to display the
list of playlists.
2. Select a playlist and press
[+ Add] to display a list of songs.
3. Select a song, and press [Add]
to add the song to the selected
playlist.
Using the Device
32
Page 12

User Guide
Removing a Song from a Playlist
1. Press [Playlists] to display the
list of playlists.
2. Press [ ] at the top, then select
the playlist you want to delete from
the playlist.
3. Select the track, and press [ ]
on top to delete the track from
the playlist.
Playing a Playlist
1. Select the desired playlist for
playback.
2.
Press [ ] at the top of the playlist,
select the music you want to play
and press [ ] to add the selected
list at the first / at the last / after
the current song of Now Playing
(go to [Menu - Settings - Playback
Settings]). Press [ ] to play the
entire playlist.
Using the Device
33
Page 13

User Guide
Renaming a Playlist
1. Press [Playlists] to view the
playlists, and press [ ].
2. Select a playlist to be renamed.
3. Press [ ] at the top of the screen
to display the name window.
4. Enter a name for the playlist, and
then press [Rename] to save the
playlist under a new name.
Deleting a Playlist
1. Press [Playlists] to view the
playlists, and press [ ].
2. Select the playlist to be deleted.
3. Press [ ] at the top of the screen
to delete the selected playlist.
Using the Device
34
Page 14

User Guide
USB DAC
Installation
The USB DAC function allows the PPR11 to be recognized
as a sound card on a computer. Music from the computer is
played through the device’s headphone port for an enhanced
listening experience.
USB DAC Specifications
Supported OS
Windows XP(32bit) / Windows 7(32bit/64bit) /
Windows 8(32bit/64bit) / Windows 10(32/64bit)
MAC OS 10.7
USB DAC Support Specifications
Supported Formats: PCM [8~384kHz(8/16/24/32bit)]
DSD [2.8/5.6/11.2MHz]
Control the volume with the PPR11’s volume wheel.
Playback is unavailable when settings exceed the supported
formats. Volume control is unavailable when the LCD screen is
turned off when using the USB DAC connection.
The Previous, Play, and Next buttons are unavailable when
connected as a USB DAC.
Playback may stutter when computer performance is slow or the
USB connection is experiencing heavy usage.
There may be issues with audio-to-video synchronization during
video playback depending on the sound quality and operating
environment.
Volume cannot be adjusted via the Windows volume control. The
volume wheel on the device or volume control on the appropriate
program must be used to adjust the volume.
Install a dedicated driver to use the PPR11 as a USB DAC.
The driver file is located in PPR11\Internal_Storage\PPR11_
Contents\Driver. Before installing the driver, set PPR11 to USB DAC
mode and connect to PC.
Using the Device
35
Page 15

User Guide
How to
Use USB
Audio
Connect the PPR11 to a portable amp and DAC using USB
Audio Out.
How to Connect a Portable USB DAC
1. Connect product’s USB Type C terminal and portable USB
DAC with a dedicated cable.
2. Press [ ] in the notification bar.
3. Once [ ] is activated, you can enjoy music stored on the
device through the connected portable USB DAC.
The USB Type-C cable provided with the product is to be used for
data transfer or to charge the product only.
The type of dedicated cable needed to connect to the portable DAC
varies; please refer to USB DAC manufacturer instructions for
correct cable type.
A USB DAC cable is not included with the device and must be
purchased separately.
Depending on the OTG cable used, the connection may be unstable.
How to Change USB Audio DSD Output Type
You can change the type of DSD data that is outputted through
the USB audio out.
1. Select a DSD output type in [Menu - Settings - USB audio].
PCM : DSD audio is converted into PCM before being
outputted through the USB audio out.
DoP : DSD audio is converted into DoP before being
outputted through the USB audio out.
The portable USB DAC must be able to receive digital input via micro
USB OTG.
Audio output may vary widely depending on the digital input specs
of the portable USB DAC used. This is not a defect in the device
output and not a reason for exchange or refund.
When using DoP as a DSD output type, no sound may be outputted
except noise depending on the portable USB DAC.
Using the Device
36
Page 16

User Guide
CD
Ripping
CDs can be ripped directly to the device using the AK CDRIPPER (sold separately).
Turning the AK CD-RIPPER ON/OFF
1. Connect AK CD ripper to Type-C USB port of PPR11 using
proper cable. Drag down notification bar and press [ ]
to use AK CD-ripper.
2. While AK CD-RIPPER is turned on, press [ ] on the
notification bar to stop.
The USB Type-C cable provided with the product is to be used to
connect to the PC or to charge the product.
Dedicated cable is not included in the product package. Separately
purchase a MicroSD card.
Depending on the OTG cable used, the connection may be unstable.
Automatic CD Ripping
1. In [Menu-Settings-CD Ripping], turn on automatic CD
ripping function.
2. Connect the AK CD-RIPPER to the device and insert a CD.
3. Metadata (ID3 tags) for the inserted CD will be retrieved
via Gracenote if Wi-Fi is turned on.
4. CD ripping will begin automatically after the metadata has
been downloaded.
5. When finished, press [OK] when prompted to complete the
automatic CD ripping process.
Manual CD Ripping
1. In [Menu-Settings-CD Ripping], turn off automatic CD
ripping function.
Using the Device
37
Page 17

User Guide
2. Connect AK CD-RIPPER and insert CD, to display [CD
Ripping] at the bottom of notification bar.
3. Press [CD Ripping] and select file format FLAC or WAV to rip.
4. The Gracenote database will be searched for matching CD
metadata after the file format is selected.
5. When the database search is complete, press [Start] to
begin CD ripping.
CD Ripping Results
: Indicates that CD ripping is complete, or that CD ripping
was successfully completed after encountering an error
via error correction.
: Indicates that the song currently being ripped can be
canceled by user.
: Indicates that CD ripping failed due to an error that
can’t be corrected, such as a scratched CD. Also
indicates that CD ripping was canceled by user.
To search the Gracenote database, the device must be connected to
Wi-Fi. Database access time may vary depending on the network
environment.
Please note that metadata for certain CDs may not be available on
the Gracenote database.
You cannot access the Home screen while CD ripping is in progress.
The AK Connect service will be disabled during CD ripping. The
service will automatically restart when CD ripping is completed. CD
Music playback is disabled during ripping.
You can set the desired file format and ripping speed from the
[Menu - Settings - CD Ripping] menu.
Several attempts at correction will be made for data with errors
when the feature is enabled under [Menu - Settings - CD Ripping Error Correction]. Please note that the CD ripping speed will be
affected when this feature is enabled.
Using the Device
38
Page 18

User Guide
Settings
The settings menu allows users to customize the device.
The settings menu may vary depending on the firmware
version.
Setup
1. Select [Menu - Settings] or select [ ] in the notification
bar on the Home screen.
2. Select the desired setting option.
Wi-Fi
Change wireless network settings and turn Wi-Fi ON/OFF.
See page 44 of the manual for more information on setting Wi-Fi.
Bluetooth
Connect a Bluetooth device to listen to music wirelessly.
See [Using Bluetooth] on page 45 for more information.
AK CONNECT
Turn AK Connect on/off and set AK Connect options.
Using the Device
39
Page 19

User Guide
Equalizer
Set the equalizer according to the user's preferences.
PRO EQ: Preset EQ recommended by Astell&Kern.
USER EQ: Adjust the frequencies according to the user's
preferences.
Supported Formats for EQ: PCM [8 ~ 192kHz(8/16/24bit)]
Using the equalizer may negatively affect device performance.
See pages 47 - 49 for more information on using the equalizer.
Gapless Playback
Plays the next song without any interruption.
Gapless playback is only supported between two files
with identical bit rates, sample rates, and channels.
Line-out
Set the voltage value generated when Line-out is activated.
Do not use earphones with the Line Out feature enabled. Doing so
may cause permanent hearing loss.
Left-Right Balance
Adjust the left-right balance for earphones/headphones.
Playback Setting
Selecting Music from the menu sets the location and way
the song is loaded during playback.
Using the Device
40
Page 20

User Guide
CD Ripping
Set the automatic CD ripping function, file format and
ripping speed seetings.
USB mode
Media Device (USB Drive): When connected to a computer,
device appears as a removable drive.
DAC Input: Output sound from a connected computer to
the device.
USB Audio
Select the type of DSD sound being outputted through the
USB Audio out to a connected portable DAC.
Screen Brightness
Adjust screen brightness settings.
Date & Time
Set the current date and time.
Using the Device
41
Page 21

User Guide
Device Name
Set the name of the device.
The maximum name length is 50 characters.
Language
Select the display language.
Supported languages: English, Korean, Japanese,
Chinese (Simplified/Traditional), French, Russian,
German
Keyboard
Select the keyboard language.
Supported languages: English, Korean, Japanese,
Chinese (Simplified/Traditional), French, Russian,
German
Supported languages may vary depending on your location
Power
Automatic power off: The device will automatically power
off after a set time of inactivity.
Turning off the screen: Screen Timeout: The screen will
turn off after a set time when there is no user input.
Set Sleep Timer: Music playback will stop, and the device
will turn off after a set time.
Download
Select a folder for downloaded files to be saved by default.
Using the Device
42
Page 22

User Guide
The default folder is set when using AK Connect to download files.
When [Select Folder] is selected, the user is prompted to choose a
download folder each time a file is downloaded.
Update
System Update: Update the device when a new firmware
version is available.
Application Update: Update the default applications
installed on the device (including the Store) when new
versions are available.
System Information
System Information: View model number, firmware version,
and data storage information. The MicroSD card can be
formatted, mounted/dismounted and data can be deleted.
Legal information: Check open source licenses and regulations.
Formatting the MicroSD card will delete all data on the memory
card. Be sure to backup any important files before formatting.
When formatting the MicroSD card from a computer, be sure to
select the FAT32 file system.
System Restore
DB Restore: Resets and rescans the internal database.
Database initialization time may vary depending on the
number of files stored on the device.
Reset: Resets all user settings back to default settings.
Factory Reset: Deletes all user data and restores the
device to its original factory settings.
Using the Device
43
Page 23

User Guide
Connecting
to Wi-Fi
Connecting to a Wi-Fi Network
1. Press and hold [ ] from the
Notification Bar or select [Menu
- Settings - Wi-Fi] to display a
list of available Wi-Fi networks.
2. Select the desired Wi-Fi network
name to connect to the wireless
network.
Additional information such as
Wi-Fi password may be required
depending on Wi-Fi settings.
requiring browser or other additional certifications are
Networks
not supported.
Wi-Fi Channels 1 through 13 are supported (but channels 12 and
13 are not supported by the FCC).
Channels 12 & 13 will be disabled and not be accessible to
users when operated in USA
Using the Device
44
Page 24

User Guide
Using
Bluetooth
Connect a Bluetooth device to listen to music wirelessly.
Turning Bluetooth ON/OFF
A Bluetooth device must be paired
with the PPR11 prior to use.
Refer to the Bluetooth device's
instruction manual for details.
1. Select [ ] from the home screen,
or select [ON/OFF] from [Menu Settings - Bluetooth].
Bluetooth Pairing
1. Select the appropriate Bluetooth device from the list of
available devices.
Disconnect a Bluetooth Device
1. Press the connected Bluetooth
device and confirm the message
prompt to disconnect the device.
Using the Device
45
Page 25

User Guide
Removing a Bluetooth Pairing
1. Press [ ] to the right of the
paired device to go to settings.
2. Select [Remove] to complete
the process.
Bluetooth Support Specifications
Profile: A2DP, aptX HD
Device performance may be affected during Hi-Res playback.
Do not turn off the device while connected to Bluetooth.
Turn the Bluetooth device off then on in case of issue.
Pairing methods may differ for individual Bluetooth devices. Always
refer to the device instruction manual for details.
When connecting the player to a Bluetooth device, the distance
between the two must be within 20 cm. Audio quality will degrade
with longer distances, and the pairing may disconnect at a distance
of 2 m (6.5 ft) or more. (Distances may vary depending on device and
environment.)
Crosstalk may be heard while using Bluetooth.
For multi-point devices, make the necessary connections prior to
use. Car audio Bluetooth connections are not supported.
Malfunction, noise, and other undesirable effects may occur due to
the device's battery level and the environment.
Signal interference affects data transmission.
(e.g., holding the device while wearing a Bluetooth device, holding
the device while holding another electronic device, etc.)
If the device or Bluetooth headset's radio transmitters are
touching parts of the body, interference may occur.
Transmission strength is affected by walls, corners, partitions,
etc.
Devices using the same frequencies may cause interference.
(e.g., medical devices, microwave ovens, Wi-Fi, etc.)
Areas with an excessive amount of interference or weak signals
can cause playback issues. (e.g., elevators, underground, etc.)
Using the Device
46
 Loading...