

Page 1

PPM41
INSTRUCTIONBOOK
User Guide
Page 2

CONTENTS
Getting Started
Package Contents
PPM 41 at a Glance
Power Management
Charging Connecti
ons Firmware Upgr
ade
_01
02
03
04
05
06
11
Using the Device
Basic Operations
Home Screen N
otification Bar S
tore
AK Connect Listenin
g to Music Playlist M
anagement USB DA
CInstallation
How to Use USB Audio
CD Ripping
Using Bluetooth
Settings
Connecting to a Wireless Network
Equalizer Setup
Miscellaneous
Safety Precautions Tro
ubleshooting Copyrigh
t Certifications Specifi c
ations Registered Tra d
emarks Disclaimers
_02
_03
12
14
15
18
19
25
31
34
35
36
38
40
45
46
49
50
52
52
54
56
56
Page 3
UserGuide
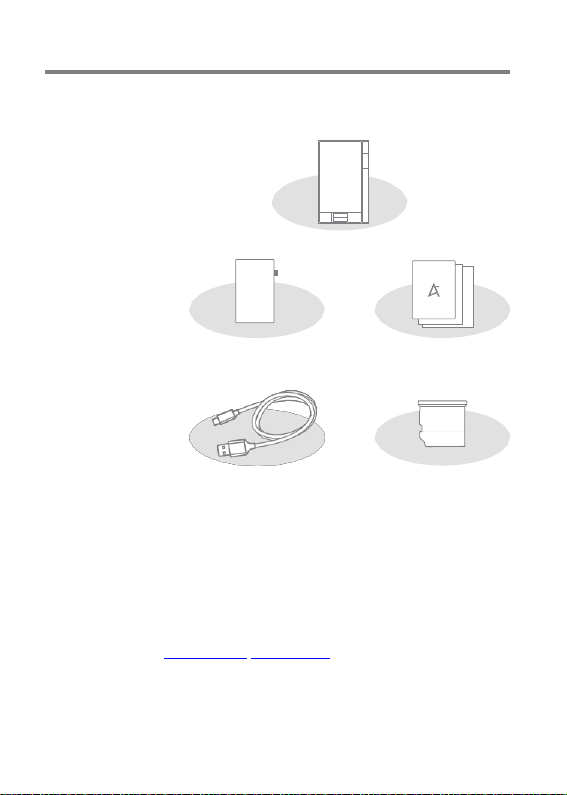
Package
Contents
Contents may be changed without prior notice to improve the
performance or quality of the product.
PPM41
Protective Film
Micro-USB Cable
Protective Film: Protect the device and its screen. Mic
ro-USB Cable: Connect the device to a compute ror ch
arge the device.
Quick Start Guide: Basic overview of device functionality. W
arranty Card: The warranty card is require d for c ustomer a
nd technical support. Do not misplace the c ard.
User Guide: The User Guide can be downloaded from the
Astell&Kern website.
[http://www.astellnkern.com/ > Support > Download]. Mic r
oSD Card Slot Cover: The cover is used to protect the mi cr
oSD card slot when not in use. It is ins talled on the prod
uct by default.
Quick Start Guide
& Warranty Card
microSD Card Slot Cover
Getting S tarted 2
Page 4
UserGuide
PPM41
at a Gla
nce
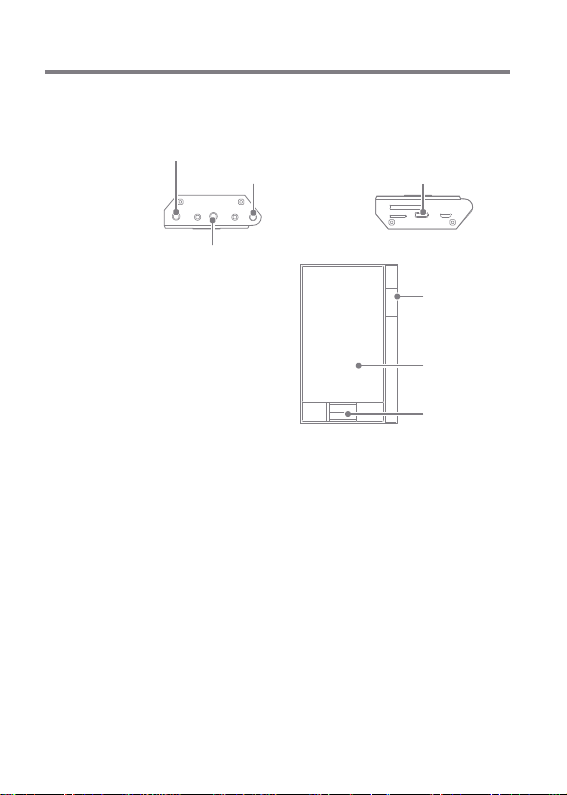
The appearance of the product as well as the printed and
engraved information may vary depending on the model.
Earphone Jack
Power Micro-USB Port
Balanced
Audio Port
Volume
LCD
Touchscreen
Home Button
Earphones: Output sound to connected earphones.
Power: Turn the screen on and off.
Long press - Turn the device on and off.
Balanced Out: Output sound to earphones or headphones
that support balanced audio connections. Connect to an e
xternal audio device by using both the earphone port (g ro
und) and balanced audio port (LR) in conjunction.
Micro- USB Port: Connect to a computer or recharge the d
evice. You can enjoy USB audio by connecting with a portable
USB DAC (refer to p. 35).
Previous/Rewind: Play the previous song or restart the song.
Play/Pause: Play or Pause a song.
Long press - Rewind.
Long press - Show the playback screen.
Getting S tarted 3
Page 5
UserGuide
Next/Fast-Forward: Skip to thenext song.
CD Touchscreen: Display with touch control. Vol
ume: Control the volume by turning the wheel.
microSD Card Slot: Insert a microSD card and access its files.
Home Button: Show the home screen.
Long press: Fast-forward. L
Power
Manage-
ment
Turn On/Off
1. Long-press the [ ] button to turn on the device.
2. While the device is on, long-press the [ ] button to
display a shutdown confirmation message.
3. Press [Confirm] to turn off the device.
This device has an automatic shutdown feature to reduce battery c
onsumption. The device will turn off after a defined period if there i
s no user input. [ - Power Saving - Automatic Shutdown] (See p. 4
3)
Turn the Screen On/Off
1. While the screen is on, press the [ ] button to turn
off thescreen.
2. Press the [ ] button again to turn off the screen.
This device has an automatic timeout feature to reduce battery con
sumption. The screen will turn off after a defined period of time if t
here is no user input. [ - Power Saving - Screen Timeout] (See p. 4
3)
Getting S tarted 4
Page 6

UserGuide
Reset Function
1. In cases of unexpected device failure or freeze, press the
[ ] button for 12 seconds to force a shutdown.
The device can be restarted after a shutdown.
The device can be restarted after a shutdown.
Resetting the device will not affect the stored data or time setting.
Do not use the reset function while the product is in use. Doing so
may corrupt the data on the device.
Charging
Charging using PC
1. Connect the device to the PC using the supplied Micro USB
cable. Charging starts.
Charging time: up to 8 hours (fully discharge, power OFF)
You may have to turn on a computer to start charging depending on
computerspecifications.
When charging via PC connection, the charging time may vary dep
ending on whether the device is turned on or off.
If a computer goes into standby/sleep mode, the device may not be
charged depending on computer specifications.
The built-in batterywill gradually lose capacityover time according
to the number of charges/discharges.
Do not use any micro-USB cable other than the one supplied with
the device. Doi ng so may causea malfunction.
Charging using the adapter
1. Charging is possible by using the 9V 1.67A output adapt
er
(sold separately).
Charging time: up to 4 hours (fully discharge, power OFF)
When using a high-speed charger that is supported with various v
oltages such as 5V/9V/12V, the charging may not proceed normally
and it may cause the product to malfunction.
Getting S tarted 5
Page 7
UserGuide
Connec-
tions
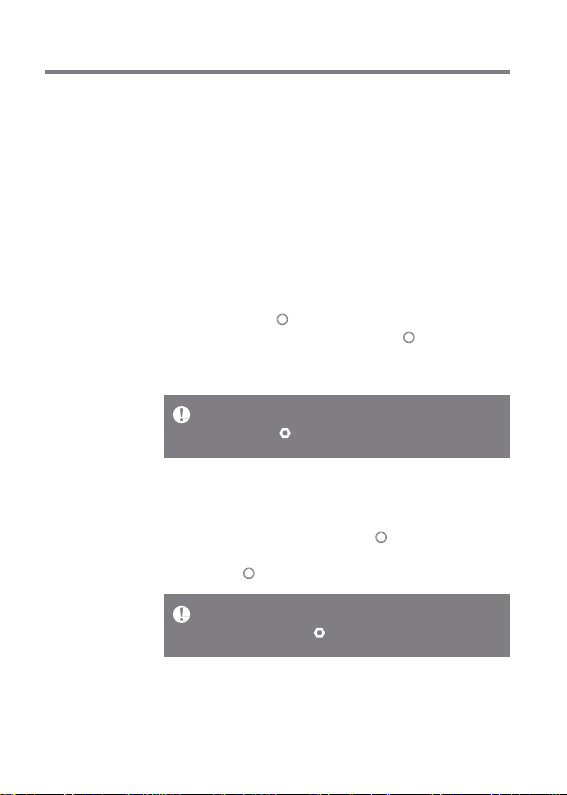
Earphones/Headphones
1. Connect earphones or headphones to the earphones port.
OR
Balanced Earphones/Headphones
1. Connect supported earphones or headphones to the
balanced port.
Balanced Audio Device
1. Connect to an external audio device by using the Earphones
port and Balanced port in conjunction.
OR
Earphones Port Balanced Port(LR)
(Ground)
Astell & Kern balanced cable (PEF12, PEF21) is not supported.
Getting S tarted 6
Page 8
UserGuide
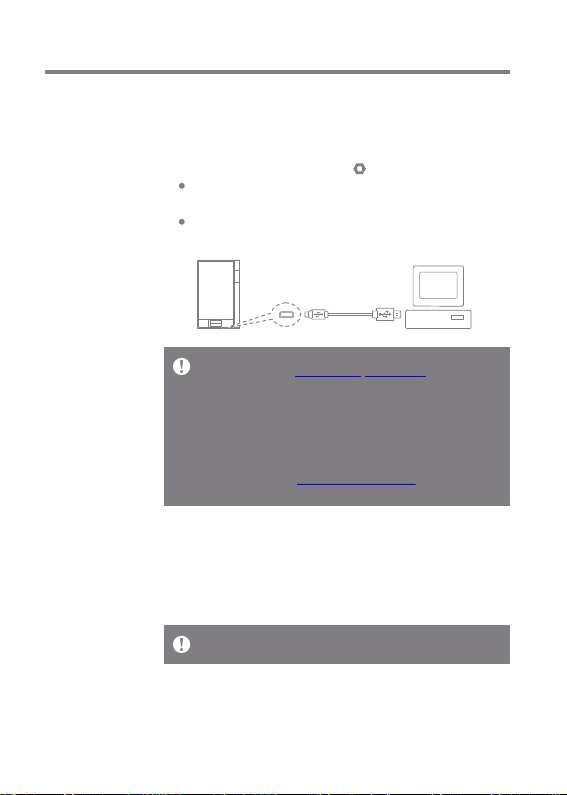
Connecting to a Computer
1. Turn on the device and your PC.
2. Connect the device to your PC as a standard USB device
by using a micro-USB cable. [ - Connect USB] Medi
a Device (USB Drive): Transfer files from a PC to the
device.
DAC input: Listen to music located on a PC through the
device. (See p. 34)
Mac users need to download and install the MTP program from the
Astell&Kern website. [http://www.astellnkern.com Support > Dow n
load]
For an optimal connection, quit any unnecessary programs before c
onnecting the device to the computer.
Only use the micro-USB cable supplied with the device. Doing so m
ay causea malfunction.
Windows XP users require Service Pack 2 and Windows Media Pla y
er 10 to be installed for the computer to recognize the USB devic e.
Download necessary Service Packs and Windows Media Player from
the Microsoft website.http://www.microsoft.com
Disconnecting from the Computer
1. Verify that all operations are completed before attempting
to disconnect the device from the computer.
Disconnecting the device from the computer during an operation (
e.g. file transfer) may corrupt data on the device.
Getting S tarted 7
Page 9

UserGuide
Copy Files/Folders to the Device
1. Tocopy files/folders from your computer, select the desired
files/folders and drag & drop them into the USB device.
Make sure that the micro-USB cable is securely connected.
Note that removing the micro-USB cable or turning off the device or
computer during a file transfer may corrupt data on the device.
File transfer speeds may be affected depending on the computer
and/or OSenvironment.
Getting S tarted 8
Page 10

UserGuide
Delete Files/Folderson the Device
1. Right-click the desired file/folder, and then select [Delete].
2. Select [Yes] in the [Confirm File/Folder Deletion] window
to delete the selected file/folder.
Insert/Remove a microSD Card
1. Refer to the diagram and
gently insert a microSD
card into the microSD c
ard slot.
2. To safely remove a microSD c
ard, select [Safely remove S
D card] from the Notification
Bar or select [Unmount SD card]
from [ - System Information].
3. Gently press the microSD card
to release it from the slot.
Getting S tarted 9
Page 11

UserGuide
Recommended microSDCards
Brand : SanDisk, Transcend
Maximum supported microSD card capacity: 128GB
Notes on inserting 128GB microSD card.
Do not force the microSD card into the slot. Doing so may cause
damage to the device and/or microSD card.
Do not repeatedlyinsert/remove the microSD card.
If the microSDcardis improperlyinserted,it maybecome immovable
or causedamage to the device.
Notes on removing a microSD card
Be sure to safely unmount and remove the microSD card from the
device. Not following the proper procedure may corrupt data and
causeserious damage to the system.
Do not remove the microSD card while it is in use. Doing so may
cause data corruption/deletion, malfunction, and damage to the
microSD card.
Miscellaneous
If the device is unable to recognize the microSD card and/or malf
unctions, format the memory cardbefore use. We recommend usi
ngthe FAT32 format.
Using microSD cards other than the recommended brands may
causedevice malfunction.
A microSD card is not included with thi s device. P lease purchase
separately.
Getting S tarted 10
Page 12

User Guide
Firmware
Upgrade
Wi-Fi Update / OTA (Over- the-Air)
1. Connect to a wireless network.
2. When a new firmware version is available, the screen will
display a Firmware Update Guide window.
3. Select [Update] and choose the items for update.
4. Follow the on-screen instructions and proceed with the
firmware upgrade.
Refer to page 45 of the manua l for more i nformation on connecting to
a wireles s network.
The fir mware upgr ade may not initial ize if the bat tery level is too l
ow. (A minimum batte ry level of 50% is req uired.)
Moving to anoth er screen during a file download wi ll can cel the do w
nload .
Do not disc onnect from the wireless network while do wnloading a f ir
mware upgrade. Do ing so may cau se data co rruption and/or da m age
to the system .
If an err or occur s or the notice in the Notification Ba r disapp ears d uri
ng an upgra de, downlo ad the firmwar e updat e again through
[ - Update - Sy stem Update].
Getting S tarted 11
Page 13
UserGuide
Basic
Operations
LCDTouchscreen
1. This device features an LCD touchscreen that allows you
to perform operations by touch.
Interact with the device by touching the screen to access
various features.
Toprevent damage, do not use a sharp object or use excessive force
when touching thescreen.
Return to the Home Screen
1. Press the [Home] button at any time to return to the
Home Screen.
HomeScreen
Using the Device 12
Page 14

UserGuide
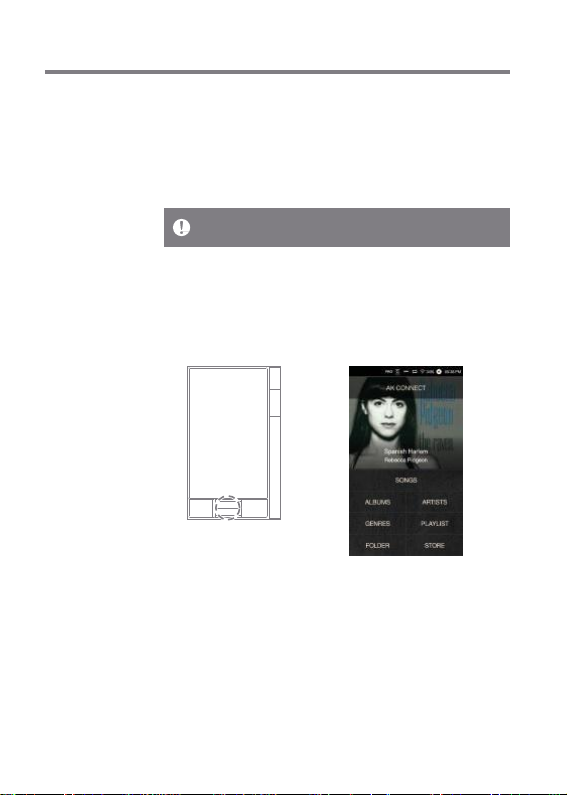
Moving a list in the home screen
1. You can move the list by dragging
the home screen [up] / [down].
Navigating Up/Down in a List
1. Scroll through the list by dragging
the list screen [up] and [down].
Using the Device 13
Page 15
UserGuide
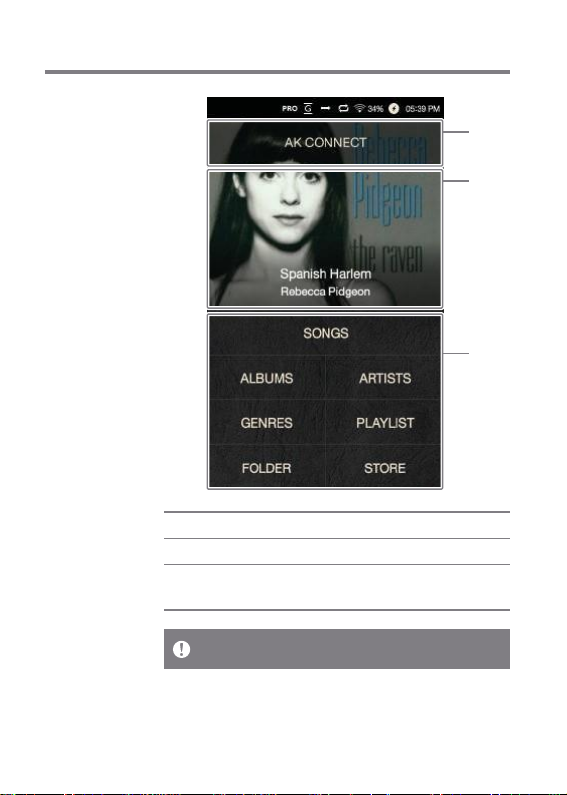
Home
Screen
1
2
3
1 AK CONNECT
2 CurrentSong
3 Search Options
The search options can be long-pressed and dragged to change the
irlocations.
Launches AK Connect.
Currently playing song information.
View the list of songs by different
search options.
Using the Device 14
Page 16
UserGuide
Notification
Bar
1
2
9
10
11
3
4
5
6
7
8
Using the Device 15
12
13
14
15
16
Page 17
UserGuide
1
2
3
4
5
6
7
network.)
8
9
10
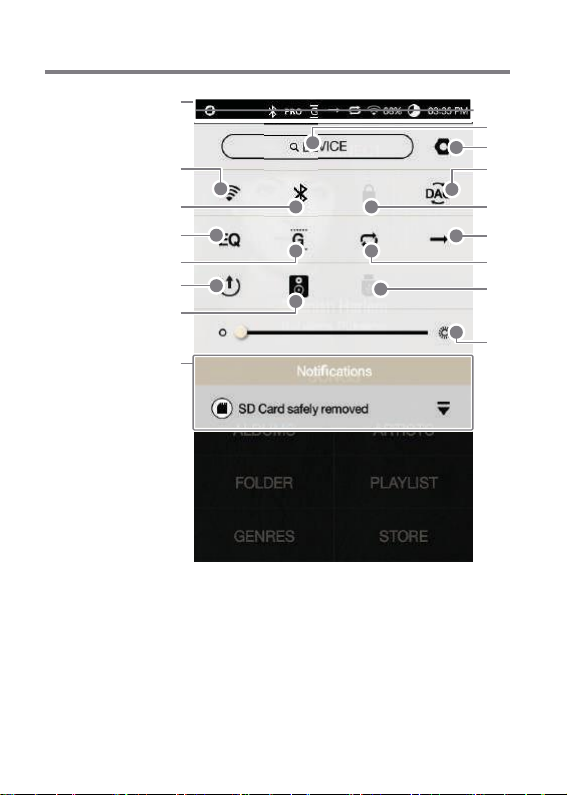
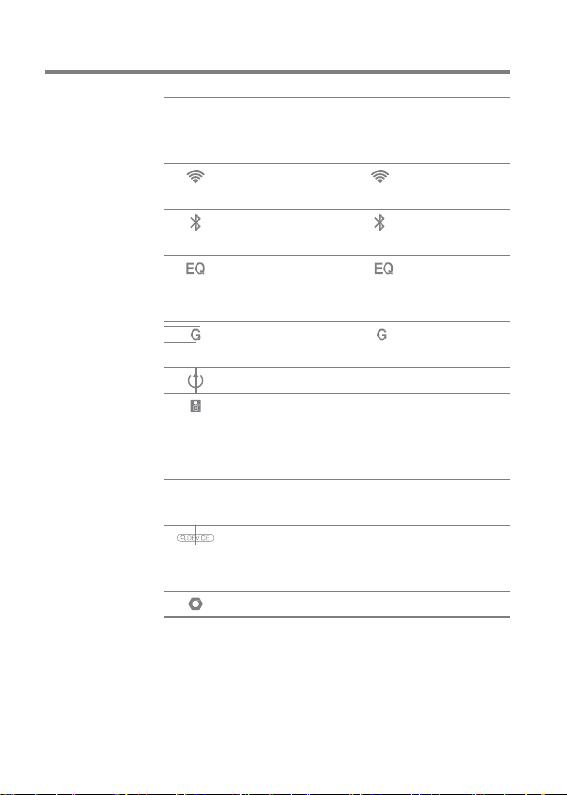
Notification
Notification Bar
Wi-Fi
Bluetooth
EQ
Gapless
Playback
Line Out Turn Line Out on or off.
Wi-Fi Speakers
s Display
FileSearch Enter keywords to display a
Settings Displays a list of settings.
Expand or collapse the notifi
cation bar by dragging the bar
down or up, respectively.
Press [ ] to turn Wi-Fi on
or off.
Press [ ] to turn Bluetooth
on or off.
Press [ ] to turn the EQ o
n or off. The most recent EQ s
ettings are applied by default.
Press [ ] to turn Gapless
Playback on or off.
Turn Wi-Fi speakers on or off.
(Must be on the same
(The icon will become enabled
when AK Connect is turned on.)
Notification contents are
displayed in this area.
list of items containing the
search terms.
Using the Device 16
Page 18
UserGuide
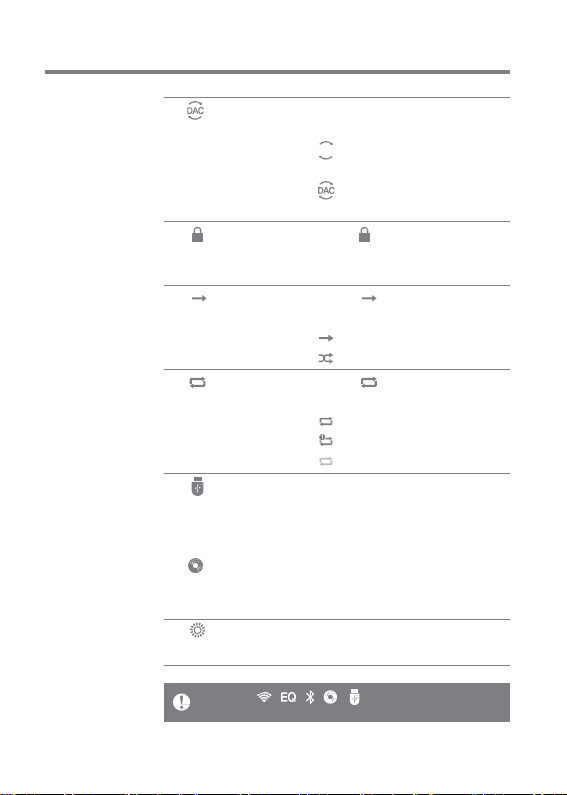
11
PC Connection Select the appropriate mode
Mode
when connected to a computer.
DISK
:USB drive mode for tra
nsferring media files.
:Listen to music located on
a PC through the device.
12
ScreenLock
Press [ ] to turn the screen lock
on or off. The volume wheel is disabled
whenthescreenlock icon is activated.
13
Play Mode
Press [ ] to cycle through
different playmodes.
:Sequential playback.
:Shuffle playback.
14
Repeat Mode
Press [ ] to cycle through
different Repeatmodes.
:Repeat the entire playlist.
:Repeat the current song.
:Disable repeat.
15
USB Audio
Please turn on or off USB audio
output after connecting thedevice
with the portable USB DAC (ref
er to p. 35).
Ripper Power
Turn the CD Ripper on or off.
(Enabled when connected to
the AK CD Ripper.)
16
Screen Br
ightness
Use the adjustment bar to co
ntrol the display brightness.
Long-press [ / / / / ] to move to the corresponding
screen.
Using the Device 17
Page 19

UserGuide
Purchasing
Music from
a Store
Conveniently purchase music from the Store when
connected to a wireless network.
Purchasing Music
1. Connect to a wireless network.
2. Select [Store] from the home screen.
3. Select the desired store.
4. Check the user guide or help menu within each store for
detailed information.
Refer to page 45of the manual for more information on connecting
to a wireless network.
Using the Device 18
Page 20

UserGuide
AK CON
NECT
The PPM41 can access and play back music file s stored o n
a comput er on the same net work as well as output soun d t
hrough Astell&Ker n speaker s.
MQS Streaming Server Installation
1. Visit the Astell&Kern website and download the server in
staller that corresponds to your opera ting system. [h ttp
://www.astellnkern.com > Support > Download].
2. Run the downloaded installe r and follow the on-screen i
nstructions.
3. C heck the User Guide within the progr am for detailed i
nformation on u sing the MQS Stre aming Server.
System Requirements
PC Minimum System Requirements
OS : Windows XP, Windows 7/8/10 (32 & 64-bit)
Mac Minimum System Requirements
OS X 10.7 (Lion) or later
Connecting to the AK Connect Server
1. Turn on the server and connect to
the same network as the PPM41
Run the MQS Stre aming Server
on your computer.
2. Turn on [AK Connect] from the
device settings.
3. Pr ess [AK Connect] from thehome
screen.
Using the Device 19
Page 21

UserGuide
4. A list of servers on the same
network as the PPM41 will b
e displayed.
5. Scroll the screen left and right to s
elect a server. The selected server
will be connected and the server h
ome screen will be displayed.
6. Select a search option at the bott
om of the server home screen to
display a list of music.
Refer to page 45of the manual for more information on connecting
to a wireless network.
Using the Device 20
Page 22

UserGuide
Streaming and Downloading from the Music Server
1. Select a search option from the
server Home Screen to display
a list of music.
2. Select a song to begin streaming.
3. Press the [ ] button atthe
upper-right corner of the music list.
4. Select the desired music, and then
press the [ ] button at the top of t
he screen to begin downloading.
A message on the Notification
Bar will indicate a completed
download.
Depending on network conditions, song loading may be slow or st
reaming maystutter.
Server response may be slow when the server computer is under l
oad.
If you do streaming and download at the same time, it may slow d
own the device’s response time depending on the speed of Wi-Fi n
etworkor server.
Terminating music streaming or pressing the item being downloa de
d withinthe Notification Bar will stop the downloading.
Using the Device 21
Page 23

UserGuide
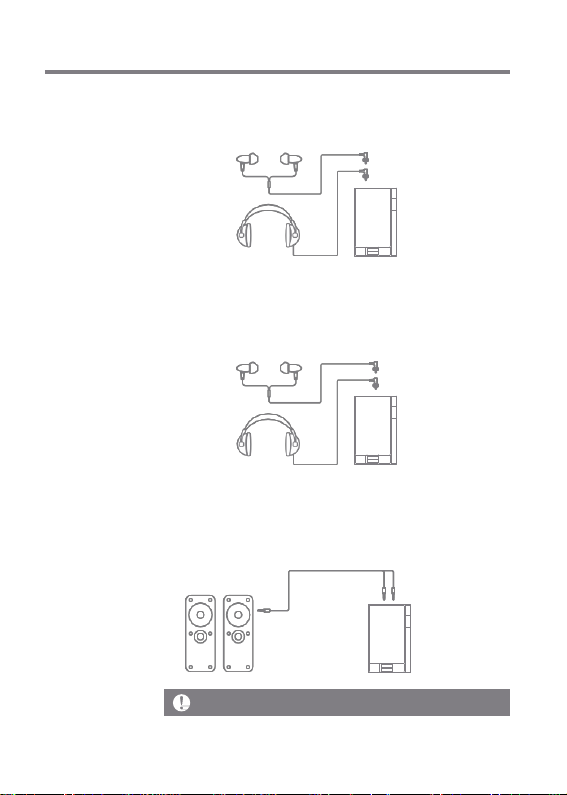
Selecting Speakers
1. Turn on the speaker(s) to be con
nected, and then connect it to th
e same network as the PPM41.
2. Turn on [AK Connect] from the
devicesettings.
3. Press [ ] from the notification
bar to display a list of speakers
available on the same network
as the PPM41.
4. Scroll the screen left and right to
select a speaker. The selected sp
eaker will be connected, and mu
sic will be played back through th
e speaker.
AK Connect Usage Examples
Example 1
LIBRARY SPEAKER
AK T1 PPM4 1
Using the Device 22
Page 24

UserGuide
Example 2
AK500N
LIBRARY REMOTE SPEAKER
Example 3
PPM41
REMOTE & LIBRARY
AK500N
SPEAKER
Using the Device 23
AK T1 PPM41
Page 25

UserGuide
Example 4
LIBRARY SPEAKER
REMOTE
Example 5
PPM41
LIBRARY
or
AK500N
LIBRARY
AKConnectAPP
REMOTE
SPEAKER
AK T1 PPM41 AK500N
AK T1
Using the Device 24
Page 26

UserGuide
Listening
to Music
Selecting Music
1. Select a search option at the bottom of the home screen
to display the playlist.
2. Select a song from the list to begin playback.
Select [Folder] to search music by folder.
Continuous Playback: Approximately 10 hours (Basis: FLAC, 16-bit,
44 kHz, unbalanced output, volume 80, EQ off, LCD off)
Supported Formats: PCM [8~192kHz(8/16/24bit)], DSD 64/128
Listening toMusic
Press [ ] at the top of the music list to display music
options.
: Add the selected file after the current/last song of
the currentplaylist.
: Add the selected file to the playlist.
: Copy the selected file.
: Move the selected file.
: Delete the selected file.
Select an album cover from the home screen to begin
playback.
Turn the [Volume Wheel] to adjust the volume.
Press [ ] during playback to pause and [ ] to resume pl
ayback.
You can also pause/resume playback by pressing the
[ ] button on the device.
Press [ / ] during playback for the previous/next song. Pla
y the previous/next song by pressing the [ / ] button on t
hedevice.
Long-press [ / ] during playback to rewind/fast-forward. Rew
ind/fast-forward by pressing the [ / ] button on the devic
e.
Using the Device 25
Page 27

UserGuide
Drag the progress bar to the desired location during
playback.
Press the [Home] button on the device to go to the Home
Screen.
Press the album cover during playback to display an
additional screen.
: Display the previous screen.
: Display the current playlist.
Press [ ] next to the playlist to edit the playlist or
der.
Press [ ] at the top of the music list to display
music options.
: Add the selected file to the playlist.
: Delete the selected file from the playlist.
: Add the current song to the playlist.
: Display lyrics for the current song.
: Display current song information.
Using the Device 26
Page 28

UserGuide
Playlist Screen
1
2
3
Using the Device 27
4
5
6
Page 29

UserGuide
1
Current
2
PlayAll
3
Playlist
4
List
Indicates the currentlocation.
Locatio
n
Sorting Select a method for
Press to return to the previous screen.
Play all songs from the current playlist.
Displays the playlist for the current location.
sorting the playlist.
5 List View
6Music O
ptions
Select a view type for the list of albums.
Select the checkbox to apply playlist
options.
Using the Device 28
Page 30

UserGuide
Music Player Screen
1
2
3
4
5
6
7
8
9
1
2
PreviousScreen
Album Cover
10
11
12
13
14
15
Return to the previous screen.
Display album covers.
Press the album cover to show
additional functions.
Using the Device 29
Page 31

UserGuide
3 Lyrics
4
Add toPlaylist
5
Song Progress
6
Details
7
Title
8
Artist
9
Play/Pause
10 Playlist
11 Details
12
Song Duration
Progress Bar
13
Previous/
14
Rewind
15
Next/
Fast-Forward
Lyrics for the current song.
Add the current song to a playlist.
Indicates song duration.
Displays bitrate and sampling
frequency data.
Song title information.
File name is displayed when
ID3Tag is unavailable.
Artist name.
Play or pause the current song.
Displays the current playlist.
Displays current song information.
Indicates the song’s total duration.
Press to switch from elapsed ti
me to remaining time.
Indicates song progress. Dr
ag the indicator to move to t
he desired time.
Short press: Previous song.
Long press: Rewind the current
song.
Short press: Next song.
Long press: Fast-forward the
current song.
Using the Device 30
Page 32

UserGuide
Playlist
Manage-
ment
Creating aPlaylist
1. Press [Playlist - Playlists] from the
home screen to display a list of pl
aylists.
2. Press [+] at the upper-right corner
of thescreen.
3. Enter a name for the playlist,
and then press [Add] to create
a newplaylist.
Adding a Song to a Playlist
1. Press [Playlists] to display a list
of playlists.
2. Select a playlist and press [+ Add]
to display a listof songs.
3. Select the desired song, and then
press [+ Add] to add the song to
the selectedplaylist.
Using the Device 31
Page 33

UserGuide
Removing a Song from a Playlist
1. Press [Playlists] to display a list
of playlists.
2. Select the desired playlist, and
then press [ ] at the top of t h
e screen.
3. Select the desired song, and then
press [ ] to remove the song fro
m the selected playlist.
Editing the Playlist Order
1. Press [ ] next to the playlist t
o modify the playlist order.
Playing a Playlist
1. Press [Playlists] to display a list
of playlists, and then press [ ]
at the top of the screen.
2. Select the desired playlist for playback.
3. Press [ ] at the top of the screen
to add the selected playlist after th
e current/last song of the current p
laylist.
Using the Device 32
Page 34

UserGuide
Renaming aPlaylist
1. Press [Playlists] to display a list
of playlists, and then press [
at the top of the screen.
2. Select a playlist to be renamed.
3. Press [ ] at the top of the screen t
o display a rename window.
4. Enter a name for the playlist, and
then press [Rename] to save the
playlist under a new name.
Deleting aPlaylist
1. Press [Playlists] to display a list
of playlists, and then press [
at the top of the screen.
2. Select the playlist to be deleted.
3. Press [ ] at the top of the screen
to delete the selected playlist.
]
]
Using the Device 33
Page 35

UserGuide
USB DAC
Installation
The USB DAC functionality allows the PPM41 to be
recognized as a sound card on a computer. Music from the
computer is played through the device’s earphones port for
an enhanced listening experience.
USB DACSpecifications
Supported OS
Windows XP (32/64-bit) / Windows 7 (32/64-bit) /
Windows 8 (32/64-bit) / Windows 10(32bit/64bit)
OS X 10.7 (Lion) or later
USB DAC Support Specifications
Supported Formats: WAV, FLAC, WMA, MP3, OGG, A
PE (Normal, High, Fast), AAC, ALAC, AIFF, DFF, DSF
Sample Rate: 44.1 kHz – 96 kHz
Bit Rate: 16-bit/24-bit
Control the volume with the PPM41's volume wheel.
Sound will not play back for files that exceed the supported formats.
Volume control is unavailable when the LCD screen is turned off d
uring USB DAC connection.
The Previous, Play, and Next buttons are unavailable during USB
DACconnection.
Playback may stutter when computer performance is slow or the U
SB connectionis experiencing heavy usage.
There may be issues with audio-to-video synchronization during vi
deo playback depending on the sound quality and operating enviro
nment.
Volume cannot be adjusted via the Windows volume control. The v
olume wheel on the device or volume control on the appropriate pr
ogram must be used to adjust the volume.
Using the Device 34
Page 36

UserGuide
How to Use
USB Audio
You can enjoy USB audio by linking with a portable amp and
DAC available in the market.
How to Link Portable USB DAC
1. Connect the device’s micro USB jack with the portable
USB DAC with dedicated cable.
2. Press [ ] after scrolling down the notification bar.
3. Once [ ] is activated, you can enjoy the music through t
he portable USB DAC’s audio output jack.
The micro USB cable that comes packaged with the device is avail
able for power recharging only by connecting with the PC.
For instructions on the dedicated cable, please refer to the manual
of the portable USB DAC manufacturer.
How to Change USB Audio DSD Output Type
You can change the output type of DSD data coming out of
USB audio.
1. Select a DSD output type on [ - USB audio].
PCM: The device’s DSD is converted into PCM and comes
out through USB audio.
DoP: The device’s DSD is converted into DoP and comes
out through USB audio.
The portable USB DAC must be able to receive digital input through
the micro USB’s OTG.
Output may not be made properly depending on the digital input s
pecs of the micro USB of the portable USB DAC. This is not a defect i
n the device and not a ground for exchange or refund.
In the case of using DoP as a DSD output type, no sound may come
out except noise depending on the specs of the portable USB DAC.
Using the Device 35
Page 37

UserGuide
CD Ripping
Connect the AK Ripper (sold separately) to rip CDs.
Turning the AK Ripper On/Off
1. You can use the AK ripper once you connect the device w
ith the AK ripper and press [ ] after scrolling down the n
otification bar.
2. While the AK Ripper is turned on, pull down the notification
bar and press the CD ripping icon to stop the AK Ripper
operation.
Automatic CD Ripping
1. Connect the AK Ripper and insert a CD.
2. The metadata (ID3 tags) for the inserted CD will be retrieved
via Gracenote.
3. CD ripping will begin automatically after the metadata
has been retrieved.
4. When finished, press [OK] on the results prompt to
complete automatic CD ripping.
Manual CDRipping
1. When the AK Ripper is connected and a CD is inserted,
the [CD Ripping] menu will be activated on the home screen.
2. Press the [CD Ripping] menu and select the desired file
format (FLAC or WAV).
3. The Gracenote database will be searched for matching
CD metadata after the file format is selected.
4. When the database search is complete, press [Start] to
begin CDripping.
5. Rip only selected songs.
Using the Device 36
Page 38

UserGuide
CD RippingResults
: Indicates that CD ripping is complete, or that although
an error occurred, CD ripping was successfully comp l
eted via error correction.
: Indicates that the song currently being ripped can be
canceled via user input.
: Indicates that CD ripping failed due to a scratch on
the CD or other similar reasons. Also indicates that
CD ripping was canceled due to user interruption.
To search the Gracenote database, the PPM41 must be connected t
o the Internet via Wi-Fi. The database access time may vary depe n
ding on the networkenvironment.
Please note that metadata for certain CDs may not be available on
the Gracenotedatabase.
You may not access the Home screen while CD ripping is in progre
ss.
The AK Connect service will be disabled during CD ripping. The se r
vice will automatically restart when CD ripping is completed.
Music playback will be disabled during CD ripping, and tracks that h
ave been ripped will not be available for playback until the entire C
D has beenripped.
You can set the desired file format and ripping speed from the [
- CD Ripping] menu.
Several attempts at correction will be made for data with errors w
hen the feature is enabled under [ - CD Ripping - Error Correction
]. Please note that the CD ripping speed will be affected when this
featureis enabled.
Using the Device 37
Page 39

User Guide
Using Bl
uetooth
Connect a Bluetooth device to listen to music wirelessly.
Turning Bluetooth On/Off
A Bluetooth device must be paired
with the PPM41 prior to use. Refer
to the Bluetooth device's instruction
manualfor details.
1. Select [ ] from the Notification B
ar, or select [On/Off] from [ - Blu
etooth].
Bluetoot h Pairin g
1. Select the appropriate Bluetooth device from the list of
available devices.
Termina ting a Blu etooth Connection
1. Press the connected Bluetooth
device and confirm the message
prompt to disconnect the device.
Using the Device 38
Page 40

UserGuide
Removing a Bluetooth Pairing
1. Press [ ] to the right of the p
aired device to be redirected
to the settings screen.
2. Select[Remove Pairing] to
complete the process.
Bluetooth Support Specifications
Profile: A2DP,aptX
Deviceperformance may be affectedduring Hi-Fi playback.
(48 kHz or lower is recommended.)
Do not turn off the device while connected to Bluetooth.
Power cycle the Bluetooth device in case of malfunction.
Pairing methods may differ for each individual Bluetooth device. A
lways refer to the respective instruction manual for details.
When connecting the product to a Bluetooth device, the distance b
etween the two must be within 20 cm.
Audio quality will degrade with longer distances, and the pairing m
ay disconnect at a distance of 2 m (6.5 ft) or more. (Distances may va
ry depending on device and environment.)
Crosstalk may be heard while using Bluetooth.
For multipoint devices, make the necessary connections prior to u
se.
Car audio Bluetooth connections are not supported.
Malfunction, noise, and other undesirable effects may occur dueto
the device's battery level and theenvironment.
If signal interference affects data transmission. (e.g. holding the
device while wearing a Bluetooth device, holding the device while
holding another electronicdevice, etc.)
If the deviceor Bluetooth headset's radio transmittersare touching
parts of the body.
If the transmission strength is affected by walls, corners,
partitions, etc.
If devices using the same frequencies cause interference. (e.g.
medical devices, microwave ovens, Wi-Fi, etc.)
Areas with an excessive amount of interference or weak signals.
(e.g. elevators, underground, etc.)
Using the Device 39
Page 41

UserGuide
Settings
Set up the device according to the user's needs. The settings
menu may vary depending on the firmware version.
Setup
1. Select [ ] from the home screen notification bar.
2. Select the desired item for setup.
Wi-Fi
Change wireless network settings and turn Wi-Fi on or off.
Refer to page 45 of the manual for more information on setting a
wirelessnetwork.
Bluetooth
Connect a Bluetooth device to listen to music wirelessly.
Refer to [Using Bluetooth] on page 38 of the manual for more info
rmation on setting up a Bluetooth connection.
AK CONNECT
Set whether to use AK Connect.
Using the Device 40
Page 42

UserGuide
Equalizer
Set the equalizer according to the user's preferences. P r
o EQ: EQ Preset recommended by professionals. Use r
EQ: Adjust the frequencies according to the user's pre f
erences.
Supported F ormats for EQ: PCM [8 – 192 kHz (8/16/24-bit)]
DSD [64/128]
Using the equalizer may negatively affect device performance. Ref
er to pages 46 - 48 of the manual for more information on using th
eequalizer.
Gapless Playback
Play the next song without any interruptions/silence.
Gapless playback is only supported between two files
with identical bit rates, sample rates, and channels.
Line Out
Turn Line Out on or off.
Enabling Line Out and pressing [Line Out] on the volume
control window will lock the volume level at maximum.
Do not use earphones with the Line Out feature enabled. Doing so
may cause permanent hearingloss.
Display BalancedOut
You can display Balanced Out on the volume screen.
Using the Device 41
Page 43

UserGuide
Left-RightBalance
Adjust the left-right balance for earphones/headphones.
CDRipping
Set the automatic CD ripping function as well as the file
format and ripping speed.
USBAudio
It sets up the output type of DSD coming out through the
portable USB DAC.
Screen Brightness
Adjust screen brightness settings.
Theme
Change thetheme.
Date & Time
Set the current date and time.
Device Name
Set the name of the device.
The maximum name length is 30 characters.
Using the Device 42
Page 44

UserGuide
Language
Select the display language.
Supported languages: English, Korean, Japanese, Chin
ese (Simplified/Traditional), French, Russian, German
Keyboard
Selectthe keyboard language.
Supported languages: English, Korean, Japanese,
Chinese (Simplified/Traditional), Russian
Power
Automatic Shutdown: The device will turn off after a
defined period if there is no user input.
Screen Timeout: The screen will turn off after a defined
period when there is no user input.
Sleep Timer: Music playback will stop, and the device will
turn off after a defined period.
USB Connection
Media Device (USB Drive): Connect to a computer to
transfer media files.
DAC Input: Listen to music located on a PC through the device.
Download
Select a folder for downloaded files.
The default folder is set when using AK Connect to download files.
When [Select Folder] is selected, the user is prompted to choose a
download folder each time a file is downloaded.
Using the Device 43
Page 45

UserGuide
Update
System Update: Update the system when a new version
is found.
Application Update: Update the default applications
(including the Store) when new versions are found.
System Information
System Information: View model number, firmware version,
and data storage information. The microSD card can be
mounted/dismounted, and data can be deleted.
Formatting the microSD card will delete all data on the memory c
ard. Be sure to backup any important files before formatting.
When formatting the microSD card from a computer, be sure to sel
ect theFAT32 system.
System Restore
Database Initialization: Reset the internal database. T
he database initialization time may vary depending on t
he number of files stored on the device.
Default Settings: Revert all user settings back to their
original settings.
Factory Reset: Delete all user data and restore the device
to its original factory settings.
Using the Device 44
Page 46

UserGuide
Connecting
to a Wir
eless N
etwork
Connecting to a Network
1. Long-press [ ] from the Noti
fication Bar or select [ -
Wi-Fi] to display a list of access
points (AP).
2. Select the desired AP to connect
to the wireless network.
Additional information (en
cryption key, index, etc.) m
ay be required depending
on the network settings.
3. Long-press the network name
and select [Network Settings] to
edit specific network settings.
Networks requiring browser or other additional certifications are
not supported.
Channels 1 through 13are supported (But, channels 12 and13 are no
t supported for FCC).
Using the Device 45
Page 47

UserGuide
Equalizer
Setup
Equalizer Setup
1. Long-press [EQ] from the
Notification Bar, or turn on
the feature from [ - Equalizer].
2. Press [Pro] from the drop-down
list and select [Add New].
3. Enter a name for the custom
EQ settings and select [Add].
Using the Device 46
Page 48

UserGuide
4. Adjust the frequencies according
to the user's preferences.
Reset Equalizer
1. Select the desired EQ setting
and select [Reset] to revert the
EQ to its default settings.
Using the Device 47
Page 49

UserGuide
Delete Equalizer
1. Select [Delete] and choose the
desired EQ setting for deletion.
2. Press [Confirm] to complete
process.
Rename Equalizer
1. Select [Rename] and enter
a new name for the EQ setting.
2. Press [Rename] to complete
the process.
Using the Device 48
Page 50

UserGuide
Safety Pre
cautions
Device
When a plug is inserted into the earphones, balanced, or
USB port, do not apply any force or shock to the plug.
Do not insert any metal objects (coins, hairpins, etc.) or
flammable debris into the device.
Do not place heavy objects on the device.
In case the device gets wet (rain, water, chemicals, medi
cine, cosmetics, sweat, moisture, etc.), do not power on t
he device and allow it to dry thoroughly. Contact the nea
rest iriver Customer Support Center.
(Malfunctions due to exposure to liquids will be repaired
for a fee regardless of the warranty period and such d
amage may not be repairable.)
Avoid exposing the device to direct sunlight o r extreme
temperatures (-10℃ - 50℃; 14°F - 122°F) such as the
inside of a car during the summer.
Do not store or use in hot and humid places such as saunas.
Avoid places with excess moisture, dust, or smoke.
Do not use for extended period on blankets, electric
blankets, or carpet.
Do not place near a fire or in a microwave.
Never attempt to disassemble, repair, or alter the product.
Do not store for extended periods in a confined space
with the power on.
Do not place the device near magnetic objects (magnets,
televisions, monitors, speakers, etc.).
Never use chemicals or cleaning products on the device
since they can damage the paint and surface coating.
Avoid dropping or subjecting the device to a strong
impact (excessive vibration, etc.).
Do not press multiple buttons simultaneously.
Do not disconnect the micro-USB cable during data transfer.
When connecting the micro-USB cable, use a USB port o
n the back of the PC. Connecting to a defective or dam a
ged USB port may damage the device.
Displaying one image for an extended period may cause
screen burn-in(afterimage).
Miscellaneous 49
Page 51

UserGuide
Using poor quality protective films or adhesive stickers on
the screen may cause damage.
Do not insert any foreign objects into the earphones port.
If playing for extended periods, the device can be very hot,
so please keep in mind when using.
Other
Do not use earphones/headphones or operate the product
while operating any type of vehicle. It is not only dangerous
but may be a violation of the law in certain regions.
Do not use the product during physical activities (driving,
walking, hiking, etc.).
Always use in a safe environment to avoid therisk of accidents. A
lways be aware of your surroundings when using the d e
vice while moving.
Avoid using the device during thunderstorms to reduce
the possibility of electric shock.
If there is a ringing in the ears during or immediately after
use, reduce the volume or discontinue using the product
and obtain medical advice.
Do notlisten to music at excessivevolumes for extended periods.
Do not use the earphones/headphones at excessive volumes.
Be careful not to get the earphones/headphones caught
in other objects.
Do not sleep with earphones in your ears or leave them in
for extended periods.
Trouble-
shooting
Check for solutions to commonproblems.
1. The device won't turn on.
The battery may need to be recharged. Charge the
device for at least one hour and try again.
Reset the device and try again. (See p. 5)
Miscellaneous 59
Page 52

UserGuide
2. The device will not charge when connected to a computer
via USB cable.
Use a USB port on the back of the computer, and check
that the USB port is functioning properly.
Check that the USB cable is connected correctly.
3. The computer won't recognize the device or an error
occurs when connected.
Use a USB port on the back of the computer. C
heck that the USB cable is connected correctly.
For Windows XP, verify that Service Pack 2 (or higher)
and Windows Media Player 10 (or higher) are installed.
Check if the deviceconnectsproperly on a different computer.
4. The screen turns off repeatedly.
The screen turns off automatically after a defined period
ower Saving - Screen Timeout].
5. The screen does not display images properl
y. Check the screen for debris.
6. There is no sound, or there is static/interferenc
e. Check that the volume setting is above [0].
Check that the earphones are plugged in properly, and
make sure debris isn't obstructing the port connection.
Check if the music file is corrupted.
Verify that the audio settings have been properly set.
(Balanced out, line out, etc.)
7. A file does not play, or the product is unstable when a
certain file is used.
The following may occur due to the condition of the file:
Playback is unstable or difficult.
The product may not work normally.
The file may sound different from a computer.
There may be a difference in the performance of
playback orother functions.
There may be differences in the playable specs.
A file conversion or use of a different file is recommended.
- P to reduce battery consumption. Set the time at [
Miscellaneous 51
Page 53

UserGuide
Copyright
Certifi-
cations
iriver Limited retains the rights to patents, trademarks, copyrights, a
nd other intellectual property rights related to this manual.
No contents of this user manual may be duplicated or repr
oduced in any format or by any means without the prior appr
oval of iriver.
Using or reproducing, in whole or part, the contents of this
document is subject to penalties.
Software, audio, video, and any other copyrighted contents ar
e protected in accordance with relevant copyright laws. T
he user accepts all legal responsibility for the unauthorized r
eproduction or distribution of the copyrighted contents from
thisproduct.
Companies, organizations, products, people, and events
used in the examples are not based on actual data.
iriver has no intention to be associated with any company, i
nstitution, product, person, or incident through this instruction
manual, and no such inference should be made.
It is the responsibility of the user to comply with applicable
copyright laws.
© 1999-2016 iriver Limited. All rights reserved.
The PPM41 was designed and audio-tuned under th
e advisement of MSD.
KC / FCC / CE / TELEC
Class B Device (Communication equipment for residential use):
This is a Class B Device and is registered for EMC requirements f
or residential use. This device can be used in residential a n
d all other areas.
FCCID:QDMPPM41
This device complies with Part 15 of the FCC Rules. Operation is su
bject to the following two conditions: (1) this device may not cause h
armful interference, and (2) this device must accept any interfere n
ce received, including interference that may cause undesired ope ra
tion.
Miscellaneous 52
Page 54

UserGuide
(b) For a Cla ss B digital device or peripheral, the instructions furnished
the user shal l include the following or s imil ar statement, placed in a p
rominent location in the text of the manual: NOTE: This equipment h a
s been tested and found to comply with the limits for a Class B digit al
device, pursuant to part 15 of the FCC Rules. These li mits are desi gne
d to provide reasonable protection against harmful interference in a res
idential installation.
This equipment generates, uses and can radiate radio frequency ener
gy and, if not installed and used in accordance with the instructions, m
ay cause harmfu l interference to radio communications. However, th
ere is no guarantee that interference will not occur in a particular ins t
allation. If this equipment does cause harmf ul interference to radio or t
elevision reception, which can be determined by turning the equip men
t off and on, the user is encouraged to try to correct the interfere nce b
y one or more of the following measures:
-Reorient or relocate the receiving antenna.
- Increase the separation between the equipment and receiver.
-Connect the equipment into an outlet on a circuit different from that
to which the receiver is connected.
- Consu lt the dealer or an experienced radio/TV technician for help
Body-Wornoperation
This device was tested for typical body-worn operations with the back
of the portable musi c player kept 5mm. from the body. To maintain c o
mpliance requirements, use only belt-clips, holsters or sim ilar acc e ss
ories that maintain a 5mm separation distance between the user’s Bo
dy and the back of the Portable musi c player, including the antenn
a. The use of belt-clips, holste rs and simil ar accessories should not c
ontain metal lic components in its assembly. The use of accessories t
hat do not satisfy these requirements may not comply with CE RF ex
posure requirements, and should be avoided.
Body-worn accessory exposure conditions “Specific information must
be included in the operating manua ls to enable users to select
body-worn access ories that meet the minimum test separation
distance requirements. Users must be fully informed of
the operating requirements and restrictions, to the extent that the ty pi
cal user can easily understand the information, to acquire the requi re
d body-worn accessories to maintain compliance. Instructions on h ow
to place and orient a device in body-worn accessories, in accorda nce
with the test results, should also be included in the user instruct ion s.
All supported bodyworn accessory operating configurations mus t be cl
early disclo sed to users through conspicuous instructions in the user
guide and user manual to ensure unsupported operations are av oided.
All body-worn accessories containing metall ic components mu st be t
ested for compliance and clearly identified in the operating man ual. T
he instruction must inform us ers to avoid using other body-wor n acc
essories containin g metalli c components to ensure RFexposure compli
ance.”
Miscellaneous 53
Page 55

UserGuide
Model
B
Body
Display
Su
Formats
Sa
OutputLevel
Low
High
L
DAC
Decoding
Input
Outputs P
L
U
Wi
Bluetooth
Dimensio ns
Operating
Feature
Frequency
Response
P
Low
High
Line
Specifi
- catio
ns
General Specifications
ody Color
Material
pported Audio
mple rate
Phone Out
ine Out
hone Out
ine Out
SB Audio
-Fi
Temperature -10℃ ~ +50℃
Enhancements
Audio Specifications
hone Out
Out ±0.253dB(Condition: 20Hz~20kHz)Unbalance/
PPM41
Aluminum
4inch WVGA(480x800) Touch Screen
WAV, FL AC, WMA, MP3, OGG,
APE(Normal, High, Fast), AAC, ALAC,
AIFF, DFF, DSF
PCM : 8kHz~ 384kHz
(8/16/24/32bits per Sample)
DSD Native: DSD64(1bit 2.8MHz), Stereo/
DSD128(1bit 5.6MHz), Stereo /
DSD256 (1bit 11.2MHz),Stereo
Gain Unbalance 2 Vrms/ Balance 2Vrms
(Condition NoLoad)
Gain Unbalance 4 Vrms/ Balance 7Vrms
(Condition NoLoad)
1.97 Vrms (Condition No Load)
AKM AK4490 x1 (Single DAC)
Support up to 32bit/384kHz
Bit to Bit Decoding
USB Type C input (for charging &
data transfer (PC & MAC))/
Connection Mode: MTP(Media Device)
PHONES(3.5mm)/
Balanced Out(2.5mm,only4-polesupported)/
PHONES(3.5mm)/
BalancedOut(2.5mm, only4-polesupported)/
micro USB Connection/
PCM : Up to 32bit 384kHz/DSD 2.8/5.6MHz
802.11b/g/n(2.4GHz)
V4.0 (A2DP, AVRCP) /aptX HD
Firmware upgradesupported(OTA)
Gain ±0.251dB(Condition:20Hz~20kHz)Unbalance /
±0.251dB(Condition: 20Hz~20kHz)Balance
Gain ±0.136dB(Condition:20Hz~20kHz)Unbalance/
±0.130dB(Condition: 20Hz~20kHz)Balance
±0.254dB(Condition: 20Hz~20kHz)Balance
Miscellaneous 54
Page 56

UserGuide
S/N P
High
L
Crosstalk
High
L
THD+N P
L
IMD SMPTE
High
L
Output
impedance
P
L
Cl
Reference
hone Out Low Gain
ine Out
Phone Out Low Gain -110dB @ 1kHz, Unbalance/
ine Out
hone Out Low Gain 0.004% @ 1 kHz, Unbalance/
ine Out 0.0007% @ 1 kHz, Unbalance/
Phone Out Low Gain 0.0008% 800Hz 10kHz(4:1) Unbalance/
ine Out 0.0006% 800Hz 10kHz(4:1) Unbalance/
hone Out Balancedout 2.5mm (1ohm)/
ock Jitter 30ps(Typ) / Reference Clock Jitter
Storage Capacity
Built-in Memory
External Memory
Battery
Capacity 6,200mAh 3.7V Li-Polymer Battery
Supported OS
Supported OS
ine Out
Clock Jitter 0.2ps(VCXOClock)
110dB 이하 @ 1kHz, Unbalance/
109dB 이하@1kHz, Balance
Gain 113dB 이하 @1kHz, Unbalance/
115dB 이하@1kHz, Balance
-130dB @1kHz, Balance
Gain -107dB @1kHz, Unbalance/
-128dB @1kHz, Balance
0.0007% @ 1k Hz, Balance
High Gain 5% @1kHz, Unbalance/5.5%
@1kHz, Balance
0.0007% @ 1k Hz, Balance
0.0008% 800Hz 10kHz(4:1)Balance
Gain 0.35% 800Hz 10kHz(4:1) Unbalance/
0.41% 800Hz 10kHz(4:1) Balance
0.0006% 800Hz 10kHz(4:1)Balance
PHONES 3.5mm(2ohm)
(VCXO Clock)0.2ps(Typ)
64GB[NAND]
microSD(Max. 256GB) x 1 /
SD(Max.256GB)
Windows XP, Windows 7,8,10(32/64bit)
MACOS X 10.7. and up
Miscellaneous 55
Page 57

UserGuide
Registered
Trademarks
Disclaimers
Windows 2000, Windows XP, Windows 7, Windows 8,
Windows 10 and Windows Media Player are trademarks of
Microsoft Corp.
The manufacturer, importer, and distributor shall not be li
able for damages including accidental and personal injury
due to the improper use or operation of this product.
The information in this user manual was written based on
current product specifications. The manufacturer, iriver L
imited, is adding new complementary features and will c
ontinue to apply new technologies in the future.
All specifications may be changed without prior notice. Th e
re is no warranty against data loss due to the use of this pr o
duct.
FCC Caution Any changes or modifications
not expressly approved by the party
responsible for compliance could void the
user's authority to operate this equipment.
Risk of explosion if battery is replaced byan incorrect type. Dispose
of used batteries according to the instructions.
Miscellaneous 56
 Loading...