

Page 1
Safety Instruction & Caution
1. Keep the device from heating sources as it may explode.
2. Avoid dropping and heavy impact to the device. This could
damage or shorten the life span of the product.
QL200User Manual
3. Do not attempt to disassemble or repair the device, this
may void the warranty.
4. If the device gets wet, turn off the power.
5. D
o not use chemical products to clean
this devi
ce.
6. The Charger is to be provided by the manufacturer.
7. When storing for long period of time, make sure to keep
device in a place that is room temperature and dry
.
8. If any medical equipment is used, make sure that the
device is well protected from electric waves, if necessary,
get help from medical doctor
.
9. This product is compliant with bluetooth version 2.0
specification. For the information on compatibility,
contact the manufacturer of the device or customer service
center.
10. Some countries may prohibit wearing the headset on two
ears while driving. Comply with the laws and regulations
related to the use of mobile phone while driving within your
state or province.
Page 2
Package Contents
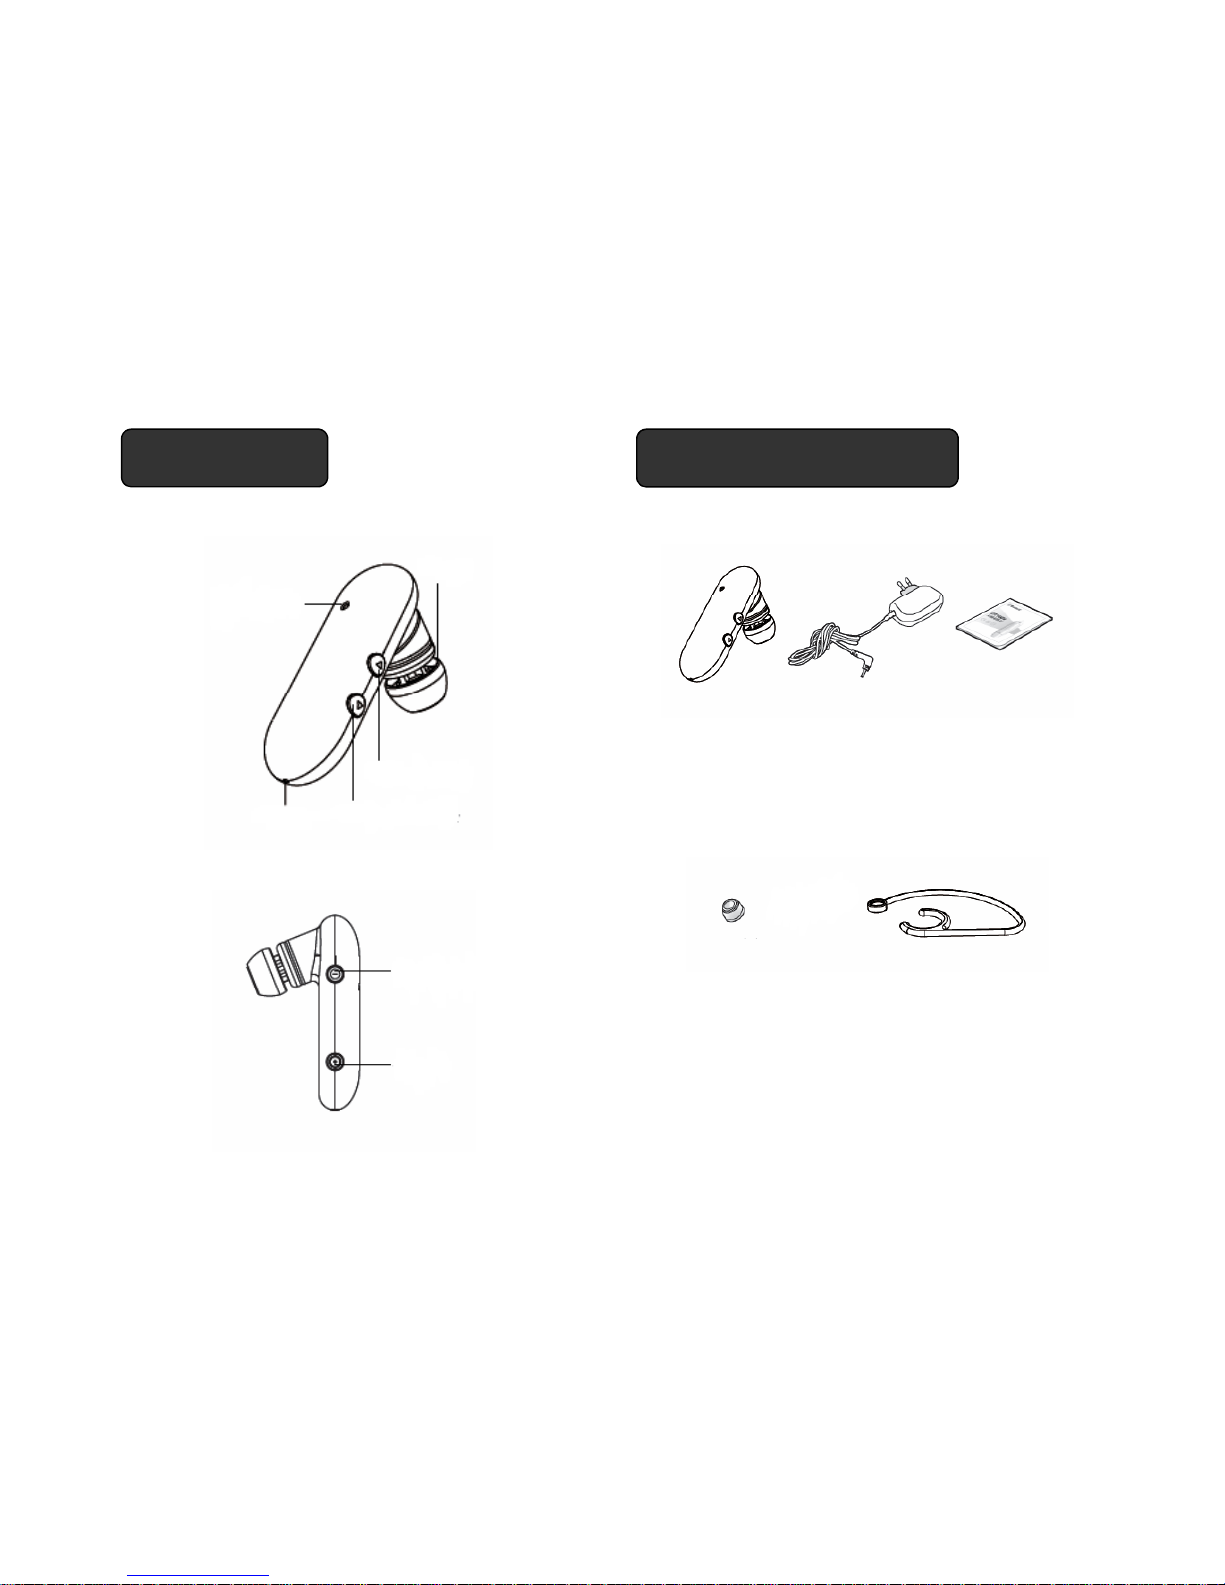
Features
Speaker
S
tatus L
ED
Volume Up Button
Bluetooth Headset Charger User Manual
Microphone
Volume Down Button
Multifunction
Extra Ear Pad Ear Loo
p
Button
Charging
Port
p
Page 3
Charging Power On / Off
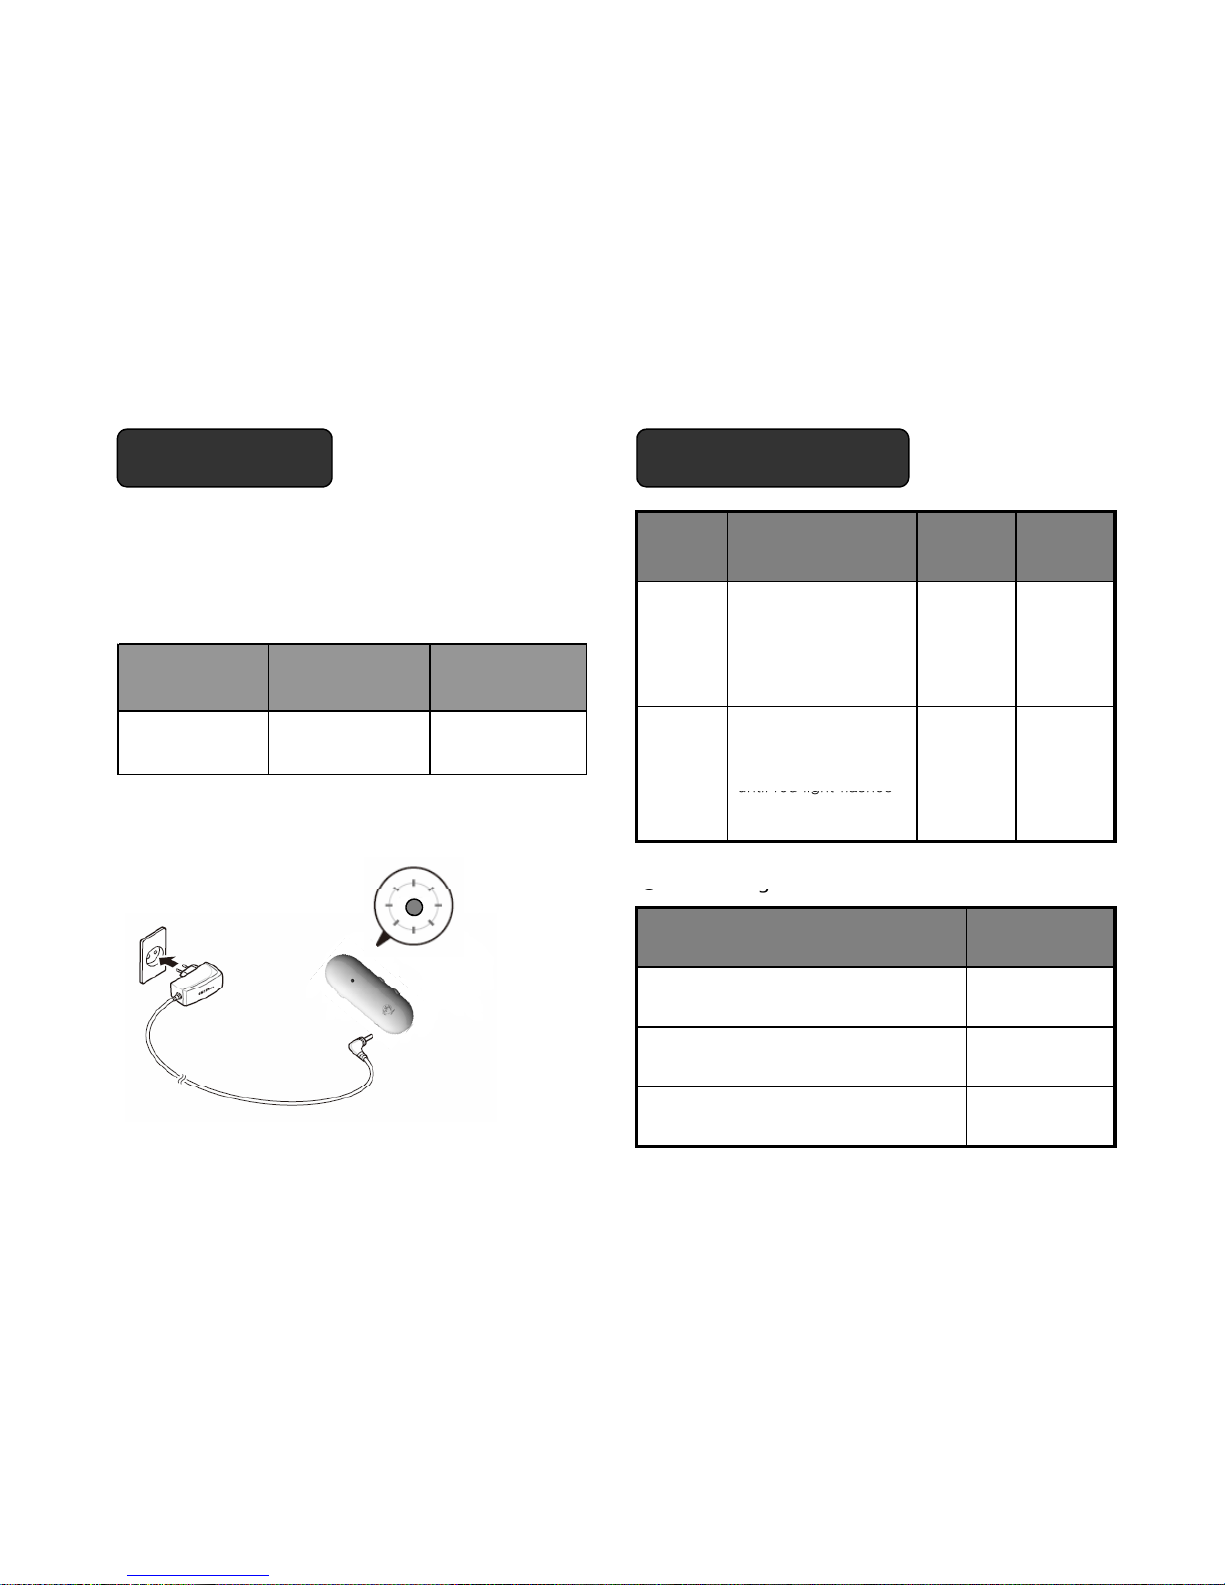
This headset has its own battery inside. The internal battery
must be fully charged before first time use.
Function Instruction
Signal
sound
Indicator
light
● Charging & Operating Time
Charg ing Time Ta lk Time Standby Time
On
Press and hold down
Multifunction button
until blue light flashes
(Approx. 3 seconds)
Melody
tone
begins
Blue light
flashes
5 times
2 Hours 4 Hours 80 Hours
Off
Press and hold down
Multifunction button
Melody
tone
Red light
flashes
• Charging in progress : Red light on
• Charging completed : Red light off
until red light flashes
(Approx. 4 seconds)
ends 5 times
●
Indicator lights
Indicator lights Headset State
●
g
Blue and red light in turn Pairable
Blue light flashes every 5 times Connectable
Blue light flashes twice every 5 times Standby
Page 4

Pairing
● Connection (Auto-Pairing)
● Pairing
Pairing headset with mobile phone before using the device.
If the devi
ce has been paired w
ith the headset bef
ore
(if there has been a connection once) re-establishing a
connection is automatically requested when the headset is
Pairing is a process which establishes a new relationship
between two Bluetooth enabled devices through the exchange
of a link key
switched on
.
● Reconnection
①
Make sure that the headset is turned off.
② Set the headset to a pairable state
Press and hold down multifunction button for 7 seconds until
the blue and red
light in turn.
You can press multifunction button once to reconnect
manually.
Reconnection is needed when you are out of range and
tebueaded gt tu
※ If the headset is turned on, press and hold down multifunction
button for 4 seconds until the blue and red light in turn.
③ Search for the headset on your mobile phone according to the
then come back into range
.
※ When the headset is out of range, the red light flashes once
10 times and warning sound tone begin 1 second.
guide of the phone.
④ When the mobile phone finds
QL200, pair it with the phone.
⑤ In case the mobile phone asks passkey or PIN, enter
00000000
to connect the two devices.
When connected successfully, the blue indicator flashes twice every 5
seconds.
When failed to connect or the headset is in connectable state due to not
paired within 3minutes, the blue indicator flashes every 5 seconds. If this
situation is met, please re-power the headset and restart connecting
Page 5

Functions
● Accept a call
Tap the multifunction button once after the tone (incoming)
● Make a call
-. Last number Redialing
● Reject a call
Press and hold down the multifunction button
Tapping the multifunction button once displays the list
(entries of all calls), and tap the multifunction button to
make a call
(
approx. 2 seconds).
Notes) The reject call function can be used only if the
mobile phone has a reject call feature.
The headset must be registered under a “handsfree
Notes) For some mobile phones, calls can be directly
made without displaying the list.
service”
● Adjust volume
-. Voice Dial
Press and hold down the multifunction button approx.
2 seconds, and say the person’s name.
Tap the volume up or down button accordingly
.
● mute On / Off microphone
Press and hold volume up button or volume down button
Notes) Voice dial can be used only if the mobile phone
has voice recognition feature and the headset is
registered under handsfree service,
Please see the user guide of your phone for detail.
p
for 2 seconds, in this case a beep sound will be heard
twice 10 seconds interval to inform you that the
microphone is in mute on mode.
● End a call
Mute off mode is the same.
● Call transfer
Tap the multifunction button once
.
Tap the multifunction button once
.
Notes) You can switch to the headset only once when you
receive a call from the mobile phone
Page 6
● Call waiting
Press and hold down the volume up button until a low pitch
Specifications
beep sound is heard twice (approx 4 seconds).
This will accept the incoming call while talking.
The previous call will be put on hold.
Bluetooth Compliance Ver 2.0
Supported Profile Handsfree / Headset
To switch back, press and hold down volume up button
until the same sound is heard.
Notes) The headset must be registered under the
Frequency Band 2,402~2,480 MHz
Tx Power -6~4 dBm (Class 2)
handsfree service
● 3 Way Call
Main Chip Set CSR BlueCore 04 QFN ROM
Operating Range Up to 10m (33 feet
)
To places all active calls (if any exist) on hold and accepts
the other (held or waiting) call, press and hold down
multifunction button for 2 seconds.
pgg
p()
Talk Time up to 4 hours
To release all active calls (if any exist) and accepts the
other (held or waiting) call, tap multifunction button once.
Notes) 3 way call function can be used only when the service
provider provides the 3 way call service.
Standby Time
up to 80 hours
Dimensions (mm) 18(W) X 48.5 (L) X 10.5 (H)
In addition, according to the mobile phone and
network specification, may be different.
Weight
10g
Page 7
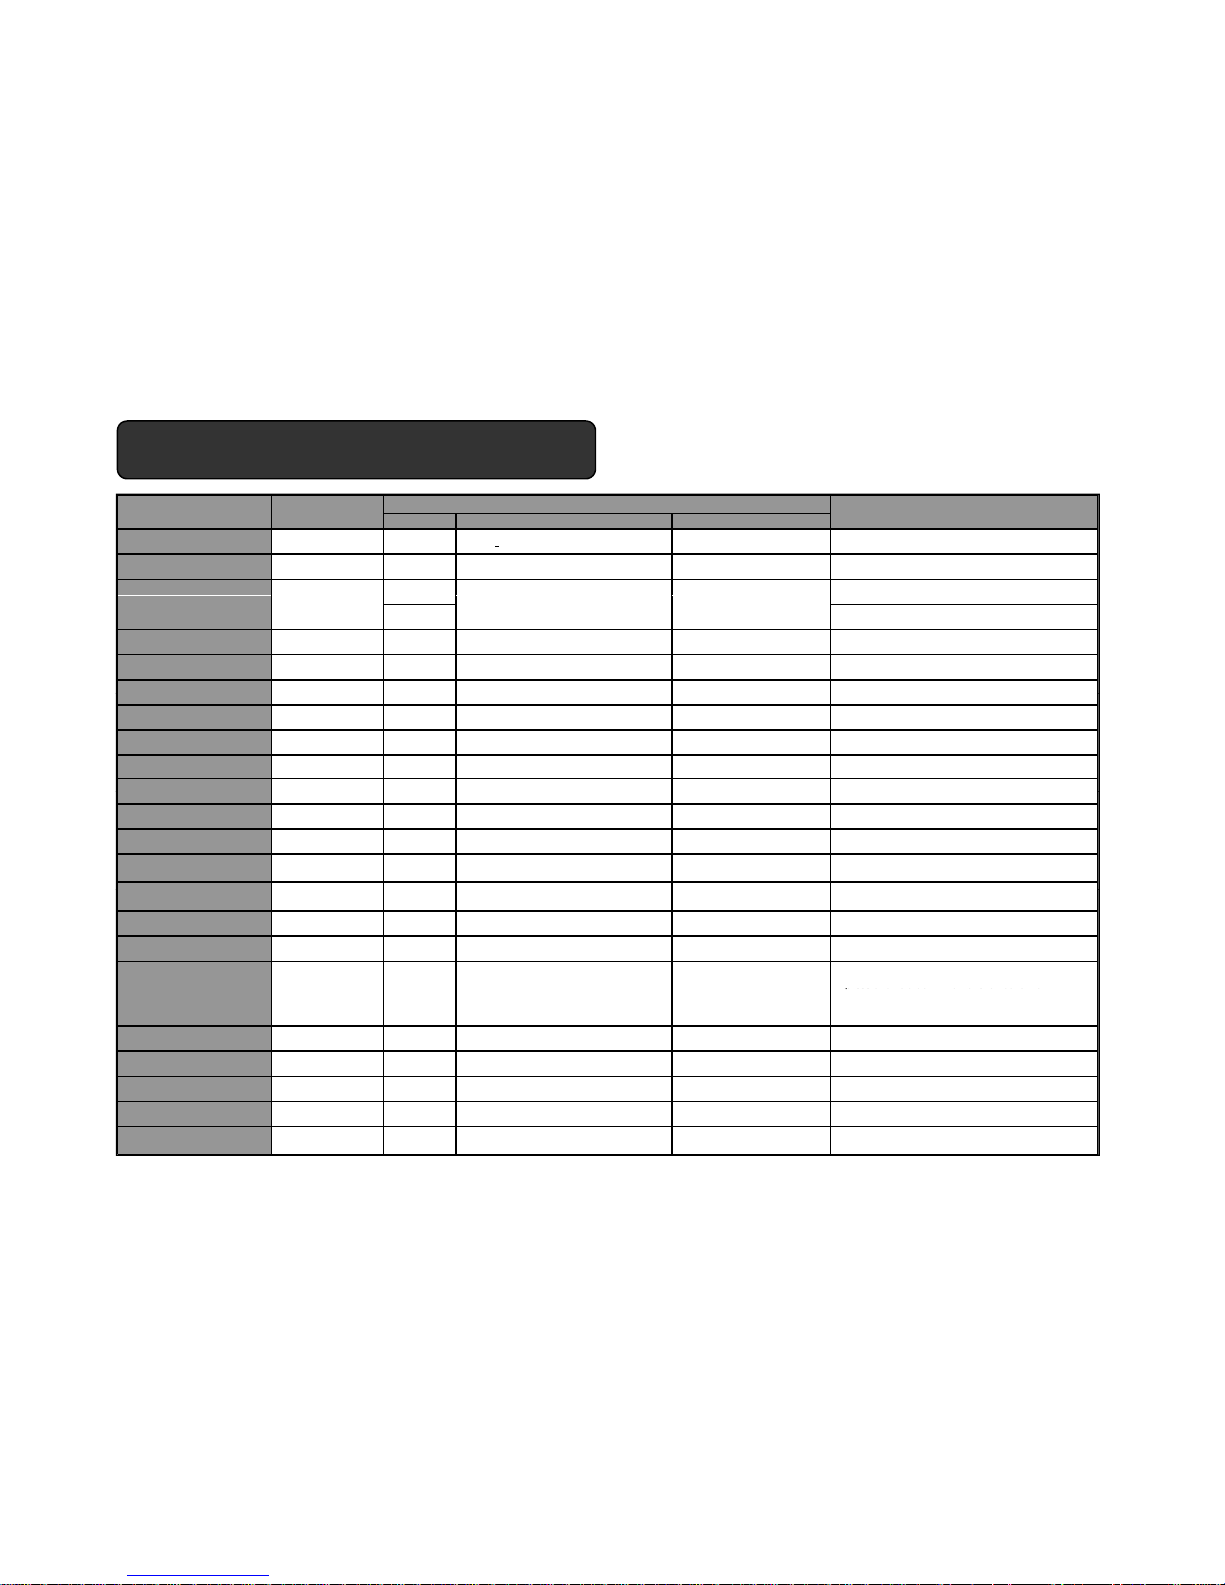
Commands Summary Table
State LED Display Audio (beep)
Power on
-Off
Blue light f lashes 5 times
(
Blue light1 0 seco nds interv al )
power on ton e Pres s and hold down M FB for 3 sec onds
Power off
- On Red light fl ashes 5 times Power off tone Press and hold down MFB for 4 sec onds
Off
Press and hold dow n MFB for 7 seconds
Act ionFunctions
Mobile Phone
State
Bluetooth Headse t
On Press and hold dow n MFB for 4 seconds
Pairing Success
(Connected)
On On
Blue light f lashes 5 times
(Not mandatory)
Connec tii ng tone
Standby
On On
Blue light f lashes 2 times
(5 seconds interval)
Warnig tone
Pairing Mode
Blue / Red light in tur n pairing mode toneOn
Link Loss (out of ranges)
OnOnRed light blinks once for 10 seconds
(
1 second
)
Make a call
On (Di als numb er) On Connec tii ng tone Tap the MFB o nce
Voice dial call
On in id le
(Hands Free Profile)
On Connec tii ng tone Pres s and ho ld do wn MFB for 2 s econd s
Accept a call
On On Con nectiing tone Tap the MFB on ce
1) Tap the M FB one : display the lists
Last number redial
OnOnConnec tii ng tone
(entry of all calls)
2) Tap the M FB one : make a call
Ending a call
On On_Talk Ending tone T ap t he MFB once
Rejec a call
On On_Ringing Ending tone Press and hold down M FB for 2 sec onds
Call waiting
On – in call
(2nd call coming in)
(Hands Free Profile)
On_Talk Co nnecti ing to ne
Press and hold dow n Vol-Up but t on for 4 seconds
during calli ng
Transfer call from phone to
headset
On On_T alk Conne ctii ng tone
Tap the MFB once
(can switch to the headset only once when y ou receive
a call from t he mobile phone
Mute on microphone
On On_Talk
short time tone twice
(10 seconds interval)
Press and hold volume u p button or volume down
button f or 2 seconds while cal l in g
Mute off microphone
On On_Talk mute off ton e
Press and hold volume u p button or volume down
button f or 2 seconds
To places all act ive calls (if an y exist) on hold
and accepts th e ot her (held or waiting) call,
3 Way call
On On_Talk
press and hold down multifunc tion button for
2 seconds.
To release all ac t iv e cal l s ( if any exist) and accepts
the other ( h e l d or w aiting) call, tap m ultifunction
button once.
Charging progress
-Off Red LED On
Charging completed
-Off LED Off
Low Battery
(under 3.7V)
- On Red light bl inks warnig tone
Volu me max imum or mini mum
is reached
On On
short time warning tone once
(Not mandat or y)
press the Volume up but t on or Volume do w n button
RF Test mode
- On Vi olet LED On
1) Press the Vol- Up button
2) Press the Vol- Dow n button
3) Press the Vol- Up button and MFB
Page 8

FCC
(Fed
eral Communications Commission)
`
This device complies with Part 15 of the FCC s Rules. Operation is subject to the following two
Conditions:
1. This device may not cause harmful interference, and
2. This device must accept ant interference received, including interference that may cause
undesirable operation.
This equipment has been tested and found to comply with the limits for a Class B digital device,
pursuant to Part 15 of the FCC Rules. These limits are designed to provide reasonable
protection against harmful interference in a residential installation.
This equipment generates uses and can radiate radio frequency energy and, if not
installed and used in accordance with the instructions, may cause harmful interference to
radio communications.
However, there is no guarantee that interference will not occur in a particular installation. If
this equipment does cause harmful interference to radio or television reception, which can
be determined by turning the equipment off and on, the user is encouraged to try to correct
the interference by one or more of the following measures:
– Reorient or relocate the receiving antenna.
– Increase the separation between the equipment and receiver.
– Connect the equipment into an outlet on a circuit different from that to which the
receiver is connected
.
– Consult the dealer or an experienced radio/TV technical for help
WARNING: This equipment may generate or use radio frequency energy. Changes or modifications to this equipment may
cause harmful interference unless the modifications are expressly approved in the instruction manual. The user could
lose the authorit
y
to operate this equipment if an unauthorized change or modification is made.
yp qp g
 Loading...