

Dreamsat 700 Instruction Manual

English

2

3
TABLE OF CONTENTS
WARNING/REMEMBER/CAUTION ---------------------------------------------------------------------- 6
SAFETY MEASURES----------------------------------------------------------------------------------------7
ABOUT THE INSTRUCTION MANUAL --------------------------------------------------------------------8
MARKETING AND SIGNS APPLIED TO THE RECEIVER ------------------------------------------------8
BASIC INFORMATION ABOUT THE RECEIVER ---------------------------------------------------------9
1. MAIN FEATURES
2. CONTENTS OF BOX
3. IMPORTANT INSTRUCTIONS CONCERNING HANDLING THE RECEIVER
4. REMOTE CONTROL ------------------------------------------------------------------------10
5. MAIN UNIT DESCRIPTION ---------------------------------------------------------------12
1) POWER -----------------------------------------------------------------------------13
2) TUNER 1 IF INPUT
3) ETHERNET
4) USB
5) HDMI
6) IR (Infrared Sensor)
7) RS-232 (Data Interface)
8) CVBS
6. CONNECTION OVERVIEW ----------------------------------------------------------------14
6.1 ANTENNA -------------------------------------------------------------------------15
6.2 POWER SUPPLY
6.3 ETHERNET : INTERNET LINE CONNECTION
6.4 POWER SUPPLY
6.5 HDMI & CVBS
6.6 INFRARED SENSOR
6.7 RS-232
7. POWERING ON/OFF ----------------------------------------------------------------------------------15
8. FIRST INSTALLATION --------------------------------------------------------------------------------16
8.1 OPERATING THE MENU
8.2 LANGUAGE SELECTION
8.3 SATELLITE SEARCH
9. DAILY USAGE ------------------------------------------------------------------------------------------17
9.1 VOLUME CONTROL
9.2 CHANGING CHANNELS
9.3 CHANNEL LIST
9.4 USER LISTS
9.5 ZOOM MODE
9.6 INFORMATION BAR

4
9.7 AUDIO CHANNEL ----------------------------------------------------------------18
9.8 AUDIO LANGUAGE
9.9 FREEZE MODE
9.10 TELETEXT
9.11 EDIT CHANNEL LIST, EVENT LIST
9.12 MEDIA ---------------------------------------------------------------------------19
9.12.1 RECORDINGS & MOVIES
9.12.2 MUSIC
9.12.3 PHOTOS
9.13 Jump Time ----------------------------------------------------------------------20
9.14 MULTI FEED
9.15 SUBTITLE LANGUAGE
9.16 EDIT/SEARCH WINDOW
10. PROGRAM GUIDE -----------------------------------------------------------------------------------21
11. RECORDING -----------------------------------------------------------------------------------------22
11.1 RECORDING GUIDE
11.2 INSTANT RECORDING ---------------------------------------------------------22
11.3 TIMESHIFT RECORDING ------------------------------------------------------23
11.4 TIMER RECORDING
12. MENU -------------------------------------------------------------------------------------------------23
12. 1 OPERATING THE MENU
13. CREATE & EDIT --------------------------------------------------------------------------------------24
13.1 EDIT CHANNEL
13.2 EDIT FAVORITE LISTS
13.3 DELETE SATELLITE & TRANSPONDER ----------------------------------------25
13.4 EXPORT DATA
13.5 IMPORT DATA
14. INSTALLATION -------------------------------------------------------------------------------------26
14.1 ANTENNA
14.2 SATELLITE SEARCH
14.3 DISEQC 1.2 --------------------------------------------------------------------- 27
14.4 BLIND SCAN -------------------------------------------------------------------- 27
14.5 USB UPDATE ------------------------------------------------------------------- 29
15. SETTINGS -------------------------------------------------------------------------------------------- 30
15.1 NETWORK CONNECTION
15.2 uPnP
15.3 TV OUT -------------------------------------------------------------------------- 31
15.4 SOFTWARE VERSION ----------------------------------------------------------32
15.5 CARD READER

5
16. USER -------------------------------------------------------------------------------------------------33
16.1 MENU & AUDIO LANGUAGE
16.2 TIME & DATE
16.3 PARENTAL LOCK ---------------------------------------------------------------34
16.4 MENU & CHANNEL LOCK
16.5 PVR SET-UP
17. MULTIMEDIA ---------------------------------------------------------------------------------------35
17.1 FILE BROWSER
18. WEB----------- --------------------------------------------------------------------------------------35
SPECIFICATION ----------------------------------------------------------------------------------------36

6
WARNING !!!
Supported network features as internet radio, Youtube, etc depend on your
network connection speed and quality and the server settings (limitations,
bandwidth, location) which you are accessing.
Playback of copy protected content, damaged files, etc. may fail or be
incorrect. Video files with a resolution higher than 1920x1080i, 1280x720p
or with a video bitrate over 30Mbps may not play properly.
This satellite receivers support recording to external hard disk drives (HDDs)
and flash memories (pen drives). The correct operation of the recording
function depends on the type of connected memory! You must read the
following limitations.
REMEMBER:
1. In order to use an external USB memory, the memory must support the USB
2.0 standard. To ensure stable recording and playback, you must use a
memory with a recording speed of 20.0 MB/s or faster. Slower hard disk
drives and flash memories may not function properly, have problems with
recording (image jitter), or do not function at all!!!
2. Only memory with one basic EXT2, EXT3 or FAT32 partition (we recommend
using the FAT32 format) will function properly. If your hard disk is not formatted in
EXT2, EXT3 or FAT32, format the disk on your computer before connecting it to the
receiver.
3. Highly fragmented or used memories may also not operate smoothly or
correctly.
CAUTION
1. Under no circumstances should you disconnect the USB device from the receiver
during recording or playback. Disconnecting during operation may cause damage to
the receiver and/or flash memory, and to the recorded data.
2. Do not touch the working receiver (and in particular the USB connector) with
wet hands. Risk of electric shock and permanent damage to the receiver!
7
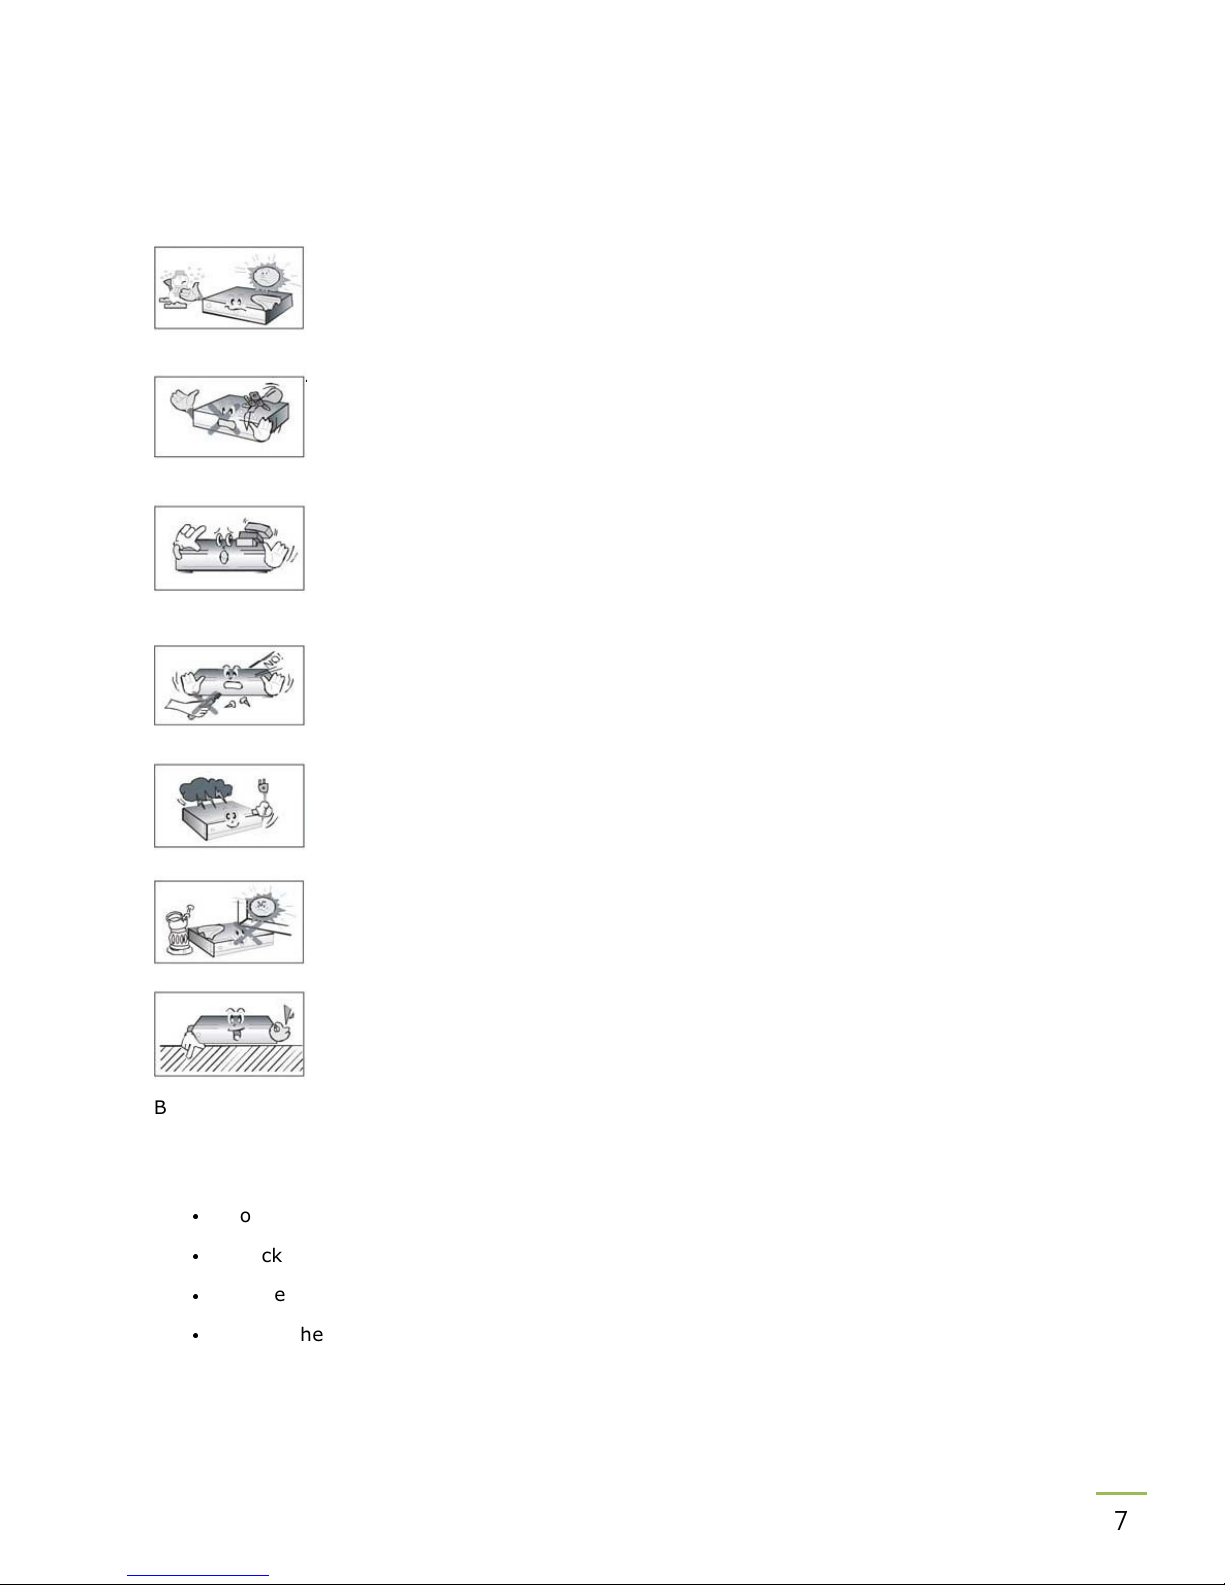
SAFETY MEASURES
We request that you read the instruction manual and recommendations set forward therein.
Also remember to correctly position the satellite antenna!
In order to avoid an electric shock, never open the housing. Damage to the
warranty seal shall void the warranty.
Disconnect the receiver from the mains during thunderstorms or when it is not
to be used for an extended period of time. Please remember that the warranty
does not cover damage to the equipment caused by a lightning strike.
Do not expose the receiver to direct sunlight. Place it away from sources of
heat and humidity. Do not cover ventilation ducts with items such as
newspapers, table-cloths, curtains, etc in order to ensure the correct
circulation of air.
Place the receiver horizontally on a flat, even and stable surface. Make sure
the receiver has more than 10 cm clearance around for sufficient ventilation.
If you move the receiver from a room that is warm to one that is cold (or vice
versa), wait at min. 1 hour before connecting it to the mains. Otherwise,
problems may arise.
The receiver should be placed away from vases, bottles, aquariums and other
Water containers in order to avoid damage. Do not touch the mains plug with
your bare hands.
Do not place any objects on the housing of the receiver. This may cause
overheating and reception problems. No naked flame sources such a lighted
candles should be placed on the receiver.
Before commencing maintenance or installation work, disconnect the receiver from the mains.
Do not clean the receiver with alcohol or liquids containing ammonia. If necessary, clean it with
a soft, lint-free cloth wetted with a gentle solution of water and soap.
•
Do not connect any cables when the mains plug is in the socket.
•
Check the condition of your cables. Damaged cables may cause a fire.
•
Please disconnect the receiver from the mains before connecting any cables.
•
Where the mains plug or an appliance coupler is used as the disconnect device, the
disconnect device shall remain readily operable.

8
ABOUT THE INSTRUCTION MANUAL
We have made every effort to provide the most current information about its products. We do
not grant any guarantee as to the contents of the present instruction manual and disclaims any
implied guarantees concerning market value or suitability for specific purposes. The information
contained herein is an instruction intended to enable the correct usage and maintenance of the
receiver.
We reserve itself the right to introduce amendments, changes or translations of the instruction
manual without prior notification thereof. For this reason, we recommend you regularly visit our
website in order to obtain the latest information.
MARKINGS AND SIGNS APPLIED TO THE RECEIVER
Digital signal transmission logo.
This logo informs that the receiver conforms to the Digital Video Broadcasting
standards.
Risk of electric shock -do not open.
This notice warns the user not to open the receiver housing. The housing may
be opened solely by authorized service technicians.
CE logo.
The logo informs that the receiver conforms to the terms and conditions of
Directive 89/336/EEC concerning observance by Member States of provisions
regulating electromagnetic compatibility, and to the terms and conditions of
Directives 73/23/EEC and 93/68/EEC concerning observance by Member States
of provisions regulating low voltage electricity and safety with relation to the
handling and operation of electrical equipment.
Double insulation logo.
This logo informs that the receiver is an electrically safe device, provided that it
is used in accordance with the recommendations set forward in the chapter
concerning safety.
Take an active part in protecting the natural environment!
• Your receiver is made from materials that can be processed or recycled.
• At the end of its service life, take this unit to a designated collection point.

9
BASIC INFORMATION ABOUT THE RECEIVER
1. Main features
∨
Reception of high definition channels
∨
Upscaling of PAL signals to 1080 P resolution
∨
20 programmable timers
∨
Separate favorite, TV and Radio channels list
∨
Quick channel search function (Quick Find)
∨
Teletext and subtitle display
∨
DiSEqC 1.0, 1.1 and DiSEqC 1.2, USALS
∨
MPEG-2, MPEG-4, MPEG-4 AVC/H.264 standards
∨
Compatible with DVB-S and DVB-S2 systems
∨
Card reader for pay-per-view television
∨
WIFI & 3G modem available for internet connection
2. Contents of box
Unpack the receiver and check whether all of the following elements are present
∨
1 x remote control unit (incl. 2AAA batteries)
∨
1 x instruction manual
∨
1 x hybrid satellite receiver
∨
1 x HDMI cable
∨
1 x IR sensor cable
3. Important instructions concerning handling of the receiver
The screen menu (OSD) simplifies operation of the receiver and has made it possible to reduce
the number of keys on the remote control. All of the functions are displayed on the screen and
may be controlled by means of a small number of keys. Common functions have been
connected in one "MENU". The selected function is colored. Depending on the selected option,
various "function keys" are displayed: red, yellow, green, blue and white in the form of graphics
and descriptions. The colors represent various functions in individual "Menus". The selected
function is activated by pressing a key on the remote control unit. The so-called function keys
are active only when in the appropriate field there is information about it. The user interface
makes it possible to navigate within a menu and between functions in a number of different
ways. Certain keys on the remote control allow direct access to functions. The keys are
multifunctional, i.e. their functions depend on previously activated elements.
NOTE:
Please keep in mind that new software may change the functionality of the receiver.
Photographs and descriptions included in the instruction manual are for informational
purposes only. If you should notice an error, please report it -we shall make every effort
to have it rectified.
10
4. Remote control
STAND BY
Switch between operation and
STAND-BY Stand-by/deep
Stand-by mode and to boot.
VOL+/VOL-
Adjust the audio volume.
CH UP/DOWN
Change channels (next/previous).
PIP
To go to Picture in Picture mode
PIP (another program's video
Play back in a sub screen available
while watching a program)
POSITION
To move sub screen's position
POSITION (up, down, left and right)
in POP mode
EDIT & CI
Enter/exit the edit menu.
EJECT
Eject the USB memory.
MULTI MEDIA
These colored keys have different
functions as displayed in the menus.
TV : Change channels
(next/previous
).
UP/DOWN
MENU: Navigate in the menus.
TV : Adjust the audio volume.
LEFT/RIGHT
MENU: Navigate in the menus and select options.
TV : Enter the list mode.
OK
MENU: Select options.
PAGE UP/DOWN
Scroll a page or list up and down. To scroll
Continuously hold the key.
11
MUTE
Turn the sound on/off.
TV/RADIO LAST
Change between TV and Radio mode.
LAST
Return to previous channel.
V. Format
Change the screen resolution.
NUMERIC KEYS
TV : Enter a channel number directly.
MENU: Enter values.
Enter/exit TELETEXT
Enter/exit the zoom mode.
Pause a live program.
Info Enter/exit information about the program, movie/recording.
EPG Enter/exit the program guide.
MENU Enter/exit the menu and save change in menus.
EXIT Exit all menu modes.
LANG Select audio language and encode the text for movie subtitles.
FEED Select a Multifeed.
SUBT Select subtitle language for program and display the subtitle for movies.
AUDIO Select audio channels.
RECORDING
Record a program and select the duration.
PLAY
Start playback.
PAUSE
Start the Timeshift recording. Pause playback.
STOP
Stop playback.
SLOW MOTION
Playback in slow motion. Each time you press this key the speed
will increase (10%, 30%, 50%).
REWIND
Each time you press this key the rewind/ forward speed will
increase (2, 4, 8).
FORWARD
JUMP
Jump back or forward during playback.
 Loading...