


Dreambox DM 7025 / DM 7025+
Bedienungsanleitung
Digitaler Satellitenempfänger zum Empfang von freien und
verschlüsselten DVB-Programmen mit optionaler digitaler
Aufzeichnungsmöglichkeit.
Mit Kommunikations-Schnittstelle
und PCMCIA-Schnittstelle für CI-Module
Anschluss für interne Festplatte
Compact Flash Schacht
Grafisches LC-Display
Twin Tuner steckbar
Smartcard Leser
Linux OS
User Manual
Digital satellite receiver for free and encrypted Digital
Video Broadcasting (DVB) with
optional digital recording capability.
Communication-Port
PCMCIA-Slot for CI-Modules
Internal hard disk connector
Compact Flash Slot
Graphical LC-Display
Pluggable Twin Tuner support
2 Smartcard Readers
Linux OS

U s e r M a n u a l D r e a m b o x D M 7 0 2 5 / D M 7 0 2 5 +
Table of contents
1. Before initial operation of the receiver
1.1 Safety instructions ...................................................................................... 6
1.2 Packaging contents .................................................................................... 9
1.3 Views ..................................................................................................... 10
1.3.1 Explanation front panel..................................................................... 11
1.3.2 Explanation rear panel...................................................................... 12
1.4 Remote control ......................................................................................... 14
2. Installation
2.1 Turning the device on ............................................................................. 20
3. Start wizard
3.1 Language selection .................................................................................. 21
3.2 Tuner setup .............................................................................................. 22
3.3 Service scan............................................................................................. 22
3.4 Parental control ........................................................................................ 23
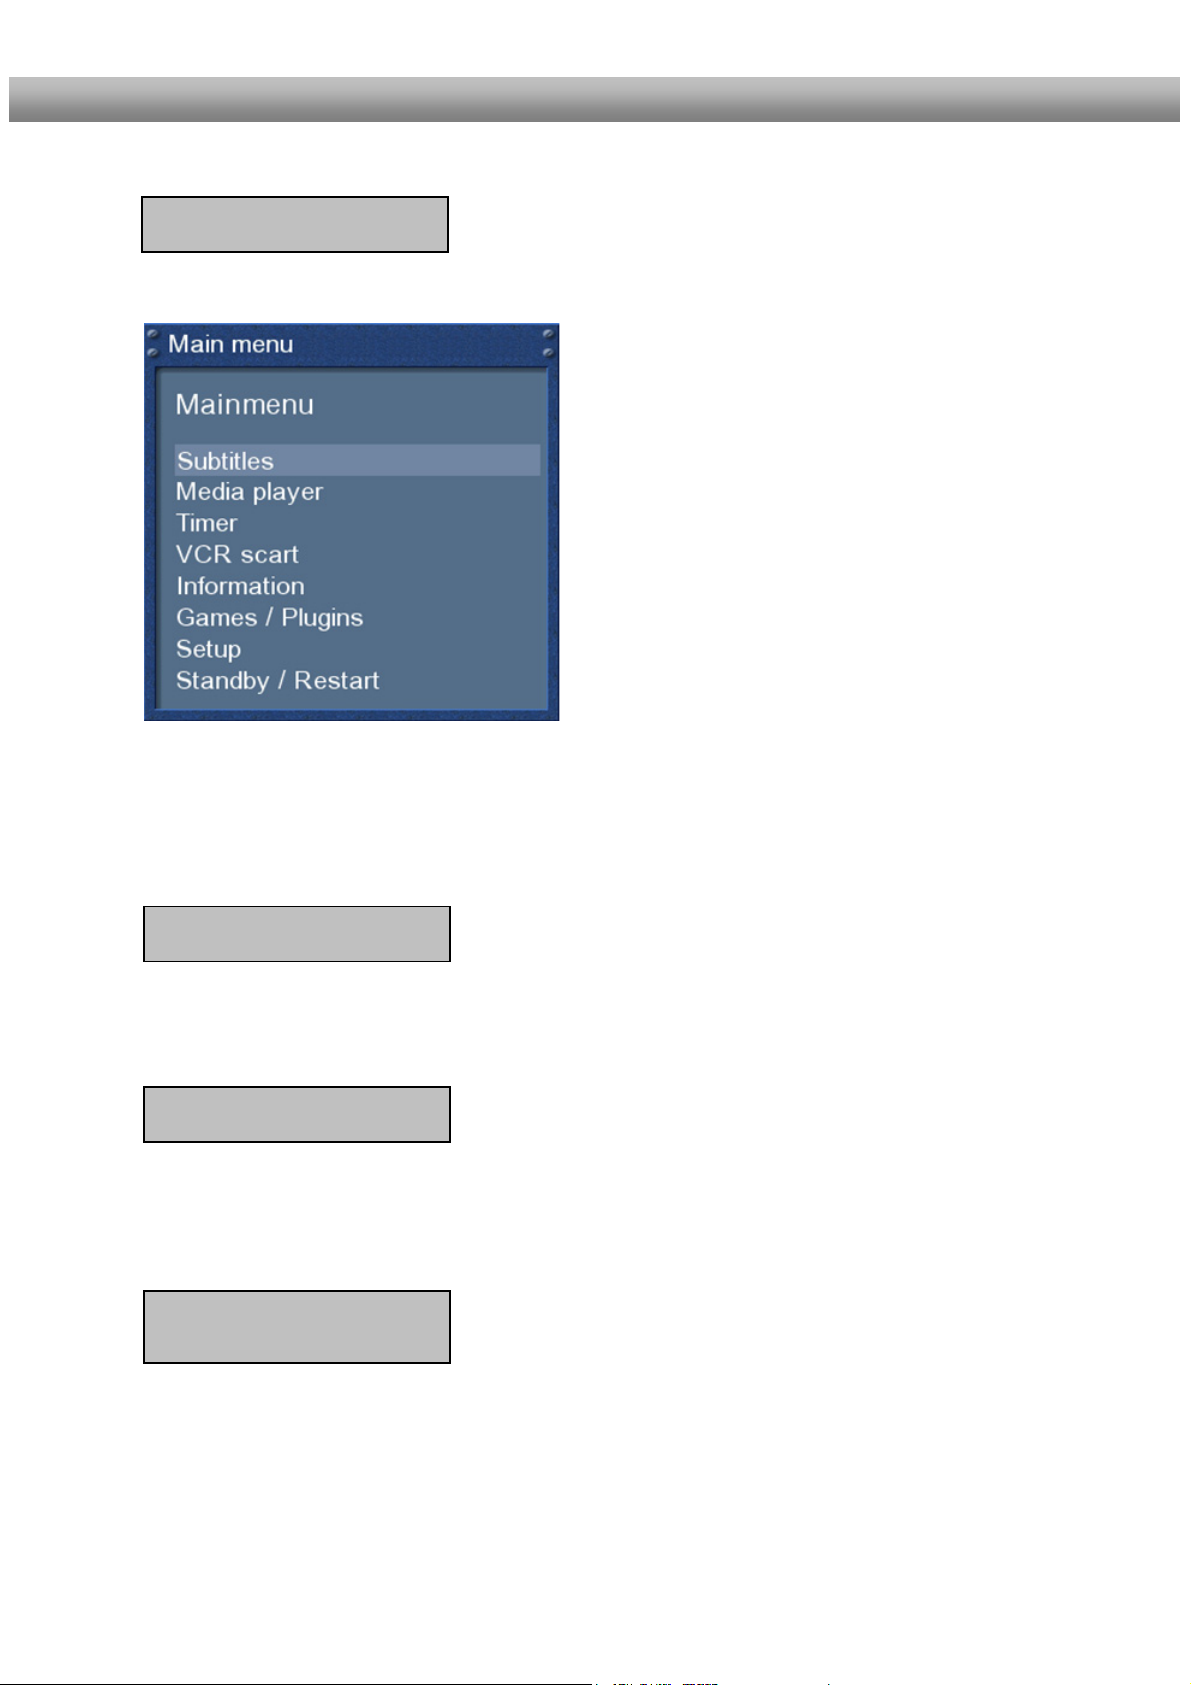
4. Basic operation
4.1 Turning your Dreambox on and off............................................................ 24
4.2 Service selection ....................................................................................... 25
4.3 Changing channels using the service list .................................................. 25
4.4 Controlling the volume............................................................................... 25
4.5 Changing the audio track .......................................................................... 25
4.6 Sub services.............................................................................................. 26
4.7 TV/Radio switching.................................................................................... 26
4.8 Teletext ................................................................................................... 26
4.9 Subtitles ................................................................................................... 26
4.10 Infobar ................................................................................................... 27
- 2 -

U s e r M a n u a l D r e a m b o x D M 7 0 2 5 / D M 7 0 2 5 +
5. Electronic Program Guide - EPG
5.1 Single-EPG................................................................................................ 28
5.2 Multi-EPG .................................................................................................. 29
U s e r M a n u a l D r e a m b o x D M 7 0 2 5 / D M 7 0 2 5 +
6. Edit the channellist
6.1 Add a bouquet ........................................................................................... 31
6.2 Add a service to favorites .......................................................................... 33
6.3 Adding multiple services to a bouquet....................................................... 34
6.4 Remove a service from favorites ............................................................... 35
6.5 Moving a service to favorites ..................................................................... 36
5.2.1 Time/Date Input ................................................................................ 30
6.6 Adding a marker to favorites...................................................................... 37
6.7 Alternative services ................................................................................... 38
6.8 Parental control ......................................................................................... 40
7. Hard disk operation
7.1 Mounting guidelines................................................................................... 43
7.2 Management.............................................................................................. 49
7.3.1 Initialization........................................................................................ 49
7.3 Recording .................................................................................................. 50
7.4 Watch a recording ...................................................................................... 54
7.5 Setting a marker (Bookmarks).................................................................... 56
7.6 Delete a recording ...................................................................................... 57
7.7 Movielist options......................................................................................... 58
8. Teletext .................................................................................................... 60
7.3.1 Instant recording............................................................................... 50
7.3.2 Stop recording .................................................................................. 51
7.3.3 Recording by timer ........................................................................... 51
7.3.4 Time shift.......................................................................................... 53
- 3 -

U s e r M a n u a l D r e a m b o x D M 7 0 2 5 / D M 7 0 2 5 +
9. Picture-in-Picture mode (PiP) ................................................................ 62
10. Sleep timer ...................................................................................................... 63
11. Setup
11.1 Language selection .................................................................................. 64
11.2 Customize ................................................................................................ 65
11.3 Timezone.................................................................................................. 68
11.4 A/V Settings.............................................................................................. 69
11.5 RF output.................................................................................................. 71
11.6 Display setup (LCD or OLED) ................................................................. 72
11.7 Network .................................................................................................... 73
11.8 Common Interface.................................................................................... 75
11.9 Skin .......................................................................................................... 76
U s e r M a n u a l D r e a m b o x D M 7 0 2 5 / D M 7 0 2 5 +
12. Service searching
12.1 DVB-S Tuner configuration ...................................................................... 77
12.2 DVB-C Tuner configuration ...................................................................... 85
12.3 DVB-T Tuner configuration....................................................................... 87
12.4 Automatic scan......................................................................................... 88
12.5 Manual scan ............................................................................................. 90
12.1.1 Single satellite – direct connection ................................................. 78
12.1.2 Two satellites via Toneburst A/B .................................................... 79
12.1.3 Two satellites via DiSEqC A/B........................................................ 80
12.1.4 Four satellites via DiSEqC A/B/C/D................................................ 81
12.1.5 Stab positioner using USALS ......................................................... 82
12.1.6 Stab positioner without USALS ...................................................... 83
12.1.7 Tuner 2 setup ................................................................................. 84
12.2.1 Tuner 2 setup (DVB-C)................................................................... 86
12.3.1 Tuner 2 setup (DVB-T) ................................................................... 87
- 4 -

U s e r M a n u a l D r e a m b o x D M 7 0 2 5 / D M 7 0 2 5 +
13. Updating the software
13.1 Backing up your settings ............................................................................ 91
13.2 Restoring your settings .............................................................................. 92
13.2 Installing new software .............................................................................. 93
14. System information
14.1 Service ....................................................................................................... 96
14.2 About (Hard- and Software) ...................................................................... 97
15. Troubleshooting ............................................................................................ 98
16. TV-Mode setup
16.1 Programming the remote control................................................................ 99
16.2 Device list ................................................................................................. 100
17. Technical data.............................................................................................. 105
18. Features......................................................................................................... 108
19. Contact & support information ................................................................ 109
20. Copyright notes........................................................................................... 110
20.1 GNU GPL (General Public License)......................................................... 111
21. Menu overview
22. Service Slip........................................................................ see PDF attachment
en
Note:
U s e r M a n u a l D r e a m b o x D M 7 0 2 5 / D M 7 0 2 5 +
The Dreambox DM 7025 carries the CE-Sign and fulfills all requirements from the EU.
............................................................................................. 114
Software Release 2.3 on 25-10-07
Subject to change without prior notification.
- 5 -

U s e r M a n u a l D r e a m b o x D M 7 0 2 5 / D M 7 0 2 5 +
1. Before initial operation of the receiver
1.1 Safety instructions
Please read the safety instructions completely and carefully, before using the Dreambox.
The Manufacturer takes no responsibility for damages as a result of incorrect handling of the
Dreambox.
¾ Allow enough space around the Dreambox for sufficient ventilation.
¾ Do not cover the top of the Dreambox and allow enough space to other devices. The
louvers of the devices must be free at all times to allow sufficient heat transfer from inside
the device.
¾ Never put vases or any other liquid filled containers on top of the device. Do not expose
the device to dripping or splashing liquids.
¾ Do not place open flame sources, such as lit candles, on top of the device.
¾ The device may only be operated in moderate climate.
¾ Do not remove the cover. Risk of electric shock. If it is necessary to open the device
please contact a trained professional.
¾ Do not put any metal things into the slots or ventilation openings.
¾ The installation of a hard disk is only allowed by skilled personal or your local dealer.
Modifications and changes to the Dreambox lead to loss of warranty if not
performed and documented by skilled personal.
We recommend the installation of a hard disk by your local dealer.
Unskilled installation of a hard disk leads to loss of warranty.
- 6 -

U s e r M a n u a l D r e a m b o x D M 7 0 2 5 / D M 7 0 2 5 +
Shut down
¾ In case your Dreambox is in use for a longer period of time disconnect the power plug
from the power outlet.
¾ During thunder storm the unit should also be physically disconnected from the power
outlet.
Additional safety instructions
¾ (Dis-)Connecting to a LNB:
Turn the Dreambox off before you connect or disconnect a cable coming from or going to
a LNB.
¾ Connecting to a TV:
Before connecting or disconnecting your Dreambox to/from a TV please turn it off.
¾ In case you notice any damage to the power cord or power plug immediately disconnect
the device from the power outlet.
¾ In case the device was exposed to humidity immediately disconnect the device from the
power outlet.
¾ In case you notice any serious damage to the outer shell of the device immediately
disconnect the device from the power outlet.
¾ Do not expose the Dreambox to direct sunlight, lightning or rain.
¾ Grounding:
The LNB cable must be grounded.
The grounding system must meet SABS 061 requirements.
¾ Cleaning:
Disconnect the mains power cord before cleaning the cover. Use a slightly damp cloth
without cleaning agents.
¾ Connect the Dreambox only to suitable sockets. Do not allow overloads to occur.
- 7 -

U s e r M a n u a l D r e a m b o x D M 7 0 2 5 / D M 7 0 2 5 +
Disposal instructions
The packaging of the Dreambox only consists of reusable materials. Please recycle if
possible.
This symbol on the product or on its packaging indicates that this product must not be
disposed of with your other household waste. Instead, it is your responsibility to dispose of
your waste equipment by handing it over to a designated collection point for the recycling of
waste electrical and electronic equipment. The separate collection and recycling of your
waste equipment at the time of disposal will help to conserve natural resources and ensure
that it is recycled in a manner that protects human health and the environment.
For more information about where you can drop off your waste equipment for recycling,
please contact your local city office, your household waste disposal service or the shop
where you purchased the product.
Please note that empty batteries and electric waste is not to be put into the regular garbage.
- 8 -
U s e r M a n u a l D r e a m b o x D M 7 0 2 5 / D M 7 0 2 5 +
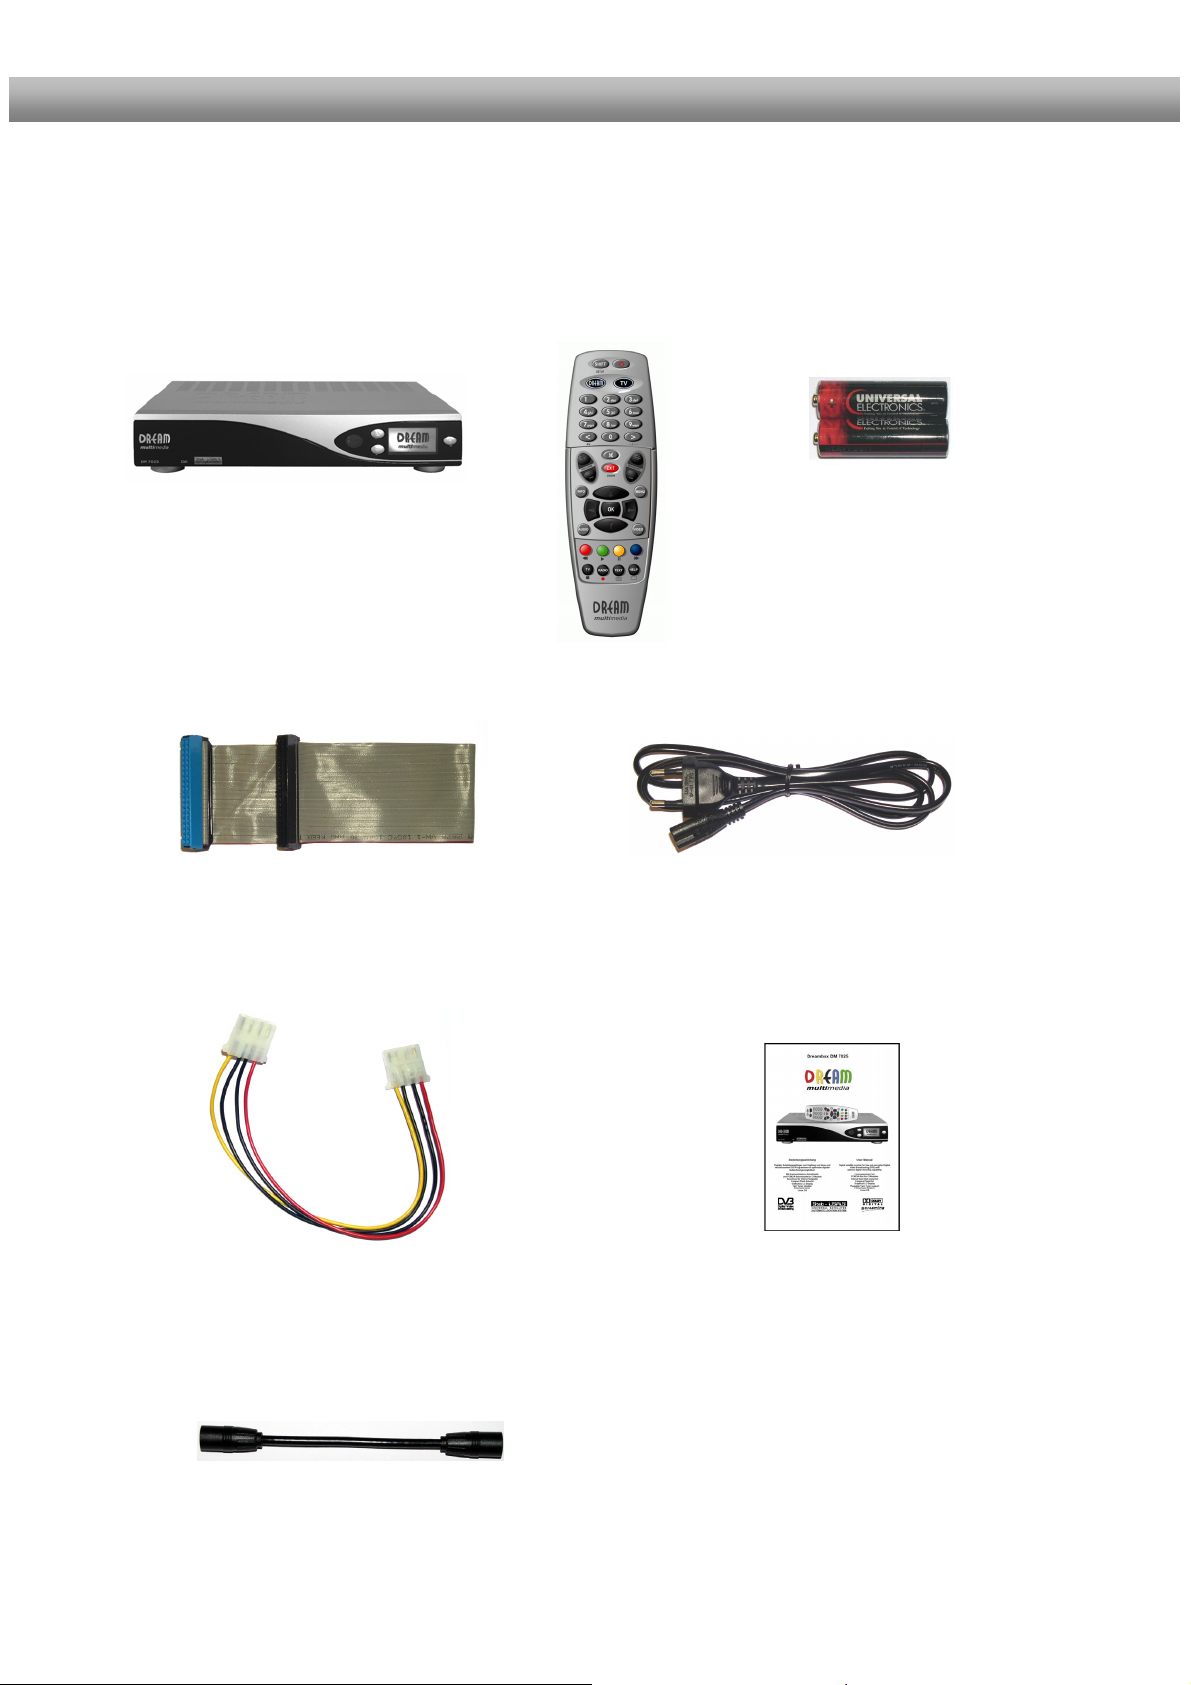
1.2 Packaging contents
Please check the completeness of the box’s contents.
Included in box:
Dreambox DM 7025
1 IDE-Cable
(already installed inside the
device)
1 HDD power cable (already installed
inside the device)
1 Tuner Connection cord
Remote control
1 User manual (most recent version online:
http://www.dream-multimedia-tv.de )
2 Batteries
(1,5V Mignon / AA / LR6)
1 Power cord
- 9 -
U s e r M a n u a l D r e a m b o x D M 7 0 2 5 / D M 7 0 2 5 +
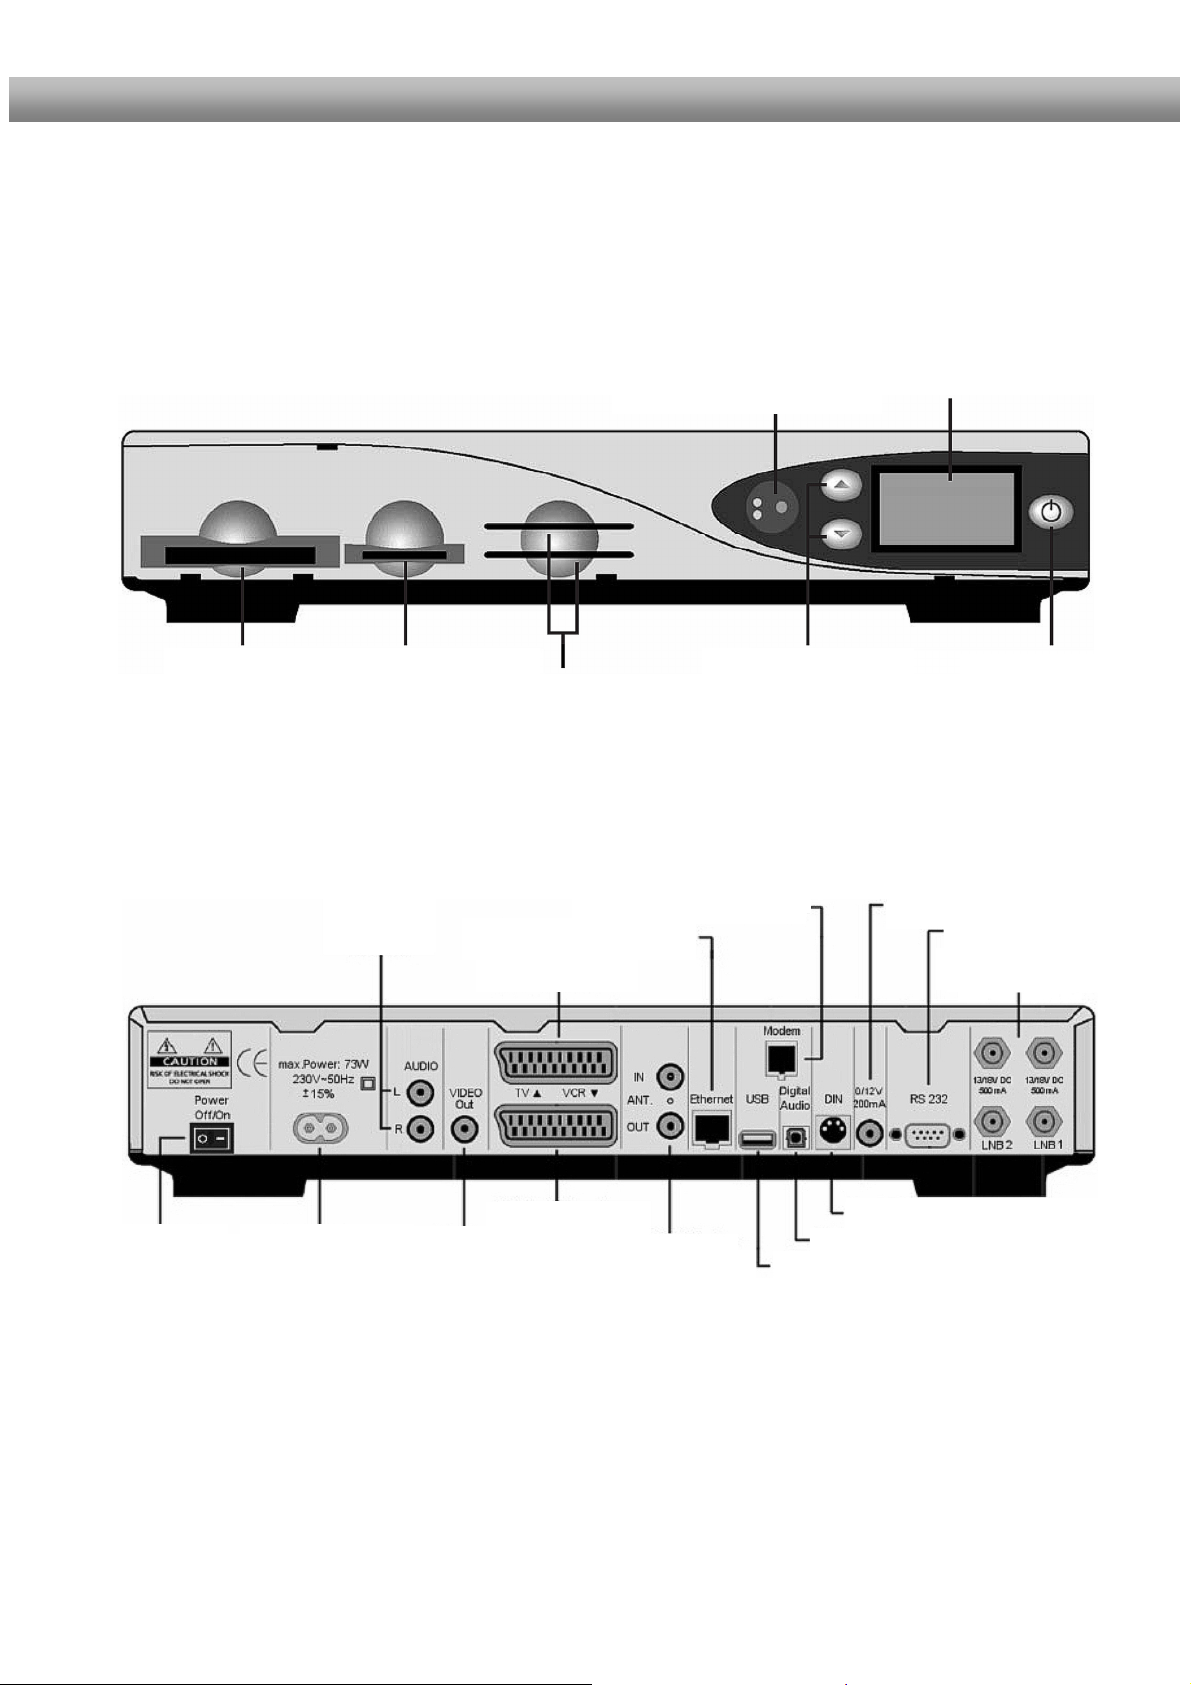
1.3 Views
Front panel
Remote control sensor
LC-Display or
OLED-Display
CI-Slot Compact Flash Slot
Rear panel
Mains switch Mains
connection
Analog
audio
out
Smartcard Reader
Network interface
TV Scart
VCR Scart
Video
out
Modem port
UHF Modulator
in/out
Channel up/down
Mini DIN Port
Digital audio out
USB port
Power button
0 / 12V out
Serial Port
LNB ins/outs
- 10 -

U s e r M a n u a l D r e a m b o x D M 7 0 2 5 / D M 7 0 2 5 +
1.3.1 Explanation Front Panel
CI-Slot
Plug in here any CI- Module of your choice.
Compact Flash Slot
The Compact Flash Slot is meant to hold a Compact Flash Module. Please note that you
only plug in the Compact Flash Module while it is switched off. Otherwise your Dreambox
might lock up and needs to be rebooted.
Smartcard reader
Insert your Dreamcrypt Smartcard with the golden chip facing down and forward into one of
the two Smartcard reader slots. Dreamcrypt is a registered trademark of Dream-Multimedia.
Remote control sensor
The remote control sensor receives the infrared signals of the Dream Remote Control.
Channel up/down
Using the channel-up and -down buttons you can switch the channels directly on your
Dreambox.
LC-(LCD) or OLED-Display
The graphical display shows all major Information for the selected service.
Power button
The Power-Button switches your Dreambox on and off.
- 11 -

U s e r M a n u a l D r e a m b o x D M 7 0 2 5 / D M 7 0 2 5 +
1.3.2 Explanation rear panel
Mains switch
The main power switch completely cuts power from your Dreambox.
Mains connection
Plug the power cable into the main power socket. You must not connect the power plug to
anything other than a socket that supplies 110V/60Hz or 230V/50Hz.
Analog audio out (RCA)
Connect your Dreambox with a RCA/Cinch cable to your HiFi-Amplifier (e.g. AUX In or Tape
In ports).
Video out (Composite)
You can optionally connect your Dreambox to a TV using a RCA/Chinch cable.
TV Scart
Connect your TV, projector or beamer to your Dreambox using a Scart cable
VCR Scart
Connect your VCR or DVD player to your Dreambox using a Scart cable. Remember, the
VCR Scart is not designed to record a video signal from the VCR or DVD player. The signal
of the connected device is looped through to the TV-Scart connector, incase you have
selected VCR Scart in the main menu. Note: You cannot record any signals onto your
Dreambox using this connector.
UHF Modulator
You can optionally connect your Dreambox to your TV via a coaxial cable.
Network interface (Ethernet 10/100Mbit, RJ45)
The Communication Port is an Ethernet port. It is used to communicate with your Dreambox
via HTTP, FTP, NFS, Telnet and Samba to access your recorded movies, to upload channel
lists, etc. This port is also used to update the operating system of your Dreambox. Please
use a regular patch cable to connect your Dreambox to your LAN.
USB port
The USB Port is designed for devices that support the USB 1.1 standard. The amount of
supported USB devices depends on the installed image (Software) and is still under
development.
- 12 -

U s e r M a n u a l D r e a m b o x D M 7 0 2 5 / D M 7 0 2 5 +
Modem port (optional)
You can optionally connect your Dreambox to your ISP via the Modem Socket using a phone
line. The modem can be ordered from Dream Multimedia.
Digital audio out (Toslink)
You can connect your Dreambox with an optical (Toslink) cable to your HiFi-Amplifier or
DSP. The AC3 signal is also available at this port in case the selected channel transmits
Dolby Digital signals.
Mini DIN Port
The Mini DIN port is an expansion port.
0 / 12V out
The 0 / 12V out provides a maximum current of 200mA and can be used to control your
satellite equipment.
Serial port (RS232C, Sub-D, 9-pol.)
The Serial Port is used to update the operating system. Please connect a serial null modem
cable here.
LNB1 in (DVB-S Tuner)
Connect the coaxial cable from your LNB here.
LNB2 in (DVB-S Tuner)
Connect the second coaxial cable from your LNB here. If you don’t have a second coaxial
cable from your LNB available you can optionally use a coaxial cable to connect the LNB1
out with the LNB2 in.
This offers you the option to have more channels available for parallel recording.
LNB1 and LNB2 out (DVB-S Tuner)
You can connect an analog/digital receiver here. Remember to shutdown your Dreambox
into Deep-Standby-Mode in order for the receiver to work.
Antenna in (DVB-C/T Tuner)
Connect the coaxial cable from your antenna here.
Antenna out (DVB-C/T Tuner)
You can optionally connect your TV or VCR here.
- 13 -
U s e r M a n u a l D r e a m b o x D M 7 0 2 5 / D M 7 0 2 5 +
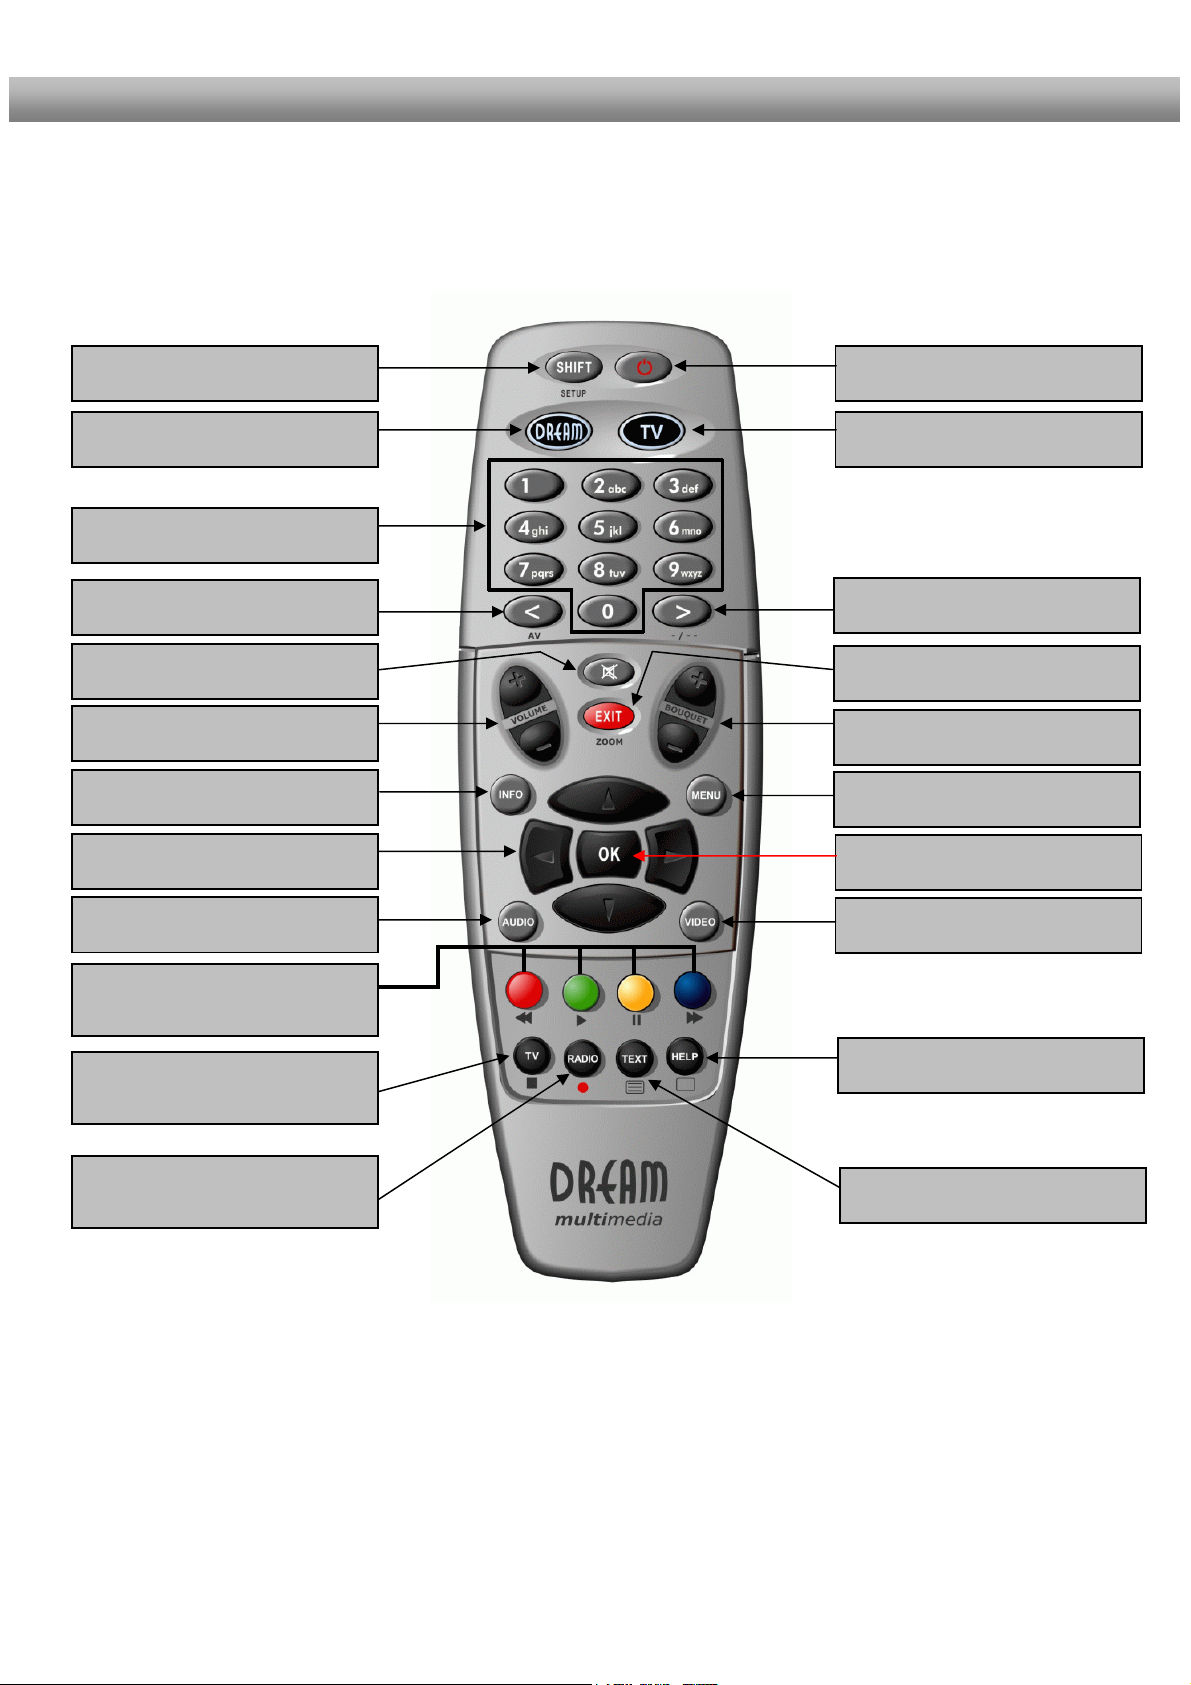
1.4 Remote control
SHIFT / SETUP-Button
DREAM-Mode-Button
Numeric-Keypad
Arrow-Left-Button
Mute-Button
Volume +/- Buttons
INFO-Button
Navigation-Buttons
AUDIO-Button
Options-Buttons
(PVR-Mode)
TV-Button
(PVR-Mode)
RADIO-Button
(PVR-Mode)
Power-Button
TV-Mode-Button
Arrow-Right-Button
EXIT-Button
Bouquet +/- Buttons
MENU-Button
OK-Button
VIDEO-Button
HELP-Button
TEXT–Button
- 14 -
U s e r M a n u a l D r e a m b o x D M 7 0 2 5 / D M 7 0 2 5 +
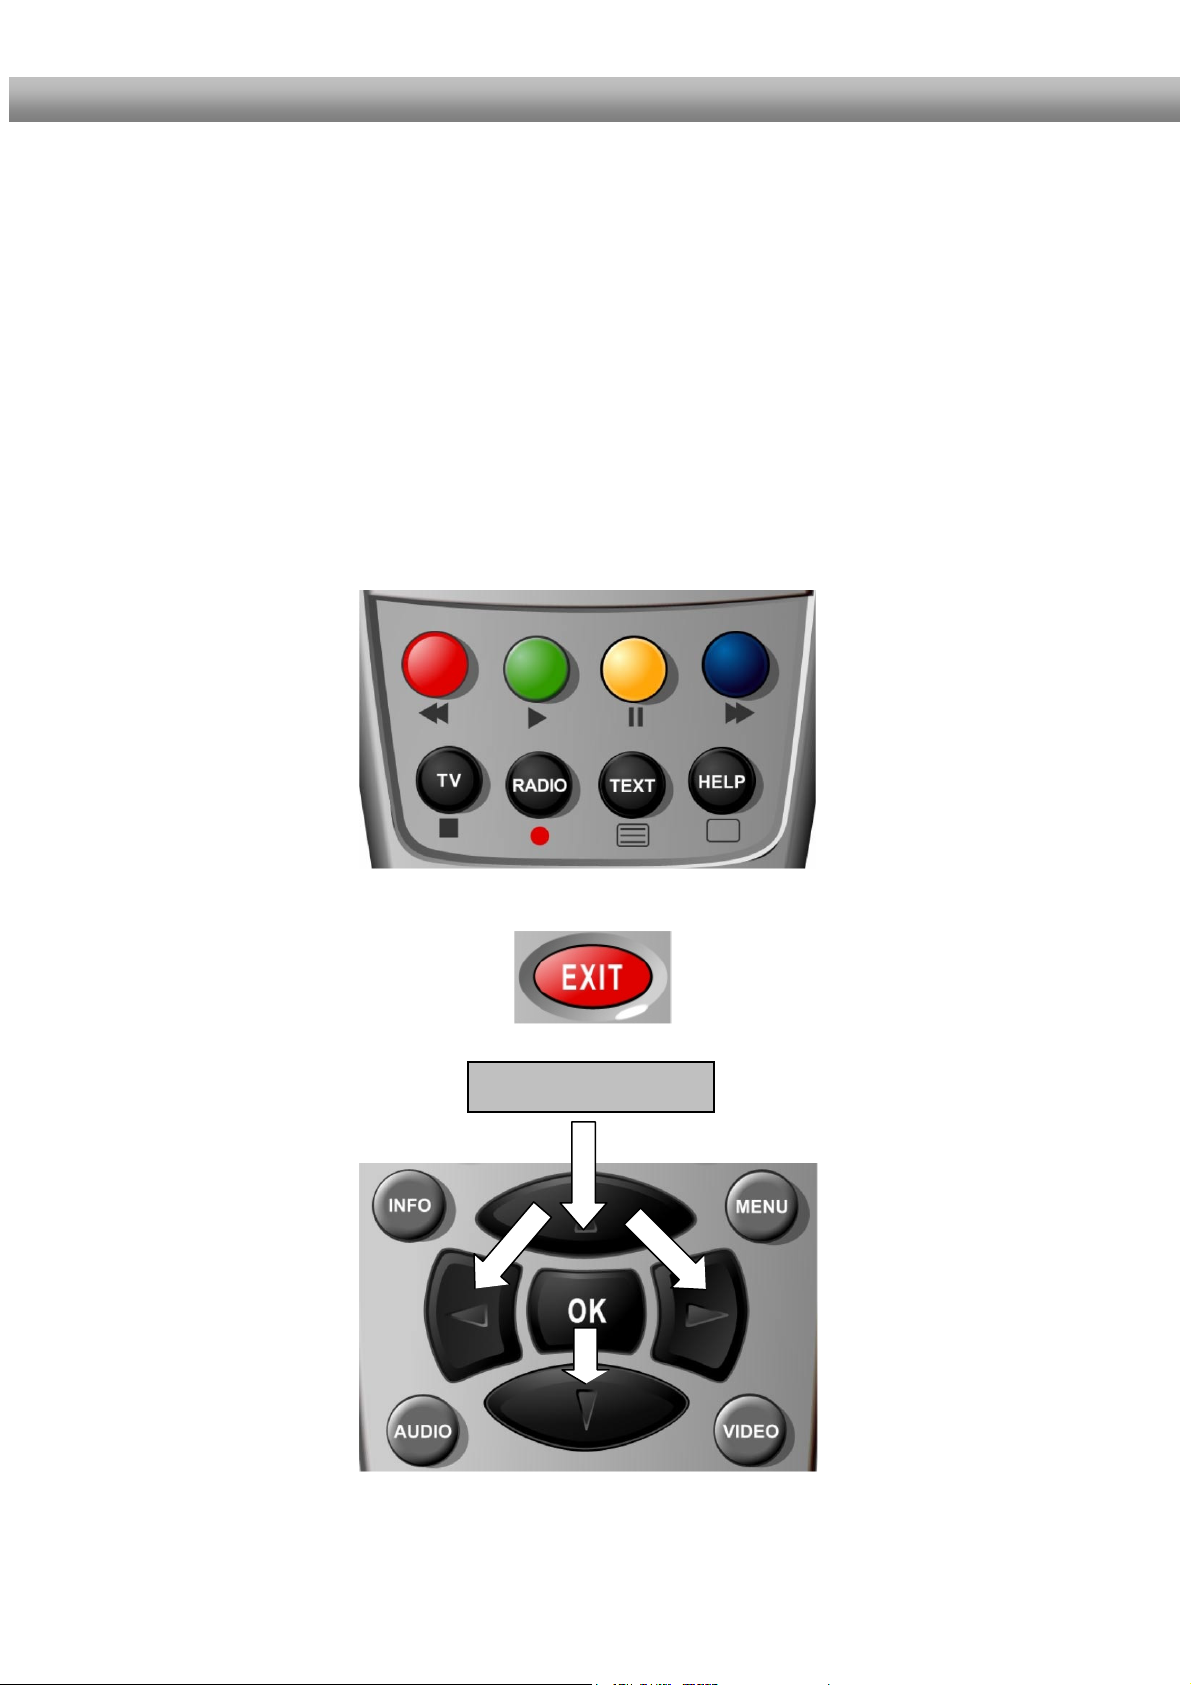
Important notes about operation
All functions of the Dreambox can be controlled via OSD-Menu (On-Screen-Display). This
makes the handling of the Dreambox very easy for you. All options are indicated by four
colored dots or beams (red, green, yellow, blue) in the OSD-Menu and can be started with
the Option-Buttons on the Remote Control.
Depending on the chosen Menu, these options do vary.
The Options-Buttons of your remote control have multiple functions. You will notice control
symbols below the four colored Options-Buttons, the TV- and the RADIO-Button. In PVRMode these buttons are used to control the digital recording according to their symbols.
Pressing the VIDEO-Button on your remote control will activate the PVR-Mode. The Infobar
will also indicate this. It changes from showing the channel information to showing the control
symbols for the PVR-Mode. (also see 7.3.1. Instant recording)
All Menus and Service
lists are closed with
the EXIT-Button.
In general the menus are To get into a submenu
controlled using the you have to press the
Navigation-Buttons on OK-Button.
your remote control.
Navigation-Buttons
- 15 -

U s e r M a n u a l D r e a m b o x D M 7 0 2 5 / D M 7 0 2 5 +
Explanation remote control buttons
SHIFT / SETUP-Button
The SHIFT/ SETUP-Button is used to preprogram the remote control to operate a TV.
See chapter 15. TV-Mode setup.
The Power-Button switches your Dreambox on and off.
See chapter 4.1 Turning your Dreambox on and off.
DREAM-Mode-Button
The DREAM-Mode-Button switches your remote control into Dreambox control mode. It will
shortly light up once your press the button.
The TV-Mode-Button switches your remote control into TV control mode to control your
preprogrammed TV. It will shortly light up once your press the button.
See chapter 15. TV-Mode setup.
Enter a service number to directly access the option by using the Numeric Keypad. The
service numbers are on the left side of the service list.
The Numeric Keypad can also be used to enter the Teletext page number.
Arrow-Left-Button
The Arrow-Left and Arrow-Right-Button enable you to jump back and forth between the
last 20 channels you have watched. If you have selected a sub service (see chapter 4.6) you
can use these buttons to switch to the next sub service.
Power-Button
TV-Mode-Button
Numeric-Keypad
Arrow-Right-Button
- 16 -

U s e r M a n u a l D r e a m b o x D M 7 0 2 5 / D M 7 0 2 5 +
Pressing the MUTE-Button mutes the Volume. A crossed speaker symbol will appear on the
TV screen. Pressing it again or pressing one of the Volume +/- Buttons brings back the
audio.
The Mute-Button deletes a character during text input.
You can leave all menus and service lists by pressing the EXIT-Button.
The Volume +/- Buttons control the volume of the audio. Pressing + will make turn it up and
pressing - will turn it down.
Pressing the Bouquet +/- Buttons will jump back and forth between the bouquets.
If no OSD menu is visible on the screen and you are in TV or RADIO-Mode, pressing the
INFO-Button will reveal the EPG information of the chose channel if it is available.
In general the menus are controlled using the Navigation-Buttons on your remote control.
To get into a submenu you have to press the OK-Button.
By pressing the OK-Button you confirm a selection in the menu or service list navigation.
If no OSD menu is present on your screen, the Infobar is shown once you press the OK-
Button.
Mute-Button
EXIT-Button
Volume +/- Buttons
Bouquet +/- Buttons
INFO-Button
Navigation-Buttons
OK-Button
- 17 -
U s e r M a n u a l D r e a m b o x D M 7 0 2 5 / D M 7 0 2 5 +
If you are in TV- or RADIO-Mode, pressing this button will bring up the OSD main menu. The
OSD main menu has the following options:
You can switch to the needed option by pressing the Navigation-Buttons up or down.
If you are in the service list, pressing the MENU-Button brings up the service menu. The
shown options may vary depending on the service list you selected.
By pressing the AUDIO-Button you can choose the different audio tracks offered by the
station.
Pressing the VIDEO-Button activates the PVR-Mode. The Infobar will show the control
symbols. You can instantly start recording by pressing the red Options-Button on your
remote control.
All possible options are shown by the four colored dots/blocks (red, green, yellow, blue) and
can be activated by the Options-Buttons. These buttons have multiple functions and are
also used to control the PVR-Mode.
Depending on the menu you currently are in the options will change and will be named
differently.
MENU-Button
AUDIO-Button
VIDEO-Button
Options-Buttons
(PVR-Mode)
- 18 -

U s e r M a n u a l D r e a m b o x D M 7 0 2 5 / D M 7 0 2 5 +
Pressing the TV-Button activates the TV-Mode. In PVR-Mode this button is mapped with the
stop function as indicated by the small square underneath it.
Pressing the HELP-Button activates the Help menu.
Pressing the RADIO-Button activates the RADIO-Mode.
The TEXT-Button activates the Teletext.
TV-Button
(PVR-Mode)
HELP-Button
RADIO-Button
(PVR-Mode)
TEXT–Button
- 19 -

U s e r M a n u a l D r e a m b o x D M 7 0 2 5 / D M 7 0 2 5 +
2. Installation
2.1 Turning the device on
¾ Place the batteries inside the battery compartment of the remote control keeping in mind
the right polarity.
¾ Before using the Dreambox, please read the safety instructions (See chapter 1.1 Safety
instructions)
¾ Connect the LNB or antenna with a coaxial cable to LNB1/2 in or Antenna in at your
Dreambox.
See chapter 1.3.2 Explanation rear panel.
¾ Connect the Dreambox with a Scart cable to your television screen and if available
connect your DVD Player or VCR to the VCR Scart of the Dreambox.
¾ Plug in the power cable into the Dreambox and then into a 110V/60Hz or 230V/50Hz
power socket.
¾ If you are using a switchable power socket please shutdown your Dreambox into deep
standby before switching off the power socket. See chapter 4.1 Turning your Dreambox
on and off
¾ If you switch on your Dreambox for the first time, you will see the setup wizard.
The setup wizard will guide you through the first time installation. Follow the instructions
on the screen. See chapter 3. Start wizard
¾ Please note that the factory setting for the video format is CVBS (FBAS).
.
- 20 -
U s e r M a n u a l D r e a m b o x D M 7 0 2 5 / D M 7 0 2 5 +
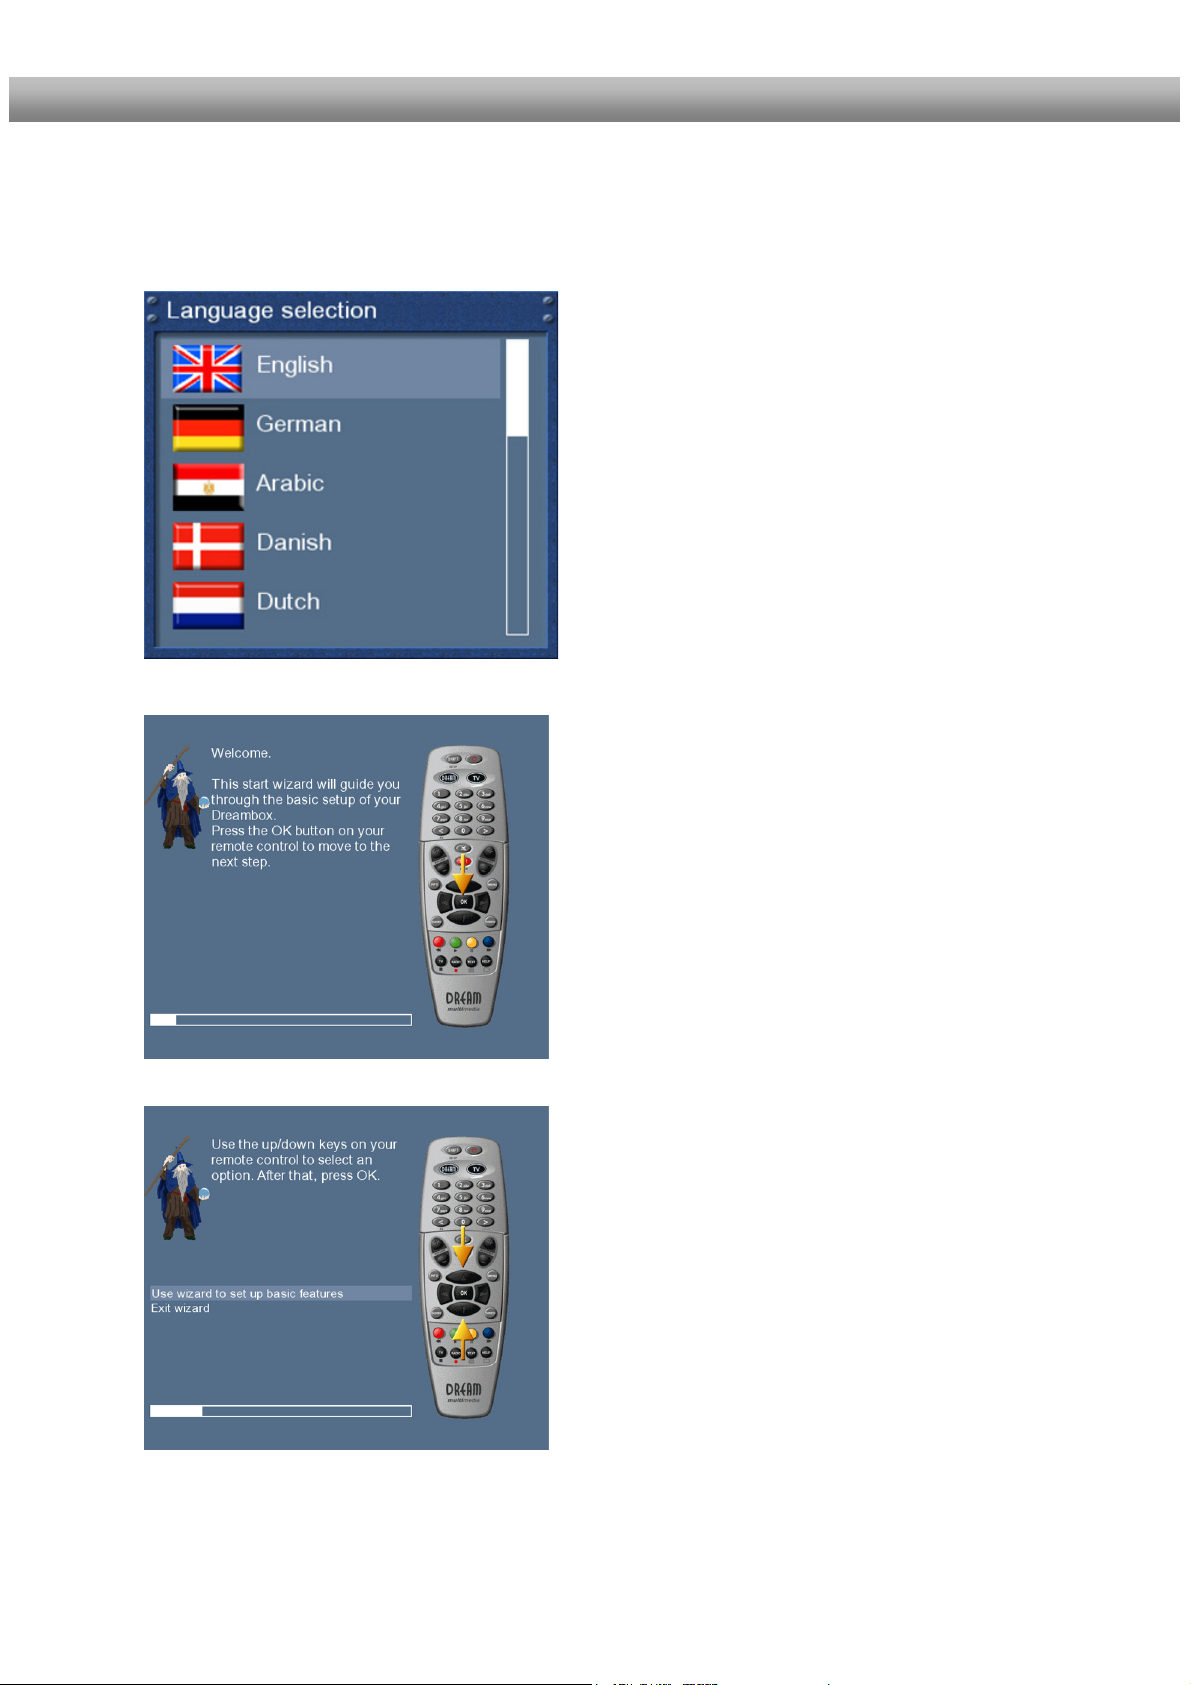
3. Start wizard
3.1 Language selection
Select your desired and language with the
Navigation-Buttons up and down. Press the OKButton to activate.
The start wizard takes you through the basic setup of
your Dreambox.
Press the OK-Button on your remote control to get
to the next step.
You will be asked if you want to set the basic settings
for your Dreambox now or if you want to quit the start
wizard.
Using the Navigation-Buttons up and down select
your desired option and press the OK-Button to
activate your selection.
If you chose “User wizard to setup basic features”
you will be taken to the menu for the language
selection.
- 21 -
U s e r M a n u a l D r e a m b o x D M 7 0 2 5 / D M 7 0 2 5 +
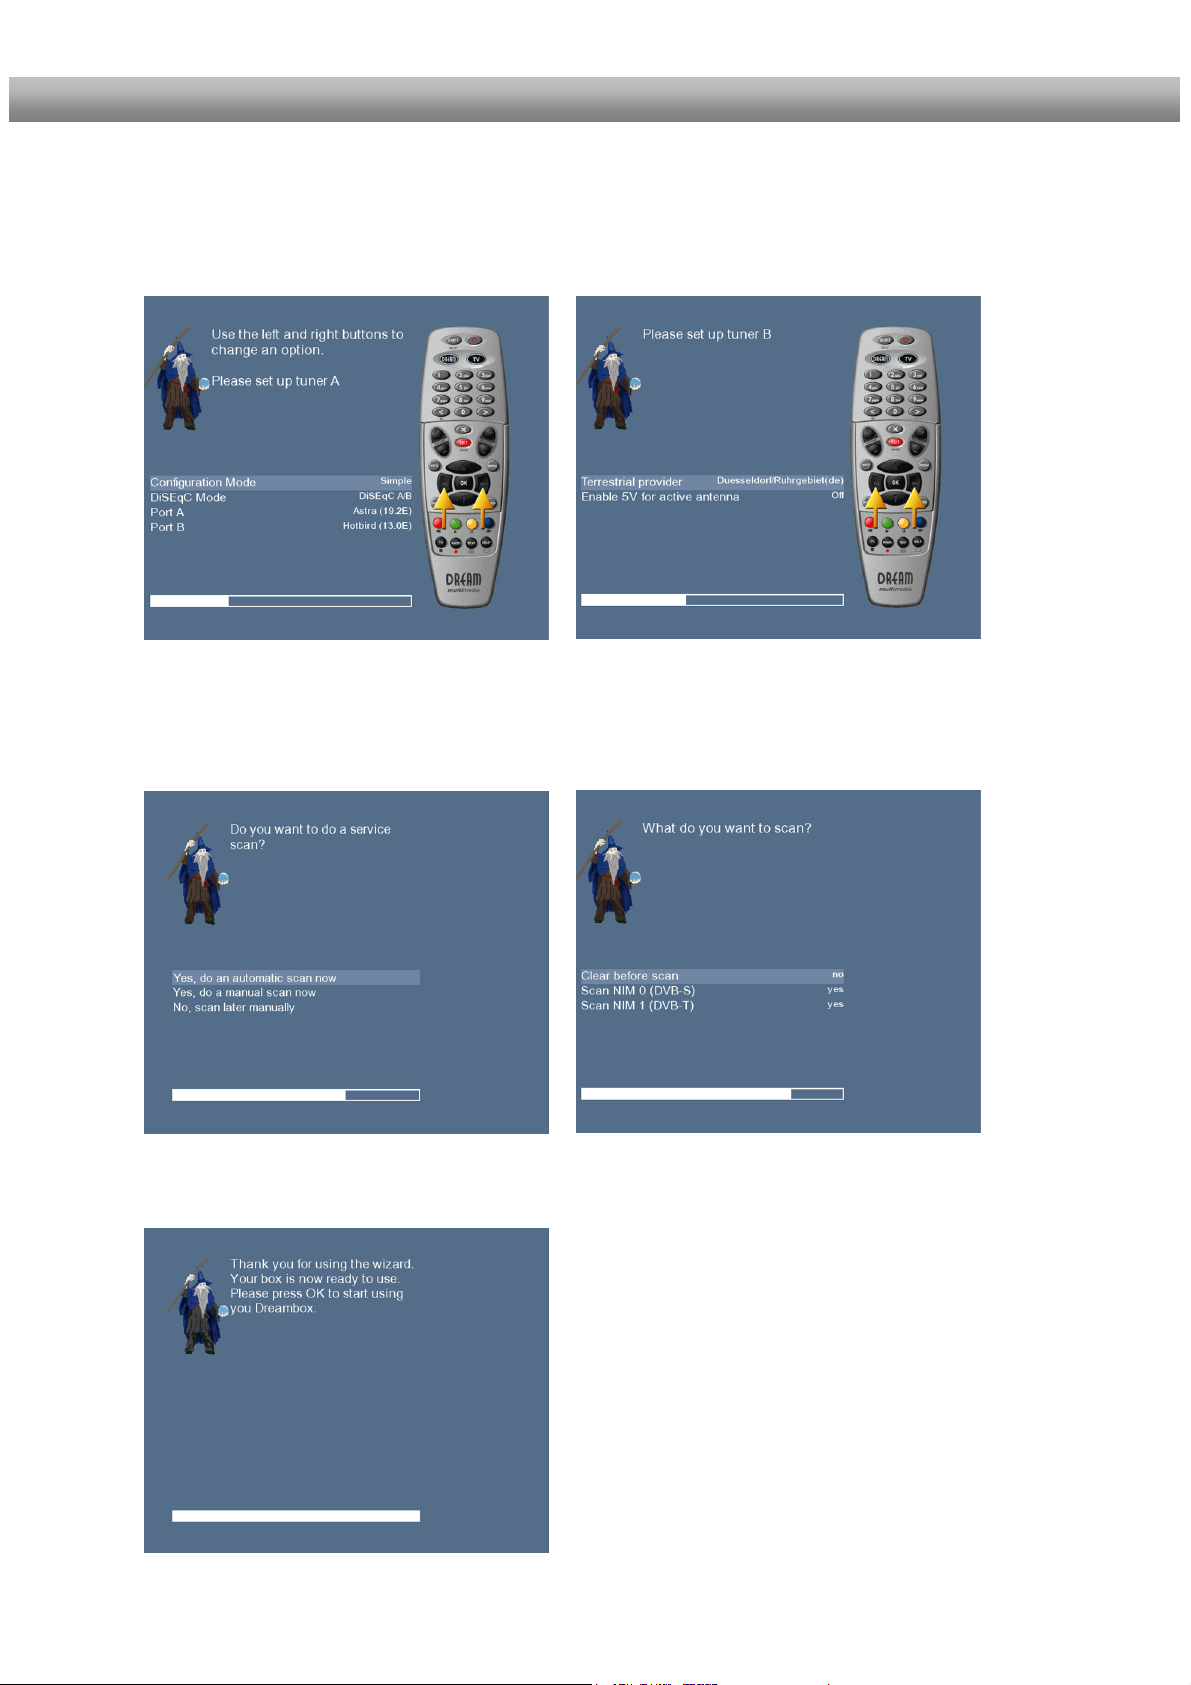
3.2 Tuner setup
Detailed information about the tuner setup can be found in chapter 11.1 DVB-S Tuner
configuration
3.3 Service scan
Detailed information about the service scan can be found in chapter 11.2 Automatic scan
Finalizing the basic setup
- 22 -
U s e r M a n u a l D r e a m b o x D M 7 0 2 5 / D M 7 0 2 5 +
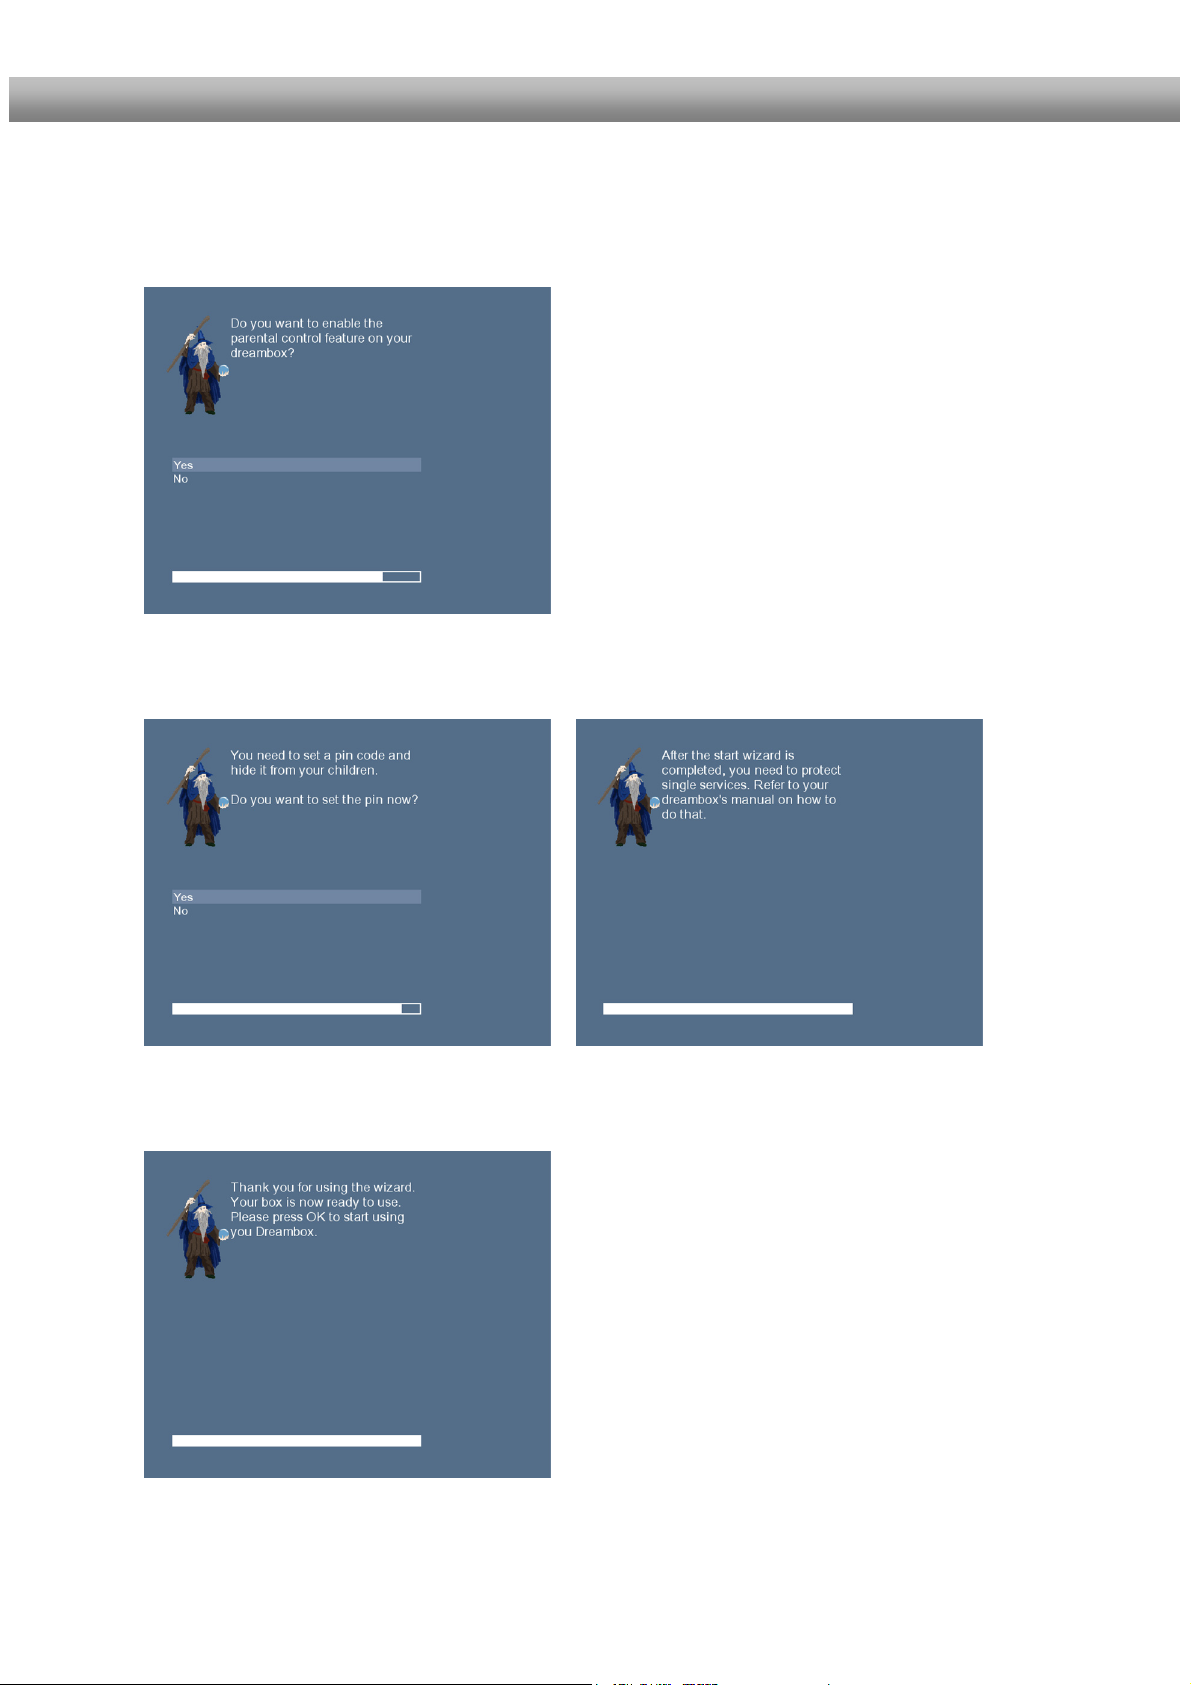
3.4 Parental Control
Refer to section 6.8 Parental control for further information about this feature.
Entering the pincode
Finalizing the basic setup
- 23 -
U s e r M a n u a l D r e a m b o x D M 7 0 2 5 / D M 7 0 2 5 +
4. Basic operation
4.1 Turning your Dreambox on and off
Use the Power-Button to turn your Dreambox on and off.
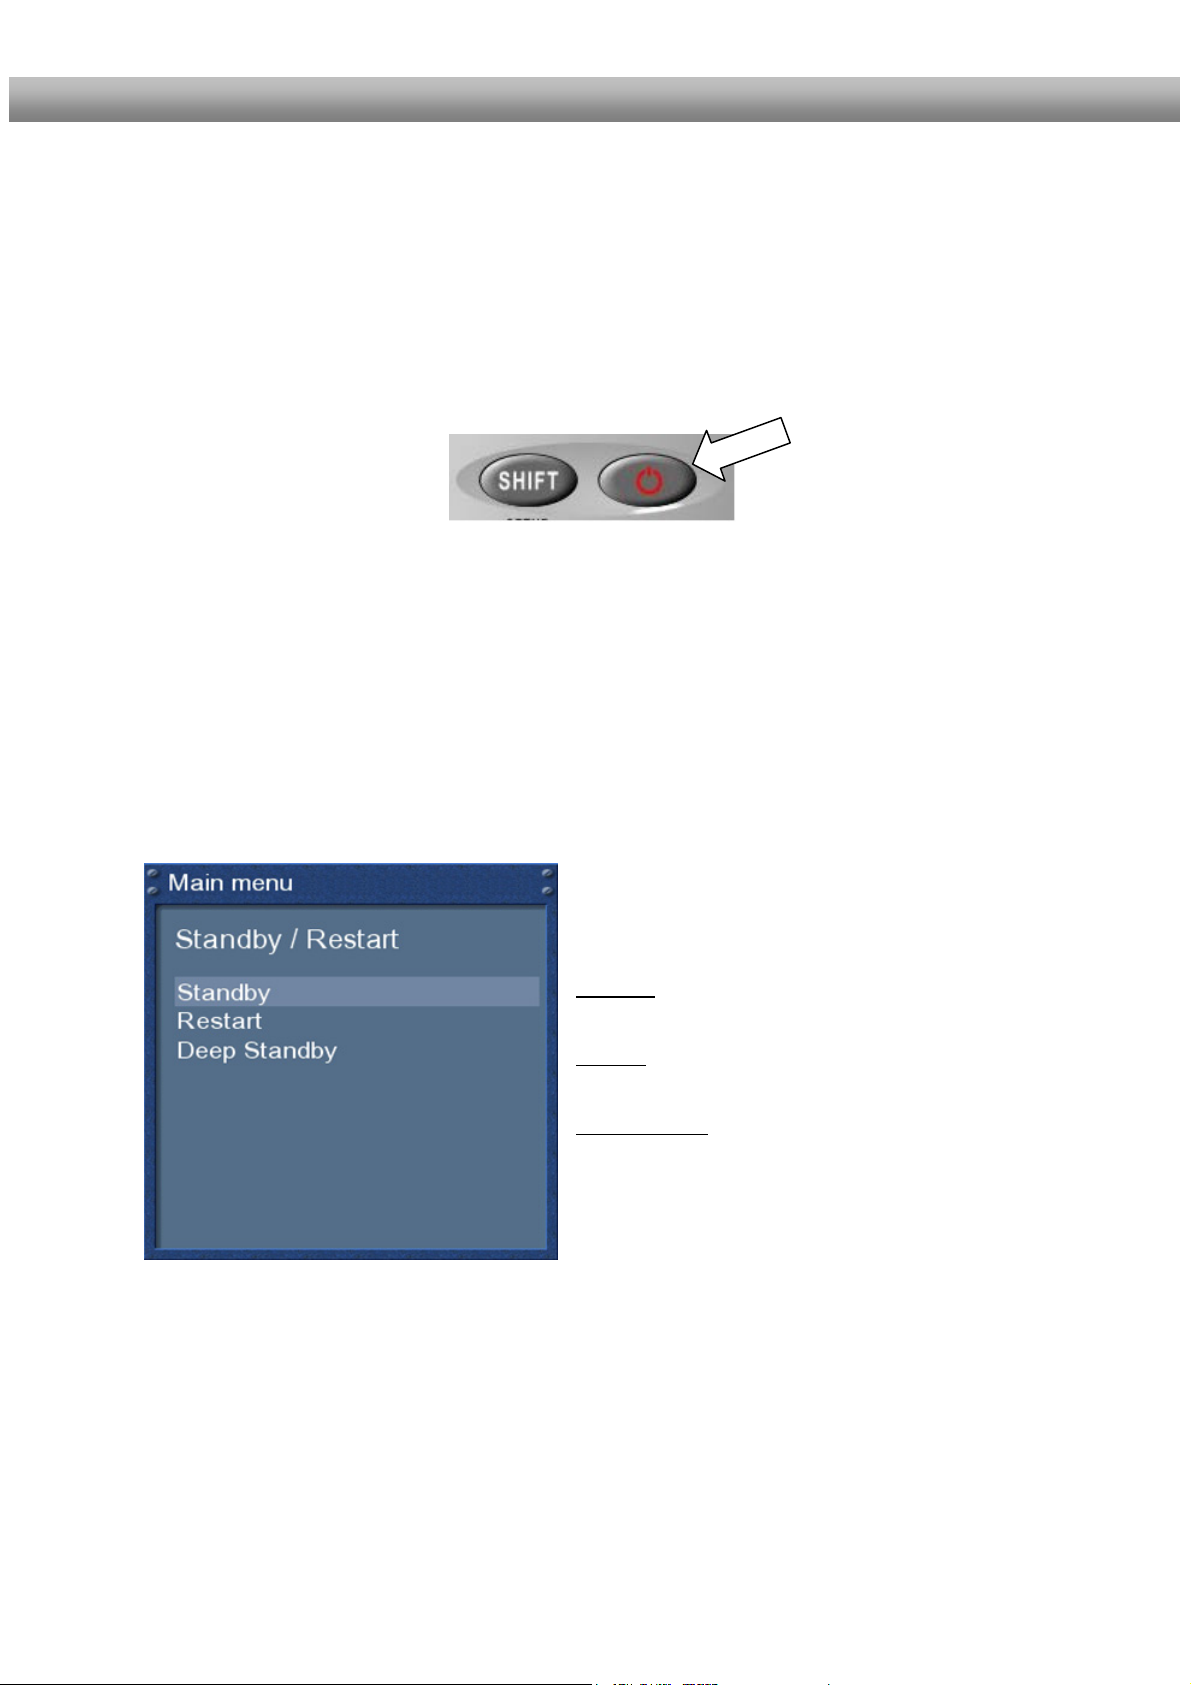
To put your Dreambox into Standby-Mode either press the Power-Button on your remote
control or directly on your Dreambox. The current time will be shown in the Dreambox’s LCDisplay.
Holding down the Power-Button on your remote control for three seconds will put your
Dreambox into the Deep-Standby-Mode
You can also put your Dreambox into Deep-Standby-Mode by using the OSD main menu.
Choose the Option “Standby / Restart” in the OSD main menu and navigate to “Deep
Standby” option afterwards. Pressing the OK-Button will put your Dreambox into the Deep-
Standby-Mode. Alternatively you can push down the Power-Button on your Dreambox for 5
seconds. If no OSD Menu is visible on the screen this will also put your Dreambox into DeepStandby-Mode.
All your settings will be saved now and your Dreambox goes into Deep-Standby-Mode
afterwards (saves energy!).
.
This is the Standby / Restart menu.
Navigate to the desired option and
confirm by pressing the OK-Button.
Standby:
Puts your Dreambox into Standby mode.
Restart:
Your Dreambox will be rebooted.
Deep Standby:
Puts your Dreambox into Deep-Standby-Mode.
- 24 -

U s e r M a n u a l D r e a m b o x D M 7 0 2 5 / D M 7 0 2 5 +
4.2 Service selection
Pressing the Left/Right-Buttons on your Dreambox remote control will take you to the
previous or next service.
Pressing the 0 on the Numeric-Keypad will enable you to skip back and forth between the
two most recently watched services. This feature is quite useful during commercial breaks
since it enables you to watch another channel and quickly check if your movies is back on.
Using the Navigation-Buttons left/right you can switch to the 20 last viewed services.
4.3 Changing channel using the service list
Pressing the Up/Down-Buttons on your remote
control activates the service list.
Use the Navigation-Buttons up/down to select the
desired service and press the OK-Button to change
to the selected service.
4.4 Controlling the volume
The Volume +/- Buttons control the volume of the
audio. Pressing + will make turn it up and pressing will turn it down.
Pressing the MUTE-Button mutes the volume. A
crossed speaker symbol will appear on the screen.
4.5 Changing the audio track
Pressing the AUDIO-Button in TV or Radio Mode will reveal the “Audio” menu of the
selected service.
Use the Navigation-Buttons up and down to
move to desired audio track. Press the
OK-Button to select.
The contents of this menu will vary from service
to service.
- 25 -
U s e r M a n u a l D r e a m b o x D M 7 0 2 5 / D M 7 0 2 5 +
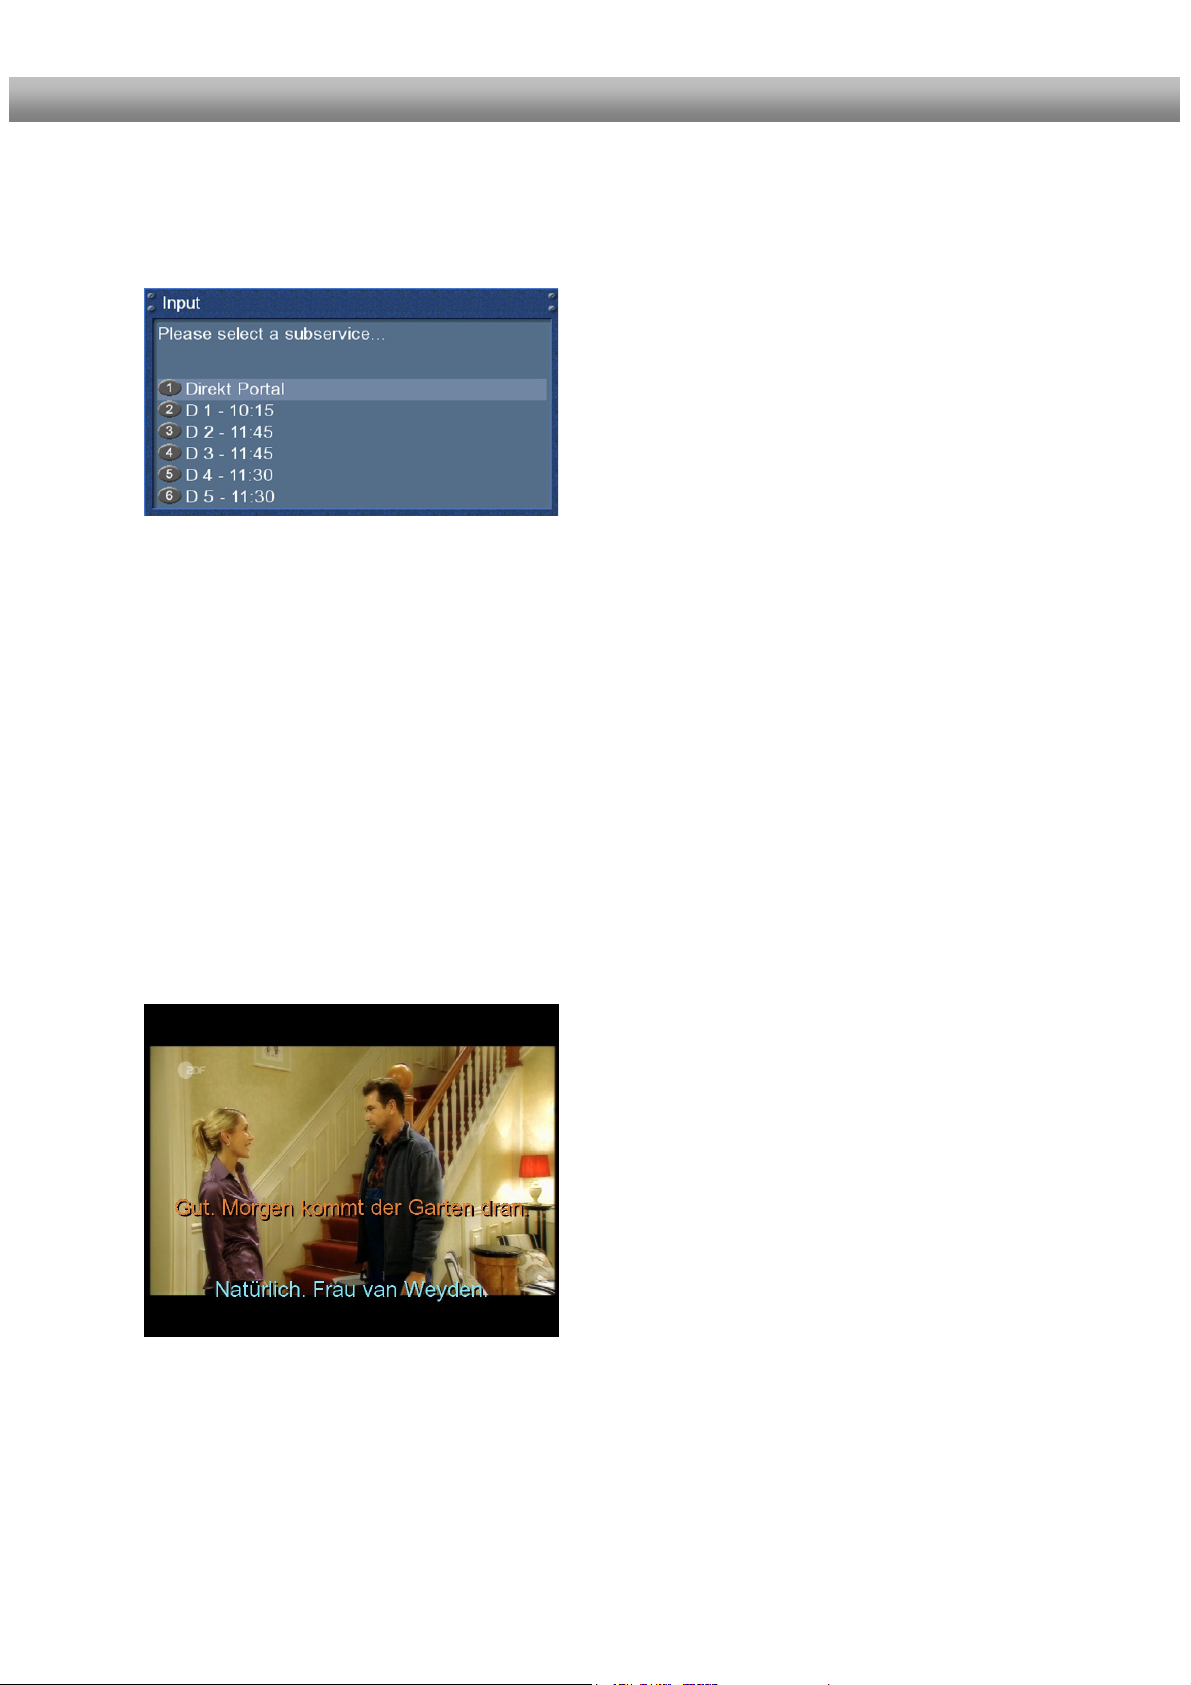
4.6 Sub Services
The green dot in the Infobar appears if the selected station transmits sub services.
4.7 TV/Radio switching
Pressing the RADIO-Button activates the RADIO-Mode. By pressing the TV- or EXITButton you can quit the RADIO-Mode.
4.8 Teletext
Use the Text-Button to enter the Teletext and the Exit-Button to leave.
4.9 Subtitles
Press the Menu-Button to enter the main menu. Select “Subtitles” and press the OKButton. A list with the available subtitles will show up. Use the Navigation-Buttons up and
down to select a desired subtitle and press the OK-Button to activate.
Pressing the green Options-Button in TV or
Radio mode will reveal the sub services menu.
Use the Navigation-Buttons up and down to move
to one of the sub services. Press the OK-Button to
select.
The screenshot on the left shows you an example of
how a subtitle looks.
To deactivate subtitles process as described
previously, just select deactivate subtitles instead of
a subtitle page.
Note: Keep in mind that not every station offers
subtitles. If no subtitles are available, the subtitle list
will stay empty.
- 26 -
U s e r M a n u a l D r e a m b o x D M 7 0 2 5 / D M 7 0 2 5 +
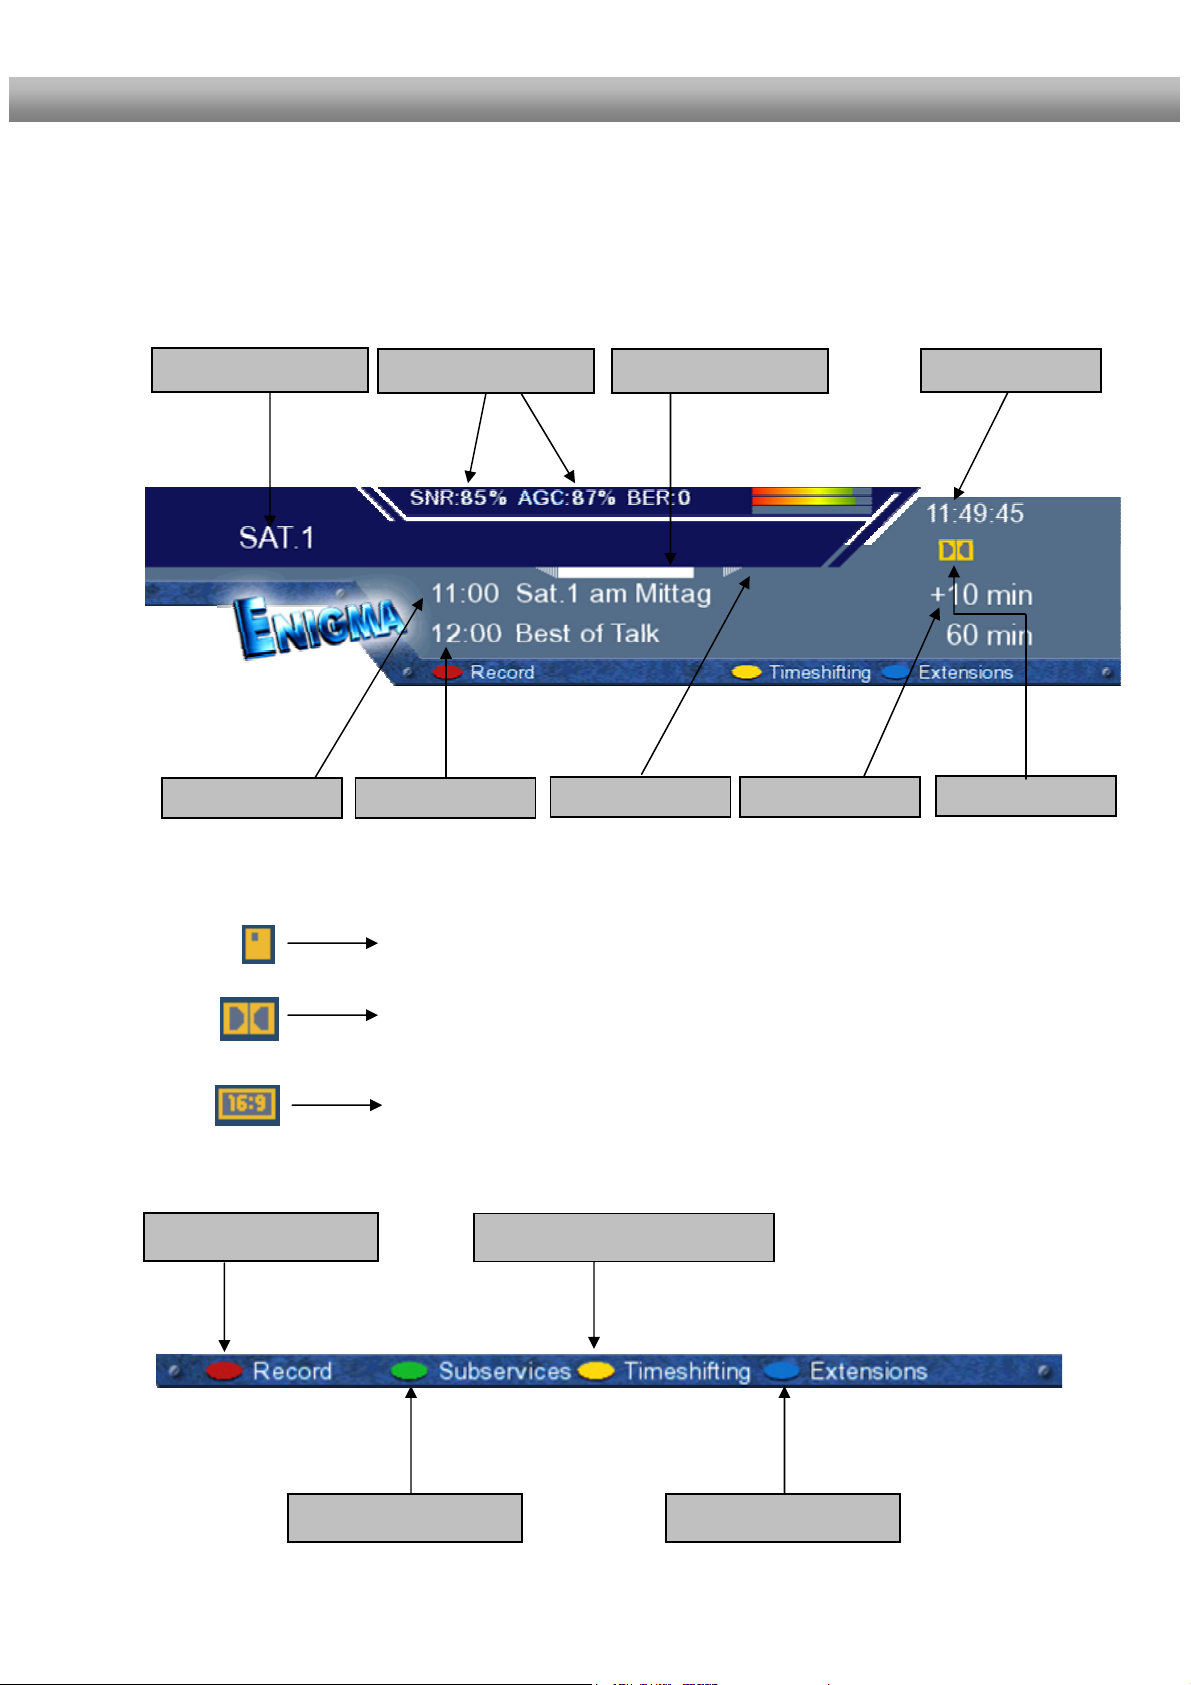
4.10 Infobar
The Infobar appears and disappears by pressing the OK-Button once, if no OSD menu is
shown on your screen or when you change channels. The Infobar shows all necessary
Information about the selected service.
Channel name
Record Options-Button
Signal level/strength
Next show Current show
Is highlighted yellow as soon as a show is broadcasted
encrypted.
Is highlighted yellow as soon as a show is broadcasted in
Dolby Digital.
Is highlighted yellow as soon as a show is broadcasted in 16:9
aspect ratio.
Subservices Extensions
Elapsed time
Recording status
Timeshifting Options-Button
Remaining time
Current time
Dolby Digital
- 27 -
U s e r M a n u a l D r e a m b o x D M 7 0 2 5 / D M 7 0 2 5 +
5. Electronic Program Guide - EPG
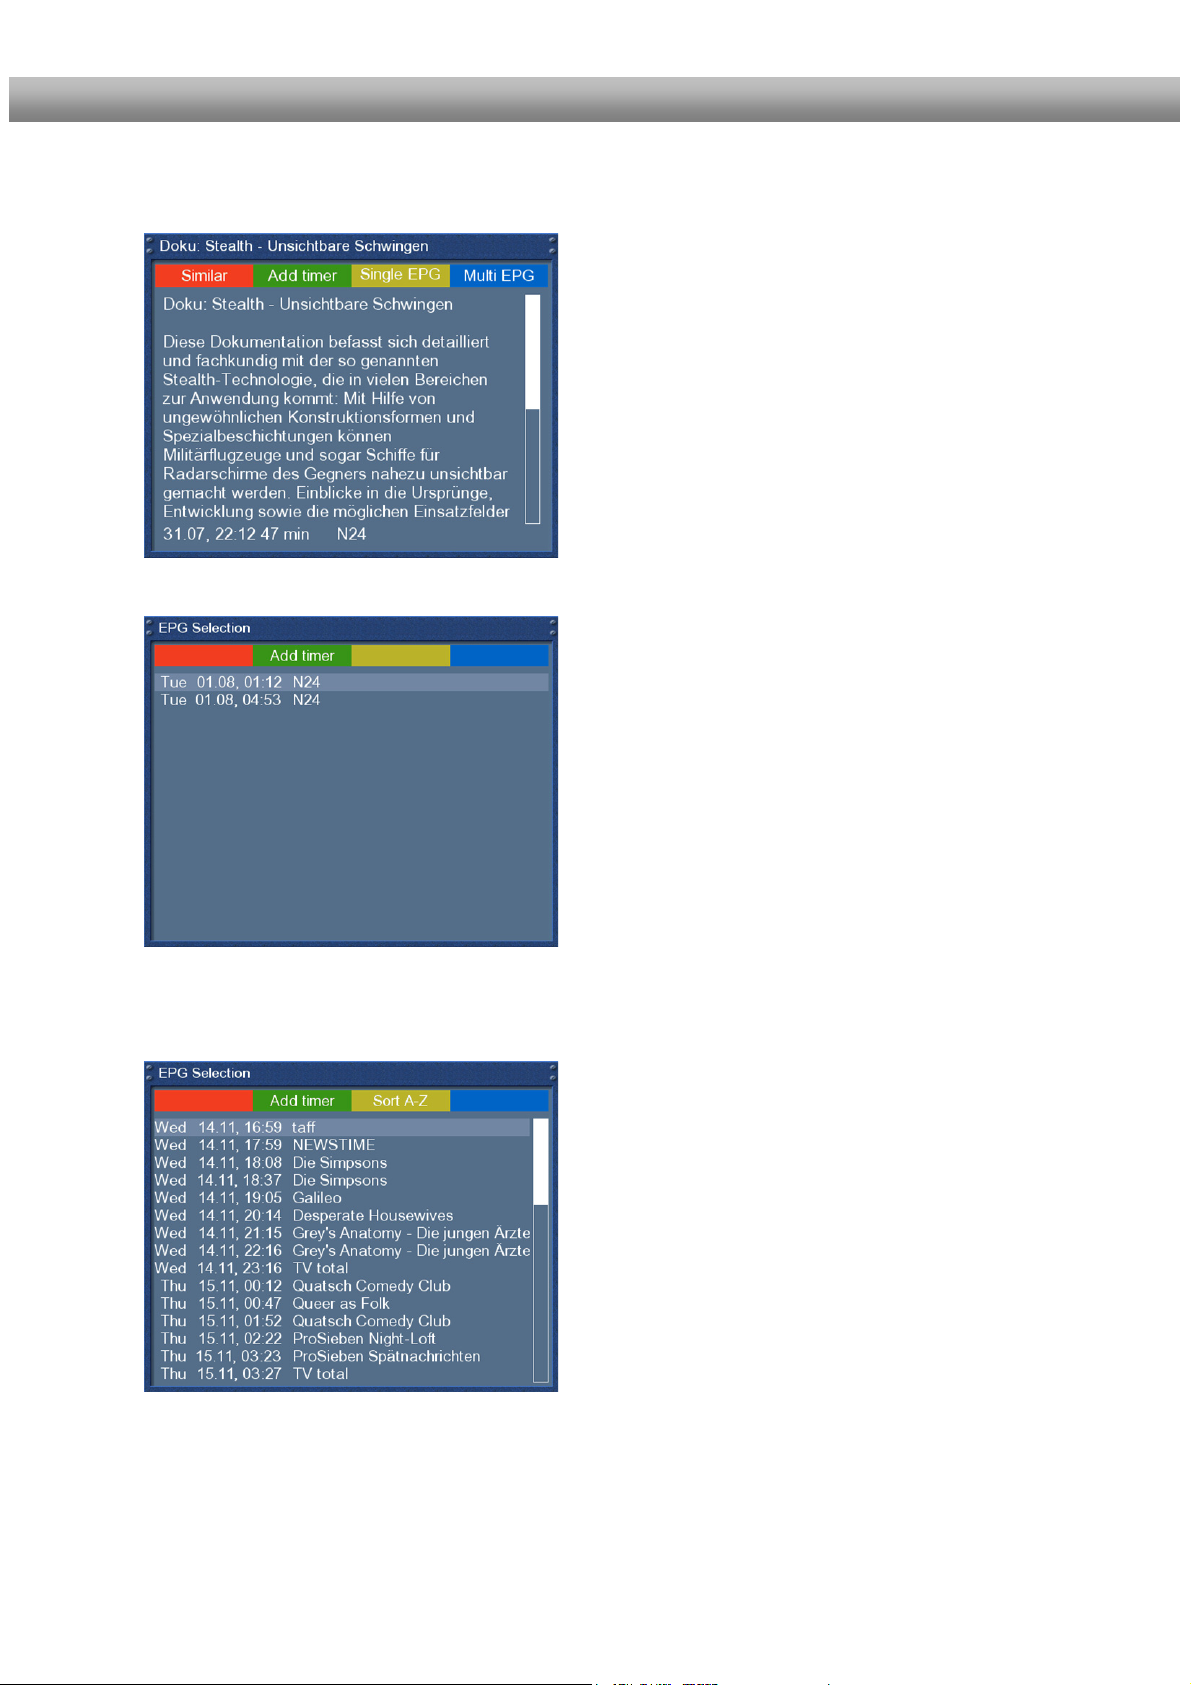
5.1 Single-EPG
By pressing the INFO-Button in TV-Mode you are
supplied with detailed information about the current
show and by pressing the Right-Button afterwards
about the next show.
Pressing the yellow Options-Button activates the
“Channel-EPG” (See chapter 5.1) and pressing the
blue Options-Button activates the “Multi-EPG“ (See
chapter 5.2).
The Dreambox automatically searches for similar
broadcasts in the background. If one or more similar
broadcasts are found the label “Similar” will appear in
the red window.
Pressing the red Options-Button opens a listing of
similar broadcasts.
By pressing the green Options-Button you can set
a timer for this rerun.
For additional information about recording by timer
please see chapter 7.3.3 Recording by timer.
In this view you are supplied with detailed information
about the currently selected channel’s programming.
By pressing the yellow Options-Button your can
ether sort the “Single-EPG” alphabetically or by time.
You can also access this view by pressing
1. the Info-Button for about 2 seconds
2. the Navigation-Buttons up/down to open the
services list and then pressing the Info-Button.
This way you can very quickly and easily access the
Single-EPG of every service.
- 28 -
U s e r M a n u a l D r e a m b o x D M 7 0 2 5 / D M 7 0 2 5 +
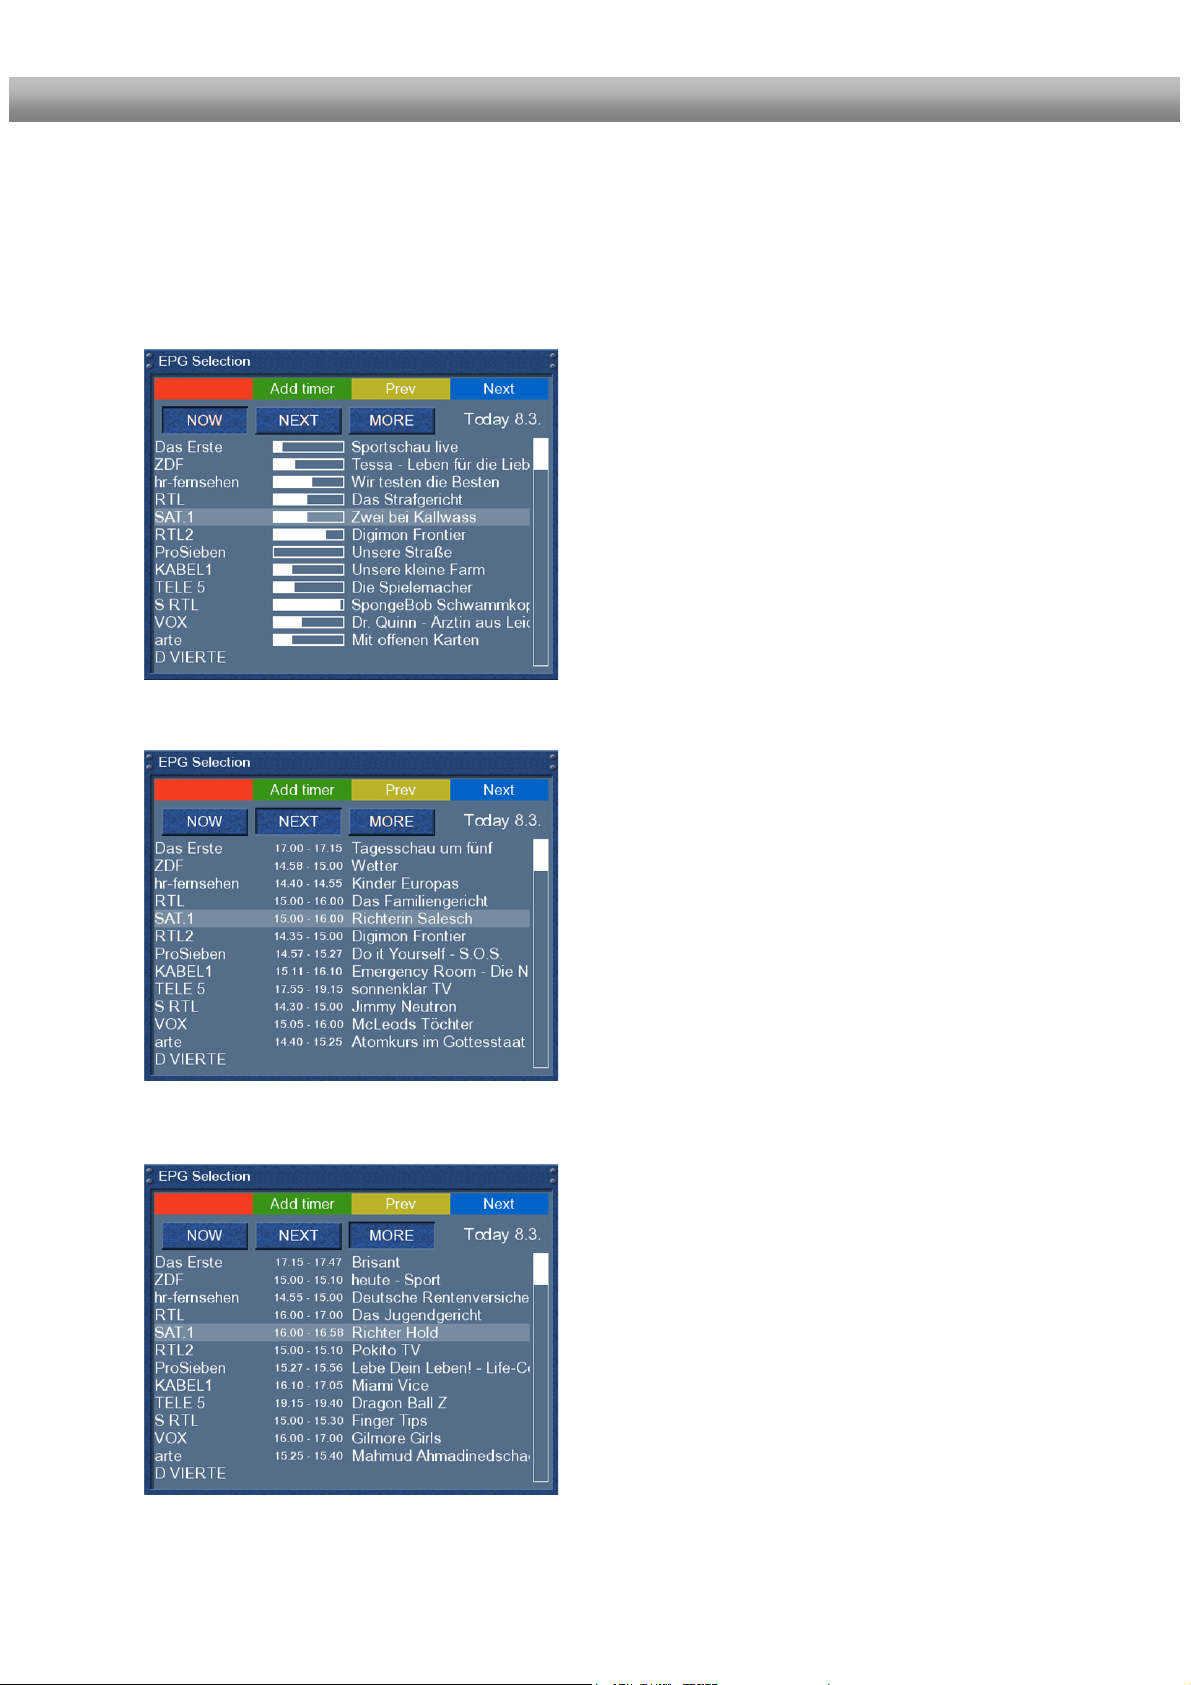
5.2 Multi-EPG
Use the blue and yellow Options-Buttons to switch between the now, next and more
views. Pressing the green Options-Button will give you the possibility to automatically copy
the start and end time of the selected show into a recording timer..
If you have set the “Multi bouquets” option to “yes”
(see chapter 11.2) a selection of you bouquets will
appear. Select the bouquet for which you want the
Multi-EPG view.
This view shows the currently airing shows on the
services listed in the left column.
A progress bar showing the progress of the currently
airing show is placed next to the service’s name.
Using the Navigation-Buttons up and down you
can select a service, just like in the service list, and
change to the selected service by pressing the red
Options-Button.
General overview of the following programming.
General overview of the upcoming programming
for_the following days. (Depending on the station
up_to_one week).
- 29 -
U s e r M a n u a l D r e a m b o x D M 7 0 2 5 / D M 7 0 2 5 +
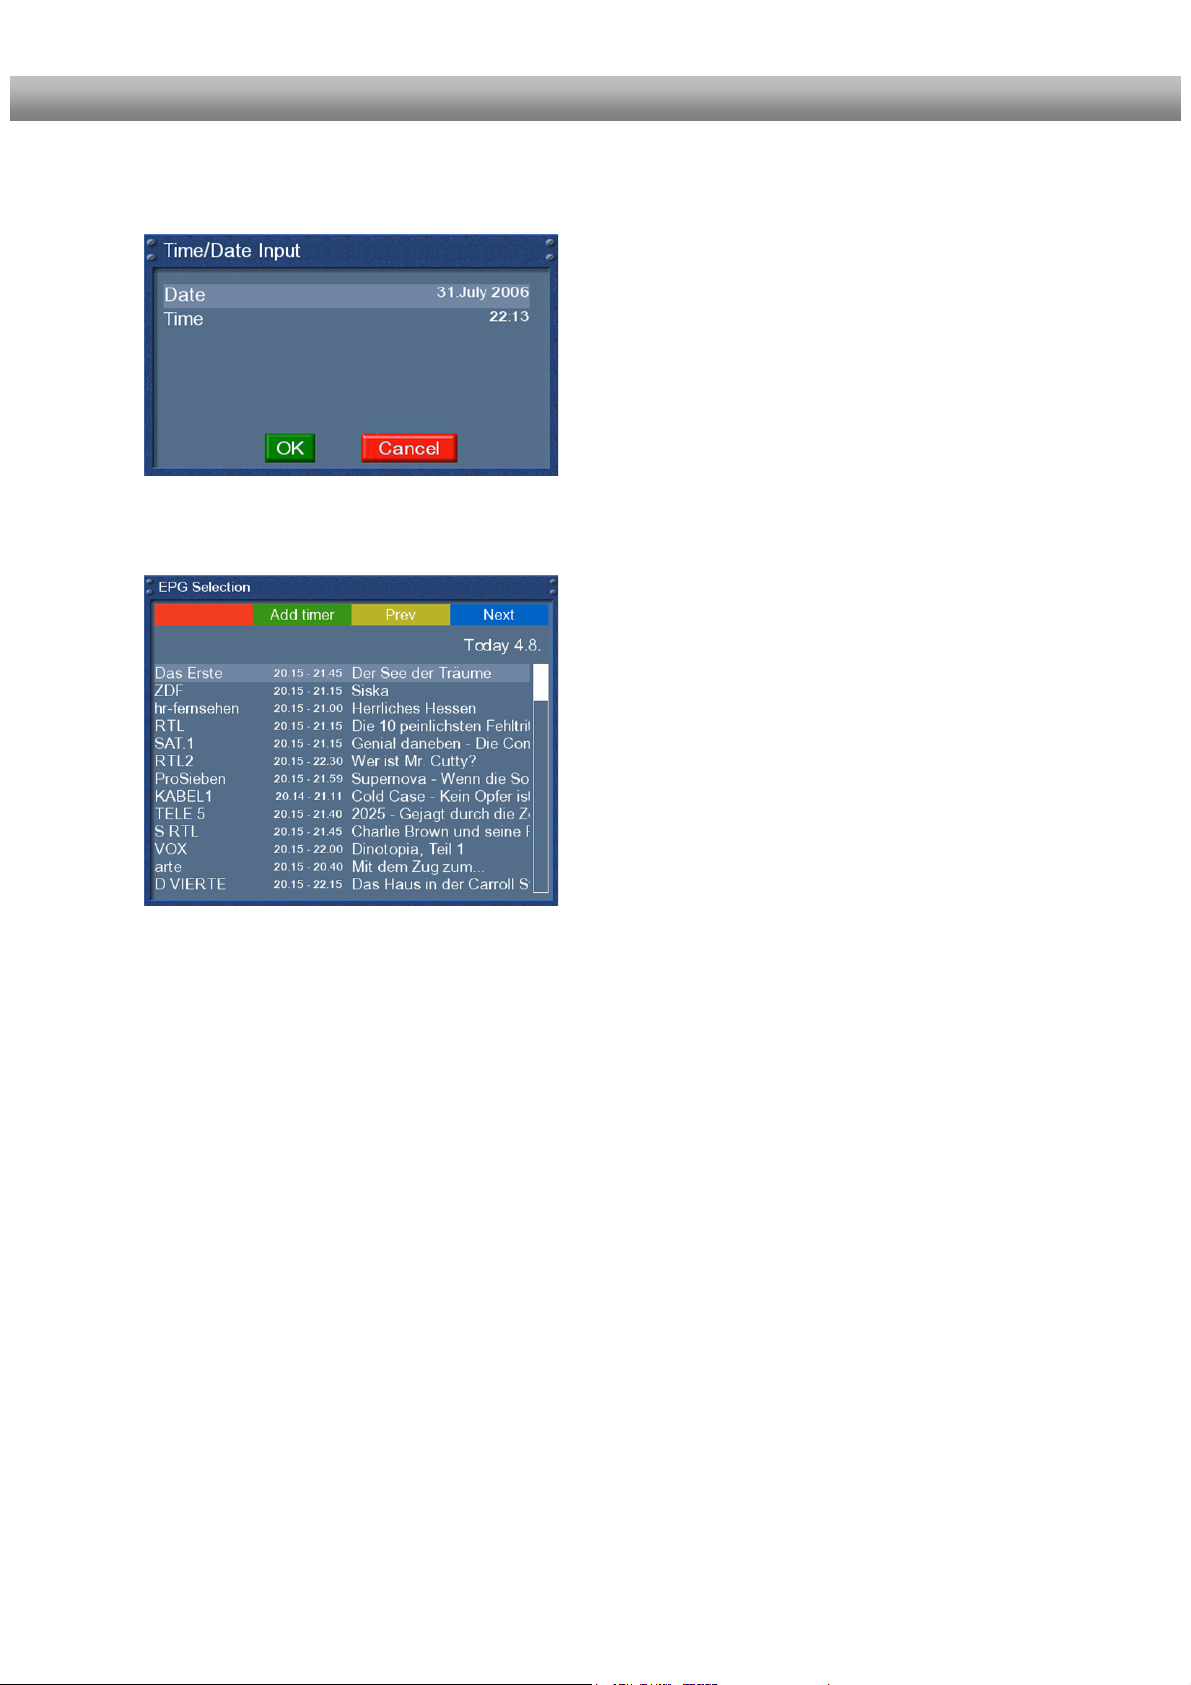
5.2.1 Time/Date Input
Press the Menu-Button in the Multi-EPG view.
A
A window will appear where you can enter a time and
date.
After you have entered the desired time and date
press the OK-Button to activate you selection.
The Multi-EPG will be displayed according to your
set time and date.
As a example we have selected 20:15. All shows
starting at / which are already running 20:15 are
displayed.
Note: The set time will be saved and used next time
when you sort by time and date.

U s e r M a n u a l D r e a m b o x D M 7 0 2 5 / D M 7 0 2 5 +
6. Edit the channellist
What is a bouquet?
A bouquet can be thought of something like a folder. Every channel equals a page in this
folder and the pages are sorted into categories.
This way you can create a bouquet called “Kids”, for example, under which you “file” all
children’s stations. Another example would be to create a bouquet called “Sports“ where you
put all sports channels. This way you can create several topic related bouquets.
Note: You can only delete channels in the favorites view
You cannot delete the channels in the “All” view. The use of the “All” view is to keep an
internal list of all available stations. If you start a new channel search the result would be
saved to the “All” view for example. You favorites bouquet will stay untouched. This way you
can easily add newly found channels from the “”All” list to your favorites bouquet. To see how
it is done refer to section 6.2.
6.1 Adding a bouquet
!
To be able to add a bouquet you have to set the
“Allow multiple bouquets” option to yes. Refer to
section 11.2.
Pressing the Up/Down-Buttons on your remote
control activates the service list.
Press the blue Options-Button to switch to the
bouquet view.
- 31 -

U s e r M a n u a l D r e a m b o x D M 7 0 2 5 / D M 7 0 2 5 +
By pressing the Menu-Button the "Channellist
menu" will open up.
Navigate to the option "add bouquet".
Use the Numeric-Keypad on your remote control to
enter the name for the new bouquet. The according
letters are printed on button.
The Mute-Button deletes a character.
Press the OK-Button to add the new bouquet to your
favorites list. You will be taken back to the
"Channellist menu".
- 32 -

U s e r M a n u a l D r e a m b o x D M 7 0 2 5 / D M 7 0 2 5 +
6.2 Add a service to favorites
If you want to add a service to your Favorites-view you can choose from services in the All-,
Satellites- and Provider-views. You can switch views by pressing the red, green, yellow
and blue Options-Buttons. At this point we only describe the process from the All-Bouquet
since it is the same for the others.
U s e r M a n u a l D r e a m b o x D M 7 0 2 5 / D M 7 0 2 5 +
Pressing the Up/Down-Buttons on your remote
control activates the service list.
Press the red Options-Button to change to the Allview.
Use the Navigation-Buttons up/down to select the
desired service and press the MENU-Button to open
the “Channellist menu”.
Navigate to the option “add service to bouquet”.
If you are using more than one bouquet this option is
named “add service to bouquet” instead and you will
get a list of your bouquets afterwards.
You can choose to which bouquet you want to add
the currently selected service.
If you are using only one bouquet which is the factory
default, the service will be added to you favorites list.
- 33 -

6.3 Adding multiple services to a bouquet
You can select multiple services from the All-view to be added to the currently selected
bouquet.
U s e r M a n u a l D r e a m b o x D M 7 0 2 5 / D M 7 0 2 5 +
Pressing the Up/Down-Buttons on your remote
control activates the service list.
Use the Bouquet +/- Buttons to switch to the
desired bouquet. As an alternative you can press the
blue Options-Button and select the desired
bouquet.
After that select a service and switch to it by pressing
the OK-Button.
By pressing the Menu-Button the "Channellist
menu" will open up.
Navigate to the option "enable bouquet edit". The Allview will open up.
All services that are in the selected bouquet are
highlighted red.
Use the Up/Down-Buttons to navigate to a desired
service and press the OK-Button to select. The
service will be highlighted red. Using this method you
can select additional services that you want to add to
the bouquet.
Once you have selected all services that you want to
add, press the Menu-Button. The "Channellist
menu" will open up.
- 34 -

6.4 Remove a service from favorites
U s e r M a n u a l D r e a m b o x D M 7 0 2 5 / D M 7 0 2 5 +
Choose the "End bouquet edit" option. All highlighted
services will now be added to the bouquet that you
selected in the beginning.
If you are only using one bouquet, which is the
default setting, the selected services will be added to
you favorites list.
Pressing the Up/Down-Buttons on your remote
control activates the service list.
Use the Navigation-Buttons up/down to select the
desired service and press the MENU-Button to open
the “Channellist menu”.
Navigate to the option “remove service”.
The selected service will be deleted from your
favorites list.
- 35 -

6.5 Moving a service to favorites
.
Pressing the Up/Down-Buttons on your remote
control activates the service list.
Use the Navigation-Buttons up/down to select the
desired service and press the MENU-Button to open
the “Channellist menu”.
Navigate to the option “enable move mode” and
press the OK-Button.
Use the Navigation-Buttons up/down to select the
service that you want to move and press the OK-
Button.
The service will be highlighted red.
Use the Navigation-Buttons up and down to move
the service to the desired position. Press the OK-
Button to release the service and thus placing it at
it’s new position.
You can move services as long as the move mode is
activated. To disable the move mode press the
MENU-Button to get into the “Channellist menu” and
chose the option “disable move mode” by pressing
the OK-Button.
U s e r M a n u a l D r e a m b o x D
- 36 -

M 7 0 2 5 / D M 7 0 2 5 +
6.6 Adding a marker to favorites
You have the option to add makers within the favorites bouquets.
Pressing the Up/Down-Buttons on your remote
control activates the service list.
Use the Bouquet +/- Buttons to switch to the desired
bouquet. As an alternative you can press the blue
Options-Button and select the desired bouquet.
Select a service. The marker will be added above the
selected service.
By pressing the Menu-Button the "Channellist menu"
will open up.
Navigate to the option "add marker".
Use the Numeric-Keypad on your remote control to
enter the name for the new bouquet. The according
letters are printed on button.
The Mute-Button deletes a character.
Press the OK-Button to add the marker to your
favorites list. You will be taken back to the "Channellist
menu".
.
As an example we have added two markers as shown
in the picture on the left.
Use the Arrow-Left and Arrow-Right-Buttons to
jump between those two markers.
- 37 -

U s e r M a n u a l D r e a m b o x D M 7 0 2 5 / D M 7 0 2 5 +
6.7 Alternative services
Incase you are using two different types of tuners in your Dreambox, for example a DVB-S
and a DVB-T tuner, you can link services that you receive on both tuners in the alternative
services list.
Every services resides on a so called transponder. A transponder contains a number of
services.
Example: ZDF-Transponder via satellite
This transponder contains the services: 3sat, Kika, ZDF, ZDFdokukanal, ZDFinfokanal,
ZDFtheaterkanal
If you now start a recording or enable the PiP function on “ZDF” only the services on the
same transponder on this tuner are available any more.
The unavailable services will be marked grey in the services list, once a service on one of the
tuners is in use either by recording or by PiP.
If you now want to view or record a different service that is not on the ZDF-Transponder it
has linked to the corresponding service on the free (other) tuner.
How to link services will be explained in the following steps.
Pressing the Up/Down-Buttons on your remote
control activates the service list.
Use the Navigation-Buttons up/down to select the
desired service and press the MENU-Button to open
the “Channellist menu”.
- 38 -

U s e r M a n u a l D r e a m b o x D M 7 0 2 5 / D M 7 0 2 5 +
Navigate to the option “Add alternatives“.
.
The All view opens up.
Use the Navigation-Buttons up/down to select the
service that you want to move and press the OK-
Button.
The service will be highlighted red. Using this method
you can select additional services that you want to
add.
Once you have selected all services that you want to
add, press the Menu-Button. The "Channellist
menu" will open up.
Select the "End alternatives edit“ option.
- 39 -

U s e r M a n u a l D r e a m b o x D M 7 0 2 5 / D M 7 0 2 5 +
6.8 Parental control
Parental control makes it possible to lock selected channels.
If no OSD menu is visible on your screen, press the Menu-Button to open the main OSD
menu. Navigate to the option “Setup” and press the OK-Button to select.
1. Navigate to the “Parental lock“ option and press the OK-Button.
¾ The “Parental control setup” menu will open up.
Set the “Enable parental control” option to yes.
Under the “Parental control type” option you can
choose between a blacklist and a whitelist.
Whitelist means that all channels NOT in the parental
control list will be locked.
Backlist means that all the channels in the parental
control list will be locked.
If you want to change the Pincode select the “Change
service pin” option and press the OK-Button.
- 40 -

U s e r M a n u a l D r e a m b o x D M 7 0 2 5 / D M 7 0 2 5 +
You now will be prompted to enter the old pincode
and afterwards the new one.
You have to enter the new pincode twice to ensure
you didn’t make any typing errors.
You will see this notice that the pincode has been
changed. Press the OK-Button to get back into the
Parental control menu.
If the entered pincode was false you will see this
notice. Press the OK-Button to get back into the
“Change service pin” menu and to enter the correct
new pincode twice.
Now select the “Edit services list” option and press
the OK-Button.
Use the Navigation-Buttons up/down to select the
first letter of the channel that you want to lock or
allow and press the OK-Button.
In this example we decided to lock the service called
“ProSieben”. Accordingly we selected the “P” as the
first letter.
- 41 -

U s e r M a n u a l D r e a m b o x D M 7 0 2 5 / D M 7 0 2 5 +
The Parental control services Editor will open up. All
services beginning with the letter P are shown.
Select “ProSieben” and press the OK-Button.
A symbolized padlock will appear in front of the
channel letting you know that it can only be watched
when the right pincode is entered.
If you have selected whitelist under the “Parental
control type” then this channel will be the only one
that can be viewed without entering the right pincode.
Protecting the parental lock setup
Additionally you have the option to protect the parental control menu using a pincode.
Setting the “Protect setup” option to yes you will only
be able to change parental control setting after you
have entered the correct pincode.
Once you entered the wrong pincode three times in a
row you have to wait 15 minutes before you can try
again.
Note: You can use two different pincodes to
protect the setup and the service list.
- 42 -

U s e r M a n u a l D r e a m b o x D M 7 0 2 5 / D M 7 0 2 5 +
7. Hard disk operation
7.1 Mounting guidelines
This chapter describes how to mount a hard disk inside your Dreambox DM 7025.
Please always adhere to ESD (Electrostatic Discharge) regulations when handling electronic
devices. Make sure that you are grounded. Do not open the device in your living room or in
any other rooms with carpeting or any other flooring that can carry an electrostatic charge.
Remove all connection from the device. Only open the device with the tools depicted in this
manual. Try to avoid direct contact with the main circuit board. If all this doesn’t mean
anything to you or if you have too many question, please contact your dealer or technician.
Also notice the warranty notes in chapter 1.1 Safety instructions.
This picture shows everything you need for installing the hard disk.
Cover
Hard disk Hard disk- Cover Screwdriver
screws screws
- 43 -

U s e r M a n u a l D r e a m b o x D M 7 0 2 5 / D M 7 0 2 5 +
Parts list
¾ 1 Dreambox (including the 11 Phillips screws for the cover and the hard disk cage).
The IDE cable and the hard disk power cord a already installed inside the Dreambox
DM7025.
¾ 1 Phillips screwdriver
¾ 1 Hard disk of your choice
¾ 4 Hard disk mounting screws
Action:
Remove these 5 screws on the rear panel.
Remove these 2 screws at the right side of the device.
Remove these 2 screws at the left side of the device.
- 44 -

U s e r M a n u a l D r e a m b o x D M 7 0 2 5 / D M 7 0 2 5 +
Lift the cover on the sides on slide it backwards.
Remove the 2 screws from the hard disk cage.
Remove the hard disk cage by lifting it upwards.
- 45 -

U s e r M a n u a l D r e a m b o x D M 7 0 2 5 / D M 7 0 2 5 +
Bend the IDE cable as shown in this picture.
Now you need the Phillips screwdriver, the hard disk cage, the 4 hard disk mounting screws
and your hard disk.
- 46 -

U s e r M a n u a l D r e a m b o x D M 7 0 2 5 / D M 7 0 2 5 +
Attach the hard disk cage to the hard disk.
Pay attention to the correct mount of the hard disk in the hard disk cage. Set the jumper of the hard
disk to cable select. This information usually is printed on the hard disk.
- 47 -

U s e r M a n u a l D r e a m b o x D M 7 0 2 5 / D M 7 0 2 5 +
Put the hard disk cage back into the Dreambox and connect the hard disk power cord
and IDE cable to the hard disk. Please be careful not to lay the power cord too close to the power
supply. Screw the two screws back onto the hard disk cage.
Slide the cover from the rear back onto the device..
Watch for the small plastic clips shown in the picture above. The must not overlap when you slide
the cover back on!
Screw the two screws on each side and five screws on the rear back into place.
Reattach all connector to your Dreambox. Attach the power cord as last.
- 48 -

U s e r M a n u a l D r e a m b o x D M 7 0 2 5 / D M 7 0 2 5 +
7.2 Management
If no OSD menu is visible on your screen, press the Menu-Button to open the main OSD
menu. Navigate to the option “Setup” and press the OK-Button to select
1. Navigate to the option “System” and press the OK-Button
¾ The “System” menu will open up.
2. Navigate to the option “Harddisk…” and press the OK-Button
3. Navigate to the “Harddisk setup” option and press the OK-Button
7.2.1 Initialization
If no OSD menu is visible on your screen, press the Menu-Button to open the main OSD
menu. Navigate to the option “Setup” and press the OK-Button to select
1. Navigate to the option “System” and press the OK-Button
¾ The “System” menu will open up.
2. Navigate to the option “Harddisk…” and press the OK-Button
3. Navigate to the “Harddisk setup” option and press the OK-Button
.
You now can set the duration of time after which the
harddisk will be put into standby-mode.
You can select from:
- No standby
- 10 or 30 seconds
- 1, 2, 5, 10, 20 or 30 minutes
- 1, 2 or 4 hours
Once you have selected the desired time press the
OK-Button or the green Options-Button to get back
into the harddisk menu.
.
Navigate to the “Initialization” option and press the
OK-Button.
If you have installed another hard disk this option will
differ from the one depicted!
By pressing the red Options-Button you will initialize
(format) the hard disk. After you confirm the safety
question the initialization process starts.
Warning!!! All data stored on the HDD will be lost.
- 49 -

U s e r M a n u a l D r e a m b o x D M 7 0 2 5 / D M 7 0 2 5 +
7.3 Recording
7.3.1 Instant recording
A ongoing recording is indicated by a flashing symbol in the Infobar (see chapter 4.10).
During a recording you can watch another service, view a previously recorded movie or add
an additional recording.
The number of simultaneous recordings depends on the number of services residing on a
transponder (6.7 Alternative services). It is possible to make up to eight simultaneous
recordings.
Pressing the Up/Down-Buttons on your remote control activates the service list. The
recording continues in the background.
Once a recording is started, no matter if manually or by timer (see chapter 7.3.3) it will be
signaled by a note on the screen.
Press the red Options-Button.
You have five available options:
- Add recording (indefinitely)
- Add recording (stop after current event)
- Add recording (enter recording duration)
- Add recording (enter recording endtime)
- Don't record
Use the up/down-Buttons to navigate to you desired
selection and press the OK-Button to select.
If both tuner are used for recording or by the Picturein-Picture mode and you are trying to access a
service that is not on one of the recorded
transponders you will get the “No free tuner”
message.

U s e r M a n u a l D r e a m b o x D M 7 0 2 5 / D M 7 0 2 5 +
7.3.2 Stop recording
7.3.3 Recording by timer
With the help of a timer you can record shows (if you have a hard disk installed). You are
offered two different ways to program a timer, the manual way of via the EPG.
If no OSD menu is visible on your screen, press the Menu-Button to open the main OSD
menu. Navigate to the option “Timer” and press the OK-Button to select
Your Dreambox will be turned on 5 minutes before the recording if a recording is supposed
to start while the Dreambox is in Deep-Standby mode.
Switch to the service which recording you want to
stop.
Press the red Options-Button, select the "Stop
recording" option and press the OK-Button to select.
The recording will be stopped immediately.
.
You see the “Timer Editor“ menu.
Pressing the red Options-Button will delete a timer.
The green Options-Button adds a timer, the yellow
Options-Button toggles active on and off (only
possible in waiting status) and the blue Options-
Button removes finished timers from the list.
To edit an existing time select it and press the OK-
Button.
The status of a timer is shown on the right side:
- waiting means: still coming up
- recording means: recording right now
- done means: recording finished
- the red X indicates that a timer was deactivated
If you pressed the blue Options-Button you will be
asked if you really want to delete the finished timer.
Use the Navigation-Buttons up and down to select.
Press the OK-Button to activate.
- 51 -

U s e r M a n u a l D r e a m b o x D M 7 0 2 5 / D M 7 0 2 5 +
Manual programming
You can choose between two different timer types. "Record" to record the desired show or
"Zap" to automatically switch to the service.
As repeat type you can choose between "once" and "repeated"
The repeat type "repeated" offers you the following options:
¾ daily
¾ weekly with choice of weekday
¾ Monday through Friday
¾ user defined
For all four options you can set a date for the first execution of the timer
You can decide what should happen after the recording finishes by selecting the "After
event" option. You can choose between "do nothing" to keep you Dreambox in the same
state as before the recording or "Go to deep standby" to shutdown your Dreambox once the
timer is done.
Set you desired option by pressing the Navigation-Buttons up/down and left/right and
press the green Options-Button to save the timer.
Press the green Options-Button to add a new
timer.
- 52 -

U s e r M a n u a l D r e a m b o x D M 7 0 2 5 / D M 7 0 2 5 +
Programming via EPG
7.3.4 Timeshift
Once you started an instant recording you can fast-forward and rewind while recording as
long as you have already recorded at least 1 minute long.
Press the yellow Options-Button to pause the screen (video and audio will pause). The
recording will continue in the background. Press the yellow Options-Button again to
resume watching.
This way you won’t have to miss anything ever again if you quickly have to catch a phone
call.
The Timeshift-Mode can be exited by pressing the TV-Button.
Change into on of the EPG views as described in
chapter 5.
By pressing the green Options-Button you have the
option to automatically add the selected show with
it’s start and end time as a timer.
All other options are the same as in the manually
added timer.
Press the green Options-Button to save the timer.
You will be taken to the “Timer Editor” menu.
You will be asked if you want to quit the TimeshiftMode.
Use the Navigation-Buttons up and down to select.
Press the OK-Button to activate.
- 53 -

U s e r M a n u a l D r e a m b o x D M 7 0 2 5 / D M 7 0 2 5 +
7.4 Watch a recording
You can see the control symbols for the PVR-Mode on you remote control below the
Options-Buttons.
In PVR-Mode the Options-Buttons are mapped as described below:
Green
Options-Button
Keep in mind that you have to be in the PVR-Mode to use these options. You can check this
by pressing the OK-Button. The Infobar will reveal and should show the depicted control
symbols. If they are not shown you simply have to press the VIDEO-Button once again.
Red
Options-Button
Blue
Options-Button
Yellow
Options-Button
Press the Video-Button to get to the selection of
recordings.
Use the Navigation-Buttons up and down to select
a recording. Press the OK-Button to start playing it.
During replay you can see the control symbols in the
Infobar.
Press the Navigation-Buttons up and down or the
Video-Button to get back to the list of recordings.
If you have previously watched the movie you
will be asked to continue where you left off when
you start watching it the next time. If you do not
make a selection within 10 seconds the window
will disappear and the movie starts from the
beginning.
TV-Button
- 54 -

U s e r M a n u a l D r e a m b o x D M 7 0 2 5 / D M 7 0 2 5 +
Red Options-Button = Rewind
Green Options-Button = Play
Yellow Options-Button = Pause
Blue Options-Button = Forward
TV-Button = Stop
The Infobar does not have to be visible to use the PVR-Mode.
The PVR-Mode can be exited by pressing the TV-
Button. You will be asked if you want to stop the
replay of the recording.
If you choose “Yes” you will be taken back to the last
channel you were watching.
Skipping in a recording
Button Time Button Time
1 10 sec. back 3 10 sec. forward
4 1 min. back 6 1 min. forward
7 5 min. back 9 5 min. Forward
Spooling in a recording
The following speeds for spooling in a recording are available:
¾ Forward (blue Options-Button): 2x,4x,8x,16x,32x,48x,64x,128x
¾ Back (red Options-Button): 8x,16x,32x,48x,64x,128x
Every press on the button increases the speed by one step.
- 55 -

U s e r M a n u a l D r e a m b o x D M 7 0 2 5 / D M 7 0 2 5 +
7.5 Setting a marker (Bookmarks)
Fast forward to the point where you want to add a marker and press the Shift-Button followed by the
yellow Options-Button.
This will set a marker at the desired point.
The red dashes in the timeline correlate to a marker.
Skip to a marker
You can directly skip to a previously set marker during playback.
Press the Shift-Button followed by the red Options-Button to skip to the previous marker and press
the Shift-Button followed by the blue Options-Button to skip to the next marker.
To delete a marker skip to it as described above and press the Shift-Button followed by the yellow
Options-Button.
- 56 -

U s e r M a n u a l D r e a m b o x D M 7 0 2 5 / D M 7 0 2 5 +
7.6 Delete a recording
Press the Video-Button to get to the selection of
recordings.
Use the Navigation-Buttons up and down to select
a recording. Press the Menu-Button.
Use the Navigation-Buttons up and down to select
“Delete” and press the OK-Button.
You will be asked if you want to delete the recording.
As a control feature the name of the recording is
displayed as well.
Choose “Yes” and you will be taken back to the
selection of recordings.
- 57 -

U s e r M a n u a l D r e a m b o x D M 7 0 2 5 / D M 7 0 2 5 + / D M 7 0 2 5 +
7.7 Movielist options
To access the Movielist menu press the Video-Button and then the Menu-Button.
Sorting options
You have the choice between two different sorting options:
1. Alphabetic sort
2. Sort by date
List styles
You have the choice between different list styles:
¾ List style default
¾ List style compact with description
¾ List style compact
¾ List style single line
¾ Show extended description
- 58 -

U s e r M a n u a l D r e a m b o x D M 7 0 2 5 / D M 7 0 2 5 + / D M 7 0 2 5 +
List styles
List style default
List style compact with desciption
List style single line List style compact
- 59 -

U s e r M a n u a l D r e a m b o x D M 7 0 2 5 / D M 7 0 2 5 +
8. Teletext
You are in the TV or Radio mode.
Press the Text-Button to enter the Teletext.
Keep in mind that not every station transmits Teletext!
Teletext - regular navigation:
If you are viewing any Teletext page you can enter the interactive mode by pressing the OK-Button.
Use the Navigation-Buttons to select a text page number and press the OK-Button to call this page.
You don’t need to type in a text page number in this mode, but it is still possible.
Press the EXIT-Button to exit.
Press the Mute-Button a couple of times to toggle between transparent-mode, invisible-mode and full
mode. The alpha-mode shows the picture from the running program through the text pages. The
invisible-mode shows the complete picture from the running program without exiting the Teletext. The
full-mode brings back the text page.
Press the Volume-up-Button to toggle between double high from the upper half, double high from the
lower half and full view text page.
Press the Volume-down-Button to activate or deactivate the PIG-Mode (Picture in Graphics). Same
view from Text page and Program picture. (best results are show on 16:9 TV’s during 4:3
transmission).
Teletext configuration menu:
If the Teletext page 100 is shown you can press the
MENU-Button to enter the Teletext configuration
menu.
- 60 -

U s e r M a n u a l D r e a m b o x D M 7 0 2 5 / D M 7 0 2 5 +
You have the following options:
Teletext - Selection:
Select the "Search" option and press the OK-Button to start searching for Teletext information on
other services without having to leave the service that you currently are watching. After the search is
finished you can use the Navigation-Buttons left and right to select the Teletext of another service
without having to switch services. Press the OK-Button to select the desired Teletext. This option is
only available if more than one service on the current satellite transponder actually transmits Teletext
information. If this is not the case you cannot make a selection.
Screen format:
Standard mode 16:9 = on/off
Enabling this shows the TuxText in 16:9 Aspect Ratio. Press the OK-Button to enable or disable this
option. The default setting is disabled.
Text/TV mode 16:9 = on/off
Enabling this, switches the TV to 16:9 Aspect Ratio if the PIG-Mode is activated with the Volumedown-Button. Press the OK-Button to enable or disable this option. The default setting is disabled.
Note:
On some older 4:3 TV’s these Modes may not work. If enabled, it could happen, that your TV switches
away from the VCR or A/V socket.
If you are using a 4:3 TV, we suggest not to enable these modes.
Brightness:
Here you can adjust the brightness of your Teletext. Press the Navigation-Buttons left or right to adjust
the brightness.
Transparency:
Here you can adjust the transparency value of your Teletext. Press the Navigation-Buttons left or right
to adjust the alpha value.
National characterset:
automatic recognition = on/off
The national codepage detection is used to display the teletextpages with the right letterset for your
location. Press the OK-Button to enable or disable this option. The default setting is enabled. If
disabled, use the Navigation-Buttons left or right, to choose your codepage.
For further information see www.tuxtxt.net
- 61 -

U s e r M a n u a l D r e a m b o x D M 7 0 2 5 / D M 7 0 2 5 +
9. Picture-in-Picture mode (PiP)
The Dreambox has a so called PiP-Function. With PiP you can display a small TV picture on top of the
main big TV picture.
The main TV picture is now additionally displayed as a small PiP in the upper right corner of your
screen and the last watched service is displayed in the main big TV picture. In PiP mode you will
always hear the sound from the main TV picture. If you now switch services as you are used to the
main TV picture will change, but the PiP stays.
By pressing the blue Options-Button you can choose between the following options:
1. Disable Picture in Picture: (blue Options-Button)
Choose the option to turn the PiP mode off.
The little PiP will disappear and only the main TV picture is displayed on your screen.
2. Move Picture in Picture: (green Options-Button)
Choose the option to move or resize the small PiP.
You can move the position of the small PiP by using the Navigation-Buttons up/down and left/right.
Use the Bouquet +/- Buttons to resize the small PiP.
Press the Exit-Button to discard your changes or the OK-Button to save the settings and return to
the current TV show.
3. Swap services: (yellow Options-Button)
Choose the option to swap the main TV picture and the small PiP. The small PiP becomes the main
TV picture and vice versa.
Press the blue Options-Button and select the
"Activate Picture in Picture" option.
- 62 -

U s e r M a n u a l D r e a m b o x D M 7 0 2 5 / D M 7 0 2 5 +
10. Sleep timer
Using the sleep timer you can put your Dreambox into standby or turn it off after a predetermined
amount of time.
Shutdown Dreambox after:
action to be executed.
Timer status:
Set this option to “enabled” to activate a set sleep timer or to “disabled” to deactivate a set sleep timer.
Press the red Options-Button to change the status.
Sleep timer action:
Select “Deep Standby” to completely turn off you Dreambox or “Standby” to put it into standby mode.
Press the green Options-Button to toggle the sleep timer action.
Ask before shutdown:
If this option is set to “Yes” a safety window will appear once the sleep timer is executed asking you if
you really want to turn off your Dreambox.
Press the yellow Options-Button to toggle this option.
Once you have set all options to your liking press the OK-Button to save your settings.
Press the blue Options-Button and select the
option “Sleep Timer”.
Set the number of minutes after you wish the predetermined shutdown
A short note will tell you that the sleep timer has
been activated.
- 63 -

U s e r M a n u a l D r e a m b o x D M 7 0 2 5 / D M 7 0 2 5 +
11. Setup
11.1 Language
If no OSD menu is visible on your screen, press the Menu-Button to open the main OSD
menu. Navigate to the option “Setup” and press the OK-Button to select
1. Navigate to the option “System” and press the OK-Button.
¾ The “System” menu will open up.
2. Navigate to the option “Language…” and press the OK-Button.
¾ The “Language” menu will open up.
Select your desired and language with the
Navigation-Buttons up and down. Press the OKButton to activate.
The Exit-Button will quit this menu.
U s e r M a n u a l D r e a m b o x D
M 7 0 2 5 / D M 7 0 2 5 +
.
- 64 -

U s e r M a n u a l D r e a m b o x D M 7 0 2 5 / D M 7 0 2 5 +
11.2 Customize
If no OSD menu is visible on your screen, press the Menu-Button to open the main OSD
menu. Navigate to the option “Setup” and press the OK-Button to select
1. Navigate to the option “System” and press the OK-Button.
¾ The “System” menu will open up.
2. Navigate to the option “Customize…” and press the OK-Button.
Setup modes:
There are three different user modes: Simple, Intermediate and Expert.
This gives you the possibility to set the level of options to your needs. Intermediate is the
default setting.
Simple mode:
Margin before record (minutes):
Set the desired forerun in minutes for a recording.
Margin after record:
Set the desired lag in minutes for a recording.
Infobar timeout:
Set the desired time after which you want the Infobar to disappear. You can choose between
one and ten seconds or “no timeout”.
.
- 65 -

U s e r M a n u a l D r e a m b o x D M 7 0 2 5 / D M 7 0 2 5 +
Intermediate mode:
These settings supplement the settings in simple mode.
D r e a m b o x D M 7 0 2 5 /
D M 7 0 2 5 +
Recordings always have priority:
If this option is set to “Yes” your Dreambox will automatically switch to the service which is
supposed to be recorded incase there is a conflict with an existing timer.
If you set this option to “No” you will be asked if you want to switch to the service which is
supposed to be recorded.
Show positioner movement:
If you own a satellite dish with a positioner you can see a flashing symbol of a satellite dish
on your screen if you set this option to “yes”.
Enable multi bouquets:
Set this option to “Yes” if you want to use multiple bouquets.
Change bouquets in quickzap:
If this option is set to “Yes” you will automatically be taken to the next bouquet while
changing channels once you have reached the end of one bouquet.
Alternative radio mode:
Set this option to “Yes” if you want the handling in the Radio mode to be the same as in the
TV mode.
12V output:
Set this option to “on” to activate the 12V output on the rear of your Dreambox. The default
setting is “off“.
U s e r M a n u a l
- 66 -

U s e r M a n u a l D r e a m b o x D M 7 0 2 5 / D M 7 0 2 5 +
Expert mode:
These settings supplement the settings in simple and intermediate mode.
Show Infobar on channel change:
If the option is set to “no” the Infobar will not appear once you change channels. The default
setting is “yes“.
Show Infobar on skip forward/backward:
If the option is set to “no” the Infobar will not appear once you skip forward/backward. The
default setting is “yes“.
Show Infobar on event change:
This option enables the Infobar to be shown once shown changes. The default setting is
“yes“.
Custom skip time for 1/3 keys:
Here you can set the amount of time which you like to skip forward/backward using the 1/3Buttons while watching a recording or during timeshift. The default setting is 10 seconds.
0-Button in PiP-Mode:
Set the function of the 0-Button while PiP is activated (see chapter 9).
Standard:
Unverändert, die 0-Taste schaltet zum letzten gesehenen Kanal.
Swap PiP and main picture:
Swaps the PiP and the main picture.
Move PiP to main picture:
Swaps the PiP and the main picture and quits the PiP mode.
Stop PiP:
Quits the PiP mode.
- 67 -

U s e r M a n u a l D r e a m b o x D M 7 0 2 5 / D M 7 0 2 5 +
11.3 Setting the time zone
If no OSD menu is visible on your screen, press the Menu-Button to open the main OSD
menu. Navigate to the option “Setup” and press the OK-Button to select
1. Navigate to the option “System” and press the OK-Button.
¾ The “System” menu will open up.
2. Navigate to the option “Timezone…” and press the OK-Button.
.
The “Time zone” menu will open up.
Use the left/right-Buttons to select the desired time
zone.
Press the green Options-Button to save the setting
or the red Options-Button to discard them.
- 68 -

U s e r M a n u a l D r e a m b o x D M 7 0 2 5 / D M 7 0 2 5 +
11.4 A/V Settings
If no OSD menu is visible on your screen, press the Menu-Button to open the main OSD
menu. Navigate to the option “Setup” and press the OK-Button to select
1. Navigate to the option “System” and press the OK-Button.
¾ The “System” menu will open up.
2. Navigate to the option “A/V settings…” and press the OK-Button.
Use the Navigation-Buttons left and right to change the values.
Color format:
CVBS (FBAS),
RGB (Red, Green, Blue separated),
SVideo (Color- and Brightness signal separated)
Aspect ratio:
4:3 Letterbox (Standard)
16:9 programs will be displayed on 4:3 TV’s with black beams at top and bottom
4:3 Panscan
16:9 programs will be zoomed to full high on 4:3 TV’s, parts of the picture on the left and right side will
cut off
16:9
Programs transmitted in 16:9 will be displayed automatically in 16:9, on 4:3 TV’s the picture will be
reduced in height
16:9 always
4:3 programs will be shown in full height and black bars are added on both sides on a 16:9 TV.
16:9 Letterbox
4:3 programs will be shown in full width and black bars are added on both sides on a 16:9 TV.
16:10 Letterbox and 16:10 Panscan
Choose these options if 4:3 and 16:9 result in a distorted view on your screen.
.
- 69 -

U s e r M a n u a l D r e a m b o x D M 7 0 2 5 / D M 7 0 2 5 +
TV System:
Choose the standard that your TV supports. PAL or NTSC.
WSS on 4:3:
Check the checkbox to disable zooming on some 16:9 TV’s during 4:3 transmissions.
AC3 default:
If a program is transmitted with an AC3 audio track (e.g. Dolby Digital), the Dreambox switches
automatically to this audio track.
The AC3 signal will only be available at the optical socket. The Dreambox has no built-in Dolby Digital
Decoder, AC3 signals are not available on the analog socket, therefore you need an external Dolby
Digital Amplifier to adjust the volume.
VCR Switch:
If this function is enabled (standard) the signal from the VCR Scart is directly passed to the TV.
Depending on the model the this is either enabled when you turn on the device or when you start a
replay.
Press the green Options-Button to save the setting or the red Options-Button to discard them.
You are taken back to the “System“ menu.
- 70 -

U s e r M a n u a l D r e a m b o x D M 7 0 2 5 / D M 7 0 2 5 +
11.5 RF output
If no OSD menu is visible on your screen, press the Menu-Button to open the main OSD
menu. Navigate to the option “Setup” and press the OK-Button to select
1. Navigate to the option “System” and press the OK-Button.
¾ The “System” menu will open up.
2. Navigate to the option “RF output…” and press the OK-Button..
.
Connect a TV to the UHF-out using a coaxial cable.
Start a channel scan on your TV. The UHFModulator is set to channel 36.
If this channel conflicts with any other existing
devices you can easily change it.
Use the Navigation-Buttons left and right to
change the values.
Press the green Options-Button to save the setting
or the red Options-Button to discard them.
- 71 -

U s e r M a n u a l D r e a m b o x D M 7 0 2 5 / D M 7 0 2 5 +
11.6 Display (LCD or OLED)
If no OSD menu is visible on your screen, press the Menu-Button to open the main OSD
menu. Navigate to the option “Setup” and press the OK-Button to select
1. Navigate to the option “System” and press the OK-Button.
¾ The “System” menu will open up.
2. Navigate to the option “Display setup…” and press the OK-Button.
.
Using the Navigation-Buttons left and right you
can set the brightness and contrast of the display.
“Standby” set the brightness value for standby.
If “Invert” is set to “Yes” the polarity of the display will
change.
All changes will take effect immediately.
Press the green Options-Button to save the setting
or the red Options-Button to discard them.
You are taken back to the “System“ menu.
- 72 -

U s e r M a n u a l D r e a m b o x D M 7 0 2 5 / D M 7 0 2 5 +
11.7 Network
If no OSD menu is visible on your screen, press the Menu-Button to open the main OSD
menu. Navigate to the option “Setup” and press the OK-Button to select
1. Navigate to the option “System” and press the OK-Button.
¾ The “System” menu will open up.
2. Navigate to the option “Network…” and press the OK-Button.
3. Navigate to the option “Device setup…” and press the OK-Button.
4. Navigate to the option “eth0” and press the OK-Button.
If you are using a DHCP server in your LAN, configure the DHCP server so it does not assign
the IP address used by the Dreambox. Otherwise an IP address collision is possible. Refer to
the DHCP server’s manual about how to configure a DHCP address pool.
.
- 73 -

U s e r M a n u a l D r e a m b o x D M 7 0 2 5 / D M 7 0 2 5 +
Use the Navigation-Buttons and the Numeric-Keypad to change the values.
Use DHCP:
If enabled your Dreambox will get its IP from a DHCP server. If you are using a router to access the
internet you usually have a DHCP server. Disable this option to set a static IP address.
IP Address:
Enter the IP address here.
Netmask:
Enter the subnet mask (Usually 255.255.255.0).
Gateway:
Enter the router’s IP address here, if the Dreambox is connected to the Internet over a router.
Nameserver:
Enter the DNS-Server’s IP address here. DNS is used to translate a Domain name to an IP address.
Normally, if the Type is set to LAN, there is no need for a DNS entry. If the Dreambox is connected to
the Internet over a router, enter the router’s IP address here.
Activate the network:
Press the OK-Button to save the setting and activate the network.
Nameserver Setup
If no OSD menu is visible on your screen, press the Menu-Button to open the main OSD
menu. Navigate to the option “Setup” and press the OK-Button to select
1. Navigate to the option “System” and press the OK-Button.
¾ The “System” menu will open up.
2. Navigate to the option “Network…” and press the OK-Button.
3. Navigate to the option “Nameserver setup…” and press the OK-Button.
Nameserver:
Enter the DNS-Server’s IP address of your LAN here. DNS is used to translate a Domain name to an
IP address. Normally, if the Type is set to LAN, there is no need for a DNS entry. If the Dreambox is
connected to the Internet over a router, enter the router’s IP address here.
Press the green Options-Button if you want to add a seconds nameserver.
You can enter a maximum of two nameservers.
.
- 74 -

U s e r M a n u a l D r e a m b o x D M 7 0 2 5 / D M 7 0 2 5 +
11.8 Common Interface
If no OSD menu is visible on your screen, press the Menu-Button to open the main OSD
menu. Navigate to the option “Setup” and press the OK-Button to select
1. Navigate to the option “Common Interface” and press the OK-Button.
¾ The “Common Interface” menu will open up.
Reset:
This options resets your CI-Module. This function is needed if you are experiencing trouble with one of
your encrypted services.
Init:
This option initializes an inserted Smartcard. It is recommended to inset the CI-Module with the
Smartcard already in it.
No module found:
No CI-Module is inserted into the slot. If you have inserted one the name and firmware version will
show.
Navigate to this option and press the OK-Button to get to the extended options of the inserted CIModule. The option strongly depend on the type of module inserted and therefore will not be explained
in detail.
Can decrypt multiple services:
You can set if your CI-Module can decrypt multiple services or not. Please note that not every CIModule supports this feature. Check the instruction manual of your CI-Module for information about
this feature.
The “Auto” option only works with so called Alphacrypt Modules.
The Exit-Button will quit this menu.
.
- 75 -

U s e r M a n u a l D r e a m b o x D M 7 0 2 5 / D M 7 0 2 5 +
11.9 Skin
Selecting another skin will change the looks of your OSD(On-Screen-Display).
If no OSD menu is visible on your screen, press the Menu-Button to open the main OSD
menu. Navigate to the option “Setup” and press the OK-Button to select
1. Navigate to the option “System” and press the OK-Button.
2. Navigate to the option “Skin” and press the OK-Button.
Navigate to your desired skin and press the OK-Button.
.
¾ The “System” menu will open up.
¾ The “Skin” menu will open up.
To fully activate the skin the system needs to be
restarted.
Use the Navigation-Buttons up/down to select your
desired option and press the OK-Button.
- 76 -

U s e r M a n u a l D r e a m b o x D M 7 0 2 5 / D M 7 0 2 5 +
12. Service searching
12.1 DVB-S Tuner configuration
If no OSD menu is visible on your screen, press the Menu-Button to open the main OSD
menu. Navigate to the option “Setup” and press the OK-Button to select
1. Navigate to the option “Service searching” and press the OK-Button.
¾ The “Service searching” menu will open up.
2. Navigate to the option “Tuner configuration” and press the OK-Button.
¾ The “Choose tuner“ menu will open up.
3. Use the Navigation-Buttons up and down to select the “Socket A” (Tuner 1) and press the OK-
Button.
.
- 77 -

U s e r M a n u a l D r e a m b o x D M 7 0 2 5 / D M 7 0 2 5 +
12.1.1 Single satellite – direct connection (DVB-S)
Use this type of configuration if you want to receive a single satellite with a Single Universal
LNB. The coax cable is directly connected from you Dreambox to the LNB.
Please read the section 12.1 DVB-S configuration to learn how to get into this menu.
The “Satconfig” menu will open up.
Use the up/down-Buttons to navigate to the
“DiSEqC-Mode” option and use the left/right-
Buttons to select “Single”.
Navigate to the option “Satellite”.
Use to the Navigation-Buttons left and right to
select the desired satellite and press the OK-Button.
You are taken back to the “Select slot“ menu.
- 78 -

U s e r M a n u a l D r e a m b o x D M 7 0 2 5 / D M 7 0 2 5 +
12.1.2 Two satellites via Toneburst A/B (DVB-S)
Use this type of configuration if you want to receive two satellites from one LNB each. It does
not matter if you use one or two dishes to achieve this.
Connect the two coax cables form the two LNBs to a so-called Toneburst switch and connect
the coax cable from the Toneburst switch to your Dreambox.
Please read the section 12.1 DVB-S configuration to learn how to get into this menu.
The “Satconfig” menu will open up.
Use the up/down-Buttons to navigate to the
“DiSEqC-Mode” option and use the left/right-
Buttons to select “Toneburst A/B”.
For Port A and Port B select the desired satellites
just as described in the Single satellite – direct
connection section.
Make sure you know which satellite is connected to
which input on the Toneburst switch.
If you do not find any services in the transponder
scan later, exchange the two satellites in this list and
try again.
Press the OK-Button to save your settings.
- 79 -

U s e r M a n u a l D r e a m b o x D M 7 0 2 5 / D M 7 0 2 5 +
12.1.3 Two satellites via DiSEqC A/B (DVB-S)
Use this type of configuration if you want to receive two satellites from one Twin Universal or
Quad Universal LNB. It does not matter if you use one or two dishes to achieve this.
In this case the LNBs are connected to a so-called Multiswitch from which the signal is via
coax cabled to the satellite receivers (Dreamboxes) in your household.
Please read the section 12.1 DVB-S configuration to learn how to get into this menu.
The “Satconfig” menu will open up.
Use the up/down-Buttons to navigate to the
“DiSEqC-Mode” option and use the left/right-
Buttons to select “DiSEqC A/B”.
For Port A and Port B select the desired satellites
just as described in the Single satellite – direct
connection section.
Make sure you know which satellite is connected to
which input on the Toneburst switch.
If you do not find any services in the transponder
scan later, exchange the two satellites in this list and
try again.
Press the OK-Button to save your settings.
- 80 -

U s e r M a n u a l D r e a m b o x D M 7 0 2 5 / D M 7 0 2 5 +
12.1.4 Four satellites via DiSEqC A/B/C/D (DVB-S)
Use this type of configuration if you want to receive four satellites from one Single Universal
or Twin Universal LNB for four or eight parties. It does not matter if you use one or two
dishes to achieve this.
In this case the LNBs are connected to a so-called Multiswitch from which the signal is via
coax cabled to the satellite receivers (Dreamboxes) in your household.
Please read the section 12.1 DVB-S configuration to learn how to get into this menu.
The “Satconfig” menu will open up.
Use the up/down-Buttons to navigate to the
“DiSEqC-Mode” option and use the left/right-
Buttons to select “DiSEqC A/B/C/D”.
For Ports A, B, C and D select the desired satellites
just as described in the Single satellite – direct
connection section.
Make sure you know which satellite is connected to
which input on the Toneburst switch.
If you do not find any services in the transponder
scan later, exchange the two satellites in this list and
try again.
Press the OK-Button to save your settings.
- 81 -

U s e r M a n u a l D r e a m b o x D M 7 0 2 5 / D M 7 0 2 5 +
12.1.5 Stab Positioner using USALS (DVB-S)
Use this type of configuration if you want to receive many satellites with a Stab positioner
from a Single Universal LNB. The coax cable is directly connected from you Dreambox to the
LNB.
Please read the section 12.1 DVB-S configuration to learn how to get into this menu.
The “Satconfig” menu will open up.
Use the up/down-Buttons to navigate to the
“DiSEqC-Mode” option and use the left/right-
Buttons to select “Positioner”.
This menu is meant for a Stab positioner. You only
have to enter the geographical details of your
residence.
At http://www.heavens-above.com
coordinates of your residence.
The rest is done automatically by your Dreambox
with build-in USALS.
USALS is a model for calculating the position of all
satellites in orbit with a margin of error less than 0.1
degrees. USALS was developed by the Stab
company.
Everything is done automatically and does not
require any technical know-how.
you can find the
- 82 -

U s e r M a n u a l D r e a m b o x D M 7 0 2 5 / D M 7 0 2 5 +
12.1.6 Stab Positioner without USALS (DVB-S)
Use this type of configuration if you want to receive many satellites without a Stab positioner
from a Single Universal LNB. The coax cable is directly connected from you Dreambox to the
LNB.
Please read the section 12.1 DVB-S configuration to learn how to get into this menu.
The “Satconfig” menu will open up.
Using the Navigations-Buttons left/right to select
the “advanced” configuration.
Navigate to the option “Satellite”. Use to the
Navigation-Buttons left and right to select the
desired satellite and.
Navigate to the option “Satellite” and press the
Navigation-Button right.
Use the up/down-Buttons to navigate to the
“DiSEqC-Mode” option and use the left/right-
Buttons to select “1.2“.
Navigate to the option “Use usals for this sat” and
change the setting to “no” using the Navigation-
Buttons left and right.
Navigate to the option “Stored position“ and enter
position of the selected satellite which is saved in the
positioner by using the Numeric Keypad.
Refer to the instruction manual or your positioner for
the number of the saved position.
- 83 -

U s e r M a n u a l D r e a m b o x D M 7 0 2 5 / D M 7 0 2 5 +
12.1.7 Tuner 2 setup (DVB-S)
The same setup possibilities that applied for Tuner 1 also apply for Tuner 2. There are some
additional configuration options.
Equal to socket A:
Use this setting if Tuner 2 should use the same settings as Tuner 1.
Loopthrough to socket A
Use this option if you connected the LNB1 out to the LNB2 in. A cable to connect the two LNB’s is
included in the packaging of your Dreambox.
Nothing connected:
Use this option if no cable is attached to Tuner 2.
Secondary cable from motorized LNB:
Use this option if you are using a positioner with a Twin- or Quad LNB and have 2 cables from the
LNB connected to the LNB1 and LNB2 in. Tuner 1 controls the positioner and using Tuner 2 you can
continue watching TV on the same satellite while recording. All others are grayed out.
:
- 84 -

U s e r M a n u a l D r e a m b o x D M 7 0 2 5 / D M 7 0 2 5 +
12.2 DVB-C Tuner configuration
If no OSD menu is visible on your screen, press the Menu-Button to open the main OSD
menu. Navigate to the option “Setup” and press the OK-Button to select
1. Navigate to the option “Service searching” and press the OK-Button.
¾ The “Service searching” menu will open up.
2. Navigate to the option “Tuner configuration” and press the OK-Button.
¾ The “Choose tuner“ menu will open up.
3. Use the Navigation-Buttons up and down to select the DVB-C Tuner and press the OK-Button.
¾ The “Reception settings” menu will open up.
Frequency bands
This type of searching scans the frequencies used by most cable providers. This setting is
the default.
Use the Navigation-Buttons left/right to set the “Used service scan type” option to
“Frequency bands”.
Press the OK-Button to save your settings.
You will be taken back to the “Select slot” menu.
.
- 85 -

U s e r M a n u a l D r e a m b o x D M 7 0 2 5 / D M 7 0 2 5 +
Frequency steps
This type of searching scans the set frequencies step by step in a set increment.
Use the Navigation-Buttons left/right to set the
“Used service scan type” option to “Frequency
steps”.
Frequency scan step size (kHz): Use the Numeric-
Keypad to set the step increment.
Press the OK-Button to save your settings.
You will be taken back to the “Select slot” menu.
Provider
This type of searching scans using a list of
known providers.
Use the Navigation-Buttons left/right to set the
“Used service scan type” option to “Provider”.
Press the OK-Button to save your settings.
You will be taken back to the “Select slot” menu
12.2.1 Tuner 2 setup (DVB-C)
The same setup possibilities apply if you are using a second DVB-C tuner in your Dreambox
(see chapter 12.2 DVB-C Tuner configuration).
- 86 -

U s e r M a n u a l D r e a m b o x D M 7 0 2 5 / D M 7 0 2 5 +
12.3 DVB-T Tuner configuration
If no OSD menu is visible on your screen, press the Menu-Button to open the main OSD
menu. Navigate to the option “Setup” and press the OK-Button to select
1. Navigate to the option “Service searching” and press the OK-Button.
¾ The “Service searching” menu will open up.
2. Navigate to the option “Tuner configuration” and press the OK-Button.
¾ The “Choose tuner“ menu will open up.
3. Use the Navigation-Buttons up and down to select the DVB-T Tuner and press the OK-Button.
¾ The “Reception settings” menu will open up.
12.3.1 Tuner 2 setup (DVB-T)
The same setup possibilities apply if you are using a second DVB-T tuner in your Dreambox
(see chapter 12.3 DVB-t Tuner configuration).
.
Choose your region by pressing the Navigation-
Buttons left/right.
If you have connected an active antenna and you
want to run the antenna without it’s original power
supply set the “Enable 5V for active antenna” option
to “On”.
Press the OK-Button to save your settings.
- 87 -

U s e r M a n u a l D r e a m b o x D M 7 0 2 5 / D M 7 0 2 5 +
12.4 Automatic scan
If no OSD menu is visible on your screen, press the Menu-Button to open the main OSD
menu. Navigate to the option “Setup” and press the OK-Button to select
1. Navigate to the option “Service searching” and press the OK-Button.
¾ The “Service searching” menu will open up.
2. Navigate to the option “Automatic scan” and press the OK-Button.
¾ The “Automatic scan” menu will open up.
3. Use the Navigation-Buttons up and down to select the DVB-T Tuner and press the OK-Button.
Set the “Clear before scan” option to “Yes” if you
want to delete all services before the scan starts.
Otherwise leave the setting to “No” which results in
only new services being added to the channel list. To
find the new services press the Navigation-Buttons
up/down and afterwards the green Options-Button to
access the “Satellites” view. You will find them under
“New”.
Use the Navigation-Buttons up/down to select a
tuner and the Navigation-Buttons left/right to
enable or disable the scan for the selected tuner.
Press the OK-Button to start the scan for all tuners
which option is set to “Yes”.
.
Note:
The search will only be run once if you are using two tuners of the same type (DVB-S,
2xDVB-T or 2x DVB-C) since the service list is the same for both of them. It is not
to run the search separately for each tuner.
necessary
- 88 -

U s e r M a n u a l D r e a m b o x D M 7 0 2 5 / D M 7 0 2 5 +
You can see the progress of the scan here.
The scan is done once you see this menu.
It shows how many channels were found during the
scan.
Press the OK-Button to close this menu.
- 89 -

U s e r M a n u a l D r e a m b o x D M 7 0 2 5 / D M 7 0 2 5 +
12.5 Manual scan
If no OSD menu is visible on your screen, press the Menu-Button to open the main OSD
menu. Navigate to the option “Setup” and press the OK-Button to select
1. Navigate to the option “Service searching” and press the OK-Button.
¾ The “Service searching” menu will open up.
2. Navigate to the option “Manual scan” and press the OK-Button.
.
The “Service scan” menu will open up.
Use the Navigation-Buttons left/right to select the
tuner on which you want to run the manual service
scan.
All other options can be changed by using the
Navigation-Buttons left/right and depend on the
type of tuner that you want to run the scan on.
Press the OK-Button to start the manual scan.
- 90 -

U s e r M a n u a l D r e a m b o x D M 7 0 2 5 / D M 7 0 2 5 + / D M 7 0 2 5 +
13. Updating the software
13.1 Backing up your settings
Before installing newer software on your Dreambox you should backup your settings,
otherwise they will be lost.
If no OSD menu is visible on your screen, press the Menu-Button to open the main OSD
menu. Navigate to the option “Games/Plugins” and press the OK-Button to select
.
Navigate to the option “Backup/Restore” and press
the OK-Button.
Set the “Backup Mode” option to “only /etc/enigma2
directory”.
Set the “Backup Location” option to “Harddisk”.
Press the blue Options-Button to start the backup.
You will be prompted if you want to backup now.
Answer with “yes”.
You will get an “Execution finished” message if the
backup process was successful.
- 91 -

U s e r M a n u a l D r e a m b o x D M 7 0 2 5 / D M 7 0 2 5 + / D M 7 0 2 5 +
13.2 Restoring your settings
Please read chapter 13.1 to find out how to get into this menu.
Press the yellow Options-Button to start restoring
your settings.
You will be prompted with a list of backups that you
have made so far.
Select the desired backup and press the yellow
Options-Button to restore your settings.
You will be prompted if you want to restore now.
Answer with “yes “.
The system will reboot with your desired settings.
- 92 -

U s e r M a n u a l D r e a m b o x D M 7 0 2 5 / D M 7 0 2 5 + / D M 7 0 2 5 +
13.3 Installing new software
How do I install new software on my Dreambox DM 7025 / DM 7025+?
Perquisites:
- PC with Windows operating system
- DreamUp software (current version under http://www.dream-multimedia-tv.de)
- 1 serial null modem cable
- 1 network cable (optional)
Firstly disconnect your Dreambox from main
power.
Start the DreamUp software on your PC.
Select COM1 or COM2 depending on the
port which the null modem cable is
connected to.
Check the “Use network” box if your PC and
Dreambox are connected using a network
cable.
The software update can be done without
network support, but it takes at least 30
minutes.
Enter your PC’s IP under “Local-IP
(PC)”you’re your Dreambox’s IP under
“Foreign-IP (Box)”.
Click on the “Connect” button and reconnect
your Dreambox to main power.
- 93 -

U s e r M a n u a l D r e a m b o x D M 7 0 2 5 / D M 7 0 2 5 + / D M 7 0 2 5 +
The flash loader will now be transferred to
your Dreambox.
After the flash loader has been transferred
to your Dreambox select the “Flash Box”
Button in the DreamUp software.
Select the software image and click on the
“Open” button.
- 94 -

U s e r M a n u a l D r e a m b o x D M 7 0 2 5 / D M 7 0 2 5 + / D M 7 0 2 5 +
The new software is now being transferred
to your Dreambox.
If the process was successful you will get a
“Box was flashed successfully” message.
Click on “OK” and on “Exit” afterwards.
Disconnect and reconnect your Dreambox
from main power.
- 95 -

U s e r M a n u a l D r e a m b o x D M 7 0 2 5 / D M 7 0 2 5 +
14. Systeminformation
14.1 Service
If no OSD menu is visible on your screen, press the Menu-Button to open the main OSD
menu. Navigate to the option “Information” and press the OK-Button to select
.
The “Information” menu will open up.
Navigate to the option “Service” and press the OK-
Button.
This window shows detailed technical information
about the current service.
Press one of the four Options-Buttons to get the
following information:
red = Serviceinfo
green = PIDs
yellow = Transponder
blue = Tuner status
Press the OK-Button to close this menu.
- 96 -

U s e r M a n u a l D r e a m b o x D M 7 0 2 5 / D M 7 0 2 5 +
14.2 About (Hard- and Software)
If no OSD menu is visible on your screen, press the Menu-Button to open the main OSD
menu. Navigate to the option “Information” and press the OK-Button to select
.
The “Information” menu will open up.
Navigate to the option “About…” and press the OK-
Button.
This window shows all relevant information about the
Hard- and Software of your Dreambox.
Press the OK-Button to close this menu.
- 97 -

U s e r M a n u a l D r e a m b o x D M 7 0 2 5 / D M 7 0 2 5 +
15. Troubleshooting
Problem
No audio, no video, LCD or
OLED-Display lit
Beamlike blackouts in the video
No reception on a channel that
was working before
No reception of the channels:
Sat1, Pro7, Kabel …
You cannot record anything
anymore
Remote control is not working
Possible cause
Faulty wiring Check wiring and connections
Faulty LNB
Wrong Tuner setting Review settings (see 12.1
Dish aligned incorrectly
Heavy rain or snow
Dish aligned incorrectly
Dish is too small
An obstacle between dish and
satellite (e.g. house or tree)
Dish aligned incorrectly or
faulty
Channel is transmitted in a new
slot
The transmission of the
channel was terminated
Interference from a wireless
DECT phone
Hard disk is full Delete no longer needed
Batteries are inserted
incorrectly
Batteries are empty Insert new batteries
Exchange LNB
DVB-S configuration)
Realign dish
Remove snow from dish
Realign dish
Install larger dish
Reposition dish so it has a
clear “view” towards the
satellite
Check dish
Start service scan (see chapter
12)
Increase distance between the
phone’s base station and the
Dreambox or buy a coaxial
cable with a higher shielding
value
recordings
Remove batteries and check
polarity
Solution
Wrong remote control mode
(Dream-Mode, TV-Mode)
Software is not reacting
Dreambox does not react Dreambox is locked up Reboot Dreambox
Press Dream-Mode or TVMode button
Reboot Dreambox
- 98 -

U s e r M a n u a l D r e a m b o x D M 7 0 2 5 / D M 7 0 2 5 +
16. TV-Mode setup
A four digit device code is selected from the device list and entered into the remote control.
The most recent device list can be found in the download center on our website.
SHIFT / SETUP-Button
Numeric-Keypad
16.1 Programming the remote control
- Press the TV-Mode-Button once.
- Press the SHIFT/Setup-Button for 3 seconds,
the TV-Mode-Button will flash twice.
- Use the Numeric-Keypad to enter the four digit device code into the remote control.
The TV-Mode-Button will flash once for every digit you enter. Once you have entered all
four digit the TV-Mode-Button will flash twice.
- The remote control exits the programming mode automatically.
- If no code is entered within 10 seconds the remote control will exit the programming
mode automatically.
TV-Mode-Button
- 99 -

U s e r M a n u a l D r e a m b o x D M 7 0 2 5 / D M 7 0 2 5 +
16.2 TV- Device list
A.R. Systems 0067 0382
Accent 0067
Admiral 0117 0123 0448 0243 0294
Adyson 0247 0246
Agashi 0246
Agazi 0294
AGB 0546
Agef 0117
Aiko 0246 0039 0067 0401 0065 0463
0102 0391 0221 0294 0247
Aim 0067
Akai 0391 0238 0401 0067 0463 0221
0065 0039 0102 0248 0193
0546 0586 0578 0510 0247
0661 0246 0294
Akiba 0248 0312 0485 0067
Akura 0248 0389 0312 0039 0442 0294
0067
Alba 0248 0265 0039 0448 0400 0385
0401 0067 0246 0277 0193
0517 0066 0698 0609
Alcyon 0106
Allorgan 0236 0324 0247
Allstar 0067
Amplivision 0247 0430 0350 0400
Amstrad 0039 0546 0294 0248 0401 0463
0442 0067
Anglo 0039 0294
Anitech 0039 0106 0294 0067
Ansonic 0400 0132 0039 0067 0404 0193
0353 0441 0289 0277 0042
0458
Apollo 0503
Arc en Ciel 0429 0531 0139 0226 0363 0228
Arcam 0246 0429 0247
Aristona 0067 0586 0042
Arthur Martin 0193 0430
ASA 0135 0376 0100 0134 0117
Asberg 0067 0106
Asora 0039
Asuka 0248 0294 0246 0312 0247
Atlantic 0067 0246 0236 0289 0350
Atori 0039
Auchan 0193 0430
Audiosonic 0067 0139 0247 0400 0367 0294
0248 0458
Audioton 0247 0400 0294
Ausind 0106
Autovox 0117 0236 0267 0106 0379 0247
0277 0366
Awa 0041 0066 0039 0187 0404 0442
0067
Ayomi 0268
Baird 0139 0373 0102 0247 0238
Barco 0410 0193
Basic Line 0248 0039 0404 0067 0597 0193
0312
Bastide 0247
Baur 0333 0225 0542 0067 0221 0391
0379 0535 0040
Bazin 0247
Beko 0400 0067
Beon 0067 0448
Best 0367 0400
Bestar 0067 0400 0404
Binatone 0247
Deitron 0067
Denko 0294
Desmet 0350 0067
Diamant 0067
Digiline 0067
Dixi 0039 0067 0277 0247
Black Star 0277
Blacktron 0312
Blackway 0312
Blaupunkt 0221 0225 0230 0243 0357 0358
0348
Blue Sky 0248 0312 0485 0067 0517 0698
Blue Star 0312
Bondstec 0277
Boots 0247
BPL 0312 0067
Brandt 0531 0139 0429 0235 0267 0363
0226 0228 0317 0365
Brinkmann 0448 0067 0549
Brionvega 0067 0117
Britannia 0246 0247
Brother 0294
Bruns 0117
BSR 0193 0324
BTC 0248
Bush 0248 0265 0193 0379 0039 0066
0312 0067 0385 0401 0404
0549 0294 0391 0517 0238
0324 0247 0698
Capsonic 0294
Carad 0640 0067
Carena 0485 0067
Carrefour 0066 0100
Cascade 0039 0067
Cathay 0067
CCE 0067
Centurion 0067
Century 0117 0243 0277 0268
CGE 0104 0114 0336 0106 0277 0193
0448 0400
Cimline 0039 0265 0248
City 0039
Clarivox 0448 0100
Clatronic 0248 0294 0400 0401 0247 0106
0277 0067 0039 0132 0350
0609
Clayton 0415
CMS Hightec 0247
Concorde 0039
Condor 0246 0277 0312 0350 0067 0400
0039 0132 0441 0448
Contec 0246 0039 0187 0041 0066
Continental Edison 0531 0139 0267 0226 0228 0429
0363 0235 0317 0517
Cosmel 0039 0367
Crezar 0243
Crosley 0117 0277 0104 0114 0106 0193
0243
Crown 0039 0400 0106 0067 0389 0609
0448 0238 0517
CS Electronics 0277 0246 0248
CTC 0277
Cybertron 0248
Daewoo 0039 0067 0246 0404 0248 0247
Dainichi 0248 0246
Dansai 0067 0294 0065 0246
Dansette 0442
Dantax 0400
Datsura 0238
Dawa 0067
Daytron 0039 0404 0067
Decca 0102 0546 0067 0247
General Technic 0039
Genexxa 0248 0067 0442
Germanvox 0243
Goldhand 0246
Goldline 0367
GoldStar 0067 0400 0039 0247 0277 0246
0193 0391
- 100 -
 Loading...