


Dream On Me Inc.
1532 S WASHINGTON AVE
PISCATAWAY TWP NJ 08854
OFFICE: 732-752-7220
CUSTOMER SERVICE: 732-366-1788
Read all instructions BEFORE assembly and USE of product.
KEEP INSTRUCTIONS FOR FUTURE USE.
ASSEMBLY INSTRUCTIONS
ITEM NO: 634
Comes with a mattress.
Adult assembly required.
Small parts may present choking hazard prior to assembly.
Enclosed please find simple step-by-step instructions to help you
quickly assemble your products. Before you begin we recommend
that you following the steps below:
1. Please read the instructions thoroughly.
634
2. Identify all parts and hardware.
s
3. You will need the following tools:
Philips head screw driver
Flat head screw driver
Hammer
Do Not Use Power Drills or Drivers
To protect your parts during assembly please place them on a soft
surface.
To clean surface use only water on a damp cloth. Do not use
window cleaners or cleaning abrasives as it will scratch the surface
and could damage the protective coating.
Please note that the warning sticker is placed on the cribs to keep parents and
caregivers informed it is a requirement by law under CPSC And ASTM.
We do apologize for any inconvenience this may cause you.
1

2

WARNING !
· FAILURE TO FOLLOW THESE WARNINGS AND THE ASSEMBLY INSTRUCTIONS
COULD RESULT IN SERIOUS INJURY OR DEATH.
· READ ALL INSTRUCTIONS BEFORE ASSEMBLING CRIB. KEEP INSTRUCTIONS
FOR FUTURE USE.
USE ONLY MATTRESS/PAD PROVIDED BY DREAM ON ME WHICH MUST BE AT
LEAST 37-3/4 IN.LONG BY 23-3/4 WIDE AND NOT MORE THAN 2 IN.THICK.
· CHECK THIS PRODUCT FOR DAMAGED HARDWARE, LOOSE JOINTS, MISSING
PARTS OR SHARP EDGES BEFORE AND AFTER ASSEMBLY.A FREQUENT CHECK
SHOULD BE MADE DURING USE.DO NOT USE CRIB IF ANY PARTS ARE MISSING,
DAMAGED OR BROKEN.CONTACT DREAM ON ME INC.1532 S WASHINGTON AVE
PISCATAWAY TWP NJ 08854
LITERATURE IF NEEDED.DO NOT SUBSTITUTE PARTS.
· TO REDUCE THE RISK OF SIDS, PEDIATRICIANS RECOMMEND HEALTHY INFANTS
BE PLACED ON THEIR BACKS TO SLEEP, OTHERWISE ADVISED BY YOUR
PHYSICIAN.
·
STRINGS CAN CAUSE STRANGULATION! DO NOT PLACE ITEMS WITH A STRING
AROUND A CHILD’S
DO NOT SUSPEND STRINGS OVER A CRIB OR ATTACH A STRINGS TO TOYS.
FOR REPLACEMENT PARTS AND INSTRUCTIONAL
NECK,SUCH AS HOOD STRINGS OR PACIFIER CORDS.
· TO HELP PREVENT STRANGULATION TIGHTEN ALL FASTENERS. A CHILD CAN
TRAP PARTS OF THE BODY OR CLOTHING ON LOOSE FASTENERS.
· DO NOT PLACE CRIB NEAR WINDOWS WHERE CORDS FROM BLINDS OR DRAPS
MAY STRANGLE A CHILD.
· WHEN CHILD IS ABLE TO PULL TO A STANDING POSITION, SET MATTRESS TO THE
LOWEST POSITION AND REMOVE BUMPER PADS, LARGE TOYS AND OTHER
OBJECTS THAT COULD SERVE AS STEPS FOR CLIMBING OUT.
· WHEN CHILD IS ABLE TO CLIMB OUT OR REACH THE HEIGHT OF 35 IN.(89CM),
THE CRIB SHALL NO LONGER BE USED.
· DO NOT USE A WATER MATTRESS WITH THIS CRIB.
· NEVER USE PLASTIC SHIPPING BAGS OR OTHER PLASTIC FILM AS MATTRESS
COVERS BECAUSE THEY CAN CAUSE SUFFOCATION.
· INFANTS CAN SUFFOCATE IN GAPS BETWEEN A MATTRESS TOO SMALL OR TOO
THICK AND PRODUCT SIDES.ON SOFT BEDDING NEVER ADD A MATTRESS,
PILLOW,COMFORTER,OR PADDING.
THE PRODUCT,INCLUDING SIDE RAILS,MUST BE FULLY ERECTED PRIOR TO USE.
ALWAYS PROVIDE THE SUPERVISION NECESSARY FOR THE CONTINUED SAFETY
OF YOUR CHILD.WHEN USED FOR PLAYING,NEVER LEAVE CHILD UNATTENDED.
· IF REFINISHING, USE A NON-TOXIC FINISH SPECIFIED FOR CHILDREN'S
PRODUCTS.
· FOLLOW WARNINGS ON ALL PRODUCTS IN A CRIB. SEE HEAD PANNEL AND
MATTRESS SUPPORT FOR WARNINGS AND INSTRUCTIONS.
MADE IN CHINA
3

=
4
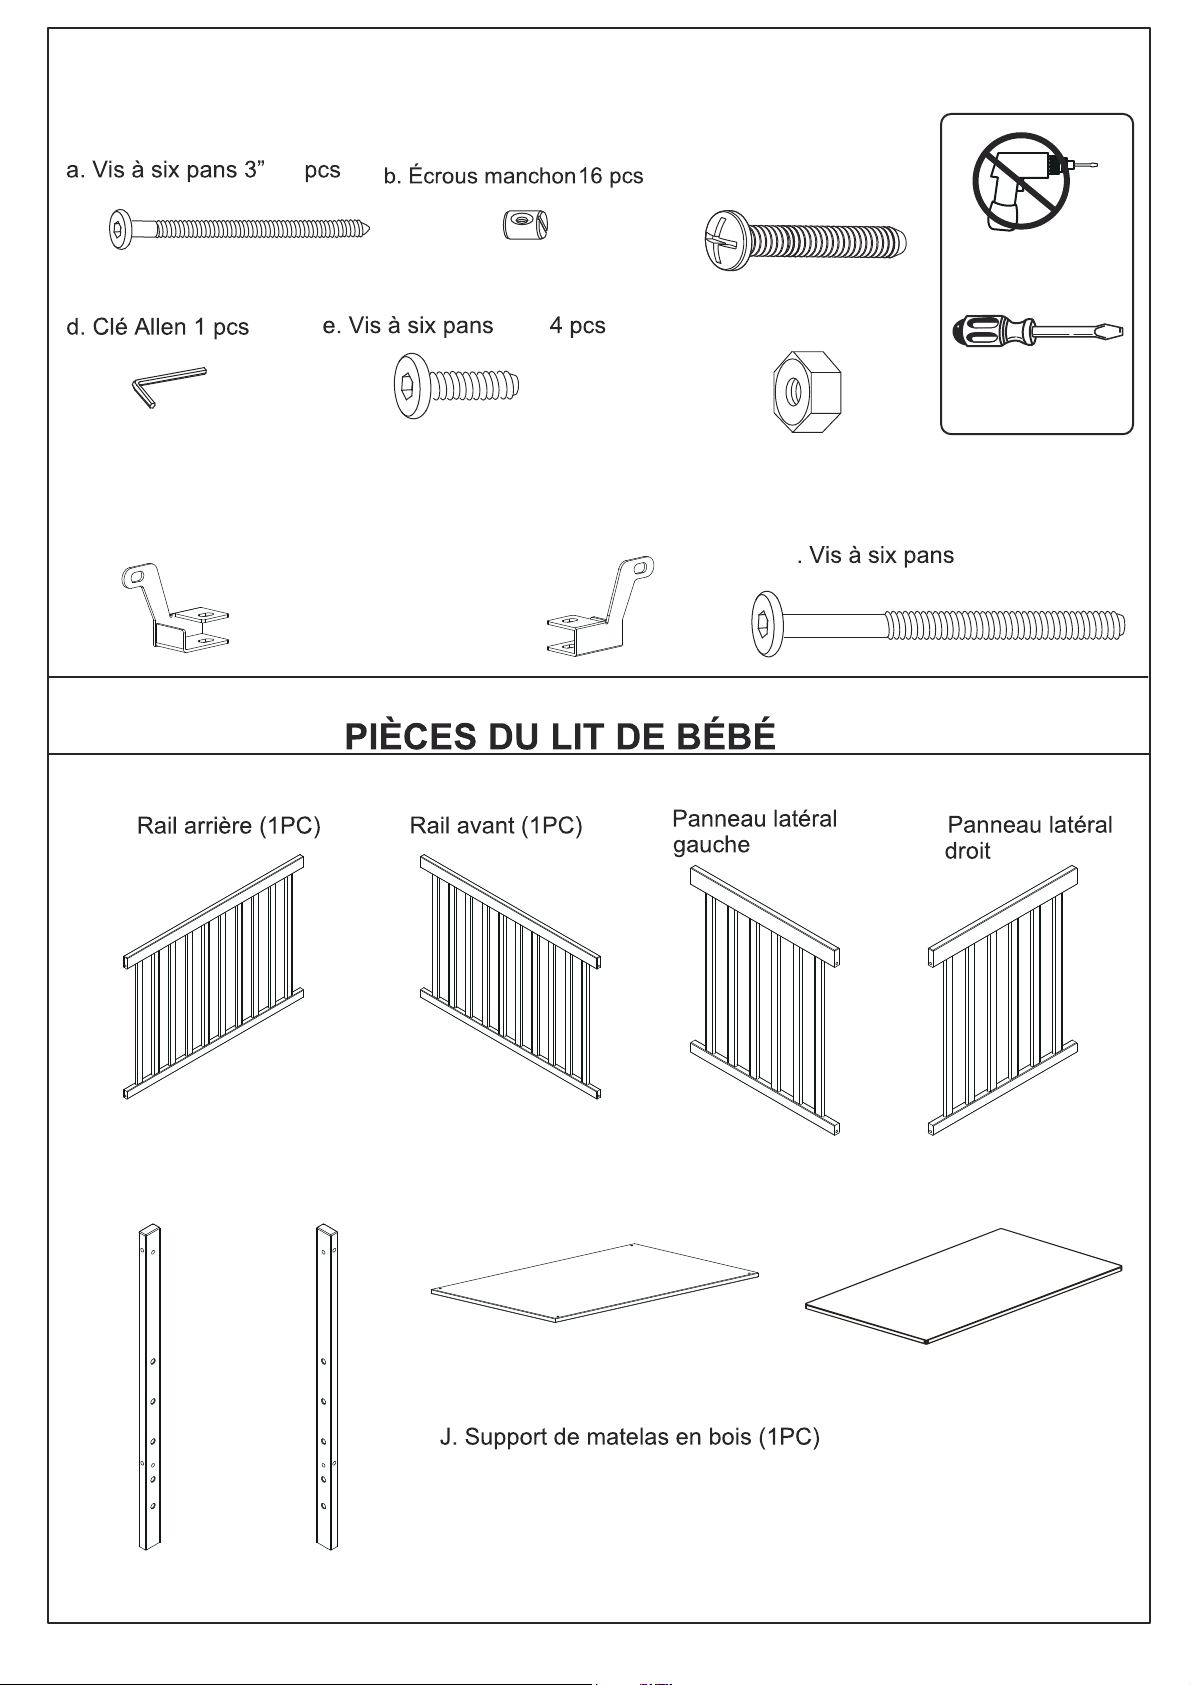
CONNECTION HARDWARE
QUINCAILLERIE DE CONNEXION
a. 3” Allen head Bolt 8 pcs
8
d. Allen Wrench 1 pcs
r.
Left support brackets (2PCS)
e.5/8” Allen head Bolt 4 pcs f. Nut x 4 pcs
Crochet du support de
matelas gauche(2PCS)
b. Barrel Nuts 16 pcs
c. 1” Allen head Bolt 4 pcs
c. Vis à six pans 1” 4 pcs
5/8”
s.
Right support brackets (2PCS)
Écrou x 4 pcs
f.
Crochet du support de
matelas droit (2PCS)
CRIB COMPONENTS
No drills necessary.
Do not use power
screwdriver
Phillips Screwdriver
(not supplied)
t. 2-1/8” Allen head Bolt 8 pcs
t
2-1/8” 8 pcs
A. Back Rail (1PC)
A.
E. Left Post (2PCS)
E. Montant arrière gauche (2PCS)
B. Front Rail (1PC)
B.
C. Left side pannel (1PC)
C.
(1PC)
D. Right side pannel (1PC)
D.
(1PC)
J. Wooden mattress base (1PC)
F. Right Post (2PCS)
F. Montant arrière droit (2PCS)
K. Mattress (1PC)
K. Matelas (1PC)
5

STEP 1
Attach the left side pannel (C) to the left
front leg (F) and the left back leg (E) by
using allen head bolts (a) & bolts (t) and
barrel nuts (b) . Then attach the right side
pannel (D) to the right front leg (H) and the
right back leg(G) by using allen
bolts(a) & bolts (t) and barrel nuts(b).
(C) (F)
(E)
(a)
(b)
(D)
(H) (G)
(a)
(b)
t
F
b
t
D
E
b
t
t
b
t
C
b
b
F
t
b
C
b
F
b
t
b
E
t
X 8
t
STEP 2
Attach the back rail (A) to the left leg(E)
and right leg(F) by using allen head
bolts(a).
(A)
(E)
X 4
a
(F)
b
A
a
b
a
a
b
C
b
A
D
a
b
C
6

STEP 3
Attach the
Right support brackets
Wooden mattress base(J)
by using allen head bolts(c) and Nut(f) .
Left support brackets
(s) to the
(r) and
3
Fixez les supports
gauche (r) et droit (s)
à la base du matelas
en bois (J) à l’aide des
vis à tête à six pans
creux (c) et
de l’écrou (f).
X 4
r
r
c
s
c
c
J
f
c
r
f
X 4
f
s
c
J
STEP 4
Attach the wooden mattress base(J)
to the left back leg(E) and right back
leg(G) and Left Front Leg (F) and
Right Front Leg (H) by using allen head bolts(e).
r
J
f
A
e
D
e
J
A
S
D
e
e
C
e
J
X 4
7

STEP 5
5
Attach the front rail (B) to the
left front leg (F) and right front
leg (H), By using allen head
bolts (a), and barrel nuts(b).
TIGHTEN ALL SCREWS.
C
a
B
b
X 4
D
a
b
a
C
B
b
a
b
b
a
STEP 6
6
K
Put the mattress(K) into the bed.
8

CONVERT THE CRIB INTO DAY BED
Remove the front rail(B).
then locate the mattress base to the lowest position.
A
C
J
D
Converting crib to a twin bed I
(FRAME RAIL NOT INCLUDED TO CONVERT TO A TWIN BED I)
1.Remove the Wooden mattress
base(J) and remove the right
side pannel(I) and the left side
pannel (H).
2.Use the front rail as footboard
of the bed,the back rail as headboard
3.Connect the headboard and footboard
by a standard hollywood frame
which is sold separately.
9

Converting crib to a twin bed II
Conversion kit is sold separately
You have the option to convert crib to a twin bed II.
1:Use the back rail as the headboard of twin bed II.
2:Connect the left foot platform and the right foot platform to the rail which are not included and
sold separately.
3:Connect the assembled parts and headboard of twin bed to the kits ( legs, long rails,and
hardware ) which are not included and sold separately.
10

LIMITED WARRANTY
workmanship and agrees to remedy any such defect.
This is solely limited to the repair or replacement of defective furniture
components and no assembly labor is included.
assembled, subjected to misuse or abuse or which has been altered or
repaired in any way.
rights which vary from State to State.
WARNING: Should this product become damaged, and/or components
are broken or missing, DO NOT USE
11
 Loading...