

Page 1
1
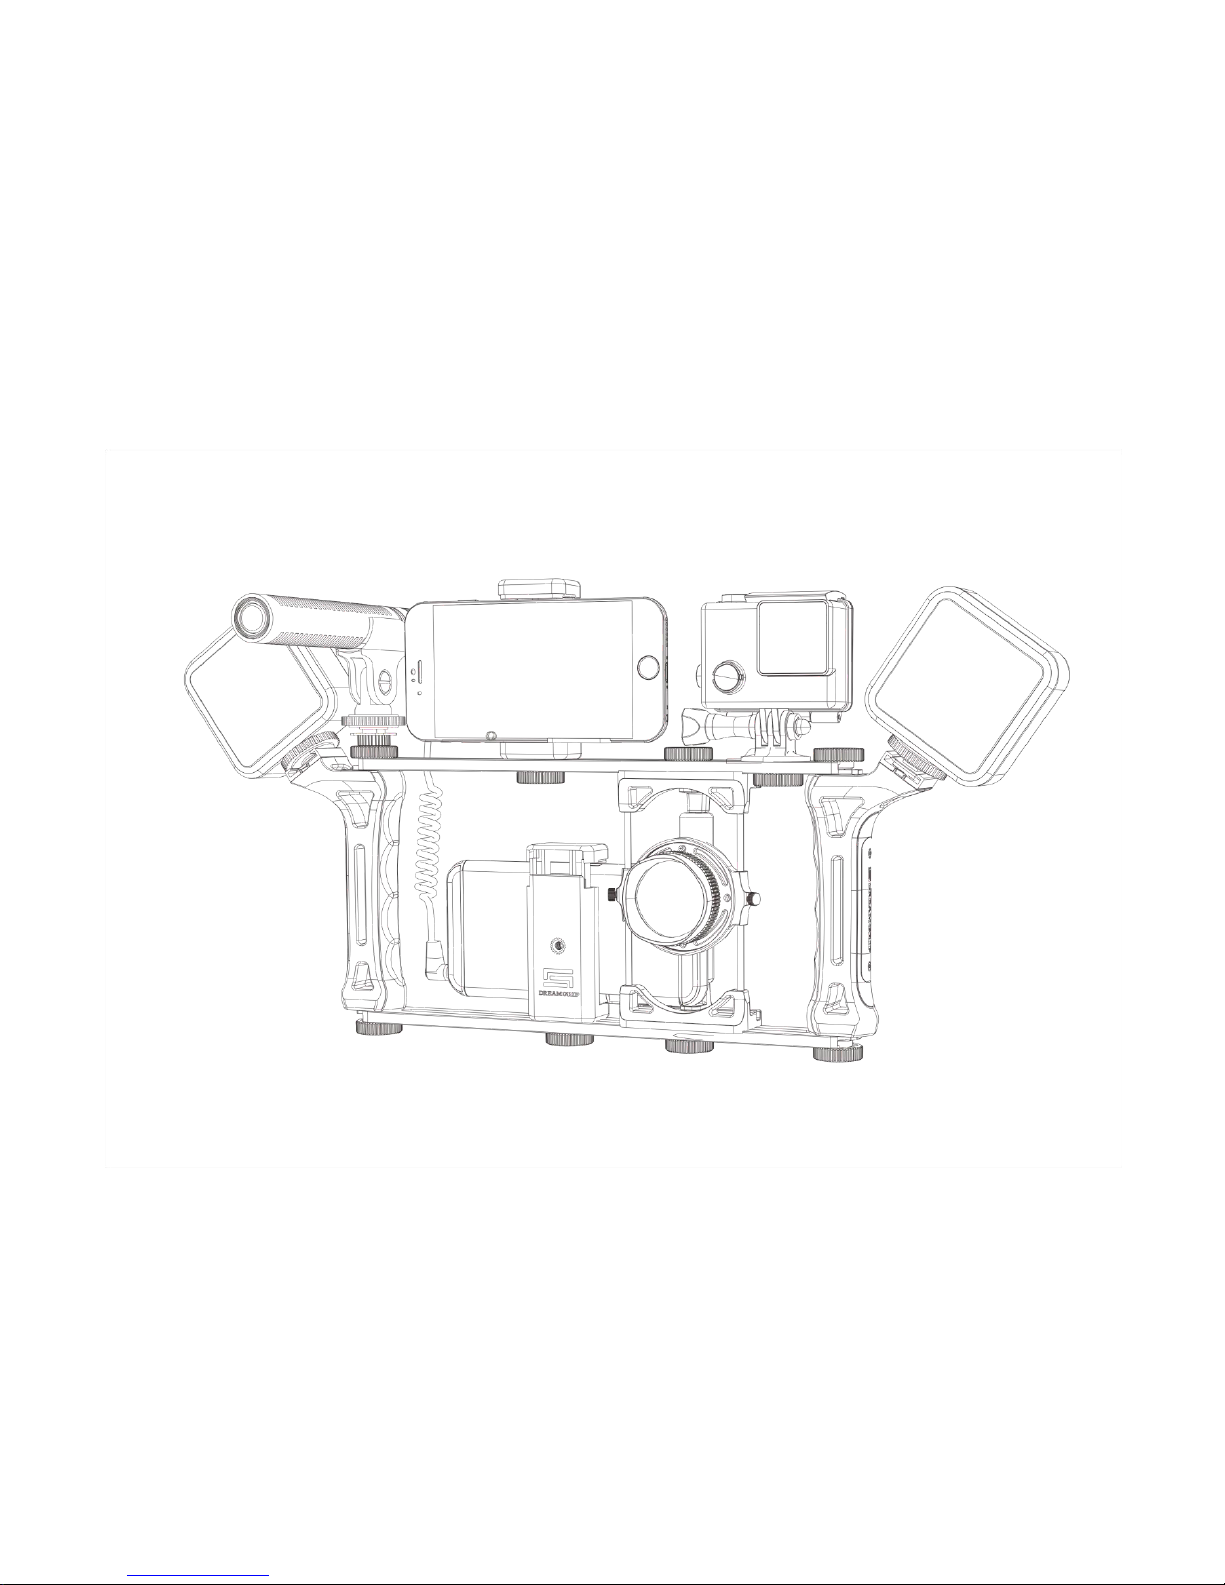
DREAMGRIP™ Universal Transformer Rig
Evolution Series
USER MANUAL
Page 2

2
TABLE OF CONTENT.
I. PRODUCT OVERVIEW ............................................................................ 3
II. BOX CONTENT ........................................................................................ 3
III. ASSEMBLING AND DISSEMBLING THE RIG .......................................... 4
IV. USING THE RIG WITH A SMARTPHONE .................................................. 5
V. USING THE RIG WITH SLR AND ACTION CAMERA ................................. 7
VI. MOUNTING LED LIGHTS ......................................................................... 8
VII. MOUNTING THE MICROPHONE .............................................................. 9
VIII. CONNECTING TO OTHER ACCESSORIES AND EXTENSIONS
(i) Using Optical Lenses .................................................................10
(ii) Using The Hood ..........................................................................11
(iii) Using Optical Filters ...................................................................11
(iv) Installing The Blinder .................................................................12
(v) Connecting The Shoulder Strap .................................................13
(vi) Connecting To A Tripod ..............................................................13
(vii) Connecting To Other Extensions. ..............................................14
IX. CUSTOMER SUPPORT .........................................................................14
X. LLIMITED WARRANTY ...........................................................................14
XI. MORE USEFUL INFORMATION AND LINKS .........................................14
Page 3
3
I. PRODUCT OVERVIEW
DREAMGRIP™ Evolution is the Universal Transformable Rig system that helps you to use your
smartphone as HD camera with external accessories for better stabilization, enhanced light, better
sound recording, optical effects and more. DREAMGRIP™ Evolution makes you able to film with
several devices at the same time including SLR and Action cameras as well as with any smartphone.
II. BOX CONTENT
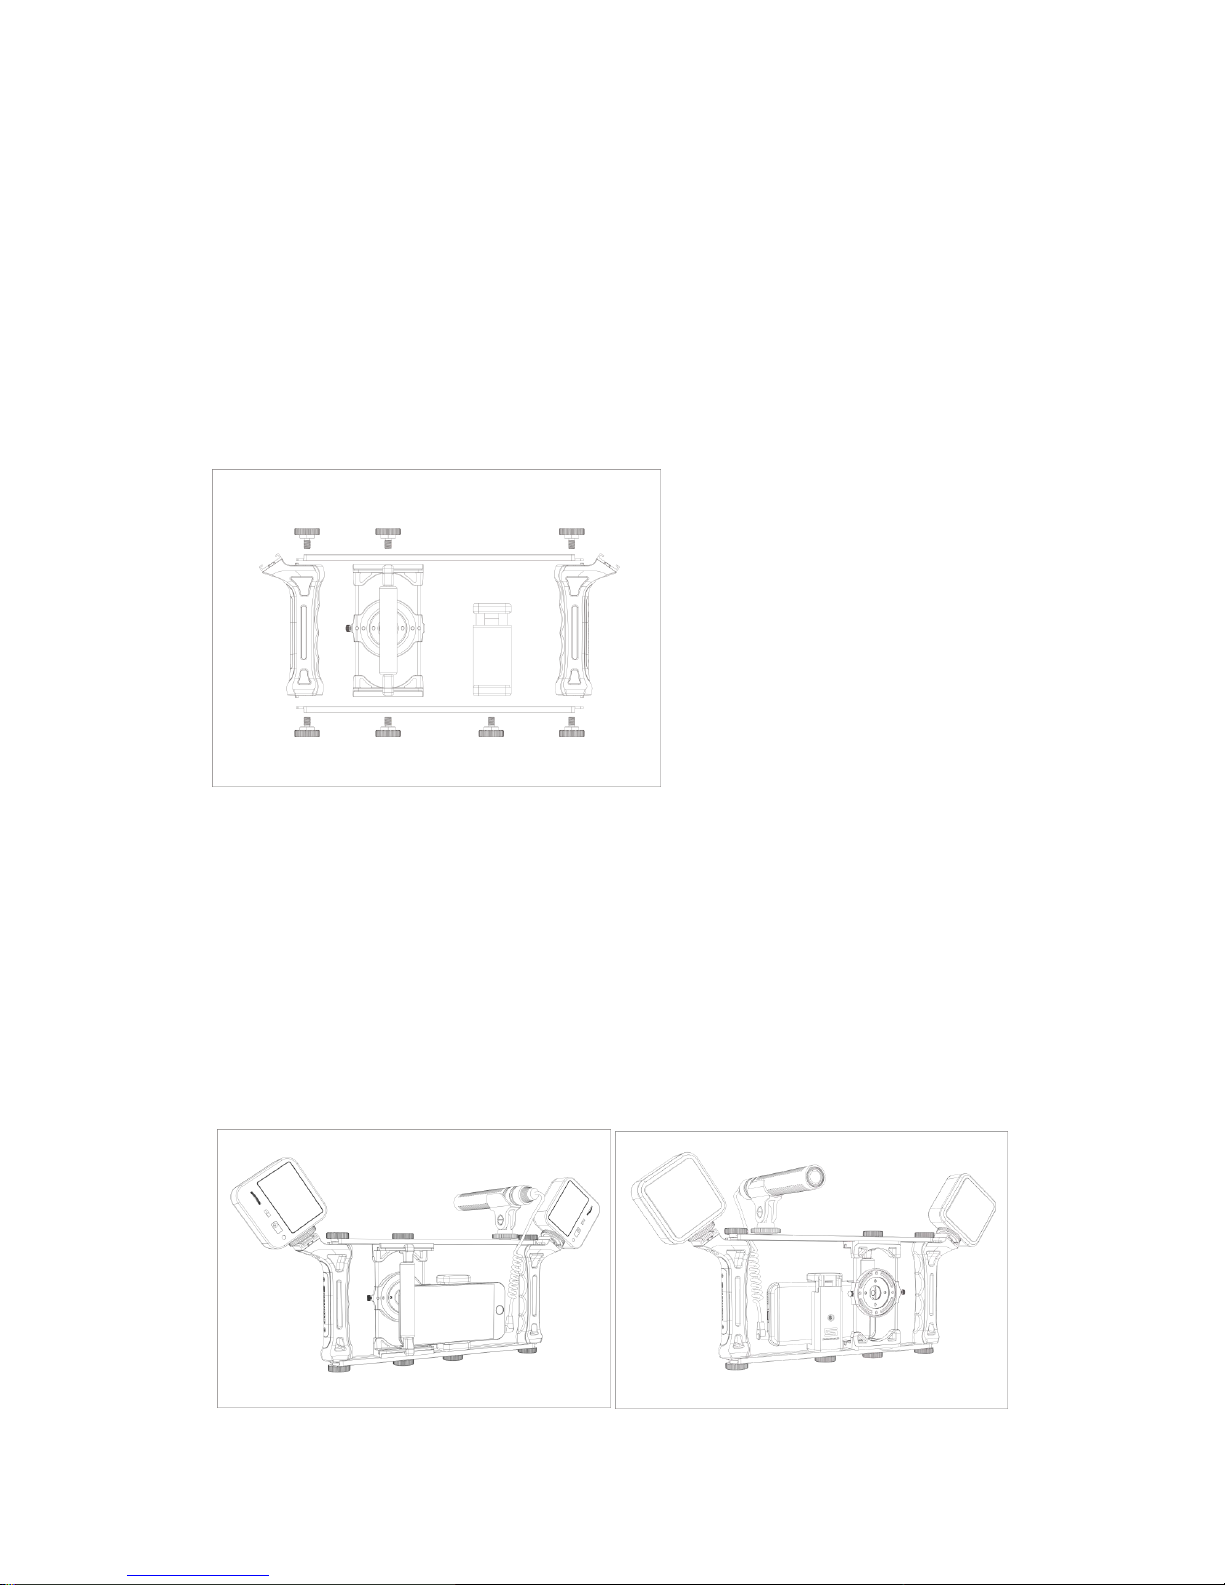
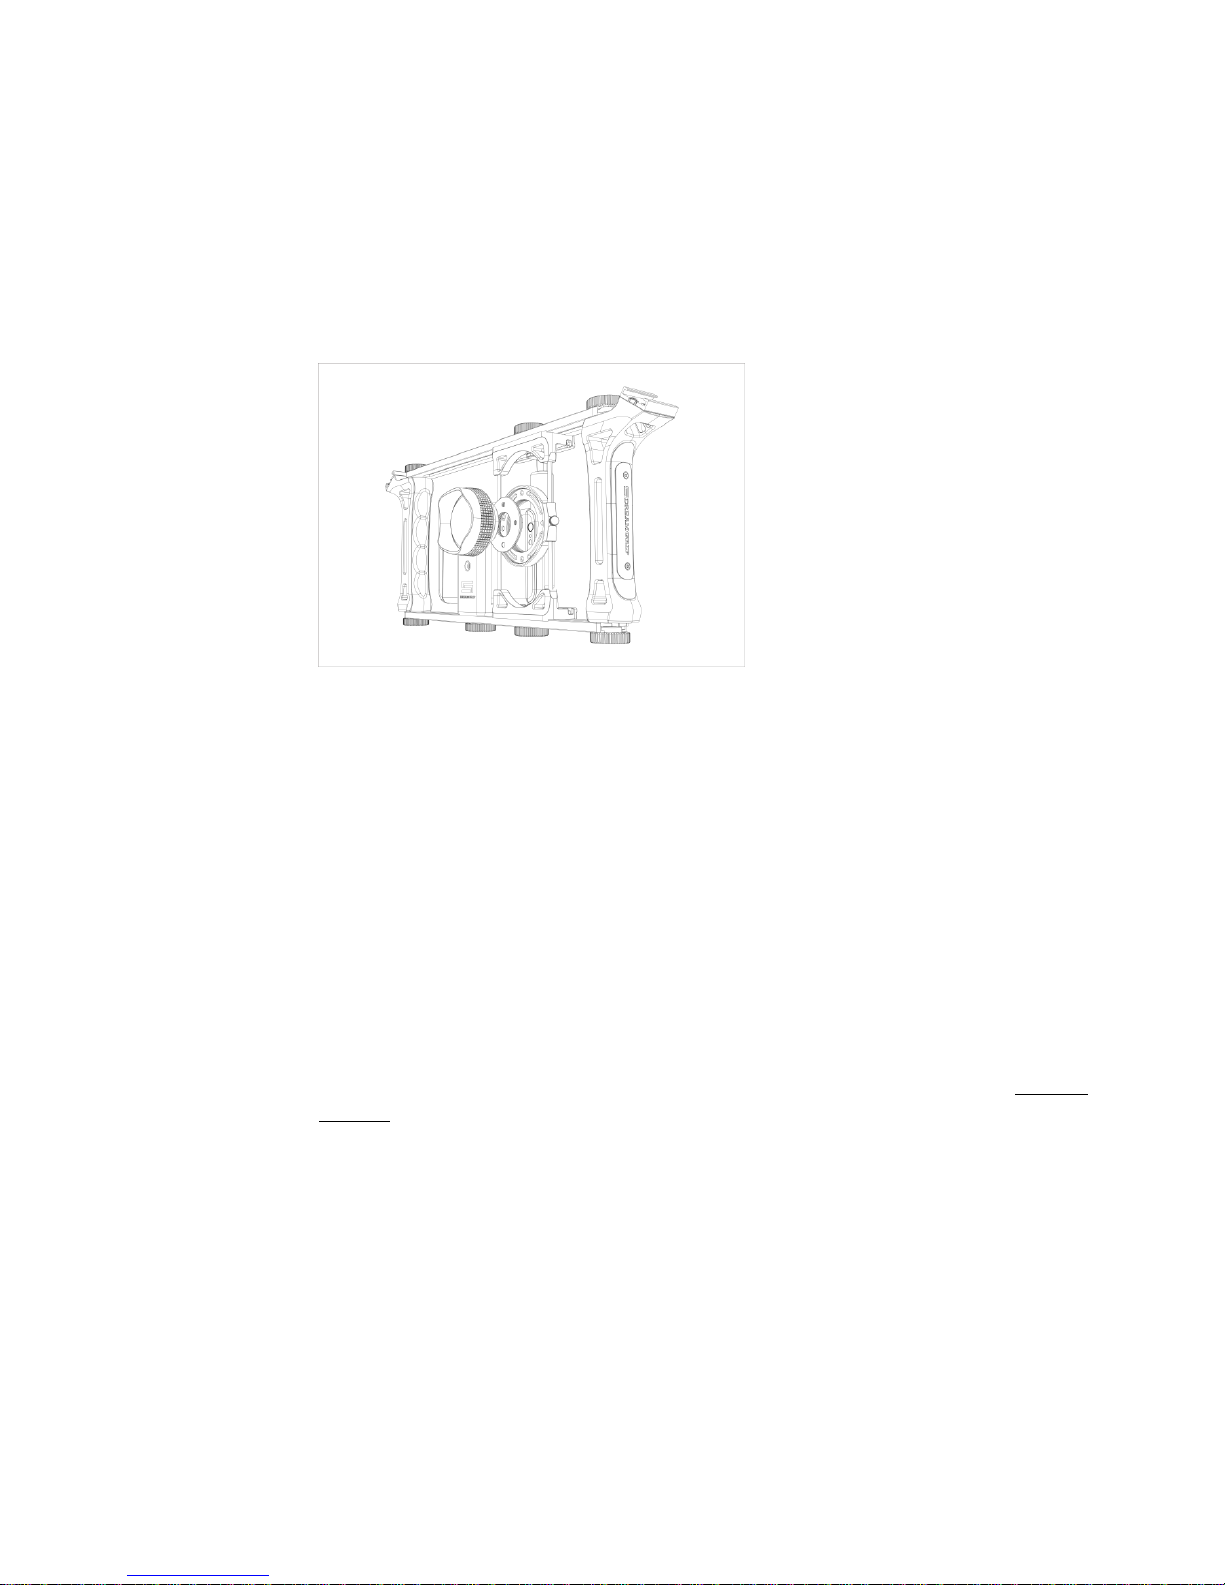
DREAMGRIP™ Evolution Rig features two moulded ergonomic Grips for secure and convenient
hold; two aluminum Tracks, one Clamp Holder, one Optics Adaptor system, and 7 standard ¼”
tightening Bolts to connect all the elements.
Pic.1. Evolution Rig elements
DREAMGRIP™ Evolution PRO set also contains 37-52mm aluminum Hood, 52mm CPL and ND2
filters, original light absorption Blinder with two 1/8” screws, one ¼” Double Stud connecting bolt,
and original shoulder Strap.
DREAMGRIP™ Evolution MOJO set contains all the items above that are included in Evolution PRO
set, but comes with extra
- Two 36 LED lights with USB charging cables;
- Gun Microphone with standard 3,5 Jack, foam windshield and cold shoe snap mount;
- One extra Clamp Holder with one more ¼” tightening Bolt.
Pic.2. Evolution Rig assembled with two LED lights and Gun Microphone.
Page 4
4
III. ASSEMBLING AND DISSEMBLING THE RIG
DREAMGRIP™ Evolution PRO set comes assembled in the box.
DREAMGRIP™ Evolution MOJO comes dissembled in the box, but can be assembled easily in
about a minute. We recommend the sequence as below:
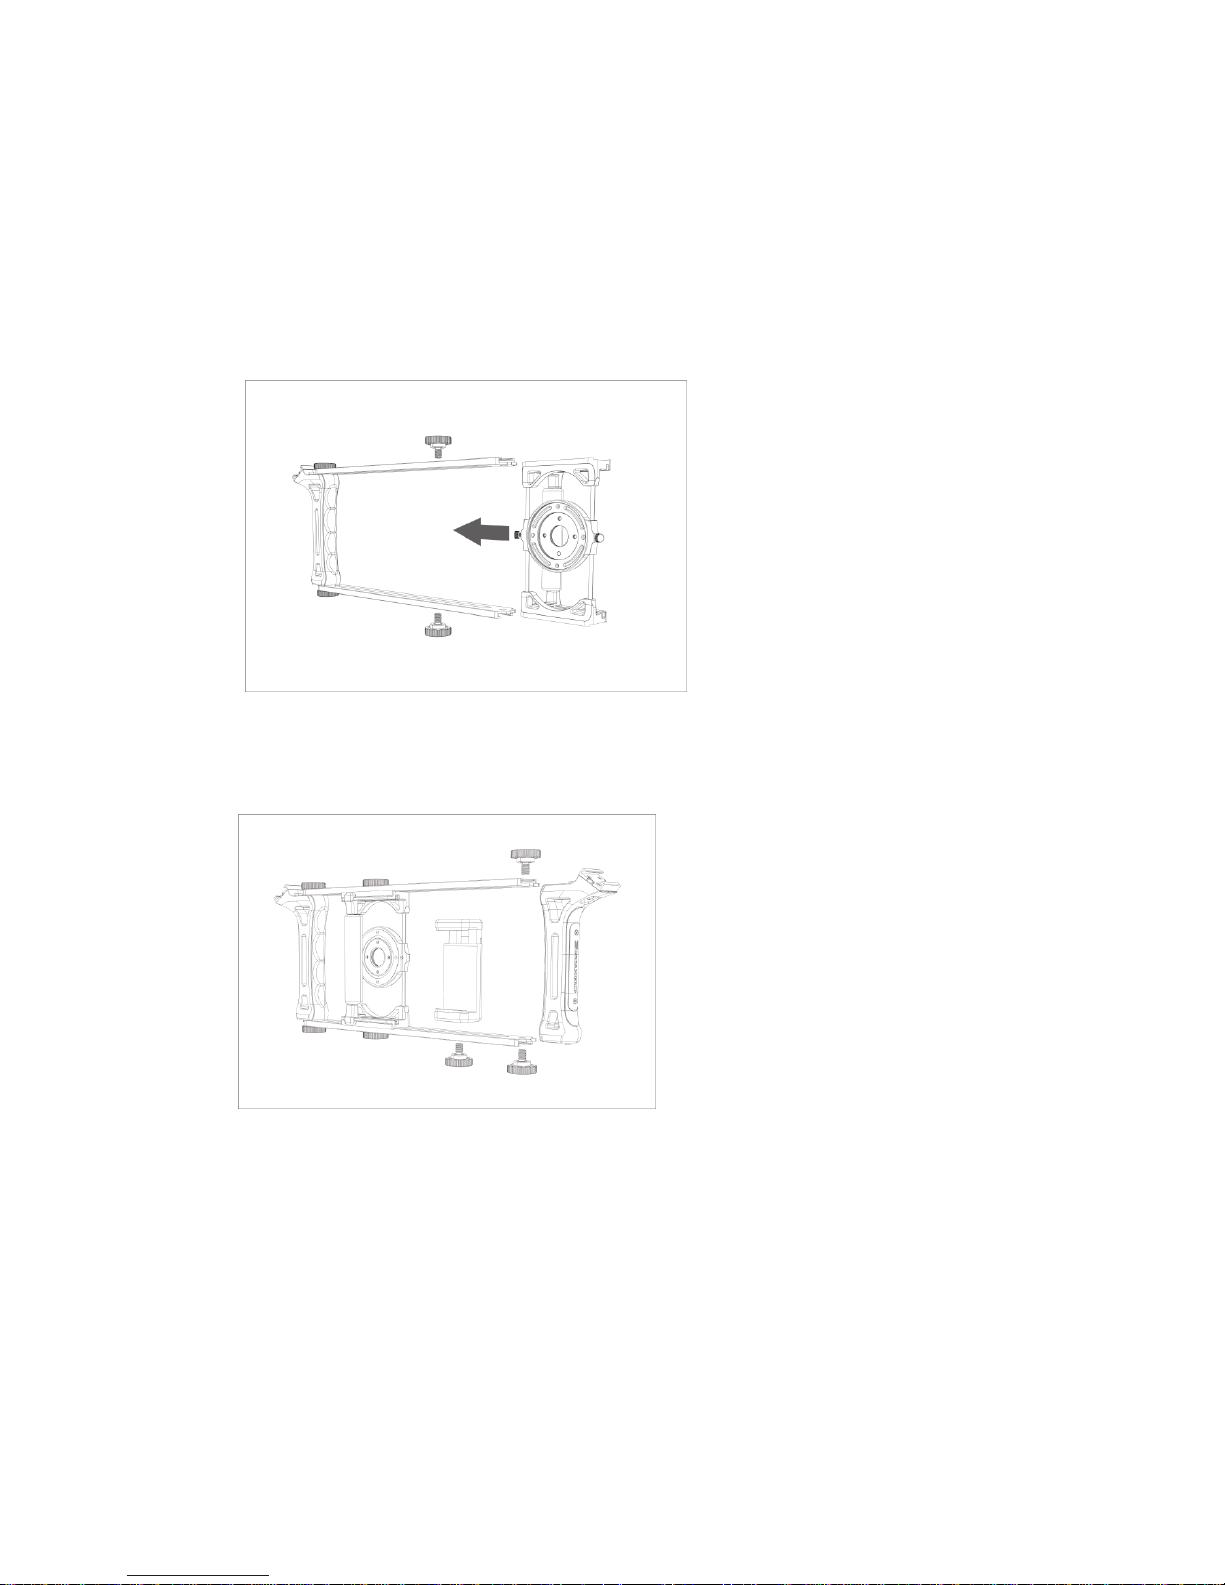
1) Connect a Grip with two Tracks and tighten them with two ¼” Bolts.
2) Slide the Optics Adaptor between the tracks from the open side and tighten it with two more
Bolts from the top and the bottom through Track cavity.
Pic.3. Sliding the Optics Adaptor between Tracks.
3) Attach the second Grip and tight it up with two Bolts.
4) Finally attach Clamp Holder and fix it with the Bolt.
Pic.4. Attaching the Clamp holder and the second Grip.
NOTE: To dissemble the Rig take the same actions in an inverse sequence.
(!)TIP: Use the Double Stud bolt together with standard ¼” Bolts to connect elements together to
construct alternative rigs. As an example, refer to the picture at the back side of the retail box. You
can see one Grip with Microphone directly connected to the Clamp Holder for one hand held
shooting. For more Transforming options you may check the website www.deramgrip.com
Page 5
5
IV. USING THE RIG WITH A SMARTPHONE
The construction of DREAMGRIP™ Evolution allows you to adjust positions of the elements to align
them to a particular phone and camera location. To load a phone into the Rig we recommend you to
follow the sequence below.
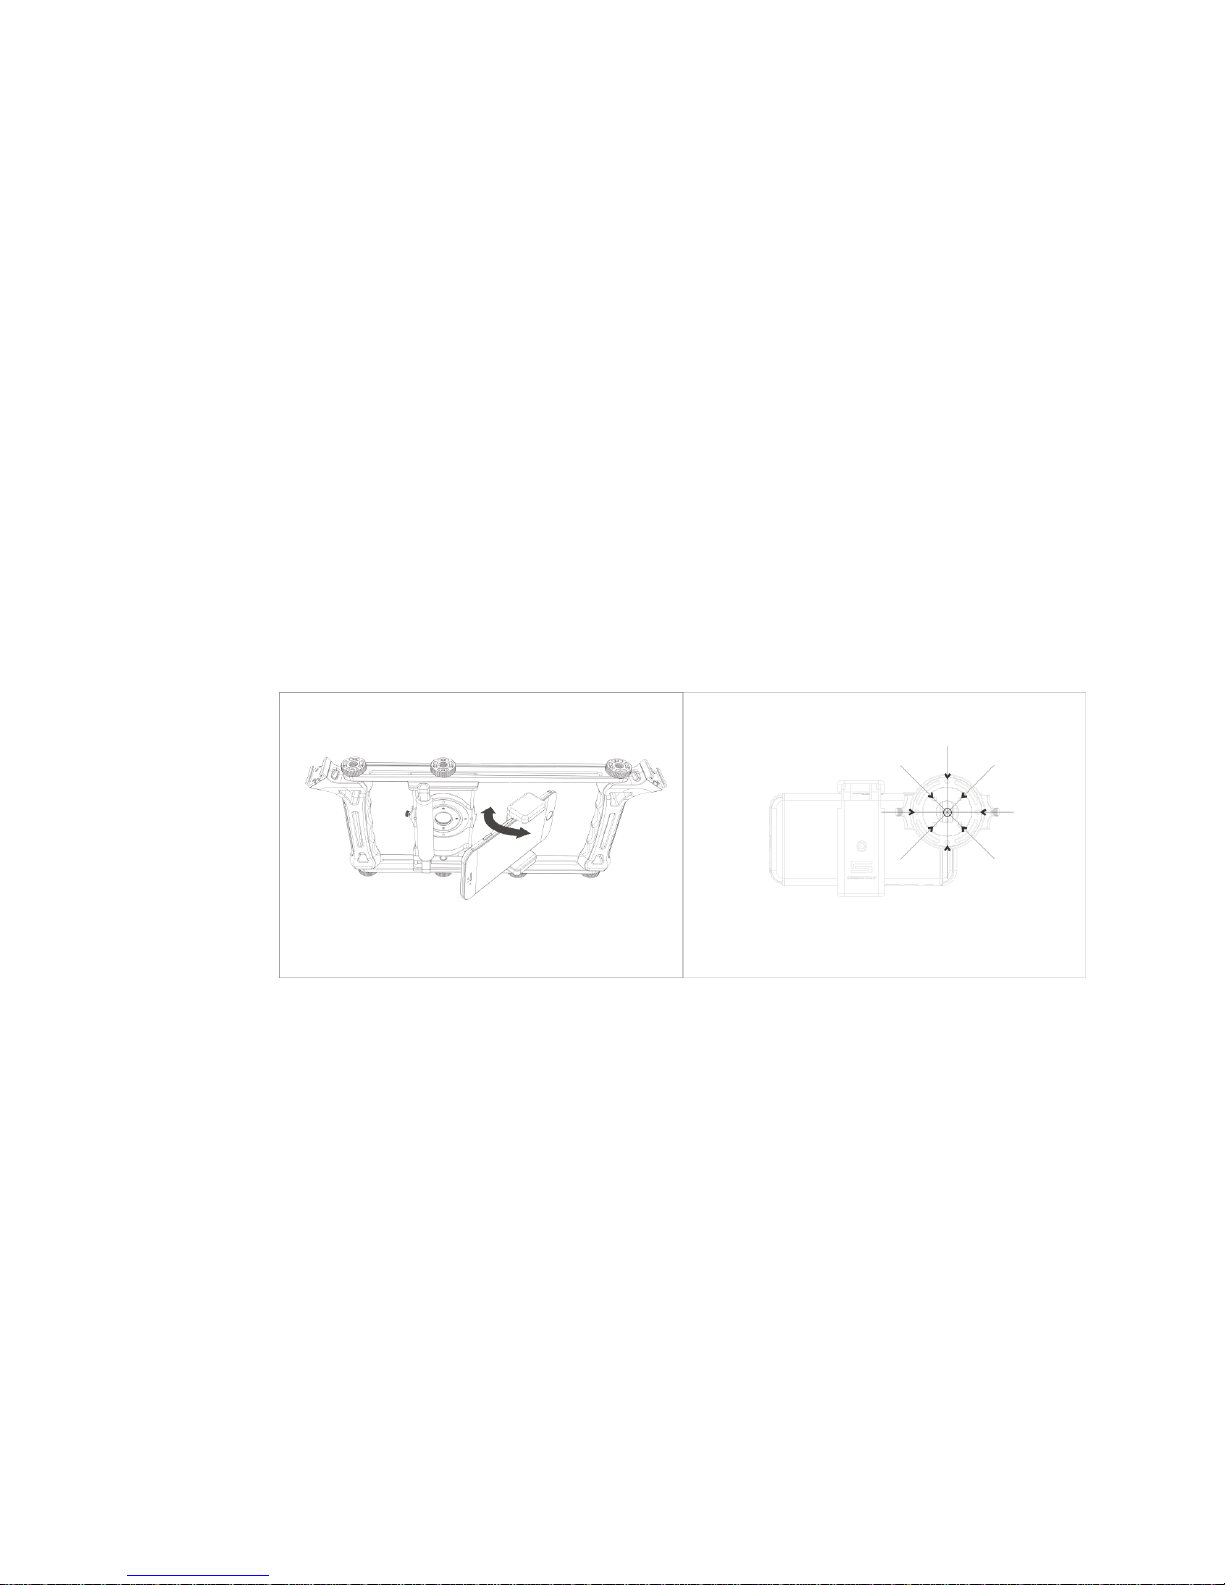
1) Loose the Bolt that fixes the Clamp Holder and turn the holder anticlockwise about 45° to
the Track.
2) Insert the phone into the Clamp Holder by pushing its top jaw up while heading phone’s top
side with camera towards Optics Adapter. If you have a phone with corner camera position load the phone to have camera side up for the better alignment with Optics Adapter.
(!)TIP: Check the position of control bottoms at sides of your phone to ensure the Clamp does
not push them.
3) Turn the Clamp Holder with your phone clockwise to align in parallel with the Sliders. Loose
the two small fixing screws at the front side on the Optics Cup to align it with phone’s camera
position on vertical axis.
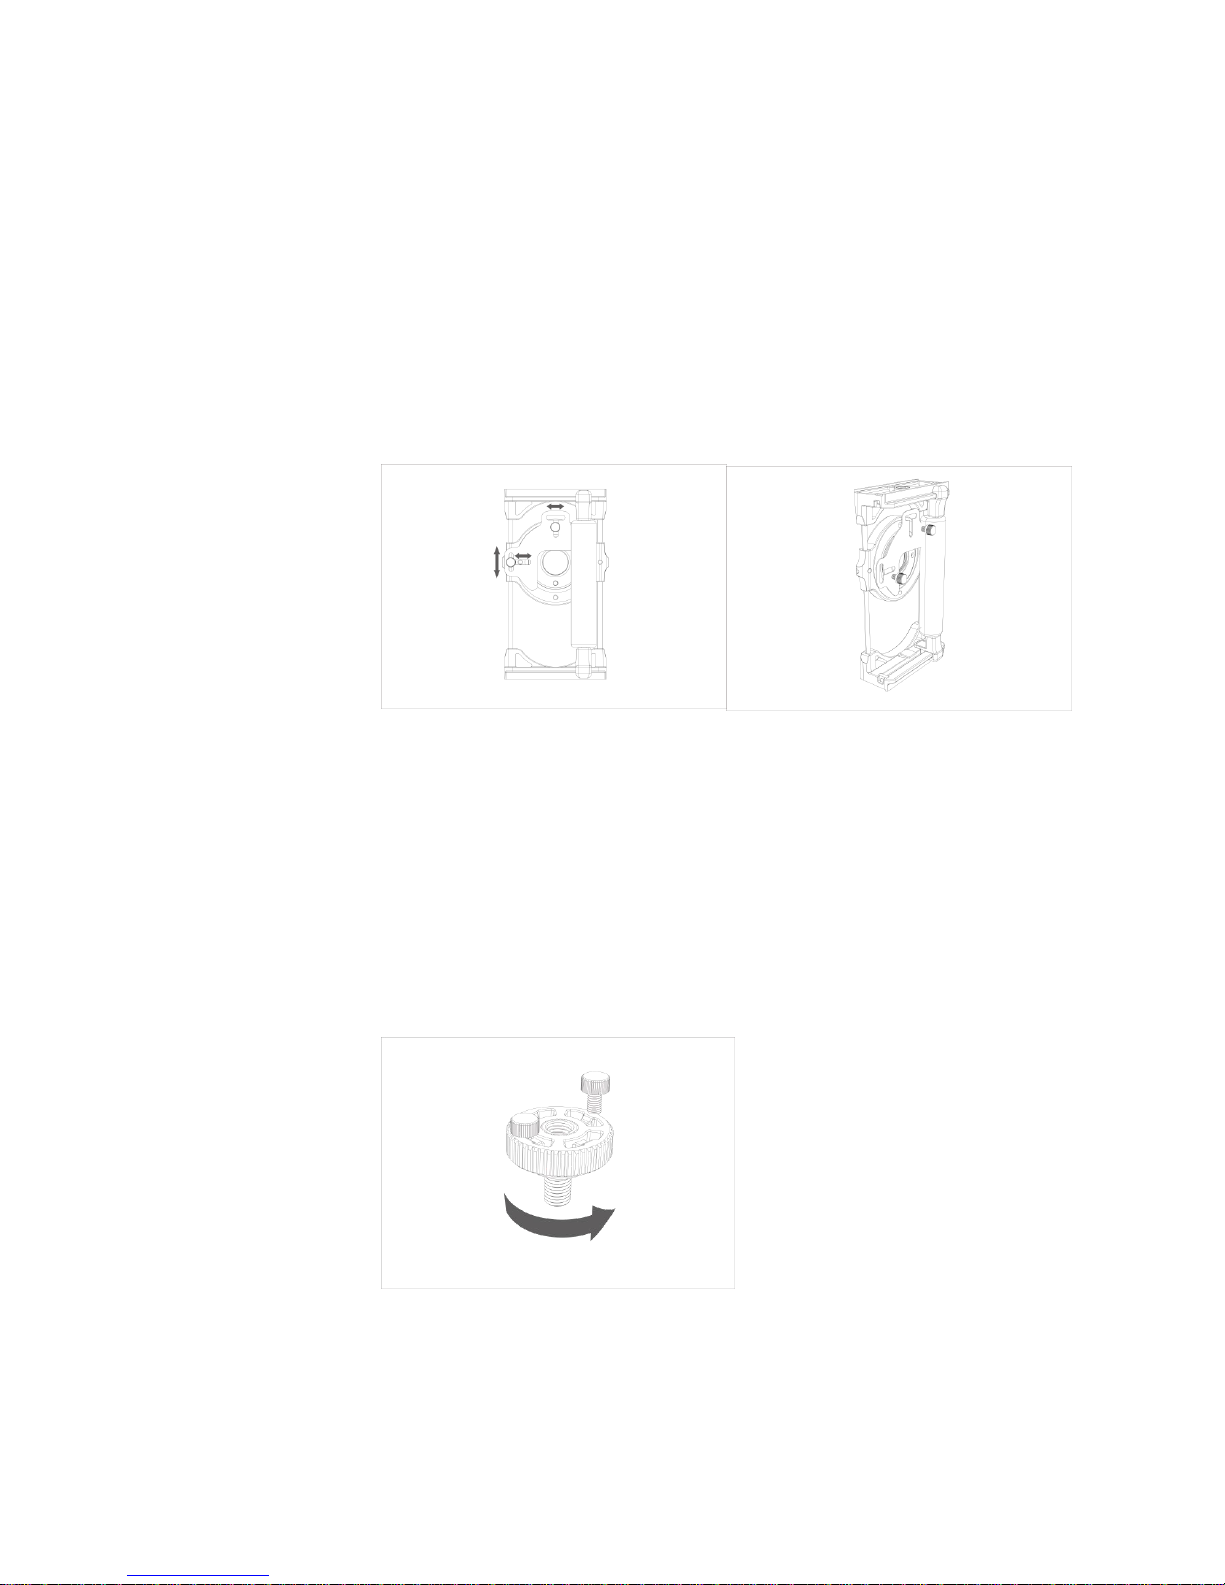
(!)TIP: Use the holes as marks to align the Cup position easy and fast (Pic.6). Be picky and
precise finding the very middle if you are planning to use any lens.
Pic.5. Inserting the phone Pic.6. Aligning camera to the Optics Cup.
4) Tight the Clamp Holder screw first, then loose two tightening screws at Optics Cup and align
the central circle precisely to have the phone camera in a very center of it.
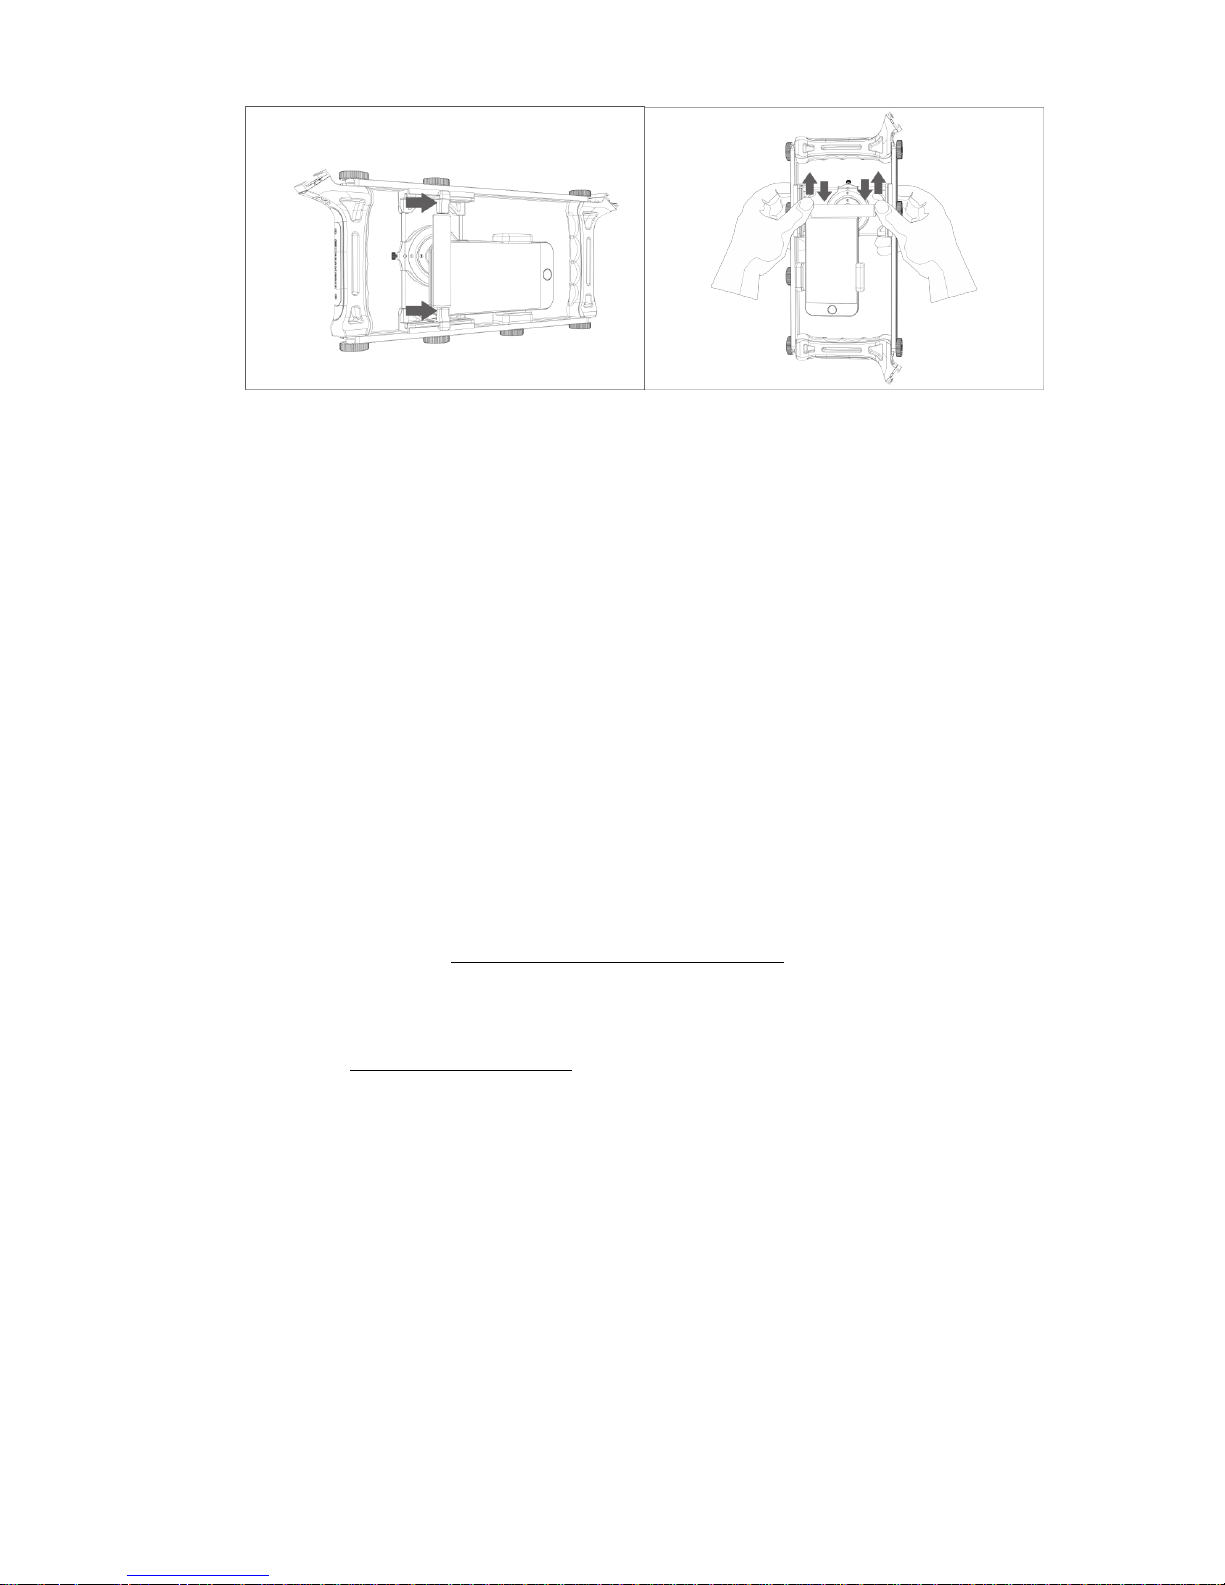
5) Move the Pushing Bar with two thumbs (pic.7) to push the phone tightly to the cup from the
other side to fix the phone’s position securely against the center of Optics Cup. Then tighten
up the Bolts on Optics Adaptor to fix it on Tracks first, and finally tighten the two small Cup
screws to ensure all the elements are aligned.
Page 6
6
Pic.7. Fixing a phone with the Pushing Bar.
(!)TIP: Some phones have a luminosity sensor at the top of the front screen. If your phone
has automatic mode of screen brightness setting and the pushing bar covers the sensor your phone will decrease screen brightness to a night mode automatically. To prevent the
effect change the settings of your phone to a manual screen brightness control.
NOTE: The higher screen brightness may consume more power and discharge your phone
faster.
NOTE: If your phone has two cameras, and you are planning to use both of them for filming –
you may need to take out the 37-17mm step down adapter to have more open space for
both cameras. Although in such a case you may need to install Blinder for the better filming
results to prevent back light reflection on optics (please refer to Installing The Blinder and
Using Lenses chapters below).
(!)TIP: The 37-17mm step down adapter features 4 holes, each with 1/8” thread. You may
screw in two small Blinder fixing bolts to use as leverage if the adapter accidentally got stuck
in the inside the Lens Cup.
(!)ATTENTION: You should remove the phone from the Lens Adaptor before using the two
screws as leverage to prevent from scratching your phone!
NOTE: Normally the most of smartphones are likely to operate only one camera at the same
time while taking a photo, and only one camera is able to film the video. It means you need
to have the actual filming camera centered against the Optics Cup if you use a lens (not
included). For more information regarding the double camera system functions please refer
to your phone supplier, specification and manual of your phone.
(!)TIP: It is more important to get the camera and Optics Cup centered if you use a lens. If you
are going to use just a filter or a hood, the position of your camera is good as long as you
can’t see any obstacles at the edges of the visual frame while using the camera.
Page 7
7
V. USING THE RIG WITH SLR AND ACTION CAMERA
You can use several cameras at the same time with the rig. To do so first refer to a manual of
your camera and check what connecting/mounting options and accessories it has. SLR
cameras normally equipped with a standard ¼” screw at the bottom side. You can fix the
camera at the Rig by using a standard ¼” Bolt to tighten it from the other side of the Track
through the cavity.
Action cameras normally equipped with several connection accessories including the same
standard ¼” screw connection kit. Although some cameras come with a standard cold shoe
adapter. In such a case you can use it to fix the camera anywhere along the top or bottom of
the Track.
You can also mount the second phone to use either as an extra camera or as a display with
the Clamp holder (the second clamp holder with extra ¼” bolt are included in the Evolution
MOJO set only).
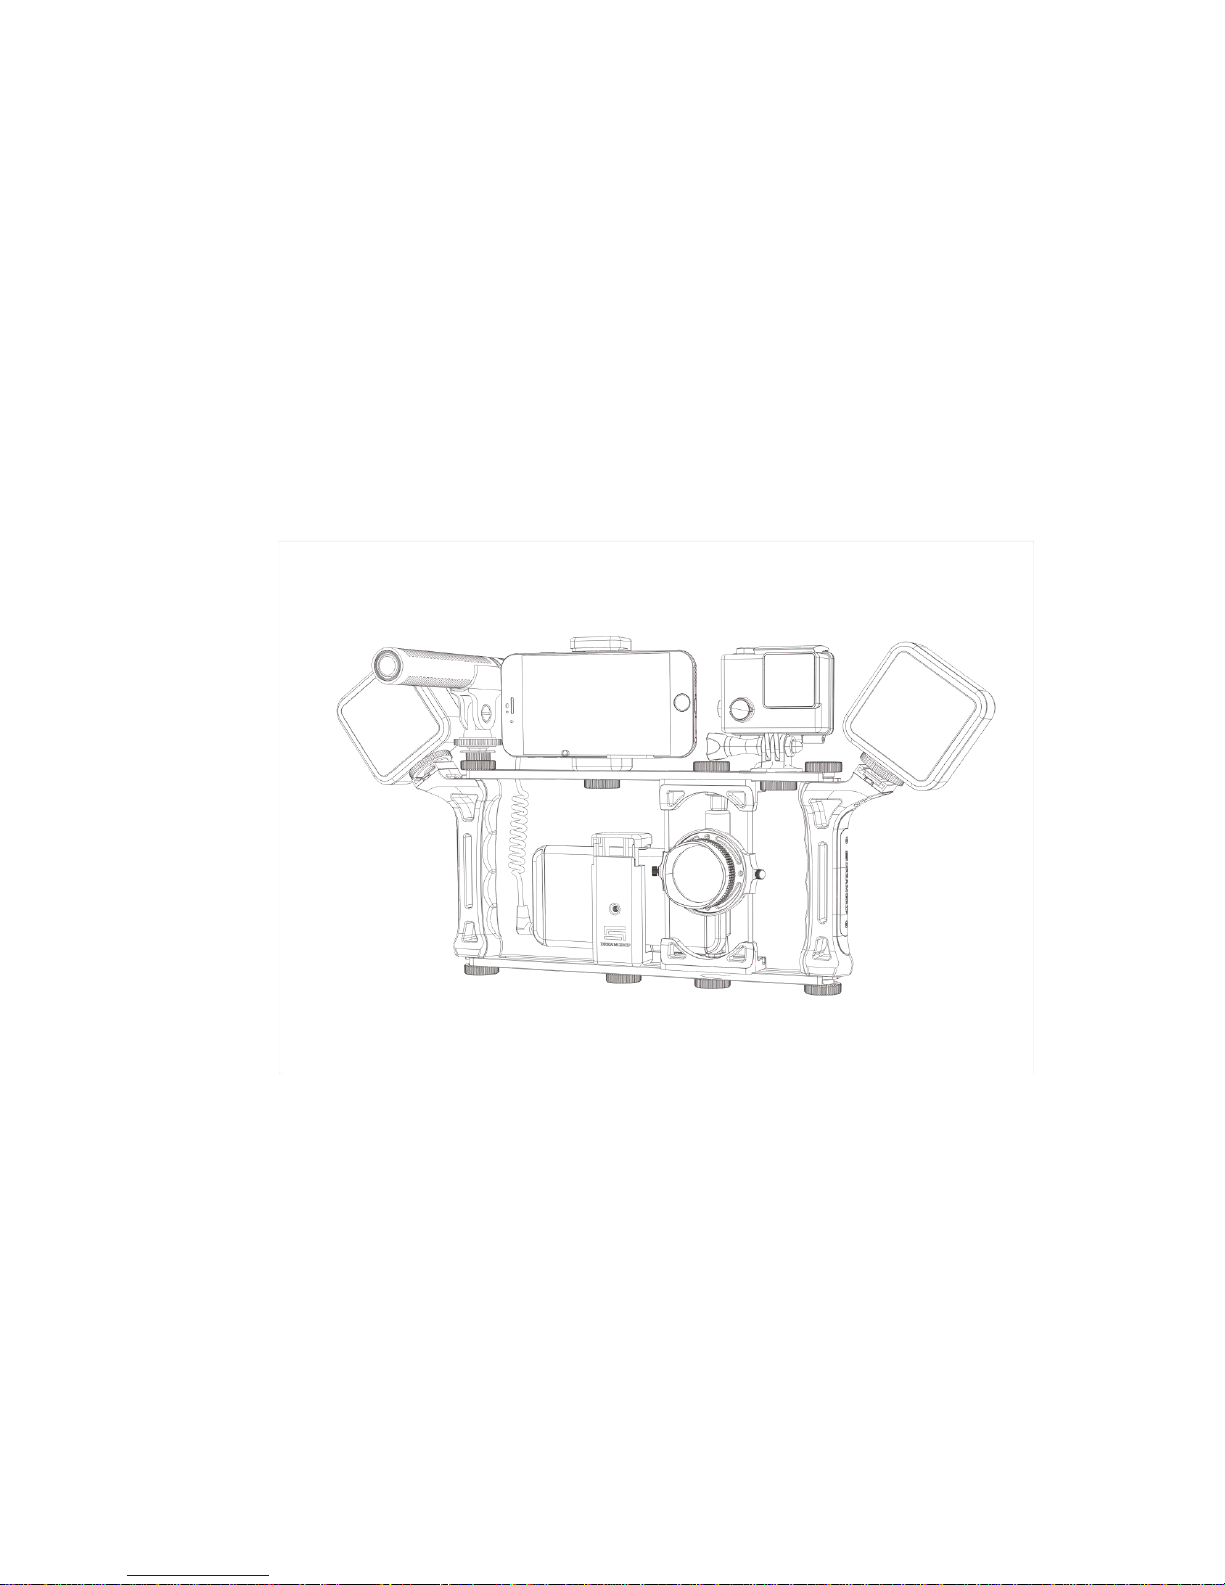
Pic.8. Evolution Rig with two Smartphones and Action camera.
(!)TIP: You also can use the Clamp holder to accommodate external Power Bank (not
included).
Page 8
8
VI. MOUNTING LED LIGHTS
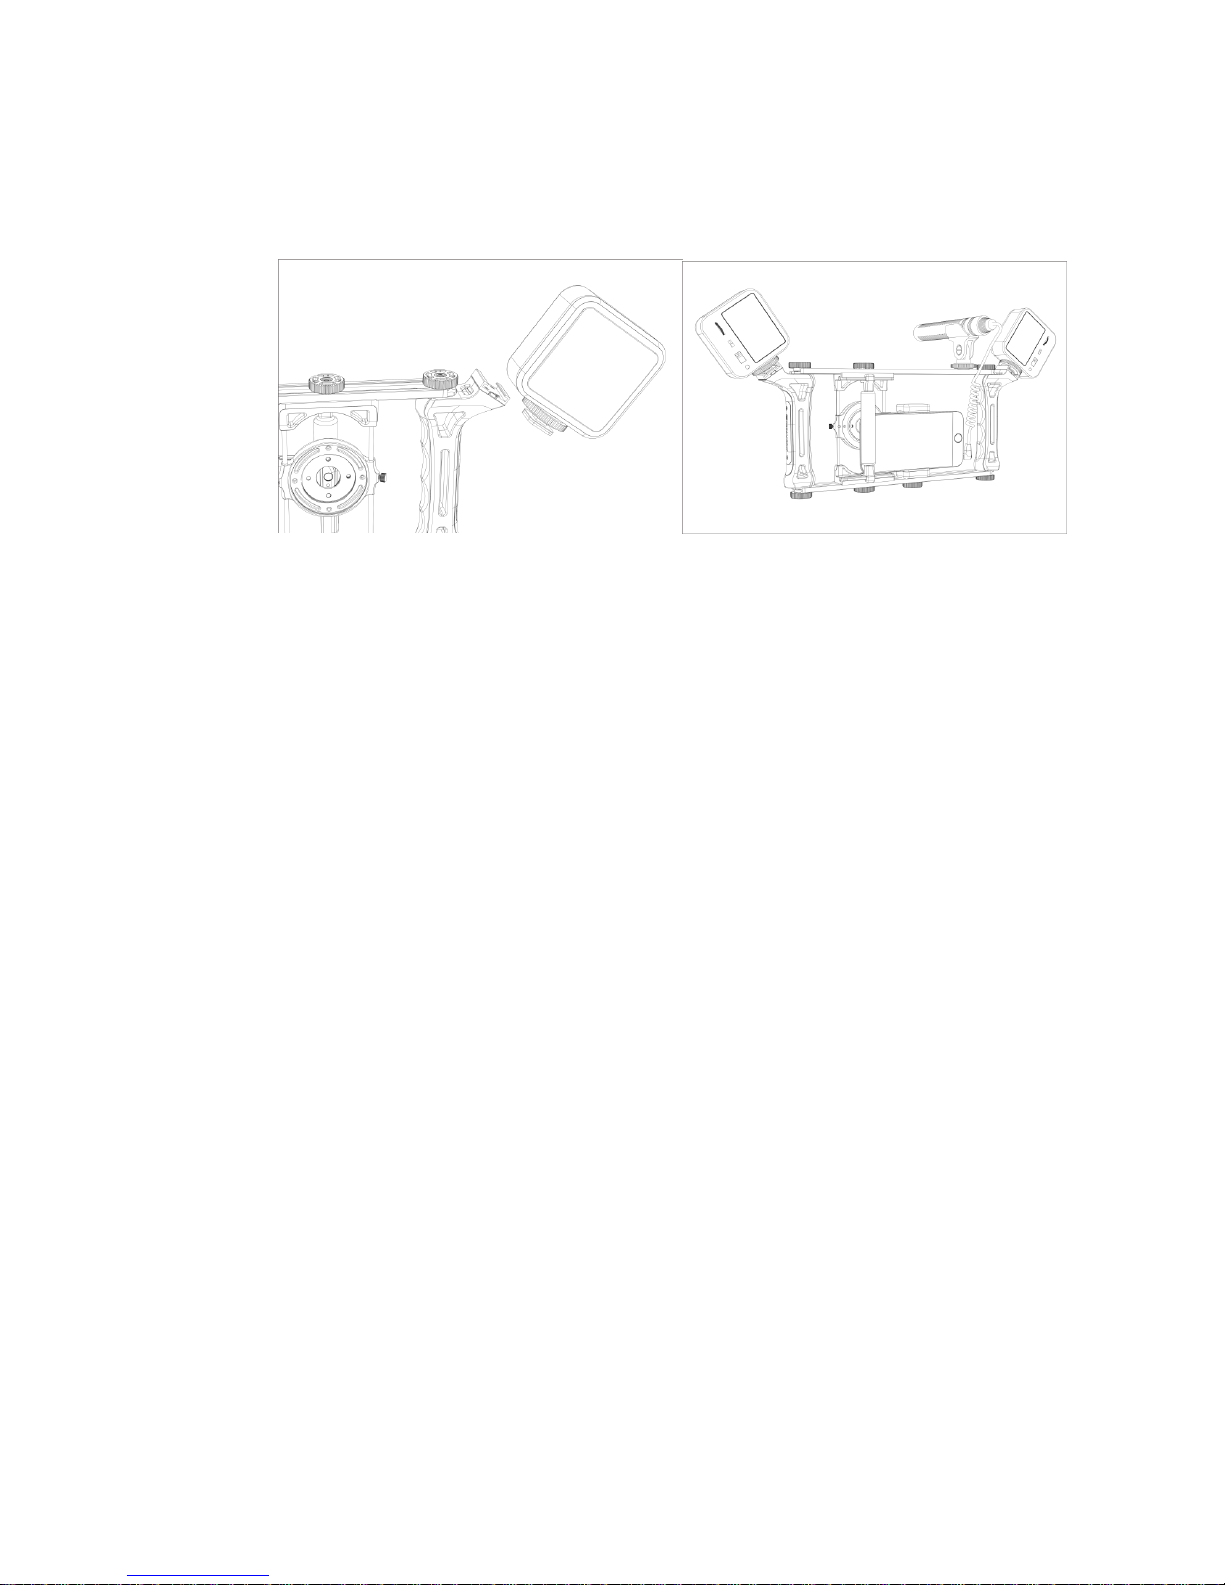
Each of two Grip features one cold shoe nest on a tilted platform. To mount the LED lights on
it you need to first to lose the tightening nut on the light base, slide it into the cold shoe, and
tighten the nut to fix the light on the Rig.
Pic.9. Mounting LED lights (included in Evolution MOJO set only).
The tilted cold shoes on the Grips is the best place for the two LED lights as the lightening
has less shadow if two light sources are placed in a distance one from the other. Although
you can use the lights at any other position at the Rig along the Tracks, or even connect it on
top of each other through the cold shoe formed nests at 3 sides of the LED light housing.
NOTE: Before using the light at the very first time you need to release the protective film that
isolates the accumulator contacts for safe transportation.
The accumulator capacity normally is enough to support the light for at least one hour with
high light intensity. The accumulator can be recharged with a standard USB power supply
adapter (not included) or any other devise with USB power supply as a laptop (not included).
(!) ATTENTION: For your safety use only the original USB cable (2 cables included in Evolution
MOJO set only) to recharge the accumulator.
(!)TIP: Use the dimmer to control the light intensity depends of the particular external light
conditions and the current distance to the filming object.
(!)TIP: Grips can be fixed on the Rig in one of the three positions using cavities at the ends of
Tracks. It will help you to adjust the light directions for shooting a close object.
Page 9
9
VII. MOUNTING THE MICROPHONE
Standard Gun Microphone in DREAMGRIP™ Evolution MOJO set features universal cold
shoe snap holder. The recommended position for it is on the top Track close to the side of
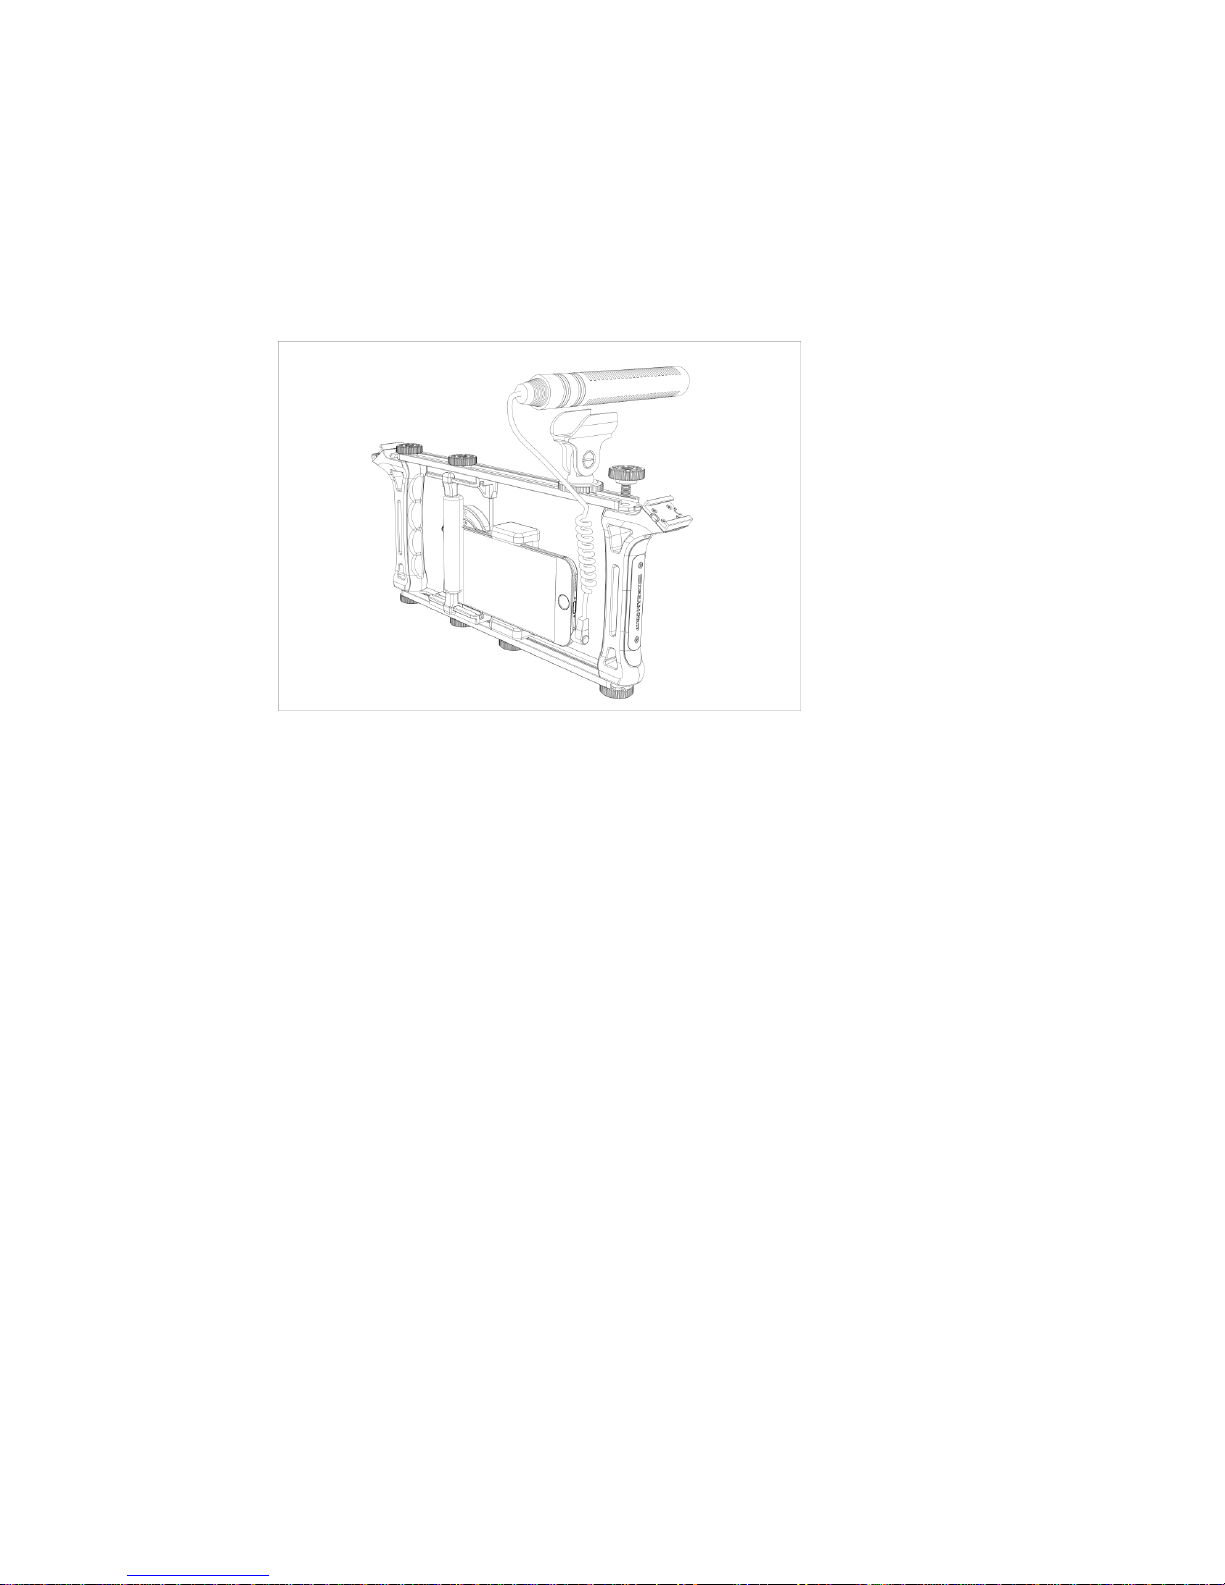
your phone with audio input. To mount the holder, first remove the top Bolt from a Grip. Then
lose the tightening nut on the Mic’s Cold Shoe mount to let the base slide in the Track. Then
tighten the Bolt back to the Grip first, and tighten the nut on the Mic mount after it. After the
holder is fixed on the Track snap the Mic in it and connect cable to the Phone.
Pic.10. Mounting the Gun Microphone (included in Evolution MOJO set only).
NOTE: The Microphone has standard Audio Jack connector suitable for use with the same
female 4 wire Jack at a phone. It may not be able to connect properly to some laptops or
other devices with a different default audio Jack contact settings.
NOTE: Some phones do not use Audio Jack connector. In such a case to connect the
microphone you may need a special connector (not included). For more details please refer
to the manual of your phone.
Page 10
10
VIII. CONNECTING TO OTHER EXTENSIONS
(i) Using Optical Lenses (not included)
With the Optics Adapter you may use 17mm, 37mm or 52mm thread lenses (not
included). To use the lens you simply need to screw it in the Lens Cup or with or without
step-down adaptor accordingly. 17mm lenses can be used only with 37-17mm step
down adapter (included). 37mm and 52mm lenses can be used with or without 3717mm step down adapter.
Pic.11. Using 17mm lens and 37-17mm step-down adaptor
(!) TIP: For the best picture quality, guaranteed compatibility and for your convenience
we recommend DREAMGRIP VISIO optics set (not included). Although optics from the
other suppliers with 17mm or 37mm thread can be compatible with the Rig. For other
thread diameters you may need to use a special adaptor (not included).
NOTE: Before using a lens make sure your phone camera position is aligned precisely
against the middle of the lens. Any deviation will effect the picture quality and may
cause lower clarity, distortion, dark spots, vignetting and other types of quality loss.
(!) TIP: Normally you will be able to see the Phone camera through the lens’ optics. So
you can adjust the better Lens Cup position against the camera center with the lens
mounted on as well as without it.
NOTE: Even if your phone has double camera system any lens can be used with only one
camera at the same time. So you need to align the actual filming camera to the center of
the Optics Adaptor.
Page 11

11
(ii) Using The Hood
37-52mm Hood helps to protect your camera and les from side light that can
effect the picture quality with undesired reflections.
To use the hood you need to screw it in the Lens Cup using the 37mm thread.
The 52mm thread at the wide end allows you to attach filters.
NOTE: The standard Hood can be used only with 17mm thread lenses of
appropriate size. Although some optical lenses may come with its own hood, but
in some cases you may need to purchase a bigger and longer hood to use it with
some lenses.
(!)TIP: The Hood can be mounted on top of 37-17 Step Down adaptor or without it
directly to 37mm thread in the Lens Cup.
(iii) Using Optical Filters
You can have a better control over the natural light and reflections by using
optical filters. One CPL and one ND2 52mm filters are included in every Evolution
Rig set. You can screw the filters directly in the Lens Cup 52mm tread or use it
with the Hood.
Both filters are helpful mainly for outdoor filming. ND2 will cut the light intensity
by a half to help you capturing a better image against the light source. CPL will
make you able to control reflections and colours intensity on a sunny day. To
learn more about the benefits of using the optical filters please check
www.dreamprip.com or any other information source.
NOTE: To use the effect of ND filter you need to switch your phone camera to
manual ISO settings. In Auto mode this filter effect will be automatically
compensated by camera software.
Page 12
12
(iv) Installing The Blinder
In case you use a 37mm thread lens (not included) with a corner positioned
camera (like iPhone has) you may need to install the Blinder. For some phones
the Blinder can be useful with filters or with 17mm thread lenses.
Blinder helps to prevent a back light reflections if you shoot with a light source at
you side or at your back. Although for centered camera position (like Samsung or
LG phones) you may not need the blinder at all if your phone covers the back side
of the Lens Cup completely and prevents any light penetration from the back.
To install the blinder you choose the best of its position to cover all the free
space of the Viewing Circle left uncovered by the phone, and fix it with the two
small bolts.
Pic.12. Installing the Blinder to cover the back of Viewing Circle.
NOTE – You have two spare bolts in the set to fix the Blinder – one with a silicon
gasket, and one without. The longer bolt without the gasket is for the top hole at
the Lens Cup. The short one with the gasket is for the far left hole.
(!) TIP – if you use the same phone for shooting with the Blinder every time – you
may keep Blinder fixed on its position even if you need to dissemble the Rig.
(!) TIP – you may also use the small bolts as leverage to unscrew the standard ¼
Bolt if it suddenly got stuck.
Pic.13. Using two small bolts as leverage.
Page 13
13
(v) Connecting The Shoulder Strap
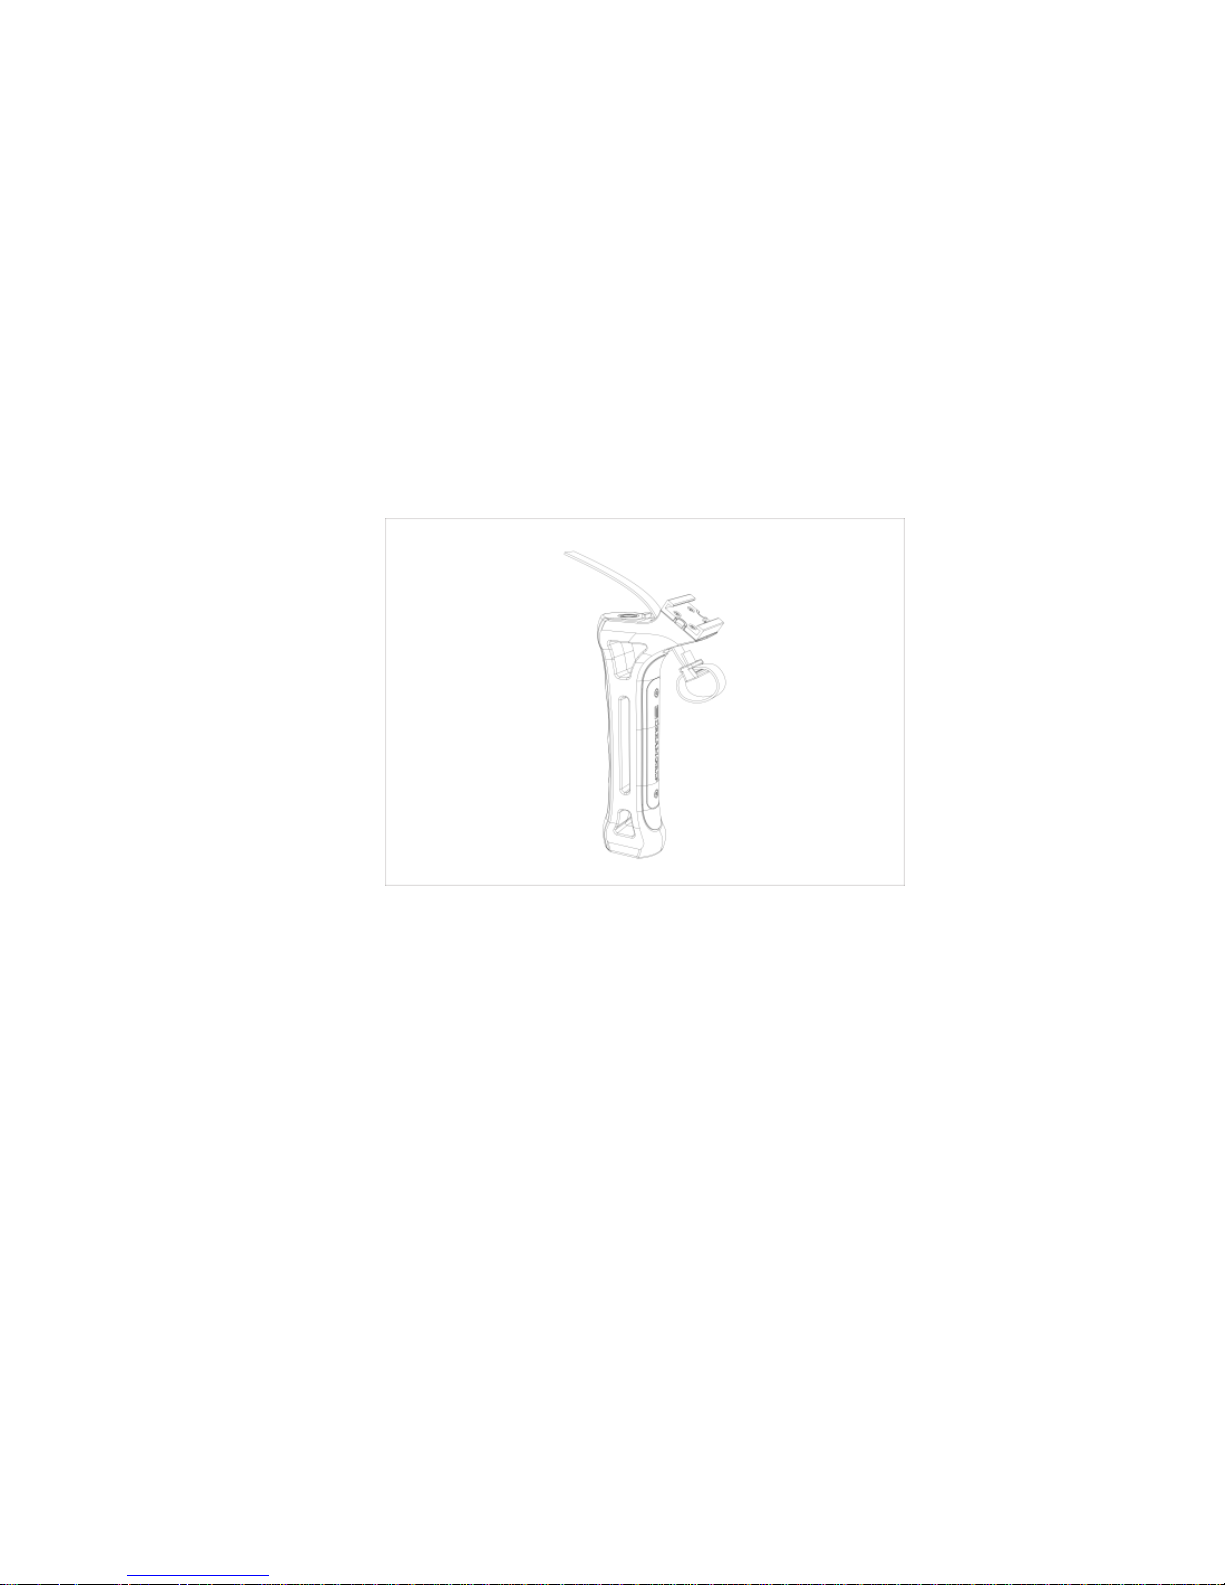
Each of the two Grips has a cavity below the cold shoe platform to fix the Strap
end in it.
To attach the Strap you need to:
- remove the stopper first;
NOTE: Check attentively the default sequence of the locks on both ends of the
strap and the way the ends loop over the Trapeze Stopper before removing it.
- then move the Strap end through the Grip cavity;
- loop the end through the Stopper the same way and pull the strap out with two
ends:
Pic.14. Fixing the Strap with the Trapeze Stopper.
The Stopper will fix the strap tightly in the Grip cavity. Repeat the same operation
to fix the second end. Use the other locks to fix the free end of the Strap.
(vi) Connecting To A Tripod (not included)
You may connect DREAMGRIP™ Evolution Rig to any tripod with the standard
¼” screw that most of tripods have. To do it you may choose one of the following
options:
1) If you use original DREAMGRIP™ Light Tripod - connect the Rig with Track
Connecting Adaptor (not included in the Rig sets). It delivers the best and secure
hold to a tripod head.
2) Connect to the standard ¼” Bolt at the lower Track using the universal female
¼” thread.
3) Use any other ¼” bolt and nut (not included) to have tripod screw tighten
through the Track cavity.
Page 14

14
(vii) Connecting To Other Accessories And Extensions.
The most of photo and video professional accessories can be easily connected to
DREAMGRIP™ Evolution Rig with standard ¼” screws, standard cold shoe
shaped mounts (not included) or even both. Please check the instructions from
the vendor of the accessories and manual for more information. You can also ask
DREAMGRIP™ Customer Support Service at www.dreamgrip.com for
assistance.
IX. CUSTOMER SUPPORT
You can check all the latest information related to any DREAMGRIP™ products, F.A.Q.,
useful advises, tips, and reviews at www.dreamgrip.com. To get the assistance from the
Customer Support you will need to register at the website first.
X. LIMITED WARRANTY
DREAMGRIP™ Evolution Rig has a limited 12 months warranty. To check the Terms
and Conditions and to enable the warranty, please get registered at www.dreamgrip.com.
In some cases you may need to provide the copy of the retail receipt and UID number of
your Rig set.
XI. MORE USEFUL INFORMATION AND LINKS
All the latest tips, news, products, and updates you can find at www.dreamgrip.com. You
are more than welcome to follow DREAMGRIP™ official accounts at social networks
and services as well as to share your own experience of using DREAMGRIP™ Rig. We
appreciate to receive any comments that will help us to make the better products
together to empower everyone with the best tools for creation of high quality photo and
video content.
 Loading...