

Page 1

X-TALK ONE
for Xbox One
TM
User guide
Guide de l'utilisateur
Guía de usuario
www.dreamgear.com
Page 2

Page 3
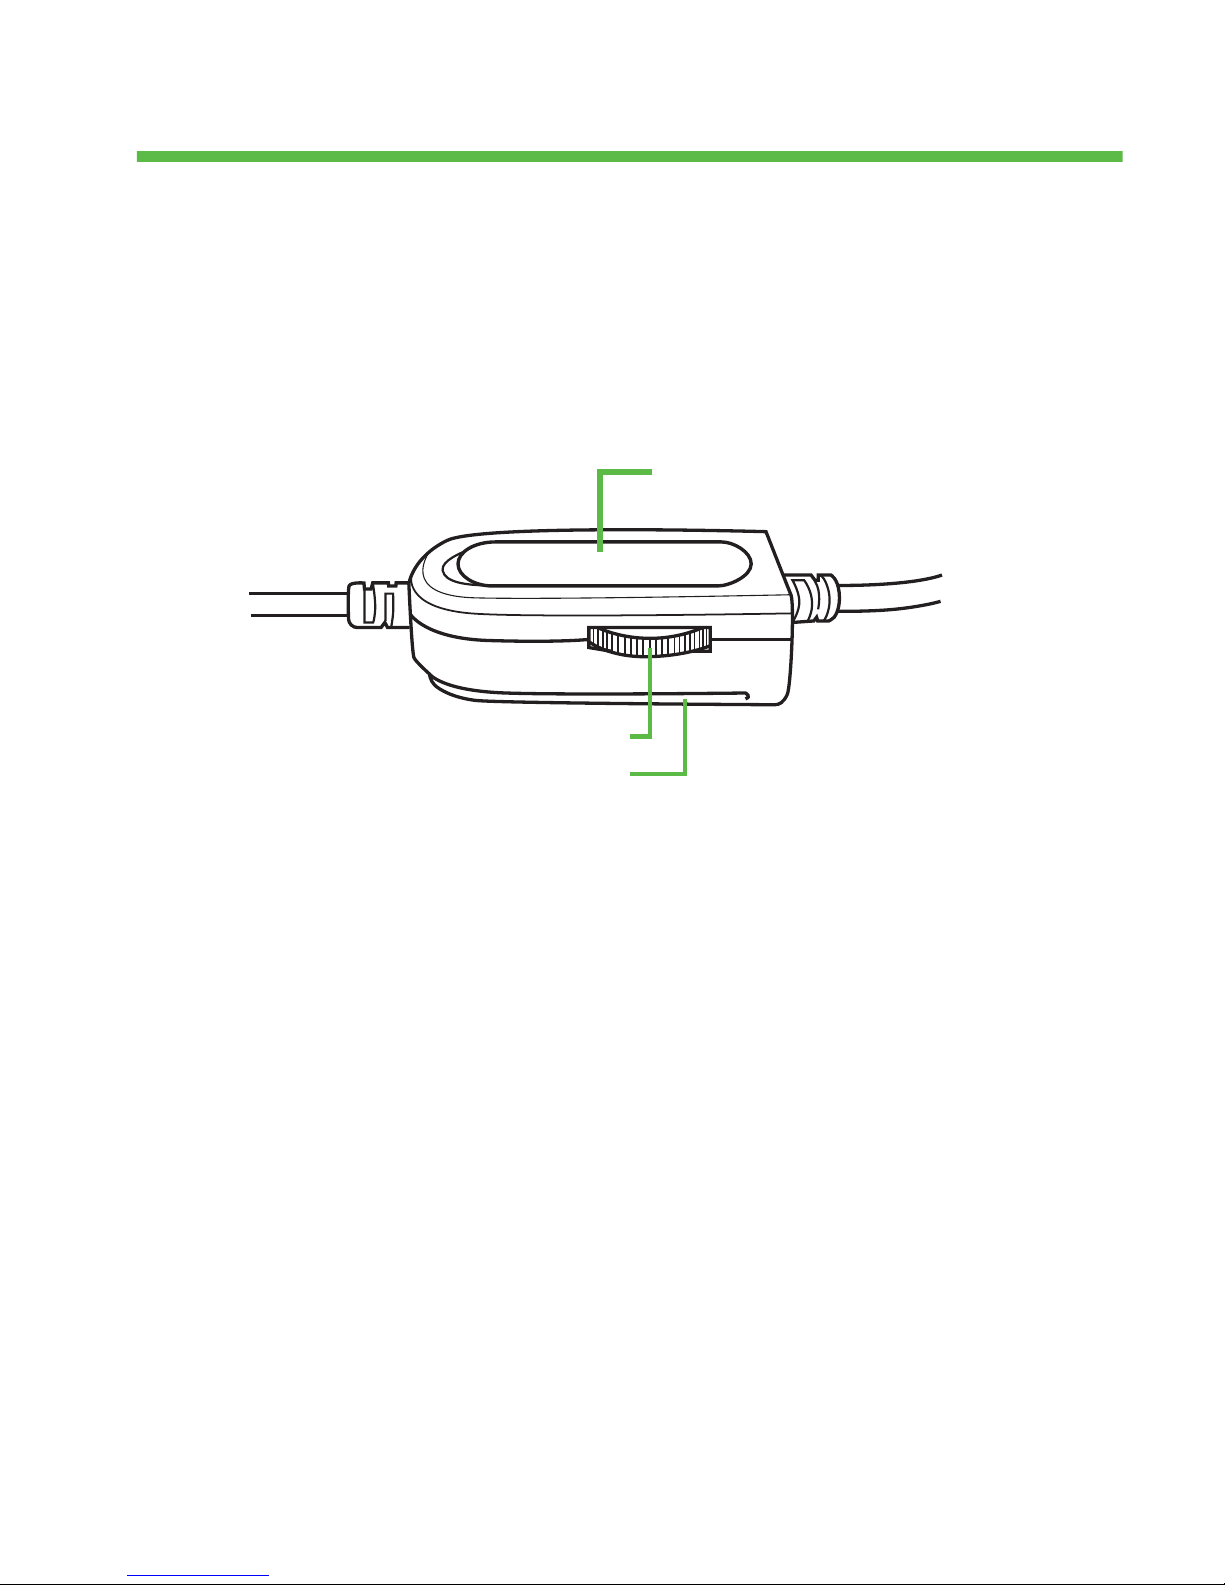
Volume dial
Clip
ENGLISH
Includes
X-Talk One, Xbox 360® adapter cable, and user guide
Please read and follow this user guide thoroughly before using
the X-Talk One.
Technical Specifications
Frequency response: 20 Hz – 20 KHz
Driver size: 40mm
Impedance: 32Ω±15%
Sensitivity: -54±3dB
Max power: 20mW
Cable length: Approx 4 feet
Control box functions
Volume dial
• With the front of the control box facing you, turn the volume dial
counterclockwise to raise the volume.
• With the front of the control box facing you, turn the volume dial
clockwise to lower the volume.
Microphone switch
Page 4

Microphone switch
• To use the microphone, slide the microphone switch upwards. The
switch will show a green color.
• To mute the microphone, slide the microphone switch downwards.
The switch will show a red color.
How to connect your X-Talk One to your Xbox One™
controller with 3.5mm jack
1. Turn down the volume on your X-Talk One to the lowest level.
2. Place the headset on your head and adjust the headband until
the headset fits comfortably. Adjust the microphone to fit properly.
3. Insert the 3.5mm plug of your X-Talk One into the bottom of your
Xbox One
™
controller with 3.5mm jack.
4. Slowly raise the volume to a comfortable level.
5. Refer to the user guide of your Xbox One
™
on how to set up your
headset to work with online play.
How to connect your X-Talk One to your Xbox One™
controller using the Microsoft® Stereo Headset
Adapter (not included)
1. Insert your Microsoft® Stereo Headset Adapter into the bottom
your Xbox One
™
controller.
NOTE: Please refer to the user guide of your Microsoft
®
Stereo
Headset Adapter for connection instructions.
2. Turn down the volume on your X-Talk One to the lowest level.
3. Place the headset on your head and adjust the headband until
the headset fits comfortably. Adjust the microphone to
fit properly.
4. Insert the 3.5mm plug of your X-Talk One into the bottom of your
Microsoft
®
Stereo Headset Adapter.
Page 5

5. Slowly raise the volume to a comfortable level.
6. Refer to the user guide of your Xbox One
™
on how to set up your
headset to work with online play.
How to connect your X-Talk One to your Xbox 360
®
1. Turn down the volume on your X-Talk One to the lowest level.
2. Place the headset on your head and adjust the headband until
the headset fits comfortably. Adjust the microphone to
fit properly.
3. Insert the 2.5mm end of the included Xbox 360
®
adapter cable
into the bottom of your Xbox 360
®
controller.
4. Insert the 3.5mm plug of the X-Talk One into the other end of the
Xbox 360
®
adapter cable.
5. Slowly raise the volume to a comfortable level.
6. Refer to the user guide of your Xbox 360
®
on how to set up the
headset to work with online play.
How to connect your X-Talk One to your
DUALSHOCK® 4 controller
1. Turn down the volume on the X-Talk One to the lowest level.
2. Place the headset on your head and adjust the headband until
the headset fits comfortably. Adjust the microphone to
fit properly.
3. Insert the 3.5mm plug of the X-Talk One into the bottom of the
DUALSHOCK® 4 controller.
4. Slowly raise the volume to a comfortable level.
5. Refer to the user guide of your PS4
™
on how to set up the
headset to work with online play.
How to connect your X-Talk One to your Wii U™
GamePad
1. Turn down the volume on the X-Talk One to the lowest level.
Page 6

2. Place the headset on your head and adjust the headband until
the headset fits comfortably. Adjust the microphone to fit properly.
3. Insert the 3.5mm plug of the X-Talk One into the top of the
Wii U
™
GamePad.
4. Slowly raise the volume to a comfortable level.
5. Refer to the user guide of your Wii U
™
on how to set up the
headset to work with online play.
How to connect your X-Talk One to your PS Vita® or
Nintendo® handheld device
1. Turn down the volume on the X-Talk One to the lowest level.
2. Place the headset on your head and adjust the headband until
the headset fits comfortably. Adjust the microphone to fit properly.
3. Insert the 3.5mm plug of the X-Talk One into your handheld device.
4. Slowly raise the volume to a comfortable level.
5. Refer to the user guide of your handheld on how to set up the
headset to work with online play.
How to connect your X-Talk One to a smartphone
or tablet
1. Turn down your audio device to the lowest level.
2. Place the headset on your head and adjust the headband until
the headset fits comfortably. Adjust the microphone to
fit properly.
3. Insert the 3.5mm plug of the X-Talk One into your smartphone
or tablet.
4. Raise the audio to a comfortable volume on your device and then
adjust the volume on the X-Talk One using the volume dial.
NOTES:
• The volume dial only controls the volume of the headset. Console
and device volume should be adjusted separately.
• Make sure that the X-Talk One is worn properly at all times. Do
Page 7

not place the headset around the back of your head; it must be
worn over the top of your head. Make sure you allow the
microphone to be positioned as close to your mouth as possible for
best voice results.
• When the microphone is switched to “OFF”, other players cannot hear
your conversation, but you will still be able to hear them speaking.
Important safety precautions
• Do not listen at a high volume level. Extended high volume levels
can lead to permanent hearing loss.
• Start with setting the volume level at the lowest volume and adjust
until you reach a comfortable volume level.
• Do not use while sleeping, as accidents may occur.
• If you experience any ringing in your ears, try lowering the
volume. If the ringing persists, visit your physician.
• Tampering with the product can result in damage to your product,
void of warranty, and could cause injuries.
Warranty information
All dreamGEAR products come with a limited warranty and have
been subjected to a thorough series of tests to ensure the highest
level of dependability and compatibility. It is unlikely that you will
experience any problem, but if a defect should become apparent
during the use of this product, dreamGEAR warrants to the original
consumer purchaser that this product will be free from defects in
material and workmanship for a period of 120 days from the date
of your original purchase. If a defect covered by this warranty
occurs, dreamGEAR, at its option, will repair or replace the product
purchased at no charge or refund the original purchase price. If a
replacement is necessary and your product is no longer available, a
comparable product may be substituted at the sole discretion of
dreamGEAR.
Page 8

This warranty does not cover normal wear and tear, abusive use or
misuse, modification, tampering or by any other cause not related
to either materials or workmanship. This warranty does not apply to
products used for any industrial, professional or commercial
purposes.
Service information
For service on any defective product under the 120-day warranty
policy, please contact Consumer Support to obtain a Return
Authorization Number. dreamGEAR reserves the right to require the
return of the defective product and proof of purchase. NOTE:
dreamGEAR will not process any defective claims without a Return
Authorization Number.
Consumer support hotline
877-999-DREAM (3732) (U.S. and Canada only)
or 310-222-1045 (International)
Consumer support email
support@dreamgear.com
Website
www.dreamgear.com
Save a tree, register online
dreamGEAR is making the eco-friendly choice to have all products
registered online. This saves the printing of physical paper
registration cards. All the information you need to register your
recent dreamGEAR purchase is available at:
www.dreamgear.com/product-registration
Page 9

FRANÇAIS
Inclus
X-Talk One, câble adaptateur de la Xbox 360®, et
de l’utilisateur
Veuillez lire et suivre attentivement ce guide d'utilisation avant
d'utiliser le X-Talk One.
Spécifications techniques
Réponse de fréquence : 20 Hz - 20 kHz
Dimensions du moteur de haut-parleur : 40 mm
Impédance : 32 Ω±15%
Sensitivité: -54±3dB
Puissance maximale: 20mW
Longueur du câble: Environ 1,20 m
Fonctions du boîtier de commande
Molette de réglage du volume
• Avec la face avant de la console orientée vers vous, tournez le
bouton du volume dans le sens antihoraire pour augmenter
le volume.
• Avec la face avant de la console orientée vers vous, tournez le
bouton du volume dans le sens horaire pour baisser le volume.
Molette de réglage du volume
Pince
Commutateur du micro
Page 10

Commutateur du micro
• Pour utiliser le micro, poussez le commutateur micro vers le haut. Le
commutateur révèle une couleur verte.
• Pour couper le micro, poussez le commutateur micro vers le bas. Le
commutateur révèle une couleur rouge.
Connexion du X-Talk One à la console Xbox One™
via le connecteur 3,5 mm
1. Baissez le volume de X-Talk One à son plus faible niveau.
2. Placez le casque sur vos oreilles et ajustez le serre-tête jusqu'à
ce que le casque s’y adapte de façon confortable. Ajustez le micro
de manière à ce qu’il soit confortable.
3. Insérez le connecteur 3,5 mm du X-Talk One dans la prise 3,5
mm située en bas de la console Xbox One™.
4. Augmentez lentement le volume jusqu’un niveau confortable.
5. Reportez-vous au guide d’utilisation de votre Xbox One™ pour
savoir comment régler le casque pour jouer en ligne.
Connexion de X-Talk One à votre console Xbox
One™ en utilisant l'adaptateur pour casque stéréo
Microsoft® (non inclus)
1. Branchez votre adaptateur pour casque stéréo Microsoft® en bas
de votre console Xbox One
™
.
REMARQUE: Reportez-vous au guide d’utilisation de votre
adaptateur pour casque stéréo Microsoft
®
pour consulter les
consignes de connexion.
2. Baissez le volume de X-Talk One à son plus faible niveau.
3. Placez le casque sur vos oreilles et ajustez le serre-tête jusqu'à
ce que le casque s’y adapte de façon confortable. Ajustez le micro
de manière à ce qu’il soit confortable.
Page 11

4. Insérez le connecteur 3,5 mm du X-Talk One en bas de
l'adaptateur pour casque stéréo Microsoft
®
.
5. Augmentez lentement le volume jusqu’un niveau confortable.
6. Reportez-vous au guide d’utilisation de votre Xbox One
™
pour
savoir comment régler le casque pour jouer en ligne.
Connexion du X-Talk One à votre Xbox 360
®
1. Baissez le volume de X-Talk One à son plus faible niveau.
2. Placez le casque sur vos oreilles et ajustez le serre-tête jusqu'à
ce que le casque s’y adapte de façon confortable. Ajustez le micro
de manière à ce qu’il soit confortable.
3. Insérez l'extrémité 2,5 mm du câble adaptateur de la Xbox 360
®
inclus en bas de votre console Xbox 360
®
.
4. Insérez le connecteur 3,5 mm du X-Talk One dans l'autre
extrémité du câble adaptateur de la Xbox 360
®
.
5. Augmentez lentement le volume jusqu’un niveau confortable.
6. Reportez-vous au guide d’utilisation de votre Xbox 360
®
pour
savoir comment régler le casque pour jouer en ligne.
Connexion de X-Talk One à la console
DUALSHOCK® 4
1. Baissez le volume de X-Talk One à son plus faible niveau.
3. Placez le casque sur vos oreilles et ajustez le serre-tête jusqu'à
ce que le casque s’y adapte de façon confortable. Ajustez le micro
de manière à ce qu’il soit confortable.
3. Insérez le connecteur 3,5 mm dans le X-Talk One situé en bas de
la console DUALSHOCK® 4.
4. Augmentez lentement le volume jusqu’un niveau confortable.
5. Reportez-vous au guide d’utilisation de votre PS4
™
pour savoir
comment régler le casque pour jouer en ligne.
Page 12

Connexion du X-Talk One à votre Wii U™ GamePad
1. Baissez le volume de X-Talk One à son plus faible niveau.
2. Placez le casque sur vos oreilles et ajustez le serre-tête jusqu'à
ce que le casque s’y adapte de façon confortable. Ajustez le micro
de manière à ce qu’il soit confortable.
3. Insérez le connectée 3,5 mm du X-Talk One en haut de la
Wii U™ GamePad.
4. Augmentez lentement le volume jusqu’un niveau confortable.
5. Reportez-vous au guide d’utilisation de votre Wii U
™
pour savoir
comment régler le casque pour jouer en ligne.
Connexion du X-Talk One à votre console PS Vita®
ou Nintendo
®
1. Baissez le volume de X-Talk One à son plus faible niveau.
2. Placez le casque sur vos oreilles et ajustez le serre-tête jusqu'à
ce que le casque s’y adapte de façon confortable. Ajustez le micro
de manière à ce qu’il soit confortable.
3. Insérez le connectée 3,5 mm du X-Talk One dans votre appareil
portable.
4. Augmentez lentement le volume jusqu’un niveau confortable.
5. Reportez-vous au guide d’utilisation de votre appareil portable
pour savoir comment régler le casque pour jouer en ligne.
Connexion du X-Talk One à un smartphone ou
une tablette
1. Baissez le volume de votre appareil audio au maximum.
2. Placez le casque sur vos oreilles et ajustez le serre-tête jusqu'à
ce que le casque s’y adapte de façon confortable. Ajustez le micro
de manière à ce qu’il soit confortable.
3. Insérez le connecteur 3,5 mm du X-Talk One dans votre
smartphone ou tablette.
4. Augmentez le volume jusqu’à atteindre un niveau confortable sur
votre appareil, puis réglez le volume sur le X-Talk One à l’aide de
Page 13

la molette de réglage.
REMARQUES:
• Le bouton volume ne permet que le réglage du volume du casque.
Le volume de l'appareil ou de la console doit être réglé autrement.
• Veillez à ce qu'à tout moment le casque X-Talk One soit porté
correctement. Ne mettez pas le casque à l'arrière de votre tête, il
doit être placé au-dessus. Pour obtenir les meilleurs effets sonores il
faut que le micro soit le plus près de votre bouche.
• Lorsque le micro est coupé « OFF », les autres joueurs ne peuvent
pas entendre votre conversation, mais vous pouvez les entendre.
Consignes de sécurité importantes
• N’écoutez pas à volume élevé. Une écoute prolongée à un volume
élevé peut provoquer une perte d’audition permanente.
• Commencez toujours par écouter à un faible volume puis
augmentez progressivement le volume jusqu'à un niveau
d'écoute confortable.
• Ne pas utiliser en dormant car des accidents pourraient
se produire.
• Si vous ressentez un bourdonnement dans les oreilles, essayez de
baisser le volume. Si le bourdonnement persiste, consultez
votre médecin.
• Toute modification non autorisée du produit risque de l’endommager, annule la garantie, et pourrait causer des blessures.
Informations sur la garantie
Tous les produits dreamGEAR offrent une garantie limitée et ont été
soumis à toute une série de tests pour assurer un plus haut niveau
de fiabilité et de compatibilité. Dans le cas, peu probable, d'avoir
un problème, l'appareil tombe en panne, dreamGEAR garantit à
l'acheteur initial que cet appareil est exempt de défauts de
matériaux et de fabrication pendant une période de 120 jours à
Page 14

compter de la date d'achat initial. Si une défaillance couverte par
cette garantie se produit, dreamGEAR, à sa discrétion, répare ou
remplace gratuitement l'appareil acheté ou vous rembourse le
montant du prix d'achat. Si un remplacement est nécessaire mais le
produit n'est plus disponible, un appareil comparable, à la seule
discrétion de dreamGEAR, sera fourni.
Cette garantie ne couvre pas les défaillances dues à l'usure
normale, usage abusif, mauvaise utilisation, modification, altération
ou toute autre cause sans rapport avec les matériaux ou la
fabrication. Cette garantie ne s'applique pas aux produits utilisés à
des fins industrielles, professionnelles ou commerciales.
Informations sur les services
Pour toute réparation d'un produit défectueux couvert par une
garantie de 120 jours, contactez le Service à la clientèle pour
obtenir un numéro d'autorisation de retour. dreamGEAR se réserve
le droit d'exiger le retour du produit défectueux et une preuve d'achat.
REMARQUE: dreamGEAR ne satisfait aucune demande de
réparation sans numéro d'autorisation de retour.
Ligne d’assistance à la clientèle
877-999-DREAM (3732) (USA et Canada seulement)
ou 310-222-1045 (International)
Email assistance à la clientèle
support@dreamgear.com
Site web
www.dreamgear.com
Sauvez un arbre, inscrivez-vous en ligne
dreamGEAR fait un choix écologique en exigeant que tous ses
Page 15

produits soient enregistrés en ligne. Ainsi plus de cartes d'enregistrement en papier, donc plus de sauvegarde de ressources
naturelles. Toutes les informations nécessaires à l’enregistrement de
votre achat récent dreamGEAR est disponible sur:
www.dreamgear.com/product-registration
Page 16

ESPAÑOL
Incluye
X-Talk One, cable adaptador de la Xbox 360®, y guía de usuario
Lea detenidamente y cumpla con esta guía de usuario antes de
usar el X-Talk One.
Especificaciones técnicas
Respuesta de frecuencia: 20 Hz – 20 kHz
Tamaño del Cono transductor: 40 mm
Impedancia: 32Ω±15%
Sensibilidad: -54±3dB
Potencia máxima: 20mW
Longitud del cable: Aproximadamente 1.21 m
Funciones del cuadro de control
Dial de volumen
• Con el frente de la caja de control mirando hacia usted, gire el
dial del volumen hacia la izquierda para aumentarlo.
•Con el frente de la caja de control mirando hacia usted, gire el
dial del volumen hacia la derecha para bajarlo.
Dial de volumen
Clip
Interruptor del micrófono
Page 17

Interruptor del micrófono
• Para utilizar el micrófono, deslice el interruptor del micrófono
hacia arriba. El interruptor encenderá una luz de color verde.
• Para silenciar el micrófono, deslice el interruptor del micrófono
hacia abajo. El interruptor encenderá una luz de color rojo.
Cómo conectar el X-Talk One al controlador de su
Xbox One™ con el conector de 3.5 mm
1. Baje el volumen del X-Talk One al mínimo.
2. Coloque el auricular en su cabeza y ajuste la vincha hasta que
la sienta cómoda. Ajuste el micrófono de manera que se adapte
correctamente a su preferencia.
3. Inserte el conector de 3.5 mm del X-Talk One en la parte inferior
del controlador de la Xbox One™.
4. Aumente el volumen lentamente hasta un nivel agradable.
5. Remítase a la guía de usuario de su Xbox One
™
para conocer
cómo configurar el auricular para utilizarlo en juegos en línea.
Cómo conectar el X-Talk One al controlador de su
Xbox One™ mediante el adaptador para auriculares
estéreo de Microsoft® (no incluido)
1. Conecte el adaptador para auriculares estéreo de Microsoft® en
la parte inferior del controlador de su Xbox One
™
NOTA: Por favor, remítase a la guía de usuario del adaptador
para auriculares estéreo de Microsoft
®
para obtener las
instrucciones de conexión.
2. Baje el volumen del X-Talk One al mínimo.
3. Coloque el auricular en su cabeza y ajuste la vincha hasta que
la sienta cómoda. Ajuste el micrófono de manera que se adapte
correctamente a su preferencia.
Page 18

4. Inserte el conector de 3.5 mm del X-Talk One en la parte inferior
del adaptador para auriculares estéreo de Microsoft
®
.
5. Aumente el volumen lentamente hasta un nivel agradable.
6. Remítase a la guía de usuario de su Xbox One
™
para conocer
cómo configurar el auricular para utilizarlo en juegos en línea.
Cómo conectar el X-Talk One a su Xbox 360
®
1. Baje el volumen del X-Talk One al mínimo.
2. Coloque el auricular en su cabeza y ajuste la vincha hasta que
la sienta cómoda. Ajuste el micrófono de manera que se adapte
correctamente a su preferencia.
3. Inserte el extremo de 2.5 mm del cable adaptador incluido de la
Xbox 360® en la parte inferior del controlador de la Xbox 360®.
4. Inserte el conector de 3.5 mm del X-Talk One en el otro extremo
del cable adaptador de la Xbox 360
®
.
5. Aumente el volumen lentamente hasta un nivel agradable.
6. Remítase a la guía de usuario de su Xbox 360
®
para conocer
cómo configurar el auricular para utilizarlo en juegos en línea.
Cómo conectar el X-Talk One al controlador
DUALSHOCK® 4
1. Baje el volumen del X-Talk One al mínimo.
2. Coloque el auricular en su cabeza y ajuste la vincha hasta que
la sienta cómoda. Ajuste el micrófono de manera que se adapte
correctamente a su preferencia.
3. Inserte el conector de 3.5 mm del X-Talk One en la parte inferior
del controlador DUALSHOCK® 4.
4. Aumente el volumen lentamente hasta un nivel agradable.
5. Remítase a la guía de usuario de su PS4
™
para conocer cómo
configurar el auricular para utilizarlo en juegos en línea.
Page 19

Cómo conectar el X-Talk One al mando para de la
Wii U™ GamePad
1. Baje el volumen del X-Talk One al mínimo.
2. Coloque el auricular en su cabeza y ajuste la vincha hasta que
la sienta cómoda. Ajuste el micrófono de manera que se adapte
correctamente a su preferencia.
3. Inserte el conector de 3.5 mm del X-Talk One en la parte
superior del mando para de la Wii U™ GamePad.
4. Aumente el volumen lentamente hasta un nivel agradable.
5. Remítase a la guía de usuario de su Wii U
™
para conocer cómo
configurar el auricular para utilizarlo en juegos en línea.
Cómo conectar el X-Talk One a su dispositivo PS
Vita® o Nintendo
®
1. Baje el volumen del X-Talk One al mínimo.
2. Coloque el auricular en su cabeza y ajuste la vincha hasta que
la sienta cómoda. Ajuste el micrófono de manera que se adapte
correctamente a su preferencia.
3. Inserte el conector de 3.5 mm del X-Talk One en su teléfono.
4. Aumente el volumen lentamente hasta un nivel agradable.
5. Remítase a la guía de usuario de su teléfono para conocer cómo
configurar el auricular para utilizarlo en juegos en línea.
Cómo conectar el X-Talk One a un teléfono inteligente o a una tableta
1. Baje el dispositivo de audio a su nivel más bajo.
2. Coloque el auricular en su cabeza y ajuste la vincha hasta que
la sienta cómoda. Ajuste el micrófono de manera que se adapte
correctamente a su preferencia.
3. Inserte el conector de 3.5 mm del X-Talk One en su teléfono
inteligente o en su tableta.
4. Aumente el volumen en su dispositivo a un nivel agradable y
Page 20

luego ajuste el volumen del X-Talk One con el dial.
NOTAS:
• El dial sólo controla el volumen del auricular. Los volúmenes de la
consola y del dispositivo se deben ajustar de forma separada.
• Asegúrese de que el X-Talk One esté bien colocado en todo
momento. No coloque el auricular en la parte posterior de su
cabeza; está diseñado para usarse en la parte superior de la
cabeza. Asegúrese de colocar el micrófono lo más cerca posible a
su boca para obtener los mejores resultados.
• Cuando el micrófono está en la posición "OFF", los otros
jugadores no podrán escuchar su voz pero usted podrá escuchar lo
que ellos digan.
Precauciones importantes de seguridad
• No escuche a un nivel de volumen elevado. Unos niveles de
volumen alto prolongados pueden provocar una pérdida
permanente de audición.
• Empiece fijando el nivel de volumen al volumen más bajo y
ajústelo hasta que alcance un nivel de volumen cómodo.
• No lo use mientras duerme ya que se pueden producir accidentes.
• Si experimenta cualquier pitido en los oídos, pruebe a bajar el
volumen. Si el pitido persiste, visite a su facultativo.
• Cualquier alteración del producto le podría causar daños al
producto, invalidar la garantía y provocar lesiones.
Información sobre la garantía
Todos los productos dreamGEAR incluyen una garantía limitada y
han sido sometidos a una serie minuciosa de pruebas para
asegurar el nivel más alto de confiabilidad y compatibilidad. Es
poco probable que experimente algún problema, pero si existiese
algún defecto evidente durante el uso de este producto,
dreamGEAR garantiza al comprador original que este producto
Page 21

estará libre de defectos de materiales y de mano de obra por un
período de 120 días a partir de la fecha de su compra original. En
caso de que exista un defecto bajo esta garantía, dreamGEAR,
según su criterio, reparará o reemplazará el producto adquirido sin
cargo o reembolsará el precio de compra original. Si fuera
necesario un reemplazo y su producto ya no está disponible, un
producto similar puede sustituirlo a criterio exclusivo de
dreamGEAR.
Esta garantía no cubre el desgaste normal, el uso abusivo o mal
uso, modificación, alteración o por cualquier otra causa no
relacionada con cualquiera de los materiales o la mano de obra.
Esta garantía no es válida si se utilizan los productos para fines
industriales, profesionales o comerciales.
Información de reparación
Para el servicio en cualquier producto defectuoso bajo la política
de garantía de 120 días, contáctese con atención al consumidor
para obtener un número de autorización de devolución.
dreamGEAR se reserva el derecho de exigir la devolución del
producto defectuoso y un comprobante de compra. NOTA:
dreamGEAR no procesará ninguna reclamación de productos
defectuoso sin un Número de Autorización de Devolución.
Línea de atención al consumidor
877-999-DREAM (3732) (solo en EE:UU: y Canadá )
ó 310-222-1045 (desde el resto del mundo)
Correo electrónico de atención al consumidor
support@dreamgear.com
Sitio web
www.dreamgear.com
Page 22

Salve un árbol, regístrese en línea
dreamGEAR hace una elección respetuosa con el medioambiente al
hacer el registro de sus productos en línea. Esto ahorra la impresión
de tarjetas de registro en papel físico. Toda la información que
necesita para registrar su compra reciente dreamGEAR está
disponible en: www.dreamgear.com/product-registration
Page 23

Page 24

www.dreamgear.com
 Loading...