

Page 1

www.dreamgear.com
with 220 Games
User guide
Manuel de l'utilisateur
Guía de usuario
Page 2

Page 3
ENGLISH
Includes
Go Gamer and user guide
Materials needed (not included)
3 “AAA” baeries, mini-screwdriver, and 2.5mm to AV cable
(optional for use with television)
Please read and follow this user guide thoroughly before
using the Go Gamer.
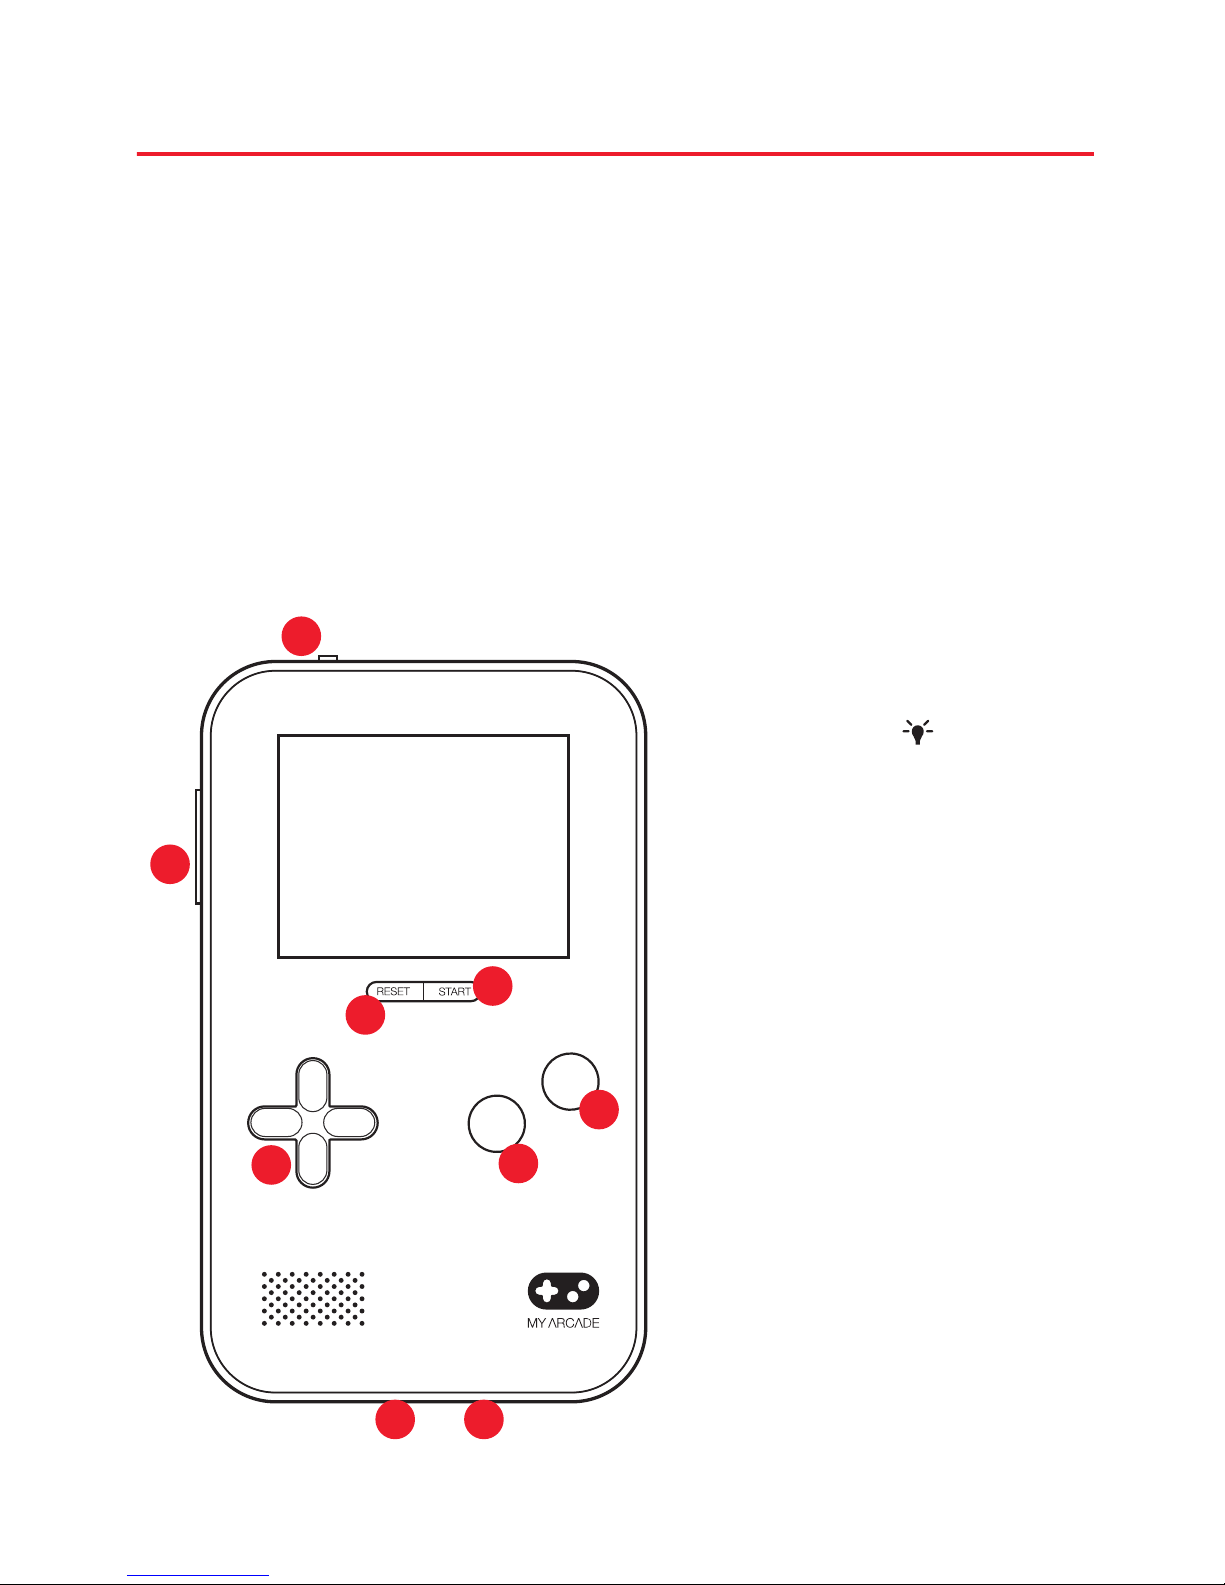
ON/OFF/ switch
1.
2. Volume buons
3. Reset buon
4. Start buon
5. D-pad
6. A buon
7. B buon
8. AV OUT
9. AUX OUT
B
A
1
2
3
6
4
5
7
8
9
Page 4

Buon functions
ON/OFF/ switch
• Turns the device and device LED “ON” and “OFF”.
Volume buons
• Press and release the plus (+) buon to raise the volume.
• Press and release the minus (-) buon to lower the volume.
Start buon
• Press and release to pause a game.
Reset buon
• Press and release to return to the main menu with list of games.
D-pad
• Press and release arrows to select a game om the main menu.
• During game play, press arrows for directional movement.
A and B buons
• Press and release for game play.
NOTE: The A and B buon functions may vary per game.
Inserting the baeries
1. Remove the screw om the back of the Go Gamer with a
mini-screwdriver (not included).
2. Gently remove the baery cover of the Go Gamer.
3. Insert 3 “AAA” baeries (not included) and replace the
baery cover of the Go Gamer and screw.
Playing on the Go Gamer
1. Move the switch located on the top of the system om
“OFF” to “ON” to turn on the system or move switch to the
Page 5

“ ” to illuminate the device LEDs.
2. The main screen will display.
2. Use the D-pad arrows to select a game.
NOTE: All directions of the D-pad can be used to help select a
game.
4. Press the A buon to play the game.
5. To return to the main menu to play a new game press and
release the reset buon.
NOTE: The Go Gamer has an AUX OUT port on the boom of
the device for use with headsets that have a 3.5mm auxiliary
connector.
Seing up your Go Gamer with a television
1. With a 2.5mm to AV cable (not included), plug the 2.5mm
end of the cable into the port on the boom of the Go Gamer
labeled “AV OUT”.
2. Locate the audio (white) and video (yellow) inputs on your
television.
3. Plug the video (yellow) side of the AV cable into your
television’s video input.
4. Plug the audio (white) side of the AV cable into your
television’s audio input.
5. Conrm your video display is set to the proper video input.
For example, if you plug the Go Gamer into your television’s
input 2 port, switch your television to the same input 2.
6. Move the switch located on the top of the system om
“OFF” to “ON” to turn on the system or move switch to the
“ ” to illuminate the device LEDs.
7. The main screen will display on the television.
Page 6

NOTES:
• Check your television user guide for instruction for inputs.
• The volume buons only control the volume of the Go
Gamer. Television volume should be adjusted separately.
Troubleshooting
Issue: My Go Gamer doesn’t turn on.
Solution: Make sure that you have new baeries installed
properly and securely in your Go Gamer.
Issue: The games won’t show up on my television screen.
Solution: Make sure of the following:
• The AV cable is not damaged and contacts on both ends are
not damaged or compromised.
• The AV cable is properly and securely plugged into the TV.
• The TV is on the proper input (the input should match the
seing on where the plugs are plugged into. Refer to your
television’s user guide for instruction for inputs).
• The AV cable and the TV ports are ee om dust and debris.
Issue: I have my headphones plugged in but cannot hear
anything.
Solution: Make sure of the following:
• Make sure you are plugged into the AUX OUT port on the
boom of the Go Gamer.
• Make sure the volume of your Go Gamer and headset is
turned up.
Baery information
Leakage of baery acid can cause personal injury as well as
damage to your controller. If baery leakage occurs,
thoroughly wash the aected skin and clothes. Keep baery
acid away om your eyes and mouth. Leaking baeries may
Page 7

make popping sounds.
To avoid baery leakage
• Baeries should be installed and replaced only by an adult.
• Do not mix used and new baeries (replace all baeries at
the same time).
• Do not mix dierent brands of baeries.
• Do not mix alkaline, standard (carbon-zinc) or rechargeable
(nickel cadmium) baeries.
• Do not leave baeries in the product for long periods of
non-use.
• Remove baeries and store them in a cool, dry place when
not in use.
• Remove depleted baeries om the unit.
• Do not put the baeries in backwards. Make sure that the
positive (+) and negative (-) ends are facing in the correct
direction. Insert the negative end rst.
• Do not use damaged, deformed or leaking baeries.
• Do not short circuit baery terminals.
• Dispose baeries only at the government approved recycling
facilities in your area.
• Tampering with the product can result in damage to your
product, void of warranty and could cause injuries.
FCC information
This equipment has been tested and found to comply with the
limits for a Class B Digital Device, pursuant to Part 15 of the FCC
Rules. These limits are designed to provide reasonable protection
against harmful interference in a residential installation. This
equipment generates, uses, and can radiate radio equency
energy and, if not installed and used in accordance with the
instructions, may cause harmful interference to radio
communications. However, there is no guarantee that
Page 8

interference will not occur in a particular installation.
If this equipment does cause harmful interference to radio or
television reception, which can be determined by turning the
equipment o and on, the user is encouraged to try to correct
the interference by one or more of the following measures:
• Reorient or relocate the receiving antenna.
• Increase the distance between the equipment and receiver.
• Connect the equipment to an outlet on a circuit dierent
om that to which the receiver is connected.
• Consult the dealer or an experienced radio/TV technician
for help.
This equipment complies with Part 15 of the FCC Rules.
Operation is subject to the following two conditions:
1. This equipment may not cause harmful interference.
2. This equipment must accept any interference received,
including interference that may cause undesired operation.
Modications not authorized by the manufacturer may void
the user’s authority to operate this device. This equipment
complies with FCC RF radiation exposure limits set forth for an
uncontrolled environment. This transmier must not be
co-located or operating in conjunction with any other antenna
or transmier.
Warranty information
All dreamGEAR products come with a limited warranty and
have been subjected to a thorough series of tests to ensure
the highest level of dependability and compatibility. It is
unlikely that you will experience any problem, but if a defect
should become apparent during the use of this product,
Page 9

dreamGEAR warrants to the original consumer purchaser that
this product will be ee om defects in material and
workmanship for a period of 120 days om the date of your
original purchase. If a defect covered by this warranty occurs,
dreamGEAR, at its option, will repair or replace the product
purchased at no charge or refund the original purchase price. If
a replacement is necessary and your product is no longer
available, a comparable product may be substituted at the sole
discretion of dreamGEAR.
This warranty does not cover normal wear and tear, abusive
use or misuse, modication, tampering or by any other cause
not related to either materials or workmanship. This warranty
does not apply to products used for any industrial,
professional or commercial purposes.
Service information
For service on any defective product under the 120-day warranty
policy, please contact Consumer Support to obtain a Return
Authorization Number. dreamGEAR reserves the right to require
the return of the defective product and proof of purchase.
NOTE: dreamGEAR will not process any defective claims without
a Return Authorization Number.
Consumer support hotline
877-999-DREAM (3732) (U.S. and Canada only)
or 310-222-1045 (International)
Consumer support email
support@dreamgear.com
Website
www.dreamgear.com
Page 10

Save a tree, register online
dreamGEAR is making the eco-iendly choice to have all
products registered online. This saves the printing of physical
paper registration cards. All the information you need to
register your recent dreamGEAR purchase is available at:
www.dreamgear.com/product-registration
Page 11

Inclus
Go Gamer et manuel de l’utilisateur
Équipement nécessaire (non inclus)
3 piles « AAA », mini-tournevis, câble AV de 2,5 mm (en option
pour une utilisation avec un téléviseur)
Veuillez lire aentivement le présent manuel de l’utilisateur
avant d’utiliser le Go Gamer.
FRANÇAIS
Interrupteur ON/OFF/
1.
2. Touches de volume
3. Bouton de réinitialisation
4. Bouton démarrer
5. Pavé directionnel
6. Boutons A
7. Boutons B
8. AV OUT
9. AUX OUT
B
A
1
2
3
6
4
5
7
8
9
Page 12

Fonctions des boutons
Interrupteur ON/OFF/
• Permet d’Allumer/Éteindre l'appareil et la lumière DEL.
Touches de volume
• Appuyez sur la touche plus (+) pour augmenter le volume.
• Appuyez sur la touche moins (-) pour diminuer le volume.
Bouton démarrer
• Appuyez dessus pour suspendre le jeu.
Bouton de réinitialisation
• Appuyez dessus pour retourner au menu principal avec la
liste de jeux.
Pavé directionnel
• Utilisez les touches échées pour sélectionner un jeu à partir
du menu principal.
• Pendant le jeu, utilisez les touches échées pour se déplacer.
Boutons A et B
• Appuyez dessus pendant un jeu pour marquer.
REMARQUE: Les fonctions des Boutons A et B peuvent varier
selon le jeu.
Insertion des piles
1. Utilisez un mini-tournevis (non inclus) pour retirer la vis
située à l'arrière de Go Gamer.
2. Retirez avec précaution le panneau arrière de Go Gamer.
3. Insérez 3 piles « AAA » (non fournies) puis remeez le
panneau arrière de Go Gamer et la vis.
Page 13

Jouer sur le Go Gamer
1. Déplacez l'interrupteur situé à l'arrière du système de «OFF»
à «ON» pour allumer le système ou sur « » pour allumer
lumière DEL.
2. L'écran principal apparaît.
3. Utilisez les touches échées du pavé directionnel pour
sélectionner un jeu.
REMARQUE: Vous pouvez utiliser toutes les touches échées
du pavé directionnel pour sélectionner un jeu.
4. Appuyez sur le bouton A pour commencer le jeu.
5. Pour retourner au menu principal et sélectionner un
nouveau jeu, appuyez sur le bouton de réinitialisation.
REMARQUE: Go Gamer est équipé d'un port AUX OUT situé en
bas, pouvant servir à un casque via un connecteur auxiliaire
3,5 mm.
Utilisation de Go Gamer avec un téléviseur
1. Branchez le connecteur 2,5 mm d’un câble AV (non fourni)
dans le port « AV OUT » situé en haut de Go Gamer.
2. Localisez les entrées audio (blanc) et vidéo (jaune) sur votre
téléviseur.
3. Branchez le côté vidéo (jaune) du câble AV dans l'entrée
vidéo de votre téléviseur.
4.Branchez le côté audio (blanc) du câble AV dans l'entrée
audio de votre téléviseur.
5. Vériez que votre téléviseur est réglé sur le bon canal vidéo.
Par exemple, si vous branchez Go Gamer dans le port d'entrée
de votre téléviseur, réglez votre téléviseur sur la même entrée 2.
6. Déplacez l'interrupteur situé à l'arrière du système de «OFF»
à «ON» pour allumer le système ou sur « » pour allumer
Page 14

lumière DEL.
7. L'écran principal apparaît.
REMARQUE:
• Consultez le manuel d’utilisation de votre téléviseur pour plus
d’informations sur les entrées.
• Les boutons de volume ne permeent de régler que le
volume de Go Gamer. Le volume du téléviseur doit être réglé
séparément.
Dépannage
Problème: Go Gamer ne s’allume pas.
Solution: Assurez-vous que vous avez des piles neuves
installées correctement dans Go Gamer.
Problème: Les jeux ne s'achent pas sur l'écran de mon
téléviseur.
Solution: Vériez les points suivants:
• Le câble AV n’est pas endommagé et les contacts des deux
extrémités ne sont pas endommagés ou sales.
• Le câble AV doit être correctement branché dans le téléviseur.
• Assurez-vous que le téléviseur est réglé sur le bon canal (le
canal doit correspondre à celui de la console. Reportez-vous au
guide d’utilisation de votre téléviseur pour plus d’informations
sur les entrées).
• Le câble AV et les ports du téléviseur doivent être exempts de
poussière et de débris.
Problème: Mon casque est branché, mais je n’entends rien
du tout.
Solution: Vériez les points suivants:
• Assurez-vous que vous êtes branché dans le port AUX OUT
situé en bas de Go Gamer.
Page 15

• Assurez-vous que le volume de votre casque et celui de Go
Gamer est réglé correctement.
• Ni l’un ni l’autre des contacts du câble AV n’est endommagé.
Information sur la pile
La fuite d’acide sulfurique peut causer des blessures et
endommager la commande. En cas de fuite, lavez soigneusement la peau et les vêtements touchés. Éloignez l’acide
sulfurique des yeux et de la bouche. Les piles qui fuient
peuvent faire des bruits secs.
Pour éviter que les piles fuient
• Les piles ne devraient être insérées et remplacées que par
n adulte.
• Ne mélangez pas des piles usagées avec des piles neuves
(replacez toutes les piles en même temps).
• Ne mélangez pas des piles de diérentes marques.
• Ne mélangez pas des piles alcalines, standards (carbone-zinc)
ou rechargeables (nickel cadmium).
• Ne laissez pas les piles dans le produit durant de longues
périodes de non-utilisation.
• Enlevez les piles et entreposez-les dans un endroit ais et sec
lorsqu’elles ne sont pas utilisées.
• Enlevez les piles épuisées de l’appareil.
• N’insérez pas les piles à l’envers. Assurez-vous que les pôles
positif (+) et négatif (-) sont orientés correctement. Insérez le
pôle négatif en premier.
• N’utilisez pas des piles endommagées, des piles déformées ou
des piles qui fuient.
• Ne court-circuitez pas les bornes de la pile.
• Jetez les piles uniquement aux installations de recyclage
approuvées par le gouvernement de votre région.
• Le fait de modier le produit peut endommager votre
Page 16

produit, annuler la garantie et causer des blessures.
Renseignements de la FCC
L’équipement a été mis à l’essai et déclaré conforme aux
limites d’un appareil numérique de catégorie B, conformément
à la partie 15 des règles de la FCC. Ces limites sont conçues
pour oir une protection raisonnable contre une interférence
nuisible dans une installation résidentielle. Cet équipement
produit, utilise et peut émere de l’énergie de équence radio,
et s’il n’est pas installé et utilisé conformément aux instructions, peut perturber les communications radio. Cependant,
rien ne garantit qu’il n’y aura pas d’interférence dans une
installation particulière.
Si l’équipement produit une interférence nuisible à la réception
de programmes de radio ou de télévision, qu’on peut
déterminer en meant en marche et en arrêtant l’équipement,
l’utilisateur est encouragé à tenter de corriger l’interférence en
prenant au moins une des mesures suivantes :
• Réorientez ou déplacez l’antenne de réception;
• Augmentez la distance entre l’équipement et le récepteur;
• Branchez l’équipement dans une prise d’un circuit diérent
de celui du récepteur;
• Consultez le concessionnaire ou un technicien chevronné se
spécialisant en radio/TV.
L’équipement se conforme à la partie 15 des règles de la
FCC. Son fonctionnement est assujei aux deux
conditions suivantes :
1. L’équipement ne doit pas cause une interférence nuisible;
2. L’équipement doit accepter toute interférence reçue, y
compris l’interférence qui peut entraîner un
Page 17

fonctionnement indésirable.
Les modications non autorisées par le fabricant peuvent
annuler le droit d’utiliser cet appareil. Cet équipement respecte
les limites d’exposition aux rayonnements RF de la FCC établies
pour un milieu non contrôlé. Cet émeeur ne doit pas être
installé ou utilisé conjointement avec une autre antenne ou un
autre émeeur.
Renseignements sur la garantie
Tous les produits dreamGEAR sont assortis d’une garantie
limitée et ont été soumis à une série de tests pour assurer la
meilleure abilité et la meilleure compatibilité. Il est peu
probable que vous ayez un problème, mais si un défaut se
manifeste pendant l’utilisation du produit, dreamGEAR garantit
à l’acheteur initial que le produit est exempt de tout défaut de
matériel et de fabrication pour une période de 120 jours à
partir de la date d’achat. En cas de défaut couvert par la
présente garantie, dreamGEAR, à son choix, réparera ou
remplacera gratuitement le produit acheté ou remboursera le
prix d’achat original. Si le produit doit être remplacé et qu’il
n’est plus en vente, dreamGEAR, à sa seule discrétion, peut le
remplacer par un produit comparable.
La présente garantie ne couvre pas l’usure normale, la
mauvaise utilisation, la modication, l’altération ou toute autre
cause non liée au matériel ou à la fabrication. La présente
garantie ne s’applique pas aux produits utilisés à des ns
industrielles, professionnelles ou commerciales.
Service information
Pour la réparation d’un produit défectueux pendant la période
de 120 jours de la politique de garantie, veuillez communiquer
avec le soutien aux consommateurs an d’obtenir un numéro
Page 18

d’autorisation de retour. dreamGEAR se réserve le droit
d’exiger le retour du produit défectueux et d’une
preuve d’achat.
REMARQUE: dreamGEAR ne traitera pas les réclamations liées
aux défectuosités sans numéro d’autorisation de retour.
Ligne directe au soutien aux consommateurs
877-999-DREAM (3732) (É.-U. et Canada uniquement)
ou 310-222-1045 (International)
Courriel de soutien aux consommateurs
support@dreamgear.com
Site Web
www.dreamgear.com
Sauvez un arbre, enregistrez-vous en ligne.
dreamGEAR fait un choix écologique en demandant à ce que
tous les produits soient enregistrés en ligne. Cela évite
l’impression des cartes d’enregistrement papier. Tous les
renseignements dont vous avez besoin pour enregistrer votre
achat récent d’un produit dreamGEAR sont achés à l’adresse:
www.dreamgear.com/product-registration
Page 19

Incluye
Go Gamer y guía del usuario
Materiales necesarios (no se incluyen)
3 baterías “AAA”, destornillador pequeño y cable conversor de
2.5 mm a AV (opcional para usar con el televisor)
Lea y siga minuciosamente esta guía del usuario antes de
usar la Go Gamer.
ESPAÑOL
Interruptor de
ENCENDIDO (ON/OFF/ )
1.
2. Botones de volumen
3. Botón de reinicio
4. Botón de inicio
5. Mando de dirección (D-pad)
6. Botones A
7. Botones B
8. AV OUT
9. AUX OUT
B
A
1
2
3
6
4
5
7
8
9
Page 20

Funciones de los botones
Interruptor de ENCENDIDO (ON/OFF/ )
• Permet d’Allumer/Éteindre l'appareil et la lumière DEL.
Botones de volumen
• Presione y suelte el botón más (+) para subir el volumen.
• Presione y suelte el botón menos (-) para bajar el volumen.
Botón de inicio
• Presione y suelte este botón para pausar
un juego.
Botón de reinicio
• Presione y suelte este botón para regresar al menú de inicio
con la lista de juegos.
Mando de dirección (D-Pad)
• Presione las echas de dirección para seleccionar un juego
desde el menú principal.
• Durante el juego, presione las echas para dirigir el
movimiento.
Botones A y B
• Presiónelos para poder jugar.
NOTA: Las funciones de los botones A y B pueden variar
dependiendo del juego.
Colocación de las baterías
1. Saque el tornillo de la parte trasera del Go Gamer usando un
destornillador pequeño (no incluido).
2. Saque lentamente la cubierta trasera del Go Gamer.
3. Inserte 3 baterías "AAA" (no incluidas) y vuelva a colocar en
Page 21

su lugar la cubierta trasera del Go Gamer y apriete el tornillo.
Jugar con el Go Gamer
1. Déplacez l'interrupteur situé à l'arrière du système de «OFF»
à «ON» pour allumer le système ou sur « » pour allumer
lumière DEL.
2. Se encenderá la pantalla.
3. Use las echas del D-Pad para seleccionar un juego.
NOTAS: Todas las direcciones del D-Pad se pueden usar para
seleccionar un juego.
4. Presione el botón A para empezar a jugar.
5. Para regresar al menú principal para jugar a un juego
diferente, presione y suelte el botón de reinicio.
NOTA: El Go Gamer tiene una salida AUX OUT en la parte
inferior del dispositivo para usar audífonos con clavija de
3.5 mm.
Congurar su Go Gamer para verlo en un
televisor
1. Usando un cable conversor de 2.5 mm a AV (no incluido),
conecte la clavija de 2.5 mm en el puerto etiquetado con "AV
OUT" en la parte de arriba del Go Gamer.
2. Localice las entradas de audio (blanco) y vídeo (amarillo) en
su televisor.
3. Conecte el conector de vídeo (amarillo) del cable AV en la
entrada de vídeo del televisor.
4. Conecte el conector de audio (blanco) del cable AV en la
entrada de audio del televisor.
5. Conrme que tiene seleccionada la entrada de vídeo
adecuada en su televisor. Por ejemplo, si conecta el Go Gamer
Page 22

en la entrada INPUT 2 de su televisor, seleccione dicha fuente
INPUT 2 en su televisor.
6. Déplacez l'interrupteur situé à l'arrière du système de «OFF»
à «ON» pour allumer le système ou sur « » pour allumer
lumière DEL.
7. La presentación de la pantalla aparecerá en el televisor.
NOTAS:
• Consulte la guía de usuario de su televisor para obtener
instrucciones acerca de las entradas.
• Los botones del volumen solo controlan el volumen del Go
Gamer. El volumen del televisor se debe ajustar por separado.
Solución de problemas
Problema: Mi Go Gamer no se enciende.
Solución: Asegúrese de que las baterías están correctamente
instaladas en su Go Gamer.
Problema: Los juegos no aparecen en la pantalla del televisor.
Solución: Compruebe lo siguiente:
• El cable AV no está dañado y los conectores de ambos
extremos no están dañados o comprometidos.
• El cable AV está correctamente conectado
al TV.
• La TV tiene seleccionada la entrada correcta (la entrada
seleccionada debe ser la misma donde conectó el cable AV.
Revise la guía de usuario de su televisor para obtener
instrucciones acerca de las entradas).
• El cable AV y los puertos del TV están libres de polvo y
residuos.
Problema: Tengo los audífonos conectados pero no puedo oír
nada.
Page 23

Solución: Compruebe lo siguiente:
• Asegúrese de que los tiene conectados en el puerto AUX OUT
en la parte inferior del Go Gamer.
• Asegúrese de que el volumen de su Go Gamer no está al
mínimo.
Información de las pilas
La fuga de ácido de las pilas puede causar lesiones corporales,
así como daños al controlador. Si se produce una fuga de las
pilas, lave minuciosamente la piel afectada y la ropa. Mantenga
el ácido de las pilas alejado de los ojos y la boca. Las pilas con
fugas pueden emitir sonidos como explosiones.
Para evitar fugas de las pilas
• Solo un adulto debería instalar y reemplazar las pilas.
• No mezcle pilas nuevas con pilas usadas (cambie todas las
pilas al mismo tiempo).
• No mezcle marcas distintas de pilas.
• No mezcle pilas alcalinas, estándar (carbono y zinc) o
recargables (níquel cadmio).
• No deje las pilas en el producto por períodos prolongados
sin uso.
• Retire las pilas y guárdelas en un lugar seco y esco cuando
no estén en uso.
• Retire las pilas gastadas de la unidad.
• No coloque las pilas al revés. Asegúrese de que los extremos
positivo (+) y negativo (-) estén orientados en la dirección
correcta. Inserte el extremo negativo primero.
• No use pilas dañadas, deformadas o con fugas.
• No cortocircuite los terminales de las pilas.
• Deseche las pilas solo en las instalaciones de reciclaje
aprobadas por las autoridades de su área.
• Cualquier alteración del producto puede provocar daños en el
Page 24

producto, anular la garantía y provocar lesiones.
Información de FCC
Este equipo ha sido sometido a pruebas y cumple con los
límites para un dispositivo digital Clase B, de acuerdo con la
Parte 15 del reglamento de la FCC. Estos límites están
diseñados para proveer una protección razonable contra la
interferencia perjudicial en una instalación residencial. Este
equipo genera, usa y puede irradiar energía de radioecuencia
y, si no se instala y usa de acuerdo con las instrucciones,
puede causar interferencia perjudicial para las comunicaciones
por radio. Sin embargo, no existe garantía de que no se
producirá interferencia en una instalación en particular.
Si este equipo provoca interferencia perjudicial en la recepción
de las señales de radio o televisión, lo que se puede determinar
encendiendo o apagando el equipo, se insta a que el usuario
corrija la interferencia mediante una o más de las
siguientes medidas:
• Reoriente la antena receptora o colóquela en otro lugar.
• Aumente la distancia entre el equipo y el receptor.
• Conecte el equipo a un tomacorriente en un circuito distinto
del que está conectado el receptor.
• Solicite ayuda al distribuidor o a un técnico especialista en
radio y televisión.
Este equipo cumple con la Parte 15 del reglamento de la FCC.
Su funcionamiento está sujeto a las siguientes dos
condiciones:
1. Este equipo no debe causar interferencia perjudicial.
2. Este equipo debe aceptar toda interferencia recibida, incluso
aquella interferencia que puede provocar un funcionamiento
Page 25

no deseado.
Las modicaciones no autorizadas por el fabricante pueden
anular la facultad del usuario para operar este dispositivo. Este
equipo cumple con los límites de exposición a radiación de
radioecuencia de la FCC para un entorno no controlado. Este
transmisor no se debe ubicar ni operar junto con ninguna otra
antena o transmisor.
Información de la garantía
Todos los productos dreamGEAR vienen con una garantía
limitada y han sido sometidos a una serie exhaustiva de
pruebas para garantizar el más alto nivel de conabilidad y
compatibilidad. Es poco probable que experimente problemas,
pero si un defecto se hace evidente durante el uso de este
producto, dreamGEAR garantiza al comprador original que este
producto estará libre de defectos de materiales y mano de
obra por un período de 120 días desde la fecha de la compra
original. Si ocurre un defecto cubierto por esta garantía,
dreamGEAR, a su criterio, reparará o reemplazará el producto
comprado sin costo o reembolsará según el precio original de
compra. Si se necesita un reemplazo y su producto ya no está
disponible, se puede reemplazar por un producto comparable,
a entera discreción de dreamGEAR.
Esta garantía no cubre el desgaste normal, el uso abusivo o
inadecuado, las modicaciones, las alteraciones o cualquier
otra causa no relacionada con los materiales o la mano de
obra. Esta garantía no se aplica a productos usados para nes
industriales, profesionales o comerciales.
Información de servicio
Para solicitar servicio para cualquier producto defectuoso
conforme a la política de garantía de 120 días, comuníquese
Page 26

con Servicio al Cliente para obtener un número de autorización
de devolución. dreamGEAR se reserva el derecho de solicitar la
devolución del producto defectuoso y el comprobante
de compra.
NOTA: dreamGEAR no procesará reclamaciones por defectos
sin un número de autorización de devolución.
Línea directa de Servicio al Cliente
877-999-DREAM (3732) (Solo EE. UU. y Canadá)
o 310-222-1045 (Internacional)
Correo electrónico de Servicio al Cliente
support@dreamgear.com
Sitio web
www.dreamgear.com
Salve un árbol, regístrese en línea
dreamGEAR ha tomado la decisión ecológica de que todos sus
productos se registren en línea. Esto ahorra la impresión de las
tarjetas de registro en papel. Toda la información que necesita para
registrar su reciente compra de dreamGEAR o i.Sound está
disponible en:
www.dreamgear.com/product-registration
Page 27

Page 28

www.dreamgear.com
 Loading...