

DreamGEAR GRX-670 Headset

GRX-670
Universal Gaming Headset
User guide
Guide de l'utilisateur
Guía de usuario
www.dreamgear.com

ENGLISH
Includes
GRX-670, control box with gaming cable, pass-through RCA
cable, USB extender, black PS4
™
cable, gray Xbox 360® cable,
and user guide
Please read and follow this user guide thoroughly before
using the GRX-670.
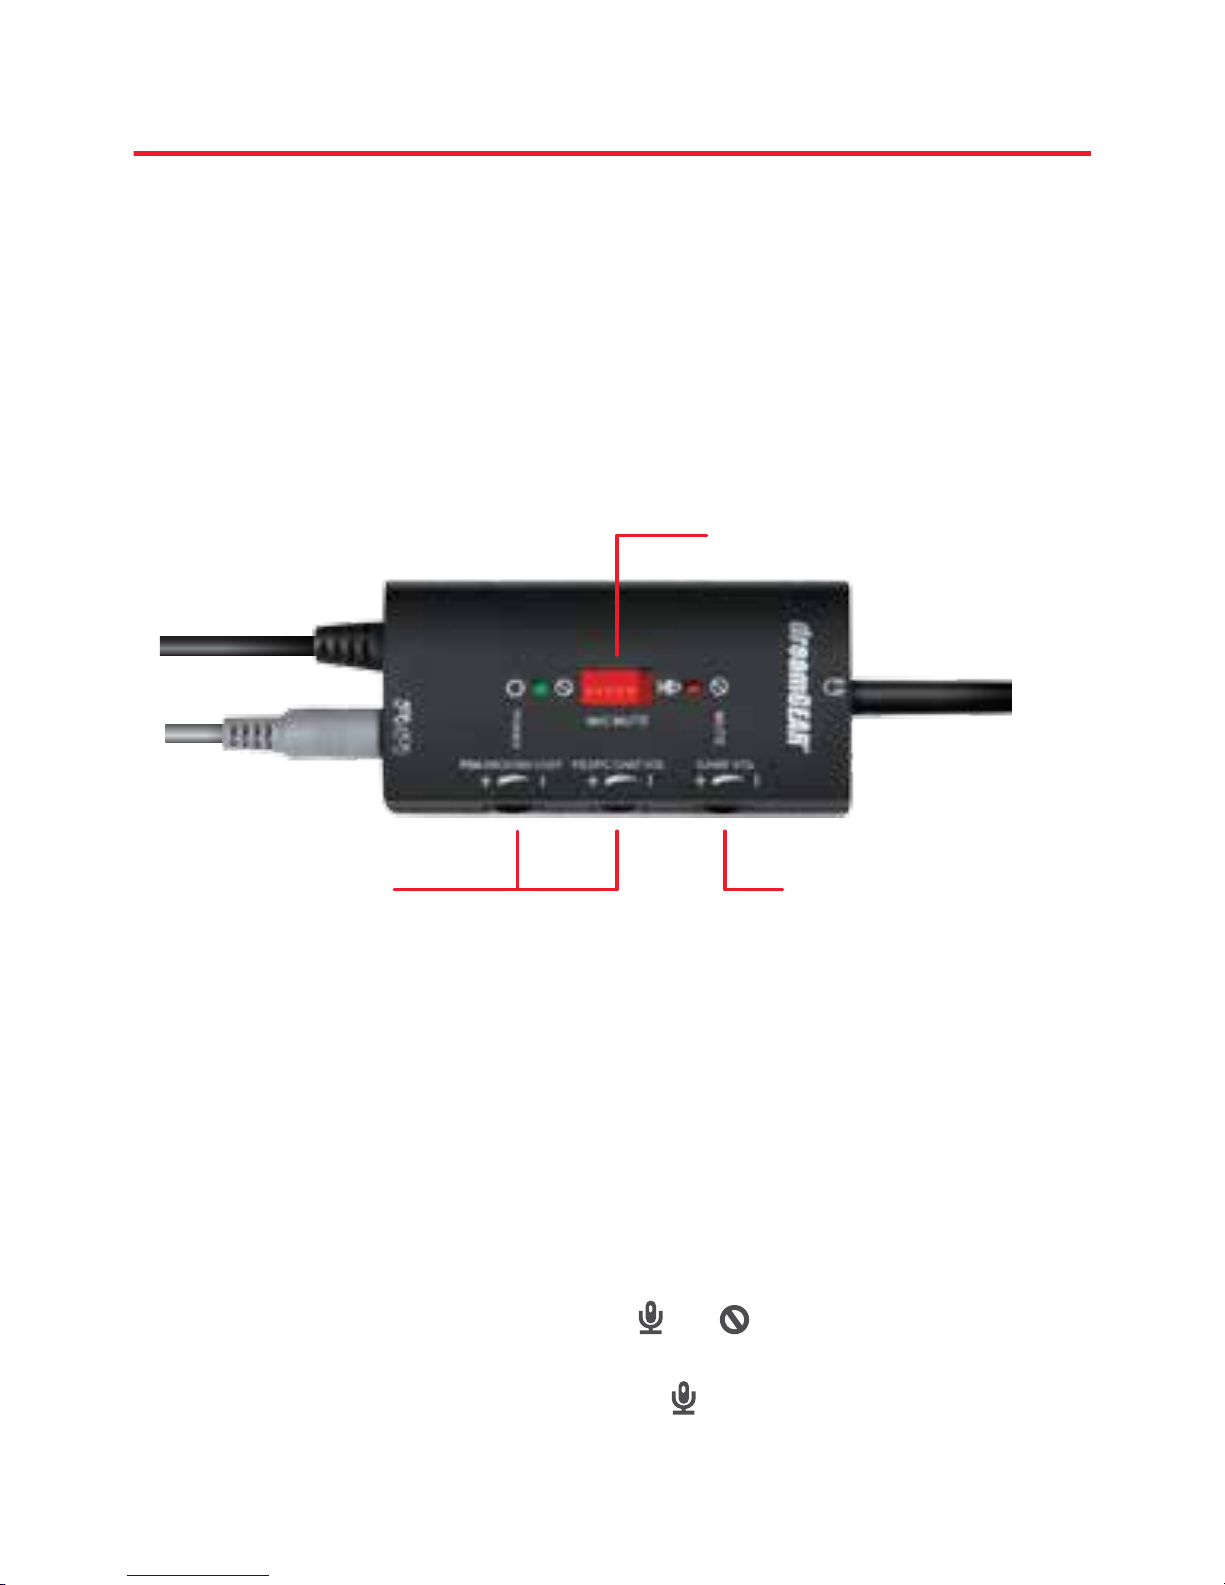
Control panel
• When the green power LED is illuminated, the GRX-670 is
powered and ready to use.
• When the red mute LED is illuminated, the mic mute is turned
on and therefore, you cannot be heard by other players.
Mic mute
• Slide the mic mute switch om to so that others cannot
hear you.
• Slide the mic mute switch back to to be heard again by
other players.
Mic mute
Game volumeChat volume

Volume dial
• Slide the volume dial down om minus (-) to plus (+) to raise
the volume higher.
• Slide the volume dial up om plus (+) to minus (-) to lower
the volume.
Chat volume (For PS4, PS3®, or Xbox 360)
NOTE: Make sure you use the correct volume slider when using
either a PS4, PS3, or Xbox 360.
• Slide the chat volume om minus (-) to plus (+) to raise the
volume higher.
• Slide the chat volume om plus (+) to minus (-) to lower
the volume.
How to use the GRX-670 with PS4
TM
1. Connect the 3.5mm plug at the end of the GRX-670 to the
control box with gaming cables ( ).
2. Plug the green male 3.5mm plug on the control box with
gaming cables into the female green 3.5mm plug on the
pass-through RCA cable.
3. Connect the pass-through RCA cable into the analog “audio
out” port on your television.
NOTE: Please refer to the user guide for your television to nd
which ports to plug the RCAs into.
4. Connect the USB plug on the control box into your PS4.
5. Plug the 3-pole end of the included black PS4 cable into the
PS4 controller port of the control box ( ). Plug the 4-pole
end of the cable into the boom of the PS4 controller.
6. Refer to the user guide for your PS4 for initial volume
management.

7. Follow the steps under “Control panel” to use the volume
and mute features.
NOTES:
• To use the pass-through function of the RCA cables, plug
your RCA enabled device (red and white plugs) into the
backside of the pass-through RCA cable.
• If the USB cable is too short to reach the PS4, use the
included USB extender. To use the USB extender, plug the USB
plug on the control box into the female plug of the USB
extender and plug the USB extender into the PS4.
How to use the GRX-670 with your Xbox OneTM
Controller with 3.5mm plug
1. Disconnect the black 3.5mm plug om the headphone port
of the control box with gaming cables.
2. Connect the black 3.5mm plug of the GRX-670 to the
headphone port located at the boom of the Xbox One
controller.
How to use the GRX-670 with your Xbox One
(using the Microso® Stereo Headset Adapter not included)
1. Plug in your Microso Stereo Headset Adapter into the
boom of your Xbox One controller.
2. Connect the black 3.5mm plug of the GRX-670 to the
headphone port located at the boom of the Microso Stereo
Headset Adapter.
NOTE: Please refer to the user guide of your Microso Stereo
Headset Adapter on how to use the buons and functions.

How to use the GRX-670 with Playstation®3
1. Connect the 3.5mm plug at the end of the GRX-670 to the
control box with gaming cables
2. Plug the green male 3.5mm plug on the control box with
gaming cables into the female green 3.5mm plug on the
pass-through RCA cable.
3. Connect the pass-through RCA cable into the analog “audio
out” port on your television.
NOTE: Please refer to the user guide for your television to nd
which ports to plug the RCAs into.
4. Connect the USB plug on the control box into your PS3.
5. Refer to the user guide for your PS3 to set up a new
audio accessory.
6. Follow the steps under “Control panel” on this user guide to
use the volume and mute features.
NOTES:
• To use the pass-through function of the RCA cables, plug
your RCA enabled device (red and white plugs) into the
backside of the pass-through RCA cable.
• If the USB cable is too short to reach the PS3, use the
included USB extender. To use the USB extender, plug the USB
plug on the control box into the female plug of the USB
extender and plug the USB extender into the PS3.
How to use the GRX-670 with Xbox 360®
1. Connect the 3.5mm plug at the end of the GRX-670 to the
control box with gaming cables
2. Plug the green male 3.5mm plug on the control box with
gaming cables into the female green 3.5mm plug on the
pass-through RCA cable.

3. Connect the pass-through RCA cable into the analog “audio
out” port on your television.
NOTE: Please refer to the user guide for your television to nd
which ports to plug the RCAs into.
4. Connect the USB plug on the Control Box into your Xbox 360.
5. Plug the 3.5mm side of the included gray Xbox 360 cable
into the Xbox 360 controller port of the control box
Plug the 2.5mm side of the included Xbox 360 cable into the
boom of the Xbox 360 controller.
6. Refer to the user guide for your Xbox 360 for initial volume
management.
7. Follow the steps under “Control panel” on this user guide to
use the volume and mute features.
NOTES:
• To use the pass-through function of the RCA cables, plug
your RCA enabled device (red and white plugs) into the
backside of the pass-through RCA cable.
• If the USB cable is too short to reach the Xbox 360, use the
included USB extender. To use the USB extender, plug the USB
plug on the control box into the female plug of the USB
extender and plug the USB extender into the Xbox 360.
How to use the GRX-670 with the Wii U
TM
1. Connect the 3.5mm plug at the end of the GRX-670 to the
headphone port located at top of the Wii U GamePad.
NOTE: Volume can be adjusted by using the volume control on
the Wii U GamePad.

How to connect your GRX-340 to your PS Vita®
or Nintendo® handheld device
1. Turn down the volume on the GRX-340 to the lowest level.
2. Place the headset on your head and adjust the headband
until the headset ts comfortably. Adjust the microphone to t
properly.
3. Insert the 3.5mm plug of the GRX-340 into your handheld
device.
4. Slowly raise the volume to a comfortable level.
5. Refer to the user guide of your handheld on how to set up
the headset to work with online play.
How to use the GRX-670 with a PC
NOTE: The Elite Gaming Headset cannot be used with a Mac.
1. Connect the 3.5mm plug at the end of the GRX-670 to the
control box with gaming cables.
2. Connect the USB plug on the control box into a powered
USB port on your PC.
3. Connect the green male 3.5mm plug on the control box
with gaming cables into the headset port on your PC.
NOTE: Refer to the user guide for your PC to congure using a
gaming headset.
4. Follow the steps under “Control panel” on this user guide to
use the volume and mute features.
How to use the GRX-670 with your mobile
audio device
1. Connect the 3.5mm plug at the end of the GRX-670 to the
headphone port located on your mobile audio device.
NOTES:
• The volume can be adjusted by using the volume control on
your mobile audio device.
• When connected to a phone, the microphone on the
GRX-670 can be used during phone calls.
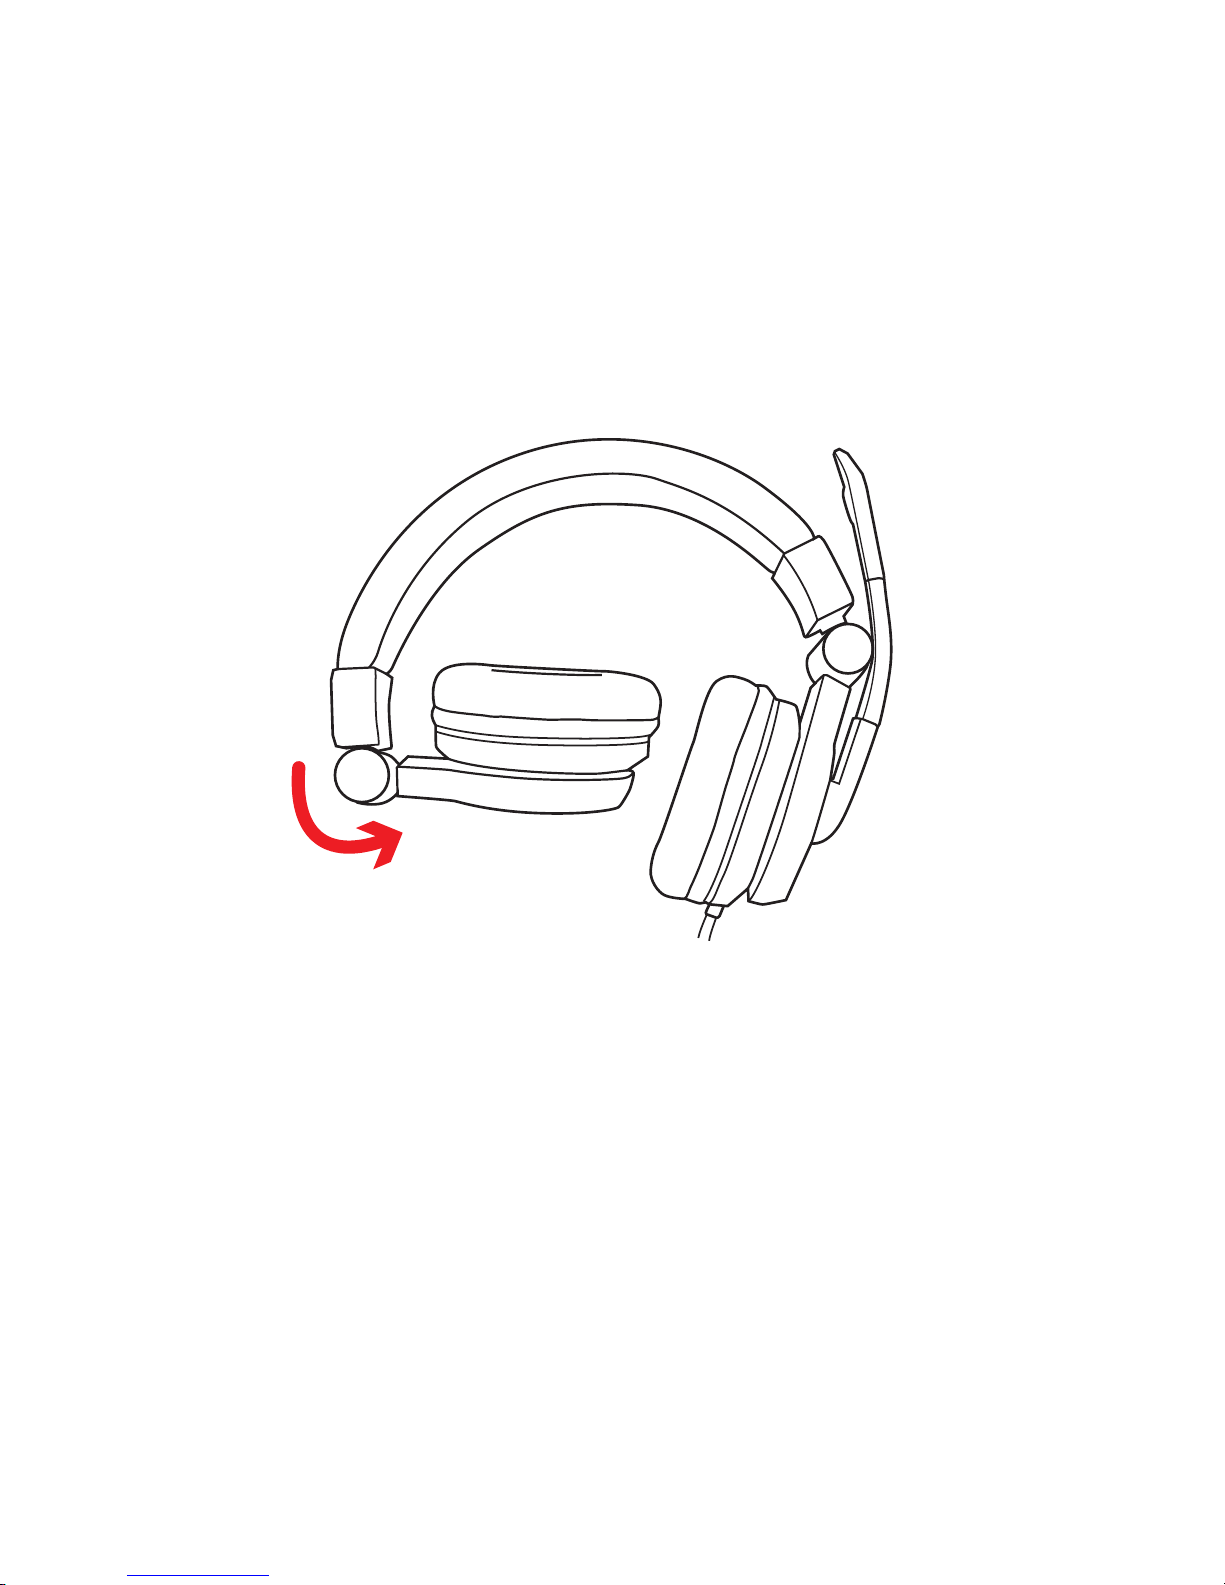
Folding your GRX-670 Gaming Headset
Important safety precautions
• Do not listen at a high volume level. Extended high volume
levels can lead to permanent hearing loss.
• Start with seing the volume level at the lowest volume and
adjust until you reach a comfortable volume level.
• Do not use while sleeping, as accidents may occur.
• If you experience any ringing in your ears, try lowering the
volume. If the ringing persists, visit your physician.
• Tampering with the product can result in damage to your
product, void of warranty, and could cause injuries.

FCC information
This equipment has been tested and found to comply with the
limits for a Class B Digital Device, pursuant to Part 15 of the FCC
Rules. These limits are designed to provide reasonable protection
against harmful interference in a residential installation. This
equipment generates, uses, and can radiate radio equency
energy and, if not installed and used in accordance with the
instructions, may cause harmful interference to radio
communications. However, there is no guarantee that
interference will not occur in a particular installation.
If this equipment does cause harmful interference to radio or
television reception, which can be determined by turning the
equipment o and on, the user is encouraged to try to correct
the interference by one or more of the following measures:
• Reorient or relocate the receiving antenna.
• Increase the distance between the equipment and receiver.
• Connect the equipment to an outlet on a circuit dierent
om that to which the receiver is connected.
• Consult the dealer or an experienced radio/TV technician
for help.
This equipment complies with Part 15 of the FCC Rules.
Operation is subject to the following two conditions:
1. This equipment may not cause harmful interference.
2. This equipment must accept any interference received,
including interference that may cause undesired operation.
Modications not authorized by the manufacturer may void
the user’s authority to operate this device. This equipment
complies with FCC RF radiation exposure limits set forth for an
uncontrolled environment. This transmier must not be
co-located or operating in conjunction with any other antenna

or transmier.
Warranty information
All dreamGEAR/i.Sound products come with a limited warranty
and have been subjected to a thorough series of tests to
ensure the highest level of dependability and compatibility. It
is unlikely that you will experience any problem, but if a defect
should become apparent during the use of this product,
dreamGEAR warrants to the original consumer purchaser that
this product will be ee om defects in material and
workmanship for a period of 120 days om the date of your
original purchase. If a defect covered by this warranty occurs,
dreamGEAR, at its option, will repair or replace the product
purchased at no charge or refund the original purchase price. If
a replacement is necessary and your product is no longer
available, a comparable product may be substituted at the sole
discretion of dreamGEAR.
This warranty does not cover normal wear and tear, abusive
use or misuse, modication, tampering or by any other cause
not related to either materials or workmanship. This warranty
does not apply to products used for any industrial,
professional or commercial purposes.
Service information
For service on any defective product under the 120-day warranty
policy, please contact Consumer Support to obtain a Return
Authorization Number. dreamGEAR reserves the right to require
the return of the defective product and proof of purchase.
NOTE: dreamGEAR will not process any defective claims without
a Return Authorization Number.
 Loading...