

Dreambaby F943NN, F1012, F820NN User Manual
IMPORTANT! READ AND FOLLOW THESE INSTRUCTIONS CAREFULLY
Read the entire instructions before assembling and installing this product.
If you sell or give away this product, make sure you give this instruction to the new owner.
WARNING
F820NN/F943NN/F1012 - v3-12/2015
F820NN (white)
INSTRUCTIONS
Retractable Gate
F943NN (black)
F1012 (grey)
Patent No. 1/604,922
AND KEEP FOR FUTURE REFERENCE
WARNING: This package contains small parts and sharp points in an
unassembled state. Keep out of reach of children. Adult assembly required.
WARNING– Incorrect installation can be
dangerous.
WARNING– Do not use the safety barrier if
any components are damaged or missing.
WARNING– The safety barrier must not be
fitted across windows.
WARNING– Never use this gate without
securely installed Locking Brackets and
Locking Hooks.
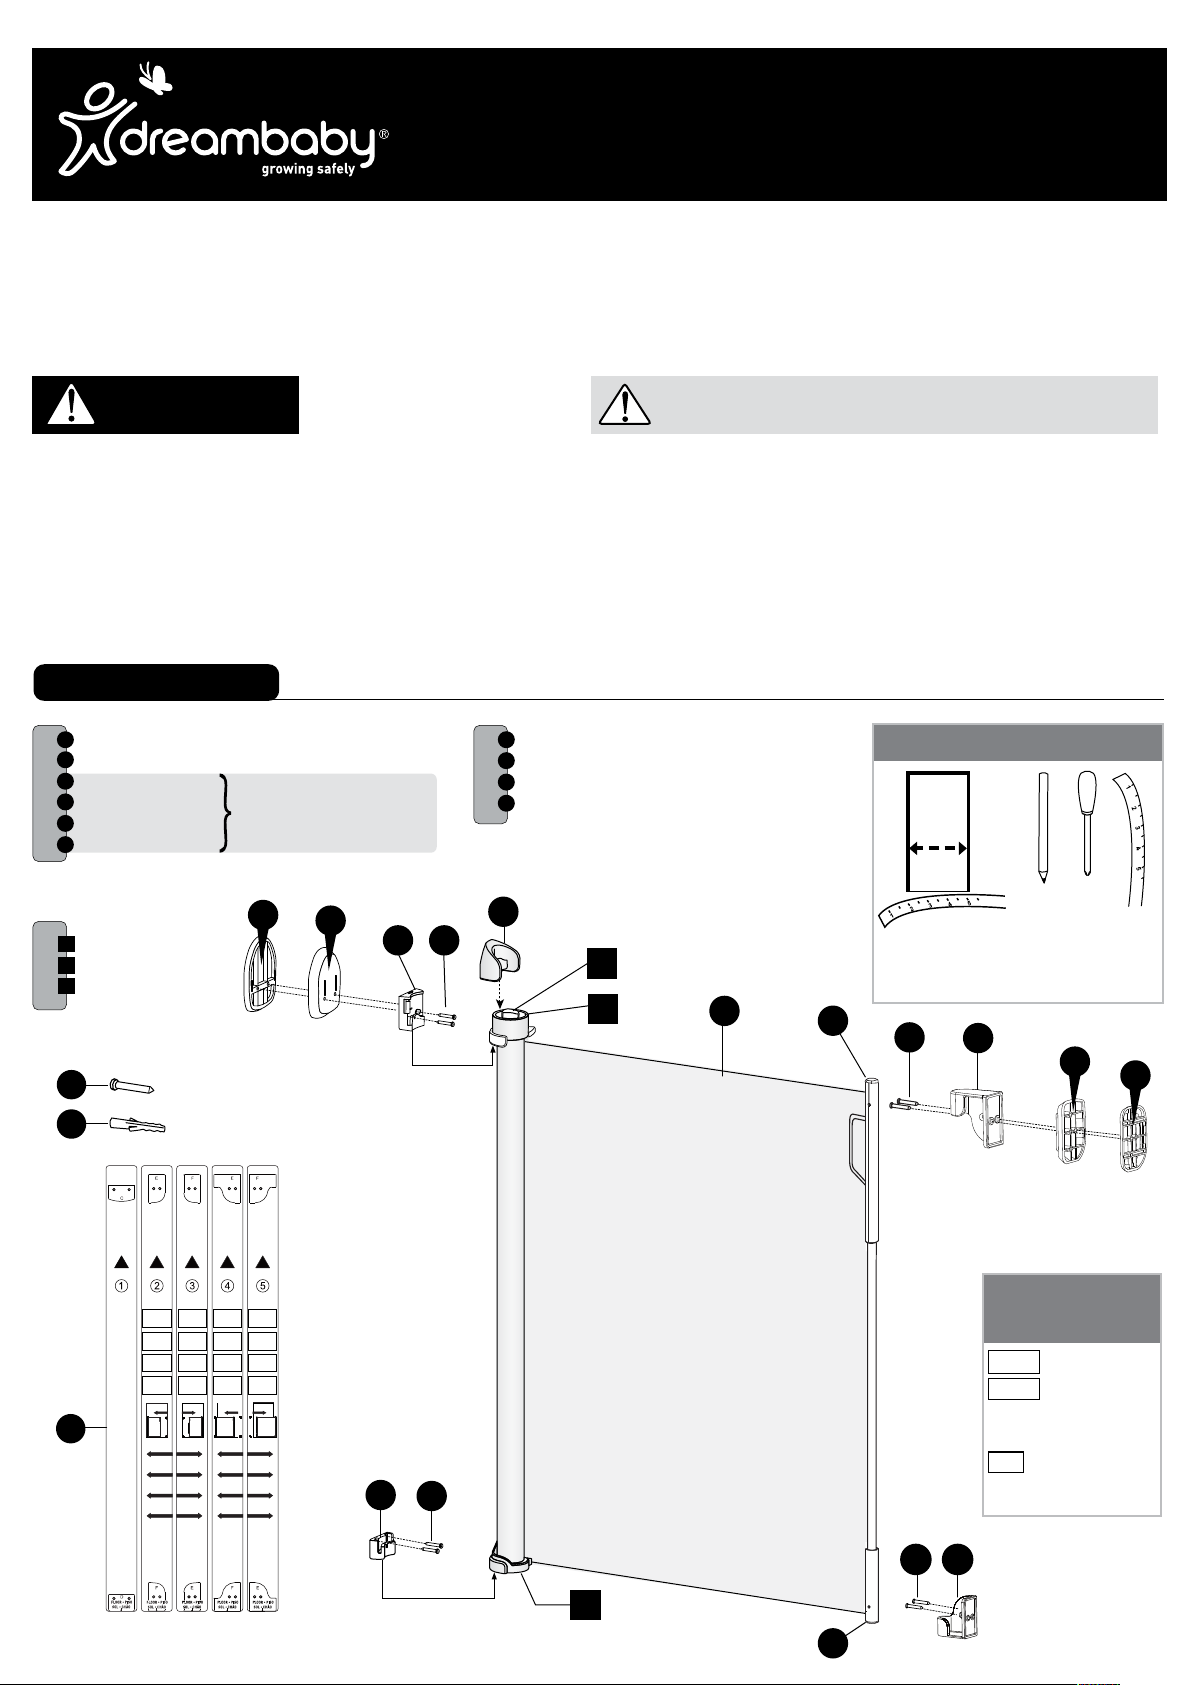
PARTS LIST
INSTALLATION
A Gate Panel
B Cover
C Upper Bracket (x2)
D Lower Bracket (x2)
E Hook (x2)
Included
F Hook (x2)
Includes 2 sets of mounting
brackets for convenient
'clip-on/clip-off' relocation
A2
K Base of Casing
L Top of Casing
M Release Button
Pre-assembled
Optional
Spacer Sets-A1/A2
(sold separately)
See Accessories Panel
H
This safety barrier conforms to
EN1930:2011;
This safety gate is for domestic use only;
This safety gate has been designed for use
with children up to 24 months of age;
Never use with a child able to climb over or
dislodge/open the gate;
The surfaces that the gate is to be fixed to
must be suitable for the purpose and must
be structurally sound;
The clearance space between the Base of
Casing and the floor MUST NOT exceed
0.3cm (0.12in);
If the safety gate is used at the bottom of
stairs to prevent the child climbing up the
stairs, it must be placed at the front of the
lowest stair;
If the safety gate is used at the top of the
stairs to prevent child falling down the stairs,
it must not be placed on any stair below the
level of the top stair;
G Locking Rod
H Screws 4x25mm (
I Masonry/Brick Plugs (x16)
Included
J Templates (x5)
A1
C
B
H
M
L
*
5/32
x1in) (x16)
A
At the top of landing, position the gate
15cm (6in) away from the top step;
This safety gate has a manual close system;
This safety gate must NEVER be used as a
pool or pond barrier;
Never leave a child unattended.
This safety gate does not replace proper
adult supervision.
Before you start
Have on hand a tape
measure. pencil. drill with
This gate can cover
an area of up to
140cm (55in).
4mm (5/32 x1in) drill bit
and a Phillips head
screwdriver.
G
H
E
X1
X2
I
17/10/2015 17/10/2015 17/10/2015 17/10/2015 17/10/2015
BRACKETS
SUPPORTS
CROCHETS
DE FIXATION
GANCHOS
SOPORTES
BRAÇADEIRA
Montage à
L’INTÉRIEUR
de l’embrasure
DENTRO da
para DENTRO
J
de droite à gauche
La puerta se abre:
de la derecha a la
Porta aberta:
direita para a
HOOKS
Mounted
INSIDE
opening
Montado
abertura
Montado
abertura
Door open:
right to left
Ouverture
de la porte :
izquierda
esquerda
HOOKS
CROCHETS
GANCHOS
Mounted
INSIDE
opening
Montage à
L’INTÉRIEUR
de l’embrasure
Montado
DENTRO da
abertura
Montado
abertura
para DENTRO
Door open:
left to right
Ouverture
de la porte :
de gauche à droite
La puerta se abre:
de la izquierda a
la derecha
Porta aberta:
esquerda para
a direita
HOOKS
CROCHETS
GANCHOS
Mounted
OUTSIDE
opening
Montage à
L’EXTÉRIEUR
de l’embrasure
Montado
abertura
para FUERA
Montado
FORA da
abertura
Door open:
right to left
Ouverture
de la porte :
de droite à gauche
La puerta se abre:
de la derecha a la
izquierda
Porta aberta:
direita para a
esquerda
HOOKS
CROCHETS
GANCHOS
Mounted
OUTSIDE
opening
Montage à
L’EXTÉRIEUR
de l’embrasure
Montado
abertura
para FUERA
Montado
FORA da
abertura
Door open:
left to right
Ouverture
de la porte :
de gauche à droite
La puerta se abre:
de la izquierda a
la derecha
Porta aberta:
esquerda para
a direita
D
H
K
G
H F
Spacer Sets -X1/X2
See Accessories Panel
Optional
(sold separately)
*
Optional
*
Accessories
(sold separately)
F821NN Spacer Sets (white)
F944NN Spacer Sets (black)
For use when gate is fitted to
Skirting boards / Baseboards
F895 Gate Adaptor Panel
To provide a flat surface
to install gate.
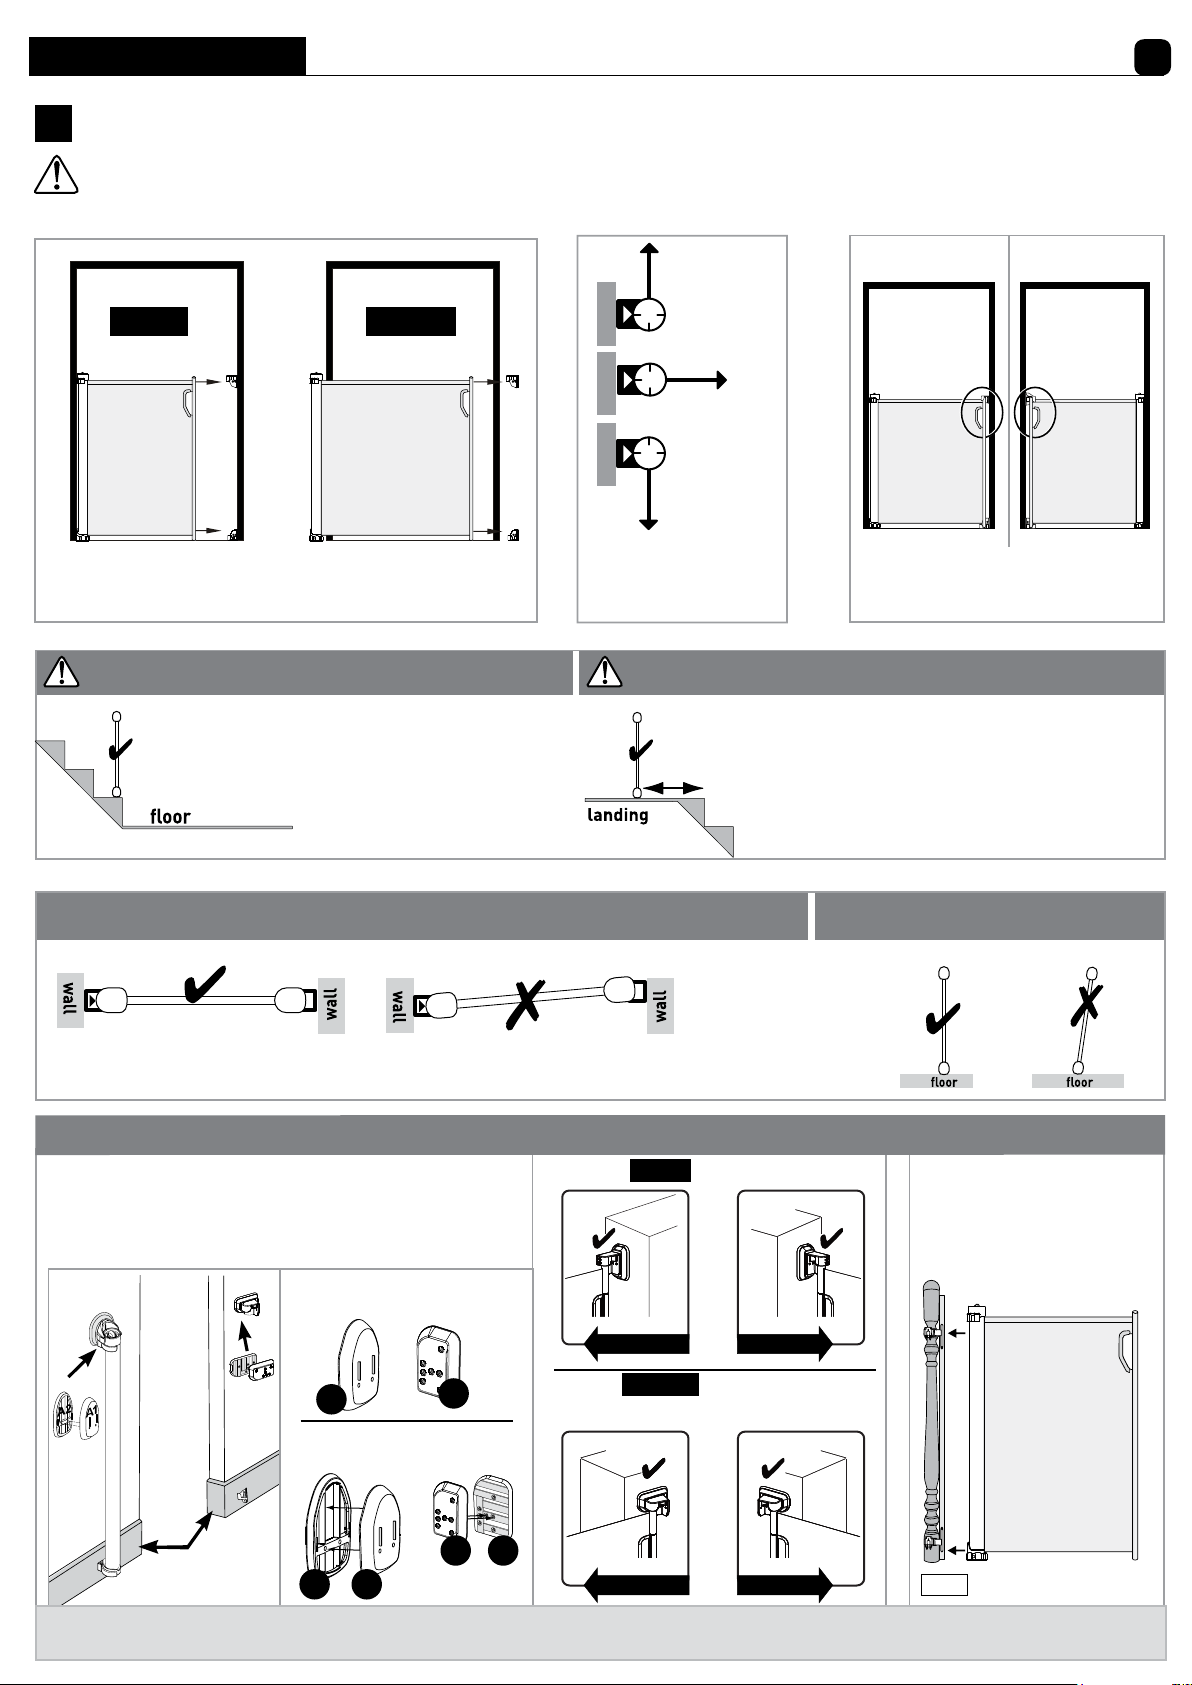
INSTALLATION
1.
1. Choose best location for gate
Ensure the surface you are mount the gate is structurally sound such as solid timber, brick or masonry. For plaster/gyprock surface, locate the timber
beam or stud behind and mount in this location (mounting on plaster/gyprock alone is not strong enough and not safe). Do not mount to glass.
2
mounted
inside
opening
MAX – 140cm/55in MAX – 129cm/51in
1a.
Gate can be installed outside or inside door openings
mounted
outside
opening
Bottom of stairs
1d.
If the gate is used at the bottom of the stairs
to prevent the child from climbing up the
stairs, it must be placed on the lowest stair.
wall
wall
wall
1b.
Opening direction of
the gate can be
changed to suit
Top of stairs
15cm
6in
1c.
Consider which side is more
convenient for handle position.
1e.
If the gate is to be used at the top of the stairs to
prevent the child from falling down the stairs, it
must not be placed on any stair below the level of
the top stair.
At the top of landing, position the gate 15cm (6in)
away from the top step.
Top view of gate
1f.
Make sure that the gate is mounted firmly and evenly in vertical position.
Accessories (sold separately)
1g. Skirting boards (baseboards)
If there is a skirting board (baseboard) to which the Retractable Gate is to be
attached, build up the wall areas equivalent to thickness of baseboard (skirting
board) with Spacers F821NN/F944NN (sold separately).
For 1.25cm (1/2in) skirting or
baseboards use:
A1
X1
X1
X1
X1 X2
+
X2
bracket
spacer
hook
spacer
skirting board
baseboard
A1
For 1.90cm (3/4in) skirting or
baseboards use:
+
A1
A2
A2 A1
Mounted INSIDE opening - with spacer
X1 + X2 X1 + X2
door open
right to left
door open
left to right
Mounted OUTSIDE opening - with spacer
Note: Hook Spacer to be mounted horizontally when
mounting gate outside door opening
X1 + X2 X1 + X2
door open
right to left
door open
left to right
Side view of gate
1h. Adaptor Panel
To provide a flat surface to install gate.
F895 Gate Adaptor Panel
To purchase accessories, contact Tee-Zed Products for your nearest retail outlet: info@tee-zed.com.au
 Loading...