

Page 1
User Instructions
Deluxe Bottle Sterilizer
Page 2

IMPORTANT SAFEGUARDS
This product is for household use only. When using electrical appliances, basic safety
precautions should always be followed including the following:
• Read all instructions.
• Do not touch hot surfaces. Use handles or knobs.
• To protect against electrical shock, do not immerse cord or plugs in water or other
liquid.
• Close supervision is necessary when any appliance is used by or near children.
• Unplug from outlet when not in use and before cleaning. Allow to cool before putting
on or taking off parts.
• Do not operate any appliance with a damaged cord or plug or after the appliance
malfunctions or has been damaged in any manner. Return appliance to the nearest
authorized service facility for examination, repair, or adjustment.
• The use of accessory attachments not recommended by Handi-Craft® Company may
cause injuries.
• Do not use outdoors.
• Do not let cord hang over edge of table or counter, or touch hot surfaces.
• Do not place on or near a hot gas or electric burner, or in a heated oven.
• Extreme caution must be used when moving an appliance containing hot liquids.
• To operate, plug cord into wall outlet. To disconnect, turn any control to “off”, then
remove plug from wall outlet.
• Do not use appliance for other than intended use.
• A short power-supply cord is provided to reduce the risk resulting from becoming
entangled in or tripping over a longer cord.
• Longer extension cords may be used if care is exercised in their use.
• If a longer extension cord is used, the marked electrical rating of the extension cord
should be at least as great as the electrical rating of the appliance, and the cord
should be arranged so that it will not drape over the countertop or tabletop where
it can be pulled on by children or tripped over unintentionally. The extension cord
should be a grounding-type 3-wire cord.
• Never immerse the sterilizer or power cord in water.
• When in use, the sterilizer contains hot water. Be careful to avoid spilling or
splashing any water on yourself when removing contents from the sterilizer.
• This appliance has a polarized plug (one blade is wider than the other). To reduce
the risk of electric shock, this plug is intended to fit into a polarized outlet only one
way. If the plug does not fit fully into the outlet, reverse the plug. If it still does not fit,
contact a qualified electrician. Do not attempt to modify the plug in any way.
• NOT FOR SPACE HEATING PURPOSES.
SAVE THESE INSTRUCTIONS
2
Page 3
Thank you for buying the Dr. Brown’s Natural Flow® Deluxe Bottle Sterilizer. It
has been designed to provide moms, dads and other caregivers a simple, easy and
reliable way to sterilize Dr. Brown’s™ baby bottles and parts before feeding your baby.
This appliance works by transforming tap water into intense steam heat which kills
most common household germs. It holds six 2 oz, 4 oz or 8 oz Dr. Brown’s™ baby bottles
in addition to all associated parts including nipples, collars, gaskets, stems and travel
covers. It also holds most major competitive brands of baby bottles. The unit can also
be used to sterilize other items and accessories such as pacifiers, teethers, toys, cups,
utensils and breast pump parts. They must be able to withstand boiling water in order
to be sterilized in this unit. Please check with the manufacturer of the other items.
As parents we know how important your baby’s well being is and this appliance will
help you make your baby’s bottles and other feeding equipment more sterile.
Please read through the ENTIRE INSTRUCTION BOOK including the IMPORTANT
SAFEGUARDS before using your new Dr. Brown’s Natural Flow® Deluxe Bottle
Sterilizer for the first time. A copy of these instructions is also available on line at
www.handi-craft.com.
IMPORTANT: Pour water into device before turning on.
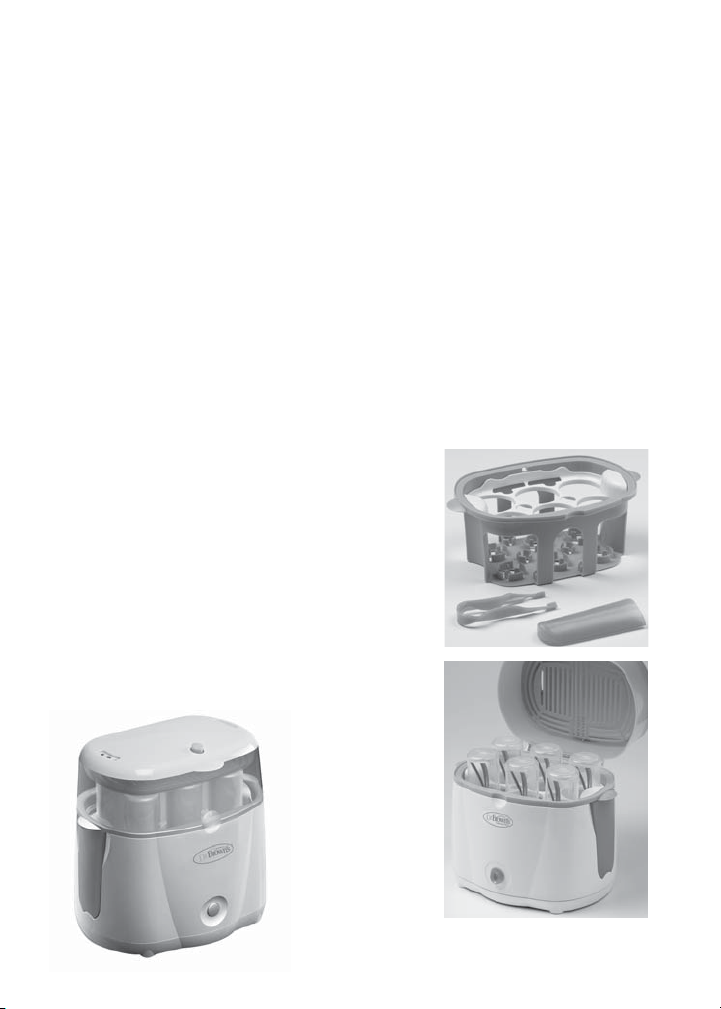
PARTS:
A. Top cover
B. Main cover
C. Main housing. Heating chamber inside.
D. Start button
E. Tongs
F. Measuring cup
G. Removable divider
H. Removable basket
E
G
H
F
A
B
C
D
3
Page 4

TO USE:
1. Before running this appliance, it is important that all bottles, bottle parts and/or
other accessories are clean. They must be washed, rinsed and empty.
2. Position the appliance on a flat surface and out of reach of children where it
cannot be knocked over or moved during operation.
3. Remove the measuring cup from the side storage compartment.
4. Fill the measuring cup to the fill line molded into the front of the measuring cup
with FRESH COLD WATER and pour the water INTO THE BOTTOM OF THE
HEATING CHAMBER.
NOTE: DO NOT EXCEED the recommended amount of water. Please note that
hard water may increase build up or other residue on the heating plate. If you
have hard water, we recommend that you use distilled water.
5. Place the removable basket (part H) in the sterilizer heating chamber.
Arrange the bottles and other parts as shown in Figure A through Figure H.
NOTE: Because of the difference in bottle and part size between standard and
wide neck bottle, different layouts are shown.
6. Insert the removable divider (part G).
7. Close the main cover (part B) and arrange the parts on the grate as shown in
Figure D and Figure H.
8. Close top cover (part A).
NOTE: When plugging in the sterilizer for the first time, you will notice that the
power light will be on. THIS IS NOT AN ERROR. After the first cycle, the unit will
automatically shut off.
9. Plug the power cord into an electrical outlet. Press down on the start button
(part D). A light will come on behind the start button to indicate that the appliance
is running and creating steam. It will remain lit until the sterilization cycle is
complete. This is approximately 12 minutes but may vary by the amount of water
you add and other environmental factors. When the cycle is complete the light
will go out. Allow your appliance to cool for a minimum of 10 minutes between
cycles and prior to opening and handling the bottles and parts.
10. Open the main cover and remove all bottles and place on a countertop or other
flat surface. Open the top cover and re-assemble the bottles with the various
components.
4
Page 5
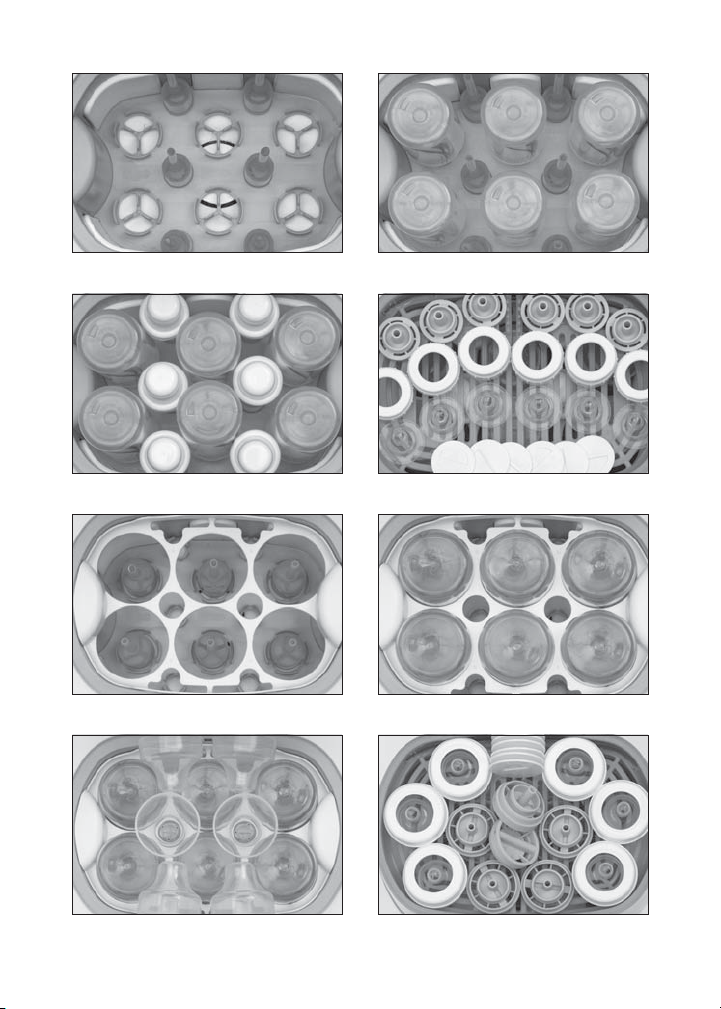
Figure A
Figure B
Placement of standard size stems
Figure C
Placement of standard size caps
Figure E
Placement of wide-neck size stems
Figure G
Placement of 2 oz, 4 oz and/or 8 oz
standard size bottles
Figure D
Placement of standard size parts
Figure F
Placement of 2 oz, 4 oz and/or 8 oz
wide-neck size bottles
Figure H
Figure H
Placement of wide-neck size caps
Placement of wide-neck size parts
5
Page 6

TO CLEAN THE APPLIANCE:
The Dr. Brown’s Natural Flow® Deluxe Bottle Sterilizer should be cleaned at least once
a week when in regular use. Wait at least 60 minutes after a sterilization cycle to allow
the devise to cool. Before cleaning your device ALWAYS disconnect the power plug
from the outlet.
• The removable divider, removable basket, tongs and measuring cup can be cleaned
in hot soapy water and rinsed completely.
• The base exterior and heating chamber and two covers can be cleaned with a damp
sponge or damp cloth.
NOTE: DO NOT IMMERSE THE STERILIZER BASE IN WATER.
TO CLEAN THE HEATING ELEMENT:
Mineral deposits may form on the metal heating element beneath the grill in the
bottom of the heating chamber. It is important to de-scale this appliance every
4 weeks to ensure that it continues to work properly.
• Unplug the device.
• Remove the divider and basket.
• De-scale utilizing a 2:1 ratio -- mix 1 oz of white vinegar with 2 oz of cold water and
pour directly over the heating element.
• Turn the unit on and run until the mixture is evaporated and any scaling has
been removed.
NOTE: DO NOT USE HARSH ABRASIVES OR SOLVENTS TO CLEAN THE HEATING
CHAMBER OR HEATING ELEMENTS AS THEY MAY CAUSE PERMANENT DAMAGE.
PLEASE ENSURE PROPER VENTILATION WHEN DESCALING WITH VINEGAR.
6
Page 7

Instrucciones para el usuario
Esterilizador de
biberones Deluxe
Page 8

INFORMACIÓN IMPORTANTE
Este producto debe ser usado solamente en el hogar. Cuando use aparatos eléctricos,
siempre debe seguir precauciones de seguridad básicas, incluyendo lo siguiente:
• Lea todas las instrucciones.
• No toque las superficies calientes. Use las asas o perillas.
• Para protegerse contra una descarga eléctrica, no sumerja el cable ni los enchufes
en agua u otros líquidos.
• Cuando se use cualquier aparato eléctrico, ya sea cerca de los niños o por ellos
mismos, es necesario supervisar en forma constante.
• Desenchufe el aparato cuando no esté en uso y antes de limpiarlo. Permita que se
enfríe antes de colocar o quitar piezas.
• No haga funcionar ningún aparato que tenga un cable o enchufe dañado, ni después
de observar que funciona mal o que sufrió cualquier tipo de daño. Lleve el aparato al
centro de reparaciones autorizado más cercano para que lo examinen, reparen
o ajusten.
• Usar piezas o accesorios que no sean recomendados por Handi-Craft® Company
puede causar lesiones.
• No use el aparato al aire libre.
• No permita que el cable cuelgue del borde de la mesa o superficie de apoyo, ni que
toque superficies calientes.
• No lo coloque sobre o cerca de un quemador caliente a gas o eléctrico, ni dentro del
horno caliente.
• Debe tener mucho cuidado al mover un aparato eléctrico que contenga líquidos
calientes.
• Para encender, conecte el cable en una toma de corriente en la pared. Para
desconectar, coloque primero cualquier control en posición de apagado (“off”)
y luego retire el enchufe de la toma de corriente en la pared.
• No use el aparato para otro fin que no sea para el que fue diseñado.
• Se incluye un cable corto para reducir el riesgo de enredarse o tropezarse
con un cable más largo.
• Se pueden utilizar extensiones eléctricas más largas si se toma precaución
al usarlas.
• Si se utiliza una extensión eléctrica más larga, la capacidad eléctrica marcada en la
extensión debe ser al menos tan alta como la que se indica en el aparato, y el cable
debe colocarse de tal modo que no cuelgue del mostrador ni la mesa donde pueda
ser halado sin intención por los niños. La extensión eléctrica debe ser del tipo que
tiene tres alambres y hacer tierra.
• Nunca sumerja el esterilizador o el cable en agua.
• Cuando se encuentra en uso, el calentador contiene agua caliente. Tenga cuidado
y evite derrames o salpicaduras de agua sobre usted al retirar el contenido del
esterilizador.
• Este aparato cuenta con un enchufe polarizado (una pata es más ancha que la otra).
8
8
Page 9

Para reducir el riesgo de descarga eléctrica, este enchufe fue diseñado para
conectarse a una toma de corriente polarizada solamente de una manera. Si el
enchufe no entra en la toma de corriente, dé vuelta el enchufe. Si continúa sin entrar,
comuníquese con un electricista calificado. No intente modificar el enchufe de
ninguna forma.
• NO ESTÁ DISEÑADO PARA FUNCIONAR COMO CALEFACTOR.
GUARDE ESTAS INSTRUCCIONES
Gracias por comprar el Esterilizador de biberones Dr. Brown’s Natural Flow® Deluxe.
El esterilizador fue diseñado para ofrecer a las mamás, papás y demás personas
que cuidan del bebé una forma sencilla, fácil y confiable de esterilizar las piezas y los
biberones Dr. Brown’s™ antes de alimentar a su bebé. Este aparato convierte el agua
del grifo en vapor intenso que mata los gérmenes más comunes que se encuentran
en el hogar. Tiene capacidad para seis biberones Dr. Brown’s™ de 2 onzas, 4 onzas u 8
onzas, además de todas las piezas asociadas, como tetinas, cuellos, juntas, pies y tapas
para viaje. También puede usarse para la mayoría de los biberones de las principales
marcas competitivas. El aparato también puede usarse para esterilizar otros objetos
y accesorios como chupetes, mordedores, juguetes, vasos, utensilios y piezas del
extractor de leche. Deben soportar agua hirviendo para poder ser esterilizados en este
aparato. Por favor consulte con el fabricante de los demás objetos que desee esterilizar.
Como padres sabemos lo importante que es el
bienestar de su bebé, y este aparato le ayudará a
que los biberones y otros objetos que use para la
alimentación estén más estériles.
Por favor lea TODO EL MANUAL DE INSTRUCCIONES
incluyendo la sección de INFORMACIÓN IMPORTANTE
antes de usar por primera vez su nuevo Esterilizador
de biberones Dr. Brown’s Natural Flow® Deluxe. Puede
obtener una copia de estas instrucciones en Internet:
www.handi-craft.com.
IMPORTANTE: Añada agua en el aparato antes
de encenderlo.
PIEZAS:
A. Tapa superior
B. Tapa principal
C. Estructura principal.
Cámara de calentamiento
en el interior.
D. Botón de inicio
E. Pinzas
F. Taza para medir
G. Divisor removible
H. Cesta removible
E
G
H
F
A
B
C
D
9
Page 10

USO:
1. Antes de hacer funcionar este aparato, es importante que todos los biberones,
piezas de biberones y/o demás accesorios estén limpios. Deben estar lavados,
enjuagados y vacíos.
2. Coloque el aparato sobre una superficie plana y lejos del alcance de los niños,
donde no se pueda derribar ni mover mientras esté encendido.
3. Retire la taza para medir del compartimiento lateral.
4. Llene la taza para medir hasta la raya de llenado al frente de la taza para
medir con AGUA LIMPIA Y FRÍA y viértala EN EL FONDO DE LA CÁMARA DE
CALENTAMIENTO.
NOTA: NO USE MÁS AGUA que la cantidad recomendada. Tenga en cuenta que
el agua dura puede aumentar la acumulación o el depósito de otros residuos
en la placa de calentamiento. Si tiene agua dura, le recomendamos usar
agua destilada.
5. Coloque la cesta removible (pieza H) en la cámara de calentamiento del
esterilizador. Coloque los biberones y demás piezas como se indica en la Figura A
a la Figura H.
NOTA: Debido a la diferencia de tamaño que existe en el biberón y las piezas entre
el modelo estándar y el de boca ancha, se incluyen diferentes diagramas.
6. Inserte el divisor removible (pieza G).
7. Cierre la tapa principal (pieza B) y coloque las piezas en la rejilla, como se indica
en la Figura D y la Figura H.
8. Cierre la tapa superior (pieza A).
NOTA: Cuando enchufe el esterilizador por primera vez, observará que la luz de
encendido está iluminada. ESTO NO ES UN ERROR. Después del primer ciclo, la
unidad se apagará automáticamente.
9. Conecte el cable en una toma de corriente. Oprima el botón de inicio (pieza D).
Se encenderá una luz detrás del botón de inicio para indicar que el aparato está
funcionando y generando vapor. La luz permanecerá encendida hasta que se haya
completado el ciclo de esterilización. Este ciclo tiene una duración aproximada
de 12 minutos, pero puede variar según la cantidad de agua que agregue y otros
factores del entorno. Cuando se haya completado el ciclo, la luz se apagará.
Permita que el aparato se enfríe durante un mínimo de 10 minutos entre ciclos y
antes de abrir y retirar los biberones y las piezas.
10. Abra la tapa principal y retire todos los biberones, y colóquelos sobre una
superficie de apoyo u otra superficie plana. Abra la tapa superior y vuelva a armar
los biberones con los varios componentes.
10
Page 11

Fig. A
Fig. B
Colocación de pies de biberones estándar
Fig. C
Colocación de tapas de biberones estándar
Fig. E
Colocación de pies de biberones de boca ancha
Fig. G
Colocación de biberones estándar de 60 ml,
120 ml y/o 240 ml
Fig. D
Colocación de piezas de biberones estándar
Fig. F
Colocación de biberones de boca ancha de
120 ml y/o 240 ml
Fig. H
Colocación de tapas de biberones de boca ancha
Colocación de piezas de biberones de boca ancha
11
Page 12

LIMPIEZA DEL APARATO:
El Esterilizador de biberones Dr. Brown’s Natural Flow® Deluxe debe limpiarse al
menos una vez por semana, si lo usa con regularidad. Espere al menos 60 minutos
después del ciclo de esterilización para permitir que el aparato se enfríe. Antes de
limpiar el aparato, SIEMPRE desconecte el enchufe de la toma de corriente.
• El divisor removible, la cesta removible, las pinzas y la taza para medir pueden
lavarse con agua caliente jabonosa y deben enjuagarse completamente.
• La base exterior, la cámara de calentamiento y las dos tapas pueden limpiarse con
una esponja o trapo húmedo.
NOTA: NO SUMERJA LA BASE DEL ESTERILIZADOR EN AGUA.
PARA LIMPIAR LA PLACA CALENTADORA:
Pueden formarse depósitos minerales en la placa calentadora de metal debajo de
la parrila ubicada en la parte inferior de la cámara de calentamiento. Es importante
desincrustar el aparato cada 4 semanas para asegurarse de que continúe funcionando
correctamente.
• Desenchufe el aparato.
• Retire el divisor y la cesta.
• Desincruste utilizando una mezcla en proporción de 2:1 de 1 oz de vinagre blanco
con 2 oz de agua y vierta directamente sobre la placa calentadora.
• Encienda la unidad y déjela funcionar hasta que la mezcla se evapore y se haya
eliminado cualquier residuo.
NOTA: NO USE PRODUCTOS ABRASIVOS NI SOLVENTES PARA LIMPIAR LA CÁMARA
DE CALENTAMIENTO O LA PLACA CALENTADORA, YA QUE PUEDEN CAUSAR DAÑOS
PERMANENTES. POR FAVOR, ASEGÚRESE DE TENER UNA VENTILACIÓN ADECUADA
AL DESINCRUSTAR CON VINAGRE.
12
Page 13

Mode d’emploi
Stérilisateur à
biberons Deluxe
13
Page 14

IMPORTANTES MESURES DE PRÉCAUTIONS
Cet appareil est destiné à un usage domestique uniquement. Lors de l’utilisation
d’appareils électriques, vous devez respecter certaines précautions élémentaires
de sécurité, notamment les suivantes :
• Lisez entièrement le mode d’emploi.
• Ne touchez pas les surfaces chaudes. Utilisez les poignées ou les boutons.
• Pour éviter les chocs électriques, ne plongez pas les cordons ou les fiches
d’alimentation dans de l’eau ou d’autres liquides.
• Surveillez étroitement les enfants lorsqu’ils utilisent ou se trouvent à proximité d’un
appareil électrique.
• Débranchez l’appareil du secteur lorsque vous ne l’utilisez pas et avant de le
nettoyer. Laissez-le refroidir avant d’y mettre ou d’en extraire des éléments.
• N’utilisez pas un appareil dont la fiche et/ou le cordon sont abîmés, qui
fonctionne mal ou qui présente tout autre dommage. Confiez l’appareil au
service après-vente le plus proche pour qu’il l’examine, le répare ou effectue les
réglages nécessaires.
• L’utilisation d’accessoires non recommandés par Handi-Craft® Company
peut entraîner des blessures.
• N’utilisez pas cet appareil à l’extérieur.
• Ne laissez pas le cordon d’alimentation pendre du bord d’une table ou d’un
plan de travail ni toucher des surfaces chaudes.
• Ne placez pas l’appareil près d’un brûleur à gaz ou électrique chaud, ou dans un
four chaud.
• Soyez extrêmement prudent lorsque vous déplacez un appareil électrique contenant
des liquides chauds.
• Pour mettre l’appareil sous tension, branchez le cordon d’alimentation dans
une prise de courant murale. Pour mettre l’appareil hors tension, placez n’importe
quelle commande sur « off » (arrêt), puis débranchez la fiche d’alimentation de la
prise murale.
• N’utilisez pas l’appareil à une fin autre que celle à laquelle il est destiné.
• Le cordon d’alimentation fourni est court pour éviter qu’il s’enchevêtre ou
fasse trébucher quelqu’un.
• Vous pouvez utiliser une rallonge électrique, à condition d’être très prudent.
• Si vous utilisez une rallonge électrique, assurez-vous que sa puissance
nominale est au moins égale à celle de l’appareil et que le cordon est placé de façon
à ne pas pendre du plan de travail ou de la table, pour éviter que quelqu’un trébuche
ou que les enfants puissent tirer dessus. La rallonge doit comporter trois fils, avec
une mise à la terre.
• N’immergez jamais le stérilisateur ou le cordon d’alimentation dans l’eau.
• Lorsqu’il est en marche, le stérilisateur contient de l’eau chaude. Faites
attention de ne pas renverser d’eau ni de vous éclabousser lorsque vous enlevez le
contenu du stérilisateur.
• Cet appareil comporte une fiche polarisée (une broche est plus large que l’autre).
Pour réduire les risques de chocs électriques, cette fiche est conçue pour s’insérer
d’une seule façon dans une prise électrique. Si elle ne s’insère pas complètement
14
Page 15

dans la prise, inversez-la. Si elle n’y entre toujours pas, appelez un électricien
qualifié. N’essayez pas de modifier la fiche.
• NE PAS UTILISER COMME SOURCE DE CHAUFFAGE AMBIANT.
CONSERVEZ CES INSTRUCTIONS
Merci d’avoir acheté le stérilisateur à biberons Dr. Brown’s Natural Flow® Deluxe. Il a
été conçu pour fournir aux parents et autres personnes chargées de garder l’enfant un
moyen simple, facile et fiable de stériliser les biberons Dr. Brown’s
avant de le nourrir. Cet appareil fonctionne en transformant l’eau du robinet en chaleur
de vapeur d’eau intense qui tue la plupart des germes domestiques courants. Il peut
contenir six biberons Dr. Brown’s™ de 60 ml, 120 ml ou 240 ml et tous les éléments
associés, notamment les tétines, les bagues, les joints, les tiges et les capuchons de
voyage. Il peut également recevoir des biberons de la plupart des principales marques
concurrentes. L’appareil peut également être utilisé pour stériliser d’autres éléments
et accessoires tels que les sucettes, les jouets de dentition, les jouets, les tasses,
les ustensiles et les composants de tire-lait. Ils doivent être capables de résister à
l’eau bouillante pour pouvoir être stérilisés dans cet appareil. Veuillez vérifier avec le
fabricant des autres éléments.
Étant nous-mêmes des parents, nous savons à quel point le bien-être de votre bébé
est important. Cet appareil vous aidera à rendre plus stériles les biberons et autres
accessoires d’alimentation de votre bébé.
Veuillez lire l’INTÉGRALITÉ du MODE d’EMPLOI,
y compris les IMPORTANTES MESURES DE
PRÉCAUTIONS avant d’utiliser votre nouveau
stérilisateur à biberons Dr. Brown’s Natural Flow®
Deluxe pour la première fois. Une copie de ce mode
d’emploi est également disponible en ligne sur
www.handi-craft.com.
IMPORTANT : versez de l’eau dans l’appareil avant
de le mettre en marche.
PIÈCES :
A. Couvercle supérieur
B. Couvercle principal
C. Boîtier principal.
Compartiment de
chauffage à l’intérieur.
D. Bouton de démarrage
E. Pincettes
F. Gobelet de mesure
G. Intercalaire amovible
H. Panier amovible
E
G
H
F
™
et leurs éléments
A
B
C
D
15
15
Page 16

MODE D’EMPLOI :
1. Avant d’utiliser cet appareil, il est important que tous les biberons, les éléments
des biberons et les autres accessoires soient propres. Ils doivent être lavés, rincés
et vides.
2. Placez l’appareil sur une surface plane et hors de la portée des enfants, où il ne
peut être ni cogné ni déplacé durant le fonctionnement.
3. Enlevez le gobelet de mesure du compartiment de rangement latéral.
4. Remplissez le gobelet de mesure jusqu’à la ligne de remplissage moulée à l’avant
du gobelet de mesure avec de l’EAU DOUCE FROIDE, puis versez l’eau
AU FOND DU COMPARTIMENT DE CHAUFFAGE.
REMARQUE : NE PAS DÉPASSER la quantité d’eau recommandée. Veuillez noter
que l’eau calcaire peut augmenter la formation de dépôts ou d’autres résidus sur
la plaque chauffante. Si votre eau est calcaire, nous vous conseillons d’utiliser de
l’eau distillée.
5. Placez le panier amovible (pièce H) dans le compartiment de chauffage du
stérilisateur. Agencez les biberons et les autres éléments comme indiqué de la
fig. A à la fig. H.
REMARQUE : À cause de la différence de taille entre les biberons et les éléments
standard et les biberons à col large, différentes dispositions sont présentées.
6. Insérez l’intercalaire amovible (pièce G).
7. Refermez le couvercle principal (pièce B), puis agencez les éléments sur la grille
comme indiqué sur la fig. D et la fig. H.
8. Refermez le couvercle supérieur (pièce A).
REMARQUE : Au moment de brancher le stérilisateur pour la première fois,
vous remarquerez que le voyant de marche s’allume. IL NE S’AGIT PAS D’UNE
ERREUR. Après le premier cycle, l’unité se mettra automatiquement à l’arrêt.
9. Branchez le cordon d’alimentation dans une prise électrique. Appuyez sur
le bouton de démarrage (pièce D). Un voyant s’allume derrière le bouton de
démarrage pour indiquer que l’appareil est en fonctionnement et produit de la
vapeur. Ce voyant reste allumé jusqu’à la fin du cycle de stérilisation. Un cycle
dure environ 12 minutes, mais cette durée peut varier suivant la quantité d’eau que
vous ajoutez et d’autres facteurs liés à l’environnement. À la fin du cycle, le voyant
s’éteint. Laissez l’appareil refroidir pendant au moins 10 minutes entre les cycles
et avant de l’ouvrir et de manipuler les biberons et les éléments.
10. Ouvrez le couvercle principal, puis retirez tous les biberons et placez-les sur un
plan de travail ou toute autre surface plane. Ouvrez le couvercle supérieur et
réassemblez les biberons avec les divers composants.
16
16
Page 17

Fig. A
Fig. B
Agencement des tiges pour col standard
Fig. C
Agencement des capuchons pour col standard
Fig. E
Agencement des tiges pour col large
Fig. G
Agencement des biberons à col standard de 60 ml,
120 ml et/ou 240 ml
Fig. D
Agencement des éléments pour col standard
Fig. F
Agencement des biberons à col large de
120 ml et/ou 240 ml
Fig. H
Agencement des capuchons pour col large
Agencement des éléments pour col large
17
Page 18

NETTOYAGE DE L’APPAREIL :
S’il est utilisé régulièrement, le stérilisateur à biberons Dr. Brown’s Natural Flow®
Deluxe doit être nettoyé au moins une fois par semaine. Attendez au moins 60 minutes
après un cycle de stérilisation pour permettre au mécanisme de refroidir. Avant
de nettoyer l’appareil, débranchez TOUJOURS la fiche d’alimentation de la prise
de courant.
• L’intercalaire amovible, le panier amovible, les pincettes et le gobelet de mesure
peuvent être nettoyés dans de l’eau savonneuse chaude et rincés entièrement.
• L’extérieur de la base et le compartiment de chauffage ainsi que les deux couvercles
peuvent être nettoyés avec une éponge humide ou un chiffon humide.
REMARQUE : NE PAS IMMERGER LA BASE DU STÉRILISATEUR DANS L’EAU.
NETTOYAGE DE L’ÉLÉMENT CHAUFFANT :
Des dépôts de minéraux peuvent se former sur l’élément chauffant métallique situé en
dessous de la grille, dans le fond du compartiment. Il est donc important de détartrer
l’appareil tous les mois pour qu’il continue à fonctionner correctement.
• Débranchez l’appareil.
• Enlevez l’intercalaire et le panier.
• Mélangez 60 ml d’eau froide et 30 ml de vinaigre blanc et versez l’ensemble
directement sur l’élément chauffant.
• Mettez l’appareil en marche et laissez-le fonctionner jusqu’à ce que le mélange se
soit évaporé et que toute trace de tartre ait disparu.
REMARQUE : N’UTILISEZ PAS DE PRODUITS ABRASIFS DURS NI DES SOLVANTS
POUR NETTOYER LE COMPARTIMENT DE CHAUFFAGE OU LES ÉLÉMENTS
CHAUFFANTS, CAR ILS PEUVENT CAUSER DES DOMMAGES IRRÉVERSIBLES.
VEILLEZ À CE QUE LA PIÈCE SOIT BIEN AÉRÉE LORSQUE VOUS EFFECTUEZ UN
DÉTARTRAGE AU VINAIGRE.
18
Page 19

LIMITED PRODUCT WARRANTY:
The Dr Brown’s Natural Flow® Deluxe Bottle Sterilizer includes a one year warranty
against defects in material and workmanship from date of purchase. In the unlikely
event of a malfunction or defect during the warranty period, Handi-Craft
®
Company, at
its option, will replace or repair the product under warranty. Upon receipt of the product
and the proof of purchase with a valid date of purchase, the defective part will be
immediately repaired or replaced and returned to you free of charge (in USA only).
Please send the defective unit, proof of purchase with valid date of purchase and
description of the problem to:
®
Handi-Craft
Company
4433 Fyler Ave.
St. Louis, MO 63116
Attention: Dr. Brown’s Natural Flow
®
Deluxe Bottle Sterilizer Warranty
PLEASE NOTE: This warranty does not cover a defect that has been
caused by negligence, accidents or improper use of the appliance.
If you have any question please contact us at handi-craft.com or 1-800-778-9001.
Household use only. 1 Year Limited Warranty.
GARANTÍA LIMITADA DEL PRODUCTO:
El Esterilizador de Biberones Deluxe Dr. Brown’s Natural Flow® incluye una garantía
de un año contra defectos en materiales y manufactura a partir de la fecha de compra.
En el raro caso que funcione mal o tenga un defecto durante el período de garantía, la
Compañía Handi-Craft
Al recibir el producto y la prueba de compra con una fecha válida de compra, la parte
defectuosa será reemplazada o reparada y el aparato le será devuelto sin cargo alguno
(en los Estados Unidos solamente).
Por favor envíe la unidad defectuosa con la prueba de compra que tenga la fecha válida
de la compra y una descripción del problema a:
®
Handi-Craft
Company
4433 Fyler Ave.
St. Louis, MO 63116
Attention: Dr. Brown’s Natural Flow
POR FAVOR OBSERVE: Esta garantía no cubre un defecto que haya sido causado por
negligencia, accidentes o uso inapropiado del aparato.
Si tiene alguna pregunta comuníquese con nosotros en handi-craft.com o al
1-800-778-9001.
Para uso doméstico únicamente. Garantía limitada de 1 año.
®
, a su opción, reemplazará o reparará el producto bajo garantía.
®
Deluxe Bottle Sterilizer Warranty
19
Page 20

GARANTIE LIMITÉE SUR LE PRODUIT :
Le stérilisateur Dr. Brown’s Deluxe Natural Flow® comporte une garantie d’un an
contre les défauts de fabrication et de matériel à partir de la date d’achat. Dans le
cas improbable où une défectuosité ou un défaut se produirait pendant la période de
garantie, Handi-Craft
garantie. Dès réception du produit et de la preuve d’achat portant une date d’achat
valide, la pièce défectueuse sera réparée ou remplacée et le produit vous sera retourné
sans frais (États-Unis seulement).
Veuillez envoyer l’appareil défectueux, la preuve d’achat portant une date d’achat valide
et la description du problème à l’adresse suivante :
Handi-Craft
4433 Fyler Ave.
St. Louis, MO 63116
Attention: Dr. Brown’s Natural Flow
REMARQUE : Cette garantie ne s’applique pas en cas de défauts causés par de la
négligence, des accidents ou un usage inapproprié de l’appareil.
En cas de questions, n’hésitez pas à nous contacter via notre site handi-craft.com
ou par téléphone au : (+1) 800 778 9001
Usage domestique uniquement. Garantie limitée de 1 an.
®
Company
®
Company, remplacera ou réparera, à son choix, le produit sous
®
Deluxe Bottle Sterilizer Warranty
Handi-Craft® Company
St. Louis, Missouri 63116 USA
www.handi-craft.com
Made in China. Fabricado en China.
Fabriqué en Chine.
©2012 Handi-Craft Company
 Loading...