

Page 1
NL1 234
COM OFF ON
MAINS
FUSED 3A
LINK FOR
230V OUTPUT
WALLPLATE CLOCK
A B
C D
Installation instructions
MAKE SURE MAINS INPUT HAS
A 3 AMP FUSE FITTED.
Installation should be carried
out by a qualified electrician or
heating engineer.
Position the wallplate with
70 mm clearance to its right,
25 mm above and 150mm below.
Ensure that the supporting
surface will fully cover the back
of the timeswitch.
Fix the wallplate, terminals at
the top, either direct to a flat
wall using wall plugs and 1" x
No.6 woodscrews or on a flush
mounting single conduit box
type UA1 (BS4662) using M3.5 x
14 mm screws. DO NOT use a
surface mounting box.
Make wiring connections as
shown in the wiring diagram.
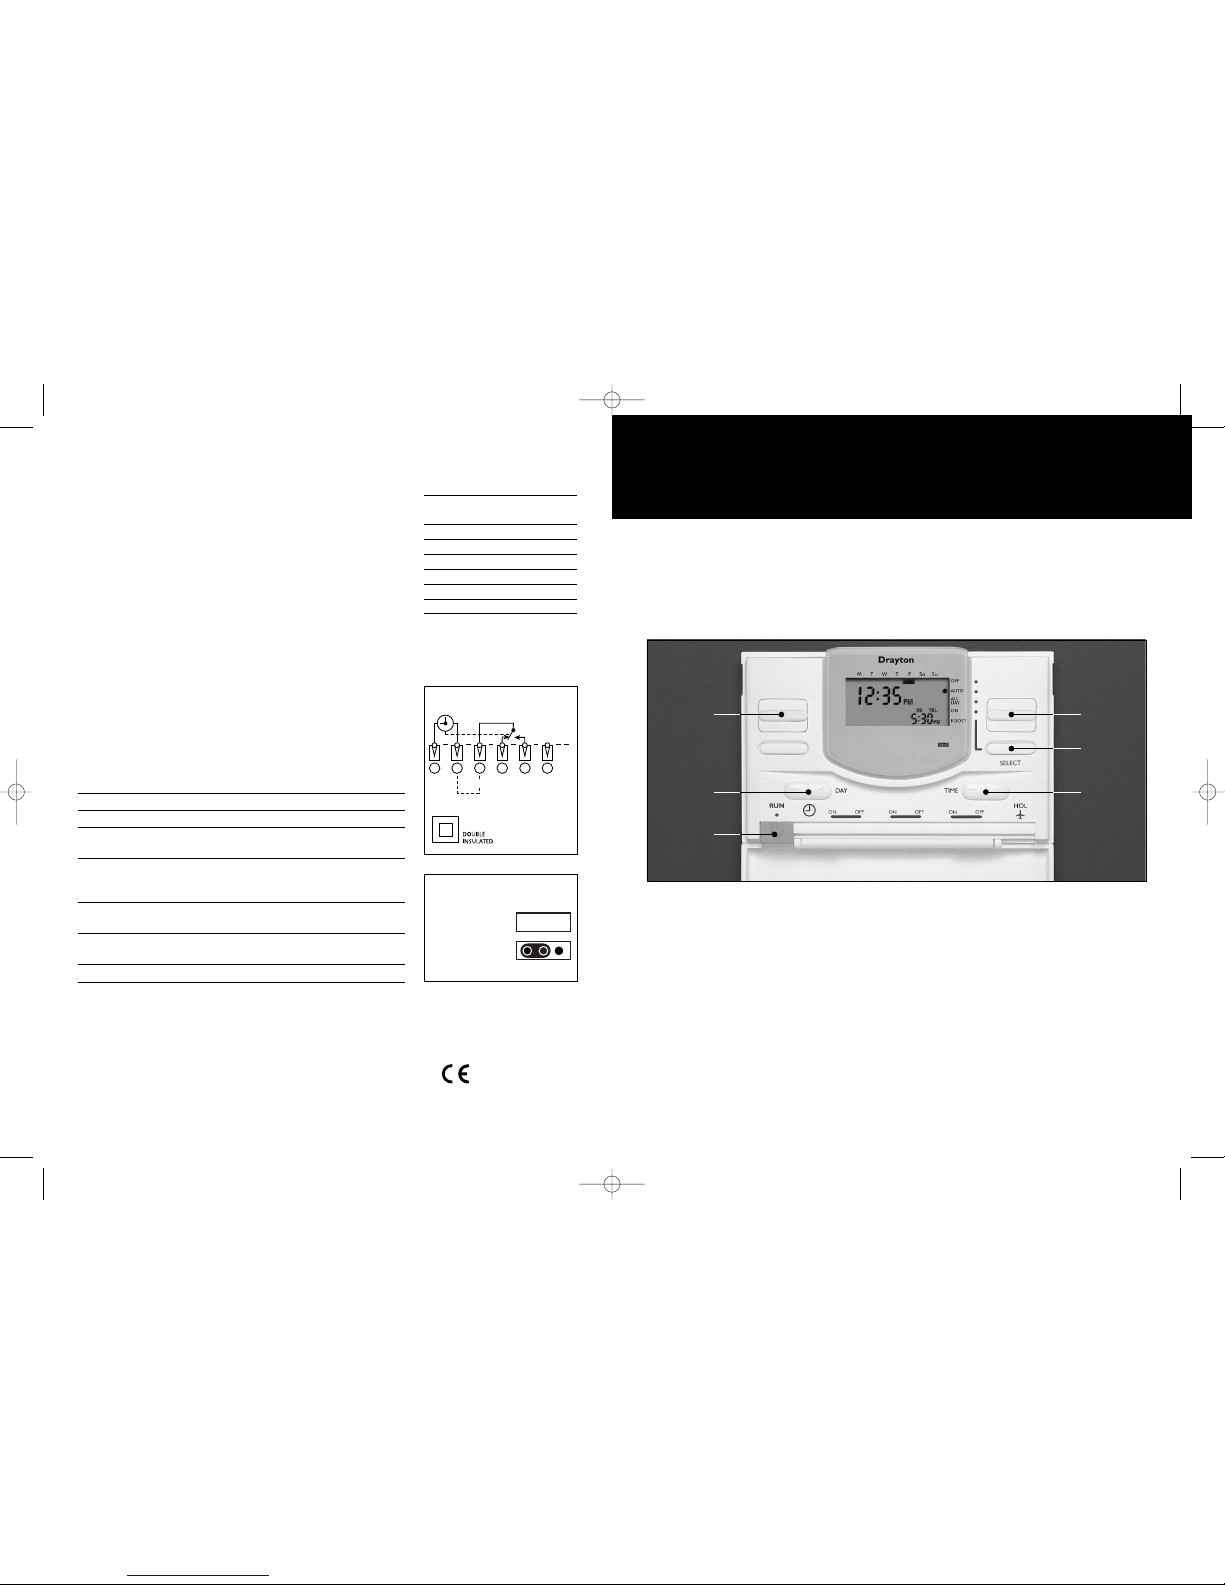
Tempus 1 electronic timeswitch
User instructions
Tempus 1 has volt-free switching
so a link from L to 1 is required
for 230V output. For surface
wiring, snap out the cable entry
strip on the bottom edge of the
wallplate. Tempus 1 is double
insulated and needs no earth connection but an earth continuity
terminal is provided if required.
Select 5/2 day or 24HR mode
referring to the jumper position
diagram.
There are two positions marked
C/D. The jumpers should be
removed if necessary and placed
across the pins which correspond
to the desired option. A/B are
not used.
Fit the Tempus 1 onto the
wallplate and tighten the
securing screws. Check that the
fuse is rated correctly (3A) and
switch on the mains supply.
Never fit the
programmer to a live
wallplate
Jumper position
A = Not used
B = Not used
C = 5/2 day mode
D = 24 hour mode
Place the jumper
across the two pins
Wiring connections
C
onforms to the essential requirements
of the following directives:
89/336/EEC – Electromagnetic compatibility
73/23/EEC – Low voltage directive
Drayton
Advance Boost
Select
Day Time
Slider
switch
The Tempus 1 electronic timeswitch will automatically switch
ON and OFF up to three times a
day. You can select one set of
times for weekdays and different
times for weekends (5/2 day), or
programme each day of the
week the same (24 hour).
The BOOST feature gives an
extra one or two hours ON time
when selected. The display will
show the next switching time as
well as the actual time of day. In
the event of a power failure, the
battery back-up will hold the
programme times in memory.
All changes to clock and
programme times are made
using the slider switch, together
with the TIME and DAY buttons.
Follow the step-by-step
instructions overleaf to set your
desired programme.
Important note:
If you are replacing an old
style Tempus, move the wire
connected to terminal 2 on the
wall-plate to terminal 3 (ON).
Please read the following
notes before programming
your Tempus
You cannot set the first ON
before midnight (i.e. the
previous day).
If you try to set an ON time
after it's matching OFF time,
both will ‘lock’ and the ON and
OFF symbols in the display will
flash alternately.
Press SELECT and TIME +at
the same time to return all
settings to factory pre-sets.
The slider switch must be in
the RUN position before the
cover will close.
To select 5/2 day or 24 hour
modes see installation
instructions on back page.
Customer Service Tel: 0845 130 5522
Customer Service Facsimile: 0845 130 0622
Technical Helpline Tel: 0845 130 7722
Website: www.draytoncontrols.co.uk
Email: customer.care@invensyscontrols.com
Invensys continuously seek to improve products and reserve the right to make
changes without notice
090-807 Issue C
Technical data
Voltage 230V AC +15% -10% 50 Hz
Rating 2 (1) A 230V AC
Wiring Designed for Fixed Wiring only
to comply with current I.E.E. regulations
Battery Backup Display: Typically 1 hour
Timekeeping: 7 to 8 hours
Programme: Minimum 11⁄2 years
Programme
Resolution 10 minutes
Ambient Operating: 0°C to 50°C
Temperature Storage: -20°C to 50°C
Maintenance No user maintenance should be attempted.
Factory pre-set
programme
24 hour Sat & Sun
or Mon-Fri
1st ON 6.30am 7.00am
1st OFF 8.30am 9.00am
2nd ON 12.00 noon 12.00 noon
2nd OFF 12.00 noon 12.00 noon
3rd ON 4.30pm 4.00pm
3rd OFF 10.30pm 11.00pm
Invensys Controls Europe
Tempus 1 user inst 090-807 IssC 5/5/06 00:15 Page 1
Page 2
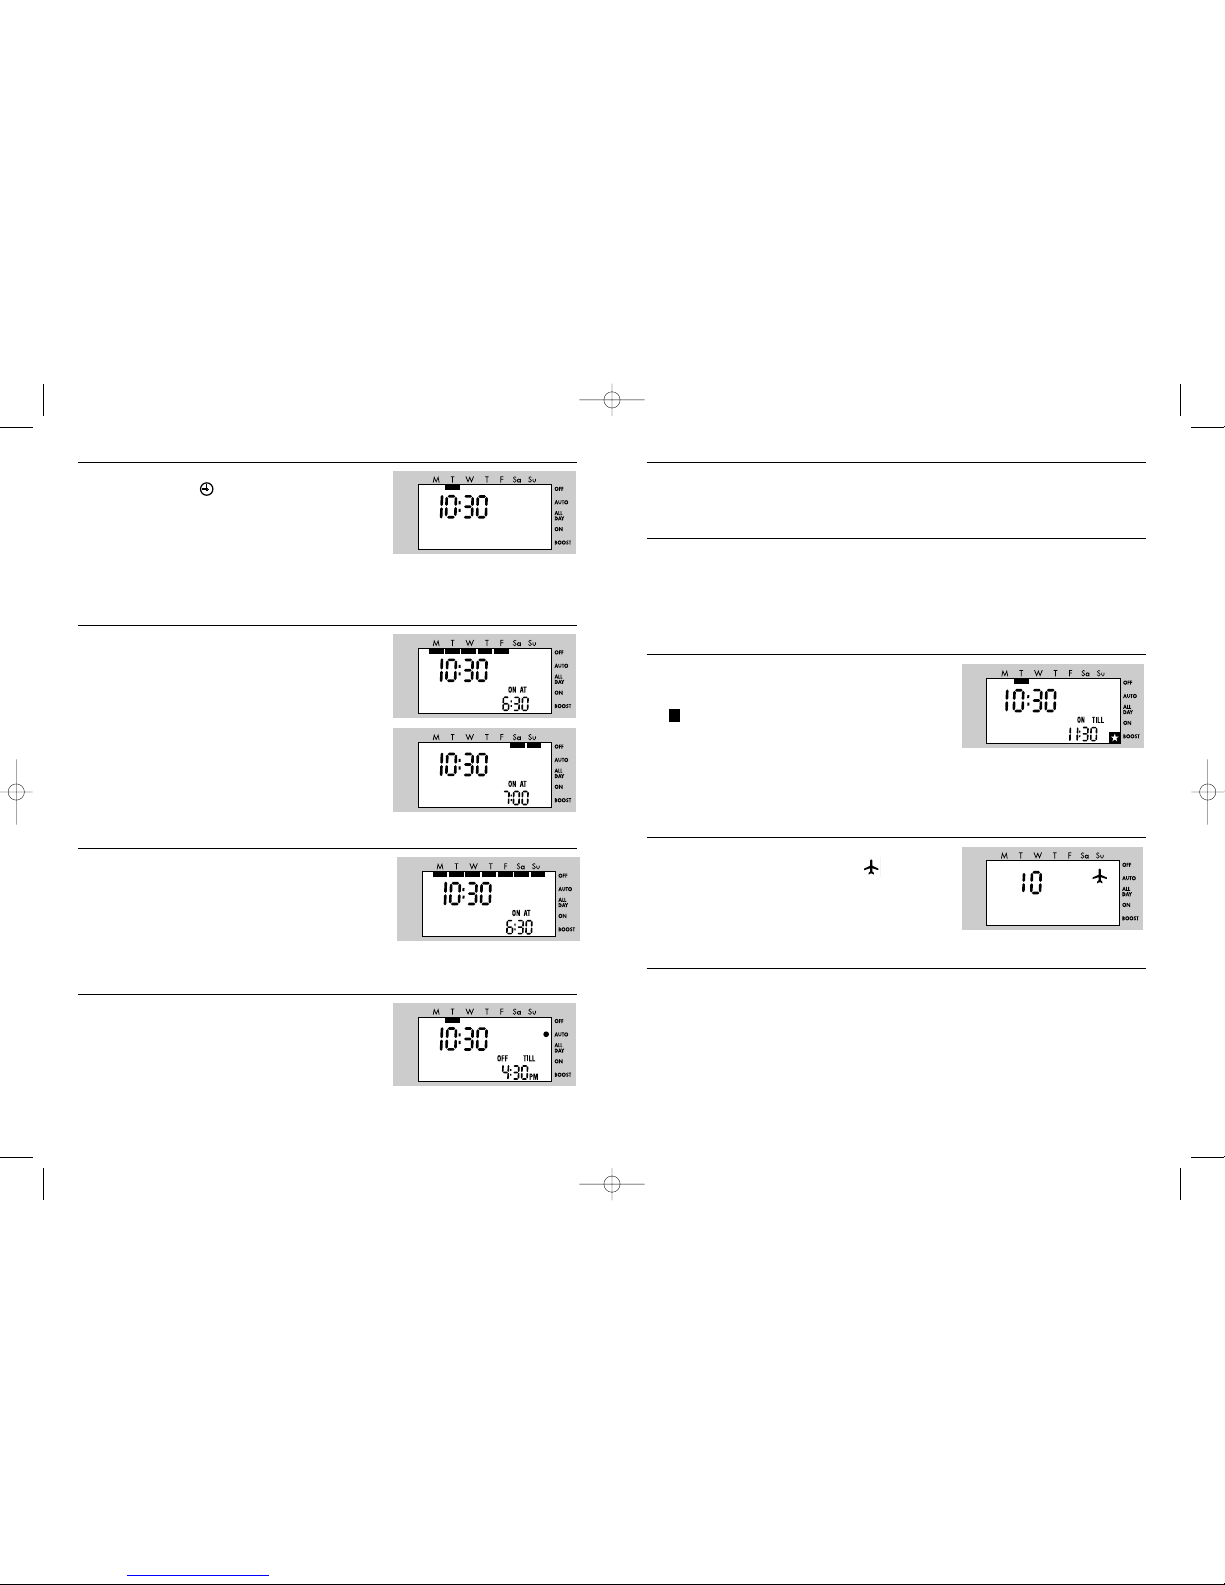
Setting the clock
Move slider switch to the position.
Press DAY button to move
n
symbol to today's day.
Press TIME button to set time.
(Morning times do not have AM symbol).
Return slider switch to RUN position if you want to use the
pre-set programme times or see below to make changes.
During installation, your Tempus 1 will have been set
for either 5/2day or 24 hour programming. Refer to the
appropriate section below.
Setting the programme in 5/2 day mode
Move the slider switch to the first ON position. The display will
now show the first ON time and the nsymbol will be below
the days M-F.
If the setting is suitable, do nothing more. Press the TIME button
if you wish to alter settings.
Move the slider switch to all the ON and OFF markers, making
changes as required.
Move slider switch back to the first ON.
Press the DAY button once to move the
n
symbol to Sa
and Su.
The display will now show the first ON for the weekend.
Change times as required and do the same with all ON's and OFF's.
Return slider switch to the RUN position.
Setting the programme in 24hr mode
Move the slider switch to the first ON position. The display will
now show the first ON time and the nsymbol will now be
below all the days of the week. If the setting is suitable, do
nothing more. Press the TIME button if you wish to alter
settings.
Move the slider switch to all the ON and OFF markers making
changes as required.
Return slider switch to RUN position.
Operating mode
Press SELECT button to choose either:
OFF = Continuously OFF
AUTO
= Switching ON and OFF as programmed
ALL DAY = On once from first ON to last OFF
ON
= Continuously ON
The lsymbol on the display will indicate which mode you have
selected. ON, OFF and the next switching times are also shown.
Your Tempus is now programmed to your
requirements and ready to operate. The following
features are used to make temporary changes
without affecting the programme.
Advance
Press the ADVANCE button to temporarily override the
programmed times, or go forward to the next period. If your
Tempus is OFF, it will switch ON, and vice versa. Note that the
displayed switching time will change. Pressing ADVANCE again
will cancel the override and return to the original programme.
ADVANCE will only operate in AUTO or ALL DAY modes.
Boost
Press the BOOST button once for one extra hour ON, or twice
for two hours.
The H symbol will appear in the display with a new next
switching time.
Press again to cancel BOOST and return to programme.
Pressing ADVANCE will also cancel BOOST.
Pressing BOOST during an ON period will extend the ON time
by one or two hours.
Whilst the programme is OFF, pressing BOOST within one hour
of the next ON will move the programme into that period.
Holiday
Move the slider switch to the position marked . Press TIME
button to set number of days (midnight to midnight) the system
is required OFF.
Return the slider switch to RUN position.
The system will now shut down for the number of days set.
Pressing any key will cancel holiday settings.
BST/GMT time changes
Use this feature to change the clock by one hour in the spring
and autumn.
Do not move the slider switch. Simply press TIME
+
once to go
forward one hour, or TIME – to go back.
Tempus 1 user inst 090-807 IssC 5/5/06 00:15 Page 3
 Loading...