

Drayton Lifestyle LP111, Lifestyle LP711, Lifestyle LP241, Lifestyle LP522, Lifestyle LP722 Installation Instructions Manual
...Page 1
Changing the timings
Pressthe SET? button and you’ll see ‘SETPROG?’.
Set all weekdays
Firstyou set the times that are going to bethe same for each
weekday,then you can selecteach day individually and make
anyfurther adjustments. If you wanteach day to be quite
different,go straight to ‘Set each day’.
Pressthe YES button, and the display willask ‘SET MON to FRI
PROG?’.
PressYES and you’ll see ON1, the start of your first heating period.Adjust it in 1-minute steps usingthe–and + buttons.
If the–and+ buttons are held down, the time changesin
10-minutesteps.
PressSET?, and you’ll see OFF1, theend of your first heating
period.Adjust this in the same way, press SET?,then repeat
the procedurefor ON2, OFF2, ON3 and OFF3.
Set each day
If,after you’ve set OFF3 youwant to fine-tune one or more
weekdays,press SET? until you findthe first day you want to
adjust– then go through the procedure, alteringany time you
wish. PressSET? to move on to the next day.When you’ve
finished, pressSET? until you see ‘SET SATSUN PROG?’.
If youdon’t want to alter anyindividual days, keep pressing
SET?until you see ‘SET SAT SUN PROG?’.
Set weekend
PressYES and alter ON1, OFF1, ON2, OFF2, ON3and OFF3
timesin the same way.
Set each day
If,after you’ve set OFF3 forboth SAT & SUN, you want to finetune Saturdayor Sunday,press SET? until you find the firstday
you wantto adjust – then go through the procedure, alteringany
timeyou wish. Press SET? to move on tothe next day. When
you pressSET? after setting your hot waterfor Sundays, the programmerwill go back to normal operation.
If youdon’t want to alter eitherday, keep pressing SET?
untilthe programmer goes back to normal operation.
SAT
THE LP11224hr ELECTRONIC PROGRAMMER
LP112–a24hr program,with linked central heating and hot
water onfor up to 3 heating periods each day,and every day
the same.
If the timingshaven’t been set for you, then your programmer
will stillbe on the factory-set standard 24hr program, with
centralheating and hot water operating togetheron the
same settingsfor every day of the week. But it’s easy to
make changes–justfollow the instructions.
Wantto leaveatiming as it is? Press SET? andmove on to
the next one.
If youneed to reset your timings to the standard program
andstart again, press ‘SET’ and ‘+’ together to goback to
the pre-setprogram.
If youdon’t press anything for two minut
es,the programmer
automaticallygoes back to normal operation.
The standardprogram
Yoursystem will come on for up to3 heating periods every
24hrs.ON1 starts the first one, OFF1 finishes it, and so on.
Noticethat on the standard program ON2 and OFF2are set
tothe same time.* This means your systemwon’t respond,
but ifyou want to activate that middle period,or change any
othertimings–read on.
Changing the timings
Pressthe SET? button and you’ll see ‘SETPROG?’.
Pressthe YES button, and you’ll see ON1,the start of your first
heatingperiod. Adjust it in 1-minute stepsusing the – and +
buttons.If the–and + buttons are held down, the time changes
in10-minute steps.
PressSET?, and you’ll see OFF1, theend of your first heating
period.Adjust this in the same way, press SET?,then repeat the
procedurefor ON2, OFF2, ON3 and OFF3.
When youpress SET? after setting OFF3,the programmer will
return tonormal operation.
THE LP24124hr ELECTRONIC PROGRAMMER
LP241–a24hr program,with central heating and hot water
working independentlyfor up to 3 heating periods each day,
andevery day the same.
If the timingshaven’t been set for you, then your programmer
will stillbe on the factory-set standard 24hr program, with
centralheating and hot water operating togetheron the
same timingsfor every day of the week. But it’seasy to make
changes,and have heating and water working independently
– justfollow the instructions.
Wantto leaveatiming as it is? Press SET? andmove on to
the next one.
If youneed to reset your timings to the standard program
andstart again, press ‘SET’ and ‘+’ together to goback to
the pre-setprogram.
If
youdon’t press anything for two minutes, the programmer
automaticallygoes back to normal operation.
The standard program
Yoursystem will come on for up to3heatingperiods every 24hrs.
ON1 starts the firstone, OFF1 finishes it, and soon. Notice that on
the standardprogram ON2 and OFF2 are set to the same time for
bothcentral heating and hot water.*Thismeans your system won’t
respond,but if you want to activate that middle period,or change
anyother timings–read on.
Changing the timings
Pressthe SET? button and you’ll see ‘SETPROG?’.
DUAL
CHANNEL
LP112, LP241, LP522, LP722
SINGLE
CHANNEL
for heating OR hot water
LP111, LP711
Technical Helpline: 0333 7000 622
Email: customer.care@draytoncontrols.co.uk
Web: www.draytoncontrols.co.uk
for heating AND hot water
Installation Instructions
06490033001 ISS L
DUAL
CHANNEL
LP112, LP241, LP522, LP722
SINGLE
CHANNEL
User’s Instructions
TIMESWITCHES
for heating OR hot water
LP111, LP711
Technical Helpline: 0333 7000 622
Email: customer.care@draytoncontrols.co.uk
Web: www.draytoncontrols.co.uk
for heating AND hot water
User Instructions
06490033001 ISS L
INSTALLATIONINSTRUCTIONS
PLEASE NOTE: INSTALLATIONMUST ONLY BE
CARRIED OUTBY A QUALIFIED ELECTRICIAN OR
HEATINGENGINEER.
MAKE SURE MAINS INPUT HAS A 3 AMP FUSE.
TECHNICAL DATA
LifestyleProgrammers and Timeswitches conform to the
essentialrequirements of these Directives:
2014/30/EU
– Electromagnetic Compatibility Directive
2014/35/EU – Low Voltage Directive
BEFORE INSTALLATION
First,make sure the mains supply is switchedoff!
PROGRAMMER ONLY
Theprogrammer must be set to the type of system it is tocontrol.The link on the back of the unit has two settings–Pand G.
P = afully pumped and controlled system–allowing
heatingand hot water to be set separately.
G =a gravity-fed hot water system – which does notallow
independentsetting of heating without hot water,though
hotwater can be controlled alone.
USING ANEXISTING WALL-PLATE
Loosenthe securing screws on the old programmer and
unplugit. Check that there’s 70mm clearance to the rightof
thewall-plate, and 25mm above it. Check the chart on the
next pageto compare terminals and if necessary,change the
wiringof the wall-plate to suit. Now plug the Lifestyleunit into
thewall-plate and tighten the securing screws.
Checkthe 3A fuse, and switch on the mains.
FITTINGANEW WALL-PLATE
Theideal location is 1.4m above floor level,with reasonable
lighting,good access, no condensation, no extremes of
temperature,andasupporting surface that fully coversthe
back ofthe unit.
Positionwith 70mm clearance to the right, 25mm above,and
sufficientroom to access the securing screws underneath.
Fix, withterminals at the top, either direct toaflatwall using wall
plugsand No. 6 x 1” (25mm) woodscrews, or on a flush mounting singleconduit box type UA1 (BS4662) usingM3.5 x 14 bolts.
DO NOTUSEASURFACE MOUNTING BOX.
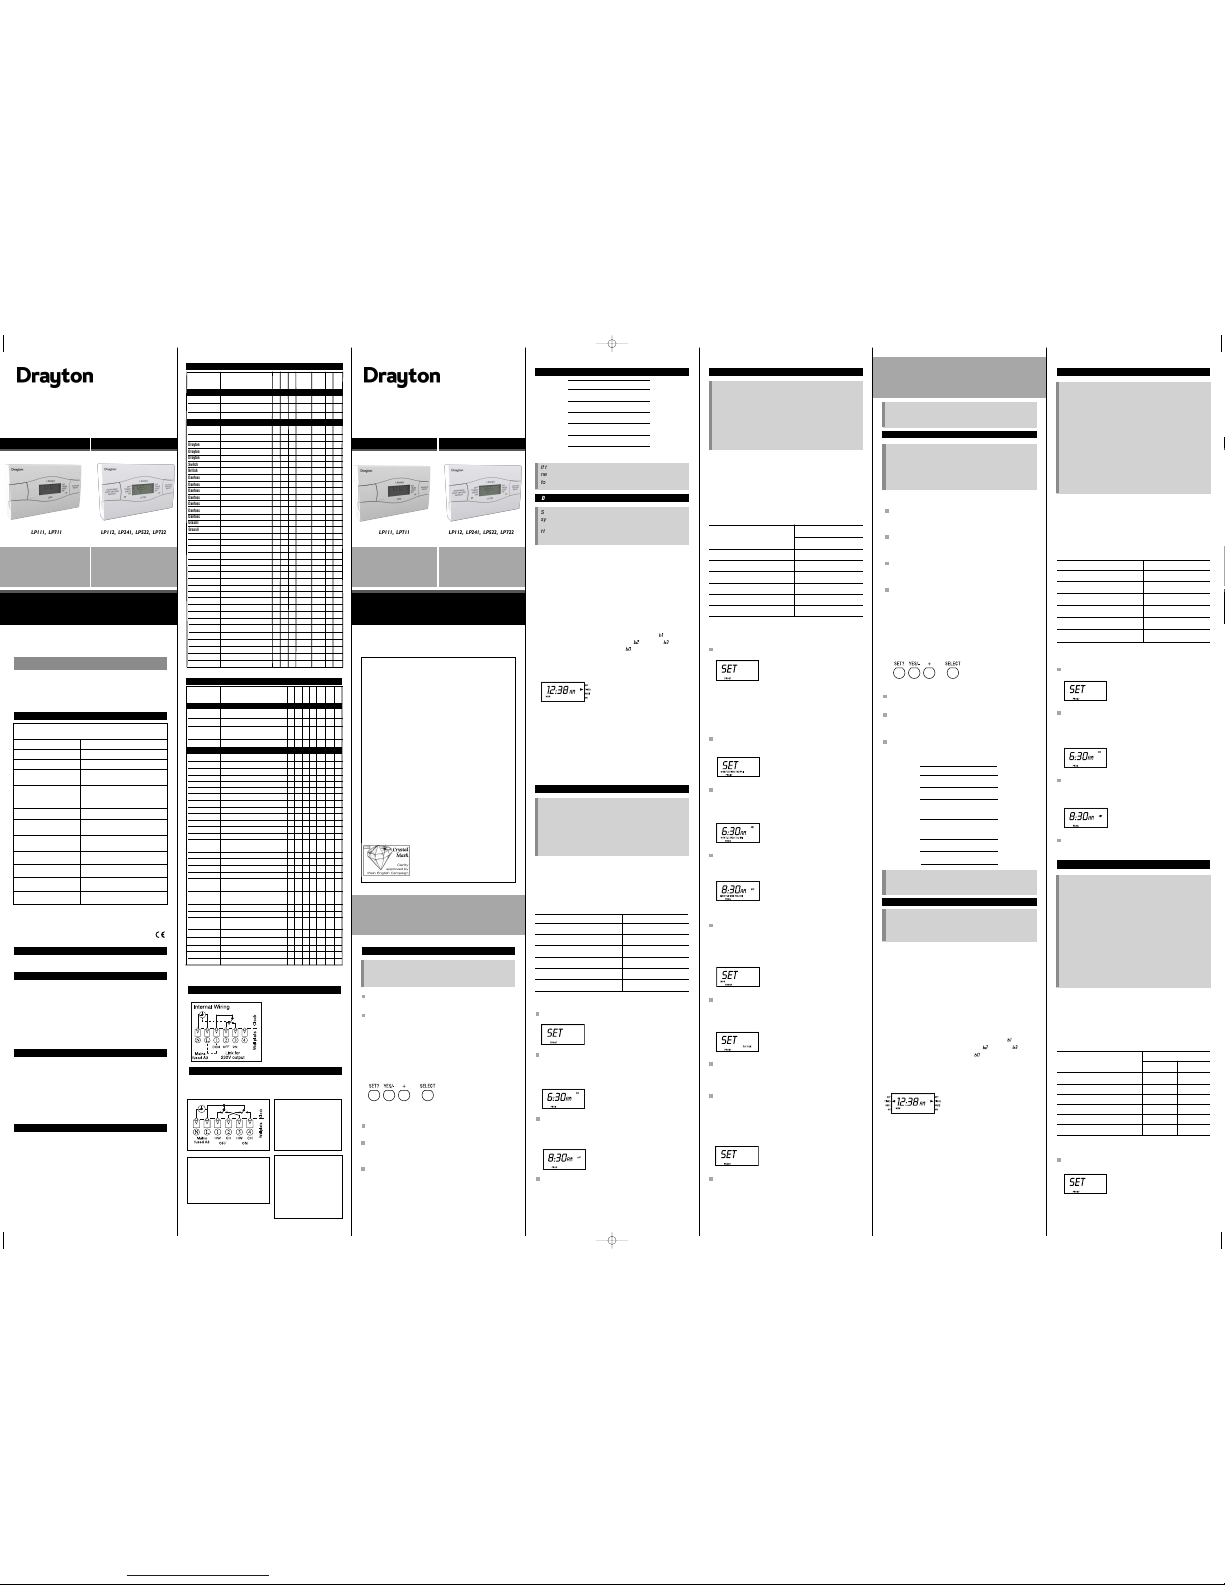
WIRING THE TIMESWITCH
Makethe wiring connections as
above.Note that the output
contactsare voltage-free, so
powerneeds to be put on to
Terminal1 either by linking from
TerminalL or from a separate
supplywith a 3A fuse.
WIRING THE PROGRAMMER
Arrowed numbersrelate to
thejunction box.
Consultboiler handbook
fordetails of pump
overrunwiring.
ConnectionCharts
Wiring ColourCodes
GR Grey
Y Yellow
BK Black
BL Blue
BR Brown
RD Red
W White
OR Orange
YG Yellow/Green
C Common
H Call for Heat
S Satisfied
N Neutral
E Earth
L Live
*ThermostatKey
USING ADRAYTON SIMP-L-FIT, ALTHOUGH NOT
NECESSARY, WILL MAKE THIS INSTALLATION EASIER.
SWITCHING
STANDARDPROGRAM
CH HW
ON 1– star t offirst timed period 6.30am 6.30am
OFF 1– end of first timed period 8.30am 8.30am
ON 2– star t ofsecond timed period* 12.00pm 12.00pm
OFF 2– end of second timed period* 12.00pm 12.00pm
ON 3– star t ofthird timed period 4.30pm 4.30pm
OFF 3– final switch-off of the day 10.30pm 10.30pm
User’s Instructions
PROGRAMMERS
SWITCHING STANDARDPROGRAM
ON 1– star t offirst timed period 6.30am
OFF 1– end of first timed period 8.30am
ON 2– star t ofsecond timed period* 12.00pm
OFF 2– end of second timed period* 12.00pm
ON 3– star t ofthird timed period 4.30pm
OFF 3– final switch-off of the day 10.30pm
INTRODUCTION Cont...
SWITCHING
ON 1– star t offirst timed period
OFF 1– end of first timed period
ON 2– star t ofsecond timed period
OFF 2– end of second timed period
ON 3– star t ofthird timed period
OFF 3– final switch-off of the day
INTRODUCTION
LifestyleTimeswitches will automaticallycontrol your system
by switchingit on and off at times that suit you. The red light
on the frontof the timeswitch shows when it’s on.
LP111 –a24hrprogram, up to3heating periods
each day,and every day the same.
LP711 –a7-dayprogram, allowing for different
timingson each day of the week, up to 3 heating periods
each day.
If theengineer hasn’t set your timings for you, your timeswitch
will work with astandard program that has been set at the
factory.If this doesn’t suit you, it’svery easy to change it –
when you’veread this introductory section, simply turn to
thepage for your timeswitch model.
Remember:
Make yourchanges using the SET?, YES/-, and + buttons.
Youcan’t set ON1 as the last timing before midnight, butyou
can set OFF3 aftermidnight–providing it’s not more than 23
hoursand 59 minutes after ON1.
Youneed to set the timings in sequence – i.e. ON1,OFF1, ON2,
OFF2, ON3,OFF3. If you get out of sequence, the display will
flasha warning.
SINGLE
CHANNEL
Timeswitch
DUAL
CHANNEL
Programmer
Lifestyle
SINGLE
CHANNEL
Timeswitch
DUAL
CHANNEL
Programmer
Lifestyle
What isaprogrammer?
...an explanation for householders
Programmers allow you to set ‘On’ and ‘Off’ time periods.
Some models switch the central heating and domestic hot
water on and off at the same time, while others allow the
domestic hot water and heating to come on and go off at
different times.
Set the ‘On’ and ‘Off’ time periods to suit your own lifestyle.
On some programmers you must also set whether you want
the heating and hot water to run continuously, run under the
chosen ‘On’ and ‘Off’ heating periods, or be permanently off.
The time on the programmer must be correct. Some types
have to be adjusted in spring and autumn at the changes
between Greenwich Mean Time and British Summer Time.
Youmay beable totemporarily adjustthe heatingprogramme, for example, ‘Override’, ‘Advance’or ‘Boost’. These
are explained in the manufacturer’s instructions.
The heating will not work if the room thermostat has switched
the heating off. And, if you haveahot-water cylinder, the
water heating will not work if the cylinder thermostat detects
that the hot water has reached the correct temperature.
If the engineerhas set your program and timings–youwon’t
need to doanything else. Just keep this guide inasafeplace
for futurereference.
Sometimesyou might need to change the way youuse your
system temporarily– perhaps due to an exceptionally cold day.
Here’s howto do it–without affecting the timings in your
program.
DAY-TO-DAYVARIATIONS
THE LP111 24hr ELECTRONIC TIMESWITCH
Switching on and off
Over-riding the program
OFF = continuously off.
TIMED = on for up to3 periods a day.
ONCE = on for 1 periodaday,from the start of ON1
to theend of OFF3.
ON = continuouslyon.
At theside of the display there are
four operatingmodes:
Use the SELECTbutton under the flap to change the mode.
This won’talter the timings in your program, which you can
returnto by selecting TIMED.
LP111–a24hrprogram, up to 3 heating periods each day,
andevery day the same.
Wantto leaveatiming as it is? Just press SET? andmove on
to the nextone.
If youneed to reset your timings to the standardprogram
andstart again, press ‘SET’ and ‘+’ together to goback to
the pre-setprogram.
The standard program
Yoursystem will come on for up to 3 heatingperiods every
24hrs. ON1starts the first one, OFF1 finishes it, and so on.
Noticethat ON2 and OFF2 are set to the same time.* This
means yoursystem won’t respond, but if you want to activate
that middleperiod or change any other timings–read on.
SWITCHING STANDARDPROGRAM
ON 1– star t offirst timed period 6.30am
OFF 1– end of first timed period 8.30am
ON 2– star t ofsecond timed period* 12.00pm
OFF 2– end of second timed period* 12.00pm
ON 3– star t ofthird timed period 4.30pm
OFF 3– final switch-off of the day 10.30pm
Pressthe YES button, and you’ll see ON1, the start of your
first heatingperiod. Adjust it in 1-minute steps using the –
and + buttons.If the–and + buttons are held down, the
time changesin 10-minute steps.
PressSET?, and you’ll see OFF1, the end of your first heating
period.Adjust this in the same way,press SET?, then repeat the
procedurefor ON2, OFF2, ON3 and OFF3.
When youpress SET? after setting OFF3, the timeswitch will
returnto normal operation.
On thefront of the timeswitch there is an Advance/Boost button.
It allowsyou to switch your system either on or off, irrespective of
theprogram. So if the heating is off, and you wantwarmth now,
you can either–
1. PressAdvance to switch it on (ADV will be displayed), andit will
stay onuntil the end of the next period. Or if the heating is on
and you don’t needit, press Advance and it will go off until the
beginningof the next ON period.
Advancewill only operate in TIMED or ONCE modes.
2. Press&HoldBoost to switch on for an extra hour ( & BST will
be displayed),then Press again for two ( ) or three ( ) hours.
Tocancel Boost, Press Boost again ( ). Orif the heating is
alreadyon, using Boost will extend the
ON timeby one, two or
threehours.
Changing the timings
Pressthe SET? button and you’ll see ‘SET PROG?’.
If the engineerhas set your program and timings–you
wont needto do anything else. Just keep this guide inasafe
placefor future reference.
INTRODUCTION
There are 4 modelsin the Lifestyle range:
LP112–a24hr program, with linked central heating andhot
wateron for up to 3 heating periods each day,and every day
the same.
LP241–a24hr program, with central heatingand
hot waterworking independently for up to 3 heatingperiods
eachday, and every day the same.
LP522–a5/2-day program allowingfor different
timingsat the weekends, withcentral heating and hotwater
workingindependently for up to3heatingperiods each day.
LP722–a7-day program allowing for different
timingson each day of the week, withcentral heating and
hot waterworking independently for up to 3 heatingperiods
eachday.
If the engineer hasn’t set your timings for you, your programmer
will work with a standard program that has been set at the
factory.If this doesn’t suit you, it’s veryeasy to change it –
whenyou’ve read this introductory section,simply go to the
sectionthat contains your programmer model.
Remember:
Lifestyleprogrammers will automatically switch your central
heatingand hot water on and off at timesthat suit you.
Dependingon your system, central heating and hot watercan
either bothcome on and off at the same time, orwork
independently.The red light on the front of the programmer
showswhem each one is on
Makeyour changes using the SET?, YES/-, and + buttonson
the programmer, found under the bottom flap.
Youcan’t set ON1 as the lasttiming before midnight, but you
can setOFF3 after midnight–providing it’s notmore than 23
hours and59 minutes after ON1.
Youneed to set the timings insequence – i.e. ON1, OFF1, ON2,
OFF2,ON3, OFF3. If you get out of sequence, thedisplay will
flasha warning.
SWITCHING
ON 1– star t offirst timed period
OFF 1– end of first timed period
ON 2– star t ofsecond timed peri-
od
OFF 2– end of second timed period
ON 3– star t ofthird timed period
OFF 3– final switch-off of the day
The engineer hasset your program and timings–you
won’t needto do anything else. Just keep this guide in a
safe placefor future reference.
Sometimesyou might need to change the way you useyour
centralheating or hot water temporarily – perhaps due toan
unusuallycold day, or exceptional demandfor hot water.
Here’s howto do it–without affecting your program.
Switchingon and off
On thefront of the programmer there are twoAdvance/Boost
buttons–onefor central heating and one for hot water.They
allowyou to switch your system eitheron or off, irrespective of
the program.So if the heating or hot water is off,and you want
warmthor hot water now, you caneither –
1. PressAdvance to switch it on (ADV will be displayed),and it
willstay on until the end of the next period.Or if the heating/hot
wateris on and you don’t need it, pressAdvance and it will go
offuntil the beginning of the next ON period.
Advancewill only operate in TIMED or ONCE modes.
2. Press& Hold Boost to switch on for an extrahour ( & BST will
bedispl
ayed),then Press again for two ( ) or three ( )hours.
Tocancel Boost, Press Boostagain ( ). Or if the heating/hot
wateris already on, using Boost will extendthe ON time by one,
twoor three hours.
Over-riding the program
On eachside of the display there arefour operating modes –
onegroup for central heating, the otherfor hot water. Youcan
changemodes with immediate effect by usingthe appropriate
SELECTbutton. This won’t alter the timings in your program,
whichyou can return to by selecting TIMED.
OFF = continuously off.
TIMED = on forup to 3 periods a day.
ONCE = on for 1 periodaday,from the start of ON1
tothe end of OFF3.
ON = continuouslyon.
DAY-TO-DAYVARIATIONS
THE LP7117-DAY ELECTRONIC TIMESWITCH
LP711–a7-dayprogram, allowing for different
timingson each day of the week, up to 3 heatingperiods
each day.
Wantto leaveatiming as it is? Just press SET?and move on
to the nextone.
If youneed to reset your timings to the standard programand
start again, press‘SET’ and ‘+’ together to go backto the
pre-setprogram.
The standard program
Yoursystem will come on for up to3 heating periods every
24hrs.ON1 starts the first one, OFF1 finishes it, and so on.
Noticethat ON2 and OFF2 are set to the sametime.* This
meansyour system won’t respond, but if you wantto activate
that middleperiod or change any other timings–rea
d on.
SWITCHING
STANDARDPROGRAM
MON-FRI SAT-SUN
ON 1– star t offirst timed period 6.30am 7.00am
OFF 1– end of first timed period 8.30am 9.00am
ON 2– star t ofsecond timed period* 12.00pm 12.00pm
OFF 2– end of second timed period* 12.00pm 12.00pm
ON 3– star t ofthird timed period 4.30pm 4.00pm
OFF 3– final switch-off of the day 10.30pm 11.00pm
06490033001 ISS L6/06/2016
on the programmer, found under the bottom flap.
LP241Si,LP522Si & LP722Si PROGRAMMERS
LP111Si& LP711Si TIMESWITCHES
Voltage
230Va.c. +10% - 10% 50Hz
ProgrammerRating
2(1) A 230V a.c. eachswitch
TimeswitchRating
2(1) A 230V a.c.
Ambienttemp
Operating:0º to 45ºC
Storage:-20ºC to 50ºC
Withoutmains power
Display:blank
Time:always kept
Programtimes: always preserved
Programmingresolution
1minute
Wiring
Fixedwiring only,to comply with
currentIEE regulations
Maintenance Mustbe maintainedbyaqualified
electricianorheating engineer
Pollution degree
Software class
Ball pressure test
temperature
Rated impulse voltage
2
2
75ºC
2.5kV
Drayton
Tempus6,7
N L 1 2 3 4
Drayton Lifestyle LP112, LP241, LP522, LP722 N L 1 2 3 4
Switchmaster N L 4 3 1400,600
(noconnection to terminal 4 on 600)
Switchmaster 805, 900, 900i N L 4 2 3 1
ACL MP(Towerchron) 2 1
ACL FP (Towerchron) 2 1 8 11 6 10
Tempus3, 4, 6,7(old models),
DanfossRandall
CP15,CP715,FP15, FP715 (Mk18
) E N L 1 2 3 4
DanfossRandall 3020P, 3060 E 7 6 4 2
DanfossRandall 4033 (link 1-6) E 7 6 5 3 4 2
DanfossRandall 102, 102E, 102E5, 102E7 (link 6-3) E 5 6 1 2
DanfossRandall 701 (link L-5 and 5-6) E N L 3 1
DanfossRandall 702 (link L-5 and 5-6) E N L 4 2 3 1
DanfossRandall 922, 972 (link L-2 and 2-5) E N L 1 4 3 6
DanfossRandall E N L 3 6 1 4SET2,SET2E , SET3E, SET3M, FP975
SET5(link L-2 and 2-5)
GrasslinTowerchron DP 72, QE2 N L 1 2 3 4
Honeywell ST 699/799 (link L-5 and 5-8) N L 7 4 6 3
Honeywell ST 6200, ST 6300, ST 6400, ST 6450 N L 1 2 3 4
Honeywell ST 7100 (link L-3 and 3-6) N L 7 4 8 5
Horstmann E N L 3 6 1 4525,527, 425 Diadem, H21, H27,
H121,Tiara (link L-2 and 2-5)
Landis&Staefa* N L 1 2 3 4RWB2,RWB2E , 20, 40, 102, 200,
252& 270, RWB9
Myson Microtimer(link L-5and 5-8) N L 7 4 6 3
PottertonMyson N L 1 2 3 4All EP2000’s, EP3000’s, EP6000’s
(linkL-5 and N-N)
PottertonMyson* Mini Minder N L 1 2 3 4
Sunvic Select207, SunPro 2000 N L 1 2 3 4
Sunvic SP50,SP100(link L-3) N L 1 4 2 5
Drayton Tempus1, 2 (new models) N L 1 2 3 4
Drayton Lifestyle
LP111,LP711, LP111Si, LP711Si
N L 1 2 3 4
Switchmaster 300 N L 4 1
ACL TC (Towerchron) 2 1 4 7
Drayton Tempus1, 2 (old models) N L 1 2 3 4
Switchmaster 980 N L 4 1
DanfossRandall TS15, 75 (Mk18) E N L 1 4 2 5/6
DanfossRandall TS715, TS715Si N L 1 4 2 3
DanfossRandall TS975 E N L 5 4 6 1,2,3
DanfossRandall SET1, SET1E E N L 5 4 6
DanfossRandall SET4 E N L 5 4 6
DanfossRandall 103, 103E, 103E5, 103E7 4 5 6 3 1 2
DanfossRandall 911, 971 E N L 5 6 4 2
GrasslinTowerchron QE1 N L 2 4
GrasslinTowerchron T2001, T2001Q E N L 7
Honeywell ST6100A, ST 6100C N L 1 4 2
Honeywell ST7000B
Horstmann Centaur SC1, SC7
L
Horstmann
CentaurPlus, C11, C17, C17-ZW
N L 2 4 3
Horstmann Emerald 423, Pearl Auto N L 2 4
Horstmann 517, Coronet, H11, H17 E N L 3 4
Landis&Staefa RWB3
N L 4 3
Landis&Staefa RWB30,RWB50, 100, 152, 170
N L 4 4 3
Landis&Staefa RWB7
PottertonMyson EP4000, 4001, 4002, 5002 N L 5 4 2
Sangamo M6
Smiths Centroller Mk1, Mk2 N L 3 2
Smiths Centroller 30 1 2 3/4
Smiths Centroller 300, 980 N L 4 1
Sunvic Select107, SunProl1000 N L 1 3 2 4
Sunvic SP20,SP35 N L 3 5 4 5
Venner Vennerette N L LINE LOAD
TIMESWITCHTERMINAL COMPARISONS
Earth
Neutral
Live
Common
On
Off
Spare
MAKE MODEL
PROGRAMMERTERMINAL COMPARISONS
CurrentModels
Earth
Neutral
Live
Ch1 on
Chl2 on
Ch3 on
Ch4 on
MAKE MODEL
Discontinued/Competitors’Models
E
4 6
3
1
Salus EP101, SP120
4
3
NL
Myson
Myson
N L 1 3 2 4
MEPIC
4
Mictrotimer (link L-5 and 5-8)
E N L 5 6
E
N L
423
3
3 2
N L 1 2 3 4
British Gas EMT2, UT1, UT2
N L 1 324
Drayton
Drayton
Drayton
N L 1 2 3 4
N L 1 2 3 4
N L 1 2 3 4
SM1
miGenie Wish 1
MiTimeMT711R, MiTime RF Pack1
CurrentModels
Discontinued/Competitors’Models
Sangamo M5 (link 1-6)
N L 1
8
N L 1 2 3 4
Salus EP200, SP220
Myson MEP2C
N L 1 2 3 4
Drayton
Drayton
Drayton
British Gas
SM2
miGenie Wish 2
MiTime MT721R, MiTimeRF Pack 2 & 3
EMP2, UP1, UP2
N L 1 2 3 4
N L 1 2 3 4
N L 1 2 3 4
N L 1 2 3 4
Cansimply beremovedfrom thebackplateand replacedwithoutany disturbance to theexisting wiring.
Page 2

Set the month
I PressSET? andthe monthwill startto flash.Use the– and+
buttonsto adjust.
Set the day
IPress SET?and the daywill startto flash.Use the– and+ but-
tonsto adjust.
Set the Day Light Saving
IPress SET?and the currentDLS status willstart toflash forday
lightsaving (BritishSummer Time).Use the– and+ buttonsto
turnon oroff.
I PressSET? togo back tonormal operation.
WEEKDAYS WEEKENDS
HW CH HW CH
ON1 –startof firsttimed period 6.30am 6.30am 7.00am 7.00am
OFF1 – endof firsttimedperiod 8.30am 8.30am 9.00am 9.00am
ON2 –startof secondtimedperiod* 12.00pm 12.00pm 12.00pm 12.00pm
OFF2 – endof secondtimedperiod* 12.00pm 12.00pm 12.00pm 12.00pm
ON3 –startof thirdtimed period 4.30pm 4.30pm 4.00pm 4.00pm
OFF3 – finalswitch-offof theday 10.30pm 10.30pm 11.00pm 11.00pm
SWITCHING
THELP522 5/2-DAY ELECTRONICPROGRAMMER Cont...
Set weekdayhot water
I Whenyou pressSET? aftersetting OFF3 forthe centralheating,
thedisplay willask ‘SETHW MONto FRIPROG?’.
IPress YES,then set yourtimes inthe same way.Remember,in
thismode youcan have differenttimes to yourcentral heatingif
youwish.
Set weekendcentral heating
IWhen youpress SET? afterOFF3 forthe weekdayhot water,
thedisplay willask ‘SETCH SATSUN PROG?’.Press YESto
confirm,and alter thetimes inthe same way.
Set weekendhot water
IWhen youpress SET? afterOFF3 forthe weekendcentral
heating,the displaywill ask‘SET HW SATSUN PROG?’.
PressYES, andfollow theprocedure.
IWhen youpress SET? afterOFF3 forHW SATSUN, the
programmerwill go backto normaloperation.
THELP522 5/2-DAY ELECTRONICPROGRAMMER
LP522– a5/2-dayprogram allowing for differenttimings at
theweekends, with centralheating and hot water working
independentlyfor up to 3 heatingperiods each day.
If thetimings haven’t been setfor you, thenyour programmer
willstill be on thefactory-set standardprogram. This means
thatcentral heating and hotwater willoperate together,with
thesame timingsfor weekdaysand differentones for the
weekend.But it’s easy to makechanges, and have heating
andwater workingindependently – justfollow the instructions.
Wantto leavea timingas it is?Press SET? andmove onto
thenext one.
If youneed toresetyour timingsto thestandardprogram
andstart again,press ‘SET’ and ‘+’ togetherto go backto
thepre-set program.
If youdon’t pressanything for two minutes,the programmer
automaticallygoes backto normal operation.
The standardprogram
Yoursystem will comeon forup to3 heatingperiods every
24hrs.ON1 startsthe firstperiod, OFF1finishes it,and so on.
Noticethat ON2and OFF2are setto thesametime.* This
meansyour systemwon’trespond, butif youwant toactivate
thatmiddle period,or changeany other timings– readon.
Changingthe timings
I Pressthe SET?buttonand you’llsee ‘SET PROG?’.
Set the weekdaycentral heating
IPress theYES button,and thedisplaywill ask‘SET CH MON to
FRIPROG?’.
IPress YESand you’llsee ON1,the startof yourfirst centralheat-
ingperiod. Adjust itin 1-minutesteps usingthe –and +buttons.If the– and+ buttonsare helddown, thetime changesin
10-minutesteps.
IPress SET?,and you’llsee OFF1,the end ofyour firstcentral
heatingperiod. Adjustthis inthe same way,press SET?, then
repeatthe procedurefor ON2,OFF2, ON3 andOFF3.
THELP722 7-DAY ELECTRONICPROGRAMMER Cont...
IWhen youpress SET? aftersetting OFF3for theweekday central
heating,the displaywill ask‘SET HW MON toFRI PROG?’.
IPress YES,then set yourhot watertimes inthe sameway.
Remember,in thismode youcan havedifferent timesto your
centralheating if youwish.
Set each day
If,after you’veset OFF3for yourhot water,you wantto fine-tune
oneor moreweekdays, pressSET? untilyou findthe firstday
youwant toadjust – thengo throughthe procedure,altering any
timeyou wish.Press SET?to moveon tothe nextday. When
you’vefinished, pressSET? untilyou see ‘SETSAT SUN
PROG?’.
If youdon’t wantto alterany individual days,keep pressing
SET?until yousee ‘SET SATSUN PROG?’.
THELP722 7-DAY ELECTRONICPROGRAMMER
LP722– a7-day programallowing for differenttimings on each
dayof theweek, withcentral heating and hotwater working
independentlyfor up to 3 heatingperiods each day.
If thetimings haven’t been setfor you, thenyour programmer
willstill be on thefactory-set standardprogram. This has central
heatingand hot water operatingtogether – with the optionof
havingdifferent timingsfor each dayof theweek. Butit’s easy
to makechanges, and have heatingand waterworking
independently– just followthe instructions.
Wantto leavea timingas it is?Press SET? andmove onto the
nextone.
If youneed toresetyour timingsto thestandardprogram and
startagain, press ‘SET’ and‘+’ togetherto goback to the
pre-setprogram.
If youdon’t pressanything for two minutes,the programmer
automaticallygoes backto normal operation.
The standardprogram
Yoursystem will comeon forup to3 heatingperiods every
24hrs.ON1 startsthe firstperiod, OFF1finishes it,and so on.
Noticethat ON2and OFF2are setto thesametime.* This
meansyour systemwon’trespond, butif youwant toactivate
thatmiddle period,change anyother timings– readon.
Changingthe timings
I Pressthe SET?buttonand you’llsee ‘SET PROG?’.
Set all weekdays
Firstyou setthe timesthat aregoing to be thesame foreach
weekday,then you canselect eachday individuallyand make
anyfurther adjustments.If youwant eachday tobe quitedifferent,go straightto ‘Seteach day.’
IPress theYES button,and thedisplaywill ask‘SET MON to FRI
PROG?’.
IPress YESand thedisplay willask ‘SETCH MONto FRI
PROG?’.
IPress YES,and you’llsee ON1,the startof yourfirst central
heatingperiod. Adjustit in1-minute stepsusing the– and +
buttons.If the– and + buttonsare helddown,the timechanges
in 10-minutesteps.
IPress SET?,and you’llsee OFF1,the end ofyour firstcentral
heatingperiod. Adjustthis inthe same way,press SET?, then
repeatthe procedurefor ON2,OFF2, ON3 andOFF3.
Technical Helpline: 0333 7000 622
Email: customer.care@draytoncontrols.co.uk
Web: www.draytoncontrols.co.uk
USERS NOTES
SETTINGTHE CLOCK Cont...
Set the minute
IPress SET?,and the minuteswill startto flash.Use the– and+
buttonsto setthe exacttime.
I PressSET?, and‘SET DATE?’appears in thedisplay.
If youdon’t wantto changethe datepress SET?to goback to
normaloperation. If youdo, goon tothe nextsection.
SETTINGTHE DATE
Theweekday is automaticallycalculated from thedate, soif
theweekday is incorrect you’llneed to reset the date.
I Pressthe SET?buttonuntil yousee SET DATE?.
Set the year
I PressYES andthe year willstart toflash. Usethe –and +but-
tonsto adjust.
Set weekend
IPress YES,and alterthe centralheatingand hotwater timesin
thesame way.
IWhen youpress SET? afterOFF3 forHW SATSUN, thepro-
grammerwill askthe questionTEST? Ifyou wantto testyour
program,see below,otherwise pressSET? again.If you don’t
wantto testyour program,press SET?again– andyou’ll be
askedthe question SETH’DAY? If youwant toset aholiday
switchoff, seepage 23,otherwise pressSET? again.If you’renot
goingto programin a holidayswitch-off, thenpress SET?again
andyour programmerwill goback to normaloperation.
Testyour program
IThis testfacilityallows youto runthrough yourprogramto check
thatthe timingsare exactlywhat youwant.
IAnswer YESto TEST?and thedisplay willshow Mondayand
a timejust pastmidnight.Press YESagain andhold itdown –
andthe displaywill startto runthrough thedays ofthe week,
pausingfor afew secondswhen itreaches an ONor anOFF
time.At eachpause, theappropriate lightsand circuitswill come
on.
IRelease theYES button,and thedisplaywill stoprunning
andgive youlonger to identifya timing.
IPress YESonce more,and thedisplay willstart runningagain–
andwill continueall throughthe weekuntilyou pressSET?
IPress SET?and your programmerwill go back tonormal
operation.
Remember- Thedisplay shows the stricttime sequence,so
ON1for HWcould be followedby ON1 for CH, then OFF1for
HW etc Usingthis feature youcan programyour systemto
Usingthis feature youcan programyour systemto switchoff
whileyou’re onholiday,then switchback onagain in timeto
havethe housewarm foryour return.
IPress SET?three timesand you’llsee ‘SETH’DAY?’
I PressYES toSET H’DAY?and thedisplaywill show‘00’.
I Using+ and-, set thenumber ofdays you wantthe systemto
beoff.
IPress SET,the display willshow ‘H’DAY’and theprogrammer
willswitch offthe system.It willthen returnto normaloperation
afterthe setnumber of days.
Remember- Theprogrammer counts eachpass through
midnightas a day. So if on a Saturdaymorning you don’twant
theheating on again until Tuesdaymorning,set for3 days.
SETTINGTHE CLOCK AND DATE
Applicableto all models.
SETTINGTHE CLOCK
Theclock inyour programmerhas been set at thefactory,
andautomatically accountsfor BritishSummer Time.
However,should youneed toset theclock, readon.
WIRINGTHE PROGRAMMER Cont...
ConnectionCharts
Makethe wiringconnections,as above,forthe appropriatesystem.
Forsurfacewiring,snapout thecable entrystripon thebottomedge
ofthe wall-plate.Lifestyleunitsaredouble-insulatedand needno earth
connection,butan earthingcontinuity(loop)terminalis providedfor
convenience.
Afterwiring,plugin theunit andtightenthe securingscrews.
Checkthemains inputhasa 3Afuse,and switchonthe mains.
Thenset thetimingsas shownin theUser’sGuide.
ALWAYSSWITCHOFF THE MAINSBEFOREREMOVING
THELIFESTYLETIMESWITCH/PROGRAMMER– AND
NEVERFIT ITTO ALIVEWALL-PLATE!
INSTALLERS/ENGINEERS NOTES
THELP241 24hr ELECTRONICPROGRAMMER Cont...
Set the centralheating
I Pressthe YESbutton,and thedisplay willask ‘SETCH PROG?’.
IPress YESand you’llsee ON1,the startof yourfirst centralheat-
ingperiod. Adjust itin 1-minutesteps usingthe –and +buttons.If the– and+ buttonsare helddown, thetime changesin
10-minutesteps.
IPress SET?,and you’llsee OFF1,the end ofyour firstcentral
heatingperiod. Adjustthis inthe same way,press SET?, then
repeatthe procedurefor ON2,OFF2, ON3 andOFF3.
Set the hot water
IWhen youpress SET? aftersetting OFF3for thecentral heating,
thedisplay willask ‘SETHW PROG?’.
IPress YES,then set yourtimes inthe same way.Remember,in
thismode youcan have differenttimes to yourcentral heatingif
youwish.
IWhen youpress SET? aftersetting OFF3for thehot water,the
programmerwill returnto normaloperation.
Set the hour
I Pressthe SET?buttonuntil yousee SET CLOCK?.
SET A HOLIDAY SWITCH-OFF
Applicableto all models.
I PressYES once,and thenthe hourwill startto flash.Use the
– and+ buttonsto setthe hour,checking forAM and PM.
Technical Helpline: 0333 7000 622
Email: customer.care@draytoncontrols.co.uk
Web: www.draytoncontrols.co.uk
LWC3 Junction Box
Pump
Boiler
Room Thermostat
Cyl. Thermostat
Programmer
Mains Input
230V a.c.
Motorized Valves
*7
2 E
L
N
E
* 1 2 3 7
N
E
Switch
L
Perm.
L
RTS 1&2
RTS 4,6,9&10
Function
N
N
NLLE
L 1
3
3
COM
CALL
SAT.
Function
COM
CALL
SAT.
Drayton
HTS 3
C
1
2
Lifestyle LP722 LP522 LP241 LP112 SM2
NOT
USED
2
N
1
L
1 2 3 4
HW
OFF
CH
OFF
HWONCH
ON
Mains
Isolator
1
L
2N3
E
3A
Drayton
22mm 3 Port Mid Position Valve
28mm 3 Port Mid Position Valve
Function of
Leads
Blue
Yell/Green
Grey
Orange
White
3 2 1 4
5
6 7
8
8 6
4
CH
On
HW
Off
Boiler
Live &
HW on
N E
5 8
723
1 2 3
4 567 8 9 10 11 12
L N E
Refer to Boiler Handbook
for wiring details of Pump
Overrun boilers. Use boiler
manufactures instructions.
*
Mid-Position Valve System
LWC3 Junction Box
Pump
Boiler
Room Thermostat
Cyl. Thermostat
Programmer
Mains Input
230V 50HZ
*
7
2 3
L
N
E
* 1 2 3 7
N
E
Switch
L
Perm.
L
Refer to Boiler Handbook
for wiring details of Pump
Overrun boilers. Use boiler
manufactures instructions.
*
RTS 1&2
RTS 4,6,9&10
Function
N
N
NLLE
L 1
3
3
COM
CALL
SAT.
Function
COM
CALL
SAT.
Drayton
HTS 3
C
1
2
Lifestyle LP722 LP522 LP241 LP112 SM2
NOT
USED
2
N
1
L
1 2 3 4
HW
OFF
CH
OFF
HWONCH
ON
Mains
Isolator
1
L
2N3
E
3A
3 2 1 4
5
8 6
8
4
21 3
4 567 8 9 10 11 12
L N E
Motorized Valves
The white wire (28mm Valves) becomes live when the valve closes, it is not
used and is wired to ‘spare’ terminals for sale isolation.
Drayton
22mm 2 Port Valve
28mm 2 Port Valve
Function of
Leads
DHW VALVE
Motor Aux.SW
L
L
Motor
Aux.SW
CH VALVE
N
N
2
2
N.O
N.O
N.C
N.C
E
E
33
C
C
6 77119
105
Brown
Brown
Blue
Blue
Yell/Green
Yell/Green
Orange
Grey
Orange
Grey
White
(28mm only)
White(28mm only)
Spring-Return 2-Valve System
Gravity HW, Pumped CH with Room Stats
Pump
L
N
E
5 2 3
Boiler
* 1 2 3 7
N
E
Switch
L
Perm.
L
LWC3 Junction Box
1 2 3
4 567 8 9 10 11 12
L N E
Programmer
Lifestyle LP722 LP522 LP241 LP112 SM2
NOT
USED
2
N
1
L
1 2 3 4
HW
OFF
CH
OFF
HWONCH
ON
7
4
Mains Input
230V a.c.
Mains
Isolator
1
L
2N3
E
3A
Room Thermostat
RTS 1&2
RTS 4,6,9&10
Function
N
NLLE
L 1
3
3
COM
CALL
SAT.
3 1 2 4
5
N
06490033001 ISS L 6/06/2016
 Loading...