

Page 1

Digistat RF3 ‘Wireless System’
User instructions
SCR RECEIVER
INITIAL START UP
IMPORTANT: ENSURE THAT THE COMMISSIONING PROCEDURE HAS
BEEN CARRIED OUT IN ACCORDANCE WITH THE ENCLOSED
INSTRUCTIONS.
SCR (RECEIVER) NORMAL OPERATING MODE
Once the ‘Wireless System’ has been commissioned, there should be little need
for any user interface with the SCR.
During normal operation the red and green LEDs will occasionally be on,
these signify the following:
Green LED
The green LED will be on when there is a demand for heating, and off when
there is no demand.
Red LED
The red LED will flash for 7 seconds, approximately every 5 minutes. This
denotes that a radio signal is being received from the Digistat RF unit.
SITUATIONS REQUIRING ATTENTION
Red LED continually flashing
This denotes that the batteries in the Digistat RF unit are approaching the end of
their life (see ‘battery replacement’).
Red LED continually on
This denotes that the SCR has been unable to receive a radio signal from the
Digistat RF unit. This may be caused by the batteries being dead (see ‘battery
replacement’) or some temporary interference with the radio signal.
To re-send and test the signal, go to the Digistat RF unit. If the flame symbol is
visible on the display, press the ‘–’ button until it disappears. If the flame symbol
is not visible, press the ‘+’ button until it appears. If the radio signal has been
successfully transmitted and received, the red LED will flash for 7 seconds then
go off. If the red LED is still on, ‘learn mode’ may have been selected by accident
(SCR buttons 1 and 2 pressed simultaneously). To correct, open both RF battery
drawers and wait for the display to fade, close the right hand drawer followed by
the left and reprogramme RF with your desired time and temperature settings.
If the red LED is still on, there may be some other fault that will require the
attention of a heating engineer/electrician.
MANUAL OVERRIDE
The heating can be manually switched on and off by using the ‘OVERRIDE’
button on the SCR in a fault situation, even though the red LED will stay on until
a satisfactory signal is reinstated.
Once the SCR receives a satisfactory signal again, it will automatically reset
itself for normal operation.
Drayton
Page 2
DIGISTAT RF3
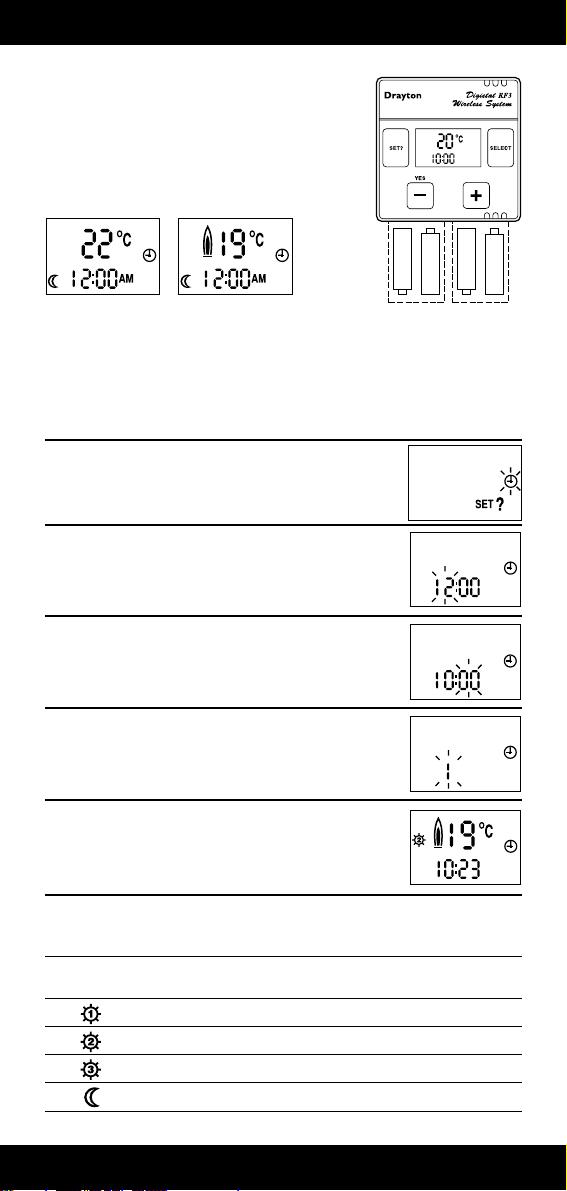
Once the ‘wireless system’ has been commissioned, the unit will
display the actual room temperature and the time at somewhere
after 12.00 midnight (Diagram A).
Note: If this unit has replaced a standard room thermo-stat
and/or a programmer is incorporated in the control system, it is
suggested that the central heating (CH) channel is switched to
On/Cont/24hrs. Operation of the heating times and temperatures will be controlled by this unit.
Diagram A Diagram B
Digistat RF3 has an indicator to show when the heating system is ON or OFF, e.g. if the SET
temperature is 20°C and the actual room temperature is below 20°C a flame symbol will appear on
the display (Diagram B). This indicates a demand for heat (system will switch ON).
During normal operation, the Digistat RF3 will display actual room temperature continuously.
SETTING THE TIME OF DAY (steps 1-5)
The diagram next to each step description shows resulting display.
1. Press “SET?” button
2. Press “Yes” (–) button.The hours will flash
as Fig. 2. Use the + and – buttons to set
correct hour.
3. Press “SET?” button again and the minutes will flash, use + and –
buttons to set correct minute time.
4. Press “SET?” button, day of the week will flash, 1 = Monday,
7 = Sunday, use + and – buttons to set correct day.
5. Press “SET?” button twice to return to normal operating mode.
PRE-PROGRAMMED TIMES AND TEMPERATURES
The Digistat RF3 comes with the following preset programme.
Symbol Mon-Fri Sat-Sun Temperature
Time Time
6.30 am 7.00 am 20°C
8.30 am 9.00 am 16°C
4.30 pm 4.00 pm 21°C
10.30 pm 11.00 pm 7°C*
* 16°C if selector pin removed, see installation instructions.
+
+
+
+
SYSTEM OFF SYSTEM ON
Page 3

TO VIEW OR CHANGE THE FACTORY SETTINGS (steps 6-14)
6. Press the “SET?” button until this display is shown.
7. Press the Yes (–) button. You have selected the Monday to
Friday part of the programme.
8. Press the Yes (–) button again. This tells you that at 6.30 a.m., the
heating system will control your home at 20°C. If you wish to
alter the temperature use the + and – buttons.
9. Press the “SET?” button. The time will now flash. If you wish to
alter the switching time use the + and – buttons. This will change
the switching time in 10 minute steps.
10. Press the “SET?” button, this tells you that at 8.30 a.m., the
heating system will control your home at 16°C. If you wish to
alter this temperature use the + and – buttons.
11. Continue to press the “SET?” button as in steps 9 and 10 above
to advance through the times and temperatures for Mon. to Fri.
(1 – 5). If you wish to alter any of the times and temperatures use
the + and – button, when the one you wish to alter is flashing.
12. Once Mon. to Fri. have been set, the display will show as here.
This means do you want to set the times for Monday (1)
differently from the rest of the week? If you do, press the Yes (–)
Button, and follow the routine as steps 9 to 11.
13. Continue to press the “SET?” button to advance through the
week (1 – 5). When this display shows, press the
Yes (–) button if you wish to view or alter the times for Sat.-Sun.
(6-7). Repeat steps 9-12 as required.
14. Continue to press “SET?” button until you
return to normal operating mode with a
display similar to the one shown here.
OPERATING MODES
The Digistat can be operated in one of three modes.
1) – Timed, all preset times and temperatures
2) – Continuous night temperature (useful for low limit temperature
protection when on holiday)
3) – Continuous ‘DAY 1’ temperature
Use the SELECT button to change the operating mode to suit your requirements, the symbols are
positioned on the right hand side of the display.
1
Continued overleaf
Page 4

Invensys Climate Controls Limited
Cordwallis Street, Maidenhead, Berkshire SL6 7BQ
Telephone: (01628) 672121 Sales Facsimile: (01628) 675062
Technical Helpline: (01895) 460444
An Invensys Product
090 796
Invensys Climate Controls reserve the right to make changes without notice and cannot accept liability for errors. 0200
TEMPERATURE OVERRIDE
If at anytime during normal operation, you wish to temporarily increase or decrease the set
temperature use the + or – buttons to change to your desired setting. This can be done without
entering the SET mode. 5 seconds after releasing the + or – button the display will revert to
showing the actual room temperature. The Digistat will now control the temperature to the
override setting until the next programmed switching time, when it will revert to the times and
temperatures you have already programmed.
BATTERY REPLACEMENT
30 days before the batteries need replacing, a battery symbol will flash in the
right hand side of the display (Dia. C). This signifies that four 1.5V type
AA alkaline batteries will be needed to replace the existing ones. If
battery replacement is carried out in this condition the programmed
settings will only be held in the memory for a maximum of
one minute, after which re-programming may be necessary.
IMPORTANT
To avoid the possibility of having to reprogramme the switching times
and temperatures, it is advisable to wait until the display with a flashing
battery symbol changes to a continuous battery only display (after 30 days
– Dia. D). In this condition the unit will remain OFF but your programmed settings will be held in the memory for a number of weeks. The two battery compartments can
now be left open, to replace the batteries, for approximately one hour. If the compartments are left
open for longer, the unit will revert to the factory preset times and temperatures. It may be
necessary to reset the correct time of day after changing the batteries.
The battery compartments are situated at the bottom of the unit (press to unlatch and slide
down). Ensure new batteries are installed correctly. Close the right hand compartment first followed
by the left.
HELPFUL HINTS
1. First/last set times The Day 1 setting cannot be programmed before 12.00. The night
setting can be programmed at whatever time you require, even after 12.00 (midnight) so long as
it is not programmed more than 23 hours 50 minutes after the Day 1 setting.
2. Part or full day omission If during programming the Digistat, one of the symbols on the left
hand side of the screen starts to flash, this indicates that two or more of the switching times have
been set to the same time. This facility enables you to omit one or more of the switched periods.
When one or more switching times are programmed together the later setting takes precedent. For
example, if all four switching times were set together the Digistat would control continuously at the
fourth (night) temperature setting .
3. Programme sequence The Digistat will not allow you to program the switched periods out of
sequence but will hold the times together as stated above.
4. Reset If at any time during the programming you get confused and would like to start the
procedure from the beginning press the SELECT and – buttons at the same time and hold for two
seconds. This resets the Digistat to the factory preset times and temperatures shown in the table
(overleaf).
5. Self revert If during programming no button is pressed for between one and two minutes the
Digistat will revert automatically to its normal operating mode.
IMPORTANT
This product operates on a new frequency of 433 MHz and is not interchangeable with previous
418 MHz units which can be easily identified:
433 MHz = Drayton brand
418 MHz = brand
CONFORMS TO THE ESSENTIAL REQUIREMENTS
OF THE FOLLOWING DIRECTIVES:
89/336/EEC Electromagnetic compatibility
Diagram D
Diagram C
+
1
 Loading...