

Drayton Digistat+1 RF710, Digistat+1 22190, Digistat+1 22192, Digistat+1RF 22190, Digistat+1RF 22192 User Manual
...Page 1
Digistat+1 & Digistat+1RF
Room Thermostat
Models:
RF710/22190/22192
Invensys Controls Europe
Technical Helpline: +44 (0) 845 130 7722
www.draytoncontrols.co.uk
User Guide
What is a room thermostat?
... An explanation for householders
A room thermostat simply switches the heating system on
and off as necessary. It works by sensing the air temperature,
switching on the heating when the air temperature falls below
the thermostat setting, and switching it off once this set
temperature has been reached.
Turning a room thermostat to a higher setting will not make
the room heat up any faster. How quickly the room heats up
depends on the design of the heating system, for example, the
size of boiler and radiators.
Neither does the setting affect how quickly the room cools
down. Turning a room thermostat to a lower setting will result
in the room being controlled at a lower temperature, and saves
energy.
The heating system will not work if a time switch or programmer
has switched it off.
The way to set and use your room thermostat is to find the
lowest temperature setting that you are comfortable with,
and then leave it alone to do its job. The best way to do this
is to set the room thermostat to a low temperature – say 18ºC
– and then turn it up by one degree each day until you are
comfortable with the temperature. You won’t have to adjust the
thermostat further. Any adjustment above this setting will waste
energy and cost you more money.
If your heating system is a boiler with radiators, there will
usually be only one room thermostat to control the whole
house. But you can have different temperatures in individual
rooms by installing thermostatic radiator valves (TRVs) on
individual radiators. If you don’t have TRVs, you should choose
a temperature that is reasonable for the whole house. If you do
have TRVs, you can choose a slightly higher setting to make sure
that even the coldest room is comfortable, then prevent any
overheating in other rooms by adjusting the TRVs.
Room thermostats need a free flow of air to sense the
temperature, so they must not be covered by curtains or
blocked by furniture. Nearby electric fires, televisions, wall or
table lamps may prevent the thermostat from working properly.
C
Page 2
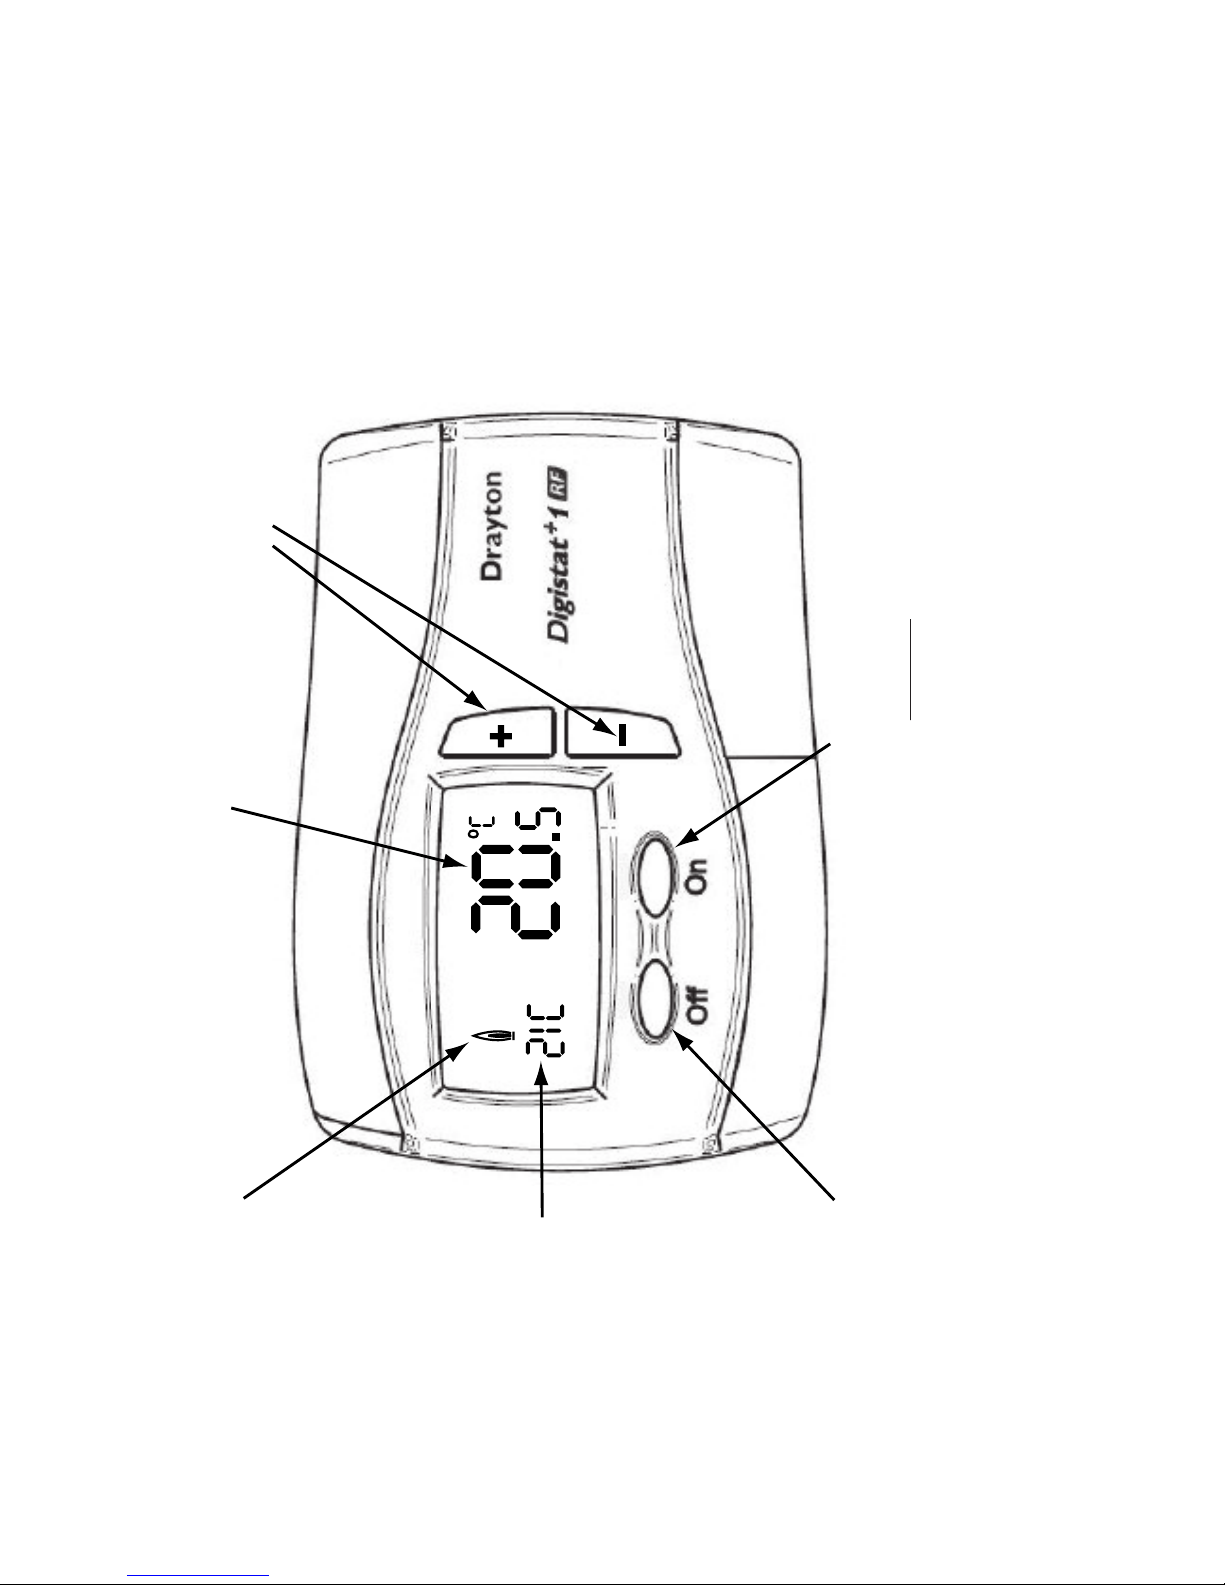
Controls and Display Layout
* Temperature displayed while adjusting the settings. Once adjustment is
complete and after 5 seconds this will disappear. When the OFF button is
pushed the word ‘OFF’ is displayed here.
** When the OFF button is pushed the OFF temperature is displayed here.
Flame shows when calling for heat
**Room Temperature
*Setpoint
Temperature
OFF Button ON Button
+ or - buttons
for setting adjustments
&%!452%3
4HISPRODUCTHASTHEFOLLOWINGUSERADJUSTABLESETTINGS
n2EQUIREDROOMTEMPERATURETEMPERATURESETPOINT
n/FFTEMPERATURESETTING
n/NTEMPERATURESETTING
n-INIMUM-AXIMUMTEMPERATURESETTINGS
Page 3
Simple Setting or Operating
n4HEDISPLAYNORMALLYSHOWSTHECURRENTROOM
TEMPERATURETOWITHIN#
n4OADJUSTTHEREQUIREDTEMPERATUREPRESSTHE
jkBUTTONTOINCREASETHETEMPERATURESETPOINT
ORTHEjkBUTTONTOREDUCETHETEMPERATURE
SETPOINT4HE,#$WILLDISPLAYTHETEMPERATURE
SETPOINTASITISBEINGADJUSTEDINTHEBOTTOM
LEFTOFTHEDISPLAY
n!FTERAFEWSECONDSTHEDISPLAYWILLRETURN
to
NORMALOPERATIONANDWILLDISPLAYTHEACTUAL
ROOMTEMPERATUREONLY
7HILEADJUSTINGTHETEMPERATUREDURINGNORMAL
OPERATIONWHENYOUREACHTHEMAXIMUMOR
MINIMUMPOSSIBLESETTINGTHESETPOINTWILLÙASHTO
INDICATEYOUCANNOTADJUSTTHEPRODUCTFURTHER
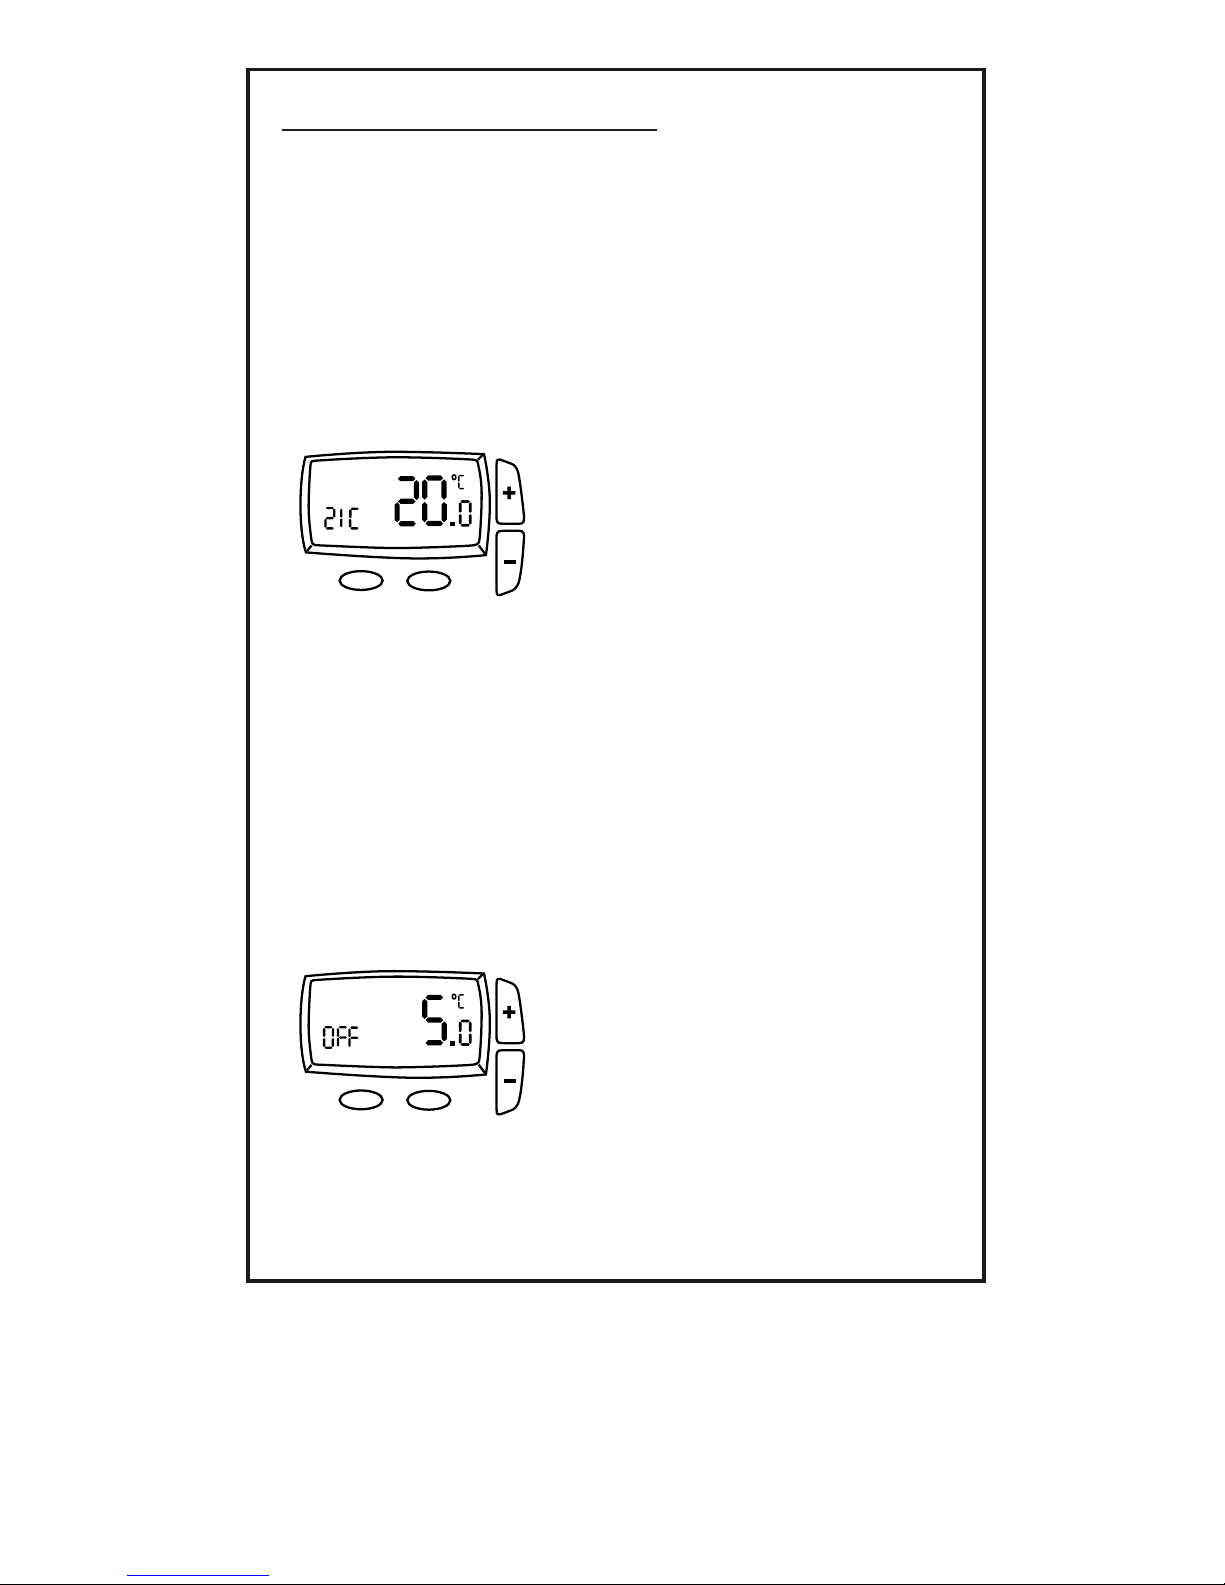
To turn the Thermostat Off
n0RESSTHEj/&&kBUTTONANDTHEDISPLAYWILLSHOW
j/&&kANDTHE/&&SETPOINT
n)FTHEROOMTEMPERATUREFALLSBELOWTHEOFFSETPOINT
TEMPERATURETHEPRODUCTWILLCONTROLATTHE/&&
TEMPERATURE
Page 4

To turn the Thermostat On
9OUCANEITHER
0RESSTHEj/.kBUTTONANDTHEDISPLAYWILL
SHOWTHE/NSETPOINTANDTHEROOM
TEMPERATURE
!FTERAFEWSECONDSTHE/NSETPOINTWILL
DISAPPEARFROMTHEDISPLAYANDTHEPRODUCT
WILLCONTROLATTHE/NSETPOINTTEMPERATURE
0RESSTHEjkORjkBUTTONANDTHEDISPLAYWILL
SHOWTHE/FFSETPOINTANDTHEROOM
TEMPERATURE
.OWPRESSTHEjkORjkBUTTONSUNTILTHE
REQUIREDSETPOINTTEMPERATUREISSHOWN
!FTERAFEWSECONDSTHESETPOINTWILL
DISAPPEARFROMTHEDISPLAYANDTHEPRODUCT
WILLCONTROLATTHENEWTEMPERATURE
.OTE4HE$IGISTAT+2OOM4HERMOSTATWILL
ONLYCONTROLTHEHEATINGWHENTHE4IMESWITCH
OR0ROGRAMERISINATIMED/NPERIOD
Page 5

!$6!.#%$&%!452%3
!
DJUSTINGTHE3ETPOINTUSINGTHE/NAND/FFBUTTONS
The ‘Off’ button can also be used to adjust the temperature setting
to a setback level and the ‘On’ button can also be used to adjust the
temperature to a comfort level.
The setback feature is designed for those interested in saving energy
and have a varied lifestyle. It means that when leaving the house for
a shopping trip or a night out, the user can adjust the temperature
to a lower level by pressing the ‘Off’ button, with the comfort level
restored on their return by pushing the ‘On ‘button.
NB. This feature can be used to quickly adjust the temperature
setpoint to a setback temperature for economy operation if for
example, ‘Off’ Temperature = 15ºC and the On temperature can
be used to quickly adjust the temperature setpoint to a comfort
temperature if for example ‘On’ Temperature = 22ºC.
4OCHANGETHEUSERADJUSTABLESETTINGS
A range of user settings can be adjusted,
1. Maximum Temperature
2. Minimum Temperature
3. Off Temperature
4. On Temperature
n4OENTERTHEj5SERkMENUPRESSANDHOLDTHEj/N/FFkBUTTON
for more than 5 seconds – the display will show ‘Hi’ and the
maximum setpoint.
n
If the ‘On’ button is pressed the display will show ‘Lo’ and the
minimum setpoint.
n
If the ‘On’ button is pressed again the display will show ‘OFF’ and the
OFF setpoint.
n
If the ‘On’ button is pressed again the display will show On’ and the
On setpoint.
Page 6

#HANGINGTHE-AXIMUM4EMPERATURE3ETTING
n4OADJUSTTHEMAXIMUMTEMPERATUREENTERTHEUSERMENUAS
described previously, then press the ‘On’ button until ‘Hi’ is shown.
n0RESSTHEjkBUTTONTOINCREASETHEMAXIMUMTEMPERATURE
setting (max. 30
o
C) and the ‘-’ button to reduce the maximum
temperature setting (min. 5
o
C or min temp setting).
Changing the Minimum Temperature Setting
n4OADJUSTTHEMINIMUMTEMPERATUREENTERTHEUSERMENUAS
described previously, then press the ‘On’ button until ‘Lo’ is shown.
n0RESSTHEjkBUTTONTOINCREASETHEMINIMUMTEMPERATURESETTING
(max. 30
o
C or max. temp. setting) and the ‘-’ button to reduce the
minimum temperature setting (min. 5
o
C).
Changing the Off Temperature
n4OADJUSTTHEj/FFkTEMPERATUREENTERTHEUSERMENUASDESCRIBED
previously, then press the ‘On’ button until ‘Off’ is shown.
n0RESSTHEjkBUTTONTOINCREASETHE/FFTEMPERATUREMAXºC or max.
temp. setting) and the ‘-’ button to reduce the Off temperature (min. 5ºC
or min. temp. setting).
Changing the On Temperature
n4OADJUSTTHEj/NkTEMPERATUREENTERTHEUSERMENUASDESCRIBED
previously, then press the ‘On’ button until ‘On’ is shown.
n0RESSTHEjkBUTTONTOINCREASETHE/NTEMPERATUREMAXºC or max.
temp. setting) and the ‘-’ button to reduce the On temperature (min. 5ºC
or min. temp. setting).
While adjusting the settings within the menu, when you reach the maximum
or minimum possible setting the display will flash to indicate you cannot
adjust the product further, e.g. you cannot set the on higher than the
maximum temperature setting.
To return to normal operation, either press the ‘on & off’ buttons for more
than 5 seconds or wait for 1 minute and it will return automatically.
Page 7

4!-0%202//&).'!LL-ODELS
To tamper proof the product i.e. prevent unauthorised adjustment of the
product set the Min and Max temperatures to the same desired value.
&!5,4$)!'./3)3!LL-ODELS
)FTHEDISPLAYSHOWS%THEFOLLOWINGFAULTSCOULDHAVEOCCURRED
1.Internal temperature sensor has failed.
2. Ambient temperature is outside product operating temperature range.
"!44%292%0,!#%-%.4!LLMODELS
(OWDO)KNOWWHENTOCHANGETHEBATTERIES
When the batteries start to run low a battery icon will flash in the display, to
indicate “low battery” during this time the Digistat +1RF will function normally
(see fig 1).
Please replace batteries with 2 x 1.5V IEC LR6 (AA) Alkaline batteries.
When the battery icon alone is shown in the display, the batteries are completely
exhausted and the Digistat +1RF will cease to function (see fig 2). Re-activate by
replacing the batteries.
(OWTOREPLACETHEBATTERIESSEEFIG
Remove the battery cover using a coin. Replace the spent batteries with 2 x
1.5V IEC LR6 (AA) Alkaline batteries ensuring correct orientation. Replace the
battery cover pressing fully home.
D
r
a
y
t
o
n
D
r
a
y
t
on
D
r
a
y
t
o
n
D
r
a
y
t
o
n
(Fig 3)
(Fig 2)
(Fig 1)
Page 8

2&02/$5#4/.,9
3#22%#%)6%22&-ODELONLY
3
#22ECEIVER.ORMAL/PERATING-ODE
n/NCETHEj7IRELESS3YSTEMkHASBEENCOMMISSIONEDTHERESHOULDBE
little need for any user interaction with the SCR.
n$URINGNORMALOPERATIONTHEREDANDGREEN,%$SWILLOCCASIONALLYBE
on, these signify the following;
'REEN,%$
T
he green LED will be on when there is a demand for heating, and off
when there is no demand.
2ED,%$
The red LED will flash for 7 seconds, approximately every 5 minutes.
This denotes that a radio signal is being received from the Digistat+RF
unit.
3ITUATIONS2EQUIRING!TTENTION
2ED,%$CONTINUALLYÙASHING
n4HISDENOTESTHATTHEBATTERIESINTHE$IGISTAT2&UNITAREAPPROACHING
the end of their life (see ‘battery replacement’).
2ED,%$CONTINUALLYON
n4HISDENOTESTHATTHE3#2HASBEENUNABLETORECEIVEARADIOSIGNAL
from the Digistat+RF unit. This may be caused by the batteries being
dead (see ‘battery replacement’) or some temporary interference with
the radio signal.
n4ORESENDANDTESTTHESIGNALGOTOTHE$IGISTAT2&UNITANDREMOVE
the batteries, after a few seconds (the display will go blank) refit
the batteries and then reset to your desired temperature. If the
radio signal has been successfully transmitted and received, the red
LED will flash for 7 seconds then go off.
n)FTHERED,%$STAYSONTHEREMAYBESOMEOTHERFAULTTHATWILL
require the attention of a heating engineer/electrician.
-ANUAL/VERIDE
n4HEHEATINGCANBEMANUALLYSWITCHEDONANDOFFBYUSINGTHE
‘OVERRIDE’ button on the SCR in a fault situation, even though
the red LED will stay on until a satisfactory signal is reinstated.
n/NCETHE3#2RECEIVESASATISFACTORYSIGNALAGAINITWILL
automatically reset itself for normal operation.
0ROPER"ATTERY2ECYCLING
Electronic devices and batteries, rechargeable or not, should not be
disposed of into ordinary household waste. Instead, they must be
recycled properly to protect the environment and cut down the waste
of precious resources. Your local waste management authority can supply
details concerning the proper disposal of batteries.
In compliance with the EU Directive 2006/66/EC, the button cell battery
located on the printed circuit board inside this product, can be removed
at the end of product life, by professional personnel only.
 Loading...