

Drayton Digistat+ 3 22087, 22084, 22088 Installation & User Manual
Drayton
User Guide
Programmable Room
Thermostat
7 Day (5-2 Day)
Models:
22083 / 22087
Power Supply:
Battery / Mains
Invensys Controls Europe
Technical Helpline: +44 (0) 845 130 7722
www.draytoncontrols.co.uk
Installation / User Guide 06490044001 (0905)
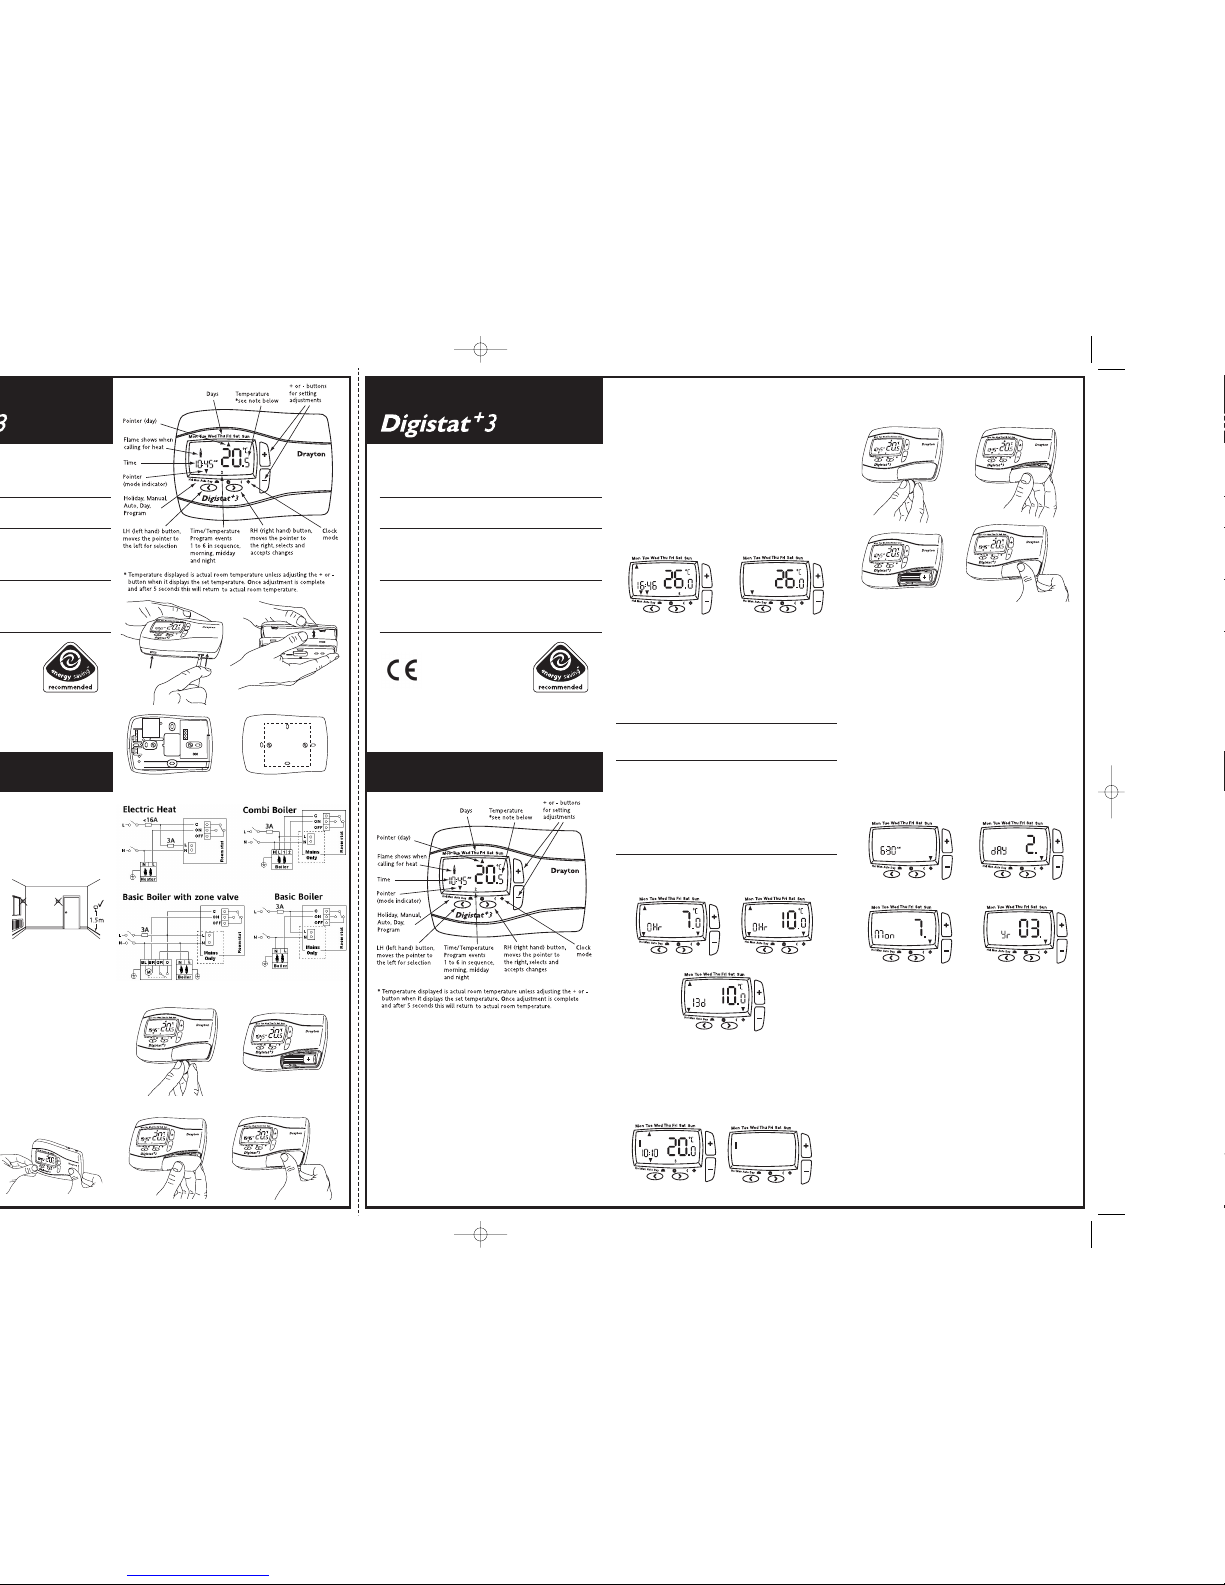
Your Digistat+3 programmable room
thermostat. (7 day (5-2 Day)
Digistat+3 programmable room thermostat allows you to set
time and temperature periods (up to 6 per day) to suit your own
lifestyle. Once fully installed and powered the Digistat+3 will
automatically set the correct time and in auto mode will control
your heating system according to pre-set program 1 (9 till 5).
The temperature is controlled by sensing air temperature,
switching on the heating when the air temperature falls below
the thermostat setting and switching it off once this set
temperature has been reached.
(Fig 1)
(Fig 2)
How to change the temperature for a short time (Override).
When in Auto mode you can override the existing temperature
setting by pressing + or -. During adjustment the temperature will
flash then stop. The Digistat+3 will now control at this
temperature until the next programmed time/temperature event is
reached, when the Digistat+3 will revert back to Auto mode.
Whilst in temperature override the pointer indicates both Man and
Auto. To exit override press > to return to Auto. (Fig 1) shows
Digistat+3 in override.
How to set a constant room temperature (Manual mode).
Manual mode will allow you to set a temperature, over-riding all
programs, until you exit manual mode. In this mode all pre-set
time temperature events will be disabled.
To enter manual mode press < until the pointer indicates MAN
(Fig 2). The screen will only show the temperature, which can be
adjusted by pressing + or -.
Once you have set the temperature it will flash for 5 seconds and
then stop. The Digistat+3 will now control at this temperature until
you adjust using + or - or exit by pressing > to enter Auto mode.
(Fig 1)
(Fig 2)
(Fig 6)
(Fig 7)
(Fig 5)
(Fig 3)
TEAR HERE TEAR HERE
How to set my room temperature for my holiday period.
(Holiday Mode)
When going on holiday you can lower the temperature of your
home for the duration of your holiday, but set Digistat+3 to
return to your normal programming ready for your return.
Holiday mode works by counting down the days or hour until
your return.
Time periods of between 1 to 24hr then 1 day to 199 days can
be set.
Example
I am ready to leave for my 2 week (14 day) holiday and would like
the house temperature held at a constant 10.0 ºC during this time
and on my return the house temperature will be already running
at my normal pre-set temperature.
To enter Holiday mode press the < button until the pointer is
indicating HOL (fig 3). The temperature will flash and by pressing
the + or - buttons you can change to the temperature required (
in this example to 10.0 ºC) (Fig 3a).
Then press < again to set the time period.(in this example 14
days) using the + or - buttons. (it would be advisable in this
example to set the time period 1 day less (13 days) to ensure the
house temperature is back to normal on your return). (Fig 3b)
Once you have set your time period the time will flash for 10
seconds and then start the holiday period. To exit the Holiday
mode press either < or > to return to auto mode.
When changing time the display will scroll through Hr (Hours)
1-24 then d (Days) 1-99.
The display will show holiday time period and set temperature.
(Fig 3)
(Fig 3a)
(Fig 3b)
(Fig 4) (Fig 5)
Battery Model only.
How do I know when to change the batteries.
When the batteries start to run low a battery icon will blink for
15 seconds every 15 seconds to indicate “low battery” during
this time the Digistat+3 will function normally (see fig 4).
Please replace batteries with (2 x AA 1.5V Alkaline batteries).
After 6 months the Digistat+3 will cease to function and will
permanently display the battery icon and nothing else, shown in
(fig 5).
(Fig 6)
(Fig 8)(Fig 7)
(Fig 10)(Fig 9)
How to change the time, day, month & year.
Digistat+3 comes with a pre-set clock, which also automatically
adjusts for summer/winter time changes. It is activated
automatically on 1st installation. There should be no need to
change these settings, however, should you wish to, it can be
done in clock mode.
To enter clock mode press > to select Day. Select Sunday. Use >
to move through all 6 time/temperature events until the arrow
points to the clock symbol. The time will now flash and can be
adjusted (Fig 7) by pressing + or - then press > to accept and
move to Day.
Change day. (Fig 8).
If you wish to change the day press + or - then press > to accept.
Digistat+3 will move to the next field - month.
Change month. (Fig 9).
If you wish to change the month press + or - then press > to
accept. Digistat+3 will move to the next field - Year.
Change year. (Fig 10).
If you wish to change the year press + or -, then press > to
accept. Digistat+3 will now return to Auto mode.
How to replace the batteries see fig 6.
Remove the battery cover using a coin. Replace the spent
batteries with 2 x AA 1.5V alkaline batteries ensuring correct
orientation. Replace the battery cover pressing fully home.
Display Error code E1 or E2.
When the display shows E1 or E2 this indicates a sensor fault and
your heating system will remain Off. Please contact your installer.
How to select another pre-set time/temperature program.
There are 3 pre-set time/temperature programs already held in
memory as shown, if pre-set program 1 is the best program to
suit your lifestyle do nothing and the Digistat+3 will control to
program 1.
If you would like to select one of the other pre-set programs,
refer to ‘How to change User Options’, Option 3 and select your
preferred program.
Installation Guide
– continued
What is a programmable room
thermostat?
...an explanation for householders
A programmable room thermostat is both a programmer
and a room thermostat. A programmer allows you to set
‘On’ and ‘Off ’ time periods to suit your own lifestyle. A room
thermostat works by sensing the air temperature, switching
on the heating when the air temperature falls below the
thermostat setting, and switching it off once this set
temperature has been reached.
So, a programmable room thermostat lets you choose what
times you want the heating to be on, and what temperature
it should reach while it is on. It will allow you to select
different temperatures in your home at different times of the
day (and days of the week) to meet your particular needs.
Turning a programmable room thermostat to a higher
setting will not make the room heat up any faster. How
quickly the room heats up depends on the design of the
heating system, for example, the size of boiler and radiators.
Neither does the setting affect how quickly the room cools
down. Turning a programmable room thermostat to a lower
setting will result in the room being controlled at a lower
temperature, and saves energy.
The way to set and use your programmable room
thermostat is to find the lowest temperature settings that
you are comfortable with at the different times you have
chosen, and then leave it alone to do its job. The best way to
do this is to set low temperatures first, say 18C, and then
turn them up by one degree each day until you are
comfortable with the temperatures. You won’t have to adjust
the thermostat further. Any adjustments above these settings
will waste energy and cost you more money.
If your heating system is a boiler with radiators, there will
usually be only one programmable room thermostat to
control the whole house. But you can have different
temperatures in individual rooms by installing thermostatic
radiator valves (TRVs) on individual radiators. If you don’t
have TRVs, you should choose a temperature that is
reasonable for the whole house. If you do have TRVs, you can
choose a slightly higher setting to make sure that even the
coldest room is comfortable, then prevent any overheating in
other rooms by adjusting the TRVs.
The time on the programmer must be correct. Some types
have to be adjusted in spring and autumn at the changes
between Greenwich Mean Time and British Summer Time.
You may be able to temporarily adjust the heating
programme, for example, ‘Override’, ‘Advance’ or ‘Boost’.
These are explained in the manufacturer’s instructions.
Programmable room thermostats need a free flow of air to
sense the temperature, so they must not be covered by
curtains or blocked by furniture. Nearby electric fires,
televisions, wall or table lamps may prevent the thermostat
from working properly.
Hol Man Auto Day
96.5
31.3
137.0
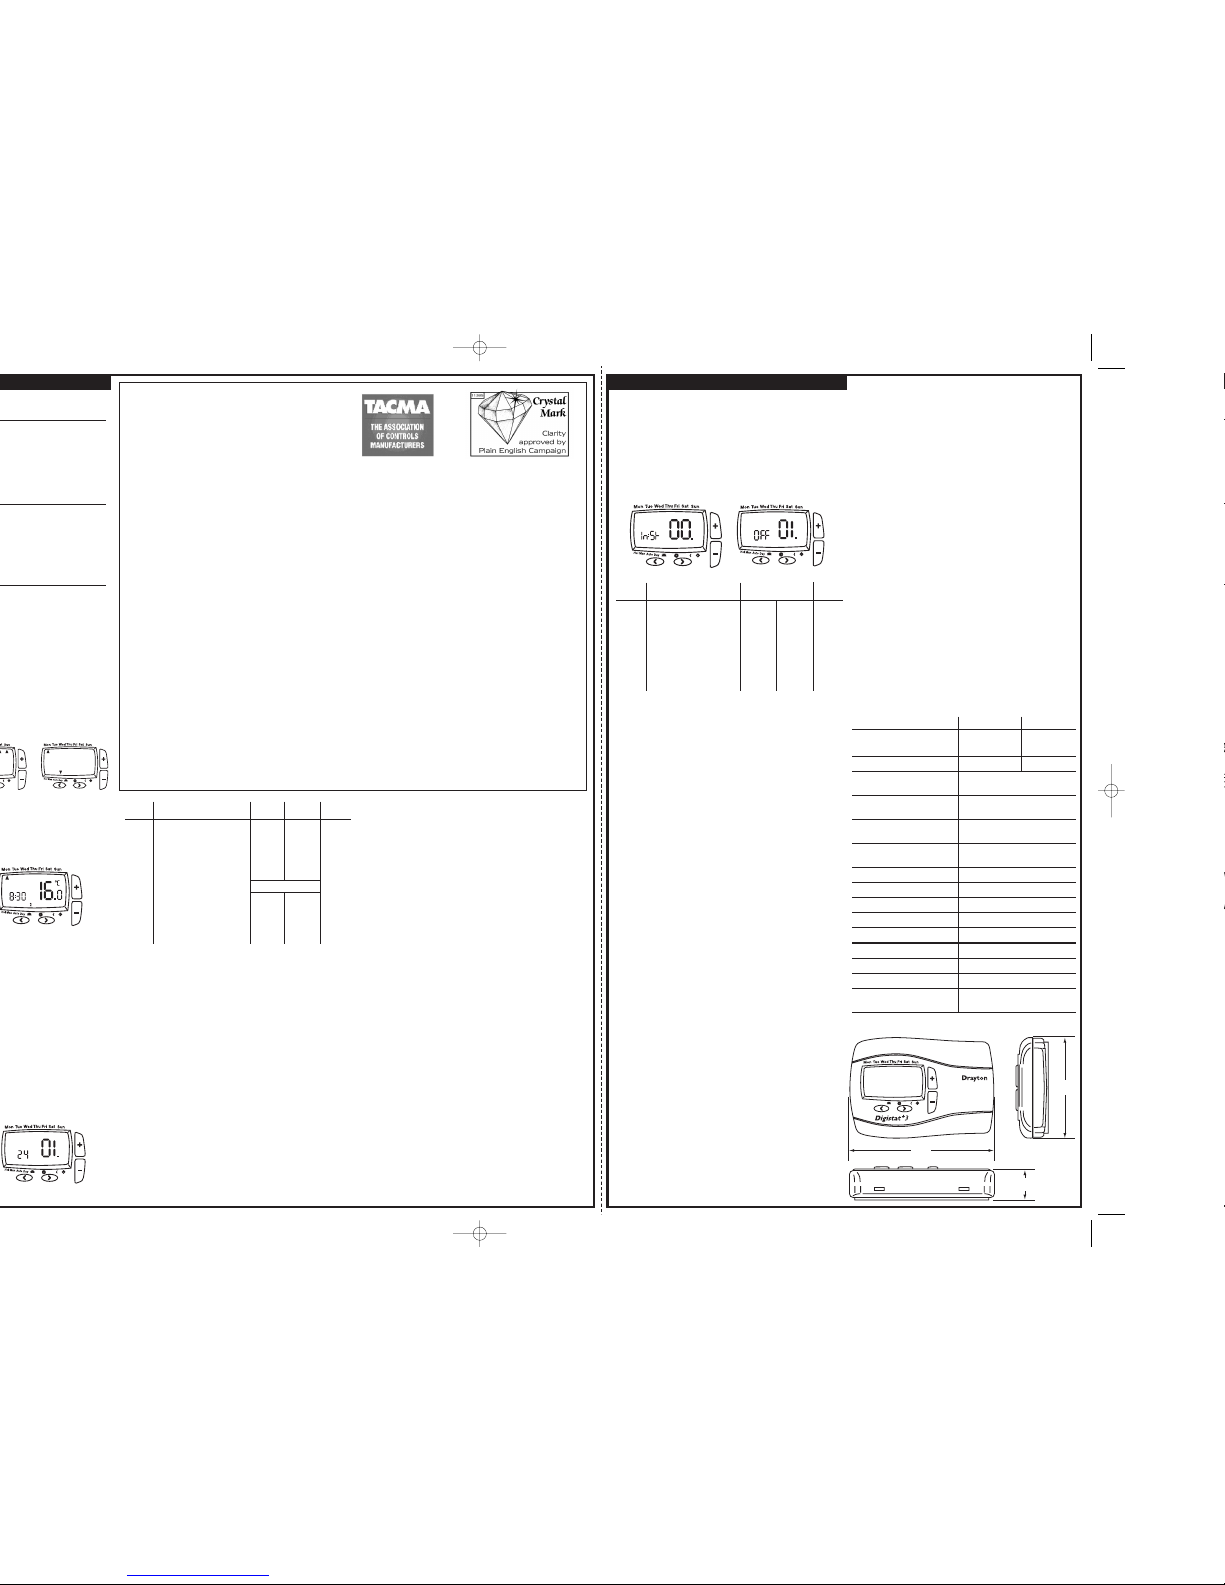
Technical Data
Model 22083 22087
Power supply 2 X AA 1.5V 230V AC 50Hz
alkaline batteries
Battery life 3 years typical –
Switch rating
Heating (switch N.O.) 16(2)A 230 Vac
Switch type SPDT (voltage free contacts)
Min. recommended current 10mA @24Vac (inductive)
Ambient temperature Operating 0°C to 50°C
Storage – 20°C to 85°C
Ambient humidity Operating 25% to 85%
(non condensing). Storage 15% to 95%
Temperature range 0°C to 32°C
Accuracy (between 7°C & 32°C) 0.5°C
Timing resolution 1 minute
Temperature resolution 0.1°C
Rated impulse voltage 2.5KV
Ball pressure test 75°C
Pollution situation Degree 2
Protection level IP30
Wiring: Designed for fixed wiring only,
to comply with IEE wiring regulations
Dimensions
Installer Options.
If you wish to change any of the Installer Options as shown
below, enter the Installer Option Menu from Auto mode by
pressing < and + simultaneously for 5 seconds.
Pressing < and + again for 5 seconds will exit the Menu and
return to Auto mode.
Once the Installer Options screen has been selected (Fig 8), the
< and > buttons allow you to scroll through the Menu (shown
below). The + and - allow you to change values. Once a value
has been changed pressing > before exiting the Menu will save
the new setting. (Fig 9 shows Option 1 OFF).
Access protection lock.
The access protection lock allows the installer to lock the
Digistat+3 so that the user cannot make any adjustments.
The default is OFF mode allowing the users to adjust the
Digistat+3 (see User Guide).
To Lock the Digistat+3 settings enter the Installer Options Menu
(Refer to Installer Option 1) and select On and press > to accept.
Once the Installer Options Menu is exited all buttons will be
locked.
To switch off the Protection Lock enter the Installer Menu and
change to OFF. Press > to accept.
Once the Installer Menu is exited all buttons will be free to adjust.
Freeze protection.
Freeze protection will switch on the heating if the room
temperature falls to 5ºC and will then control the temperature at
7ºC even if the Digistat+3 is in OFF mode.
The freeze protection default is ON.
To switch off the Freeze protection mode enter the Installer
Options Menu (Refer to Installer Options 2) and change to OFF.
Press > to accept.
Low and High Limit set points.
The user temperature set points defaults are High 32ºC and Low
7ºC, to change these limits enter the Installer Options Menu
(Refer to Installer Options 3 & 4).
Intelligent Delayed Start (Energy saving feature).
The Intelligent Delayed Start is an energy saving feature which
automatically reduces the warm up time for the heating system.
As the weather becomes milder, Intelligent Start will delay the
heating start times so that fuel is not wasted bringing the room
up to temperature earlier than necessary.
Note: Intelligent Delayed Start only applies in Auto mode.
Intelligent Delayed Start default is in OFF mode.
To switch on Intelligent Delayed Start enter the Installer Options
Menu (Refer to Installer Options 5).
Note the Intelligent Delayed start option is not suitable for
Hydronic underfloor application.
Ensure Installer option 5 is set to Off before final commissioning
for Hydronic underfloor application.
Valve protection.
In some hydronic heating systems there may be a requirement to
protect the valve by operating it once a day, for a given period
without bringing on the heating system.
If valve protection is selected the valve will be operated for a
period as shown in Valve protection time (mins).
Valve protection time every day at 10.00am.
Valve protection default is OFF.
To enable the valve protection mode enter the Installer Options
Menu (Refer to Installer Option 6)
Valve protection time (mins).
Valve protection time can be set between 1 and 5 minutes
(default 3 minutes)
To change this once a day on time enter the Installer Options
Menu (Refer to Installer Option 7).
(Fig 9)
Installer
Options What is it Select between Default
1 Access protection lock On Off Off
2 Freeze protection On Off On
3 Low limit set point ºC 7 High limit 7
4 High limit set point ºC Low limit 32 32
5 Delayed start
(Energy saving feature) On Off Off
6 Valve protection On Off Off
7 Valve protection time (Mins) 1 5 3
8 Sensor fault function On Off Off
9 Application type 1 0 0
Sensor fault function.
When the display shows an error code (E1) or (E2) this indicates
a sensor fault and the heating system will
remain Off.
(E1) = internal sensor and (E2) = external sensor.
If (E1) is shown the Digistat+3 should be replaced.
If (E2) is shown, first check the external sensor terminal block
connections before replacing the Digistat+3.
Sensor fault function allows you to temporally set the Digistat+3
to cycle the heating system 30% On and 70% Off until you have
replaced the product.
This can be done by entering the installer Option Menu (Option
8) and selecting On. Press > to accept.
To reset to default Off, entering the installer Option Menu
(Option 8) and selecting Off. Press > to accept.
Application type.
Model 22083
(Battery) can be used for radiator or Hydronic underfloor
applications.
In installer Option select:
0 = Radiator.
1 = Hydronic underfloor.
Default 0 = Radiator.
Model 22087
(Mains) can also be used for electric heat applications.
0 = Radiator and electric heat.
1 = Hydronic underfloor.
To change application enter the installer Option Menu and refer
to (Option 9).
Drayton – Digistat+3 7 day 5:2 day Programmable Room
Thermostat
Allowing different programs for weekdays and weekends and
also every day of the week can be programmed differently.
(Fig 8)
TEAR HERE TEAR HERE
(Fig 15a)
How to change from 24hr to 12hr clock (Option 1).
Enter user options, select option 1 and use + and – keys to select
desired option, 12 = 12hr and 24 = 24hr. Press > to accept change.
How to change the default manual set-point temperature
(Option 2).
Enter user options, select option 2 and use + and – keys to set
desired temperature. Press > to accept desired change.
How to change to another predefined program 1, 2 or 3
(Option 3).
Enter user options, select option 3 and use + and – keys to select
desired program 1, 2 or 3. 1 = program 1, 2 = program 2 and
3 = program 3. Press > to accept desired change.
How to change the number of program events per day
(Option 4).
Enter user options, select option 4 and use + and – keys to select
desired option. 2 = 2 time / temp events per day, 4 = 4 time /
temp events per day and 6 = 6 time / temp events per day. Press
> to accept desired change.
How to switch on/off the automatic summer / winter time
change (Option 5).
Twice a year the actual time is automatically changed to keep it in
line with the summer / winter time change. Default setting is On.
If you wish to disable / enable this feature enter user options,
select option 5 and press – or + key to display Off or On as
desired. Press > to accept desired change.
How to change temperature offset (Option 6).
The temperature displayed on the thermostat may not match
that of other temperature measuring devices in the controlled
space, because of its location. The displayed and set
temperature may be offset to bring it in line with other devices.
To adjust the temperature, enter the user options, select option
6. The temperature may be offset by +/- 5 degrees by pressing
the + and – keys. Press > to accept the desired change.
How to restore the built in time temperature programs
(Option 7).
Enter user options, select option 7 and use + and – keys to
select desired option. Off = current programs retained. On =
restore factory program settings. Press > to select the desired
change. Please note enabling this function will lose any user
changes to the preset programs.
How to switch the Digistat+3 and heating system off
(Option 8).
To switch the Digistat+3 and the heating system off you need to
enable the Off function. Enter user options, select option 8 and
use + or – keys to select On to enable the Off function .The
thermostat and heating system will now be Off unless the
temperature in the controlled space falls below 7
o
C the frost
protection set-point. The LCD will display Off and room
temperature only and the keys will not function. To switch On
the Digistat+3 enter user options select option 8 and use + or –
keys to select Off to disable the Off function. The thermostat
will now regulate the heating system in line with the currently
selected program. Please note this does not effect the operation
of domestic hot water where provided.
User
options What is it Min Max Default
1 Change 12h or 24h clock 12 24 24
2 Change the manual set
point temperature
0
C7 0C 32 0C 20 0C
3 Change to another
pre-set programme 1 3 1
4 Change the number of
programme events per day 2, 4 or 6 6
5 Switch on/off automatic
summer/winter time change On Off On
6 Change temperature offset
0
C-5 5 0
7 Restore pre-set programme On Off Off
8 To enable Off function On Off Off
(Table 1)
 Loading...