

Page 1
INSTRUCTION MANUAL
PART NO. 491720-00 10-30-05
Copyright © 2005 Delta Machinery
To learn more about DELTA MACHINERY
visit our website at: www.deltamachinery.com.
For Parts, Service, Warranty or other Assistance,
please call
1-800-223-7278 (In Canada call 1-800-463-3582).
ESPAÑOL: PÁGINA 27
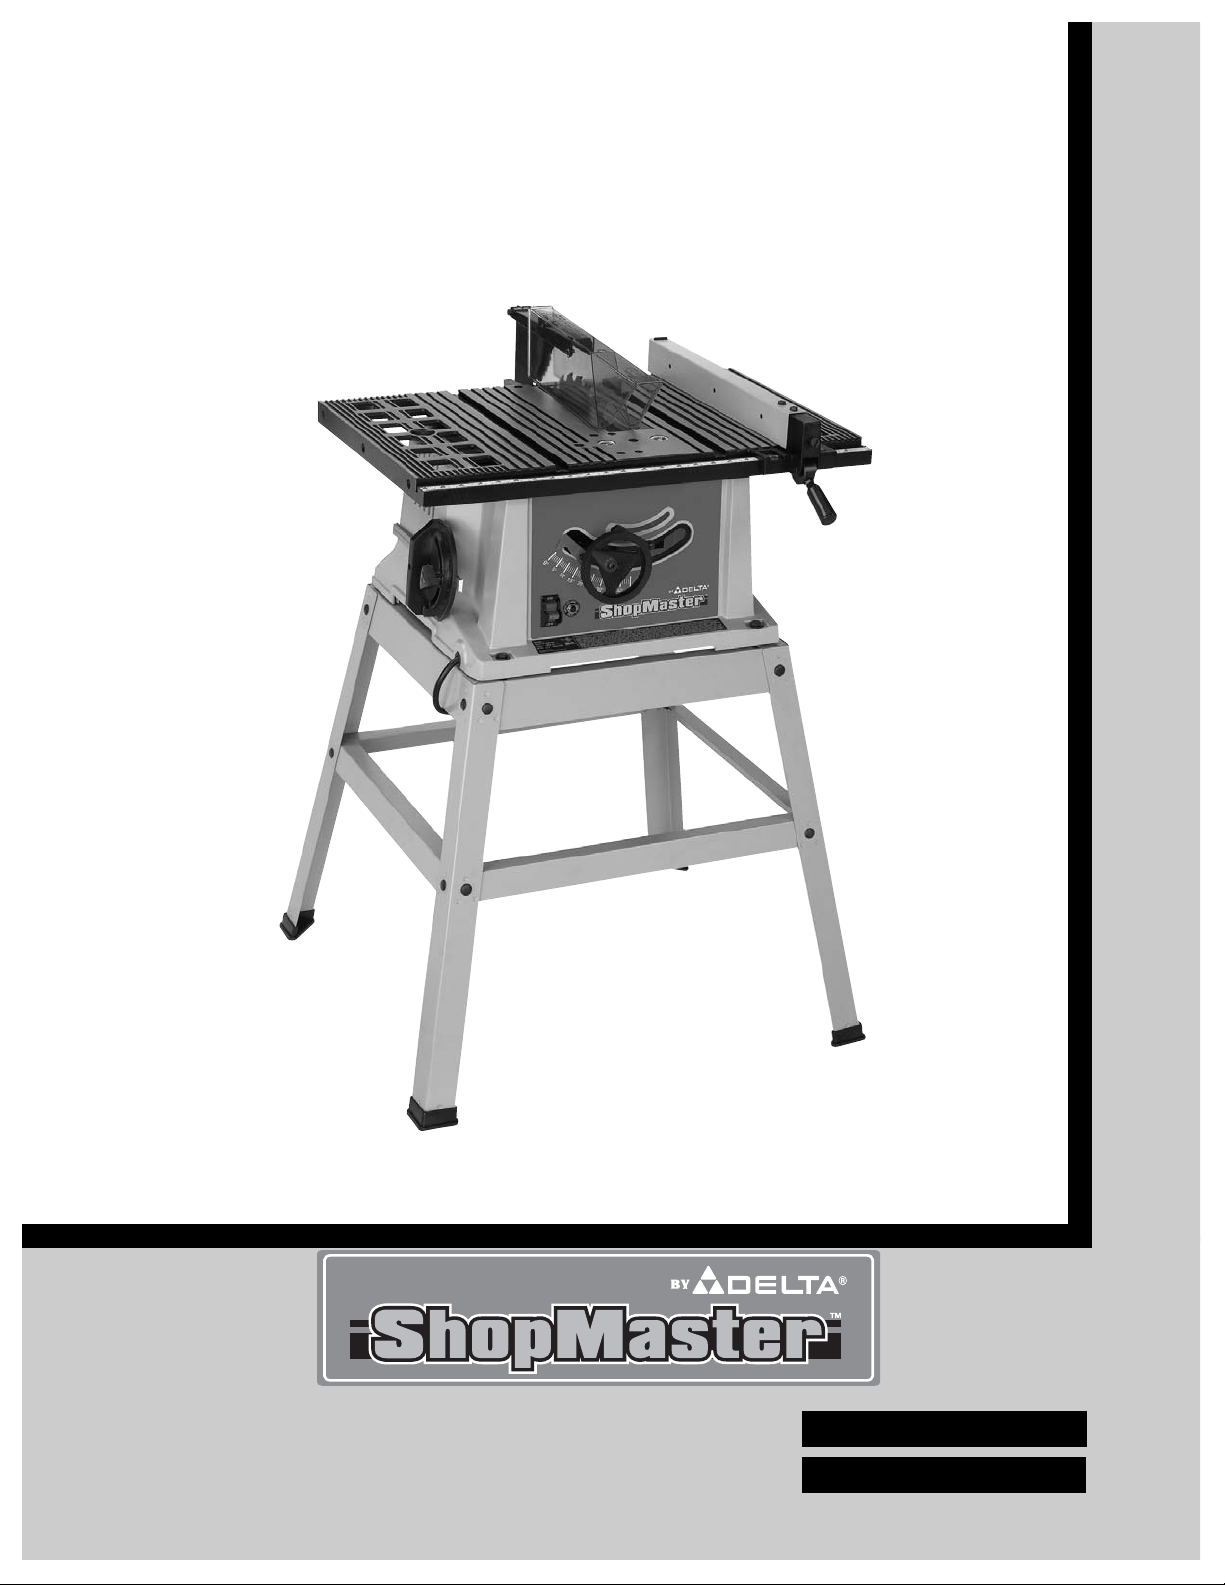
10" Motorized
Bench Saw
(SM200L)
FRANÇAIS: PAGE 51
Page 2

2
TABLE OF CONTENTS
Read and understand all warnings and operating instructions before using any tool or equipment. When
using tools or equipment, basic safety precautions should always be followed to reduce the risk of personal injury.
Improper operation, maintenance or modification of tools or equipment could result in serious injury and property
damage. There are certain applications for which tools and equipment are designed. Delta Machinery strongly
recommends that this product NOT be modified and/or used for any application other than for which it was designed.
If you have any questions relative to its application DO NOT use the product until you have written Delta Machinery
and we have advised you.
Online contact form at www.deltamachinery.com
Postal Mail: Technical Service Manager
Delta Machinery
4825 Highway 45 North
Jackson, TN 38305
(IN CANADA: 125 Mural St. Suite 300, Richmond Hill, ON, L4B 1M4)
Information regarding the safe and proper operation of this tool is available from the following sources:
Power Tool Institute
1300 Sumner Avenue, Cleveland, OH 44115-2851
www.powertoolinstitute.org
National Safety Council
1121 Spring Lake Drive, Itasca, IL 60143-3201
American National Standards Institute, 25 West 43rd Street, 4 floor, New York, NY 10036 www.ansi.org
ANSI 01.1Safety Requirements for Woodworking Machines, and
the U.S. Department of Labor regulations www.osha.gov
IMPORTANT SAFETY INSTRUCTIONS
SAVE THESE INSTRUCTIONS!
IMPORTANT SAFETY INSTRUCTIONS . . . . . . . . . . . . . . . . . . . . . . . . . . . . . . . . . . . . . . . . . . . . . . . . . . . . . . . . . . .2
SAFETY GUIDELINES . . . . . . . . . . . . . . . . . . . . . . . . . . . . . . . . . . . . . . . . . . . . . . . . . . . . . . . . . . . . . . . . . . . . . . . .3
GENERAL SAFETY RULES . . . . . . . . . . . . . . . . . . . . . . . . . . . . . . . . . . . . . . . . . . . . . . . . . . . . . . . . . . . . . . . . . . . .4
ADDITIONAL SPECIFIC SAFETY RULES . . . . . . . . . . . . . . . . . . . . . . . . . . . . . . . . . . . . . . . . . . . . . . . . . . . . . . . . .5
FUNCTIONAL DESCRIPTION . . . . . . . . . . . . . . . . . . . . . . . . . . . . . . . . . . . . . . . . . . . . . . . . . . . . . . . . . . . . . . . . . .7
CARTON CONTENTS . . . . . . . . . . . . . . . . . . . . . . . . . . . . . . . . . . . . . . . . . . . . . . . . . . . . . . . . . . . . . . . . . . . . . . . . .7
ASSEMBLY . . . . . . . . . . . . . . . . . . . . . . . . . . . . . . . . . . . . . . . . . . . . . . . . . . . . . . . . . . . . . . . . . . . . . . . . . . . . . . . . .9
OPERATION . . . . . . . . . . . . . . . . . . . . . . . . . . . . . . . . . . . . . . . . . . . . . . . . . . . . . . . . . . . . . . . . . . . . . . . . . . . . . . .15
TROUBLESHOOTING . . . . . . . . . . . . . . . . . . . . . . . . . . . . . . . . . . . . . . . . . . . . . . . . . . . . . . . . . . . . . . . . . . . . . . .24
MAINTENANCE . . . . . . . . . . . . . . . . . . . . . . . . . . . . . . . . . . . . . . . . . . . . . . . . . . . . . . . . . . . . . . . . . . . . . . . . . . . . .25
SERVICE . . . . . . . . . . . . . . . . . . . . . . . . . . . . . . . . . . . . . . . . . . . . . . . . . . . . . . . . . . . . . . . . . . . . . . . . . . . . . . . . . .25
ACCESSORIES . . . . . . . . . . . . . . . . . . . . . . . . . . . . . . . . . . . . . . . . . . . . . . . . . . . . . . . . . . . . . . . . . . . . . . . . . . . .25
WARRANTY . . . . . . . . . . . . . . . . . . . . . . . . . . . . . . . . . . . . . . . . . . . . . . . . . . . . . . . . . . . . . . . . . . . . . . . . . . . . . . . .25
SPANISH . . . . . . . . . . . . . . . . . . . . . . . . . . . . . . . . . . . . . . . . . . . . . . . . . . . . . . . . . . . . . . . . . . . . . . . . . . . . . . . . . .27
FRENCH . . . . . . . . . . . . . . . . . . . . . . . . . . . . . . . . . . . . . . . . . . . . . . . . . . . . . . . . . . . . . . . . . . . . . . . . . . . . . . . . . .52
SERVICE CENTER LOCATIONS . . . . . . . . . . . . . . . . . . . . . . . . . . . . . . . . . . . . . . . . . . . . . . . . . . . . . . . .back cover
Page 3

3
Indicates an imminently hazardous situation which, if not avoided, will result in death or serious injury.
Indicates a potentially hazardous situation which, if not avoided, could result in death or serious injury.
Indicates a potentially hazardous situation which, if not avoided, may result in minor or moderate injury.
Used without the safety alert symbol indicates potentially hazardous situation which, if not avoided, may result
in property damage.
It is important for you to read and understand this manual. The information it contains relates to protecting
YOUR SAFETY and PREVENTING PROBLEMS. The symbols below are used to help you recognize this
information.
SAFETY GUIDELINES - DEFINITIONS
Some dust created by power sanding, sawing, grinding, drilling, and other construction activities
contains chemicals known to cause cancer, birth defects or other reproductive harm. Some
examples of these chemicals are:
• lead from lead-based paints,
• crystalline silica from bricks and cement and other masonry products, and
• arsenic and chromium from chemically-treated lumber (CCA).
Your risk from these exposures varies, depending on how often you do this type of work. To reduce your exposure to
these chemicals: work in a well ventilated area, and work with approved safety equipment, such as those dust masks
that are specially designed to filter out microscopic particles.
• Avoid prolonged contact with dust from power sanding, sawing, grinding, drilling, and other construction activities. Wear
protective clothing and wash exposed areas with soap and water. Allowing dust to get into your mouth, eyes, or lay on
the skin may promote absorption of harmful chemicals.
Use of this tool can generate and/or disperse dust, which may cause serious and permanent respiratory or other
injury. Always use NIOSH/OSHA approved respiratory protection appropriate for the dust exposure. Direct particles away
from face and body.
Wear appropriate hearing protection during use. Under some conditions and duration of use, noise from this product
may contribute to hearing loss.
CALIFORNIA PROPOSITION 65
Page 4

4
GENERAL SAFETY RULES
READ AND UNDERSTAND ALL WARNINGS AND OPERATING INSTRUCTIONS BEFORE
USING THIS EQUIPMENT. Failure to follow all instructions listed below, may result in
electric shock, fire, and/or serious personal injury or property damage.
IMPORTANT SAFETY INSTRUCTIONS
1. FOR YOUR OWN SAFETY, READ THE INSTRUCTION
MANUAL BEFORE OPERATING THE MACHINE.
Learning the machine’s application, limitations, and
specific hazards will greatly minimize the possibility of
accidents and injury.
2. WEAR EYE AND HEARING PROTECTION.
ALWAYS USE SAFETY GLASSES. Everyday
eyeglasses are NOT safety glasses. USE
CERTIFIED SAFETY EQUIPMENT. Eye protection
equipment should comply with ANSI Z87.1
standards. Hearing equipment should comply with
ANSI S3.19 standards.
3. WEAR PROPER APPAREL. Do not wear loose
clothing, gloves, neckties, rings, bracelets, or other
jewelry which may get caught in moving parts. Nonslip
footwear is recommended. Wear protective hair
covering to contain long hair.
4. DO NOT USE THE MACHINE IN A DANGEROUS
ENVIRONMENT. The use of power tools in damp or wet
locations or in rain can cause shock or electrocution.
Keep your work area well-lit to prevent tripping or
placing arms, hands, and fingers in danger.
5. MAINTAIN ALL TOOLS AND MACHINES IN PEAK
CONDITION. Keep tools sharp and clean for best and safest
performance. Follow instructions for lubricating and changing
accessories. Poorly maintained tools and machines can further
damage the tool or machine and/or cause injury.
6. CHECK FOR DAMAGED PARTS. Before using the
machine, check for any damaged parts. Check for
alignment of moving parts, binding of moving parts,
breakage of parts, and any other conditions that may
affect its operation. A guard or any other part that is
damaged should be properly repaired or replaced.
Damaged parts can cause further damage to the
machine and/or injury.
7. KEEP THE WORK AREA CLEAN. Cluttered areas and
benches invite accidents.
8. KEEP CHILDREN AND VISITORS AWAY. Your shop is a
potentially dangerous environment. Children and visitors can be
injured.
9. REDUCE THE RISK OF UNINTENTIONAL STARTING.
Make sure that the switch is in the “OFF” position before
plugging in the power cord. In the event of a power
failure, move the switch to the “OFF” position. An
accidental start-up can cause injury.
10.
USE THE GUARDS. Check to see that all guards are
in place, secured, and working correctly to reduce
the risk of injury.
11. REMOVE ADJUSTING KEYS AND WRENCHES
BEFORE STARTING THE MACHINE. Tools, scrap
pieces, and other debris can be thrown at high speed,
causing injury.
12. USE THE RIGHT MACHINE. Don’t force a machine or
an attachment to do a job for which it was not designed.
Damage to the machine and/or injury may result.
13. USE RECOMMENDED ACCESSORIES. The use of
accessories and attachments not recommended by
Delta may cause damage to the machine or injury to the
user.
14. USE THE PROPER EXTENSION CORD. Make sure
your extension cord is in good condition. When using an
extension cord, be sure to use one heavy enough to
carry the current your product will draw. An undersized
cord will cause a drop in line voltage, resulting in loss of
power and overheating. See the Extension Cord Chart
for the correct size depending on the cord length and
nameplate ampere rating. If in doubt, use the next
heavier gauge. The smaller the gauge number, the
heavier the cord.
15. SECURE THE WORKPIECE. Use clamps or a vise to hold
the workpiece when practical. Loss of control of a
workpiece can cause injury.
16. FEED THE WORKPIECE AGAINST THE DIRECTION OF
THE ROTATION OF THE BLADE, CUTTER, OR ABRASIVE
SURFACE. Feeding it from the other direction will cause
the workpiece to be thrown out at high speed.
17. DON’T FORCE THE WORKPIECE ON THE MACHINE.
Damage to the machine and/or injury may result.
18. DON’T OVERREACH. Loss of balance can make you
fall into a working machine, causing injury.
19. NEVER STAND ON THE MACHINE. Injury could occur if the
tool tips, or if you accidentally contact the cutting tool.
20. NEVER LEAVE THE MACHINE RUNNING UNATTENDED.
TURN THE POWER OFF. Don’t leave the machine until it
comes to a complete stop. Achild or visitor could be injured.
21. TURN THE MACHINE “OFF”, AND DISCONNECT THE
MACHINE FROM THE POWER SOURCE before installing
or removing accessories, before adjusting or changing
set-ups, or when making repairs. An accidental start-up
can cause injury.
22. MAKE YOUR WORKSHOP CHILDPROOF WITH
PADLOCKS, MASTER SWITCHES, OR BY
REMOVING STARTER KEYS. The accidental start-up
of a machine by a child or visitor could cause injury.
23. STAY ALERT, WATCH WHAT YOU ARE DOING, AND
USE COMMON SENSE. DO NOT USE THE MACHINE
WHEN YOU ARE TIRED OR UNDER THE INFLUENCE OF
DRUGS, ALCOHOL, OR MEDICATION. A moment of
inattention while operating power tools may result in
injury.
24. USE OF THIS TOOL CAN GENERATE
AND DISBURSE DUST OR OTHER AIRBORNE
PARTICLES, INCLUDING WOOD DUST,
CRYSTALLINE SILICA DUST AND ASBESTOS
DUST. Direct particles away from face and body.
Always operate tool in well ventilated area and provide
for proper dust removal. Use dust collection system
wherever possible. Exposure to the dust may cause
serious and permanent respiratory or other injury,
including silicosis (a serious lung disease), cancer, and
death. Avoid breathing the dust, and avoid prolonged
contact with dust. Allowing dust to get into your mouth or
eyes, or lay on your skin may promote absorption of
harmful material. Always use properly fitting
NIOSH/OSHA approved respiratory protection
appropriate for the dust exposure, and wash exposed
areas with soap and water.
Page 5

5
SAVE THESE INSTRUCTIONS.
Refer to them often
and use them to instruct others.
1. DO NOT OPERATE THIS MACHINE until it is
assembled and installed according to the instructions.
2. OBTAIN ADVICE FROM YOUR SUPERVISOR,
instructor, or another qualified person if you are not
familiar with the operation of this machine.
3. FOLLOW ALL WIRING CODES and recommended
electrical connections.
4. USE THE GUARDS WHENEVER POSSIBLE. Check
to see that they are in place, secured, and working
correctly.
5. KICKBACK IS THE NATURAL TENDENCY OF THE
WORKPIECE TO BE THROWN BACK AT THE
OPERATOR when the workpiece initially contacts the
blade or if the workpiece pinches the blade. Kickback is
dangerous and can result in serious injury.
AVOID KICKBACK by:
A. keeping blade sharp and free of rust and pitch.
B. keeping rip fence parallel to the saw blade.
C. using saw blade guard and spreader for every
possible operation, including all through sawing.
D. pushing the workpiece past the saw blade prior to
release.
E. never ripping a workpiece that is twisted or warped,
or does not have a straight edge to guide along the
fence.
F. using featherboards when the anti-kickback device
cannot be used.
G. never sawing a large workpiece that cannot be
controlled.
H. never using the fence as a guide when
crosscutting.
I. never sawing a workpiece with loose knots or other
flaws.
6. ALWAYS USE GUARDS, SPLITTER, AND
ANTI-KICKBACK FINGERS whenever possible.
7. REMOVE CUT-OFF PIECES AND SCRAPS from the
table before starting the saw. The vibration of the
machine may cause them to move into the saw blade
and be thrown out. After cutting, turn the machine off.
After the blade has come to a complete stop, remove
all debris.
8. NEVER START THE MACHINE with the workpiece
against the blade.
9. NEVER run the workpiece between the fence and a
moulding cutterhead.
10. CUTTING THE WORKPIECE WITHOUT THE USE OF
A FENCE OR MITER GAUGE IS KNOWN AS
“FREEHAND” CUTTING. NEVER perform “free-hand”
operations. Use either the fence or miter gauge to
position and guide the workpiece.
11. HOLD THE WORKPIECE FIRMLY against the miter
gauge or fence.
12. CUTTING COMPLETELY THROUGH THE WORK-
PIECE IS KNOWN AS “THROUGH-SAWING”.
Ripping and cross-cutting are through-sawing
operations. Cutting with the grain (or down the length of
the workpiece) is ripping. Cutting across the grain (or
across the workpiece) is cross-cutting. Use a fence or
fence system for ripping. DO NOT use a fence or fence
system for cross-cutting. Instead, use a miter gauge.
USE PUSH STICK(S) for ripping a narrow workpiece.
13. AVOID AWKWARD OPERATIONS AND HAND
POSITIONS where a sudden slip could cause a hand to
move into the blade.
14. KEEP ARMS, HANDS, AND FINGERS away from the
blade.
15. NEVER have any part of your body in line with the path
of the saw blade.
16. NEVER REACH AROUND or over the saw blade.
17. NEVER attempt to free a stalled saw blade without first
turning the machine “OFF”.
18. PROPERLY SUPPORT LONG OR WIDE workpieces.
19. NEVER PERFORM LAYOUT, assembly or set-up work
on the table/work area when the machine is running.
20. TURN THE MACHINE “OFF” AND DISCONNECT
THE MACHINE
from the power source before installing
or removing accessories, before adjusting or changing
set-ups, or when making repairs.
21. TURN THE MACHINE “OFF”, disconnect the machine
from the power source, and clean the table/work area
before leaving the machine. LOCK THE SWITCH IN
THE “OFF” POSITION to prevent unauthorized use.
22. ADDITIONAL INFORMATION regarding the safe
and proper operation of power tools (i.e. a safety video)
is available from the Power Tool Institute, 1300
Sumner Avenue, Cleveland, OH 44115-2851
(www.powertoolinstitute.com). Information is also
available from the National Safety Council, 1121 Spring
Lake Drive, Itasca, IL 60143-3201. Please refer to the
American National Standards Institute ANSI 01.1
Safety Requirements for Woodworking Machines and
the U.S. Department of Labor OSHA 1910.213
Regulations.
ADDITIONAL SPECIFIC SAFETY RULES
READ AND UNDERSTAND ALL INSTRUCTIONS. FAILURE TO FOLLOW THESE INSTRUCTIONS
MAY RESULT IN ELECTRICAL SHOCK, FIRE AND / OR SERIOUS INJURY.
Page 6
66
Fig. A Fig. B
GROUNDED OUTLET BOX
CURRENT
CARRYING
PRONGS
GROUNDING BLADE
IS LONGEST OF THE 3 BLADES
GROUNDED OUTLET BOX
GROUNDING
MEANS
ADAPTER
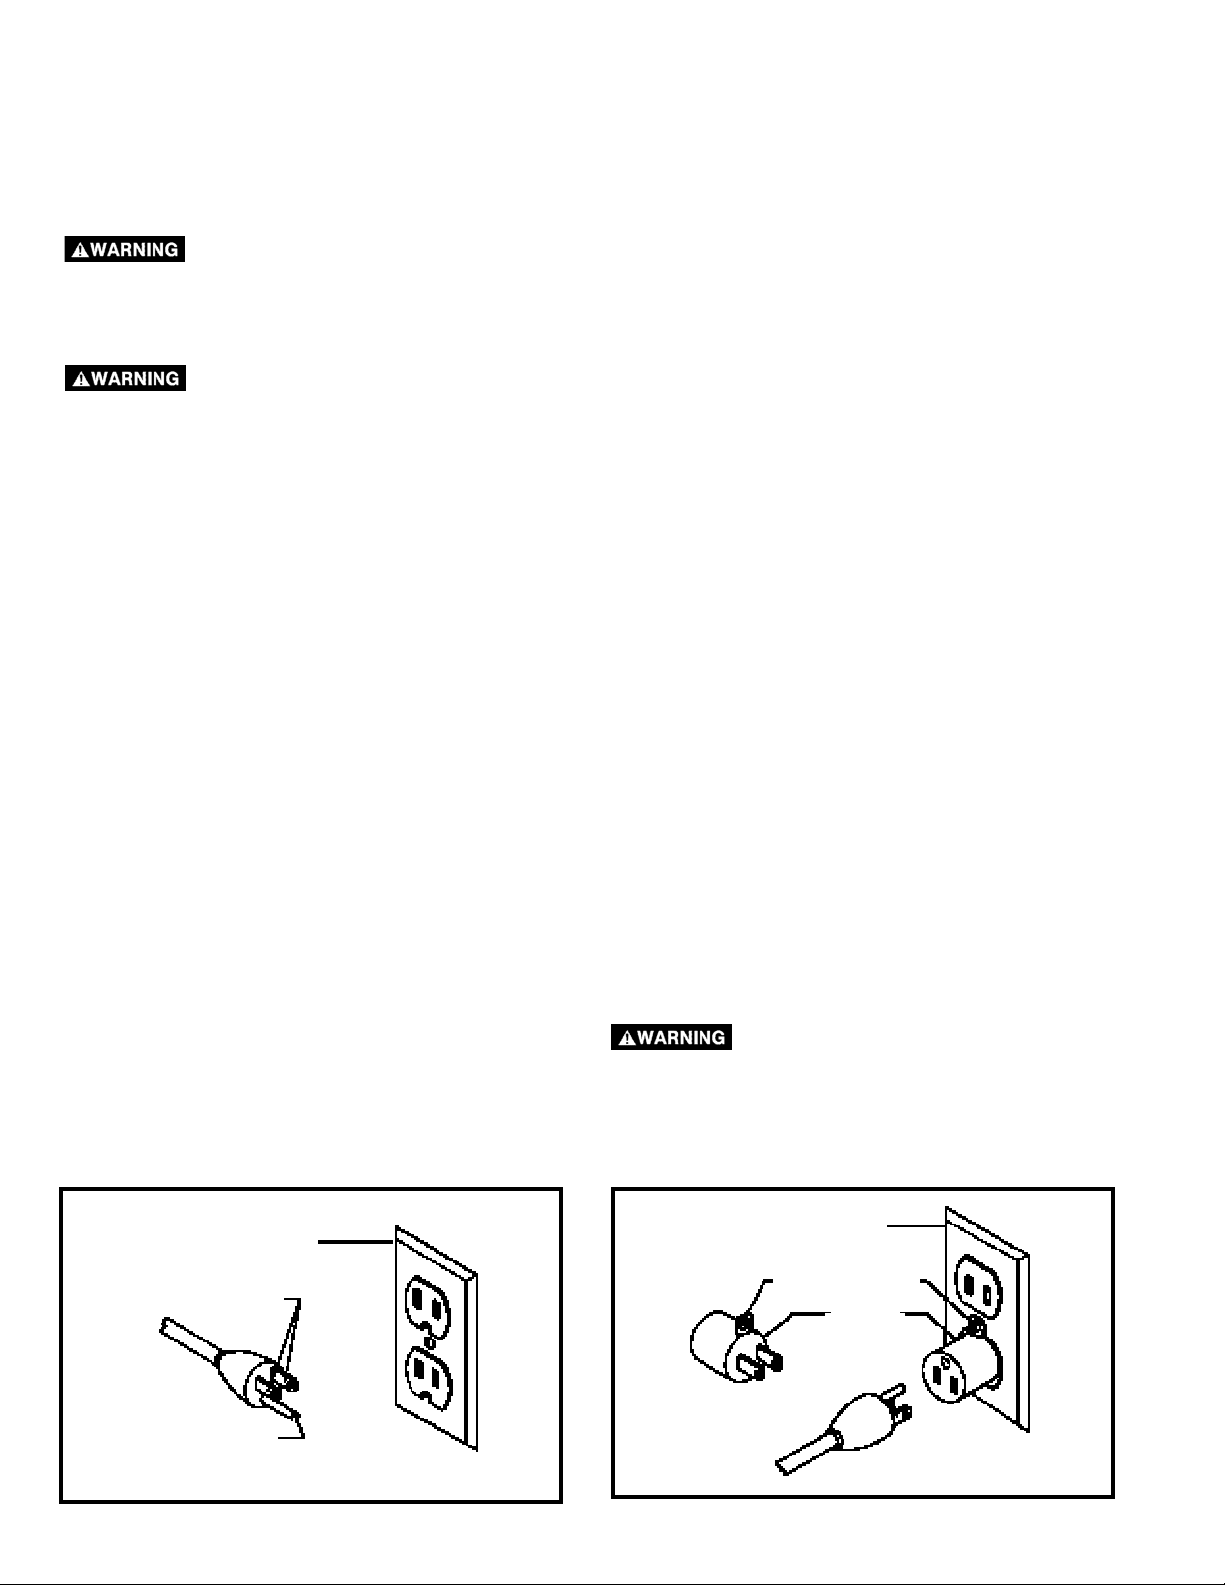
2. Grounded, cord-connected machines intended for
use on a supply circuit having a nominal rating less
than 150 volts:
If the machine is intended for use on a circuit that has an
outlet that looks like the one illustrated in Fig. A, the
machine will have a grounding plug that looks like the plug
illustrated in Fig. A. A temporary adapter, which looks like
the adapter illustrated in Fig. B, may be used to connect
this plug to a matching 2-conductor receptacle as shown in
Fig. B if a properly grounded outlet is not available. The
temporary adapter should be used only until a properly
grounded outlet can be installed by a qualified electrician.
The green-colored rigid ear, lug, and the like, extending
from the adapter must be connected to a permanent
ground such as a properly grounded outlet box. Whenever
the adapter is used, it must be held in place with a metal
screw.
NOTE: In Canada, the use of a temporary adapter is not
permitted by the Canadian Electric Code.
SHOCK HAZARD. IN ALL CASES, MAKE
CERTAIN THE RECEPTACLE IN QUESTION IS
PROPERLY GROUNDED. IF YOU ARE NOT SURE
HAVE A QUALIFIED ELECTRICIAN CHECK THE
RECEPTACLE.
1. All grounded, cord-connected machines:
In the event of a malfunction or breakdown, grounding
provides a path of least resistance for electric current to
reduce the risk of electric shock. This machine is equipped
with an electric cord having an equipment-grounding
conductor and a grounding plug. The plug must be plugged
into a matching outlet that is properly installed and
grounded in accordance with all local codes and
ordinances.
Do not modify the plug provided - if it will not fit the outlet,
have the proper outlet installed by a qualified electrician.
Improper connection of the equipment-grounding
conductor can result in risk of electric shock. The
conductor with insulation having an outer surface that is
green with or without yellow stripes is the equipmentgrounding conductor. If repair or replacement of the
electric cord or plug is necessary, do not connect the
equipment-grounding conductor to a live terminal.
Check with a qualified electrician or service personnel if the
grounding instructions are not completely understood, or if
in doubt as to whether the machine is properly grounded.
Use only 3-wire extension cords that have 3-prong
grounding type plugs and matching 3-conductor
receptacles that accept the machine’s plug, as shown in
Fig. A.
Repair or replace damaged or worn cord immediately.
A separate electrical circuit should be used for your machines. This circuit should not be less than #12 wire and should
be protected with a 20 Amp time lag fuse. If an extension cord is used, use only 3-wire extension cords which have 3prong grounding type plugs and matching receptacle which will accept the machine’s plug. Before connecting the
machine to the power line, make sure the switch (s) is in the “OFF” position and be sure that the electric current is of the
same characteristics as indicated on the machine. All line connections should make good contact. Running on low
voltage will damage the machine.
SHOCK HAZARD. DO NOT EXPOSE THE MACHINE TO RAIN OR OPERATE THE MACHINE IN
DAMP LOCATIONS.
POWER CONNECTIONS
Your machine is wired for 120 Volt, 60 HZ alternating current. Before connecting the machine to the power source,
make sure the switch is in the “OFF” position.
GROUNDING INSTRUCTIONS
SHOCK HAZARD. THIS MACHINE MUST BE GROUNDED WHILE IN USE TO PROTECT THE
OPERATOR FROM ELECTRIC SHOCK.
Page 7
7
FUNCTIONAL DESCRIPTION
NOTICE: THE PHOTO ON THE MANUAL COVER ILLUSTRATES THE
CURRENT PRODUCTION MODEL. ALL OTHER ILLUSTRATIONS CONTAINED
IN THE MANUAL ARE REPRESENTATIVE ONLY AND MAY NOT DEPICT THE
ACTUAL COLOR, LABELING OR ACCESSORIES AND ARE INTENDED TO
ILLUSTRATE TECHNIQUE ONLY.
FOREWORD
ShopMaster Model SM200L is a 10" Table Saw designed to give high quality performance with depth of cut capacity up
to 3" (76mm) at 90° and 2" (51mm) at 45° for clean cutting of standard stock sizes. Delta ShopMaster Model TS200LS
includes the saw with a 13 amp 120V motor, a metal stand, rip fence, miter gage, see-through blade guard with splitter
and anti-kickback fingers, a 10” carbide-tipped saw blade, table insert and blade wrenches. The TS200 is the same saw
without the stand.
EXTENSION CORDS
Use proper extension cords. Make sure
your extension cord is in good condition and is a 3-wire
extension cord which has a 3-prong grounding type plug
and matching receptacle which will accept the machine’s
plug. When using an extension cord, be sure to use one
heavy enough to carry the current of the machine. An
undersized cord will cause a drop in line voltage,
resulting in loss of power and overheating. Fig. C shows
the correct gauge to use depending on the cord length.
If in doubt, use the next heavier gauge. The smaller the
gauge number, the heavier the cord.
Fig. C
MINIMUM GAUGE EXTENSION CORD
RECOMMENDED SIZES FOR USE WITH STATIONARY ELECTRIC MACHINES
Ampere Total Length Gauge of
Rating Volts of Cord in Feet Extension Cord
0-6 120
up to
25 18 AWG
0-6 120 25-50 16 AWG
0-6 120 50-100 16 AWG
0-6 120 100-150 14 AWG
6-10 120
up to
25 18 AWG
6-10 120 25-50 16 AWG
6-10 120 50-100 14 AWG
6-10 120 100-150 12 AWG
10-12 120
up to
25 16 AWG
10-12 120 25-50 16 AWG
10-12 120 50-100 14 AWG
10-12 120 100-150 12 AWG
12-16 120
up to
25 14 AWG
12-16 120 25-50 12 AWG
12-16 120
GREATER THAN 50 FEET NOT RECOMMENDED
MOTORIZED BENCH SAW PARTS
Fig. 1 illustrates the saw removed from the container.
Figs. 2 and Fig. 3 illustrate the loose items packed with
the saw. Fig. 4 illustrates the loose items packed for the
stand.
Fig. 1
CARTON CONTENTS
Page 8

8
1
8
9
7
10
3
6
2
4
5
Fig. 4
1. Leg (4)
2. 3/8” Flat Washer for Mounting Saw to Stand & for
Assembling Stand (24)
3. Foot (4)
4. M8x1.25 Hex Nut for Mounting Saw to Stand & for
Assembling Stand (20)
5. M8x1.25x40mm Hex Screw for Mounting Saw to
Stand (4)
6. M8x1.25x20mm Carriage Head Bolts for
Assembling Stand (16)
7. 18-1/2” Top Front and Rear Brackets (2)
8. 17” Top Side Brackets (2)
9. 22” Bottom Front and Rear Brackets (2)
10. 20-3/8” Bottom Side Brackets (2)
STAND FOR MODEL
TS200LS ONLY (Fig. 4)
Fig. 2
Fig. 3
Fig. 2 Parts
1. Rip Fence
2. Splitter and Guard Assembly
3. Lock Handle for Rip Fence
4. Blade Raising and Lowering Handwheel
5. Miter Gage
6. Splitter Support Bracket
7. Splitter Bracket
8. Handle for Blade Raising and Lowering Handwheel
9. Miter Gage Holder
10. Spring Clip for Miter Gage Holder
11. Blade Wrench
Fig. 3 Hardware
1. M6x1x55mm Pan Head Screw (1)
2. 1/4-20x2fi" Hex Head Screw (1)
3. M6x1x20mm Hex Head Screw (1)
4. 1/4-20x1/2" Hex Head Screw (2)
5. M6x1x12mm Flat Head Screw (1)
6. M4x.7x10mm Pan Head Screw (1)
7. M4x.2x10mm Pan Head Screw (4)
8. M8x1.25 Hex Nut (1)
9. M6x1 Wing Nut (1)
10. M4.7 Hex Nut (1)
11. M6.4 Flat Washer (3)
12. 1/4" Internal Tooth Lockwasher (1)
13. 1/4" External Tooth Lockwasher (5)
14. 3/16" Flat Washer (4)
15. 3/16" External Tooth Flat Washer (1)
1
2
3
4
5
6
7
8
9
10
1
2
3
4
5
6
7
8
9
10
11
12
13
14
15
11
Page 9

UNPACKING AND CLEANING
Carefully unpack the machine and all loose items from the shipping container(s). Remove the protective coating from all
unpainted surfaces. This coating may be removed with a soft cloth moistened with kerosene (do not use acetone, gasoline
or lacquer thinner for this purpose). After cleaning, cover the unpainted surfaces with a good quality household floor paste
wax.
ASSEMBLY
ASSEMBLY TOOLS REQUIRED
(None supplied)
* Phillips head screw driver
* 13mm wrench for stand bolts
* 10mm wrench for splitter assembly bolts
* Straight edge and/or framing square for adjustments
ASSEMBLY TIME ESTIMATE - 1 hour
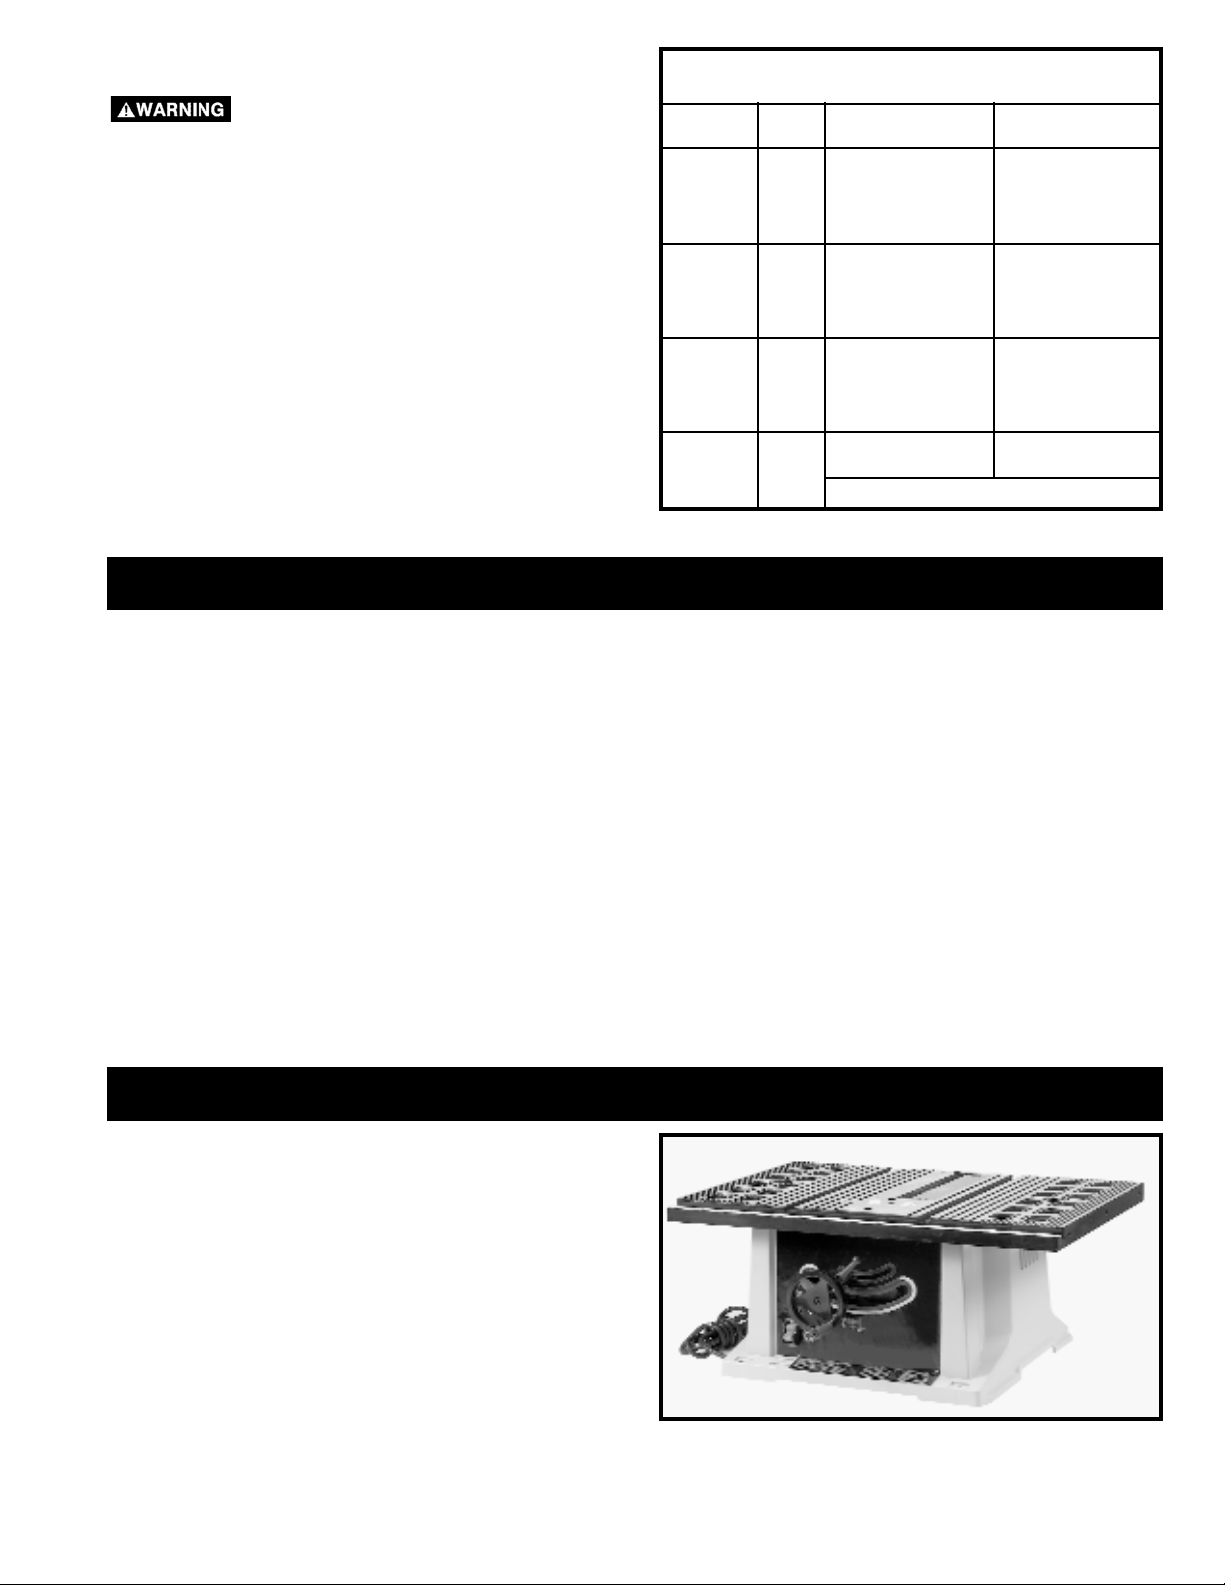
THE SAW MUST BE PROPERLY SECURED TO A SUPPORTING SURFACE. ALSO, FAILURE TO
PROVIDE A SAWDUST FALL-THROUGH AND REMOVAL HOLE WILL ALLOW SAWDUST TO BUILD
UP AROUND THE MOTOR, CAUSING A POSSIBLE FIRE HAZARD AND/OR MOTOR DAMAGE.
Fig. 4A
ELEVATING AND SUPPORTING SURFACES FOR A SAW WITH NO STAND
A
The saw must be elevated enough for sawdust to fall
through the bottom of the saw and not build up around
the motor.
Position the four mounting holes located on the base of
the saw cabinet (two of which are shown at (A) Fig. 4A)
over whatever proper support you are using. Then
securely fasten the saw to the supports. The saw can be
secured by fastening the stand through the mounting
holes with suitable hardware (not supplied).
THE SAW SUPPORT MUST BE STABLE AND ABLE TO
SUPPORT 300 POUNDS.
You can also construct a simple elevated support, as
shown in Fig. 4B.
USE A GOOD GRADE OF PLYWOOD
WITH A MINIMUM 3/4" THICKNESS.
DO NOT MAKE THE MOUNTING BOARD FROM
PARTICLE BOARD SINCE PARTICLE BOARD
BREAKS EASILY.
A HOLE MUST BE PROVIDED IN THIS
SUPPORT TO ALLOW SAWDUST TO
FALL THROUGH.
Square the saw on the supporting surface and mark the
location for four 5/16 inch holes to be drilled (Fig. 4B).
MAKE SURE THERE IS AT LEAST 3"
ON ALL FOUR SIDES OF THE BASE.
Set the saw aside and then drill holes in these marks.
Locate and mark an 11" or 12" square centered between
the four mounting holes. Cut out and remove the square
(Fig. 4B). To elevate the supporting surface, measure
two 2x4s (A) Fig. 4B to the width of two opposite sides of
the supporting surface. Attach the supporting surface to
the narrow edges of the 2X4s (as shown in Fig. 4B) using
wood screws (not provided) in at least three spots (B)
Fig. 4B on each side.
5/16" PILOT
HOLES
11" OR 12"
SQUARE
CUTOUT
SAW PLACEMENT
MARKS
3" MINIMUM
3" MINIMUM
B
B
A
3" MINIMUM
3" MINIMUM
Fig. 4B
Fasten the saw to the surface by inserting suitable
hardware (not supplied) through the mounting holes on
the saw and into the previously drilled holes. While
using the saw, periodically remove the sawdust buildup
from below the saw.
DISCONNECT MACHINE FROM POWER SOURCE.
9
Page 10
10
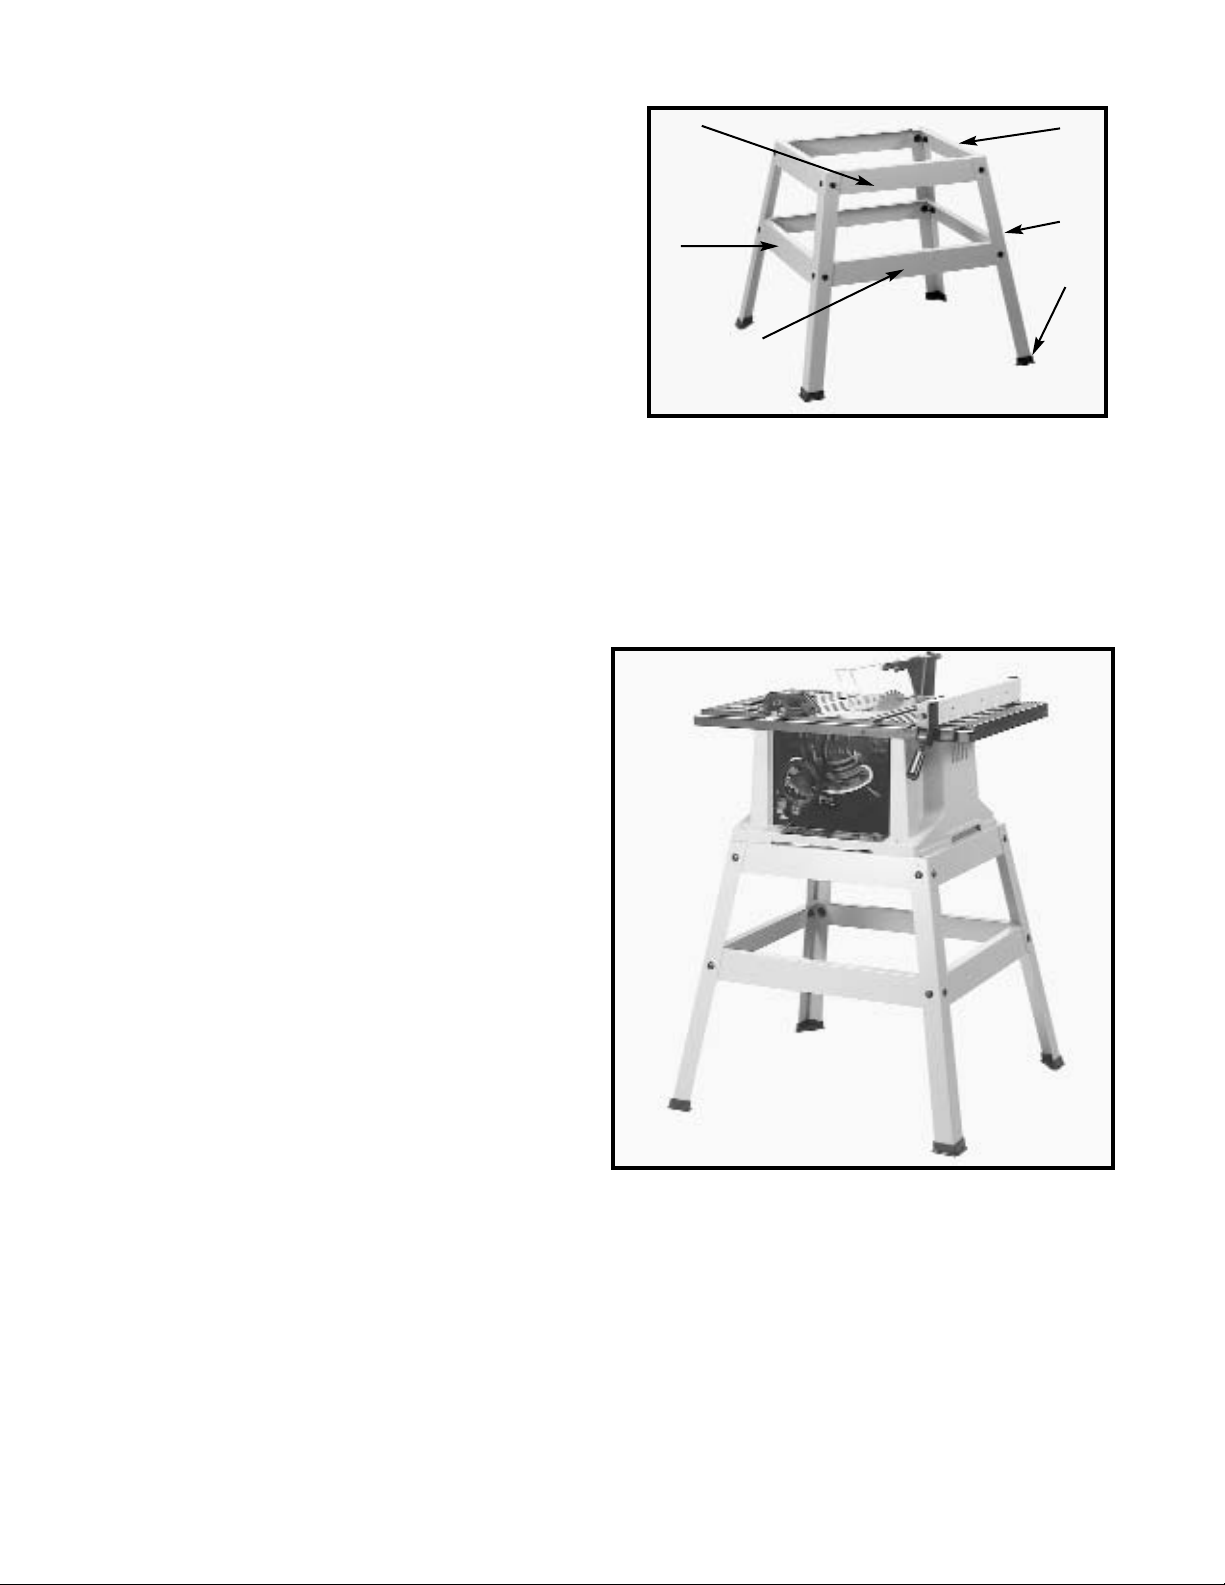
ASSEMBLING STAND
1. Assemble the stand as shown in Fig. 4C, using 16
M8x1.25x20mm carriage head bolts, 3/8" flat washers
and M8x1.25 hex nuts. Align the holes in the stand legs
(F) with the holes in the brackets. Insert the carriage
head bolt through the hole in the leg and the hole in the
bracket, place a flat washer on the carriage head bolt
and thread a hex nut onto the carriage head bolt.
Repeat this process for the 15 remaining holes in the
legs and brackets.
NOTE: Loosely tighten the hardware for further
adjustment.
Letters are on the stand brackets to ease assembly:
A - Top front and rear brackets
B - Top side brackets
C - Bottom side brackets
D - Bottom front and rear brackets
2. Attach the rubber feet (E) Fig. 4C to the bottom of each
leg (F).
NOTE: Each rubber foot is provided with holes for
mounting the stand to the floor surface if required.
Fig. 4C
B
A
C
F
E
D
Fig. 4D
SAW TO STAND
1. Turn saw table face down on a piece of cardboard to
protect the table surface. Place stand upside down
onto saw and align the four holes in the stand with
the mounting holes in the saw.
2. Place a 3/8" flat washer on a M8x1.25x40mm hex
head screw. Insert the hex head screw through the
mounting hole in the saw and the mounting hole in
the stand. Place another 3/8" flat washer on the hex
head screw and thread a M8x1.25 hex nut on the
screw and loosely tighten. Complete this process for
the other three holes.
3. Stand the saw upright, as shown in Fig. 4D (Saw is
shown fully assembled here).
4. Push down on top of the saw so that the legs of the
stand adjust to the surface of the floor. Tighten all
hardware securely.
Page 11
11
Fig. 5
Fig. 6
Fig. 7
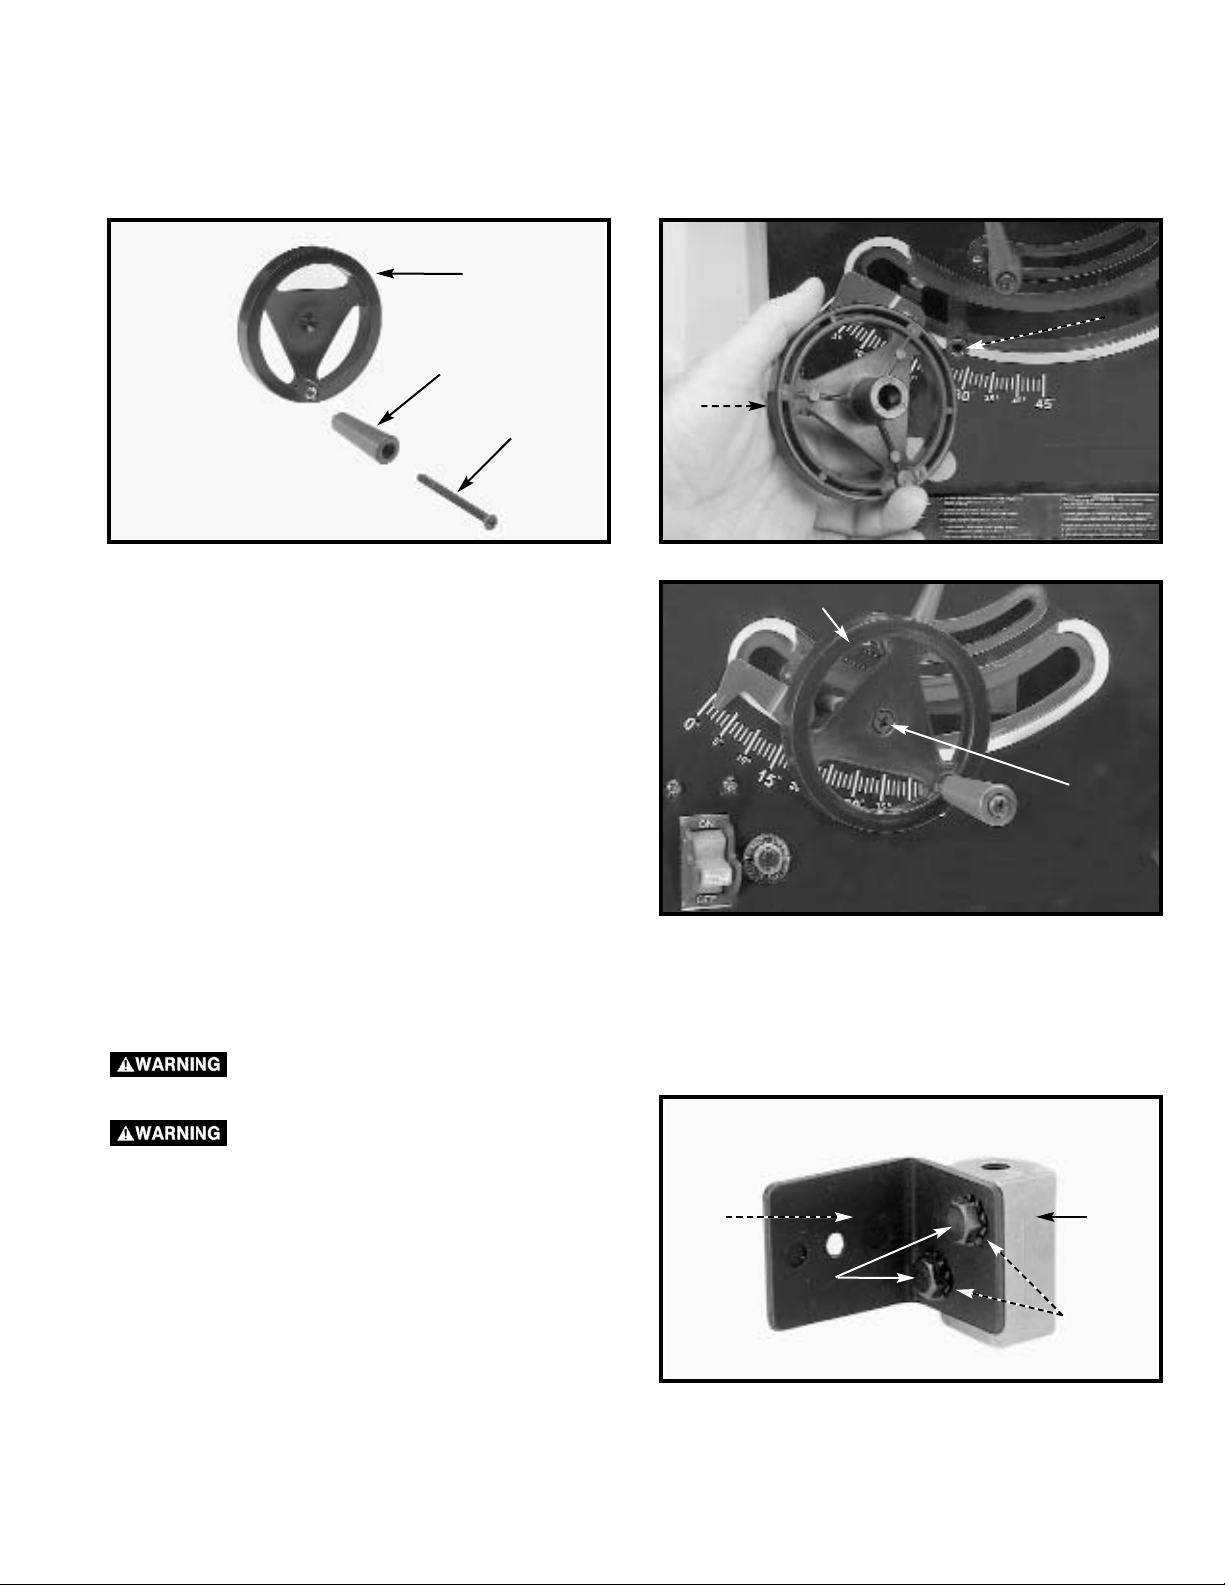
ATTACHING BLADE HEIGHT ADJUSTING HANDWHEEL
1. Insert an M6x1x55mm pan head screw (D) Fig. 5 through the handle (E). Attach the handle (E) to the handwheel
(A) by threading the screw (D) clockwise into the handwheel.
2. Attach the handwheel (A) Fig. 6 to the shaft (B). Align the flat on the inside of the handwheel to the flat on the shaft.
D
E
A
C
A
A
B
3. Fasten the handwheel (A) Fig. 7 to the shaft using an
M6x1x12mm flat head screw (C)
DISCONNECT MACHINE FROM POWER
SOURCE.
PROPERLY ALIGN THE BLADE GUARD
AND SPLITTER ASSEMBLY WITH THE
SAW BLADE TO PREVENT KICKBACK.
1. Position the blade 90 degrees to the table and lock
in place.
2. Fasten the splitter support bracket (A) Fig. 9 to the
splitter bracket (B) using two 1/4-20x1/2" hex head
screws (C) and two 1/4" external tooth lockwashers
(D).
NOTE: Loosely tighten the screws for further
adjustment.
Fig. 9
A
B
C
D
ATTACHING BLADE GUARD AND SPLITTER ASSEMBLY
Page 12
12
Fig. 14
L
B
H
C
Fig. 10
Fig. 13Fig. 12
Fig. 11
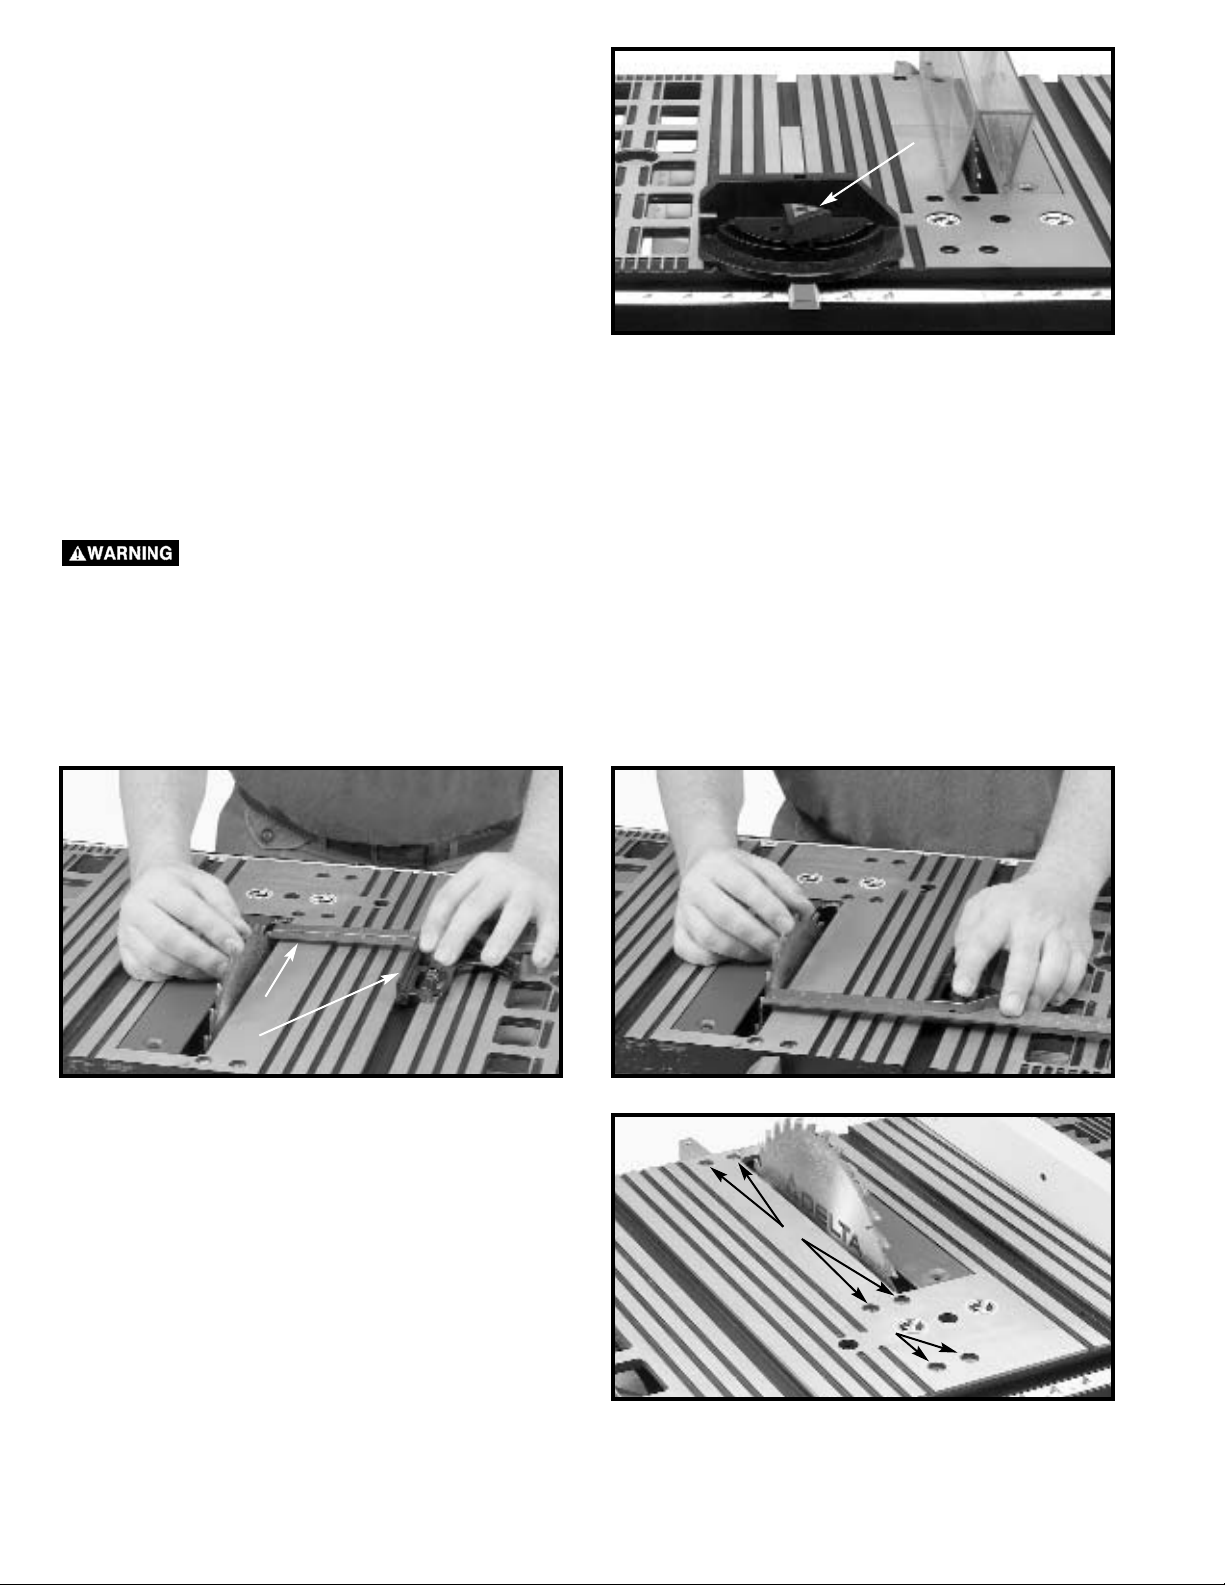
3. Locate the 1/4-20x2fi" hex head screw (G) Fig. 10. Place the 1/4" internal tooth lockwasher (O) M6.4 flat washer (P)
and the 1/4" external tooth lockwasher (R) on the screw (G).
4. Position the recessed end (E) Fig. 11 of the splitter bracket (B) against the end of the pivot rod (F), and fasten using
the assembly in STEP 3.
NOTE: Loosely tighten the hardware for further adjustment.
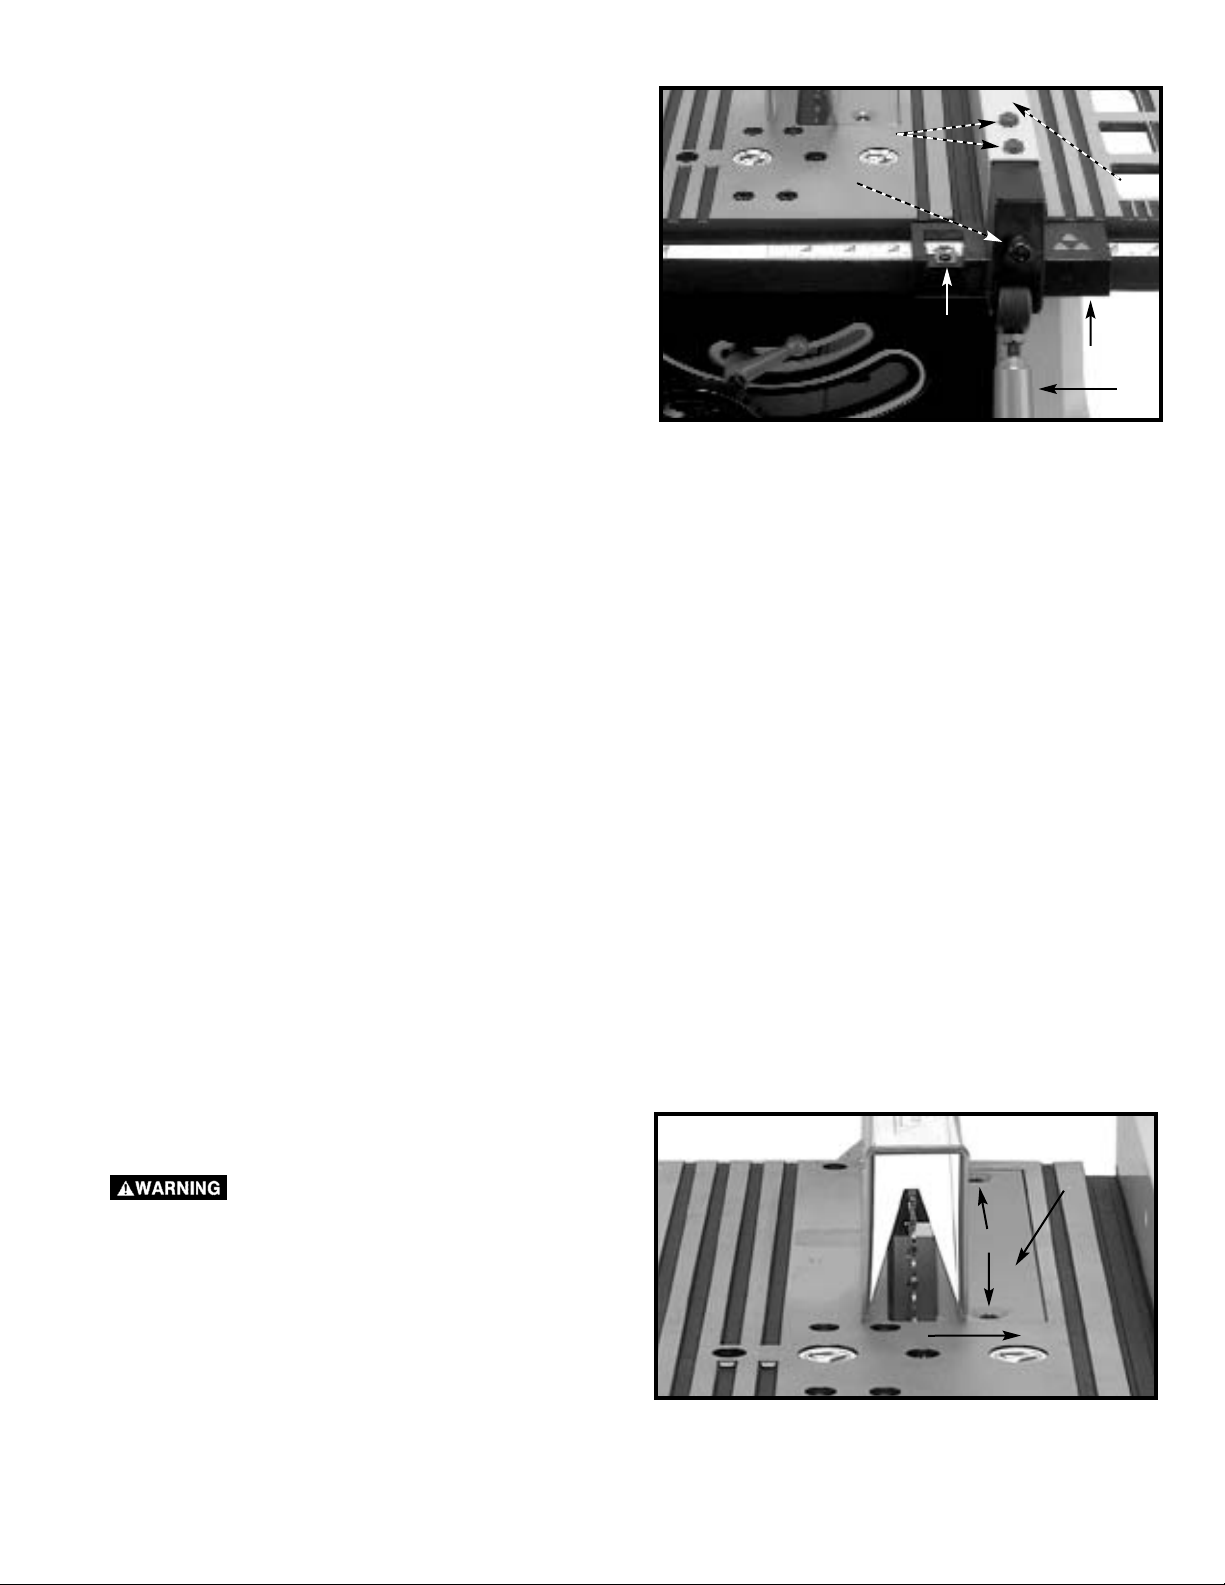
5. Position the splitter (H) Fig. 13 against the splitter support bracket, making certain the two protrusions (K) on the
splitter support bracket are inside the slot of splitter (H).
R
P
O
G
F
E
G
B
K
H
6. Attach the splitter (H) Fig. 14 to the splitter support
bracket (B). Place a 1/4" external tooth lockwasher
and an M6.4 flat washer on an M6x1x20mm hex
head screw (L).
7. Insert the screw (L) Fig. 14 through the splitter
support bracket (C) and the splitter (H). Place an
M6.4 flat washer and a 1/4" external tooth lock
washer on the screw (L). Thread an M6x1 wing nut
(M) Fig. 15 on the screw (L) Fig. 15.
Page 13

13
Fig. 18
Fig. 15
Fig. 17Fig. 16
NOTE: Before tightening the wing nut (M) Fig. 15,
make certain a gap of at least 1/8" is between the
bottom edge of the splitter (N) and the top surface of
the table (P) and that the protrusions (K) are inside
the slot of the splitter assembly (H).
8. Use a straight edge to see if the splitter (H)
Fig. 16 is aligned with the saw blade (R). If an
adjustment is necessary, the splitter (H) can be
moved left or right and rotated.
9. When the splitter is properly aligned with the saw
blade, tighten the screws (C) and (G) Fig. 17.
MITER GAUGE
The miter gauge is shipped assembled and is supplied
with a T-slot bar (A) Fig. 18 that is inserted into either one
of the two T-slotted miter gauge grooves (B) located in
the table top. The T-slot prevents the miter gauge from
falling when it is extended beyond the front of the table
when cross-cutting extra wide workpieces.
K
M
N
P
H
R
C
G
H
A
B
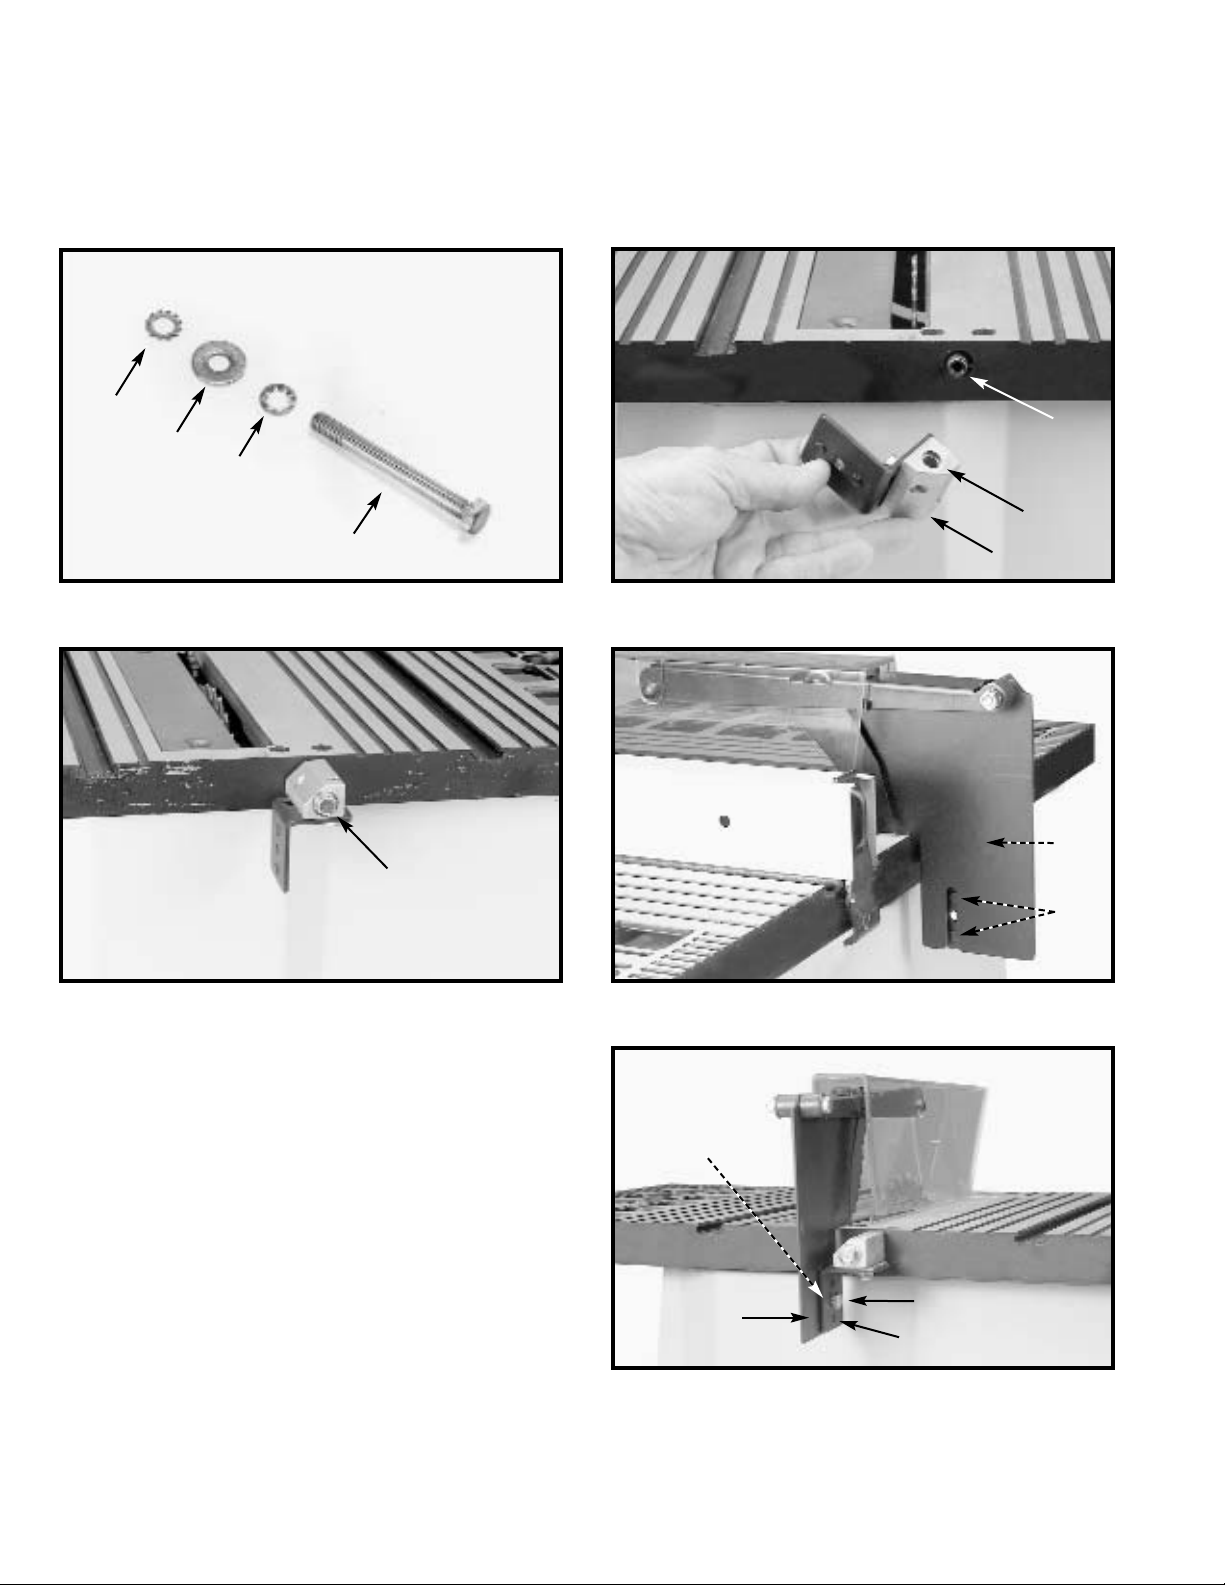
ATTACHING MITER GAUGE HOLDER
DISCONNECT MACHINE FROM POWER SOURCE.
Fig. 19
E
A
B
Fig. 20
G
F
Page 14

14
Fig. 24
Fig. 26Fig. 25
ASSEMBLING RIP FENCE
1. Thread the M8x1.25 hex nut (A) Fig. 24, approximately halfway on the stud of the handle (B).
2. Thread the handle (B) Fig. 24 into the tapped hole (C) in the fence cam (D). Tighten the hex nut (A) Fig. 25 against
the cam (D).
3. The rip fence is usually set up on the right hand side of the saw table. Lift the lock handle (B) Fig. 26 and position
the fence on the table. Push down on the handle (B) Fig. 26 to lock the fence in place.
B
A
D
C
D
B
Fig. 21
Fig. 22
Fig. 23
1. Attach the spring clip (E) Fig. 19 to the miter gauge holder (A) using an M4x.7x10mm pan head screw (F), 3/16"
external tooth lockwasher, (B) and M4x.7 hex nut.
NOTE: The hex nut (G) Fig. 20 will fit into the recess at the back of the miter gauge holder (A) Fig. 19 to keep the
spring clip (E) secured to the miter gauge holder.
2. Attach the miter gauge holder (A) Fig. 21 to the left side of the saw cabinet using the four M4x.2x10mm screws (B)
Fig. 22, and 3/16" flat washers (C) from inside of the saw cabinet.
3. Fig. 23 illustrates the miter gauge (D) inserted into the holder.
A
B
C
D
A
Page 15
15
BLADE HEIGHT ADJUSTMENT
To adjust the height of the saw blade, turn the handwheel
(A) Fig. 29. Turning the handwheel clockwise lowers the
blade and turning the handwheel counter-clockwise
raises the blade.
Fig. 29
A
OVERLOAD PROTECTION
Your saw is equipped with a reset button (C) Fig. 28. If the motor stops or fails to start due to over-loading (cutting stock
too fast, using a dull blade, using the saw beyond its capacity, etc.) or low voltage, turn the switch to the “OFF” position.
Let the motor cool three to five minutes. Push the reset button (C) to reset the overload device. The motor can then be
started again in the usual manner.
Fig. 28
Fig. 27
A
B
C
OPERATION
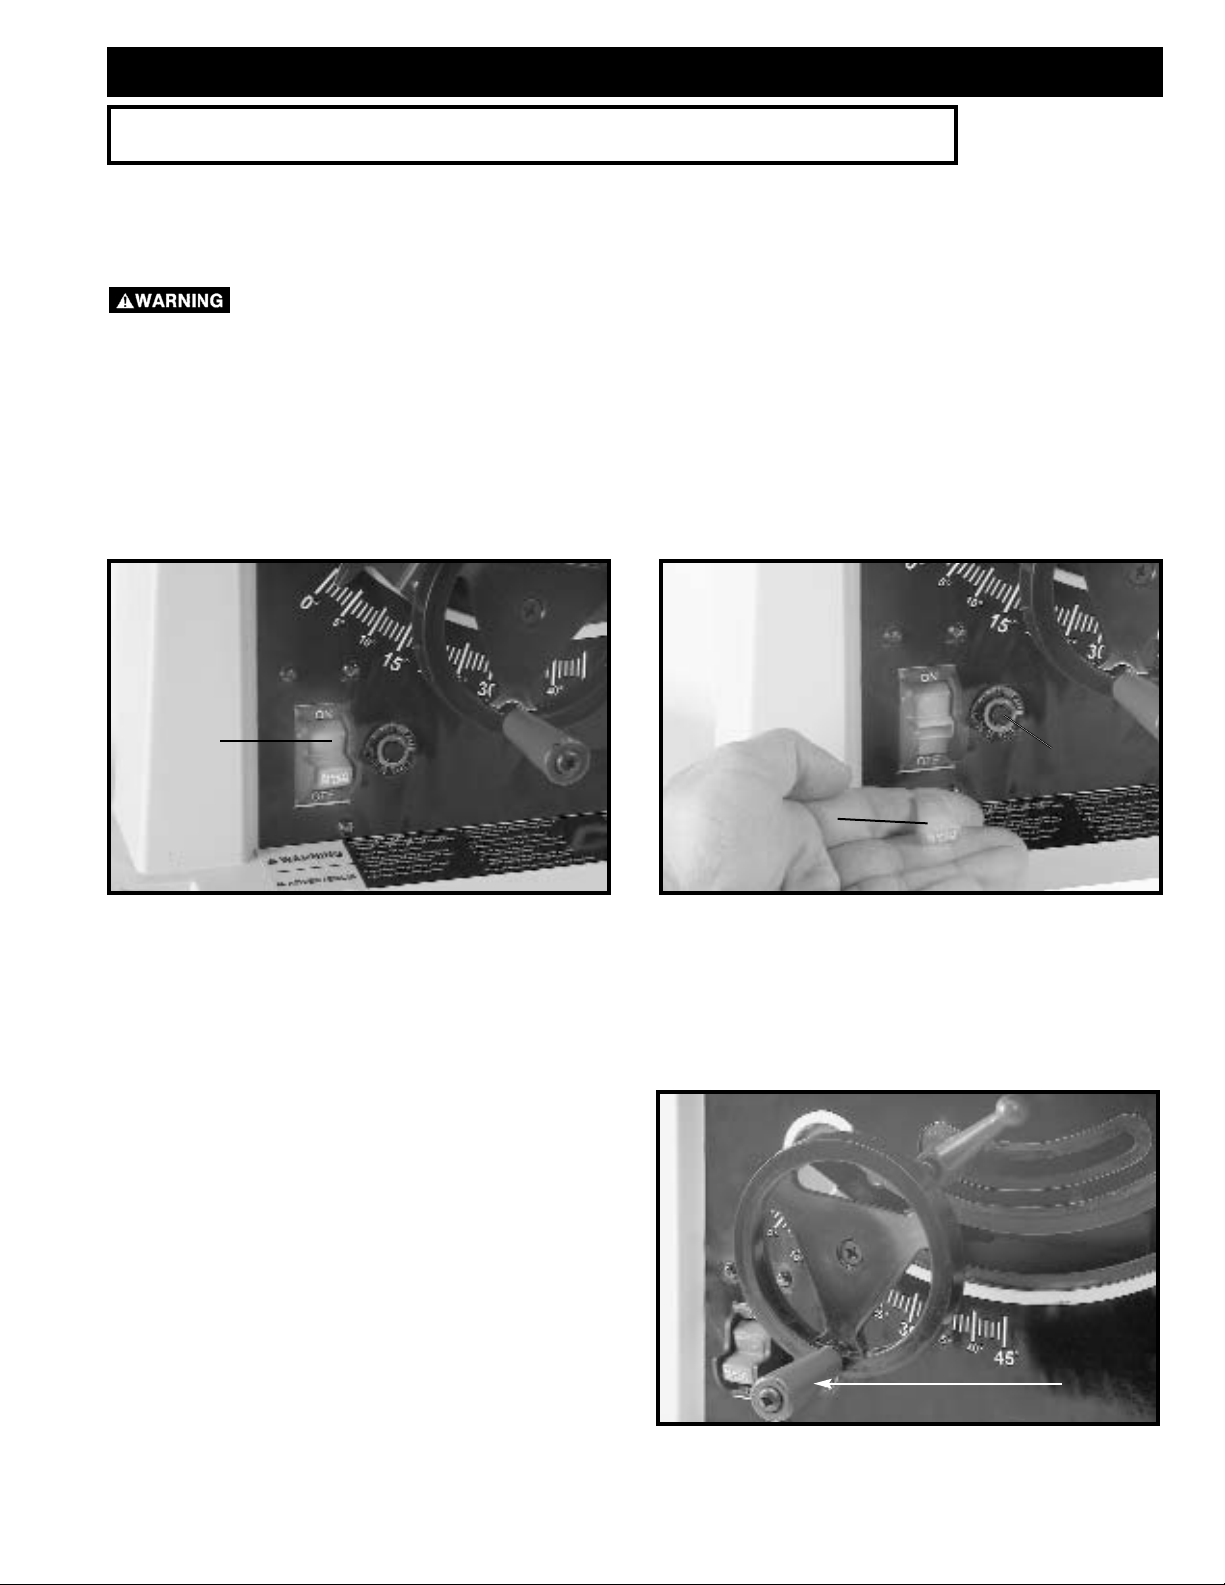
STARTING AND STOPPING SAW
The on/off switch (A) Fig. 27 is located on the front of the saw cabinet. To turn the saw “ON”, move the switch (A) up
to the “ON” position. To turn the saw “OFF”, move the switch (A) down to the “OFF” position.
MAKE SURE THAT THE SWITCH IS IN THE “OFF” POSITION BEFORE PLUGGING IN THE POWER
CORD. IN THE EVENT OF A POWER FAILURE, MOVE THE SWITCH TO THE “OFF” POSITION. AN
ACCIDENTAL START-UP CAN CAUSE INJURY.
LOCKING SWITCH IN THE “OFF” POSITION
IMPORTANT: When the tool is not in use, the switch should be locked in the “OFF” position to prevent
unauthorized use. To lock the tool, grasp the switch toggle (B) and pull it out of the switch (Fig. 28). With the switch
toggle (B) removed, the switch will not operate. However, should the switch toggle be removed while the saw is running,
the machine can be turned “OFF,” but cannot be restarted without re-inserting the switch toggle (B).
OPERATIONAL CONTROLS AND ADJUSTMENTS
Page 16
16
Fig. 30
A
B
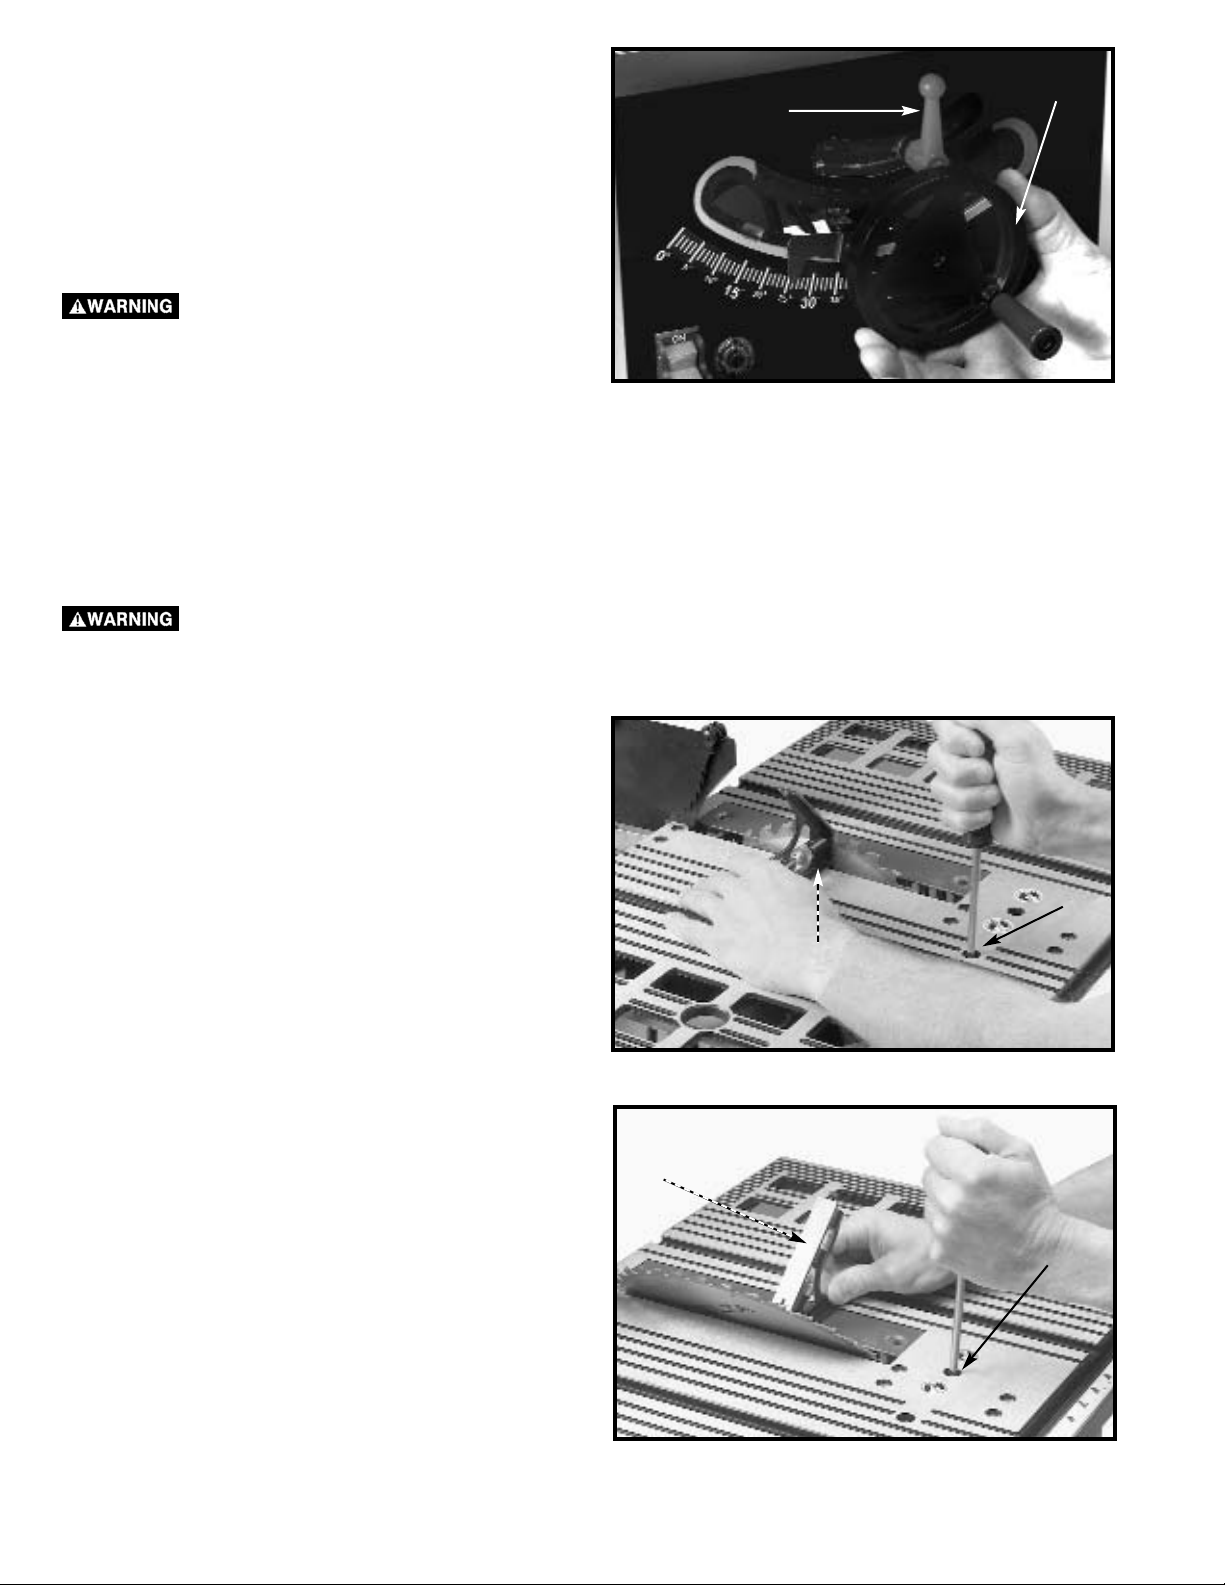
BLADE TILT ADJUSTMENT
To tilt the saw blade, loosen the lock handle (A)
Fig. 30 and move the handwheel (B) until the blade is at
the desired angle. Tighten the lock handle (A).
NOTE: The lock handle (A) is spring-loaded. Pull out on
the handle (A) and reposition it on the serrated stud
located underneath the handle.
THE BLADE TILTING LOCK HANDLE
(A) MUST BE LOCKED DURING ALL
CUTTING OPERATIONS.
TO ADJUST POSITIVE STOP AT 90 DEGREES
1. Raise the saw blade to its maximum height.
2. Loosen the blade tilting lock handle (A) Fig. 30, move
the blade tilting mechanism (B) as far as possible to
the left, and tighten the blade tilting lock handle (A).
3. Place a square (A) Fig. 31 on the table with one end
of the square against the blade, and check to see if
the blade is 90 degrees to the table. If not, loosen the
screw (B) Fig. 31 a few turns and move the blade
tilting mechanism until the blade is 90 degrees to the
table. Tighten the blade tilting lock handle (A) Fig. 30,
and tighten the screw (B) Fig. 31 until it stops.
Fig. 31
B
A
DISCONNECT MACHINE FROM POWER SOURCE.
90 AND 45 DEGREE POSITIVE STOP ADJUSTMENTS
Your saw is equipped with positive stops for rapid and accurate positioning of the saw blade at 90 and 45 degrees to
the table.
Fig. 32
C
A
TO ADJUST POSITIVE STOP AT 45 DEGREES
1. Raise the saw blade to its maximum height.
2. Loosen the blade tilting lock handle (A) Fig. 31, move
the blade tilting mechanism (B) as far as possible to
the right, and tighten the blade tilting lock handle (A).
3. Place a square (A) Fig. 32 on the table with one end
of the square against the blade, and see if the blade
is 45 degrees to the table. If not, loosen the screw
(C) Fig. 32 a few turns and move the blade tilting
mechanism (B) Fig. 30, until the blade is 45 degrees
to the table. Tighten the blade tilting lock handle (A)
Fig. 30, and tighten the screw (C) Fig. 32 until it
stops.
Page 17
17
RIP FENCE OPERATION
AND ADJUSTMENTS
1. To move the rip fence (A) Fig. 33 along the table, lift
up the fence locking lever (B), slide the fence to the
desired location on the table, and push down the
fence locking lever (B).
2. The pointer indicates the distance from the fence to
the saw blade. If an adjustment is required, loosen
the screw (C) Fig. 37 and adjust.
IMPORTANT: The rip fence must be properly aligned
to the miter gauge slot to prevent kickback when
ripping.
3. The saw blade is set parallel to the miter gauge slot
at the factory. The fence must be parallel to the miter
gauge slot to do accurate work and to prevent
kickback when ripping. To check the alignment:
4. Position the fence next to the miter gauge slot (Fig.
33). Clamp the fence to the table by pushing the
locking lever (B) down . The edge of the fence should
be parallel to the miter gauge slot.
Fig. 33
TABLE INSERT ADJUSTMENT
1. Make sure that the table insert (A) Fig. 33A, is flush
with, or slightly below, the surface of the table (B).
2. If the table insert is above the surface of the table,
tighten the two table insert screws (C) Fig. 33A to
lower the insert.
Fig. 33A
A
B
C
A
D
E
F
B
C
5. If an adjustment is necessary, loosen the two
screws (D) Fig. 33, and lift the locking lever (B).
While holding the fence bracket (F) firmly toward
the front of the saw, move the rear of the fence (A)
until it is parallel with the miter gage slot. Tighten
two screws (D) and push locking lever down (B).
6. Adjust the clamping action of the fence (A) Fig. 33
by lifting the locking lever (B) and turning the screw
(E) clockwise to increase, or counterclockwise to
decrease the clamping action of the fence.
DISCONNECT MACHINE FROM POWER
SOURCE.
Page 18
18
MITER GAUGE OPERATION
AND ADJUSTMENTS
For cross-cutting (blade set 90 degrees to the table), the
miter gauge can be used in either table slot. For bevel
cross-cutting (with the blade tilted), use the miter gauge
in the right table slot only so that the blade will be tilted
away from the miter gauge and your hands.
To operate the miter gauge, loosen the lock knob (E)
Fig. 34, and rotate the miter gauge to the desired angle.
Fig. 34
E
ADJUSTING BLADE PARALLEL TO MITER GAUGE SLOTS
The blade was adjusted parallel to the miter gauge slots at the factory. In order to ensure accurate cuts and help prevent
kickback, check this adjustment.
To adjust:
1. Raise the blade to its highest position and adjust the blade so that it is 90 degrees to the table.
2. Select a tooth on the saw blade that is set to the left. Mark this tooth with a pencil or marker.
3. Use a combination square (A) Fig. 35 against the miter gauge slot and adjust the blade (B) of the square until it
touches the marked tooth.
4. Rotate the blade and check the same marked blade tooth at the rear of the saw table (Fig. 36).
DISCONNECT MACHINE FROM POWER SOURCE.
Fig. 35
Fig. 36
B
A
Fig. 37
C
D
5. If the front and back measurements (Figs. 35 and 36)
are not identical, you can adjust the blade. Start by
loosening the nuts below the four screws (C) Fig. 37
on the table. Then loosen the screws (C). Carefully
move the saw blade until the blade is parallel to the
miter gauge slot. When done, tighten four nuts under
the table and the four screws (C) Fig. 37 securely.
NOTE: If sufficient adjustment cannot be achieved by
loosening the screws (C) Fig. 37, loosen the screw (D)
Fig. 37 necessary to make the adjustment.
Page 19

19
Fig. 38
1. NOTE: One 7/8" wrench is supplied with the saw for
changing the saw blade.
2. Remove table insert (A) Fig. 38, and raise saw blade
(F) to its maximum height.
3. To remove blade, place the wrench (D) on the flats of
the arbor nut (C) to keep the arbor from turning. Place a
piece of wood (B) flat on the table against the blade so
that a tooth of the blade can “grab” the wood to keep
the blade from turning. Use wrench to turn the arbor nut
toward the front of the saw. Remove arbor nut, blade
flange (E), and saw blade.
4. Assemble the new blade, making certain the teeth
point down at the front of the saw table, and assemble
outside blade flange and arbor nut. Using the piece of
wood (B) to keep the blade from turning, tighten arbor
nut by turning wrench (D) toward the rear of the saw.
5. Replace table insert.
F
C
E
D
B
A
CHANGING THE BLADE
DISCONNECT THE MACHINE FROM THE POWER SOURCE. USE ONLY 10" DIAMETER SAW BLADES
RATED FOR 4700 RPM OR HIGHER. USE ONLY SAW BLADES WITH 5/8" ARBOR HOLES.
CROSS-CUTTING
Cross-cutting requires the use of the miter gage to
position and guide the work. Place the work against the
miter gage and advance both the gage and work toward
the saw blade, as shown in Fig. 39. The miter gage may
be used in either table slot. When bevel cutting (blade
tilted), use the table groove that does not cause
interference of your hand or miter gage with the saw
blade guard.
Start the cut slowly and hold the work firmly against the
miter gage and the table.
ONE OF THE RULES IN RUNNING A
SAW IS THAT YOU NEVER HANG
ONTO OR TOUCH THE PART OF THE WORKPIECE
THAT WILL BE CUT OFF.
Hold the supported piece, not the free piece that is cut
off. The feed in cross-cutting continues until the work is
cut in two, and the miter gage and work are pulled back
to the starting point. Before pulling the work back, it is
good practice to give the work a little sideways shift to
move the work slightly away from the saw blade. Never
pick up any short length of free work from the table while
the saw is running. Never
touch a cut-off piece unless it
is at least a foot long.
Common sawing operations include ripping and crosscutting plus a few other standard operations of a fundamental
nature. As with all power machines, there is a certain amount of hazard involved with the operation and use of the
machine. Using the machine with the respect and caution demanded as far as safety precautions are concerned, will
considerably lessen the possibility of personal injury. However, if normal safety precautions are overlooked or completely
ignored, personal injury to the operator can result. The following information describes the safe and proper method for
performing the most common sawing operations.
THE USE OF ATTACHMENTS AND ACCESSORIES NOT RECOMMENDED BY DELTA MAY RESULT
IN THE RISK OF INJURY TO THE USER OR OTHERS.
Fig. 39
MACHINE USE
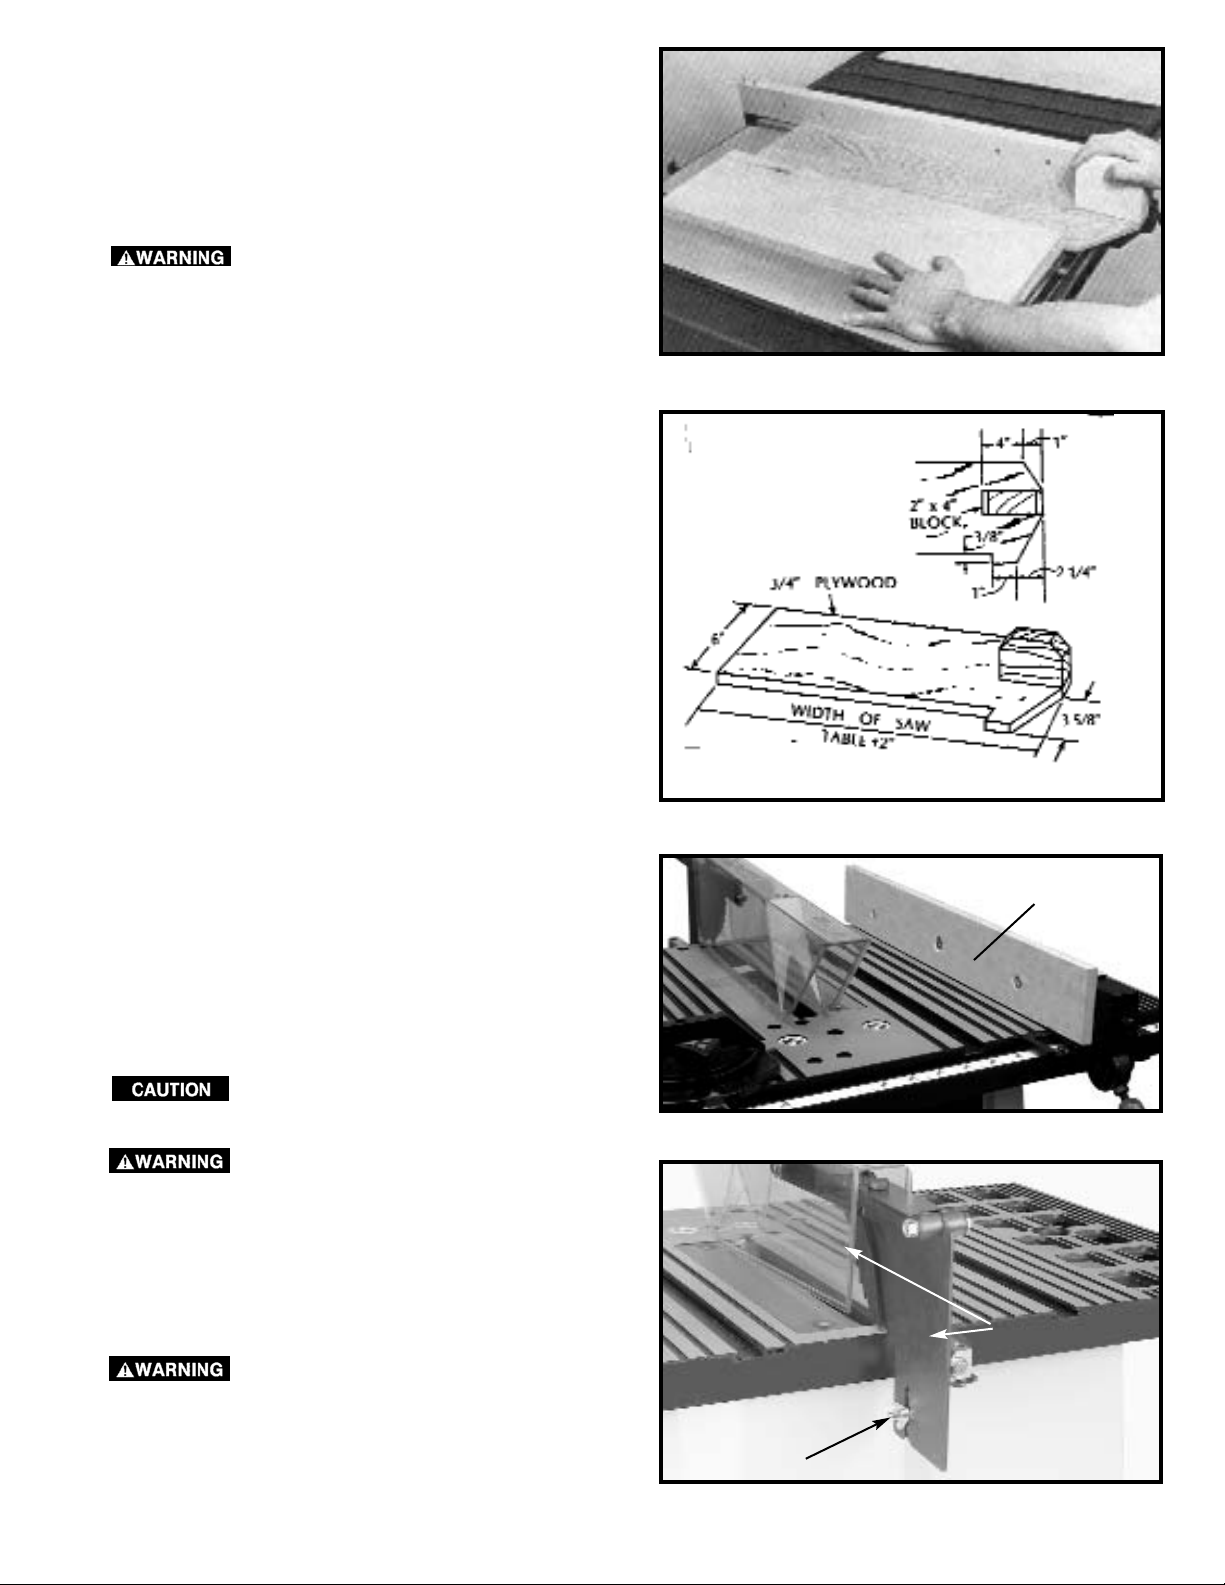
For added safety and convenience the miter gage (A)
can be fitted with an auxiliary wood-facing (B), as shown
in Fig. 39A, that should be at least 1 inch higher than the
maximum depth of cut, and should extend out 12 inches
or more to one side or the other depending on which
miter gage slot is being used. This auxiliary wood-facing
Page 20
20
Fig. 39A
A
C
B
Fig. 39B
B
(B) can be fastened to the front of the miter gage by
using two wood screws (C) through the holes provided in
the miter gage body and into the wood-facing.
NEVER USE THE FENCE AS A CUT-OFF
GAGE WHEN CROSS-CUTTING.
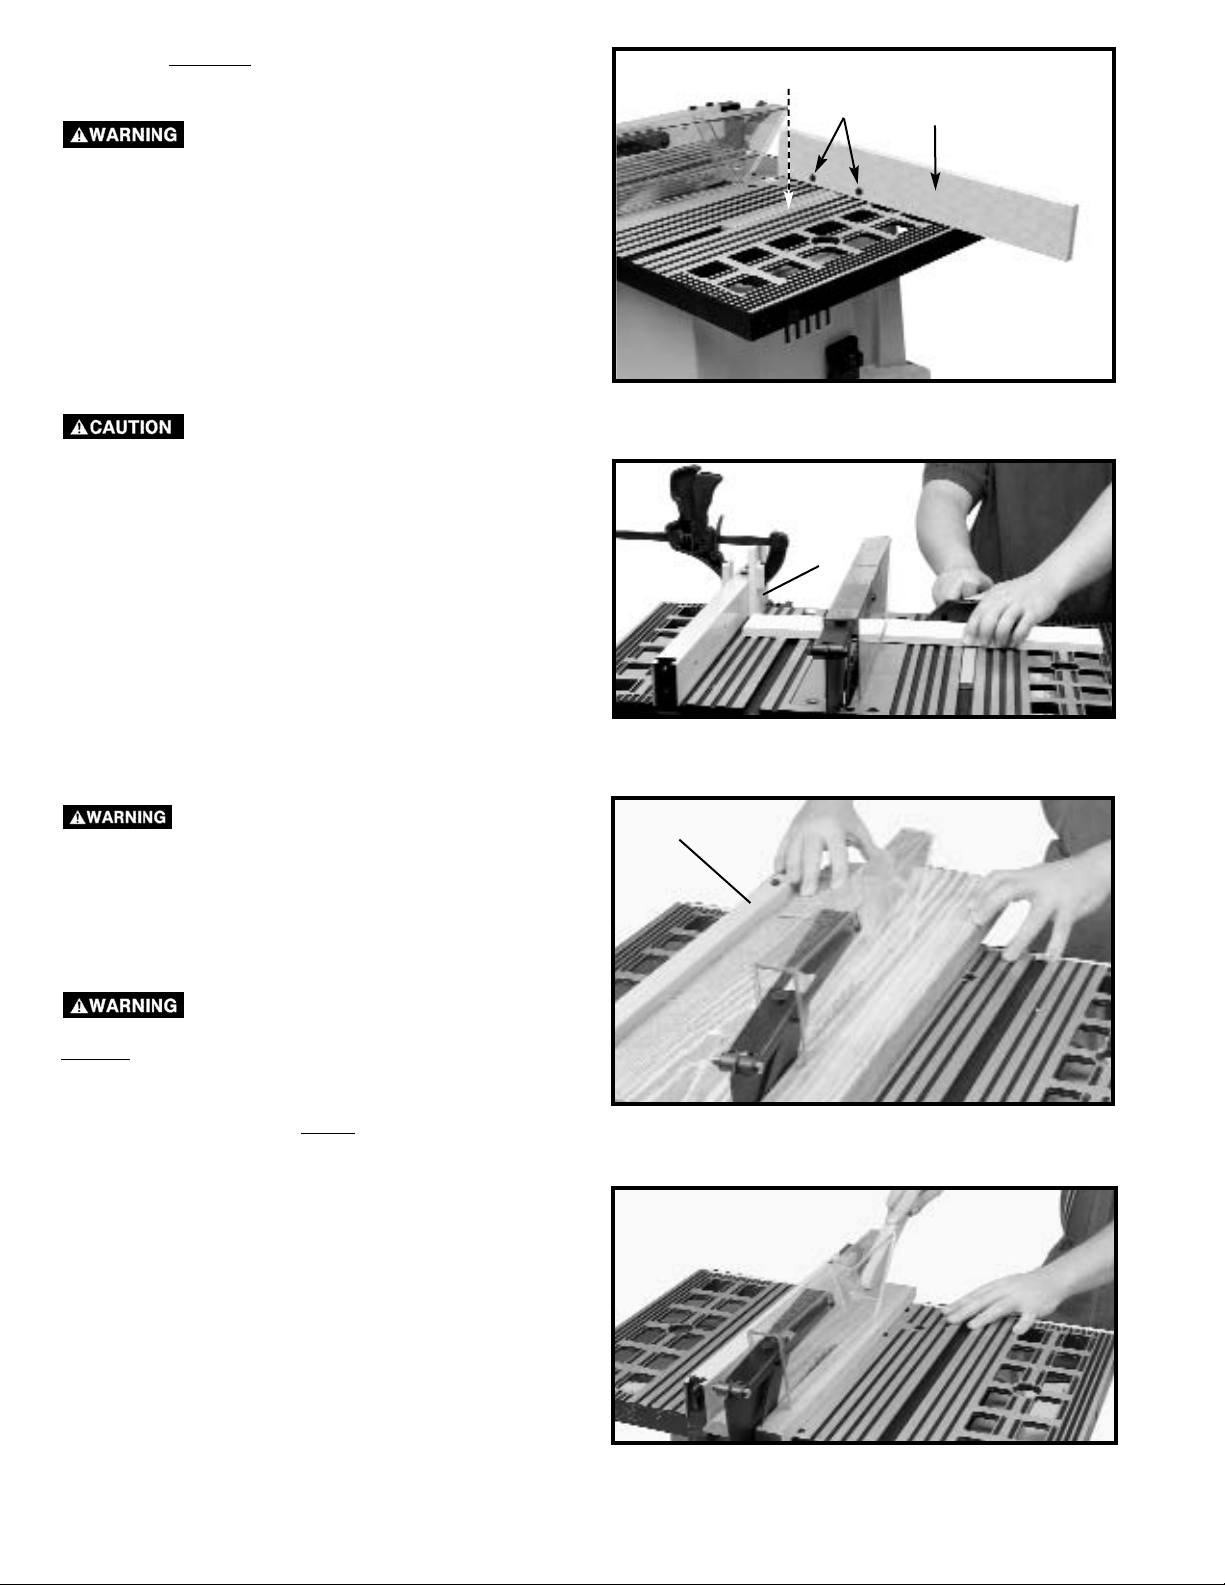
When cross-cutting a number of pieces to the same length, a
block of wood (B) Fig. 39B can be clamped to the fence and
used as a cut-off gage as shown in Fig. 39B. It is important that
this block of wood always be positioned in front of the saw blade
as shown. Once the cut-off length is determined, secure the
fence and use the miter gage to feed the work into the cut. This
block of wood allows the cut-off piece to move freely along the
table surface without binding between the fence and the saw
blade, thereby lessening the possibility of kickback and injury to
the operator.
WHEN USING THE BLOCK (B) FIG. 39B,
AS A CUT-OFF GAGE, IT IS VERY
IMPORTANT THAT THE REAR END OF THE BLOCK BE
POSITIONED SO THE WORK PIECE IS CLEAR OF THE
BLOCK BEFORE IT CONTACTS THE BLADE.
Ripping is cutting lengthwise through a board. The rip
fence (A) Fig. 40 is used to position and guide the work.
One edge of the work rides against the rip fence while
the flat side of the board rests on the table. Since the
work is pushed along the fence, it must have a straight
edge and make solid contact with the table.
THE SAW BLADE GUARD MUST BE
USED. ON DELTA SAWS, THE GUARD
HAS ANTI-KICKBACK FINGERS TO PREVENT
KICKBACK AND A SPLITTER TO PREVENT THE
WOOD KERF FROM CLOSING AND BINDING THE
BLADE. BE SURE TO REPLACE OR SHARPEN THE
ANTI-KICKBACK DEVICES WHEN THE POINTS
BECOME DULL.
A RIP FENCE SHOULD ALWAYS BE
USED FOR RIPPING OPERATIONS.
NEVER
PERFORM A RIPPING OPERATION FREE-
HAND.
RIPPING
1. Start the motor and advance the work holding it down
and against the fence. Never stand in the line of the
saw cut when ripping. When the rip width is 6 inches
or wider, hold the work with both hands and push it
along the fence and into the saw blade (Fig. 40). The
work should then be fed through the saw blade with
the right hand. Only use the left hand to guide the
workpiece. Do not feed the workpiece with the left
hand. After the work is beyond the saw blade and antikickback fingers, remove hands from the work.
2. When this is done the work will either stay on the
table, tilt up slightly and be caught by the end of the
rear guard, or slide off the table to the floor.
Alternately, the feed can continue to the end of the
table, after which the work is lifted and brought along
the outside edge of the fence. The cut-off stock
remains on the table and is not touched until the saw
blade has stopped, unless it is a large piece allowing
safe removal. When ripping boards longer than three
Fig. 40
A
Fig. 41
Page 21
21
Fig. 42
Fig. 43
THE MAXIMUM WIDTH DADO CUT FOR
THIS SAW IS 1/2 INCH.
THE BLADE GUARD AND SPLITTER
ASSEMBLY CANNOT BE USED WHEN
DADOING. IT MUST BE REMOVED OR SWUNG TO
THE REAR OF THE SAW.
Before dadoing, loosen wing nut (A) Fig. 44 and take off
the blade guard and splitter assembly (B). Keep
assembly handy to replace it after dadoing.
AUXILIARY JIGS, FIXTURES, PUSH
STICKS AND FEATHER BOARDS
SHOULD BE USED.
ACCESSORY DADO CUTTERHEAD
feet, use a work support at the rear of the saw to
keep the workpiece from falling off the saw table.
3. If the ripped work is less than 6 inches wide, a push
stick should always be used to complete the feed, as
shown in Fig. 41. The push stick can easily be made
from scrap material as explained in the section
“CONSTRUCTING A PUSH STICK.”
4. Ripping narrow pieces can be dangerous if not done
carefully.
WHEN THE PIECE IS TOO NARROW
FOR A PUSH STICK TO BE EFFECTIVE
- AND IF THE WORKPIECE IS SHORT ENOUGH - USE
A PUSHBOARD. WHEN RIPPING MATERIAL UNDER
2 INCHES IN WIDTH, ORDINARY PUSH STICKS MAY
INTERFERE WITH THE BLADE GUARD.
When using a pushboard, the width of the pushboard
must be added to the width of the rip fence position
setting. A flat pushboard can be constructed as shown in
Fig. 43 and should be used as shown in Fig. 42. NOTE:
GUARD REMOVED FOR CLARITY. ALWAYS USE THE
GUARD.
NOTE: Some special operations require the addition of
an auxiliary wood facing to the fence, as explained in the
section “USING AUXILIARY WOOD FACING ON THE
RIP FENCE” and use of a push stick.
Fig. 43A
USING AUXILIARY WOOD FACING
ON RIP FENCE
When performing special cutting operations – and that
operation may cause the cutting implement to contact the
fence – it is necessary to add a wood facing (A) Fig. 43A,
to one side of the rip fence as shown. The wood facing is
attached to the fence with wood screws through holes
drilled in the fence. 3/4-inch stock is suitable for most
work, although an occasional job may require one-inch
facing.
Fig. 44
A
B
A
Page 22
22
Fig. 47
Fig. 48
Fig. 45 Fig. 46
Fig. 44A
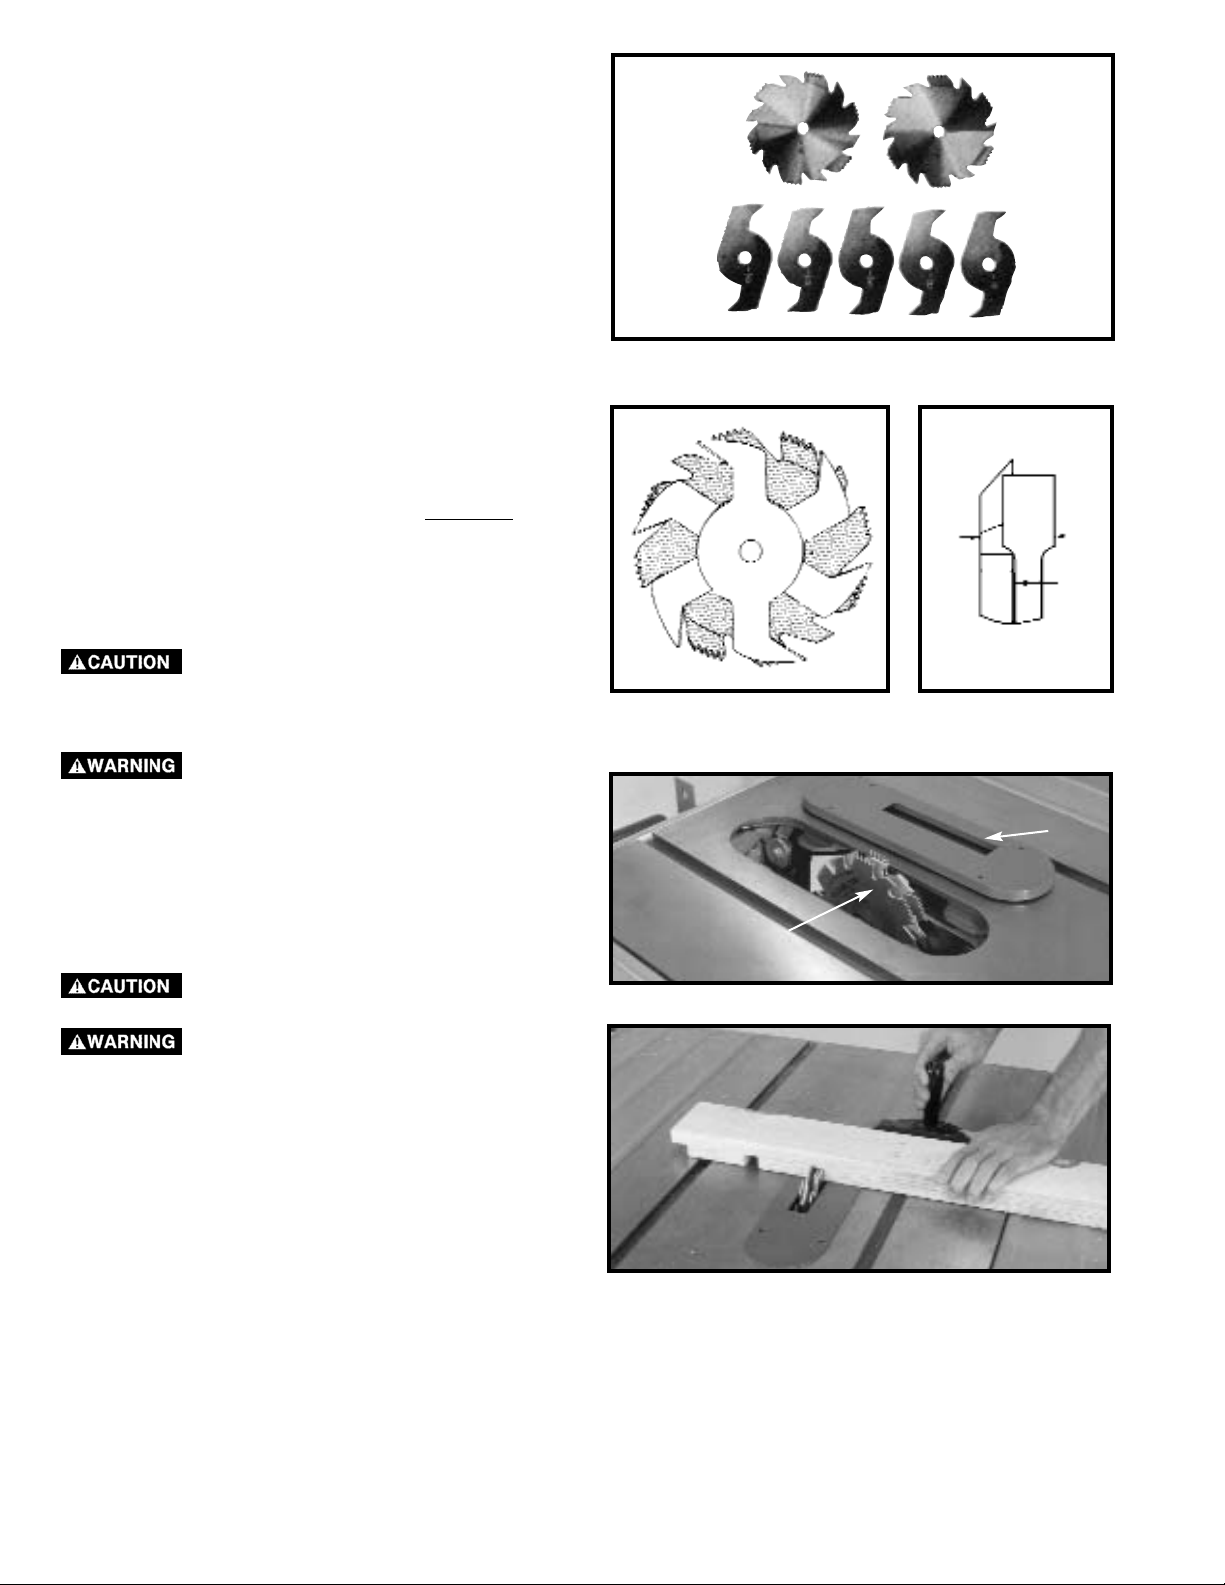
1. Dadoing is cutting a rabbet or wide groove into the
work. Most dado head sets are made up of two outside
saws and four or five inside cutters, (Fig. 44A). Various
combinations of saws and cutters are used to cut grooves
from 1/8” to 13/16” for use in shelving, making joints,
tenoning, grooving, etc. The cutters are heavily swaged
and must be arranged so that this heavy portion falls in
the gullets of the outside saws, as shown in Fig. 45. The
saw and cutter overlap is shown in Fig. 46, (A) being the
outside saw, (B) an inside cutter, and (C) a paper washer
or washers, used as needed to control the exact width of
groove. A 1/4” groove is cut by using the two outside
saws. The teeth of the saws should be positioned so that
the raker on one saw is beside the cutting teeth on the
other saw.
2. Attach the dado head set (D) Fig. 47, to the saw arbor.
NOTE: THE OUTSIDE ARBOR FLANGE CAN NOT BE
USED WITH THE DADO HEAD SET, TIGHTEN THE
ARBOR NUT AGAINST THE DADO HEAD SET BODY.
DO NOT LOSE THE OUTSIDE ARBOR FLANGE. IT
WILL BE NEEDED WHEN REATTACHING A BLADE TO
THE ARBOR.
THE ACCESSORY DADO HEAD SET
TABLE INSERT (E) FIG. 47, MUST BE
USED IN PLACE OF THE STANDARD TABLE INSERT.
THE BLADE GUARD AND SPLITTER
ASSEMBLY CANNOT BE USED WHEN
DADOING AND MUST BE REMOVED OR SWUNG TO
THE REAR OF THE SAW. AUXILIARY JIGS, FIXTURES,
PUSH STICKS AND FEATHER BOARDS SHOULD
ALSO BE USED.
3. Fig. 48, shows a typical dado operation using the miter
gage as a guide.
NEVER USE THE DADO HEAD IN A
BEVEL POSITION.
ALWAYS INSTALL BLADE GUARD
AFTER OPERATION IS COMPLETED.
A
B
C
D
E
Page 23

23
PUSH STICK
MAKE FROM 1/2" OR 3/4"
WOOD OR THICKNESS
LESS THAN WIDTH OF
MATERIAL TO BE CUT
CUT OFF HERE TO
PUSH 1/4" WOOD
CUT OFF HERE TO
PUSH 1/2" WOOD
NOTCH TO HELP
PREVENT HAND
FROM SLIPPING
1/2" SQUARES
CONSTRUCTING A PUSH STICK
When ripping work less than 4 inches wide, a push stick should be used to complete the feed and could be easily made
from scrap material by following the pattern shown in Fig. 48B.
Fig. 48B
Page 24
24
Fig. 49
Fig. 50
Kerf should be about 1/4" apart.
Further information on the safe and proper
operation of table saws is available in the Delta
“Getting the Most Out of Your Table Saw” HowTo Book, Catalog No. 11-400. Additional
Information on table saw safety, including a
table saw safety video, is available from the
following:
POWER TOOL INSTITUTE
1300 Sumner Avenue
Cleveland, OH 44115-2851
www.powertoolinstitute.com
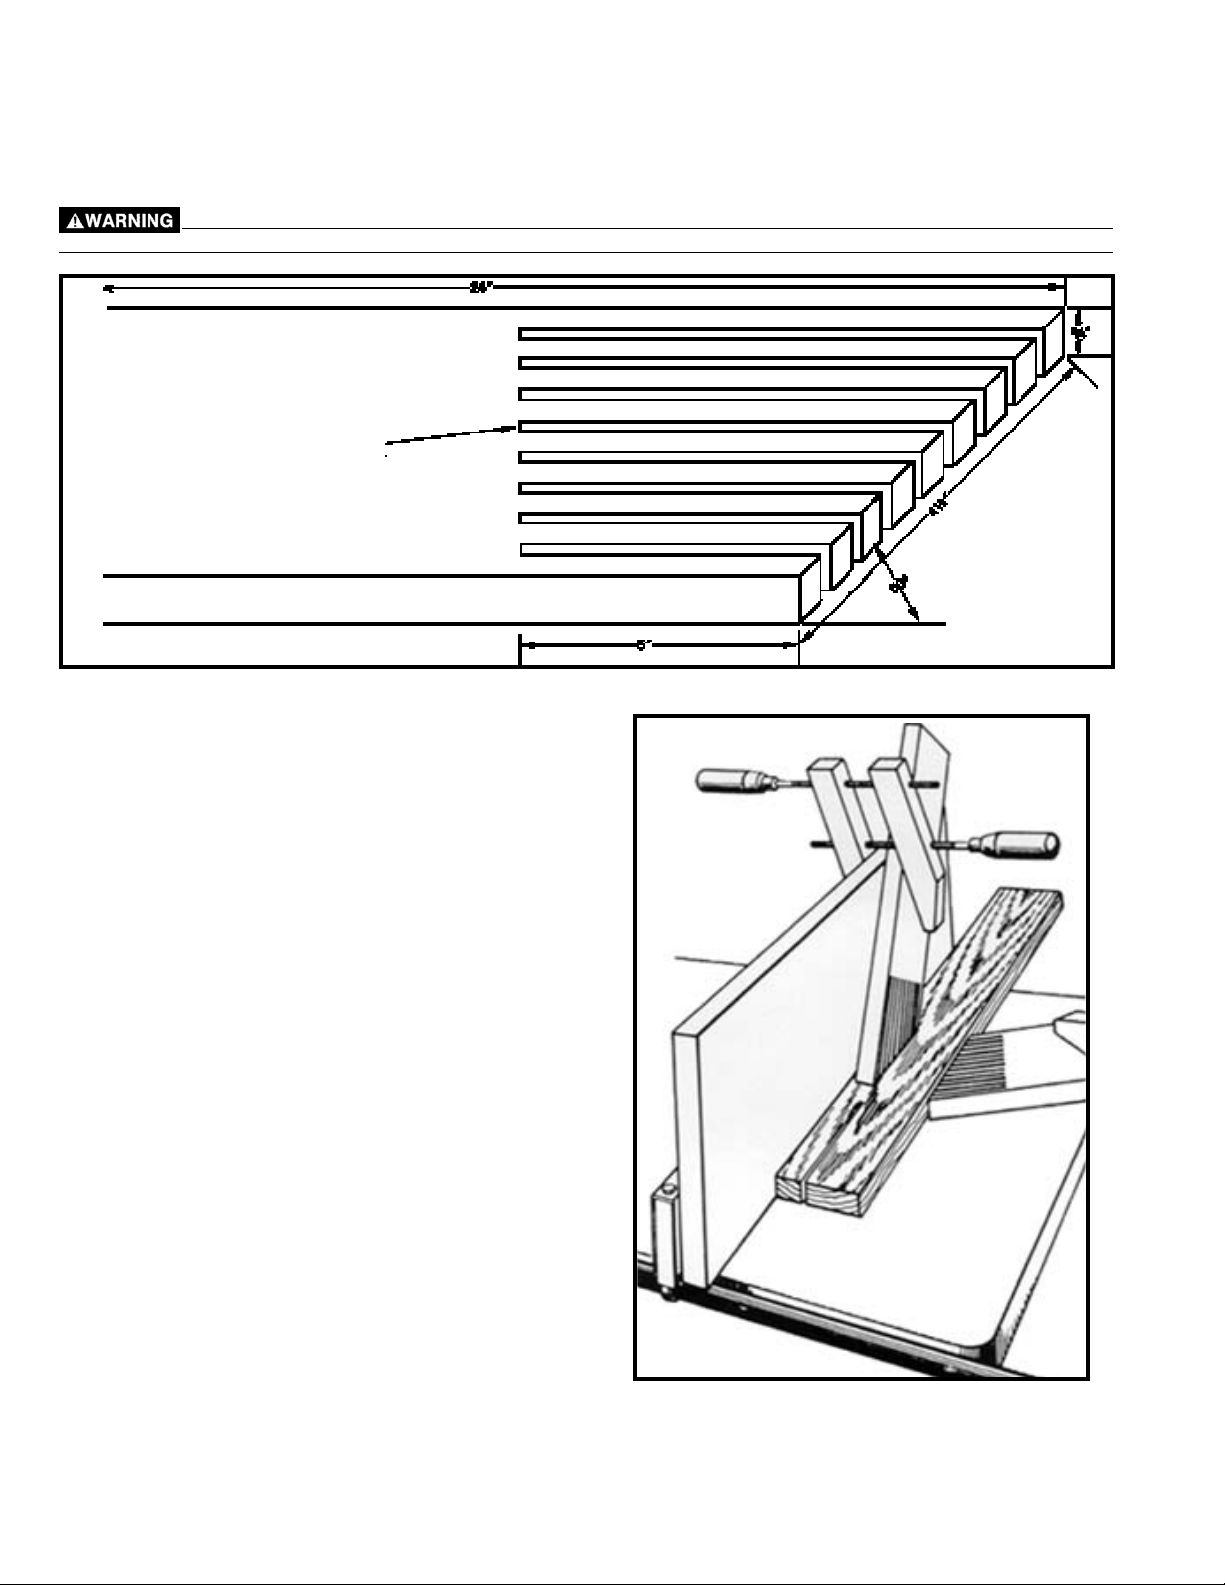
Fig. 49, illustrates dimensions for making a typical featherboard. The material which the featherboard is constructed of,
should be a straight piece of wood that is free of knots and cracks. Featherboards are used to keep the work in contact
with the fence and table, as shown in Fig. 50, and help prevent kickbacks. Clamp the featherboards to the fence and
table so that the leading edge of the featherboards will support the workpiece until the cut is completed. An 8≈ high flat
board can be clamped to the rip fence and the featherboard can be clamped to the 8≈ high board.
Use featherboards for all non “thru-sawing” operations where the guard and splitter assembly
must be removed. Always replace the guard and splitter assembly when the non thru-sawing operation is
completed.
CONSTRUCTING A FEATHERBOARD
Page 25

25
BE SURE TO FOLLOW SAFETY RULES AND INSTRUCTIONS
TROUBLE! SAW WILL NOT START
WHAT’S WRONG? WHAT TO DO…
1.Saw not plugged in. 1.Plug in saw.
2.Fuse blown or circuit breaker tripped. 2.Replace fuse or reset
circuit breaker.
3.Cord damaged. 3.Have cord replaced by
authorized service center.
4.Brushes worn out. 4.Have brushes replaced
by authorized service center.
TROUBLE! SAW MAKES UNSATISFACTORY CUTS
WHAT’S WRONG? WHAT TO DO…
1.Dull blade. 1.Replace blade.
2.Blade mounted backwards. 2.Turn blade around.
3.Gum or pitch on blade. 3.Remove blade and
clean with turpentine.
4.Incorrect blade for work being done. 4.Change the blade.
TROUBLE! BLADE DOES NOT COME UP TO SPEED
WHAT’S WRONG? WHAT TO DO…
1.Extension cord too light or too long. 1.Replace with adequate
size cord.
2.Low house current. 2.Contact your electric
company.
TROUBLE! MACHINE VIBRATES EXCESSIVELY
WHAT’S WRONG? WHAT TO DO…
1.Stand or bench on uneven floor. 1.Reposition on flat level
surface.
2.Damaged saw blade. 2.Replace blade.
For assistance with your machine, visit our website at www.deltamachinery.com for a list of service centers or call
the DELTA Machinery help line at 1-800-223-7278 (In Canada call 1-800-463-3582).
TROUBLESHOOTING
Page 26

26
MAINTENANCE
PARTS, SERVICE OR WARRANTY ASSISTANCE
All Delta Machines and accessories are manufactured to high quality standards and are serviced by a network
of Porter-Cable · Delta Factory Service Centers and Delta Authorized Service Stations. To obtain additional
information regarding your Delta quality product or to obtain parts, service, warranty assistance, or the location
of the nearest service outlet, please call 1-800-223-7278 (In Canada call 1-800-463-3582).
A complete line of accessories is available from your Delta Supplier, Porter-Cable · Delta Factory Service Centers,
and Delta Authorized Service Stations. Please visit our Web Site www.deltamachinery.com for a catalog or for
the name of your nearest supplier.
Since accessories other than those offered by Delta have not been tested
with this product, use of such accessories could be hazardous. For safest operation, only
Delta recommended accessories should be used with this product.
ACCESSORIES
Two Year Limited New Product Warranty
Delta will repair or replace, at its expense and at its option, any new Delta machine, machine part, or machine accessory
which in normal use has proven to be defective in workmanship or material, provided that the customer returns the product
prepaid to a Delta factory service center or authorized service station with proof of purchase of the product within two
years and provides Delta with reasonable opportunity to verify the alleged defect by inspection. For all refurbished Delta
product, the warranty period is 180 days. Delta may require that electric motors be returned prepaid to a motor
manufacturer’s authorized station for inspection and repair or replacement. Delta will not be responsible for any asserted
defect which has resulted from normal wear, misuse, abuse or repair or alteration made or specifically authorized by
anyone other than an authorized Delta service facility or representative. Under no circumstances will Delta be liable for
incidental or consequential damages resulting from defective products. This warranty is Delta’s sole warranty and sets
forth the customer’s exclusive remedy, with respect to defective products; all other warranties, express or implied, whether
of merchantability, fitness for purpose, or otherwise, are expressly disclaimed by Delta.
KEEP MACHINE CLEAN
Periodically blow out all air passages with dry compressed
air. All plastic parts should be cleaned with a soft damp cloth.
NEVER use solvents to clean plastic parts. They could
possibly dissolve or otherwise damage the material.
Wear ANSI Z87.1 safety glasses while
using compressed air.
FAILURE TO START
Should your machine fail to start, check to make sure the
prongs on the cord plug are making good contact in the
outlet. Also, check for blown fuses or open circuit breakers in
the line.
LUBRICATION
Apply household floor paste wax to the machine table and
extension table or other work surface weekly.
PROTECTING CAST IRON FROM RUST
To clean and protect cast iron tables from rust, you will
need the following materials: 1 pushblock from a jointer, 1
sheet of medium Scotch-Brite™ Blending Hand Pad, 1
can of WD-40®, 1 can of degreaser, 1 can of TopCote
®
Aerosol. Apply the WD-40 and polish the table surface
with the Scotch-Brite pad using the pushblock as a
holddown. Degrease the table, then apply the TopCote
®
accordingly.
SERVICE
WARRANTY
Page 27

27
27272727
Sierra Motorizada de Banco
de 10 pulg.
(Modelo SM200L)
Para obtener más información sobre Delta Machinery,
visite nuestro sitio web en: www.deltamachinery.com
Para las piezas, el servicio, la garantía o la otra ayuda
llaman por favor
1-800-223-7278 (en la llamada 1-800-463-3582 de Canada).
MANUAL DE INSTRUCCIONES
491720-00 10-30-05
Copyright © 2005 Delta Machinery
Page 28

2828282828
Lea y entienda todas advertencias y las instrucciones operadoras antes de utilizar cualquier instrumento o el equipo.
Cuando se usa instrumentos o equipo, las precauciones básicas de la seguridad siempre se deben seguir para reducir el riesgo de la herida
personal. La operación impropia, la conservación o la modificación de instrumentos o equipo podrían tener como resultado el daño grave
de la herida y la propiedad. Hay ciertas aplicaciones para que equipaas con herramienta y el equipo se diseña. La Delta Machinery
recomienda totalmente que este producto no sea modificado y/o utilizado para ninguna aplicación de otra manera que para que se diseñó.
Si usted tiene cualquiera pregunta el pariente a su aplicación no utiliza el producto hasta que usted haya escrito Delta Machinery y nosotros
lo hemos aconsejado.
La forma en línea del contacto en www. deltamachinery. com
El Correo Postal: Technical Service Manager
Delta Machinery
4825 Highway 45 North
Jackson, TN 38305
Información con respecto a la operación segura y apropiada de este instrumento está disponible de las fuentes siguientes:
Power Tool Institute
1300 Sumner Avenue, Cleveland, OH 44115-2851
www.powertoolinstitute.org
National Safety Council
1121 Spring Lake Drive, Itasca, IL 60143-3201
American National Standards Institute, 25 West 43rd Street, 4 floor, New York, NY 10036 www.ansi.org
ANSI 01.1Safety Requirements for Woodworking Machines, and
the U.S. Department of Labor regulations www.osha.gov
Indica una situación de inminente riesgo, la cual, si no es evitada, causará la muerte o lesiones serias.
Indica una situación potencialmente riesgosa, que si no es evitada, podría resultar en la muerte o lesiones
serias.
Indica una situación potencialmente peligrosa, la cual, si no es evitada, podría resultar en lesiones menores o
mode-radas.
Usado sin el símbolo de seguridad de alerta indica una situa-ción potencialmente riesgosa la que, si no es
evitada, podría causar daños en la propiedad.
PAUTAS DE SEGURIDAD/DEFINICIONES
Algunos tipos de aserrín creados por máquinas eléctricas de lijado, aserrado, amolado, perforado u otras
actividades de la construcción, contienen materiales químicos conocidos (en el Estado de California) como causantes de cáncer, defectos
de nacimiento u otros daños del aparato reproductivo. Algunos ejemplos de dichos productos químicos son:
l El plomo contenido en algunas pinturas con base de plomo
l Sílice cristalizado proveniente de los ladrillos, el cemento y otros productos de albañilería
l Arsénico y cromo de madera tratada químicamente
Su riesgo por causa de estas exposiciones varía, dependiendo de con cuánta frecuencia realice este tipo de trabajo. Para reducir
su exposición a estos agentes químicos: trabaje en un área bien ventilada y trabaje con equipo de seguridad aprobado, use siempre
protección facial o respirador MSHA / NIOSH aprobados cuando deba utilizar dichas herramientas.
Es importante para usted leer y entender este manual. La información que lo contiene relaciona a proteger SU SEGURIDAD y
PREVENIR los PROBLEMAS. Los símbolos debajo de son utilizados para ayudarlo a reconocer esta información.
INSTRUCCIONES DE SEGURIDAD IMPORTANTES
GUARDE ESTAS INSTRUCCIONES!
PROPOSICIÓN DE CALIFORNIA 65
Page 29

29
1. PARA SU PROPIA SEGURIDAD, LEA EL MANUAL DE
INSTRUCCIONES ANTES DE UTILIZAR LA MÁQUINA. Al
aprender la aplicación, las limitaciones y los peligros
específicos de la máquina, se minimizará enormemente la
posibilidad de accidentes y lesiones.
2. USE PROTECCIÓN DE LOS OJOS. USE SIEMPRE
ANTEOJOS DE SEGURIDAD. Use también una careta o
una máscara antipolvo si la operación de corte genera
polvo. Los anteojos de uso diario sólo tienen lentes
resistentes a los golpes. NO son anteojos de seguridad.
UTILICE EQUIPO DE SEGURIDAD CERTIFICADO. El
equipo de protección de los ojos debe cumplir con las
normas ANSI Z87.1, el equipo de protección de la audición
debe cumplir con las normas ANSI S3.19 y la protección
con máscara antipolvo debe cumplir con las normas para
respiradores certificados de MSHA/NIOSH. Las astillas, los
residuos suspendidos en el aire y el polvo pueden causar
irritación, lesiones y/o enfermedad.
3. USE INDUMENTARIA ADECUADA. No use ropa holgada,
guantes, corbatas, anillos, pulseras u otras joyas que
podrían engancharse en las piezas móviles. Se recomienda
usar calzado antideslizante. Use una cubierta protectora del
pelo para sujetar el pelo largo.
4. NO UTILICE LA MÁQUINA EN UN ENTORNO
PELIGROSO. La utilización de herramientas mecánicas en
lugares húmedos o mojados, o en la lluvia, puede causar
descargas eléctricas o electrocución. Mantenga bien
iluminada el área de trabajo para evitar tropezar o poner en
peligro los brazos, las manos y los dedos.
5. MANTENGA TODAS LAS HERRAMIENTAS Y MÁQUINAS
EN CONDICIONES ÓPTIMAS. Mantenga las herramientas
afiladas y limpias para lograr el mejor y más seguro
rendimiento. Siga las instrucciones de lubricación y cambio
de accesorios. Las herramientas y las máquinas mal
mantenidas pueden dañar más la herramienta o la máquina
y/o causar lesiones.
6. COMPRUEBE SI HAY PIEZAS DAÑADAS. Antes de
utilizar la máquina, compruebe si hay piezas dañadas.
Compruebe la alineación de las piezas móviles, si las piezas
móviles se atascan, si hay piezas rotas y toda otra situación
que podría afectar su funcionamiento. Un protector o
cualquier otra pieza que presente daños debe repararse o
reemplazarse apropiadamente. Las piezas dañadas pueden
causar daños adicionales a la máquina y/o lesiones.
7. MANTENGA LIMPIA EL ÁREA DE TRABAJO. Las áreas y
los bancos desordenados invitan a que se produzcan
accidentes.
8. MANTENGA ALEJADOS A LOS NIÑOS Y A LOS
VISITANTES. El taller es un entorno potencialmente
peligroso. Los niños y los visitantes pueden sufrir lesiones.
9. REDUZCA EL RIESGO DE UN ARRANQUE NO
INTENCIONADO. Asegúrese de que el interruptor esté en
la posición de apagado antes de enchufar el cable de
alimentación. En caso de un apagón, mueva el interruptor a
la posición de apagado. Un arranque accidental podría
causar lesiones.
10. UTILICE LOS PROTECTORES. Asegúrese de que todos
los protectores estén colocados en su sitio, sujetos
firmemente y funcionando correctamente para prevenir
lesiones.
11. QUITE LAS LLAVES DE AJUSTE Y DE TUERCA ANTES
DE ARRANCAR LA MÁQUINA. Las herramientas, los
pedazos de desecho y otros residuos pueden salir
despedidos a alta velocidad, causando lesiones.
12. UTILICE LA MÁQUINA ADECUADA. No fuerce una
máquina o un aditamento a hacer un trabajo para el que no
se diseñó. El resultado podría ser daños a la máquina y/o
lesiones.
13. UTILICE ACCESORIOS RECOMENDADOS. La utilización
de accesorios y aditamentos no recomendados por Delta
podría causar daños a la máquina o lesiones al usuario.
14. UTILICE EL CORDÓN DE EXTENSIÓN ADECUADO.
Asegúrese de que el cordón de extensión esté en buenas
condiciones. Cuando utilice un cordón de extensión,
asegúrese de utilizar un cordón que sea lo suficientemente
pesado como para llevar la corriente que su producto tome.
Un cordón de tamaño insuficiente causará una caída de la
tensión de la línea, lo cual producirá una pérdida de
potencia y recalentamiento. Consulte el Cuadro de
cordones de extensión para obtener el tamaño correcto
dependiendo de la longitud del cordón y la capacidad
nominal en amperios indicada en la placa de
especificaciones. En caso de duda, utilice el próximo calibre
más grueso. Cuanto más pequeño sea el número de calibre,
más pesado será el cordón.
15. SUJETE FIRMEMENTE LA PIEZA DE TRABAJO. Utilice
abrazaderas o un tornillo de carpintero para sujetar la pieza
de trabajo cuando resulte práctico. La pérdida de control de
una pieza de trabajo puede causar lesiones.
16. HAGA AVANZAR LA PIEZA DE TRABAJO CONTRA EL
SENTIDO DE ROTACIÓN DE LA HOJA, EL CORTADOR O
LA SUPERFICIE ABRASIVA. Si la hace avanzar desde el
otro sentido, el resultado será que la pieza de trabajo salga
despedida a alta velocidad.
17. NO FUERCE LA PIEZA DE TRABAJO SOBRE LA
MÁQUINA. El resultado podría ser daños a la máquina y/o
lesiones.
18. NO INTENTE ALCANZAR DEMASIADO LEJOS. Una
pérdida del equilibrio puede hacerle caer en una máquina en
funcionamiento, causándole lesiones.
19. NO SE SUBA NUNCA A LA MÁQUINA. Se podrían
producir lesiones si la herramienta se inclina o si usted hace
contacto accidentalmente con la herramienta de corte.
20. NO DEJE NUNCA DESATENDIDA LA MÁQUINA
CUANDO ESTÉ EN MARCHA. APÁGUELA. No deje la
máquina hasta que ésta se detenga por completo. Un niño
o un visitante podría resultar lesionado.
21. APAGUE LA MÁQUINA Y DESCONÉCTELA DE LA
FUENTE DE ALIMENTACIÓN antes de instalar o quitar
accesorios, antes de ajustar o cambiar configuraciones o al
realizar reparaciones. Un arranque accidental puede causar
lesiones.
22. HAGA SU TALLER A PRUEBA DE NIÑOS CON
CANDADOS E INTERRUPTORES MAESTROS O
QUITANDO LAS LLAVES DE ARRANQUE. El arranque
accidental de una máquina por un niño o un visitante podría
causar lesiones.
23. MANTÉNGASE ALERTA, FÍJESE EN LO QUE ESTÁ
HACIENDO Y USE EL SENTIDO COMÚN. NO UTILICE LA
MÁQUINA CUANDO ESTÉ CANSADO O BAJO LA
INFLUENCIA DE DROGAS, ALCOHOL O MEDICAMENTOS. Un momento de distracción mientras se estén
utilizando herramientas mecánicas podría causar lesiones.
24. EL USO DE ESTA HERRAMIENTA
PUEDE GENERAR Y DISPERSAR
POLVO U OTRAS PARTÍCULAS SUSPENDIDAS EN EL
AIRE, INCLUYENDO POLVO DE MADERA, POLVO DE
SÍLICE CRISTALINA Y POLVO DE ASBESTO. Dirija las
partículas de modo que se alejen de la cara y del cuerpo.
Utilice siempre la herramienta en un área bien ventilada y
proporcione un medio apropiado de remoción de polvo. Use
un sistema de recolección de polvo en todos los lugares
donde sea posible. La exposición al polvo puede causar
lesiones respiratorias graves y permanentes u otras lesiones
graves y permanentes, incluyendo silicosis (una enfermedad
pulmonar grave), cáncer y muerte. Evite aspirar el polvo y
evite el contacto prolongado con el polvo. Si se permite que
el polvo entre en la boca o en los ojos, o que se deposite en
la piel, se puede promover la absorción de material nocivo.
Use siempre protección respiratoria aprobada por
NIOSH/OSHA que se ajuste apropiadamente y sea
adecuada para la exposición al polvo, y lávese las áreas
expuestas con agua y jabón.
NORMAS GENERALES DE SEGURIDAD
LEA Y COMPRENDA TODAS LAS ADVERTENCIAS Y LAS INSTRUCCIONES DE
OPERACIÓN ANTES DE UTILIZAR ESTE EQUIPO. El incumplimiento de cualquiera de las
instrucciones enumeradas abajo puede provocar descarga eléctrica, incendio o lesiones
personales graves o daños a la propiedad.
INSTRUCCIONES IMPORTANTES SOBRE SEGURIDAD
Page 30

30
REGLAS DE SEGURIDAD ADICIONALES
PARA SIERRA DE MESA
1. NO UTILICE ESTA MÁQUINA hasta que esté
completamente montada e instalada de acuerdo con las
instrucciones.
2. OBTENGA ASESORAMIENTO de su supervisor,
instructor u otra persona calificada si no está
completamente familiarizado con la utilización de esta
máquina.
3. SIGA TODOS LOS CÓDIGOS DE CABLEADO y las
conexiones eléctricas recomendadas.
4. UTILICE LOS PROTECTORES SIEMPRE QUE SEA
POSIBLE. Asegúrese de que estén colocados en su sitio,
sujetos firmemente y funcionando correctamente.
5. EVITE EL RETROCESO:
A. manteniendo la hoja afilada y libre de herrumbre y
resina.
B. manteniendo el tope-guía para cortar al hilo paralelo a
la hoja de sierra.
C. utilizando el protector de la hoja de sierra y el separador
para todas las operaciones posibles, incluyendo el
aserrado pasante.
D. empujando la pieza de trabajo más allá de la hoja de
sierra antes de soltarla.
E. no cortando nunca al hilo una pieza de trabajo que esté
torcida o combada, o que no tenga un borde recto
para guiarla a lo largo del tope-guía.
F. utilizando tablas de canto biselado cuando no pueda
utilizarse el dispositivo antirretroceso.
G. no aserrando nunca una pieza de trabajo grande que no
pueda ser controlada.
H. no utilizando nunca el tope-guía como guía cuando se
realicen cortes transversales.
I. no aserrando nunca una pieza de trabajo que tenga
nudos sueltos u otros defectos.
6. UTILICE SIEMPRE LOS PROTECTORES, EL
SEPARADOR Y LOS DEDOS ANTIRRETROCESO,
excepto cuando se indique otra cosa en el manual.
7. RETIRE LAS PIEZAS CORTADAS Y LOS RESIDUOS de
la mesa antes de arrancar la sierra. La vibración de la
máquina puede hacer que dichas piezas y residuos se
muevan hacia la hoja de sierra y salgan despedidos.
Después de realizar el corte, apague la máquina. Cuando
la hoja se haya detenido completamente, retire todos los
residuos.
8. NUNCA ARRANQUE LA MÁQUINA con la pieza de
trabajo contra la hoja.
9. SUJETE FIRMEMENTE LA PIEZA DE TRABAJO contra
el calibre de ingletes o el tope-guía.
10.
NUNCA haga pasar la pieza de trabajo entre el tope-guía
y una fresa de moldurar.
11. NUNCA realice operaciones "a pulso". Utilice el tope-guía
o el calibre de ingletes para posicionar y guiar la pieza de
trabajo.
12. UTILICE UNO O VARIOS PALOS DE EMPUJAR para
cortar al hilo una pieza de trabajo estrecha.
13. EVITE LAS OPERACIONES DIFÍCILES Y LAS
POSICIONES DIFÍCILES DE LAS MANOS en las que un
resbalón repentino podría hacer que una mano se mueva
hacia la hoja.
14. MANTENGA LOS BRAZOS, LAS MANOS Y LOS DEDOS
alejados de la hoja.
15. NUNCA haga que alguna parte de su cuerpo esté en línea
con la trayectoria de la hoja de sierra.
16. NUNCA PONGA LAS MANOS ALREDEDOR de la hoja de
sierra ni sobre ella.
17. NUNCA intente soltar una hoja de sierra parada sin apagar
primero la máquina.
18. SOPORTE APROPIADAMENTE las piezas de trabajo
LARGAS O ANCHAS.
19. NUNCA REALICE TRABAJO DE INSTALACIÓN,
MONTAJE o preparación en la mesa/área de trabajo
cuando la máquina esté en marcha.
20. APAGUE LA MÁQUINA Y DESCONÉCTELA de la fuente
de alimentación antes de instalar o quitar accesorios,
antes de ajustar o cambiar las preparaciones o al hacer
reparaciones.
21. APAGUE LA MÁQUINA, desconéctela de la fuente de
alimentación y limpie la mesa/área de trabajo antes de
dejar la máquina. BLOQUEE EL INTERRUPTOR EN LA
POSICIÓN DE APAGADO para impedir el uso no
autorizado.
22. HAY DISPONIBLE INFORMACIÓN ADICIONAL
RELACIONADA CON LA UTILIZACIÓN SEGURA y
apropiada de esta herramienta a través del Instituto de
Herramientas Mecánicas, Power Tool Institute, 1300
Summer Avenue, Cleveland, OH 44115-2851. También hay
información disponible a través del Consejo Nacional de
Seguridad, National Safety Council, 1121 Spring Lake
Drive, Itasca, IL 60143-3201. Sírvase consultar los
Requisitos de Seguridad para Máquinas de Elaboración
de la Madera ANSI 01.1 del Instituto Nacional Americano
de Normas (American National Standards Institute) y las
normas OSHA 1910.213 del Departamento de Trabajo de
los EE.UU.
GUARDE ESTAS INSTRUCCIONES.
Refiérase a ellas con frecuencia y utilícelas para adiestrar a otros.
ES IMPORTANTE PARA USTED LEER Y ENTENDER ESTE MANUAL. EL INCUMPLIMIENTO DE
LAS INSTRUCCIONES ENUMERADAS DEBAJO PUEDE PROVOCAR DESCARGA ELÉCTRICA,
INCENDIO O LESIONES GRAVES.
Page 31

31
Fig. A
Fig. B
CAJA TOMACORRIENTE
CONECTADA A TIERRA
TERMINALES
QUE LLEVAN
CORRIENTE
EL TERMINAL DE CONEXIÓN A
TIERRA ES EL MÁS LARGO DE
LOS 3 TERMINALES
MEDIO DE CONEXIÓN
TIERRA
ADAPTADOR
CAJA TOMACORRIENTE
CONECTADA A TIERRA
1. Todas las máquinas conectadas con cordón
conectadas a tierra:
En caso de mal funcionamiento o avería, la conexión a
tierra proporciona una ruta de resistencia mínima para la
corriente eléctrica, con el fin de reducir el riesgo de
descargas eléctricas. Esta máquina está equipada con
un cordón eléctrico que tiene un conductor de conexión
a tierra del equipo y un enchufe de conexión a tierra. El
enchufe debe enchufarse en un tomacorriente
coincidente que esté instalado y conectado a tierra
adecuadamente, de acuerdo con todos los códigos y
ordenanzas locales.
No modifique el enchufe suministrado. Si el enchufe no
cabe en el tomacorriente, haga que un electricista
calificado instale el tomacorriente apropiado.
La conexión inapropiada del conductor de conexión a
tierra del equipo puede dar como resultado riesgo de
descargas eléctricas. El conductor con aislamiento que
tiene una superficie exterior de color verde con o sin
franjas amarillas es el conductor de conexión a tierra del
equipo. Si es necesario reparar o reemplazar el cordón
eléctrico o el enchufe, no conecte el conductor de
conexión a tierra del equipo a un terminal con corriente.
Consulte a un electricista competente o a personal de
servicio calificado si no entiende completamente las
instrucciones de conexión a tierra o si tiene dudas en
cuanto a si la máquina está conectada a tierra
apropiadamente.
Utilice únicamente cordones de extensión de tres
alambres que tengan enchufes de tipo de conexión a
tierra con tres terminales y receptáculos de tres
conductores que acepten el enchufe de la máquina, tal
como se muestra en la Fig. A.
Repare o reemplace inmediatamente los cordones
dañados o desgastados.
2. Máquinas conectadas con cordón conectadas a
tierra diseñadas para utilizarse en un circuito de
alimentación que tenga una capacidad nominal de
menos de 150 V:
Si la máquina está diseñada para utilizarse en un circuito
que tenga un tomacorriente parecido al que se ilustra en
la Fig. A, la máquina tendrá un enchufe de conexión a
tierra que se parece al enchufe ilustrado en la Fig. A.
Puede utilizarse un adaptador temporal, que se parece
al adaptador ilustrado en la Fig. B, para conectar este
enchufe a un receptáculo coincidente de dos
conductores, tal como se muestra en la Fig. B, si no se
dispone de un tomacorriente conectado a tierra
apropiadamente. El adaptador temporal debe utilizarse
solamente hasta que un electricista calificado pueda
instalar un tomacorriente conectado a tierra
apropiadamente. La orejeta, lengüeta, etc., rígida de
color verde que sobresale del adaptador debe
conectarse a una toma de tierra permanente, como por
ejemplo una caja tomacorriente conectada a tierra
adecuadamente. Siempre que se utilice un adaptador,
debe sujetarse en su sitio con un tornillo de metal.
NOTA: En Canadá, el uso de un adaptador temporal
no está permitido por el Código Eléctrico
Canadiense.
RIESGO DE DESCARGA
ELÉCTRICA. EN TODOS LOS CASOS, ASEGÚRESE DE
QUE EL RECEPTÁCULO EN CUESTIÓN ESTÉ
CONECTADO A TIERRA ADECUADAMENTE. SI NO ESTÁ
SEGURO, HAGA QUE UN ELECTRICISTA CALIFICADO
COMPRUEBE EL RECEPTÁCULO.
Debe utilizarse un circuito eléctrico independiente para las máquinas. Este circuito debe tener alambre de no menos del No. 12 y
debe estar protegido con un fusible de acción retardada de 20 A. Si se utiliza un cordón de extensión, utilice únicamente cordones
de extensión de tres alambres que tengan enchufes de tipo de conexión a tierra con tres terminales y un receptáculo coincidente
que acepte el enchufe de la máquina. Antes de conectar el máquina a la línea de alimentación, asegúrese de que el interruptor(s)
esté en la posición de apagado y cerciórese de que la corriente eléctrica tenga las mismas características que las que estén
indicadas en la máquina. Todas las conexiones a la línea de alimentación deben hacer buen contacto. El funcionamiento a bajo
voltaje dañará el máquina.
RIESGO DE DESCARGA ELÉCTRICA. NO EXPONGA LA MÁQUINA A LA LLUVIA NI LA
UTILICE EN LUGARES HÚMEDOS.
CONEXIONES A LA FUENTE DE ALIMENTACIÓN
La máquina está cableada para corriente alterna de 120 V., 60 Hz. Antes de conectar la máquina a la fuente de
alimentación, asegúrese de que el interruptor esté en la posición de apagado.
INSTRUCCIONES DE CONEXIÓN A TIERRA
RIESGO DE DESCARGA ELÉCTRICA. ESTA MÁQUINA DEBE ESTAR CONECTADA A TIERRA MIENTRAS
SE ESTÉ UTILIZANDO, PARA PROTEGER AL OPERADOR CONTRA LAS DESCARGAS ELÉCTRICAS.
Page 32

32
INSTRUCCIONES DE FUNCIONAMIENTO
La ShopMaster modelo SM200L de Delta es una sierra de mesa de 10" diseñada para brindar un rendimiento de alta
calidad, con una capacidad de profundidad de corte de hasta 3" (76 mm) a 90° y 2" (51 mm) a 45°, para cortar
limpiamente tamaños de material estándar. La ShopMaster modelo TS200LS de Delta incluye la sierra con un motor
de 13 A, 120 V, una base de soporte de metal, un tope-guía para cortar al hilo, un calibre de ingletes, un protector de
la hoja transparente con separador y dedos antirretroceso, una hoja de sierra de 10" con puntas de carburo, un
accesorio de inserción de la mesa y llaves de tuerca. La TS200 es la misma sierra sin la base de soporte.
Utilice cordones de extensión
apropiados. Asegúrese de que el cordón de extensión
esté en buenas condiciones y de que sea un cordón de
extensión de tres alambres que tenga un enchufe de
tipo de conexión a tierra con tres terminales y un
receptáculo coincidente que acepte el enchufe de la
máquina. Cuando utilice un cordón de extensión,
asegúrese de emplear un cordón que sea lo
suficientemente pesado como para llevar la corriente de
la máquina. Un cordón de tamaño insuficiente causará
una caída de la tensión de la línea eléctrica que dará
como resultado pérdida de potencia y recalentamiento.
En la Fig. C se muestra el calibre correcto que debe
utilizarse dependiendo de la longitud del cordón. En
caso de duda, utilice el siguiente calibre más pesado.
Cuanto más pequeño sea el número de calibre, más
pesado será el cordón.
Fig. C
CORDÓN DE EXTENSIÓN DE CALIBRE MÍNIMO
TAMAÑOS RECOMENDADOS PARA USO CON MÁQUINAS ELÉCTRICAS ESTACIONARIAS
Capacidad Longitud Total Del Calibre Del Cordon
Nominal En Voltios Cordon De Extensión
Amperios En Pies
0-6 120
Hasta
25 18 AWG
0-6 120 25-50 16 AWG
0-6 120 50-100 16 AWG
0-6 120 100-150 14 AWG
6-10 120
Hasta
25 18 AWG
6-10 120 25-50 16 AWG
6-10 120 50-100 14 AWG
6-10 120 100-150 12 AWG
10-12 120
Hasta
25 16 AWG
10-12 120 25-50 16 AWG
10-12 120 50-100 14 AWG
10-12 120 100-150 12 AWG
12-16 120
Hasta
25 14 AWG
12-16 120 25-50 12 AWG
12-16 120
NO SE RECOMIENDA LONGITUDES MAYOR DE 50 PIES
NOTA: LA FOTO DE LA CUBIERTA DEL MANUAL ILUSTRA EL MODELO DE PRODUCCIÓN ACTUAL.
TODAS LAS DEMÁS ILUSTRACIONES SON SOLAMENTE REPRESENTATIVAS Y ES POSIBLE QUE
NO MUESTREN EL COLOR, EL ETIQUETADO Y LOS ACCESORIOS REALES.
CONTENIDO DE CARTON
SIERRA MOTORIZADA DE
BANCO PARTES
La Fig. 1 ilustra la sierra removida de su caja y la Fig. 2
en Fig. 3, ilustra todos los artículos sueltos que se
adjuntan con la sierra. La fig. 4, ilustra todos los items
flojos pila de discos para el soporte.
Fig. 1
CORDONES DE EXTENSIÓN
Page 33

33
Fig. 4
1
8
9
7
10
3
6
2
4
5
SOPORTE PARA EL MODELO
TS200LS (Fig. 4)
1. Pata (4)
2. Arandela plana de 3/8" para montar la sierra en la base
de soporte & para montar la base de soporte (24)
3. Pie (4)
4. Tuerca hexagonal M8 para montar la sierra en la base
de soporte & para montar la base de soporte (20)
5. Tornillo hexagonal M8 x 40 mm para montar la sierra en
la base de soporte (4)
6. Pernos de carruaje M8x1.25x 20 mm para montar la
base de soporte (16)
7. Ménsulas superiores delanteras y traseras de18-1/2" (2)
8. Ménsulas laterales superiores de 17" (2)
9. Ménsulas inferiores delanteras y traseras de 22" (2)
10. Ménsulas laterales inferiores de 20-3/8" (2)
Fig. 3
Fig. 2
1. Guía de corte a lo largo
2. Ensamblaje de hendidor y protector
3. Agarradera de cierre para la guía de corte a lo largo
4. Volante de mano de elevación y bajado de hoja
5. Escuadra de ingletes
6. Soporte de apoyo del hendidor
7. Soporte del hendidor
8. Agarradera de cierre para la guía de corte a lo largo
9. Portador de la escuadra de ingletes
10. Abrazadera de muelle para el portador de la
escuadra de ingletes
11. Llave De la Lámina
Fig. 3
1. M6x1x55mm Tornillo de la pista de la cacerola de (1)
2. 1/4-20x2fi" Tornillo Principal De Tuerca hexagonal (1)
3. M6x1x20mm Tornillo Principal De Tuerca
hexagonal (1)
4. 1/4-20x1/2" Tornillo Principal De Tuerca hexagonal (2)
5. M6x1x12mm Plano Principal Tornillo (1)
6. M4x.7x10mm Tornillo Principal De la Cacerola (1)
7. M4x.2x10mm Tornillo Principal De la Cacerola (4)
8. M8x1.25 Tuerca hexagonal (1)
9. M6x1 Tuerca De Ala (1)
10. M4.7 Tuerca hexagonal (1)
11. M6.4 Plana Arandela (3)
12. 1/4" Arandela de cierre Interna Del Diente (1)
13. 1/4" Arandela de cierre Externa Del Diente (5)
14. 3/16" Plana Arandela (4)
15. 3/16" Arandela Plana Del Diente Externo (1)
1
2
3
4
5
6
7
8
9
10
11
12
13
14
15
Fig. 2
1
2
3
4
5
6
7
8
9
10
11
Page 34

34
ENSAMBLAJE
DESEMPAQUETADO Y LIMPIEZA
Desempaque cuidadosamente la máquina y todas las piezas sueltas que están en el contenedor o contenedores de
transporte. Quite el revestimiento protector de todas las superficies no pintadas. Este revestimiento puede quitarse
con un paño suave humedecido con queroseno (no utilice acetona, gasolina ni diluyente de laca para este fin).
Después de realizar la limpieza, cubra las superficies no pintadas con una cera en pasta doméstica de buena calidad
para pisos.
* El destornillador de cruz
* 13mm llave de boca
* 10mm llave de boca
* Orilla recta
HERRAMIENTAS DE ENSAMBLAJE REQUERIDAS
ESTIMACIÓN DEL TIEMPO DE ENSAMBLAJE - 90 minutos
EL VIO DEBE SER ASEGURADO APROPIADAMENTE A UNA SUPERFICIE SECUNDARIA.
TAMBIÉN, USTED DEBE PROPORCIONAR UN HOYO PARA EL SERRÍN PARA CAERSE POR O
EL POLVO REUNIRÁ ALREDEDOR DEL MOTOR, CAUSANDO UN PELIGRO POSIBLE DEL
FUEGO Y/O EL DAÑO DEL MOTOR.
Fig. 4A
ELEVAR Y SUPERFICIES SECUNDARIAS PARA UN VIO CON NINGÚN SOPORTE
A
El vio debe ser elevado bastante para serrín para
fracasar el fondo del vio y no construye alrededor del
motor.
Posicione los cuatro hoyos que montan localizado en
la base del vio gabinete (dos de que se muestran en
(UN) Fig. 4A) sobre cualquier apoyo apropiado que
usted utilizan. Entonces abroche seguramente el vio a
los apoyos. El vio puede ser asegurado abrochando el
soporte por los hoyos que montan con hardware
conveniente (no suministrado).
EL VIO APOYO DEBE SER FIJO Y
CAPAZ DE SOSTENER 300 LIBRAS.
Usted puede construir también un apoyo elevado
sencillo, como mostrado en el Fig. 4B.
UTILICE UN BUEN GRADO DEL
CHAPEADO CON UN GRUESO
MÍNIMO DEL 3/4 PULG. NO HAGA EL TABLERO DEL
MONTAJE DE TABLERO DE PARTÍCULA PUESTO
QUE EL TABLERO DE PARTÍCULA SE ROMPE
FÁCILMENTE.
UN HOYO SE DEBE PROPORCIONAR
EN ESTE APOYO PARA PERMITIR EL
SERRÍN PARA FRACASAR.
Cuadre el vio en la superficie secundaria y marca la
ubicación para cuatro 5/16 hoyos de pulgada para ser
taladrada (Fig. 4B).
CERCIORESE ALLI ES POR LO
MENOS 3 PULGADAS EN CUATRO
LADOS DE LA BASE.
Ponga el vio aparte y entonces taladra hoyos en estas
marcas. Localice y marque un 11 o 12 cuadrado de
pulgada centrado entre los cuatro hoyos que monta.
Recorte y quite el cuadrado (Fig. 4B).
Para elevar la superficie secundaria, la medida dos de
2x4s 4B (UN) Fig. a la anchura de dos lados opuestos
5/16" HOYOS
PILOTOS
11" OR 12"
RECORTE
CUADRADO
VIO las MARCAS de
la COLOCACION
3" MINIMO
3" MINIMO
B
B
A
3" MINIMO
3" MINIMO
Fig. 4B
de la superficie secundaria. Conecte la superficie
secundaria a las orillas estrechas del 2X4s (como
mostrado en el Fig. 4B) utilizando los tornillos de
madera (no proporcionado) en por lo menos tres Fig.
4B de lugares (B) en cada lado.
DESCONECTE LA MÁQUINA DE FUENTE DE ENERGÍA..
Page 35

35
Fig. 5
D
E
A
1. Inserte el tornillo de M6x1x55 screw (D) Fig. 5, a
través de la agarradera (E) y ensamble la agarradera (E)
al volante de mano (A) mediante el roscado del tornillo
(D) en el sentido de las manecillas del reloj hacia dentro
del volante de mano.
ENSAMBLADO DEL VOLANTE DE INCLINACION Y ELEVADO DE HOJA
1. La vuelta vio la tabla hacer frente abajo en un
pedazo de cartulina para proteger la superficie de la
tabla. Alinee los cuatro agujeros en el gabinete de la
sierra con los cuatro agujeros en el soporte.
2. Coloque una arandela el 3/8"plana sobre un tornillo
principal de tuerca hexagonal de M8x1.25x40mm.
Inserte el tornillo a través del agujero en el soporte y del
agujero en la sierra. Coloque una arandela el 3/8"plana
sobre el tornillo y rosque una tuerca de tuerca
hexagonal M8x1.25 sobre el tornillo y apriete con
seguridad. Repita este proceso para los tres agujeros
restantes.
3. La vuelta consideró la tabla cara arriba, según lo
demostrado en Fig. 4D
4. Empuje hacia abajo encima de la sierra así que las
piernas del soporte ajustan a la superficie del piso y
aprietan todo el hardware del soporte.
Fig. 4D
MONTAJE DE LA BASE DE SOPORTE SM200L
1. Monte la base de soporte de la manera que se
muestra en la Fig. 4C, utilizando 16 pernos de
M8x1.25x20mm carruaje, 3/8 plug. arandelas planas
y M8x1.25 tuercas hexagonales. No apriete
completamente los herrajes en este momento. Hay
letras estampadas en las ménsulas de la base de
soporte para facilitar el montaje.
A - Ménsulas superiores delanteras y traseras
B - Ménsulas laterales superiores
C - Ménsulas laterales inferiores
D - Ménsulas inferiores delanteras y traseras
2. Monte los pies de goma (E), Fig. 4C, en la parte
inferior de cada pata (F) de la manera que se
muestra en la ilustración.
NOTA: Cada pie de goma está provisto con agujeros
para montar la base de soporte en la superficie del
piso en caso de que se requiera hacerlo.
Fig. 4C
B
A
C
F
E
D
SIERRA QUE ENSAMBLA
Page 36

36
2. Ensamble el volante de mano (A) Fig. 6 al eje (B), asegurando que el plano en el lado interior del volante de mano
se alinee con el plano del eje.
3. Fije el volante de mano (A) Fig. 7 al eje, utilizando el tornillo M6x1x12mm screw (C).
Fig. 6
C
A
A
B
Fig. 7
ENSAMBLADO DEL ENSAMBLAJE DE PROTECTOR DE HOYA Y HENDIDOR
DESCONCTE LA MAQUINA DE LA FUENTE DE ALIMENTACION.
EL ENSAMBLADO DE PROTECTOR DE HOJA Y HENDIDOR DEBE ESTAR CORRECTAMENTE
ALINEADO CON LA HOJA DE LA SIERRA PARA PREVENIR LOS CONTRAGOLPES.
1. Coloque la hoja a 90 grados de la mesa y fíjela en su sitio.
2. Afiance el soporte de apoyo del hendidor (A) Fig. 9 al soporte del hendidor (B)
haciendo uso de los dos tornillos de 1/4-20x1/2" de largo (C), que fueron
quitados anteriormente del soporte del hendidor (B), y dos arandelas (C) de
cierre de dientes externos de 1/4 de pulg. como se ilustra aquí.
AVISO: No apriete los tornillos (C) del todo en este momento.
3. Localice el tornillo de cabeza hexagonal de 1/4-20x2fi pulg. de largo (G) Fig.
10, y ensamble la 1/4 pulg. arandela de cierre con dientes internos (O), 1/4
pulg. arandela plana (P), y 1/4 pulg. arandela con dientes externos (R) al
tornillo (G).
4. Coloque el extremo rebajado (E) Fig. 11 del soporte del hendidor contra el
extremo de la vara pivotante (F) y fíjela en su sitio utilizando se ensamblaron
al tornillo (G) en el PASO #3.
AVISO: No apriete totalmente fig. 9 del (C) de los tornillos en este tiempo.
5. Coloque el hendidor (H) Fig. 13 sobre el soporte de apoyo del hendidor como
se ilustra aquí, asegurándose que las dos protuberancias (K) en el soporte de
apoyo del hendidor estén dentro de la ranura del hendidor (H).
6. Monte el hendidor (H) Fig. 14 al soporte de apoyo del hendidor (B) según
se ilustra, utilizando para ello un tornillo de cabeza hexagonal de
M6x1x20mm pulg. de largo, una arandela de dientes externos, y una M6
arandela plana (L).
Fig. 9
A
B
C
D
Fig. 10
R
P
O
G
Fig. 12
Fig. 11
F
E
G
B
Page 37

37
7. Afiance el hendidor (L) Fig. 14 al soporte de apoyo
del hendidor utilizando una arandela plana, una
arandela de cierre de dientes externos, y una M6
tuerca de mariposa (M).
AVISO: Antes de apretar la tuerca de mariposa (M),
asegúrese de que haya una abertura de por lo menos
1/8 pulg. entre el borde inferior del hendidor (N) y la
superficie superior de la mesa (P), y que las
protuberancias (K) Fig. 15 estén dentro de la ranura del
ensamblaje del hendidor (H).
8. Utilizando una regla recta, revise si el hendidor (H)
Fig. 16 está alineado con la hoja de la sierra (R). Si
resulta necesario hacer cualquier ajuste, el hendidor
(H) puede ser movido a la izquierda o a la derecha y
puede ser rotada.
9. Cuando esté seguro que el hendidor está debidamente alineado con la hoja de la sierra, apriete los dos tornillos
(C) Fig. 17 que fijan el soporte de apoyo del hendidor al soporte del hendidor, y apriete el tornillo (G) que fija el
soporte del hendidor a la varilla pivotante.
Fig. 13
K
H
Fig. 14
L
B
H
C
Fig. 15
Fig. 17
Fig. 16
K
M
N
P
H
R
C
G
H
Fig. 18
A
B
ESCUADRA DE INGLETES
La escuadra de ingletes se envía completamente
ensamblado y viene equipado con una barra de
escuadra de ingletes con ranura en T (A) Fig. 18, que se
inserta en uno de las dos ranuras para escuadras de
ingletes con ranuras en T, localizadas en la superficie de
la mesa, como se ilustra aquí. La escuadra de ingletes
con ranura en T impide que la escuadra se caiga al ser
extendido más allá del frente de la mesa durante el corte
transversal de materiales extremadamente anchos.
Page 38

38
1. Ensamble fig. 19 del (E) del clip de resorte, el (A) del sostenedor de la galga de los ingletes según lo mostrado
usando un tornillo de la pista de la cacerola de M4x.7x10mm (F), el (B) de la arandela de cierre del diente del 3/16"
y la tuerca de tuerca hexagonal externos M4x.7.
NOTA: La fig. 20 del (G) de la tuerca de tuerca hexagonal, cabrá en el receso en la parte posteriora del (A) del
sostenedor de la galga de los ingletes para guardar fig. 19 del (E) del clip de resorte, asegurada al sostenedor de la
galga de los ingletes.
2. Ensamble el portador de la escuadra de ingletes (A) Fig. 21 a la izquierda del gabinete de la sierra utilizando los
cuatro M4x.2x10mm tornillos (B) Fig. 22, y 3/16 plug. arandelas (C) desde el interior del gabinete de la sierra.
3. La Fig. 23 ilustra la escuadra de ingletes (D) insertado en el portador de la escuadra de ingletes cuando no se
encuentra en uso.
DESCONCTE LA MAQUINA DE LA FUENTE DE ALIMENTACION.
Fig. 19
E
A
B
Fig. 20
G
F
Fig. 21
Fig. 22
Fig. 23
A
B
C
D
ENSAMBLADO DEL PORTADOR DE LA ESCUADRA DE INGLETES
Page 39

39
Fig. 24
Fig. 26
Fig. 25
B
A
D
C
D
B
A
ENSAMBLADO DE LA GUIA DE
CORTE A LO LARGO
1. Enrosque la M8x1.25 tuerca de cierre (A) Fig. 24
aproximadamente a la mitad del camino sobre el gorrón de
la agarradera (B).
2. Enrosque la tuerca de cierre (B) Fig. 24 dentro del
agujero roscado (C) en la leva de la guía (D). Apriete la
tuerca de cierre (A) Fig. 25 contra la leva (D).
3. La guía de corte a lo largo es accionada generalmente
desde el lado derecho de la mesa de la cierra. Levante la
agarradera de cierre (B) Fig. 26 y coloque la guía sobre la
mesa como se ilustra aquí. Empuje la agarradera hacia
abajo (B) Fig. 26, para bloquear la guía en su sitio sobre la
mesa de la sierra.
Fig. 27
A
ARRANCANDO Y DETENIENDO LA
SIERRA
El interruptor (A) Fig. 27 está localizado en el tablero
delantero del gabinete de la sierra. Para encender la
sierra, mueva el interruptor (A) a la posición superior.
Para apagar la sierra, mueva el interruptor (A) a la
posición inferior.
OPERACIÓN
CONTROLES Y AJUSTES OPERACIONALES
Page 40

40
Fig. 28
B
C
FIJANDO EL INTERRUPTOR EN LA
POSICION DE APAGADO
Sugerimos que cuando la sierra no se encuentre en uso
que el interruptor quede fijado en la posición de
apagado. Esto puede hacerse tomando la pieza
acodada (B) y removiéndolo por completo del
interruptor, tal como se ilustra en la Fig. 28. El
interruptor no funcionará sin la pieza acodada (B). No
obstante, si se quita la pieza acodada mientras que la
sierra está funcionando, ésta puede ser apagada una
vez, pero no puede volver a arrancar sin la inserción de
la pieza acodada (B).
PROTECCION CONTRA
SOBRECARGAS
Su sierra está equipada con un botón de relevo para
reenganche de sobrecargas (C) Fig. 28. Si el motor se
apaga o no arranca debido a una sobrecarga (corte
excesivamente rápido del material, uso de una hoja
roma, uso de la sierra más allá de sus capacidades, etc.)
o voltajes bajos, mueva el interruptor a la posición de
apagado, permita que se enfríe el motor de tres a cinco
minutos, y oprima el botón de reenganche (C), que
reenganchará el dispositivo de sobrecarga. El motor
puede ser encendido entonces como de costumbre.
Fig. 29
A
Fig. 30
A
B
CONTROL DE ELEVACION Y
BAJADO DE LA HOJA
Para alzar o bajar la hoja de la sierra, gire el volante de
mano (A) Fig. 29. El girar en el sentido de las manecillas
del reloj baja la hoja, y el girar el volante de mano contra
las manecillas del reloj eleva la hoja.
CONTROL DE INCLINACION DE LA
HOJA
Para inclinar la hoja de la sierra, afloje la agarradera de
cierre (A) Fig. 30 y gire el volante de mano (B) hasta
conseguir el ángulo deseado. Vuelva a apretar
entoncesla agarradera de cierre (A).
AVISO: La agarradera decierre (A) está cargada con
resortes y puede ser reposicionada al tirar de la
agarradera (A), colocándola sobre el gorrón aserrado
localizado debajo de la agarradera.
LA AGARRADERA DE CIERRE DE
INCLINACION DE HOJA (A) DEBE
ESTAR CERRADA DURANTE
TODAS LAS FUNCIONES DE
CORTE.
Page 41

41
DESCONCTE LA MAQUINA DE LA FUENTE DE ALIMENTACION.
AJUSTANDO LOS TOPES POSITIVOS DE 90 Y 45 GRADOS
Su sierra está equipada con topes positivos que colocarán rápida y precisamente la hoja de la sierra a 90 y a 45 grados
a la mesa.
1. Eleve la hoja de la sierra a su elevación máxima.
2. Afloje la agarradera de cierre de inclinación de hoja,
mueva el mecanismo de inclinación de hoja lo más
lejos posible hacia la izquierda y apriete la
agarradera de cierre de inclinación de hoja.
3. Coloque una escuadra (A) Fig. 31 sobre la mesa y
contra la hoja, tal como se ilustra, y revise si la hoja
se encuentra a 90 grados de la mesa. Si la hoja no
se encuentra a 90 grados a la mesa, afloje el tornillo
(B) unas cuantas vueltas, y mueva el mecanismo de
inclinación de hoja hasta que la hoja quede a 90
grados a la mesa. Ajuste entonces la agarradera de
cierre de inclinación de hoja y apriete el tornillo (B)
hasta que haga fondo.
PARA AJUSTAR EL TOPE POSITIVO A LOS 90 GRADOS
Fig. 31
B
A
1. Eleve la hoja de la sierra a su elevación máxima.
2. Afloje la agarradera de cierre de inclinación de hoja,
mueva el mecanismo de inclinación de hoja lo más
lejos posible hacia la derecha y apriete la agarradera
de cierre de inclinación de hoja.
3. Coloque una escuadra (A) Fig. 32 sobre la mesa y
contra la hoja, tal como se ilustra, y revise si la hoja
se encuentra a 45 grados a la mesa. Si la hoja no se
encuentra a 45 grados a la mesa, afloje el tornillo (C)
unas cuantas vueltas y mueva el mecanismo de
inclinación de hoja hasta que la hoja quede a 45
grados de la mesa. Ajuste entonces la agarradera de
cierre de inclinación de hoja y apriete el tornillo (C)
hasta que haga fondo.
ARA AJUSTAR EL TOPE POSITIVO A LOS 45 GRADOS
Fig. 32
C
A
FUNCIONAMIENTO Y AJUSTES DE LA GUIA DE CORTE A LO LARGO
1. Para mover la guía de corte a lo largo (A) Fig. 33, a
lo largo de la mesa, levante la palanca de cierre (B),
deslice la guía a la posición deseada en la mesa y
empuje la palanca de cierre de la guía (B) hacia
abajo para fijar la guía a dicha posición.
2. Se suministra un indicador para señalar la distancia
en que se ha fijado la guía desde la hoja de la sierra.
Si resulta necesario ajustar el indicador, afloje el
tornillo (C) Fig. 33 que fija el indicador al soporte de
la guía de corte a lo largo y ajuste el indicador
conforme a los requisitos.
IMPORTANTE: La guia de corte a lo largo debe estar
debidamente alineada a la ranura de la escuadra de
ingletes para prevenir contragolpes durante el corte
a lo largo.
Fig. 33
A
D
E
F
B
C
Page 42

42
3. La hoja de la sierra está colocada de forma paralela a la ranura de la escuadra de ingletes en la fábrica, y la guía debe
estar paralela a la ranura de la escuadra de ingletes para realizar una labor acertada e impedir los contragolpes durante el
corte a lo largo. Para revisar el alineamiento, haga lo siguiente:
4. Coloque la guía en un extremo de la ranura de la escuadra de ingletes, tal como se ilustra en la Fig. 33. Fije la guía a la
mesa empujando la palanca de cierre (B) hacia abajo. El borde de la guía debe quedar entonces paralela a la ranura de la
escuadra de ingletes.
5. Si resulta necesario cualquier ajuste, haga lo siguiente:
6. Afloje los dos tornillos (D) Fig. 33, y levante la palanca de cierre (B). Entonces, mientras que detiene el soporte de la
gua (F) firmemente hacia usted, mueva la parte posterior de la guía (A) hasta que quede paralela con la ranura de la escuadra
de ingletes. Apriete entonces los dos tornillos (D) y empuje la palanca de cierre (B) hacia abajo.
7. La acción de abrazadera de la guía (A) Fig. 33, puede ajustarse al levantar la palanca de cierre (B) y girando el tornillo
(E) en el sentido de las manecillas del reloj para apretar, o en el sentido contrario para reducir la acción de abrazadera de la
guía.
1. Cerciórese de que la fig. 33A del separador de
millares del vector (a), sea rasante con o slightly
debajo de la superficie de la tapa de vector (B).
2. Si el separador de millares del vector está sobre la
superficie de la tapa de vector, apriete la fig. de dos
del vector tornillos del separador de millares (c) 33
(A), de modo que el separador de millares del vector
sea llano con la tapa de vector o el slightly debajo
de la superficie de la tapa de vector.
DESCONCTE LA MAQUINA DE LA
FUENTE DE ALIMENTACION.
Fig. 33A
A
B
C
AJUSTE DEL SEPARADOR DE MILLARES DEL VECTOR
Al realizar cortes transversales (la hoja fijada a 90 grados
de la mesa), la escuadra de ingletes puede utilizarse en
cualquiera de las ranuras de la mesa. Cuando realiza un
corte transversal biselado (con la hoja inclinada), sólo
utilice la escuadra de ingletes en la ranura derecha, en la
cual la hoja está inclinada en la dirección opuesta de la
escuadra de ingletes y de sus manos.
Para accionar la escuadra de ingletes, sencillamente
afloje la perilla de cierre (E) Fig. 34 y mueva el cuerpo de
la escuadra de ingletes al ángulo deseado.
FUNCIONAMIENTO Y AJUSTES DE LA ESCUADRA DE INGLETES
Fig. 34
E
AJUSTANDO LA HOJA PARALELAMENTE A LAS RANURAS DE LA
ESCUADRA DE INGLETES
La hoja fue ajustada de fábrica paralelamente a las ranuras de la escuadra de ingletes. Para asegurar cortes acertados
y ayudar a prevenir los contragolpes durante el cortado, este ajuste debe verificarse de nuevo
Para ajustar:
DESCONCTE LA MAQUINA DE LA FUENTE DE ALIMENTACION.
Page 43

43
Fig. 38
F
C
E
D
B
A
1. Eleve la hoja a su elevación máxima y ajuste la hoja para
que quede a 90 grados de la mesa.
2. Escoja un diente en la hoja de la sierra que esté colocado
hacia la izquierda. Marque dicho diente con un lápiz o
marcador.
3. Utilizando una escuadra ajustable, coloque el cuerpo de
la escuadra (A) Fig. 35 contra la escuadra de ingletes y
ajuste la hoja (B) de la escuada hasta que se roce con el
diente marcado, como se ilustra aquí.
4. Gire la hoja y revise el mismo diente marcado en la parte
posterior de la mesa, como se ilustra en la Fig. 40.
5. Si las medidas delanteras y posteriores, mostradas en
las Figuras 35 y 36, no son idénticas, afloje los cuatro
tornillos (C) Fig. 37. Antes aflojar los tornillos, aflojan las
nueces bajo la mesa localizada debajo de cada tornillo.
Tome la hoja de la sierra cuidadosa-mente y muévala
hasta que la hoja quede paralela a la ranura de la
escuadra de ingletes. Apriete entonces los cuatro
tornillos (C) Fig. 41 firmemente.
AVISO: Si no se puede realizar un ajuste suficiente aflojando
los tornillos (C), los tornillos (D) también Fig. 37 pueden
ser aflojados si resulta totalmente necesario para realizar
el ajuste.
ASEGURESE DE QUE LA MAZUINA
ESTE DESCONECTADA DE LA
FUENTE DE POTENCIA. SOLO
UTILICE HOJAS DE 10 PULG DE
DIAMETRO CON AGUJERO DE
ARBOL DE 5/8 PULG, TASADA
PARA 4700 RPM O MAS ALTO.
CAMBIO DE LA HOJA
1. Eleve la hoja de la sierra a su altura máxima y quite la
pieza de inserción, (A) Fig. 38.
2. Ponga un pedazo de madera fig. 38 (b) plana en la mesa
contra la lámina de modo que un diente del "encaje” la
madera para prevenir el movimiento de la madera. Quite la
tuerca del cenador (c) con la llave del retiro de la lámina (d).
Dé vuelta al nut(C) a la izquierda para quitar. Quite el reborde
exterior de la lámina (e) y la lámina de sierra (f).
3. Invierta el procedimiento para instalar la lámina nueva.
Fig. 37
C
D
Las operaciones de aserrado comunes incluyen el corte al hilo y el corte transversal, y unas cuantas operaciones
estándar más que son de naturaleza fundamental. Al igual que sucede con todas las máquinas eléctricas, hay una
cierta cantidad de peligro involucrado con la operación y el uso de la máquina. La utilización de la máquina con el
respeto y la precaución exigidos, en lo que se refiere a precauciones de seguridad, reducirá considerablemente la
posibilidad de que se produzcan lesiones corporales. Sin embargo, si no se hace caso de las precauciones de
seguridad normales o si éstas se ignoran completamente, el resultado puede ser que el operador sufra lesiones
corporales. La información que aparece a continuación describe el método seguro y adecuado de realizar las
operaciones de aserrado más comunes.
Fig. 35
Fig. 36
B
A
EL USO DE ADITAMENTOS Y ACCESORIOS NO RECOMENDADOS POR DELTA PUEDE
CAUSAR RIESGO DE LESIONES PARA EL USUARIO Y OTRAS PERSONAS.
UTILIZAR LA MAQUINA
Page 44

44
Comience el corte lentamente y sujete firmemente la pieza
de trabajo contra el calibre de ingletes y la mesa.
UNA DE LAS REGLAS PARA
UTILIZAR UNA SIERRA ES QUE EL
OPERADOR NO DEBE AGARRARSE NUNCA A UNA
PIEZA DE TRABAJO LIBRE NI TOCARLA. Sujete la pieza
de trabajo soportada, no la pieza libre que se esté cortando.
El avance en la realización de un corte transversal continúa
hasta que la pieza de trabajo esté cortada en dos y se tire
hacia atrás del calibre de ingletes y la pieza de trabajo hasta
el punto de comienzo. Antes de tirar hacia atrás de la pieza
de trabajo, es buena costumbre desplazar lateralmente un
poco la pieza de trabajo para moverla alejándola
ligeramente de la hoja de sierra. No recoja nunca de la mesa
ningún tramo de longitud corta de pieza de trabajo libre
mientras la sierra esté en marcha. No toque nunca una
pieza que se esté cortando, a menos que mida al menos un
pie de longitud.
Para brindar seguridad y conveniencia adicionales, el calibre de
ingletes (A) se puede equipar con un refrentado de madera
auxiliar (B), de la manera que se muestra en la Fig. 39A, que
debe ser al menos 1 pulgada más alto que la profundidad de
corte máxima y debe sobresalir 12 pulgadas o más a un lado
o al otro, dependiendo de qué ranura para el calibre de ingletes
se esté utilizando. Este refrentado de madera auxiliar (B) se
puede sujetar a la parte delantera del calibre de ingletes
utilizando dos tornillos para madera (C) a través de los agujeros
provistos en el cuerpo del calibre de ingletes e introduciéndolos
en el refrentado de madera.
NO USE NUNCA EL TOPE-GUÍA
COMO CALIBRE DE CORTE CUANDO REALICE
CORTES TRANSVERSALES.
Al cortar transversalmente varias piezas de la misma
longitud, se puede sujetar con abrazaderas un bloque de
madera (B), Fig. 39B, al tope-guía y se puede utilizar dicho
bloque como calibre de corte, de la manera que se muestra
en la Fig. 39B Es importante que este bloque de madera
esté posicionado siempre delante de la hoja de sierra, de la
manera que se muestra en la ilustración. Una vez que se
haya determinado la longitud de corte, sujete firmemente el
tope-guía y use el calibre de ingletes para hacer avanzar la
pieza de trabajo hacia el corte. Este bloque de madera
permite que la pieza que se esté cortando se mueva
libremente a lo largo de la superficie de la mesa sin atorarse
entre el tope-guía y la hoja de sierra, con lo que se reduce
la posibilidad de retroceso y de que el operador sufra
lesiones.
CUANDO UTILICE EL BLOQUE (B),
FIG. 39B, COMO CALIBRE DE CORTE, ES MUY
IMPORTANTE QUE EL EXTREMO TRASERO DEL
BLOQUE ESTÉ POSICIONADO DE MANERA QUE LA
PIEZA DE TRABAJO NO TOQUE EL BLOQUE ANTES
DE ENTRAR EN CONTACTO CON LA HOJA.
REALIZACIÓN DE CORTES TRANSVERSALES
Fig. 39
Fig. 39A
C
B
Fig. 39B
B
REALIZACIÓN DE CORTES AL HILO
La realización de cortes transversales requiere el uso del calibre de ingletes para posicionar y guiar la pieza de trabajo.
Coloque la pieza de trabajo contra el calibre de ingletes y haga avanzar tanto dicho calibre como la pieza de trabajo hacia
la hoja de sierra, de la manera que se muestra en la Fig. 39. El calibre de ingletes se puede utilizar en cualquiera de las dos
ranuras de la mesa. Cuando realice cortes en bisel (con la hoja inclinada), utilice la ranura de la mesa que no cause
interferencia de la mano o del calibre de ingletes con el protector de la hoja de sierra.
La realización de cortes al hilo consiste en cortar
longitudinalmente a través de una tabla. El tope-guía para
cortar al hilo (A), Fig. 40, se utiliza para posicionar y guiar la
pieza de trabajo. Un borde de la pieza de trabajo se desplaza
contra el tope-guía para cortar al hilo, mientras que el lado
plano de la tabla descansa sobre la mesa. Como la pieza de
trabajo se empuja a lo largo del tope-guía, debe tener un borde
recto y hacer contacto sólido con la mesa.
Fig. 40
A
Page 45

45
Fig. 41
Fig. 43
1. Arranque el motor y haga avanzar la pieza de trabajo
sujetándola hacia abajo y contra el tope-guía. No se sitúe
nunca en la línea del corte de la sierra cuando realice
cortes al hilo. Sujete la pieza de trabajo con las dos manos
y empújela a lo largo del tope-guía y hacia la hoja de sierra
(Fig. 40). Seguidamente, se puede hacer avanzar la pieza
de trabajo a través de la hoja de sierra con una mano o
con las dos manos. Después de que la pieza de trabajo
esté más allá de la hoja de sierra y los dedos
antirretroceso, se retira la mano de la pieza de trabajo.
2. Cuando se haya hecho esto, la pieza de trabajo
permanecerá sobre la mesa, se inclinará ligeramente hacia
arriba y será atrapada por el extremo del protector trasero,
o se deslizará de la mesa hasta caer al piso.
Alternativamente, el avance puede continuar hasta el
extremo de la mesa, después de lo cual la pieza de trabajo
es levantada y traída de vuelta a lo largo del borde exterior
del tope-guía. El material cortado permanece en la mesa y
no se toca con las manos hasta que la hoja de sierra se ha
detenido, a menos que sea una pieza grande que permita
retirarla de modo seguro. Cuando corte al hilo tablas de
más de tres pies de longitud, utilice un soporte para la
pieza de trabajo en la parte trasera de la sierra, para evitar
que la pieza de trabajo se caiga de la mesa de la sierra.
3. Si la pieza de trabajo que se esté cortando al hilo mide
menos de 4 pulgadas de ancho, se debe utilizar siempre
un palo de empujar para completar el avance, de la
manera que se muestra en la Fig. 41. El palo de empujar
se puede hacer fácilmente utilizando material de desecho,
de la manera que se explica en la sección
"CONSTRUCCIÓN DE UN PALO DE EMPUJAR".
4. Cortar al hilo piezas estrechas puede ser peligroso si no
se hace cuidadosamente.
CUÁNDO EL PEDAZO ES
DEMASIADO ESTRECHA PARA UN
PALO DEL EMPUJÓN PARA SER EFECTIVO - Y SI EL
TRABAJO ES BREVEMENTE SUFICIENTE - UTILIZA
UN EMPUJE LA TABLA. AL CORT DE HILO LA
MATERIA BAJO 2 PULGADAS EN LA ANCHURA, LOS
PALOS ORDINARIOS DEL EMPUJÓN PUEDEN
INTERVENIR CON EL GUARDIA DE HOJA.
Cuando utilice una tabla de empujar, la anchura de dicha
tabla debe añadirse a la anchura del ajuste de la posición
del tope-guía para cortar al hilo. Una tabla de empujar
plana se puede construir de la manera que se muestra en
la Fig. 43 y se debe usar de la manera que se muestra en
la Fig. 42.
NOTA: El protector quitó para la claridad. Siempre utilice
El protector.
NOTA: Algunas operaciones especiales (cuando se utiliza
la cabeza portafresa de moldurar) requieren la adición de
un refrentado de madera auxiliar al tope-guía, de la
manera que se explica en la sección "UTILIZACIÓN DE
UN REFRENTADO DE MADERA AUXILIAR EN EL
TOPE-GUÍA PARA CORTAR AL HILO", y el uso de un
palo de empujar.
Fig. 42
SE DEBE USAR EL PROTECTOR DE LA
HOJA DE SIERRA. EN LAS SIERRAS
PORTER-CABLE, EL PROTECTOR TIENE DEDOS
ANTIRRETROCESO PARA EVITAR EL RETROCESO Y UN
SEPARADOR PARA EVITAR QUE LA SEPARACIÓN DE CORTE
DE LA MADERA SE CIERRE Y ATORE LA HOJA. ESTÉ SEGURO
REEMPLAZAR O AFILAR LOS ANTIRRETROCESO CUANDO
LOS PUNTOS LLEGAN A SER LÁNGUIDOS.
UNA TOPE-GUIA SIEMPRE SE DEBE
UTILIZAR PARA LAS OPERACIONES LA
REALIZACIÓN DE CORTES AL HILO. NUNCA REALICE UNA
OPERACIÓN QUE LA REALIZACIÓN DE CORTES AL HILO
HECHO A PULSO.
BLOQUE DE 2" x 4"
MADERA CONTRACHAPADA DE 3/4"
ANCHURA DE LA MESA
DE LA SIERRA + 2"
Page 46

46
Fig. 43A
A
Fig. 44
A
B
UTILIZACIÓN DE UN REFRENTADO DE
MADERA AUXILIAR EN EL TOPE-GUÍA
PARA CORTAR AL HILO
En algunas operaciones especiales se necesitan refrentados de
madera (A), Fig. 43A, a un lado o a ambos lados del tope-guía
para cortar al hilo. El refrentado de madera se sujeta al tope-guía
con tornillos a través de los agujeros del tope-guía. La mayoría
de los trabajos requerirán un material de 3/4", aunque algún
trabajo ocasional podría requerir un refrentado de 1".
FRESA DE RANURAR ACCESORIA
NOTA: EL CORTE DE RANURADO DE ANCHURA
MÁXIMA PARA ESTA SIERRA ES DE 1/2 PULGADA.
EL CONJUNTO DE PROTECTOR
DE LA HOJA Y SEPARADOR NO SE PUEDE
UTILIZAR CUANDO SE REALICEN OPERACIONES
DE RANURADO. SE DEBE QUITAR DICHO
CONJUNTO.
Antes de ranurar, afloje la tuerca de mariposa (A), Fig.
44, y quite el conjunto de protector de la hoja y
separador (B). Tenga a mano el conjunto para colocarlo
de nuevo después de ranurar.
LAS PLANTILLAS, LOS
ACCESORIOS, LOS PALILLOS DEL EMPUJE Y LOS
TABLEROS AUXILIARES DE LA PLUMA DEBEN SER
UTILIZADOS.
1. Ranurar es cortar un rebajo o un surco ancho en la
pieza de trabajo. La mayoría de juegos de fresa de
ranurar están hechos con dos sierras exteriores y cuatro
o cinco cortadores interiores (Fig. 44A). Se emplean
varias combinaciones de sierras y cortadores para
cortar ranuras desde 1/8 hasta 13/16 de pulgada para
utilizarse en la fabricación de estantes, la elaboración de
juntas, el ensamblaje a espiga, la realización de ranuras,
etc. Los cortadores están muy triscados y deben
disponerse de manera que esta parte muy triscada
caiga en las gargantas de las sierras exteriores, de la
manera que se muestra en la Fig. 45. La superposición
de la sierra y el cortador se muestra en la Fig. 46, donde
(A) es la sierra exterior, (B) es un cortador interior y (C) es
una o varias arandelas de papel, que se utilizan según
sea necesario para controlar la anchura exacta de la
ranura. Una ranura de 1/4" se corta usando las dos
sierras exteriores. Los dientes de las sierras deben estar
posicionados de manera que el limpiador de una sierra
esté junto a los dientes de corte de la otra sierra.
Fig. 44A
Fig. 45
Fig. 46
Page 47

47
Fig. 49
CONSTRUCCIÓN DE UNA TABLA DE CANTO BISELADO
En la Fig. 49 se ilustran las dimensiones para hacer una tabla de canto biselado típica. El material con el que se construye dicha tabla
debe ser un pedazo recto de madera que no tenga nudos ni grietas. Las tablas de canto biselado se utilizan para mantener la pieza
de trabajo en contacto con el tope-guía y la mesa, y ayudan a evitar los retrocesos. Sujete con abrazaderas las tablas de canto
biselado al tope-guía y la mesa de manera que el borde de avance de dichas tablas soporte la pieza de trabajo hasta que se haya
completado el corte. Utilice tablas de canto biselado para todas las operaciones de “aserrado no pasante” en las que deba quitarse
el conjunto de protector y separador (Fig. 50). Reemplace siempre dicho conjunto de protector y separador cuando la operación de
aserrado no pasante se haya completado.
La separación
de corte debe ser
aproximadamente 1/4".
2. Coloque el juego de fresa de ranurar (D), Fig. 47, en
el eje portaherramienta de la sierra.
NOTE: LA PESTAÑA EXTERIOR DEL EJE
PORTAHERRAMIENTA NO SE PUEDE UTILIZAR
CON EL JUEGO DE FRESA DE RANURAR. APRIETE
LA TUERCA DEL EJE PORTAHERRAMIENTA
CONTRA EL CUERPO DEL JUEGO DE FRESA DE
RANURAR. NO AFLOJE LA PESTAÑA EXTERIOR
DEL EJE PORTAHERRAMIENTA. DICHA PESTAÑA
SE NECESITARÁ CUANDO SE COLOQUE DE
NUEVO UNA HOJA EN EL EJE
PORTAHERRAMIENTA.
EL ACCESORIO DE INSERCIÓN
DE LA MESA PARA EL JUEGO DE
FRESA DE RANURAR ACCESORIO (E), FIG. 47, SE
DEBE USAR EN LUGAR DEL ACCESORIO DE
INSERCIÓN DE LA MESA ESTÁNDAR.
EL CONJUNTO DE PROTECTOR
DE LA HOJA Y SEPARADOR NO
SE PUEDE UTILIZAR CUANDO SE REALICEN
OPERACIONES DE RANURADO Y SE DEBE QUITAR
O GIRAR HASTA LA PARTE TRASERA DE LA
SIERRA. TAMBIÉN SE DEBEN USAR
POSICIONADORES AUXILIARES, DISPOSITIVOS DE
FIJACIÓN, PALOS DE EMPUJAR Y TABLAS DE
CANTO BISELADO.
3. En la Fig. 48 se muestra una operación de ranurado
típica utilizando el calibre de ingletes como guía.
NO USE NUNCA LA FRESA DE
RANURAR EN UNA POSICIÓN DE BISEL.
INSTALE SIEMPRE EL
PROTECTOR DE LA HOJA DESPUÉS DE
COMPLETAR LA OPERACIÓN.
Fig. 47
Fig. 48
Page 48

48
Fig. 50
La información adicional sobre la operación
segura y apropiada de las sierras de la tabla
está disponible en el delta "Consiguiendo el la
mayoría de su tabla vio" como al libro,
catálogo No. 11-400. La información adicional
sobre la tabla consideró seguridad,
incluyendo un vídeo de la seguridad de la
sierra de la tabla, está disponible del
siguiente:
POWER TOOL INSTITUTE
1300 Sumner Avenue
Cleveland, OH 44115-2851
www.powertoolinstitute.com
GUIA LOCALIZACION DE FALLAS
SUIVRE LES RÈGLES ET CONSIGNES DE SÉCURITÉ
PROBLÈME! LA SCIE NE DÉMARRE PAS
QUEL EST LE PROBLÈME ? QUE FAIRE…
1.Scie non branchée. 1.Brancher la scie.
2.Fusible grillé ou disjoncteur déclenché.2.Remplacer le fusible ou réinitialiser le disjoncteur.
3.Cordon endommagé. 3.Faire remplacer le cordon par un centre de réparation agréé.
4.Brosses usées. 4.Faire remplacer les brosses par un centre de réparation agréé.
PROBLÈME! LES DÉCOUPES EFFECTUÉES PAR LA SCIE NE SONT PAS SATISFAISANTES
QUEL EST LE PROBLÈME ? QUE FAIRE…
1.Lame émoussée. 1.Remplacer la lame.
2.Lame montée à l’envers. 2.Inverser la lame.
3.Gomme ou résine sur la lame. 3.Retirer la lame et la nettoyer avec de la térébenthine.
4.Lame inadéquate pour le travail 4.Changer la lame.
effectué
PROBLÈME! LA LAME N’ATTEINT PAS SON PLEIN RÉGIME
QUEL EST LE PROBLÈME ? QUE FAIRE…
1.La rallonge est trop légère ou 1.La remplacer par une rallonge de taille adéquate.
trop longue.
2.Courant domestique trop faible. 2.Contacter votre fournisseur d’électricité.
PROBLÈME! LA MACHINE VIBRE DE MANIÈRE EXCESSIVE
QUEL EST LE PROBLÈME ? QUE FAIRE…
1..Le tréteau ou l’établi est sur un sol 1.Le irrégulie repositionner sur une surface plane.
2.Lame de scie endommagée. 2.Remplacer la lame.
Para obtener asistencia para su máquina, visite nuestro sitio Web en www.deltamachinery.com para tener acceso a
una lista de centros de servicio o llame a la línea de ayuda de Delta Machinery al 1-800-223-7278. (En Canadá,
llame al 1-800-463-3582.)
Page 49

49
CORTE AQUI PARA EMPUJAR
†MADERA DE 1/4" (6.4 mm)
CORTE AQUI PARA EMPUJAR
†MADERA DE 1/2" (12.7 mm)
MUESCA PARA AYUDAR
A PREVENIR QUE LA
MANO SE RESBALE
CUADROS DE 1/2"
(12.7 mm)
VARA DE EMPUJE
HAGASE DE MADERA DE 1/2" O 3/4"
(12.7 ó 19 mm) O UN ESPESOR
MENOR QUE LA ANCHURA DEL
MATERIAL A SER CORTADO.
Cuando vaya a cortar a lo largo materiales de menos de 100 mm (4 pulg.) de ancho, deber a utilizarse una vara de empuje
para completar la alimentación. La vara puede hacerse fácilmente de material descartado, siguiendo el patrón ilustrado en la
Fig. 51.
Fig. 51
CONSTRUCCIÓN DE UN PALO DE EMPUJAR
Page 50

50
MANTENIMIENTO
MANTENGA LAS HERRAMIENTAS LIMPIAS
Periódicamente sople todos los conductos de ventilación con aire seco a presión. Todas las partes de plástico deben
ser limpiadas con una tela suave y húmeda. NUNCA use solventes para limpiar las partes de plástico. Es posible que
puedan disolver o de otra manera dañar el material.
USE ANSI Z87.1 ANTEOJOS DE SEGURIDAD CUANDO USE AIRE A PRESIÓN.
FALLA DE PONERSE EN MARCHA
Si su herramienta falla de ponerse en marcha, revísela para asegurarse de que los contactos de la clavija estén en buen
contacto con el tomacorriente. También, vea si hay fusibles fundidos o ruptores abiertos en el circuito.L
LUBRICACIÓN
Esta herramienta ha sido lubricada con suficiente lubricante de alta calidad para la vida de la máquina bajo condiciones
de uso normal. La lubricación adicional no es necesaria.
SERVICIO
PIEZAS, SERVICIO O ASISTENCIA DE GARANTÍA
Todas las máquinas y accesorios Delta se fabrican conforme a altos estándares de calidad y reciben
servicio de una red de Centros de Servicio de Fábrica Porter-Cable · Delta y Estaciones de Servicio
Autorizado Delta. Para obtener la información adicional con respecto a su producto de calidad del delta
o para obtener piezas, el servicio, la ayuda de la garantía, o la localización del tomacorriente para servicio
más cercano, llaman por favor 1-800-223-7278 (en la llamada 1-800-463-3582 de Canadá).
GARANTIA
Garantía Limitada de Dos Años
Delta reparará o repondrá a gasto y opción propia cualquier máquina, pieza de maquinaria o accesorio de máquina Delta que
haya sido encontrado defectuoso en su fabricación o material durante el transcurso del uso normal, siempre que el cliente
devuelva el producto pagado por adelantado a un centro de servicio en una fábrica de Delta o autorizado por Delta dentro
de dos años y proporcione a Delta una oportunidad suficiente como para verificar el alegado defecto por inspección. Delta
puede requerir que los motores eléctricos sean devueltos con pago adelantado a la estación autorizada del fabricante del
motor para ser sometidos a inspección y reparación o reemplazo. Delta no será responsable por cualquier defecto que haya
resultado del desgaste normal, uso indebido, abuso o reparación o alteración hecha o autorizada específicamente por
cualquiera que no sea una facilidad o representante autorizado de Delta. Delta no será responsable bajo ninguna
circunstancia por daños incidentales o de consecuencia como resultado de productos defectuosos. Esta garantía es la única
garantía de Delta y establece la remediación exclusiva del cliente en lo que respecta a los productos dañados. Cualquier otra
garantía, expresa o implicada, ya sea de mercadeo, adecuación para el propósito dado o cualquier otra, es específicamente
renunciada por Delta.
Una línea completa de accesorios está disponible de su surtidor de Porter-Cable · Delta, centros de servicio de la
fábrica de Porter-Cable · Delta, y estaciones autorizadas delta. Visite por favor nuestro Web site
www.deltamachinery.com para un catálogo o para el nombre de su surtidor más cercano.
Puesto que los accesorios con excepción de ésos ofrecidos por Delta no se han probado con este
producto, el uso de tales accesorios podría ser peligroso. Para la operación más segura, solamente el delta
recomendó los accesorios se debe utilizar con este producto.
ACCESORIOS
Page 51

51
MODE D'EMPLOI
Scie d'établi motorisée
de 10 po (25,4 cm)
(SM200L)
Pour en savoir plus à propos de DELTA MACHINERY
consulter le site Web au : www.deltamachinery.com.
Pour des pièces, réparations, garantie ou toute autre demande d’aide
veuillez composer le
1-800-223-7278 (au Canada, composer le 1-800-463-3582).
491720-00 10-30-05
Copyright © 2005 Delta Machinery
Page 52

52
Lisez et comprenez tous les avertissements et directives d’utilisation avant d’utiliser un outil ou un
équipement. Lorsque vous utilisez des outils ou un équipement, des précautions de base en matière
de sécurité doivent être suivies afin de réduire le risque de blessure personnelle. Un fonctionnement, un entretien ou
une modification inappropriés des outils ou de l’équipement pourraient résulter en de graves blessures ou en des
dommages à la propriété. Certaines applications sont conçues pour des outils et de l’équipement spécifiques.
Delta Machinery recommande fortement de NE PAS modifier ce produit ou de NE PAS l’utiliser pour une application
autre que celle pour laquelle il a été conçu.
Si vous avez des questions à propos de son utilisation, N’utilisez PAS le produit avant de communiquer avec Delta Machinery et
d’obtenir nos conseils.
Pour communiquer par Internet, un formulaire est disponible en ligne au www.deltamachinery.com
Par courrier : Directeur du service technique
Delta Machinery
4825 Highway 45 North
Jackson, TN 38305 É.-U.
(AU CANADA : 125, rue Mural, bureau 300, Richmond Hill, ON, L4B 1M4)
Des informations, indiquant comment utiliser cet outil correctement et en toute sécurité, sont disponibles auprès des
sources suivantes :
Power Tool Institute
1300 Sumner Avenue, Cleveland, OH 44115-2851
www.powertoolinstitute.org
National Safety Council
1121 Spring Lake Drive, Itasca, IL 60143-3201 É.-U.
American National Standards Institute, 25 West 43rd Street, 4 floor, New York, NY 10036 É.-U. www.ansi.org
La norme ANSI 01,1 concernant les machines de travail du bois ainsi que la règlementation du département américain
du travail Department of Labor regulations www.osha.gov
DIRECTIVES DE SÉCURITÉ IMPORTANTES
CONSERVER CES DIRECTIVES !
AVERTISSEMENT
Page 53

53
Indique une situation dangereuse imminente qui, si elle n’est pas évitée, causera la mort ou des graves
blessures.
Indique une situation potentiellement dangereuse qui, si elle n’est pas évitée, pourrait causer la mort ou
de graves blessures.
Indique une situation potentiellement dangereuse qui, si elle n’est pas évitée, pourrait causer des
blessures mineures ou modérées.
Utilisé sans le symbole d’alerte à la sécurité, indique une situation potentiellement dangereuse qui, si
elle n’est pas évitée, peut résulter en des dommages à la propriété.
Il est important que vous lisiez et compreniez ce mode d’emploi. Les informations qu’il contient concernent
VOTRE SÉCURITÉ et visent à ÉVITER TOUT PROBLÈME. Les symboles ci-dessous servent à vous aider à
reconnaître cette information.
LIGNES DIRECTRICES EN MATIÈRE DE SÉCURITÉ —
DÉFINITIONS
ATTENTION
ATTENTION
AVERTISSEMENT
Certaines poussières produites par les activités de ponçage, de sciage, de meulage, de perçage et
autres activités de construction peuvent contenir des produits chimiques pouvant causer le cancer,
des anomalies congénitales ou d’autres problèmes liés aux fonctions reproductrices. Voici quelques exemples de ces
produits chimiques :
• le plomb contenu dans les peintures à base de plomb;
• la silice cristalline de la brique, du ciment et d’autres produits de maçonnerie ; et
• l’arséniate de cuivre et de chrome provenant du bois traité chimiquement.
Les risques reliés à l’exposition à ces poussières varient selon la fréquence à laquelle l’utilisateur travaille avec ce type de
matériaux. Pour réduire votre exposition à ces produits chimiques, travaillez dans un endroit bien ventilé et portez un
équipement de sécurité approuvé comme un masque anti-poussières conçu spécialement pour filtrer les particules
microscopiques.
• Éviter le contact prolongé avec les poussières produites par les activités de ponçage, sciage, meulage, perçage et autres
activités de construction. Porter des vêtements de protection et laver les parties du corps exposées avec une solution d’eau et
de savon. Le fait de laisser la poussière pénétrer dans la bouche et les yeux ou de la laisser reposer sur la peau, peut
promouvoir l’absorption de produits chimiques nocifs.
L’utilisation de cet outil peut produire et/ou disperser de la poussière, ce qui peut causer des problèmes respiratoires
graves et permanents ou d’autres problèmes médicaux. Toujours porter un appareil respiratoire approuvé par la
NIOSH/OSHA pour se protéger de la poussière. Diriger les particules loin du visage et du corps.
Porter un dispositif de protection anti-bruit pendant l’utilisation de l’outil. Dans certaines conditions et selon la durée
d’utilisation, le bruit provoqué par ce produit peut contribuer à une perte auditive.
PROPOSITION 65 DE LA CALIFORNIE
AVERTISSEMENT
Page 54

54
1. POUR SA PROPRE SÉCURITÉ, LIRE LE MODE
D’EMPLOI AVANT D’UTILISER L’OUTIL. L’apprentissage
de l’utilisation de cet outil, des restrictions, et des risques
qui lui sont propres réduit grandement la possibilité
d'accidents et de blessures.
2. PORTER DES PROTECTIONS OCULAIRE ET AUDITIVE.
TOUJOURS PORTER DES LUNETTES DE SÉCURITÉ.
Les lunettes de vue NE constituent PAS des lunettes de
sécurité. UTILISER UN ÉQUIPEMENT DE SÉCURITÉ
HOMOLOGUÉ. L'équipement de protection oculaire doit se
conformer aux normes ANSI Z87.1. L'équipement de
protection auditive doit se conformer aux normes ANSI
S3.19.
3. PORTER LES VÊTEMENTS APPROPRIÉS. Ne pas porter
de vêtement ample, ni gant, ni cravates, ni bague, ni
bracelet, ni autre bijou, car ces derniers pourraient
s’enchevêtrer dans des pièces mobiles. Le port de
chaussures antidérapantes est recommandé. Se couvrir les
cheveux s’ils sont longs.
4. NE PAS UTILISER CET OUTIL DANS UN
ENVIRONNEMENT DANGEREUX. L'utilisation d'outils
électriques dans des endroits humides ou mouillés ou sous
la pluie peut provoquer un choc électrique ou
l'électrocution. Tenir la zone de travail bien éclairée pour
éviter de trébucher ou de mettre vos bras, mains et doigts
en danger.
5. CONSERVER TOUS LES OUTILS ET MACHINES DANS
LE MEILLEUR ÉTAT POSSIBLE. S’assurer que vos outils
sont aiguisés et propres afin d’optimiser sécurité et
performance. Suivre les consignes de graissage et de
changement d’accessoires. Les outils et machines mal
entretenus peuvent s'endommager davantage et/ou
provoquer des blessures.
6. VÉRIFIER QUE LES PIÈCES NE SONT PAS
ENDOMMAGÉES. Avant d’utiliser la machine, vérifier
qu'aucune pièce n'est endommagée. Vérifier l’alignement
des pièces mobiles, la présence de grippage des pièces
mobiles, de bris de pièces et tout autre problème pouvant
nuire au fonctionnement de l’outil. Un dispositif de
protection ou toute autre pièce qui pourrait être
endommagé(e) doit être réparé(e) ou remplacé(e)
correctement. Les pièces endommagées peuvent
contribuer à endommager davantage l'appareil et/ou
provoquer des blessures.
7. GARDER LA ZONE DE TRAVAIL PROPRE. Les zones et
établis encombrés sont souvent des causes d’accidents.
8. ÉLOIGNER LES ENFANTS ET LES VISITEURS. L'atelier
représente un environnement potentiellement dangereux.
Les enfants et les visiteurs peuvent être blessés.
9. RÉDUIRE LE RISQUE DE DÉMARRAGE ACCIDENTEL.
S’assurer que l’interrupteur se trouve sur la position d’arrêt
avant de brancher le cordon d’alimentation. En cas de
panne de courant, mettre l’interrupteur sur la position
d’arrêt. Un démarrage accidentel peut provoquer des
blessures.
10. UTILISATION DES DISPOSITIFS DE PROTECTION.
Vérifier que tous les dispositifs de protection sont en place,
fixés, et qu’ils fonctionnent correctement afin de réduire tout
risque de blessure.
11. RETIRER LES CLÉS ET LES CLÉS DE RÉGLAGE.
AVANT LE DÉMARRAGE DE L'APPAREIL. Des outils,
chutes, et autres débris peuvent être projetés à grande
vitesse, provoquant des blessures.
12. UTILISATION DE L’OUTIL APPROPRIÉ. Ne pas forcer un
appareil ou un accessoire pour accomplir un travail pour
lequel il n'est pas conçu. Cela pourrait endommager
l'appareil et/ou causer des blessures.
13. UTILISATION DES ACCESSOIRES RECOMMANDÉS.
L'utilisation d'accessoires non recommandés par Delta
pourrait endommager l'appareil ou blesser l'utilisateur.
14. UTILISER LA RALLONGE APPROPRIÉE. S'assurer que la
rallonge est en bon état. En utilisant une rallonge, s'assurer
d'utiliser une rallonge assez lourde pour le transport du
courant nécessaire au fonctionnement du produit. Une
rallonge sousdimensionnée provoquera une chute de
tension menant ainsi à une perte de courant et une
surchauffe. Se reporter au tableau des rallonges électriques
pour connaître le calibre approprié à utiliser selon la
longueur de la rallonge et l’intensité nominale de la plaque
signalétique. En cas de doute, utiliser le calibre suivant le
plus gros. Plus le numéro de calibre est petit, plus la
rallonge est lourde.
15. FIXER LA PIÈCE. Utiliser des pinces ou un étau pour
maintenir la pièce lorsque c’est possible. La perte de
contrôle d'une pièce peut provoquer des blessures.
16. ACHEMINER LA PIÈCE À CONTRE-COURANT DU SENS
DE ROTATION DE LA LAME, DE LA FRAISE, OU DE LA
SURFACE ABRASIVE. En l'acheminant à contresens, la
pièce sera projetée à grande vitesse.
17. NE PAS FORCER LA PIÈCE SUR L'APPAREIL.Cela
pourrait endommager l'appareil et/ou causer des blessures.
18. NE PAS TROP TENDRE LES BRAS. Une perte d’équilibre
peut vous faire tomber sur une machine en fonctionnement
provoquant ainsi des blessures.
19. NE JAMAIS SE TENIR DEBOUT SUR L'APPAREIL. Si
l’outil bascule, ou si vous touchez accidentellement l’outil
de coupe, vous pouvez être blessé.
20. NE JAMAIS LAISSER LA MACHINE FONCTIONNER
SANS SURVEILLANCE. ÉTEINDRE L’APPAREIL. Ne pas
laisser l'appareil tant qu’il ne soit pas complètement arrêté.
Un enfant ou un visiteur pourrait être blessé.
21. ÉTEINDRE L'APPAREIL ET COUPER LE COURANT
avant d'installer ou de retirer des accessoires, avant tout
réglages ou modifications de celles-ci ou lors de réparation.
Un démarrage accidentel peut provoquer des blessures.
22. METTRE L'ATELIER À L'ÉPREUVE DES ENFANTS AVEC
DES CADENAS, DES INTERRUPTEURS PRINCIPAUX
OU EN RETIRANT LES CLÉS DE DÉMARRAGE. Le
démarrage accidentel d'un appareil par un enfant ou par un
visiteur peut causer des blessures.
23. DEMEURER VIGILANT, SURVEILLER LE TRAVAIL
EFFECTUÉ, ET FAIRE PREUVE DE JUGEMENT. NE PAS
UTILISER L'APPAREIL EN CAS DE FATIGUE OU SOUS
L’INFLUENCE DE DROGUES, D'ALCOOL, OU DE
MÉDICAMENTS. Un moment d'inattention, en utilisant des
outils électriques, peut se solder par des blessures.
24. L'UTILISATION DE CET OUTIL PEUT
PRODUIRE ET/OU DISPERSER DE LA POUSSIÈRE OU
D'AUTRES PARTICULES EN SUSPENSION, Y COMPRIS
LA POUDRE DE BOIS, LA POUSSIÈRE DE SILICE
CRISTALINE ET D'AMIANTE. Diriger les particules loin du
visage et du corps. Toujours utiliser l'outil dans des endroits
bien aérés et veiller à le dépoussiérer correctement. Utiliser
un système de dépoussiérage lorsque c’est possible.
L’exposition à la poussière peut provoquer des troubles
respiratoires graves et permanents ou d’autres blessures,
et notamment une silicose (maladie pulmonaire grave), un
cancer, ou encore la mort. Éviter de respirer la poussière et
éviter tout contact prolongé avec la poussière.
Le fait de laisser la poussière pénétrer dans la bouche et
les yeux ou de la laisser reposer sur la peau, peut
promouvoir l'absorption de produits chimiques nocifs.
Toujours porter toujours un appareil respiratoire homologué
par la NIOSH/OSHA adéquat et correctement ajusté pour
se protéger des poussières et laver les régions exposées
avec de l'eau et du savon.
AVERTISSEMENT
RÈGLES GÉNÉRALES DE SÉCURITÉ
LIRE ATTENTIVEMENT TOUTES LES MISES EN GARDE ET DIRECTIVES
D’UTILISATION AVANT D’UTILISER CET ÉQUIPEMENT. À défaut de suivre les
directives sous mentionnées, un choc électrique, un incendie, des dommages ou une blessure
corporelle grave pourraient survenir.
DIRECTIVES DE SÉCURITÉ IMPORTANTES
AVERTISSEMENT
Page 55

55
CONSERVER CES DIRECTIVES.
Les consulter souvent et les utiliser pour donner des directives aux autres.
1. NE PAS UTILISER CET OUTIL AVANT qu'il ne soit
assemblé et installé conformément aux instructions.
2. CONSULTER LE SUPERVISEUR, instructeur, ou autre
personne qualifiée si vous n'êtes pas familiarisé avec le
fonctionnement de cet outil.
3. SUIVRE TOUS LES CODES DE CÂBLAGE et les
connexions électriques recommandées.
4. UTILISER LES DISPOSITIFS DE PROTECTION
CHAQUE FOIS QUE POSSIBLE. Vérifier qu’ils sont
bien en place et fixés et fonctionnent correctement.
5. LE REBOND EST LA TENDANCE NATURELLE DE LA
PIÈCE DE REVENIR VERS L'OPÉRATEUR lorsque la
pièce entre en contact pour la première fois avec la lame
ou si la pièce pince la lame. L'effet de rebond est
dangereux et peut se solder par de graves blessures.
POUR ÉVITER L’EFFET DE REBOND :
A. maintenir la lame affûtée et libre de rouille et de résine.
B. garder le guide longitudinal parallèle à la lame de la scie.
C. utiliser le dispositif de protection de lame et dispositif
d'écartement pour toutes les opérations possibles, y
compris pour tous les débitages complets.
D. pousser la pièce au-delà de la lame de scie avant de
dégager.
E. ne jamais scier en long une pièce qui est tordue ou
voilée, ou qui n'a pas de bord droit pour glisser le long du
guide.
F. utiliser des planches en éventail lorsqu'on ne peut pas
utiliser les dispositifs anti-effet de rebond.
G. ne jamais scier une grande pièce qui ne peut pas être
contrôlée.
H. ne jamais utiliser le guide comme guide longitudinal pour
le tronçonnage.
I. ne jamais scier une pièce avec des n?uds détachés ou
autres défauts.
6. TOUJOURS UTILISER DES PARE-MAINS, UN
COUTEAU SÉPARATEUR ET DES DOIGTS ANTIEFFET DE REBOND si possible.
7. DÉGAGER LA TABLE DES PIÈCES COUPÉES ET
CHUTE avant de démarrer la scie. La vibration de
l'appareil pourrait les entraîner vers la lame de scie et les
projeter Après la coupe, éteindre la machine. Une fois la
lame complètement immobilisée, enlever tous les débris.
8. NE JAMAIS DÉMARRER L'APPAREIL avec la pièce
contre la lame.
9. NE JAMAIS acheminer la pièce entre le guide et la fraise
à moulurer.
10. LA COUPE DE PIÈCE SANS GUIDE OU DE JAUGE À
ONGLET EST CONNUE SOUS LE NOME DE COUPE
« À MAINS LIBRES ». NE JAMAIS effectuer d’opération
« à mains libres ». Utiliser soit le guide ou la jauge à
onglet pour positionner et guider le travail.
11. TENIR SOLIDEMENT LA PIÈCE contre la jauge à
onglet ou le guide.
12. LA COUPE D'UNE PIÈCE DE PART ET D'AUTRE
EST CONNUE COMME UN « DÉBITAGE COMPLET ».
Le sciage en long et le tronçonnage sont des
opérations de débitage complet. La coupe dans le sens
du grain (ou le long de la pièce) est un sciage en long.
La coupe à contrefil (ou en sens transversal) est un
tronçonnage. Utiliser un guide ou un système de guide
pour le sciage en long. NE PAS utiliser un guide ou un
système de guide pour le tronçonnage. Utiliser plutôt
une jauge à onglet. UTILISER UN (DES)
POUSSOIR(S) pour scier en long une pièce étroit.
13. ÉVITER LES OPÉRATIONS MALADROITES
ET ÉVITER DE PLACER LES MAINS À UN ENDROIT
où un glissement soudain pourrait amener la main sur
la lame.
14. GARDER LES BRAS, LES MAINS, ET LES DOIGTS
éloignés de la lame.
15. NE JAMAIS laisser de partie du corps dans le passage
de la lame de scie.
16. NE JAMAIS S'INCLINER AUTOUR ou au-dessus de la
lame de scie.
17. NE JAMAIS tenter de débloquer une lame coincée sans
éteindre l'appareil au préalable.
18. SOUTENIR CORRECTEMENT LES PIÈCES
LONGUES OU LARGES.
19. NE JAMAIS EFFECTUER D'OPÉRATIONS DE
TRAÇAGE, d'assemblage, ou de réglage sur la
table/l'espace de travail lorsque l'appareil est en
marche.
20. ÉTEINDRE L'APPAREIL ET COUPER LE COURANT
avant d'installer ou de retirer des accessoires, avant
tout réglages ou modifications de celles-ci ou lors de
réparation
21. ÉTEINDRE L'APPAREIL
ET couper le courant, et
nettoyer la table/l'espace de travail avant de quitter la
machine. VERROUILLER L'INTERRUPTEUR EN
POSITION « D’ARRÊT » pour éviter toute utilisation
non autorisée.
22. DES INFORMATIONS SUPPLÉMENTAIRES à propos
de l'utilisation sans danger et appropriée des outils
électriques (p. ex. une vidéo sur la sécurité) sont
disponibles auprès du Power Tool Institute, 1300
Sumner Avenue, Cleveland, OH É.-U. 441152851(www.powertoolinstitute.com). Des informations
sont également disponibles auprès du National Safety
Council, 1121Spring Lake Drive, Itasca, IL 60143-3201,
É.-U. Se reporter à la norme ANSI 01.01 de l'American
National Standards Institute concernant les machines
de travail du bois, ainsi que la réglementation OSHA
1910.213 du département américain du travail.
RÈGLES DE SÉCURITÉ SPÉCIFIQUES SUPPLÉMENTAIRES
LIRE ATTENTIVEMENT TOUTES LES MISES EN GARDE ET DIRECTIVES D’UTILISATION
AVANT D’UTILISER CET ÉQUIPEMENT. À défaut de suivre les directives
sous mentionnées, un choc électrique, un incendie, des dommages ou une blessure corporelle grave
pourraient survenir.
AVERTISSEMENT
Page 56

Fig. A
Fig. B
PRISE ÉLECTRIQUE MISE
À LA TERRE
LAMES
CONDUCTRICES
LA LAME DE MISE A LA TERRE EST LA PLUS
LONGUE DES TROIS LAMES
PRISE ÉLECTRIQUE MISE À LA
TERRE
MOYEN DE MISE À
LA TERRE
ADAPTATEUR
2. Pour les machines mises à la terre et branchées à
un cordon d’alimentation utilisées sur un circuit
d’alimentation de régime nominal inférieur à 150 V :
Si la machine est utilisée sur un circuit dont la prise de
courant ressemble à celle de la figure A, la machine aura
alors une fiche de mise à la terre semblable à celle de la
figure A. Un adaptateur temporaire, qui ressemble à celui
de la figure B, peut être utilisé pour connecter cette fiche à
une prise à 2 conducteurs, comme le montre la figure B, s’il
n’existe aucune prise de courant correctement mise à la
terre. L’adaptateur temporaire ne doit être utilisé que
jusqu’à ce qu’un électricien qualifié puisse installer une
prise électrique correctement mise à la terre. L’oreille rigide
et la cosse de couleur verte (et tout ensemble semblable)
dépassant de l’adaptateur doivent être connectées à une
mise à la terre permanente, telle qu’une prise correctement
mise à la terre. Chaque fois que l’adaptateur est utilisé, il
doit être maintenu en place par une vis métallique.
REMARQUE : au Canada, l’utilisation d’un adaptateur
temporaire n’est pas autorisée par le Code électrique
canadien.
RISQUE DE CHOC ÉLECTRIQUE.
DANS TOUS LES CAS, S’ASSURER QUE LA PRISE DE
COURANT EN QUESTION EST CORRECTEMENT MISE
À LA TERRE. SI VOUS N’EN ÊTES PAS SÛR,
DEMANDEZ À UN ÉLECTRICIEN PROFESSIONNEL DE
VÉRIFIER LA PRISE.
1. Pour toutes les machines mises à la terre,
branchées à un cordon d’alimentation :
En cas de défaillance ou de panne, la mise à la terre
permet un cheminement de moindre résistance pour le
courant électrique afin de réduire le risque de choc
électrique. Cette machine est munie d’un cordon
d’alimentation doté d’un conducteur de mise à la terre
d’équipement et d’une fiche de mise à la terre. La fiche doit
être branchée sur une prise de courant correspondante qui
est installée et mise à la terre conformément à tous les
codes et à toutes les ordonnances à l’échelle locale.
Ne pas modifier la fiche fournie; si elle ne s’insère pas
dans la prise de courant, faire installer une prise
appropriée par un électricien professionnel.
Si le conducteur de mise à la terre d’équipement n’est pas
correctement connecté, ceci peut provoquer un choc
électrique. Le conducteur de mise à la terre d’équipement
est le conducteur avec isolation qui a une surface
extérieure verte à rayures jaunes (ou sans). S’il est
nécessaire de faire réparer ou remplacer le cordon
électrique ou la fiche, ne pas connecter le conducteur de
mise à la terre d’équipement à une borne sous tension.
Vérifier auprès d’un électricien ou d’un personnel de
réparation professionnels si les directives de mise à la
terre ne sont pas parfaitement comprises, ou en cas de
doute sur le fait que la machine soit correctement mise à
la terre ou non.
Utiliser uniquement une rallonge à 3 fils pourvue d’une
fiche de mise à la terre à 3 lames et une prise à 3
conducteurs correspondant à la fiche de la machine,
comme le montre la fig. A.
Réparer ou remplacer immédiatement le cordon s’il est
endommagé ou usé.
AVERTISSEMENT
Un circuit électrique séparé doit être utilisé pour vos machines. Ce circuit doit utiliser un câble de calibre 12 au minimum
et doit être protégé par un fusible temporisé de 20 A. Si vous utilisez une rallonge électrique, n’utiliser que des rallonges
à 3 fils pourvues d’une fiche de mise à la terre à 3 lames et un réceptacle correspondant à la fiche de la machine. Avant
de brancher la machine sur le secteur, s’assurer que le ou les interrupteurs sont en position d’arrêt et veiller à ce que le
courant électrique ait bien les mêmes caractéristiques que celles indiquées sur la machine. Tous les branchements
doivent établir un bon contact. Si la machine fonctionne à basse tension, elle peut être endommagée.
RISQUE DE CHOC ÉLECTRIQUE. NE PAS EXPOSER LA MACHINE À LA PLUIE NI L’UTILISER
DANS UN ENDROIT HUMIDE.
CONNEXIONS ÉLECTRIQUES
Votre machine est conçue pour être alimentée par un courant alternatif de 120 volts et 60 Hz. Avant de brancher la
machine à la source d’alimentation, s’assurer que l’interrupteur est en position d’arrêt.
DIRECTIVES DE MISE À LA TERRE
RISQUE DE CHOC ÉLECTRIQUE. CETTE MACHINE DOIT ÊTRE MISE À LA TERRE LORS DE
SON UTILISATION AFIN DE PROTÉGER L’UTILISATEUR CONTRE TOUT CHOC ÉLECTRIQUE.
AVERTISSEMENT
AVERTISSEMENT
56
Page 57

57
DESCRIPTION FONCTIONNELLE
AVIS : LA PHOTO DE LA COUVERTURE DU MODE D’EMPLOI ILLUSTRE LE MODÈLE DE
PRODUCTION ACTUEL. LES AUTRES ILLUSTRATIONS DE CE MODE D'EMPLOI NE SONT
PRÉSENTES QU'À TITRE INDICATIF ET IL EST POSSIBLE QUE LA COULEUR, LES
ÉTIQUETTES, OU LES ACCESSOIRES, QUI ONT UNIQUEMENT POUR BUT D'ILLUSTRER LA
TECHNIQUE, DIFFÈRENT DES CARACTÉRISTIQUES RÉELLES DE CE MODÈLE.
AVANT-PROPOS
Le modèle SM200L ShopMaster est une scie de table de 254 mm (10 po) conçue pour vous offrir une performance de
haute qualité avec une profondeur de coupe jusqu’à 76 mm (3 po) à 90°, et 51 mm (2 po) à 45°, pour une coupe nette
des pièces de taille standard. Le modèle TS200LS de ShopMaster comprend une scie avec moteur de 13 A et 120 V, un
socle métallique, un guide longitudinal, une jauge à onglet, un pare-main de lame transparent avec couteau séparateur
et doigts anti-effet de rebond, une lame à pointes carburées de 254 mm (10 po), un insert de table et des clés de lame.
Le modèle TS200 est la même scie sans le socle.
RALLONGES ÉLECTRIQUES
Utiliser les rallonges appropriées
S'assurer que la rallonge est en bon état et qu’il s’agit
d’une rallonge à 3 fils avec une fiche de mise à la terre
à 3 broches et prise de courant compatible avec la fiche
de l'appareil. Lorsque qu’une rallonge est utilisée,
s'assurer d’en utiliser une de calibre suffisamment élevé
pour assurer le transport du courant de l'appareil. Une
rallonge sousdimensionnée provoquera une chute de
tension menant ainsi à une perte de courant et une
surchauffe. La figure C montre le bon calibre à utiliser
selon la longueur de la rallonge.
En cas de doute, utiliser le calibre suivant le plus gros.
Plus le numéro de calibre est petit, plus le cordon est
lourd.
PIÈCES POUR SCIE D'ÉTABLI
MOTORISÉE
La figure 1 illustre la scie hors de son emballage.
Les figures 2 et 3 illustrent les autres pièces emballées
avec la scie. La figure 4 illustre les autres pièces
emballées pour le socle.
Fig. 1
CONTENU DU CARTON
AVERTISSEMENT
RALLONGE DE CALIBRE MINIMUM
CALIBRES RECOMMANDÉS POUR UNE UTILISATION AVEC DES MACHINES
ÉLECTRIQUES D’ÉTABLI
Intensité Longueur totale Calibre de
nominale Volts du cordon en pieds la rallonge
0-6 120
jusqu’à
25 18 AWG
0-6 120 25-50 16 AWG
0-6 120 50-100 16 AWG
0-6 120 100-150 14 AWG
6-10 120
jusqu’à
25 18 AWG
6-10 120 25-50 16 AWG
6-10 120 50-100 14 AWG
6-10 120 100-150 12 AWG
10-12 120
jusqu’à
25 16 AWG
10-12 120 25-50 16 AWG
10-12 120 50-100 14 AWG
10-12 120 100-150 12 AWG
12-16 120
jusqu’à
25 14 AWG
12-16 120 25-50 12 AWG
12-16 120
SUPÉRIEURE À 50 PIEDS
NON RECOMMANDÉE
Fig. C
Page 58

58
1
8
9
7
10
3
6
2
4
5
Fig. 4
1. (4) Pattes
2. (24) Rondelles plates de 3/8 po (4,8 mm) pou fixer la
scie à un socle et assembler le socle
3. (4) Pattes
4. (20) Écrous hexagonaux de M8x1,25 pour fixer la
scie à un socle et assembler le socle.
5. (4) Vis hexagonales de M8x1,25x40 mm pour fixer la
scie au socle
6. (16) Boulons de carrosserie de M8x1,25x20 mm
pour assembler le socle
7. (2) Supports supérieurs avant et arrière de 18-1/2 po
(47 cm)
8. (2) Supports supérieurs latéraux de 17 po (43,2 cm)
9. (2) Supports inférieurs avant et arrière de 22 po (55,9
cm)
10. (2) Supports inférieurs latéraux de 20-3/8 po (51,3
cm)
SOCLE POUR LE MODÈLE
TS200LS SEULEMENT (figure 4)
Fig. 2
Figure 2 Pièces
1. Guide longitudinal
2. Assemble couteau séparateur/pare-main
3. Poignée de blocage pour le guide longitudinal
4. Volant pour lever ou baisser la lame
5. Jauge à onglet
6. Palier support du couteau séparateur
7. Support du couteau séparateur
8. Poignée du volant servant à lever ou baisser la lame
9. Porte-jauge à onglet
10. Attache à ressort du porte-jauge à onglet
11. Clé de la lame
Figure 3 Visserie
1. (1) Vis à tête cylindrique à dépouille M6x1x55 mm
2. (1) Vis à tête hexagonale de 1/4-20x2 po
3. (1) Vis à tête hexagonale de M6x de 1 x 20 mm
4. (2) Vis à tête hexagonale de 1/4-20 x 1/2 po
5. (1) Vis à tête plate de M6x1x12 mm
6. (1) Vis à tête cylindrique à dépouille de M4x0,7x10
mm
7. (4) Vis à tête cylindrique à dépouille de M4x2x10 mm
8. (1) Écrou hexagonal M8x1,25
9. (1) Écrou à oreilles M6x1
10. (1) Écrou hexagonal M4,7
11. (3) Rondelles plates M6,4
12. (1) Rondelle à denture intérieure de 1/4 po (6,4
mm)
13. (5) Rondelle à denture intérieure de 1/4 po (6,4
mm)
14. (4) Rondelles plates de 3/16 po (4,8 mm)
15. (1) Rondelle plate à denture extérieure de 3/16 po
(4,8 mm)
1
2
3
4
5
6
7
8
9
10
1
2
3
4
5
6
7
8
9
10
11
12
13
14
15
11
Fig. 3
Page 59

59
DÉSEMBALLAGE ET NETTOYAGE
Désemballer soigneusement la machine et toutes les pièces de ou des emballage(s) d'expédition. Retirer le revêtement
protecteur de toutes les surfaces non peintes Le revêtement peut être retiré avec un chiffon doux humidifié avec du
kérosène (ne pas utiliser d'acétone, d'essence ou de diluant à laque). Après le nettoyage, couvrir les surfaces non
peintes d’une cire à parquets d’usage domestique de bonne qualité.
ASSEMBLAGE
OUTILS NÉCESSAIRES POUR
L’ASSEMBLAGE
(Aucun n’est fourni)
* Tournevis à tête cruciforme
* Clé de 13 mm pour les boulons du socle
* Clé de 10 mm pour les boulons d’assemblage du
couteau séparateur
* Règle droite et/ou équerre de charpente pour les
réglages
DURÉE ESTIMÉE POUR L’ASSEMBLAGE : 1 heure
LA SCIE DOIT ÊTRE CORRECTEMENT FIXÉE SUR UNE SURFACE DE SUPPORT. DE MÊME, LE
TROU LAISSANT PASSER ET ENLEVANT LA SCIURE EST NÉCESSAIRE POUR EMPÊCHER
CELLE-CI DE S’ACCUMULER AUTOUR DU MOTEUR, PROVOQUANT UN RISQUE D’INCENDIE ET/OU
L'ENDOMMAGEMENT DU MOTEUR.
Fig. 4A
SURFACES DE LEVAGE ET DE SUPPORT POUR UNE SCIE SANS SOCLE
A
La scie doit être suffisamment élevée pour que la sciure
tombe par le bas de la scie sans accumulation autour du
moteur.
Positionner les quatre trous de montage à la base de
l'armoire de la scie (dont deux sont illustrés en (A) fig. 4A
sur le support que vous utiliser. Puis fixer la scie
solidement sur les supports. La scie se fixe en attachant
le socle à travers les trous de montage avec la visserie
appropriée (non fournie).
LE SUPPORT DE LA SCIE DOIT ÊTRE
STABLE ET POUVOIR SUPPORTER 136 KG (300 LBS).
Il est également possible de construire un simple support
élevé comme le montre la figure 4B.
UTILISER UN CONTREPLAQUÉ DE
BONNE QUALITÉ D'AU MOINS 19 MM (3/4 PO)
D'ÉPAISSEUR. NE PAS FABRIQUER LA PLANCHE DE
MONTAGE À PARTIR D'AGGLOMÉRÉ DE BOIS CAR
CELUI-CI SE FEND FACILEMENT.
IL FAUT PRÉVOIR UN TROU DANS CE
SUPPORT POUR LAISSER LA SCIURE TOMBER.
Aligner la scie sur la surface de support et marquer
l'emplacement pour percer quatre trous de 5/16 po (7,9
mm) (figure 4B).
S'ASSURER D'AVOIR AU MOINS
7,6 MM (3 PO) DES QUATRE CÔTÉS DE LA BASE.
Poser la scie à l'écart, puis percer des trous à
l'emplacement de ces marques.
Marquer l'emplacement d'un carré de 279 mm (11 po) ou
304 mm (12 po) de côté, au centre des quatre trous de
montage. Découper et retirer le carré (figure 4B). Pour
élever la surface de support, mesurer deux 2 x 4s (A, Fig.
4B) à la largeur de deux côtés opposés de la surface de
support. Fixer la surface de support aux bords étroits des
2X4 (comme indiqué à la figure 4B) en utilisant des vis à
bois (non fournies) dans au moins trois endroits (B) fig.
4B de chaque côté.
AVANT-TROU DE 5/16 PO
(7,9 MM)
CARRÉ DÉCOUPÉ DE
279 MM (11 PO) OU
304 MM (12 PO)
MARQUES DE
PLACEMENT DE
LA SCIE
7,6 MM (3 PO)
MINIMUM
7,6 MM
(3 PO) MINIMUM
B
B
A
7,6 MM (3 PO)
MINIMUM
7,6 MM (3 PO)
MINIMUM
Fig. 4B
Fixer la scie à la surface en insérant la visserie
convenable (non fournie) à travers les trous de
montage de la scie et dans les trous déjà percés.
Pendant l’utilisation de la scie, retirer régulièrement
l'accumulation de sciure sous la scie.
DÉBRANCHER L'APPAREIL DE LA SOURCE D’ALIMENTATION.
AVERTISSEMENT
AVERTISSEMENT
AVERTISSEMENT
AVERTISSEMENT
AVERTISSEMENT
AVERTISSEMENT
Page 60

60
ASSEMBLAGE DU SOCLE
1. Assembler le socle comme indiqué à la figure 4C avec
les 16 boulons de carrosserie de M8x1, 25x20 mm, les
rondelles plates de 3/8 po (9,5 mm) et les écrous
hexagonaux de M8x1,25. Aligner les trous des pattes
du socle (F) avec les trous des supports. Insérer le
bouton de carrosserie à travers le trou de la patte et le
trou du support, placer une rondelle plate sur le boulon
de carrosserie et enfiler un écrou hexagonal sur le
boulon de carrosserie.
Répéter la procédure pour les 15 autres trous dans les
pattes et les supports.
REMARQUE : visser lâchement la visserie pour un
réglage ultérieur.
Des lettres figurent sur les supports du socle pour faciliter
l’assemblage :
A – supports supérieurs avant et arrière
B – supports supérieurs latéraux
C – supports inférieurs latéraux
D – supports inférieurs avant et arrière
2. Fixer un pied de caoutchouc (E, fig. 4C) au bas
de chaque patte (F).
REMARQUE : chaque pied de caoutchouc est doté de
trous pour monter le socle au plancher si nécessaire.
Fig. 4D
ASSEMBLAGE DE LA SCIE SUR
SOCLE
1. Inverser la scie sur un morceau de carton pour
protéger la surface de la table. Inverser le socle
sur la scie et aligner les quatre trous du socle avec
les trous de montage de la scie.
2. Placer une rondelle plate de 3/8 po (4,6 mm) sur la
vis à tête hexagonale de M8x1,25x40 mm. Insérer la
vis à tête hexagonale à travers le trou de montage
de la scie et le trou de montage du socle. Placer une
autre rondelle plate de 3/8 po (4,6 mm) sur la vis à
tête hexagonale et enfiler un écrou hexagonal M8x
de 1,25 puis serrer lâchement. Répéter ce procédé
pour les trois autres trous.
3. Relever la scie à la verticale, comme le montre la
Fig. 4D (la scie est montrée complètement
assemblée).
4. Pousser sur le dessus de la scie pour que les pattes
du socle s'ajustent à la surface du plancher. Serrer
solidement toute la visserie.
Fig. 4C
B
A
C
F
E
D
Page 61

61
Fig. 5
Fig. 6
Fig. 7
FIXATION DU VOLANT SERVANT À RÉGLER LA HAUTEUR DE LA LAME
1. Insérer une vis à tête cylindrique à dépouille de M6x de 1 x 55 mm (D, fig. 5) à travers la poignée (E). Fixer la poignée
(E) au volant (A) en enfilant la vis (D) en sens horaire sur le volant.
2. Fixer le volant (A) fig. 6 à l'arbre (B). Aligner la partie plate de l’intérieur du volant avec la partie plate de l’arbre.
3. Fixer le volant (A) fig. 7 à l'arbre avec une vis à
tête plate M6x de 1x12 mm (C).
D
E
A
C
A
A
B
DÉBRANCHER L'APPAREIL DE LA
SOURCE D’ALIMENTATION.
ALIGNER CORRECTEMENT
L'ENSEMBLE PARE-MAIN /COUTEAU
SÉPARATEU AVEC LA LAME DE LA
SCIE POUR ÉVITER L'EFFET DE
REBOND.
1. Positionner la lame à angle droit (90°) par rapport à
la table puis la verrouiller en place.
2. Fixer le support du couteau séparateur (A) fig. 9 au
support du couteau séparateur (B) à l'aide de deux
vis à tête hexagonale de1/4-20x1/2 po (C) et deux
rondelles à denture extérieure de 1/4 po (6,4 mm)
(D).
REMARQUE : serrer lâchement la visserie pour
un réglage ultérieur.
Fig. 9
A
B
C
D
FIXATION DE L'ENSEMBLE PARE-MAIN /COUTEAU SÉPARATEUR
AVERTISSEMENT
AVERTISSEMENT
Page 62

62
Fig. 14
L
B
H
C
Fig. 10
Fig. 13Fig. 12
Fig. 11
3. Localiser la vis à tête hexagonale 1/4-20x2 po (G, fig. 10. Placer la rondelle à denture intérieure de 1/4 po (6,4 mm)
(O), la rondelle plate M6.4 (P) et la rondelle à denture extérieure de 1/4 po (6,4 mm) (R) sur la vis (G).
4. Positionner l’extrémité en retrait (E) fig. 11 du support du couteau séparateur (B) contre l’extrémité de la tige pivot
(F), puis la fixer en utilisant l'assemblage de l'ÉTAPE 3.
REMARQUE : visser lâchement la visserie pour un réglage ultérieur.
5. Positionner le couteau séparateur (H) fig. 13 contre le support du couteau séparateur en s'assurant que les deux
saillies (K) du support du couteau séparateur soient à l'intérieur de la fente du couteau (H).
R
P
O
G
F
E
G
B
K
H
6. Fixer le couteau séparateur (H) fig. 14 au support du
couteau séparateur (B). Placer une rondelle à
denture extérieure de 1/4 po (6,4 mm) et une
rondelle plate M6.4 sur une tête de vis hexagonale
M6x de 1 x 20 mm (L).
7. Insérer la vis (L) fig. 14 à travers le support du
couteau séparateur (C) et le couteau séparateur (H).
Placer une rondelle plate M6.4 et une rondelle à
denture externe de 1/4 po (6,4 mm) sur la vis (L).
Insérer un écrou à oreilles M6x de 1 (M) sur la vis (L)
fig.15. 15.
Page 63

63
Fig. 18
Fig. 15
Fig. 17Fig. 16
REMARQUE : avant de resserrer l'écrou (M) fig. 15,
s'assurer d'avoir un jeu d'au moins 3,1 mm (1/8 po)
entre le bord inférieur du couteau séparateur (N) et la
surface supérieur de la table (P) et que les saillies (K)
soient à l'intérieur de la fente de l'assemblage du
couteau séparateur (H).
8. Utiliser une règle droite pour savoir si le couteau
séparateur (H) fig. 16 est aligné avec la lame de scie
(R). Si un réglage est nécessaire, il est possible de
déplacer et de tourner le couteau séparateur (H) vers
la droite ou la gauche.
9. Lorsque le couteau séparateur est bien aligné avec la
lame de scie, resserrer les vis (C) et (G) fig. 17.
JAUGE À ONGLET
La jauge à onglet est expédiée assemblée et avec une
barre à rainure en T (A, fig. 18) insérée dans l'une des
deux rainures de la jauge à onglet à rainure à T (B) qui se
trouvent dans le dessus de la table. La rainure à T
empêche la jauge à onglet de tomber lorsqu'elle sort de
l'avant de la table lors du tronçonnage de pièces très
larges.
K
M
N
P
H
R
C
G
H
A
B
FIXATION DU PORTE-JAUGE À ONGLET
DÉBRANCHER L'APPAREIL DE LA SOURCE D’ALIMENTATION.
Fig. 19
E
A
B
Fig. 20
G
F
AVERTISSEMENT
Page 64

64
Fig. 24
Fig. 26Fig. 25
ASSEMBLAGE DU GUIDE LONGITUDINAL
1. Visser l’écrou hexagonal M8x de 1,25 (A) fig. 24 à mi-chemin sur le goujon de la poignée (B).
2. Fixer la poignée (B) fig. 24 dans le trou fileté (C) de la came du guide. Serrer l'écrou hexagonal (A) fig. 24 contre la
came (D).
3. Le guide longitudinal est généralement posé sur le côté droit de la table de la scie. Soulever la poignée de
verrouillage (B) fig. 26 et positionner le guide sur la table. Pousser sur la poignée (B) fig. 26 pour verrouiller le guide
en place.
B
A
D
C
D
B
Fig. 21
Fig. 22
Fig. 23
. Fixer l'attache à ressort (E) fig. 19 du porte-jauge à onglet (A) en utilisant une vis à tête cylindrique de M4x de 0,7
x 10 mm (F), une rondelle à denture extérieure de 3/16 po (4,8 mm), (B) et un écrou hexagonal M4x de 0,7.
REMARQUE : l'écrou hexagonal (G) fig. 20 s'ajustera dans le retrait à l'arrière du porte-jauge à onglet (A) fig. 19
pour garder l'attache à ressort (E) fixée solidement au porte-jauge à onglet.
2. Fixer le porte-jauge à onglet (A) fig. 21 au côté gauche de l'armoire de la scie à l'aide de quatre vis M4x de 0,2 x
10 mm (B) fig. 22, et de rondelles plates de 3/16 po (4,8 mm) (C) depuis l'intérieur de l'armoire de la scie.
3. La figure 23 illustre la jauge à onglet (D) insérée dans le support.
A
B
C
D
A
Page 65

65
RÉGLAGE DE LA HAUTEUR DE LA
LAME
Pour régler la hauteur de la lame de la scie, tourner le
volant (A) fig. 29. Tourner le volant en sens horaire
abaisse la lame et le tourner dans le sens antihoraire la
relève.
Fig. 29
A
PROTECTION CONTRE LES SURCHARGES
La scie est dotée d’une touche de réinitialisation (C) 28. Si le moteur s'arrête ou ne démarre pas à cause d'une
surcharge (coupe trop rapide, utilisation d'une lame émoussée, utilisation de la scie au-delà de ses capacités, etc.) ou
d'une basse tension, mettre l'interrupteur à la position d'arrêt.
Laisser refroidir le moteur pendant trois à cinq minutes. Enfoncer la touche de réinitialisation (C) pour réinitialiser le
dispositif de protection contre les surcharges. Le moteur
peut alors être redémarré normalement.
Fig. 28
Fig. 27
A
B
C
FONCTIONNEMENT
DÉMARRAGE ET ARRÊT DE LA SCIE
L'interrupteur marche/arrêt (A) fig. 27 se trouve à l'avant de l'armoire de la scie. Pour mettre la scie en marche, déplacer
l'interrupteur (A) vers le haut à la position « MARCHE » (ON). Pour mettre la scie en marche, déplacer l'interrupteur (A)
vers le haut à la position « MARCHE » (OFF).
S’ASSURER QUE L’INTERRUPTEUR SE TROUVE SUR LA POSITION D’ARRÊT AVANT DE BRANCHER
LE CORDON D’ALIMENTATION. EN CAS DE PANNE DE COURANT, METTRE L’INTERRUPTEUR SUR LA POSITION
D’ARRÊT. UN DÉMARRAGE ACCIDENTEL PEUT PROVOQUER DES BLESSURES.
VERROUILLER L’INTERRUPTEUR EN POSITION D’ARRÊT
IMPORTANT : lorsque l’outil est inutilisé, l’interrupteur doit être verrouillé en position d’arrêt afin d’empêcher
toute utilisation non autorisée. Pour ce faire, saisir la bascule de l'interrupteur (B) et la retirer de l'interrupteur (figure
28). Une fois la bascule de l’interrupteur (a) retirée, l’interrupteur ne fonctionnera pas. Cependant, si la bascule de
l’interrupteur est retirée tandis que la scie est en marche, il sera possible d’éteindre l'outil et non de le redémarrer sans
réinsérer la bascule de l’interrupteur (B).
COMMANDES ET RÉGLAGES OPÉRATIONNELS
AVERTISSEMENT
Page 66

66
Fig. 30
A
B
RÉGLAGE DE L’INCLINAISON DE LA
LAME
Pour incliner la lame de la scie, desserrer la poignée de
verrouillage (A) fig. 30, et déplacer le volant (B) jusqu'à
ce que la lame soit à l'angle voulu.Serrer la poignée de
verrouillage (A).
REMARQUE : La poignée de verrouillage (A) est à
ressort. Retirer la poignée (A) et la repositionner sur le
goujon dentelé sous la poignée.
LA POIGNÉE DE VERROUILLAGE
D'INCLINAISON DE LA LAME (A) DOIT
ÊTRE VERROUILLÉE PENDANT
TOUTES LES OPÉRATIONS DE
COUPE.
RÉGLAGE D'UNE BUTÉE FIXE À 90°
1. Lever la lame de la scie à sa hauteur maximum.
2. Desserrer la poignée de verrouillage d'inclinaison de la
lame (A) fig. 30, déplacer le mécanisme d'inclinaison de la
lame (B) aussi loin que possible vers la gauche et resserrer
la poignée de verrouillage d'inclinaison de lame (A).
3. Placer une équerre (A) fig. 31, sur la table, une de ses
extrémités contre la lame, et vérifier si la lame est
perpendiculaire à la table. Sinon, desserrer la vis (B, fig. 31)
de quelques tours et déplacer le mécanisme d'inclinaison
de lame jusqu'à ce que la lame soit perpendiculaire à la
table. Resserrer la poignée de verrouillage d'inclinaison de
la lame (A, fig. 30) et resserrer la vis (B) fig. 31 à fond.
Fig. 31
B
A
DÉBRANCHER L'APPAREIL DE LA SOURCE D’ALIMENTATION.
RÉGLAGES DES BUTÉES FIXES À 90 ET 45 DEGRÉS
La scie est dotée de butées fixes pour un positionnement rapide et précis de la lame de la scie à 90 et 45 degrés par
rapport à la table.
Fig. 32
C
A
RÉGLAGE D'UNE BUTÉE FIXE À 45 DEGRÉS
1. Lever la lame de la scie à sa hauteur maximum.
2. Desserrer la poignée de verrouillage d'inclinaison de
la lame (A) fig. 31, déplacer le mécanisme
d'inclinaison de la lame (B) aussi loin que possible
vers la gauche et resserrer la poignée de verrouillage
d'inclinaison de lame (A).
3. Placer une équerre (A) fig. 32, sur la table, une de
ses extrémités contre la lame, et vérifier si la lame
est à 45 degrés à la table. Sinon, desserrer la vis (C,
fig. 32) de quelques tours et déplacer le mécanisme
d'inclinaison de lame (B) fig. 30, jusqu'à ce que la
lame soit à 45 degrés à la table. Resserrer la poignée
de verrouillage d'inclinaison de la lame (A) fig. 30 et
resserrer la vis (C) fig. 32 à fond.
AVERTISSEMENT
AVERTISSEMENT
Page 67

67
UTILISATION ET RÉGLAGES
DU GUIDE LONGITUDINAL
1. Pour déplacer le guide longitudinal (A) fig. 33 le long
de la table, soulever le levier de verrouillage du guide,
le glisser jusqu'à l'emplacement voulu sur la table
puis pousser vers le bas sur le levier de verrouillage
du guide (B).
2. Le pointeur indique la distance entre le guide et la
lame de la scie. Si un réglage est nécessaire,
desserrer la vis (C) fig. 37 et régler.
IMPORTANT : le guide longitudinal doit être aligné
correctement par rapport à la fente de la jauge à
onglet pour éviter l'effet de rebond lors de sciage en
long.
3. La lame de scie est installée parallèlement à la fente
de la jauge à onglet en usine. Le guide longitudinal
doit être parallèle à la fente de la jauge à onglet pour
un travail précis et pour prévenir l'effet de rebond lors
de sciage en long. Pour vérifier l’alignement :
4. Positionner le guide près de la fente de la jauge à
onglet (figure 33). Installer le guide sur la table en
poussant le levier de verrouillage (B) vers le bas. Le
bord du guide devrait être parallèle à la fente de la
jauge à onglet.
5. Si un réglage est nécessaire, desserrer les deux vis
(D) fig. 33 et lever le levier de verrouillage (B).
Tenir le support du guide (F) bien fermement vers
l'avant de la scie et déplacer l'arrière du guide (A)
jusqu'à ce qu'il soit parallèle à la fente de la jauge à
onglet. Resserrer les deux vis (D) et pousser le levier
de verrouillage vers le bas (B).
6. Régler le serrage du guide (A) fig. 33 en soulevant le
levier de verrouillage (B) et en tournant la vis (E) en
sens horaire pour augmenter ou dans le sens
antihoraire pour réduire le serrage du guide.
Fig. 33
RÉGLAGE DE L'INSERT DE TABLE
1. S'assurer que l'insert de la table (A) fig. 33A, affleure
ou soit un peu sous la surface de la table (B).
2. S'il est plus haut que la surface de la table, resserrer
les deux vis de l'insert de table (C) fig. 33A pour
abaisser l'insert.
Fig. 33A
A
B
C
A
D
E
F
B
C
DÉBRANCHER L'APPAREIL DE LA
SOURCE D’ALIMENTATION.
AVERTISSEMENT
Page 68

68
UTILISATION ET RÉGLAGES DE LA
JAUGE À ONGLET
Pour le tronçonnage (lame à 90 degrés de la table la
jauge à onglet peut être utilisée dans l'une ou l'autre fente
sur la table. Pour un tronçonnage en biseau (avec la
lame inclinée) utiliser la jauge à onglet dans la fente
droite de la table uniquement pour que la lame soit
inclinée en s'éloignant de la jauge et de vos mains.
Pour utiliser la jauge à onglet, desserrer le bouton de
verrouillage (E) fig. 34, et tourner la jauge à onglet à
l'angle voulu.
Fig. 34
E
RÉGLAGE LA LAME PARALLÈLEMENT AUX FENTES DE LA JAUGE À ONGLET
À l’usine, la lame a été réglée parallèlement aux fentes de la jauge à onglet. Pour garantir une précision de coupe et
permettre d’éviter l’effet de rebond, vérifier ce réglage.
Pour effectuer un réglage :
1. Lever la lame au maximum et régler la lame de façon à ce qu'elle se trouve à 90° par rapport à la table.
2. Sélectionner une dent de la lame qui se trouve sur la gauche. Marquer cette dent à l’aide d’un crayon ou d’un
marker.
3. Placer une équerre combinée (A) fig. 35 contre la fente de la jauge à onglet et ajuster la lame (B) de l’équerre jusqu’à
ce qu’elle touche la dent marquée.
4. Tourner la lame et vérifier la même dent de lame marquée à l'arrière de la table de scie (figure 36).
DÉBRANCHER L'APPAREIL DE LA SOURCE D’ALIMENTATION.
Fig. 35
Fig. 36
B
A
Fig. 37
C
D
5. Si les mesures avant et arrière (figures 35 et 36) ne
sont pas identiques, régler la lame.
Commencer en desserrant les écrous sous les
quatre vis (C) fig. 37 sur la table. Puis desserrer les
vis (C). Déplacer soigneusement la lame de la scie
jusqu’à ce qu’elle soit parallèle à la fente de la jauge
à onglet. Puis serrer solidement quatre écrous sous
la table ainsi que les quatre vis (C) Fig. 37.
REMARQUE : S’il n’est pas possible d’effectuer un
réglage suffisant en desserrant les vis (C) fig. 37,
desserrer la vis (D) fig. 37 pour effectuer le réglage.
AVERTISSEMENT
Page 69

69
Fig. 38
1. REMARQUE : une clé de 7/8 po (22,2 mm) est
fournie avec la scie pour changer la lame.
2. Retirer l'insert de la table (A) fig. 38, et soulever la
lame de scie (F) à sa hauteur maximum.
3. Pour retirer la lame, placer la clé (D) sur le côté plat
de l'écrou d'axe (C) pour empêcher l'arbre de tourner.
Placer un morceau de bois (B) à plat sur la table
contre la lame pour qu'une dent de la lame puisse
saisir le bois et ainsi empêcher la lame de tourner.
Utiliser la clé pour tourner l'écrou de l'arbre vers
l'avant de la scie. Déposer l’écrou de l’axe, la bride de
la lame (E) et la lame de la scie.
4. Assembler la nouvelle lame, s'assurer que les dents
pointent vers le bas à l'avant de la table de la scie et
assembler la bride de lame extérieure et l'écrou d'axe.
Utiliser le morceau de bois (B) pour empêcher la lame
de tourner, resserrer l'écrou d'axe en tournant la clé
(D) vers l'arrière de la scie.
5. Replacer l'insert de la table.
F
C
E
D
B
CHANGEMENT DE LA LAME
DÉBRANCHER L'APPAREIL DE LA SOURCE D’ALIMENTATION. UTILISER UNIQUEMENT DES LAMES DE
10 PO (254 MM) DE DIAMÈTRE CONÇUES POUR FONCTIONNER À UN RÉGIME DE 4 700 TR/MIN AU
MOINS. UTILISER UNIQUEMENT DES LAMES À TROUS D’AXE DE 5/8 PO (15,87 MM).
TRONÇONNAGE
Le tronçonnage nécessite l’utilisation de la jauge à
onglet pour positionner et guider l’ouvrage. Placer la
pièce contre la jauge à onglet et pousser la jauge et la
pièce en direction de la lame de la scie comme indiqué à
la figure 39. La jauge à onglet peut servir dans l'une ou
l'autre fente de la table. Pour une coupe à biseau (lame
inclinée), utiliser la rainure de la table qui ne crée pas
l'interférence de la main ou de la jauge à onglet avec le
pare-main de la lame de la scie.
Commencer lentement la découpe et tenir fermement la
pièce contre la jauge à onglet et la table.
UNE DES RÈGLES D'UTILISATION
D'UNE SCIE : NE JAMAIS SE SUSPENDRE SUR, NI
TOUCHER LA PARTIE DE LA PIÈCE À DÉCOUPER.
Tenir la pièce supportée, et non la pièce coupée. Le
tronçonnage se poursuit jusqu’à ce que la pièce soit
coupée en deux, et que la jauge à onglet et la pièce
reviennent au point de départ. Avant de reculer la pièce,
il est préférable de donner un peu de jeu latéral au travail
pour le déplacer en l'éloignant un peu de la lame de scie.
Ne jamais ramasser de pièces courtes libres sur la table
tandis que la scie est en marche. Ne jamais toucher une
pièce découpée à moins qu'elle ne mesure au moins un
pied (305 mm) de long.
Les opérations courantes de sciage comprennent le sciage en long et le tronçonnage, ainsi que quelques autres
opérations normale de base. Comme avec tout équipement électrique, l’utilisation de l'appareil comporte certains
dangers. En utilisant cet appareil avec toute la prudence requise, le risque de blessures corporelles en sera
considérablement réduit. Toutefois, si les mesures de sécurité normales ne sont pas respectées ou complètement
ignorées, l’opérateur de l’outil peut être blessé. L'information suivante décrit la méthode appropriée et sans danger
d'exécuter les opérations les plus courantes de sciage.
L'UTILISATION D'ACCESSOIRES NON RECOMMANDÉS PAR DELTA POURRAIT PROVOQUER
DES RISQUES DE BLESSURES POUR L'UTILISATEUR OU POUR D'AUTRES.
Fig. 39
UTILISATION DE LA MACHINE
Pour une sécurité accrue et pour la commodité, ajouter à
la jauge à onglet (A) un parement auxiliaire en bois (B)
comme indiqué à la figure 39A, qui devrait être au moins
1 pouce (25,4 mm) plus haut que la profondeur
maximum de coupe et prolongé jusqu'à 12 pouces (305
mm), ou plus d'un côté ou l'autre selon la fente utilisée
pour la jauge à onglet. Ce parement en bois auxiliaire (B)
se fixe à l'avant de la jauge à onglet à l'aide de deux vis
à bois (C) à travers les trous fournis dans le corps de la
jauge à onglet et dans le parement.
AVERTISSEMENT
AVERTISSEMENT
AVERTISSEMENT
A
Page 70

70
Fig. 39A
A
C
B
Fig. 39B
B
NE JAMAIS UTILISER LE GUIDE COMME
GUIDE POUR LE TRONÇONNAGE
Pour tronçonner plusieurs pièces de même longueur, fixer un
bloc de bois (B) fig. 39B sur le guide et l'utiliser comme jauge de
coupe, comme le montre la figure 39B. Il est important de
toujours positionner ce bloc de bois devant la lame de la scie
comme indiqué. Après avoir déterminé la longueur de coupe,
fixer solidement le guide et utiliser la jauge à onglet pour
acheminer la pièce de coupe. Ce bloc de bois permet à la pièce
découpée de se déplacer librement le long de la
surface de la table sans se coincer entre le guide et la lame de
scie, réduisant ainsi la possibilité d'effet de rebond et de
blessure pour l'opérateur.
EN UTILISANT LE BLOC (B) FIG. 39B,
COMME GUIDE DE COUPE, IL EST TRÈS IMPORTANT
QUE L'EXTRÉMITÉ ARRIÈRE DU BLOC SOIT PLACÉE
POUR QUE LA PIÈCE DÉGAGE LE BLOC AVANT SON
CONTACT AVEC LA LAME.
La coupe d'une planche dans sa longueur est connue
sous le nom de sciage en long. Le guide longitudinal (A)
fig. 40 sert à positionner et à guider le travail.
Un bord de la pièce s'appuie contre le guide longitudinal
tandis que le côté plat de la planche repose sur la table.
Puisque la pièce est poussée le long du guide, il doit
avoir un bord droit et entrer solidement en contact avec
la table.
LE PARE-MAIN DE LA LAME DE SCIE
DOIT ÊTRE UTILISÉ SUR LES SCIES DELTA, LE
DISPOSITIF COMPORTE DES DOIGTS ANTI-EFFET
DE REBOND POUR PRÉVENIR L'EFFET DE REBOND
ET UN COUTEAU SÉPRATEUR POUR EMPÊCHER LE
TRAIT DE BOIS DE SE FERMER ET DE COINCER LA
LAME. S’ASSURER DE REMPLACER OU D’AFFÛTER
LES DISPOSITIFS ANTI-EFFET DE REBOND
LORSQUE LES POINTES S’ÉMOUSSENT.
TOUJOURS UTILISER UN GUIDE
LONGITUDINAL POUR UN SCIAGE EN LONG.
NE JAMAIS SCIER EN LONG À MAINS LIBRES.
SCIAGE EN LONG
1. Démarrer le moteur et avancer la pièce en le tenant
vers le bas, contre le guide. Ne jamais se mettre dans
la ligne de coupe de la scie lors d'un sciage en long.
Lorsque la largeur de la pièce pour le sciage sur le
long est de 15,2 cm (6 po) ou plus, la tenir avec les
deux mains et la guider le long du guide sous la lame
de la scie (fig. 40). La pièce devrait alors être guidée
sous la lame de la scie avec la main droite. Utiliser la
main gauche seulement pour guider la pièce. Ne pas
guider la pièce avec la main gauche. Lorsque la pièce
dépasse la lame de scie et les doigts anti-effet de
rebond, retirer les mains de la pièce.
2. Une fois la coupe effectuée, il est possible de laisser
la pièce sur la table, de l'incliner légèrement et de la
saisir par l’extrémité du pare-main arrière, ou de la
faire tomber de la table, sur le plancher.
Alternativement, il est possible d'acheminer la pièce
vers l’extrémité de la table. Par la suite, la pièce est
soulevée et acheminée le long du bord externe du
guide. La pièce coupée demeure sur la table, et ne
Fig. 40
A
Fig. 41
AVERTISSEMENT
ATTENTION
AVERTISSEMENT
AVERTISSEMENT
Page 71

71
Fig. 42
Fig. 43
LA LARGEUR MAXIMUM DE RAINURAGE
EST DE 12,7 MM (1/2 PO) POUR CETTE SCIE.
L'ENSEMBLE PARE-MAIN/COUTEAU
SÉPARATEUR NE PEUT PAS ÊTRE
UTILISÉS POUR LE RAINURAGE IL FAUT LE RETIRER
OU LE REPOUSSER VERS L'ARRIÈRE DE LA SCIE.
Avant de rainurer, desserrer l’écrou à oreilles (A) fig. 44 et
retirer l’ensemble pare-main/couteau séparateur (B).
Garder l’ensemble sous la main pour le replacer après le
rainurage.
UTILISER ÉGALEMENT DES SERRE-
JOINTS, FIXTURES, POUSSOIRS ET
PLANCHES EN ÉVENTAIL AUXILIAIRES.
FRAISE ACCESSOIRE À RAINURER
3. Si la pièce mesure moins de 6 pouces (152 mm) de
largeur, toujours utiliser un poussoir pour terminer
l'acheminement à comme indiqué à la figure 41. Le
poussoir se fabrique facilement de matériau de rebut
selon l'explication dans la section « FABRICATION
D'UN POUSSOIR ».
4. Il peut être dangereux de scier des pièces étroites en
long si cette opération n'est pas réalisée avec
prudence.
LORSQUE LA PIÈCE EST TROP
ÉTROITE POUR QU'UN POUSSOIR SOIT EFFICACE
- ET SI LA PIÈCE EST ASSEZ COURTE – UTILISER UN
CARTON POUSSOIR. POUR LE SICAGE EN LONG
D'UNE PIÈCE DE MOINS DE 2 POUCES (50,8 MM) DE
LARGEUR, LES POUSSOIRS COURANTS PEUVENT
ENTRAVER LE FONCTIONNEMENT DU PARE-MAIN.
En cas d'utilisation d'un poussoir, il faut ajouter la largeur
du carton poussoir à la largeur du guide longitudinal pour
le réglage de la position. Un carton poussoir plat se
construit comme indiqué à la figure 43 et doit être utilisé
comme indiqué à la figure 42. REMARQUE : LE
DISPOSITIF DE PROTECTION EST RETIRÉ POUR LA
CLARTÉ. TOUJOURS UTILISER LE
DISPOSITIF DE PROTECTION.
REMARQUE : certaines opérations spéciales exigent
l'ajout d'un parement en bois face au guide, selon
l'explication de la section «UTILISATION DU PAREMENT
EN BOIS AUXILIAIRE FACE AU GUIDE
LONGITUDINAL » et utilisent un poussoir.
Fig. 43A
UTILISATION DU PAREMENT EN BOIS
AUXILIAIRE FACE AU GUIDE
LONGITUDINAL
En exécutant certaines coupes spéciales – et si cette
opération peut mettre l'accessoire de coupe en contact
avec le guide – il faut ajouter un parement en bois (A) fig.
43A, d'un côté du guide longitudinal tel qu'illustré. Le
parement en bois se fixe au guide avec des vis en bois à
travers les trous percés dans le guide. Une pièce de 3/4
po (19 mm) convient pour la plupart des travaux, bien qu'à
l'occasion il faudra un parement d'un pouce (25,4 mm).
Fig. 44
A
B
A
AVERTISSEMENT
AVERTISSEMENT
AVERTISSEMENT
ATTENTION
doit pas être touchée jusqu’à ce que la lame
s'immobilise, à moins qu’il ne s’agisse d’une grande
pièce pouvant être retirée en toute sécurité. Pour scier
en long des planches de plus de trois pieds (914 mm)
de long, utiliser un support de pièce à l’arrière de la
scie afin d’empêcher la pièce de tomber hors de la
table.
TABLE DE 50,8 MM (2 PO)
BLOC
CONTREPLAQUÉ DE 19 MM
(3/4 PO)
LARGEUR DE SCIE
Page 72

72
Fig. 47
Fig. 48
Fig. 45 Fig. 46
Fig. 44A
1. Le rainurage consiste à couper une feuillure ou une
rainure large dans une pièce. La plupart des
ensembles à rainurer sont constitués de deux scies
externes et de quatre ou cinq couteaux internes
(figure 44A). Diverses combinaisons de lames et de
couteaux sont utilisées pour couper les rainures de
1/8 po à 13/16 po (3,1 à 20,6 mm) utilisées pour les
étagères, préparer des joints, des tenons, des
rainures, etc.Les couteaux sont fortement emboutis
et doivent être disposées de sorte qu'ils s'insèrent
dans les gorges des dents externes, comme le
montre la figure 45. Le chevauchement de scie et
couteau est illustré dans la figure 46, (A) est la scie
extérieure, (B) un couteau intérieur, et (C) une
rondelle ou des rondelles de papier, utilisés au
besoin pour contrôler la largeur exacte de la rainure.
Une rainure de 1/4 po (6,3 mm) est coupée avec les
deux scies extérieures. Les dents de scies doivent
être placées pour que le râteau d'une scie soit près
des dents de coupe de l'autre scie
2. Fixer l'ensemble à rainure (D, fig. 47) à l'axe de scie.
REMARQUE : LA BRIDE D'AXE EXTERNE NE PEUT
PAS ÊTRE UTILISÉE AVEC L'ENSEMBLE À
RAINURER, RESSERRER L'ÉCROU D'AXE CONTRE
LE CORPS DE L'ENSEMBLE À RAINURER.
NE PAS PERDRE LA BRIDE D’AXE EXTERNE. ELLE
SERA NÉCESSAIRE POUR FIXER DE NOUVEAU UNE
LAME SUR L'AXE.
IL FAUT UTILISER L'INSERT DE TABLE
(E, fig. 47) DE TÊTE À RAINURER EN ACCESSOIRE
AU LIEU DE L'INSERT DE TABLE STANDARD.
L’ENSEMBLE PARE-MAIN/COUTEAU
SÉPARATEUR NE PEUT PAS ÊTRE UTILISÉ POUR LE
RAINURAGE ET DOIT ÊTRE RETIRÉ OU BASCULÉ À
L'ARRIÈRE DE LA SCIE UTILISER ÉGALEMENT DES
SERRE-JOINTS, FIXTURES, POUSSOIRS ET
PLANCHES EN ÉVENTAIL AUXILIAIRES.
3. La figure 48 illustre une opération courante de
rainurage avec utilisation de la jauge à onglet comme
guide..
NE JAMAIS UTILISER LA TÊTE À
RAINURER EN POSITION DE BISEAU.
TOUJOURS INSTALLER LE PAREMAIN DE LA LAME À LA FIN DE L’OPÉRATION.
A
B
C
D
E
AVERTISSEMENT
AVERTISSEMENT
ATTENTION
ATTENTION
Page 73

73
Poussoir
Pièce en bois de 12,7
mm (1/2 po) ou 19 mm
(3/4 po) ou d'une
épaisseur inférieur
e à la
lar
geur de la pièce à
couper
Couper ici pour une pièce de
6,4 mm (1/4 po)Couper ici pour
une pièce de 6,4 mm (1/4 po)
Encoche pour
empêcher la main de
glisser
Carrés de 12,7
mm (1/2 po)
« FABRICATION D'UN POUSSOIR »
Pour scier en long une pièce de moins de 15,24 cm (4 po) de largeur, utiliser un poussoir pour terminer la coupe. Il
est facile de fabriquer un poussoir avec des déchets de découpe en suivant le patron indiqué à la figure 48B.
Fig. 48B
Couper ici pour une pièce
de 6,4 mm (1/4 po)Couper
ici pour une pièce de 12,7
mm (1/2 po)
Page 74

74
Fig. 49
Fig. 50
Le trait devrait être à 6,4 mm
(1/4 po) d'écart.
D'autre information au sujet de l'utilisation sans
danger et appropriée des scies de table se trouve
dans le guide pratique disponible auprès de Delta
“Getting the Most Out of Your Table Saw”, no. de
catalogue : 11-400. Vous pouvez obtenir d'autre
information sur la sécurité de la scie de table, y
compris une vidéo de sécurité :
POWER TOOL INSTITUTE
1300 SUMNER AVENUE
CLEVELAND, OH 44115-2851 É.-U.
WWW.POWERTOOLINSTITUTE.COM
La figure 49 illustre les dimensions utilisées pour la fabrication d’une planche en éventail typique. Utiliser une pièce de
bois droite exempte de n?uds et de fissures pour la fabrication de la planche en éventail. Elles sont utilisées pour garder
le travail en contact avec le guide et la table, tel qu'illustré à la figure 50 et aider à prévenir l'effet de rebond. Fixer les
planches en éventail sur le guide et la table de sorte que le bord d'attaque des planches en éventail soutienne l'ouvrage
tout au long de la coupe. Une planche à plat de 20,3 cm (8 po) peut être fixée au guide longitudinal et la planche en
éventail, à celle-ci.
Utiliser des planches en éventail pour toutes les opérations, hors débitage complet, pour
lesquelles l’ensemble pare-main/couteau séparateur doit être retiré. Toujours replacer
l’ensemble lorsque l'opération hors débitage complet est terminée.completed.
CONSTRUCTION D'UNE PLANCHE EN ÉVENTAIL
AVERTISSEMENT
Page 75

75
SUIVRE LES RÈGLES ET CONSIGNES DE SÉCURITÉ
PROBLÈME ! LA SCIE NE DÉMARRE PAS
QUEL EST LE PROBLÈME ? QUE FAIRE…
1.Scie non branchée. 1.Brancher la scie.
2.Fusible grillé ou disjoncteur déclenché. 2.Remplacer le fusible ou réinitialiser le disjoncteur.
3.Cordon endommagé. 3.Faire remplacer le cordon par un centre de réparation agréé.
4.Brosses usées. 4.Faire remplacer les brosses par un centre de réparation agréé.
PROBLÈME ! LES DÉCOUPES EFFECTUÉES PAR LA SCIE NE SONT PAS SATISFAISANTES
QUEL EST LE PROBLÈME ? QUE FAIRE…
1.Lame émoussée. 1.Remplacer la lame.
2.Lame montée à l’envers. 2.Inverser la lame.
3.Gomme ou résine sur la lame. 3.Retirer la lame et la nettoyer avec de la térébenthine.
4.Lame inadéquate pour le travail effectué. 4.Changer la lame.
PROBLÈME ! LA LAME N’ATTEINT PAS SON PLEIN RÉGIME
QUEL EST LE PROBLÈME ? QUE FAIRE…
1.La rallonge est trop légère ou trop longue. 1.La remplacer par une rallonge de taille adéquate.
2.Courant domestique trop faible. 2.Contacter votre fournisseur d’électricité.
PROBLÈME ! LA LAME N’ATTEINT PAS SON PLEIN RÉGIME
QUEL EST LE PROBLÈME ? QUE FAIRE…
1.Le socle ou l’établi est sur un sol 1.Le repositionner sur une surface plane.
irrégulier
2.Lame de scie endommagée. 2.Remplacer la lame.
Pour obtenir de l’aide au sujet de l’outil, consulter notre site Web www.deltamachinery.com pour obtenir une liste
des centres de réparation ou composer le 1-800-223-7278 du Centre de dépannage DELTA Machinery (au Canada,
composer le 1-800-463-3582).
DÉPANNAGE
Page 76

76
ENTRETIEN
ACCESSOIRES
GARDER LA MACHINE PROPRE
Dégager régulièrement toutes les conduites d’air avec de l’air
comprimé sec. Toutes les pièces en plastique doivent être
nettoyées à l'aide d'un chiffon doux humide.
NE JAMAIS utiliser de solvants pour nettoyer les pièces en
plastique. Les solvants peuvent dissoudre ou endommager
le matériel.
Porter des lunettes de sécurité ANSI
Z87.1 pour l'utilisation d'air comprimé.
DÉMARRAGE IMPOSSIBLE
Si l'appareil ne démarre pas, s’assurer que les lames de la
fiche du cordon d’alimentation sont bien an contac avec la
prise. Vérifier également s'il y a des fusibles grillés ou un
disjoncteur déclenché.
LUBRICATION
Appliquer chaque semaine une cire à parquets d’usage
domestique sur la table de l'appareil, sur la rallonge de table
et toute autre surface de travail.
EMPÊCHER LA FONTE DE ROUILLER
Utiliser les produits suivants pour nettoyer et protéger les
tables en fonte contre la rouille : un plateau-poussoir de
rainureuse, une feuille de papier à poncer Scotch-Brite™
moyen, une boîte de WD-40® et une boîte de dégraissant et
boîte d'aérosol TopCote®. Appliquer le WD-40 et polir la
surface de la table avec le papier à poncer Scotch-Brite, en
utilisant le plateau-poussoir comme serre-flan. Dégraisser la
table, puis appliquer le TopCote® convenablement.
RÉPARATION
GARANTIE
Garantie limitée de deux ans sur nouveaux produits
Delta réparera ou remplacera, à ses frais et à sa discrétion, toute nouvelle machine Delta, pièce de rechange ou tout
accessoire qui, dans des circonstances d'utilisation normale, s'est avéré défectueux en raison de défauts de matériau ou
de fabrication, à condition que le client retourne le produit (transport payé d'avance) au centre de réparation de l'usine
Delta ou à un centre de réparation autorisé accompagné d'une preuve d'achat et dans les deux ans de la date d'achat du
produit, et fournisse à Delta une opportunité raisonnable de vérifier le défaut présumé par une inspection. La période de
garantie des produits Delta réusinés est de 180 jours. Delta peut demander que les moteurs électriques soient retournés
(transport payé d'avance) à un centre de réparation autorisé du fabricant du moteur en vue d'une inspection, d'une
réparation ou d'un remplacement. Delta ne peut être tenu pour responsable des défauts résultants de l'usure normale, de
la mauvaise utilisation, de l'abus, de la réparation ou de la modification du produit, sauf en cas d'autorisation spécifique
d'un centre de réparation ou d'un représentant Delta autorisé. En aucune circonstance Delta ne peut être tenu pour
responsable des dommages accidentels ou indirects résultant d'un produit défectueux. Cette garantie constitue la seule
garantie de Delta et le recours exclusif des clients en ce qui concerne les produits défectueux; toutes les autres garanties,
expresses ou implicites, de qualité marchande, d'adéquation à un usage particulier, ou autre, sont expressément déclinées
par Delta.
Une gamme complète d’accessoires est disponible auprès de votre fournisseur Delta, centres de réparation de l’usine
Porter-Cable - Delta et centres de réparation agréés Delta. Veuillez consulter le site Web www.deltamachinery.com
pour un catalogue ou le nom du fournisseur le plus près de chez vous.
Puisque les accessoires autres que ceux offerts par Delta n’ont pas été testés avec ce
produit, l’utilisation de ceux-ci pourrait s’avérer dangereux. Pour un fonctionnement en
toute sécurité, utiliser seulement les accessoires recommandés Delta avec ce produit.
AVERTISSEMENT
PIÈCES RÉPARATION OU AIDE À PROPOS DE LA GARANTIE
Tous les outils et accessoires Delta sont fabriqués selon des normes de qualité élevées et sont réparés par un réseau
de centres de réparation de l’usine Porter-Cable — Delta et de centres de réparation agréés Delta. Pour de plus amples
renseignements à propos de vos produits de qualité Delta ou pour l’obtention de pièces, réparations, aide à la garantie
ou l’emplacement du centre de réparation le plus près de chez vous, composer le 1-800-223-7278 (au Canada,
composer le 1-800-463-3582).
Page 77

The following are trademarks of PORTER-CABLE •DELTA (Las siguientes son marcas registradas de PORTER-CABLE • DELTA S.A.) (Les marques suivantes
sont des marques de fabriquant de la PORTER-CABLE •DELTA): Auto-Set®, BAMMER®, B.O.S.S.®, Builder’s Saw®, Contractor’s Saw®, Contractor’s Saw II™,
Delta®, DELTACRAFT®, DELTAGRAM™, Delta Series 2000™, DURATRONIC™, Emc≈™, FLEX®, Flying Chips™, FRAME SAW®, Grip Vac™, Homecraft®,
INNOVATION THAT WORKS®, Jet-Lock®, JETSTREAM®, ‘kickstand®, LASERLOC®, MICRO-SET®, Micro-Set®, MIDI LATHE®, MORTEN™, NETWORK™,
OMNIJIG®, POCKET CUTTER®, PORTA-BAND®, PORTA-PLANE®, PORTER-CABLE®&(design), PORTER-CABLE®PROFESSIONAL POWER TOOLS, PORTERCABLE REDEFINING PERFORMANCE™, Posi-Matic®, Q-3®&(design), QUICKSAND®&(design), QUICKSET™, QUICKSET II®, QUICKSET PLUS™,
RIPTIDE™&(design), SAFE GUARD II®, SAFE-LOC®, Sanding Center®, SANDTRAP®&(design), SAW BOSS®, Sawbuck™, Sidekick®, SPEED-BLOC®,
SPEEDMATIC®, SPEEDTRONIC®, STAIR EASE®, The American Woodshop®&(design), The Lumber Company®&(design), THE PROFESSIONAL EDGE®, THE
PROFESSIONAL SELECT®, THIN-LINE™, TIGER®, TIGER CUB®, TIGER SAW®, TORQBUSTER®, TORQ-BUSTER®, TRU-MATCH™, TWIN-LITE®, UNIGUARD®,
Unifence®, UNIFEEDER™, Unihead®, Uniplane™, Unirip®, Unisaw®, Univise®, Versa-Feeder®, VERSA-PLANE®, WHISPER SERIES®, WOODWORKER’S
CHOICE™.
Trademarks noted with ™ and ® are registered in the United States Patent and Trademark Office and may also be registered in other countries. Las Marcas
Registradas con el signo de ™ y ® son registradas por la Oficina de Registros y Patentes de los Estados Unidos y también pueden estar registradas en otros
países. Les marques de commerce affichant les symboles ™ et ® sont enregistrées auprès du United States Patent and Trademark Office et peuvent être
enregistrées dans d’autres pays. Printed in China
PORTER-CABLE · DELTA SERVICE CENTERS
(CENTROS DE SERVICIO DE PORTER-CABLE · DELTA)
(CENTRES DE RÉPARATION PORTER-CABLE ·DELTA)
Parts and Repair Service for Porter-Cable ·Delta Machinery are Available at These Locations
(Obtenga Refaccion de Partes o Servicio para su Herramienta en los Siguientes Centros de Porter-Cable ·Delta)
(Des pièces et des centres de réparation de Porter-Cable Delta sont disponibles à ces emplacements)
Authorized Service Stations are located in many large cities. Telephone 800-438-2486 or 731-541-6042 for assistance locating one.
Parts and accessories for Porter-Cable·Delta products should be obtained by contacting any Porter-Cable·Delta Distributor,
Authorized Service Center, or Porter-Cable·Delta Factory Service Center. If you do not have access to any of these, call 800-223-7278
and you will be directed to the nearest Porter-Cable·Delta Factory Service Center. Las Estaciones de Servicio Autorizadas están
ubicadas en muchas grandes ciudades. Llame al 800-438-2486 ó al 731-541-6042 para obtener asistencia a fin de localizar una. Las
piezas y los accesorios para los productos Porter-Cable·Delta deben obtenerse poniéndose en contacto con cualquier distribuidor
Porter-Cable·Delta, Centro de Servicio Autorizado o Centro de Servicio de Fábrica Porter-Cable·Delta. Si no tiene acceso a ninguna
de estas opciones, llame al 800-223-7278 y le dirigirán al Centro de Servicio de Fábrica Porter-Cable·Delta más cercano.
Des centres de réparation agréés sont situés dans plusieurs grandes villes. Pour repérer un centre, composer le 800-438-2486 ou le
731-541-6042. Communiquer avec un distributeur, un centre de réparation agréé ou un centre de réparation de l’usine Porter-Cable
Delta pour obtenir toutes pièces ou accessoires pour tous produits Porter-Cable Delta. Si aucun n’est disponible, composer le
800-223-7278 et vous serez redirigés vers le centre de réparation de l'usine Porter-Cable Delta le plus près de chez vous.
ARIZONA
Phoenix 85013-2906
4501 N. 7th Ave.
Phone: (602) 279-6414
Fax: (602) 279-5470
CALIFORNIA
Ontario 91761 (Los Angeles)
3949A East Guasti Road
Phone: (909) 390-5555
Fax: (909) 390-5554
San Diego 92111
7290 Clairemont Mesa Blvd.
Phone: (858) 279-2011
Fax: (858) 279-0362
San Leandro 94577 (Oakland)
3039 Teagarden Street
Phone: (510) 357-9762
Fax: (510) 357-7939
COLORADO
Denver 80223
700 West Mississippi Ave.
Phone: (303) 922-8325
Fax: (303) 922-0245
FLORIDA
Davie 33314 (Miami)
4343 South State Rd. 7 (441)
Unit #107
Phone: (954) 321-6635
Fax: (954) 321-6638
Tampa 33634
4909 West Waters Ave.
Phone: (813) 884-0434
Fax: (813) 888-5997
GEORGIA
Forest Park 30297 (Atlanta)
5442 Frontage Road,
Suite 112
Phone: (404) 608-0006
Fax: (404) 608-1123
ILLINOIS
Addison 60101 (Chicago)
400 South Rohlwing Rd.
Phone: (630) 424-8805
Fax: (630) 424-8895
KANSAS
Overland Park 66214
9201 Quivira Road
Phone: (913) 495-4330
Fax: (913) 495-4378
MARYLAND
Elkridge 21075 (Baltimore)
7397-102 Washington Blvd.
Phone: (410) 799-9394
Fax: (410) 799-9398
MASSACHUSETTS
Franklin 02038 (Boston)
Franklin Industrial Park
101E Constitution Blvd.
Phone: (508) 520-8802
Fax: (508) 528-8089
MICHIGAN
Madison Heights 48071 (Detroit)
30475 Stephenson Highway
Phone: (248) 597-5000
Fax: (248) 597-5004
MINNESOTA
Eden Prairie 55344
9709 Valley View Road
Phone: (952) 884-9191
Fax: (952) 884-3750
MISSOURI
St. Louis 63146
11477 Page Service Drive
Phone: (314) 997-9100
Fax: (314) 997-9183
NEW YORK
Flushing 11365-1595 (N.Y.C.)
175-25 Horace Harding Expwy.
Phone: (718) 225-2040
Fax: (718) 423-9619
NORTH CAROLINA
Charlotte 28270
9129 Monroe Road, Suite 115
Phone: (704) 841-1176
Fax: (704) 708-4625
OHIO
Columbus 43229
1948 Schrock Road
Phone: (614) 895-3112
Fax: (614) 895-3187
Parma Heights OH 44130
6485 Pearl Road
Phone: (440) 842-9100
Fax: (440) 884-3430
OREGON
Portland 97230
14811 North East Airport Way
Phone: (503) 255-6556
Fax: (503) 255-6543
PENNSYLVANIA
Willow Grove 19090
(Philadelphia)
520 North York Road
Phone: (215) 658-1430
Fax: (215) 658-1433
TEXAS
Carrollton 75006 (Dallas)
1300 Interstate 35 N, Suite 112
Phone: (972) 446-2996
Fax: (972) 446-8157
Houston 77022-2122
536 East Tidwell Rd.
Phone: (713) 692-7111
Fax: (713) 692-1107
WASHINGTON
Auburn 98001(Seattle)
3320 West Valley HWY, North
Building D, Suite 111
Phone: (253) 333-8353
Fax: (253) 333-9613
CANADIAN PORTER-CABLE · DELTA SERVICE CENTERS
CENTROS DE MANTENIMIENTO DELTA DE PORTER-CABLE DE CANADÁ
CENTRES CANADIENS DE RÉPARATION PORTER-CABLE DELTA
ALBERTA
Bay 6, 2520-23rd St. N.E.
Calgary, Alberta
T2E 8L2
Phone: (403) 735-6166
Fax: (403) 735-6144
BRITISH COLUMBIA
8520 Baxter Place
Burnaby, B.C.
V5A 4T8
Phone: (604) 420-0102
Fax: (604) 420-3522
MANITOBA
1699 Dublin Avenue
Winnipeg, Manitoba
R3H 0H2
Phone: (204) 633-9259
Fax: (204) 632-1976
ONTARIO
505 Southgate Drive
Guelph, Ontario
N1H 6M7
Phone: (519) 767-4132
Fax: (519) 767-4131
QUÉBEC
1515 ave.
St-Jean Baptiste, Suite 160
Québec, Québec
G2E 5E2
Phone: (418) 877-7112
Fax: (418) 877-7123
1447, Begin
St-Laurent, (Montréal),
Québec
H4R 1V8
Phone: (514) 336-8772
Fax: (514) 336-3505
 Loading...