

Page 1

Vigor2800 Series
ADSL2/2+ Security Router
User’s Guide
Version: 3.1
Date: 2006/6/20
Copyright 2006 All rights reserved.
This publication contains information that is protected by copyright. No part may be reproduced, transmitted,
transcribed, stored in a retrieval system, or translated into any language without written permission from the copyright
holders. The scope of delivery and other details are subject to change without prior notice.
Microsoft is a registered trademark of Microsoft Corp.
Windows, Windows 95, 98, Me, NT, 2000, XP and Explorer are trademarks of Microsoft Corp.
Apple and Mac OS are registered trademarks of Apple Computer Inc.
Other products may be trademarks or registered trademarks of their respective manufacturers.
Page 2

TTaabbllee ooff CCoonntteennttss
1
Preface ...............................................................................................................1
1.1 LED Indicators and Connectors.............................................................................................. 1
1.1.1 For Vigor2800................................................................................................................... 2
1.1.2 For Vigor2800G................................................................................................................ 3
1.1.3 For Vigor2800i.................................................................................................................. 4
1.1.4 For Vigor2800Gi ............................................................................................................... 5
1.1.5 For Vigor2800V................................................................................................................. 6
1.1.6 For Vigor2800VG.............................................................................................................. 7
1.1.7 For Vigor2800VGi............................................................................................................. 8
1.2 Hardware Installation .............................................................................................................. 9
2
Configuring Basic Settings ............................................................................11
2.1 Changing Password...............................................................................................................11
2.2 Quick Start Wizard................................................................................................................ 13
3
2.2.1 Adjusting Protocol/Encapsulation................................................................................... 13
2.2.2 PPPoE/PPPoA................................................................................................................ 14
2.2.3 Bridged IP....................................................................................................................... 16
2.2.4 Routed IP........................................................................................................................ 17
2.3 Online St atus......................................................................................................................... 18
2.4 Saving Configuration............................................................................................................. 20
A d v a n c e d We b C o n f i g u r at i o n..................................................................................21
3.1 Internet Access...................................................................................................................... 21
3.1.1 Basics of Internet Protocol (IP) Network......................................................................... 21
3.1.2 PPPoE/PPPoA................................................................................................................ 22
3.1.3 MPoA (RFC1483/2684).................................................................................................. 26
3.1.4 Multi-PVCs...................................................................................................................... 28
3.2 LAN ....................................................................................................................................... 29
3.2.1 Basics of LAN ................................................................................................................. 29
3.2.2 General Setup................................................................................................................. 31
3.2.3 Static Route.................................................................................................................... 33
3.3 NAT ....................................................................................................................................... 36
3.3.1 Port Redirection.............................................................................................................. 37
3.3.2 DMZ Host........................................................................................................................ 38
3.3.3 Open Ports...................................................................................................................... 40
3.4 Firewall.................................................................................................................................. 42
3.4.1 Basics for Firewall........................................................................................................... 42
3.4.2 General Setup................................................................................................................. 45
3.4.3 Filter Setup ..................................................................................................................... 46
ii
Vigor2800 Series User’s Guide
Page 3

3.4.4 IM Blocking ..................................................................................................................... 50
3.4.5 P2P Blocking .................................................................................................................. 50
3.4.6 DoS Defense .................................................................................................................. 51
3.4.7 URL Content Filter.......................................................................................................... 53
3.4.8 Web Content Filter.......................................................................................................... 56
3.4.9 Bind IP to MAC............................................................................................................... 57
3.5 Bandwidth Management....................................................................................................... 58
3.5.1 Limit Session .................................................................................................................. 58
3.5.2 Limit Bandwidth .............................................................................................................. 60
3.5.3 Quality of Service............................................................................................................ 61
3.6 Applications........................................................................................................................... 67
3.6.1 Dynamic DNS................................................................................................................. 67
3.6.2 Schedule......................................................................................................................... 69
3.6.3 RADIUS.......................................................................................................................... 70
3.6.4 UPnP............................................................................................................................... 72
3.6.5 Wake On LAN................................................................................................................. 74
3.7 VPN and Remote Access...................................................................................................... 75
3.7.1 Remote Access Control.................................................................................................. 75
3.7.2 PPP General Setup ........................................................................................................ 75
3.7.3 IPSec General Setup...................................................................................................... 77
3.7.4 IPSec Peer Identity......................................................................................................... 78
3.7.5 Remote User Profiles......................................................................................................80
3.7.6 LAN to LAN..................................................................................................................... 83
3.7.7 Connection Management................................................................................................ 90
3.8 Certificate Management........................................................................................................ 90
3.8.1 Local Certificate.............................................................................................................. 91
3.8.2 Trusted CA Certificate ....................................................................................................92
3.9 VoIP....................................................................................................................................... 94
3.9.1 DialPlan .......................................................................................................................... 96
3.9.2 SIP Accounts.................................................................................................................. 99
3.9.3 Phone Settings ............................................................................................................. 102
3.9.4 Status............................................................................................................................ 112
3.10 ISDN...................................................................................................................................113
3.10.1 General Setup............................................................................................................. 114
3.10.2 Dialing to a Single ISP................................................................................................ 115
3.10.3 Dialing to Dual ISPs.................................................................................................... 116
3.10.4 Virtual TA.................................................................................................................... 116
3.10.5 Call Control................................................................................................................. 120
3.1 1 Wireless LAN..................................................................................................................... 121
3.11.1 Basic Concepts........................................................................................................... 121
3.11.2 General Settings......................................................................................................... 124
3.11.3 Security....................................................................................................................... 126
3.11.4 Access Control............................................................................................................ 128
3.11.5 WDS............................................................................................................................ 129
3.11.6 AP Discovery.............................................................................................................. 131
3.11.7 Station List.................................................................................................................. 132
3.11.8 Station Rate Control ................................................................................................... 133
3.12 VLAN................................................................................................................................. 133
3.12.1 Wired VLAN................................................................................................................ 133
3.12.2 Wireless VLAN............................................................................................................ 134
3.12.3 VLAN Cross Setup...................................................................................................... 137
3.12.4 Wired Rate Control..................................................................................................... 139
Vigor2800 Series User’s Guide
iii
Page 4

3.12.5 Wireless Rate Control................................................................................................. 140
3.13 System Maintenance......................................................................................................... 141
3.13.1 System Status............................................................................................................. 141
3.13.2 Administrator Password.............................................................................................. 142
3.12.3 Configuration Backup ................................................................................................. 142
3.13.4 Syslog/Mail Alert......................................................................................................... 144
3.13.5 Time and Date............................................................................................................ 146
3.13.6 Management............................................................................................................... 147
3.13.7 Reboot System........................................................................................................... 148
3.13.8 Firmware Upgrade...................................................................................................... 149
3.14 Diagnostics........................................................................................................................ 150
3.14.1 WAN Connection........................................................................................................ 150
3.14.2 Dial-out Trigger........................................................................................................... 151
3.14.3 Routing Table ............................................................................................................. 151
3.14.4 ARP Cache Table....................................................................................................... 152
3.14.5 DHCP Table................................................................................................................ 152
3.14.6 NAT Sessions Table................................................................................................... 153
3.14.7 ADSL Spectrum Analysis............................................................................................ 154
3.14.8 Wireless VLAN Online Station Table.......................................................................... 155
3.14.9 Ping Diagnosis............................................................................................................ 155
3.14.10 Data Flow Monitor..................................................................................................... 156
3.14.11 Trace Route.............................................................................................................. 157
4
5
Application and Examples............................................................................159
4.1 Create a LAN-to-LAN Connection Between Remote Office and Headquarter................... 159
4.2 Create a Remote Dial-in User Connection Between the Teleworker and Headquarter...... 166
4.3 QoS Setting Example.......................................................................................................... 170
4.4 LAN – Created by Using NAT ............................................................................................. 172
4.5 Calling Scenario for VoIP function ...................................................................................... 175
4.5.1 Calling via SIP Sever.................................................................................................... 175
4.5.2 Peer-to-Peer Calling..................................................................................................... 177
4.6 Upgrade Firmware for Y our Router..................................................................................... 178
4.7 Request a certificate from a CA server on Windows CA Server......................................... 180
4.8 Request a CA Certificate and Set as Trusted on Windows CA Server............................... 184
Trouble Shooting...........................................................................................187
5.1 Checking If the Hardware Status Is OK or Not....................................................................187
5.2 Checking If the Network Connection Settings on Your Computer Is OK or Not................. 187
iv
5.3 Pinging the Router from Your Computer............................................................................. 190
5.4 Checking If the ISP Settings are OK or Not........................................................................ 191
5.5 Backing to Factory Default Setting If Necessary ................................................................ 193
5.6 Contacting Your Dealer ....................................................................................................... 193
Vigor2800 Series User’s Guide
Page 5

1
Prreeffaaccee
P
Targeting requirement for residential, SOHO (Small Office and Home Office) and business
users, the Vigor2800 series is an ADSL2/2+ enabled integrated access device. With
downstream speed up to 12Mbps (ADSL2) or 24Mbps (ADSL2+), the Vigor2800 V models
provide exceptional bandwidth for Internet access.
To secure your network, the Vigor2800 series provides an advanced firewall with advanced
features, such as NAT with multi VPN pass-through, Stateful Packet Inspection (SPI) to
offer network reliability by detecting and prohibiting malicious penetrating packets,
user-configurable web filtering for parental control against network abuse etc.
Vigor2800 series is embedded with an 802.11g compliant wireless module which provides
wireless LAN access with data rate as much as 108Mpbs, SuperG. As for data privacy of
wireless network, the Vigor2800 series can encode all transmissions data with standard WEP
and industrial strength WPA2 (IEEE 802.11i) encryption. Additional features include
Wireless Client List and MAC Address Control for maintaining control over user’s
authorization in your network, and Hidden SSID for being invisible to outside intruders
scanning.
11..11 LLEEDD IInnddiiccaattoorrss aanndd CCoonnnneeccttoorrss
Before you use the Vigor router, please get acquainted with the LED indicators and
connectors first.
The displays of LED indicators and connectors for the routers are different slightly. The
following sections will introduce them respectively.
Vigor2800 Series User’s Guide
1
Page 6

11..11..11 FFoorr VViiggoorr22880000
ACT
Printer
LLEEDD EExxppllaannaattiioonn
LED Status Explanation
ACT
(Activity)
VPN On The VPN tunnel is launched.
DSL On The ADSL, ADSL2/2+ line is connected.
Printer On The USB interface printer is ready.
LAN (P1, P2,
P3, P4)
QoS
P2P
PWR
Firewall VPN
DSL
Printer
Blinking
On
On The QoS function is active. QoS
Off The QoS function is inactive.
On The P2P function is active. P2P
Blinking Starts to prohibit P2P data.
Orange A normal 10Mbps connection is through its
Green A normal 100Mbps connection is through its
Blinking Ethernet packets are transmitting.
The router is powered on and running properly.
The router is powered on.
corresponding port.
corresponding port.
LAN
P1 P2 P3 P4
P4
P1P2P3
DSL
Factory
Reset
CCoonnnneeccttoorr EExxppllaannaattiioonn
Interface Description
Printer Connecter for a USB printer.
PWR Connecter for a power adapter with 12-15VDC.
ON/OFF Power Switch.
LAN P4 – P1 Connecters for local networked devices.
DSL Connecter for accessing Internet with the ADSL,ADSL2/2+ line
Factory Reset Restore the default settings.
Usage: Turn on the router (ACT LED is blinking). Press the hole and
keep for more than 5 seconds. When you see the ACT LED begins to
blink rapidly than usual, release the button. Then the router will restart
with the factory default configuration.
2
Vigor2800 Series User’s Guide
Page 7
11..11..22 FFoorr VViiggoorr22880000GG
QoS
ACT
Printer
LLEEDD EExxppllaannaattiioonn
LED Status Explanation
ACT (Activity)
QoS
P2P
WLAN
DSL
Printer
LAN (P1, P2,
P3, P4)
P2P
PWR
Firewall WLAN
Printer
DSL P1P2 P3P4
Blinking The router is powered on and running properly.
On The router is powered on.
On The QoS function is active.
Off The QoS function is inactive.
On The P2P function is active.
Blinking Starts to prohibit P2P data.
On The DoS function is enabled. Firewall
Blinking When encountered DoS attacks.
On Wireless access point is ready.
Blinking Wireless traffic goes through.
Off Wireless access point is turned off.
On The ADSL, ADSL2/2+ line is connected.
On The USB interface printer is ready.
Orange A normal 10Mbps connection is through its corresponding
port.
Green A normal 100Mbps connection is through its corresponding
port.
Blinking Ethernet packets are transmitting.
LAN
Factory
P4
P1P2P3
DSL
Reset
CCoonnnneeccttoorr EExxppllaannaattiioonn
Interface Description
Printer Connecter for a USB printer.
PWR Connecter for a power adapter with 12-15VDC.
ON/OFF Power Switch.
LAN P4 – P1 Connecters for local networked devices.
DSL Connecter for accessing Internet with the ADSL,ADSL2/2+ line
Factory Reset Restore the default settings.
Vigor2800 Series User’s Guide
Usage: Turn on the router (ACT LED is blinking). Press the hole and keep for
more than 5 seconds. When you see the ACT LED begins to blink rapidly than
usual, release the button. Then the router will restart with the factory default
configuration.
3
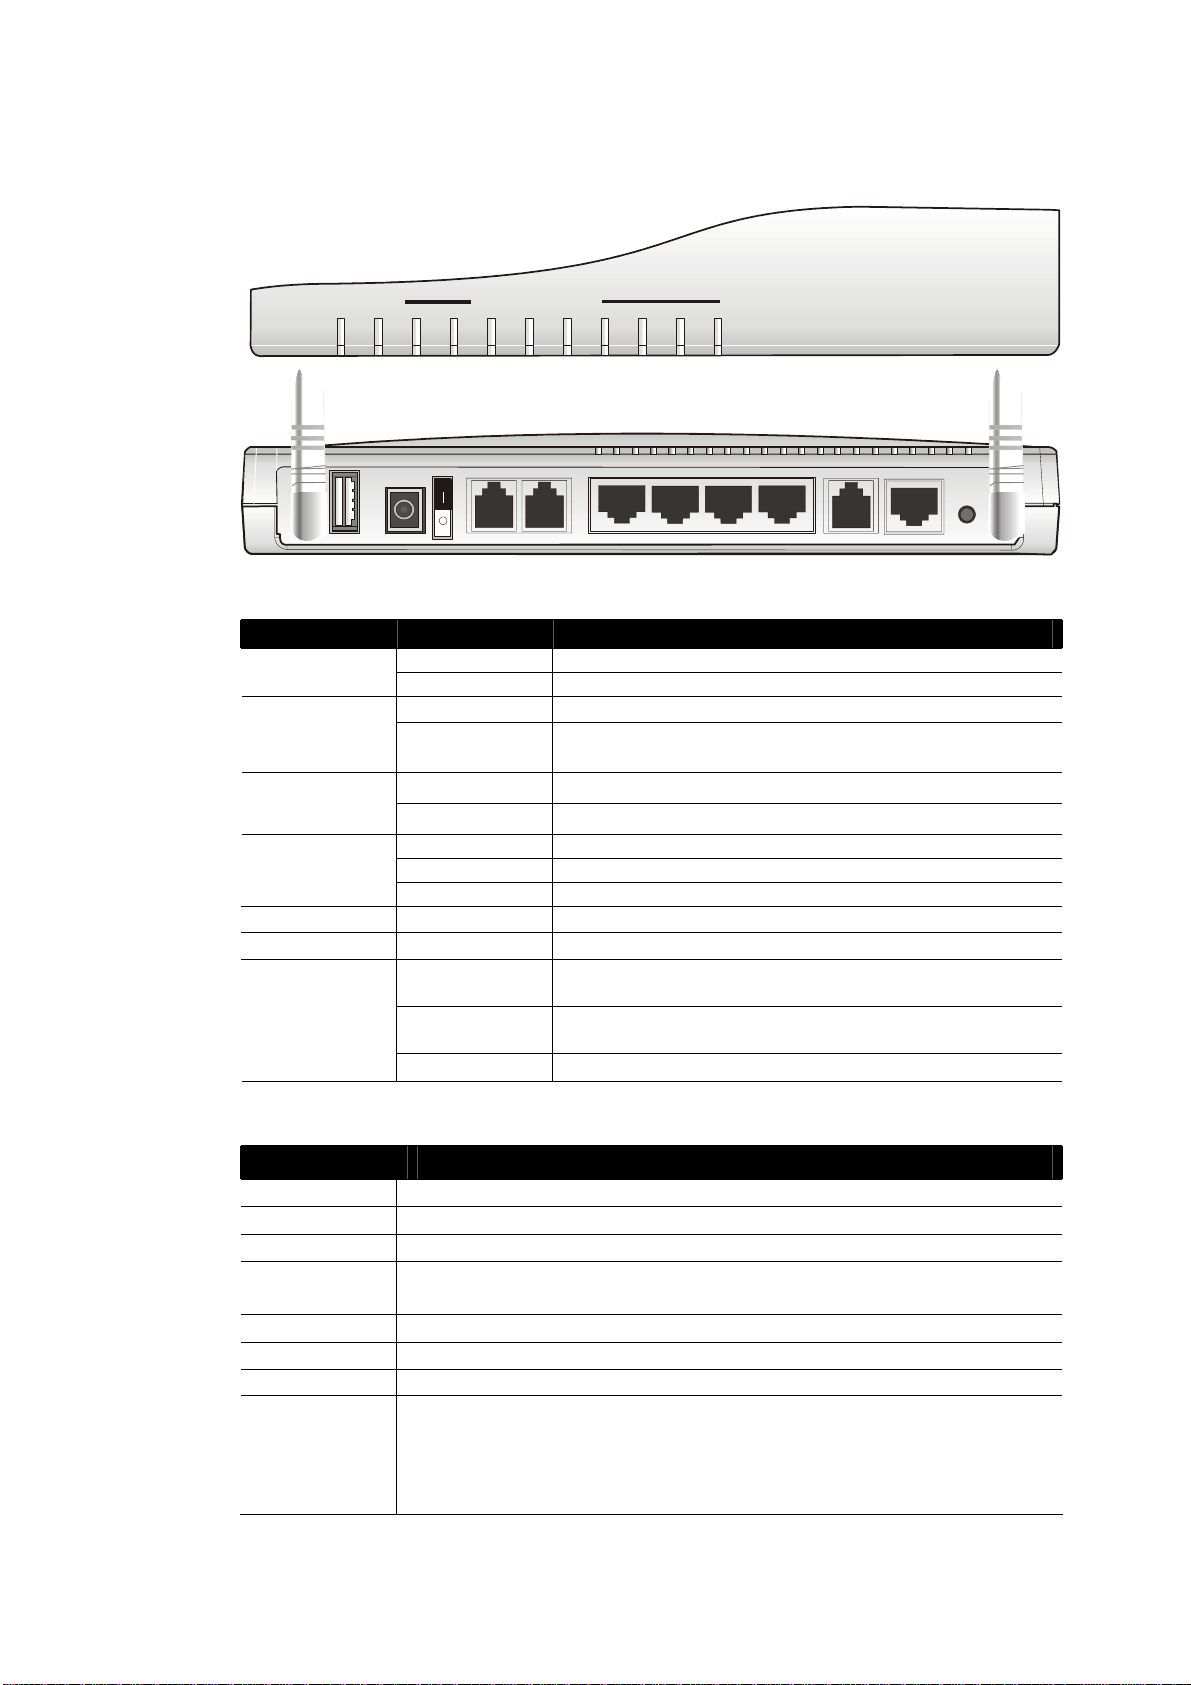
Page 8

A
11..11..33 FFoorr VViiggoorr22880000ii
CT ISDN
Printer
LLEEDD EExxppllaannaattiioonn
LED Status Explanation
ACT
(Activity)
ISDN
VPN On The VPN tunnel is launched.
DSL On The ADSL, ADSL2/2+ line is connected.
Printer On The USB interface printer is ready.
LAN (P1, P2,
P3, P4)
P2P Firewall VPN Printer
PWR
DSL
Blinking
On
On
Blinking
On The P2P function is active. P2P
Blinking Starts to prohibit P2P data.
Orange A normal 10Mbps connection is through its
Green A normal 100Mbps connection is through its
Blinking Ethernet packets are transmitting.
The router is powered on and running properly.
The router is powered on.
The ISDN network is correctly setup.
A successful remote connection on the ISDN BRI
B1/B2 channel.
corresponding port.
corresponding port.
LAN
P1 P2 P3 P4
P4
P1P2P3
DSL
ISDN
Factory
Reset
CCoonnnneeccttoorr EExxppllaannaattiioonn
Interface Description
Printer Connecter for a USB printer.
PWR Connecter for a power adapter with 12-15VDC.
ON/OFF Power Switch.
LAN P4 – P1 Connecters for local networked devices.
DSL Connecter for accessing Internet with the ADSL,ADSL2/2+ line
ISDN Connecter for NT1 (or NT1+) box provided by ISDN service provider.
Factory Reset Restore the default settings.
Usage: Turn on the router (ACT LED is blinking). Press the hole and
keep for more than 5 seconds. When you see the ACT LED begins to
blink rapidly than usual, release the button. Then the router will restart
with the factory default configuration.
4
Vigor2800 Series User’s Guide
Page 9
A
11..11..44 FFoorr VViiggoorr22880000GGii
CT
ISDN
Printer
LLEEDD EExxppllaannaattiioonn
LED Status Explanation
ACT (Activity)
ISDN
P2P
WLAN
DSL
Printer
LAN (P1, P2,
P3, P4)
P2P Firewall WLAN Printer
PWR
DSL
Blinking The router is powered on and running properly.
On The router is powered on.
On The ISDN network is correctly setup.
Blinking A successful remote connection on the ISDN BRI B1/B2
channel.
On The P2P function is active.
Blinking Starts to prohibit P2P data.
On The DoS function is enabled. Firewall
Blinking When encountered DoS attacks.
On Wireless access point is ready.
Blinking Wireless traffic goes through.
Off Wireless access point is turned off.
On The ADSL, ADSL2/2+ line is connected.
On The USB interface printer is ready.
Orange A normal 10Mbps connection is through its corresponding
port.
Green A normal 100Mbps connection is through its corresponding
port.
Blinking Ethernet packets are transmitting.
LAN
P1 P2 P3 P4
P4
Factory
P1P2P3
DSL
ISDN
Reset
CCoonnnneeccttoorr EExxppllaannaattiioonn
Interface Description
Printer Connecter for a USB printer.
PWR Connecter for a power adapter with 12-15VDC.
ON/OFF Power Switch.
LAN P4 – P1 Connecters for local networked devices.
DSL Connecter for accessing Internet with the ADSL,ADSL2/2+ line
ISDN Connecter for NT1 (or NT1+) box provided by ISDN service provider.
Factory Reset Restore the default settings.
Usage: Turn on the router (ACT LED is blinking). Press the hole and keep for
more than 5 seconds. When you see the ACT LED begins to blink rapidly than
usual, release the button. Then the router will restart with the factory default
configuration.
Vigor2800 Series User’s Guide
5
Page 10

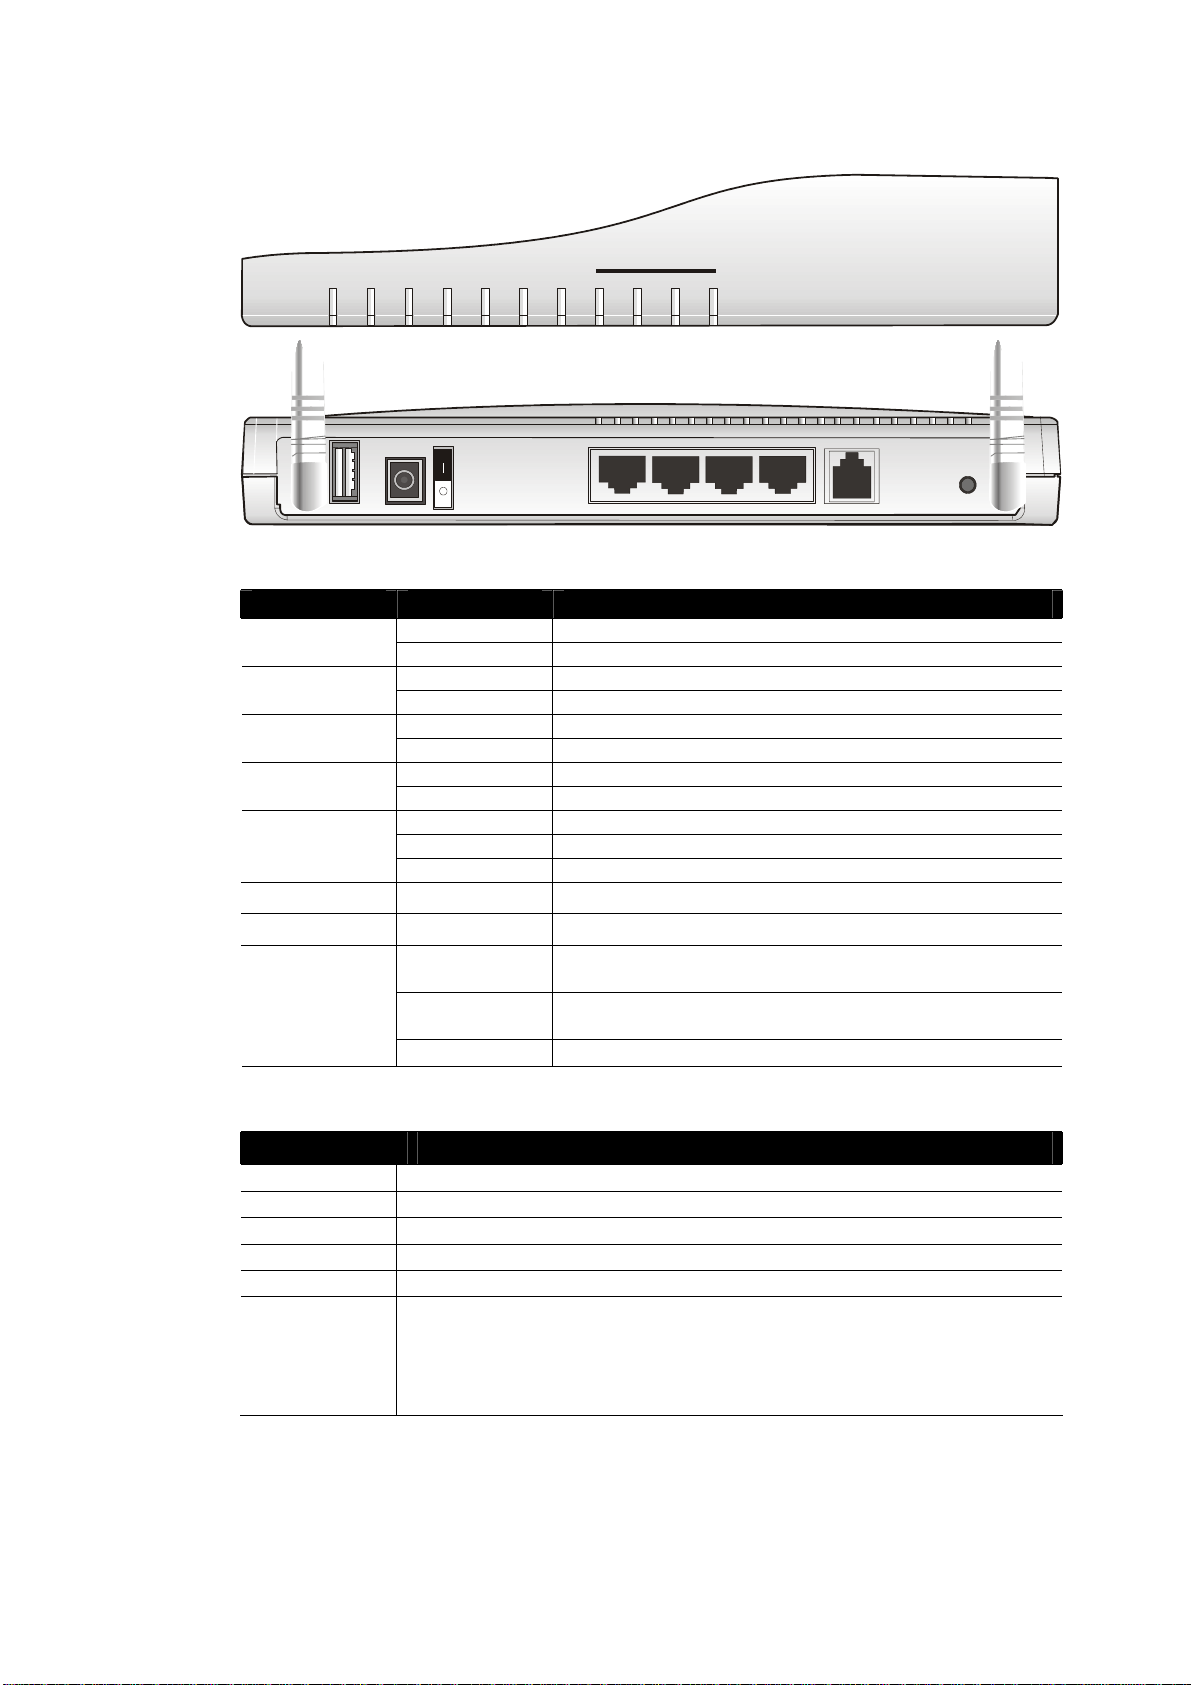
11..11..55 FFoorr VViiggoorr22880000VV
LLEEDD EExxppllaannaattiioonn
LED Status Explanation
ACT
(Activity)
VPN On The VPN tunnel is launched.
DSL On The ADSL, ADSL2/2+ line is connected.
Printer On The USB interface printer is ready.
LAN (P1, P2,
P3, P4)
Blinking
On
On The QoS function is active. QoS
Off The QoS function is inactive.
On The phone is off hook (the handset of phone is hanging). FXS1/FXS2
Blinking A phone call is incoming.
Orange A normal 10Mbps connection is through its
Green A normal 100Mbps connection is through its
Blinking Ethernet packets are transmitting.
The router is powered on and running properly.
The router is powered on.
corresponding port.
corresponding port.
CCoonnnneeccttoorr EExxppllaannaattiioonn
Interface Description
Printer Connecter for a USB printer.
PWR Connecter for a power adapter with 12-15VDC.
ON/OFF Power Switch.
FXS2 & FXS1 Connecters for telephone set and analog phone with VoIP
communication.
LAN P4 – P1 Connecters for local networked devices.
DSL Connecter for accessing Internet with the ADSL,ADSL2/2+ line
Factory Reset Restore the default settings.
Usage: Turn on the router (ACT LED is blinking). Press the hole and
keep for more than 5 seconds. When you see the ACT LED begins to
blink rapidly than usual, release the button. Then the router will restart
with the factory default configuration.
6
Vigor2800 Series User’s Guide
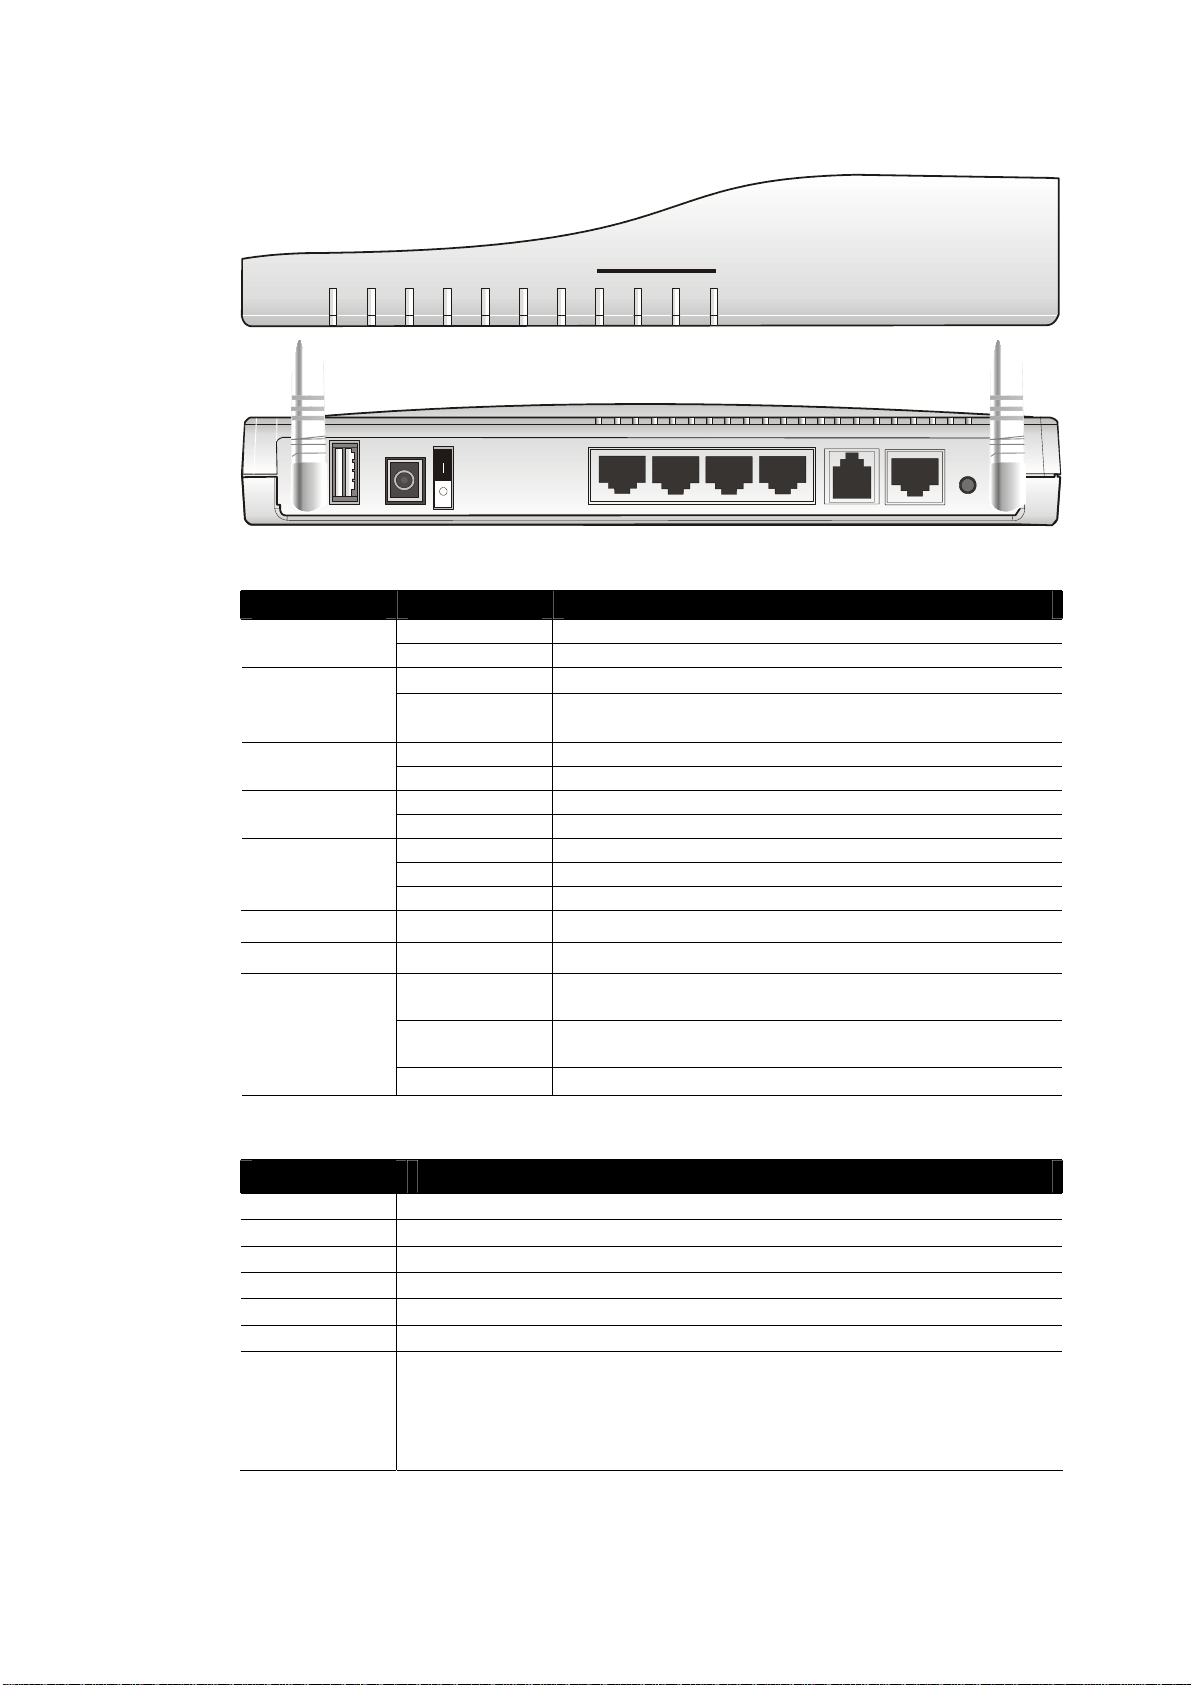
Page 11
11..11..66 FFoorr VViiggoorr22880000VVGG
LLEEDD EExxppllaannaattiioonn
LED Status Explanation
ACT
(Activity)
WLAN
DSL On The ADSL, ADSL2/2+ line is connected.
Printer On The USB interface printer is ready.
LAN (P1, P2,
P3, P4)
Blinking
On
On The QoS function is active. QoS
Off The QoS function is inactive.
On The phone is off hook (the handset of phone is hanging). FXS1/FXS2
Blinking A phone call is incoming.
On Wireless access point is ready.
Blinking Wireless traffic goes through.
Off Wireless access point is turned off.
Orange A normal 10Mbps connection is through its
Green A normal 100Mbps connection is through its
Blinking Ethernet packets are transmitting.
The router is powered on and running properly.
The router is powered on.
corresponding port.
corresponding port.
CCoonnnneeccttoorr EExxppllaannaattiioonn
Interface Description
Printer
PWR
ON/OFF
FXS2 & FXS1
LAN P4 – P1
DSL
Factory Reset
Vigor2800 Series User’s Guide
Connecter for a USB printer.
Connecter for a power adapter with12-15VDC.
Power Switch.
Connecters for telephone set and analog phone with VoIP
communication.
Connecters for local networked devices.
Connecter for accessing Internet with the ADSL,ADSL2/2+ line
Restore the default settings.
Usage: Turn on the router (ACT LED is blinking). Press the hole and
keep for more than 5 seconds. When you see the ACT LED begins to
blink rapidly than usual, release the button. Then the router will restart
with the factory default configuration.
7
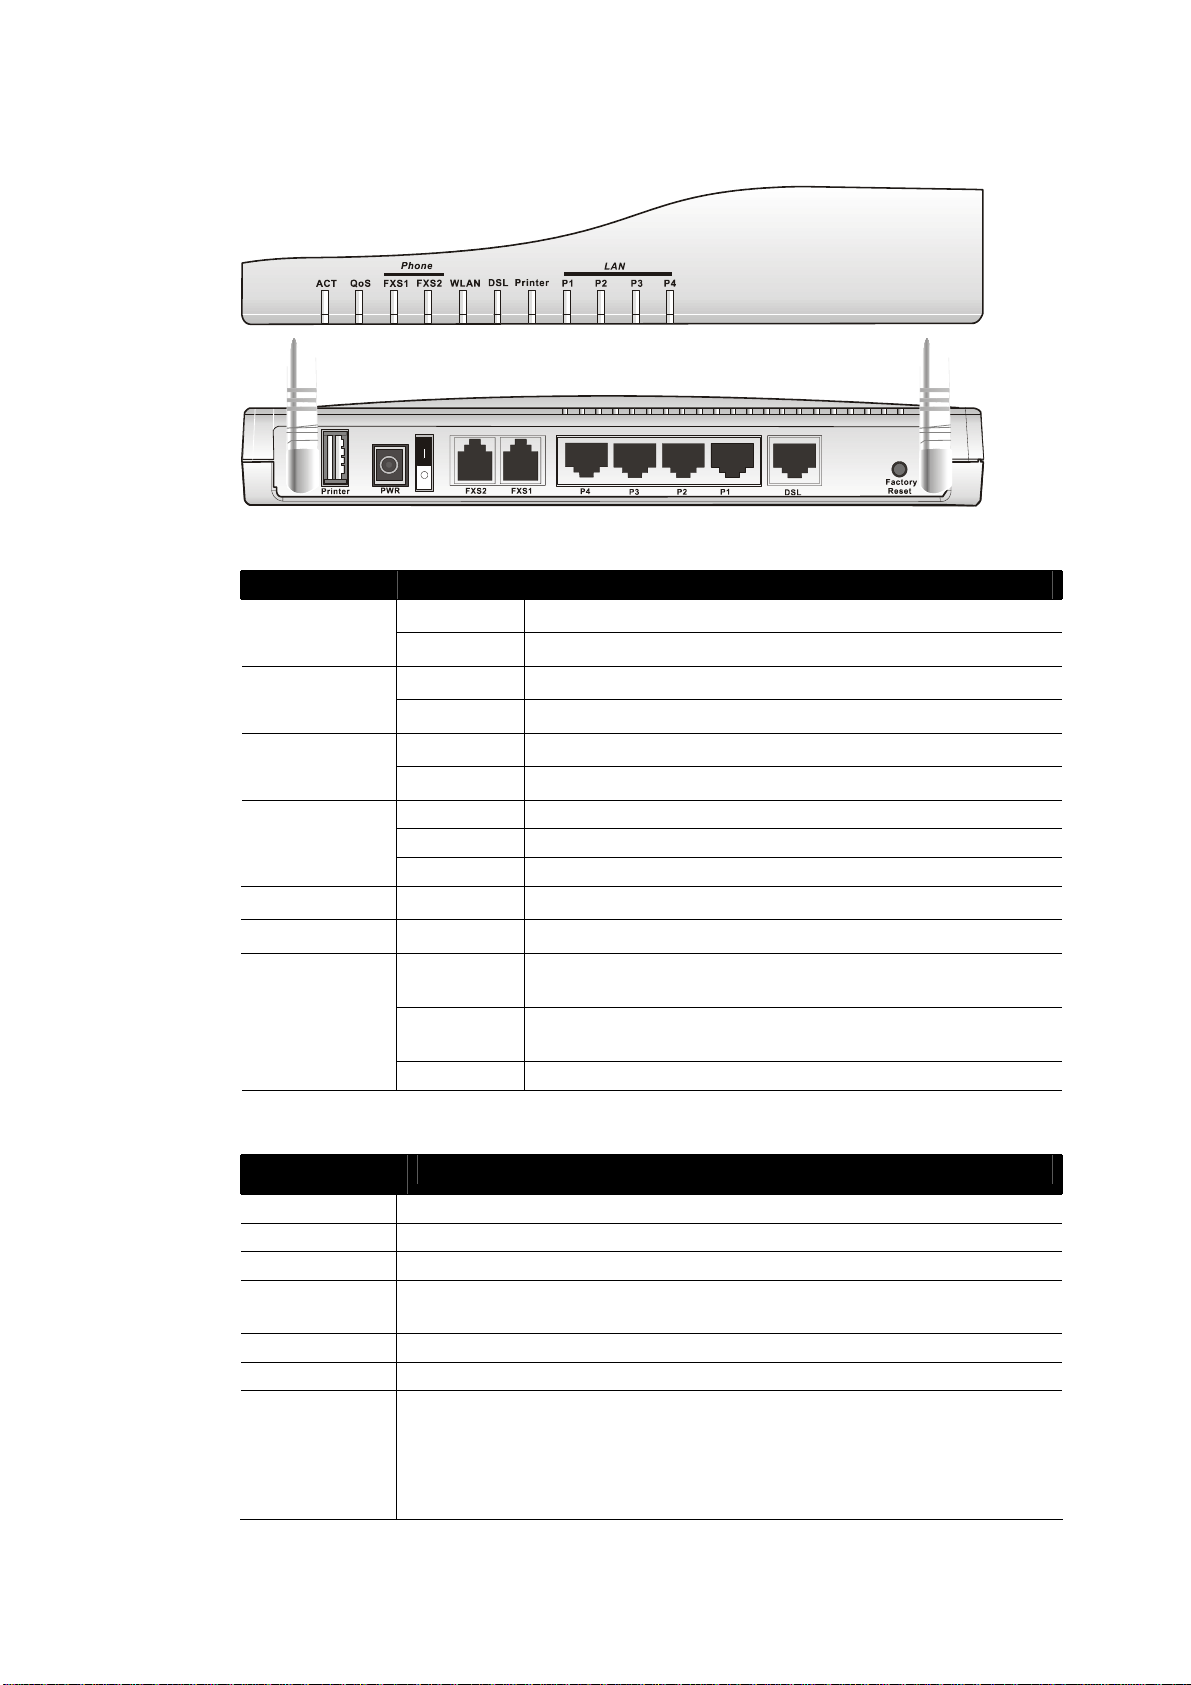
Page 12
A
11..11..77 FFoorr VViiggoorr22880000VVGGii
ISDN
CT
Printer
LLEEDD EExxppllaannaattiioonn
LED Status Explanation
ACT (Activity)
ISDN
WLAN
DSL
Printer
LAN (P1, P2,
P3, P4)
PWR
FXS1
Phone
FXS2 WLAN
FXS2 FXS1
DSL
Printer
Blinking The router is powered on and running properly.
On The router is powered on.
On The ISDN network is correctly setup.
Blinking A successful remote connection on the ISDN BRI B1/B2
channel.
On The phone is off hook (the handset of phone is hanging). FXS1/FXS2
Blinking A phone call is incoming.
On Wireless access point is ready.
Blinking Wireless traffic goes through.
Off Wireless access point is turned off.
On The ADSL, ADSL2/2+ line is connected.
On The USB interface printer is ready.
Orange A normal 10Mbps connection is through its corresponding
port.
Green A normal 100Mbps connection is through its corresponding
port.
Blinking Ethernet packets are transmitting.
LAN
P1 P2 P3 P4
P4
Factory
P1P2P3
DSL
ISDN
Reset
CCoonnnneeccttoorr EExxppllaannaattiioonn
Interface Description
Printer
PWR
ON/OFF
FXS2 & FXS1
Connecter for a USB printer.
Connecter for a power adapter with12-15VDC.
Power Switch.
Connecters for telephone set and analog phone with VoIP
communication.
LAN P4 – P1
DSL
ISDN Connecter for NT1 (or NT1+) box provided by ISDN service provider.
Factory Reset Restore the default settings.
8
Connecters for local networked devices.
Connecter for accessing Internet with the ADSL,ADSL2/2+ line
Usage: Turn on the router (ACT LED is blinking). Press the hole and keep for
more than 5 seconds. When you see the ACT LED begins to blink rapidly than
usual, release the button. Then the router will restart with the factory default
configuration.
Vigor2800 Series User’s Guide
Page 13
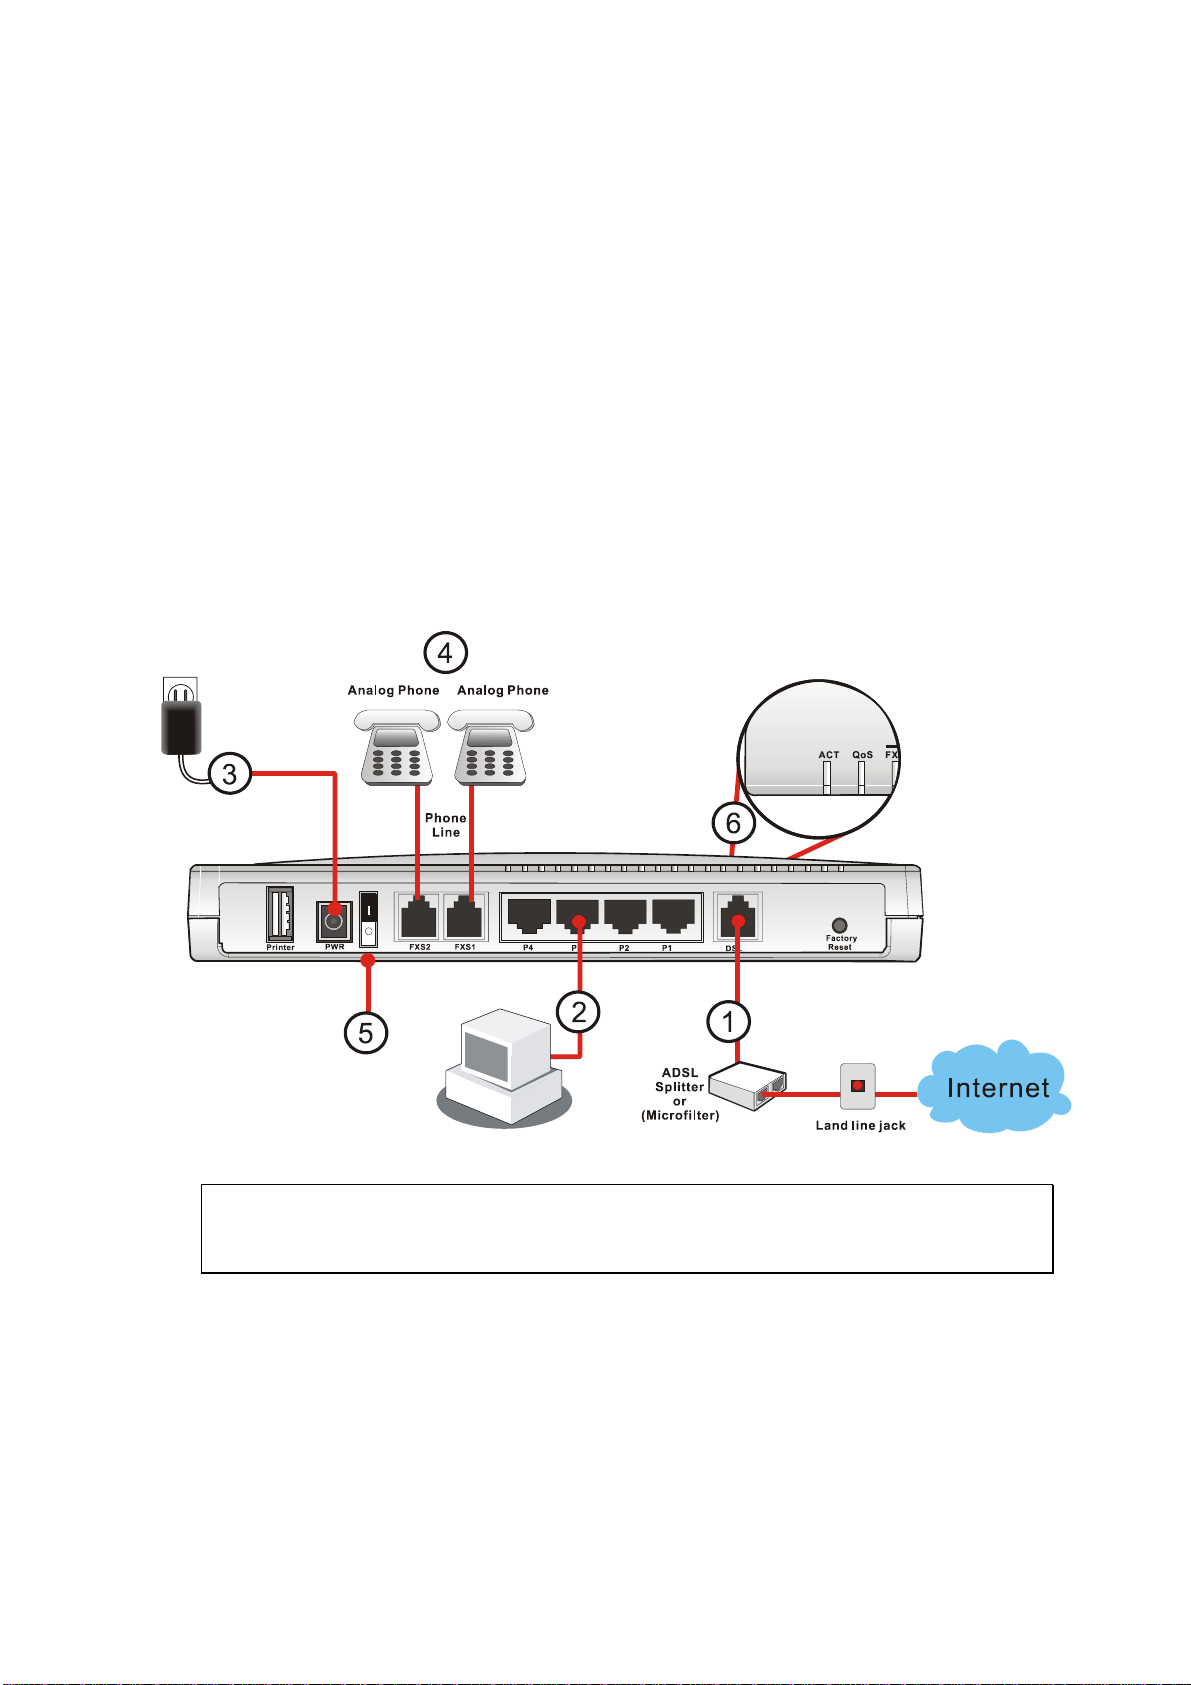
11..22 HHaarrddwwaarree IInnssttaallllaattiioonn
Before starting to configure the router, you have to connect your devices correctly.
1. Connect the DSL interface to the external ADSL splitter with an ADSL line cable.
2. Connect one port of 4-port switch to your computer with a RJ-45 cable. This device
allows you to connect 4 PCs directly.
3. Connect one end of the power cord to the power port of this device. Connect the other
end to the wall outlet of electricity.
4. Connect the telephone sets with phone lines (for using VoIP function). For the user of
the model without VoIP ports, skip this step.
5. Power on the router.
6. Check the ACT LED to assure network connections.
(For the detailed information of LED status, please refer to section 1.1.)
Caution: Each of the FXS ports can be connected to an analog phone only. Do not
connect the FXS ports to the telephone wall jack. This connection might damage your
router.
Vigor2800 Series User’s Guide
9
Page 14

This page is left blank.
10
Vigor2800 Series User’s Guide
Page 15
2
Coonnffiigguurriinngg
C
For use the router properly, it is necessary for you to change the password of web
configuration for security and adjust primary basic settings.
This chapter explains how to setup a password for an administrator and how to adjust basic
settings for accessing Internet successfully. Be aware that only the administrator can change
the router configuration.
22..11 CChhaannggiinngg PPaasssswwoorrdd
To change the password for this device, you have to access into the web browse with default
password first.
1. Make sure your computer connects to the router correctly.
Notice: You may either simply set up your computer to get IP dynamically
from the router or set up the IP address of the computer to be the same
subnet as the default IP address of Vigor router 192.168.1.1. For the
detailed information, please refer to the later section - Trouble Shooting of
this guide.
Baassiicc
B
Seettttiinnggss
S
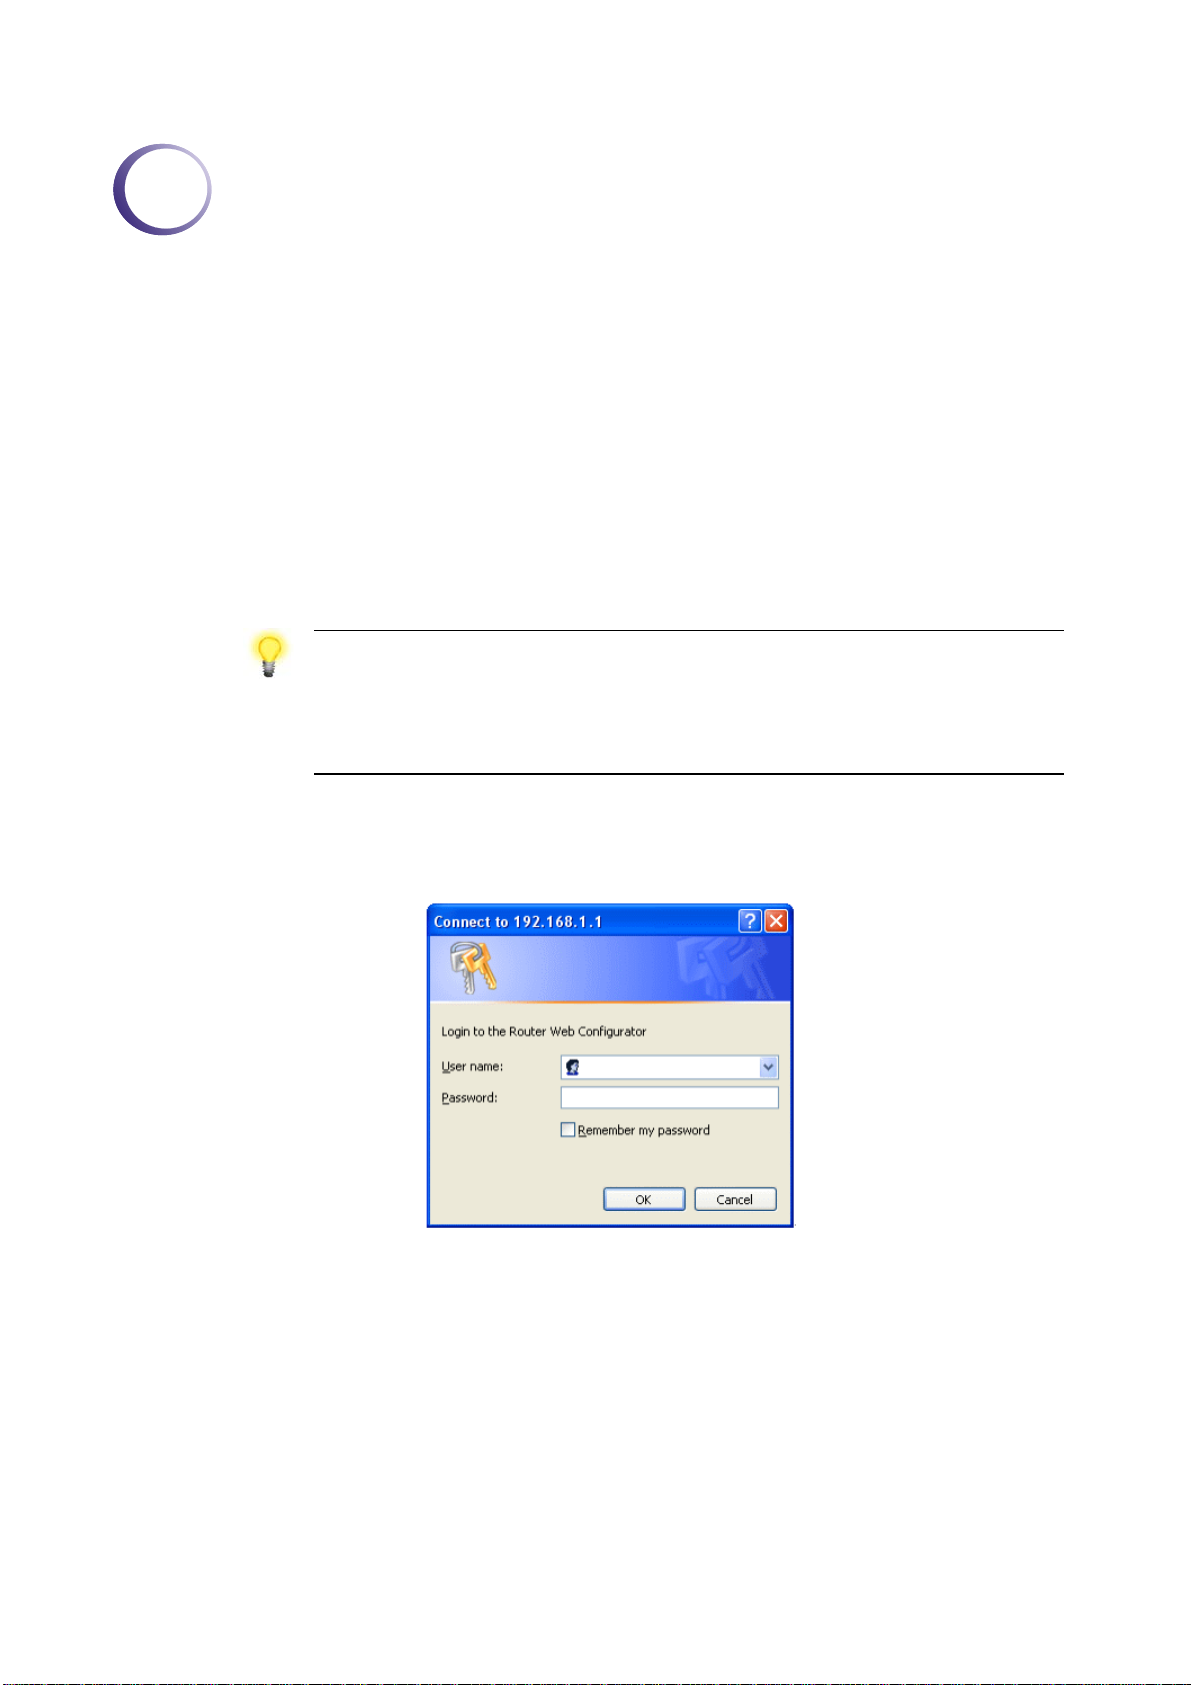
2. Open a web browser on your PC and type http://192.168.1.1. A pop-up window will
open to ask for username and password. Please type default values (both username and
password are Null) on the window for the first time accessing and click OK for next
screen.
3. Now, the Main Screen will pop up.
Vigor2800 Series User’s Guide
11
Page 16
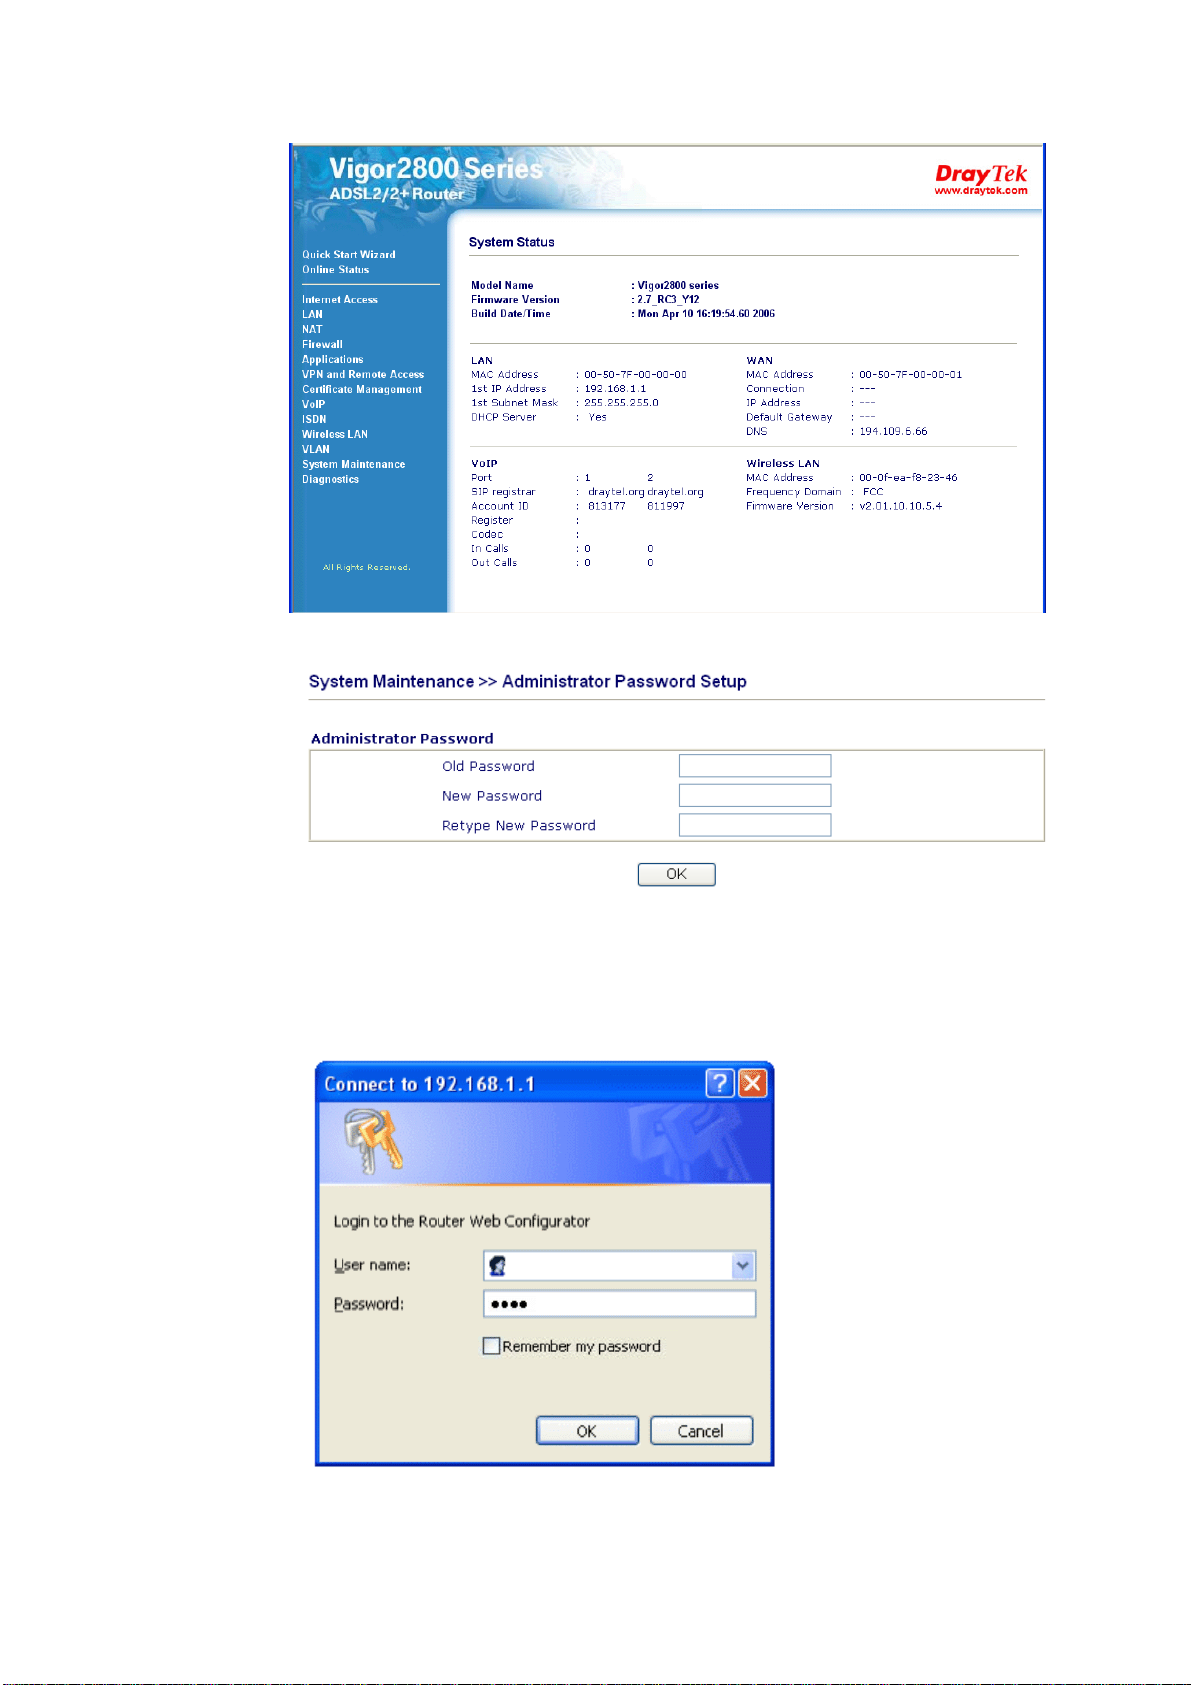
4. Go to System Maintenance page and choose Administrator Password.
5. Enter the login password (the default is blank) on the field of Old Password. Type a
new one in the field of New Password and retype it on the field of Retype New
Password. Then click OK to continue.
6. Now, the password has been changed. Next time, use the new password to access the
Web Configurator for this router.
12
Vigor2800 Series User’s Guide
Page 17
22..22 QQuuiicckk SSttaarrtt WWiizzaarrdd
If your router can be under an environment with high speed NAT, the configuration provide
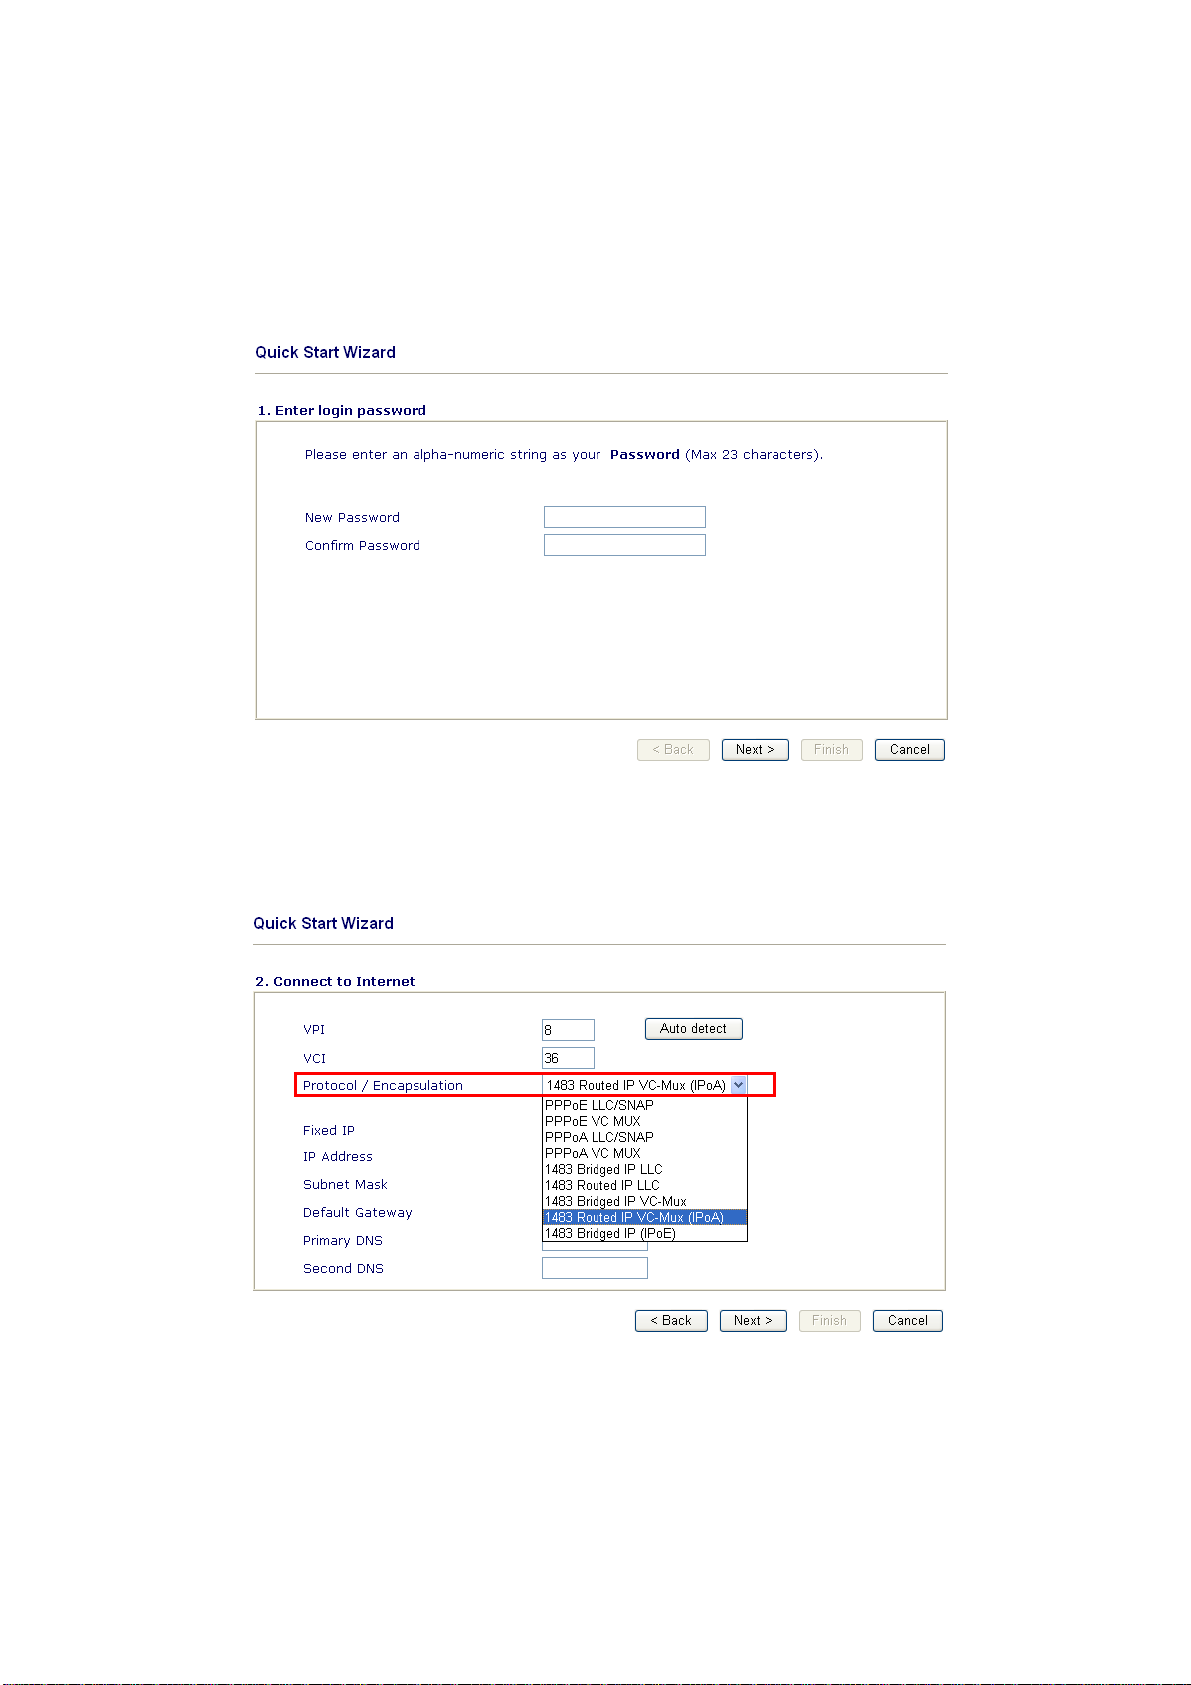
here can help you to deploy and use the router quickly. The first screen of Quick Start
Wizard is entering login password. After typing the password, please click Next.
22..22..11 AAddjjuussttiinngg PPrroottooccooll//EEnnccaappssuullaattiioonn
In the Quick Start Wizard, you can configure the router to access the Internet with different protocol/modes such as PPPoE, PPPoA, Bridged IP, or Routed IP. The router supports the DSL WAN interface for Internet access.
Now, you have to select an appropriate WAN connection type for connecting to the Internet
through this router according to the settings that your ISP provided.
VPI Stands for Virtual Path Identifier. It is an 8-bit header inside
Vigor2800 Series User’s Guide
each ATM cell that indicates where the cell should be routed. The
ATM, is a method of sending data in small packets of fixed sizes.
It is used for transferring data to client computers.
13
Page 18

VCI Stands for Virtual Channel Identifier. It is a 16-bit field inside
ATM cell’s header that indicates the cell’s next destination as it
travels through the network. A virtual channel is a logical
connection between two end devices on the network.
Protocol/Encapsulation Select an IP mode for this WAN interface. There are several
available modes for Internet access such as PPPoE, PPPoA,
Bridged IP and Routed IP.
Fixed IP Click Yes to specify a fixed IP for the router. Otherwise, click No
(Dynamic IP) to allow the router choosing a dynamic IP. If you
choose No, the following IP Address, Subnet Mask and Default
Gateway will not be changed.
IP Address Assign an IP address for the protocol that you select.
Subnet Mask Assign a subnet mask value for the protocol of Routed IP and
Bridged IP.
Default Gateway Assign an IP address to the gateway for the protocol of Routed
IP and Bridged IP.
Primary DNS Assign an IP address to the primary DNS.
Second DNS Assign an IP address to the secondary DNS.
22..22..22 PPPPPPooEE//PPPPPPooAA
PPPoE stands for Point-to-Point Protocol over Ethernet. It relies on two widely accepted
standards: PPP and Ethernet. It connects users through an Ethernet to the Internet with a
common broadband medium, such as a single DSL line, wireless device or cable modem. All
the users over the Ethernet can share a common connection. And the PPPoA stands for
Point-to-Point Protocol over ATM. PPPoA uses the PPP dial-up protocol with ATM as the
transport.
PPPoE or PPPoA is used for most of DSL modem users. All local users can share one
PPPoE or PPPoA connection for accessing the Internet. Your service provider will provide
you information about user name, password, and authentication mode.
If your ISP provides you the PPPoE or PPPoA connection, please select PPPoE or PPPoA
for this router. The following page will be shown:
14
ISP Name Assign a specific name for ISP requirement.
Vigor2800 Series User’s Guide
Page 19
User Name Assign a specific valid user name provided by the ISP.
Password Assign a valid password provided by the ISP.
Confirm Password Retype the password.
Always On Check this box to allow the router connecting to Internet forever.
Idle Timeout Type in the value (unit is second) as the idle timeout of the
connection. When the time is expired, the internet connection will be
dropped immediately.
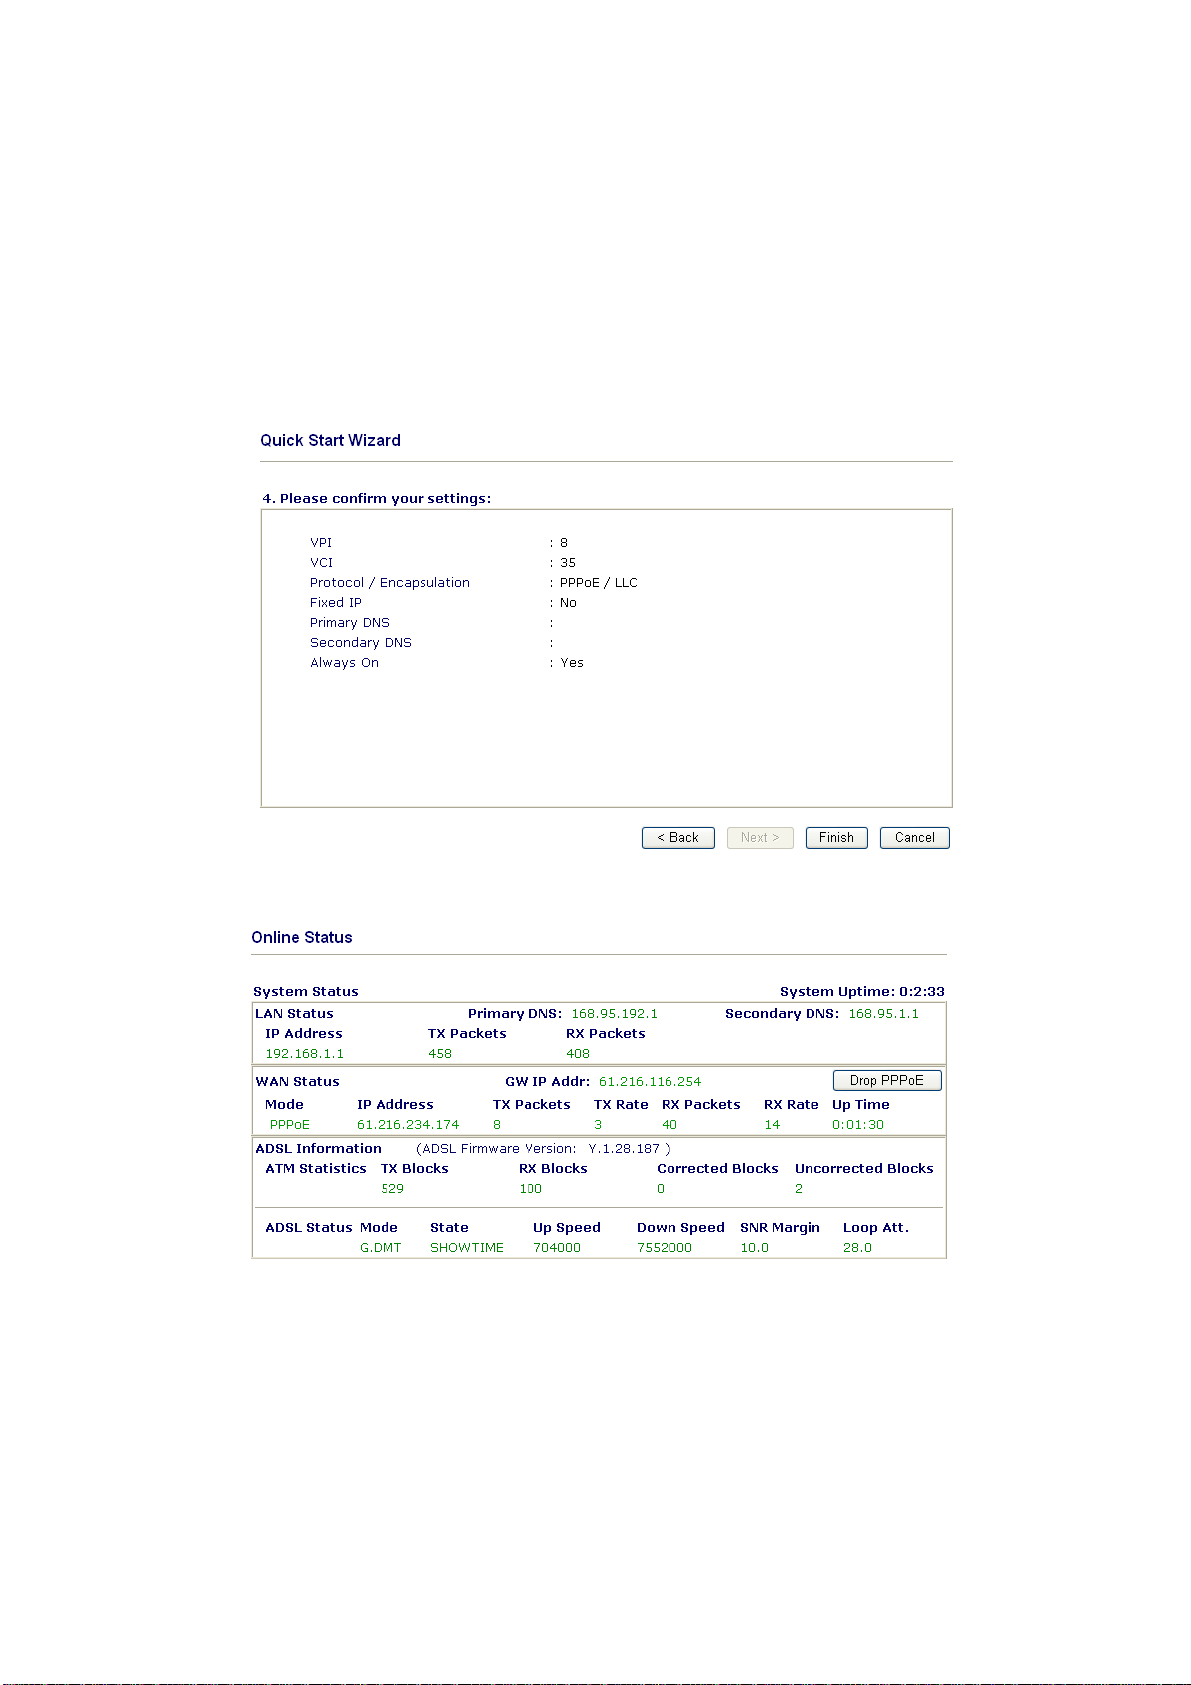
Click Next for viewing summary of such connection.
Click Finish. The online status of this protocol will be shown as below.
Vigor2800 Series User’s Guide
15
Page 20
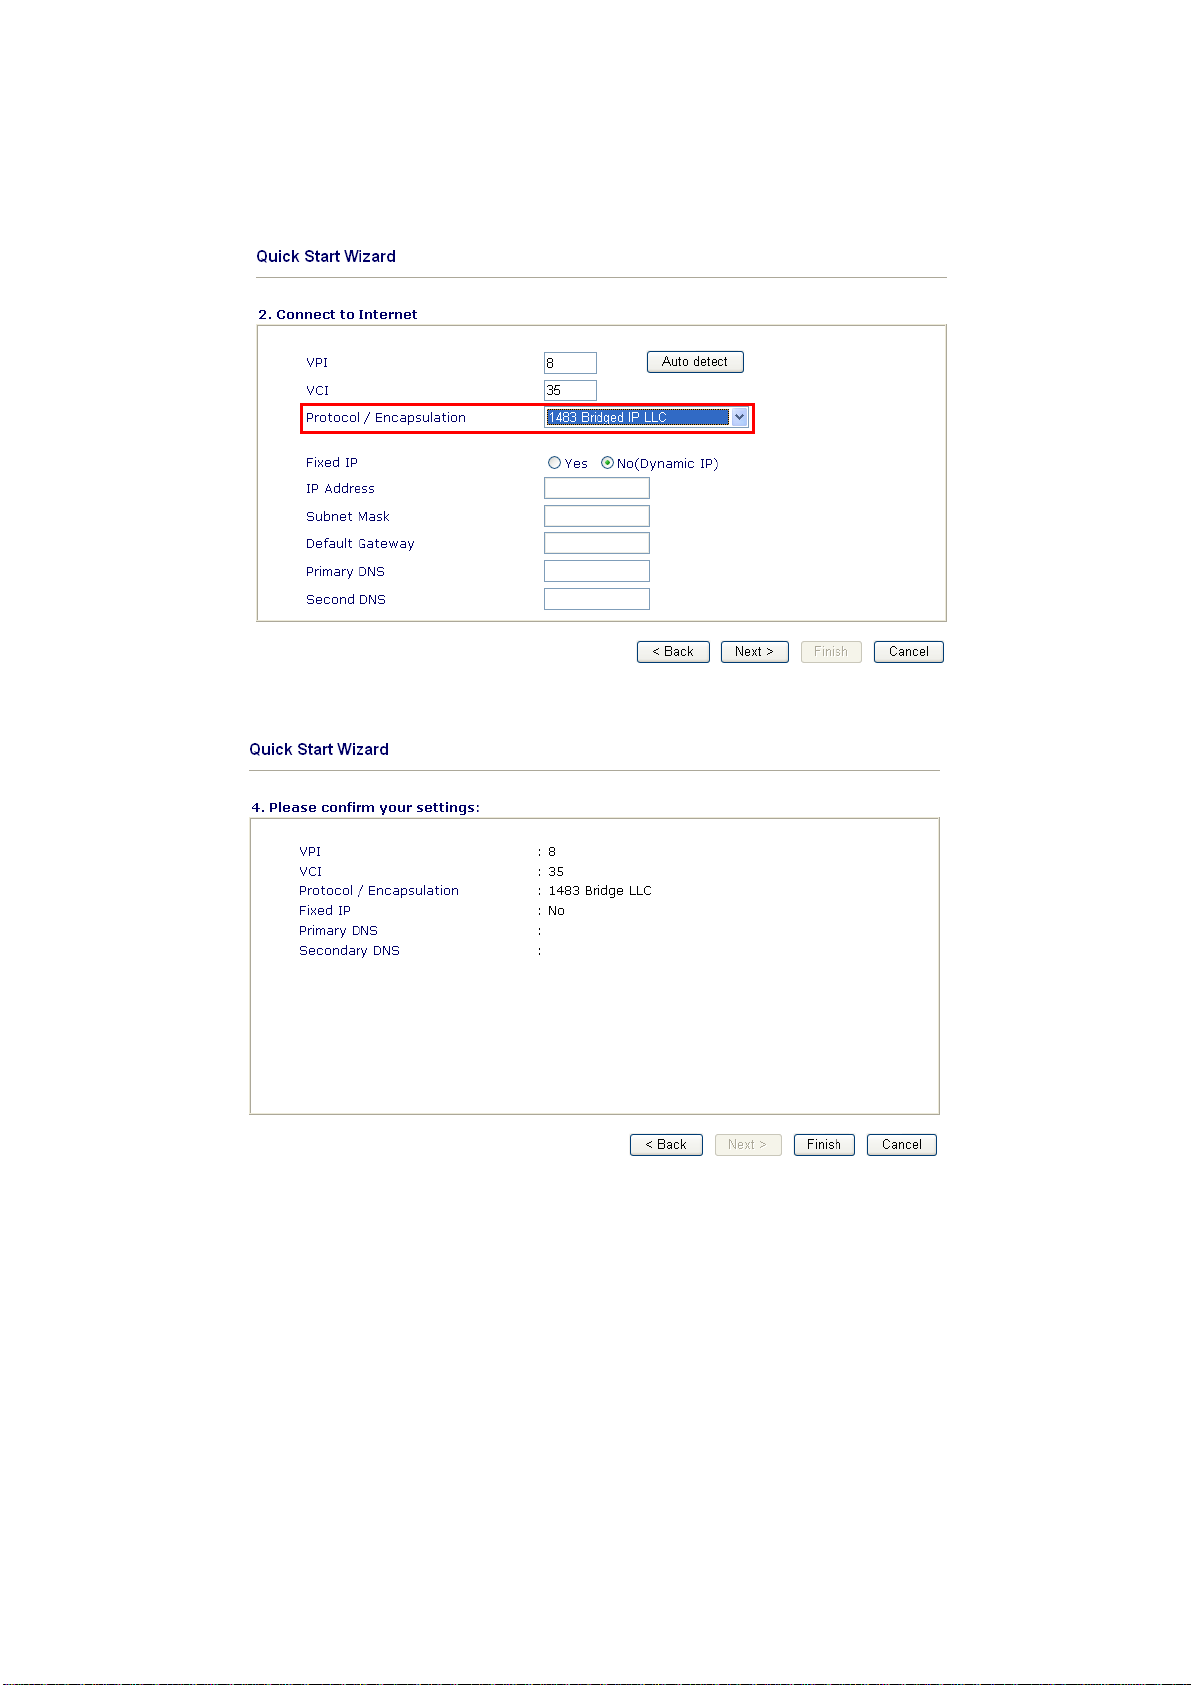
22..22..33 BBrriiddggeedd IIPP
Click 1483 Bridged IP as the protocol. Type in all the information that your ISP provides
for this protocol.
After finishing the settings in this page, click Next to see the following page.
16
Click Finish. The online status of this protocol will be shown as below.
Vigor2800 Series User’s Guide
Page 21
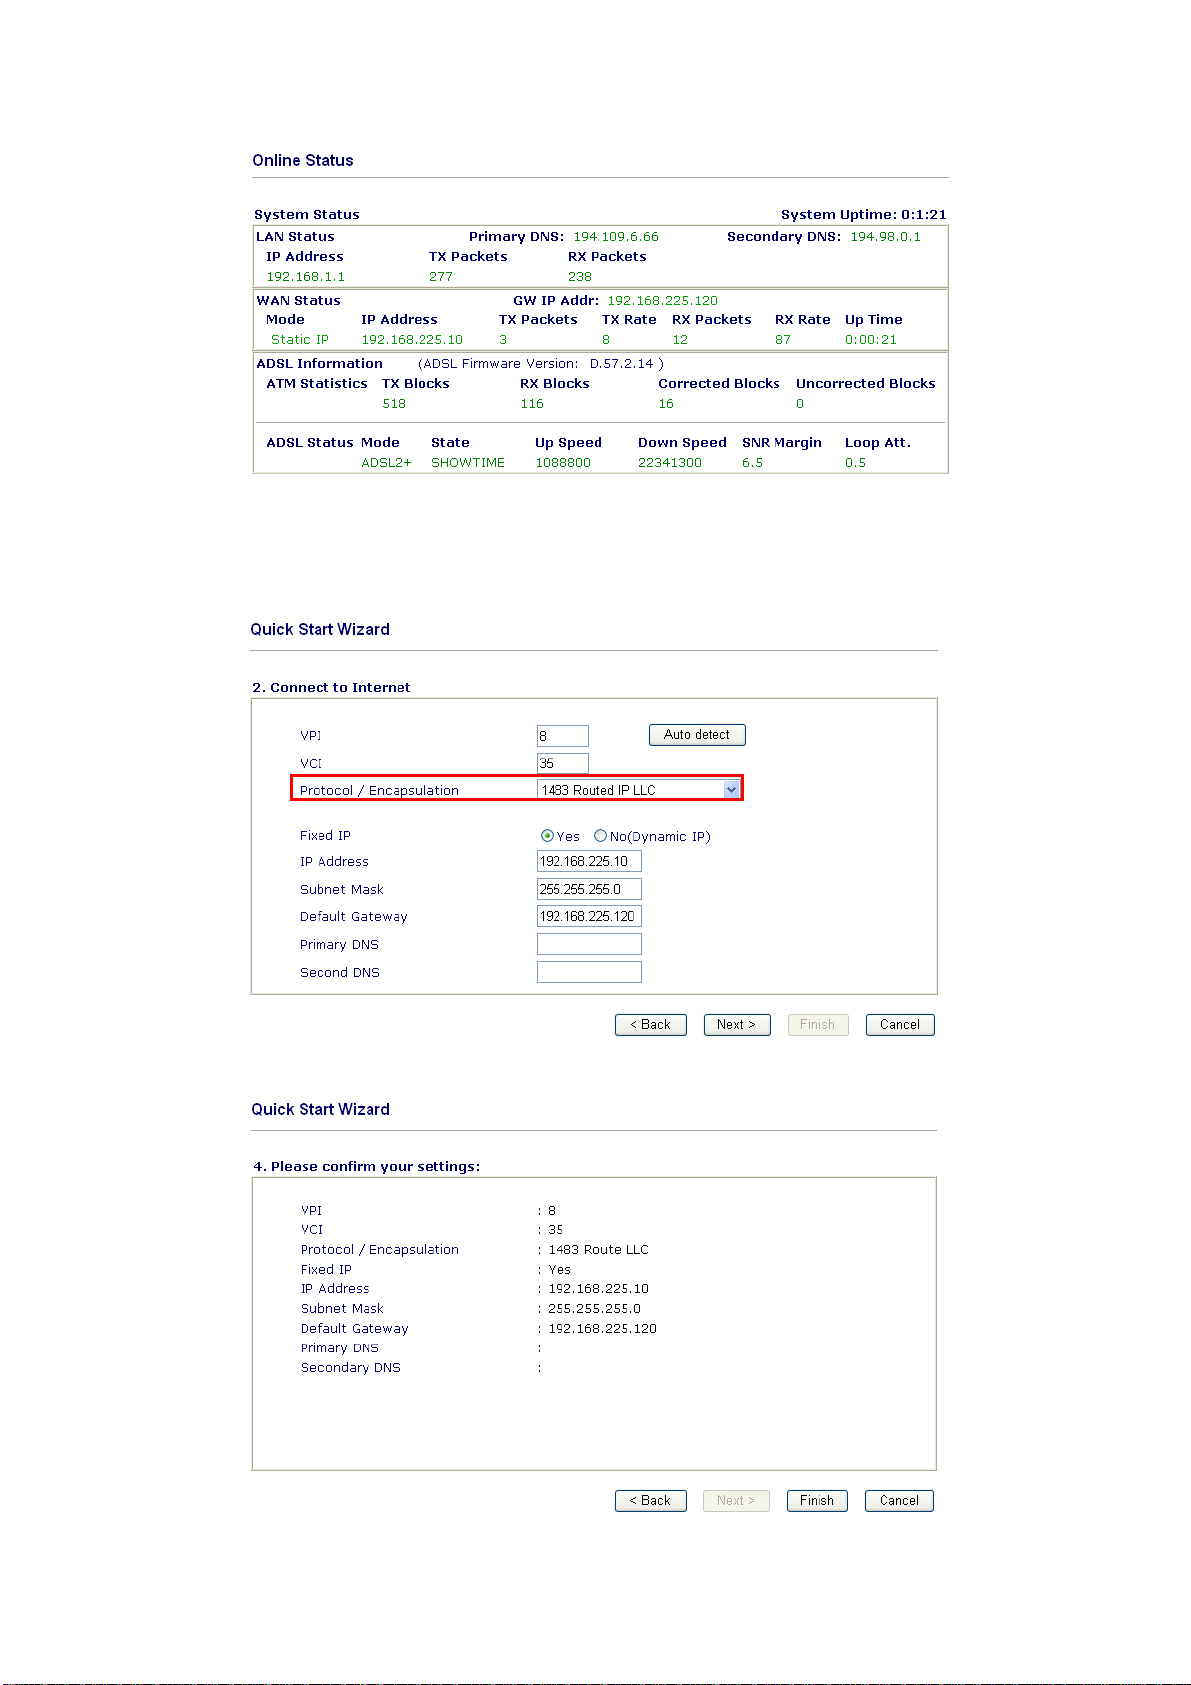
22..22..44 RRoouutteedd IIPP
Click 1483 Routed IP as the protocol. Type in all the information that your ISP provides for this protocol.
After finishing the settings in this page, click Next to see the following page.
Vigor2800 Series User’s Guide
17
Page 22
Click Finish. The online status of this protocol will be shown as below.
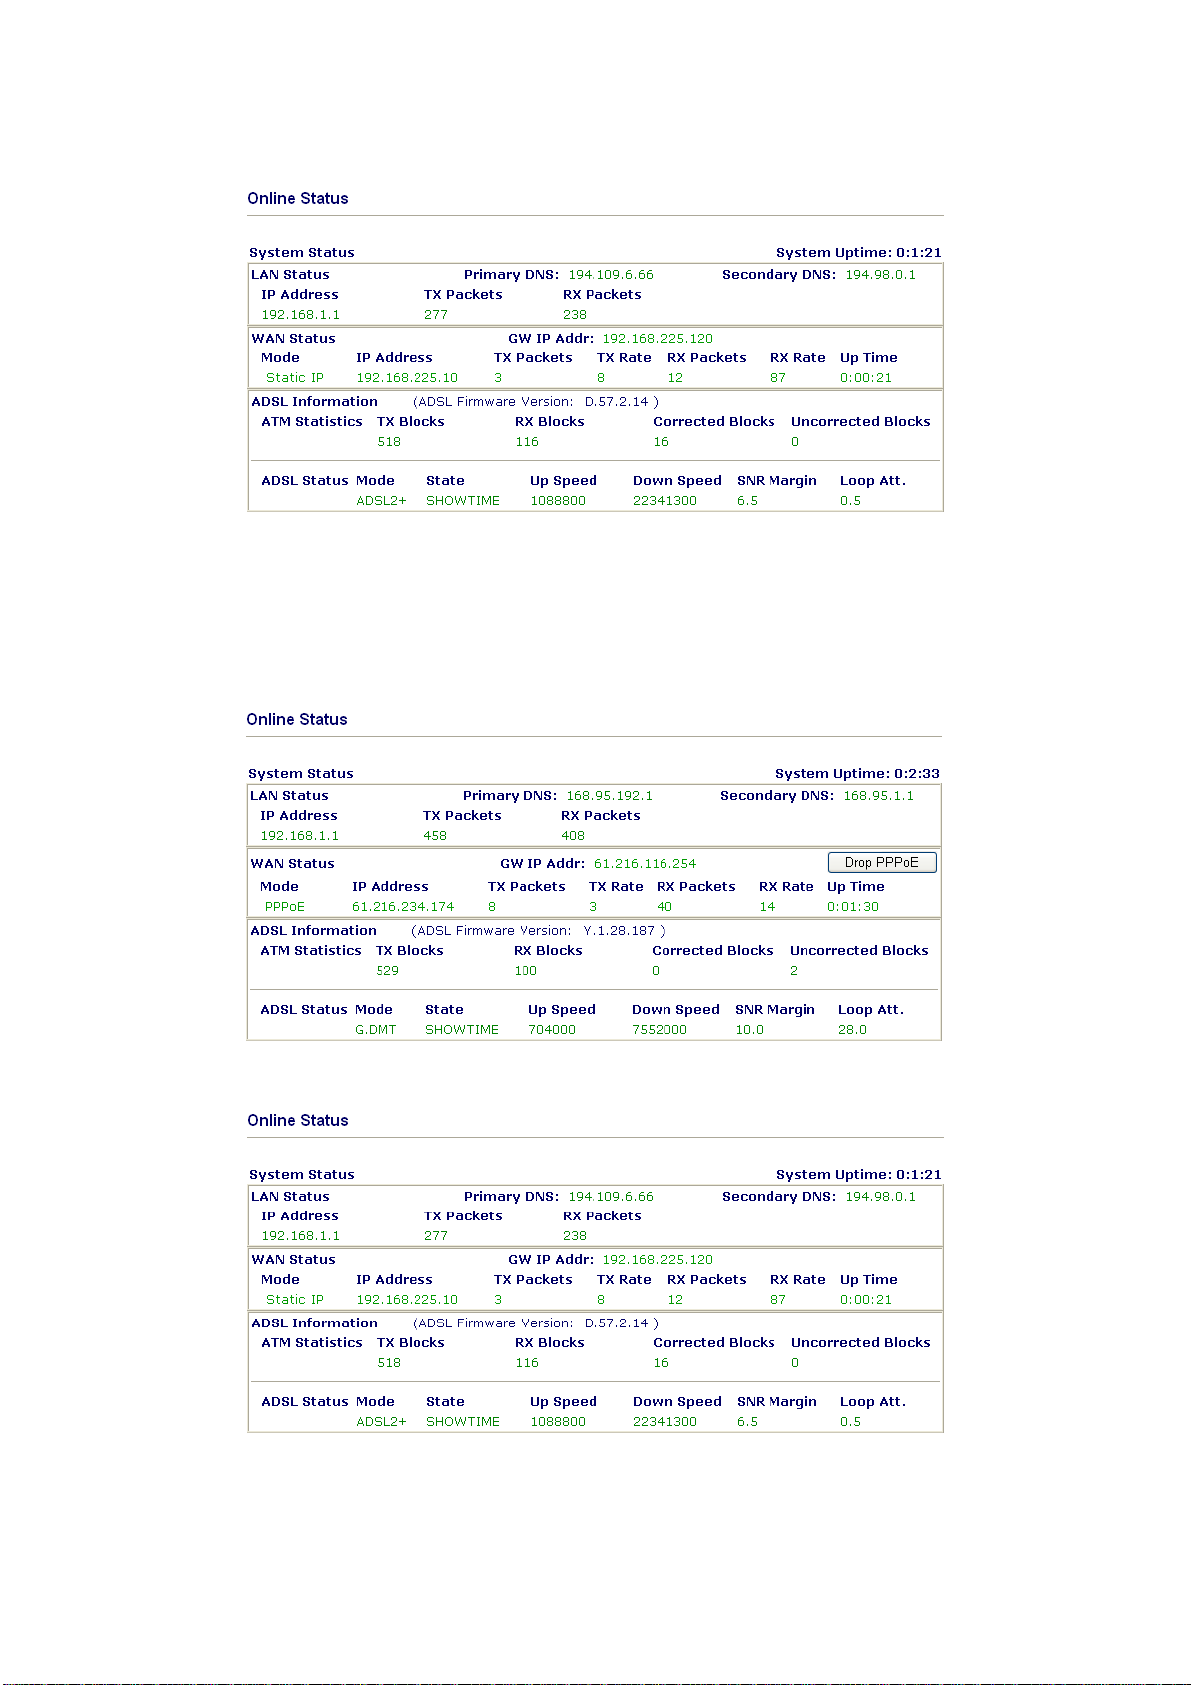
22..33 OOnnlliinnee SSttaattuuss
The online status shows the system status, WAN status, ADSL Information and other status
related to this router within one page. If you select PPPoE or PPPoA as the protocol, you
will find out a button of Dial PPPoE or Dial PPPoE in the Online Status web page.
Online status for PPPoA/PPPoE
Online status for Bridge
18
Vigor2800 Series User’s Guide
Page 23

Online status for Routed IP
Primary DNS Displays the assigned IP address of the primary DNS.
Secondary DNS Displays the assigned IP address of the secondary DNS.
IP Address (in LAN) Displays the IP address of the LAN interface.
TX Packets Displays the total transmitted packets at the LAN interface.
RX Packets Displays the total number of received packets at the LAN interface.
GW IP Addr: Displays the assigned IP address of the default gateway.
IP Address (in WAN) Displays the IP address of the WAN interface.
TX Rate Displays the speed of transmitted packets at the WAN interface.
RX Rate Displays the speed of received packets at the WAN interface.
Up Time Displays the total system uptime of the interface.
TX Blocks Displays the total number of transmitted ATM Blocks.
RX Blocks Displays the total number of received ATM Blocks.
Corrected Blocks Displays the total l number of received ATM Blocks corrupted but
corrected.
Uncorrected Blocks Displays the total number of received ATM Blocks corrupted but
uncorrected.
Mode Displays the modulation mode used: G.DMT, G.Lite, or T1.413.
State Displays the DSL line status.
Up Speed Displays the transmission speed of uploading data (bits/ second).
Down Speed Displays the transmission speed of downloading data (bits/
second).
SNR Margin Displays the value of Signal Noise Ratio Margin (dB). The higher
Loop Att. Displays the value of subscribed Loop Attenuation.
Vigor2800 Series User’s Guide
value has better signal quality.
19
Page 24

22..44 SSaavviinngg CCoonnffiigguurraattiioonn
Each time you click OK on the web page for saving the configuration, you can find
messages showing the system interaction with you.
Ready indicates the system is ready for you to input settings.
Settings Saved means your settings are saved once you click Finish or OK button.
20
Vigor2800 Series User’s Guide
Page 25

3
Addvvaanncceedd
A
After finished basic configuration of the router, you can access Internet with ease. For the
people who want to adjust more setting for suiting his/her request, please refer to this chapter
for getting detailed information about the advanced configuration of this router. As for other
examples of application, please refer to chapter 4.
33..11 IInntteerrnneett AAcccceessss
33..11..11 BBaassiiccss ooff IInntteerrnneett PPrroottooccooll ((IIPP)) NNeettwwoorrkk
IP means Internet Protocol. Every device in an IP-based Network including routers, print
server, and host PCs, needs an IP address to identify its location on the network. To avoid
address conflicts, IP addresses are publicly registered with the Network Information Centre
(NIC). Having a unique IP address is mandatory for those devices participated in the public
network but not in the private TCP/IP local area networks (LANs), such as host PCs under
the management of a router since they do not need to be accessed by the public. Hence, the
NIC has reserved certain addresses that will never be registered publicly. These are known as
private IP addresses, and are listed in the following ranges:
From 10.0.0.0 to 10.255.255.255
From 172.16.0.0 to 172.31.255.255
From 192.168.0.0 to 192.168.255.255
Weebb
W
Coonnffiigguurraattiioonn
C
WWhhaatt aarree PPuubblliicc IIPP AAddddrreessss aanndd PPrriivvaattee IIPP AAddddrreessss
As the router plays a role to manage and further protect its LAN, it interconnects groups of
host PCs. Each of them has a private IP address assigned by the built-in DHCP server of the
Vigor router. The router itself will also use the default private IP address: 192.168.1.1 to
communicate with the local hosts. Meanwhile, Vigor router will communicate with other
network devices through a public IP address. When the data flow passing through, the
Network Address Translation (NAT) function of the router will dedicate to translate
public/private addresses, and the packets will be delivered to the correct host PC in the local
area network. Thus, all the host PCs can share a common Internet connection.
GGeett YYoouurr PPuubblliicc IIPP AAddddrreessss ffrroomm IISSPP
To acquire a public IP address from your ISP for Vigor router as a customer premises
equipment, there are three common protocols: Point to Point Protocol over Ethernet
(PPPoE), PPPoA and MPoA. Multi-PVC is provided for more advanced setup of the
above.
In ADSL deployment, the PPP (Point to Point)-style authentication and authorization is
required for bridging customer premises equipment (CPE). Point to Point Protocol over
Ethernet (PPPoE) connects a network of hosts via an access device to a remote access
concentrator or aggregation concentrator. This implementation provides users with
significant ease of use. Meanwhile it provides access control, billing, and type of service
according to user requirement.
When a router begins to connect to your ISP, a serial of discovery process will occur to ask
for a connection. Then a session will be created. Your user ID and password is authenticated
via PAP or CHAP with RADIUS authentication system. And your IP address, DNS server,
and other related information will usually be assigned by your ISP.
Vigor2800 Series User’s Guide
21
Page 26
Below shows the menu items for Internet Access.
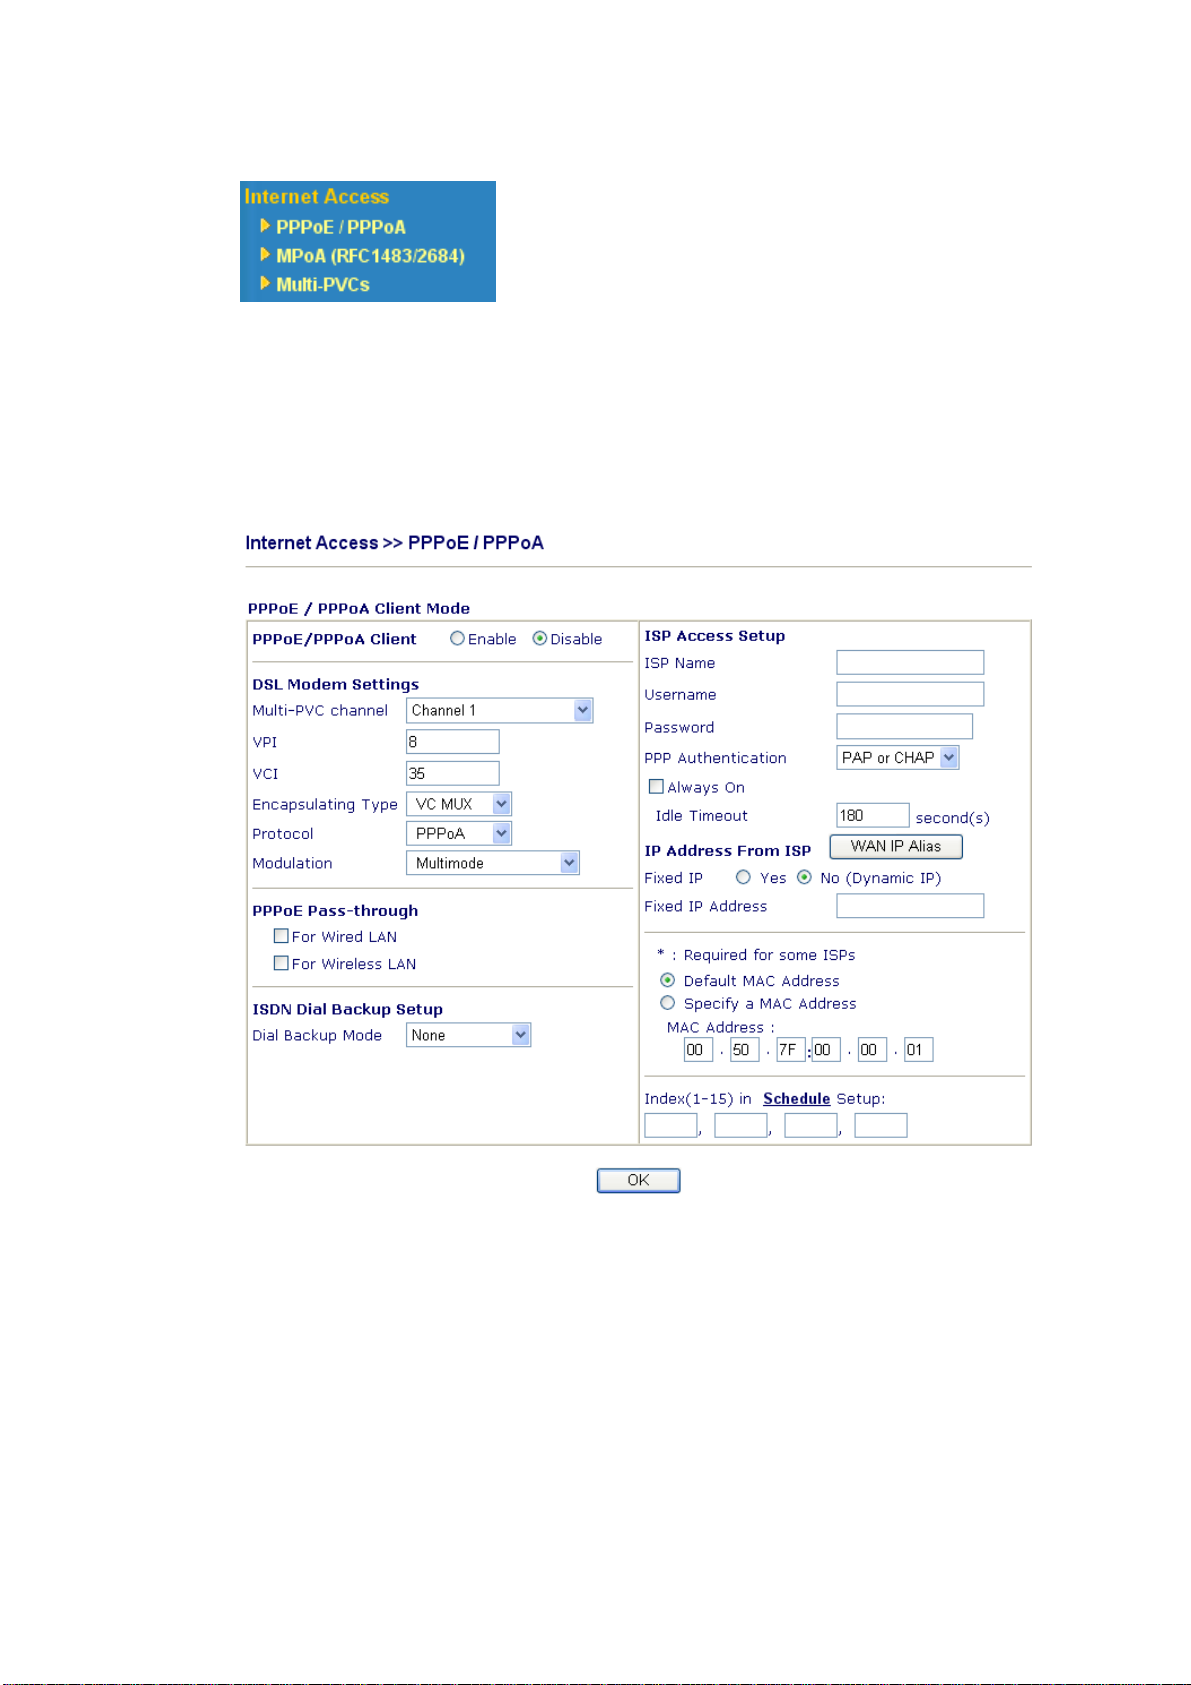
33..11..22 PPPPPPooEE//PPPPPPooAA
PPPoA, included in RFC1483, can be operated in either Logical Link Control-Subnetwork
(LLC) Access Protocol or VC-Mux mode. As a CPE device, Vigor router encapsulates the
PPP session based for transport across the ADSL loop and your ISP’s Digital Subscriber
Line Access Multiplexer (SDLAM).
To choose PPPoE or PPPoA as the accessing protocol of the internet, please select PPPoE/PPPoA from the Internet Access menu. The following web page will be shown.
22
PPPoE/PPPoA Client Click Enable for activating this function. If you click Disable, this
function will be closed and all the settings that you adjusted in this
page will be invalid.
DSL Modem Settings Set up the DSL parameters required by your ISP. These are vital
for building DSL connection to your ISP.
Multi-PVC channel – The selections displayed here are
determined by the page of Internet Access – Multi PVCs. Select
M-PVCs Channel means no selection will be chosen.
VPI - Type in the value provided by ISP.
VCI - Type in the value provided by ISP.
Encapsulating Type - Drop down the list to choose the type
provided by ISP.
Vigor2800 Series User’s Guide
Page 27

Protocol - Drop down the list to choose the one provided by ISP.
If you have already used Quick Start Wizard to set the protocol,
then it is not necessary for you to change any settings in this group.
PPPoE Pass-through The router offers PPPoE dial-up connection. Besides, you also can
establish the PPPoE connection directly from local clients to your
ISP via the Vigor router.
For Wired LAN – If you check this box, PCs on the same network
can use another set of PPPoE session (different with the Host PC)
to access into Internet.
For Wireless LAN - If you check this box, PCs connecting to this
router through wireless LAN can use another set of PPPoE session
(different with the Host PC) to access into Internet.
ISP Access Setup Enter your allocated username, password and authentication
parameters according to the information provided by your ISP. If
you want to connect to Internet all the time, you can check Always
On.
ISP Name – Type in the ISP Name provided by ISP in this field.
Username – Type in the username provided by ISP in this field.
Password – Type in the password provided by ISP in this field.
PPP Authentication – Select PAP only or PAP or CHAP for
PPP.
Always On – Check this box if you want the router keeping
connecting to Internet forever.
Idle Timeout – Set the timeout for breaking down the Internet
after passing through the time without any action.
IP Address From ISP Usually ISP dynamically assigns IP address to you each time you
connect to it and request. In some case, your ISP provides service
to always assign you the same IP address whenever you request. In
this case, you can fill in this IP address in the Fixed IP field. Please
contact your ISP before you want to use this function.
Fixed IP – Click Yes to use this function and type in a fixed IP
address in the box.
WAN IP Alias - If you have multiple public IP addresses and
would like to utilize them on the WAN interface, please use WAN
IP Alias. You can set up to 8 public IP addresses other than the
current one you are using.
Vigor2800 Series User’s Guide
23
Page 28
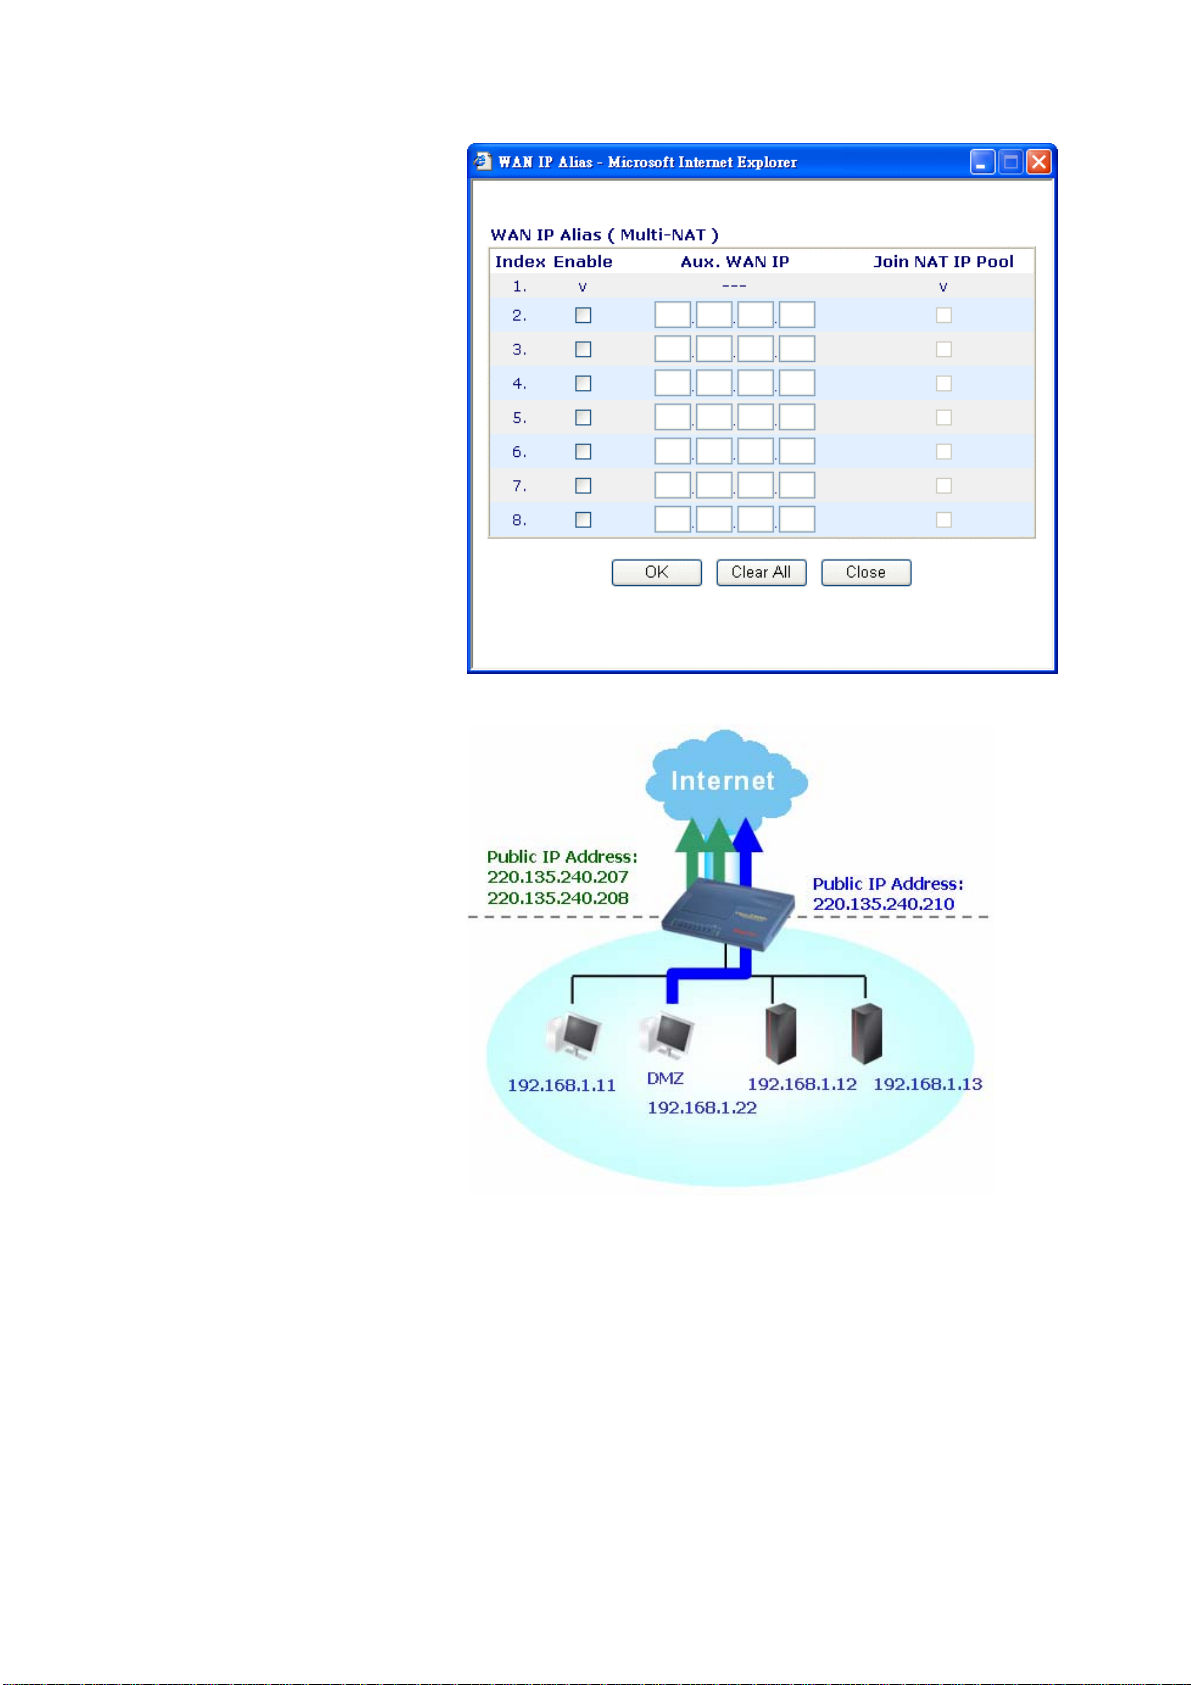
By checking the checkbox Join NAT IP Pool, data from NAT
hosts will be round-robin forwarded on a session basis.
If you do not check Join NAT IP Pool, you can still use these
public IP addresses for other purpose, such as DMZ host, Open
24
Vigor2800 Series User’s Guide
Page 29
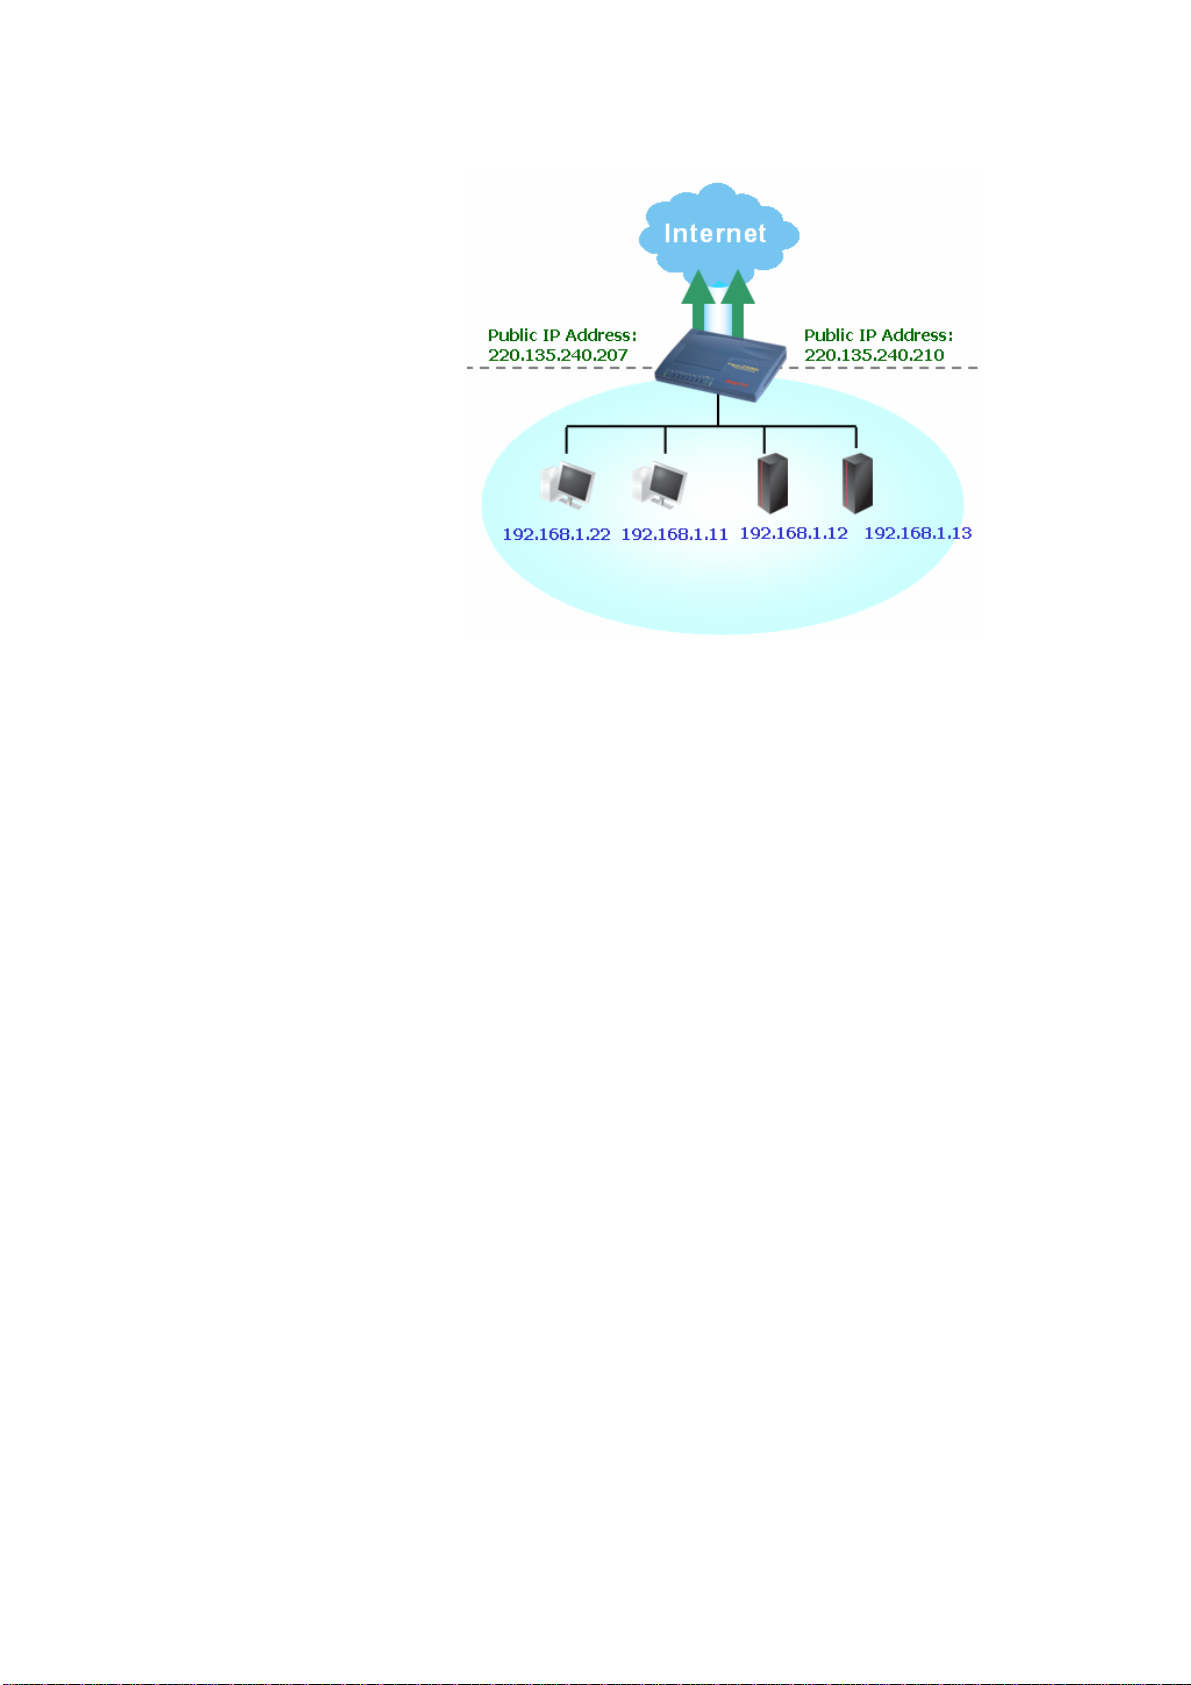
Ports.
Default MAC Address Type in MAC address for the router. You can use Default MAC
Address or specify another MAC address for your necessity.
MAC Address – Type in the MAC address for the router manually.
Index (1-15) in
Schedule Setup
You can type in four sets of time schedule for your request. All the
schedules can be set previously in Application – Schedule web
page and you can use the number that you have set in that web
page.
After finishing all the settings here, please click OK to activate them.
Vigor2800 Series User’s Guide
25
Page 30
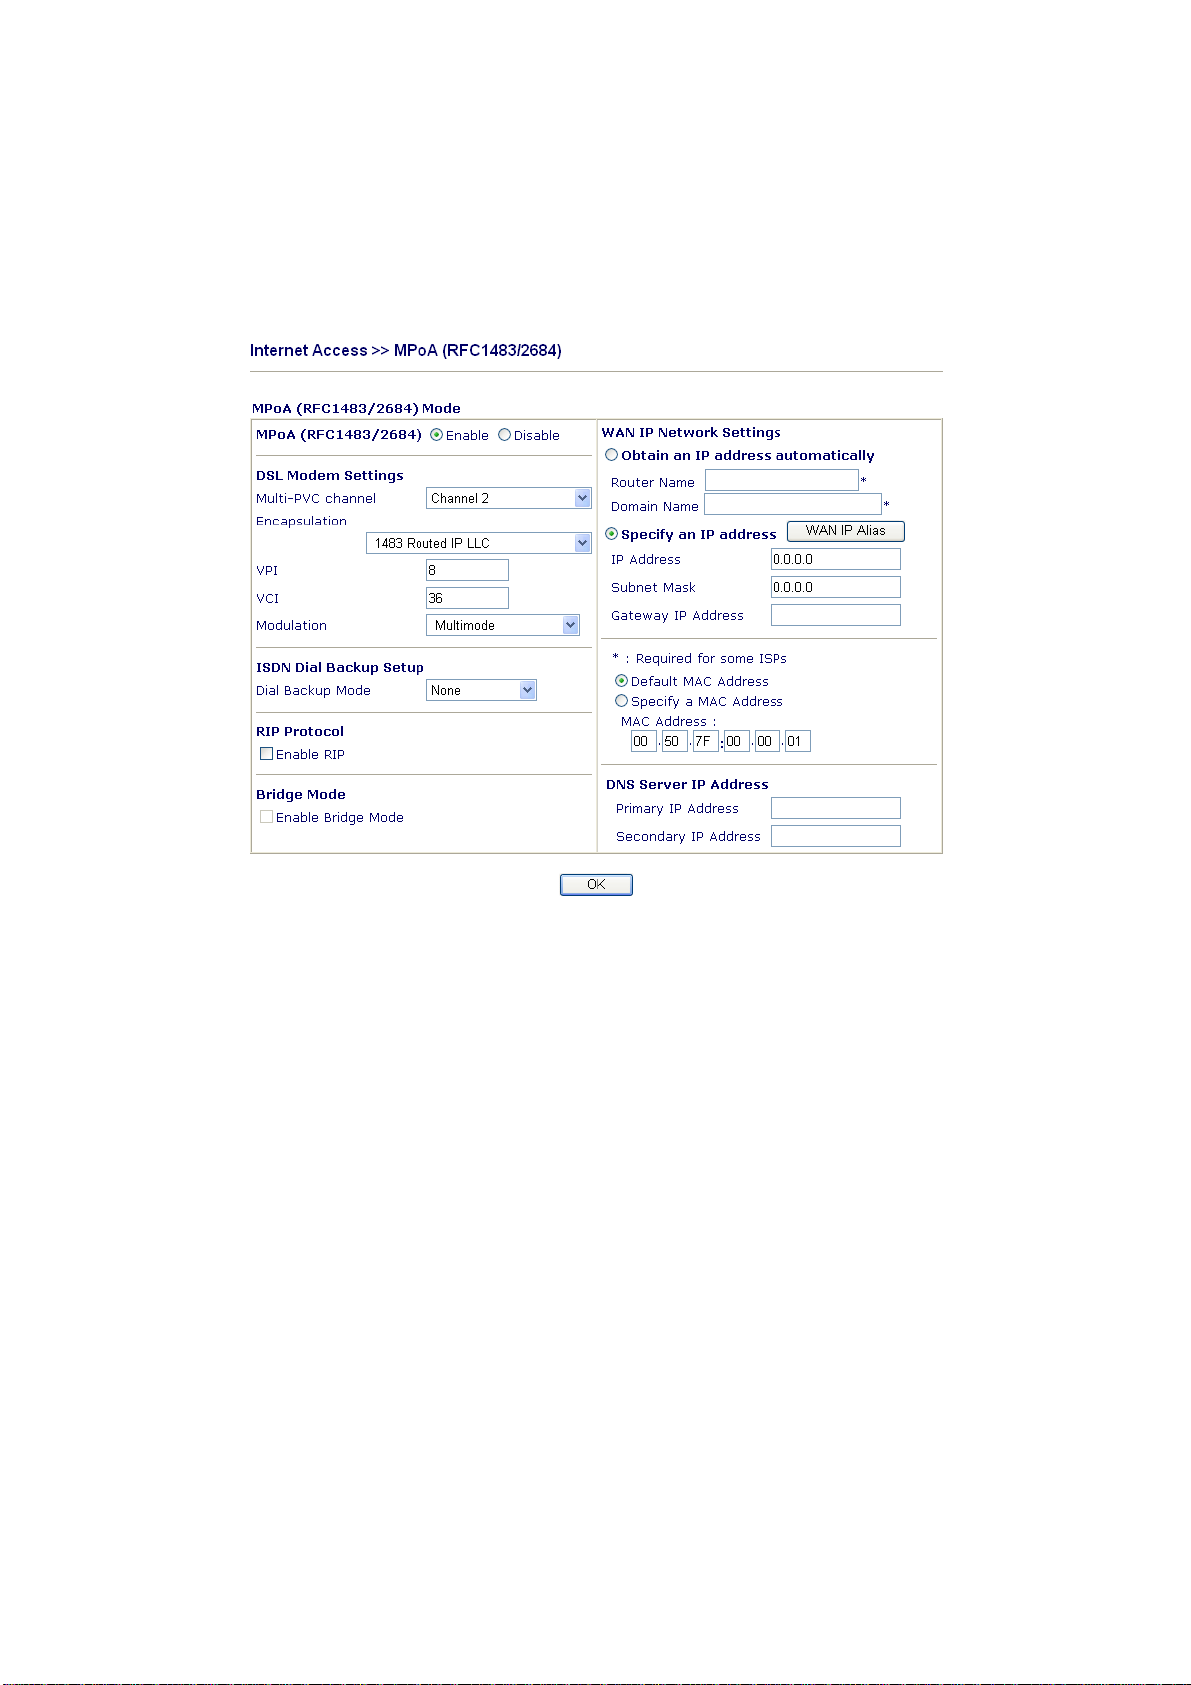
33..11..33 MMPPooAA ((RRFFCC11448833//22668844))
MPoA is a specification that enables ATM services to be integrated with existing LANs,
which use either Ethernet, token-ring or TCP/IP protocols. The goal of MPoA is to allow
different LANs to send packets to each other via an ATM backbone.
To choose MPoA as the accessing protocol of the internet, please select MPoA from the
Internet Access menu. The following web page will be shown.
MPoA(RFC1483/2684) Click Enable for activating this function. If you click Disable, this
function will be closed and all the settings that you adjusted in this
page will be invalid.
DSL Modem Settings Set up the DSL parameters required by your ISP. These are vital
for building DSL connection to your ISP.
Multi-PVC channel - The selections displayed here are
determined by the page of Internet Access – Multi PVCs. Select
M-PVCs Channel means no selection will be chosen.
Encapsulating Type - Drop down the list to choose the type
provided by ISP.
VPI - Type in the value provided by ISP.
VCI - Type in the value provided by ISP.
RIP Protocol Routing Information Protocol is abbreviated as RIP(RFC1058)
specifying how routers exchange routing tables information. Click
Enable RIP for activating this function.
Bridge Mode If you choose Bridged IP as the protocol, you can check this box
to invoke the function. The router will work as a bridge modem.
WAN IP Network
Settings
This group allows you to obtain an IP address automatically and
allows you type in IP address manually.
Obtain an IP address automatically – Click this button to obtain
the IP address automatically.
Router Name – Type in the router name provided by ISP.
26
Vigor2800 Series User’s Guide
Page 31

Domain Name – Type in the domain name that you have assigned.
WAN IP Alias - If you have multiple public IP addresses and
would like to utilize them on the WAN interface, please use WAN
IP Alias. You can set up to 8 public IP addresses other than the
current one you are using.
Specify an IP address – Click this radio button to specify some
data.
IP Address – Type in the private IP address.
Subnet Mask – Type in the subnet mask.
Gateway IP Address – Type in gateway IP address.
Default MAC Address Type in MAC address for the router. You can use Default MAC
Address or specify another MAC address for your necessity.
MAC Address – Type in the MAC address for the router
manually.
DNS Server IP
Address
Type in the primary IP address for the router. If necessary, type in
secondary IP address for necessity in the future.
After finishing all the settings here, please click OK to activate them.
Vigor2800 Series User’s Guide
27
Page 32

33..11..44 MMuullttii--PPVVCCss
This router allows you to create multi-PVCs for different data transferring for using. Simply
go to Internet Access and select Multi-PVC Setup page.
Enable Type in the primary IP address for the router. If necessary, type
VPI Type in the value provided by your ISP.
VCI Type in the value provided by your ISP.
QoS Type Select a proper QoS type for the channel.
Protocol Select a proper protocol for this channel.
Encapsulation Choose a proper type for this channel. The types will be different
according to the protocol setting that you choose.
28
Vigor2800 Series User’s Guide
Page 33

33..22 LLAANN
Local Area Network (LAN) is a group of subnets regulated and ruled by router. The design
of network structure is related to what type of public IP addresses coming from your ISP.
33..22..11 BBaassiiccss ooff LLAANN
The most generic function of Vigor router is NAT. It creates a private subnet of your own. As
mentioned previously, the router will talk to other public hosts on the Internet by using
public IP address and talking to local hosts by using its private IP address. What NAT does is
to translate the packets from public IP address to private IP address to forward the right
packets to the right host and vice versa. Besides, Vigor router has a built-in DHCP server that
assigns private IP address to each local host. See the following diagram for a briefly
understanding.
In some special case, you may have a public IP subnet from your ISP such as
220.135.240.0/24. This means that you can set up a public subnet or call second subnet that
each host is equipped with a public IP address. As a part of the public subnet, the Vigor
router will serve for IP routing to help hosts in the public subnet to communicate with other
public hosts or servers outside. Therefore, the router should be set as the gateway for public
hosts.
Vigor2800 Series User’s Guide
29
Page 34

WWhhaatt iiss RRoouuttiinngg IInnffoorrmmaattiioonn PPrroottooccooll ((RRIIPP))
Vigor router will exchange routing information with neighboring routers using the RIP to
accomplish IP routing. This allows users to change the information of the router such as IP
address and the routers will automatically inform for each other.
WWhhaatt iiss SSttaattiicc RRoouuttee
When you have several subnets in your LAN, sometimes a more effective and quicker way
for connection is the Static routes function rather than other method. You may simply set
rules to forward data from one specified subnet to another specified subnet without the
presence of RIP.
WWhhaatt aarree VViirrttuuaall LLAANNss aanndd RRaattee CCoonnttrrooll
You can group local hosts by physical ports and create up to 4 virtual LANs. To manage the
communication between different groups, please set up rules in Virtual LAN (VLAN)
function and the rate of each.
30
Vigor2800 Series User’s Guide
Page 35

33..22..22 GGeenneerraall SSeettuupp
This page provides you the general settings for LAN. Click LAN to open the LAN settings page and choose General Setup.
1st IP Address Type in private IP address for connecting to a local private network
(Default: 192.168.1.1).
1st Subnet Mask Type in an address code that determines the size of the network.
(Default: 255.255.255.0/ 24)
For IP Routing Usage Click Enable to invoke this function. The default setting is
Disable.
nd
IP Address Type in secondary IP address for connecting to a subnet.
2
(Default: 192.168.2.1/ 24)
nd
Subnet Mask An address code that determines the size of the network.
2
(Default: 255.255.255.0/ 24)
nd
DHCP Server You can configure the router to serve as a DHCP server for the 2nd
2
subnet.
Vigor2800 Series User’s Guide
Start IP Address: Enter a value of the IP address pool for the
31
Page 36

DHCP server to start with when issuing IP addresses. If the 2nd IP
address of your router is 220.135.240.1, the starting IP address
must be 220.135.240.2 or greater, but smaller than
220.135.240.254.
IP Pool Counts: Enter the number of IP addresses in the pool. The
maximum is 10. For example, if you type 3 and the 2nd IP address
of your router is 220.135.240.1, the range of IP address by the
DHCP server will be from 220.135.240.2 to 220.135.240.11.
MAC Address: Enter the MAC Address of the host one by one
and click Add to create a list of hosts to be assigned, deleted or
edited IP address from above pool. Set a list of MAC Address for
nd
2
DHCP server will help router to assign the correct IP address of
the correct subnet to the correct host. So those hosts in 2
won’t get an IP address belonging to 1
st
subnet.
nd
subnet
RIP Protocol Control Disable deactivates the RIP protocol. It will lead to a stoppage of
the exchange of routing information between routers. (Default)
1st Subnet - Select the router to change the RIP information of the
1st subnet with neighboring routers.
2nd Subnet - Select the router to change the RIP information of
the 2nd subnet with neighboring routers.
DHCP Server
Configuration
DHCP stands for Dynamic Host Configuration Protocol. The
router by factory default acts a DHCP server for your network so it
automatically dispatch related IP settings to any local user
configured as a DHCP client. It is highly recommended that you
leave the router enabled as a DHCP server if you do not have a
DHCP server for your network.
If you want to use another DHCP server in the network other than
the Vigor Router’s, you can let Relay Agent help you to redirect the
DHCP request to the specified location.
Enable Server - Let the router assign IP address to every host in
the LAN.
Disable Server – Let you manually assign IP address to every host
in the LAN.
Relay Agent – (1
st
subnet/2nd subnet) Specify which subnet that
DHCP server is located the relay agent should redirect the DHCP
request to.
Start IP Address - Enter a value of the IP address pool for the
DHCP server to start with when issuing IP addresses. If the 1st IP
address of your router is 192.168.1.1, the starting IP address must
be 192.168.1.2 or greater, but smaller than 192.168.1.254.
IP Pool Counts - Enter the maximum number of PCs that you
want the DHCP server to assign IP addresses to. The default is 50
and the maximum is 253.
Gateway IP Address - Enter a value of the gateway IP address for
the DHCP server. The value is usually as same as the 1st IP address
of the router, which means the router is the default gateway.
DHCP Server IP Address for Relay Agent - Set the IP address of
32
Vigor2800 Series User’s Guide
Page 37

the DHCP server you are going to use so the Relay Agent can help
to forward the DHCP request to the DHCP server.
DNS Server
Configuration
DNS stands for Domain Name System. Every Internet host must
have a unique IP address, also they may have a human-friendly,
easy to remember name such as www.yahoo.com. The DNS server
converts the user-friendly name into its equivalent IP address.
Primary IP Address -You must specify a DNS server IP address
here because your ISP should provide you with usually more than
one DNS Server. If your ISP does not provide it, the router will
automatically apply default DNS Server IP address: 194.109.6.66
to this field.
Secondary IP Address - You can specify secondary DNS server IP
address here because your ISP often provides you more than one
DNS Server. If your ISP does not provide it, the router will
automatically apply default secondary DNS Server IP address:
194.98.0.1 to this field.
The default DNS Server IP address can be found via Online Status:
If both the Primary IP and Secondary IP Address fields are left
empty, the router will assign its own IP address to local users as a
DNS proxy server and maintain a DNS cache.
There are two common scenarios of LAN settings that stated in Chapter 4. For the
configuration examples, please refer to that chapter to get more information for your
necessity.
33..22..33 SSttaattiicc RRoouuttee
Go to LAN to open setting page and choose Static Route.
Index The number (1 to 10) under Index allows you to open next page to
If the IP address of a domain name is already in the DNS cache, the
router will resolve the domain name immediately. Otherwise, the
router forwards the DNS query packet to the external DNS server
by establishing a WAN (e.g. DSL/Cable) connection.
setup static route.
Destination Address Displays the destination address of the static route.
Status Displays the status of the static route.
Vigor2800 Series User’s Guide
33
Page 38

Viewing Routing Table Displays the routing table for your reference.
AAdddd SSttaattiicc RRoouutteess ttoo PPrriivvaattee aanndd PPuubblliicc NNeettwwoorrkkss
Here is an example of setting Static Route in Main Router so that user A and B locating in
different subnet can talk to each other via the router. Assuming the Internet access has been
configured and the router works properly:
z use the Main Router to surf the Internet.
z create a private subnet 192.168.10.0 using an internal Router A (192.168.1.2)
z create a public subnet 211.100.88.0 via an internal Router B (192.168.1.3).
z have set Main Router 192.168.1.1 as the default gateway for the Router A 192.168.1.2.
Before setting Static Route, user A cannot talk to user B for Router A can only forward
recognized packets to its default gateway Main Router.
34
1. Go to LAN page and click General Setup, select 1st Subnet as the RIP Protocol
Control. Then click the OK button.
Note: There are two reasons that we have to apply RIP Protocol Control on
1st Subnet. The first is that the LAN interface can exchange RIP packets
with the neighboring routers via the 1st subnet (192.168.1.0/24). The second
is that those hosts on the internal private subnets (ex. 192.168.10.0/24) can
access the Internet via the router, and continuously exchange of IP routing
information with different subnets.
Vigor2800 Series User’s Guide
Page 39

2. Click the LAN - Static Route and click on the Index Number 1. Please add a static
route as shown below, which regulates all packets destined to 192.168.10.0 will be
forwarded to 192.168.1.2. Click OK.
3. Return to Static Rout e Setup page. Click on another Index Number to add another
static route as show below, which regulates all packets destined to 211.100.88.0 will be
forwarded to 192.168.1.3.
4. Go to Diagnostics and choose Routing Table to verify current routing table.
DDeelleettee SSttaattiicc RRoouuttee
1. Go to LAN page and click Static Rout e to open the web page. Select the index number
of the one that you want to delete.
2. Select Empty/Clear from the drop-down menu, and then click the OK button to delete
the route.
Vigor2800 Series User’s Guide
35
Page 40

33..33 NNAATT
DDiissaabbllee SSttaattiicc RRoouuttee
1. Click the Index Number that you want to disable from the Static Route
Configuration page.
2. Select Inactive/Disable from the drop-down menu, and then click the OK button to
disable the route.
Usually, the router serves as an NAT (Network Address Translation) router. NAT is a
mechanism that one or more private IP addresses can be mapped into a single public one.
Public IP address is usually assigned by your ISP, for which you may get charged. Private IP
addresses are recognized only among internal hosts.
When the outgoing packets destined to some public server on the Internet reach the NAT
router, the router will change its source address into the public IP address of the router, select
the available public port, and then forward it. At the same time, the router shall list an entry
in a table to memorize this address/port-mapping relationship. When the public server
response, the incoming traffic, of course, is destined to the router’s public IP address and the
router will do the inversion based on its table. Therefore, the internal host can communicate
with external host smoothly.
The benefit of the NAT includes:
z Save cost on applying public IP address and apply efficient usage of IP address.
NAT allows the internal IP addresses of local hosts to be translated into one public IP
address, thus you can have only one IP address on behalf of the entire internal hosts.
36
z Enhance security of the internal network by obscuring the IP address. There are
many attacks aiming victims based on the IP address. Since the attacker cannot be
aware of any private IP addresses, the NAT function can protect the internal network.
On NAT page, you will see the private IP address defined in RFC-1918. Usually
we use the 192.168.1.0/24 subnet for the router. As stated before, the NAT facility
can map one or more IP addresses and/or service ports into different specified
services. In other words, the NAT function can be achieved by using port mapping
methods.
Below shows the menu items for NAT.
Vigor2800 Series User’s Guide
Page 41

33..33..11 PPoorrtt RReeddiirreeccttiioonn
Port Redirection is usually set up for server related service inside the local network (LAN), such as web servers, FTP servers, E-mail servers etc. Most of the case, you need a public IP address for each server and this public IP address/domain name are recognized by all users. Since the server is actually located inside the LAN, the network well protected by NAT of the router, and identified by its private IP address/port, the goal of Port Redirection function is to forward all access request with public IP address from external users to the mapping private IP address/port of the server.
The port redirection can only apply to incoming traffic.
To use this function, please go to NAT page and choose Port Redirection web page. The
Port Redirection Table provides 10 port-mapping entries for the internal hosts.
Service Name Enter the description of the specific network service.
Vigor2800 Series User’s Guide
37
Page 42

Protocol Select the transport layer protocol (TCP or UDP).
Public Port Specify which port can be redirected to the specified Private IP
and Port of the internal host.
Private IP Specify the private IP address of the internal host providing the
service.
Private Port Specify the private port number of the service offered by the
internal host.
Active Check this box to activate the port-mapping entry you have
defined.
Note that the router has its own built-in services (servers) such as Telnet, HTTP and FTP etc.
Since the common port numbers of these services (servers) are all the same, you may need to
reset the router’s in order to avoid confliction.
For example, the built-in web configurator in the router is with default port 80, which may
conflict with the web server in the local network, http://192.168.1.13:80. Therefore, you need
to change the router’s http port to any one other than the default port 80 to avoid
conflict, such as 8080. This can be set in the System Maintenance >>Management Setup.
You then will access the admin screen of by suffixing the IP address with 8080, e.g.,
http://192.168.1.1:8080 instead of port 80.
33..33..22 DDMMZZ HHoosstt
As mentioned above, Port Redirection can redirect incoming TCP/UDP or other traffic on particular ports to the specific private IP address/port of host in the LAN. However, other IP protocols, for example Protocols 50 (ESP) and 51 (AH), do not travel on a fixed port. Vigor router provides a facility DMZ Host that maps ALL unsolicited data on any protocol to a single host in the LAN. Regular web surfing and other such Internet activities from other clients will continue to work without inappropriate interruption. DMZ Host allows a defined internal user to be totally exposed to the Internet, which usually helps some special applications such as Netmeeting or Internet Games etc.
38
Vigor2800 Series User’s Guide
Page 43

The inherent security properties of NAT are somewhat bypassed if you set up DMZ
host. We suggest you to add additional filter rules or a secondary firewall.
Click DMZ Host to open the following page:
If you previously have set up WAN Alias in Internet Access>>PPPoE/PPPoA or Internet
Access>>MPoA, you will find them in Aux. WAN IP list for your selection.
Enable Check to enable the DMZ Host function.
Private IP Enter the private IP address of the DMZ host, or click Choose PC
Choose PC Click this button and then a window will automatically pop up, as
Vigor2800 Series User’s Guide
to select one.
depicted below. The window consists of a list of private IP
addresses of all hosts in your LAN network. Select one private IP
address in the list to be the DMZ host.
39
Page 44

When you have selected one private IP from the above dialog, the
IP address will be shown on the following screen. Click OK to
save the setting.
33..33..33 OOppeenn PPoorrttss
Open Ports allows you to open a range of ports for the traffic of special applications. Common application of Open Ports includes P2P application (e.g., BT, KaZaA, Gnutella, WinMX, eMule and others), Internet Camera etc. Ensure that you keep the application involved up-to-date to avoid falling victim to any security exploits.
Click Open Ports to open the following page:
40
Index Indicate the relative number for the particular entry that you want to
offer service in a local host. You should click the appropriate index
number to edit or clear the corresponding entry.
Comment Specify the name for the defined network service.
Aux. WAN IP Display the private IP address of the local host that you specify in
WAN Alias. If you did not specify any IP address in WAN Alias,
this item will not be shown.
Local IP Address Display the private IP address of the local host offering the service.
Vigor2800 Series User’s Guide
Page 45

Status Display the state for the corresponding entry. X or V is to represent
the Inactive or Active state.
To add or edit port settings, click one index number on the page. The index entry setup page
will pop up. In each index entry, you can specify 10 port ranges for diverse services.
Enable Open Ports Check to enable this entry.
Comment Make a name for the defined network application/service.
Local Computer Enter the private IP address of the local host or click Choose PC to
select one.
Choose PC Click this button and, subsequently, a window having a list of
private IP addresses of local hosts will automatically pop up. Select
the appropriate IP address of the local host in the list.
Protocol Specify the transport layer protocol. It could be TCP, UDP, or -----
(none) for selection.
Start Port Specify the starting port number of the service offered by the local
host.
End Port Specify the ending port number of the service offered by the local
host.
Vigor2800 Series User’s Guide
41
Page 46

33..44 FFiirreewwaallll
33..44..11 BBaassiiccss ffoorr FFiirreewwaallll
While the broadband users demand more bandwidth for multimedia, interactive applications,
or distance learning, security has been always the most concerned. The firewall of the Vigor
router helps to protect your local network against attack from unauthorized outsiders. It also
restricts users in the local network from accessing the Internet. Furthermore, it can filter out
specific packets that trigger the router to build an unwanted outgoing connection.
The most basic security concept is to set user name and password while you install your
router. The administrator login will prevent unauthorized access to the router configuration
from your router.
If you did not set password during installation; you can go to System Maintenance to set up
your password.
FFiirreewwaallll FFaacciilliittiieess
The users on the LAN are provided with secured protection by the following firewall
facilities:
z User-configurable IP filter (Call Filter/ Data Filter).
z Stateful Packet Inspection (SPI): tracks packets and denies unsolicited incoming data
z Selectable Denial of Service (DoS) /Distributed DoS (DDoS) attacks protection
z URL Content Filter
42
Vigor2800 Series User’s Guide
Page 47

IIPP FFiilltteerrss
Depending on whether there is an existing Internet connection, or in other words “the WAN
link status is up or down”, the IP filter architecture categorizes traffic into two: Call Filter
and Data Filter.
z Call Filter - When there is no existing Internet connection, Call Filter is applied to all
traffic, all of which should be outgoing. It will check packets according to the filter
rules. If legal, the packet will pass. Then the router shall “initiate a call” to build the
Internet connection and send the packet to Internet.
z Data Filter - When there is an existing Internet connection, Data Filter is applied to
incoming and outgoing traffic. It will check packets according to the filter rules. If legal,
the packet will pass the router.
The following illustrations are flow charts explaining how router will treat incoming traffic
and outgoing traffic respectively.
SSttaatteeffuull PPaacckkeett IInnssppeeccttiioonn ((SSPPII))
Stateful inspection is a firewall architecture that works at the network layer. Unlike legacy
static packet filtering, which examines a packet based on the information in its header,
stateful inspection builds up a state machine to track each connection traversing all interfaces
of the firewall and makes sure they are valid. The stateful firewall of Vigor router not just
examine the header information also monitor the state of the connection.
Vigor2800 Series User’s Guide
43
Page 48

IInnssttaanntt MMeesssseennggeerr ((IIMM)) aanndd PPeeeerr--ttoo--PPeeeerr ((PP22PP)) AApppplli
iccaattiioonn BBlloocckkiinngg
As the popularity of all kinds of instant messenger application arises, communication cannot
become much easier. Nevertheless, while some industry may leverage this as a great tool to
connect with their customers, some industry may take reserve attitude in order to reduce
employee misusage during office hour or prevent unknown security leak. It is similar
situation for corporation towards peer-to-peer applications since file-sharing can be
convenient but insecure at the same time. To address these needs, we provide IM and P2P
blocking functionality.
DDeenniiaall ooff SSeerrvviiccee ((DDooSS)) DDeeffeennssee
The DoS Defense functionality helps you to detect and mitigate the DoS attack. The attacks
are usually categorized into two types, the flooding-type attacks and the vulnerability attacks.
The flooding-type attacks will attempt to exhaust all your system's resource while the
vulnerability attacks will try to paralyze the system by offending the vulnerabilities of the
protocol or operation system.
The DoS Defense function enables the Vigor router to inspect every incoming packet based
on the attack signature database. Any malicious packet that might duplicate itself to paralyze
the host in the secure LAN will be strictly blocked and a Syslog message will be sent as
warning, if you set up Syslog server.
Also the Vigor router monitors the traffic. Any abnormal traffic flow violating the pre-defined
parameter, such as the number of thresholds, is identified as an attack and the Vigor router
will activate its defense mechanism to mitigate in a real-time manner.
The below shows the attack types that DoS/DDoS defense function can detect:
1. SYN flood attack
2. UDP flood attack
3. ICMP flood attack
4. TCP Flag scan
5. Trace route
6. IP options
7. Unknown protocol
8. Land attack
CCoonntteenntt FFiilltteerriinngg
9. Smurf attack
10. SYN fragment
11. ICMP fragment
12. Tear drop attack
13. Fraggle attack
14. Ping of Death attack
15. TCP/UDP port scan
To provide an appropriate cyberspace to users, Vigor router equips with URL Content Filter
not only to limit illegal traffic from/to the inappropriate web sites but also prohibit other web
feature where malicious code may conceal.
Once a user type in or click on an URL with objectionable keywords, URL keyword blocking
facility will decline the HTTP request to that web page thus can limit user’s access to the
website. You may imagine URL Content Filter as a well-trained convenience-store clerk
who won’t sell adult magazines to teenagers. At office, URL Content Filter can also provide
a job-related only environment hence to increase the employee work efficiency. How can
URL Content Filter work better than traditional firewall in the field of filtering? Because it
checks the URL strings or some of HTTP data hiding in the payload of TCP packets while
legacy firewall inspects packets based on the fields of TCP/IP headers only.
44
On the other hand, Vigor router can prevent user from accidentally downloading malicious
codes from web pages. It’s very common that malicious codes conceal in the executable
objects, such as ActiveX, Java Applet, compressed files, and other executable files. Once
downloading these types of files from websites, you may risk bringing threat to your system.
For example, an ActiveX control object is usually used for providing interactive web feature.
If malicious code hides inside, it may occupy user’s system.
Vigor2800 Series User’s Guide
Page 49

WWeebb FFiilltteerriinngg
We all know that the content on the Internet just like other types of media may be
inappropriate sometimes. As a responsible parent or employer, you should protect those in
your trust against the hazards. With Web filtering service of the Vigor router, you can protect
your business from common primary threats, such as productivity, legal liability, network and
security threats. For parents, you can protect your children from viewing adult websites or
chat rooms.
Once you have activated your Web Filtering service in Vigor router and chosen the categories
of website you wish to restrict, each URL address requested (e.g.www.bbc.co.uk) will be
checked against our server database, powered by SurfControl. The database covering over 70
languages and 200 countries, over 1 billion Web pages divided into 40 easy-to-understand
categories. This database is updated as frequent as daily by a global team of Internet
researchers. The server will look up the URL and return a category to your router. Your Vigor
router will then decide whether to allow access to this site according to the categories you have
selected. Please note that this action will not introduce any delay in your Web surfing because
each of multiple load balanced database servers can handle millions of requests for
categorization.
Below shows the menu items for Firewall.
33..44..22 GGeenneerraall SSeettuupp
General Setup allows you to adjust settings of IP Filter and common options. Here you can
enable or disable the Call Filter or Data Filter. Under some circumstance, your filter set can
be linked to work in a serial manner. So here you assign the Start Filter Set only. Also you
can configure the Log Flag settings, Enable Stateful packet inspection, Apply IP filter to
VPN incoming packets, Drop non-http connection on TCP port 80, and Accept
incoming fragmented UDP packets.
Click Firewall and click General Setup to open the general setup page.
Vigor2800 Series User’s Guide
45
Page 50

Call Filter Check Enable to activate the Call Filter function. Assign a start
filter set for the Call Filter.
Data Filter Check Enable to activate the Data Filter function. Assign a start
Log Flag For troubleshooting needs you can specify the filter log here.
Some on-line games (for example: Half Life) will use lots of fragmented UDP packets to
transfer game data. Instinctively as a secure firewall, Vigor router will reject these
fragmented packets to prevent attack unless you enable “Accept Incoming Fragmented UDP
Packets”. By checking this box, you can play these kinds of on-line games. If security
concern is in higher priority, you cannot enable “Accept Incoming Fragmented UDP
Packets”.
33..44..33 FFiilltteerr SSeettuupp
Click Firewall and click Filter Setup to open the setup page.
filter set for the Data Filter.
None - The log function is not activated.
Block - All blocked packets will be logged.
Pass - All passed packets will be logged.
No Match - The log function will record all packets that are not
matched.
Note that the filter log will be displayed on the Telnet terminal
when you type the log -f command.
46
Vigor2800 Series User’s Guide
Page 51

To edit or add a filter, click on the set number to edit the individual set. The following page
will be shown. Each filter set contains up to 7 rules. Click on the rule number button to edit
each rule. Check Active to enable the rule.
Filter Rule Click a button numbered (1 ~ 7) to edit the filter rule. Click the
button will open Edit Filter Rule web page. For the detailed
information, refer to the following page.
Active Enable or disable the filter rule.
Comment Enter filter set comments/description. Maximum length is
23–character long
Next Filter Set Set the link to the next filter set to be executed after the current
filter run. Do not make a loop with many filter sets.
To edit Filter Rule, click the Filter Rule index button to enter the Filter Rule setup page.
Comments Enter filter set comments/description. Maximum length is 14-
Check to enable the
Filter Rule
Pass or Block Specifies the action to be taken when packets match the rule.
Vigor2800 Series User’s Guide
character long.
Check this box to enable the filter rule.
Block Immediately - Packets matching the rule will be dropped
47
Page 52

immediately.
Pass Immediately - Packets matching the rule will be passed
immediately.
Block If No Further Match - A packet matching the rule, and that
does not match further rules, will be dropped.
Pass If No Further Match - A packet matching the rule, and that
does not match further rules, will be passed through.
Branch to other Filter
Set
If the packet matches the filter rule, the next filter rule will branch
to the specified filter set. Select next filter rule to branch from the
drop-down menu.
Log Check this box to enable the log function. Use the Telnet command
log-f to view the logs.
Direction Set the direction of packet flow. It is for Data Filter only. For the
Call Filter, this setting is not available since Call Filter is only
applied to outgoing traffic.
Protocol Specify the protocol(s) which this filter rule will apply to.
IP Address Specify a source and destination IP address for this filter rule to
apply to. Place the symbol “!” before a specific IP Address will
prevent this rule from being applied to that IP address. To apply the
rule to all IP address, enter any or leave the field blank.
Subnet Mask Select the Subnet Mask for the IP Address column for this filter
rule to apply from the drop-down menu.
Operator, Start Port
and End Port
The operator column specifies the port number settings. If the Start
Port is empty, the Start Port and the End Port column will be
ignored. The filter rule will filter out any port number.
(=) If the End Port is empty, the filter rule will set the port
number to be the value of the Start Port. Otherwise, the port
number ranges between the Start Port and the End Port (including
the Start Port and the End Port).
(!=)If the End Port is empty, the port number is not equal to the
value of the Start Port. Otherwise, this port number is not between
the Start Port and the End Port (including the Start Port and End
Port).
(>) Specify the port number is larger than the Start Port (includes
the Start Port).
(<) Specify the port number is less than the Start Port (includes the
Start Port).
48
Keep State This function should work along with Direction, Protocol, IP
address, Subnet Mask, Operator, Start Port and End Port settings. It
is used for Data Filter only.
Keep State is in the same nature of modern term Stateful Packet
Inspection. It tracks packets, and accept the packets with
appropriate characteristics showing its state is legal as the protocol
defines. It will deny unsolicited incoming data. You may select
protocols from any, TCP, UDP, TCP/UDP, ICMP and IGMP.
Fragments Specify the action for fragmented packets. And it is used for Data
Filter only.
Don’t care -No action will be taken towards fragmented packets.
Unfragmented -Apply the rule to unfragmented packets.
Vigor2800 Series User’s Guide
Page 53

Fragmented - Apply the rule to fragmented packets.
Too Short - Apply the rule only to packets that are too short to
contain a complete header.
EExxaammppllee
As stated before, all the traffic will be separated and arbitrated using on of two IP filters: call
filter or data filter. You may preset 12 call filters and data filters in Filter Setup and even
link them in a serial manner. Each filter set is composed by 7 filter rules, which can be
further defined. After that, in General Setup you may specify one set for call filter and one
set for data filter to execute first.
Vigor2800 Series User’s Guide
49
Page 54

33..44..44 IIMM BBlloocckkiinngg
IM Blocking means instant messenger blocking. Click Firewall and click IM Blocking to
open the setup page. You will see a list of common IM (such as MSN, Yahoo, ICQ/AQL)
applications. Check Enable IM Blocking and select the one(s) that you want to block. To
block selected IM applications during specific periods, enter the number of the scheduler
predefined in Applications>>Call Schedule.
33..44..55 PP22PP BBlloocckkiinngg
P2P is the short name of peer to peer. Click Firewall and click P2P Blocking to open the setup page. You will see a list of common P2P applications. Check Enable P2P Blocking and select the one(s) to block. To block selected P2P applications during specific periods, enter the number of the scheduler predefined in Applications>>Schedule.
50
Action Specify the action for each protocol.
Allow – Allow the client to access into the application through the
specified protocol.
Disallow – Forbid the client to access into the application through the
specified protocol.
Disallow upload – Forbid the client to access into the application through
the specified protocol for downloading. Yet uploading is allowed.
Vigor2800 Series User’s Guide
Page 55

33..44..66 DDooSS DDeeffeennssee
As a sub-functionality of IP Filter/Firewall, there are 15 types of detect/ defense function in the DoS Defense setup. The DoS Defense functionality is disabled for default.
Click Firewall and click DoS Defense to open the setup page.
Enable Dos Defense Check the box to activate the DoS Defense Functionality.
Enable SYN flood
defense
Check the box to activate the SYN flood defense function. Once
detecting the Threshold of the TCP SYN packets from the Internet
has exceeded the defined value, the Vigor router will start to
randomly discard the subsequent TCP SYN packets for a period
defined in Timeout. The goal for this is prevent the TCP SYN
packets’ attempt to exhaust the limited-resource of Vigor router.
By default, the threshold and timeout values are set to 50 packets
per second and 10 seconds, respectively.
Enable UDP flood
defense
Check the box to activate the UDP flood defense function. Once
detecting the Threshold of the UDP packets from the Internet has
exceeded the defined value, the Vigor router will start to randomly
discard the subsequent UDP packets for a period defined in
Timeout. The default setting for threshold and timeout are 150
packets per second and 10 seconds, respectively.
Enable ICMP flood
defense
Check the box to activate the ICMP flood defense function. Similar
to the UDP flood defense function, once if the Threshold of ICMP
packets from Internet has exceeded the defined value, the router
will discard the ICMP echo requests coming from the Internet. The
default setting for threshold and timeout are 50 packets per second
and 10 seconds, respectively.
Enable PortScan
detection
Vigor2800 Series User’s Guide
Port Scan attacks the Vigor router by sending lots of packets to
many ports in an attempt to find ignorant services would respond.
Check the box to activate the Port Scan detection. Whenever
51
Page 56

detecting this malicious exploration behavior by monitoring the
port-scanning Threshold rate, the Vigor router will send out a
warning. By default, the Vigor router sets the threshold as 150
packets per second.
Block IP options Check the box to activate the Block IP options function. The Vigor
router will ignore any IP packets with IP option field in the
datagram header. The reason for limitation is IP option appears to
be a vulnerability of the security for the LAN because it will carry
significant information, such as security, TCC (closed user group)
parameters, a series of Internet addresses, routing messages...etc.
An eavesdropper outside might learn the details of your private
networks.
Block Land
Check the box to enforce the Vigor router to defense the Land
attacks. The Land attack combines the SYN attack technology with
IP spoofing. A Land attack occurs when an attacker sends spoofed
SYN packets with the identical source and destination addresses, as
well as the port number to victims.
Block Smurf Check the box to activate the Block Smurf function. The Vigor
router will ignore any broadcasting ICMP echo request.
Block trace router Check the box to enforce the Vigor router not to forward any trace
route packets.
Block SYN fragment Check the box to activate the Block SYN fragment function. The
Vigor router will drop any packets having SYN flag and more
fragment bit set.
Block Fraggle Attack Check the box to activate the Block fraggle Attack function. Any
broadcast UDP packets received from the Internet is blocked.
Activating the DoS/DDoS defense functionality might block some
legal packets. For example, when you activate the fraggle attack
defense, all broadcast UDP packets coming from the Internet are
blocked. Therefore, the RIP packets from the Internet might be
dropped.
Block TCP flag scan Check the box to activate the Block TCP flag scan function. Any
TCP packet with anomaly flag setting is dropped. Those scanning
activities include no flag scan, FIN without ACK scan, SYN FINscan,
Xmas scan and full Xmas scan.
52
Block Tear Drop Check the box to activate the Block Tear Drop function. Many
machines may crash when receiving ICMP datagrams (packets) that
exceed the maximum length. To avoid this type of attack, the Vigor
router is designed to be capable of discarding any fragmented ICMP
packets with a length greater than 1024 octets.
Block Ping of Death Check the box to activate the Block Ping of Death function. This
attack involves the perpetrator sending overlapping packets to the
target hosts so that those target hosts will hang once they
re-construct the packets. The Vigor routers will block any packets
realizing this attacking activity.
Block ICMP Fragment Check the box to activate the Block ICMP fragment function. Any
ICMP packets with more fragment bit set are dropped.
Block Land
Check the box to enforce the Vigor router to defense the Land
attacks. The Land attack combines the SYN attack technology with
Vigor2800 Series User’s Guide
Page 57

IP spoofing. A Land attack occurs when an attacker sends spoofed
SYN packets with the identical source and destination addresses, as
well as the port number to victims.
Block Unknown
Protocol
Check the box to activate the Block Unknown Protocol function.
Individual IP packet has a protocol field in the datagram header to
indicate the protocol type running over the upper layer. However,
the protocol types greater than 100 are reserved and undefined at
this time. Therefore, the router should have ability to detect and
reject this kind of packets.
Warning Messages We provide Syslog function for user to retrieve message from Vigor
router. The user, as a Syslog Server, shall receive the report sending
from Vigor router which is a Syslog Client.
All the warning messages related to DoS defense will be sent to user
and user can review it through Syslog daemon. Look for the
keyword DoS in the message, followed by a name to indicate what
kind of attacks is detected.
33..44..77 UURRLL CCoonntteenntt FFiilltteerr
Based on the list of user defined keywords, the URL Content Filter facility in Vigor router inspects the URL string in every outgoing HTTP request. No matter the URL string is found full or partial matched with a keyword, the Vigor router will block the associated HTTP connection.
For example, if you add key words such as “sex”, Vigor router will limit web access to web
sites or web pages such as “www.sex.com”, ”www.backdoor.net/images/sex/p_386.html”.
Or you may simply specify the full or partial URL such as “www.sex.com” or “sex.com”.
Also the Vigor router will discard any request that tries to retrieve the malicious code.
Click Firewall and click URL Content Filter to open the setup page.
Vigor2800 Series User’s Guide
53
Page 58

Enable URL Access
Check the box to activate URL Access Control.
Control
Black List (block those
matching keyword)
White List (pass those
matching keyword)
Click this button to restrict accessing into the corresponding
webpage with the keywords listed on the box below.
Click this button to allow accessing into the corresponding
webpage with the keywords listed on the box below.
Keyword The Vigor router provides 8 frames for users to define keywords
and each frame supports multiple keywords. The keyword could be
a noun, a partial noun, or a complete URL string. Multiple
keywords within a frame are separated by space, comma, or
semicolon. In addition, the maximal length of each frame is
32-character long. After specifying keywords, the Vigor router will
decline the connection request to the website whose URL string
matched to any user-defined keyword. It should be noticed that the
more simplified the blocking keyword list, the more efficiently the
Vigor router perform.
Prevent web access
from IP address
Check the box to deny any web surfing activity using IP address,
such as http://202.6.3.2. The reason for this is to prevent someone
dodges the URL Access Control.
You must clear your browser cache first so that the URL content
filtering facility operates properly on a web page that you visited
before.
54
Vigor2800 Series User’s Guide
Page 59

Enable Restrict Web
Feature
Check the box to activate the function.
Java - Check the checkbox to activate the Block Java object
function. The Vigor router will discard the Java objects from the
Internet.
ActiveX - Check the box to activate the Block ActiveX object
function. Any ActiveX object from the Internet will be refused.
Compressed file - Check the box to activate the Block Compressed
file function to prevent someone from downloading any
compressed file. The following list shows the types of compressed
files that can be blocked by the Vigor router. .
zip, rar, .arj, .ace, .cab, .sit
Executable file - Check the box to reject any downloading
behavior of the executable file from the Internet.
.exe, .com, .scr, .pif, .bas, .bat, .inf, .reg
Cookie - Check the box to filter out the cookie transmission from
inside to outside world to protect the local user's privacy.
Proxy - Check the box to reject any proxy transmission. To control
efficiently the limited-bandwidth usage, it will be of great value to
provide the blocking mechanism that filters out the multimedia
files downloading from web pages. Accordingly, files with the
following extensions will be blocked by the Vigor router.
.mov .mp3 .rm .ra .au .wmv
.wav .asf .mpg .mpeg .avi .ram
Enable Excepting
Subnets
Four entries are available for users to specify some specific IP
addresses or subnets so that they can be free from the URL Access
Control. To enable an entry, click on the empty checkbox, named as
ACT, in front of the appropriate entry.
Time Schedule Specify what time should perform the URL content filtering
facility.
Vigor2800 Series User’s Guide
55
Page 60

33..44..88 WWeebb CCoonntteenntt FFiilltteerr
Click Firewall and click Web Content Filter to open the setup page. For this section, please refer to Web Content Filter user’s guide.
56
Vigor2800 Series User’s Guide
Page 61

33..44..99 BBiinndd IIPP ttoo MMAACC
This function is used to bind the IP and MAC address in LAN to have a strengthen control in
network. When this function is enabled, all the assigned IP and MAC address binding
together cannot be changed. If you modified the binding IP or MAC address, it might cause
you not access into the Internet.
Click Firewall and click Bind IP to MAC to open the setup page.
Enable Click this radio button to invoke this function. However, IP/MAC
which is not listed in IP Bind List also can connect to Internet.
Disable Click this radio button to disable this function. All the settings on
this page will be invalid.
Strict Bind Click this radio button to block the connection of the IP/MAC
which is not listed in IP Bind List.
ARP Table This table is theLAN ARP table of this router. The information
for IP and MAC will be displayed in this field. Each pair of IP
and MAC address listed in ARP table can be selected and added
to IP Bind List by clicking Add below
.
Add and Edit IP Address – Type the IP address that will be used for the
specified MAC address.
Mac Address – Type the MAC address that is used to bind with
the assigned IP address.
Refresh It is used to refresh the ARP table. When there is one new PC
added to the LAN, you can click this link to obtain the newly
ARP table information.
IP Bind List It displays a list for the IP bind to MAC information.
Vigor2800 Series User’s Guide
57
Page 62

Add It allows you to add the one you choose from the ARP table or the
IP/MAC address typed in Add and Edit to the table of IP Bind
List.
Edit It allows you to edit and modify the selected IP address and MAC
address that you create before.
Remove You can remove any item listed in IP Bind List. Simply click and
select the one, and click Remove. The selected item will be
removed from the IP Bind List.
Note: Before you select Strict Bind, you have to bind one set of IP/MAC address
for one PC. If not, no one of the PCs can access into Internet. And the web
configurator of the router might not be accessed.
33..55 BBaannddwwiiddtthh MMaannaaggeemmeenntt
Below shows the menu items for Bandwidth Management.
33..55..11 LLiimmiitt SSeessssiioonn
When PCs with private IP addresses try to access into the Internet via NAT router, the router
will generate the record of NAT sessions for such connection. The P2P (Peer to Peer)
applications (e.g., BitTorrent) always need many sessions for procession and also they will
occupy over resources which might result in important accesses impacted. To solve the
problem, you can use limit session to limit the session procession for specified Hosts.
In the Bandwidth Management menu, click Limit Session to open the web page.
58
Vigor2800 Series User’s Guide
Page 63

To activate the function of limit session, simply click Enable and set the default session
limit.
Enable Click this button to activate the function of limit session.
Disable Click this button to close the function of limit session.
Default session limit Define the default session number used for each computer in
LAN.
Limitation List Display a list of specific limitations that you set on this web
page.
Start IP Define the start IP address for limit session.
End IP Define the end IP address for limit session.
Session Number Define the available session number for specific range of IP
addresses. If you do not set the session number in this field,
the system will use the default session limit for the specific
limitation you set for each index.
Add Add the specific session limitation onto the list above.
Edit Allows you to edit the settings for the selected limitation.
Remove Remove the selected settings existing on the limitation list.
Index (1-15) in Schedule
Setup
Vigor2800 Series User’s Guide
You can type in four sets of time schedule for your request.
All the schedules can be set previously in Application –
Schedule web page and you can use the number that you have
set in that web page.
59
Page 64

33..55..22 LLiimmiitt BBaannddwwiiddtthh
The downstream or upstream from FTP, HTTP or some P2P applications will occupy large
of bandwidth and affect other normal applications. Please can use Limit Bandwidth to make
the bandwidth usage more efficient.
In the Bandwidth Management menu, click Limit Bandwidth to open the web page.
To activate the function of limit bandwidth, simply click Enable and set the default upstream
and downstream limit.
Enable Click this button to activate the function of limit bandwidth.
Disable Click this button to close the function of limit bandwidth.
Default TX limit Define the default speed of the upstream for each computer in
LAN.
Default RX limit Define the default speed of the downstream for each computer
in LAN.
Limitation List Display a list of specific limitations that you set on this web
page.
Start IP Define the start IP address for limit bandwidth.
End IP Define the end IP address for limit bandwidth.
TX limit Define the limitation for the speed of the upstream. If you do
not set the limit in this field, the system will use the default
speed for the specific limitation you set for each index.
RX limit Define the limitation for the speed of the downstream. If you
do not set the limit in this field, the system will use the default
speed for the specific limitation you set for each index.
60
Vigor2800 Series User’s Guide
Page 65

Add Add the specific speed limitation onto the list above.
Edit Allows you to edit the settings for the selected limitation.
Remove Remove the selected settings existing on the limitation list.
Index (1-15) in Schedule
Setup
33..55..33 QQuuaalliittyy ooff SSeerrvviiccee
Deploying QoS (Quality of Service) management to guarantee that all applications receive
the service levels required and sufficient bandwidth to meet performance expectations is
indeed one important aspect of modern enterprise network.
One reason for QoS is that numerous TCP-based applications tend to continually increase
their transmission rate and consume all available bandwidth, which is called TCP slow start.
If other applications are not protected by QoS, it will detract much from their performance in
the overcrowded network. This is especially essential to those are low tolerant of loss, delay
or jitter (delay variation).
Another reason is due to congestions at network intersections where speeds of
interconnected circuits mismatch or traffic aggregates, packets will queue up and traffic can
be throttled back to a lower speed. If there’s no defined priority to specify which packets
should be discarded (or in another term “dropped”) from an overflowing queue, packets of
sensitive applications mentioned above might be the ones to drop off. How this will affect
application performance?
You can type in four sets of time schedule for your request.
All the schedules can be set previously in Application –
Schedule web page and you can use the number that you
have set in that web page.
There are two components within Primary configuration of QoS deployment:
z Classification: Identifying low-latency or crucial applications and marking them for
high-priority service level enforcement throughout the network.
z Scheduling: Based on classification of service level to assign packets to queues and
associated service types
The basic QoS implementation in Vigor routers is to classify and schedule packets based on
the service type information in the IP header. For instance, to ensure the connection with the
headquarter, a teleworker may enforce an index of QoS Control to reserve bandwidth for
HTTPS connection while using lots of application at the same time.
One more larger-scale implementation of QoS network is to apply DSCP (Differentiated
Service Code Point) and IP Precedence disciplines at Layer 3. Compared with legacy IP
Precedence that uses Type of Service (ToS) field in the IP header to define 8 service classes,
DSCP is a successor creating 64 classes possible with backward IP Precedence compatibility.
In a QoS-enabled network, or Differentiated Service (DiffServ or DS) framework, a DS
domain owner should sign a Service License Agreement (SLA) with other DS domain
owners to define the service level provided toward traffic from different domains. Then each
DS node in these domains will perform the priority treatment. This is called
per-hop-behavior (PHB). The definition of PHB includes Expedited Forwarding (EF),
Assured Forwarding (AF), and Best Effort (BE). AF defines the four classes of delivery (or
forwarding) classes and three levels of drop precedence in each class.
Vigor routers as edge routers of DS domain shall check the marked DSCP value in the IP
header of bypassing traffic, thus to allocate certain amount of resource execute appropriate
policing, classification or scheduling. The core routers in the backbone will do the same
checking before executing treatments in order to ensure service-level consistency throughout
the whole QoS-enabled network.
Vigor2800 Series User’s Guide
61
Page 66

However, each node may take different attitude toward packets with high priority marking
since it may bind with the business deal of SLA among different DS domain owners. It’s not
easy to achieve deterministic and consistent high-priority QoS traffic throughout the whole
network with merely Vigor router’s effort.
In the Bandwidth Management menu, click Quality of Service to open the web page.
Enable the QoS Control The factory default for this setting is checked.
Direction Define which traffic the QoS Control settings apply to.
IN- apply to incoming traffic only.
OUT-apply to outgoing traffic only.
BOTH- apply to both incoming and outgoing traffic.
Index The group index number of QoS Control settings. There are
total 4 groups.
Class Name Define the name for the group index.
Reserved Bandwidth Ratio It is reserved for the group index in the form of ratio of
reserved bandwidth to upstream speed and reserved
bandwidth to downstream speed.
Setup There are two-level of settings:
Basic - setup Reserved Bandwidth Ratio according to the
traffic service type. We provide a list of common service
types.
Advance - custom setting of Reserved Bandwidth Ratio based
on the source address, destination address, DiffServ
CodePoint, and service type.
62
Vigor2800 Series User’s Guide
Page 67

Enable UDP Bandwidth
Control
Check this and set the limited bandwidth ratio on the right
field. This is a protection of TCP application traffic since
UDP application traffic such as streaming video will exhaust
lots of bandwidth.
Limited_bandwidth Ratio The ratio typed here is reserved for limited bandwidth of UDP
application.
On Line Statistics Display an online statistics for quality of service for your
reference.
BBaassiicc SSeettttiinnggss ffoorr QQooSS
Click the Basic button to open basic configuration screen for each index number.
Choose one of the items from the left box and click ADD>>. The selected one will be shown
on the right box. To remove the selected on from the right box, simply choose the one again
and click <<Remove.
AAddvvaanncceedd SSeettttiinnggss ffoorr QQooSS
Click this button to open advanced configuration for each index number. You can insert,
move, edit or delete select rule in this page.
Vigor2800 Series User’s Guide
63
Page 68

For inserting a rule, click Insert to open the following page.
SrcEdit It allows you to edit source address information.
Address Type – Determine the address type for the source
address.
For Single Address, you have to fill in Start IP address.
For Range Address, you have to fill in Start IP address and
End IP address.
For Subnet Address, you have to fill in Start IP address and
Subnet Mask.
64
Vigor2800 Series User’s Guide
Page 69

DestEdit It allows you to edit destination address information.
Address Type – Determine the address type for the
destination address.
For Single Address, you have to fill in Start IP address.
For Range Address, you have to fill in Start IP address and
End IP address.
For Subnet Address, you have to fill in Start IP address and
Subnet Mask.
DiffServ CodePoint All the packets of data will be divided with different levels
and will be processed according to the level type by the
system. Please assign one of the level of the data for
processing with QoS control.
Vigor2800 Series User’s Guide
65
Page 70

Service Type It determines the service type of the data for processing with
QoS control. It can also be edited. You can choose the
predefined service type from the Service Type drop down list.
Those types are predefined in factory. Simply choose the one
that you want for using by current QoS.
In addition, you can add a new service for your necessity by
simply clicking Add button to access into the following page.
Service Name – Type in a new service for your request.
Service Type – Choose the type (TCP, UDP or TCP/UDP) for
the new service.
Type for Port Configuration – Click Single or Range. If you
select Range, you have to type in the starting port number and
the end porting number on the boxes below.
Port Number – Type in the starting port number and the end
porting number here if you choose Range as the type.
You can add a new service name for your necessity. Also, you
can Edit/Delete to change the one that you added before.
66
Vigor2800 Series User’s Guide
Page 71

33..66 AApppplliiccaattiioonnss
Below shows the menu items for Applications.
33..66..11 DDyynnaammiicc DDNNSS
The ISP often provides you with a dynamic IP address when you connect to the Internet via
your ISP. It means that the public IP address assigned to your router changes each time you
access the Internet. The Dynamic DNS feature lets you assign a domain name to a dynamic
WAN IP address. It allows the router to update its online WAN IP address mappings on the
specified Dynamic DNS server. Once the router is online, you will be able to use the
registered domain name to access the router or internal virtual servers from the Internet. It is
particularly helpful if you host a web server, FTP server, or other server behind the router.
Before you use the Dynamic DNS feature, you have to apply for free DDNS service to the
DDNS service providers. The router provides up to three accounts from three different
DDNS service providers. Basically, Vigor routers are compatible with the DDNS services
supplied by most popular DDNS service providers such as www.dyndns.org,
www.no-ip.com, www.dtdns.com, www.changeip.com, www.dynamic- nameserver.com.
You should visit their websites to register your own domain name for the router.
Enable the Function and Add a Dynamic DNS Account
1. Assume you have a registered domain name from the DDNS provider, say
hostname.dyndns.org, and an account with username: test and password: test.
2. In the DDNS setup menu, check Enable Dynamic DNS Setup.
Enable Dynamic DNS Setup Check this box to enable DDNS function.
Index Click the number below Index to access into the setting
page of DDNS setup to set account(s).
WAN Interface Display current WAN interface used for accessing
Domain Name Display the domain name that you set on the setting page
Vigor2800 Series User’s Guide
Internet.
of DDNS setup.
67
Page 72

Active Display if this account is active or inactive.
3. Select Index number 1 to add an account for the router. Check Enable Dynamic DNS
Account, and choose correct Service Provider: dyndns.org, type the registered
hostname: hostname and domain name suffix: dyndns.org in the Domain Name block.
The following two blocks should be typed your account Login Name: test and
Password: test.
Enable Dynamic
DNS Account
Check this box to enable the current account. If you did check
the box, you will see a check mark appeared on the Active
column of the previous web page in step 2).
Service Provider Select the service provider for the DDNS account.
Service Type Select a service type (Dynamic, Custom, Static).
Domain Name Type in a domain name that you applied previously.
Login Name Type in the login name that you set for applying domain.
Password Type in the password that you set for applying domain.
4. Click OK button to activate the settings. You will see your setting has been saved.
The Wildcard and Backup MX features are not supported for all Dynamic DNS providers.
You could get more detailed information from their websites.
Disable the Function and Clear all Dynamic DNS Accounts
In the DDNS setup menu, uncheck Enable Dynamic DNS Setup, and push Clear All button
to disable the function and clear all accounts from the router.
Delete a Dynamic DNS Account
In the DDNS setup menu, click the Index number you want to delete and then push Clear
All button to delete the account.
68
Vigor2800 Series User’s Guide
Page 73

33..66..22 SScchheedduullee
The Vigor router has a built-in real time clock which can update itself manually or
automatically by means of Network Time Protocols (NTP). As a result, you can not only
schedule the router to dialup to the Internet at a specified time, but also restrict Internet
access to certain hours so that users can connect to the Internet only during certain hours, say,
business hours. The schedule is also applicable to other functions.
You have to set your time before set schedule. In System Maintenance>> Time and Date
menu, press Inquire Time button to set the Vigor router’s clock to current time of your PC.
The clock will reset once if you power down or reset the router. There is another way to set
up time. You can inquiry an NTP server (a time server) on the Internet to synchronize the
router’s clock. This method can only be applied when the WAN connection has been built
up.
Index Click the number below Index to access into the setting page
of schedule.
Status Display if this schedule setting is active or inactive.
You can set up to 15 schedules. Then you can apply them to your Internet Access or VPN
and Remote Access >> LAN-to-LAN settings.
To add a schedule, please click any index, say Index No. 1. The detailed settings of the call
schedule with index 1 are shown below.
Enable Schedule Setup Check to enable the schedule.
Vigor2800 Series User’s Guide
69
Page 74

Start Date (yyyy-mm-dd) Specify the starting date of the schedule.
Start Time (hh:mm) Specify the starting time of the schedule.
Duration Time (hh:mm) Specify the duration (or period) for the schedule.
Action Specify which action Call Schedule should apply during the
period of the schedule.
Force On -Force the connection to be always on.
Force Down -Force the connection to be always down.
Enable Dial-On-Demand -Specify the connection to be
dial-on-demand and the value of idle timeout should be
specified in Idle Timeout field.
Disable Dial-On-Demand -Specify the connection to be up
when it has traffic on the line. Once there is no traffic over
idle timeout, the connection will be down and never up again
during the schedule.
Idle Timeout Specify the duration (or period) for the schedule.
How often -Specify how often the schedule will be applied
Once -The schedule will be applied just once
Weekdays -Specify which days in one week should perform
the schedule.
Example
Suppose you want to control the PPPoE Internet access connection to be always on (Force
On) from 9:00 to 18:00 for whole week. Other time the Internet access connection should be
disconnected (Force Down).
Office
Hour:
(Force On)
Mon - Sun 9:00 am to 6:00 pm
1. Make sure the PPPoE connection and Time Setup is working properly.
2. Configure the PPPoE always on from 9:00 to 18:00 for whole week.
3. Configure the Force Down from 18:00 to next day 9:00 for whole week.
4. Assign these two profiles to the PPPoE Internet access profile. Now, the PPPoE
Internet connection will follow the schedule order to perform Force On or Force
Down action according to the time plan that has been pre-defined in the schedule
profiles.
33..66..33 RRAADDIIUUSS
70
Remote Authentication Dial-In User Service (RADIUS) is a security authentication
client/server protocol that supports authentication, authorization and accounting, which is
widely used by Internet service providers. It is the most common method of authenticating
and authorizing dial-up and tunneled network users.
The built-in RADIUS client feature enables the router to assist the remote dial-in user or a
wireless station and the RADIUS server in performing mutual authentication. It enables
centralized remote access authentication for network management.
Vigor2800 Series User’s Guide
Page 75

Enable Check to enable RADIUS client feature
Server IP Address Enter the IP address of RADIUS server
Destination Port The UDP port number that the RADIUS server is using. The
default value is 1812 , based on RFC 2138.
Shared Secret The RADIUS server and client share a secret that is used to
authenticate the messages sent between them. Both sides must
be configured to use the same shared secret.
Re-type Shared Secret Re-type the Shared Secret for confirmation.
Vigor2800 Series User’s Guide
71
Page 76

33..66..44 UUPPnnPP
The UPnP (Universal Plug and Play) protocol is supported to bring to network connected devices the ease of installation and configuration which is already available for directly connected PC peripherals with the existing Windows 'Plug and Play' system. For NAT routers, the major feature of UPnP on the router is “NAT Traversal”. This enables applications inside the firewall to automatically open the ports that they need to pass through a router. It is more reliable than requiring a router to work out by itself which ports need to be opened. Further, the user does not have to manually set up port mappings or a DMZ. UPnP is available on Windows XP and the router provides the associated support for MSN Messenger to allow full use of the voice, video and messaging features.
Enable UPNP Service Accordingly, you can enable either the Connection Control
Service or Connection Status Service.
After setting Enable UPNP Service setting, an icon of IP Broadband Connection on
Router on Windows XP/Network Connections will appear. The connection status and
control status will be able to be activated. The NAT Traversal of UPnP enables the
multimedia features of your applications to operate. This has to manually set up port
mappings or use other similar methods. The screenshots below show examples of this
facility.
The UPnP facility on the router enables UPnP aware applications such as MSN Messenger to
discover what are behind a NAT router. The application will also learn the external IP
address and configure port mappings on the router. Subsequently, such a facility forwards
packets from the external ports of the router to the internal ports used by the application.
72
Vigor2800 Series User’s Guide
Page 77

The reminder as regards concern about Firewall and UPnP
Can't work with Firewall Software
Enabling firewall applications on your PC may cause the UPnP function not
working properly. This is because these applications will block the accessing
ability of some network ports.
Security Considerations
Activating the UPnP function on your network may incur some security threats.
You should consider carefully these risks before activating the UPnP function.
¾ Some Microsoft operating systems have found out the UPnP weaknesses and
hence you need to ensure that you have applied the latest service packs and
patches.
¾ Non-privileged users can control some router functions, including removing
and adding port mappings.
The UPnP function dynamically adds port mappings on behalf of some
UPnP-aware applications. When the applications terminate abnormally, these
mappings may not be removed.
Vigor2800 Series User’s Guide
73
Page 78

33..66..55 WWaakkee OOnn LLAANN
A PC client on LAN can wake up specified PC through the router. Yet the specified PC must
have installed a network card supporting WOL function. By the way, WOL function must be
set as “Enable” on the BIOS setting of the specified PC.
Wake by Two types provide for you to wake up the binded IP. If you
choose Wake by MAC Address, you have to type the correct
MAC address of the host in MAC Address boxes. If you
choose Wake by IP Address, you have to choose the correct IP
address. The IP address should be binded with MAC address
configured in Bind IP to MAC page.
IP Address The IP addresses that have been configured in
Firewall>>Bind IP to MAC will be shown in this drop down
list. Choose the IP address from the drop down list that you
want to wake up.
MAC Address Type any one of the MAC address of the binded PCs.
Wake Up! Click this button to wake up the selected IP. See the following
figure. The result will be shown on the box.
74
Vigor2800 Series User’s Guide
Page 79

33..77 VVPPNN aanndd RReemmoottee AAcccceessss
A Virtual Private Network (VPN) is the extension of a private network that encompasses
links across shared or public networks like the Internet. In short, by VPN technology, you
can send data between two computers across a shared or public network in a manner that
emulates the properties of a point-to-point private link.
Below shows the menu items for VPN and Remote Access.
Note: This feature can be applied for ISDN remote dial-in or ISDN LAN-to-LAN
connection in i series models.
33..77..11 RReemmoottee AAcccceessss CCoonnttrrooll
Enable the necessary VPN service as you need. If you intend to run a VPN server inside your
LAN, you should disable the VPN service of Vigor Router to allow VPN tunnel pass through,
as well as the appropriate NAT settings, such as DMZ or open port.
The Vigor router will not accept the ISDN dial-in connection if the box of Enable ISDN
Dial-in is not checked.
33..77..22 PPPPPP GGeenneerraall SSeettuupp
This submenu only applies to PPP-related VPN connections, such as PPTP, L2TP, L2TP
over IPSec.
Vigor2800 Series User’s Guide
75
Page 80

Dial-In PPP
Authentication PAP Only
Select this option to force the router to authenticate dial-in
users with the PAP protocol.
PAP or CHAP
Dial-In PPP Encryption
(MPPE Optional MPPE
Selecting this option means the router will attempt to
authenticate dial-in users with the CHAP protocol first. If the
dial-in user does not support this protocol, it will fall back to
use the PAP protocol for authentication.
This option represents that the MPPE encryption method will
be optionally employed in the router for the remote dial-in
user. If the remote dial-in user does not support the MPPE
encryption algorithm, the router will transmit “no MPPE
encrypted packets”. Otherwise, the MPPE encryption scheme
will be used to encrypt the data.
Require MPPE (40/128bits) - Selecting this option will force
the router to encrypt packets by using the MPPE encryption
algorithm. In addition, the remote dial-in user will use 40-bit
to perform encryption prior to using 128-bit for encryption.
In other words, if 128-bit MPPE encryption method is not
available, then 40-bit encryption scheme will be applied to
encrypt the data.
Maximum MPPE - This option indicates that the router will
use the MPPE encryption scheme with maximum bits
(128-bit) to encrypt the data.
76
Mutual Authentication
(PAP)
The Mutual Authentication function is mainly used to
communicate with other routers or clients who need
bi-directional authentication in order to provide stronger
security, for example, Cisco routers. So you should enable
this function when your peer router requires mutual
authentication. You should further specify the User Name
and Password of the mutual authentication peer.
Start IP Address Enter a start IP address for the dial-in PPP connection. You
should choose an IP address from the local private network.
For example, if the local private network is
192.168.1.0/255.255.255.0, you could choose 192.168.1.200
as the Start IP Address. But, you have to notice that the first
Vigor2800 Series User’s Guide
Page 81

two IP addresses of 192.168.1.200 and 192.168.1.201 are
reserved for ISDN remote dial-in user.
33..77..33 IIPPSSeecc GGeenneerraall SSeettuupp
In IPSec General Setup, there are two major parts of configuration.
There are two phases of IPSec.
¾ Phase 1: negotiation of IKE parameters including encryption, hash, Diffie-Hellman
parameter values, and lifetime to protect the following IKE exchange, authentication of
both peers using either a Pre-Shared Key or Digital Signature (x.509). The peer that
starts the negotiation proposes all its policies to the remote peer and then remote peer
tries to find a highest-priority match with its policies. Eventually to set up a secure
tunnel for IKE Phase 2.
¾ Phase 2: negotiation IPSec security methods including Authentication Header (AH) or
Encapsulating Security Payload (ESP) for the following IKE exchange and mutual
examination of the secure tunnel establishment.
There are two encapsulation methods used in IPSec, Transport and Tunnel. The Transport
mode will add the AH/ESP payload and use original IP header to encapsulate the data
payload only. It can just apply to local packet, e.g., L2TP over IPSec. The Tunnel mode will
not only add the AH/ESP payload but also use a new IP header (Tunneled IP header) to
encapsulate the whole original IP packet.
Authentication Header (AH) provides data authentication and integrity for IP packets passed
between VPN peers. This is achieved by a keyed one-way hash function to the packet to
create a message digest. This digest will be put in the AH and transmitted along with packets.
On the receiving side, the peer will perform the same one-way hash on the packet and
compare the value with the one in the AH it receives.
Encapsulating Security Payload (ESP) is a security protocol that provides data
confidentiality and protection with optional authentication and replay detection service.
IKE Authentication Method This usually applies to those are remote dial-in user or node
(LAN-to-LAN) which uses dynamic IP address and
IPSec-related VPN connections such as L2TP over IPSec
and IPSec tunnel.
Pre-Shared Key -Currently only support Pre-Shared Key
authentication.
Pre-Shared Key- Specify a key for IKE authentication
Re-type Pre-Shared Key-Confirm the pre-shared key.
Vigor2800 Series User’s Guide
77
Page 82

IPSec Security Method Medium - Authentication Header (AH) means data will be
authenticated, but not be encrypted. By default, this option is
active.
High - Encapsulating Security Payload (ESP) means
payload (data) will be encrypted and authenticated. You may
select encryption algorithm from Data Encryption Standard
(DES), Triple DES (3DES), and AES.
33..77..44 IIPPSSeecc PPeeeerr IIddeennttiittyy
To use digital certificate for peer authentication in either LAN-to-LAN connection or
Remote User Dial-In connection, here you may edit a table of peer certificate for selection.
As shown below, the router provides 32 entries of digital certificates for peer dial-in users.
Set to Factory Default Click it to clear all indexes.
Index Click the number below Index to access into the setting page
Name Display the profile name of that index.
of IPSec Peer Identity.
Next Click this link to access into next page for setting more
accounts.
Click each index to edit one peer digital certificate. There are three security levels of digital
signature authentication: Fill each necessary field to authenticate the remote peer. The
following explanation will guide you to fill all the necessary fields.
78
Vigor2800 Series User’s Guide
Page 83

Profile Name Type in a name in this file.
Accept Any Peer ID Click to accept any peer regardless of its identity.
Accept Subject Alternative
Name
Click to check one specific field of digital signature to accept
the peer with matching value. The field can be IP Address,
Domain, or E-mail Address. The box under the Type will
appear according to the type you select and ask you to fill in
corresponding setting.
Accept Subject Name Click to check the specific fields of digital signature to accept
the peer with matching value. The field includes Country (C),
State (ST), Location (L), Organization (O), Organization
Unit (OU), Common Name (CN), and Email (E).
Vigor2800 Series User’s Guide
79
Page 84

33..77..55 RReemmoottee UUsseerr PPrrooffiilleess
You can manage remote access by maintaining a table of remote user profile, so that users
can be authenticated to dial-in or build the VPN connection. You may set parameters
including specified connection peer ID, connection type (VPN including PPTP, IPSec
Tunnel, and L2TP by itself or over IPSec) and corresponding security methods, etc.
The router provides 32 access accounts for dial-in users. Besides, you can extend the user
accounts to the RADIUS server through the built-in RADIUS client function. The
following figure shows the summary table.
Set to Factory Default Click to clear all indexes.
Index Click the number below Index to access into the setting page
of Remote Dial-in User.
User Display the username for the specific dial-in user of the
LAN-to-LAN profile. The symbol ??? represents that the
profile is empty.
Status Display the access state of the specific dial-in user. The
symbol V and X represent the specific dial-in user to be active
and inactive, respectively.
Next Click this link to access into next page for setting more
accounts.
Click each index to edit one remote user profile. Each Dial-In Type requires you to fill the
different corresponding fields on the right. If the fields gray out, it means you may leave it
untouched. The following explanation will guide you to fill all the necessary fields.
80
Vigor2800 Series User’s Guide
Page 85

Enable this account Check the box to enable this function.
Idle Timeout- If the dial-in user is idle over the limitation of
the timer, the router will drop this connection. By default, the
Idle Timeout is set to 300 seconds.
ISDN Allow the remote ISDN dial-in connection. You can further
set up Callback function below. You should set the User
Name and Password of remote dial-in user below. This feature
is for i model only.
PPTP Allow the remote dial-in user to make a PPTP VPN
connection through the Internet. You should set the User
Name and Password of remote dial-in user below
IPSec Tunnel Allow the remote dial-in user to trigger a IPSec VPN
connection through Internet.
L2TP Allow the remote dial-in user to make a L2TP VPN
connection through the Internet. You can select to use L2TP
alone or with IPSec. Select from below:
None - Do not apply the IPSec policy. Accordingly, the VPN
connection employed the L2TP without IPSec policy can be
viewed as one pure L2TP connection.
Nice to Have - Apply the IPSec policy first, if it is applicable
during negotiation. Otherwise, the dial-in VPN connection
becomes one pure L2TP connection.
Must -Specify the IPSec policy to be definitely applied on the
L2TP connection.
Specify Remote Node Check the checkbox-You can specify the IP address of the
Vigor2800 Series User’s Guide
remote dial-in user, ISDN number or peer ID (used in IKE
aggressive mode).
81
Page 86

Uncheck the checkbox-This means the connection type you
select above will apply the authentication methods and
security methods in the general settings.
User Name This field is applicable when you select ISDN, PPTP or L2TP
with or without IPSec policy above.
Password This field is applicable when you select ISDN, PPTP or L2TP
with or without IPSec policy above.
IKE Authentication Method This group of fields is applicable for IPSec Tunnels and L2TP
with IPSec Policy when you specify the IP address of the
remote node. The only exception is Digital Signature (X.509)
can be set when you select IPSec tunnel either with or without
specify the IP address of the remote node.
Pre-Shared Key - Check the box of Pre-Shared Key to
invoke this function and type in the required characters (1-63)
as the pre-shared key.
Digital Signature (X.509) – Check the box of Digital
Signature to invoke this function and select one predefined in
the X.509 Peer ID Profiles.
IPSec Security Method This group of fields is a must for IPSec Tunnels and L2TP
with IPSec Policy when you specify the remote node. Check
the Medium, DES, 3DES or AES box as the security method.
Medium -Authentication Header (AH) means data will be
authenticated, but not be encrypted. By default, this option is
invoked. You can uncheck it to disable it.
High-Encapsulating Security Payload (ESP) means payload
(data) will be encrypted and authenticated. You may select
encryption algorithm from Data Encryption Standard (DES),
Triple DES (3DES), and AES.
Local ID - Specify a local ID to be used for Dial-in setting in
the LAN-to-LAN Profile setup. This item is optional and can
be used only in IKE aggressive mode.
Callback Function The callback function provides a callback service only for the
ISDN dial-in user (for i model only). The remote user will be
charged the connection fee by the telecom.
Check to enable Callback function-Enables the callback
function.
Specify the callback number-The option is for extra security.
Once enabled, the router will ONLY call back to the specified
Callback Number.
Check to enable callback budget control-By default, the
callback function has a time restriction. Once the callback
budget has been exhausted, the callback mechanism will be
disabled automatically.
Callback Budget (Unit: minutes)- Specify the time budget
for the dial-in user. The budget will be decreased
automatically per callback connection.
82
Vigor2800 Series User’s Guide
Page 87

33..77..66 LLAANN ttoo LLAANN
Here you can manage LAN-to-LAN connections by maintaining a table of connection
profiles. You may set parameters including specified connection direction (dial-in or
dial-out), connection peer ID, connection type (VPN including PPTP, IPSec Tunnel, and
L2TP by itself or over IPSec) and corresponding security methods, etc.
The router provides up to 32 profiles, which also means supporting 32 VPN tunnels
simultaneously. The following figure shows the summary table.
Set to Factory Default
Click to clear all indexes.
Name
Indicate the name of the LAN-to-LAN profile. The
symbol ??? represents that the profile is empty.
Status
Indicate the status of individual profiles. The symbol
V and X represent the profile to be active and
inactive, respectively.
Click each index to edit each profile and you will get the following page. Each LAN-to-LAN
profile includes 4 subgroups. If the fields gray out, it means you may leave it untouched. The
following explanations will guide you to fill all the necessary fields.
For the web page is too long, we divide the page into several sections for explanation.
Vigor2800 Series User’s Guide
83
Page 88

Profile Name Specify a name for the profile of the LAN-to-LAN
connection.
Enable this profile Check here to activate this profile.
Call Direction Specify the allowed call direction of this LAN-to-LAN profile.
Both:-initiator/responder
Dial-Out- initiator only
Dial-In- responder only.
Always On or Idle Timeout Always On- Check to enable router always keep VPN
connection.
Idle Timeout: The default value is 300 seconds. If the
connection has been idled over the value, the router will drop
the connection.
Enable PING to keep alive This function is to help the router to determine the status of
IPSec VPN connection, especially useful in the case of
abnormal VPN IPSec tunnel disruption. For details, please
refer to the note below. Check to enable the transmission of
PING packets to a specified IP address.
PING to the IP Enter the IP address of the remote host that located at the
other-end of the VPN tunnel.
84
Enable PING to Keep Alive is used to handle abnormal
IPSec VPN connection disruption. It will help to provide
the state of a VPN connection for router’s judgment of
redial.
Vigor2800 Series User’s Guide
Page 89

Normally, if any one of VPN peers wants to disconnect
the connection, it should follow a serial of packet
exchange procedure to inform each other. However, if the
remote peer disconnect without notice, Vigor router will
by no where to know this situation. To resolve this
dilemma, by continuously sending PING packets to the
remote host, the Vigor router can know the true existence
of this VPN connection and react accordingly. This is
independent of DPD (dead peer detection).
ISDN Build ISDN LAN-to-LAN connection to remote network. You
should set up Link Type and identity like User Name and
Password for the authentication of remote server. You can
further set up Callback (CBCP) function below. This feature is
useful for i model only.
PPTP Build a PPTP VPN connection to the server through the
Internet. You should set the identity like User Name and
Password below for the authentication of remote server.
IPSec Tunnel Build an IPSec VPN connection to the server through Internet.
L2TP with … Build a L2TP VPN connection through the Internet. You can
select to use L2TP alone or with IPSec. Select from below:
None: Do not apply the IPSec policy. Accordingly, the VPN
connection employed the L2TP without IPSec policy can be
viewed as one pure L2TP connection.
Nice to Have: Apply the IPSec policy first, if it is applicable
during negotiation. Otherwise, the dial-out VPN connection
becomes one pure L2TP connection.
Must: Specify the IPSec policy to be definitely applied on the
L2TP connection.
User Name This field is applicable when you select ISDN, PPTP or L2TP
with or without IPSec policy above.
Password This field is applicable when you select ISDN, PPTP or L2TP
with or without IPSec policy above.
PPP Authentication This field is applicable when you select ISDN, PPTP or L2TP
with or without IPSec policy above. PAP/CHAP is the most
common selection due to wild compatibility.
VJ compression This field is applicable when you select ISDN, PPTP or L2TP
with or without IPSec policy above. VJ Compression is used
for TCP/IP protocol header compression. Normally set to Yes
to improve bandwidth utilization.
IKE Authentication
Method
IPSec Security Method This group of fields is a must for IPSec Tunnels and L2TP
Medium Authentication Header (AH) means data will be
Vigor2800 Series User’s Guide
This group of fields is applicable for IPSec Tunnels and L2TP
with IPSec Policy.
Pre-Shared Key-Input 1-63 characters as pre-shared key.
Digital Signature (X.509) - Select one predefined in the
X.509 Peer ID Profiles.
with IPSec Policy.
authenticated, but not be encrypted. By default, this option is
active.
85
Page 90

High (ESP-Encapsulating Security Payload)- means
payload (data) will be encrypted and authenticated. Select
from below:
DES without Authentication -Use DES encryption algorithm
and not apply any authentication scheme.
DES with Authentication-Use DES encryption algorithm and
apply MD5 or SHA-1 authentication algorithm.
3DES without Authentication-Use triple DES encryption
algorithm and not apply any authentication scheme.
3DES with Authentication-Use triple DES encryption
algorithm and apply MD5 or SHA-1 authentication algorithm.
AES without Authentication-Use AES encryption algorithm
and not apply any authentication scheme.
AES with Authentication-Use AES encryption algorithm and
apply MD5 or SHA-1 authentication algorithm.
Advanced Specify mode, proposal and key life of each IKE phase,
Gateway etc.
The window of advance setup is shown as below:
IKE phase 1 mode -Select from Main mode and Aggressive
mode. The ultimate outcome is to exchange security proposals
to create a protected secure channel. Main mode is more
secure than Aggressive mode since more exchanges are done
in a secure channel to set up the IPSec session. However, the
Aggressive mode is faster. The default value in Vigor router is
Main mode.
IKE phase 1 proposal-To propose the local available
authentication schemes and encryption algorithms to the VPN
peers, and get its feedback to find a match. Two combinations
are available for Aggressive mode and nine for Main mode.
We suggest you select the combination that covers the most
schemes.
IKE phase 2 proposal-To propose the local available
algorithms to the VPN peers, and get its feedback to find a
match. Three combinations are available for both modes. We
suggest you select the combination that covers the most
algorithms.
IKE phase 1 key lifetime-For security reason, the lifetime of
key should be defined. The default value is 28800 seconds.
You may specify a value in between 900 and 86400 seconds.
IKE phase 2 key lifetime-For security reason, the lifetime of
key should be defined. The default value is 3600 seconds.
You may specify a value in between 600 and 86400 seconds.
86
Vigor2800 Series User’s Guide
Page 91

Perfect Forward Secret (PFS)-The IKE Phase 1 key will be
reused to avoid the computation complexity in phase 2. The
default value is inactive this function.
Local ID -In Aggressive mode, Local ID is on behalf of the IP
address while identity authenticating with remote VPN server.
The length of the ID is limited to 47 characters.
Callback Function
(for I models only)
The callback function provides a callback service as a part of
PPP suite only for the ISDN dial-in user. The router owner
will be charged the connection fee by the telecom.
Require Remote to Callback-Enable this to let the router to
require the remote peer to callback for the connection
afterwards.
Provide ISDN Number to Remote-In the case that the
remote peer requires the Vigor router to callback, the local
ISDN number will be provided to the remote peer. Check
here to allow the Vigor router to send the ISDN number to
the remote router. This feature is useful for i model only.
Allowed Dial-In Type Determine the dial-in connection with different types.
ISDN Allow the remote ISDN LAN-to-LAN connection. You
Vigor2800 Series User’s Guide
should set the User Name and Password of remote dial-in user
below. This feature is useful for i model only. In addition, you
can further set up Callback function below.
87
Page 92

PPTP Allow the remote dial-in user to make a PPTP VPN
connection through the Internet. You should set the User
Name and Password of remote dial-in user below.
IPSec Tunnel Allow the remote dial-in user to trigger a IPSec VPN
connection through Internet.
L2TP Allow the remote dial-in user to make a L2TP VPN
connection through the Internet. You can select to use L2TP
alone or with IPSec. Select from below:
None- Do not apply the IPSec policy. Accordingly, the VPN
connection employed the L2TP without IPSec policy can be
viewed as one pure L2TP connection.
Nice to Have- Apply the IPSec policy first, if it is applicable
during negotiation. Otherwise, the dial-in VPN connection
becomes one pure L2TP connection.
Must- Specify the IPSec policy to be definitely applied on the
L2TP connection.
Specify CLID or Remote
VPN Gateway
You can specify the IP address of the remote dial-in user or
peer ID (should be the same with the ID setting in dial-in
type) by checking the box. Enter Peer ISDN number if you
select ISDN above (This feature is useful for i model only.).
Also, you should further specify the corresponding security
methods on the right side.
If you uncheck the checkbox, the connection type you select
above will apply the authentication methods and security
methods in the general settings.
User Name This field is applicable when you select ISDN, PPTP or L2TP
with or without IPSec policy above.
Password This field is applicable when you select ISDN, PPTP or L2TP
with or without IPSec policy above.
VJ Compression VJ Compression is used for TCP/IP protocol header
compression. This field is applicable when you select ISDN,
PPTP or L2TP with or without IPSec policy above.
IKE Authentication
Method
This group of fields is applicable for IPSec Tunnels and L2TP
with IPSec Policy when you specify the IP address of the
remote node. The only exception is Digital Signature (X.509)
can be set when you select IPSec tunnel either with or without
specify the IP address of the remote node.
Pre-Shared Key - Check the box of Pre-Shared Key to
invoke this function and type in the required characters (1-63)
as the pre-shared key.
Digital Signature (X.509) – Check the box of Digital
Signature to invoke this function and select one predefined in
the X.509 Peer ID Profiles.
88
IPSec Security Method This group of fields is a must for IPSec Tunnels and L2TP
with IPSec Policy when you specify the remote node.
Medium- Authentication Header (AH) means data will be
authenticated, but not be encrypted. By default, this option is
active.
High- Encapsulating Security Payload (ESP) means payload
(data) will be encrypted and authenticated. You may select
Vigor2800 Series User’s Guide
Page 93

encryption algorithm from Data Encryption Standard (DES),
Triple DES (3DES), and AES.
Callback Function The callback function provides a callback service only for the
ISDNLAN-to-LAN connection (this feature is useful for i
model only). The remote user will be charged the connection
fee by the telecom.
Check to enable Callback function-Enables the callback
function.
Callback number-The option is for extra security. Once
enabled, the router will ONLY call back to the specified
Callback Number.
Callback budget- By default, the callback function has
limitation of callback period. Once the callback budget is
exhausted, the function will be disabled automatically.
Callback Budget (Unit: minutes)- Specify the time budget
for the dial-in user. The budget will be decreased
automatically per callback connection. The default value 0
means no limitation of callback period.
My WAN IP This field is only applicable when you select PPTP or L2TP
with or without IPSec policy above. The default value is
0.0.0.0, which means the Vigor router will get a PPP IP
address from the remote router during the IPCP negotiation
phase. If the PPP IP address is fixed by remote side, specify
the fixed IP address here.
Remote Gateway IP This field is only applicable when you select PPTP or L2TP
with or without IPSec policy above. The default value is
0.0.0.0, which means the Vigor router will get a remote
Gateway PPP IP address from the remote router during the
IPCP negotiation phase. If the PPP IP address is fixed by
remote side, specify the fixed IP address here.
Remote Network IP/
Remote Network Mask
Add a static route to direct all traffic destined to this Remote
Network IP Address/Remote Network Mask through the VPN
connection. For IPSec, this is the destination clients IDs of
phase 2 quick mode.
More Add a static route to direct all traffic destined to more Remote
Network IP Addresses/ Remote Network Mask through the
VPN connection. This is usually used when you find there are
several subnets behind the remote VPN router.
RIP Direction The option specifies the direction of RIP (Routing Information
Protocol) packets. You can enable/disable one of direction
here. Herein, we provide four options: TX/RX Both, TX Only,
RX Only, and Disable.
RIP Version Select the RIP protocol version. Specify Ver. 2 for greatest
compatibility.
For NAT operation, treat
remote sub-net as
While communicating with remote subnet, the router can treat
it as private subnet by sending packets with the router’s
private IP address, or treat it as public subnet by sending
packets with the router’s public IP address.
Vigor2800 Series User’s Guide
89
Page 94

33..77..77 CCoonnnneeccttiioonn MMaannaaggeemmeenntt
You can find the summary table of all VPN connections. You may disconnect any VPN
connection by clicking Drop button. You may also aggressively Dial-out by using Dial-out
Tool and clicking Dial button.
Dial Click this button to execute dial out function.
Refresh Seconds Choose the time for refresh the dail information among 5, 10,
and 30.
Refresh Click this button to refresh the whole connection status.
33..88 CCeerrttiiffiiccaattee MMaannaaggeemmeenntt
A digital certificate works as an electronic ID, which is issued by a certification authority
(CA). It contains information such as your name, a serial number, expiration dates etc., and
the digital signature of the certificate-issuing authority so that a recipient can verify that the
certificate is real. Here Vigor router support digital certificates conforming to standard
X.509.
Any entity wants to utilize digital certificates should first request a certificate issued by a CA
server. It should also retrieve certificates of other trusted CA servers so it can authenticate
the peer with certificates issued by those trusted CA servers.
Here you can manage generate and manage the local digital certificates, and set trusted CA
certificates. Remember to adjust the time of Vigor router before using the certificate so that
you can get the correct valid period of certificate.
Below shows the menu items for Certificate Management.
90
Vigor2800 Series User’s Guide
Page 95

33..88..11 LLooccaall CCeerrttiiffiiccaattee
Generate Click this button to open Generate Certificate Request
window.
Import Click this button to import a saved file as the certification
Refresh Click this button to refresh the information listed below.
View Click this button to view the detailed settings for certificate
After clicking Generate, the generated information will be displayed on the window below:
Vigor2800 Series User’s Guide
Type in all the information that the window request. Then
click Generate again.
information.
request.
91
Page 96

33..88..22 TTrruusstteedd CCAA CCeerrttiiffiiccaattee
Trusted CA certificate lists three sets of trusted CA certificate.
To import a pre-saved trusted CA certificate, please click IMPORT to open the following
window. Use Browse… to find out the saved text file. Then click Import. The one you
imported will be listed on the Trusted CA Certificate window. Then click Import to use the
pre-saved file.
92
Vigor2800 Series User’s Guide
Page 97

For viewing each trusted CA certificate, click View to open the certificate detail information
window. If you want to delete a CA certificate, choose the one and click Delete to remove all
the certificate information.
Vigor2800 Series User’s Guide
93
Page 98

33..99 VVooIIPP
Voice over IP network (VoIP) enables you to use your broadband Internet connection to
make toll quality voice calls over the Internet.
There are many different call signaling protocols, methods by which VoIP devices can talk
to each other. The most popular protocols are SIP, MGCP, Megaco and H.323. These
protocols are not all compatible with each other (except via a soft-switch server).
The Vigor V models support the SIP protocol as this is an ideal and convenient deployment
for the ITSP (Internet Telephony Service Provider) and softphone and is widely supported.
SIP is an end-to-end, signaling protocol that establishes user presence and mobility in VoIP
structure. Every one who wants to talk using his/her SIP Uniform Resource Identifier, “SIP
Address”. The standard format of SIP URI is
sip: user:password @ host: port
Some fields may be optional in different use. In general, "host” refers to a domain. The
“userinfo” includes the user field, the password field and the @ sign following them. This is
very similar to a URL so some may call it “SIP URL”. SIP supports peer-to-peer direct
calling and also calling via a SIP proxy server (a role similar to the gatekeeper in H.323
networks), while the MGCP protocol uses client-server architecture, the calling scenario
being very similar to the current PSTN network.
After a call is setup, the voice streams transmit via RTP (Real-Time Transport Protocol).
Different codecs (methods to compress and encode the voice) can be embedded into RTP
packets. Vigor V models provide various codecs, including G.711 A/µ-law, G.723, G.726
and G.729 A & B. Each codec uses a different bandwidth and hence provides different levels
of voice quality. The more bandwidth a codec uses the better the voice quality, however the
codec used must be appropriate for your Internet bandwidth.
Usually there will be two types of calling scenario, as illustrated below:
z Calling via SIP Servers
First, the Vigor V models of yours will have to register to a SIP Registrar by sending
registration messages to validate. Then, both parties’ SIP proxies will forward the
sequence of messages to caller to establish the session.
If you both register to the same SIP Registrar, then it will be illustrated as below:
The major benefit of this mode is that you don’t have to memorize your friend’s IP
address, which might change very frequently if it’s dynamic. Instead of that, you will
94
Vigor2800 Series User’s Guide
Page 99

only have to using dial plan or directly dial your friend’s account name if you are
with the same SIP Registrar. Please refer to the Example 1 and 2 in the Calling
Scenario.
z Peer-to-Peer
Before calling, you have to know your friend’s IP Address. The Vigor VoIP Routers
will build connection between each other. Please refer to the Example 3 in the Calling
Scenario.
Our Vigor V models firstly apply efficient codecs designed to make the best use of
available bandwidth, but Vigor V models also equip with automatic QoS assurance.
QoS Assurance assists to assign high priority to voice traffic via Internet. You will
always have the required inbound and outbound bandwidth that is prioritized
exclusively for Voice traffic over Internet but you just get your data a little slower and
it is tolerable for data traffic.
CCoonncceeppttss ooff IISSDDNN OOnn--NNeett aanndd OOffff--NNeett ((ffoorr 22880000VVGGii oonnllyy))
Different directions generate different meanings for on-net and off-net.
y ISDN On-Net means a user (A) calls another one (B) through ISDN line, routers and
Internet with the yellow route displayed in the following graphic.
User A connects to S0 extern of switchboard through ISDN line. The switchboard
connects to a router(C) with ISDN cable. The router connects to Internet through
WAN port with ADSL cable. When A calls B, the voice signal will be sent to router (C)
through ISDN interface. Next, the voice signal will be transferred to B through Internet.
Such route is named ISDN On-Net (see yellow route).
y ISDN Off-Net means a user (B) calls another one (A) through Internet, router and
ISDN line with the blue route displayed in the following graphic.
Vigor2800 Series User’s Guide
95
Page 100

User B connects a router with FXS port and accesses Internet through WAN port of
that router. When B calls A, the voice signal will be sent to a remote router (C) through
Internet. Then, the voice signal will be passed to switchboard (via S0 intern) and
transferred to A through ISDN line (leaving Internet). Such route is named ISDN
Off-Net (see blue route).
Below shows the menu items for Certificate Management.
33..99..11 DDiiaallPPllaann
This page allows you to set phone book and digit map for the VoIP function. Click the
Phone Book and Digit Map links on the page to access into next pages for dialplan settings.
PPhhoonnee BBooookk
In this section, you can set your VoIP contacts in the “phonebook”. It can help you to make
calls quickly and easily by using “speed-dial” Phone Number. There are total 60 index
entries in the phonebook for you to store all your friends and family members’ SIP
addresses.
96
Vigor2800 Series User’s Guide
 Loading...